The Complete Guide to DAZ
Studio 4
Bring your 3D characters to life with DAZ Studio
Paolo Ciccone
The Complete Guide to DAZ Studio 4
Copyright © 2013 Packt Publishing
All rights reserved. No part of this book may be reproduced, stored in a retrieval system, or transmitted in any form or by any means, without the prior written permission of the publisher, except in the case of brief quotations embedded in critical articles or reviews.
Every effort has been made in the preparation of this book to ensure the accuracy of the information presented. However, the information contained in this book is sold without warranty, either express or implied. Neither the author, nor Packt Publishing, and its dealers and distributors will be held liable for any damages caused or alleged to be caused directly or indirectly by this book.
Packt Publishing has endeavored to provide trademark information about all of the companies and products mentioned in this book by the appropriate use of capitals. However, Packt Publishing cannot guarantee the accuracy of this information.
First published: October 2013
Production Reference: 1071013
Published by Packt Publishing Ltd. Livery Place
35 Livery Street
Birmingham B3 2PB, UK.
ISBN 978-1-84969-408-7
www.packtpub.com
Credits
Author
Paolo Ciccone
Reviewers Joshua S. Nye
Atausch Paolini
Acquisition Editor Edward Gordon
Lead Technical Editor Mayur Hule
Technical Editor Amit Ramadas
Project Coordinator Navu Dhillon
Proofreaders Ting Baker
Bernadette Watkins
Indexer
Priya Subramani
Production Coordinator Shantanu Zagade
About the Author
Paolo Ciccone
is a software engineer and photographer who lives in Santa Cruz, California. He has been developing software for more than 20 years in a large series of disciplines, including IDEs (JBuilder) and 3D modeling and rendering. His field of expertise is developing multiplatform applications (Mac OS and Windows) that help computer graphics artists achieve photorealistic results.In 2010, he founded Prêt-à-3D (www.preta3d.com), a company dedicated to bringing high-end computer graphics tools to the masses. His Reality software for Poser and DAZ Studio has been used for video game illustration and for the preproduction of Hollywood large budget movies such as Jurassic Park IV and Hunger Games: Catching Fire.
For more than two decades, Paolo has taught all kinds of classes, from training for large corporations to live workshops about 3D graphics.
Paolo's experience with 3D software started in 1999, with the first public version of Blender, and then evolved to include other programs, including DAZ Studio, which he has used since version 1.0. Paolo is very active in the online community and he publishes a weekly blog covering topics about 3D graphics.
About the Reviewers
Joshua S. Nye
is currently going into the second year of the Studio Art program at the University of Vermont, transferring there following studying Psychology for three semesters at Daniel Webster college. In his coursework, he diligently applies his computer and creative skills he's practiced for his entire life. Ranging from 3D modeling to graphic design and even some dabbling in computer programing, he enjoys the wide skill set he has developed. However, Joshua still finds projects that are purely abstractionist, not very interesting.Using DAZ Studio for anatomical and still life references, Joshua is currently working on a graphic novel that he plans to publish as well as merchandise.
He spends a fair portion of his time in the northern wilderness of Vermont and when not on his computer (which is more common than one would think), he can be found enjoying fresh air.
I would like to thank my parents for supporting my interests (especially when I changed my major four times); without them, I would not have pursued these interests and consequently not be a better person. I would also like to thank the wonderful people who made DAZ Studio; without them, the author would have had nothing to write, and I would have had nothing to review.
Atausch Paolini
is a 3D artist, game developer, and game programmer in the world of 3D graphics. As a recognized 3D artist, he has worked on several games in the gaming industry. In his five years as a 3D artist, he's had the opportunity to work for Staltech, Enraged Entertainment, and Hawkeye Games, and a handful of startup companies. Currently, he is the CEO of Xentrium Entertainment working as a one-man team, developing games for mobile devices. Atausch is a contributing artist to several games, including Relic, Liberico, and Iron Pride. You can read more about Atausch at www.atausch.com or learn more about Xentrium Entertainment at www.xentrium.com.I'd like to thank Navu Dhillon for helping me review this book, as well as for the help that she provided when I encountered a few bugs and errors. I also would like to thank Mayur Hule who I've worked with in reviewing this book.
www.PacktPub.com
Support files, eBooks, discount offers and more
You might want to visit www.PacktPub.com for support files and downloads related to your book.Did you know that Packt offers eBook versions of every book published, with PDF and ePub files available? You can upgrade to the eBook version at www.PacktPub. com and as a print book customer, you are entitled to a discount on the eBook copy. Get in touch with us at [email protected] for more details.
At www.PacktPub.com, you can also read a collection of free technical articles, sign up for a range of free newsletters and receive exclusive discounts and offers on Packt books and eBooks.
http://PacktLib.PacktPub.com
Do you need instant solutions to your IT questions? PacktLib is Packt's online digital book library. Here, you can access, read and search across Packt's entire library of books.
Why Subscribe?
• Fully searchable across every book published by Packt • Copy and paste, print and bookmark content
• On demand and accessible via web browser
Free Access for Packt account holders
Table of Contents
Preface 1
Chapter 1: Quick Start – Our First 3D Scene
7
Stepping into DAZ Studio 7
Studio uses 3D assets 8
Customizing Studio 8
Introducing Genesis – a shapeshifter 13
Adding smart content 15
Adding clothing 16
Adding hair 18
Treat yourself 18
Strike the pose 19
Fixing nonconforming clothing 20
Saving your scene 22
Adding an environment 22
Rendering an image 26
Summary 28
Chapter 2: Customizing Studio
29
Getting more screen space 29
Customizing the layout 30
Removing screen clutter 35
Saving the new layout 36
Simpler, faster keyboard shortcuts 38
Changing the background color 43
Table of Contents
[ ii ]
Chapter 3:
Posing Figures
45
The main blocks of a pose 45
Using a reference image as a backdrop 56
Selecting an image size 56
Setting the position of the surfboard 59
Setting the surfer pose 60
Bodies without limits 62
Avoiding common mistakes 64
Keep a level head 64
Posing the lower part of the body 66
Positioning the legs 66
Positioning the legs with Inverse Kinematics 68
Finishing touches 69
Arms and fingers 69
Removing the "gaze of death" 70
Saving the pose 72
Summary 73
Chapter 4:
Creating New Characters with Morphs
75
Understanding morphs 75
Combining premade morphs to create new faces 79
Saving your morphs 83
Character creation with morphs 83
Inside the monster factory 84
Summary 88
Chapter 5: Rendering
89
Gearing up for rendering 89
Table of Contents
[ iii ]
Faking ambient light 106
Replacing the background 111
Summary 112
Chapter 6:
Finding and Installing New Content
113
Places to find more content 113
The beginning of the DAZ Studio era 116
Genesis and the market 116
Configuring Studio for the new content 144
Summary 147
Chapter 7:
Navigating the Studio Environment
149
Polygons – the building blocks of our scenes 149
Finding the number of polygons in the scene 152 Subdivision 153
Moving in the 3D space 154
Benefits of using a real camera 155
Moving the camera around 158
Learning about the Viewport tools 160
The Node selection tool 160 The Scale, Rotate, and Translate tools 160
Other useful tools 161
The Smart Content and Content Library tabs 166 Organizing the Content Library tab 167
Importing models from other applications 171
Scaling issues 172
Importing an OBJ file 172
Table of Contents
[ iv ]
Chapter 8: Building a Full Scene
179
Adding an environment 179
Mixing colors with image maps 196
The specular channel 199
No lights in the frame 223
Summary 224
Chapter 10: Hyper-realism – the Reality Plugin
225
Table of Contents
Lighting with Reality and Lux 240
Creating water 243
Reality in production 244
Summary 245
Chapter 11:
Creating Content
247
Creating clothing 247
Making a dress for Dawn 253
Exporting a figure as an OBJ file 254
The Transform tool 263
Assigning a material 273
Defining UV maps 274
Getting the dress out of modo 282
Rigging the dress 282 Delving into the frame ratio 296
The Studio timeline 297
Scrubbing 298
A simple animation test 299
Controlling the keyframes 301
Editing keyframes 302
Table of Contents
[ vi ]
Organizing your project 304
The shot list 304
Defining NLE 305
aniMate2 305
Spline editing 306
Rendering 308
The reason to avoid movie clips 308
Horror story 1 309
Horror story 2 309
Escaping the horrors 309
Color grading 310
Adding music and sound effects 311
Exporting for playback 311
H.264 settings 314
Summary 316
Appendix: Installing DAZ Studio
317
The reason for installing software 317
Using the Install Manager 318
32-bit and 64-bit versions 320
Running DAZ Studio 321
Preface
Computer art is today a mature field. Gone are the days when 3D modeling and rendering were arcane arts reserved for software experts who had access to expensive programs. Today, we have 3D software that is both affordable and easy to use.
About 18 years ago, Larry Weinberg, a software engineer working for a Hollywood VFX company, had a vision of a program that would give everybody the means to easily pose and render human figures. That software was, of course, Poser, a 3D program for the masses. Poser spawned a large business of premade content marketed by several companies. One of the companies born from the Poser phenomenon was DAZ 3D. DAZ became famous as the maker of the Victoria and Michael Poser figures, which have been received very well by the market. In fact, Victoria 4 is the most widely used 3D figure of all time. In 2006, DAZ released its own alternative to Poser, dubbed DAZ Studio. DAZ Studio is distributed as freeware, software that is given away for free because DAZ's business model is based on selling premade content. By giving away the software, DAZ provides a great entry point for people who want to explore the fascinating world of 3D computer art.
This book helps you take full advantage of the many features of Studio. You will learn how to pose human figures and how to make your own creature by using morphs. You will learn how to light your 3D scenes and render them as beautiful images that you will be able to share or even sell as illustrations. The cover of this book, for example, was created with DAZ Studio.
Preface
[ 2 ]
What this book covers
Chapter 1, Quick Start – Our First 3D Scene, introduces some of the main Studio features by creating a simple scene, showing how to position the camera and how to render the scene to an image file.
Chapter 2, Customizing Studio, shows how to personalize Studio by simplifying the user interface and configuring special keystrokes to make us work faster and with less effort.
Chapter 3, Posing Figures, explains how to use premade poses and create our own pose for a human character.
Chapter 4, Creating New Characters with Morphs, introduces the power of morphs, showing how we can create whole new characters from a regular human figure.
Chapter 5, Rendering, explains the rendering options in detail, including what graphic file format provides the best results.
Chapter 6, Finding and Installing New Content, describes in detail where we can find additional content and how we can install it on both Macintosh and Windows PCs.
Chapter 7, Navigating the Studio Environment, explains how to organize the Studio library and how to use the scene manipulation tools of Studio. This chapter also gives information about the building block of geometry objects.
Chapter 8, Building a Full Scene, shows how to create a full scene with a character, clothing, and creative use of props to build an environment. We also see how to solve common clothing issues.
Chapter 9, Lighting, delves deep into the magic of lighting.
Chapter 10, Hyper-realism – the Reality Plugin, introduces an alternative rendering system that gives you the highest level of realism with Studio.
Chapter 11, Creating Content, describes how to create clothing for a figure and how we can sell it on the Internet.
Chapter 12, Animation, covers the principles of animation, from its building blocks all the way to the finished product available for playback.
Preface
[ 3 ]
What you need for this book
For most of this book the only thing that you need is DAZ Studio 4.6 or above. For Chapter 11, Creating Content, you will need to download the evaluation version of modo. It's best if you wait until you reach Chapter 11, Creating Content before downloading modo (instructions and links are found in the chapter), as the evaluation period starts from the moment you download the program.
Who this book is for
This book is for all users of DAZ Studio. If you have just started using Studio and you need to figure out how to use the program, this book is for you. If you have used Studio for some time and you want to learn more about lighting, rendering, content creation, and installation, this book is for you.
Conventions
In this book, you will find a number of styles of text that distinguish between different kinds of information. Here are some examples of these styles, and an explanation of their meaning.
File names in text are shown as follows: "You can find the scene in the projects files inside the Project Files directory."
Any command-line input or output is written as follows:
cd Documents Return
New terms and important words are shown in bold. Words that you see on the screen, in menus or dialog boxes for example, appear in the text like this: "Click on the Accept button to save your choice."
Warnings or important notes appear in a box like this.
Preface
[ 4 ]
Reader feedback
Feedback from our readers is always welcome. Let us know what you think about this book—what you liked or may have disliked. Reader feedback is important for us to develop titles that you really get the most out of.
To send us general feedback, simply send an e-mail to [email protected], and mention the book title via the subject of your message.
If there is a topic that you have expertise in and you are interested in either writing or contributing to a book, see our author guide on www.packtpub.com/authors.
Customer support
Now that you are the proud owner of a Packt book, we have a number of things to help you to get the most from your purchase.
Downloading the example code
You can download the example code files for all Packt books you have purchased from your account at http://www.packtpub.com. If you purchased this book elsewhere, you can visit http://www.packtpub.com/support and register to have the files e-mailed directly to you.
Downloading the color images of this book
We also provide you a PDF file that has color images of the screenshots/diagrams used in this book. The color images will help you better understand the changes in the output. You can download this file from http://www.packtpub.com/sites/ default/files/downloads/4087OT_Graphics.pdf.Errata
Preface
[ 5 ]
Piracy
Piracy of copyright material on the Internet is an ongoing problem across all media. At Packt, we take the protection of our copyright and licenses very seriously. If you come across any illegal copies of our works, in any form, on the Internet, please provide us with the location address or website name immediately so that we can pursue a remedy.
Please contact us at [email protected] with a link to the suspected pirated material.
We appreciate your help in protecting our authors, and our ability to bring you valuable content.
Questions
Quick Start – Our
First 3D Scene
While preparing for a real-life photo shoot, let's say a fashion shoot, a photographer will have to hire a model, pose her in front of a background, position some lights, and then take a few photos. This workflow is pretty much what we will follow to create a scene in DAZ Studio, except that we will work with 3D objects. These objects have been designed by 3D modelers and are prepared in a way that Studio can easily add them to a scene. Because these are 3D objects, instead of simple bidimensional images, we can move around them and photograph them from any point of view. Welcome to the fascinating world of 3D art!
In this chapter you will learn the following topics:
• Adding a human figure to the scene • Positioning the camera
• Moving objects in the scene • Rendering an image
Stepping into DAZ Studio
With DAZ Studio you can create 3D scenes filled with all kinds of objects, such as people, cars, buildings, animals, and plants. As the best way to learn is by doing, we are not going to spend any time at this point discussing 3D concepts and ideas. Instead, we are going to dive into the program and start doing something interesting with it.
Quick Start – Our First 3D Scene
[ 8 ]
Studio uses 3D assets
A program like Studio allows you to create a scene using 3D assets. Think of Studio as your own virtual, potentially infinite, photographer's studio. In it you can pose models, add objects, pose lights, and then take a photograph. While using Studio you pick from a library of premade 3D assets, such as people, clothing, cars, buildings, weapons, and so on. Once you select an object, you place it in the scene and change its place until you find an arrangement that works for the image that you have in mind. Throughout this book, we will see many different types of 3D assets. Some of these assets come with Studio; they are installed with the program so that you can start getting results within minutes after finishing the installation. Other assets can be added by either purchasing them or by downloading them from free repositories on the Web.
Refer to Appendix, Installing DAZ Studio, for step-by-step instructions on how to install DAZ Studio on your computer.
Customizing Studio
Chapter 1
[ 9 ]
This configuration is not optimal. Most of the time, we will end up deleting the default figure to start your scene with something that you want. In addition, the loading of that figure adds to the time that it takes to start Studio, and we all know how much fun it is to wait for a program to become ready. So, let's make a few changes that will help us work faster.
First of all we delete the figure from the scene. To do this, we double-click on the figure's pelvis and then press the Delete key.
Downloading the example code
You can download the example code files for all Packt books you have
Quick Start – Our First 3D Scene
[ 10 ]
This action will get rid of the figure and give us a clear scene. Of course, repeating this operation every time we start Studio becomes very tedious very quickly. There is a much better way. We can configure Studio to start with an empty scene.
1. Call the Studio configuration window by navigating to DAZStudio | Preferences (in Mac) or Edit | Preferences (in Windows).
2. Click on the Startup tab.
3. Uncheck the option labeled Load file.
4. Click on the Accept button to save your choice.
Now, every time you start Studio, it will come up with an empty scene and it will load faster.
Chapter 1
[ 11 ]
The Highway style is similar to the default one, but it takes a lot less screen real estate to be drawn. Click on the Accept button to confirm your choice.
Quick Start – Our First 3D Scene
[ 12 ]
Lastly, we need to fix the orientation of the tabs. While having the tabs arranged vertically might seem like a good way of saving screen space, the orientation makes it very hard to read the text of the tabs and it forces us to tilt our heads sideways. To fix this issue, navigate to Window | Workspace | Orient Tabs Along Top. Refer to the following screenshot to see exactly where the menu option is:
Once you perform this last change, you will see the right pane of the window collapse to almost nothing. Don't worry about it. We will do some more rearranging of the layout later on. For now, be assured that you will be able to get access to the pane by simply clicking on the disclosure arrow.
Chapter 1
[ 13 ]
Now that we have configured Studio with a much more comfortable layout, we can start putting together the elements of our first scene.
Introducing Genesis – a shapeshifter
Quick Start – Our First 3D Scene
[ 14 ]
In the Smart Content tab, which should be at the left of your monitor, you can find a series of vertical labels that indicate the groups of 3D assets available in Studio.
Click on the People category, where there are four actors available: Basic Child, Basic Female, Basic Male, and Genesis. If this is a fresh installation, all the icons will have a New label to indicate that the asset has never been used before.
It would seem that the icon labeled Genesis would add a female figure to the scene, complete with hair. That icon actually loads the same androgynous gray figure that we deleted from the scene.
Chapter 1
[ 15 ]
The figure comes in the scene with the typical T pose, a neutral pose that is common to most characters. This pose is our starting point, and it can be modified to assume any pose that we want to apply to the model. The basic female character is fairly similar to the Victoria 4 model, the previous version of female characters made by DAZ. You can notice that it comes with no genitalia and no nipples. This is a feature of the skin—the texture—applied to the figure and something that can be changed easily, if the need for such features arises.
Adding smart content
Quick Start – Our First 3D Scene
[ 16 ]
Adding clothing
Click on the disclosure triangle next to the Wardrobe category. Then, click on the Outerwear subcategory; you will see two items: Jacket and Leggings.
Chapter 1
[ 17 ]
This is called conforming the clothing to the character. Without conforming the two objects, the figure and the jacket would be simply two independent items in the scene.
Now click on the Pants subcategory in the Smart Content tab. In there you will find two other items: JS Pants and Shorts. Make sure that the female figure is selected and then double-click on the JS Pants icon. That will add and conform the pants to the figure.
Quick Start – Our First 3D Scene
[ 18 ]
Adding hair
Studio can give you access to hundreds of hairdos that you can customize with colors and styles. The default installation of Studio has a few hair models available. Let's pick one and work with it. In the Smart Content pane, click on the Hair category. You will see four models of hair; let's add the one called Aldora. The procedure is the same as we saw before, but now that the figure is fully clothed, it's not easy to click on a part of the body to select it.
The fact is you can select the figure by double-clicking on any part of
the body, for example, the head. I suggested to use the pelvis because sometimes small movements of the mouse, while double-clicking, can
actually move the body part by mistake. I find the center of the body just
less sensitive to small mistakes. Call it a good habit.
So, now we can double-click on the head to select the whole figure, and then add the hair by double-clicking on the Aldora icon.
Treat yourself
Chapter 1
[ 19 ]
Click-and-drag on that cube to change your camera's point of view. You can now see that we are actually using 3D objects, and that we can place our camera in any place of the scene to take a snapshot in any way we want.
Restore the position of the camera to the default by clicking on the camera reset button.
Strike the pose
To change the pose from the uninspiring "T" default, let's apply a predefined pose. This is one of the strengths of Studio, the ability to save and apply poses to our characters. Luckily for us, Studio comes with a set of predefined poses so we can change our scene with a point-and-click approach.
Quick Start – Our First 3D Scene
[ 20 ]
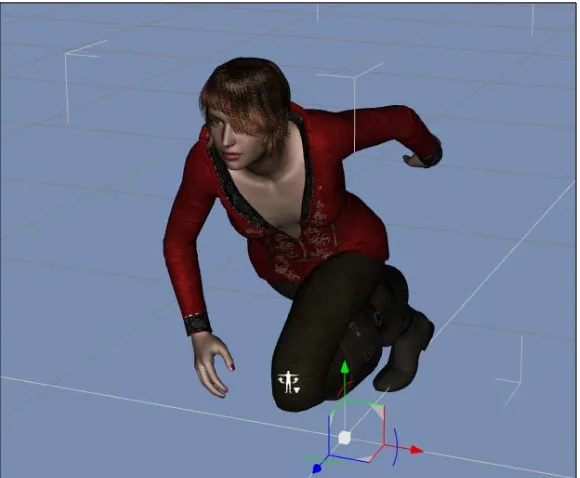
If everything went well, you should have the same result that you can see in the following image. As we can see, all the garments are following the pose of the main figure. The sleeves bend, the boots adapt to the position of the feet, and everything works perfectly. This is no small feat, as conforming and fitting clothes to a 3D figure is a very complex operation, as we will see in the chapter dedicated to creating clothing. Studio makes this operation very simple, and this is one of the advantages of using this application.
Fixing nonconforming clothing
If you see something different with your scene, like clothing out of place or not following the main figure, it could be that you didn't conform the garment to the figure when the garment was added to the scene. To fix this there is an easy procedure that can be followed, but it uses a part of the UI that we haven't explored yet.
Chapter 1
[ 21 ]
Once you do that, you will see a series of additional tabs: Scene, Parameters, Content Library, and Tool Settings. Let's not worry about those for now and just click on the Parameters tab. Let's assume that Jacket is the item that didn't conform to the figure. So, to correct the problem, follow these easy steps:
1. Click on the drop-down list just below the Parameters tab and select Jacket. 2. Click on the General category.
3. From the right-hand side of the pane, find the Fit to drop-down list and click on it.
4. Select Genesis.
Quick Start – Our First 3D Scene
[ 22 ]
Once you are done with the fix, you can click on the disclosure triangle to hide the pane again and have more screen surface available for the 3D Viewport.
Saving your scene
With so many actions performed at this point, it would be a pity if something happened to our scene. Better save it so that we don't risk losing data. From the Studio menu click on the File menu and then select Save…. As it usually happens for this operation, you will be asked to select a folder where to save the file and a name for the file. Let's select Chapter_01_01 to indicate that this is the scene for chapter 1 and this is the first version of the file. You can use, of course, any filename of your choice. Just be sure to remember what name you used and in which folder you stored the file because Studio, strangely enough, doesn't provide an Open Recent menu option. Studio will save the scene into a file named with the name that you selected and with the extension .duf, which is the default used by the application. DUF stands for DSON User File and it's the normal format for Studio scenes since Studio 4.5.
Adding an environment
As nice as our character is, she is standing in the middle of nothing and that is not right. We need to add an environment. To do so follow these easy steps:
1. Click away from the figure in an empty area of the scene to clear your selection.
2. With no active selection, the Smart Content pane now shows all the items installed in Studio.
3. Click on the Sets category.
Chapter 1
[ 23 ]
5. The environment is much larger than what we can see with our camera. Use the mouse wheel to zoom out and see more of the scene. You will need to roll the wheel toward the screen to zoom out. Rolling the wheel in the opposite direction zooms in. Chapter 7, Navigating the Studio Environment, explains in detail how to move the camera in the scene.
The environment has been added to the scene with a position that places the floor at a point that is much higher than where our figure stands. We need to move the figure so that it looks like she is touching the floor. For this, follow these steps:
1. Select Genesis by right-clicking on the face and then choosing Select Genesis – Dbl Click from the menu.
Quick Start – Our First 3D Scene
[ 24 ]
3. Move your mouse to the top of the green arrow, which is pointing up. This arrow allows us to move the selected object up or down. When the arrow is highlighted, click-and-drag up to move the figure until the upper half of it is beyond the camera's frame. The following image shows how the Universal tool appears in the Viewport:
Chapter 1
[ 25 ]
5. Now hover above the tip of the blue arrow of the Universal Tool. This part of the tool allows you to move the selected object in the depth direction. Click-and-drag until you see Genesis standing above the floor. Use the following image for reference:
6. Now use the green axis again to move the figure toward the floor. Keep an eye on the sole of the right boot. When you see that the boot sinks inside the floor, move the figure back up. We want to have our character rest on the floor. There should be just a bit of contact with the floor. For now don't worry too much about it. Just use your best judgment; later on, we will learn how to make precise adjustments.
Quick Start – Our First 3D Scene
[ 26 ]
8. If you want to explore some rules of image composition, you can look in your public library for a good, introductory book about photography. There is also a nice article available online at the Digital Camera World website, http://www.digitalcameraworld.com/2012/04/12/10-rules-of-photo-composition-and-why-they-work/.
Rendering an image
All that we have done up to now is great, but the target of this activity is to be able to produce an image that we can show independently from Studio; for example, this could be a frame of a graphic novel. Ideally, we would like to obtain a PNG or JPG file that we can show other people. This can be achieved through a process
called rendering.
Chapter 1
[ 27 ]
When we ask Studio to render an image, the software computes all the elements in the scene and it generates an image that is the faithful representation of those elements, including all the details of the materials and lights. We haven't looked at the lights yet, but those are also computed at render time.
To render an image use these steps:
1. From the Studio menu, navigate to Render | Render.
2. A window will pop up and in it you will be able to see the gradual development of the image.
Note that the indicator for the Universal tool and the other icons visible in the 3D Viewport are not visible in the rendered image.
Quick Start – Our First 3D Scene
[ 28 ]
4. Click on the drop-down menu that says Library and select Folder. Click on the button with three dots to select the destination folder. Select your Desktop for now.
5. Click on the Save button to save your rendered image.
6. Using your file manager (Finder on the Mac, Windows Explorer on Windows) go to your Desktop, and you will be able to see an icon with the name that you have selected.
7. Double-click to open the image in your default image viewer.
Congratulations, you have created an image from a 3D scene that includes a human figure, conforming clothing, conforming hair, and a fully featured environment. As a last step, use the Studio menu and navigate to File | Save as… to save your scene as Chapter_01_02.
Summary
In this chapter you have learned the following topics:
• Customizing the Studio environment
• Using the Smart Content pane to locate 3D assets • Adding figures, clothing, and hair
• Fitting a garment to a figure via the Parameters tab • Adding an environment to the scene
• Using the Universal tool to move objects in the scene • Rendering an image from the 3D scene
As we complete this quick tour of the essential elements of a Studio scene, we have gained considerable familiarity with the program. Take a few minutes to re-examine the work done so far. You should feel good about the progress. Think how complex and time consuming it would be to draw a scene like this using pencil and colors.
Customizing Studio
Studio is designed to be fully customizable and to adapt to the user's preferences. While this is a very good thing, this aspect of the program can be a "time-sucking" device. It's easy to get lost in all the customization options only to find out later that a couple of hours have passed since we started poking around. In this chapter we will see a few essential customizations designed to make our work with Studio easier, faster, and more fun. Specifically, we will see the following topics:
• Selecting a style that maximizes screen real estate • Simplifying the UI and getting rid of redundant panels • Using keyboard shortcuts to access Studio features quickly • Changing the background color
All the tips in this chapter are meant to give you a better, easier way of working with Studio. Strictly speaking, they are not required in order to use the lessons in this book, but they are of great help in speeding up the creative process. If you prefer to skip this chapter now, it is perfectly fine. You can apply the customizations described in this chapter at any point in your workflow.
Getting more screen space
Customizing Studio
[ 30 ]
While the tab metaphor makes it easy to locate useful areas of the program, the default size and placement of those tabs can take a lot of screen space. The way Studio tries to solve this issue is, by default, to rotate the tabs 90 degrees to display them vertically. Screens are usually wider rather than taller, so this arrangement seems to make sense, at least on paper. In reality, reading tabs sideways is quite impractical. If the text was shown vertically, like the typical Hotel sign that we can see on the side of buildings, it would be OK, but with letters rotated 90 degrees this solution leaves a lot to be desired.
In the previous chapter we saw how to change the orientation of the tabs so that they return to the usual horizontal configuration. Here we will go one step further and select a UI layout that maximizes screen use and removes some redundant elements that are easily accessible in other ways.
Customizing the layout
A Studio layout is a way of organizing the Studio UI elements on the screen. A layout does not change the functionalities of Studio, and it does not affect your scenes either. It simply re-arranges all the tabs, panes, and buttons of Studio in a given way.
Studio comes with a few predefined layouts, arranged to make the UI simpler for newcomers or richer and fully featured for expert users. Unfortunately, the default layout seems to be quite wasteful and full of redundant parts. We are going to configure our own layout that is efficient, clean, and fully featured.
Chapter 2
[ 31 ]
What is interesting to note is that we don't need any of those top tabs to work with Studio. In fact, in the previous chapter we rendered an image without switching to the Render tab. Not only we don't need those tabs, but clicking on any one of them adds a noticeable delay and does nothing else other than re-arranging some other tabs and buttons on the screen. The result of all this rearrangement is that we have to relearn where things are, and we need to switch back and forth to regain access to certain tools. All this flickering and switching is actually quite hard on the eyes and it breaks the creative flow. It's much better to use a single configuration where we can rely on things being in the right spot all the time. By using such configuration we can use "muscle memory" to control Studio. This results in spending less time fumbling with the UI and more time performing fun, creative activities.
To achieve this task, we need to switch layout, a task that is easily done by navigating to Window | Workspace | Select Layout ….
Downloading the color images of this book
We also provide you a PDF file that has color images of the screenshots/
diagrams used in this book. The color images will help you better
understand the changes in the output. You can download this file
Customizing Studio
[ 32 ]
This action calls the layout manager window. The Hollywood Blvd layout should be selected by default.
Chapter 2
[ 33 ]
No problem, now we know how to fix this problem by navigating to Window | Workspace | Orient Tabs Along Top again. As we do this, the tabs disappear, as the panes that hold them are collapsed by default. Let's click on the toggle triangle on the left.
Customizing Studio
[ 34 ]
If we look at the left-hand side of the Studio window, we can see a column of gray-scale icons representing document pages and folders. These icons provide shortcuts for actions such as saving and opening scenes. All these actions are easily accessible either via the standard File menu, or via key combinations. So this sidebar is of very limited use. On the other hand, we can definitely use the screen space that it occupies, so let's remove this sidebar.
Right-click on an area of the sidebar that has no icons. A pop-up menu should show up.
From this menu, click on Input Output to remove the sidebar. Voilà, we gained a few more precious pixels for our 3D Viewport.
If you use a Macintosh, you might not have a three-button mouse. In that case, whenever I mention right-click, you should use the Ctrl + click combination to obtain the equivalent result. If you use the Apple Magic
Trackpad or an Apple laptop computer, use the two-finger tap. In either
Chapter 2
[ 35 ]
Removing screen clutter
When we opened the pane on the left, we saw a few tabs preloaded there. Among them is one titled Render Library. You can probably also see a couple of horizontal arrows used to scroll the tabs when there is not enough space in the panel to show them all. While working in Studio, we spend a lot of time adding objects to the scene and moving them around. In proportion, we spend much less time rendering and managing the rendered images. It makes much more sense to dedicate screen space to often-used tools than to panes that are rarely, if ever, utilized.
While rendering the images, the filesystem of the computer is what we want to use to manage the files; after all, that is the reason for having a filesystem. The Render Library pane is an attempt to manage the rendered images inside Studio, but in reality, it doesn't do much and it gets in the way of proper file management. Therefore, the Render Library tab is of very limited use, and we can instead use that space for something more useful.
Fortunately for us, all the tabs in Studio are completely adjustable, so we can configure the program to our liking. Use the following steps to remove Render Library:
1. Click on the Render Library tab to activate it. 2. Right-click on the tab to call the contextual menu. 3. From the menu select Close Pane.
Now the remaining tabs are shown centered on top of the pane. There is a lot of advantage in having a clean UI that is easy to read. It reduces eyestrain and provides a more relaxing environment that is conducive to creativity.
Customizing Studio
[ 36 ]
Once the pane opens up, look for the Lights and Cameras tabs and close them as we did with the Render Library pane.
1. Click on the Lights tab. 2. Right-click on the same tab.
3. Select Close Pane from the context menu. This is the last option in the list. 4. Click on the Cameras tab.
5. Right-click on the same tab.
6. Select Close Pane from the context menu.
Lights and cameras are more easily managed and changed from the Parameters tabs, so the two tabs that we have just closed were completely redundant. Once again we have gained some screen space and the UI looks less crowded, which has subtle but perceptible benefits. In case you want to explore those tabs, they can be re-enabled via the Window | Panes (Tabs) menu.
Saving the new layout
Obviously, we don't want to have to repeat the steps that we just performed over and over again. While Studio saves the current layout automatically, there are situations that could cause the setup to be erased, like for example, if you switch to another layout by mistake or just for testing purposes.
Let's save our layout that we have configured so far, so that it will be easy to recall if the need arises.
From the Studio menu, navigate to Window | Workspace | Save Layout As….
Chapter 2
[ 37 ]
Customizing Studio
[ 38 ]
Simpler, faster keyboard shortcuts
The most efficient, fast, and fun way of using Studio is to use a few keyboard shortcuts in combination with the mouse. This workflow avoids interruptions in the creative process caused by searching for specific tools in the UI. For example, it's much faster and less distracting to press Cmd + S (on Mac)/Ctrl + S (on Windows) to save a scene, instead of taking your eyes away from the scene, looking up for the File menu, and then searching for the Save option.
As Studio works on both Mac OS and Windows, it's necessary to
find a notation to refer to keyboard combinations that work for both
OSs. Macintosh uses the Cmd key to trigger special key combinations. Windows uses the Ctrl key. So, when you see something like Cmd/Ctrl + S, it means that you need to press a key combination that on Mac OS is Cmd + S and on Windows is Ctrl + S. Similarly, Opt/Alt + S indicates Opt + S for Mac OS and Alt + S for Windows.
If we look at the toolbar that has been created when we switched to the City Limits layout, we see that it now has a lot more buttons than when we first launched Studio. That is a good thing. Those buttons represent a lot of tools that we constantly need during the creation of our scenes.
Looking at the toolbar from left to right, we see a couple of buttons that can be used to access the help system. Then, we see a button that can be used to add a camera to the scene, followed by other buttons used to add different types of lights.
We will focus, for now, on the tools in the middle, starting with the one looking like a big mouse cursor to the left of the one highlighted in orange. These tools are listed in the following table:
Icon Name Function
The Node selection tool This is used to select objects or portions of objects, called nodes. For example, the forearm of a human figure is a node.
Chapter 2
[ 39 ]
Icon Name Function
The Rotate tool This is used to rotate objects.
The Translate tool This is used to move objects around.
The Scale tool This is used to enlarge or shrink objects.
The Active pose tool This is used to change the pose of a character.
The aniMate2 tool This is used to create animations.
The Surface Selection tool This is used to select nodes based on a material.
For now we stop at these tools, we will look at the other ones later on. What we want to do is to gain access to any of the tools described in the preceding table with just the pressure of a key. If we move the mouse over one of the buttons, the Universal tool for example, we can see that a little help bubble, also known as a tool tip, shows up telling us that we can activate the Universal tool using the keyboard shortcut Opt/Alt-Shift-U. That is one heck of a shortcut. You actually need to engage three fingers in order to get there. It pretty much defeats the purpose of having a keyboard shortcut. That is too bad because having a real shortcut would save us so much time and wrist strain by not having to rely so heavily on the mouse.
Customizing Studio
[ 40 ]
So, let's change all those pesky keyboard shortcuts to real shortcuts. It's done in just a few easy steps:
1. From the Studio menu navigate to Window | Workspace | Customize…, or if you want to be in the spirit of this modification, just press F3.
The Customize DAZ Studio window appears.
2. In the left pane titled Actions, scroll down until you find a group called Viewport Tools.
Chapter 2
[ 41 ]
4. Right-click on the node selection item to show the associated context menu. 5. From the menu, select Change Keyboard Shortcut.
6. When you see the text Please Press a Key on the screen, press the letter V. Now you can activate the selection tool by simply pressing one key.
Customizing Studio
[ 42 ]
8. Continue with the Rotate, Translate, and Scale tools and assign the keys R, T, and S, respectively.
9. Lastly, assign the keystroke M to the Surface Selection tool. 10. Confirm your changes by clicking on the Accept button.
Now that we have some handy shortcuts, it's a good idea to try them!
1. Let's click on the Smart Content tab and then click on the People category. 2. Double-click on the Basic Female icon to add the figure to the scene. 3. Now, let's press V to enable the selection tool. Using the lowercase letter is
just fine; I use the uppercase letter in the text for clarity. With the selection tool we can select individual parts of the figure.
4. Let's click on the head. The head appears selected inside a box traced by the four corners. That is called the bounding box. When we select a node, the parameters for that node show up in the Parameters tab. This tab allows us to precisely alter the characteristics of the selected object/node. We will see more about these later on.
5. Now let's press the letter U to select the Universal tool. As the head node was selected previously, the Universal tool is set to act on that node. The Universal tool includes the Translate, Rotate, and Scale tools in one convenient gizmo on screen. The curved lines in red, green, and blue are used to rotate the selected node along one axis.
Chapter 2
[ 43 ]
Click on that blue curve, hold the mouse, and then move it up or down. If you hover the mouse over each one of the curves in the tool, you will see a tool tip that explains the function of each part of the Universal tool. We need to use the Side-Side curve. Drag on that curve and you will see the head tilt as a result of your action. This is the first step in posing your characters!
Now click on the Pelvis node and use the right red arrow tip to translate (move) the character to the left or right. As we did before, we need to click, hold, and drag the mouse. This time we move left or right. You should see the whole figure move in the 3D Viewport.
Whether you prefer to use the Universal tool or the individual Translate, Rotate, and Scale tools is a matter of personal preference. What is important is that now you have a simple and effective way of selecting each tool with a simple keystroke.
Changing the background color
Studio's background color is set by default to be a light shade of blue. We can change that to any color of our liking. The background color will not affect the rendered image, but it can help our work by presenting the objects against a background that provides good contrast. This makes it easier to find objects and spot possible issues.
Changing the background color is easy. Click on the Viewport Options button at the top-right of the 3D Viewport.
Customizing Studio
[ 44 ]
Summary
In this chapter we have seen how to adapt Studio to our needs. The customizations that can be applied to the program don't stop here. We will see more customizations as we learn more about Studio.
In this chapter you have learned the following topics:
• Switching to a different layout • Removing unnecessary tabs • Hiding redundant sidebars • Saving a layout
• Customizing keyboard shortcuts • Changing the background color
Controlling the tools offered by DAZ Studio is one of the crucial aspects of making art with this program. Now that we have a simpler and faster way of accessing those tools we can focus on the artistic exploration instead of having to break the creative flow. This will have a deep, positive impact in our artistic work.
Posing Figures
As we saw in Chapter 1, Quick Start – Our First 3D Scene, figures added to a scene are presented in the standard T pose. When we create an illustration with Studio, we want to change that basic pose and set the figures in the position and situation that fit the scene. In this chapter we will see how we can achieve that. Studio provides a good set of tools to change the poses of our figures, but creating good poses is an art that takes a bit of practice. It's important to have a good strategy in order to get the results that we want.
In this chapter you will learn the following topics:
• Using premade poses • Creating an original pose
• Sound strategies on approaching a new pose • Avoiding common pitfalls
The main blocks of a pose
While posing a figure, we can break the process into three main areas:
• The torso and the limbs • Hands and fingers • Face
Posing Figures
[ 46 ]
Using premade poses
The figures that we can use in Studio, such as Victoria 4 or Genesis, are completely articulated and they can be posed like a person. They are not only made to look like humans, but they also react to the poses in subtle ways that make the final result convincing. For example, while moving the eyes, the eyelids bulge and deform in ways to conform to the shape of the underlying eye orb. Once we pose a figure, we can save that pose into a file. This allows us to recall that pose without spending all the time that was initially needed to pose the figure. To apply a presaved pose, all that is needed is to load the base figure, and then apply the saved pose to it. Files that store poses are called Pose Presets, and Studio comes with a few of these presets already installed with the program.
Let's first explore this approach.
We start by adding a female Genesis figure to the scene. We have seen the steps before, but here they are again:
1. Click on the Smart Content tab. 2. Click on the People category.
3. Double-click on the Basic Female icon.
The figure should appear in the scene in the standard T pose. Now that we have a figure and it's selected, the Smart Content tab will adapt and show the items that are relevant to our selection. Let's click on the disclosure triangle of the Presets category. Once all the subcategories are shown, we can click on the Poses subcategory. This action causes the Smart Content tab to show us all the poses that fit Genesis.
Because Genesis is highly compatible with the previous generation of
DAZ figures (also known as Gen4), such as Victoria 4, all the poses for the Gen4 figures can also be applied to any Genesis figure.
You can refine the filter of poses shown by opening the Genesis subcategory. This will show the Basic Child, Basic Female, and Basic Male groups. The names of these groups are more of suggestions than restrictions. The fact that a pose is under the Basic Male group doesn't prevent us from using it for a female character.
Chapter 3
[ 47 ]
You can verify which object in the scene is selected by finding which object is highlighted by its bounding box, which is the series of four corners enclosing an object. Here is an example:
Posing Figures
[ 48 ]
Chapter 3
[ 49 ]
Using that set, we can quickly add some variety to our character's hand and do it in a second. Hands are very laborious to pose, so it saves a lot of time and effort if you have a good library of hand poses. We will see in a later chapter how to find additional products for Studio, including pose sets.
Purchasing the right poses
The ease of applying premade poses to a character can easily lead to filling up your hard disk with tons of pose packages. My experience is that it is rarely a good move. What I found is that, over the years, I rarely use the pose set that I bought. At first it might seem useful to buy a set that contains complex poses that are difficult to recreate. In reality, a very complex pose has very few applications. In the end, I keep revolving around the same few poses that I use as starting points. My advice is to look at some good hand pose sets and some basic, everyday body pose packages, and avoid buying dozens of pose packages. A few sets are OK; let's say between four and five. If you add more than that, you will spend a long time staring at your tiny thumbnails trying to decide if a given pose will fit the scene that you have in mind. This time can be actually used to pose the character and create something unique.
Creating a new pose
If you ever marveled at the drawings of comic book artists, this section of the book will definitely interest you because we are going to pose a full body in action. With Genesis we have a fully posable figure in Studio. All that we need is an idea for a scene. Let's try to make an illustration of a female surfer riding the waves.
Posing Figures
[ 50 ]
Dennis Glover's page at deviantART is full of striking images, but one caught my attention because of the dynamic movement that it conveys, coupled with the fact that the subject is prominently in the frame.
Dennis' page is at http://thorvold.deviantart.com and the link for the image that I used is http://fav.me/d42eisz.
The image that I used is the one at the bottom-right of the page, titled Surfer Girl. I suggest that you download the image and keep it handy throughout this lesson.
Chapter 3
[ 51 ]
Planning your shot
It's useful to spend a few minutes examining a reference photo, just to identify the major elements and prepare a plan of action. The hands in this image are fairly simple, so we don't need to worry much about them. The torso has a good amount of twist and it's bent forward. The arms are fairly straight. The legs are the biggest challenge so we know where we are going to spend most of our time.
Setting up the scene
For this exercise, we are not going to have waves or a wetsuit. In fact, we are not even going to bother with the surfboard, but we do need something that works in its place in order to get the right angle for the figure and the feet. This situation gives us the opportunity to learn a little bit about a very useful feature of Studio: geometry primitives.
Geometry primitives are simple objects that can be created with some variable parameters. The primitives are as follows:
These are basic shapes that can come in handy several times. A sphere can work as a beach ball, a crystal ball or, if deformed, as a lens. A torus is a doughnut shape and can become useful to make bracelets, lifesavers or …doughnuts! It's useful to get familiar with these primitives because they can provide a lot of flexibility without requiring us to use a specialized 3D modeling program such as modo or ZBrush just to create some useful shapes in Studio.
Posing Figures
[ 52 ]
The same action is available from the Create | New Primitive… menu. Regardless of what method you use, the result will always be to show a small window from where we can select to create one of the primitives that we want.
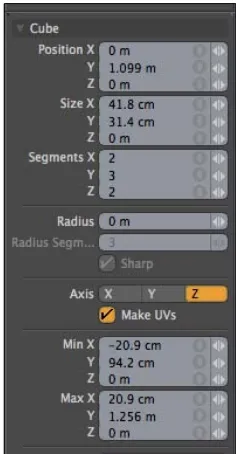
From this window, you can do several interesting things. For example, you can create a cylinder and make it have just six sides. That will create a hexagonal pillar. We will see all the options about the primitive shapes later; for now, let's concentrate on the cube primitive. We need to have some sort of surfboard to pose our character. All that we need is some shape that resembles the surfboard. For this task a cube primitive, correctly sized, will do the trick.
First, let's add a cube to a brand new scene.
1. Click on the new primitive button in the toolbox.
2. From the drop-down menu at the top of the window, select Cube. 3. Make sure that the Size parameter is set to 1 meter (abbreviated as m)
and the Divisions parameter is set to 1.
Chapter 3
[ 53 ]
5. Switch to the Universal tool by pressing the U key and make sure that the cube is selected.
6. Now, hover your mouse over the little green cube under the green arrow of the Universal tool. A tool tip should appear saying Scale in Y. This means that if you click-and-drag on that cube, we will be scaling the cube along the Y (vertical) axis.
Posing Figures
[ 54 ]
Chapter 3
[ 55 ]
As we can see, the Y Scale parameter's slider value is set at 10.5. Your value is most likely different, but it should be around that range. We want to set the vertical size to be exactly 6 percent. To do so we need to perform the following steps:
1. Click on the number that shows the value of Y Scale, in my case, the 10.5% text.
2. The value is now editable and we can simply enter the number via the keyboard.
3. Enter the value 6 and press Enter (on Windows) or return (on Mac).
4. Now, we need to adjust the size of the rest of the cube to have roughly the proportions of a surfboard.
5. Click on the value for Z Scale, enter 200, and press the Enter (on Windows) or return (on Mac) key. From now, it's implicit that we need to follow every value entered with the Enter (on Windows) or return (on Mac) key so that we avoid repeating it.
6. Click on the value for X Scale and enter 60.
Posing Figures
[ 56 ]
This is an excellent time to save the scene obtained so far. Navigate to File | Save and use an appropriate name. Let's save it as surfer_01.duf.
Looking at the image, the surfboard does seem a bit too thick; so let's lower the Y Scale to 4%.
Using a reference image as a backdrop
Now that we have the objects in place, it's time to work on the pose. A good way to keep the reference photo in sight while working is to set it to be the background image. From the Studio menu, navigate to Edit | Backdrop …. This operation allows us to select an image, and that image will then be painted as a backdrop for our scene, no matter how we move the camera. When we select that menu option, a window shows up from where we can select the image for the backdrop and a few transformations to apply to it.
The various options are pretty self-explanatory. For our surfer, we don't need any transformation. To select an image, we need to click on the Image: drop-down list and from there select Browse…; the standard Open window will open allowing us to select an image file. Once the file is selected, it appears immediately in the Viewport. For this to work properly, it's important that the size of the rendered image matches the aspect ratio of the backdrop image.
Selecting an image size
Chapter 3
[ 57 ]
The Standard Definition TV that dominated the field for about 60 years was set at a 4:3 ratio. High Definition (HD) TV is set at a ratio of 16:9 regardless of the two resolutions available: 1280 x 720 or 1920 x 1080. Let's verify that. 1920/16 = 120. 120 x 9 = 1080. 1280:16 = 80.80 x 9 = 720.
This little exercise illustrates that aspect ratio, and not resolution, determines the proportions of an image.
The proportions of an image determine how that image is perceived by the viewer. For example, take this photo that I shot using my DSLR:
Posing Figures
[ 58 ]
While the width has not changed a single bit, the cropping has the effect of making the photo look wider. This is why Laurence of Arabia has been shot at 2.20:1 instead of the more conventional 1.78:1 ratio used for most movies.
All this talk about the aspect ratio leads to a fairly simple point. When we render an image in a program like Studio, we will have to decide, at some point, what aspect ratio your image will have. This decision is better taken at the beginning of the process because it influences how we are going to frame the shot. In the case of setting a backdrop, it is also necessary to match the Studio camera frame to the aspect ratio of the image used for the backdrop, otherwise we will get stretching or compressing of the image. There are plenty of videos on YouTube that show people squeezed or stretched. This is caused by the mismatch of the aspect ratio of the original video.
Chapter 3
[ 59 ]
Those numbers give us a ratio of 1.33 (800 divided by 600), which is more square-like than what we have with our photo reference. The solution is simple; just enter, for now, the same dimensions used by the photo. While you do that, make sure to uncheck the Constraint Proportions checkbox before making the change. After this operation is done, we can close the window by clicking on the close button (X) at the top-right corner.
Setting the position of the surfboard
We have created our surrogate surfboard to obtain a level of believability in setting our character. The board gives us a place to rest the feet of the figure, so it's important to set that object in place before we begin posing Genesis. Before we do that though, it's crucial that we reset the camera by clicking on the designated button in the 3D Viewport.
The reason to do so is to have a stable reference point. At any time during the setting of the pose, we might need to change the position of the camera, which will break the correspondence of the image with the scene in the backdrop. If that happens, we can simply re-click on the Camera: Reset (LMB|RMB) button to find our starting point.
Posing Figures
[ 60 ]
After a few adjustments, you should see something like this:
Setting the surfer pose
Chapter 3
[ 61 ]
Posing Figures
[ 62 ]
We also want to act on the Bend parameter, the one identified by the curve shown in the following image. We can think of it as "rotate the body part on the X axis."
Now let's do the same for the abdomen2 and chest part. We need to apply all kinds of small rotations on different axes to get to the desired pose. This is a perfect time to experiment on your own and become familiar with the tools. It's perfectly OK to take some "artistic license" and create a pose that is slightly different from the reference.
Bodies without limits
Chapter 3
[ 63 ]
1. Select the chest part by single-clicking on it in the 3D Viewport. 2. In the Parameters tab, locate the Twist parameter.
3. Click on the gear icon for the parameter, and a pop-up menu appears.
4. From the pop-up menu, select Parameter Settings…. A window appears.