59
Workshop 4
Selection Widget
A.
Tujuan
1.
Memahami penggunaan dari Selection Widget
B.
Tugas Pendahuluan
1.
Pelajari Selection Widget Android
C.
Percobaan
a.
Percobaan 1: Menggunakan Spin Control
Langkah 1: Buat project Android baru pada Eclipse
Langkah 2: Ketikan kode berikut pada main.xml
<RelativeLayout
xmlns:android="http://schemas.android.com/apk/res/android"
xmlns:tools="http://schemas.android.com/tools"
android:layout_width="match_parent"
android:layout_height="match_parent"
tools:context=".MainActivity"
android:background="#000000" >
<TextView
android:id="@+id/select"
android:layout_width="fill_parent"
android:layout_height="wrap_content"
android:textSize="14pt"
android:textStyle="bold"
android:textColor="#000000"
android:background="#0000fftes" />
<AutoCompleteTextView android:id="@+id/edit"
60
android:layout_height="wrap_content"android:layout_alignParentLeft="true"
android:layout_below="@+id/select" android:completionThreshold="3"
android:ems="10"
android:textColor="#ff0000" >
<requestFocus /> </AutoCompleteTextView>
</RelativeLayout>
Langkah 3 : Pada MainActivity.java ketikkan kode berikut ini :
package com.example.selectionwidget2;
import android.os.Bundle; import android.app.Activity; import android.view.Menu; import android.text.Editable; import android.text.TextWatcher; import android.widget.ArrayAdapter;
import android.widget.AutoCompleteTextView; import android.widget.TextView;
public class MainActivity extends Activity implements TextWatcher{
TextView selection;
AutoCompleteTextView edit;
String[] items = {"this", "is", "a",
"test1", "test2", "test3",
"test4", "test5", "test", "list"};
@Override
public void onCreate(Bundle icicle) { super.onCreate(icicle);
setContentView(R.layout.main);
selection = (TextView) findViewById(R.id.select); edit = (AutoCompleteTextView)findViewById(R.id.edit); edit.addTextChangedListener(this);
edit.setAdapter(new ArrayAdapter<String>(this, android.R.layout.simple_dropdown_item_1line, items)); }
public void onTextChanged(CharSequence s, int start, int before, int count){
61
public void beforeTextChanged(CharSequence s, int start,int count, int after){
//needed for interface but unused
}
public void afterTextChanged(Editable e){ //needed for interface but unused
} }
Langkah 4: Tekan F11 untuk mendebug aplikasi pada emulator Android
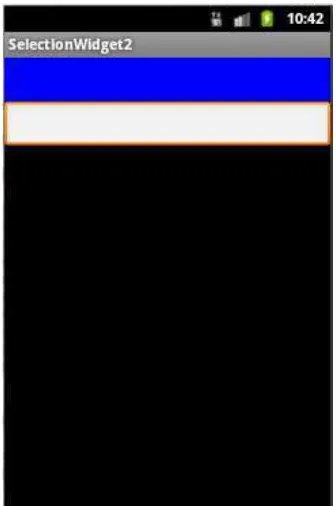
[image:3.595.230.398.305.558.2]Langkah 5: Kemudian, akan muncul output sebagai berikut :
Gambar 21 Contoh Tampilan Selection Widget
b.
Percobaan 2: Menggunakan AutoCompleteTextView
Langkah 1: Buat project Android baru pada Eclipse
Langkah 2: Ketikan kode berikut pada main.xml
<RelativeLayout
xmlns:android="http://schemas.android.com/apk/res/android"
xmlns:tools="http://schemas.android.com/tools"
android:layout_width="match_parent"
62
tools:context=".MainActivity"android:background="#000000" >
<TextView
android:id="@+id/select"
android:layout_width="fill_parent"
android:layout_height="wrap_content"
android:textSize="14pt"
android:textStyle="bold"
android:textColor="#000000"
android:background="#0000fftes" />
<AutoCompleteTextView android:id="@+id/edit"
android:layout_width="fill_parent"
android:layout_height="wrap_content"
android:layout_alignParentLeft="true"
android:layout_below="@+id/select" android:completionThreshold="3"
android:ems="10"
android:textColor="#ff0000" >
<requestFocus /> </AutoCompleteTextView>
</RelativeLayout>
Langkah 3 : Pada MainActivity.java ketikkan kode berikut ini :
package com.example.selectionwidget2;
import android.os.Bundle; import android.app.Activity; import android.view.Menu; import android.text.Editable; import android.text.TextWatcher; import android.widget.ArrayAdapter;
import android.widget.AutoCompleteTextView; import android.widget.TextView;
public class MainActivity extends Activity implements TextWatcher{
TextView selection;
AutoCompleteTextView edit;
String[] items = {"this", "is", "a",
"test1", "test2", "test3",
63
@Overridepublic void onCreate(Bundle icicle) { super.onCreate(icicle);
setContentView(R.layout.main);
selection = (TextView) findViewById(R.id.select); edit = (AutoCompleteTextView)findViewById(R.id.edit); edit.addTextChangedListener(this);
edit.setAdapter(new ArrayAdapter<String>(this, android.R.layout.simple_dropdown_item_1line, items)); }
public void onTextChanged(CharSequence s, int start, int before, int count){
selection.setText(edit.getText()); }
public void beforeTextChanged(CharSequence s, int start,int count, int after){
//needed for interface but unused
}
public void afterTextChanged(Editable e){ //needed for interface but unused
} }
Langkah 4: Tekan F11 untuk mendebug aplikasi pada emulator Android
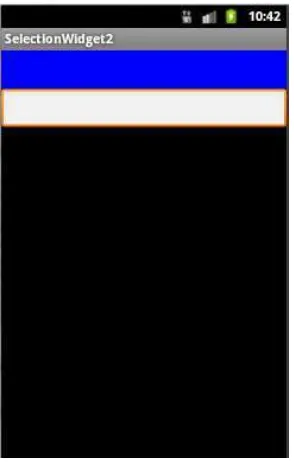
[image:5.595.233.380.456.687.2]Langkah 5: Kemudian, akan muncul output sebagai berikut :
64
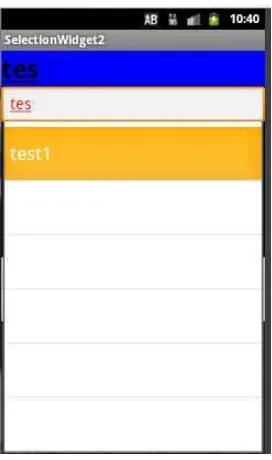
Langkah 6 : Isikan edit text yang tersedia, misalnya, ketikkan “test”. Maka akan
[image:6.595.237.373.170.400.2]muncul AutoCompleteTextView seperti gambar bawah ini :
Gambar 23 Contoh Tampilan AutoCompleteTextView
c.
Percobaan 3: Membuat Date and Time Selection Widget
Langkah 1: Buat project Android baru pada Eclipse
Langkah 2: Ketikan kode berikut pada main.xml
<?xml version="1.0" encoding="utf-8"?> <RelativeLayout
android:id="@+id/widget34"
android:layout_width="fill_parent"
android:layout_height="fill_parent"
xmlns:android="http://schemas.android.com/apk/res/android"
>
<DigitalClock
android:id="@+id/digital"
android:layout_width="wrap_content"
android:layout_height="wrap_content"
android:background="#ff0000ff"
android:textSize="20px"
android:layout_below="@+id/analog"
android:layout_centerHorizontal="true"
>
65
android:id="@+id/analog"android:layout_width="fill_parent"
android:layout_height="wrap_content"
android:layout_alignParentTop="true"
android:layout_alignParentLeft="true"
>
</AnalogClock> </RelativeLayout>
Langkah 3: Berikut ini merupankan kode pada Activity.java
Langkah 4: Tekan F11 untuk mendebug aplikasi pada emulator Android
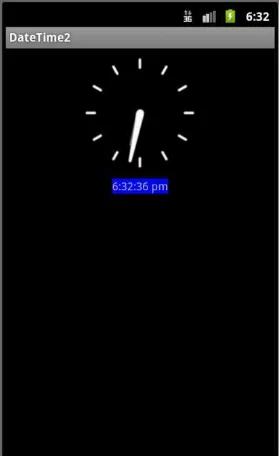
[image:7.595.235.375.453.681.2]Langkah 5: Kemudian, akan muncul output sebagai berikut :
66
d.
Percobaan 4: Membuat Tabhost
Langkah 1: Buat project Android baru pada Eclipse
Langkah 2: Ketikan kode berikut pada main.xml
<?xml version="1.0" encoding="utf-8"?> <LinearLayout
xmlns:android="http://schemas.android.com/apk/res/android"
android:orientation="vertical"
android:layout_width="fill_parent"
android:layout_height="fill_parent">
<TabHost
android:id="@+id/tabhost"
android:layout_width="fill_parent"
android:layout_height="fill_parent"> <TabWidget
android:id="@android:id/tabs"
android:layout_width="fill_parent"
android:layout_height="wrap_content"
/>
<FrameLayout
android:id="@android:id/tabcontent"
android:layout_width="wrap_content"
android:layout_height="fill_parent"
android:paddingTop="62px">
<AnalogClock
android:id="@+id/tab1"
android:layout_width="fill_parent"
android:layout_height="fill_parent"
android:layout_gravity="center_horizontal"
/>
<LinearLayout
android:id="@+id/tab2"
android:layout_width="fill_parent"
android:layout_height="fill_parent"
android:orientation="vertical"
xmlns:android="http://schemas.android.com/apk/res/android"
>
<TextView
android:layout_width="fill_parent"
android:layout_height="wrap_content"
></TextView> <TextView
android:id="@+id/caption1"
67
android:layout_height="wrap_content"android:background="#ff0000ff"
android:text="Person Name"
android:textSize="20px" ></TextView> <EditText android:id="@+id/txtPerson" android:layout_width="2500px" android:layout_height="wrap_content" android:text="txtPerson" android:textSize="18sp" ></EditText> <Button android:id="@+id/btnGo" android:layout_width="wrap_content" android:layout_height="wrap_content" android:text="Go" > </Button> </LinearLayout> </FrameLayout> </TabHost> </LinearLayout>
Langkah 3: Berikut ini merupankan kode pada Activity.java
package com.ai.date;
import android.app.Activity; import android.os.Bundle; import android.view.View;
import android.view.View.OnClickListener; import android.widget.Button;
import android.widget.EditText; import android.widget.TabHost;
public class TabSelectionWidgetActivity extends Activity { /** Called when the activity is first created. */ @Override
public void onCreate(Bundle icicle) { super.onCreate(icicle);
setContentView(R.layout.main);
TabHost tabs= (TabHost)findViewById(R.id.tabhost); tabs.setup();
TabHost.TabSpec spec;
68
spec = tabs.newTabSpec("tag2"); spec.setContent(R.id.tab2); spec.setIndicator("2-Login"); tabs.addTab(spec);
tabs.setCurrentTab(0);
Button btnGo=(Button)findViewById(R.id.btnGo);
btnGo.setOnClickListener(new OnClickListener() {
@Override
public void onClick(View v) {
// TODO Auto-generated method stub
EditText txtPerson = (EditText)findViewById(R.id.txtPerson);
String theUser = txtPerson.getText().toString();
txtPerson.setText("Hola " + theUser); }
});
} }
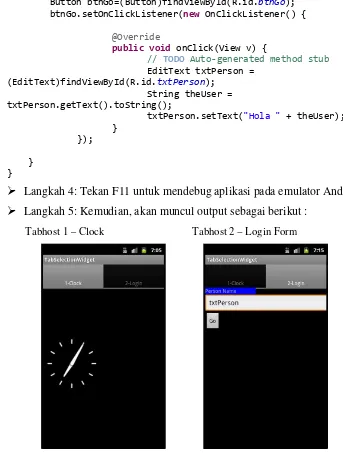
Langkah 4: Tekan F11 untuk mendebug aplikasi pada emulator Android
Langkah 5: Kemudian, akan muncul output sebagai berikut :
[image:10.595.118.461.227.680.2]Tabhost 1 – Clock
Tabhost 2 – Login Form