This Adobe Press book is published by Peachpit.
Peachpit is a division of Pearson Education
For the latest on Adobe Press books, go to www.adobepress.com To report errors, please send a note to [email protected]
Copyright © 2011 Chris Georgenes and Justin Putney
Project Editor: Susan Rimerman
Development Editor/Copy Editor: Anne Marie Walker Production Editor: Hilal Sala
Technical Editor: Amy Petersen Composition: David Van Ness Proofreader: Scout Festa Indexer: Karin Arrigoni
Cover design: Peachpit/Charlene Will Cover illustration: Pascal Campion
Notice of Rights
All rights reserved. No part of this book may be reproduced or transmitted in any form by any means, electronic, mechanical, photocopying, recording, or otherwise, without the prior written permission of the publisher. For information on getting permission for reprints and excerpts, contact [email protected].
Notice of Liability
The information in this book is distributed on an “As Is” basis, without warranty. While every precaution has been taken in the preparation of the book, neither the authors nor Peachpit shall have any liability to any person or entity with respect to any loss or damage caused or alleged to be caused directly or indirectly by the instructions contained in this book or by the computer software and hardware products described in it.
Trademarks
Adobe, Flash, and ActionScript are either registered trademarks of Adobe Systems Incorporated in the United States and/or other countries. All other trademarks are the property of their respective owners.
Many of the designations used by manufacturers and sellers to distinguish their products are claimed as trademarks. Where those designations appear in this book, and Peachpit was aware of a trademark claim, the designations appear as requested by the owner of the trademark. All other product names and services identified throughout this book are used in editorial fashion only and for the benefit of such companies with no intention of infringement of the trademark. No such use, or the use of any trade name, is intended to convey endorsement or other affiliation with this book.
ISBN 13: 978-0-321-68369-4 ISBN 10: 0-321-68369-2
9 8 7 6 5 4 3 2 1
iii Introduction v
Chapter 1 Getting Started 1
File Setup Tips 2
Camera Techniques 13
Incorporating Audio 20
Narrative 27
Character Design 29
Storyboarding 31 Animatics 46
Chapter 2 Character Animation 49
Animation Techniques 50
Designing a Character 54
Building a Character in Flash 56
Animating a Character 90
Adding Dialogue 110
Chapter 3 Introduction to ActionScript Classes 129
Reasons to Use ActionScript 130
The Importance of Planning 131
ActionScript Basics 134
The Document Class 141
Object-oriented Programming 150
Attaching Classes to Library Items 151
Events 154 Creating Reusable Classes For Animation 155
Using Classes from Other Sources 224
Chapter 4 Workflow Automation 225
Why Automate? 226
What Is JSFL? 227
Writing Scripts to Control Flash 232
Extending Flash Even Further 257
Packaging Extensions for Distribution 268
More Resources 270
Chapter 5 Sharing Your Animation 273
Showcasing Your Animation on the Web 274
Publishing for Broadcast 325
Publishing to Mobile and Desktop 333
iv
This book would not have been possible if it weren’t for the tireless efforts of my coauthor Justin Putney. His knowledge of designing and animating in Flash mixed with his Action-Script prowess make for a rare combination of Flash talent.
Thanks to my wife Becky who for weeks tolerated my absence from most of our family-related events. She continues to raise the bar of patience year after year, and for that our marriage remains intact and my gratitude unparalleled.
Thanks to Thibault Imbert for his Sausage Kong ActionScript and overall generosity. Thanks to Amy Petersen for her technical edits. Thanks to Pascal Campion for gracing the cover with his strokes of genius. Thanks to Adobe Systems for providing the tools that allow us to create endlessly.
—Chris Georgenes
Several years ago, in my first days of learning Flash, I emailed Chris for assistance with one of his beginner-level tutorials. I was amazed not only that he wrote me back, but also that he was so enthusiastic about helping a total stranger. His willingness to share his skills with the Flash community has remained a source of inspiration, and I’m honored to have coauthored this book with him.
I’m thrilled and honored that Pascal Campion created the beautiful cover. Thanks to John Smick for graciously lending his voice talent.
Thanks to Anne Marie Walker, Susan Rimerman, and the entire team at Peachpit for their flexibility in the course of making this book.
Thanks to my family, especially my mother and sister, as I worked on the book through most of our shared vacation. Thanks to my mom and my grandfather for supporting my drawing and computer interests. Thanks to Carole Petersen for her enthusiastic encour-agement along the way.
Thanks to my wife, Amy Petersen, who not only did a fantastic job as technical editor, but also served as my sounding board for several elements in the book. She was very patient as she and I spent long hours at the computer. She gave me my first copy of Flash as a birth-day present and encouraged me to start animating my drawings. I would not be where I am today without her.
T
his book assumes you have a working knowledge of Flash, meaning that you have probably already drawn with the Brush tool, converted artwork to a symbol, created a tween, personalized your Flash workspace, and published a SWF file. If you are not yet familiar with these tasks, it is recommended that you read a beginning-level Flash book before attempting the exercises in this book.To best understand the approach to animating with Flash in this book, it helps to know a little bit about Flash history.
The Nature of the Beast
In 1996, FutureSplash Animator was released with a basic set of editing tools and a Time-line, which at the time was one of the few ways to create animations for the web. That same year, Macromedia acquired FutureSplash Animator and renamed it Flash. Over the next three releases, a Library was added, the Movie Clip symbol emerged, and basic scripting was built into the package. In Flash 5, Macromedia introduced ActionScript 1.0, XML sup-port, and HTML formatting. Flash 6, known as Flash MX, included video capabilities and user interface components. Version 7, known as MX 2004, introduced ActionScript 2.0, an extensibility language, more video support, and many other features. Flash 8 expanded on the previous features and added additional mobile support. In 2005, Adobe purchased Macromedia. In 2007, Flash Professional CS3 was released as part of the Adobe Creative Suite and included ActionScript 3.0. Flash is now a platform capable of exporting to the web, television and film, mobile devices, and computer desktops (as native applications). Adobe has introduced a developer tool, Flash Builder (formerly Flex Builder), and a designer tool, Flash Catalyst, which also author Flash content (SWF files).
The Flash we use today is not unlike a chimera, the beast from ancient Greek mythology composed of parts from several different animals.
vi
Who Should Read This Book?
This book is for you: the aspiring animator, motion designer, or graphic designer who seeks to exploit the chi-meric nature of Flash to get the most out of your animat-ing experience. If you’re interested in creatanimat-ing animated shorts, video games, mobile games, or websites, this book can introduce you to parts of Flash that you may have previously shied away—or even recoiled—from, or that you simply didn’t know about.
What makes Flash Professional different from the other tools in the Flash platform is that, at its core, it’s still an animation program. The nonanimation components can be used to radically improve your animations, as well as your animating experience. Although activities such as writing ActionScript and extending Flash can feel daunting to nonprogrammers, once you have completed a project or two using these techniques, much of that original hesita-tion subsides.
You may have been working in Flash for a little while, and you might feel like you’ve plateaued at a certain skill or productivity level. If you find yourself at such a juncture, it is our hope that this book will provide some novel tech-niques. The book also includes several “best practices” for working in teams and may provide insight into the roles of your colleagues who may be using Flash in a different way.
You may have noticed that the titles of many professional Flash users (as well as those seen in job postings) contain “hybrid slashes” (e.g., animator/designer, designer/devel-oper), and even more eccentricities (e.g., Flash guru and Flash ninja) are becoming increasingly common. This book will help you wear any combination of hats you find neces-sary while you’re on the job animating.
vii
What’s in This Book?
We’ve compiled a mix tape containing some of Flash’s greatest hits. Here’s a rundown of the playlist:
Chapter 1: Getting Started. This chapter covers some “best practices” for file setup while introducing a few important animation concepts.
Chapter 2: Character Animation. This chapter covers the basics of creating a character and animating using inverse kinematics or “bones” in Flash.
Chapter 3: Introduction to ActionScript Classes. This chap-ter reaches right for the most powerful developer tools. Don’t worry; we’ll provide the safety goggles. If you follow the exercises, you’ll create some beautiful, reusable effects that can be repurposed for as long as you like.
Chapter 4: Workflow Automation. This chapter focuses on speeding up some of the otherwise time-intensive tasks common to most animation projects.
Chapter 5: Sharing Your Animation. In this last chapter you’ll assemble an animated portfolio to showcase your cre-ations made in previous chapters. The chapter also provides additional ways (broadcast, video sharing sites, mobile, and desktop) to share your animation.
Conventions Used in This Book
This book uses Mac OS X for all the figures. Fortunately, there is little difference between using Flash on a Mac and on a Windows PC. All shortcuts are listed with the Mac ver-sion first (e.g., Command+A/Ctrl+A). Because the average Mac mouse has only one button, Ctrl-click refers to access-ing context menus on Mac systems that lack a right-click mouse option.
Code within the book is displayed in a monospacedfont. When new code is added to existing code, it is highlighted in blue as follows:
viii
A return character (➥) in front of a line break is used to designate continuous lines of code.
What’s on the CD?
The CD included with this book contains finished versions of the exercises for each chapter, as well as the assets neces-sary to complete the exercises. The CD also contains an Extensions folder that provides you with free Flash exten-sions to support your animation workflow.
Beyond This Book, Where Can I Go?
If you have the print version of the book, your copy comes equipped with a tracking device. If you’re reading the electronic version, we’re already monitoring your location via satellite.
As a Flashstar, Chris is famously accessible. You can follow him on Twitter, Facebook, and/or via his blog:
. Twitter. @keyframer
. Facebook. http://www.facebook.com/chris.georgenes
. Blog. http://www.keyframer.com
. Portfolio. http://www.mudbubble.com
You can find Justin at one or more of the following locations:
. Twitter. @justinputney
. Blog. http://blog.ajarproductions.com
. Portfolio. http://putney.ajarproductions.com
There is also a special landing page for this book at http://animflashbook.ajarproductions.com.
I
f you’ve picked up this book, you probably already know a thing or two about Flash. Most likely, you also know that Flash is a multifaceted application, and there isn’t a single, linear way in which everyone learns to use Flash. What you learn and what you retain depends greatly on how you use Flash. This book is largely aimed at aspiring animators who want to expand their skill set and learn how to add interactivity. Even within the world of Flash animation, there are numerous techniques and styles that you can employ. This first chapter will serve as a primer and a refresher to ensure that everyone is on the same page (so to speak) before moving forward in the book.In this chapter, we’ll cover some basic animation concepts, production techniques for Flash animation, and how to begin planning an animated project. The techniques covered are applicable to animated stories, animated games, interactive applications, and in some cases, live-action movies.
The goals for this chapter include:
. Learn file setup basics
. Learn production techniques to keep your files organized
. Understand different types of narratives and how they can be created in Flash
. Learn to simulate camera movements in Flash
. Study the basics of storyboards and animatics
. Walk through an existing storyboard for an animated game
The remaining chapters in this book will apply the techniques found in this chapter to create dynamic characters for animated and interactive projects. Before bounding for-ward, let’s look at some best practices for your Flash files.
1
2
File Setup Tips
When audience members are immersed in a fantastic piece of art, a well-executed magic trick, or a mind-bending special effect, they are generally too distracted to think about how that particular experience was created. As an animator, it is of the utmost importance that you under-stand how to create a particularly engrossing experience— the successful execution of which depends heavily on what occurs behind the scenes. In Flash, there are several choices to be made (regarding Library symbols, document settings, ActionScript, and so on) that your audience will never see, but these choices will nevertheless affect your final product.
This section introduces (or reviews depending on your experience-level) some settings, techniques, and templates that are designed to save you time and energy.
Title Safe and Action Safe Guides
Safe areas are used in television to ensure that important information is not lost or distorted at the edge of a viewer’s screen. As such, safe areas can be considered as margins for visual content that is intended for broadcast. There are two types of safe areas: action safe and title safe. The action safe area indicates the outer edges at which important graphics can reside and actions can take place. The title safe area exists within the action safe area and indicates the outer edges at which text (i.e., titles and credits) should be displayed.
3 movie will be maintained and viewable in most cases across
all browsers.
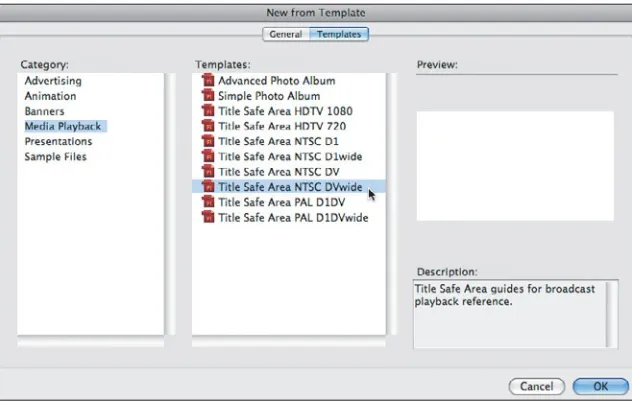
Most video editing software includes the ability to add action and title safe areas. Flash also offers several templates that contain ready-made guides for action and title safe areas. To create a new file with action and title safe guides:
1. Choose File > New.
2. In the New Document dialog box, choose the
Tem-plates heading at the top, and then choose the Media Playback category at the left.
3. Select from any of the template files that include Title
Safe Area in their name, and click OK to create a new document from that template (Figure 1.1).
4
A new document will be generated from the selected tem-plate (Figure 1.2). This document’s Timeline will contain two layers: a “title / action safe” Guide layer and a “con-tent” layer (Figure 1.3).
Figure 1.2 The Flash Stage showing title and action safe guidelines.
Figure 1.3 The Timeline contains the “title / action safe” Guide layer.
A Guide layer in Flash allows you retain content in your FLA document that will not be published in your final SWF (or video). Guide layers are useful when you want to keep certain objects on the Timeline or Stage while working, but you don’t want them included in the final exported file. This is very handy when you have reference material in your movie that you need for production but don’t want to delete the materials entirely from the Timeline when you’re done. The content on Guide layers can be used as guidelines to easily align objects or as a rough sketch to trace over (as you will do for the character created in Chapter 2). A Guide layer can also be used as a motion guide to direct a classic tween (also known as a motion tween
5 To convert a layer to a Guide layer, Ctrl-click/right-click on
the layer name and select Guide (Figure 1.4). In the case of the template file, the title/action safe layer is already a Guide layer, so you don’t have to worry about changing it.
Figure 1.4 The context menu allows you to convert an existing layer to a Guide.
Guided content can be used as reminders to yourself or as notes to other animators that may be working in the same file. The sections that follow will touch upon several other methods available in Flash to organize your content and communicate with colleagues.
Frame Labels
A frame label in Flash is a unique identifier given to a key-frame. Frame labels are great for adding notes to specific points on your Timeline. Additionally, frame labels can be utilized to easily target a specific frame using ActionScript.
To add labels to the Timeline:
1. Create a new layer to house your labels that will remain
separate from your artwork.
2. Name the new layer labels (or “notes” as the case may
be) and lock the layer so that artwork cannot be added to this layer.
6
3. Select frame 1 of the labels layer. In the Name field
within the Properties panel, type in a word or a short description of what takes place at that point in your movie, such as start (Figure 1.5).
Figure 1.5 Type in a frame label using the Properties panel.
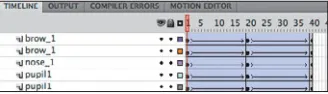
4. Each time you need an additional label, select the
desired frame on the labels layer, add a blank keyframe (F7), and type a new label, description, or note into the Name field in the Properties panel (Figure 1.6).
Figure 1.6 The Timeline with frame labels added.
With the addition of frame labels, you can keep your Timeline organized and make it easier to jump to different sections, especially if you are sharing the file with others. The next two sections describe additional techniques to organize your Timeline.
Timeline Customization
A number of lesser-known ways to customize the look of the Flash Timeline panel are available. For instance, click the menu button in the Timeline panel’s upper-right corner. In the menu, you can choose the size of the frames by selecting Tiny, Small, Normal (default), Medium, Large, Preview, and Preview in Context (Figure 1.7).
To add a frame label that is specifi-cally a note and is not to be used with ActionScript, you can add a double-slash (//) to the beginning of the label text (or select Com-ment from the Type menu). Frame notes will not be published with your movie.
You may need to add frames (F5) to be able to read your frame label on the Timeline.
Navigating to a Frame Label Using ActionScript
You may already be aware that the
gotoAndStop and gotoAndPlay methods allow you to navigate to a specific frame number. For example, the following code will move your playhead to frame 15 and begin playing from there:
gotoAndPlay(15);
However, you can also navigate to a frame label by passing the label name rather than a frame num-ber. The following code will move your playhead to the “start” label and begin playing from that keyframe:
7 Figure 1.7 Customize the look of the Timeline using the menu.
One option within the Timeline menu that can make a big difference is Short (located in the middle of the menu). This setting compresses the height of each layer, which is perfect for Timelines containing several layers. You can also use Small or Tiny to compress the width of the frames displayed in the Timeline (Figure 1.8). This can be effec-tive when your document has a large number of frames and you find yourself scrolling horizontally in large jumps on the Timeline.
Choosing the Preview option provides you with a thumb-nail of the contents of each frame within the Timeline (Figure 1.9).
Figure 1.9 Preview allows you to see thumbnails of any artwork on your frames within the Timeline.
Preview in Context is the same as Preview, but the thumb-nails are shown as they appear on the Stage (rather than scaled to fit the thumbnail size).
Figure 1.8 Setting your frames to Tiny (with Short also selected in this case) allows you to see more frames and layers in your Timeline panel.
8
Layer properties
In addition to altering the Timeline display using the Timeline’s menu, you can alter the display of an individual layer by changing that layer’s display properties. Most notably, you can change the height of a given layer within the Timeline.
To alter the height of a layer:
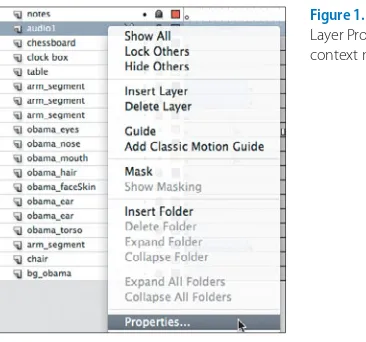
1. Ctrl-click/right-click on a layer name and choose
Prop-erties at the bottom of the context menu (Figure 1.10).
Figure 1.10 Access the Layer Properties from the context menu.
2. In the Layer Properties dialog box, change the Layer
Height to 300% (Figure 1.11) and click OK.
Figure 1.11 The Layer Proper-ties dialog box allows you to adjust the Layer height.
This may sound like a given, but be sure to give descriptive names to your layers! A name such as “Layer 5” doesn’t tell you anything about the purpose of the layer.
9 Taller layers are especially useful when you want to see a
waveform (the visual representation of the audio) more clearly on a layer that contains audio (Figure 1.12). See the “Incorporating Audio” section later in this chapter, as well as the “Lip Syncing” section in Chapter 2, for more infor-mation about working with audio on the Timeline.
Figure 1.12 An audio layer with 300% height allows you to see changes in the audio waveform.
Layer folders
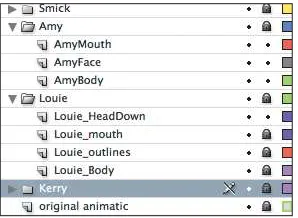
Another great way to keep your Timeline tidy is to organize your layers into folders. You can expand and collapse the folders as needed to hide layers that you are not currently working on (Figure 1.13).
Figure 1.13 Layer folders are used in this file to group elements for differ-ent characters.
To add a new layer folder, click the New Folder button. The New Folder button is right next to the New Layer but-ton in the Timeline (Figure 1.14).
Figure 1.14 The New Folder button allows you to add folders to your Timeline.
10
Scenes
Scenes are great to use for each different setting in your story. Scenes help segment your overall Timeline into smaller pieces, so that you don’t have a single Timeline with thousands of frames that you have to scroll through. You can add as many scenes as you like to your Timeline. One important detail to remember about scenes, espe-cially when exporting for the web, is that upon export, your movie will become one long Timeline. References to scenes are not included in the final output. For example, imagine you have two scenes that are 100 frames each. Upon export, frame 1 in scene 2 will become frame 101. This is important if you are using buttons and ActionScript to target different areas of the Timeline across several scenes. If you target a frame number in a different scene, the script may fail. It is always best practice to create a frame label and have your script point to that instead. We highly recommend using scenes just for Timeline organi-zation and planning your story during the storyboard or animatic phase (storyboards and animatics will be covered later in this chapter). The main benefit of using scenes is to keep the number of layers and frames to a minimum, because each scene has its own Timeline when inside the Flash authoring environment.
To add or remove a scene, use the Scene panel; choose Window > Other Panels > Scene (Figure 1.15).
In the Scene panel, you can click the Add Scene button to add new scenes to your movie. You can rename a scene by double-clicking on the scene name and typing in a new name. You can use the Duplicate Scene button (next to the Add Scene button) to generate an exact copy of an existing scene. If you want to rearrange scenes, simply drag them vertically to change their order. Flash will play them sequentially starting from the top to the bottom.
Now that you have your Timeline organized, let’s look at organizing the assets in the Library.
Figure 1.15 Adding scenes using the Scene panel.
Navigating to a Scene Using ActionScript
You can also use the gotoAndStop and gotoAndPlay methods to navigate to a scene by passing a second argument. For example, the following code will move your playhead to frame 1 of a scene named “opening” and begin playing from that point:
11
Library Organization
The Library serves as the repository for the artwork inside your Flash file. In addition to housing your graphic symbols, the Library stores all imported audio, imported bitmaps (JPEGs, GIFs, PNGs, PSDs), components used, component assets, font symbols, buttons, Movie Clips, and any Library folders (created by you or Flash). The Library can quickly become a very crowded place, which can be frustrating when you’re looking for a specific item.
Every Flash document Library should apply these two basic principles:
. A naming convention
. A folder organization system
There are many different approaches to these two prin-ciples. No single approach is the “correct” approach. The important rule is to be consistent within each file so that your Library is both readable and navigable for you and anyone else who may need to use the file. When you share a file that has an organized Library, you exhibit your expe-rience and professionalism to colleagues, and you’ll likely make their job easier. It’s a simple and subtle way to market yourself as “easy to work with.” Additionally, even if you only ever work solo, you will at some point be reopening your own files, and then you’ll be the one who is relieved to have an organized Library (Figure 1.16).
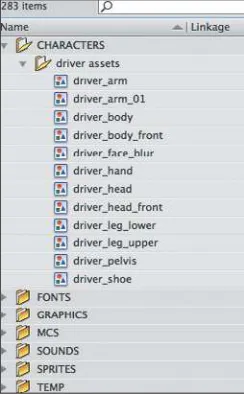
Your folder system should be one in which each Library item has only one place to go. Items can then be located quickly. For example, if you separate your folders by item type (i.e., Movie Clips, Graphics, Sound, Bitmaps, and so on), each item will only be able to go into one folder. When you create a graphic symbol, it will go in the Graph-ics folder. Alternatively, you could organize your items by their purpose in the file. For instance, you could put all the assets that belong to a particular character in a single folder regardless of each item’s type. You could also use subfolders to combine these two methods, item type subfolders within a character folder, or character folders within each type folder—as long as you can find what you want when you need it.
Figure 1.16 A well-organized Library can make life a little easier.
12
Consistency is the main goal when naming your Library items. Add relevant prefixes (e.g., “driver_”) to your Library item names to ensure that they’re listed together within the Library. You can also add suffixes to indicate other information such as symbol type (e.g., “_btn” for a Button symbol).
Now that you have your document, Timeline, layers, and Library in top shape, let’s take a brief moment to discuss ActionScript.
ActionScript
ActionScript is the language that allows you to add inter-activity to Flash. All ActionScript code in this book is ActionScript 3.0 (AS3). ActionScript techniques that utilize separate ActionScript files are covered in detail in Chapter 3. In this section, we want to mention a few best practices when adding ActionScript to your document.
ActionScript can be added to frames on the Timeline. Before adding any ActionScript to your Timeline, you should create a new layer, name the layer actions (or simi-lar), and lock the layer so that artwork cannot be added. This will keep your ActionScript separate and easy to find.
To begin adding actions to a frame, select the frame in the Timeline, and open the Actions panel (Window > Actions) (Figure 1.17).
Figure 1.17 The Actions panel allows you to add ActionScript to your frames.
13 Flash CS5 also has a brand-new Code Snippets panel. This
panel contains common predefined actions (Figure 1.18). To implement one of the code snippets, double-click on it in the Code Snippets panel. Flash will add commented code to your actions layer and open the Actions panel (if it isn’t open already). If you have not yet created an actions layer, Flash will create one for you when you apply the first snippet.
Figure 1.18 The Code Snippets panel facilitates adding commonly used code to your document.
Now every corner of your Flash document should be orga-nized, right? Don’t worry; nobody’s coming to your house to check. Just keep in mind the techniques we’ve covered thus far. They can reduce unnecessary hassle and save you from undue stress.
Now let’s dive into some animation-specific topics!
Camera Techniques
We know what you’re thinking: What camera? Flash doesn’t have a camera per se; however, in Flash the Stage serves as the window through which viewers look into your story. You can create the illusion of a roving viewpoint by moving your scenery on Stage. Different shots, angles, and “camera” movements within a scene can provide unique visual effects.
Two of the most common camera effects are known as
panning and zooming. To set up a scene for panning or zooming, you need to place the entire scene in a single symbol. Once this has been done, panning and zooming is achieved by applying a motion tween to the instance of the symbol containing the actual scene.
Certain snippets will require that you have a Movie Clip instance selected, and some may require that the instance have a name. In these cases, you may get a warning instructing you that Flash will automatically convert your artwork to a symbol and provide it with an instance name.
You can also create and save your own snippets. To learn more about the Code Snippets panel, visit www. adobe.com/devnet/flash/articles/ code_snippets_panel.html.
14
Panning
Panning is the technique of moving or rotating the cam-era horizontally to follow an object in motion or to reveal other objects within the scene. Panning in Flash generally refers to 2D movement.
A perfect example of (3D) panning occurs in the opening scene of the original Star Wars movie. The scene is deep space, and the audience sees the mother ship flying past in all its glory. The ship moving through space is very con-vincing to the eye. If you were to look behind the scenes, however, you’d find that the ship never actually moves. On the set where this scene was filmed, the ship was a stationary model. To create the illusion of the ship flying, the camera was moved in reverse, past the immobile ship. When the footage is played back, the ship appears to move forward through space past the camera.
You use the same basic principle to create a panning effect in Flash. To pan across a scene, you need to follow two guidelines. Make sure that
. The scene is wider than the stage, so when you shift the “camera,” there is still something to see.
. The entire scene is inside the symbol that will be Motion Tweened.
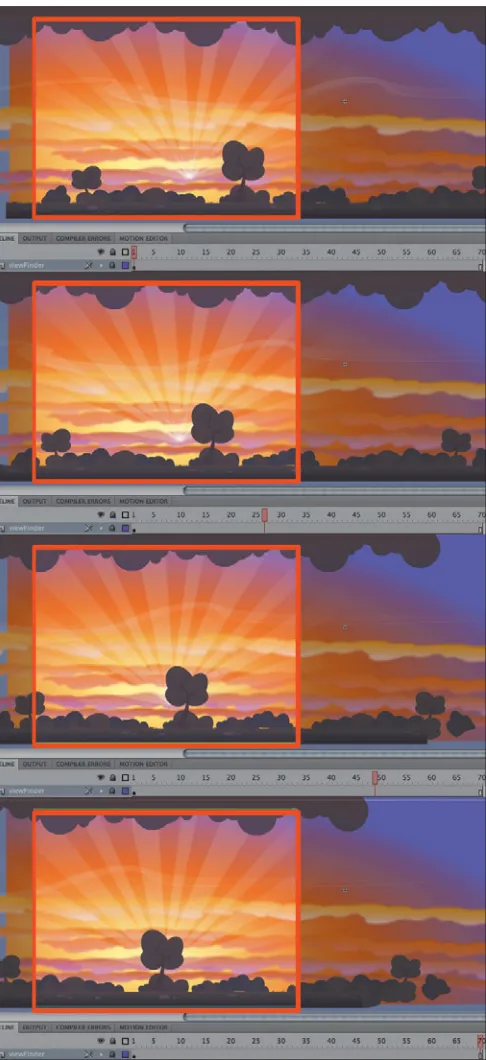
Panning your scene is as simple as dragging an instance of your scene onto the Stage and tweening horizontally from one side to the other (Figure 1.19).
15 In Figure 1.19 a red outline has been added to indicate
the viewable Stage area. The background was intentionally drawn much wider for the purpose of creating a panning effect and converted to a symbol. The steps that follow describe how to create a pan effect on a background that has been encapsulated in a symbol.
1. Insert frames (F5) in the Timeline and position the
frame indicator (aka playhead) at the last frame (Figure 1.20).
Figure 1.20 The Timeline panel with frames inserted and ready for the Motion Tween to be applied.
2. Ctrl-click/right-click over the symbol and select Create
Motion Tween (Figure 1.21).
Figure 1.21 Applying the Motion Tween to the symbol instance.
3. Position the symbol containing the background to
16
There may be occasions when you realize that you want to add a pan to artwork that has already been drawn and ani-mated on the main Timeline. The following steps describe how to convert an existing scene to a symbol.
1. Select all frames and layers by clicking and dragging
across the Timeline (highlighting them in black).
2. Ctrl-click/right-click over the highlighted frames and
select Copy Frames.
3. Create a new symbol in the Library,
Ctrl-click/right-click over frame 1 of the new symbol’s Timeline, and select Paste Frames.
4. Return to the main Timeline to delete the original
animation.
5. Create a new layer, drag your scene onto the Stage from
the Library, and reposition it accordingly.
Now you can move the symbol containing your scene around the Stage by using a Motion Tween (Figure 1.22).
Figure 1.22 The panning effect completed with the symbol repositioned to the opposite side of the Stage.
Upon playback, the illusion to the viewer is the camera being moved; when in actuality, it is the scene that is moving.
17
Parallax scrolling
As a general rule, objects that are closer to you appear to move faster than objects in the distance (e.g., clouds or a mountain on the horizon). To add depth to your anima-tions, you can simulate this natural phenomenon using a technique known as parallax scrolling to move your fore-ground objects greater distances than your backfore-ground objects over an equal amount of time (i.e., number of frames).
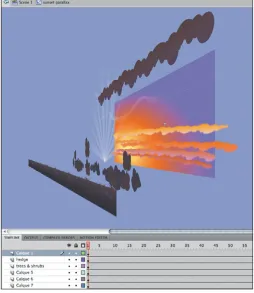
Parallax scrolling grew out of the multiplane camera invented at Disney in the 1940s. The multiplane camera involved layering different pieces of artwork in front of the camera. As the camera moved, the layers of artwork moved differently based on their relative distance from the camera (Figure 1.23).
18
To simulate parallax scrolling within an existing (multi-layered) scene in Flash:
1. Make sure each piece of artwork in your scene has
been converted to a symbol and each symbol has its own layer.
2. Add a Motion Tween to each layer by Ctrl-clicking/
right-clicking on each symbol instance that will move, and choose Create Motion Tween.
3. Adjust each tween to the desired duration by
drag-ging the right edge of the final keyframe in the tween (Figure 1.24).
4. On the last keyframe of each tween, move each object
according to the desired camera movement. Adjust the foreground objects more than the background objects. Suppose, for example, you have three layers (e.g., background, character, and a foreground in front of the character) and you’d like to create a parallax pan effect. Sample last-frame adjustments might include moving the lowest layer horizontally by 100 pixels, the middle layer by 200 pixels, and the top layer by 400 pixels (Figure 1.25).
You can also blur the more rapidly moving objects to add extra realism to your parallax effect (see Chapter 3 for a motion blur effect using ActionScript). These same paral-lax techniques can be applied to zoom effects as well.
Zooming
Zooming is a method of decreasing the apparent view angle of an image so that the image appears closer to the viewer. Zooming effects in Flash are accomplished in a similar manner to panning except that the symbol is scaled instead of repositioned (or rotated).
1. To zoom into a scene, start with a symbol (containing
your scene) at its default size so that the scenery fills the entire Stage area.
2. Insert any number of frames in the Timeline,
Ctrl-click/right-click over the symbol, and select Create Motion Tween.
Figure 1.24 You can adjust the dura-tion of a Modura-tion Tween by clicking and dragging.
You can easily create a motion blur on the Timeline using the
19 Figure 1.25 An example of
20
3. With the playhead at the last frame, use the Free
form tool or the Transform panel (Window > Trans-form) to make the symbol larger.
4. Play back your animation to see the illusion of the
“camera” zooming into the scene (Figure 1.26).
Figure 1.26 The zooming effect is achieved in the same manner as panning except that the symbol is scaled as opposed to repositioned.
Camera effects go a long way toward pulling your audience into your animation. You can also engage your audience by including music, sound effects, and/or dialogue. In the next section you’ll read about how to make your movie a “talkie.”
Incorporating Audio
Flash enables you to add sound to your movies with ease. Flash can import WAV, AIFF, and MP3 files. Generally, WAV files are preferred, because they are usually of higher qual-ity and allow you to control the amount of compression (for online animations) for each audio file.
21 An audio track requires as much planning as any other
aspect in animation. You should consider your production needs when processing your audio. For instance, if you have dialogue that spans multiple scenes, you’ll want to cut your audio accordingly before importing it into Flash. Generally, smaller audio clips are more flexible because they can be played back to back on the Timeline, whereas one long clip cannot be easily separated across multiple Timelines in Flash.
To apply an audio clip to your Timeline:
1. Choose File > Import > Import to Library. Select the
desired audio file. Once imported, your audio file becomes a Library item.
2. Create a new dedicated layer for your audio. Give the
layer a clear name, such as audio (or be more specific when possible, e.g., “dialogue” or “music”). As a matter of best practice, audio should always be on a separate layer.
3. Lock your audio layer to avoid accidentally adding
art-work to this layer.
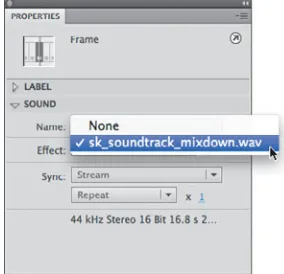
4. Select the first keyframe in your audio layer, and then
in the Properties panel, under Sound, select your imported sound from the Name menu (Figure 1.27).
5. Insert new frames (F5) to extend your Timeline so that
it is long enough to accommodate your audio (use the waveform displayed on the Timeline as your guide).
6. Add new keyframes to your audio layer as necessary,
and repeat the previous step to start an audio clip at a different location (Figure 1.28).
Figure 1.28 Audio clips spanning multiple keyframes.
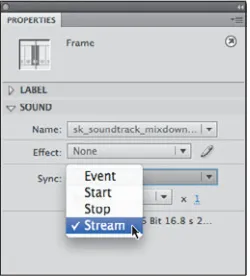
If you move the playhead back and forth, you won’t hear anything at this point. This is because the default behav-ior is Event. The next section shows you how to adjust the sound properties.
22
Sound Properties
In the Properties panel, when your sound is selected in the Timeline, you can choose the Sync menu to select from four behavior options: Event, Start, Stop, and Stream.
. Event. Synchronizes the sound to the occurrence of an event, such as when a user clicks a button. An event sound plays when its starting keyframe first appears (and plays in its entirety, independently of the Time-line, even if the SWF file stops playing). If an event sound is playing and the sound is instantiated again (for example, by the user clicking the button again), the first instance of the sound continues to play and another instance begins to play simultaneously.
. Start. The same as Event except that if the sound is already playing, no new instance of the sound plays.
. Stop. Silences the specified sound.
. Stream. Synchronizes the sound with the Timeline. Flash forces animation to keep pace with stream sounds. If Flash can’t draw animation frames quickly enough, it skips frames. Unlike event sounds, stream sounds stop if the SWF file stops playing. Also, a stream sound can never play longer than the length of the frames it occupies.
As an animator, you’ll want to use the Stream behavior almost exclusively so that you can time your music, effects, and dialogue with your visual elements. The other three behaviors are useful in games and when you need to play audio using ActionScript. To update your existing audio on the Timeline so that it will sync with your artwork:
1. Select the first keyframe (or whichever keyframe has an
associated sound item) in your audio layer.
2. Switch the Sync behavior to Stream in the Properties
panel (Figure 1.29).
3. Move the playhead around again. You should now hear
the sound, assuming your speakers are on and Mute Sounds (Control > Mute Sounds) is deselected. Figure 1.29 Set the sound behavior
23 You can now see (and hear) how the Stream behavior
enables you to sync your audio with your animation. You’ll put the Stream behavior to good use in Chapter 2 when you sync a character’s mouth to an audio clip.
Although Flash doesn’t allow you to manipulate audio to any great extent, you can make some adjustments to how the sound plays by editing the sound envelope.
Editing the Sound Envelope
A sound envelope effectively clips the volume of an audio file based on the shape of the envelope and the shape of the audio waveform. A waveform is a visual representation of the amplitude (basically volume) of an audio clip over time. Flash has a number of presets to quickly adjust the envelope of an audio clip, such as Fade in or Fade out, Fade to left or Fade to right, and so on. When you have a keyframe with audio selected, you can apply one of these presets via the Effect menu under the Sound heading within the Properties panel (Figure 1.30).
To edit the audio envelope more precisely, click the Edit sound envelope button (the pencil icon) next to the Effect menu (Figure 1.31). With the Edit Envelope window open, you can edit the envelope by hand (Figure 1.32). The two waveforms represent the left and right channels (for stereo audio).
Figure 1.32 The Edit Envelope dialog box lets you make custom edits to the audio’s envelope.
Figure 1.30 You can apply an Effect preset from the Properties panel.
24
To alter the sound envelope, drag the envelope handles to change levels at different points in the sound (Figure 1.33). To create additional envelope handles (up to eight total), click the envelope lines. To remove an envelope handle, drag it out of the window. Note how adding or removing a handle applies to both channels.
Figure 1.33 Drag the handles to customize the envelope.
Effects such as fading from one channel to the other chan-nel (essentially, one speaker to the other) can add real-ism to an action that takes place on one side of the Stage and ends on the opposite side. For example, a character running from offstage onto the Stage, across the Stage, and eventually off the Stage on the opposite side would be greatly enhanced by editing the sound effect files of his footsteps from one channel to the other.
Now that you can import and customize your sounds, let’s briefly touch on how to apply sounds to animated projects that contain multiple scenes.
Using Sounds Across Multiple Scenes
25 problem if your audio is one continuous soundtrack, like
music (as we have discussed). You can’t split an audio file in Flash between two scenes and expect an audibly seam-less result. If the audio is a continuous sound and you add it to the Timeline in Scene 1 and then again in Scene 2, there will most likely be a noticeable glitch in the audio during playback. Within the Flash environment, there’s really no way around this issue. Thus, if you have an audio track similar to a piece of music and there are no obvious breaks or moments of complete silence, we recommend keeping your movie as a single scene.
Conversely, you’ll want to set up your Flash file so that it’s easy to edit. Try to avoid having a 30,000-frame Timeline during the planning of your project, before even opening Flash. In some projects, a long Timeline will be unavoid-able. Use the techniques from the “File Setup Tips” section earlier in this chapter to keep your Timeline as manage-able as possible.
If you have several audio files containing effects and spoken lines from actors, it’s much easier to implement the separate files across multiple scenes. Remember that scenes are only a function of the Flash authoring tool. Once you export your movie, your animation becomes one long Timeline.
One last topic, sound settings, needs to be addressed before we wrap up this section on incorporating audio into your animation.
Sound Settings
26
To alter your sound settings:
1. Choose File > Publish Settings and select the Flash
heading (Figure 1.34).
Figure 1.34 The Publish Settings dialog box allows you to access the sound export settings.
2. Click the Set button to the right of the Audio Stream
label to open the Sound Settings for all audio with the Stream behavior (Figure 1.35).
Figure 1.35 The Sound Settings allow you to change the quality of the audio in your exported SWF.
In the Sound Settings dialog box, you can change the Compression, Bit rate, and Quality. Bit rate is generally the most effective setting to change. For publishing to the web, MP3 generally has the best compression-to-quality ratio.
27 3. Once you’ve adjusted the Sound Settings to your liking,
click OK in the Sound Settings dialog box, and then click OK to save your Publish Settings.
4. Test your movie (Command+Return/Ctrl+Enter) and
listen for the difference. Return to the Sound Settings as necessary to adjust the audio quality to your satisfac-tion. The new SWF History heading in the Properties panel keeps a log of your published SWF file size and will give you an indication of how your Sound Settings are affecting the file size of your output.
Now that we’ve covered the technical aspects of animating in Flash, let’s consider the creative phases of animation.
Narrative
The sequences of events that constitute your story are considered its narrative. The word “narrative” is often synonymous with story, but is more specifically used when referring to the structure of a story. Narrative defines how your story is told.
Before delving into the specifics of a project, you should have a rough idea of the story’s narrative. This will help you develop a broad understanding of where your anima-tion is going before you begin investing your time in imple-mentation. Here are some questions to consider when assembling a narrative:
. Is the story driven by a character or a situation?
. What characters are present in the story?
. How do the characters’ actions affect one another?
. From whose point of view is the story told?
. In what sequence are the story elements presented?
. What is the setting (time and place) of the story?
. What conflicts occur in the story?
. How are the conflicts resolved?
28
broad strokes what makes Star Wars a compelling story. Answering these questions will also make it easier for you to explain your story to others, which is especially helpful if you are seeking funding or need additional help produc-ing your animation. In addition, answerproduc-ing these questions can help you decide what type of narrative to employ.
Types of Narrative
There are a few basic types of narratives. You can use a single narrative type, or you can exploit multiple narra-tive types in a single story. There are three broad types of narrative to consider: linear, nonlinear, and branching. These narrative types can be used on their own or combined with each other in various ways.
Linear
A linear narrative occurs in a straight, cause-and-effect, chronological sequence. A sample linear narrative might proceed as follows:
. We, the audience, meet Boy (what a nice, troubled young man)
. We meet Girl (hey, she should meet this Boy we know)
. Boy meets Girl (and we realize they’d be perfect together)
. Conflict ensues and it appears that Boy and Girl cannot be together (and the suspense is unbearable…)
. Conflict is resolved, and Boy and Girl end up together in the end (phew!)
This may be a plain-vanilla narrative, but the truth is that many good stories utilize such a linear narrative. As with any other art form, execution is key. Plenty of fantastic events occur in the original Wizard of Oz movie, but it’s essentially a linear travel narrative until the very end (when we learn that most of the story may have all just been a dream).
Nonlinear
29 narrative device. Many nonlinear narratives are meant to
mimic human memory. Some of these narratives can be reconstructed (chronologically) in your head once you’ve seen the whole story (e.g., Memento), whereas others can-not. Some film theorists argue that these movies, which can be reconstructed into chronological order after the fact, are better described as out of sequence. Other narratives are designed precisely so that a chronological sequence cannot be reconstructed (e.g., David Lynch’s Lost Highway). As you can imagine, there are several variations within the general category of nonlinear narrative.
Branching
Interactive storytelling is especially well suited for a partic-ular subtype of nonlinear narrative: branching. A branch-ing narrative allows the path of the story to change as the story is being told (or shown), as in the context of a game. Shifts in the narrative can be based on user interaction, they can be based on environmental factors (e.g., time of day or location), or they can be entirely random.
With Flash’s capabilities, all narrative options are on the table. It’s up to you to determine what kind of structure best serves your story. Depending on the specific project and how you work, you may develop your narrative first and then begin sketching your characters, or you may sketch a character that sparks an idea for a narrative.
Character Design
Your character’s motives and mannerisms contribute greatly to your story. For this reason, it’s important to have a good understanding of your character before you begin animating. Character design is the process of defining your character’s physical and behavioral traits.
30
up any relevant ideas while constructing your narrative. If you want to take your character description a bit further, you can write a story bible. Story bibles are reference documents written for comics and television shows that include detailed information on character, setting, and other story elements. Story bibles are especially helpful for maintaining consis-tency on projects that have multiple authors or writers.
In addition to creating a written description of your char-acter, you’ll want to design a model sheet.
Model Sheets
A model sheet depicts a character in several different poses, often from different angles. These poses help to determine how a character will be rendered from various vantage points. Additionally, these poses help to establish the character’s onscreen personality.
Model sheets serve two distinct purposes: exploration and communication. If it’s early in a project and you’re trying to “figure out” your character, your mode is one of explo-ration. If you’re ready to begin production and you’re working with a team of animators that need to render a character consistently in every scene, the model sheet serves as a means of communication between animators. A model sheet can be rendered as rough sketches (Figure 1.36) or as polished, full-color drawings (Figure 1.37), depending on the specific project (and its current stage).
Figure 1.36 A rough-sketch model sheet.
Figure 1.37 A polished model sheet.
31 Once you’ve designed your characters, you can start
rendering them into scenes within your narrative. Usually, rough sketches are drawn to determine shot composition and timing. The process of drawing a rough version of your story is known as storyboarding.
Storyboarding
A storyboard is a sequence of drawings, as in a comic book or a graphic novel, that serves as a blueprint for your story. The act of “storyboarding” is the process of drawing (and/or laying out) each scene of your movie based on a script or a soundtrack. Think of the storyboard as a visual plan for your project or as a script with sketches instead of words.
When developing a game, storyboards are useful for map-ping out the overall game play, action sequences, and scene breaks. If you’re creating a game or other interactive experience, you may be employing a branching narrative (see the “Types of Narrative” section earlier). If this is the case, your storyboard may require a more complex layout that includes arrows to describe branching outcomes (simi-lar to the look of a flowchart).
A successful animated project is the result of good prepara-tion. Whether your project is a motion picture film, video, animated cartoon, or interactive game, a storyboard is often a necessary part of the production process. If you’re working on your own, you might be able to keep every-thing in your head, but if you’re working in a team, you’ll want to use a storyboard to communicate your ideas. A sto-ryboard ensures that all animators are on the same page. The storyboard also gives you a feel for how your movie will look and enables you to decide on changes before doing the full-fledged animation.
Now that you know what a storyboard entails, you might be curious to see what one looks like.
In Chapter 2 you’ll see how the rubber meets the road by translat-ing a rough sketch into a polished, animated character.
Like many other techniques in animation, storyboards were first created at Disney in the 1930s. Since then, the elements of story-boarding have remained essentially unchanged.
Many live-action movies are also storyboarded to help plan shots.
32
Storyboard Format
Storyboards, like characters, come in all shapes and sizes. All storyboards contain an indication of framing. The frame (in film, not in Flash) denotes the edges of the screen that will display the image. All actions take place within the frame. Each frame of the storyboard translates to a frame in the finished animation. Usually, only frames with important actions are included in the storyboard (i.e., keyframes).
Storyboards can be rough hand-drawn images because their purpose is to save time, but the drawings should be clear enough to make the action evident to someone else. Each frame in the storyboard should include just enough detail to convey the setting, characters, and camera shots (collectively known as blocking).
Don’t worry if your drawing skills are lacking, you do not have to be an artist to draw a storyboard. We’ve seen plenty of storyboards from nonillustrators that convey the story or gameplay just fine. Some of the best storyboards have even been drawn on restaurant napkins. It doesn’t really matter how imperfect your storyboard is, as long as it communi-cates the story visually (Figure 1.38).
33 Your storyboard page can contain 1, 2, 3, 4, 6, or 8 frames
(or panels) of action. If you try to fit more than eight on a page, you’ll end up with some pretty tiny drawings. You can download preformatted storyboard templates or create your own by drawing panels (on paper or in Flash). If you use Flash to create your storyboard and include one action per keyframe, the Stage will serve as your frame border.
Beyond including a frame border on your storyboard pages, you can also choose to include space for informa-tion about the producinforma-tion and/or company, a scene number, dialogue boxes for each frame, descriptions of the actions on each frame, and any other information that you deem relevant to the storyboard (Figure 1.39).
Figure 1.39 This simple storyboard format contains three panels and a space for action, notes, and/or dialogue.
The tools that you use to create your storyboard may affect the particular format that you choose for your storyboard.
Digital tools
Traditionally, storyboards are drawn with pencil on paper, and then each image is scanned and saved as a file. You may prefer to use this method, or you may prefer to remain completely paperless by drawing entirely on the computer. Drawing directly into Flash is certainly a fast and easy way to start your Flash animation project.
There are several digital alternatives to drawing in Flash: Adobe Photoshop, Adobe Illustrator, and Autodesk SketchBook Pro are our favorites, but you can use what-ever you are most comfortable with. There is also a pro-gram from Toon Boom (http://toonboom.com) called
If you build your storyboard in Flash, don’t forget that you can use frame labels to include notes.
34
Storyboard Pro that is designed specifically for the creation of storyboards and visual storytelling (Figure 1.40).
Figure 1.40 Toon Boom’s Storyboard Pro software.
If you will be drawing your storyboard in Flash or any other graphics program, we recommend setting the width and height of the Stage to the same dimensions as your final Flash file. You can locate the dimensions of your Flash file in the Document Settings dialog box (Modify > Document) (Figure 1.41).
Figure 1.41 The Document Settings dialog box; here you can retrieve (as well as set) the width, height, and frame rate of your project.
Now that you’re familiar with potential storyboard formats, let’s address the less tangible elements that constitute a good storyboard.
Storyboard Composition
One of the most important functions of the storyboard is to establish your framing (i.e., shot composition). This is essentially how the camera (and thus, the audience) will Storyboarding on Tablet Devices
With new technology comes new ways of creat-ing content. The iPad from Apple (http://www. apple.com/ipad) can be turned into a portable drawing tablet if you install the Brushes applica-tion (http://brushesapp.com), or you can use Autodesk’s SketchBook Pro for mobile devices (http://autodesk.com/sketchbookmobile). These applications are designed so that your finger is the actual drawing tool. But for more precision, you can purchase a Pogo stylus from Ten One Design (http://tenonedesign.com).
35 see your characters and the scenes they inhabit. Several
elements combine to form successfully drawn storyboard images. The following subsections detail the primary elements that should be considered when drawing your storyboard frames.
Setting
Setting determines where the action takes place: inside a building or outside, in a city, a jungle, or perhaps a desert. The setting may be very minimal, such as a simple back-ground texture or color that doesn’t play a large role in the story other than to help provide a specific look and feel to the project. On the other hand, the setting may play an integral part of your project, provided certain areas of the background interact with the character.
Plot
Plot describes what happens to the character(s) in the story or the game. In a game, a plot can be as simple as getting the character from point A to point B, or something more complicated such as accumulating points by collecting vari-ous types of hidden objects on different levels. A character may have to traverse a particular terrain and overcome various obstacles before reaching the finish line. Obstacles can be physical obstructions, difficult path choices, trivia questions, or just other people who stand in the character’s way. Conflicts develop as the protagonist attempts to battle the obstacles in a particular path. The conflict might consist of a sequence of events linked by cause and effect (in a linear narrative). The decisive event is the climax—a final conflict that determines whether or not the protagonist will reach the goal. In the event you are planning an interactive game, the climax could be as simple as time running out, or the user reaching the final and most difficult level.
Action
36
Camera shots
Storyboards are quite useful for deciding on camera shots, as well as on any pans and zooms. Typically, Flash animated shorts and games do not have as many different camera shots as a traditionally animated cartoon, but a new camera angle here and there can be refreshing and can help con-vey emotions within a scene. There are several traditional camera shots that describe the camera’s distance from the character. In a storyboard, these roughly translate to how much space a character consumes in a particular frame.
. Wide shot (or long shot). This is a shot that shows your entire scene or stage. It can also be called an establish-ing shot. You will usually see this as the very first shot of a film because it does a good job of setting the scene for your movie. When used in other parts of a story, the wide shot can be used to emphasize a character’s isolation (Figure 1.42).
. Medium shot. This type of shot is “closer” to the subject than a wide shot. If the subject is a character, the medium shot would be from about the waist up. The medium shot can also serve as a transition from a wide shot to a close-up. If you don’t transition using a medium shot, going from wide to close-up may be disorienting for the viewer (Figure 1.43).
. Close-up shot. This shot is very close to the subject and tends to show your character from the shoulders up. The Stage could potentially be filled with your charac-ter’s head. It’s a very useful shot for showing details of expression and emotion (Figure 1.44).
. Extreme close-up shot. Use the extreme close-up spar-ingly, especially in any animation. Since animation contains less detail than live-action photography, an animated character’s face may be slightly less engaging than that of a real person (Figure 1.45).
. Two-shot. This is a shot in which the frame encom-passes a view of two people (Figure 1.46).
. Over-the-shoulder shot. This is a great shot to use when two or more characters are interacting with each other. It gives the viewer a solid visual understanding of who Figure 1.45 An extreme close-up shot.
Figure 1.42 A wide shot.
Figure 1.43 A medium shot.
37 is where in the scene. The over-the-shoulder shot is an
effective way to transition from one shot to the next (Figure 1.47).
In addition to considering the camera’s relative distance from your characters, you should also consider the cam-era’s angle when viewing your characters.
Perspective angle
The camera’s perspective (or point of view) determines the angles at which objects are displayed within the frame and creates spatial depths for the scene. The simplest way to imply a camera angle is to add angle lines in the back-ground. Angled lines can add depth to an otherwise flat scene (think railroad tracks trailing off into the distance). Angled lines also serve to draw a viewer’s eye to specific points in your composition.
Different angles can alter the interpretation of a given shot or serve to reinforce a mood that is being conveyed with other elements (e.g., music, dialogue, and actions). The angle you choose can convey a certain relationship between two characters or between the character and the audience. One angle can make your character look power-ful; yet another can make your character appear meek and helpless (Figure 1.48).
Figure 1.48 Note how the four different angles depicted invoke four different emotions.
Figure 1.46 A two-shot.
38
It can be difficult to render characters at an angle if you’re used to drawing them straight on. Rendering characters from various angles can also generate more work for the final animation because it entails creating more new draw-ings instead of reusing symbols. Even when rendering a character essentially flat, consider angling your back-ground to add depth to your scene (Figure 1.49).
Figure 1.49 Note how the background texture and angled lines lend depth in this frame.
For more tips on perspective and storyboarding in general, visit http://animationmeat.com/notes/televisionanimation/ televisionanimation.html. This page contains notes from Brad Bird (director of Iron Giant, The Incredibles, and Ratatouille) on composition, notes on “Storyboarding The Simpsons Way” by Christian Roman (story artist on The Simpsons and Toy Story 3), as well as layout notes from Hanna-Barbera (producers of
Scooby-Doo, The Flintstones, and several others) and Spumco (producers of Ren & Stimpy).
39
Sausage Kong Storyboard Example
Sausage Kong is a game developed by Thibault Imbert (Adobe Systems Flash Player Product Manager) and Chris. This game started as a simple way to showcase the peer-to-peer capabilities of Flash Player 10.1 by controlling a single character running across the screen on Android mobile devices. What started off as a very simple example quickly grew into a fully interactive Flash game that includes vari-ous characters, animation, and a scoring system. Sausage Kong is the result of several fun ideas tossed back and forth by Thibault and Chris via email. At the time, Thibault was living in Paris, France, and Chris lives in Boston, Massachu-setts, so it was helpful to construct a storyboard to ensure that both parties were on the same page when it came to determining how the game would work and what assets were necessary to create and program the game. This is a situation in which a rough storyboard came in handy.
The Concept
Within Sausage Kong, the user presses the arrow keys on the keyboard to control the direction of a character (left and right). To start the game, the user presses the space-bar, and a boy jumps in the air. Pigs with parachutes begin floating down from the sky, and the boy has to run back and forth to “catch” them. Once caught, the boy must run toward a grinder machine, and the user presses the space-bar to make the boy throw the pig into the grinder. The grinder cranks out sausages made from the pig. The more sausages made within a predetermined amount of time, the more points earned.
40
Storyboard Panels
The first frame of the storyboard shows what the preloader screen will look like. Since the pigs are parachuting from a high elevation, the background environment is an exterior shot with grass, trees, and sky. The preloader includes a percentage load bar as well as a fun animation of sausages dancing in a circle (Figure 1.50).
Figure 1.50 Panel 1 of the Sausage Kong storyboard shows the preloader screen.
The second frame of the storyboard roughly shows how the introductory splash page will look. The preloader dis-appears, and the game logo drops down from outside the viewable area, as indicated by the red arrow. When creating a storyboard in Flash, it can be useful to dedicate an addi-tional layer just for drawing arrows and notes to specify how various elements will move (Figure 1.51).
41 Figure 1.51 Panel 2 of the Sausage Kong storyboard shows the splash screen.
If the user selects New Game (with the arrow keys), the logo will disappear and the game begins. The third draw-ing in the storyboard shows the character enterdraw-ing from a hole that appears in the ground. The boy jumps up from the hole, the hole disappears, and the boy lands safely on the ground (Figure 1.52).
42
Immediately, the game starts as the pigs begin falling, and the timer (in the upper-left corner) appears and starts counting from 0 to 60 seconds (Figure 1.53).
Figure 1.53 Panel 4 of the Sausage Kong storyboard shows the game play.
The fifth frame simply shows how the boy will run toward the grinder and throw the pig into it; the resulting sausages made from the pig are also shown (Figure 1.54).
43 When time has elapsed, the game will end and the entire
screen will pan to the left (Figure 1.55).
Figure 1.55 Panel 6 of the Sausage Kong storyboard shows the screen panning to the left.
In this screen, a meat truck will drive in from the right in reverse (Figure 1.56).