iv
Contents at a Glance
Contents ... vi
About the Authors ... xxi
About the Technical Reviewers ... xxii
Acknowledgments ... xxiv
Preface ... xxv
■
Chapter 1: Introducing the Android Computing Platform ... 1
■
Chapter 2: Setting Up Your Development Environment ... 23
■
Chapter 3: Understanding Android Resources ... 51
■
Chapter 4: Understanding Content Providers ... 79
■
Chapter 5: Understanding Intents ... 113
■
Chapter 6: Building User Interfaces and Using Controls ... 135
■
Chapter 7: Working with Menus ... 203
■
Chapter 8: Fragments for Tablets and More ... 229
■
Chapter 9: Working with Dialogs ... 261
■
Chapter 10: Exploring ActionBar ... 281
■
Chapter 11: Advanced Debugging and Analysis ... 315
■
Chapter 12: Responding to Configuration Changes ... 331
■
Chapter 13: Working with Preferences and Saving State ... 339
v
■
Chapter 15: Building and Consuming Services ... 383
■
Chapter 16: Exploring Packages ... 441
■
Chapter 17: Exploring Handlers ... 469
■
Chapter 18: Exploring the AsyncTask ... 489
■
Chapter 19: Broadcast Receivers and Long-Running Services ... 503
■
Chapter 20: Exploring the Alarm Manager ... 539
■
Chapter 21: Exploring 2D Animation ... 555
■
Chapter 22: Exploring Maps and Location-based Services ... 599
■
Chapter 23: Using the Telephony APIs ... 641
■
Chapter 24: Understanding the Media Frameworks ... 659
■
Chapter 25: Home Screen Widgets ... 709
■
Chapter 26: Exploring List Widgets ... 745
■
Chapter 27: Touch Screens ... 775
■
Chapter 28: Implementing Drag and Drop ... 813
■
Chapter 29: Using Sensors ... 833
■
Chapter 30: Exploring the Contacts API ... 873
■
Chapter 31: Deploying Your Application: Android Market and Beyond ... 927
1
Chapter
Introducing the Android
Computing Platform
Computing is more accessible than ever before. Handheld devices have transformed into computing platforms. Be it a phone or a tablet, the mobile device is now so capable of general-purpose computing that it’s becoming the real personal computer (PC). Every traditional PC manufacturer is producing devices of various form factors based on the Android OS. The battles between operating systems, computing platforms,
programming languages, and development frameworks are being shifted and reapplied to mobile devices.
We are also seeing a surge in mobile programming as more and more IT applications start to offer mobile counterparts. In this book, we’ll show you how to take advantage of your Java skills to write programs for devices that run on Google’s Android platform (http://developer.android.com/index.html), an open source platform for mobile and tablet development.
NOTE: We are excited about Android because it is an advanced Java-based platform that introduces a number of new paradigms in framework design (even with the limitations of a mobile platform).
In this chapter, we’ll provide an overview of Android and its SDK, give a brief overview of key packages, introduce what we are going to cover in each chapter, show you how to take advantage of Android source code, and highlight the benefits of programming for the Android platform.
A New Platform for a New Personal Computer
The Android platform embraces the idea of general-purpose computing for handheld devices. It is a comprehensive platform that features a Linux-based operating system stack for managing devices, memory, and processes. Android’s Java libraries cover
telephony, video, speech, graphics, connectivity, UI programming, and a number of other aspects of the device.
NOTE: Although built for mobile- and tablet-based devices, the Android platform exhibits the characteristics of a full-featured desktop framework. Google makes this framework available to Java programmers through a Software Development Kit (SDK) called the Android SDK. When you are working with the Android SDK, you rarely feel that you are writing to a mobile device because you have access to most of the class libraries that you use on a desktop or a server—including a relational database.
The Android SDK supports most of the Java Platform, Standard Edition (Java SE), except for the Abstract Window Toolkit (AWT) and Swing. In place of AWT and Swing, Android SDK has its own extensive modern UI framework. Because you’re programming your applications in Java, you could expect that you need a Java Virtual Machine (JVM) that is responsible for interpreting the runtime Java byte code. A JVM typically provides the necessary optimization to help Java reach performance levels comparable to compiled languages such as C and C++. Android offers its own optimized JVM to run the compiled Java class files in order to counter the handheld device limitations such as memory, processor speed, and power. This virtual machine is called the Dalvik VM, which we’ll explore in a later section, “Delving into the Dalvik VM.”
NOTE: The familiarity and simplicity of the Java programming language, coupled with Android’s extensive class library, makes Android a compelling platform to write programs for.
Figure 1–1. High-level view of the Android software stack
Early History of Android
Mobile phones use a variety of operating systems, such as Symbian OS, Microsoft’s Windows Phone OS, Mobile Linux, iPhone OS (based on Mac OS X), Moblin (from Intel), and many other proprietary OSs. So far, no single OS has become the de facto
standard. The available APIs and environments for developing mobile applications are too restrictive and seem to fall behind when compared to desktop frameworks. In contrast, the Android platform promised openness, affordability, open source code, and, more important, a high-end, all-in-one-place, consistent development framework.
Figure 1–2. Android early timeline
The Android SDK was first issued as an “early look” release in November 2007. In September 2008, T-Mobile announced the availability of T-Mobile G1, the first
smartphone based on the Android platform. Since then we have seen the SDKs 2.0, 3.0, and now 4.0, roughly one every year. The devices that run Android started out as a trickle but now are a torrent.
One of Androids key architectural goals is to allow applications to interact with one another and reuse components from one another. This reuse applies not only to services, but also to data and the user interface (UI).
Android has attracted an early following and sustained the developer momentum because of its fully developed features to exploit the cloud-computing model offered by web resources and to enhance that experience with local data stores on the handset itself. Android’s support for a relational database on the handset also played a part in early adoption.
In releases 1.0 and 1.1 (2008) Android did not support soft keyboards, requiring the devices to carry physical keys. Android fixed this issue by releasing the 1.5 SDK in April 2009, along with a number of other features, such as advanced media-recording capabilities, widgets, and live folders.
In September 2009 came release 1.6 of the Android OS and, within a month, Android 2.0 followed, facilitating a flood of Android devices in time for the 2009 Christmas season. This release introduced advanced search capabilities and text to speech.
In Android 2.3, the significant features include remote wiping of secure data by
administrators, the ability to use camera and video in low-light conditions, Wi-Fi hotspot, significant performance improvements, improved Bluetooth functionality, installation of applications on the SD card optionally, OpenGL ES 2.0 support, improvements in backup, improvements in search usability, Near Field Communications support for credit card processing, much improved motion and sensor support (similar to Wii), video chat, and improved Market.
significantly enhanced, and more UI controls are now available. In the 3D space, OpenGL has been enhanced with Renderscript to further supplement ES 2.0. It is an exciting introduction for tablets.
However, the 3.0 experience is limited to tablets. At the time of the 3.0 release, the 2.x branch of Android continued to serve phones while 3.x branches served the tablets. Starting with 4.0, Android has merged these branches and forged a single SDK. For phone users, the primary UI difference is that the tablet experience is brought to phones as well.
The key aspects of the 4.0 user experience are as follows:
A new type face called Roboto to provide crispness on high-density screens.
A better way to organize apps into folders on home pages.
Ability to drag apps and folders into the favorites tray that is always present at the bottom of the device.
Optimization of notifications based on device type. For small devices, they show up on the top, and for larger devices they show up in the bottom system bar.
Resizable, scrollable widgets. A variety of ways to unlock screens. Spell checker.
Improved voice input with a “speak continuously” option. More controls to work with network data usage.
Enhanced Contacts application with a personal profile much like social networks.
Enhancements to the calendar application.
Better camera app: continuous focus, zero shutter lag, face detection, tap to focus, and a photo editor.
Live effects on pictures and videos for silly effects. A quick way to take and share screen shots. Browser performance that is twice as fast. Improved e-mail.
A new concept called Android beaming for NFC-based sharing. Support for Wi-Fi Direct to promote P2P services.
Bluetooth health device profile.
Revamped animation based on changing properties of objects, including views
Fixed number of list-based widget behaviors from 3.0
Much more mature action bar with integrated search
Support for a number of mobile standards: Advanced Audio
Distribution Profile (A2DP: the ability to use external speakers), Real-time Transport Protocol RTP: to stream audio/video over IP), Media Transfer Protocol (MTP), Picture Transfer Protocol (PTP: for hooking up to computers to download photos and media), and Bluetooth Headset Profile (HSP)
Full device encryption
Digital Rights Management (DRM)
Encrypted storage and passwords
Social API involving personal profiles
Enhanced Calendar API
Voice Mail API
Delving Into the Dalvik VM
As part of Android, Google has spent a lot of time thinking about optimizing designs for low-powered handheld devices. Handheld devices lag behind their desktop
counterparts in memory and speed by eight to ten years. They also have limited power for computation. The performance requirements on handsets are severe as a result, requiring handset designers to optimize everything. If you look at the list of packages in Android, you’ll see that they are fully featured and extensive.
These issues led Google to revisit the standard JVM implementation in many respects. The key figure in Google’s implementation of this JVM is Dan Bornstein, who wrote the Dalvik VM—Dalvik is the name of a town in Iceland. Dalvik VM takes the generated Java class files and combines them into one or more Dalvik Executable (.dex) files. The goal of the Dalvik VM is to find every possible way to optimize the JVM for space,
performance, and battery life.
The final executable code in Android, as a result of the Dalvik VM, is based not on Java byte code but on .dex files instead. This means you cannot directly execute Java byte code; you have to start with Java class files and then convert them to linkable .dex files.
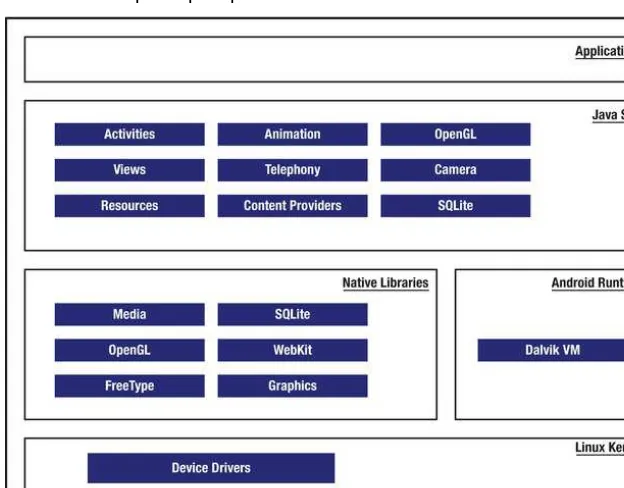
Understanding the Android Software Stack
cover the development aspect of Android. Figure 1–3 shows the Android software stack from a developer’s perspective.
Figure 1–3. Detailed Android SDK software stack
At the core of the Android platform is a Linux kernel responsible for device drivers, resource access, power management, and other OS duties. The supplied device drivers include Display, Camera, Keypad, Wi-Fi, Flash Memory, Audio, and inter-process communication (IPC). Although the core is Linux, the majority—if not all—of the
applications on an Android device such as a Motorola Droid are developed in Java and run through the Dalvik VM.
Sitting at the next level, on top of the kernel, are a number of C/C++ libraries such as OpenGL, WebKit, FreeType, Secure Sockets Layer (SSL), the C runtime library (libc), SQLite, and Media. The system C library based on Berkeley Software Distribution (BSD) is tuned (to roughly half its original size) for embedded Linux-based devices. The media libraries are based on PacketVideo’s (www.packetvideo.com/) OpenCORE. These
libraries are responsible for recording and playback of audio and video formats. A library called Surface Manager controls access to the display system and supports 2D and 3D.
The WebKit library is responsible for browser support; it is the same library that supports Google Chrome and Apple’s Safari. The FreeType library is responsible for font support. SQLite (www.sqlite.org/) is a relational database that is available on the device itself. SQLite is also an independent open source effort for relational databases and not directly tied to Android. You can acquire and use tools meant for SQLite for Android databases as well.
Most of the application framework accesses these core libraries through the Dalvik VM, the gateway to the Android platform. As we indicated in the previous sections, Dalvik is optimized to run multiple instances of VMs. As Java applications access these core libraries, each application gets its own VM instance.
The Android Java API’s main libraries include telephony, resources, locations, UI, content providers (data), and package managers (installation, security, and so on). Programmers develop end-user applications on top of this Java API. Some examples of end-user applications on the device include Home, Contacts, Phone, and Browser. Android also supports a custom Google 2D graphics library called Skia, which is written in C and C++. Skia also forms the core of the Google Chrome browser. The 3D APIs in Android, however, are based on an implementation of OpenGL ES from the Khronos group (www.khronos.org). OpenGL ES contains subsets of OpenGL that are targeted toward embedded systems.
From a media perspective, the Android platform supports the most common formats for audio, video, and images. From a wireless perspective, Android has APIs to support Bluetooth, EDGE, 3G, Wi-Fi, and Global System for Mobile Communication (GSM) telephony, depending on the hardware.
Developing an End-User Application with the
Android SDK
In this section, we’ll introduce you to the high-level Android Java APIs that you’ll use to develop end-user applications on Android. We will briefly talk about the Android emulator, Android foundational components, UI programming, services, media, telephony, animation, and more.
Android Emulator
The Android SDK ships with an Eclipse plug-in called Android Development Tools (ADT). You will use this Integrated Development Environment (IDE) tool for developing,
The Android emulator accomplishes its work through an open source “processor emulator” technology called QEMU, developed by Fabrice Bellard
(http://wiki.qemu.org/Index.html). This is the same technology that allows emulation of one operating system on top of another, regardless of the processor. QEMU allows emulation at the CPU level.
With the Android emulator, the processor is based on Advanced RISC Machine (ARM). ARM is a 32-bit microprocessor architecture based on Reduced Instruction Set
Computing (RISC), in which design simplicity and speed is achieved through a reduced number of instructions in an instruction set. The emulator runs the Android version of Linux on this simulated processor.
ARM is widely used in handhelds and other embedded electronics where lower power consumption is important. Much of the mobile market uses processors based on this architecture.
You can find more details about the emulator in the Android SDK documentation at http://developer.android.com/guide/developing/tools/emulator.html.
The Android UI
Android uses a UI framework that resembles other desktop-based, full-featured UI frameworks. In fact, it’s more modern and more asynchronous in nature. The Android UI is essentially a fourth-generation UI framework, if you consider the traditional C-based Microsoft Windows API the first generation and the C++-based Microsoft Foundation Classes (MFC) the second generation. The Java-based Swing UI framework would be the third generation, introducing design flexibility far beyond that offered by MFC. The Android UI, JavaFX, Microsoft Silverlight, and Mozilla XML User Interface Language (XUL) fall under this new type of fourth-generation UI framework, in which the UI is declarative and independently themed.
NOTE: In Android, you program using a modern user interface paradigm, even though the device you’re programming for may be a handheld.
Programming in the Android UI involves declaring the interface in XML files. You then load these XML view definitions as windows in your UI application. This is very much like HTML-based web pages. Much as in HTML, you find (get hold of) the individual controls through their IDs and manipulate them with Java code.
Views internally use the familiar concepts of canvases, painting, and user interaction. An activity hosting these composite views, which include views and view groups, is the logical replaceable UI component in Android.
Android 3.0 introduced a new UI concept called fragments to allow developers to chunk views and functionality for display on tablets. Tablets provide enough screen space for multipane activities, and fragments provide the abstraction for the panes.
One of the Android framework’s key concepts is the life cycle management of activity windows. Protocols are put in place so that Android can manage state as users hide, restore, stop, and close activity windows. You will get a feel for these basic ideas in Chapter 2, along with an introduction to setting up the Android development environment.
The Android Foundational Components
The Android UI framework, along with many other parts of Android, relies on a new concept called an intent. An intent is an intra- and interprocess mechanism to invoke components in Android.
A component in Android is a piece of code that has a well defined life cycle. An activity representing a window in an Android application is a component. A service that runs in an Android process and serves other clients is a component. A receiver that wakes up in response to an event is another example of a component in Android.
While serving this primary need of invoking components, an intent exhibits the
characteristics parallel to those of windowing messages, actions, publish-and-subscribe models, and interprocess communications. Here is an example of using the Intent class to invoke or start a web browser:
public static void invokeWebBrowser(Activity activity) {
Intent intent = new Intent(Intent.ACTION_VIEW); intent.setData(Uri.parse("http://www.google.com")); activity.startActivity(intent);
}
In this example, through an intent, we are asking Android to start a suitable window to display the content of a web site. Depending on the list of browsers that are installed on the device, Android will choose a suitable one to display the site. You will learn more about intents in Chapter 5.
Android has extensive support for resources, which include such things as strings and bitmaps, as well as some not-so-familiar items like XML-based view (layout like HTML) definitions. The Android framework makes use of resources in a novel way so their usage is easy, intuitive, and convenient. Here is an example where resource IDs are automatically generated for resources defined in XML files:
public final class R {
//All string resources will have constants auto generated here public static final class string {
}
//All image files will have unique ids generated here public static final class drawable {
public static final int myanimation=0x7f020001; public static final int numbers19=0x7f02000e; }
//View ids are auto generated based on their names public static final class id {
public static final int textViewId1=0x7f080003; }
//The following are two files (like html) that define layout //auto generated from the filenames in respective sub directories. public static final class layout {
public static final int frame_animations_layout=0x7f030001; public static final int main=0x7f030002;
} }
Each auto-generated ID in this class corresponds to either an element in an XML file or a whole file itself. Wherever you would like to use those XML definitions, you will use these generated IDs instead. This indirection helps a great deal when it comes to specializing resources based on locale, device size, and so on. (Chapter 3 covers the R.java file and resources in more detail.)
Another new concept in Android is the content provider. A content provider is an abstraction of a data source that makes it look like an emitter and consumer of RESTful services. The underlying SQLite database makes this facility of content providers a powerful tool for application developers. We will cover content providers in Chapter 4. In Chapters 3, 4, and 5, we’ll discuss how intents, resources, and content providers promote openness in the Android platform.
Advanced UI Concepts
XML page-layout definitions (similar to HTML web pages) play a critical role in describing the Android UI. Let’s look at an example of how an Android layout XML file does this for a simple layout containing a text view:
<?xml version="1.0" encoding="utf-8"?>
<!-- place it in /res/layout/sample_page1.xml -->
<!-- will auto generate an id called: R.layout.sample_page1 --> <LinearLayout ..some basic attributes..>
<TextView android:id="@+id/textViewId" android:layout_width="fill_parent" android:layout_height="wrap_content" android:text="@string/hello"
/>
</LinearLayout>
loaded as XML files and because resource IDs for those menus are auto-generated. Here’s how you would declare menus in an XML file:
<menu xmlns:android="http://schemas.android.com/apk/res/android"> <!-- This group uses the default category. -->
<group android:id="@+id/menuGroup_Main"> <item android:id="@+id/menu_clear" android:orderInCategory="10" android:title="clear" />
<item android:id="@+id/menu_show_browser" android:orderInCategory="5"
android:title="show browser" /> </group>
</menu>
Android supports dialogs, and all dialogs in Android are asynchronous. These asynchronous dialogs present a special challenge to developers accustomed to the synchronous modal dialogs in some windowing frameworks. We’ll address menus in Chapter 7 and dialogs in Chapter 9.
Android offers extensive support for animation. There are three fundamental ways to accomplish animation. You can do frame-by-frame animation. Or you can provide tweening animation by changing view transformation matrices (position, scale, rotation, and alpha). Or you can also do tweening animation by changing properties of objects. The property-based animation is introduced in 3.0 and is the most flexible and recommended way to accomplish animation. All of these animations are covered in Chapter 21.
Moreover, Android allows you to define these animations in an XML resource file. Check out this example, in which a series of numbered images is played in frame-by-frame animation:
<animation-list xmlns:android="http://schemas.android.com/apk/res/android" android:oneshot="false">
<item android:drawable="@drawable/numbers11" android:duration="50" /> ……
<item android:drawable="@drawable/numbers19" android:duration="50" /> </animation-list>
Android also supports 3D graphics through its implementation of the OpenGL ES 1.0 and 2.0 standards. OpenGL ES, like OpenGL, is a C-based flat API. The Android SDK, because it’s a Java-based programming API, needs to use Java binding to access the OpenGL ES. Java ME has already defined this binding through Java Specification Request (JSR) 239 for OpenGL ES, and Android uses the same Java binding for
OpenGL ES in its implementation. If you are not familiar with OpenGL programming, the learning curve is steep. Due to space limitations, we are not able to include the OpenGL coverage in the fourth edition of the book. However we have over 100 pages of
coverage in our third edition.
device or from the Internet. Due to space limitations, we are not able to cover live folders in the fourth edition of the book. However, the third edition includes extensive coverage. The second homepage-based idea is the home screen widget. Home screen widgets are used to paint information on the homepage using a UI widget. This information can change at regular intervals. An example could be the number of e-mail messages in your e-mail store. We describe home screen widgets in Chapter 25. The home screen
widgets are enhanced in 3.0 to include list views that can get updated when their underlying data changes. These enhancements are covered in Chapter 26.
Integrated Android Search is the third homepage-based idea. Using integrated search, you can search for content both on the device and also across the Internet. Android search goes beyond search and allows you to fire off commands through the search control. Due to space limitations, we can’t include coverage of the search API in the fourth edition of the book. However, it is covered in the third edition.
Android also supports touchscreen and gestures based on finger movements on the device. Android allows you to record any random motion on the screen as a named gesture. This gesture can then be used by applications to indicate specific actions. We cover touchscreens and gestures in Chapter 27.
Sensors are now becoming a significant part of the mobile experience. We cover sensors in Chapter 29.
Another necessary innovation required for a mobile device is the dynamic nature of its configurations. For instance, it is very easy to change the viewing mode of a handheld between portrait and landscape. Or you may dock your handheld to become a laptop. Android 3.0 has introduced a concept called fragments to deal with these variations effectively. Chapter 8 is dedicated to fragments, and Chapter 12 talks about how to deal with configuration changes.
We also cover the 3.0 feature (which is much enhanced in 4.0) of action bars in Chapter 10. Action bars bring Android up to par with a desktop menu bar paradigm.
Drag-and-drop is introduced for tablets in 3.0. This feature is now available to phones as well. We cover drag-and-drop in Chapter 28.
Handheld devices are fully aware of a cloud-based environment. To make server-side HTTP calls, it is important to understand the threading model to avoid Application Not Responding messages. We cover the mechanisms available for asynchronous
processing in Chapter 18.
Android Service Components
Security is a fundamental part of the Android platform. In Android, security spans all phases of the application life cycle—from design-time policy considerations to runtime boundary checks. We cover security and permissions in Chapter 14.
In Chapter 15, we’ll show you how to build and consume services in Android, specifically HTTP services. This chapter will also cover interprocess communication (communication between applications on the same device).
Location-based service is another of the more exciting components of the Android SDK. This portion of the SDK provides application developers with APIs to display and
manipulate maps, as well as obtain real-time device-location information. We’ll cover these ideas in detail in Chapter 22.
Android Media and Telephony Components
Android has APIs that cover audio, video, and telephony components. Chapter 23 will address the telephony API. We’ll cover the audio and video APIs extensively in Chapter 24.
Starting with Android 2.0, Android includes the Pico Text-to-Speech engine. Due to space limitations, we are not able to include Text-to-Speech coverage in the fourth edition of the book. The third edition does cover the Text-to-Speech API.
Last but not least, Android ties all these concepts into an application by creating a single XML file that defines what an application package is. This file is called the application’s manifest file (AndroidManifest.xml). Here is an example:
<?xml version="1.0" encoding="utf-8"?>
<manifest xmlns:android="http://schemas.android.com/apk/res/android" package="com.ai.android.HelloWorld"
android:versionCode="1" android:versionName="1.0.0">
<application android:icon="@drawable/icon" android:label="@string/app_name"> <activity android:name=".HelloWorld"
android:label="@string/app_name"> <intent-filter>
<action android:name="android.intent.action.MAIN" />
<category android:name="android.intent.category.LAUNCHER" /> </intent-filter>
</activity> </application> </manifest>
Android Java Packages
One way to get a quick snapshot of the Android platform is to look at the structure of Java packages. Because Android deviates from the standard JDK distribution, it is important to know what is supported and what is not. Here’s a brief description of the important packages that are included in the Android SDK:
android.app: Implements the Application model for Android. Primary classes include Application, representing the start and stop
semantics, as well as a number of activity-related classes, fragments, controls, dialogs, alerts, and notifications. We work with most of these classes through out this book.
android.app.admin: Provides the ability to control the device by folks such as enterprise administrators.
android.accounts: Provides classes to manage accounts such as Google, Facebook, and so on. The primary classes are
AccountManager and Account. We cover this API briefly in Chapter 30 when we discuss the Contacts API.
android.animation: Hosts all the new property animation classes. These clases are extensively covered in Chapter 21.
android.app.backup: Provides hooks for applications to back up and restore their data when folks switch their devices.
android.appwidget: Provides functionality for home screen widgets. This package is covered extensively in Chapter 25 and Chapter 26 when we talk about home screen widgets, including list-based widgets.
android.bluetooth: Provides a number of classes to work with Bluetooth functionality. The main classes include BluetoothAdapter, BluetoothDevice, BluetoothSocket, BluetoothServerSocket, and BluetoothClass. You can use BluetoothAdapter to control the locally installed Bluetooth adapter. For example, you can enable it, disable it, and start the discovery process. BluetoothDevice represents the remote Bluetooth device that you are connecting with. The two Bluetooth sockets are used to establish communication between the devices. A Bluetooth class represents the type of Bluetooth device you are connecting to.
android.content.pm: Implements package manager–related classes. A package manager knows about permissions, installed packages, installed providers, installed services, installed components such as activities, and installed applications.
android.content.res: Provides access to resource files, both structured and unstructured. The primary classes are AssetManager (for unstructured resources) and Resources. Some of the classes from this package are covered in Chapter 3.
android.database: Implements the idea of an abstract database. The primary interface is the Cursor interface. Some of the classes from this package are covered in Chapter 4.
android.database.sqlite: Implements the concepts from the android.database package using SQLite as the physical database. Primary classes are SQLiteCursor, SQLiteDatabase, SQLiteQuery, SQLiteQueryBuilder, and SQLiteStatement. However, most of your interaction is going to be with classes from the abstract
android.database package.
android.drm: Classes related to Digital Rights Management.
android.gesture: Houses all the classes and interfaces necessary to work with user-defined gestures. Primary classes are Gesture, GestureLibrary, GestureOverlayView, GestureStore, GestureStroke, and GesturePoint. A Gesture is a collection of GestureStrokes and GesturePoints. Gestures are collected in a GestureLibrary. Gesture libraries are stored in a GestureStore. Gestures are named so that they can be identified as actions. Some of the classes from this package are covered in Chapter 27.
android.graphics: Contains the classes Bitmap, Canvas, Camera, Color, Matrix, Movie, Paint, Path, Rasterizer, Shader, SweepGradient, and TypeFace.
android.graphics.drawable: Implements drawing protocols and background images, and allows animation of drawable objects. android.graphics.drawable.shapes: Implements shapes including ArcShape, OvalShape, PathShape, RectShape, and RoundRectShape. android.hardware: Implements the physical Camera-related classes. The Camera represents the hardware camera, whereas
android.graphics.Camera represents a graphical concept that’s not related to a physical camera at all.
android.location: Contains the classes Address, GeoCoder, Location, LocationManager, and LocationProvider. The Address class represents the simplified Extensible Address Language (XAL). GeoCoder allows you to get a latitude/longitude coordinate given an address, and vice versa. Location represents the latitude/longitude. Some of the classes from this package are covered in Chapter 22.
android.media: Contains the classes MediaPlayer, MediaRecorder, Ringtone, AudioManager, and FaceDetector. MediaPlayer, which supports streaming, is used to play audio and video. MediaRecorder is used to record audio and video. The Ringtone class is used to play short sound snippets that could serve as ringtones and notifications. AudioManager is responsible for volume controls. You can use FaceDetector to detect people’s faces in a bitmap. Some of the classes from this package are covered in Chapter 24.
android.media.audiofx: Provides audio effects. android.media.effect: Provides video effects.
android.mtp: Provides the ability to interact with cameras and music devices.
android.net: Implements the basic socket-level network APIs. Primary classes include Uri, ConnectivityManager, LocalSocket, and
LocalServerSocket. It is also worth noting here that Android supports HTTPS at the browser level and also at the network level. Android also supports JavaScript in its browser.
android.net.rtp: Supports streaming protocols.
android.net.sip: Provides support for VOIP.
android.net.wifi: Manages Wi-Fi connectivity. Primary classes include WifiManager and WifiConfiguration. WifiManager is
responsible for listing the configured networks and the currently active Wi-Fi network.
android.net.wifi.p2p: Supports P2P networks with Wi-Fi Direct. android.nfc: Lets you interact with devices in close proximity to enable touchless commerce such as credit card processing at sales counters.
android.opengl: Contains utility classes surrounding OpenGL ES 1.0 and 2.0 operations. The primary classes of OpenGL ES are
implemented in a different set of packages borrowed from JSR 239. These packages are javax.microedition.khronos.opengles,
javax.microedition.khronos.egl, and
android.os: Represents the OS services accessible through the Java programming language. Some important classes include
BatteryManager, Binder, FileObserver, Handler, Looper, and PowerManager. Binder is a class that allows interprocess
communication. FileObserver keeps tabs on changes to files. You use Handler classes to run tasks on the message thread and Looper to run a message thread.
android.preference: Allows applications to have users manage their preferences for that application in a uniform way. The primary classes are PreferenceActivity, PreferenceScreen, and various preference-derived classes such as CheckBoxPreference and SharedPreferences. Some of the classes from this package are covered in Chapter 13 and Chapter 25.
android.provider: Comprises a set of prebuilt content providers adhering to the android.content.ContentProvider interface. The content providers include Contacts, MediaStore, Browser, and Settings. This set of interfaces and classes stores the metadata for the underlying data structures. We cover many of the classes from the Contacts provider package in Chapter 30.
android.sax: Contains an efficient set of Simple API for XML (SAX) parsing utility classes. Primary classes include Element, RootElement, and a number of ElementListener interfaces.
android.speech.*: Provides support for converting text to speech. The primary class is TextToSpeech. You will be able to take text and ask an instance of this class to queue the text to be spoken. You have access to a number of callbacks to monitor when the speech has finished, for example. Android uses the Pico Text-to-Speech (TTS) engine from SVOX.
android.telephony: Contains the classes CellLocation,
PhoneNumberUtils, and TelephonyManager. TelephonyManager lets you determine cell location, phone number, network operator name, network type, phone type, and Subscriber Identity Module (SIM) serial number. Some of the classes from this package are covered in Chapter 23.
android.telephony.gsm: Allows you to gather cell location based on cell towers and also hosts classes responsible for SMS messaging. This package is called GSM because Global System for Mobile Communication is the technology that originally defined the SMS data-messaging standard.
android.text: Contains text-processing classes.
android.text.method: Provides classes for entering text input for a variety of controls.
android.text.style: Provides a number of styling mechanisms for a span of text.
android.utils: Contains the classes Log, DebugUtils, TimeUtils, and Xml.
android.view: Contains the classes Menu, View, and ViewGroup, and a series of listeners and callbacks.
android.view.animation: Provides support for tweening animation. The main classes include Animation, a series of interpolators for animation, and a set of specific animator classes that include AlphaAnimation, ScaleAnimation, TranslationAnimation, and RotationAnimation.Some of the classes from this package are covered in Chapter 21.
android.view.inputmethod: Implements the input-method framework architecture.
android.webkit: Contains classes representing the web browser. The primary classes include WebView, CacheManager, and CookieManager. android.widget: Contains all of the UI controls usually derived from the View class. Primary widgets include Button, Checkbox,
Chronometer, AnalogClock, DatePicker, DigitalClock, EditText, ListView, FrameLayout, GridView, ImageButton, MediaController, ProgressBar, RadioButton, RadioGroup, RatingButton, Scroller, ScrollView, Spinner, TabWidget, TextView, TimePicker, VideoView, and ZoomButton.
com.google.android.maps: Contains the classes MapView,
MapController, and MapActivity, essentially classes required to work with Google maps.
These are some of the critical Android-specific packages. From this list, you can see the depth of the Android core platform.
NOTE: In all, the Android Java API contains more than 50 packages and more than 1,000 classes, and it keeps growing with each release.
In addition, Android provides a number of packages in the java.* namespace. These include awt.font, beans, io, lang, lang.annotation, lang.ref, lang.reflect, math, net, nio, nio.channels, nio.channels.spi, nio.charset, security, security.acl,
util.concurrent.atomic, util.concurrent.locks, util.jar, util.logging, util.prefs, util.regex, and util.zip.
Android comes with these packages from the javax namespace: crypto, crypto.spec, microedition.khronos.egl, microedition.khronos.opengles, net, net.ssl,
security.auth, security.auth.callback, security.auth.login, security.auth.x500, security.cert, sql, xml, and xmlparsers.
In addition to these, it contains a lot of packages from org.apache.http.* as well as org.json, org.w3c.dom, org.xml.sax, org.xml.sax.ext, org.xml.sax.helpers,
org.xmlpull.v1, and org.xmlpull.v1.sax2. Together, these numerous packages provide a rich computing platform to write applications for handheld devices.
Taking Advantage of Android Source Code
Android documentation is a bit wanting in places. Android source code can be used to fill the gaps.
The source code for Android and all its projects is managed by the Git source code control system. Git (http://git-scm.com/) is an open source source-control system designed to handle large and small projects with speed and convenience. The Linux kernel and Ruby on Rails projects also rely on Git for version control.
The details of the Android source distribution are published at
http://source.android.com. The code was made available as open source around October 2008. One of the Open Handset Alliance’s goals was to make Android a free and fully customizable mobile platform.
Browsing Android Sources Online
Prior to Android 4.0, the Android source distribution was made available at http://android.git.kernel.org/. Android now is hosted on its own Git site at https://android.googlesource.com. However, this is not browsable online as of this writing. There are some posts online indicating that online browsing may be available soon.
Another frequently visited site to browse Android sources online is at
www.google.com/codesearch/p?hl=en#uX1GffpyOZk/core/java/android/
However, there are rumors that the Code Search project may be in the process of getting shut down. Even if it is not, this site does not search the Android 4.0 code yet. For example, we were not able to find the new Contact APIs here.
Another useful site is
www.grepcode.com/search/?query=google+android&entity=project
We hope both these sites will continue to have the most recent releases so that you can browse the sources online.
Using Git to Download Android Sources
If all else fails, you may have to install Git on your computer and download the sources yourself. If you have a Linux distribution, you can follow the instructions at
http://source.android.com to get the latest sources.
If you are on a Windows platform, this gets to be a challenge. You will have to install Git first and then use it to get the Android packages you want.
NOTE: Our research notes on using Git to download Android can be found at http://androidbook.com/item/3919.
Installing Git
Use the following URL to install the msysGit package on Windows:
http://code.google.com/p/msysgit/downloads/list
Once you have installed it, you will see a directory called C:\git (assuming you have installed it under c:\).
Testing the Git Installation
The key directory is C:\git\bin. To see if it is working, you can use the following command to clone a public repository:
git clone git://git.kernel.org/pub/scm/git/git.git
This should clone the repository to your local drive.
Downloading Android Repositories
Run this command to discover how many Android Git repositories there are:
git clone https://android.googlesource.com/platform/manifest.git
This will bring down a directory called manifest. Look for a file called manifest\default.xml.
This file will have many of the names for the Android repositories. Here are a couple of lines from that file:
<project path="frameworks/base"
name="platform/frameworks/base" /> <project path="frameworks/compile/libbcc"
You can see this full file for 4.0 at http://androidbook.com/item/3920, where we have posted the contents of the file for quick review. Keep in mind that it is not updated with the latest information.
Now you can get the base android.jar source code by using the command
git clone https://android.googlesource.com/platform/frameworks/base.git
Using the same logic, you can get the contacts provider package by typing
git clone https://android.googlesource.com/platform/packages/providers/ContactsProvider
The Sample Projects in this Book
In this book, you will find many, many working sample projects. At the end of each chapter is a “References” section that contains a URL to download sample projects for that chapter. All of these sample projects can be accessed from
http://androidbook.com/proandroid4/projects
If you have any issues downloading or compiling these projects, please contact us by e-mail: satya.komatineni@gmail.com or davemac327@gmail.com.
We are continuously updating the androidbook.com supporting site with what we are learning. It is well worth our efforts if we are able to further contribute to your learning.
Summary
23
Chapter
Setting Up Your
Development Environment
The last chapter provided an overview of Android’s history and hinted at concepts that are covered in the rest of the book. At this point, you’re probably eager to get your hands on some code. You start by seeing what you need to begin building applications with the Android software development kit (SDK) and set up your development
environment. Next, you step through a “Hello World!” application. Then the chapter explains the Android application life cycle and ends with a discussion about running your applications with Android Virtual Devices (AVDs) and on real devices.
To build applications for Android, you need the Java SE Development Kit (JDK), the Android SDK, and a development environment. Strictly speaking, you can develop your applications using a primitive text editor, but for the purposes of this book, you use the commonly available Eclipse IDE. The Android SDK requires JDK 5 or JDK 6 (the examples use JDK 6) and Eclipse 3.5 or higher (this book uses Eclipse 3.5, also known as Galileo, and 3.6, also known as Helios).
NOTE: At the time of this writing, Java 7 was available but not yet supported by the Android SDK. The latest version of Eclipse (3.7, a.k.a. Indigo) was also available, but Android has historically not been reliable on the latest Eclipse right away. Check the System Requirements here to find the latest: http://developer.android.com/sdk/requirements.html.
The Android SDK is compatible with Windows (Windows XP, Windows Vista, and Windows 7), Mac OS X (Intel only), and Linux (Intel only). In terms of hardware, you need an Intel machine, the more powerful the better.
To make your life easier, you want to use Android Development Tools (ADT). ADT is an Eclipse plug-in that supports building Android applications with the Eclipse IDE. The Android SDK is made up of two main parts: the tools and the packages. When you first install the SDK, all you get are the base tools. These are executables and supporting
files to help you develop applications. The packages are the files specific to a particular version of Android (called a platform) or a particular add-on to a platform. The platforms include Android 1.5 through 4.0. The add-ons include the Google Maps API, the Market License Validator, and even vendor-supplied ones such as Samsung’s Galaxy Tab add-on. After you install the SDK, you then use one of the tools to download and set up the platforms and add-ons. Let’s get started!
Setting Up Your Environment
To build Android applications, you need to establish a development environment. In this section, you walk through downloading JDK 6, the Eclipse IDE, the Android SDK (tools and packages), and ADT. You also configure Eclipse to build Android applications. Google provides a page to describe the installation process
(http://developer.android.com/sdk/installing.html) but leaves out some crucial steps, as you will see.
Downloading JDK 6
The first thing you need is the Java SE Development Kit. The Android SDK requires JDK 5 or higher; we developed the examples using JDK 6. For Windows, download JDK 6 from the Oracle web site (www.oracle.com/technetwork/java/javase/
downloads/index.html) and install it. You only need the JDK, not the bundles. For Mac OS X, download the JDK from the Apple web site (http://developer.apple.com/java/ download/), select the appropriate file for your particular version of Mac OS, and install it. You need to register for free as an Apple developer to get the JDK, and once at the Downloads page, you need to click the Java link at right. To install the JDK for Linux, open a Terminal window and try the following:
sudo apt-get install sun-java6-jdk
This should install the JDK plus any dependencies such as the Java Runtime Environment (JRE). If it doesn’t, it probably means you need to add a new software source and then try that command again. The web page
https://help.ubuntu.com/community/Repositories/Ubuntu explains software sources and how to add the connection to third-party software. The process is different depending on which version of Linux you have. After you’ve done that, retry the command.
With the introduction of Ubuntu 10.04 (Lucid Lynx), Ubuntu recommends using OpenJDK instead of the Oracle/Sun JDK. To install OpenJDK, try the following: sudo apt-get install openjdk-6-jdk
sudo update-alternatives --config java
and then choose which Java you want as the default.
Now that you have a Java JDK installed, it’s time to set the JAVA_HOME environment variable to point to the JDK install folder. To do this on a Windows XP machine, choose Start ➤ My Computer, right-click, select Properties, choose the Advanced tab, and click Environment Variables. Click New to add the variable or Edit to modify it if it already exists. The value of JAVA_HOME is something like C:\Program Files\Java\jdk1.6.0_27. For Windows Vista and Windows 7, the steps to get to the Environment Variables screen are a little different. Choose Start ➤ Computer, right-click, choose Properties, click the link for Advanced System Settings, and click Environment Variables. After that, follow the same instructions as for Windows XP to change the JAVA_HOME environment variable. For Mac OS X, you set JAVA_HOME in the .bashrc file in your home directory. Edit or create the .bashrc file, and add a line that looks like this
export JAVA_HOME=path_to_JDK_directory
where path_to_JDK_directory is probably /Library/Java/Home. For Linux, edit your .bashrc file and add a line like the one for Mac OS X, except that your path to Java is probably something like /usr/lib/jvm/java-6-sun or /usr/lib/jvm/java-6-openjdk.
Downloading Eclipse 3.6
After the JDK is installed, you can download the Eclipse IDE for Java Developers. (You don’t need the edition for Java EE; it works, but it’s much larger and includes things you don’t need for this book.) The examples in this book use Eclipse 3.6 (on a Windows environment). You can download all versions of Eclipse from
www.eclipse.org/downloads/.
The Eclipse distribution is a .zip file that can be extracted just about anywhere. The simplest place to extract to on Windows is C:\, which results in a C:\eclipse folder where you find eclipse.exe. For Mac OS X, you can extract to Applications. For Linux, you can extract to your home directory or have your administrator put Eclipse into a common place where you can get to it. The Eclipse executable is in the eclipse folder for all platforms. You may also find and install Eclipse using Linux’s Software Center for adding new applications, although this may not provide you with the latest version. When you first start up Eclipse, it asks you for a location for the workspace. To make things easy, you can choose a simple location such as C:\android or a directory under your home directory. If you share the computer with others, you should put your workspace folder somewhere underneath your home directory.
Downloading the Android SDK
device with the Android OS to develop Android applications. It also has a setup utility to allow you to install the packages that you want to download.
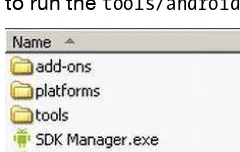
You can download the Android SDK from http://developer.android.com/sdk. It ships as a .zip file, similar to the way Eclipse is distributed, so you need to unzip it to an appropriate location. For Windows, unzip the file to a convenient location (we used the C: drive), after which you should have a folder called something like C:\android-sdk-windows that contains the files as shown in Figure 2–1. For Mac OS X and Linux, you can unzip the file to your home directory. Notice that Mac OS X and Linux do not have an SDK Manager executable; the equivalent of the SDK Manager in Mac OS X and Linux is to run the tools/android program.
Figure 2–1. Base contents of the Android SDK
An alternate approach (for Windows only) is to download an installer EXE instead of the zip file and then run the installer executable. This executable checks for the Java JDK, unpacks the embedded files for you, and runs the SDK Manager program to help you set up the rest of the downloads.
Figure 2–2. Adding packages to the Android SDK
Click the Install button. You need to click Accept for each item you’re installing (or Accept All) and then click Install. Android then downloads your packages and platforms to make them available to you. The Google APIs are add-ons for developing applications using Google Maps. You can always come back to add more packages later.
Updating Your PATH Environment Variable
The Android SDK comes with a tools directory that you want to have in your PATH. You also need in your PATH the platform-tools directory you just installed. Let’s add them now or, if you’re upgrading, make sure they’re correct. While you’re there, you can also add a JDK bin directory, which will make life easier later.
For Windows, get back to the Environment Variables window. Edit the PATH variable and add a semicolon (;) on the end, followed by the path to the Android SDK tools folder, followed by another semicolon, followed by the path to the Android SDK platform-tools folder, following by another semicolon, and then %JAVA_HOME%\bin. Click OK when you’re done. For Mac OS X and Linux, edit your .bashrc file and add the Android SDK tools directory path to your PATH variable, as well as the Android SDK platform-tools directory and the $JAVA_HOME/bin directory. Something like the following works for Linux:
Just make sure that the PATH component that’s pointing to the Android SDK tools directories is correct for your particular setup.
The Tools Window
Later in this book, there are times when you need to execute a command-line utility program. These programs are part of the JDK or part of the Android SDK. By having these directories in your PATH, you don’t need to specify the full pathnames in order to execute them, but you need to start up a tools window in order to run them (later chapters refer to this tools window). The easiest way to create a tools window in Windows is to choose Start ➤ Run, type in cmd, and click OK. For Mac OS X, choose Terminal from your Applications folder in Finder or from the Dock if it’s there. For Linux, choose Terminal from the Applications ➤ Accessories menu.
You may need to know the IP address of your workstation later. To find this in Windows, launch a tools window and enter the command ipconfig. The results contain an entry for IPv4 (or something like that) with your IP address listed next to it. An IP address looks something like this: 192.168.1.25. For Mac OS X and Linux, launch a tools window and use the command ifconfig. You find your IP address next to the label inet addr.
You may see a network connection called localhost or lo; the IP address for this network connection is 127.0.0.1. This is a special network connection used by the operating system and is not the same as your workstation’s IP address. Look for a different number for your workstation’s IP address.
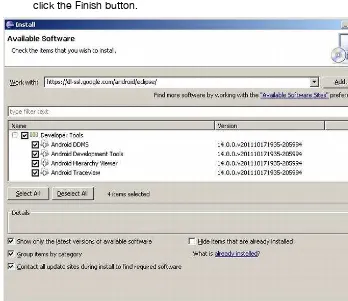
Installing Android Development Tools (ADT)
Now you need to install ADT, an Eclipse plug-in that helps you build Android applications. Specifically, ADT integrates with Eclipse to provide facilities for you to create, test, and debug Android applications. You need to use the Install New Software facility in Eclipse to perform the installation. (The instructions for upgrading ADT appear later in this section.) To get started, launch the Eclipse IDE and follow these steps:
1. Select Help ➤ Install New Software.
2. Select the Work With field, type in
https://dl-ssl.google.com/android/eclipse/
3. You should see an entry named Developer Tools with four child nodes: Android DDMS, Android Development Tools, Android Hierarchy Viewer, and Android Traceview. Select the parent node Developer Tools, make sure the child nodes are also selected, and click the Next button. The versions you see may be newer than these, and that’s okay. You may also see additional tools. These tools are explained further in Chapter 11.
4. Eclipse asks you to verify the tools to install. Click Next.
5. You’re asked to review the licenses for ADT as well as for the tools required to install ADT. Review the licenses, click “I accept,” and then click the Finish button.
Figure 2–3. Installing ADT using the Install New Software feature in Eclipse
Eclipse downloads the Developer Tools and installs them. You need to restart Eclipse for the new plug-in to show up in the IDE.
NOTE: If you’re doing an upgrade of ADT, you may not see some of these tools in the list of tools to be upgraded. If you don’t see them, then after you’ve upgraded the rest of the ADT, go to Install New Software and select https://dl-ssl.google.com/android/eclipse/ from the Works With menu. The middle window should show you other tools that are available to be installed.
The final step to make ADT functional in Eclipse is to point it to the Android SDK. In Eclipse, select Window ➤ Preferences. (On Mac OS X, Preferences is under the Eclipse menu.) In the Preferences dialog box, select the Android node and set the SDK Location field to the path of the Android SDK (see Figure 2–4), and then click the Apply button. Note that you may see a dialog box asking if you want to send usage statistics to Google concerning the Android SDK; that decision is up to you.
Figure 2–4. Pointing ADT to the Android SDK
Figure 2–5. Speeding up the builds
From Eclipse, you can launch the SDK Manager. To do so, choose Window ➤ Android SDK Manager. You should see the same window as in Figure 2–2.
You are almost ready for your first Android application—but first, you must briefly look at the fundamental concepts of Android applications.
Learning the Fundamental Components
Every application framework has some key components that developers need to understand before they can begin to write applications based on the framework. For example, you need to understand JavaServer Pages (JSP) and servlets in order to write Java 2 Platform, Enterprise Edition (J2EE) applications. Similarly, you need to
understand views, activities, fragments, intents, content providers, services, and the AndroidManifest.xml file when you build applications for Android. You briefly cover these fundamental concepts here and explore them in more detail throughout the book.
View
Views are user interface (UI) elements that form the basic building blocks of a user interface. A view can be a button, a label, a text field, or many other UI elements. If you’re familiar with views in J2EE and Swing, then you understand views in Android. Views are also used as containers for views, which means there’s usually a hierarchy of views in the UI. In the end, everything you see is a view.
Activity
like it sounds—something that helps the user do one thing, which could be viewing data, creating data, or editing data. Most Android applications have several activities within them.
Fragment
When a screen is large, it becomes difficult to manage all of its functionality in a single activity. Fragments are like sub-activities, and an activity can display one or more fragments on the screen at the same time. When a screen is small, an activity is more likely to contain just one fragment, and that fragment can be the same one used within larger screens.
Intent
An intent generically defines an “intention” to do some work. Intents encapsulate several concepts, so the best approach to understanding them is to see examples of their use. You can use intents to perform the following tasks:
Broadcast a message. Start a service. Launch an activity.
Display a web page or a list of contacts. Dial a phone number or answer a phone call.
Intents are not always initiated by your application—they’re also used by the system to notify your application of specific events (such as the arrival of a text message). Intents can be explicit or implicit. If you simply say that you want to display a URL, the system decides what component will fulfill the intention. You can also provide specific information about what should handle the intention. Intents loosely couple the action and action handler.
Content Provider
Data sharing among mobile applications on a device is common. Therefore, Android defines a standard mechanism for applications to share data (such as a list of contacts) without exposing the underlying storage, structure, and implementation. Through content providers, you can expose your data and have your applications use data from other applications.
Service
that are only accessible by the application that is hosting the service. Conversely, remote services are services that are meant to be accessed remotely by other applications running on the device.
An example of a service is a component that is used by an e-mail application to poll for new messages. This kind of service may be a local service if the service is not used by other applications running on the device. If several applications use the service, then it’s implemented as a remote service.
AndroidManifest.xml
AndroidManifest.xml, which is similar to the web.xml file in the J2EE world, defines the contents and behavior of your application. For example, it lists your application’s activities and services, along with the permissions and features the application needs to run.
Android Virtual Devices
An Android Virtual Device (AVD) allows developers to test their applications without hooking up an actual Android device (typically a phone or a tablet). AVDs can be created in various configurations to emulate different types of real devices.
Hello World!
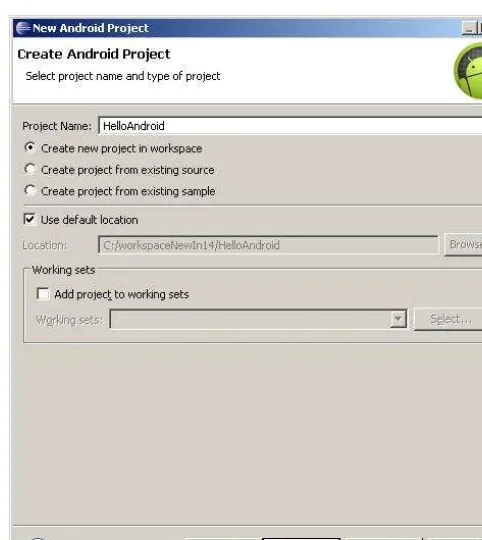
Now you’re ready to build your first Android application. You start by building a simple “Hello World!” program. Create the skeleton of the application by following these steps:
Figure 2–6. Using the New Project Wizard to create an Android application
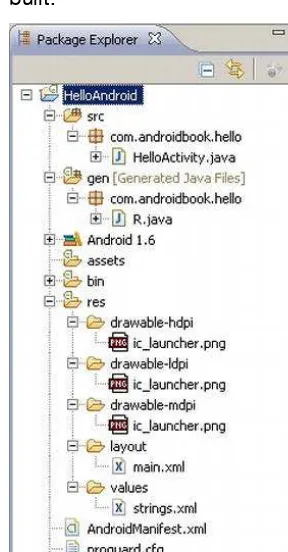
2. As shown in Figure 2–6, enter HelloAndroid as the project name. You need to distinguish this project from other projects you create in Eclipse, so choose a name that will make sense to you when you are looking at all the projects in your Eclipse environment. Also note that the default location for the project is derived from the Eclipse workspace location. The New Project Wizard appends the name of the new application to the workspace location. In this case, if your Eclipse workspace is c:\android, your new project is at c:\android\HelloAndroid\.
3. Leave the Location section alone for now, because you want to create a new project in your workspace in the default location. Click Next.
4. The next window shows you the available Build Targets. Select Android 1.6. This is the version of Android you use as your base for the application. You can run your application on later versions of Android, such as 2.1 and 2.3.3; but Android 1.6 has all the functionality you need, so choose it as your target. In general, it’s best to choose the lowest version number you can, because that maximizes the number of devices that can run your
5. Type Hello Android as the application name. This is the name that will appear with the application icon in your application’s title bar and in application lists. It should be descriptive but not very long.
6. Use com.androidbook.hello as the package name. Your application must have a base package name, and this is it. This package name will be used as an identifier for your application and must be unique across all applications. For this reason, it’s best to start the package name with a domain name that you own. If you don’t own one, be creative to ensure that your package name won’t likely be used by anyone else. However, don’t use a package name that starts with com.google, com.android, android, or com.example, because these are restricted by Google and you won’t be able to upload your application to Android Market.
7. Type HelloActivity as the Create Activity name. You’re telling Android that this activity is the one to launch when your application starts up. You may have other activities in your application, but this is the first one the user should see when the application is started.
8. The Min SDK Version value of 4 tells Android that your application requires Android 1.6 or newer. Technically, you can specify a Min SDK Version that is less than the Build Target value. If your application calls for functionality that is not present in the older version of Android, you need to handle that situation gracefully, but this can be done.
9. Click the Finish button, which tells ADT to generate the project skeleton for you. For now, open the HelloActivity.java file under the src folder and modify the onCreate() method as follows:
/** Called when the activity is first created. */ @Override
public void onCreate(Bundle savedInstanceState) { super.onCreate(savedInstanceState);
/** create a TextView and write Hello World! */ TextView tv = new TextView(this);
tv.setText("Hello World!");
/** set the content view to the TextView */ setContentView(tv);
}
You probably need to add an import android.widget.TextView; statement to the code to get rid of the error reported by Eclipse. Save the HelloActivity.java file.
1. Select Run ➤ Run Configurations.
2. In the Run Configurations dialog box, double-click Android Application in the left pane. The wizard inserts a new configuration named New Configuration.
3. Rename the configuration RunHelloWorld.
4. Click the Browse button, and select the HelloAndroid project.
5. Leave Launch Action set to Launch Default Activity. The dialog should appear as shown in Figure 2–7.
Figure 2–7. Configuring an Eclipse launch configuration to run the “Hello World!” application
6. Click Apply and then Run. You’re almost there! Eclipse is ready to run your application, but it needs a device on which to run it. As shown in Figure 2–8, you’re warned that no compatible targets were found and asked if you’d like to create one. Click Yes.
7. You’re presented with a window that shows the existing AVDs (see Figure 2–9). You need to add an AVD suitable for your new application. Click the New button.
Figure 2–9. The existing Android Virtual Devices
Figure 2–10. Configuring an Android Virtual Device
NOTE: You’re choosing a newer version of the SDK for your AVD, but your application can also run on an older one. This is okay because AVDs with newer SDKs can run applications that require older SDKs. The opposite, of course, is not true: an application that requires features of a newer SDK won’t run on an AVD with an older SDK.
9. Select your new AVD from the bottom list. Note that you may need to click the Refresh button to make any new AVDs to show up in the list. Click the OK button.
NOTE: It may take the emulator a while to emulate the device bootup process. Once the bootup process has completed, you typically see a locked screen. Click the Menu button or drag the unlock image to unlock the AVD. After unlocking, you should see HelloAndroidApp running in the emulator, as shown in Figure 2–11. Be aware that the emulator starts other applications in the background during the startup process, so you may see a warning or error message from time to time. If you do, you can generally dismiss it to allow the emulator to go to the next step in the startup process. For example, if you run the emulator and see a message like “application abc is not responding,” you can either wait for the application to start or simply ask the emulator to forcefully close the application. Generally, you should wait and let the emulator start up cleanly.
Figure 2–11. HelloAndroidApp running in the emulator
Now you know how to create a new Android application and run it in the emulator. Next, you look more closely at AVDs, and also how to deploy to a real device.
Android Virtual Devices
An AVD represents a device configuration. For example, you could have an AVD
representing a really old Android device running version 1.5 of the SDK with a 32MB SD card. The idea is that you create AVDs you are going to support and then point the emulator to one of those AVDs when developing and testing your application. Specifying (and changing) which AVD to use is very easy and makes testing with various