Sébastien Goasguen
978-1-491-94097-6
[LSI]
Docker in the Cloud: Recipes for AWS, Azure, Google, and More by Sébastien Goasguen
Copyright © 2016 O’Reilly Media, Inc. All rights reserved.
Printed in the United States of America.
Published by O’Reilly Media, Inc., 1005 Gravenstein Highway North, Sebastopol, CA 95472.
O’Reilly books may be purchased for educational, business, or sales promotional use. Online editions are also available for most titles (http://safaribooksonline.com). For more information, contact our corporate/institutional sales department: 800-998-9938 or [email protected].
Editor: Brian Anderson
Production Editor: Leia Poritz
Interior Designer: David Futato
Cover Designer: Karen Montgomery
Illustrator: Rebecca Demarest
January 2016: First Edition
Revision History for the First Edition 2016-01-15: First Release 2016-04-11: Second Release
Table of Contents
Docker in the Cloud. . . 1
Introduction 1
Starting a Docker Host on AWS EC2 3
Starting a Docker Host on Google GCE 7
Starting a Docker Host on Microsoft Azure 9
Introducing Docker Machine to Create Docker Hosts in the Cloud 11
Starting a Docker Host on AWS Using Docker Machine 16
Starting a Docker Host on Azure with Docker Machine 19
Running a Cloud Provider CLI in a Docker Container 21
Using Google Container Registry to Store Your Docker Images 23
Using Kubernetes in the Cloud via GKE 26
Setting Up to Use the EC2 Container Service 30
Creating an ECS Cluster 33
Starting Docker Containers on an ECS Cluster 37
Docker in the Cloud
Introduction
With the advent of public and private clouds, enterprises have moved an increasing number of workloads to the clouds. A signifi‐ cant portion of IT infrastructure is now provisioned on public
clouds like Amazon Web Services (AWS), Google Compute Engine
(GCE), and Microsoft Azure (Azure). In addition, companies have
deployed private clouds to provide a self-service infrastructure for IT needs.
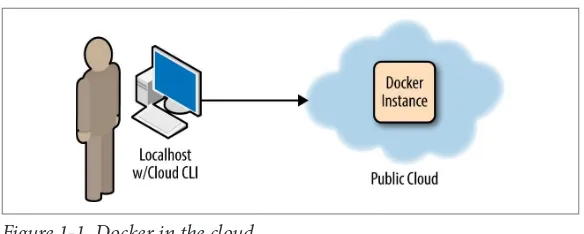
Although Docker, like any software, runs on bare-metal servers, running a Docker host in a public or private cloud (i.e., on virtual machines) and orchestrating containers started on those hosts is going to be a critical part of new IT infrastructure needs. Debating whether running containers on virtual machines makes sense or not is largely out of scope for this mini-book. Figure 1-1 depicts a simple setup where you are accessing a remote Docker host in the cloud using your local Docker client. This is made possible by the remote Docker Engine API which can be setup with TLS authentication. We will see how this scenario is fully automated with the use of docker-machine.
Figure 1-1. Docker in the cloud
In this book we show you how to use public clouds to create Docker hosts, and we also introduce some container-based services that have reached general availability recently: the AWS container service and the Google container engine. Both services mark a new trend in public cloud providers who need to embrace Docker as a new way to package, deploy and manage distributed applications. We can expect more services like these to come out and extend the capabilities of Docker and containers in general.
This book covers the top three public clouds (i.e., AWS, GCE, and Azure) and some of the Docker services they offer. If you have never used a public cloud, now is the time. You will see how to use the CLI
of these clouds to start instances and install Docker in “Starting a
Docker Host on AWS EC2” on page 3, “Starting a Docker Host on Google GCE” on page 7, and “Starting a Docker Host on Microsoft Azure” on page 9. To avoid installing the CLI we show you a trick in “Running a Cloud Provider CLI in a Docker Container” on page 21, where all the cloud clients can actually run in a container.
While Docker Machine (see “Introducing Docker Machine to Create
Docker Hosts in the Cloud” on page 11) will ultimately remove the need to use these provider CLIs, learning how to start instances with them will help you use the other Docker-related cloud services. That
being said, in “Starting a Docker Host on AWS Using Docker
Machine” on page 16 we show you how to start a Docker host in AWS EC2 using docker-machine and we do the same with Azure in “Starting a Docker Host on Azure with Docker Machine” on page 19.
like the Docker Hub but has the advantage of leveraging Google’s authorization system to give access to your images to team members and the public if you want to. The hosted Kubernetes service, Goo‐
gle Container Engine (i.e., GKE), is presented in “Using Kubernetes
in the Cloud via GKE” on page 26. GKE is the fastest way to experi‐ ment with Kubernetes if you already have a Google cloud account.
To finish this chapter, we look at two services on AWS that allow you
to run your containers. First we look at the Amazon Container Ser‐
vice (i.e., ECS) in “Setting Up to Use the EC2 Container Service” on
page 30. We show you how to create an ECS cluster in “Creating an ECS Cluster” on page 33 and how to run containers by defining
tasks in “Starting Docker Containers on an ECS Cluster” on page 37.
AWS, GCE, and Azure are the recognized top-three public cloud providers in the world. However, Docker can be installed on any public cloud where you can run an instance based on a Linux distribution supported by Docker (e.g., Ubuntu, CentOS, CoreOS). For instance
DigitalOcean and Exoscale also support Docker in a seamless fashion.
Starting a Docker Host on AWS EC2
Problem
You want to start a VM instance on the AWS EC2 cloud and use it as a Docker host.
Solution
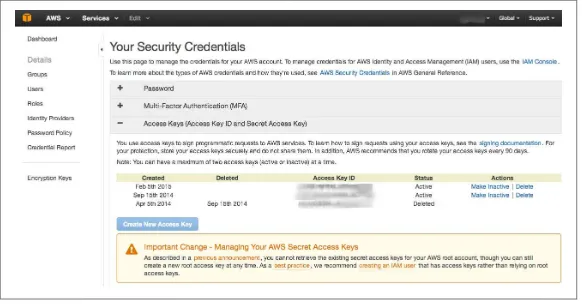
Although you can start an instance and install Docker in it via the EC2 web console, you will use the AWS command-line interface (CLI). First, you should have created an account on AWS and obtained a set of API keys. In the AWS web console, select your account name at the top right of the page and go to the Security Cre‐
dentials page, shown in Figure 1-2. You will be able to create a new
access key. The secret key corresponding to this new access key will be given to you only once, so make sure that you store it securely.
Figure 1-2. AWS Security Credentials page
You can then install the AWS CLI and configure it to use your newly
generated keys. Select an AWS region where you want to start your
instances by default.
The AWS CLI, aws, is a Python package that can be installed via the Python Package Index (pip). For example, on Ubuntu:
$ sudo apt-get -y install python-pip $ sudo pip install awscli
$ aws configure
AWS Access Key ID [**********n-mg]: AKIAIEFDGHQRTW3MNQ AWS Secret Access Key [********UjEg]: b4pWY69Qd+Yg1qo22wC Default region name [eu-east-1]: eu-west-1
Default output format [table]: $ aws --version
aws-cli/1.7.4 Python/2.7.6 Linux/3.13.0-32-generic
To access your instance via ssh, you need to have an SSH key pair set up in EC2. Create a key pair via the CLI, copy the returned pri‐ vate key into a file in your ~/.ssh folder, and make that file readable and writable only by you. Verify that the key has been created, either via the CLI or by checking the web console:
$ aws ec2 create-key-pair --key-name cookbook $ vi ~/.ssh/id_rsa_cookbook
$ chmod 600 ~/.ssh/id_rsa_cookbook $ aws ec2 describe-key-pairs
|+---+---+| ||69:aa:64:4b:72:50:ee:15:9a:da:71:4e:44:cd:db | cookbook || |+---+---+|
You are ready to start an instance on EC2. The standard Linux images from AWS now contain a Docker repository. Hence when starting an EC2 instance from an Amazon Linux AMI, you will be one step away from running Docker (sudo yum install docker):
Use a paravirtualized (PV) Amazon Linux AMI, so that you can use a t1.micro instance type. In addition, the default security group allows you to connect via ssh, so you do not need to create any additional rules in the security group if you only need to ssh to it.
$ aws ec2 run-instances --image-id ami-7b3db00c --count 1
--instance-type t1.micro --key-name cookbook $ aws ec2 describe-instances
$ ssh -i ~/.ssh/id_rsa_cookbook [email protected]
Warning: Permanently added '54.194.31.39' (RSA) to the list of known hosts.
Install the Docker package, start the Docker daemon, and verify that the Docker CLI is working:
[ec2-user@ip-172-31-8-174 ~]$ sudo yum update
[ec2-user@ip-172-31-8-174 ~]$ sudo yum install docker [ec2-user@ip-172-31-8-174 ~]$ sudo service docker start [ec2-user@ip-172-31-8-174 ~]$ sudo docker ps
CONTAINER ID IMAGE COMMAND CREATED ...
Do not forget to terminate the instance or you might get charged for it:
$ aws ec2 terminate-instances --instance-ids <instance id>
Discussion
You spent some time in this recipe creating API access keys and installing the CLI. Hopefully, you see the ease of creating Docker
hosts in AWS. The standard AMIs are now ready to go to install Docker in two commands.
The Amazon Linux AMI also contains cloud-init, which has
become the standard for configuring cloud instances at boot time.
This allows you to pass user data at instance creation. cloud-init
parses the content of the user data and executes the commands. Using the AWS CLI, you can pass some user data to automatically install Docker. The small downside is that it needs to be base64-encoded.
Create a small bash script with the two commands from earlier:
#!/bin/bash
yum -y install docker service docker start
Encode this script and pass it to the instance creation command:
$ udata="$(cat docker.sh | base64 )"
$ aws ec2 run-instances --image-id ami-7b3db00c \ --count 1 \
--instance-type t1.micro \ --key-name cookbook \ --user-data $udata
$ ssh -i ~/.ssh/id_rsa_cookbook ec2-user@<public_IP_instance> $ sudo docker ps
CONTAINER ID IMAGE COMMAND CREATED ...
With the Docker daemon running, if you wanted to access it remotely, you would need to set up TLS access, and open port 2376 in your security group.
Using this CLI is not Docker-specific. This CLI gives you access to the complete set of AWS APIs. However, using it to start instances and install Docker in them significantly streamlines the provisioning of Docker hosts.
See Also
• Installing the AWS CLI
• Configuring the AWS CLI
Starting a Docker Host on Google GCE
Problem
You want to start a VM instance on the Google GCE cloud and use it as a Docker host.
Solution
Install the gcloud CLI (you will need to answer a few questions),
and then log in to the Google cloud (You will need to have registered before). If the CLI can open a browser, you will be redirected to a web page and asked to sign in and accept the terms of use. If your terminal cannot launch a browser, you will be given a URL to open in a browser. This will give you an access token to enter at the com‐ mand prompt:
$ curl https://sdk.cloud.google.com | bash $ gcloud auth login
Your browser has been opened to visit:
https://accounts.google.com/o/oauth2/auth?redirect_uri=... ...
$ gcloud compute zones list NAME REGION STATUS asia-east1-c asia-east1 UP asia-east1-a asia-east1 UP asia-east1-b asia-east1 UP europe-west1-b europe-west1 UP europe-west1-c europe-west1 UP us-central1-f us-central1 UP us-central1-b us-central1 UP us-central1-a us-central1 UP
If you have not set up a project, set one up in the web console.
Projects allow you to manage team members and assign specific permission to each member. It is roughly equivalent to the Amazon Identity and Access Management (IAM) service.
To start instances, it is handy to set some defaults for the region and
zone that you would prefer to use (even though deploying a robust
system in the cloud will involve instances in multiple regions and zones). To do this, use the gcloud config set command.
For example:
$ gcloud config set compute/region europe-west1 $ gcloud config set compute/zone europe-west1-c $ gcloud config list --all
To start an instance, you need an image name and an instance type. Then the gcloud tool does the rest:
$ gcloud compute instances create cookbook \ --machine-type n1-standard-1 \ --image ubuntu-14-04 \
--metadata startup-script=\
"sudo wget -qO- https://get.docker.com/ | sh" ...
$ gcloud compute ssh cookbook sebgoa@cookbook:~$ sudo docker ps
CONTAINER ID IMAGE COMMAND CREATED ... ...
$ gcloud compute instances delete cookbook
In this example, you created an Ubuntu 14.04 instance, of machine type n1-standard-1 and passed metadata specifying that it was to be used as a start-up script. The bash command specified installed
the docker package from the Docker Inc. repository. This led to a
running instance with Docker running. The GCE metadata is rela‐ tively equivalent to the AWS EC2 user data and is processed by cloud-init in the instance.
Discussion
If you list the images available in a zone, you will see that some are interesting for Docker-specific tasks:
$ gcloud compute images list
NAME PROJECT ALIAS ... STATUS
container-vm... google-containers container-vm READY ...
ubuntu-1404-trusty... ubuntu-os-cloud ubuntu-14-04 READY ...
Indeed, GCE provides CoreOS images, as well as container VMs.
If you want to start a CoreOS instance, you can use the image alias. You do not need to specify any metadata to install Docker:
$ gcloud compute instances create cookbook --machine-type n1-standard-1 --image coreos
$ gcloud compute ssh cookbook ...
CoreOS (stable)
sebgoa@cookbook ~ $ docker ps
CONTAINER ID IMAGE COMMAND CREATED ...
Using the gcloud CLI is not Docker-specific. This CLI gives you access to the complete set of GCE APIs. However, using it to start instances and install Docker in them significantly streamlines the provisioning of Docker hosts.
Starting a Docker Host on Microsoft Azure
Problem
You want to start a VM instance on the Microsoft Azure cloud and use it as a Docker host.
Solution
First you need an account on Azure. If you do not want to use the
Azure portal, you need to install the Azure CLI. On a fresh Ubuntu
14.04 machine, you would do this:
$ sudo apt-get update
$ sudo apt-get -y install nodejs-legacy $ sudo apt-get -y install npm
$ sudo npm install -g azure-cli $ azure -v
0.8.14
Then you need to set up your account for authentication from the
CLI. Several methods are available. One is to download your
account settings from the portal and import them on the machine you are using the CLI from:
$ azure account download
$ azure account import ~/Downloads/Free\ Trial-2-5-2015-credentials.publishsettings $ azure account list
You are now ready to use the Azure CLI to start VM instances. Pick a location and an image:
$ azure vm image list | grep Ubuntu $ azure vm location list
info: Executing command vm location list + Getting locations
info: vm location list command OK
To create an instance with ssh access using password authentication, use the azure vm create command:
$ azure vm create cookbook --ssh=22 \
--password #@$#%#@$ \ data: cookbook ReadyRole West Europe ... 100.91.96.137 info: vm list command OK
You can then ssh to the instance and set up Docker normally.
Discussion
The Azure CLI is still under active development. The source can be
found on GitHub, and a Docker Machine driver is available.
The Azure CLI also allows you to create a Docker host automatically by using the azure vm docker create command:
-14_04_1-LTS-amd64-server-20150123-en-us -30GB cookbook @#$%@#$%$ info: Executing command vm docker create
warn: --vm-size has not been specified. Defaulting to "Small".
info: Found docker certificates. ...
info: vm docker create command OK $ azure vm list
info: Executing command vm list + Getting virtual machines
data: Name ... DNS Name IP Address data: --- ... --- ---data: goasguen ... goasguen.cloudapp.net 100.112.4.136
The host started will automatically have the Docker daemon run‐ ning, and you can connect to it by using the Docker client and a TLS connection:
$ docker --tls -H tcp://goasguen.cloudapp.net:4243 ps CONTAINER ID IMAGE COMMAND CREATED STATUS .... $ docker --tls -H tcp://goasguen.cloudapp.net:4243 images REPOSITORY TAG IMAGE ID CREATED VIRTUAL SIZE
Using this CLI is not Docker-specific. This CLI gives you access to the complete set of Azure APIs. However, using it to start instances and install Docker in them significantly streamlines the provisioning of Docker hosts.
See Also
• The Azure command-line interface
• Starting a CoreOS instance on Azure
• Using Docker Machine with Azure
Introducing Docker Machine to Create Docker
Hosts in the Cloud
Problem
You do not want to install the Docker daemon locally using Vagrant or the Docker toolbox. Instead, you would like to use a Docker host
in the cloud (e.g., AWS, Azure, DigitalOcean, Exoscale or GCE) and connect to it seamlessly using the local Docker client.
Solution
Use Docker Machine to start a cloud instance in your public cloud of
choice. Docker Machine is a client-side tool that you run on your
local host that allows you to start a server in a remote public cloud and use it as a Docker host as if it were local. Machine will automati‐ cally install Docker and set up TLS for secure communication. You will then be able to use the cloud instance as your Docker host and use it from a local Docker client.
Docker Machine beta was announced on February 26, 2015. Official documentation is now available on the Docker website. The source code is available on Git‐ Hub.
Let’s get started. Machine currently supports VirtualBox, DigitalO‐
cean, AWS, Azure, GCE, and a few other providers. This recipe uses DigitalOcean, so if you want to follow along step by step, you will
need an account on DigitalOcean.
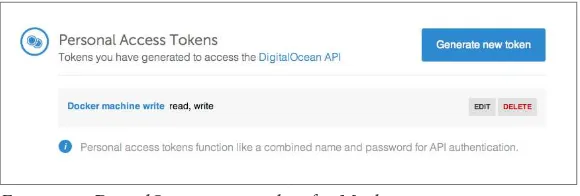
Once you have an account, do not create a droplet through the Digi‐ talOcean UI. Instead, generate an API access token for using Docker Machine. This token will need to be both a read and a write token so
that Machine can upload a public SSH key (Figure 1-3). Set an envi‐
ronment variable DIGITALOCEAN_ACCESS_TOKEN in your local com‐ puter shell that defines the token you created.
Figure 1-3. DigitalOcean access token for Machine
You are almost set. You just need to download the docker-machine
binary. Go to the documentation site and choose the correct binary
for your local computer architecture. For example, on OS X:
$ sudo curl -L https://github.com/docker/machine/releases/\ download/v0.5.6/docker-machine_darwin-amd64
$ mv docker-machine_darwin-amd64 docker-machine $ chmod +x docker-machine
$ ./docker-machine --version docker-machine version 0.5.6
With the environment variable DIGITALOCEAN_ACCESS_TOKEN set, you can create your remote Docker host:
$ ./docker-machine create -d digitalocean foobar Running pre-create checks...
Creating machine...
(foobar) Creating SSH key...
(foobar) Creating Digital Ocean droplet... ...
To see how to connect Docker to this machine, run: docker-machine env foobar
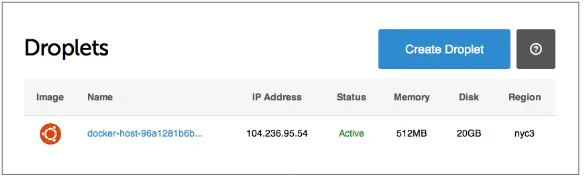
If you go back to your DigitalOcean dashboard, you will see that an
SSH key has been created, as well as a new droplet (see Figures 1-4
and 1-5).
Figure 1-4. DigitalOcean SSH keys generated by Machine
Figure 1-5. DigitalOcean droplet created by Machine
To configure your local Docker client to use this remote Docker host, you execute the command that was listed in the output of cre‐ ating the machine:
$ ./docker-machine env foobar export DOCKER_TLS_VERIFY="1"
export DOCKER_HOST="tcp://104.131.102.224:2376"
export DOCKER_CERT_PATH="/Users/.docker/.../machines/foobar" export DOCKER_MACHINE_NAME="foobar"
# Run this command to configure your shell: # eval $(docker-machine env foobar)
$ eval "$(./docker-machine env foobar)" $ docker ps
CONTAINER ID IMAGE COMMAND CREATED ...
Enjoy Docker running remotely on a DigitalOcean droplet created with Docker Machine.
Discussion
If not specified at the command line, Machine will look for DIGITALOCEAN_IMAGE, DIGITALOCEAN_REGION, and DIGITALOCEAN_SIZE environment variables. By default, they are set to docker, nyc3, and 512mb, respec‐ tively.
The docker-machine binary lets you create multiple machines, on
multiple providers. You also have the basic management capabilities: start, stop, rm, and so forth:
$ ./docker-machine ...
Commands:
active Print which machine is active
config Print the connection config for machine create Create a machine
inspect Inspect information about a machine
ip Get the IP address of a machine kill Kill a machine
ls List machines regenerate-certs Regenerate TLS ... restart Restart a machine
rm Remove a machine ssh Log into or run a command ... scp Copy files between machines start Start a machine
status Get the status of a machine stop Stop a machine
upgrade Upgrade a machine to the latest version of Docker
url Get the URL of a machine
version Show the Docker Machine version ... help Shows a list of commands or ...
For instance, you can list the machine you created previously, obtain its IP address, and even connect to it via SSH:
$ ./docker-machine ls
NAME ... DRIVER STATE URL
foobar digitalocean Running tcp://104.131.102.224:2376 $ ./docker-machine ip foobar
104.131.102.224
$ ./docker-machine ssh foobar
Welcome to Ubuntu 14.04.2 LTS (GNU/Linux 3.13.0-57-generic x86_64)
...
Last login: Mon Mar 16 09:02:13 2015 from ... root@foobar:~#
Before you are finished with this recipe, do not forget to delete the machine you created:
$ ./docker-machine rm foobar
See Also
• Official documentation
Starting a Docker Host on AWS Using Docker
Machine
Problem
You understand how to use the AWS CLI to start an instance in the
cloud and know how to install Docker (see “Starting a Docker Host
on AWS EC2” on page 3). But you would like to use a streamlined process integrated with the Docker user experience.
Solution
Use Docker Machine and its AWS EC2 driver.
Download the release candidate binaries for Docker Machine. Set some environment variables so that Docker Machine knows your AWS API keys and your default VPC in which to start the Docker host. Then use Docker Machine to start the instance. Docker auto‐ matically sets up a TLS connection, and you can use this remote Docker host started in AWS. On a 64-bit Linux machine, do the fol‐ lowing:
$ sudo su
# curl -L https://github.com/docker/machine/releases/\ download/v0.5.6/docker-machine_linux-amd64 > \ /usr/local/bin/docker-machine
# chmod +x docker-machine # exit
$ export AWS_ACCESS_KEY_ID=<your AWS access key> $ export AWS_SECRET_ACCESS_KEY_ID=<your AWS secret key> $ export AWS_VPC_ID=<the VPC ID you want to use> $ docker-machine create -d amazonec2 cookbook Running pre-create checks...
Creating machine...
(cookbook) Launching instance... ...
To see how to connect Docker to this machine, run: docker-machine env cookbook
Once the machine has been created, you can use your local Docker client to communicate with it. Do not forget to kill the machine after you are finished:
$ eval "$(docker-machine env cookbook)" $ docker ps
NAME ... DRIVER STATE URL
cookbook ... amazonec2 Running tcp://<IP_Machine_AWS>:2376 $ docker-machine rm cookbook
You can manage your machines directly from the Docker Machine CLI:
$ docker-machine -h ...
COMMANDS:
active Get or set the active machine create Create a machine
config Print the connection config for machine inspect Inspect information about a machine ip Get the IP address of a machine
upgrade Upgrade a machine to the latest version of Docker url Get the URL of a machine
help, h Shows a list of commands or help for one command
Discussion
Docker Machine contains drivers for several cloud
providers. We already showcased the Digital Ocean driver (see “Introducing Docker Machine to Create Docker Hosts in the Cloud” on page 11), and you can see how to use it for Azure in “Starting a Docker Host on Azure with Docker Machine” on page 19.
The AWS driver takes several command-line options to set your keys, VPC, key pair, image, and instance type. You can set them up as environment variables as you did previously or directly on the machine command line:
$ docker-machine create -h ...
OPTIONS:
--amazonec2-access-key
AWS Access Key [$AWS_ACCESS_KEY_ID] --amazonec2-ami
AWS machine image [$AWS_AMI]
--amazonec2-instance-type 't2.micro' AWS instance type [$AWS_INSTANCE_TYPE] --amazonec2-region 'us-east-1'
AWS region [$AWS_DEFAULT_REGION] --amazonec2-root-size '16' AWS root disk size (in GB) ... --amazonec2-secret-key
AWS Secret Key [$AWS_SECRET_ACCESS_KEY] --amazonec2-security-group
AWS VPC security group ... --amazonec2-session-token
AWS Session Token [$AWS_SESSION_TOKEN] --amazonec2-subnet-id
AWS VPC subnet id [$AWS_SUBNET_ID] --amazonec2-vpc-id
AWS VPC id [$AWS_VPC_ID] --amazonec2-zone 'a'
AWS zone for instance ... [$AWS_ZONE]
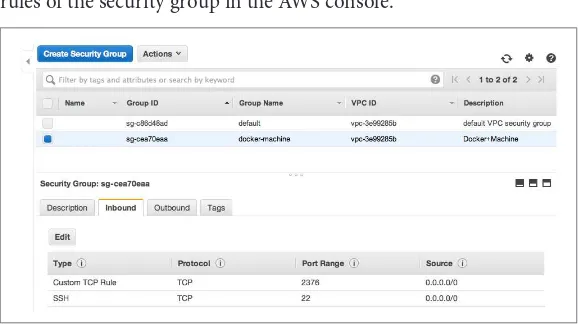
Finally, machine will create an SSH key pair and a security group for you. The security group will open traffic on port 2376 to allow com‐
munications over TLS from a Docker client. Figure 1-6 shows the
rules of the security group in the AWS console.
Starting a Docker Host on Azure with Docker
Machine
Problem
You know how to start a Docker host on Azure by using the Azure CLI, but you would like to unify the way you start Docker hosts in multiple public clouds by using Docker Machine.
Solution
Use the Docker Machine Azure driver. In Figure 1-3, you saw how
to use Docker Machine to start a Docker host on DigitalOcean. The
same thing can be done on Microsoft Azure. You will need a valid subscription to Azure.
You need to download the docker-machine binary. Go to the docu‐
mentation site and choose the correct binary for your local com‐
puter architecture. For example, on OS X:
$ wget https://github.com/docker/machine/releases/\
With a valid Azure subscription, create an X.509 certificate and
upload it through the Azure portal. You can create the certificate
with the following commands:
$ openssl req -x509 -nodes -days 365 -newkey rsa:1024 \ -keyout mycert.pem -out mycert.pem
$ openssl pkcs12 -export -out mycert.pfx -in mycert.pem -name "My Certificate"
$ openssl x509 -inform pem -in mycert.pem -outform der -out mycert.cer
Upload mycert.cer and define the following environment variables:
$ export AZURE_SUBSCRIPTION_ID=<UID of your subscription> $ export AZURE_SUBSCRIPTION_CERT=mycert.pem
You can then use docker-machine and set your local Docker client to use this remote Docker daemon:
$ ./docker-machine create -d azure goasguen-foobar Creating Azure machine...
Waiting for SSH...
...
"goasguen-foobar" has been created and is now the active machine.
...
$ ./docker-machine ls
NAME DRIVER ... URL
goasguen-foobar azure ... tcp://goasguen-foobar.cloudapp.net: 2376
$ $(docker-machine env goasguen-foobar) $ docker ps
CONTAINER ID IMAGE COMMAND CREATED ...
In this example, goasguen-foobar is the name that I gave to my Docker machine. This needs to be a glob‐ ally unique name. Chances are that names like foobar
and test have already been taken.
Discussion
With your local Docker client set up to use the remote Docker dae‐ mon running in this Azure virtual machine, you can pull images from your favorite registries and start containers.
For example, let’s start an Nginx container:
$ docker pull nginx
$ docker run -d -p 80:80 nginx
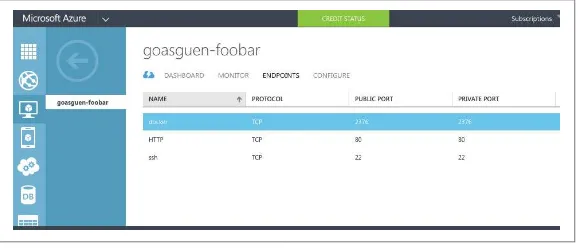
To expose port 80 of this remote host in Azure, you need to add an endpoint to the VM that was created. Head over to the Azure portal, select the VM (here, goasguen-foobar), and add an endpoint for the
HTTP request, as in Figure 1-7. Once the endpoint is created, you
can access Nginx at http://<unique_name>.cloudapp.net.
See Also
• Docker Machine Azure driver documentation
Running a Cloud Provider CLI in a Docker
Container
Problem
You want to take advantage of containers and run your cloud pro‐ vider CLI of choice within a container. This gives you more porta‐ bility options and avoids having to install the CLI from scratch. You just need to download a container image from the Docker Hub.
Solution
For the Google GCE CLI, there is a public image maintained by
Google. Download the image via docker pull and run your GCE commands through interactive ephemeral containers.
For example:
$ docker pull google/cloud-sdk $ docker images | grep google
google/cloud-sdk latest a7e7bcdfdc16 ...
You can then log in and issue commands as described in “Starting a
Docker Host on Google GCE” on page 7. The only difference is that the CLI is running within containers. The login command is issued through a named container. That named container is used as a data volume container (i.e., --volumes-from cloud-config) in subse‐ quent CLI calls. This allows you to use the authorization token that is stored in it:
$ docker run -t -i --name gcloud-config google/cloud-sdk gcloud auth login
Go to the following link in your browser: ...
$ docker run --rm \ -ti \
--volumes-from gcloud-config google/cloud-sdk \ gcloud compute zones list
NAME REGION STATUS asia-east1-c asia-east1 UP asia-east1-a asia-east1 UP
asia-east1-b asia-east1 UP europe-west1-b europe-west1 UP europe-west1-c europe-west1 UP us-central1-f us-central1 UP us-central1-b us-central1 UP us-central1-a us-central1 UP
Using an alias makes things even better:
$ alias magic='docker run --rm \ -ti \
--volumes-from gcloud-config \ google/cloud-sdk gcloud' $ magic compute zones list
NAME REGION STATUS asia-east1-c asia-east1 UP asia-east1-a asia-east1 UP asia-east1-b asia-east1 UP europe-west1-b europe-west1 UP europe-west1-c europe-west1 UP us-central1-f us-central1 UP us-central1-b us-central1 UP us-central1-a us-central1 UP
Discussion
A similar process can be used for AWS. If you search for an awscli
image on Docker Hub, you will see several options. The Dockerfile
provided shows you how the image was constructed and the CLI
installed within the image. If you take the nathanleclaire/awscli
image, you notice that no volumes are mounted to keep the creden‐ tials from container to container. Hence you need to pass the AWS access keys as environment variables when you launch a container:
||69:aa:64:4b:72:50:ee:15:9a:da:71:4e:44:cd:db | cookbook || |+---+---+|
Also notice that aws was set up as an entry point in this image. Therefore, there you don’t need to specify it and should only pass arguments to it.
You can build your own AWS CLI image that allows you to handle API keys more easily.
See Also
• Official documentation on the containerized Google SDK
Using Google Container Registry to Store Your
Docker Images
Problem
You have used a Docker private registry hosted on your own infra‐ structure but you would like to take advantage of a hosted service. Specifically, you would like to take advantage of the newly
announced Google container registry.
Other hosted private registry solutions exist, including Docker Hub Enterprise and Quay.io. This recipe does not represent an endorsement of one versus another.
Solution
If you have not done so yet, sign up on the Google Cloud Platform. Then download the Google Cloud CLI and create a project (see “Starting a Docker Host on Google GCE” on page 7). Make sure that you update your gcloud CLI on your Docker host to load the pre‐ view components. You will have access to gcloud docker, which is a wrapper around the docker client:
$ gcloud components update $ gcloud docker help
Usage: docker [OPTIONS] COMMAND [arg...]
A self-sufficient runtime for linux containers. ...
This example uses a cookbook project on Google Cloud with the
project ID sylvan-plane-862. Your project name and project ID will
differ.
As an example, on the Docker host that we are using locally, we have
a busybox image that we want to upload to the Google Container
Registry (GCR). You need to tag the image you want to push to the GCR so that it follows the namespace naming convention of the GCR (i.e., gcr.io/project_id/image_name). You can then upload the image with gcloud docker push:
$ docker images | grep busybox
busybox latest a9eb17255234 8 months ago 2.433 MB $ docker tag busybox gcr.io/sylvan_plane_862/busybox
$ gcloud docker push gcr.io/sylvan_plane_862/busybox
The push refers to a repository [gcr.io/sylvan_plane_862/busy-box] (len: 1)
Sending image list
Pushing repository gcr.io/sylvan_plane_862/busybox (1 tags) 511136ea3c5a: Image successfully pushed
42eed7f1bf2a: Image successfully pushed 120e218dd395: Image successfully pushed a9eb17255234: Image successfully pushed Pushing tag for rev [a9eb17255234] on \
{https://gcr.io/v1/repositories/sylvan_plane_862/busybox/tags/ latest}
The naming convention of the GCR namespace is such that if you have dashes in your project ID, you need to replace them with underscores.
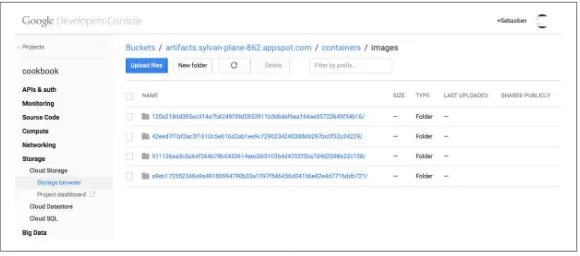
If you navigate to your storage browser in your Google Developers console, you will see that a new bucket has been created and that all
Figure 1-8. Google container registry image
Discussion
Automatically, Google compute instances that you started in the same project that you used to tag the image, will have the right privi‐ leges to pull that image. If you want other people to be able to pull that image, you need to add them as members to that project. You can set your project by default with gcloud config set project <project_id> so you do not have to specify it on subsequent gcloud commands.
Let’s start an instance in GCE, ssh to it, and pull the busybox image from GCR:
$ gcloud compute instances create cookbook-gce \ --image container-vm \ --zone europe-west1-c \ --machine-type f1-micro $ gcloud compute ssh cookbook-gce
Updated [https://www.googleapis.com/compute/v1/projects/sylvan-plane-862].
...
$ sudo gcloud docker pull gcr.io/sylvan_plane_862/busybox Pulling repository gcr.io/sylvan_plane_862/busybox a9eb17255234: Download complete
511136ea3c5a: Download complete 42eed7f1bf2a: Download complete 120e218dd395: Download complete
Status: Downloaded newer image for gcr.io/sylvan_plane_862/ busybox:latest
sebastiengoasguen@cookbook:~$ sudo docker images | grep busybox gcr.io/sylvan_plane_862/busybox latest a9eb17255234 ...
To be able to push from a GCE instance, you need to start it with the correct scope: --scopes https:// www.googleapis.com/auth/devstorage.read_write.
Using Kubernetes in the Cloud via GKE
Problem
You want to use a group of Docker hosts and manage containers on
them. You like the Kubernetes container orchestration engine but
would like to use it as a hosted cloud service.
Solution
Use the Google Container Engine service (GKE). This new service
allows you to create a Kubernetes cluster on-demand using the Goo‐ gle API. A cluster will be composed of a master node and a set of compute nodes that act as container VMs, similar to what was
described in “Starting a Docker Host on Google GCE” on page 7.
GKE is Generally Available (GA). Kubernetes is still under heavy development but has released a stable API with its 1.0 release. For details on Kubernetes, see chapter 5 of the Docker cookbook.
Update your gcloud SDK to use the container engine preview. If you
have not yet installed the Google SDK, see “Starting a Docker Host
on Google GCE” on page 7.
$ gcloud components update
Install the kubectl Kubernetes client:
$ gcloud components install kubectl
Starting a Kubernetes cluster using the GKE service requires a single command:
$ gcloud container clusters create cook \ --num-nodes 1 \
--machine-type g1-small Creating cluster cook...done.
Created [https://container.googleapis.com/v1/projects/sylvan-plane-862/zones/ \
NAME ZONE MASTER_VERSION ... STATUS cook us-central1-f 1.0.3 ... RUNNING
Your cluster IP addresses, project name, and zone will differ from what is shown here. What you do see is that a Kubernetes configura‐ tion file, kubeconfig, was generated for you. It is located at ~/.kube/ config and contains the endpoint of your container cluster as well as the credentials to use it.
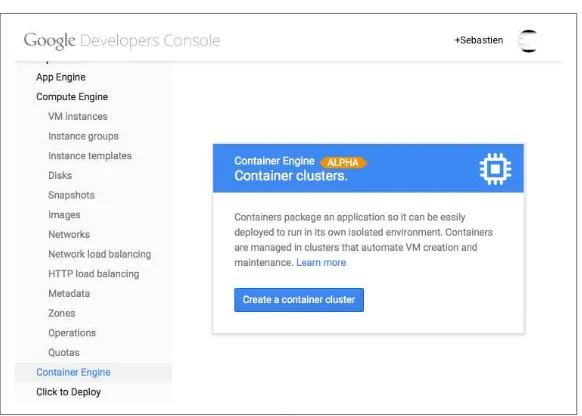
You could also create a cluster through the Google Cloud web con‐ sole (see Figure 1-9).
Figure 1-9. Container Engine Wizard
Once your cluster is up, you can submit containers to it—meaning that you can interact with the underlying Kubernetes master node to launch a group of containers on the set of nodes in your cluster.
Groups of containers are defined as pods. The gcloud CLI gives you
a convenient way to define simple pods and submit them to the clus‐
ter. Next you are going to launch a container using the tutum/word‐
press image, which contains a MySQL database. When you installed
the gcloud CLI, it also installed the Kubernetes client kubectl. You can verify that kubectl is in your path. It will use the configuration that was autogenerated when you created the cluster. This will allow you to launch containers from your local machine on the remote container cluster securely:
$ kubectl run wordpress --image=tutum/wordpress --port=80 $ kubectl get pods
NAME READY STATUS RESTARTS AGE wordpress-0d58l 1/1 Running 0 1m
Once the container is scheduled on one of the cluster nodes, you need to create a Kubernetes service to expose the application run‐ ning in the container to the outside world. This is done again with kubectl:
$ kubectl expose rc wordpress \ --type=LoadBalancer
NAME LABELS SELECTOR IP(S) PORT(S) wordpress run=wordpress run=wordpress 80/TCP
The expose command creates a Kubernetes service (one of the three Kubernetes primitives with pods and replication controllers) and it also obtains a public IP address from a load-balancer. The result is that when you list the services in your container cluster, you can see
the wordpress service with an internal IP and a public IP where you
can access the WordPress UI from your laptop:
$ kubectl get services
NAME ... SELECTOR IP(S) PORT(S) wordpress ... run=wordpress 10.95.252.182 80/TCP 104.154.82.185
You will then be able to enjoy WordPress.
Discussion
The kubectl CLI can be used to manage all resources in a Kuber‐ netes cluster (i.e., pods, services, replication controllers, nodes). As shown in the following snippet of the kubectl usage, you can create, delete, describe, and list all of these resources:
$ kubectl -h
kubectl controls the Kubernetes cluster manager.
create Create a resource by filename or stdin replace Replace a resource by filename or stdin. patch Update field(s) of a resource by stdin. delete Delete a resource by filename, or ... ...
Although you can launch simple pods consisting of a single con‐ tainer, you can also specify a more advanced pod defined in a JSON or YAML file by using the -f option:
$ kubectl create -f /path/to/pod/pod.json
A pod can be described in YAML. Here let’s write your pod in a
JSON file, using the newly released Kubernetes v1 API version. This
pod will start Nginx:
{
"kind": "Pod",
"apiVersion": "v1",
"metadata": {
Start the pod and check its status. Once it is running and you have a firewall with port 80 open for the cluster nodes, you will be able to see the Nginx welcome page. Additional examples are available on
the Kubernetes GitHub page.
$ kubectl create -f nginx.json pods/nginx
$ kubectl get pods
NAME READY STATUS RESTARTS AGE
nginx 1/1 Running 0 20s wordpress 1/1 Running 0 17m
To clean things up, remove your pods, exit the master node, and delete your cluster:
$ kubectl delete pods nginx $ kubectl delete pods wordpress
$ gcloud container clusters delete cook
See Also
• Cluster operations
• Pod operations
• Service operations
• Replication controller operations
Setting Up to Use the EC2 Container Service
Problem
You want to try the new Amazon AWS EC2 container service (ECS).
Solution
ECS is a generally available service of Amazon Web Services. Get‐ ting set up to test ECS involves several steps. This recipe summari‐
zes the main steps, but you should refer to the official documenta‐
tion for all details:
1. Sign up for AWS if you have not done so.
2. Log in to the AWS console. Review “Starting a Docker Host on
AWS EC2” on page 3 if needed. You will launch ECS instances within a security group associated with a VPC. Create a VPC and a security group, or ensure that you have default ones present.
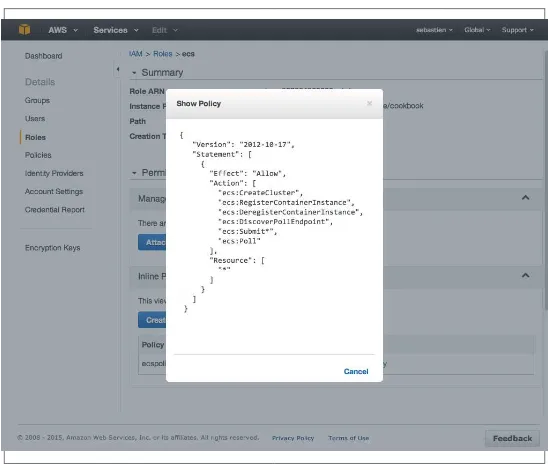
3. Go to the IAM console and create a role for ECS. If you are not familiar with IAM, this step is a bit advanced and can be fol‐
lowed step by step on the AWS documentation for ECS.
Figure 1-10. See the discussion section of this recipe for an automated way of creating this policy using Boto.
Figure 1-10. ECS policy in IAM role console
5. Install the latest AWS CLI. The ECS API is available in version
1.7.0 or greater. You can verify that the aws ecs commands are now available:
$ sudo pip install awscli $ aws --version
aws-cli/1.7.8 Python/2.7.9 Darwin/12.6.0 $ aws ecs help
ECS()
NAME
ecs
-DESCRIPTION
Amazon EC2 Container Service (Amazon ECS) is a highly scalable, fast, container management service that makes it easy to run, stop, and manage Docker con-tainers on a cluster of Amazon EC2 instances. Amazon ECS lets you launch and stop container-enabled applica-tions with simple API calls, allows you to get the state of your cluster from a centralized service, and
gives you access to many familiar Amazon EC2 features like security groups, Amazon EBS volumes, and IAM roles. ...
6. Create an AWS CLI configuration file that contains the API keys of the IAM user you created. Note the region being set is us-east-1, which is the Northern Virginia region where ECS is currently available:
$ cat ~/.aws/config [default]
output = table region = us-east-1
aws_access_key_id = <your AWS access key> aws_secret_access_key = <your AWS secret key>
Once you have completed all these steps, you are ready to use ECS.
You need to create a cluster (see “Creating an ECS Cluster” on page
33), define tasks corresponding to containers, and run those tasks to
start the containers on the cluster (see “Starting Docker Containers
on an ECS Cluster” on page 37).
Discussion
Creating the IAM profile and the ECS policy for the instances that will be started to form the cluster can be overwhelming if you have not used AWS before. To facilitate this step, you can use the online
code accompanying this book, which uses the Python Boto client to
create the policy.
Install Boto, copy /.aws/config to /.aws/credentials, clone the reposi‐ tory, and execute the script:
$ git clone https://github.com/how2dock/docbook.git $ sudo pip install boto
$ cp ~/.aws/config ~/.aws/credentials $ cd docbook/ch08/ecs
$ ./ecs-policy.py
This script creates an ecs role, an ecspolicy policy, and a cookbook instance profile. You can edit the script to change these names. After
completion, you should see the role and the policy in the IAM con‐
sole.
See Also
• ECS documentation
Creating an ECS Cluster
Problem
You are set up to use ECS (see “Setting Up to Use the EC2 Container
Service” on page 30). Now you want to create a cluster and some instances in it to run containers.
Solution
Use the AWS CLI that you installed in “Setting Up to Use the EC2
Container Service” on page 30 and explore the new ECS API. In this recipe, you will learn to use the following:
• aws ecs list-clusters
• aws ecs create-cluster
• aws ecs describe-clusters
• aws ecs list-container-instances
• aws ecs delete-cluster
By default, you have one cluster in ECS, but until you have launched an instance in that cluster, it is not active. Try to describe the default cluster:
$ aws ecs describe-clusters
---| DescribeClusters ---| +---+ || failures || |+---+---+| || arn | reason || |+---+---+| || arn:aws:ecs:us-east-1::cluster/default | MISSING || |+---+---+
Currently you are limited to two ECS clusters.
To activate this cluster, launch an instance using Boto. The AMI
used is specific to ECS and contains the ECS agent. You need to have
created an SSH key pair to ssh into the instance, and you need an
instance profile associated with a role that has the ECS policy (see “Setting Up to Use the EC2 Container Service” on page 30):
$ python
With one instance started, wait for it to run and register in the clus‐
ter. Then if you describe the cluster again, you will see that the
default cluster has switched to active state. You can also list con‐ tainer instances:
Starting additional instances increases the size of the cluster:
$ aws ecs list-container-instances
|+---+| || arn:aws:ecs:us-east-1::container-instance/75738343-... || || arn:aws:ecs:us-east-1::container-instance/b457e535-... || || arn:aws:ecs:us-east-1::container-instance/e5c0be59-... || || arn:aws:ecs:us-east-1::container-instance/e62d3d79-... || |+---+|
Since these container instances are regular EC2 instances, you will see them in your EC2 console. If you have set up an SSH key prop‐ erly and opened port 22 on the security group used, you can also ssh to them:
$ ssh -i ~/.ssh/id_rsa_ecs [email protected] ...
__| __| __|
_| ( \__ \ Amazon ECS-Optimized Amazon Linux AMI ____|\___|____/
Image created: Thu Dec 18 01:39:14 UTC 2014 PREVIEW AMI
9 package(s) needed for security, out of 10 available Run "sudo yum update" to apply all updates.
[ec2-user@ip-172-31-33-78 ~]$ docker ps
CONTAINER ID IMAGE ... 4bc4d480a362 amazon/amazon-ecs-agent:latest ... [ec2-user@ip-10-0-0-92 ~]$ docker version
You see that the container instance is running Docker and that the ECS agent is a container. The Docker version that you see will most likely be different, as Docker releases a new version approximately every two months.
Discussion
Although you can use the default cluster, you can also create your own:
$ aws ecs create-cluster --cluster-name cookbook
---|| arn:aws:ecs:us-east-1:587264368683:cluster/cookbook ---|| || arn:aws:ecs:us-east-1:587264368683:cluster/default || |+---+|
To launch instances in that freshly created cluster instead of the
default one, you need to pass some user data during the instance
creation step. Via Boto, this can be achieved with the following script:
See Also
• The ECS agent on GitHub
Starting Docker Containers on an ECS Cluster
Problem
You know how to create an ECS cluster on AWS (see “Creating an
ECS Cluster” on page 33), and now you are ready to start containers on the instances forming the cluster.
Solution
Define your containers or group of containers in a definition file in
JSON format. This will be called a task. You will register this task
and then run it; it is a two-step process. Once the task is running in the cluster, you can list, stop, and start it.
For example, to run Nginx in a container based on the nginx image
from Docker Hub, you create the following task definition in JSON format:
[
{
"environment": [],
"name": "nginx",
"image": "nginx",
"cpu": 10,
"portMappings": [
{
"containerPort": 80,
"hostPort": 80
}
],
"memory": 10,
"essential": true
} ]
You can notice the similarities between this task definition, a Kuber‐ netes Pod and a Docker compose file. To register this task, use the
ECS register-task-definition call. Specify a family that groups
the tasks and helps you keep revision history, which can be handy for rollback purposes:
$ aws ecs register-task-definition \ || arn:aws:ecs:us-east-1:5845235:task-definition/nginx:1 || |+---+|
To start the container in this task definition, you use the run-task command and specify the number of containers you want running. To stop the container, you stop the task specifying it via its task UUID obtained from list-tasks, as shown here:
$ aws ecs run-task --task-definition nginx:1 --count 1
$ aws ecs stop-task --task 6223f2d3-3689-4b3b-a110-ea128350adb2
ECS schedules the task on one of the container instances in your cluster. The image is pulled from Docker Hub, and the container started using the options specified in the task definition. At this pre‐ view stage of ECS, finding the instance where the task is running and finding the associated IP address isn’t straightforward. If you have multiple instances running, you will have to do a bit of guess‐ work. There does not seem to be a proxy service as in Kubernetes either.
Discussion
The Nginx example represents a task with a single container run‐ ning, but you can also define a task with linked containers. The task
definition reference describes all possible keys that can be used to
define a task. To continue with our example of running WordPress
with two containers (a wordpress one and a mysql one), you can
define a wordpress task. It is similar to a Compose definition file to AWS ECS task definition format. It will not go unnoticed that a standardization effort among compose, pod, and task would benefit the community.
[
{
"image": "wordpress",
"name": "wordpress",
"cpu": 10,
"essential": true,
"name": "WORDPRESS_DB_PASSWORD",
"value": "wordpresspwd"
The task is registered the same way as done previously with Nginx, but you specify a new family. But when the task is run, it could fail due to constraints not being met. In this example, my container instances are of type t2.micro with 1GB of memory. Since the task definition is asking for 500 MB for wordpress and 500 MB for mysql, there’s not enough memory for the cluster scheduler to find an instance that matches the constraints and running the task fails:
$ aws ecs register-task-definition --family wordpress \ --cli-input-json file://$PWD/wordpress.json $ aws ecs run-task --task-definition wordpress:1 --count 1
---You can edit the task definition, relax the memory constraint, and register a new task in the same family (revision 2). It will success‐ fully run. If you log in to the instance running this task, you will see the containers running alongside the ECS agent:
$ aws ecs run-task --task-definition wordpress:2 --count 1 $ ssh -i ~/.ssh/id_rsa_ecs [email protected]
... 81023576f81e amazon/amazon-ecs ... ecs-agent
See Also
• Task definition reference