Plumbing
FOR
DUMmIES
Plumbing
FOR
DUMmIES
‰
D O - I T - YO U R S
E L F
Plumbing Do-It-Yourself For Dummies®
Published by
Wiley Publishing, Inc.
111 River St.
Hoboken, NJ 07030-5774
Copyright © 2008 by Wiley Publishing, Inc., Indianapolis, Indiana Published by Wiley Publishing, Inc., Indianapolis, Indiana Published simultaneously in Canada
No part of this publication may be reproduced, stored in a retrieval system, or transmitted in any form or by any means, elec-tronic, mechanical, photocopying, recording, scanning, or otherwise, except as permitted under Sections 107 or 108 of the 1976 United States Copyright Act, without either the prior written permission of the Publisher, or authorization through pay-ment of the appropriate per-copy fee to the Copyright Clearance Center, 222 Rosewood Drive, Danvers, MA 01923,
978-750-8400, fax 978-646-8600. Requests to the Publisher for permission should be addressed to the Legal Department, Wiley Publishing, Inc., 10475 Crosspoint Blvd., Indianapolis, IN 46256, 317-572-3447, fax 317-572-4355, or online at
http://www.wiley.com/go/permissions.
Trademarks: Wiley, the Wiley Publishing logo, For Dummies, the Dummies Man logo, A Reference for the Rest of Us!, The Dummies Way, Dummies Daily, The Fun and Easy Way, Dummies.com and related trade dress are trademarks or registered trademarks of John Wiley & Sons, Inc. and/or its affiliates in the United States and other countries, and may not be used with-out written permission. All other trademarks are the property of their respective owners. Wiley Publishing, Inc., is not associated with any product or vendor mentioned in this book.
LIMIT OF LIABILITY/DISCLAIMER OF WARRANTY: THE PUBLISHER AND THE AUTHOR MAKE NO REPRESENTATIONS OR WARRANTIES WITH RESPECT TO THE ACCURACY OR COMPLETENESS OF THE CONTENTS OF THIS WORK AND SPECIF-ICALLY DISCLAIM ALL WARRANTIES, INCLUDING WITHOUT LIMITATION WARRANTIES OF FITNESS FOR A PARTICULAR PURPOSE. NO WARRANTY MAY BE CREATED OR EXTENDED BY SALES OR PROMOTIONAL MATERIALS. THE ADVICE AND STRATEGIES CONTAINED HEREIN MAY NOT BE SUITABLE FOR EVERY SITUATION. THIS WORK IS SOLD WITH THE UNDER-STANDING THAT THE PUBLISHER IS NOT ENGAGED IN RENDERING LEGAL, ACCOUNTING, OR OTHER PROFESSIONAL SERVICES. IF PROFESSIONAL ASSISTANCE IS REQUIRED, THE SERVICES OF A COMPETENT PROFESSIONAL PERSON SHOULD BE SOUGHT. NEITHER THE PUBLISHER NOR THE AUTHOR SHALL BE LIABLE FOR DAMAGES ARISING HERE-FROM. THE FACT THAT AN ORGANIZATION OR WEBSITE IS REFERRED TO IN THIS WORK AS A CITATION AND/OR A POTENTIAL SOURCE OF FURTHER INFORMATION DOES NOT MEAN THAT THE AUTHOR OR THE PUBLISHER ENDORSES THE INFORMATION THE ORGANIZATION OR WEBSITE MAY PROVIDE OR RECOMMENDATIONS IT MAY MAKE. FURTHER, READERS SHOULD BE AWARE THAT INTERNET WEBSITES LISTED IN THIS WORK MAY HAVE CHANGED OR DISAPPEARED BETWEEN WHEN THIS WORK WAS WRITTEN AND WHEN IT IS READ.
For general information on our other products and services, please contact our Customer Care Department within the U.S. at 800-762-2974, outside the U.S. at 317-572-3993, or fax 317-572-4002.
For technical support, please visit www.wiley.com/techsupport.
Wiley also publishes its books in a variety of electronic formats. Some content that appears in print may not be available in electronic books.
Library of Congress Control Number: 2007936468 ISBN: 978-0-470-17344-2
About the Author
Donald R. Prestly is a former Senior Editor for HANDY Magazinefor The Handyman Club of America as well as a former Associate Editor for The Family Handyman Magazine.In addition to nearly 20 years of writing and doing home improvement projects, he spent several years as a manager for one of the Midwest’s largest home centers. Throw in the everyday upkeep require-ments of being a homeowner, dealing with the same problems and repairs as other
Dedication
Author’s Acknowledgments
Publisher’s Acknowledgments
We’re proud of this book; please send us your comments through our Dummies online registration form located at www.dummies.com/register/.
Some of the people who helped bring this book to market include the following:
Acquisitions, Editorial, and Media Development
Senior Project Editor:Tim Gallan
Acquisitions Editor: Tracy Boggier
Senior Copy Editor:Elizabeth Rea
Editorial Program Coordinator:Erin Calligan Mooney
Editorial Managers: Christine Meloy Beck, Michelle Hacker
Editorial Assistants:Joe Niesen, David Lutton, Leeann Harney
Photographer: Tom Reed, Kreber Photography
Cartoons: Rich Tennant (www.the5thwave.com)
Composition Services
Project Coordinator: Kristie Rees
Layout and Graphics: Shawn Frazier, Shelley Norris, Kathie Rickard, Brent Savage
Anniversary Logo Design:Richard Pacifico
Proofreaders: Laura Albert, Jessica Kramer, Shannon Ramsey
Indexer: Potomac Indexing, LLC
Publishing and Editorial for Consumer Dummies
Diane Graves Steele, Vice President and Publisher, Consumer Dummies
Joyce Pepple, Acquisitions Director, Consumer Dummies
Kristin A. Cocks, Product Development Director, Consumer Dummies
Michael Spring, Vice President and Publisher, Travel
Kelly Regan,Editorial Director, Travel
Publishing for Technology Dummies
Andy Cummings,Vice President and Publisher, Dummies Technology/General User
Composition Services
Gerry Fahey,Vice President of Production Services
Contents at a Glance
Introduction...1
Part I: Getting to Know Your Plumbing System...5
Chapter 1: Understanding Plumbing...7
Chapter 2: Fetch Me My Pipe and Fittings!...15
Chapter 3: Getting the 411 on Codes and Requirements ...23
Chapter 4: Filling Your Plumbing Toolbox ...25
Part II: Faucets and Sinks...31
Cleaning a Faucet Aerator and Sink Sprayer...33
Repairing a Leaky Rotary Ball Faucet ...35
Repairing a Leaky Cartridge Filter Faucet...39
Repairing a Leaky Ceramic Disk Faucet ...44
Repairing a Leaky Compression Faucet ...48
Repairing a Leaky Two-Handle Faucet Spout...51
Caulking around a Sink Bowl ...54
Replacing a Leaky Sink Basket...56
Replacing a Sink Trap ...59
Replacing a Double-Bowl Kitchen Sink Drain ...61
Replacing a Bathroom Sink Drain...65
Adjusting a Pop-Up Drain ...70
Unclogging Sink Drains ...72
Soldering Copper Pipe ...74
Part III: Tubs and Showers ...77
Caulking the Tub, Tile, and Fixtures ...79
Replacing a Tub Spout...81
Replacing a Showerhead ...84
Repairing a Tub and Shower Compression Faucet ...86
Repairing a Cartridge Shower Faucet ...92
Repairing a Disk Shower Faucet ...97
Repairing a Cartridge/Seat-Spring Faucet ...102
Adjusting a Tub Drain ...108
Part IV: Toilets...115
Checking a Toilet for Leaks ...117
Replacing a Fill Valve ...119
Replacing a Flush Valve ...125
Replacing a Flapper...130
Adjusting the Tank’s Water Level ...133
Repairing a Leaky Tank...135
Repairing a Leaky Bowl ...138
Stopping a Tank from Sweating ...143
Replacing a Toilet Seat...147
Unclogging a Toilet with a Plunger ...149
Clearing a Clog with a Closet Auger...151
Part V: The Part of Tens ...153
Chapter 5: Ten Tips for Plumbing Success ...155
Chapter 6: Ten Tips for Dealing with Problematic Pipes ...159
Chapter 7: Ten Safety Considerations ...161
Table of Contents
Introduction ...1
Part I: Getting to Know Your Plumbing System ...5
Chapter 1: Understanding Plumbing ...7
Establishing Your Plumbing Limits...7
Ensuring Successful Plumbing Adventures ...7
The Residental Plumbing System...8
The supply side: Water comes in ...10
Drain, waste, and vent: Water goes out ...11
Septic systems: Don’t mess with them! ...13
Chapter 2: Fetch Me My Pipe and Fittings!...15
Pipes ...15
Supply Tubes ...18
Supply Fittings...19
Drain and Vent Fittings ...20
Chapter 3: Getting the 411 on Codes and Requirements...23
Common Code Requirements...23
Getting Permission — and the Inspector’s Blessing!...24
Chapter 4: Filling Your Plumbing Toolbox ...25
Tools, Tools, and More Tools ...25
Stocking Up on Safety Equipment — and Using It ...29
Part II: Faucets and Sinks ...31
Cleaning a Faucet Aerator and Sink Sprayer...33
Repairing a Leaky Rotary Ball Faucet ...35
Repairing a Leaky Cartridge Filter Faucet ...39
Repairing a Leaky Ceramic Disk Faucet...44
Repairing a Leaky Compression Faucet...48
Repairing a Leaky Two-Handle Faucet Spout...51
Caulking around a Sink Bowl...54
Replacing a Leaky Sink Basket...56
Replacing a Sink Trap...59
Replacing a Double-Bowl Kitchen Sink Drain...61
Replacing a Bathroom Sink Drain...65
Adjusting a Pop-Up Drain ...70
Unclogging Sink Drains ...72
xiv
Plumbing Do-It-Yourself For Dummies
Part III: Tubs and Showers...77
Caulking the Tub, Tile, and Fixtures ...79
Replacing a Tub Spout ...81
Replacing a Showerhead...84
Repairing a Tub and Shower Compression Faucet ...86
Repairing a Cartridge Shower Faucet ...92
Repairing a Disk Shower Faucet ...97
Repairing a Cartridge/Seat-Spring Faucet ...102
Adjusting a Tub Drain ...108
Unclogging Tub and Shower Drains ...111
Part IV: Toilets ...115
Checking a Toilet for Leaks ...117
Replacing a Fill Valve...119
Replacing a Flush Valve ...125
Replacing a Flapper...130
Adjusting the Tank’s Water Level ...133
Repairing a Leaky Tank...135
Repairing a Leaky Bowl...138
Stopping a Tank from Sweating ...143
Replacing a Toilet Seat...147
Unclogging a Toilet with a Plunger...149
Clearing a Clog with a Closet Auger ...151
Part V: The Part of Tens...153
Chapter 5: Ten Tips for Plumbing Success...155
Try Simple Solutions First...155
Work During Store Hours ...155
Plan, Plan, Plan ...155
Know Your Home ...156
Don’t Forget the Codes...156
Don’t Be a Cheapskate...156
Have the Right Tools...156
Ask for Advice ...156
Know When to Call a Pro...156
Don’t Procrastinate...157
Chapter 6: Ten Tips for Dealing with Problematic Pipes ...159
Noisy Pipes ...159
Sweating Pipes...160
Chapter 7: Ten Safety Considerations ...161
Think about Safety Before Anything Else...161
Don’t Get Zapped ...161
Have Emergency Numbers Handy ...161
Chill...161
Practice ...162
Protect Your Eyes...162
Protect Your Ears ...162
Protect Your Hands...162
Protect Your Lungs ...162
Use the Right Tools...162
Index ...163
xv
Introduction
P
lumbing Do-It-Yourself For Dummiesshows you how to deal with most runs, leaks, and drips of your home’s plumbing system and gives you confidence to tackle some seemingly professional-level repairs. I provide information here on kitchen fixtures (both the faucet and the sink) and bathroom fixtures (toilets, tubs, and showers). I also show you how a residential plumbing system is designed as well as how it operates and what’s needed to make it work right.I hope you find this book not only packed full of information but also fun to use. My years of working with customers every day in one of the country’s major home cen-ters, along with my decade and a half of researching and writing about — and doing! — home repairs gives me real-life insight into what you can expect to find when it comes to fixing your home’s plumbing problems. And, believe me, you will eventu-ally encounter problems.
About This Book
This book is intended to provide step-by-step instructions on repairing the most common types of plumbing fixtures. I’d need much more space to cover every brand or style of plumbing fixture in homes or being sold today. But the information I pro-vide will equip you to make repairs or, at the very least, give you the knowledge to explain the problem to a plumbing professional (also known as “the plumber”) and understand what the plumber is doing if you need to hire a professional to make the repair.
The information in the book is organized into five parts, and the chapters within each part cover repairs to specific types of fixtures. You can read every chapter or pick and choose the ones that are of interest to you. Either way, you come away with the tips and techniques to keep your home’s plumbing system working right!
For many of the repairs, you’ll be dealing with nuisance issues — for example, a kitchen faucet that drips or a toilet that occasionally “runs” for a short time. Some of the repairs, however, require immediate attention to prevent damage to your home. A perfect example is when there’s water leaking out from under your toilet bowl! Fix it ASAP or you could be spending hundreds (maybe thousands?) of dollars to repair structural damage due to rot.
2
Plumbing Do-It-Yourself For Dummies
Conventions Used in This Book
Most projects in this book intentionally have more photos than text. Seeing how a repair is done is just as critical as reading how to do it.
All Web addresses appear in monofont.
Foolish Assumptions
Plumbing repairs can seem too hard for many do-it-yourselfers. In reality, you, the homeowner, can handle many plumbing problems as long as you’re armed with the proper information. In writing this book, I made the following assumptions about you:
⻬
You’re interested in understanding plumbing repairs, not only to gain the confidence and know-how to take them on but also to save money by making repairs yourself.⻬
You probably aren’t familiar with plumbing repairs and may never have attempted making any before. But you want to try!⻬
You want to know more about how a repair should be done so that if you have to hire someone to do it, you can be confident that you’re getting a good deal on quality work.How This Book Is Organized
This book is divided into five parts. Part I introduces you to the world of plumbing. Parts II, III, and IV explain how to make repairs to the most common plumbing prob-lems, whether in the kitchen or bathroom. Part V presents the usual top-ten lists found in all For Dummiesbooks.
Part I: Getting to Know Your
Plumbing System
Part II: Faucets and Sinks
This part shows how to repair the most commonly found types of kitchen and bath-room faucets in homes. It also shows how to keep your sink leak-free and in best-use condition, covering things from caulking the seam between the sink and countertop to replacing a sink drain basket assembly and drain lines.
Part III: Tubs and Showers
This part shows how to keep your tub faucet and showerhead working their best. No leaks, no drips, and the best water-flow possible. It walks you through the steps of sealing joints between the plumbing fixtures and the walls, preventing costly repairs. It also shows you how to deal with clogged or slow-running drains.
Part IV: Toilets
This part deals with the most important plumbing fixture in the house! It shows you how to make a toilet run efficiently and eliminate the “phantom flush” (seeping water) by replacing any or all old or defective parts in the tank. It also illustrates how to deal with a leak under the bowl and prevent damage to the bathroom floor and subfloor. Finally, this part shows you the best ways to deal with and remove or clear the dreaded clogged toilet!
Part V: The Part of Tens
No For Dummiesbook would be complete without the Part of Tens. In this part, you uncover ways to deal with noisy and frozen pipes, what to do before you call a plumbing professional, and what you must do to keep yourself safe when making plumbing repairs.
Icons Used in This Book
This book is loaded with the following helpful icons that point out key information:
3
Make a note when you see this icon. It points out time-saving, money-saving, and keep-you-from-pulling-out-your-hair advice.
Think of this icon as the flashing light and red flag alerting you to things that have the potential to cause you and your plumbing helpers physical harm or make your repair more difficult.
Where to Go from Here
I recommend that you start with Part I, especially if you’re completely or even fairly unfamiliar with plumbing in general. If you feel comfortable and confident that you can make some plumbing repairs, then feel free to find the repair for your specific plumbing problem and have at it!
Remember, it really doesn’t matter where you start just as long as you address plumbing issues in your home that need attention and fixing. I’m confident that after you attempt (and successfully complete!) your first do-it-yourself plumbing project, you’ll be ready to tackle virtually any others that come along in the years to come.
Part I
In this part . . .
Chapter 1
Understanding Plumbing
In This Chapter
䊳 Knowing what you’re getting yourself into
䊳 Touring residential plumbing systems
T
o many people, a home’s plumbing system is perceived as being extremely complex with lots of parts that only a professional plumber is qualified to work on. In some cases, it’s true that you’re better off in terms of both time and money calling in a professional; for example, only the most advanced do-it-your-selfer should consider taking on replacing the main drainpipe for a home’s toilets. But for many plumbing jobs around the average home, even a plumbing novice can make the repairs the right way with good information to follow. And that’s what this book is all about — providing the most up-to-date plumbing project information so that even a beginner can tackle many of the most common residential plumbing problems.Establishing Your Plumbing Limits
If you consider yourself moderately handy (and be honest with yourself when you assess your plumbing skills), then you should be able to tackle most of the projects in this book. Remember, however, that plumbing repairs can be time-consuming and therefore require one important trait — patience! I’ve tackled (and successfully com-pleted, I might add!) more plumbing repairs than I care to count. But I’m the first to admit that many of my projects took twice as long to complete as I had planned for. Some of that extra time was the result of buyer-error, less-than-cooperative existing plumbing, and not allowing for extra visits to the hardware store or home center. My plumbing projects have taught me that even a well-planned project can run into unexpected problems and delays. And when that happens, you should be ready and willing to call out for an extra helping of patience.
Ensuring Successful Plumbing Adventures
8
Part I: Getting to Know Your Plumbing System
Making plumbing repairs isn’t and shouldn’t be frightening or utterly impossible. Today’s plumbing product manufacturers have made installation instructions pretty easy to understand, and many companies have toll-free numbers or online technical support departments to turn to with questions. Plus, most home centers and hard-ware stores have at least a few salespeople who really do know their stuff! But it’s important to remember that if you feel uncomfortable attempting a specific repair, don’t be ashamed to call in a plumber.
Before you start a plumbing project, assess and evaluate if the project is something you can or even want to attempt. If you answer “no” or even “maybe,” consider hiring a plumber from the start instead of starting the project yourself. You’ll save money by only paying the plumber for the work and not for having to fix or undo the work you attempted. Here are a few plumbing realities to keep in mind when consid-ering a project:
⻬
Plumbing repairs require you to get your hands dirty. Some can get really messy — that’s just the way it is.⻬
Some plumbing repairs require some physical labor and may require helpers. For example, lifting a toilet can be a job for two people, so don’t be afraid to ask someone to help.⻬
You may have to work in some pretty uncomfortable and cramped areas, like under the kitchen sink or overhead when soldering copper supply lines.The Residential Plumbing System
For the most part, the majority of your home’s plumbing system is hidden in walls, floors, and ceilings. The parts you see — the fixtures and faucets — are only the end of the line. The lines and pipes that get water to you and waste away from you are the guts of the system. However, understanding a home plumbing system is really quite simple.
Most residential plumbing systems have three components:
⻬
A water supply system that includes getting both hot and cold water to fix-tures⻬
The fixtures that deliver the water⻬
A drain/waste/vent, or DWV, system9
Chapter 1: Understanding Plumbing
Figure 1-1: An overview of a home’s entire plumbing system.
Roof vent Roof vent
Trap
Trap
Branch Branch line line Main Main shutoff shutoff valve valve Water Water heater heater Water Water meter meter Floor Floor
drain drain
Sewer line Sewer line
Branch drain line
Branch drain line
Vent Vent pipe pipe Waste and Waste and vent stack
vent stack
Main Main supply supply line line Roof vent
Trap
Branch
line Main shutoff valve Water heater Water meter Floor
drain
Sewer line
Branch drain line
Vent pipe Waste and vent stack
10
Part I: Getting to Know Your Plumbing System
The supply side: Water comes in
The supply system, which is highlighted in Figure 1-2, begins where the water enters the house through a main supply line or water main. The water source is either pro-vided by a municipal water company or a private underground well located on the property. If the source is a municipal supplier, the water runs through a water meter so that water useage can be recorded and the homeowner billed accordingly. There’s no meter on a private well.
Homes built before 1960 generally have galvanized pipe for the original supply lines, whereas homes built after 1960 usually have rigid copper pipe supply lines. Some of today’s new homes have plastic supply line pipes; this setup now is being accepted by most local plumbing codes. I cover supply line pipes in more detail in Chapter 3.
Figure 1-2: The water supply system.
Cold water Cold water
supply lines supply lines
Cold water
supply lines
Hot water
Hot water
supply lines supply lines
In from municipal
In from municipal
water supply
water supply
Hot water
supply lines
11
Chapter 1: Understanding Plumbing
Within just feet of where the main line enters the home, a branch line splits off the main and connects to your water heater. From the water heater, the hot water line runs parallel to the cold water line to fixtures (including sinks, bathtubs, showers, and laundry tubs) and appliances (including washing machines, dishwashers, and water softeners). Toilets and exterior faucets (called sillcocks) are fixtures that require only cold water. A refrigerator icemaker also only requires cold water, which often is tapped off of a nearby cold water line.
The water pressure to the fixtures in your home is determined by the size of the pipe’s inside diameter. The larger the pipe, the greater the pressure, so if your water pressure is too weak, the problem may be undersized pipes. The pipe entering the house usually has an inside diameter of 1 or 11⁄
4inches. Soon after the main line enters the house, the pipe reduces to 3⁄
4inch. Pipes that carry water to rooms throughout the house have an inside diameter of either 3⁄
4or 1⁄2inch. Pipes that supply water to each fixture are usually 1⁄
2-inch inside diameter to the shutoff valve and then 1⁄
4-inch inside diameter to the fixture.
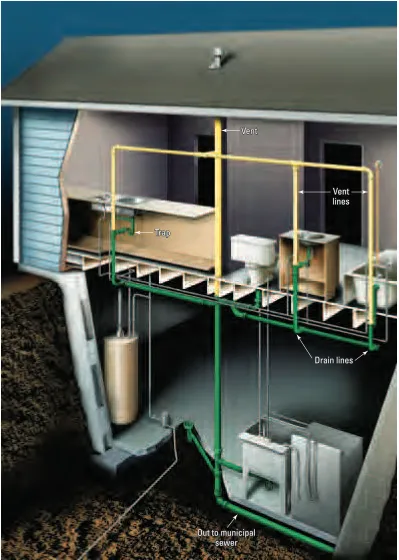
Drain, waste, and vent: Water goes out
Getting rid of used or waste water is achieved through your home’s DWV system, which stands for drain, waste, and vent. The drains (D) are the pieces that hold and then carry the waste water to the main drain lines (W). Without a constant air supply, a vacuum would build up in the drain lines, eventually stopping the water from flowing; To prevent this, each DWV system requires adequate and proper vent-ing (V). The drain pipes use gravity to carry waste and waste water away from fix-tures, drains, and appliances. The waste water is carried out of the house through the main drain line to a municipal sewer system or a septic tank (if you have a pri-vate well). Figure 1-3 shows the system in detail.
Never install or alter your home’s DWV system without consulting a building inspec-tor. All three parts of this system must be installed according to precise specifica-tions in order to work properly and safely.
Is your water safe?
Municipal water companies regularly test the water they supply to homes to make sure that it’s safe to drink. If you have a pri-vate well, it’s your responsibility to test the water for purity. Most areas require private wells to be tested at least once a year. Check with your city’s water officials for the testing frequency requirements in your area. They can also provide you with a list of compa-nies that do qualified well water testing.
12
Part I: Getting to Know Your Plumbing System
Figure 1-3: The DWV system.
Trap
Trap
Out to municipal
Out to municipal
sewer
sewer
Drain lines Drain lines Vent Vent lines lines Vent
Vent
Trap
Out to municipal
sewer
Drain lines
13
Chapter 1: Understanding Plumbing
The main stack
The primary component in a DWV system is the main stack(sometimes called the
main soil stack). The stack pipe is usually 3 or 4 inches in diameter and made of plas-tic or cast iron. Located near the center of the house, the main stack goes down below the basement floor or under the house slab (if there’s no basement) and emp-ties into the sewer or septic tank. The main stack also has a vent pipe connected to it that extends up through the roof. Without the vent, the waste water wouldn’t flow quickly enough to clear the pipes, eventually leading to severe main line clogs. A house may also have one or two secondary vent stacks located above and off the bathroom drain lines.
Branch drain lines carry water from specific fixtures to the main stack. The branch lines are smaller diameter than the main stack — usually 11⁄
2or 2 inches in diameter. Drain lines must be sloped so that water runs freely to the main stack. The slope is usually 1⁄
4inch per foot. For branch lines, local plumbing codes require special fittings that have sweeping turns and not abrupt angles that could lead to clogged pipes.
Traps
Traps are a critical part of the DWV system. These curved pieces of pipe hold water inside the curve that prevents sewer gas from backing up into the house. Each time the drain in a fixture or appliance is used, the standing water is flushed down the drain and replaced with new water.
Vents
Venting is required for the DWV system to operate properly. Without an air passage-way behind the water flow, the system would run slow and gurgle. Each fixture is required to be vented, but you don’t need a vent stack through the roof for each fix-ture. If you did, your home’s roof would look like a smokestack-filled industrial fac-tory! Individual fixture vent stacks often are connected to a revent pipe that eventually connects to the main stack vent in the roof.
If one or more of your fixtures runs slow, or if a toilet gurgles when you flush it and you know it’s not clogged, chances are good that the vent stack is blocked. This fix is best left to a professional plumber to determine if it’s just a blocked vent or if the plumbing itself is improperly installed and needs correction.
Septic systems: Don’t mess with them!
If your home is outside city or suburb limits, it probably isn’t connected to a munici-pal water system, which means that you have your own well and septic system.
14
Part I: Getting to Know Your Plumbing System
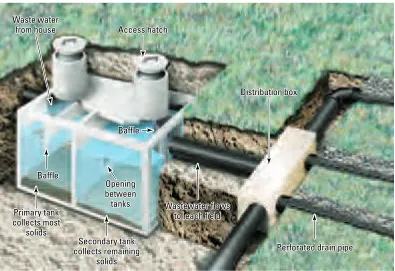
A septic system has two tanks: the primary tank that collects most solids and the secondary tank that collects the remaining solids. The solids or sludge sink to the bottom of the primary tank while baffles inside the tank trap the scum (floating grease and soap) so that only liquid (called effluent liquid) leaves the tank. The effluent liquid moves by gravity through a drain pipe and empties into the septic system’s leach field, where the effluent liquid is broken down by naturally occurring microbes. Then it either evaporates or is absorbed by the soil and plants.
A septic system needs to be monitored and either cleaned or pumped on a regular basis, although not every year because each time waste water flows into the tanks, an equal amount of effluent liquid is pushed out the other end into the leach field. If the system is properly sized for your house and properly installed, it probably only needs to be pumped every three to four years. Use a wooden pole to check the sludge level in the tanks once a year. If the tank is almost half filled, hire someone to pump the system. If the leach field starts to smell bad, or if water backs up out of the drains, call a septic company immediately! The cause may just be a clog that’s easily cleared if you catch it soon enough. Leave the work of repairing a septic system to professionals.
Figure 1-4: A septic system.
Primary tank
Primary tank collects most collects most
solids solids
Secondary tank
Secondary tank
collects remaining collects remaining
solids solids Opening Opening between between tanks tanks Baffle Baffle Baffle Baffle
Primary tank collects most
solids
Secondary tank collects remaining
solids
Perforated drain pipe
Perforated drain pipe
Perforated drain pipe
Access hatch
Access hatch
Access hatch
Wastewater flows Wastewater flows
to leach field
to leach field
Wastewater flows
to leach field
Distribution box Distribution box
Distribution box
Opening between tanks Baffle
Baffle
Waste water
Waste water
from house
from house
Waste water
Chapter 2
Fetch Me My Pipe and Fittings!
In This Chapter
䊳 Getting to know pipes and supply tubes
䊳 Sorting out fittings of all shapes and sizes
W
ithout the two basic components of a plumbing system — water supply pipes and fittings — water could never reach you in an efficient manner. The pipes and fittings you use for the repairs shown in this book probably will be copper, PVC, or ABS (see the next section for coverage of these pipe types). However, you may encounter other types while working with an existing plumbing system. For example, homes built before 1960 have galvanized steel pipe for water supply lines and usually cast iron DWV pipe systems (for an explanation of DWV systems, turn to Chapter 1).Because this book is really intended for beginning do-it-yourself plumbers, I recom-mend that you call in a professional plumber if your home is older and has galva-nized steel or cast iron pipe.
Pipes
Here’s a quick look at types of pipes commonly used in homes, beginning with the pipes used for DWV systems.
⻬
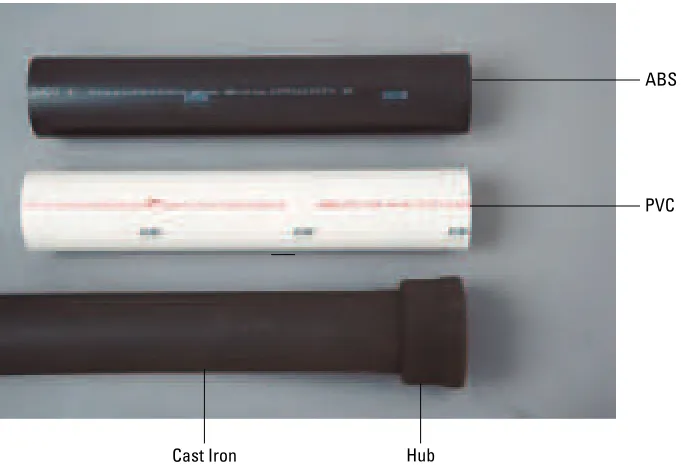
Cast iron:Most homes built before 1960 have cast iron pipes (see Figure 2-1) used for the vertical drain and vent stacks. Cast iron also may have been used for the horizontal drain lines. Cast iron is very durable and lasts for decades, but it can rust over time. It’s not uncommon for a section of pipe, a fitting, or a coupling to rust through while the rest of the cast iron system remains fine. A professional plumber can replace rusted sections and connecting pieces with plastic (PVC or ABS) paired with the correct transition fittings.⻬
Plastic:Plastic pipe comes in two primary varieties: ABS (acrylonitrile-buta-diene-styrene) and PVC (polyvinyl-chloride). In general, plastic has been the pipe material of choice since the mid-1970s because it’s inexpensive and easy to use. You simply glue the joints together using a primer and a liquid cement made for the particular type of pipe you’re installing, whether ABS or PVC.16
Part I: Getting to Know Your Plumbing System
•PVC:This white or cream colored pipe (see Figure 2-1) is the most com-monly used pipe for drain lines. It’s strong, virtually untouchable by chemicals, and seems to last forever! The engineering rating and diame-ter is stamped on the outside of the pipe; Schedule 40 PVC is the most common and is accepted as strong enough for residential drain lines in most locales. Check with your plumbing inspector to be certain.
Schedule 80 PVC is sometimes used for cold-water supply lines; however, many inspectors disapprove of its use as a cold-water supply pipe, and therefore it isn’t allowed in some regions. Schedule 80 isn’t suitable for hot-water supply due to its shrinking and expanding properties. CPVC (chlorinated polyvinyl-chloride) pipe (see Figure 2-2) has the strength of PVC but is heat-resistant, which makes it acceptable in many regions for use on interior supply lines.
⻬
PEX:The newest type of pipe for residential use is PEX (cross-linked poly-ethylene). It’s approved in many regions of the country. PEX, shown in Figure 2-2, is easy to install because it cuts easily, is flexible enough for gentle bends around corners, and uses compression fittings to join sections together. However, more permanent connections, like from PEX tubing to a copper supply pipe, require a special crimping tool. Another drawback is cost; PEX is three to four times more expensive than copper or plastic.⻬
Steel:Many older homes have galvanized steel pipe supply lines and possi-bly some branch drain lines. Galvanized pipe (see Figure 2-2) is very strong, but it doesn’t last more than 50 years. So do the math on the age of your home and your plumbing system to help you determine if your galvanized pipe is worth repair or if you’re better off replacing it with copper and plas-tic. If you do call in a professional to replace it, you should see an immediate increase in water pressure and flow because the insides of galvanized pipes become clogged with minerals over time, resulting in low water pressure.Figure 2-1: ABS, PVC, and cast iron pipe.
ABS
Cast Iron Hub
17
Chapter 2: Fetch Me My Pipe and Fittings!
⻬
Copper:Copper pipe is very long-lasting and resistant to corrosion, which makes it the most commonly used pipe in water supply lines. It’s more expensive than plastic but is still a good buy because it lasts and lasts! Copper pipe for residential plumbing use comes in two basic types:•Rigid coppercomes in three thicknesses, each with its own letter rating. Type M is the thinnest but is rated strong enough for most residential sit-uations. Types L and K are thicker and used in outdoor and drain applica-tions. All rigid copper, which you can see in Figure 2-2, is cut using a wheel or tube cutter or a hacksaw. Lengths of copper pipe are usually connected with soldered (sweat) fittings. Compression fittings can con-nect the pipe to shut-off valves.
•Flexible copperis often used as a supply line for dishwashers, refrigera-tor icemakers, and other appliances that need a water supply; you can see it in Figure 2-2. It’s easily bent to form even a fairly tight turn, but if it gets kinked, you must cut the piece off and replace it. Sections of flexible copper pipe are joined using either soldered or compression fittings.
Figure 2-2:CPVC pipe, PVC pipe, PEX tubing, galvanized steel pipe, rigid copper pipe, and flexible copper tubing.
CPVC
PVC
PEX Tubing
Galvanized Steel
Rigid Copper
Flexible Copper
18
Part I: Getting to Know Your Plumbing System
Supply Tubes
To connect a toilet or faucet to a shutoff valve that’s connected to a supply line, you can choose from several different types of supply tubes, which are shown in Figure 2-3. They are as follows:
⻬
Plastic:The least expensive option, plastic supply tubes are relatively easy to use. They’re easy to cut to length. The downside to plastic is that water flow may be restricted due to the thickness.⻬
Copper:You usually find copper supply tubes with chrome exteriors for appearance. They need to be cut to length to fit and can’t be bent into posi-tion because the copper is rigid and will kink or split if bent.⻬
Braided steel:A braided stainless steel supply tube is a great choice if the tube isn’t in plain view. These supply tubes are flexible and even can be looped when in place. The braided steel prevents the inner rubber tube from rupturing over time, a major cause of interior flooding and water damage from dishwashers or clothes washers. Braided steel supply tubes are code-accepted virtually everywhere. They come in various lengths and fitting combinations for faucets, toilets, dishwashers, icemakers, and clothes washers.Figure 2-3: Plastic, flexible copper, chromed copper, flexible braided steel, flexible braided plastic, and toilet supply tubes.
Plastic Flexible
Copper
Chromed
Copper
Flexible Braided
Steel
Flexible Braided Plastic
Toilet
19
Chapter 2: Fetch Me My Pipe and Fittings!
Supply Fittings
No matter what material you choose for your plumbing supply, most fittings fall into one of four categories:
⻬
Couplers or unions:Join pipes in straight lines⻬
Elbows:Turn corners⻬
Tees and Ys:Allow pipes to branch out into new lines⻬
Caps or ends:Seal the ends of pipes during rough-in and final installationAlways buy more fittings than you need; it’s my experience that most folks underes-timate the correct quantity. Fittings are inexpensive, and buying extra means that you save yourself an extra trip to the store, not to mention a reduction in frustration when you’re one elbow short of finishing your project!
Figure 2-4 shows the various types of copper fittings you’re likely to use, plus some brass fittings needed to connect copper to fixtures. Keep in mind that copper fittings come in the same sizes (diameters) as rigid copper pipe. Common brass and copper fittings include the following:
⻬
Brass drop-ear elbow:You use this fitting in showers to connect the copper supply for the showerhead and/or tub spout. The drop-ear elbow has two wings that you screw tightly to the wall. Drop-ears come in both sweated and threaded styles.⻬
Copper supply elbows:Also called ells,these fitting come in 90- and 45-degree angles. A standard elbowhas two female openings that are the same size. A street elbow,which is useful in tight spots, has one female and one male opening. A reducer elbowor couplingmakes the transition between dif-ferent diameter pipes possible. You also can get reducer elbows that let you change pipe size right after going around a corner.⻬
Copper tees:A straight teehas three openings, all with the same diameter. Areducer teehas three openings, but one is smaller than the other two; the usual configuration is for the two opposite openings to be the same size with the smaller opening perpendicular to the other two.
⻬
Copper couplings or unions:Copper couplings have a center indentation that stops the inserted pipes so that both sides of the connection have the same length of pipe inside the coupling to ensure a solid connection. A20
Part I: Getting to Know Your Plumbing System
Figure 2-4: All kinds of copper and brass fittings.
Drain and Vent Fittings
Plumbing inspectors are sticklers for the correct DWV fittings, so be sure to use the right one for a specific application. Some look almost identical on the outside but are engineered for different applications and aren’t interchangeable.
The following list explains each type of fitting to help you get the correct one for your project. Fittings come in various diameters to match the pipe size you’re using. As you can see in Figure 2-5, these fittings have hub ends to accept straight lengths of pipe. In order to use these joints, you have to clean them with the proper cleaner and join them with liquid cement adhesive.
⻬
Waste or sanitary cross and double-Y:Both have two branch openings. A reducer connects different size pipes to the waste or double-Y fitting.⻬
Drain elbow:Also called a sweepor quarter bend,the drain elbow comes in short, medium, or long radii. Whenever possible, use the long radius bend for better clearing of water and waste. When working in tight quarters, choose from several different size bends: a 60-degree, a 45-degree (or eighth bend), or a 221⁄2-degree (or sixteenth bend).
⻬
Closet bend:This fitting is engineered to accept a toilet flange, which you install after the finished floor surface.21
Chapter 2: Fetch Me My Pipe and Fittings!
Figure 2-5: Drain and vent fittings. Waste Cross Double-Y
Reducer Redu
cer Bushing
90-Degree Drain Elbow
45-Degree Drain Elbow
Long-Radius Elbow Closet Bend
Waste Tee Trap Adapter
Single-Y Cleanout
Male-to-Threaded
22
Part I: Getting to Know Your Plumbing System
⻬
Tees and single-Ys:These fittings come in all sizes to fit all drain pipes. The two opposite openings, called run openings,are in a straight line. The other opening is the branch opening.When describing a tee, the run sizes are given first and the branch size is last. For example, a 21⁄2-x-21⁄2-x-2 tee has two 21⁄
2run openings and one 2-inch branch opening.
When buying tees, get waste or sanitary tees, which have a curved, sweep-ing interior bend instead of an abrupt, hard bend. A sweepsweep-ing bend has a smoother interior flow design.
⻬
Cleanouts:Plumbing codes require drain lines to have cleanouts at regular intervals. You either can use a Y with a cleanout or install a cleanout plug to the end of a pipe. Cleanouts are threaded openings.Chapter 3
Getting the 411 on Codes
and Requirements
In This Chapter
䊳 Understanding typical code requirements
䊳 Getting an inspection for the projects that require it
U
nlike the National Electrical Code (NEC), which applies to electrical work throughout the United States, there’s no national plumbing code. Codes vary from state to state and even from city to city, but most are based on the National Uniform Plumbing Code, commonly referred to as the “national code.”Your local code may be much more stringent than the National Uniform Plumbing Code, so check with your local plumbing inspector before, during, and after your project is completed. Your local plumbing code always supercedes the national code.
Most of the repairs I show in this book don’t require pre-project inspection or approval; examples include replacing a leaky faucet or installing a new toilet. As the homeowner, you’re allowed to make these repairs without an inspection or getting a permit. (Permits are covered later in this chapter.) But a good rule to follow is this: When in doubt, talk to your local plumbing inspector. Inspectors are there to help you through these projects by answering questions and giving advice, but you shouldn’t use them as personal plumbing resources or expect them to walk you through every step of a project. Inspectors are very busy out in the field performing inspections and reviewing submitted plans for major remodeling projects and new construction.
For more routine or common plumbing questions, find yourself a good salesperson at your local home center or hardware store. Most have at least one knowledgeable person in the plumbing department whom you can go to for expert advice.
Common Code Requirements
Here are some commonly required code issues that are applicable virtually nation-wide:
24
Part I: Getting to Know Your Plumbing System
⻬
Fixture placement:Fixtures can’t be placed too close together. This require-ment is more critical in the bathroom, where space is already limited. Here are the minimum space requirements for toilets and tubs: 15 inches between the center of the toilet and the side wall or sink; 1 inch between the toilet tank and the wall; 18 inches between the bathtub and other fix-tures.⻬
Pipe sizes:The correct size pipes must be used for drains, supplies, and vents. Check your local code for the minimum requirement in your area. Also, find out what type of pipes are accepted in your area for drain lines and water supplies.⻬
Plastic pipe connections:PVC is so widely accepted that you’re likely to use it for repairing or reworking your existing system. PVC pipe joints must be primed and glued to last. And if you don’t prime, the joint will eventually leak! (For more on PVC pipe, flip to Chapter 2.)Getting Permission — and the
Inspector’s Blessing!
As I say earlier in this chapter, most of the repairs I show in this book don’t require pre-project inspection or approval, and they don’t require a permit. In most areas, homeowners are allowed to make “fix-it” repairs to their homes without getting a permit (or as people in the know like to call it, “pulling a permit”).
As I state earlier in this chapter, plumbing inspectors are busy people, out in the field inspecting and (hopefully) approving plumbing projects. And if the inspector is inspecting, that means that a plumbing permit was taken out or “pulled” at the local city hall.
Chapter 4
Filling Your Plumbing Toolbox
In This Chapter
䊳 Collecting the right tools for the job
䊳 Protecting yourself with safety equipment
H
ere’s where you can dream and dream and dream about all the “stuff” you think you need to own to be a real do-it-yourself plumber! Fortunately for your bank account, there are some tools (actually, several!) that you really don’t need to own for these projects. This chapter covers tools in a way that should help guide you through the sea of options and keep some peace in the family when you ask for permission to buy another tool.After I discuss the common plumbing tools that are available, I include a very impor-tant section on must-have safety equipment for every do-it-yourself plumber.
Tools, Tools, and More Tools
For a small investment, you can assemble a plumbing toolbox that arms you to tackle almost any of the projects in this book. Here are the tools you should own no matter what type of materials your plumbing system consists of.
The following tools are shown in Figure 4-1:
⻬
Levels:A 2-foot level works for checking drain pipe slope on longer sections of pipe. A torpedo level is best for short sections of pipe. See Figure 4-1A.⻬
Screwdrivers:You should have both a medium slotted and a #2 Phillips screw-driver because plumbing fixtures use both slotted and Phillips screws. A 4-in-1 screwdriver combines both screwdrivers in one tool. See Figure 4-1B-C.⻬
Tape measure:In order to handle measuring jobs without a helper, get a tape measure that’s at least 20 feet long and has a 3⁄4-inch-wide blade. (Narrower blade tapes bend when extended beyond about 8 feet.) See Figure 4-1D.
⻬
Files:You should have both a flat file for general-purpose smoothing and a round (or rattail) file for removing burrs from the inside of metal or plastic pipes. See Figure 4-1E-F.26
Part I: Getting to Know Your Plumbing System
Figure 4-1: Plumbing tools: Group 1.
⻬
Adjustable wrench:An adjustable wrench is designed to adjust to any size nuts and bolts. Get two sizes: an 8-inch and a 6-inch. See Figure 4-1H-I.⻬
Needle-nose pliers:This tool is great for gripping small items even in hard-to-reach areas. See Figure 4-1J.⻬
Groove-joint pliers:This tool has several jaw width sizes to accommodate everything from small nuts and bolts to sink basker rings. See Figure 4-1K.⻬
Hammer:It’s a must-have tool in every toolbox. Period! See Figure 4-1L.⻬
Pipe wrench:Use this wrench on all types of threaded pipe connectionsand fittings. A 14-inch pipe wrench is the best size for most projects. Buy two wrenches if you plan to work on steel pipe because you use both at the same time when tightening some galvanized or threaded copper fittings. See Figure 4-1M.
These tools are shown in Figure 4-2:
⻬
Hacksaw:This saw, which has replaceable blades, is used for cutting metal and plastic pipe. See Figure 4-2A.⻬
Socket wrench:This wrench takes different-sized sockets to handle a vari-ety of nuts and bolts. See Figure 4-2B.⻬
Caulk gun:This tool is useful not only for plumbing projects but anytime you need to caulk a seam or joint. The gun pushes a steady, uniform bead of caulk out of the tube as you squeeze the handle. See Figure 4-2C.⻬
Flashight: Great for illuminating under-sink areas and other dark places. See Figure 4-2D. A B C D E F G H I J27
Chapter 4: Filling Your Plumbing Toolbox
Figure 4-2: Plumbing tools: Group 2.
⻬
Utility knife:This knife is great for cutting a variety of materials. The safest type of utility knife has a retractable blade. The blades are replaceable and can be purchased in multiple-blade packs. See Figure 4-2E.⻬
Wire brush:A small wire brush is great for cleaning heavily encrusted plumbing parts and pipe threads. An old toothbrush works well on less crusty stuff. See Figure 4-2F.⻬
Cold chisel.See Figure 4-2G.⻬
Circuit tester: You use this tool to see if you’re getting power to an outlet. See Figure 4-2H.These tools are shown in Figure 4-3:
⻬
Tubing cutters:To cut copper or plastic pipe, you tighten the screw handle as you rotate the cutter body around the pipe. For most pipe cutting, a stan-dard tubing cutter works fine. A small or mini-tube cutter is useful when working in tight spots. See Figure 4-3A-C.⻬
4-in-1 wire brush:This brush is a handy tool for preparing copper pipe and fittings for soldering. It has two wire brush ends (one 1⁄2inch in diameter and the other 3⁄
4inch in diameter) and two cleaning holes in the tool body (one for 1⁄
2-inch copper and one for 3⁄4-inch copper). See Figure 4-3D. If you don’t have this 4-in-1 brush, you need to get a reamer brush and a roll of emery cloth.
⻬
Flux:You apply a paste called fluxto the cleaned end of copper pipe before connecting a fitting and soldering. The flux paste ensures a clean surface for the soldered joint. See Figure 4-3E.⻬
Emery cloth:Use this cloth to clean copper pipe before soldering. See Figure 4-3F.⻬
Flux brush: You apply flux with this kind of brush. See Figure 4-3G.28
Part I: Getting to Know Your Plumbing System
Figure 4-3: Plumbing tools: Group 3.
⻬
Reamer brush:See Figure 4-3H.⻬
Handle-puller:Great for removing stuck fixtures. See Figure 4-3I.⻬
Tubing benders:These spring-like tools fit around the appropriate sized flexible copper tubing to gently bend the tubing. Tubing benders usually are sold in three- or four-piece sets. See Figure 4-3J.⻬
Fiber or safety shield:When soldering in areas of flammable materials (like wood framing or wallboard), you must have one of these shields to place between the flammable material and the propane tank flame. See Figure 4-3K.⻬
Propane torch:This is a generic term for the gas tank setup used for solder-ing. In Figure 4-3, the torch labeled L requires a spark igniter, and the torch labeled M has an electric igniter. I recommend using MAPP gas instead of propane for soldering because MAPP gas burns hotter than propane, which makes soldering joints with lead-free solder easier. Lead-free solder is required on pipes carrying potable water or water for cooking.These tools are shown in Figure 4-4:
⻬
Toilet auger:This auger is specifically designed for clearing toilet clogs when a plunger doesn’t do the trick. It fits into the toilet bowl’s drain chan-nel and comes with a plastic or rubber sleeve to protect the bowl’s porce-lain finish. See Figure 4-4A.⻬
Lock-nut or spud wrench:This type of wrench is specially designed for removing or tightening large nuts that are 2 to 4 inches in diameter, like a sink basket nut. The wrench’s hooks grab the lugs of the nut. See Figure 4-4B.A B E G H I
C D J
K
29
Chapter 4: Filling Your Plumbing Toolbox
Figure 4-4: Plumbing tools: Group 4.
⻬
Plastic pipe cutter: A handy tool for cutting, you guessed it, plastic pipe. See Figure 4-4C.⻬
Hand-crank auger:Often called a “snake,” this tool is a must for every homeowner. It lets you get into drain lines and traps to clear clogs and blockages. See Figure 4-4D.⻬
Flanged plunger:This plunger helps you clear clogs in toilets, sinks, and tubs. The funnel-shaped flange fits snugly into the toilet opening to create a good seal for forcing clogs through. To use this plunger on a clogged sink or tub drain, simply fold the flange into the body of the plunger to create a uni-form seal over the drain. See Figure 4-4E.Stocking Up on Safety
Equipment — and Using It
Where there’s drilling, pounding, or heat, there’s the need for safety equipment. And just having it around or in your toolbox doesn’t cut it. Safety equipment is there to protect you and your project so don’t just have it available — USE IT! Here’s a look at what you should have to stay safe in just about every plumbing job (see Figure 4-5).
⻬
Ear protection:A good set of earmuff-style hearing protectors will preserve your hearing when using noisy power tools. You should also wear hearing protection when you’re just hammering; repeated, loud hammer blows eventually can damage your hearing. See Figure 4-5A.A
B
C
30
Part I: Getting to Know Your Plumbing System
⻬
GFCI-protected extension cord:A GFCI (ground fault circuit interrupter)-protected extension cord is the best way to protect yourself from shocks (or worse) when using corded power tools. The GFCI shuts off the power to the tool the second (actually the millisecond) it senses moisture. Plug all corded tools into a GFCI-protected extension cord and not directly into an outlet unless you know that the outlet is GFCI-protected as well. See Figure 4-5B.⻬
Safety goggles:If your project involves sparks or the chance of flying debris, wear safety goggles. They’re also invaluable when clearing drain lines where caustic chemicals may have been used. Styles vary, so choose one that’s comfortable but still offers good protection. Even the best safety eyewear is useless if it’s so uncomfortable that you don’t want to wear it! See Figure 4-5C.⻬
Gloves:Both leather gloves and heavy-duty rubber gloves are musts. Leather gloves protect you when drilling, cutting, and soldering, whereas rubber gloves protect your skin when you’re clearing clogged drain lines that may contain caustic chemicals. See Figure 4-5D-E.⻬
Fire extinguisher:Keep a fire extinguisher nearby and know how to use it if you’re soldering copper pipe. A fire extinguisher and fiber or safety shield are the best pieces of protective gear to have when soldering. See Figure 4-5F.Figure 4-5:Necessary safety equipment. A
B
C
Part II
In this part . . .
T
his part focuses on two things you surely use every-day: faucets and sinks. And a problem with one or the other (or both!) can really throw a wrench in your day (pun intended). Different types of faucets and sinks abound, but this part focuses on the most common fix-tures that you’re likely to be dealing with. Specific tasks covered in this part include cleaning faucets and traps to keep water flowing freely, repairing leaky faucets, caulking around sinks, replacing or just adjusting drains, and unclogging drains.Here are all of the projects in Part II:
⻬ Cleaning a Faucet Aerator and Sink Sprayer
⻬ Repairing a Leaky Rotary Ball Faucet
⻬ Repairing a Leaky Cartridge Filter Faucet
⻬ Repairing a Leaky Ceramic Disk Faucet
⻬ Repairing a Leaky Compression Faucet
⻬ Repairing a Leaky Two-Handle Faucet Spout
⻬ Caulking around a Sink Bowl
⻬ Replacing a Leaky Sink Basket
⻬ Replacing a Sink Trap
⻬ Replacing a Double-Bowl Kitchen Sink Drain
⻬ Replacing a Bathroom Sink Drain
⻬ Adjusting a Pop-Up Drain
⻬ Unclogging Sink Drains
33
Cleaning a Faucet Aerator and Sink Sprayer
Cleaning a Faucet Aerator and Sink Sprayer
Toolbox:
⻬ Groove-joint pliers
⻬ Masking tape ⻬ Paper clip
⻬ Old toothbrush or small
wire brush
⻬ Small bowl
Materials:
⻬ White vineger or
lime-dissolver solution
Time Needed:
Less than an hour
Stuff You
Need to Know
Hard water is loaded with minerals that build up over time and eventu-ally clog aerators and sink sprayers. So if the water flow from your faucet seems slower than normal, cleaning the aerator and sink sprayer may bring things back to normal. The aerator screws onto the end of the faucet spout and typically has two screens inside that the water flows through. The fix is easy: Simpy unscrew the aerator, disassemble it, clean it, and reinstall. For this type of repair, you usually don’t need any new parts. The following steps apply to both faucets and sprayers.
Before you start, place an old towel on the counter next to the sink. This is the best way to keep track of all the parts when you disassemble the aerator.
1.
Wrap some masking tape around the jaws of the groove-joint pliers or around the aerator to pre-vent scratching the surface of the aerator. Grip the outside of the aerator with the pliers, and turn the pliers clockwise to loosen the aerator. You don’t need to apply much pressure to the aerator; in fact, too much pressure can crush the aerator housing.34
Part II: Faucets and Sinks
Cover the sink drain to prevent any small parts from accidentally falling into the drain trap. Also, lay the parts out in the order that you remove them so that you have an easier time putting things back together.
3.
Clean the parts using an old toothbrush and a gentle touch. Be careful not to bend the screens or you’ll have to replace them.4.
Reassemble the aerator parts by inserting the screen, disk, washer, or O-ring (depending on your aerator’s design) in reverse order of disassembly.35
Repairing a Leaky Rotary Ball Faucet
Repairing a Leaky Rotary Ball Faucet
Toolbox:
⻬ Hex wrench
⻬ Screwdriver ⻬ Utility knife
Materials:
⻬ Repair kit for your brand
of faucet (should include O-rings, seats, and springs)
⻬ Replacement faucet ball (if needed)
⻬ Silicone grease
Time Needed:
Less than an hour
Stuff You
Need to Know
A rotary ball faucet has a smooth plastic or metal ball that rotates inside the socket of the faucet body. Water is dispensed when the handle is moved and the grooves and holes on the ball line up with the seats and springs. If water leaks out below the faucet handle or drips out of the spout, first try tightening the cap or cap-adjusting ring. If that doesn’t correct the problem, you need to buy a repair kit and replace the faucet’s internal parts, including the O-rings, seats, and springs and possibly the faucet ball. The following figure shows a typical repair kit for this kind of faucet.
1.
Shut off the water under the sink, and turn on the faucet until water stops running.2.
Use a hex wrench to loosen the setscrew in the faucet handle.36
Part II: Faucets and Sinks
4.
Remove the plastic cam and cam washer (which usually are one piece) from the faucet body.5.
Lift out the ball. Inspect each part for damage and replace them with parts from the kit as needed.37
Repairing a Leaky Rotary Ball Faucet
8.
Remove the spout assembly from the faucet to access the O-rings. It can be simply lifted off. Pry off the old O-rings, or cut them off with a utility knife if necessary.9.
Coat the faucet body lightly with silicone grease, and install new O-rings.10.
Install the new springs and seats (in that order) into the holes in the faucet body by pressing them in place with your fingers.11.
Insert the ball in the faucet body so that it sits snugly. The small tab on the ball should fit into the notch in the body; otherwise the faucet won’t work.38
Part II: Faucets and Sinks
If your faucet has a plastic ball, replace it with a metal one. Plastic types can wear out in less than a year, which means that you’ll be doing this repair again before you know it.
13.
Reinstall the handle and tighten the setscrew with a hex wrench.39
Repairing a Leaky Cartridge Filter Faucet
Repairing a Leaky Cartridge Filter Faucet
Toolbox:
⻬ Screwdriver
⻬ Hex wrench ⻬ Groove-joint pliers
⻬ Needle-nose pliers ⻬ Stem puller for your
brand of faucet (if you can’t remove the old stem with pliers)
Materials:
⻬ Replacement cartridge ⻬ Replacement O-ring
⻬ Silicone grease
Time Needed:
Less than an hour
Stuff You
Need to Know
Cartridge faucets control the flow of water by channeling water through grooves or holes or by way of a tapered cartridge design. Several of the major faucet manufacturers make cartridge faucets and therefore replacement parts, so it’s a good idea to take your old parts with you to the store to be sure you get the right brand of replacement parts.
1.
Shut off the water under the sink, and turn on the faucet until the water stops running.2.
Remove the retaining screw using a hex wrench or screwdriver depending on the screw. Lift off the handle.40
Part II: Faucets and Sinks
4.
Pull out the retaining clip located just beneath the retaining nut.5.
Unscrew the plastic retaining caps.6.
Unscrew the ring that holds the spout housing the faucet body.41
Repairing a Leaky Cartridge Filter Faucet
8.
Use needle-nose pliers to remove the clip at the top of the cartridge.9.
With the tip of a screwdriver, slip the old O-ring from its groove and remove it from the housing. Avoid cutting the ring off the hous-ing so that you can take the old, intact O-rhous-ing to the store to get an exact replacement.10.
Grip the old cartridge with groove-joint pliers, and pull it straight up to remove it from the faucet body without breaking or damaging either piece. If you can’t remove the cartridge using the pliers, you need to buy a tool called a stem puller.You must use the stem puller made for your brand of faucet.11.
Clean the faucet body to remove debris.42
Part II: Faucets and Sinks
13.
Insert a new cartridge or replace the old one if it’s in good shape. Reinstall the clip on the cartridge, slide the faucet spout on the hous-ing body, and screw on the retainhous-ing rhous-ing.14.
Reinstall the plastic nut.43
Repairing a Leaky Cartridge Filter Faucet
17.
Turn the water on under the sink, and check the hot and cold water from the faucet to be sure that they aren’t reversed. If they’re reversed, meaning that turning the faucet to the hot side produces cold water and vice versa, disassemble the faucet, rotate the cartridge 180 degrees, and then reassemble the faucet.44
Part II: Faucets and Sinks
Repairing a Leaky Ceramic Disk Faucet
Stuff You
Need to Know
Toolbox:
⻬ Hex wrench
⻬ Screwdriver ⻬ Groove-joint pliers
⻬ Old toothbrush
Materials:
⻬ Replacement cartridge (if needed)
Time Needed:
Less than an hour
Ceramic disk faucets are durable and reliable, but they’re subject to sediment buildup that restricts water flow. For that reason, if you live in an area with hard water and find yourself making repairs a couple times each year or more, you may want to consider a different type of faucet. You may be able to fix a ceramic disk faucet by cleaning or replacing the neoprene seals, but most often it’s best to simply replace the entire car-tridge. This project shows you how to clean the cartridge and replace the seals.
1.
Shut off the water under the sink, and turn on the faucet until the water stops running.2.
Use a hex wrench to loosen the setscrew. Remove the handle.45
Repairing a Leaky Ceramic Disk Faucet
4.
Use groove-joint pliers to loosen the cartridge.5.
Lift off the cartridge. You can usually do this by hand. Use groove-joint pliers if the car-tridge sticks.46
Part II: Faucets and Sinks
8.
With a screwdriver, remove the O-ring from the inside of the faucet body.9.
Rub silicone grease on the O-ring and seals and reinsert them.12.
Reinstall the handle.11.
Replace the decorative cap.10.
Replace the cartridge inside the faucet body and tighten with groove-joint pliers.47
48
Part II: Faucets and Sinks
Repairing a Leaky Compression Faucet
Toolbox:
⻬ Screwdriver
⻬ Groove-joint pliers ⻬ Seat wrench
Materials:
⻬ Universal washer kit ⻬ Silicone grease
Time Needed:
Less than an hour
Compression or stem faucets have been around for over 100 years and are still in use in a lot of older bathrooms. Their operation is relatively simple: A stem moves up and down when the handle is turned, and a rubber washer at the bottom of the stem pushes against a seat in the faucet body to stop or start water flow. If the washer or seat becomes worn, water drips from the faucet spout.
All purpose or universal washer kits contain various sizes of washers and O-rings. To make sure you get an exact match, take the old faucet stem with you to buy the repair kit. Older faucets may need a packing washer or packing string that usually isn’t included in a washer kit but can be found at most hardware stores.
If the stem itself is worn, it should be replaced, but as this type of faucet gets older, parts get harder to find in stores. Replacing the faucet may be your best or only option.
1.
Shut off the water under the sink, and open both faucet handles until the water sto