DotNetNuke 5.4
Cookbook
Over 100 recipes for installing, configuring, and
customizing your own website with the DotNetNuke CMS
Copyright © 2010 Packt Publishing
All rights reserved. No part of this book may be reproduced, stored in a retrieval system, or transmitted in any form or by any means, without the prior written permission of the publisher, except in the case of brief quotations embedded in critical articles or reviews. Every effort has been made in the preparation of this book to ensure the accuracy of the information presented. However, the information contained in this book is sold without warranty, either express or implied. Neither the authors, nor Packt Publishing, and its dealers and distributors will be held liable for any damages caused or alleged to be caused directly or indirectly by this book.
Packt Publishing has endeavored to provide trademark information about all of the companies and products mentioned in this book by the appropriate use of capitals. However, Packt Publishing cannot guarantee the accuracy of this information.
First published: September 2010
Production Reference: 1300810
Published by Packt Publishing Ltd. 32 Lincoln Road
Olton
Birmingham, B27 6PA, UK. ISBN 978-1-849511-68-1 www.packtpub.com
About the Author
John K. Murphy is a software industry veteran with more than 25 years experience as
a programmer and database administrator. A graduate of the University of West Virginia, he began writing computer games in the 1980s before pursuing a career as a computer consultant. Over the years, John has enjoyed developing software in most majorprogramming languages while striving to keep current with new technologies.
In his spare time, John enjoys scuba diving, skydiving, and piloting small planes. He lives with his wife and two children in Pittsburgh, Pennsylvania.
About the Reviewers
Jeff Cochran is a Senior Network Specialist for the City of Naples, Florida. A large
part of his job includes web design and coding, as well as web server management. Jeff has nearly two decades of experience with the Internet, having started one of the first Internet service providers in Southwest Florida, and has worked with Windows and Unix-based web servers. Now primarily concentrating on Windows technologies, Jeff has been a Microsoft MVP for Microsoft's Internet Information Server for nearly a decade and is active in the ASP Classic and ASP.NET communities as well. Jeff co-authored Packt's "Building an ASP.NET Content Management System" and has worked on several books by other publishers.Sebastian Leupold after studying Economics and Business Engineering at Karlsruhe
University has acquired professional experience in software applications for about 20 years now. He is the CEO of Gamma Concept, a solutions company specialized in developing database-driven software for PC and the Web, which is part of dnnWerk, the compound of leading DotNetNuke experts in Germany, providing all services around DotNetNuke, including hosting, training, advisory, skinning, and module development. As a member of the DotNetNuke Core Team, Sebastian added a couple of enhancements to the DotNetNuke Core Framework and is mainly responsible for module release testing. While also being a member of the User Experience Team, he focuses on improvements for DNN usability. In the past, he has been a project lead for UserDefinedTable module. Sebastian creates and maintains hundreds of German language packs for the DotNetNuke framework and modules.Table of Contents
Preface
1
Chapter 1: Installation and Setup
5
Introduction 5
Downloading the Microsoft Web Platform Installer 6
Installing SQLServer Express 8
Downloading and installing the DotNetNuke package 10
Running the DotNetNuke installation 14
Setting the site name and information 19
Choosing a skin for the site 22
Choosing a container for the site 24
Adding a module to a page 25
Installing standard DNN modules 27
Downloading an extension (skin or module) 28
Installing a new extension 31
Chapter 2: Managing Users and Site Setup
35
Introduction 35
Enabling user registration for your site 36
Creating users and granting access 39
Creating and assigning security roles 43
Granting access to modules 46
Banning and deleting users 48
Managing profile properties 50
Creating and organizing pages 54
Creating an announcement 67
Distributing documents online 70
Publishing a Newsletter 73
Creating a calendar of events 75
Creating a Wiki 77
Publishing sets of popular links 81
Displaying RSS news feeds 84
Configuring RSS news feeds 86
Publishing a simple report 88
Publishing a survey questionnaire 90
Chapter 4: Creating your Own Modules
93
Introduction 93
Installing Visual Web Developer 2010 Express 94
Viewing the database from Web Developer 95
Installing the DNN 5 Starter Kit 98
Creating a new module with the Starter Kit 100
Creating a database table with keys 102
Creating stored procedures 105
Connecting a module to the database 112
Creating an uninstall script 118
Chapter 5: Building, Debugging, and Deploying Modules
121
Introduction 121
Building a View control 123
Building an Edit control 128
Editing the Manifest File 136
Building for release or debug 138
Deploying a module as a standalone package 140
Downloading the DNN 5 source code 144
Setting up a debugging environment 145
Preparing a module for debugging 149
Setting a breakpoint and stepping through module code 152 Creating a Manifest from an installed module 155
Chapter 6: Data Entry Tricks
159
Introduction 159
Displaying labels from the resource file 160
Creating collapsible panels 163
Chapter 7: Cool Web Controls
195
Introduction 195
Adding web controls to your Toolbox 196
Showing an e-mail link in an Datagrid 197
Showing checkboxes in a Datagrid 199
Showing a thumbnail image in a Datagrid 202
Creating labels you can edit 205
Suggest text while typing 208
Showing data in a Treeview 212
Using a TabStrip to separate content 217
Using a CAPTCHA control for security 221
Creating a multi-state checkbox 225
Chapter 8: Basic Skinning
229
Introduction 229
Downloading and installing a skin 230
Creating a simple HTML skin 233
Creating a simple ASCX skin 238
Deploying your skins and containers 242
Exploring Skin Objects 244
Creating a simple HTML container 248
Creating a basic ASCX container 253
Creating custom container images 257
Styling a container with images 260
Styling a menu with images 265
Chapter 9: Working with Foreign Languages
271
Introduction 271
Downloading and installing a language pack 272
Creating a bilingual site with a single portal 273
Editing the language resource file 275
Creating your own module translations 277
Determining controls that need translations 279 Localizing labels, titles, panels, and links 280 Localizing a drop-down list with a stored procedure 284 Localizing a drop-down list with a DNN list 288
Localizing a stored procedure 292
Using the HTML module with Flash 306
Displaying an XML feed 309
Controlling the friendly URL rewriting 312
Tracking your site with Google Analytics 314
Publishing calendar events as an RSS feed 317
Designing your own forms 319
Styling your own forms 324
Chapter 11: Challenging Custom Modules
327
Introduction 327
Making modules searchable 328
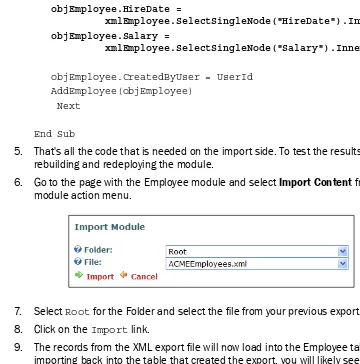
Exporting module data 332
Importing module data 335
Exporting and importing user defined tables 336
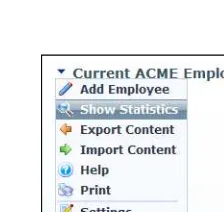
Creating custom module actions 338
Using HTML in your manifest 342
Deploying a new module version 346
Using multiple database connections 351
Chapter 12: Advanced Modules and Security
355
Introduction 355
Creating a secondary View control 356
Controlling navigation with NavigateURL 364
Displaying module messages and event logging 366
Creating your own CBO Hydrator 369
Using Active Directory with DNN 371
Synchronizing Security Roles with DNN 375
Correcting Active Directory issues 377
Chapter 13: Advanced Skinning
379
Introduction 379
Using the Rotator widget 380
Using the Visibility widget 384
Using the Stylesheet widget 387
Creating and deploying a custom widget 391
Using a custom widget in a skin 395
Using the rounded corner Super Stylesheet 397
Showing portal settings in a skin 402
Adding animation to a menu 407
Preface
DotNetNuke 5.4 is a powerful and flexible content management system for building websites. It comes with many features for publishing content, including tools to create Blogs, Banner Advertising, News Feeds, and much more. The chapters in this book provide example recipes that will show how to download, install, configure, and customize DotNetNuke with your own plugin modules.What this book covers
Chapter 1, Installation and Setup, explains downloading and installing the tools you need to create your own DotNetNuke website.
Chapter 2, Managing Users and Site Setup, explains creating users, assigning security, and configuring your site.
Chapter 3, Easy Tricks with Existing Modules, discusses installing and configuring the most popular modules.
Chapter 4, Creating your Own Modules, explains installing the development tool and creating your first custom module.
Chapter 5, Building, Debugging, and Deploying Modules, has in-depth examples of module development and debugging.
Chapter 10, Advanced Tricks with Existing Modules, shows examples of more complicated modules demonstrating Flash, jQuery, XML feeds, URL rewriting, and more.
Chapter 11, Challenging Custom Modules, shows examples of searching, importing, and exporting from custom modules.
Chapter 12, Advanced Modules and Security, explains advanced module examples and security techniques.
Chapter 13, Advanced Skinning, takes a look at skinning in more detail with animated menus, CSS, and Widgets.
What you need for this book
DotNetNuke is a web-based content management system that uses Windows Internet Information Server (IIS) and the .NET Framework. To follow along with the recipes in this book, you will need the following:
f ISS 5 or later found in Windows Server 2003, 2008, or 2008R2. For development
you may use Windows XP Professional, Windows Vista, or Windows 7 (Home Premium and above).
f Microsoft .NET Framework 2.5 or higher.
Who this book is for
If you are a .NET developer with beginner to intermediate knowledge of Visual Basic or C# and want to develop a website/CMS using DotNetNuke, this book is for you.
Familiarity with DNN operation, CSS, and basic web development (ASP.NET) skills is required.
Conventions
In this book, you will find a number of styles of text that distinguish between different kinds of information. Here are some examples of these styles, and an explanation of their meaning. Code words in text are shown as follows: "We can include other contexts through the use of the include directive."
A block of code is set as follows:
<asp:TextBox ID="txtSalary" runat="server"></asp:TextBox> <asp:RequiredFieldValidator ID="valSalary"
When we wish to draw your attention to a particular part of a code block, the relevant lines or items are set in bold:
<tr valign="top">
<td class="SubHead" width="125">
<dnn:label id="lblSalary" runat="server" controlname="lblSalary" suffix=":"> </dnn:label>
</td>
New terms and important words are shown in bold. Words that you see on the screen, in
menus or dialog boxes for example, appear in the text like this: "If you like how it looks, click
on Apply to apply the container to your site.".
Warnings or important notes appear in a box like this.
Tips and tricks appear like this.
Reader feedback
Feedback from our readers is always welcome. Let us know what you think about this book—what you liked or may have disliked. Reader feedback is important for us to develop titles that you really get the most out of.
To send us general feedback, simply send an e-mail to [email protected], and mention the book title via the subject of your message.
If there is a book that you need and would like to see us publish, please send us a note in the
SUGGEST A TITLE form on www.packtpub.com or e-mail [email protected].
If there is a topic that you have expertise in and you are interested in either writing or contributing to a book, see our author guide on www.packtpub.com/authors.
Customer support
Downloading the example code for this book:
You can download the example code files for all Packt books you have purchased from your account at http://www.PacktPub.com. If you purchased this book elsewhere, you can visit http://www.packtpub. com/support and register to have the files e-mailed directly to you.
Errata
Although we have taken every care to ensure the accuracy of our content, mistakes do happen. If you find a mistake in one of our books—maybe a mistake in the text or the code—we would be grateful if you would report this to us. By doing so, you can save other readers from frustration and help us improve subsequent versions of this book. If you find any errata, please report them by visiting http://www.packtpub.com/support, selecting your book, clicking on the errata submission form link, and entering the details of your errata. Once your errata are verified, your submission will be accepted and the errata will be uploaded on our website, or added to any list of existing errata, under the Errata section of that title. Any existing errata can be viewed by selecting your title from http://www.packtpub.com/support.
Piracy
Piracy of copyrighted material on the Internet is an ongoing problem across all media. At Packt, we take the protection of our copyright and licenses very seriously. If you come across any illegal copies of our works, in any form, on the Internet, please provide us with the location address or website name immediately so that we can pursue a remedy. Please contact us at [email protected] with a link to the suspected pirated material.
We appreciate your help in protecting our authors, and our ability to bring you valuable content.
Questions
1
Installation and Setup
In this chapter we will cover the following topics:
f Downloading the Microsoft Web Platform Installer f Installing SQLServer Express
f Downloading and installing DotNetNuke package f Running the DotNetNuke installation
f Setting the site name and information f Choosing a skin for the site
f Choosing a container for the site f Adding a module to a page f Installing Standard DNN Modules
f Downloading an extension (skin or module) f Installing a new extension
Introduction
But setting up a website from scratch can be challenging. There are multiple pieces involved and each piece must be correct for the whole to work. Fortunately, the recipes in this chapter will safely navigate you around the obstacles and have your own website up and running in no time. It is important that you read the instructions of the recipes with care making sure each step is done as described. Following these recipes is very much like following a cooking recipe — if you leave out an ingredient or set the oven to the wrong temperature the result could be a mess.
In the recipes of this chapter you will see the phrases web server and database server. If you are building a website for a company chances are the web server and database server are two different machines located on the network. To install and run DNN you need login access to each machine with privileges to install software.
On the other hand, if you are developing a small test website everything will be installed on your desktop or laptop and the terms web server and database server refer to your machine to which of course, you already have full access.
Internet access is necessary to download the DNN code and installation files but if you have made it this far we'll assume you are properly equipped.
Let's get started.
Downloading the Microsoft Web Platform
Installer
In this recipe we will show how to prepare a machine for a DNN installation by installing
Microsoft Web Platform Installer (Web PI). The Microsoft Web Platform Installer is a free tool
for downloading applications from the Internet including the DotNetNuke installation, Internet Information Services (IIS), SQL Server Express, .NET Framework, and Visual Web Developer. To make installing DNN as simple as possible, it is best to install Web PI first.
How to do it...
1. Open your favorite web browser and go to the site http://www.microsoft.com/ web/Downloads/platform.aspx.
2. Click on the Download It Now button on the right side of the page.
3. Web PI will now start to download. When the Run/Save dialog appears, click on Run. 4. If prompted by the Security Warning, click on Run.
7. Web PI will now launch and show the products available for download.
8. From this dialog you can choose the software to download. Click on Exit when you are done downloading products.
See also
Installing SQLServer Express
This recipe will show you how to download and install Microsoft's free version of SQLServer called Microsoft SQL Server 2008 Express. DNN currently supports SQL Server 2005 and 2008, but SQL Server Express is also a good solution for a website developer looking to run DNN from a single machine.
Getting ready
For this recipe you should have Windows Server 2003, 2008, or 2008R2. For development you may use Windows XP Professional, Windows Vista, Windows 7 (Home Premium and above).
In addition, you should complete the following recipe:
f Downloading the Microsoft Web Platform Installer
How to do it...
1. Start by launching the Microsoft Web Platform Installer.
4. Make sure the following products are selected:
SQL Server Express 2008
SQL Server 2008 Management Studio Express SQL Server 2008 Management Objects
5. Click on the Install button to begin the installation.
6. The next dialog will list the file you are downloading and prompt IDecline or IAccept.
Click on I Accept.
7. Lastly, you must choose how you want to authenticate users in the database. As this installation is probably just for your local use, you can choose
Mixed Mode Authentication.
10. After the installation finishes you will see a congratulations message. If you are prompted to reboot, click on Yes.
How it works...
Microsoft's Web Platform Installer handles the details of the file download and installation. Once it is completed, you will have SQL Server Express running on your machine.
Downloading and installing the DotNetNuke
package
In this recipe we will walkthrough downloading and installing the DotNetNuke package using the Web PI tool.
Some of the other ways to install DNN are:
Pre-installed by a hosting provider This is certainly the easiest way. There are many hosting providers offering DNN as part of a hosting package. Manually uploading and installing If you are familiar with SQL Server databases and
IIS you can download the DNN installation files and manually install the package. This is a good way to see how the individual pieces fit together.
Use DNN Starter Kit for Visual Studio
2008 You can also run DNN from your development tool. For more information, see Chapter 5, Building, Debugging, and Deploying Modules
Getting ready
For this recipe you should have Windows Server 2003, 2008, or 2008R2. For development you may use Windows XP Professional, Windows Vista, Windows 7 (Home Premium and above).
In addition, you should complete the following recipe:
f Downloading the Microsoft Web Platform Installer
How to do it...
1. Start by launching the Microsoft Web Platform Installer.
3. Scroll down until you see DotNetNuke and make sure it is selected.
4. Click on the Install button to begin the installation.
7. Once DotNetNuke package has been downloaded, Web PI will immediately launch the installation. It starts by prompting for the details of your new DNN site:
8. Leave the defaults and click on Continue.
Database Administrator Password: use the password you choose
when the database was installed
Database User Name: Choose a user name (such as DNN5User)
Database Password: Choose a password (such as DNN5User2010)
Database Server: .\SQLExpress
Database Name: DotNetNuke
11. Click on Continue.
12. Next, the status screen will be displayed as the installation runs. If you see a login failure instead, check that your database is up and running and you gave the correct password for the user sa.
13. You should now see the congratulations screen. Click on Finish. 14. Click on Exit to close the Web Platform Installer.
How it works...
In this recipe we used the Web PI Installer to download and install the DNN site. To complete the installation, see the next recipe Running the DotNetNuke installation.
Running the DotNetNuke installation
Once all the pieces are in place the final step is to access the DNN web and run the final installation code.
Getting ready
At this point you must have successfully completed the following recipes:
f Downloading the Microsoft Web Platform Installer
f Installing SQLServer Express
f Downloading and installing DotNetNuke package
How to do it...
2. There will be a pause while the installation begins, then you will see the installation wizard screen.
3. Select Typical for the installation method. 4. Choose English for the language.
5. Click on Next.
6. The next page will test the file permissions. The wizard will automatically check the file permission. You should see the message: Your site passed the permissions
7. Now we must point our DNN installation to the database. Make sure SQL Server
2005/2008 Database is selected at the top of the page (select this option even if
you are using SQL Express. We're not really defining the database here; we're just saying how we want to connect to it).
8. For Server, go with the default .\SQLExpress.
9. For the Database, type the name of the database created when SQLServer Express was installed: DotNetNuke.
10. Leave Integrated Security unchecked.
11. User ID should be the user name you selected (such as DNN5User).
12. Password should be the password you selected (such as DNN5User2010).
15. Click on Next. You will now see status messages as the database tables and stored procedures are created. At the end should be the message InstallationofDatabase
Complete. If the installation was successful, pat yourself on the back and click
on Next.
16. Now the wizard will create two users to start with: the SuperUser who controls the entire DNN installation and the Administrator user who administers the portals and has more limited privileges.
17. For the First Name, keep the default SuperUser. 18. For the Last Name, type Account.
22. Click on Next and provide the details for the Administrator user.
23. For the First Name, keep the default Administrator. 24. For the Last Name, type Account.
25. Select a User Name (avoid the standard admin for the username. It is too well known).
26. Choose a good password and confirm it. Then write it down as you will need it later. 27. Provide your Email Address to get system messages.
28. Lastly, the wizard will prompt for the basic information for your site. Choose a title for your site and type it into Portal Title.
29. Select DefaultWebsite for the Template. 30. Click on Next.
How it works...
When you navigate to a brand-new DNN website, it checks whether the necessary tables and stored procedures exist or not. If they are not there the script will create the tables, views, and stored procedures that DNN needs to run.
There's more...
As this recipe is the final step in the DNN installation it will show an error if any of the previous recipes were not done correctly. This means you may not realize until this moment that a step has been missed in any of the previous recipes. If you do encounter an error the best course of action is to cancel the installation by closing the browser; then review all the previous recipes to confirm every step was done correctly. If the installation continues to fail, it is recommended that you delete all files and the database and retry this recipe from the beginning.
Setting the site name and information
With the installation complete you can now setup your site. DNN is a powerful and flexible content management system so there is much to customize. This recipe will take you through the basics and show you how to quickly set up your site name and copyright message, as well as demonstrate how to upload your own logo for the site.
Getting ready
In this recipe we will demonstrate setting up the basic information for your site. To accomplish this task you must have successfully installed DNN as described in the first four recipes. You will also need to know the host and admin logins, and their passwords as chosen when DNN was installed.
How to do it...
1. Open your favorite web browser and go to the site you set up. If you are developing on your own machine then the web address would be http://localhost/ DotNetNuke/default.aspx.
2. At the welcome screen click on the Login link in the upper right corner of the page (just below the search magnifying glass).
4. The first thing you'll notice is the Control Panel across the top of the page. It contains useful tools to maintain the site divided into four categories: Common Tasks, Current Page, Admin, and Host. Some of these tools are also available under the host or admin menus, but they're easier to find here in the Control Panel.
5. Click on Admin to display the Admin tasks and click on the Site Settings icon in the upper-left corner.
7. Start filling out this form with the following information:
Title: MyOwnPersonalDNNWebsite
Description: MyfirstDNNsite
Copyright: Copyright2010byDNNNewbee
8. Click on the small plus sign next to Appearance to expand the panel and display fields dealing with the appearance of the site.
9. You can upload your own logo to the site by clicking on the Upload File link next to
12. Click on OK to close the File dialog.
13. Then click on the Save File link to actually bring your file up to the web server for DNN to display. The name of the file will now appear in the form.
14. Click on Update at the very bottom of the page to save your changes.
How it works...
The SiteSettings page has a variety of options you can set, many of which will be explored in
later chapters. Feel free to try different options. If it doesn't look right you can come back to this screen and change it back.
Choosing a skin for the site
This is a quick and easy recipe for changing the color scheme (called the "Skin") of your DNN site. When you download DNN it comes with a basic skin. However, you can download different skins selecting the one which you want your visitors to see. You may even opt for a different skin for the site administrator.
Getting ready
The typical installation of DNN has only one skin. In order to follow this recipe you will need to download at least one other skin to switch. If your site has only one skin you can still follow along to see how to change it. Or try the recipe Downloading an extension(skin or module) to download more skins for your site then come back and see how to change them.
How to do it...
2. From the Admin menu, select Skins.
3. Look for the drop-down list showing the available skins that have been installed on your site. If you don't see the skin you want, refer to the recipe Downloading an extension(skin or module) to install more skins.
4. Select the skin you want from the drop-down list. Samples of the skin will then be displayed.
5. Click on Preview to see what your site would look like with the selected skin. 6. If you like how it looks, click on Apply to apply the skin to your site.
How it works...
A skin in DNN is a kind of layout. Visual elements in DNN like the login link, the copyright phrase, and the site logo appear to the skin as simple tokens that are easily repositioned in the layout. The purpose of a skin is to separate the functionality of your site from the visual layout. It allows the artists to design the site without having to worry about how the code works; in turn the programmers can code the site without having to worry about how the graphics work. It provides a consistent look all over the pages of your website.
See also
See the next recipe for more ways to change the visual appearance of your site.
Choosing a container for the site
The skin controls the layout and color scheme of your site but the actual content of your DNN site (the blogs, news articles, and so on) are contained inside visual blocks called Containers. Containers help you lay out your site but you can also choose a visual style for these
containers in the same way you pick a visual style for the page itself.
How to do it...
1. Log in as Portal Administrator (sysadmin in our example). 2. From the Admin menu, select Skins.
3. Look for the drop-down list showing the available skins that have been installed on your site.
5. Look over the available containers and click on Preview to see what your site would look like with the selected container.
6. If you like how it looks, click on Apply to apply the container to your site.
7. If you want to have a different container just for the Administrator user, then find the two checkboxes labeled Portal and Admin. Uncheck Portal and leave Admin
checked, then apply the container as above.
How it works...
Containers are usually found within skins so the styles available for the containers are determined by the skin you have chosen. That is why you have to pick a skin before you can see the available containers. However, DNN is very flexible, allowing you to assign one skin to the pages of your site but also allowing the use of containers from a totally different skin. You are free to mix and match containers and skins to achieve the best appearance for your site.
See also
For more information on how to change the appearance of your site pages, see the recipe Choosing a skin for the site.
Adding a module to a page
A module in DNN is a way to organize content into easy-to-use (and easy to reuse) plugins. You create a forum or a blog once, but you can "plug it in" to any page in your site as many times as you like. That is how you build your site by creating pages and plugging in whatever modules you have.
Getting ready
How to do it...
1. Log in as Portal Administrator (sysadmin in our examples).
2. Make sure the Control Panel is displayed across the top of the page (the Control Panel is the set of icons you see when you are logged in as administrator).
3. Click on the New icon on the left side. This will create a new page. 4. For the Page Name, use OurSponsors.
5. For the Page Title, use OurSponsors.
6. Leave the rest as default and click on Update to create the page.
7. Next, look at the top center of the Control Panel and make sure Add Module: New is selected.
8. Locate the drop-down list that appears next to the Module: prompt. Select Banners. 9. Find the drop-down list next to the Pane: prompt and make sure ContentPane
is selected.
10. In the Title box, type AWordfromOurSponsors.
11. In the drop-down list labeled Insert: make sure Bottom is displayed.
12 Click on the Add Module button to insert the Banners module into the page you're looking at.
13. That's all there is to it. Once a module is added to a page you must set the options for the module before you use it. For more details on setting up specific modules, see Chapter 3, Easy tricks with existing modules.
How it works...
Adding a module to a page is a simple task and one you will do often. Building a website in DNN is merely adding modules to pages to create the features you need.
When you already have modules on the page, the Insert drop-down list controls whether the new module should appear above or below the existing modules. Again these are just options to help position the module on the page you've selected. Feel free to experiment with module positioning to get a better feel for what looks good on your site.
Installing standard DNN modules
DNN comes out of the box with many modules, but only the most popular are installed at first. This was a conscious decision by the makers of DNN so that new DNN websites would not be bogged down running a lot of modules that were not needed. This makes for an efficient install, but it also means you'll want to install several standard modules once your site is created.
How to do it...
1. Log in as a SuperUser (syshost in our examples).
2. Look at the Control Panel and make sure you're in Edit mode. 3. Look under the Host menu and select Extensions.
4. Scroll to the bottom and click on the link Install Available Extensions or hover the mouse over the module action menu and select it.
5. Check the modules you want to install. For the recipes in this book, select the following modules:
Announcements
Forum
IFrame
Links
Reports
Wiki
6. Scroll to the bottom of the page and click on Install Selected Extensions. 7. Now each of these modules will appear in the Control Panel.
How it works...
By installing these additional modules you have many more features you can place on your pages.
Downloading an extension (skin or module)
Extensions in DNN consist of a set of files put together in a compressed folder (also called a ZIP file). To install a new extension you just provide the ZIP file and the DNN extension wizard will do the rest. Only the SuperUser can install new skins and modules.
A good way to get new extensions for your DNN site is to download them from the Internet. Sometimes they are free or cost only a nominal amount. In later chapters you will see how to make your own extensions. No matter how you get your extensions it will consist of a single ZIP file that you need to upload to the DNN server and install before it will appear in the Control Panel drop-down lists as we saw in Adding a module to a page.
Popular sites for downloading DNN extensions are www.codeplex.com (free open source modules), DotNetNuke Forge (www.dotnetnuke.com), and www.snowcovered.com (mainly commercial modules). You may need to register for an account with the site, but the registration is free.
This recipe will show how to download an extension (a free skin in this example) but the process is basically the same for all different extension types (such as modules and foreign language packs).
How to do it...
1. Open your favorite browser and go to www.snowcovered.com.
3. Fill in your name and pick a Username and Password to use with this site. Fill in any other required fields and click on Register.
4. After a successful login or registration, you will see the Welcome page, showing the most recent modules and skins. In the upper left corner, click on DotNetNuke 5 in the list of Browse links.
5. This will show a list of all the modules and skins for DNN 5. We're looking to get a free skin, so find and click on the Skins link in the Browse list to the upper left. 6. Next, locate the drop-down list that says Release Date and select Price: Low to High.
Then click on the Sort link. This will show the free skins first.
7. Look over the free skins and pick one you think will look nice on your site. In this example we'll pick one called Greytness, but you can pick whichever one you like. Click on it to go to the skin detail screen.
10. The next screen shows the skin you are downloading. Click on the Proceed to
Checkout button.
11. At the Payment page, type your e-mail address. Click on the Continue button. 12. If you haven't logged into the SnowCovered site yet, you will be asked for your
username and password. Otherwise you'll go right to the Payment page.
13. The Payment page will show your account information. Make sure all the required fields are filled in and click on Continue.
14. The next screen will show the Sales Agreement and Terms. Click on the Agree to
terms checkbox and click on Confirm Order.
15. The last page will present a link called My Downloads. Click on this link. 16. At the list of pending downloads, click on Downloads shown next to the skin
you purchased.
17. On the next page, click on the Download link.
18. The File download dialog will ask if you want to Open or Save. Click on Save and select a temporary folder to hold the ZIP file.
19. That's all we need from the SnowCovered site so close the browser.
22. In the file we downloaded, there are several folders inside, one for DNN4 and one for DNN5. Look inside the DNN5 folder and you'll see the ZIP file we really need called Greytness_01.00.00_Install.zip. Choose File|ExtractAll from the menu and save all files that were inside the original ZIP to their own folder.
23. Remember the name of the folder holding the Greytness_01.00.00_Install. zip file. This is the ZIP we will send up to our DNN site. We will not send up the ZIP file we got from SnowCovered site but the ZIP we found inside that file.
How it works...
A DNN extension is an installable add-on for DotNetNuke that extends the visual experience (Skin, Container), Functions (Skin Objects, Modules), Services (Providers), Localization, or even modules. Modules, skins, and foreign language packs were treated separately in older versions of DNN, but in version 5 they are grouped together under the category of Extension with a single wizard to install them.
See also
Now that you have downloaded the extension in a ZIP file, the next recipe will show how to upload the ZIP file to your DNN site and install it.
Installing a new extension
Once an extension has been downloaded and saved in a temporary folder the last step is to connect to your DNN site and upload the module or skin. This recipe will show you how to install a module you have downloaded from a site like SnowCovered.
Getting ready
To perform this recipe you need to have downloaded an extension file as described in the recipe Downloading an extension (skin or module). In this example we will assume you have a file called Greytness_01.00.00_Install.zip ready to upload. Note: some extension packages are zipped with additional material (documentation, install instructions) together and need to be unzipped to be installed. For example, a DNN 5 install ZIP must have a manifest file inside.
3. Look at the Control Panel and make sure you are in Edit mode (not View mode). 4. Go to the menu Admin | Extensions.
5. Scroll to the bottom of the page and click on the link called Install Extension Wizard. You can also select this from the module action menu.
6. Click on the Browse button and select the ZIP file (Greytness_01.00.00_ Install.zip in our example).
7. Click on Next.
8. If you see a screen with a warning about a missing manifest, don't panic! It probably means that you skipped the steps from the download recipe and are trying to load the ZIP file that you got directly from SnowCovered. Click on Cancel and repeat the steps from the recipe Downloading an extension(skin or module) to extract the ZIP file for DNN5. w
9. If all is well, you will see the Install Extension page. This shows the details of the skin file. Click on Next to install it.
10. At the Release Notes page, click on Next.
11. If you see a Review License page, check Accept License and click on Next. 12. The last screen is the Package Installation Report which should list all the items
loaded for the skin with a final message at the bottom saying Installation Successful. If you see an error message instead, there could be a problem with the skin file. Try loading a different skin.
13. Click on Return to complete the skin installation.
14. The skin is now available to use on your site. If go to the menu Admin | Extensions
How it works...
The ZIP file holding the extension is uploaded to the DNN site and parsed for a special file called a manifest. The manifest tells DNN whether this is a skin, module, or foreign language extension you are trying to load. From there DNN knows what to do and it will make sure your extension is put in the right place.
There's more...
2
Managing Users and
Site Setup
In this chapter we will cover the following topics:
f Enabling user registration for your site f Creating users and granting access f Creating and assigning security roles f Granting access to modules
f Banning and deleting users f Managing profile properties f Creating and organizing pages f Using the Recycle Bin
f Setting up a SMTP server with Gmail
Introduction
Enabling user registration for your site
Once you have installed your DNN website, the first thing you're going to think about is how to create the users for it. In DNN users are created through the process of User Registration. You control how users can join the site by choosing one of the four membership options:
f None: Users cannot register themselves. Instead the Portal Administrator must create
each user as needed.
f Private: Users create their own registration but the Portal Administrator approves the
user registration before the user can access the site.
f Public: Users create their own registration and gain immediate access.
f Verified: Users create their own registration and gain access by clicking on a link in
the confirmation e-mail.
In this recipe we will show how to set the user registration for the site and demonstrate how the Verified membership works.
Getting ready
When using the Private, Public, or Verified memberships, both the Portal Administrator and the new user will receive an e-mail alert as part of the registration process. To see this entire process demonstrated in this recipe you need a valid e-mail address and the site must be set up to send e-mails. To set up your site this way, see the recipe Setting up a SMTP server with Gmail at the end of this chapter.
How to do it...
1. Begin by logging in as the Portal Administrator (sysadmin in our examples). 2. Look at the Control Panel and make sure you are in Edit mode.
3. Look under the Admin menu and select Site Settings.
7. To test the new setting, log out of the site by clicking on the Logout link.
8. By selecting a membership type that is not None, you will now see a Register link next to the Login link:
9. The register link will now also appear on the Login page:
11. Click on the Register link to create the user.
12. As the membership is Verified, the new user will receive a special e-mail containing a link that will complete the registration and add the user to the site. The e-mail looks something like this:
How it works...
Allowing users to register themselves with your site takes the burden of user creation off of the administrator. With the options of Private, Public, and Verified you can control the user registration process as much or as little as needed.
There's more...
When a user has attempted to register with the site, the Portal Administrator will receive an e-mail alert so that the administrator can take the appropriate steps to complete the registration. Here is an example:
See also
The fields that appear on the user registration form (first name, last name, and so on) are part of the user's profile. To see how you can add your own fields and make them required for registration, see the recipe Managing profileproperties later in this chapter.
Creating users and granting access
Getting ready
To create users all you need is the Portal Administrator login. But there are some decisions to make. Should the new user get an e-mail to notify them when their account has been created? Should you automatically authorize them so they can immediately log in? Should you give them a random password and force them to change it when they first log in? This recipe shows how to set these options.
How to do it...
1. Begin by logging in as the Portal Administrator (sysadmin in our examples). 2. Look at the Control Panel and make sure you are in Edit mode.
3. Look under the Admin menu and select User Accounts. You can also select the Users icon in the Admin tab of the Control Panel.
4. The page shows a list of users.
5. To create a new user look at the bottom of the page and click on the Add New User
6. This displays the AddNewUser form. Fill in the form with the following information:
User Name:jsmith
First Name: John
Last Name:Smith
Display Name: Professor Smith
Email Address:[email protected]
Authorize: Checked
Notify: Unchecked
Random Password: Unchecked
Password/Confirm Password: rfid2010
7. Click on Add New User to save your changes and create the user.
9. Find jsmith in the list of user accounts. Click on the lock icon next to the name to display the Manager Roles page.
10. On the left side you'll see the label Security Role and under that is a drop-down list of all the roles in the portal. Find the Contributor role in the list and select it. 11. Pick an Effective Date of today and leave the Expiry Date blank.
12. Uncheck Send Notification?
13. Click on the Add Role to User link to save your changes.
14. The Contributor role should now appear in the list of roles in the bottom-left of the page.
15. Click on Cancel to close the page as our change is done.
How it works...
The text that appears in the alert e-mails is completely customizable. You can find it by selecting Languages from the Admin menu (or from the Control Panel) and clicking on the pencil icon next to the language of your portal. To learn more about localizing text like this see the recipe in Chapter 9, Editing the language resource file.
There's more...
After creating a user and defining security access the last thing remaining is defining which security roles can see the portal modules.
See also
To learn how to assign security access to different modules see the recipe Granting access to modules later in this chapter.
Creating and assigning security roles
Getting ready
To create a security role you need either the host or Portal Administrator login. To decide what security roles you need think about the different types of users accessing the site. For example, if you have a news site you may create a group called Contributors. By creating a security role for this group you can give them access to edit content that a normal user would not have.
How to do it...
1. Begin by logging in as the Portal Administrator (sysadmin in our examples). 2. Look at the Control Panel and make sure you are in Edit mode.
3. Look under the Admin menu and select Security Roles. 4. This page will display all the security roles you currently have.
6. When the Edit Security Roles page is displayed, enter the following information:
Role Name: Contributor
Description: Aroletodesignateuserswhocancontribute
content
Role Group: <Global Roles>
Public Role: Unchecked
Auto Assignment: Unchecked
7. Click on the Update button to create the role.
How it works...
Once a security role is created you can assign it to a user then take advantage of DNN's flexible security and assign it to either the pages or the modules in your portal. This will control access to your portal's content.
There's more...
When your DNN was installed, five security roles were created for you:
f Administrator: This role grants full access to the selected portal.
f Registered User: This is any user who has been given a username and password
for the website.
f Subscribers: This is a sample for a public role, intended to be used in Newsletter
modules. Users can register and unregister for role membership by themselves.
f Unregistered users: These are public users who are visiting your site but have not
logged in.
f All Users: This special role is used when you want to give access to all users,
regardless of whether they are logged in or not.
These security roles can provide most of the security control your portal needs, but sometimes you need to create roles that make more sense to your business.
See also
Granting access to modules
Once security roles are defined and assigned to users the last step is to decide which users can access the modules in the portal. You specify access to modules in two ways: a module can inherit access from the page where it is placed or you can turn off inheritance and specify directly on the module what security roles can access it. Some modules are available to all users while others are private. If you don't have the security role required by the module you will not see the module when the portal page is displayed.
Getting ready
For this recipe you need a module. The default DNN portal includes a small HTML module called Sponsors that displays some of the companies that support DNN. We will take the normally private module and make it public so everyone can see it. Keep in mind that the recipe below will work with any module in DNN, not just with Sponsors.
How to do it...
1. Begin by logging in as the Portal Administrator (sysadmin in our examples). 2. Look at the front page of the portal and scroll down to the bottom of the page.
Look for the Sponsors or just use any module you see on the page.
4. Select Settings from the action menu. This displays the ModuleSettings form.
5. Make sure Inherit View permissions from Page is unchecked. This will allow you to set the security at the module level.
6. Listed under the Permissions prompt will be the five security roles that came with DNN plus any security roles you created. To give view access to unregistered users (that is the general public) make sure that:
All Users is checked
Registered Users is unchecked
Unauthenticated Users is unchecked
There's more...
In this recipe we saw a simple example of controlling user access at the module level, but security in DNN is determined at several different levels. You can control access at the page level and the let modules on the page inherit the same access or you override at the module level for additional control. But there may be additional factors to consider when choosing security for your site. Users can have multiple security roles and some modules (such as the Blog module) have additional layers of security built into them as well. It is best to think carefully about your security decisions and test them before deploying them on a production site.
See also
For more examples of user account security see the next recipe, Banning and deleting users.
Banning and deleting users
Once you have created users and given them access to your portal you have two different ways to remove that access. You can ban them by stripping them of their privileges or you can delete and remove them all together.
Getting Ready
For this recipe you will need some test users to ban and delete. See the recipe Creating users and granting access for more information.
How to do it...
1. Begin by logging in as the Portal Administrator (sysadmin in our examples). 2. Look at the Control Panel and make sure you are in Edit mode.
3. Look under the Admin menu and select User Accounts or click on the Users icon in the Control Panel.
5. To ban a user without deleting you need to unauthorize him. Find the user you want to ban in the list and click on the small pencil icon next to their name. This will display
the Edit User Accounts page.
6. Click on the Unauthorize User link at the bottom of the page. You will see a message saying User successfully Un-Authorized.
7. Click on Cancel to return to the list of users.
8. The test user is still listed but the Authorized checkbox is now unchecked. This user is now banned and can no longer log into the portal.
How it works...
A user can only log into your portal if they exist and are authorized. By removing these you effectively block access.
Managing profile properties
Before we leave managing users and move on to site setup there is one more thing to demonstrate. The user accounts page has fields such as First Name, Last Name, and many others. These are called Profile Properties. But as Portal Administrator you can control the fields that appear on the user profile. You can streamline user registration by removing properties you don't want. You can also create your own profile properties if there is special user information you want to collect.
Getting ready
For this recipe you will need some test users to modify their profile. See the recipe Creating users and granting access to create a test user.
How to do it...
1. Begin by logging in as the Portal Administrator (sysadmin in our examples). 2. Look at the Control Panel and make sure you are in Edit mode.
4. Click on Manage Profile Properties (or select it from the action menu).
5. You'll see a list of all the current profile properties. To hide some of these look under
Visible column and uncheck the following:
Biography: Unchecked
TimeZone: Unchecked
PreferredLocale: Unchecked
7. To add a new property click on Add New Profile Property (or select it from the action menu).
8. Fill in the following information:
PropertyName:JobPosition (no space)
DataType:Text
PropertyCategory: Preferences
Length:20
DefaultValue:Intern
ValidationExpression: Leave blank
Required: Unchecked
9. Click on Next.
10. On this page we provide the Help, Validation, and Error messages for the new profile property. Fill in the following information:
Property Name:JobPosition (no space)
Property Help:Yourpositioninthecompany
Category Name: Preferences
11. Click on Save Localized Text.
12. Click on Return to Profiles Properties List.
13. The new property will appear in the list of properties. Click on Cancel to return to User Accounts.
14. To check your results, click on the pencil icon to edit a user. 15. Click on Manage Profile.
16. Confirm that JobPosition now appears as a property for the user.
17. You can also use profile properties as part of the user registration process. If we want to add the example JobPosition to the user registration we start by going to User
Accounts under the Admin menu.
19. Scroll down to the bottom of the page until you see Require a Valid Profile
for Registration.
20. Set Require a Valid Profile for Registration to True. 21. Click on Update to save your changes.
22. To see how the user registration form looks, click on the Logout link. 23. Then click on the Register link.
24. The new JobPosition property now displays along with the other properties:
Creating and organizing pages
In this example we will create a few blank pages to show how to create new content and organize it in a menu. We will create one page that will be the parent of several smaller pages. So what is a page? A page in DNN is really a place holder. When you create a new page it appears in the menu of your site and acts as a blank layout to hold your modules.
How to do it...
1. Begin by logging in as the Portal Administrator (sysadmin in our examples). 2. Look at the Control Panel and make sure you are in Edit mode.
3. Look under the Admin menu and select Pages (or select Pages from the Admin tab of the Control Panel).
5. Click on the Add New Page icon under Actions on the left side.
6. Provide the following information:
Page Name: MyLinks
Template Folder: <None Specified>
Include in Menu? Checked
Permissions: Check ViewPage for Registered Users
7. Click on Update to save your information.
8. Now we have a new menu item that appears on every page of the site (like the Home or Admin menu). Let's create another page, but put it under this new menu item. 9. Click on the Add New Page again.
10. Provide the following information:
Page Name: Announcements
Page Title: Announcements
Parent Page: My Links
Template Folder: <None Specified>
Include in Menu? Checked
Permissions: Check View Page for Registered Users
11. Click on Update to save your information.
12. See how our second page appears underneath our first page. This is because we choose the first page as our Parent Page.
13. Add another page called My Blog and put it under MYLINKS. 14. Add another page called My Forum under MYLINKS.
15. Add another page called Useful Documents under MYLINKS. 16. Add another page called Delete Me under MYLINKS.
17. We now have five pages under our original parent page but they are in the wrong order. We can move the Delete Me page to the bottom of the menu.
20. Now that we know how to move a page in the menu, let's see how to delete a page. 21. Select DeleteMe in the list of pages on the left side.
22. Click on the small red X under Actions on the right side of the page.
23. You will be prompted Are you Sure You Wish To Delete This Item? Click on OK. 24. The page is sent to the Recycle Bin and disappears from the menu and the list of
pages. If you delete a page and change your mind later, see the next recipe Using the Recycle Bin to learn how to get it back.
How it works...
Creating pages, organizing them in the menu and adding modules to them is a big part of building a website using DNN. We'll see many more examples of adding pages and creating content in the next chapter.
See also
Now that you have blank pages in your site you can start adding modules using the remaining recipes in this chapter and Chapter 3.
Using the Recycle Bin
When you delete pages and modules in DNN, they are not actually deleted. Instead they are held in a Recycle Bin just like files on your computer. This recipe will show you how to "undelete" pages and modules.
Getting ready
To follow along with this recipe you'll need a deleted page. See the recipe Creating and organizing pages to learn how to delete a page.
How to do it...
3. Look under the Admin menu and select Recycle Bin.
4. The Recycle Bin maintains pages and modules you have deleted. To bring back a page click on the page to select it.
5. Click on the small green recycle icon.
6. After a pause the page will become active again and reappear in the menu. 7. To restore a module, select the module in the list.
8. Click on the recycle icon.
9. After a pause the module will reappear on the page it was deleted from.
How it works...
The Recycle Bin lets you undelete pages and modules but it also offers a link to empty the Recycle Bin. If you click on this link then all the pages and modules in the Recycle Bin will be deleted forever. Use this link with caution.
Setting up a SMTP server with Gmail
DNN uses e-mail in many ways: when a new user is created, when you set up vendors, or when someone responds to a blog post.
You can configure your site to send e-mails using the Simple Mail Transfer Protocol (SMTP)
Getting ready
To follow along with this recipe you must have the following:
f A Gmail account (you can get a free one by going to http://mail.google.com and clicking on the Create an Account button)
f The username and password to your Gmail account
How to do it...
1. Begin by logging in as the host (syshost in our examples). 2. Look under the Host menu and select Host Settings. 3. Under Basic Settings, provide the following information:
Host Email: (put your Gmail address here,
6. Fill in the following information:
SMTP Server and port: smtp.gmail.com
SMTP Authentication:Basic
SMTP Enabled SSL: Checked
SMTP Username: (your Gmail email address dnnsyshost@gmail.
com)
SMTP Password: (your Gmail password)
7. Click on the Update button to save your changes. 8. Click on the Test link to test your configuration.
9. You should see a message Email Successfully Sent. If you see an error instead, check whether you typed everything as shown above and provided the correct Gmail address and password.
How it works...
3
Easy Tricks with
Existing Modules
In this chapter we will cover the following topics:
f Using the HTML module f Creating an Announcement f Distributing documents online f Publishing a Newsletter f Creating a calendar of events f Creating a Wiki
f Publishing sets of popular links f Displaying RSS news feeds f Configuring RSS news feeds f Publishing a simple report f Publishing a survey questionnaire
Introduction
Most of the modules described in this chapter are included in the current version of DNN but are uninstalled. Limiting the number of installed modules keeps a new DNN site as simple and efficient as possible. Review the recipe from Chapter 1, Installing standard DNN modules to install these additional modules before following these recipes.
Using the HTML module
The HTML module is a very simple module but it offers a lot of possibilities. Think of it as an HTML file you can put inside a container on your DNN page. Whatever code you put in the module will be interpreted just like an HTML file placed on the web server.
On the positive side, this means your HTML module can contain the same kind of code you would find in any HTML file: HTML, JavaScript, VBScript, even JQuery. On the negative side, as the HTML module sits inside the DNN page, it means there are some important limitations to what the HTML module can do. The principal consideration is that whatever code you place in the HTML module must play nice with the all the other code running on the page outside of your module. It also means that you are responsible for the correct syntax of your HTML code. There is no error checking done on the code in the HTML module.
In this recipe we will demonstrate simple HTML with CSS code. For more examples of the HTML module, you can look ahead to Chapter 10.
Getting ready
To follow along with this recipe, it is handy to be familiar with HTML and CSS.
How to do it...
1. Log in as Portal Administrator (sysadmin in our examples). 2. Add the HTML module to a new or existing page.
3. Select Edit Content from the module menu (or click on the EditContent icon). 4. On the EditContent page, you will see the editor which has different modes. You can
5. As we are working in HTML, click on the HTML tab at the bottom.
6. Type the following HTML in the editor to create a list of sample images of DNN vendors:
<div class="imagebar"> <ul class="image">
<li><img alt="" src="/dotnetnuke/Portals/0/aspnet.gif" /></li> <li><img alt="" src="/dotnetnuke/Portals/0/redgate.gif" /> </li>
<li><img alt="" src="/dotnetnuke/Portals/0/WH4L.gif" /></li> <li><img alt="" src="/dotnetnuke/Portals/0/
exacttarget.gif" /> </li>
<li><img alt="" src="/dotnetnuke/Portals/0/
maximumasp.gif" /> </li>
<li><img alt="" src="/dotnetnuke/Portals/0/telerik.gif" /> </li>
</ul> </div>
7. Click on Save to save your changes.
9. This demonstrates how the module renders simple HTML, but to format the display we need to add some style information. Select EditContent from the module menu (or click on the EditContent icon) and click on the HTML button.
10. Add the following style information at the top of the editor, just before the HTML code:
<p><style type="text/css">
<li><img alt="" src="/dotnetnuke/Portals/0/
crystaltech.jpg" /> </li>
<li><img alt="" src="/dotnetnuke/Portals/0/
datasprings.gif" /> </li>
<li><img alt="" src="/dotnetnuke/Portals/0/easycgi.gif" /></ li>
<li><img alt="" src="/dotnetnuke/Portals/0/
exacttarget.gif" /> </li>
<li><img alt="" src="/dotnetnuke/Portals/0/
maximumasp.gif" /> </li>
<li><img alt="" src="/dotnetnuke/Portals/0/telerik.gif" /> </li>