Oracle ADF 11gR2 Development
Beginner's Guide
Experience the easiest way to learn, understand,
and implement rich Internet applications using
Oracle ADF 11
g
R2
Vinod Krishnan
Copyright © 2013 Packt Publishing
All rights reserved. No part of this book may be reproduced, stored in a retrieval system, or transmitted in any form or by any means, without the prior written permission of the publisher, except in the case of brief quotations embedded in critical articles or reviews. Every effort has been made in the preparation of this book to ensure the accuracy of the information presented. However, the information contained in this book is sold without warranty, either express or implied. Neither the author, nor Packt Publishing, and its dealers and distributors will be held liable for any damages caused or alleged to be caused directly or indirectly by this book.
Packt Publishing has endeavored to provide trademark information about all of the companies and products mentioned in this book by the appropriate use of capitals. However, Packt Publishing cannot guarantee the accuracy of this information.
First published: April 2013
Production Reference: 1180413
Published by Packt Publishing Ltd. Livery Place
35 Livery Street
Birmingham B3 2PB, UK. ISBN 978-1-84968-900-7
www.packtpub.com
About the Author
Vinod Krishnan
has over eight years' experience in the Information Technology industry this exposed him to a wide range of technologies that include Java, J2EE, WebLogic, Fusion Middleware, SOA, and Webcenter.He has been working with Oracle ADF Technologies since 2005, and enhanced his affinity towards ADF after he joined Oracle India. For the last five years, Vinod is actively involved in large implementations of next-generation enterprise applications, utilizing Oracle's JDeveloper and Application Development Framework (ADF) technologies. He holds a B.Tech. in Information Technology from Anna University, Chennai, India.
He is currently responsible for building and deploying applications using the Oracle Fusion Middleware technology stack as a Project Lead in Oracle America.
Vinod has had a multifaceted career, he has worked in positions such as Senior Consultant, Senior Applications Engineer, Software Engineer, and Solution Architect for MNCs such as Oracle, Capgemini, and Keane. Currently he is working as a Project Lead in Oracle America.
I would like to express my gratitude to the people who saw me through this book, to all those who provided support, talked things over, read, wrote, offered comments, allowed me to quote their remarks, and assisted in the editing, proofreading, and design.
I want to thank my wife, Sandhya, who supported and encouraged me in spite of all the time it took me away from her. It was a long and difficult journey for her.
I would like to thank Grant Mizen, Stephanie Moss, Ameya Sawant, and Poonam Jain for helping me with the process of selection and editing.
About the Reviewers
Frank Nimphius
is a Senior Principal Product Manager in the Oracle application development tools group at Oracle Corporation, specializing in Oracle JDeveloper and Oracle Application Development Framework (ADF).In his current position, Frank represents and evangelizes the Oracle JDeveloper and Oracle ADF products worldwide as a speaker at user group and technology conferences as well as in various publications. Frank runs the ADF Code Corner website, the "OTN Forum Harvest" blog, and is the co-author of the Oracle Fusion Developer Guide book published in 2009 by McGraw-Hill.
Sten E. Vesterli
took up Oracle development as his first job after graduating from the Technical University of Denmark, and hasn't looked back since. He has worked with almost every development tool and server Oracle has produced in the last two decades, including Oracle ADF, JDeveloper, WebLogic, SQL Developer, Oracle Portal, BPEL, Collaboration Suite, Designer, Forms, Reports, and even Oracle Power Objects.Oracle has recognized Sten's skills as an expert communicator on Oracle technology by awarding him the prestigious title of Oracle ACE Director, which is carried by less than 100 people in the world. He is also an Oracle Fusion User Experience Advocate and sits on the Oracle Usability advisory board, and he is part of the Oracle WebLogic Partner Council as well.
www.PacktPub.com
Support files, eBooks, discount offers and more
You might want to visit www.PacktPub.com for support files and downloads related to your book.
Did you know that Packt offers eBook versions of every book published, with PDF and ePub files available? You can upgrade to the eBook version at www.PacktPub.com and as a print book customer, you are entitled to a discount on the eBook copy. Get in touch with us at [email protected] for more details.
At www.PacktPub.com, you can also read a collection of free technical articles, sign up for a range of free newsletters and receive exclusive discounts and offers on Packt books and eBooks.
TM
http://PacktLib.PacktPub.com
Do you need instant solutions to your IT questions? PacktLib is Packt's online digital book library. Here, you can access, read and search across Packt's entire library of books.
Why Subscribe?
Fully searchable across every book published by Packt Copy and paste, print and bookmark content
On demand and accessible via web browser
Free Access for Packt account holders
Table of Contents
Preface 1
Chapter 1:
Installing and Configuring JDeveloper IDE
7
System requirements for Windows 8
Installing JDeveloper 8
Time for action – downloading the installer 8
Studio edition 9
Time for action – installing JDeveloper Studio Edition 10 Time for action – launching JDeveloper for the first time 12
Knowing the start-up flags/parameters 13
Time for action – setting the start-up options 14
Setting up the user directory (System directory) 14
Working with IDE configuration files 15
Knowing the roles 17
Getting familiar with the IDE 18
Setting the preferences 20
Knowing the IDE components 20
Time for action – opening the sample application 21
Application Navigator 21
Application Resources 23
Data Controls palette 24
Recently Opened Files 24
Structure window 24
Database Navigator 25
The Resource palette 26
Code editor 28
Code editor views 28
Property Inspector 29
Summary 30
Chapter 2: Getting Started with ADF
31
Model-View-Controller 32
How ADF implements MVC 33
The ADF architecture 34
Creating a simple application in ADF 35
ADF development practice 35
Sample application – employee directory application 36
Time for action – creating the application workspace 37
Planning your application 39
Connect to a database 39
Time for action – setting up the database tables 41
Time for action – creating a database connection 41
Build business services 42
Accessing the project properties 42
Time for action – creating the business components 43
Running the AM tester 49
Exposing data to the UI layer 50
Time for action – bind data to the UI components 51
Time for action – running the application 57
Summary 60
Chapter 3: Understanding the Model Layer
61
ADF business components 61
What is an entity object? 63
Time for action – checking the attributes of an entity object 64 Time for action – creating an entity object for DEPT table 66
Why association? 69
Time for action – creating an association between EmpEO and DeptEO objects 70
About the view object 71
Types of view object 72
Time for action – creating an entity-based view object 73
Importance of a view link 77
Time for action – creating a view link between EmpVO and DeptVO 77
What is an application module? 80
Time for action – creating an application module 80
Time for action – running the application module 83
Options for the business components 85
Entity object 86
Chapter 4: Validating and Using the Model Data
97
Declarative validation 98
Knowing the lifecycle of an entity object 98
Types of validation 99
Time for action – adding a collection validator for the DeptEO file 101
The Compare validator 104
The Key Exists validator 105
The Length validator 105
The List validator 105
The Method validator 105
The Range validator 105
The Regular Expression validator 106
The Script validator 106
The UniqueKey validator 106
Time for action – creating an alternate key for DeptEO 107
Groovy expression 108
Setting a default value 109
Time for action – setting a default salary for employees 109
Validation execution 111
Some commonly used expressions 112
Time for action – adding a script expression 113
Time for action – generating a Java API for DeptEO 115
Classes for view objects 118
Application module API 119
Time for action – learning to override a method 120
Managing transactions 121
Configuring transactions 121
Time for action – creating configurations 122
Exposing data 123
Time for action – exposing a method using the client interface 123
Summary 126
Chapter 5: Binding the Data
127
ADF model layer 128
Data Controls palette 129
Data control 129
The view object collection 129
Attributes 130
Time for action – adding a Commit button to the UI page 133
Working with the data control layer and binding 135
Time for action – accessing the page definition file 136
Creating the bindings manually 137
Time for action – creating page definition bindings 141
Adding executables 142
Chapter 6: Displaying the Data
147
Creating a page 148
Knowing the page template 148
Oracle Three Column Layout 148
Oracle dynamic tabs shell 149
Time for action – creating the dept.jspx file 154
Layout the page display 156
Time for action – creating the layout for the page 157
Knowing the UI components 158
Input components 159
Time for action – showing a popup to the user 164
List of values components 166
Time for action – adding an EL expression 171
Partial page rendering 172
Summary 174
Chapter 7: Working with Navigation Flows
175
Task flows 176
Task flow types 176
Unbounded task flow 176
Bounded task flow 177
Time for action – adding a bounded task flow to EmpDirectoryApplication 178
Task flow components 180
Method call 180
Time for action – adding a method call activity 180
Router 183
Save Point Restore 183
Task Flow Call 183
Task Flow Return 184
Time for action – adding a Task Flow Return 184
Parent Action 185
URL View 186
View 186
Time for action – adding a View activity to the task flow 187
Control flow 188
Wild card 188
Task flow options 188
General 188
Visibility 190
Based on a template 190
Managed beans 190
Managed properties 191
Parameters 191
Time for action – passing parameters to a task flow 191
Behavior 193
Transactions 194
Task flow as a region 194
Time for action – adding a task flow as a region 194
ADF life cycle 195
Memory scopes 197
Relationships between the scopes 198
Summary 201
Chapter 8:
Layout with Look and Feel
203
Skinning essentials 203
What is a skin? 204
Pseudo classes in the ADF skinning framework 207
Using the skin editor 208
Time for action – creating an ADF skin using the skin editor IDE 208
Extended skins 211
Time for action – deploying the skin file 215
Summary 218
Chapter 9: Implementing Security
219
Introduction to security 219
Basic security 220
Time for action – implementing basic security 220
Applying security permissions 223
Security for business objects 224
Security for task flows and page-related files 224
Time for action – adding permissions 225
Creating a login page 228
Time for action – creating a login page 228
Creating roles and groups 230
Time for action – creating roles and assignments 231
Disabling ADF security 233
Time for action – disabling security for ADF applications 233
Summary 235
Chapter 10: Deploying the ADF Application
237
ADF application deployment 238
Overview 238
Preparing for deployment 240
Connection 240
Deployment profiles 241
Time for action – creating the deployment profile 241
MDS configuration 242
Deployment descriptors 243
web.xml 243
weblogic.xml 244
Deployment to the WebLogic server 247
Integrated server 247
Time for action – creating a default domain for integrated server 248
Time for action – deployment to integrated server 249
Standalone server 250
Time for action – deploying to the standalone server 251
Summary 254
Chapter 11:
Advanced Features of ADF
255
Advanced topics on entity objects 256
Tuning 256
The Custom validation rule 260
Custom error messages 261
Advanced topics on view objects 262
Avoid getRowCount, getEstimatedRowCount 264
Working with Rowsets 264
List of values 264
Time for action – creating a list of values of a department 264
UI categories 266
Application module state management 267
Complex data controls 268
Complex task flows 268
Contextual events 270
Time for action – publishing an event and subscribing it 270
Complex usage of a managed bean 273
Debugging the application 275
Debugging practices 275
Exception handling 276
Debugging the lifecycle 277
The Metadata Services framework 278
Customization layers 278
Customization classes 279
Seeded customization 280
Runtime customization 281
Modes of data transport 282
WebLogic server configurations 282
Domain 283
Servers 283
Deployments 284
The Security realm 284
Data sources 284
Diagnostics 285
Creating an extension 285
The extension.xml file 286
Time for action – creating and running an extension 286
Summary 288
Pop Quiz Answers
289
Preface
Application Development Framework (ADF) 11gR2 is the next-generation JEE framework from Oracle for building robust and scalable enterprise applications. ADF 11gR2 provides out of the box infrastructure solutions that simplify application development and end user experience. Application development using ADF 11gR2 is fun as it provides a visual and declarative development experience. Some of the noted features offered by ADF 11gR2 are rich and powerful components support for rich Internet applications, Page Flow 2.0 support, drag-and-drop support for data bindings, ADF business components support, mobile development support, security implementation support, declarative development support, runtime customization, reusability support, and so on.
Oracle ADF 11gR2 Development Beginner's Guide aims to provide step-by-step instructions for designing, developing, and deploying a highly scalable, secured, and rich Internet application. This book will help any user with basic programming skills to quickly learn what options are available, and how to develop web applications using ADF 11gR2. This book has been designed to help you learn basics and have fun while developing practical applications using ADF 11gR2. In this book, you will learn about developing web-based applications using ADF 11gR2 in a simple and easy way. Screenshots and practical instructions are included to make the book more interactive. This book will serve as a faithful friend to its readers.
What this book covers
Chapter 1, Installing and Configuring JDeveloper IDE will teach you how to install and configure the JDeveloper IDE, and how to work with the IDE.
Chapter 3, Understanding the Model Layer will teach you about ADF Business Components, how they work, and it will help you familiarize with the components.
Chapter 4, Validating and Using the Model Data describes how to write business logic declaratively. Learn groovy expressions, and how to manage transactions and expose the data.
Chapter 5, Binding the Data teaches you how to use the data controls and bind the data for the user interface.
Chapter 6, Displaying the Data shows how to display the data in the UI using layers and components.
Chapter 7, Working with Navigation Flows describes how to use page flows and activities, pass parameters, and about the ADF life cycle.
Chapter 8, Layout with Look and Feel will teach you how to style the page and make it presentable.
Chapter 9, Implementing Security will help in securing the page that you have created, and show how to allow and restrict access for different roles and groups.
Chapter 10, Deploying the ADF Application will help you deploy the application to the server.
Chapter 11, Advanced Features of ADF delves into the Advanced features of the ADF 11gR2 framework.
What you need for this book
Who this book is for
The book is intended for beginners who know a little bit of HTML and Java programming and would like to learn how to develop rich web applications using Oracle ADF 11gR2.
Conventions
In this book, you will find a number of styles of text that distinguish between different kinds of information. Here are some examples of these styles, and an explanation of their meaning.
Code words in text are shown as follows: " Accept the prompt to save jdevstudio11123install.exe on your machine "
A block of code is set as follows:
<context-param>
<param-name>org.apache.myfaces.trinidad.CHECK_FILE_MODIFICATION</ param-name>
When we wish to draw your attention to a particular part of a code block, the relevant lines or items are set in bold:
[default]
exten => s,1,Dial(Zap/1|30) exten => s,2,Voicemail(u100) exten => s,102,Voicemail(b100) exten => i,1,Voicemail(s0)
Any command-line input or output is written as follows:
New terms and important words are shown in bold. Words that you see on the screen, in
menus or dialog boxes for example, appear in the text like this: "clicking the Next button
moves you to the next screen".
Warnings or important notes appear in a box like this.
Tips and tricks appear like this.
Reader feedback
Feedback from our readers is always welcome. Let us know what you think about this book—what you liked or may have disliked. Reader feedback is important for us to develop titles that you really get the most out of.
To send us general feedback, simply send an e-mail to [email protected], and mention the book title via the subject of your message.
If there is a topic that you have expertise in and you are interested in either writing or contributing to a book, see our author guide on www.packtpub.com/authors.
Customer support
Now that you are the proud owner of a Packt book, we have a number of things to help you to get the most from your purchase.
Downloading the example code
Errata
Although we have taken every care to ensure the accuracy of our content, mistakes do happen. If you find a mistake in one of our books—maybe a mistake in the text or the code—we would be grateful if you would report this to us. By doing so, you can save other readers from frustration and help us improve subsequent versions of this book. If you find any errata, please report them by visiting http://www.packtpub.com/submit-errata, selecting your book, clicking on the erratasubmissionform link, and entering the details
of your errata. Once your errata are verified, your submission will be accepted and the errata will be uploaded on our website, or added to any list of existing errata, under the Errata section of that title. Any existing errata can be viewed by selecting your title from http://www.packtpub.com/support.
Piracy
Piracy of copyright material on the Internet is an ongoing problem across all media. At Packt, we take the protection of our copyright and licenses very seriously. If you come across any illegal copies of our works, in any form, on the Internet, please provide us with the location address or website name immediately so that we can pursue a remedy.
Please contact us at [email protected] with a link to the suspected pirated material.
We appreciate your help in protecting our authors, and our ability to bring you valuable content.
Questions
1
Installing and Configuring
JDeveloper IDE
Developing a web application using ADF is fun, and the most interesting part is to work in an integrated development environment such as JDeveloper IDE. JDeveloper IDE imparts a declarative environment and supports an end-to-end development life cycle for an enterprise application using ADF. JDeveloper has been designed to interact efficiently with most of the technologies.
JDeveloper has undergone several phases of changes/versions, and it is now the prominent, most preferred IDE for developing web applications using Oracle technologies, especially ADF. The latest version of JDeveloper available in the market is 11gR2 with the release Version 11.1.2.3.0. The advantage of the JDeveloper 11gR2 release 11.1.2.3.0 is that it supports the development of mobile applications for iOS and Android mobile devices.
In this chapter, we will learn how to:
Install JDeveloper on Windows Work with the IDE
System requirements for Windows
JDeveloper 11gR2 is supported to run on the following operating systems:
Windows Linux Mac OS X
The recommended system requirements for Windows are as follows:
Operating system version: Windows 7 and Windows XP with service pack 3 on both
32-bit and 64-bit systems
Minimum system memory: 2 GB for 32-bit and 3 GB for 64-bit machines is desirable
Display settings: Minimum of 1024 x 768 resolution for ADF development JDK requirement: Java 6.0 Update 24 and above
When writing this book, the author used JDeveloper 11gR2
(11.1.2.3.0) on Windows 7 professional, a 32-bit operating system with 3 GB of system memory.
Installing JDeveloper
Installing JDeveloper 11gR2 on Windows is an easy task. Following the steps will ensure a smooth installation.
The installation process involves:
Downloading the installer from OTN Installing the software in Windows
Time for action – downloading the installer
JDeveloper 11gR2 Studio Edition is free for development and is licensed under the OTN JDeveloper license agreement. JDeveloper 11gR2 (11.1.2.3.0) has a free runtime license for applications deployed to GlassFish using the ADF Essentials feature. Perform the following steps for downloading the installer:
2.
Select the Windows Install drop-down option for Studio Edition: 11.1.2.3.0 and click on the Download File button.3.
Accept the prompt to save jdevstudio11123install.exe on your machine.What just happened?
You have downloaded the installer from the OTN site to install the JDeveloper 11.1.2.3.0 Studio edition on Windows.
This installer is an executable that will run only on Windows. The installer and the installation procedure differ from platform to platform. You will have to download a Linux install for a Linux platform, and there is an option to download a generic, platform-independent installer for MAC. Refer to the following URL for more information on how to use a generic installer:
http://www.oracle.com/technetwork/developer-tools/jdev/documentation/ index.html
Have a go hero – researching the optional components for JDeveloper
Ok, now it's your turn to research more on the optional components that can be downloaded for JDeveloper 11gR2. There are other components that support adding more features for JDeveloper IDE.
Ask yourself the following questions and find the answers on the Downloads page:
We have different development teams to work with. What are the options to
collaborate for increased productivity?
How can you find out more about the previous versions of JDeveloper before
starting with 11gR2?
Can I install my ADF application on any other JEE servers? Where can I see the ADF framework components in action?
I want to develop my own custom theme for the ADF components. Where can
I find a user-friendly editor for customizing the components?
Studio edition
Time for action – installing JDeveloper Studio Edition
Let's perform the following steps to install the JDeveloper 11gR2 Studio Edition:1.
Double-click on the jdevstudio11123install.exe file to launch the installer. The Oracle installer starts preparing for the installation, and a screen with a progress bar appears.2.
Once the preparation is completed, a Welcome screen is displayed. Click on theNext button to proceed with the installation process.
3.
The next screen will ask you to choose the middleware home directory for the installation. The Middleware Home Type section will have two options to choosefrom. One is Use an existing Middleware Home and the other one is Create a new Middleware Home.
When we select Use an existing Middleware Home, the existing
middleware installation paths get enabled, and the installation of the additional component depends on the user selection.
4.
Select Create a new Middleware Home and locate the directory where you want to install JDeveloper Studio and other additional components. The installers will display an error message if the path already exists. The directory that you specify here will be your middleware home, and a common practice is to refer to the directory as MW_HOME.5.
Click on the Next button to choose the installation type on the next screen.6.
On this screen, you will select how you want to install the product. You will seetwo options, namely Typical and Custom.
The Typical installation will install JDeveloper Studio, application
development framework runtime, and WebLogic Server on your system
The Custom installation will allow you to choose the product and
components to install
7.
We will select the Typical option this time; it will install all the related components necessary to run the application.8.
The next screen will display the installation directories for different components. Following are the default directories: For JDeveloper: MW_HOME/jdeveloper
9.
You can select the Discard Changes option at this point of time to revert back and choose a different directory for your middleware installation.10.
The next screen will allow you to create the following shortcuts for the components: “All Users” Start Menu folder will create shortcuts in the Start menu,
and all users registered on the system can access these shortcuts
Localuser's Start Menu will restrict access to any other user except the
current user
11.
The next screen will display the installation summary of all the components that will be installed as part of the current installation. The components installed are: JDeveloper Studio
Application development framework runtime WebLogic Server
Java 6.0 Update 24
If we had selected the Custom installation type, we would
have had an option to unselect the JDK 1.6 installation on
the component selection screen. Also remember that JDK has to be installed separately for users who had opted to use a generic installer.
12.
Click on the Next button to proceed with the installation of the components displayed on the Installation Summary screen. During this process, the installation-related artifacts will be displayed along with the progress of the installation. You have an option to exit the installation at any point of time.13.
Once the installation is complete, you will be directed to the Installation Complete screen with a message saying Installation is Complete. You are provided with an option Run Quickstart that will display a wizard to launch installed components, configure the server, and show a way to upgrade the server domains. We can also access the online resources and documentation related to JDeveloper 11gR2 using the wizard.14.
Click on the Done button to display the Quickstart wizard.What just happened?
Congratulations! We just installed JDeveloper 11gR2 Studio Edition on Windows; this means that the initial and most important step for developing this next generation enterprise application is complete.
Starting JDeveloper is the next easy task that follows the installation.
Have a go hero – check the folder structure of JDeveloper
Now it is time for you to have a look at the installation directory of JDeveloper. Perform the following steps to check the folder structure of JDeveloper:
1. List down the folders that you see inside MW_HOME. 2. Familiarize yourself with the directory structure. 3. What can you infer from the folder structure?
Time for action – launching JDeveloper for the first time
By now you will be excited to launch JDeveloper, but since this is your first time, it will be good to know the options available:
1.
Launch Oracle JDeveloper 11g from the Quickstart wizard after the installation is complete. The Quickstart wizard is also available from All Programs | FusionMiddleware 11.1.2.3.0.
2.
The newly installed products are pinned to the Start menu for easy access. Click on JDeveloper Studio 11.1.2.3.0.3.
You can also click on All Programs from the Start menu, locate Oracle FusionMiddleware 11.1.2.3.0, and click on JDeveloper Studio 11.1.2.3.0.
The locations from where you can start JDeveloper apart from the shortcuts are:
MW_HOME/jdeveloper/jdeveloper.exe
MW_HOME/jdeveloper/jdev/bin/jdevw.exe
MW_HOME/jdeveloper/jdev/bin/jdev.exe
What just happened?
Now you have launched JDeveloper. What do you see? You will see a startup screen called
Oracle JDeveloper 11g with the Version 11.1.2.3.0.
Have a go hero – have fun with the welcome screen
By now you will have a better idea of the folder structure of JDeveloper. To have some fun, just guess where the welcome screen is coming from.
If you succeed in identifying the location, you can have your own welcome screen every time you start JDeveloper, just by changing it.
Knowing the start-up flags/parameters
There are some flags that you can set to alter the launching behavior of the IDE. These are set as the command-line options for the shortcut that is used to launch the IDE.
JDeveloper is a multiuser-enabled IDE that allows multiple users to share the same workstation. By default, the IDE configuration files are saved in a directory within the user's working directory. The following are the start-up flags/parameters:
-J-Dide.user.dir=<system_directory>: Using this property, you can override the default behavior to write the configuration files into the specific directory of choice.
An alternate way for this is to set the JDEV_USER_DIR environment
variable that points to the user's current working directory.
JDEV_USER_HOME and JDEV_USER_DIR are the variables that are
listed in the MW_HOME/jdeveloper/jdev/bin/jdev.boot
file. JDeveloper will look up these variables on startup to set the user's directory. For example:
set JDEV_USER_HOME=C:\Users\vtkrishn\AppData\ Roaming\JDeveloper
set JDEV_USER_DIR=C:\JDeveloper\mywork
noreopen: This option will not reopen the files that were opened in the previous user session.
The noreopen option will help JDeveloper to start faster, with
there being no open files from the previous user session. All these settings will be displayed in the Properties tab of the IDE in Help |
About. You may find other useful information in this section.
Time for action – setting the start-up options
1.
Locate your middleware directory on the Start menu.2.
Right-click on JDeveloper Studio 11.1.2.3.0 and select Properties.3.
In the Target section, add the following line of code at the end of the line: -J-Dide.user.dir=C:\jdev –nonag –noopenWhat just happened?
You have selected JDeveloper to have the user directory in the C:\jdev folder and also opted not to open any kind of message or welcome screen while launching the IDE. The IDE will not have the files from your last session open.
Have a go hero – more options
You will find more options listed in the Help | About section related to the start-up parameters.
Setting up the user directory (System directory)
The system directory is created when you first start your JDeveloper and it keeps storing the IDE settings thereafter. The default location on Windows for the JDeveloper 11gR2 release Version 11.1.2.3 is:
C:\Users\%UserName%\AppData\Roaming\JDeveloper\ system11.1.2.3.39.62.76.1
Have a go hero – look for other files in the system folder
Now it's time for you to do some research on the system directory. Perform the following steps:
List down other configuration files that you can locate in the system directory Analyze how and when these files are created as you learn to develop
the application
Change some IDE settings and see which file gets changed
Working with IDE configuration files
There are two files that are used to store the configuration information of JDeveloper IDE. To add memory to the IDE or JDeveloper during startup, we add the following appropriate Virtual Memory options to these files:
MW_HOME/jdeveloper/ide/bin/ide.conf
To increase the JDeveloper memory, set the following options in the appropriate files specified previously. Some of the JVM options are explained as follows:
AddVMOption is used to optimize the memory for
JDeveloper IDE
Xms is the initial Java Heap size
Xmx is the maximum Java Heap size
XX:MaxPermSize is used to set the maximum Java
permanent size
Please note that the following setting depends on the available memory in your system:
Add AddVMOption -Xms512M AddVMOption -Xmx1024M
in ide.conf.
Add AddVMOption -Xmx512M AddVMOption -XX:MaxPermSize=1024M in jdev.conf.
To configure the boot behavior of the IDE or JDeveloper, we modify the following files:
MW_HOME/jdeveloper/ide/bin/ide.boot
MW_HOME/jdeveloper/jdev/bin/jdev.boot
The settings for the files mostly correspond to the system properties. To configure the JDK-related properties for the IDE, modify MW_HOME/jdeveloper/ide/bin/jdk.conf. For example, you can include options such as the following option for Java2D to allow DirectDraw usage in Windows:
AddVMOption -Dsun.java2d.noddraw=true
You can add other VM options to the .conf files as well. The override sequence is jdk.conf, then ide.conf, followed by jdev.conf.
Use JAVA_HOME/bin/jvisualvm.exe to monitor and profile Jdeveloper.exe. This tool will also help you gather VM options
Have a go hero – look for other configuration files
Now it's time for you to verify all available configuration files in the middleware directory. Perform the following steps to verify configuration files:
What are the differences that you see between these files? Try changing some properties such as -Dsun.awt.
keepWorkingSetOnMinimize=false in your jdev.conf file and see how it affects the behavior of the IDE. This option becomes more responsive when JDeveloper IDE is restored after minimizing.
Knowing the roles
When you launch the IDE without the –nonag startup option, a splash screen followed by a Select Role screen is displayed. The Select Role screen provides the options to select the role in which you want to start the IDE. This is also referred to as shaping the IDE based on the selection. You have an option to configure this in the Switch Roles menu in Tools.
Studio Developer: This role will include all the features available for the IDE. You
will be allowed to create applications using different technologies. You have the option to choose the features to include in the Features menu in Tools. This is
the commonly used role for ADF development.
Customization Developer: This role is more inclined towards customization for a user to edit the metadata in JDeveloper. This option is used only for ADF customization and is outside the scope of this book.
Database Developer: This role will enable all the features needed for database
development using JDeveloper.
Java Developer: This role will enable features that are best suited for Java
developers. ADF-related features are not included in this role.
When JDeveloper IDE is started, the Tip of the Day popup will appear that will give some tips on using the IDE effectively.
To add your own tip, go to the following location:
MW_HOME\jdeveloper\jdev\doc\studio_doc\ohj\ tip.jar
Create an HTML file called tip_11_0460.html (just increase
the number, for example, tip_11_0470.html).
Create an image file called tip_11_0470.gif in the images
folder if you want to refer to this in your HTML tip.
Have your HTML tip registered in tip_map.smp as shown in
the following code snippet:
<map>
<mapID target=”tip_11_0470_ html”url=”tip_11_0470.html”/> </map>
Have a go hero – explore the IDE
Now you are at a stage where you can explore the IDE and look for options, as follows:
What are the new features that you see in JDeveloper IDE? Is the look and feel
the same as your earlier development environment?
Open the entire menu and see the options available in each menu.
Getting familiar with the IDE
The Design and Source menus are toggled between the Design and Source views of the file
in the Editor window. History and Diagram menus are also displayed based on the active view of the file.
The toolbar for JDeveloper IDE is displayed just below the Menu section, as shown in the
following screenshot:
The highlighted tools are added as part of the External Tools option in the Tools menu.
The standout features of JDeveloper are:
Drag-and-drop: You can drag-and-drop the content between windows, panels,
and sections.
Docking: Almost all the panels within the IDE are “dockable”. You can customize
the location of the windows anywhere. Move the panel and drag it to dock the panel or window.
Floating: Panels can be made floating if the dockable option is not preferred. Minimize and Maximize: Panels and windows support minimize and maximize
features. Right-click on the panel and select the option as appropriate.
Keyboard access: You can navigate, select, and interact with the IDE using
shortcut keys.
Searching: Search for the property in the property inspector, Resource palette,
structure window, code editor, and so on.
Tabbed view: All the windows that open in the center of the IDE will have the
tabbed view.
Splitting: All code editors support splitting of the documents vertically and
horizontally. Drag the horizontal splitter to the bottom-right corner to split the document horizontally and the top-right corner to split it vertically, as shown in the following screenshot:
Closing: The Editor window supports the Close, Close others, and Close all options.
Setting the preferences
There are many configurations, as shown in the following list, related to the IDE that can be configured using the Preferences menu in Tools:
Environment: This section will allow the user to change the look and feel and
theme of the page, give an option to save the file on exit, check for modified files, and so on. This section has the following options:
Dockable windows: This customizes how the docking behaves. Local History: This enables local history for the files stored in the user
directory.
Log: This enables logging and specifies where to save the logfile.
Also, it customizes the size, lines, and color of the log file.
External Editor: A user can set a preference to open the files in either the
external editor or the application. For example, PDF files will be preferred to be opened in an Adobe application.
File Types: This will let the user decide which extensions can be opened by
JDeveloper and which editors are used to open the files within JDeveloper.
Setting the Default Editor option to source view will increase
the performance in opening up the files within JDeveloper.
Shortcut Keys: This is used to configure the shortcut keys for different operations
within the IDE.
You can have external applications or tools configured within your IDE using the External
Tools menu in Tools.
Knowing the IDE components
JDeveloper IDE consists of dockable windows and components that will help in developing ADF applications efficiently. Users may take advantage of these windows to keep track of the changes made, switch between windows, identify and modify particular resources that are part of the application.
Time for action – opening the sample application
1.
Download the sample application from http://www.packtpub.com (The EmpDirectoryApplication code downloadable with this book).2.
Click on the Open Application option and locate theEmpDirectoryApplication.jws file.
3.
You will now see that the application is listed in the Application Navigator window and the projects are listed for EmpDirectoryApplication.What just happened?
We have opened an already existing ADF application to get a feel of how the IDE components work together. Some of the components explained in the following section would need an open application.
Application Navigator
The application-related artifacts are managed in a window called Application Navigator. A user can create an application and open existing applications. We will see how to create and open an application in detail in the next chapter.
All open applications are available in the drop-down menu and the user can choose between different applications.
The Application menu will list out all the options available to configure an application. The options include creating a new project, opening a project, closing the application, securing the application, application properties, and so on, as shown in the following screenshot:
Have a go hero – exploring the Application menu
You are now going to explore the Application menu by clicking on each of the options available:
Try and find what the difference is between the New Project and New options
Try to find some application files using the Menu option provided
Identify what Filter Application means to you
Browse through the Application properties option and familiarize yourself with
the options available
The Projects pane will display some options for configuring the projects that are available
The options on the previous ribbon bar are explained as follows:
Project properties: This icon will display the properties that can be configured
for the current project.
Refresh: This will refresh the current project for any file changes.
Working sets: This will help you to filter the current project or files from other
open projects. This will be really helpful if you have multiple projects for your application and would like to work on only one project at a time. Having less projects open will load the application faster instead of when all the projects for the application are open.
Navigator display options: This will let the user display the structure of the
project efficiently.
Have a go hero – exploring the projects pane
Now it's your turn to figure out the options provided for the projects pane:
Open the Project Properties pane and check the available settings for the project. We will be using some of these properties in the coming chapters.
Add some files outside JDeveloper in the Project folder, and click on the Refresh
button. Do you see the file in JDeveloper?
Where have you seen the Manage Working Set option available in the Working Sets
menu before?
You are provided with Navigator Display options for the projects. Try out different
options and look for changes.
Application Resources
The Application Resources pane will list out all the common resources available for the application. Connections and Descriptors are the two folders available in this panel that contain the resources.
Connections: This folder displays all the connections available for the application. It can be anything that gives a context of the connection to the server or to the repository available for the applications.
Descriptors: This will list all the configuration files and descriptors available for
Have a go hero – explore Application Resources
Now you will have to locate the application resource files outside the JDeveloper IDE and then note down the folder structure that you see. Do you see all the files listed under the folder listed in Application Resources? The missing files are subsequently created when you add a database connection or when you secure your application.
Data Controls palette
The Data Controlspane palette will expose the available Data controls options from the model layer to use in the UI layer. You can refresh the data controls or filter out the data controls using the options available.
The Data controls palette shown in the following screenshot will not be available in the EmpDirectoryApplication file. This will be created automatically when you have the corresponding component created in the model project. Right now don't worry about that.
Recently Opened Files
The Recently Opened Files pane will list all the files opened recently in the application. This pane should not be confused with the Reopen option in the File menu. If you have multiple
applications in your workspace, this pane will display recent files specific to the application.
Structure window
The Structure window, as shown in the following screenshot, will display the structure of the
Have a go hero – identify the structure of the file
Double-click on the web.xml file available in the ViewController project. Do you see any change in the Recently Opened Files window?
In the Structure window, what do you see?
Click on the Source tab of the web.xml file and check the changes in the
Structure window.
Click on the tag displayed in the Structure window. What do you see in the Source view?
Database Navigator
The Resource palette
The Resource palette window will allow the user to create IDE resources and assets. Click on
the View menu to display this palette.
There are two types of resources that can be created from the Resource palette. They are Catalogs and Connections.
Catalogs: These are user-defined assets from different repositories used for
easy access.
Connections: These are the contexts for the application or IDE added to different
repositories or servers.
My Catalogs: This will list all the user-defined resources added as a catalog.
For example, if you have a filesystem connection, the catalog can store the images or contents from the filesystem as a user-defined catalog.
Time for action – creating a catalog
1.
Click on the folder icon in the Resource palette.2.
Select the New Catalog option from the drop-down menu.3.
Provide the name catalog in the Name box.4.
Click on OK to see the new catalog listed in the My Catalog section.5.
To add a resource to the catalog, you will have to right-click on the resources that are listed in the IDE connections menu. You can add resources from a filesystem connection that is mapped to any of your preferred folders.6.
Select the Add to Catalog option from the menu.7.
Select the catalog that you have created from the option.8.
Click on OK to add the resource to the catalog.What just happened?
We have now created a catalog for our IDE for the frequent use of resources. Resources added to the catalog are available for the IDE, and we can make use of these resources in different applications and projects.
IDE Connections will have all the connections that are added for the particular IDE. We can use the connections from this window and add them to a particular project by dragging-and-dropping them onto the project displayed in the Database Navigator plugin.
The Component palette
The Component palette will display all the available components that can be added to the UI
page. This palette is categorized with different components based on the technology available for the current project. Within each technology available for the project, components are further classified based on behavior. There is an option to search for the component using the search box available at the top of the palette.
Have a go hero – components available for IDE
Now it's time for you to explore different components available for different technologies. Use the EmpDirectoryApplication file for your analysis. Perform the following to check for the components available for the IDE:
What are the components listed in the palette for web.xml?
Open trinidad-config.xml and check if it's listing the same components as in web.xml.
Run Manager
Run Managerwill display all the current running processes and give an option to terminate
whenever needed. This is not shown by default and can be enabled from the View menu.
The Log window
The Log window will display log messages related to the projects. There are other tabs embedded within the Log window to categorize the logs that are generated, as follows:
IntegratedWeblogicServer: This displays the log information of the integrated
WebLogic server. This Log window is helpful in identifying application errors during
runtime. It will display the log information while starting and stopping the server.
Messages: This tab displays the compilation logs.
Extensions: This tab will display logs related to the installed IDE extensions. Compiler: This tab will display the warnings and errors that occurred while the
project was being compiled.
Code editor
You will use the code editor section to write the code. The Java code file can be opened in the editor by double-clicking on the Application Navigator window. There are different options available within the code editor that will be helpful to run the code efficiently.
Code editor views
Design: Files with extension such as .jsff or .jspx which represent a UI page will have a Design mode added to design the pages.
Source: The Source tab is added for all the files where a user can change
Bindings: This section will help the user interact with the data bindings bounded to
the UI components. The page-definition file will hold the binding information, and it is shown in this view.
Preview: This will help to preview the page designed and imitate the components
rendered at runtime.
History: This view is common for all files, and the local history of the file changes
is tracked in this view.
Property Inspector
The Property Inspector pane will help to alter the property of the currently selected component or tag in the Design or Source mode of a page.
All the previously explained windows and panels are available in the View menu.
Have a go hero – code editor and Property Inspector
Now it's time for you to check the usage of the code editor and the Property Inspector pane as follows:
Open the adfc-config.xml file and check how many views are available. Check the Overview tab and see the options to configure the properties declaratively.
Open the Source tab and select any of the tags to see the changes in the Property Inspector window.
Pop quiz
Q1. Which role will enable all the features of the IDE? 1. Database developer
Q2. Which IDE component is used to drag the model data and drop it on the UI page? 1. Application Navigator
2. The Data Controls palette 3. The Resource palette
Q3. IDE connections are created only for an application in JDeveloper. 1. True
2. False
Q4. _________ and _________ are the two folders displayed in the Application Resources
panel of the IDE.
Q5. Which of the following features are supported in JDeveloper? 1. Drag-and-drop
2. Docking 3. Floating 4. Searching 5. All of the above
Summary
Let us recap what we have learned in this chapter. We started our chapter by downloading and installing JDeveloper 11gR2. Then we learnt about some important configuration files for JDeveloper IDE. Later we discussed some of the roles to customize the IDE for different users. We also gained some knowledge about the components within the environment. We got a chance to familiarize ourselves with common tasks, such as docking the panels, searching within the panels, and closing the files and windows. Finally, we learnt where to set preferences and some common user preferences for the IDE.
2
Getting Started with ADF
Application Development Framework (ADF) is a JEE development framework that helps a developer to minimize the effort required for developing robust applications for web, desktop, and mobile devices. With the help of ADF's declarative approach, a developer can visualize the data model and proceed with the development of an application rapidly instead of spending time on writing the code.
The benefits you get from using ADF include a rich user interface, components usage, task flow support, declarative development, drag-and-drop binding, a productive environment, security, and customization.
Application Development Framework (ADF) is based on the Model-View-Controller (MVC)
architecture and exposes its data model as a business service. The ADF model abstracts the business service layer through metadata, thereby providing a consistent set of APIs for developers to work with, independent of the business service implementation technology. In this chapter, we will cover the following topics:
Understanding MVC The components of ADF
Model-View-Controller
Model-View-Controller is a popular architecture for application development, that separates business logic from client and control flow logic. The core components of this pattern are as follows:
Model: This layer directs the data layer to respond to requests passed from the
UI layer. The model layer contains the core business logic of the application.
View: In this layer, the user interacts with the application and requests data to
be fetched. The actions performed in the UI layer by the user will command the controller to request data from the model layer.
Controller: This layer controls the UI flow and often gets involved in the navigation from one page to another. The controller is also responsible for directing the requested data from the UI to the model layer.
The following diagram explains the Model-View-Controller architecture:
View
Controller
Model
DB XML WS
The data service layer can be anything from which the model layer gets the data. This can be obtained using relational data, XML data services, legacy applications, or through web services.
How ADF implements MVC
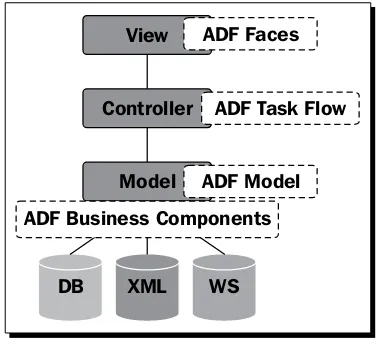
Oracle ADF extends the MVC architecture by introducing a generic binding layer as the model. In Oracle ADF, the architecture you use to build Java EE applications is comprised of the view layer (typically represented by ADF Faces), the controller layer (ADF controller), the model layer (represented by ADF data controls and page data bindings), and the business service layer (often ADF Business Components though EJB, web services, POJOs, and more are possible). Following are the ADF components:
ADF Business Components: A business service based on a relational database
table schema that, before persisting user data entries, enforces business logic and validation rules.
ADF Model: This data binding layer is an abstraction layer that facilitates access
to data from underlying business service layers. This layer acts as an interface that exposes the services available from the business service layers to the UI components. This helps the declarative binding of the UI components with the exposed services.
ADF Task flows: The ADF controller extends the JSF navigation handler for page
navigation and UI component event handling. ADF Task flow is a concept of the ADF controller, that allows you to build reusable navigation units that you can use standalone or chain up to an overall application flow.
ADF Faces: This is a JSF-based and Ajax-enabled component set, that provides a
rich set of user interface components for building the application's user interface. The following diagram shows how ADF implements MVC:
The ADF architecture
ADF is designed to simplify the development of web applications, desktop applications (MS Office), and mobile applications. It is focused on giving a visual and declarative approach to building applications based on the common MVC pattern. This architecture is targeted at providing a service-based, loosely coupled solution with the following five layers:
Business Service: This layer is responsible for handling the interactions between the
database and the model layer by providing database persistence, object/relational mapping, managing transactions, and so on. Business logic is also taken care of in this layer. ADF Business Components are the first choice to develop the business service layer apart from Java, EJB, and web services.
Model: This layer is on top of the business service layer and abstracts the business
services exposed to the view layer. The Data Controls palette acts as an interface between the view and the business services layers. Data bindings map the exposed services to the UI components. The data control and data binding approaches are collectively represented as ADF Model based on JSR 227 (Java Specification Request).
Controller: The navigation from one page to another is handled in this layer using
the ADF task flow. Its reusability along with parameter passing, a single point of entry, and allowing re-entry are the highlights of using the ADF task flow. The other technology choice in this layer can be JSF Struts.
View: This is the actual presentation layer facing the user directly and passing the
inputs to the controller layer for processing. ADF Faces is used for this purpose. ADF Faces uses more than 150 rich components to support the development of competing web user interfaces. ADF Faces is based on JSF, which allows JSF as the second choice for UI development. ADF Desktop Integration will also act as a view layer for standalone applications.
Metadata services: Customization and personalization of the application is done
using the metadata services framework that uses metadata to store and retain user session information. This is not an architectural layer but an additional service layer on top of the controller and the model layers.
ADF Bindings
Struts ADF Task Flows
DB
Java Web Services EJB ADF BC
XML WS
Creating a simple application in ADF
Till now we have been focusing on the architecture; now let us see how ADF development is carried out in a typical web application development environment.
ADF development practice
ADF web application development is classified into two sections—the Business Service development and the UI development. Both these sections can be developed independently, but the development of either of the sections is followed by the development of the other. The following is a brief description of the two sections:
Business Service development: This section includes the development of
objects in the business service layer, which sits on top of the data source. Most of the development is declarative to help the developer concentrate more on the business logic.
UI development: The development of UI pages along with task flow creation
The development stage is further classified into the following two approaches:
Top-down: The development of a UI page is done first, followed by the building of
business services. Placeholder data control is used to mock up the business service to simulate enterprise data queries. This approach is mostly used for proof-of-concept studies in which the application's design and flow are more important than the actual business data.
Bottom-up: The development of the business service is followed by the designing
of UI pages and task flows.
Sample application – employee directory application
It's easy to build a simple application using the HR schema that is shipped with Oracle XE Database. The requirements for building the application are as follows:
JDeveloper 11.1.2.3.0 Studio Edition: This is required to develop the ADF web
application; we have installed this on Windows as a part of Chapter 1, Installing and Configuring JDeveloper IDE.
Oracle Database Express Edition or any other Oracle DB: This is required for the
HRSchema setup for our sample application.
Oracle Database 10g Express Edition is used at the time of writing the book.
It's the user's choice to use either the 10g or 11g version. You may refer to
The high-level development processes for the employee directory application included in this section are as follows:
1. Create the application workspace: Create a new application and set up the workspace for developing with ADF.
2. Model database objects: Set up the HRSchema database objects for the application. 3. Create business components: Create ADF Business Components corresponding to
the DB objects.
4. Create the UI page: Use the UI components to represent the data on the page. 5. Bind the data to the UI components: Bind the exposed service to the UI