What Readers Are Saying About
Programming Cocoa with Ruby
This isn’t just a book on RubyCocoa; it is probably the best book I’ve seen that explains Cocoa technology. It actually explains how some of the core technologies, especially bindings, work instead of just show-ing an example of how to use them.
Allison Newman
Cocoa application developer
Learning a new API is hard enough, but learning a new API and a new programming language at the same time can be overwhelming.
Pro-gramming Cocoa with Rubyis written for those of us used to a
lan-guage like Ruby or Python who want to learn about all the great stuff Cocoa has to offer.
Jeremy McAnally Developer, entp
The influence of Smalltalk on Ruby and Objective-C is considerable. It shouldn’t be a surprise then that Cocoa, whose native tongue is Objective-C, can be effectively learned and programmed from Ruby in a way that captures the succinctness and expressiveness of this newly popular scripting language. Brian’s book is a great introduc-tion to the agile development of Cocoa apps, it serves as a primer on Cocoa, and it demonstrates sound and thoughtful development prac-tices and hygiene throughout.
Jerry Kuch
Programming Cocoa with Ruby
Create Compelling Mac Apps Using RubyCocoa
Brian Marick
Many of the designations used by manufacturers and sellers to distinguish their prod-ucts are claimed as trademarks. Where those designations appear in this book, and The Pragmatic Programmers, LLC was aware of a trademark claim, the designations have been printed in initial capital letters or in all capitals. The Pragmatic Starter Kit, The Pragmatic Programmer, Pragmatic Programming, Pragmatic Bookshelf and the linkingg
device are trademarks of The Pragmatic Programmers, LLC.
Every precaution was taken in the preparation of this book. However, the publisher assumes no responsibility for errors or omissions, or for damages that may result from the use of information (including program listings) contained herein.
Our Pragmatic courses, workshops, and other products can help you and your team create better software and have more fun. For more information, as well as the latest Pragmatic titles, please visit us at
http://www.pragprog.com
Copyright © 2009 Brian Marick.
All rights reserved.
No part of this publication may be reproduced, stored in a retrieval system, or transmit-ted, in any form, or by any means, electronic, mechanical, photocopying, recording, or otherwise, without the prior consent of the publisher.
Printed in the United States of America.
ISBN-10: 1-934356-19-0 ISBN-13: 978-1-934356-19-7
Printed on acid-free paper. P1.0 printing, July 2009
Version: 2009-8-6
Contents
1 Introduction 11
1.1 What Is Cocoa? . . . 12
1.2 What Is RubyCocoa? . . . 12
1.3 What’s It Like to Learn Cocoa Using Ruby? . . . 12
1.4 RubyCocoa? That’sSoLast Year! . . . 13
1.5 Prerequisites. . . 13
1.6 Versions . . . 15
1.7 Our Example App . . . 16
1.8 Centuries of the Bookmaker’s Art: Scorned . . . 18
1.9 Some Terminology . . . 19
1.10 Service After the Sale . . . 19
1.11 Solving Problems . . . 19
1.12 Acknowledgments . . . 20
2 How Do We Get This Thing Started? 22 2.1 A Program That Prints . . . 23
2.2 Putting an Item in the Status Bar . . . 26
2.3 Menus . . . 27
2.4 An Application Bundle . . . 31
2.5 What Now? . . . 35
I
A First Realistic App
36
3 Working with Interface Builder and Xcode 37 3.1 The Basics . . . 383.2 Creating and Editing Classes in Xcode. . . 48
3.3 Debugging . . . 55
3.4 Synchronizing Interface Builder and Xcode . . . 57
3.5 Attributes . . . 58
CONTENTS 6
3.7 Try This Yourself . . . 61
3.8 What Now? . . . 61
4 One Good App Observes Another 62 4.1 Notifications Within an App . . . 62
4.2 Notifications Between Apps . . . 67
4.3 The App to Fenestrate . . . 70
4.4 Putting Notification Handling Behind the GUI . . . 71
4.5 Reopening Objective-C Classes . . . 73
4.6 What Now? . . . 73
II Reshaping Fenestra
75
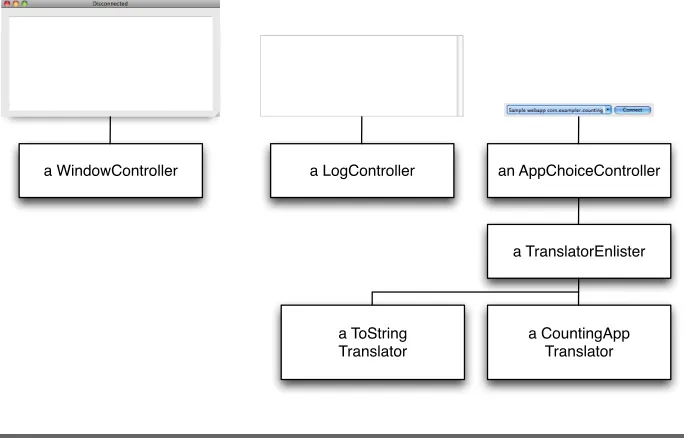
5 A Better GUI 766 Decoupled Controllers 82 6.1 Ignorant Objects . . . 83
7 Notifications Connect Decoupled Objects 94 7.1 Controllers . . . 94
7.2 Translators and the Rising Tide of Ugliness. . . 96
7.3 What Now? . . . 99
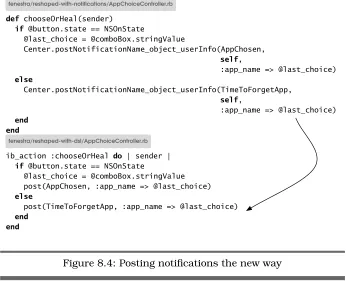
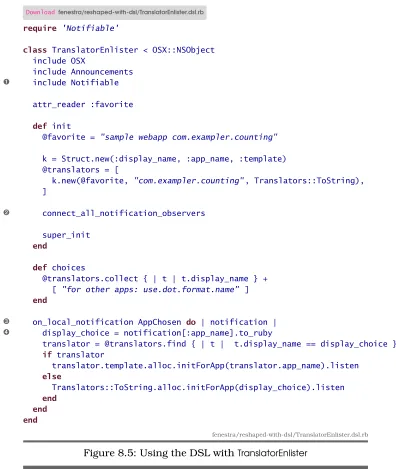
8 More Expressive Code 100 8.1 A DSL for Notifications . . . 101
8.2 RubyCocoa Has Two Ways of Referring to Superclasses 103 8.3 Shorthand for Posting Notifications . . . 103
8.4 Try This Yourself . . . 105
CONTENTS 7
III Project Mechanics
108
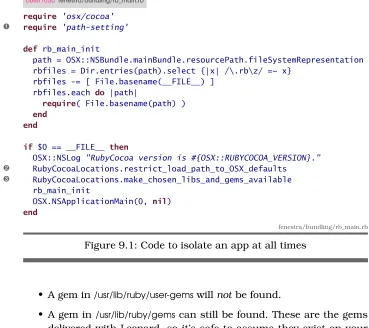
9 Bundling Gems and Libraries with Your App 109
9.1 Manual Control . . . 110
9.2 Standaloneify . . . 114
9.3 What Now? . . . 116
10 Project Organization, Builds, and Your Favorite Editor 117 10.1 Groups . . . 118
10.2 Using Xcode with Hierarchical Project Folders . . . 119
10.3 Running in Place . . . 121
10.4 Building Without Xcode . . . 121
10.5 Using Interface Builder with Hierarchical Project Folders123 10.6 Starting a New Project . . . 124
10.7 What Now? . . . 125
IV Declarative Data Handling
126
11 Persistent User Preferences 127 11.1 The User Preferences System . . . 12812 Creating a Preference Panel in a New Nib 150 12.1 Creating a Nib . . . 151
13 Implementing a Preference Panel with Cocoa Bindings 162 13.1 Binding a Simple Value . . . 162
13.2 Binding an Array of Hashes . . . 166
13.3 Formatters . . . 172
CONTENTS 8
13.5 Adding and Deleting Table Rows . . . 182
13.6 What Now? . . . 184
14 Setting Up Bindings with Code 185 14.1 Oh No! Terminology! . . . 185
14.2 Using Rooted Keypaths in Code . . . 189
14.3 Subclassing NSArrayController . . . 189
14.4 bind_toObject_withKeyPath_options . . . 192
14.5 What Now? . . . 196
V
Fun with Tables
197
15 Prologue: Folders and Tests 198 15.1 Disk Layout . . . 19816 Selections and Editing 202 16.1 An Example of Creating Tests: The Add Method . . . . 202
16.2 Working with an Uncooperative Control . . . 212
16.3 Try This Yourself . . . 220
16.4 Building Setup Methods . . . 227
16.5 What Now? . . . 229
17 Buttons in Tables 230 17.1 Cells. . . 230
17.2 Making the Change . . . 231
17.3 What Now? . . . 233
18 A Formatter with Two Wrinkles 234 18.1 The Formatter Code . . . 235
18.2 Calling Methods That Take Reference Arguments . . . 237
18.3 Breaking Encapsulation in Tests . . . 240
18.4 What Now? . . . 242
19 Picking Files with Open Panels 243 19.1 NSOpenPanel . . . 243
19.2 A Design for Using NSOpenPanel in Fenestra. . . 246
19.3 Try This Yourself: PreferencesController Tests . . . 248
19.4 Try This Yourself: The NSOpenPanel Controller . . . . 256
CONTENTS 9
20 Drag and Drop 261
20.1 How Drag and Drop Works . . . 261
21 Epilogue: A Wonderful World of Tests 282 21.1 Test-Driven Design . . . 282
21.2 To Learn More . . . 285
VI Wrapping Up
286
22 Fit and Finish 287 22.1 Saving the Window Position Until the Next Launch . . 28722.2 Tab Behavior. . . 288
23 Adding Help 301 23.1 Help Book Basics . . . 301
CONTENTS 10
25 MacRuby 334
25.1 Getting MacRuby . . . 337
25.2 MacRuby Basics. . . 337
25.3 A MacRuby Checklist . . . 339
25.4 What Now? . . . 343
VII Reference
344
26 The Objective-C Bridge and Bridge Metadata 345 26.1 An Unexpected Return Value . . . 34526.2 What Information Can Be Found at Runtime? . . . 346
26.3 Supplementing Runtime Information . . . 347
26.4 Our Own Private Metadata. . . 348
26.5 Finding Out More . . . 349
27 The Underpinnings of Cocoa Bindings 350 27.1 Requirements . . . 350
27.2 Our Goal . . . 351
27.3 Declaring Observed Properties . . . 352
27.4 Observing Changes . . . 353
27.5 Implementing bind_toObject_withKeyPath_options . . 355
27.6 Changing the Value of an Observed Key . . . 356
27.7 In Summary... . . 357
27.8 Postscript: Observing Changes to Collections . . . 359
A Glossary 361
B Bibliography 372
Index 376
Chapter 1
Introduction
It’s simple, really: if you like Ruby and you like Macs and you want to put the two together, this book is for you. After you read through it. . . wait, scratch that—after youworkthrough it, you’ll be able to build nice, Mac-like apps. You’ll have the memory of doing, at least once, many of the tasks that make up building a Mac app. Your life will have much less of the “What do I do now?” frustration that sinks so many first attempts to use a big and complicated framework.
I endured that frustration for you. When I started writing the book, I knew practically nothing about coding Mac GUI apps (in Ruby or any other language). I learned how in my usual way: by diving into coding something too ambitious. As always happens, I spent much of my time blundering down blind alleys, staring at app crashes and weird behav-iors, figuring out what pieces of the conceptual puzzle I was missing, searching for them in vast masses of documentation, and revisiting old code in the light of new understanding. The only difference was that after I figured something out, I wrote a new chapter about what I’d done and what I’d learned—except that I removed most of the frustra-tion from the story line. When I had to backtrack because I didn’t know something, I wrote that something into the story just when I would have needed it. The result is what Imre Lakatos, the philosopher of science, called a rational reconstruction of history: follow the book, and I think you’ll get pretty much the experience Ishould have had.
That turns out to be a fantastically time-consuming way of writing a book. The payoff is that, when I wrote, the experience of learning was fresh in my mind. Experts often have a problem remembering what it was like to learn and how much they used to not know. I solved that problem by beingbarely not ignorant as I wrote.
WHATISCOCOA? 12
1.1
What Is Cocoa?
Most modern Mac applications are written using the Cocoa framework. Cocoa is an object-oriented framework that structures your app and handles a lot of drudgery for you. It mostly makes developing a user interface easier, but it also has classes and libraries for handling the file system, interprocess communication, persistent data, and so on.
1.2
What Is RubyCocoa?
The Cocoa framework was originally designed to be used via Objective-C programs. Objective-Objective-C is an object-oriented dialect of Objective-C. Early in the history of OS X, Apple also provided Java interfaces to some of the framework, but that didn’t work out well. The problem was that Java wants to know things at compile time that Objective-C defers to run-time. For example, Objective-C is not nearly so picky about declaring types as Java is. Because Cocoa framework writers took advantage of such features, the mapping between Java and Cocoa was clumsy.
It’s much easier to build a bridge between Cocoa and Ruby because Ruby and Objective-C stem from similar philosophies of language de-sign. RubyCocoa is that bridge. With it, you can write Ruby code that calls Objective-C code, and vice versa. So, it’s quite possible to write a Mac app in Ruby.
1.3
What’s It Like to Learn Cocoa Using Ruby?
It doesn’t take much time to learn the basics of RubyCocoa. Once you’ve done that, you’ll spend most of your time learning Cocoa. Your Cocoa learning will occasionally be interrupted by some surprising RubyCocoa fact, which you will then absorb and move on.
This book follows that sequence. It begins with an introductory chapter that teaches RubyCocoa basics without many of the distractions of a real user interface. Then it follows a typical development pattern: begin with a small version of your app, get it working, find the next thing you wish it did, make it do that, and repeat until you’re done. Cocoa and RubyCocoa topics will be covered as they come up in a realistic course of development.
RUBYCOCOA? THAT’SSoLASTYEAR! 13
guess whether the framework addresses it, roughly how it will address it, and where to look to find the details. The aim of this book is to give you that feel for Cocoa and RubyCocoa. It’s not a reference to the Cocoa framework because that information is already on your hard drive or, at most, an HTTP address away.
Still, because no single development history can naturally encounter every topic and because exploring some topics in enough detail would be too much of a digression from the story line, the last part of the book consists of essays on important topics. They can be read in any order, at any time.
1.4
RubyCocoa? That’s
So
Last Year!
During the writing of this book, various people suggested that it be switched from RubyCocoa to MacRuby, Apple’s next generation of sup-port for Ruby. As I write, though, MacRuby is still in beta. Both my lim-ited experience with it and my subscription to the developer mailing list make me think it’s not quite ready to replace RubyCocoa. As I noted in the previous section, most of your time spent learning RubyCocoa will be spent learning the Cocoa part. That’s the same in RubyCocoa and MacRuby, so you might as well learn it in the more stable environment. At some point, you’ll switch to MacRuby. If you like to be on the cut-ting edge, you’ll do it soon. If not, it will be later. In either case, it helps to know what’s coming. For that reason, I’ve written Chapter25,
MacRuby, on page334for you.
1.5
Prerequisites
• You should have used a Mac enough that you’re familiar with the conventions Mac apps follow. There’s no need to have ever built an app with a graphical user interface, whether for the Mac or for any other platform. You don’t need to understand Objective-C (or C). • You should know Ruby reasonably well. A good measure of that is
whether you’re comfortable reading parts of someone else’s Ruby code. If some gems’ behavior surprises you, do you follow a stack trace into it to see what’s really going on?
I’ll use some tricky Ruby code behind the scenes, but the code you’ll need to understand will be fairly straightforward. However, I won’t stop to explain common idioms like this sort of initialization:
@var ||= 5
PREREQUISITES 14
If you don’t think you know Ruby well enough, I recommend the Pickaxe book,Programming Ruby[TFH08], possibly supplemented
withThe Ruby Way[Ful06]. My ownEveryday Scripting with Ruby
[Mar06] teaches Ruby in the same style as this book teaches
Ruby-Cocoa—by having you implement projects alongside the book— but it may be too slow-paced for an experienced programmer, and you’ll still want the Pickaxe book for reference.
• Make sure you’re running Apple’s version of Ruby. You can con-firm that like this:
$ /usr/bin/which ruby
/System/Library/Frameworks/Ruby.framework/Versions/1.8/usr/bin/ruby
If you see other output (like/usr/local/bin/rubyor/opt/local/bin/ruby), adjust your load path so that/usr/bin/rubyis used instead.
• You should be running Mac OS X 10.5 (Leopard) or later, with the Developer Tools installed.1 Earlier versions of the Developer Tools
do not include RubyCocoa.
To see what version of RubyCocoa you’re running, type this toirb:
irb(main):001:0> require 'osx/cocoa'
=> true
irb(main):002:0> OSX::RUBYCOCOA_VERSION
=> "0.13.1"
I also have most of the examples write RubyCocoa’s version to the console (visible via the Console app). If you manually installed a version of RubyCocoa before you installed Leopard, that old ver-sion may be loaded instead of Leopard’s (by an application, but not byirb). If samples behave oddly, you check the console, and the version is old, then delete/Library/Frameworks/RubyCocoa.framework.
RubyCocoa is available for earlier versions of OS X, but I’ve made no attempt to avoid Leopard features. Moreover, the two main Apple tools we’ll use (Xcode and Interface Builder) changed con-siderably between 10.4 and 10.5. So if you install RubyCocoa on a pre-Leopard version, prepare to spend time figuring out how a picture in the text maps into an old tool.
• You have to be prepared to build the app yourself. If you just read the book, the knowledge probably won’t stick. You’ll then find that
1. You had to choose to install the Developer Tools when you installed Leopard. If you didn’t, you can fetch them off the install disc or fromhttp://developer.apple.com.
VERSIONS 15
building your first app is a flood of tasks you vaguely know you should perform but forget how. It’s better to build up your “muscle memory” by building the book’s app before you build your own.
• You need to downloadbmrc-code.zipfromhttp://pragprog.com/titles/ bmrc/source_code. It contains some files and tools you’ll need as you work through the chapters. When you unzipbmrc-code.zip, it will place all its contents in acodesubdirectory. Since you’ll likely want to rename that, I’ll leave off thecodeprefix when referring to files. So, for example, when I direct you to the very first file you’ll work on, I’ll refer to it asstatusbar/most-basic-app.rb.
The download also contains snapshots of the app taken just before and after each important step. As you work along, you can copy snippets from the snapshots or use one of them as a starting point.
The download means that, at any given moment, there may be thirty-four versions of the app on your disk: thirty-three interme-diate versions that I supply and one that you’re working on. That presents a problem. For example, on page96, I write “look in Win-dowController to see how it handles the AppChosen notification.” The problem is that your version might not use the same names as mine, so it might not handle anything calledAppChosen. In that case, you’ll need to look at my most recent version, not yours. But which is most recent? You can find that out by looking backward to the most recent code snippet that identifies its source file. The following snippet, for example, would tell you we’re working on the reshaped-with-dslversion of the app:
Downloadfenestra/reshaped-with-dsl/WindowController.rb
on_local_notification AppChosen do | notification | @logWindow.title = notification[:app_name]
end
1.6
Versions
The book uses these tools:
• Ruby 1.8.6
• RubyCocoa 0.13.1 • Xcode 3.0
OUREXAMPLEAPP 16
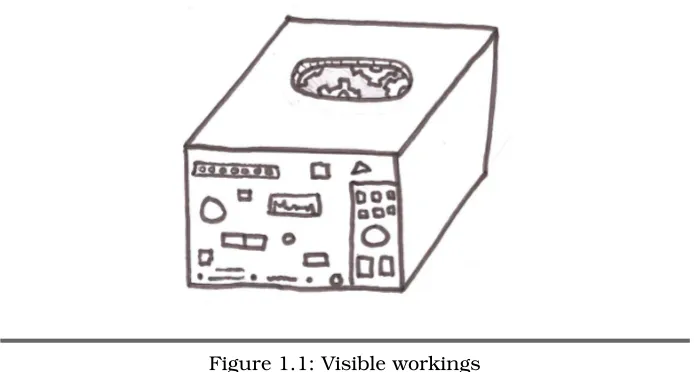
Figure 1.1: Visible workings
These were the most recent versions delivered by Apple at the time of writing.
When the book also uses libraries or gems, they’re included in the book’sbmrc-code.zipfile.
1.7
Our Example App
If you’re going to go to the trouble of working through an entire book of code, you ought to end up with something more than knowledge at the end of it. You ought to get code you can use, either as a complete app or as snippets and templates to incorporate into your own apps. I’m not creative enough to imagine an app with wide appeal, but I do know of a template you might very well need.
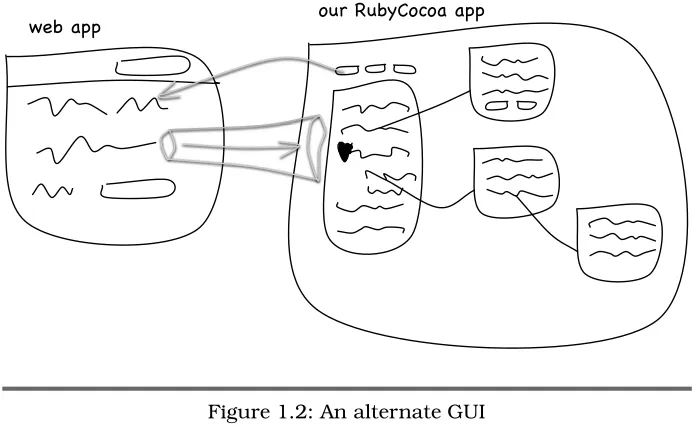
You see, too many programmers are like the proverbial shoemaker’s children who go unshod. You build sophisticated graphical interfaces that let bond traders or camera buffs or physicists easily see and manipulate the stuff of their work, but you don’t do the same for your-self. A person who one moment is adding Ajax wizardry to streamline a web app’s workflow will, the next moment, be trying to diagnose a bug by groveling through textual log files, manually trying to reproduce the steps to the failure, viewing the HTML source of page after page, and poring over database tables that hold a distorted version of the app’s objects. That doesn’t seem right.
OUREXAMPLEAPP 17
!"#$%&& '()$*(#+,'-'%$%&&
Figure 1.2: An alternate GUI
It’s not right, and it’s our fault. We allow our apps to be childish. Every parent knows how bad children are at answering the two vital ques-tions: “All right, who did it?” and “Whaton Earth were you thinking to make that seem like a good idea?” Trying to figure out a bug with noth-ing more than a user’s report and the app’s regular GUI is like benoth-ing faced with the child who answers every question with “I dunno.” But going after a bug with general-purpose tools like the language’s debug-ger is like talking to the child who tries to get out of trouble by throwing up a smoke screen of detail, irrelevancies, and finger-pointing. What we need is to build every app with a special window into its inner workings that programmers and testers can use (Figure 1.1, on the preceding page).
CENTURIES OF THEBOOKMAKER’SAR T: SCORNED 18
about programming OS X, I’ll limit myself to features that teach Cocoa.
I think of such apps as windows you can both look and reach into, but the word window is already taken, so I’ll use the Latinate equivalent:
fenestra. It’s a particularly apt choice because that’s also the word for
a hole surgically carved into a body part to let bad stuff leak out. In our case, the “bad stuff” is information about bugs.
The act of creating such a hole is calledfenestration. I’ll use that word when I need to describe what the program is doing, and I’ll usefenestra
to describe the result.
1.8
Centuries of the Bookmaker’s Art: Scorned
I hate it when words refer to a figure that you have to flip the page to see. It’s bad enough with drawings, but it really hurts my comprehen-sion when the figure contains code. I’ve made a real effort to keep the code and the references to that code on the same or facing pages. The result is. . .
SOMETERMINOLOGY 19
. . . big blank spaces at the bottom of some pages. Text and figures are traditionally laid out to avoid that ugliness. I embrace it. You deserve an unattractive book.
1.9
Some Terminology
While writing the book, I sometimes had a choice between consistent-but-awkward usage and flowing-but-inconsistent usage. For example, consider the following bit of Ruby:
"foo".upcase
I’d normally say that Ruby “sends the message :upcase to the string
"foo".” Sometimes, though, the words sends and message won’t work
in a sentence, so I use “calling the method” instead. There’s nothing but stylistic significance to the choice—I don’t mean a different thing.
Similarly, when writing of a variable, I might say that it “refers to,” “names,” or “points at” an object. I might also say it “is” an object— even though that’s strictly incorrect—because “i names 5” sounds silly.
1.10
Service After the Sale
My mail address [email protected].
You can find errata athttp://pragprog.com/titles/bmrc/errata.
1.11
Solving Problems
The Apple documentation (cited throughout the book) will be your main source of Cocoa information, but don’t be surprised when you run into problems that it doesn’t help you solve. Cocoa isbig.
When I’ve been stumped, I’ve had the best luck just using Google to search for the right keywords. A thoroughly gratifying percentage of the time someone has written a blog entry or email message solving my exact problem. The solutions are almost always in Objective-C, but I expect that won’t be a problem for you after you finish the book.
ACKNOWLEDGMENTS 20
in terms that make sense to an Objective-C programmer, you can get help there. It’s not unusual for Google to point me to its archive.
In /Developer/Examples, Apple provides examples of Cocoa features in the form of small—but complete—apps. They’re written in Objective-C. I am ever so gradually translating them into Ruby at http://github.com/ marick/cocoa-examples-translated. (I welcome help.)
When it comes to RubyCocoa itself, I’ve used both its source and tests to answer my questions. I encourage you to download RubyCocoa from http://rubycocoa.sourceforge.net.
1.12
Acknowledgments
Dawn, light of my life.
The creators of RubyCocoa: Eloy Duran, Fujimoto Hisa, Chris Mcgrath, Satoshi Nakagawa, Jonathan Paisley, Laurent Sansonetti, Chris Thomas, Kimura Wataru, and others.
Corey Haines, for spending two days of his Pair Programming Tour2 in
my living room, helping me figure out the mysteries of drag and drop.
My editor, Daniel Steinberg.
Technical reviewers Chris Adamson, Julio Barros, Craig Castelaz, Michael Ivey, Jerry Kuch, Mathias Meyer, Allison Newman, and Scott Schram.
Readers of the beta drafts: Steven Arnold, Jason M. Batchelor, Rune Botten, Tom Bradford, Stephyn G. W. Butcher, Leroy Campbell, Gregory Clarke, Eloy Duran, Frantz Gauthier, Joseph Grace, Aleksey Gureiev, Christopher M. Hanson, Cornelius Jaeger, Masahide Kikkawa, Fred-erick C. Lee, Jay Levitt, Tim Littlemore, Nick Ludlam, Stuart Malin, Ule Mette, James Mitchum, Steve Ross, Peter Schröder, Jakub Suder, Tommy Sundström, Matthew Todd, Daniel J. Wellman, Markus Werner, “Dr. Nic” Williams, and perhaps others whose names I didn’t write down. (Sorry.)
Although this is a book about RubyCocoa, I’ve snuck in bits and pieces of a philosophy and pragmatics of application design. It’s a style I have learned from people such as Kent Beck, Ward Cunningham, Carl Erickson, Michael Feathers, Martin Fowler, Steve Freeman, Richard P.
ACKNOWLEDGMENTS 21
Gabriel, Andy Hunt, Ron Jeffries, Ralph Johnson, Joshua Kerievsky, Yukihiro Matsumoto, Nat Pryce, Richard Stallman, Guy Steele, Prag-matic Dave Thomas, and others. Without them, this book would have been less interesting to write and—I hope—read.
Sophie Marick for the picture on page 16.
Giles Bowkett for the musical accompaniment to the embedded video in the sample app’s help pages.
The baristas at Bar Guiliani, Aroma Cafe, and Espresso Royale, espe-cially Alex Kunzelman for not calling the nice people from the mental health center around the fourth draft of Chapter 7.
Chapter 2
How Do We Get
This Thing Started?
We’re going to start fast, small, and with the fundamentals. To that end, here’s the smallest RubyCocoa app:
Downloadstatusbar/most-basic-app.rb
#!/usr/bin/env ruby
➊ require 'osx/cocoa'
➋ OSX::NSApplication.sharedApplication ➌ OSX::NSApp.run
If you run it, you’ll see that it does nothing but exist: no windows, no output, no exit:
$ ruby most-basic-app.rb
(You’ll have to kill the script with Control-C.)
What causes this nonbehavior? Line➊creates the ability for Ruby and Objective-C methods to call each other. You’ll see more about how that works throughout the book.
Line ➋’s NSApplication is the class corresponding to the entire
applica-tion itself. The call to class method sharedApplication creates the sin-gle instance of that class, names it with the constant NSApp(used on the next line), connects it to the window server, and does other useful initialization.
A PROGRAMTHATPRINTS 23
TheNSprefix is used by all the Cocoa classes you’re ever likely to see. So, using the module prefix OSX:: isn’t really helping to avoid name clashes. I’ll usually justincludethe OSXmodule and forget about it.
Notice that sharedApplication isn’t an idiomatic Ruby name. In Ruby, you would be much more likely to seeshared_application. It is idiomatic Objective-C, though. You should expect to see such method names— and even stranger ones—in RubyCocoa programs.
At➌,NSAppis told to run. It does, waiting forever for someone to send it work to do.
2.1
A Program That Prints
In this section, I’m going to make the app do one tiny additional thing: print a message to standard output. That raises two questions right away:
• When should the message be printed? Since the Cocoa runtime
tells NSApp when it (NSApp) has finished launching, that seems like a good moment.
• Where do we add the code? In some systems, you’d add the code
in a subclass of NSApplication. That style is rare for Cocoa apps. Instead, Cocoa programmers have NSApp delegate some of the work to another object (called, unsurprisingly, adelegate).
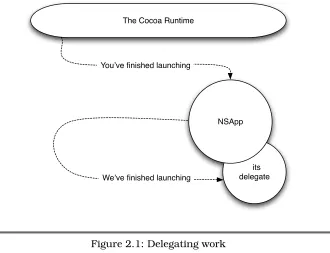
The application structure we’ll use looks like Figure 2.1, on the next page. Here’s the code:
Downloadstatusbar/no-ui.rb
#!/usr/bin/env ruby
require 'osx/cocoa'
include OSX
➊ class AppDelegate < NSObject
➋ def applicationDidFinishLaunching(aNotification)
puts "#{aNotification.name} makes me say: Hello, world"
end end
➌ our_object = AppDelegate.alloc.init
NSApplication.sharedApplication # Creates global NSApp
➍ NSApp.setDelegate(our_object)
NSApp.run
A PROGRAMTHATPRINTS 24
its delegate The Cocoa Runtime
NSApp
We8ve finished launching You8ve finished launching
Figure 2.1: Delegating work
The delegate is defined at➊. It volunteers to handle the “application has
launched” event by defining theapplicationDidFinishLaunchingmethod (at
➋). There are other events; because the class doesn’t contain a
corre-sponding method, it won’t have to handle them.
Notice what’s happening here: Objective-C, like Ruby, encouragesduck
typing. The term comes from the saying “If it quacks like a duck, it’s a
duck.” If an AppDelegate object responds to the right messages, it’s a suitable application delegate no matter what its declared superclass. It does have to be an Objective-C object, so it’s declared as a subclass of NSObject. That class is the root of the Objective-C class hierarchy, just asObjectis the root of the Ruby hierarchy.
The app creates the delegate at➌. Whereas in Ruby you’d expect
App-Delegate.new, object creation in Objective-C is done in two parts.alloc creates the object in memory and attaches all its methods to it. init is what we in Ruby call initialize. Objective-C separates the two because many Objective-C classes have variantinitmethods to support different ways of initializing the instance.1
1. Ruby actually works like Objective-C under the covers: new first uses the class methodallocateand then sendsinitializeto the resulting instance.
A PROGRAMTHATPRINTS 25
NSAppis told of its delegate at➍. ThenNSAppstarts running. Once the
application setup work is finished,NSAppcalls its delegate’s application-DidFinishLaunchingmethod.
There’s not much more to the app: applicationDidFinishLaunchingprints. For fun, I had it print thenameof its single argument, anNSNotification object. Notice that sending a message to an Objective-C object is no different from sending one to a Ruby object. (You can check that aNoti-fication names an Objective-C object by printing its class: does it start withNS?)
If you run the new script, you’ll see this:
$ ruby no-ui.rb
NSApplicationDidFinishLaunchingNotification makes me say: Hello, world
Try This Yourself
1. applicationDidFinishLaunching is not the only message that can be sent to a delegate. It’s too early for you to handle most of them, but try changingno-ui.rbto handleapplicationWillFinishLaunching.2
2. Notifications have more than names. They can also point to an object of interest. In the case of these two notifications, that object isNSApp. Write some code to make sure that’s true. Use theobject message to get the object of interest.
3. Run your solution to the previous exercise again, but this time misspell the wordobject. Learn to recognize the output—you’ll be seeing it a lot in your RubyCocoa career. That’s what happens when RubyCocoa tries to send any Objective-C message that the object doesn’t respond to. It’s the equivalent of this Ruby error message:
irb(main):005:0> notification.objct
NoMethodError: undefined method `objct' for #<Notification:0x10a4050>
from (irb):5
2. What’s the point of knowing an application hasn’t finished launching yet? Certain things happen between the two events you know about. For example, it’s between them that an application is told it was started by double-clicking a file. If you want to do any setup before then,applicationWillFinishLaunchingis the time to do it.
PUTTING AN ITEM IN THESTATUSBAR 26
2.2
Putting an Item in the Status Bar
Without using Interface Builder (described in Chapter 3,Working with
Interface Builder and Xcode, on page 37), making a user interface is
tedious work, so we will create only a single, incredibly simple user-interface element in this section: an icon in the status bar (the symbols and text on the strip across the top of the screen on the right).
Here’s the code:
Downloadstatusbar/statusbar-item.rb
#!/usr/bin/env ruby
require 'osx/cocoa'
include OSX
class App < NSObject
def applicationDidFinishLaunching(aNotification)
➊ statusbar = NSStatusBar.systemStatusBar
➋ status_item = statusbar.statusItemWithLength(NSVariableStatusItemLength) ➌ image = NSImage.alloc.initWithContentsOfFile("stretch.tiff")
➍ raise "Icon file 'stretch.tiff' is missing." unless image ➎ status_item.setImage(image)
Line➊fetches a reference to the global status bar. Then line➋allocates
screen space (on the left of all the other items) for the item you are about to create. The parameterNSVariableStatusItemLengthsays that the amount of space needed is unknown yet.
Line ➌ uses a handy class that represents an in-memory image. The
next line, ➍, quits the program if there was no image file to load. Its
unless check works because NSImage’s init follows the Cocoa
conven-tion of returningnil—rather than the allocated object—when something goes wrong during initialization. There’s a suitable image file in status-bar/stretch.tiff.
Finally, at➎, the image is placed in the previously allocated space.
MENUS 27
Try This Yourself
You can add text to the status bar with setTitle. Try that in statusbar-item.rb, both with and without an accompanying image.3
2.3
Menus
Our status bar item doesn’t do anything, so let’s give it a menu. For fun, I’ll use it to make the app speak to us. That’s not hard: I’ll use a Cocoa object,NSSpeechSynthesizer, to turn text into speech.
Before starting that, let’s separate concerns.Appwill concern itself only with application-wide events such as being launched and being termi-nated. A new class,SpeechController, will do everything else.
Here’s the new version ofApp:
Downloadstatusbar/speaking-statusbar.rb
class App < NSObject
def applicationDidFinishLaunching(aNotification) statusbar = NSStatusBar.systemStatusBar
status_item = statusbar.statusItemWithLength(NSVariableStatusItemLength) image = NSImage.alloc.initWithContentsOfFile("stretch.tiff")
status_item.setImage(image)
➊ SpeechController.alloc.init.add_menu_to(status_item) end
end
Only one thing has changed, at line➊. We just create aSpeechController, ask it to add its menu to the status bar item, and then forget about it. Notice that aSpeechControlleris an Objective-C object—you can tell because it’s created withallocandinit.
And here’s theSpeechControllerclass:
Downloadstatusbar/speaking-statusbar.rb
class SpeechController < NSObject
def init
➊ super_init
@synthesizer = NSSpeechSynthesizer.alloc.init
➋ self
end
Like App, SpeechController descends from NSObject. A SpeechController needs to define its own init, though, because we want it to create an
3. If you’re not working in the statusbardirectory, get a copy ofstatusbar/stretch.tifffrom there before running the script.
MENUS 28
NSSpeechSynthesizerand hold onto it in an instance variable. Such aninit method differs from Ruby’s familiarinitializein two ways:
➊ In an ordinary Ruby class, theinitializemethod usessuperto call its
superclass’sinitializemethod. In anNSObjectsubclass,initcalls the superclass’s init method withsuper_init. (In general, any overriding methodmethod calls its superclass version withsuper_method.)
As you saw on page26, init methods can sometimes returnnil. For that reason, a pedantically safe use of the superclass would look like this:
return nil unless super_init
In this case, though, I know thatNSObject’sinitalways returnsself. (In fact, it does nothing but return self, so I could omit the line entirely.)
➋ In an ordinary Ruby class, initialize’s return value is irrelevant. In
contrast, an NSObject subclassmust returnself(or, in the case of error,nil). If I’d forgotten line➋, code like this:
s = SpeechController.alloc.init s.add_menu_to(status_item)
. . . would make s anNSSpeechSynthesizer and then blow up on the next line with a “no such message” failure. Even after seeing a lot of those failures, it still sometimes takes me much too long to think of blaminginit.
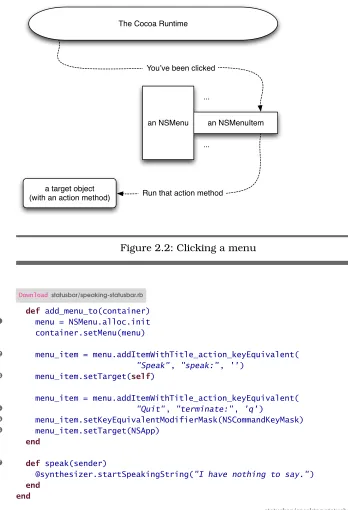
Now for the menu. In Cocoa, a menu is represented by anNSMenuthat containsNSMenuItemobjects. It’s those objects that receive “you’ve been clicked” events from the window manager. If anNSMenuItemhandles the event, it forwards the work by calling an action method attached to a
target object. (See Figure2.2, on the following page.)
TheNSMenuitself does only a little work. It asks each item for its name
and key equivalent (the keystroke that selects that item via the
key-board instead of the mouse). Then it paints all the items on the screen.
SpeechController’sadd_menu_to, shown in Figure2.3, on the next page, wires all this together.
MENUS 29
a target object (with an action method)
an NSMenu an NSMenuItem ...
... The Cocoa Runtime
You=ve been clicked
Run that action method
Figure 2.2: Clicking a menu
Downloadstatusbar/speaking-statusbar.rb
def add_menu_to(container)
➊ menu = NSMenu.alloc.init
container.setMenu(menu)
➋ menu_item = menu.addItemWithTitle_action_keyEquivalent(
"Speak", "speak:", '')
➌ menu_item.setTarget(self)
menu_item = menu.addItemWithTitle_action_keyEquivalent(
➍ "Quit", "terminate:", 'q')
➎ menu_item.setKeyEquivalentModifierMask(NSCommandKeyMask) ➏ menu_item.setTarget(NSApp)
end
➐ def speak(sender)
@synthesizer.startSpeakingString("I have nothing to say.")
end end
statusbar/speaking-statusbar.rb
MENUS 30
what it’s attached to, so long as that object responds tosetMenu. Today, it’s a status bar item. Tomorrow, it could be something else.
Next, an NSMenuItemis created and assigned to the menu by addItem-WithTitle_action_keyEquivalent(line ➋). What’s up with that name?
Objec-tive-C has an interesting and nearly unique way of naming methods. Here’s (almost) what Objective-C code that added a menu item would look like:4
[menu addItemWithTitle: "Speak" action: "speak:" keyEquivalent: ""]
The method being called here is named addItemWithTitle:action:keyEqui-valent:. It takes exactly three arguments that have to come in exactly the defined order.
RubyCocoa has to provide you with a way of naming that Objective-C method. It can’t use the same name, because method names in Ruby can’t contain colons. So, the colons are replaced with underscores. To avoid excessive ugliness, you can leave off the last underscore, as I did at line➋.5
The first and third arguments to the method provide the name and key equivalent. (This particular item has no key equivalent.) The second argument is the name of the message to send when the menu item is selected. Although the speak method is defined in Ruby, I’ve used Objective-C’s notion of its name: "speak:". The name ends in a colon because (as you’ll see shortly),speaktakes a single argument.
Which object receives thespeak:message is set on the next line (➌). In
this case, theSpeechControllerhandles the message itself.
Lines ➍ and ➎ show how you create a keyboard equivalent. Those
are almost never plain characters like q. They’re usually characters with modifiers, like Command-Q. For whatever reason, the character and modifier keystrokes are set in separate methods.
The menu item will send a terminate: message, but not to SpeechCon-troller. Since it’s a message about the whole app, it’s targeted at NSApp (line➏), an Objective-C class that implementsterminate:.
4. I’ve removed a little type casting because it’s not important to this explanation. To be pedantic, the title and key equivalent shouldn’t be strings. They should beNSStringobjects, which are written as@"string". Similarly, the action argument should be a “selector,” not a string. You’ll see more—and more correct—examples of Objective-C later in the book. 5. That’s not always safe: consider an Objective-C class that has two methods, action andaction:.
ANAPPLICATIONBUNDLE 31
Thespeak (➐) action is simple. Notice that it takes a senderargument,
which will be theNSMenuItemthat was clicked. Action methods can use thesenderto query or change the user interface.
If you run the app, you’ll probably notice that the synthesizer takes a second or two to start talking after you click the menu item. Presumably it’s doing some first-time initialization. It’s more prompt the second time.
Try This Yourself
1. Put this at the end ofspeak:
puts sender.objc_methods.grep(/title/i)
Use one or more of those methods to change the menu after some-thing is said.
2. While terminating, NSApp will send its delegate two messages: applicationShouldTerminateandapplicationWillTerminate. The first lets the delegate decide to cancel shutdown, and the second gives it a chance to do any of its own cleanup.
UseapplicationWillTerminateto print out “Goodbye, cruel world!”
3. Make applicationShouldTerminate return false unless the app has spoken at least twice,true otherwise. See what happens when you return values like nil,"fred", and the integer 0.
A small quirk: unlike the delegate messages you’ve seen so far, applicationShouldTerminate takes an NSApplication as its argument, sosenderorappwould be a better name thanaNotification.
(If you need help, there’s a solution in statusbar/speaking-statusbar-solution.rb.)
2.4
An Application Bundle
Fine though our script may be, it doesn’t behave like a Mac applica-tion. If you double-click it, it doesn’t launch. (Most likely, it opens in an editor.) It doesn’t get an icon in the Dock, you can’t see it if you
Command-Tab through open applications, and so on. In this section, I’ll
explain what’s special about apps. You’ll create your first one in
Chap-ter3,Working with Interface Builder and Xcode, on page37.
ANAPPLICATIONBUNDLE 32
!"#"$%&#'(#))*
+,-".-"%*
/-0,()12%" 3#45!* 6.%,$'4.%*
!"#"$%&#'(24-% '&78#2-('& %"'."49("200
Figure 2.4: A bundle
On the Mac, executable code is delivered inside bundles. A bundle is just a directory hierarchy with a certain predefined structure. Applica-tions are one kind of bundle. If you look inside statusbar/Statusbar.app, you’ll see a structure like that of Figure2.4.6
Reading roughly top to bottom and left to right, we have these files:
Contents/
This identifies the bundle as a “modern” bundle.
Info.plist
This contains various configuration options. For example, if you launch the application, you’ll notice that it doesn’t have a main menu and doesn’t appear in the Dock. I made that happen by settingLSBackgroundOnly. Apple’sRuntime Configuration Guidelines
[App08x] has the gory details about all the options you can tweak.
MacOS/
There is a small compiled Objective-C executable namedStatusbar in this directory. It loads and starts the Ruby code. (You don’t have to write the Objective-C yourself; Apple’s Xcode, explained in Chapter3,Working with Interface Builder and Xcode, on page 37, creates it for you.)
6. If you’re browsing from the command line,Statusbar.applooks like what it is: a direc-tory. If you’re browsing with the Finder, it appears to be a single file. That’s because it’s a
package, a special kind of directory that the Finder pretends is a file. All application bun-dles are packages. You can tell Finder to let you look inside it by selecting Show Package Contents fromStatusbar.app’s context menu.
ANAPPLICATIONBUNDLE 33
Resources/
This directory contains unchanging information the application might use. The good thing about resources is that their loca-tion is relative to the bundle itself, so code doesn’t need to use absolute pathnames or know where it has been installed. Apple’s
Resource Programming Guide [App08v] teaches how to load and
use resources.
Because this is a small program, it has few resources:
Statusbar.icns
.icnsfiles contain the icons shown in the Finder, Dock, and so on. I create icon files with a drawing program and Icon Com-poser, which you can find in/Developer/Applications/Utilities.
rb_main.rb
All your Ruby source files are stored as resources.
stretch.tiff
Pictures, sound files, movies: all these are stored inResources.
For more information about bundles, see Apple’s Bundle Programming Guide [App08d].
Ruby Code Within a Bundle
Our existing script barely needs to change when moved into a bundle. Its name changed to rb_main.rb. (That’s not required, but it’s easiest to follow the convention.) The following old line of code won’t work:
Downloadstatusbar/speaking-statusbar.rb
image = NSImage.alloc.initWithContentsOfFile("stretch.tiff")
That line assumes the script is running in the same directory as the image file. That’s not true for an application, which should fetch the image fromResources. That’s done like this:
Downloadstatusbar/Statusbar.app/Contents/Resources/rb_main.rb
image_name = NSBundle.mainBundle.pathForResource_ofType('stretch', 'tiff') image = NSImage.alloc.initWithContentsOfFile(image_name)
Simple enough.
Try This Yourself
1. What’s a running application’s working directory? You can print it to the system log with this line:
NSLog(Dir.pwd)
ANAPPLICATIONBUNDLE 34
Add a menu item to Statusbar.app/Contents/Resources/rb_main.rb to do that. You can view the system log with the Console app (in /Application/Utilities). It will appear in thesystem.loglog file.
Log the directory both when double-clicking the app and when opening it from the shell like this:
$ open Statusbar.app
2. What does the process environment look like when the app is launched by double-clicking (NSLog(ENV.inspect))?
You should see that it’s pretty sparse, containing nothing you set in your .bashrc file. Therefore, the common gem-loading trick of setting the environment variable RUBYOPTto rubygemswon’t work for a RubyCocoa app. Here are three solutions:
a) Just userequire ’rubygems’in your Ruby code. This is probably the best solution. In Leopard, RubyGems is guaranteed to be installed.
b) Create a file named~/.MacOSX/environment.plist. (Note that the directory starts with a period so that the Finder ignores it.) In it, place this XML:
Downloadstatusbar/environment.plist
<?xml version="1.0" encoding="UTF-8"?>
<!DOCTYPE plist PUBLIC "-//Apple//DTD PLIST 1.0//EN"
"http://www.apple.com/DTDs/PropertyList-1.0.dtd">
<plist version="1.0"> <dict>
<key>RUBYOPT</key> <string>rubygems</string> </dict>
</plist>
You will have to log out and log back in for the change to take effect. Once you do, the environment variable will be set for all applications.
c) Add the following lines toInfo.plist:
WHATNOW? 35
Beware, though: Info.plistis used only if your app is launched through Launch Services. The Finder and the shell’s open command use Launch Services, but your IDE or program-mer’s editor may not.7 In particular, Apple’s Xcode does not.
2.5
What Now?
Given what you’ve seen, I hope you believe that writing a Mac app in Ruby is potentially as pleasant as any other Ruby programming. But only potentially. Three obstacles still have to be removed:
• Setting up even simple user interface elements like menus seems like fiddly, detail-heavy work. Imagine what windows with panels and sidebars and tooltips must be like! Apple’s free developer tools remove that obstacle. They’re explained in Chapter3,Working with
Interface Builder and Xcode, on page 37.
• The code has already used a number of mystery classes such as NSMenu,NSBundle, andNSImage. How do you find, understand, and use their documentation? That’s explained in Section3.2,The API
Browser, on page49.
• Information about classes and methods is all well and good, but classes and methods exist in a context. You need to know how Mac applications are put together and what kinds of things they can do. That’s the topic of most of the rest of the book.
7. See Apple’sLaunch Services Programming Guide[App08o] for more.
Part I
Chapter 3
Working with
Interface Builder and Xcode
In this chapter, we’ll build a simple GUI that lets us fenestrate an app (open a window, or fenestra, into its internals). It’s the acorn that will grow into the mighty oak tree of Section 1.7, Our Example App, on page 16. It looks like Figure 3.1. We’ll imagine we’ll type the name of the application we want to fenestrate in the smaller text field, and information from that app will ooze into the largertext view.
!"#$%&'%&(()
THEBASICS 38
3.1
The Basics
The two main tools for building Mac apps are Xcode and Interface
Builder. (The latter is often abbreviated IB.) Xcode manages the
col-lection of files used to build an app and provides a programmer’s edi-tor. It’s akin to Eclipse or IntelliJ IDEA for Java, but it’s tailored to Objective-C programs. Interface Builder is a tool for drawing executable user interfaces.
Begin by creating a project. Start Xcode (in /Developer/Applications). If you see a Welcome page, dismiss it (although you may want to look at it later). Create a project by selecting File > New Project. You’ll see a screen like this:
Choose, as I did in the figure, a Cocoa-Ruby application, and hit Next.
THEBASICS 39
After you hit Finish, you’ll see something like the following:
This view has nothing to do with the file system structure of the project. It’s more like a collection of smart folders in the Finder or iTunes. I won’t give a detailed description of what you see, but notice some files we edited in Section 2.4, An Application Bundle, on page 31: Info.plist andrb_main.rb. Those are the source versions of the files that are put in the application bundle when it’s built.
Click Build and Go on the toolbar now. After a bit of a pause, you should see this window:
THEBASICS 40
Our next job is to make that window have the label, text field, and text view shown in Figure3.1, on page37.
Interface Builder
In the project view, there’s an entry in the right panel called Main-Menu.nib. You can also see it under the Resources or NIB Files groups in the left panel. (If you see MainMenu.xib instead, don’t worry; it’s the same data, just formatted differently.)
You can think of a nib file1 as describing a user interface, but the reality is more clever: it’s actually a “frozen” (“marshaled” or “serial-ized” or “pickled”) user interface. For more about that cleverness, see Section11.2,Archiving, on page 134and Section 14.4,bind_toObject_
withKeyPath_options, on page192. For now, edit the nib file by
double-clicking its name.
You should see the following five windows, although sized and placed differently. (If you don’t see all the windows, try selecting Window > Bring All to Front.)
①
②
⑤ ④
③
• The main menu is what appears in the menu bar on top of the screen. You’ll be tinkering with that in Chapter22,Fit and Finish, on page287.
1. The name stands for “name’s irrelevant, basically,” although some claim it stands for “NeXT Interface Builder.”
THEBASICS 41
• Themain windowis what the window will look like in the running app.
• Thedoc window(ordocument window) represents the contents of the nib file in the same way that a window in Pages or Word repre-sents the contents of a file. The doc window is a Finder-like view of the objects most important to the user interface. We won’t be using all of them, and I’ll describe only those we do. A good place to look for descriptions is in Apple’s Human Interface Guidelines
[App08b].
The doc window starts out using icons, but hereafter I’ll show it in list view because that lets me save some space in figures. I use list view in my ordinary programming, too—as the UI gets more complicated with objects within objects within objects, list view makes working with them easier.
• The library contains a large set of predefined user interface ele-ments. Shortly, you’ll be dragging three of them onto the main window. Dragging is how you build a Cocoa user interface with Interface Builder.
• The inspector is a tabbed editor for the bazillion-and-two things you can change about each UI element.
THEBASICS 42
After you drop the label, double-click it to edit its text. Change it to “Pick an app:” or whatever you like.
The library will also contain text fields and text views. Drag them into the window. Note that, when selected, they have drag handles that let you resize them. Make a window that looks something like the following:
Big views have little views...
...in front of them to hide ’em. And little views have lesser views, and so ad infinitum.2
Everything you’ve done has involved two main classes of object. First, there’s anNSWindowthat represents a rectangular area on the screen. Within it are different subclasses ofNSView, each responsible for its own piece of the window. Views are typically nested, with smaller views “on top of” larger ones (which means that they are responsible for the space they obscure).
2. With apologies to Augustus De Morgan and Jonathan Swift.
THEBASICS 43
Once you’ve put IB’s doc window in list mode, you can see the view structure of your window by expanding theNSWindow:
• Thecontent viewcovers the entire space of the window. It contains all the other views.
• The label and text field cover part of the content view. Notice that they are both NSTextField objects—their different appearance is entirely because of how they’re initialized. (See Section 3.5,
Attributes, on page58, for more.)
• What seems like a simple text view is actually its own hierarchy of objects. AnNSScrollViewcontains the actualNSTextViewand also two scrollers. One of them (the vertical scroller) takes up some space even when there’s no need for a scrollbar, but the other is invisible until it’s needed.
• If there were other visible objects in the window, even ones as insignificant as a vertical line used as a separator, they’d beNSView objects too. (A line is anNSBox, just a very, very thin one.)
You’ll eventually need to know more about views to answer questions like “What object handles a mouse click?” and “What object handles keypresses?” This book will answer those questions only in the con-text of Fenestra. For complete details, see Apple’sCocoa Event-Handling Guide [App08h].
THEBASICS 44
Connecting the Interface to Code
In the working application, typing into the text field will make a connec-tion to a web app that will spew data for Fenestra to catch and display in various pleasing ways. For this first example, though, let’s just have the text view echo whatever is typed into the text field.
If you squint, that looks a lot like the earlier status bar example
(Sec-tion2.3,Menus, on page27). In it, some input (a mouse click in a menu)
went to an action, a method inside the target class (SpeechController). That action did almost no processing; it just sent text to some Cocoa object attached to an instance variable. Like this:
!"#$$%&'((!)*+,-.+""(.%/%0&123(!-In that code, @synthesizeris a particular kind of instance variable: one that points to some Cocoa object used for output. In the jargon, that’s anoutlet.
The connections shown earlier were made with code we wrote, code like this:
menu_item = menu.addItemWithTitle_action_keyEquivalent(
"Speak", "speak:", '')
menu_item.setTarget(self)
. . . and this:
@synthesizer = NSSpeechSynthesizer.alloc.init
That kind of code is boring to write. Interface Builder can usually elim-inate the need for it. All you need to do is create objects and draw lines between them. The objects and wiring instructions are stored in the nib file and decoded when the app starts up.
1. We already have almost all the objects that need to be wired to-gether: you can see them in the main window and the doc window. Those are all UI objects, though, and we need one more to serve as the target of actions, the so-calledcontroller.
THEBASICS 45
The way you make an object in Interface Builder is by dragging some representation of it from the library. Since our class doesn’t exist yet, it’s not in the library. But no matter what the details, any object made in Interface Builder has to be an NSObject—all Cocoa objects are. So, we can use that as a placeholder. Search for NSObject in the library. When you find it, drag it into the doc window, as shown here:
2. Now we can add detail. With the new object selected, pick the Identity (sixth) tab in the inspector. The result should look like the following:
THEBASICS 46
The Class Identity (topmost) field is where we tell IB about the class of our object. Controller class names conventionally end in Controller. Since we’ll have only one for now, let’s just call it Con-troller. Type that in the field. Notice that the name changes in the doc window after you hit Return.
3. In the Class Actions field, add a new action (using the + but-ton). Name it chooseApp:. You have to end with the colon, since IB thinks the action is an Objective-C method that takes a single senderargument.
The Type field is the type of the sender argument. A type of id means “figure it out at runtime,” which both Ruby and Objective-C are perfectly happy to do. So, leave it as is.
4. In the Class Outlets field, add an outlet named log. As with the chooseApp:action, there’s no need to change the type fromid.
The inspector should now look like this:
Interface Builder now knows that Controller exists (or will exist) and needs two connections.
THEBASICS 47
1. First, open theController’s Connections (fifth) tab in the inspector. That looks like this:
2. Our outlet and action show up there. Their lines have little circles at the end. If you click the one for the logoutlet, you can drag a line to the text view in the main window, as shown in the follow-ing figures. Make sure to drop the end of the line in the “Lorem ipsum” text; if you drop it below there, you’ll actually be making a connection to the scroll view that contains the text view. Check the tooltip to make sure.
In IB 3.0, the inspector loses track of what it’s inspecting when you drop the far end of the connection. Worse, clicking theControllerin the doc window doesn’t get it back. What I do is click some other object (like the text view) and then click theControlleragain. (Later versions of IB don’t have this problem.)
CREATING ANDEDITINGCLASSES IN XCODE 48
Once you’ve made the connection correctly, the log entry in the Connections tab will now describe the other end as “Text View,” as shown here:
If you made a mistake, you can destroy the connection by clicking the littlex. Double-clicking the now-filled-in circle will take you to the other end of the connection.
3. Next, drag thechooseApp:received action to its source in the text field.
IB now knows how Controller should be hooked into the UI. There’s no code for that class yet, though. We’ll write it in Xcode. Save the nib file
with Command-S before switching from IB to Xcode.
3.2
Creating and Editing Classes in Xcode
In Xcode, select the File > New File menu item. You’ll see this dialog box:
CREATING ANDEDITINGCLASSES IN XCODE 49
Select the Ruby NSObject subclass. Name the new file Controller.rb. Al-though that’s unidiomatic Ruby, it seems to make Xcode happier.
When that’s finished, you’ll see something like this:
(The comment at the head of the file will look different. If you want to peek ahead and see how to make it include your name and company name, see Section22.6,The About Window, on page297.)
The API Browser
I’m about to walk you through the implementation, telling you which methods to call on which classes as we go. Because of that, you don’t need to know how to use the Cocoa API browser to find classes and methods yet, but you may want to anyway.
CREATING ANDEDITINGCLASSES IN XCODE 50
The browser is available by selecting Help > Documentation. It looks like this:
① ②
③
④ ⑤
The arrows point out the parts of the browser I find most helpful:
1. I use the search field to find documentation for classes and meth-ods whose name I know. To go from “I need to do X” to ”I need to use class Y,” I use Google. I find it does a better job of finding relevant hits in Apple non-API documentation than does Xcode’s search or the one at Apple’s Developer Connection website.3
2. If you have a similar experience (which you might not), you can restrict search results to the API with the button on the far left of this bar. Toward the middle, there’s an All Languages button, which means in practice “include the Java API.” That’s not useful, so I turn it off.
3. In the middle of this bar, there’s a drop-down list that contains the class name. If you open it, you’ll get quick access to instance and class methods.
At the right, marked with a “C,” you can get quick access to super-class and subsuper-class documentation.
CREATING ANDEDITINGCLASSES IN XCODE 51
But I AlreadyHave an Editor!
If you’re a typical reader, you already have a favorite editor that you use for Ruby, and you’re not wild about changing
to Xcode. Chapter 10, Project Organization, Builds, and Your
Favorite Editor, on page117, will tell you how to do your edit-ing and buildedit-ing without Xcode. You’ll likely want to keep usedit-ing Xcode for infrequent actions such as adding new nib files to a project. To build up enough familiarity with Xcode, I recom-mend that you continue using it for everything—just for now.
4. Each class begins with an overview. I’ve found them quite good, and I make a habit of reading them.
5. There are often companion guides that put the class in context. I usually at least skim them.
Implementation
Implement your new class as shown in Figure 3.2, on the following page:
➊ In Interface Builder, we declared that Controller had a log outlet. From inside the class, the outlet is just the instance variable@log.
It’s the responsibility of code outside this class, code we don’t write, to initialize @log. For that reason, we have to declare an attr_writer method for that code to call.
➋ The text view’s default content will be the strange “Lorem ipsum” text that Interface Builder showed you. I want to replace that with an empty string. That means sending a message via @log—but only after the attr_writer method has been used to initialize it. The Cocoa runtime callsawakeFromNibafter all outlets are guaranteed to be connected, so that’s the method that should initialize the text view. However, as is so often the case in object-oriented programs, awakeFromNibdoesn’t do anything itself; it just passes work along to someone else.
➌ chooseAppimplements the action we declared in Interface Builder.
Unlike @log, we don’t need to provide any special access to the outside world—it’s just a public method like any other.
CREATING ANDEDITINGCLASSES IN XCODE 52
Downloadfenestra/text-field-to-view/Controller.rb
require 'osx/cocoa'
class Controller < OSX::NSObject
include OSX
➍ everything = NSRange.new(0, @log.textStorage.length)
➎ @log.replaceCharactersInRange_withString(everything, string) end
end
fenestra/text-field-to-view/Controller.rb
Figure 3.2: The first controller
chooseApp shows how you retrieve values from simple views like text fields: you just ask for theirstringValue. As withawakeFromNib, the real work will be done byrecord.
➍ A text view is part of Cocoa’s text subsystem, which is both
pow-erful and complex. Among its complexities are various ways to get at the text inside a view. This code shows one way.
This way of working with a text view uses an NSRange. You can think of NSRange classes like selections you make with a mouse; indeed, if you ask a text view for its selection, you’ll get back an NSRange. Like a selection, an NSRange can describe a run of one or more characters. In that case, inserting new text will replace the old text. Alternately, anNSRangecan describe zero characters. (Think of a cursor blinking between two characters.) In that case, inserting new text doesn’t change old text.
CREATING ANDEDITINGCLASSES IN XCODE 53
object for its text length; instead, you have to reach into the view, pull out the associated textStorage, and ask that object.
If you’re wondering why anNSRangeis created withnewinstead of alloc. . . hold that thought for a moment.
➎ replaceCharactersInRange_withString does what its name says.
The absence of explicit type declarations in Ruby hides something aboutrecord. When it’s called fromawakeFromNib, it’s given a plain Ruby string (class String). When it’s called from chooseApp, it’s given the stringValue of a text field, which is a Cocoa NSString. So, replaceCharactersInRange_withString is sometimes given aString and sometimes anNSString. Is that safe?
If the Objective-C methodreplaceCharactersInRange_withString
actu-ally received a Ruby String, the result would be ugly—very ugly.
RubyCocoa saves us from disaster by converting anyString passed to an Objective-C method into an NSString before it reaches the method. You’ll see more about conversions throughout the book. If you’re impatient, I’ve provided a command,conversions/round-trip, that lets you convert Ruby objects and examine their Objective-C equivalents. Here’s an example:
$ cd conversions $ ./round-trip 1
---If 'In' is the Fixnum '1' (1),
then 'Out' will be the OSX::NSCFNumber '1' (#<NSCFNumber 1>) with
classes [OSX::NSCFNumber, OSX::NSNumber, OSX::NSValue, OSX::NSObject] Will Out==In? Yes.
Out.to_ruby will be the Fixnum '1' (1).
Useround-trip -hto find out more.