Build Windows 8
Apps with HTML5 and
JavaScript
Published with the authorization of Microsoft Corporation by: O’Reilly Media, Inc.
1005 Gravenstein Highway North Sebastopol, California 95472
Copyright © 2013 by Dino Esposito
All rights reserved. No part of the contents of this book may be reproduced or transmitted in any form or by any means without the written permission of the publisher.
ISBN: 978-0-7356-7594-0
1 2 3 4 5 6 7 8 9 LSI 8 7 6 5 4 3
Printed and bound in the United States of America.
Microsoft Press books are available through booksellers and distributors worldwide. If you need support related to this book, email Microsoft Press Book Support at [email protected]. Please tell us what you think of this book at http://www.microsoft.com/learning/booksurvey.
Microsoft and the trademarks listed at http://www.microsoft.com/about/legal/en/us/IntellectualProperty/ Trademarks/EN-US.aspx are trademarks of the Microsoft group of companies. All other marks are property of their respective owners.
The example companies, organizations, products, domain names, email addresses, logos, people, places, and events depicted herein are fictitious. No association with any real company, organization, product, domain name, email address, logo, person, place, or event is intended or should be inferred.
This book expresses the author’s views and opinions. The information contained in this book is provided without any express, statutory, or implied warranties. Neither the authors, O’Reilly Media, Inc., Microsoft Corporation, nor its resellers, or distributors will be held liable for any damages caused or alleged to be caused either directly or indirectly by this book.
Acquisitions and Developmental Editor: Russell Jones Production Editor: Christopher Hearse
Editorial Production: S4Carlisle Publishing Services Technical Reviewer: Russ Mullen
Indexer: Angela Howard Cover Design: Jake Rae
To Michela and Silvia, who are stronger and smarter than they
think.
—D
inoTo Grandma Concetta, for providing free calories through
amazing quantities of unbeatable homemade prosciutto.
Contents at a glance
Introduction xiii
CHApTer 1 Using Visual Studio 2012 express edition for Windows 8 1
CHApTer 2 Making sense of HTML5 23
CHApTer 3 Making sense of CSS 47
CHApTer 4 Making sense of JavaScript 73
CHApTer 5 First steps with Windows 8 development 97
CHApTer 6 The user interface of Windows Store applications 121
CHApTer 7 Navigating through multimedia content 147
CHApTer 8 States of a Windows 8 application 177
CHApTer 9 Integrating with the Windows 8 environment 201
CHApTer 10 Adding persistent data to applications 235
CHApTer 11 Working with remote data 265
CHApTer 12 Accessing devices and sensors 291
CHApTer 13 Adding Live tiles 319
CHApTer 14 publishing an application 335
What do you think of this book? We want to hear from you!
Microsoft is interested in hearing your feedback so we can continually improve our books and learning resources for you. To participate in a brief online survey, please visit:
microsoft.com/learning/booksurvey
Contents
Introduction . . . xiii
Chapter 1 Using Visual Studio 2012 Express edition
for Windows 8
1
Getting ready for development . . . 2The software you need . . . 2
Configuring Visual Studio 2012 . . . 5
Start playing with Windows 8 apps . . . 9
The “Hello Windows 8” application . . . 10
Adding a bit more action . . . 16
Summary. . . .21
Chapter 2 Making sense of HTML5
23
Elements of a webpage . . . 24Building the page layout with HTML5 . . . 24
Miscellany of other new elements. . . .32
Collecting data . . . .34
Adjusting input fields . . . 35
Form submission . . . .38
Multimedia elements . . . 41
The audio element . . . 41
The video element . . . 42
Chapter 3 Making sense of CSS
47
Styling a webpage . . . 47
Adding CSS information to pages . . . .48
Selecting elements to style . . . 51
Basic style commands . . . 55
Setting colors . . . 55
Controlling text. . . .58
HTML display modes . . . .60
Spacing and the boxing model . . . .63
Advanced CSS scenarios . . . .66
CSS pseudo-classes . . . .66
Media Queries . . . .70
Summary. . . .71
Chapter 4 Making sense of JavaScript
73
Language basics . . . 74The JavaScript type system. . . 74
Dealing with variables . . . .77
Dealing with objects . . . .79
Dealing with functions . . . .81
Organizing your own JavaScript code . . . .89
Linking JavaScript code to pages . . . .89
Practices and habits . . . .92
Summary. . . .94
Chapter 5 First steps with Windows 8 development
97
The Windows 8 Runtime (WinRT) . . . .98Windows Store apps and other apps . . . .98
An overview of the WinRT API . . . .100
The Windows Store app user interface . . . .102
Aspects of the Windows 8 UI . . . .102
Components for the presentation layer . . . .107
Data binding . . . .112
Understanding the application’s lifecycle . . . .116
States of a Windows Store application . . . .116
Background tasks . . . .119
Summary. . . .120
Chapter 6 The user interface of Windows Store applications
121
Foundation of Windows Store applications . . . .121Defining the layout of the application . . . .122
Application attributes . . . .129
Getting serious with the TodoList application . . . .132
Building an interactive form . . . .133
Putting data into the form . . . .138
Summary. . . .146
Chapter 7 Navigating through multimedia content
147
Foundation of page navigation . . . .147The navigation model of Windows Store applications . . . .147
Inside the Navigation App template . . . .149
Building a gallery of pictures . . . .152
Introducing the FlipViewcomponent . . . .152
Navigating to a detail page . . . .156
Zooming the image in and out . . . .161
Building a video clip gallery . . . .165
Introducing the SemanticZoom component . . . .165
Dealing with video . . . .172
Summary. . . 174
Chapter 8 States of a Windows 8 application
177
States of a Windows Store application . . . .177Snapping applications . . . .179
Making the application reactive . . . .182
Towards an adaptive layout . . . .188
General principles of snapped and filled views . . . .188
Fluid layouts . . . .189
Summary. . . .200
Chapter 9 Integrating with the Windows 8 environment
201
Contracts and common tasks . . . .202Aspects of Windows 8 contracts . . . .202
Contracts and extensions . . . .204
Consuming the File picker contract . . . .206
Choosing a file to save data . . . .207
Choosing a file to load data . . . .214
The Share contract . . . .216
Publishing an application’s data . . . .216
Adding share source capabilities to TodoList . . . .217
Providing a Settings page . . . .224
Populating the Settings charm . . . .224
Creating a functional Settings page . . . .227
Summary. . . .233
Chapter 10 Adding persistent data to applications
235
Persisting application objects . . . .235Making Taskobjects persistent . . . .236
Choosing a serialization format . . . .240
Creating Taskobjects from files . . . .243
Using the application’s private storage . . . .247
Storage options in Windows 8 . . . .248
Creating tasks in the isolated storage . . . .251
Chapter 11 Working with remote data
265
Working with RSS data . . . .265
Getting remote data . . . .266
Parsing and displaying downloaded data . . . .272
Drilling down into data . . . .276
Working with JSON data . . . .278
Laying out a Flickr viewer . . . .279
Enhancing the application . . . .285
Summary. . . .290
Chapter 12 Accessing devices and sensors
291
Working with the webcam . . . .291Capturing the webcam stream . . . .292
Processing captured items . . . .297
Working with the printer . . . .301
The Print contract . . . .301
Printing context-specific content . . . .305
Working with the GPS system . . . .309
Detecting latitude and longitude . . . .309
Making use of geolocation data . . . .312
Summary. . . .318
Chapter 13 Adding Live tiles
319
What’s a Live tile anyway? . . . .319Tiles in action . . . .320
Creating Live tiles for a basic application . . . .323
Adding Live tiles to an existing application . . . .326
Bringing back the TodoList application . . . .326
Implementation of Live tiles . . . .328
Chapter 14 Publishing an application
335
Getting a developer account . . . .336
Registering as a developer of free applications . . . .336
Registering as a developer of paid applications . . . .339
Steps required to publish an application . . . .340
Choosing a name for the application . . . .340
Packaging an application . . . .342
Sideloaded applications . . . .349
Summary. . . .349
Index 351
What do you think of this book? We want to hear from you!
Introduction
F
or years, programming has been the nearly exclusive domain of people that others typically thought of as super-experts, gurus, or geniuses. The advent of mobile programming, however, changed things a bit because the idea of programming for these devices regained its appeal for youngsters. Today, a teenager appearing suddenly in the spotlight due to his or her ability to build a cool Android or iPhone app is not uncommon. There are a few reasons why this is happening, and why it’s happening now.One reason is certainly that today’s teenagers are the first generation of digital natives. You’re far more likely to find a few programmers among this group than among the members of previous generations. Another reason is that mobile apps are much easier to write than any other type of modern software. Mobile apps are small pieces of code built around a smart idea. It’s one thing to build a mobile app, and quite another to plan and maintain a multitiered enterprise system.
Being mobile added a new dimension to software development. In this context, Windows Phone is not simply yet another mobile platform to code for; It is by far the simplest (and even most pleasant) platform to code for, regardless of background. This makes coding for Windows Phone an excellent way to get started with programming. This is particularly true for the smart kids who constantly hunger after new technology and seek emotional gratification in that technology. I’ve seen this happen with my 14-year-old son, Francesco—who is the effective coauthor of this book.
Microsoft Windows 8 takes the “programming with pleasure” approach one step further. With Windows 8, you can not only build mobile apps for tablets, but also build standalone applications for yourself, either for fun or to help automate some of the repetitive tasks of everyday life. Windows 8, with its overall simplicity, brings back a dimension of craftsmanship in applications that went missing as the complexity of software architectures and websites increased over the past decade or so. On one hand, Windows 8 is a powerful client front end for rich and sophisticated middleware; on the other, it is simple enough for nearly everybody to program via HTML5 and JavaScript.
tablets. As evidence, consider that Francesco is a teenager—and he wrote most of the examples and a few chapters of this book.
After completing the book, you won’t be a super-expert, but you’ll surely know enough to start writing your own apps, at least for fun.
Who should read this book
This book is a beginner’s guide to Windows 8 programming using web technologies, such as HTML5 and JavaScript. But the scope of the word “beginner” needs some further explanation. One definition of a beginner, in a programming sense, is a person who has never learned any serious programming. While this book does target such beginners, it does require some minimal background knowledge about HTML5, JavaScript, and some familiarity with basic concepts of logic and formalism, such as IF, WHILE, and assignments. Another definition of a beginner, however, would include people who have never learned Windows programming, or people who perhaps wrote COBOL for decades—or even perhaps a person who built and maintained a Visual Basic 6 application for the past 15 years. While this book can also be useful for those more experienced “beginners,” people with serious programming experience are not the target audience for this book.
This book attempts to provide a smooth approach to key topics of Windows 8 programming. If you are primarily interested in Windows 8 and are new to Windows Phone, Microsoft Silverlight, or even single-page applications, then you should definitely consider getting this book.
Who should not read this book
Organization of this book
This book is divided into three sections. Chapters 1-5 cover the basics of acquiring and using Microsoft Visual Studio 2012 Express and also provide a summary of what you need to know about HTML, CSS, and JavaScript. Chapters 6-11 deal with programming Windows 8 apps and cover the foundation of Windows 8 programming while providing step-by-step exercises that help you understand and deal with the user interface of Windows 8 apps, graphics, video, data storage, and Internet calls. Finally, Chapters 12-14 focus on advanced Windows 8 programming, with an emphasis on working with device sensors and accessories (such as printers, GPS, webcams, and so forth), interacting with the system (Live tiles), and publishing your completed application.
Finding your best starting point in this book
Overall, the scenarios for using this book are quite simple. We recommend you read it cover to cover, because it is designed to guide you through the key topics you need to know to program Windows 8 with HTML5 and JavaScript. However, if you already have a solid grasp of the technologies used in this book—Visual Studio 2012 Express, HTML5, CSS, and JavaScript—you may be able to skip Chapters 1-4 without compromising your understanding of the rest of the book.
Conventions and features in this book
This book presents information using conventions designed to make the information readable and easy to follow.
■ Each exercise consists of a series of tasks, presented as numbered steps (1, 2, and so on) listing each action you must take to complete the exercise.
■ Boxed elements with labels such as “Note” provide additional information or alternative methods for completing a step successfully.
■ Text that you type (apart from code blocks) appears in bold.
■ A plus sign (+) between two key names means that you must press those keys at the same time. For example, “Press Alt+Tab” means that you hold down the Alt key while you press the Tab key.
System requirements
You will need the following hardware and software to set up yourself on the various mobile platforms and compile the sample code:
■ A PC equipped with Windows 8 and Visual Studio 2012 Express for Windows 8.
Code samples
Most of the chapters in this book are built around exercises that are reflected in the sample code for the chapter. All sample projects in their finalized form can be downloaded from the following page:
http://aka.ms/SH_W8AppsHTML5JS/files
Follow the instructions to download the starthere-buildapps-winjs-sources.zip file.
Installing the code samples
Follow these steps to install the code samples on your computer so that you can use them with the exercises in this book.
1. Unzip the starthere-buildapps-winjs-sources.zip file that you downloaded from the book’s website (name a specific directory along with directions to create it, if necessary).
2. If prompted, review the displayed end user license agreement. If you accept the
terms, select the accept option, and then click Next.
Note If the license agreement doesn’t appear, you can access it from the same webpage from which you downloaded the
Errata and book support
We’ve made every effort to ensure the accuracy of this book and its companion content. Any errors that have been reported since this book was published are listed on our Microsoft Press site at oreilly.com:
http://aka.ms/SH_W8AppsHTML5JS/errata
If you find an error that is not already listed, you can report it to us through the same page.
If you need additional support, email Microsoft Press Book Support at mspinput@ microsoft.com.
Please note that product support for Microsoft software is not offered through the addresses above.
We want to hear from you
At Microsoft Press, your satisfaction is our top priority, and your feedback our most valuable asset. Please tell us what you think of this book at:
http://www.microsoft.com/learning/booksurvey
The survey is short, and we read every one of your comments and ideas. Thanks in advance for your input!
Stay in touch
Acknowledgements
Dino:
I’ll be honest: Russell Jones, my editor at O’Reilly Media, convinced me to try this project. If the book is in your hands, both some of the good and some of the bad are on him! When Russell first mentioned this book, when it was still just an idea, I first declined, making the point that I have never written a book for beginners.
But then my son, Francesco (proud and efficient coauthor), made me look at the subject from a different perspective. It was one of those powerful forms of lateral thinking that only young people can sometimes contribute. Francesco said something like, “Dad, I don’t think you only admit experts to your software design or ASP.NET MVC classes. If I were a true expert, I’d probably rarely take a class; if I need a class it is because I want someone to show me the way slowly and effectively. If I decide to invest money on a class it is because I feel somehow that I’m a beginner. Why should this be different for a book?”
That message hit home; I found that to be a valuable bit of wisdom; even coming from a 14-year-old boy.
So with that change of heart, I embarked enthusiastically on this project and asked Francesco to cooperate, because he was perfect for testing the material—essentially eating the dog food we were cooking up! Francesco did a truly fantastic job. At one point, I was on a plane about to leave and talking on the phone, giving suggestions on how to improve the gallery of photos and the downloading of JSON data from Flickr. From the outside, that phone call was nothing more than a classic business phone call—the last-minute kind you make just moments before the plane leaves the gate. But I was talking to my son! And, more importantly, he had diligently accomplished all the tasks by the time I got back. Thank you, Francesco!
Francesco:
I love technology and love the Microsoft software platform and tooling. In the beginning, for me, writing the book was primarily a way to get my hands on a Surface device. In the end, though, I spent most of the time working with the simulator and a secondary laptop.
up my sleeves and worked out some examples. And in doing so, I also was able to contribute a list of points for Dad to expand on. I’m not sure this project would have been as pleasant for Dad without my help.
Working on the book was mostly fun, but I do recognize that this book is an important achievement for me. I know I’ll feel better if I can share this moment with some people who make my life happier: my mom, my sister, Michela, my friends Francesco and Mattia, and all my waterpolo teammates at UISP Monterotondo. I love you all!
Chapter 1
Using Visual Studio
2012 express edition for
Windows 8
Differences of habit and language are nothing at all if our aims are identical. — J. K. Rowling, Harry Potter and the Goblet of Fire
M
icrosoft Windows 8 marks the debut of a significantly revised runtime platform—the Windows RunTime (WinRT) platform. Like the .NET platform, WinRT supports several programming languages. You will find a pleasant surprise (and an old acquaintance) side by side with the popular .NET languages (such as, C#, Visual Basic, C++, F#)—the JavaScript language.Note You may not even recall that a decade ago, when Microsoft first shipped the .NET Framework, developers were also given a chance to write applications using an adapted version of JavaScript called JScript .NET. It was not exactly a success; indeed, today you
won’t even find JScript .NET supported in Visual Studio—the premiere development
environment for .NET code. Ten years ago, JavaScript was probably close to the bottom of its popularity. JScript .NET was a dialect of the standard JavaScript, and using JScript .NET didn’t mean you could use HTML and CSS to shape up the user interface of the resulting application. This is different in Windows 8.
If you already know a bit of JavaScript development, building Windows 8 applications will not be a huge, new type of adventure. If you are not already a JavaScript developer, the JavaScript route probably represents the shortest path for learning to build Windows 8 applications.
This chapter sets up the preliminary aspects of such a learning path and discusses what you need to install—specifically Windows 8 and Microsoft Visual Studio—and how to configure the environment. In the next chapters you’ll first see a summary of HTML (in particular, the latest version of HTML, known as HTML5), CSS, and JavaScript, and then attack the task of building Windows 8 applications with topics more specifically related to Windows 8 programming.
Important If you are already familiar with HTML5, CSS, and JavaScript, you might want to start directly with Chapter 5. If not, at the very minimum I recommend you look carefully at Chapters 2, 3, and 4. Better yet, I suggest you look into specific books for HTML5 and
JavaScript, as the chapters you find here represent about 10 percent of the content you would find in a dedicated book. You might want to explore other books in this Microsoft
Press series that address these topics directly: Start Here! Learn HTML5 by Faithe Wempen (Microsoft Press, 2012) and Start Here! Learn JavaScript by Steve Suehring (Microsoft Press, 2012).
Getting ready for development
So you want to start building applications for Windows 8 using HTML, CSS, and JavaScript. First, you need to make sure that some software is properly installed on your development machine. The following section discusses the details.
The software you need
As obvious as it may sound, you need to have Windows 8 installed to develop, test, and run Windows 8 applications. The easiest way to develop and test applications for Windows 8 is by using the current version of Visual Studio—Visual Studio 2012.
Installing Windows 8
Having a machine equipped with Windows 8 is a fundamental prerequisite to working through the information and exercises in this book. Windows 8 comes in a few flavors, as detailed in Table 1-1.
TABLE 1-1 Windows 8 editions
Version Description
Windows 8 The Basic edition of Windows 8 is available for both the x86 and x86-64 architecture. It provides a new Start screen and redesigned user interface, live tiles, Internet Explorer 10, and more.
Windows 8 Pro This edition offers additional features such as booting from VHD and support for
virtualization via Hyper-V.
Windows 8 Enterprise This edition adds IT-related capabilities such AppLocker and Windows-To-Go (booting and running from a USB drive). This version also supports installation of internally developed applications from locations other than the Windows Store. Windows 8 RT Only available pre-installed on ARM-based tablets, it also natively includes
touch-optimized versions of main Office 2013 applications.
If you don’t have your copy of Windows 8 already, you can get a free 90-day trial version from the following location: http://msdn.microsoft.com/en-us/evalcenter/jj554510.aspx. Note that this link gets you a non-upgradeable copy of Windows 8 Enterprise. Before you embark on the download, consider that because it is a few gigabytes in size, it may not be quick!
Installing Visual Studio express
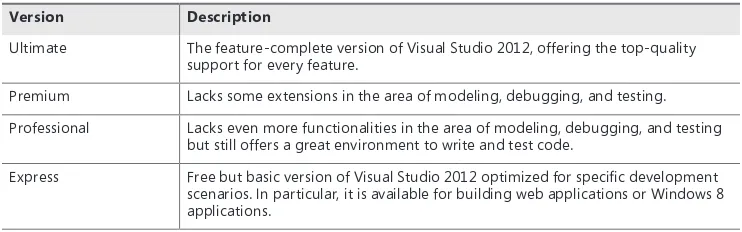
Once you have Windows 8 installed, you can proceed to download Visual Studio 2012 Express edition. (Note that in the rest of the chapter—and the entire book—we’ll be using the term Visual Studio or Visual Studio2012 often just to mean the Visual Studio 2012 Express edition.) As shown in Table 1-2, Visual Studio is available in different flavors.
TABLE 1-2 Visual Studio 2012 editions
Version Description
Ultimate The feature-complete version of Visual Studio 2012, offering the top-quality support for every feature.
Premium Lacks some extensions in the area of modeling, debugging, and testing. Professional Lacks even more functionalities in the area of modeling, debugging, and testing
but still offers a great environment to write and test code.
Express Free but basic version of Visual Studio 2012 optimized for specific development
scenarios. In particular, it is available for building web applications or Windows 8 applications.
You can read more about and compare Visual Studio features at the following page: http://www.microsoft.com/visualstudio/11/en-us/products/compare.
FIGURE 1-1 The home page of the Dev Center for Windows 8 applications.
After clicking the link to download the tools and Software Development Kit (SDK), you will be sent to another page where you can finally start the download process, as shown in Figure 1-2.
FIGURE 1-2 Downloading the tools for Windows 8 application programming.
At various times during the setup, you’ll be prompted to accept or modify options. For the purposes of this book, you can simply accept all the default options. The default setup installs the newest .NET Framework 4.5, the Windows 8 SDK, plus a bunch of other tools and project templates. At the end of the installation, if everything worked just fine, you should expect to see the screen reproduced in Figure 1-3. In the unfortunate case in which the software doesn’t install correctly, you will get a message with some helpful directions. Please follow them carefully.
FIGURE 1-3 Visual Studio 2012 is ready to launch.
Now you’re ready for some real fun: launching and configuring Visual Studio for your first Windows 8 application!
Configuring Visual Studio 2012
After completing the setup, Visual Studio 2012 Express requires a couple of more steps before it is ready to run.
Getting a product key
FIGURE 1-4 Product key required for Visual Studio 2012 Express.
Clicking the “Register online” link takes you to a page where you can insert your name, email address, and company details (see Figure 1-5).
You then submit the form. You’ll receive an email containing the product key to unlock the current version of Visual Studio (see Figure 1-6).
FIGURE 1-6 Product key retrieval for Visual Studio 2012 Express.
It usually takes only a few seconds to receive an email from Microsoft to your specified address. The email contains the product key as text; copy it to the clipboard and switch back to Visual Studio. In the same window you saw in Figure 1-4, paste the product key you just received.
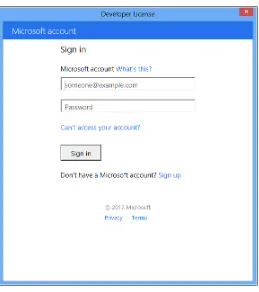
Creating a developer account
FIGURE 1-7 Creating your developer account.
A developer license successfully installed on a machine enables you to freely create and run Windows 8 applications outside the official Windows Store.
Note A Windows 8 machine can install only certified applications,either downloaded from the Windows Store (in much the same way in which it works for Windows Phone applications), or created by registered developers on a “signed” machine, so you’ll need the developer license to complete the examples in this book.
FIGURE 1-8 Renewing your developer license.
You can get as many developer licenses as you need, provided that you have a Windows Live ID account.
Windows Store account
Getting a developer license for Windows 8 is only the first mandatory step in developing and testing Windows 8 applications. Armed solely with a developer account, you can’t publish a Windows 8 application to the Windows Store for others to download and install.
There’s no direct relationship between developer accounts and Windows Store accounts. Each plays a specific role and you can get one without having the other. However, if you own a Windows Store account and then qualify for a developer license, then the default expiration of your developer license is automatically set to a longer time.
The point to remember here is that before you can publish your Windows 8 application to the Windows Store, you need to get a Windows Store account. You’ll see how to obtain a Windows Store account later, in Chapter 14.
Important As a developer and user of a Windows 8 system, keep in mind that your machine can only run Windows 8 applications that have been downloaded from the Windows Store or custom applications for which a developer license has been installed on the machine. Another scenario enables you to host custom applications—when those applications have been “sideloaded” onto the machine by your organization, which in turn holds an enterprise store account.
Start playing with Windows 8 apps
by generating some vanilla code appropriate to that template and language that you can customize and extend.
For the purposes of this book, your programming language of choice is JavaScript. It’s worth remembering, though, that you could use other languages, such as C#, Visual Basic, and even C++.
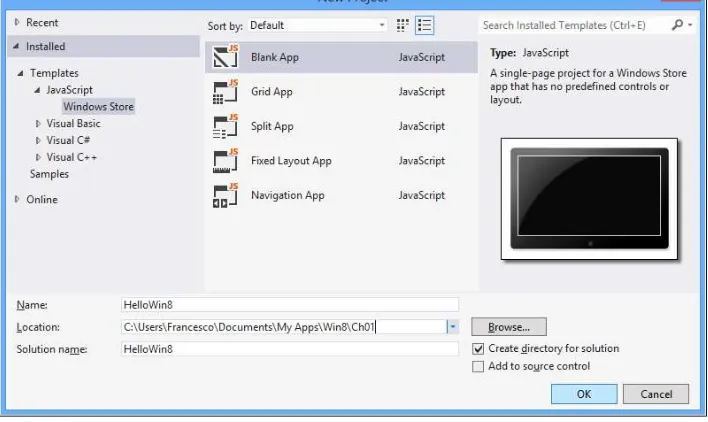
The “Hello Windows 8” application
Without further ado, launch Visual Studio and discover what it takes to create a new project. It couldn’t be simpler, actually; from the start page, you just click the New Project link, as shown in Figure 1-9.
FIGURE 1-9 Creating a new project.
Choosing a project template
FIGURE 1-10 Choosing a project template.
Templates are grouped by programming language. In the Express edition of Visual Studio considered here, you can create just one type of application—a Windows 8 application for the Windows Store. If you acquire a more advanced edition of Visual Studio, you should expect to see more options available, including web, console, and desktop applications.
So how do you decide which template to use?
Templates have the primary purpose of saving you some work, at least for common application layouts. You are not forced to pick up a specific template, however. If none of the predefined templates seems to be right for you or, more likely, if you don’t know exactly which one to pick, then you just select the template for a blank application. Table 1-3 provides more information on the predefined templates for JavaScript.
TABLE 1-3 Predefined project templates for Windows Store applications
Template Description
Blank App The application consists of a single and nearly empty page: no visual controls, no
widgets, and no layout defined.
Grid App A master-detail application made of three pages. The master page groups items in a grid. Additional pages provide details on groups and individual items. Split App A two-page master-detail application in which the master page shows selectable
items and the details page lists related items alongside.
Fixed Layout App A single-page application whose layout scales using a fixed aspect ratio. Navigation App A multipage application with predefined controls to navigate between pages.
Creating the sample project
Before you give Visual Studio the green light to create files, you might want to spend some time thinking about the location of the project. In Figure 1-10, you see Location; that’s the place where you enter the disk path to the files being created for the project.
It is always preferable to save your sample applications in a well-organized structure. For the sample code of this book, you’ll use a root directory named Win8 containing ChXX directories for each chapter, where XX is a two-digit chapter number.
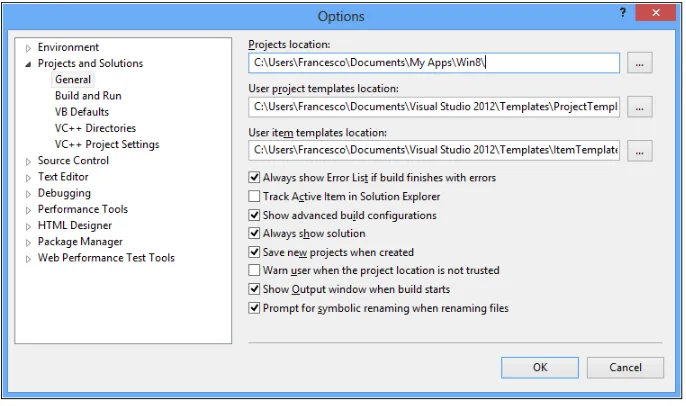
By default, Visual Studio saves your project files right under the Documents folder and creates a new directory for each solution. You can change the default location of a project by simply editing the path in the Location every time. Alternatively, you can set a new default path for every project by selecting Options from the Tools menu and then picking up the General node under the Projects and Solutions element (see Figure 1-11).
FIGURE 1-11 Changing the default project location.
FIGURE 1-12 Creating the HelloWin8 project.
Click OK and you’re officially a Windows 8 developer.
Note Visual Studio 2012 comes with a dark theme for windows and controls by default. For the sake of print, we changed it to the light theme which makes for screenshots that render
better in print. Anyway, to change the Visual Studio theme, open the Tools | Options menu, and then select Environment from the window shown in Figure 1-11.
Tweaking the sample project
FIGURE 1-13 The HelloWin8 project.
It turns out that a Windows 8 application written using JavaScript looks like a self-contained web application made of HTML pages properly styled using CSS and powered by JavaScript logic. If you are familiar with the web paradigm and client-side web development, then you only need to make sense of the Windows 8-specific application programming interface (API) exposed to you via a few JavaScript files to link.
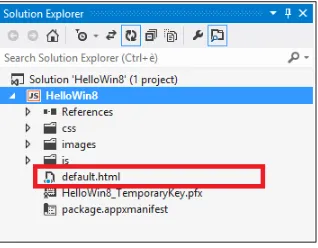
Before compiling the project to see what happens, let’s make some minimal change: Close the default.js file and open up the default.html file, which is responsible for the home page of the application (see Figure 1-14). To open a file that is part of the current project, you locate the file by name in the Solution Explorer panel and then double-click it. In general, if you need to open a file that is not included in the project for your reference, then you might want to use the Open item on the File menu.
The body of the sample HTML page is all here:
<body>
<p>Content goes here</p> </body>
Let’s just replace the placeholder text with some custom text. For example:
<body>
<p> Hello, Windows 8!<p> </body>
In HTML, the <body> element indicates the entire content of a page. The <p> element, instead, defines a paragraph of text. The net effect of the change is making the page display the text “Hello, Windows 8.”
The next step is building the application and admiring it in action live.
Admiring the app in action
To build the application, you hit F5 or click Build | Start Debugging. Debugging is the action of finding and fixing errors in computer programs. However, the sequence Build+Debugging more generally refers to giving the application a try. You launch the application and interact with it to see if it behaves as you expect.
For an even quicker start, you can click the Play button in the toolbar, as shown in Figure 1-15.
FIGURE 1-15 Starting the debug of the application.
The Debug option in Figure 1-15 refers to the way in which the compiler produces the code. In debug mode, the binaries include additional information that allows you to set breakpoints on specific lines of code and proceed step by step. A breakpoint is a line of code where execution will pause. You typically use breakpoints to stop execution at a given point and investigate the state of the application and its internal data. You can have multiple breakpoints in the program. The Release mode is required for finished applications ready for distribution. In the book, you’ll be using the Debug mode predominantly.
Figure 1-16 shows the application in action on the local machine.
FIGURE 1-16 The HelloWin8 app in action.
If you run the application in the simulator, then the application runs in a separate window you can control at will. When you run it on the local machine, then the app runs full screen and it is not immediately apparent what you need to do to get back to Visual Studio to terminate the app. Here’s how to exit the application: move the mouse towards the left border until you see a window icon to click to return to the desktop mode. To terminate the app, you then click the Stop button that has replaced the Play button in the Visual Studio user interface.
You’re done. But it was way too simple, wasn’t it? So let’s make the sample application more colorful and add a bit of action too.
Adding a bit more action
Create a new project and name it HelloWin8-Step2. First, you’ll make it more colorful by simply adding more HTML elements and style information. Next, you will transform it into a simple but fully functional application that generates a random number.
Adding style to the page
<body> <header>
Start Here! Build <b>Windows 8</b> Applications with <b>HTML5</b> and <b>JavaScript</b>
<hr /> </header> <footer> <hr />
Dino Esposito | Francesco Esposito </footer>
</body>
Now let’s proceed with colors and fonts. The style of the page is defined in the default.css file from the CSS folder. By editing a CSS file, you can change nearly everything in a HTML page that has to do with appearance and layout. You’ll find a summary of what’s important to know about CSS in Chapter 3, “Making sense of CSS.”
In the default.css file, you initially find something like below:
body { }
This code describes the style to be applied to the tag body of any page that links the CSS file. You can edit the CSS file manually or you can create CSS styles using a builder tool available in Visual Studio. To use the tool, right-click a CSS element (that is, body) and select Build Style, as shown in Figure 1-17.
Here’s a modified style for the page body that changes the background color and adds a bit of space around the content:
body {
background-color: #1649AD; padding: 10px;
}
You can also customize the header and footer elements slightly to define the color of the text, font size, and a vertical offset, as shown below:
header {
font-size: x-large; color: #ffffff; padding-bottom: 50px; }
footer {
font-size: large; color: #eeee00; padding-top: 50px; }
Now run the application and be proud of it! (See Figure 1-18.)
FIGURE 1-18 The application running with a modified style.
Generating a random number
First off, add the following markup to the body of the page in default.html. The markup consists of two DIV blocks containing the placeholder for generated number and the button to click to get a new number. You insert the following markup between the header and footer elements:
<div>
<label id="numberLabel">?</label> </div>
<div>
<input id="numberButton" type="button" value="Get number" /> </div>
Next, open the default.js file and add the following JavaScript functions at the bottom of the file:
function numberButtonClick() { var number = generateNumber();
document.getElementById("number").innerHTML = number; }
function generateNumber() {
var number = 1 + Math.floor(Math.random() * 1000); return number;
}
The first function is the handler for the click event on the button. The second function just generates and returns a random number between 1 and 1000. The final step consists of binding the click handler to the actual button in the HTML markup. There are a number of ways to do this, the simplest of which is shown below:
<input id="numberButton" type="button" value="Get number" onclick="numberButtonClick()" />
A more elegant way—and the recommended way of doing it in Windows 8 programming— consists of making the binding dynamically as the page is loaded. So open the default.js file and modify the code of the app.onactivated function, as shown below:
app.onactivated = function (args) {
if (args.detail.kind === activation.ActivationKind.launch) { if (args.detail.previousExecutionState !==
activation.ApplicationExecutionState.terminated) {
// TODO: This application has been newly launched. Initialize // your application here.
document.getElementById("numberButton").addEventListener( "click", numberButtonClick)
} else {
}
args.setPromise(WinJS.UI.processAll()); }
};
In the end, you just add one line to run when the application has been newly launched. The line just registers a handler for any click event raised by the specified button.
You can give the final touch to the application with a second pass on CSS to adjust the rendering of the label and button. Add the following to the default.css file:
#numberButton {
font-size: x-large; }
#numberLabel {
font-size: xx-large; color: #eeee00; font-weight: bold; }
The leading pound (#) symbol indicates that the style applies to any HTML element whose ID matches the name—for example, the style defined as #numberButton applies to all elements with an ID of numberButton. Figure 1-19 shows the modified application in action.
FIGURE 1-19 A Windows 8 application to get random numbers.
Summary
This chapter provided a step-by-step guide to getting ready for Windows 8 programming. You started with the operating system and tools necessary for writing code, then installed and configured Visual Studio 2012 Express edition for Windows 8, and finally played a bit with the simplest type of application.
Chapter 2
Making sense of HTML5
Broadly speaking, the short words are the best, and the old words best of all. —Winston Churchill
H
TML5 is the latest version of the HTML language—the popular text-based language used to define the content of webpages. HTML appeared on the scene in the early 1990s. In the beginning it was merely a markup language apt at describing simple documents. A markup language is a language based on a set of markers that wrap text and give it a special meaning.Initially, the set of HTML markup elements, called “tags” or (better) “elements,” was fairly limited. It contained elements to define references to other documents and headings, to link to images and paragraphs, and apply basic text styling such as bold or italic. Over the years, however, the role of HTML grew beyond imagination, progressing from being a simple language that described documents to a language used to define the user interface of web applications. That trend continues today with HTML5.
The latest version of HTML5 removes some of the older elements and makes it easier to keep elements that provide style information in one place, and elements that provide text and define the layout of the text, in another place. As you’ll see in more detail in the next chapter, style information can be defined through a special distinct file known as a Cascading Style Sheet (CSS). In addition, HTML5 adds some new elements suitable for including multimedia content and drawing, and several new frameworks for manipulating the content of the page programmatically.
With HTML5 alone, you still won’t be able to go too far toward building a complete application. However, the union of HTML5, CSS, and JavaScript functions as a close approximation to a full programming language.
■ You use HTML5 to define the layout of the user interface and to insert text and multimedia.
■ You use CSS to add colors, style, and shiny finishes.
in particular, is the collection of programmable objects that expose the structure of the current document to coders.
In the rest of this chapter, you’ll briefly explore the basics of the HTML5 markup elements, including input forms and multimedia. Neither this chapter nor the rest of the book covers every aspect of the basics of HTML. If you need a refresher on the fundamentals of HTML, you can refer to the book Start Here! Learn HTML5, by Faithe Wempen (Microsoft Press, 2012).
Important This chapter and the next two provide an overview of HTML, CSS, and JavaScript. In these chapters, you’ll get acquainted with new key elements of HTML5 and CSS3 and receive an end-to-end coverage of common programming techniques you use
in JavaScript. The content of these chapters is not specific to Windows 8 apps; it is instead
meant to be preliminary to upcoming chapters where you’ll be using ad hoc elements from the WinJs library in a basic HTML skeleton, using custom CSS for graphics and custom JavaScript for behavior.
Elements of a webpage
HTML5 comes about a decade after its most recent predecessor (HTML4). Looking at what’s new in HTML5, one could reasonably say that all these years have not passed in vain. HTML5 provides a set of new elements that offer several native functionalities that developers and designers used to have to code via artifacts and ingenious combinations of existing elements. Here’s a quick look at what’s relevant to creating a webpage with HTML5.
Building the page layout with HTML5
FIGURE 2-1 Different HTML page layouts.
Developers have been smart enough to build such complex layouts using basic HTML block elements such as DIV.
Note In HTML, a block element is an element whose content is rendered between two line breaks—one before and one after the content. Therefore, the content displays as a stand-alone “block” of content. One popular block element is H1, which renders some text as a
first-level heading. TheDIV element is another popular block element aimed at creating blocks out of any valid HTML content. Block elements are opposed to inline elements,
namely elements whose content flows with the rest of the page with no line breaks applied.
Important Note that in this book, as well as in other books and articles, truly common HTML elements, such as <div> and <h1> often appear in text written without the brackets. However, the use of the angle brackets is mandatory if you are using those elements within HTML itself.
In HTML5, the multicolumn layout is recognized as a common layout and therefore gets full support via several new ad hoc markup elements.
preparing the sample application
Open up Visual Studio and create a new blank application. Name it Html5-Demos. When done, add the following code to the body of default.html so that it serves as the main menu for navigating into all of the sample HTML5 pages you’ll write throughout the chapter.
<body> <header>
Start Here! Build <b>Windows 8</b> Applications with <b>HTML5</b> and <b>JavaScript</b>
<hr />
HTML5 samples </header>
<div id="links">
<a href="pages/multi.html">MULTI</a>
<!-- Add here more links to HTML pages as we proceed in the chapter. --> </div>
<footer> <hr />
Dino Esposito | Francesco Esposito </footer>
</body>
Figure 2-2 shows the aspect of the resulting application. By clicking the links (such as, the MULTI link in the figure below) you force the operating system to open the webpage into Internet Explorer 10—the native browser in Windows 8.
FIGURE 2-2 The home page of the sample application for this chapter.
From generic blocks to semantic elements
A large share of websites out there have a common layout that includes header and footer, as well as a navigation bar on the left of the page. More often than not, these results are achieved by using DIV elements styled to align to the left or the right.
Let’s add a new HTML page to the project: right-click the project node in Solution Explorer and choose Add | New Item from the subsequent flyout menu. What you get next is the window shown in Figure 2-3. From that window, you then choose a new HTML page and save it as multi.html.
FIGURE 2-3 Creating a new HTML page in Visual Studio.
Next, from within Visual Studio double-click the newly created HTML page and replace the content with the following markup.
<!DOCTYPE html> <html>
<head>
<title>MULTI-COLUMN LAYOUT</title> </head>
<body>
<a href="/default.html">Back</a> <hr />
<div id="page"> <div id="header"> Header of the page <hr />
</div>
<ul>
<li> Home </li> <li> Find us </li>
<li> Job opportunities </li> </ul>
</div>
<div id="container"> <div id="left-sidebar"> Left sidebar
<ul>
<li> Article #1 </li> <li> Article #2 </li> <li> Article #3 </li> </ul>
</div>
<div id="content">
This is the main content of the page </div>
<div id="right-sidebar"> Right sidebar
</div> </div>
<div id="footer"> <hr />
Footer of the page </div>
</div> </body> </html>
FIGURE 2-4 The multi.html page as it is rendered by Internet Explorer 10.
The preceding markup alone, however, doesn’t produce the expected results and the page doesn’t really show any multicolumn layout. For that, you need to add ad hoc graphic styles to individual DIV elements to make them float and anchor to the left or right edge. You add graphic style to an HTML page using CSS markup, placed in a CSS file. The next chapter provides a quick summary of CSS. The real point of this demo is a little different.
As you can see, each DIV element is made distinguishable from others only by the name of the id attribute. Yet, each DIV element plays a clear role that makes it fairly different from others—header is different from footer, and both are different from left or right sidebars.
Header and footer elements
HTML5 brings a selection of new block elements with specific names and clear behavior. The set of new elements was determined by looking at the most common layouts used by page authors. For example, in HTML5 header and footer are new plain block elements you use to indicate a header and footer. Similar elements exist for most of the semantic elements in the previous listing. Here’s how you can rewrite the page multi.html using only HTML5-specific elements. Name this page multi5.html. The listing below shows the content of the body tag for the new page.
<header>
Header of the page <hr />
</header> <nav>
<a href="..."> Home </a> <a href="..."> Find us </a>
<a href="..."> Job opportunities </a> </nav>
<article> <aside>
<ul>
<section> Introduction </section> <section> First section </section> <section> Second section </section> </article>
You can insert header and footer using specific elements with a very simple syntax, as below:
<header> Markup </header> <footer> Markup </footer>
It is interesting to notice that you can have multiple header and footer elements in a HTML5 page. The most common use is to give the page a header and footer. However, you should consider these elements as blocks meant to represent heading content of a page or a section of a page and footers.
Section and article elements
HTML5 defines two similar-looking elements to represent the content of a page. The <section> element is slightly more generic, as it is meant to delimit a logical section of a HTML page. A logical section can be the content of a tab in a page designed as a collection of tabs.
At the same time, a logical section can also be a portion of the main content being displayed in the page. In this case, the section element is likely embedded in an <article> element.
<article>
<h1>Article #1</h1> <hr />
Note Elements such as <section>, <article>, <header>, and <footer> are semantic elements,
in the sense that browsers treat them as block elements. If you look at final results, there’s
nearly no difference between semantic elements and plain DIV elements. The most
significant difference is in the expressivity of the resulting markup. By using <section>,
<article>, <header>, and <footer> elements, the resulting markup is much easier to read, understand, and maintain over time.
The
aside
element
A lot of HTML pages display part of their content on columns that lie side by side horizontally. The <aside> element has been introduced in HTML5 to quickly identify some content that is related to the content being displayed all around. The syntax of the <aside> element is straightforward:
<aside> Markup </aside>
A very common scenario where you might want to take advantage of the<aside> element is to define a sidebar in an article element and, more in general, to create multicolumn layouts for the content of the page or sections of the page.
The
nav
element
The <nav> element indicates a special section of the page content—the section that contains major navigation links. It should be noted that not all links you can have in a HTML page must be defined within a <nav> element. The <nav> element is reserved only for the most relevant links, such as those you would place on the main page navigation menu.
The syntax of the <nav> element is fairly intuitive. It consists of a list of <a> anchor elements listed within the <nav> element:
<nav>
<a href="..."> Home </a> <a href="..."> Find us </a>
<a href="..."> Job opportunities </a> </nav>
The <nav> element plays an important role in HTML5 because it indicates the boundaries of the section of the page that contains navigation links. This allows special page readers—such as browsers for disabled users—to better understand the structure of the page and optionally skip some content.
Miscellany of other new elements
Semantic block elements represent the largest family of new elements in HTML5. As mentioned, semantic elements are important not so much for the effect they produce in the page but because they increase the readability of the page significantly for developers, software, and especially browsers for disabled users.
Semantic block elements alone do not produce significant changes in the way in which HTML5-compliant browsers render the page. For example, to color and position a sidebar (that is, the <aside> element) where you like you still need to resort to CSS settings. However, using semantic elements reduces the noise of having too many generic DIV block elements whose role and scope is not immediately clear.
In addition to semantic elements, HTML5 provides a few new elements with an embedded behavior that couldn’t be obtained in earlier versions of HTML without resorting to a combination of CSS, markup, and JavaScript. Let’s see a few examples.
The
details
element
Many times you have small pieces of content in a page that you want to show or hide on demand. A good example is the title of some news and its actual content. Sometimes you want to display only the title but want to leave users free from clicking to expand the content and hide it to gain more space.
Before HTML5, you had to code all of this manually using a bit of HTML, CSS, and JavaScript code. In HTML5, the entire logic is left to the browser and all you have to do is type the following in an HTML page.
<details open>
<summary>This is the title</summary> <div>
This is the text of the news and was initially kept hidden from view </div>
</details>
The <details> element is interpreted by the browser and used to implement a collapsible panel. The open attribute indicates whether you want the content to be displayed initially or not. The <summary> child element indicates the text for the clickable placeholder, whereas the remaining content is hidden or shown on demand. Note that all parts of the <details> element can be further styled at will using CSS.
Important Although the Visual Studio editor recognizes the <details> element and even offers IntelliSense for it, the element is not supported by Internet Explorer 10. Other
HTML5-compliant browsers, however, do support it—specifically the latest versions of
The
mark
element
HTML5 also adds the <mark> element as a way to highlight small portions of text as if you were using a highlighter on a paper sheet. Using the <mark> element is easy; all you do is wrap some text in the <mark> element, as shown below:
The <mark>DETAILS</mark> element is not supported by Internet Explorer 10.
The entire text is rendered with default settings except the text enclosed in the <mark> element. Most HTML5 browsers have default graphical settings for marked text. Most commonly, these settings entail a yellow background. Needless to say, graphical effects of the <mark> element can be changed at will via CSS.
Figure 2-5 shows how the previous text looks using Internet Explorer 10.
FIGURE 2-5 The mark element in action.
The
dataList
element
For a long time, HTML developers asked loudly for the ability to offer a list of predefined options for a text field. The use-case is easy to figure out. Imagine a user required to type the name of a city in a text field. As a page author, you want to leave the user free of entering any text; at the same time, though, you want to provide a few predefined options that can be selected and entered with a single click. Up until HTML5, this feature had to be coded via JavaScript, as HTML provided only two options natively: free text with no auto-completion or a fixed list of options with no chance of typing anything. The new <datalist> element fills the gap. Copy the following text to the body of a new HTML page named datalist.html.
<input list="cities" /> <datalist id="cities"> <option value="Rome"> <option value="New York"> <option value="London"> <option value="Paris"> </datalist>
<input> element: the list attribute. The attribute gets the name of a <datalist> element to be used as the source of the input options.
When the input field gets the input focus, then the content of the <datalist> element is used to autocomplete what the user is typing. Figure 2-6 shows the element in action on Internet Explorer.
FIGURE 2-6 The datalist element in action.
elements removed from older HTML versions
HTML5 adds some new elements, but also removes a few elements whose presence would only increase redundancy once combined with the new capabilities of CSS and new elements in HTML5.
The list of elements no longer supported most notably includes frame and font elements. It should be noted, though, that the <iframe> element remains available.
In addition, a few style elements such as <center>, <u>, and <big> are removed. The reason is that this functionality can be achieved easily through CSS. Probably due to the much larger use that page authors made over the years, HTML5 still supports elements such as <b> (for bold text) and <i> (for italic text) that are logically equivalent to the now unsupported <u> and <big> elements.
Collecting data
HTML was originally devised to be a language for creating hypertext documents. Over the years, the language has been enriched with layout capabilities and basic features to collect data. Writing input forms to collect data from users proved to be a nontrivial task. One thing is to collect plain text; it is quite another to collect a date, a number, or an email address.
For too many years, HTML has only offered input text fields completely unable to distinguish numbers, dates, and email addresses from plain text. Subsequently, page developers were responsible for preventing users from typing unwanted characters and for client validation of the entered text.
Adjusting input fields
In HTML5, you still create an input form by using the same markup elements you used from earlier versions of the language. In other words, the following markup will still give you the opportunity to upload any typed content to the given server.
<form action="http://www.yourserver.com/upload"> <span> Your name </span>
<input type="text" value="" /> <input type="submit" value="Save" /> </form>
The <input> element is the element that inserts a graphical element (such as, an input box or a drop-down list) to collect some input data. You also use the <input> element to add a push button to start the submission process to the server. In HTML5, the <input> element comes with more options for the type of input boxes. For example, you can have date pickers, sliders, and search boxes offered by the browser. At the same time, the browser provides free form validation for most common scenarios, such as when a field is required and can’t be left empty by the user.
New input types
If you look at the HTML5 syntax of the <input> element, the major difference with past versions is the list of values now allowed for the type attribute. Table 2-1 lists some of the new input types supported in HTML5.
TABLE 2-1 HTML5 specific values for the type attribute
Value Description
Color Meant to let the browser display any UI that allows entry of a color. Note: This input type is not supported on Internet Explorer 10.
date Meant to let the browser display any UI that allows entry of a date.
email Meant to let the browser display any UI that allows entry of an email address.
number Meant to let the browser display any UI that allows entry of a numeric input.
range Meant to let the browser display any UI that allows entry of a numeric input.
search Meant to let the browser display any UI that allows entry of a text to be searched for.
tel Meant to let the browser display any UI that allows entry of a telephone number.
time Meant to let the browser display any UI that allows entry of a time.
url Meant to let the browser display any UI that allows entry of a URL.
Note that the list in Table 2-1 is incomplete and limited to input types that you can really find supported today on some web browsers. Other input types (for example, week) are part of the current HTML5 draft but are not implemented anywhere. You might want to refer to
What you can really expect from browsers
What you have read in Table 2-1 represents the HTML5 standard that browsers are expected to comply with by the time the standard is officially approved and promulgated. At this time, Opera and Chrome are likely the browsers that offer the best support for the current draft of HTML5. In general, the support for HTML5 you can currently get from all browsers is not uniform.
The point is that HTML5 is not yet an approved standard and won’t be definitive for a few more years. At the same time, companies are eager to use HTML5 goodies in real websites and applications. Websites and applications, however, require compliant browsers. As you can imagine, this situation determines a sort of catch-me game between browser vendors. Each new release of browsers improves support for the HTML5 standard or makes it more adherent to the actual standard, removing possible features resulting from misinterpretation of older drafts.
HTML5 is not going to be something unambiguously defined for a few more years. Internet Explorer 10—the browser you find integrated in Windows 8—improves significantly the sup -port for HTML5 over Internet Explorer 9. Note that in Windows 8 you find two flavors of the Internet Explorer browser—the classic version, which builds on top of Internet Explorer 9, and the version with the native Windows 8 look-and-feel. This version, in particular, lacks the ability to run plug-ins (specifically, Flash and Silverlight) and organize favorites in folders.
Making input fields auto-focusable
HTML5 provides the definitive solution to a couple of common problems that developers faced for years and solved using a bit of JavaScript code. The first of these problems relates to giving the input focus to an input field.
Using JavaScript, you can tell the browser to assign the input focus to a particular input field upon display of the page. In HTML5, you can use a new attribute for the <input> element—the autofocus attribute. Try placing the following code in the body of a new HTML page named autofocus.html.
<form>
<input type="text" value="Dino" /> <input type="text" autofocus /> <br />
<input type="submit" value="Save" /> </form>