Bluetooth Low Energy in Android
Java
1st Edition
Tony Gaitatzis
BackupBrain Publishing, 2017
ISBN: 978-1-7751280-1-4
Bluetooth Low Energy in Android
Java
by Tony Gaitatzis
Copyright © 2015 All Rights Reserved
All rights reserved. This book or any portion thereof
may not be reproduced or used in any manner
whatsoever without the express written permission of
the publisher except for the use of brief quotations in a
book review. For permission requests, write to the
publisher, addressed “Bluetooth Android Book Reprint
Request,” at the address below.
[email protected]
This book contains code samples available under the
MIT License, printed below:
Software without restriction, including without
limitation the rights to use, copy, modify, merge,
publish, distribute, sublicense, and/or sell copies of the
Software, and to permit persons to whom the Software
is furnished to do so, subject to the following
conditions:
The above copyright notice and this permission notice
shall be included in all copies or substantial portions of
the Software.
THE SOFTWARE IS PROVIDED "AS IS",
WITHOUT WARRANTY OF ANY KIND, EXPRESS
OR IMPLIED, INCLUDING BUT NOT LIMITED TO
THE WARRANTIES OF MERCHANTABILITY,
FITNESS FOR A PARTICULAR PURPOSE AND
NONINFRINGEMENT. IN NO EVENT SHALL THE
AUTHORS OR COPYRIGHT HOLDERS BE
LIABLE FOR ANY CLAIM, DAMAGES OR
Dedication
To Sierra, for lending me a phone
Preface
Thank you for buying this book. I’m excited to have
written it and more excited that you are reading it.
I started with Bluetooth Low Energy in 2011 while
making portable brain imaging technology. Later,
while working on a friend’s wearable electronics
startup, I ended up working behind teh scenes on the
TV show America’s Greatest Makers in the Spring of
2016.
Coming from a web programming background, I found
the mechanics and nomenclature of BLE confusing and
cryptic. A er immersing myself in it for a period of
time I acclimated to the di erences and began to
appreciate the power behind this low-power
technology.
Unlike other wireless technologies, BLE can be
project! Because of its low power and short data
transmissions, it is great for transmitting bite size
information, but not great for streaming data such as
sound or video.
Section 1
Conventions Used in this Book
Every developer has their own coding conventions. I
personally believe that well-written code is
self-explanatory. Moreover, consistent and organized
coding conventions let developers step into each
other’s code much more easily, enabling them to
reliably predict how the author has likely organized
and implemented a feature, thereby making it easier to
learn, collaborate, fix bugs and perform upgrades.
The coding conventions I used in this book is as
follows:
Inline comments are as follows:
// inline comments
Multiline comments follow the JavaDoc standard:
/**
* It features more than one line of comment */
Constants are written in all capitals:
public static final int CONSTANT_NAME = 0x01;
Local variables are written in Camel Case:
int MemberVariableName = 1;
Member variables are written in Camel Case with a
lowercase “m” preceding the name.
private int mMemberVariableName = 1;
void shortFunction() { }
void superLongFunctionName(int parameterOne, int parameterTwo) {
... }
Class names are in Camel Case with the first character
in upper case
public ClassName { ...
}
Long lines will be broken with a backslash ( \ ) and the
next line will be indented:
static final String
CHAPTER 1
Introduction
In this book you will learn the basics of how to
program Central and Peripheral devices that
communicate over Bluetooth Low Energy using Java
on Android. These tutorials will culminate in three
projects:
A Beacon and Scanner
A Echo Server and Client
A Remote Controlled Device
Through the course of the book you will learn
important concepts that relate to:
Common paradigms for handling data
This book is an excellent read for anyone familiar with
Android programming, who wants to build an Internet
of Things device or a tool that communicates with a
Bluetooth device.
Overview
Bluetooth Low Energy (BLE) is a digital radio
protocol. Very simply, it works by transmitting radio
signals from one computer to another.
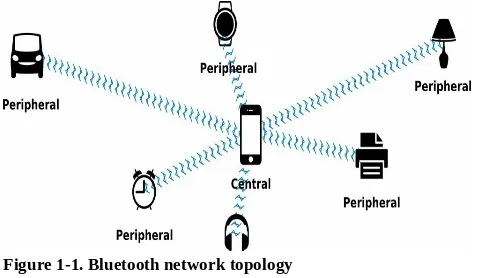
Bluetooth supports a hub-and-spoke model of
connectivity. One device acts as a hub, or “Central” in
Bluetooth terminology. Other devices act as
“Peripherals.”
A Central may hold several simultaneous connections
with a number of peripherals, but a peripheral may
Figure 1-1. Bluetooth network topology
For example, your smartphone acts as a Central. It may
connect to a Bluetooth speaker, lamp, smartwatch, and
fitness tracker. Your fitness tracker and speaker, both
Peripherals, can only be connected to one smartphone
at a time.
The Central has two modes: scanning and connected.
The Peripheral has two modes: advertising and
Advertising
A Peripheral advertises by advertising its device name
and other information on one radio frequency, then on
another in a process known as frequency hopping. In
doing so, it reduces radio interference created from
reflected signals or other devices.
Scanning
Similarly, the Central listens for a server’s
advertisement first on one radio frequency, then on
another until it discovers an advertisement from a
Peripheral. The process is not unlike that of trying to
find a good show to watch on TV.
Each device has a unique media access control address
(MAC address) that identifies it on the network.
Peripherals advertise this MAC address along with
other information about the Peripheral’s settings.
Connecting
A Central may connect to a Peripheral after the Central
has seen the Peripheral’s advertisement. The
connection involves some kind of handshaking which
is handled by the devices at the hardware or firmware
level.
While connected, the Peripheral may not connect to
any other device.
Disconnecting
Communication
A Central may send and request data to a Peripheral
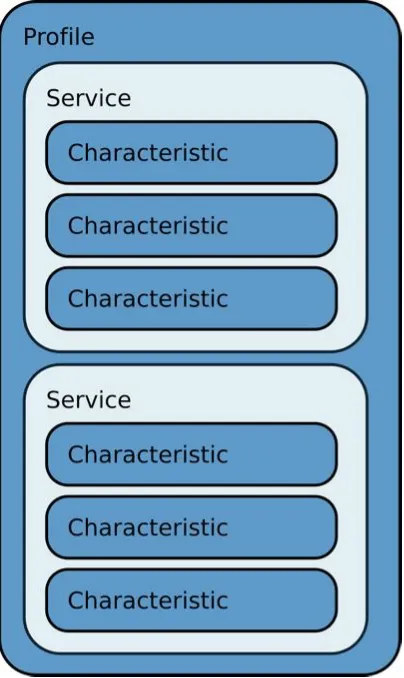
through something called a “Characteristic.”
Characteristics are provided by the Peripheral for the
Central to access. A Characteristic may have one or
more properties, for example READ or WRITE. Each
Characteristic belongs to a Service, which is like a
container for Characteristics. This paradigm is called
the Bluetooth Generic Attribute Profile (GATT).
Figure 1-2. Example GATT Structure
To transmit or request data from a Characteristic, a
Central must first connect to the Characteristic’s
Service.
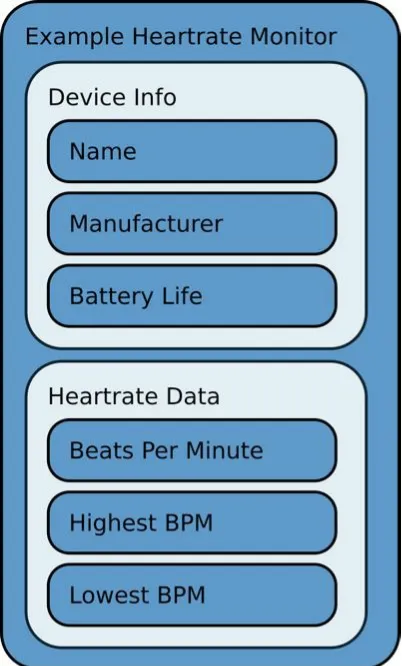
For example, a heart rate monitor might have the
Figure 1-3. Example GATT structure for a heart monitor
In order to retrieve the battery life of the Characteristic,
the Central must be connected also to the Peripheral’s
“Device Info” Service.
To reiterate, a Characteristic is a field that can be
written to or read from. A Service is a container that
may hold one or more Characteristics. GATT is the
layout of these Services and Characteristics.
Characteristic can be written to or read from.
Byte Order
Bluetooth orders data in both Big-Endian and
Little-Endian depending on the context.
During advertisement, data is transmitted in Big
Figure 1-4. Big Endian byte order
Data transfers inside the GATT however are
transmitted in Little Endian, with the least significant
byte at the end (
Figure 1-5
).
Figure 1-5. Little Endian byte order
Permissions
Descriptors
Descriptors describe the configuration of a
Characteristic. The only one that has been specified so
far is the “Notification” flag, which lets a Central
subscribe to Notifications.
UUIDs
A UUID, or Universally Unique IDentifier is a very
long identifier that is likely to be unique, no matter
when the UUID was created or who created it.
BLE uses UUIDs to label Services and Characteristics
so that Services and Characteristics can be identified
accurately even when switching devices or when
several Characteristics share the same name.
UUIDs are usually 128-bit strings and look like this:
ca06ea56-9f42-4fc3-8b75-e31212c97123
But since BLE has very limited data transmission,
16-bit UUIDs are also supported and can look like this:
0x1815
Each Characteristic and each Service is identified by its
own UUID. Certain UUIDs are reserved for specific
purposes.
For example, UUID 0x180F is reserved for Services
that contain battery reporting Characteristics.
Similarly, Characteristics have reserved UUIDs in the
Bluetooth Specification.
For example, UUID 0x2A19 is reserved for
Characteristics that report battery levels.
A list of UUIDs reserved for specific Services can be
found in
Appendix IV: Reserved GATT Services.
Characteristics.
If you are unsure what UUIDs to use for a project, you
are safe to choose an unassigned service (e.g. 0x180C)
for a Service and generic Characteristic (0x2A56).
Although the possibility of two generated UUIDs being
the same are extremely low, programmers are free to
arbitrarily define UUIDs which may already exist. So
long as the UUIDs defining the Services and
Characteristics do not overlap in the a single GATT
Profile, there is no issue in using UUIDs that exist in
other contexts.
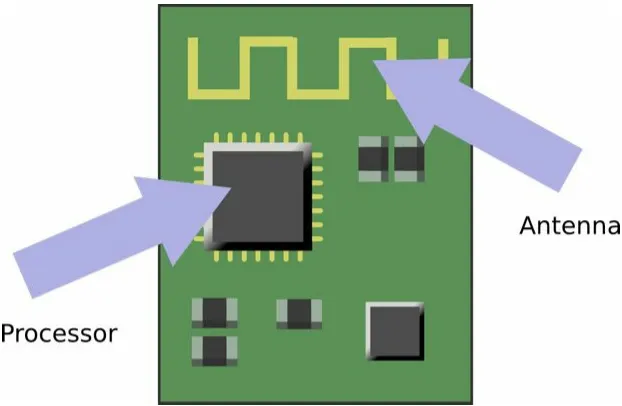
Bluetooth Hardware
Figure 1-6. Parts of a Bluetooth device
The antenna transmits and receives radio signals. The
processor responds to changes from the antenna and
controls the antenna’s tuning, the advertisement
message, scanning, and data transmission of the BLE
device.
Power and Range
As with any radio signal, the quality of the signal drops
dramatically with distance, as shown below (
Figure
1-7
).
Figure 1-7. Distance versus Bluetooth Signal Strength
This signal quality is correlated the Received Signal
Strength Indicator (RSSI).
If the RSSI is known when the Peripheral and Central
are 1 meter apart (
A
), as well as the RSSI at the current
distance (
R
) and the radio propagation constant (
n
).
The distance betweeen the Central and the Peripheral
in meters (
d
) can be approximated with this equation:
d≈10A-R10n
The radio propagation constant depends on the
in a poor environment and 4.3 in an ideal environment.
Take for example a device with an RSSI of 75 at one
meter, a current RSSI reading 35, with a propagation
constant of 3.5:
d≈1075-3510×3.5
d≈104035
d≈14
CHAPTER 2
Introducing Android
Android makes it easy for developers to get into
making apps because it doesn’t have any developer
registration costs, and there is no vetting process for
publishing apps.
That means developers can produce apps and share
them with their friends without a lot of work.
Android, as with all modern smartphones, is designed
to support Bluetooth Low Energy.
We will be using Android to learn how to
communicate between the Android and the Arduino
using Bluetooth Low Energy (BLE). Although the
examples in this book are relatively simple, the app
Android Studio can be downloaded
from
http://developer.android.com/sdk
.
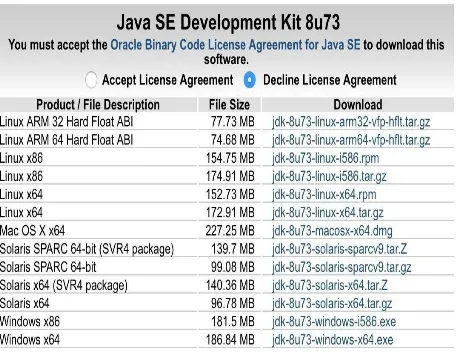
Although Android Studio is easy to download, it can be
complicated to install, because it relies on the Java
Development Kit (JDK).
At the time of this writing, you must download JDK 7
or higher, available
at
Figure 2-1. Java Development Kit versions
Accept the License Agreement and choose the link that
matches your system platform.
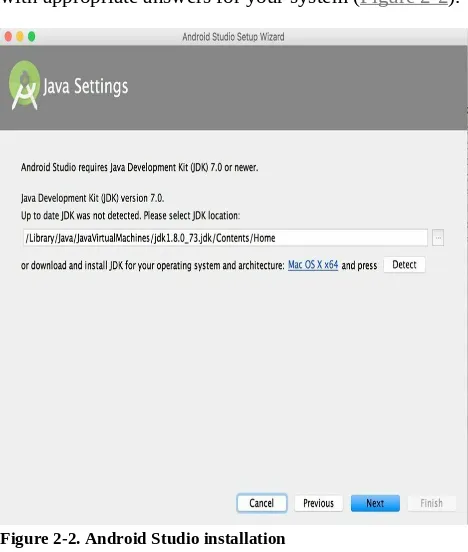
Install the JDK, then install Android Studio.
with appropriate answers for your system (
Figure 2-2
).
Figure 2-2. Android Studio installation
Figure 2-3. Starting a new Android project
Low Energy Android Apps.
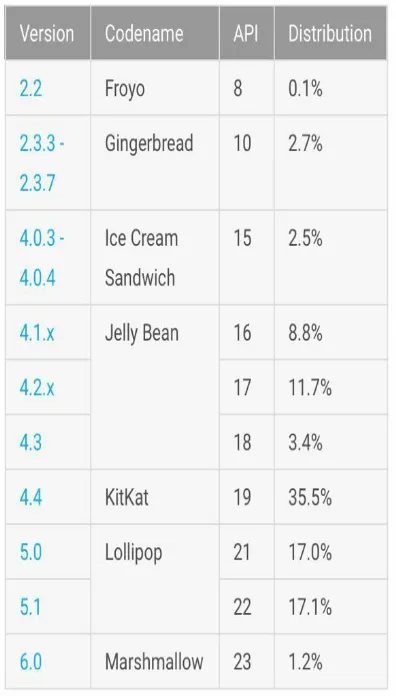
API Compatibility
Android phones were first created by Google in 2008.
Periodically, Google periodically releases updates that
enable newer or more advanced features to be
programmed. Each feature release is called an API
level. Higher API levels have newer and more
improved features but take time before users adopt
them. Therefore, not every user has access to the
newest features.
Bluetooth Low Energy was implemented in Android
API level 18. At the time of this writing, the latest API
level is 23, which corresponds to user version 6,
non-exhaustive list of supported hardware is available
in Appendix VII: Android Peripheral Mode Support.
When the latest API level is used for development
fewer people can use the program. When an older API
level is used, more people can use the program but
fewer features are supported. For this reason, choosing
an API level is a tension between supporting more
users and supporting more features.
We will support Android API level 18 and higher for
Central mode, and API level 21 or higher for
Peripheral mode. These are the oldest version of the
Android API that supports Bluetooth Low Energy but
has the most compatible devices.
Figure 2-4. Android IDE Distribution. Source:
Android
CHAPTER 3
Bootstrapping
The first thing to do in any software project is to
become familiar with the environment.
Because we are working with Bluetooth, it’s important
to learn how to initialize the Bluetooth radio and report
what the program is doing.
Both the Central and Peripheral talk to the computer
over USB when being programmed. That allows you to
report errors and status messages to the computer when
the programs are running (
Figure 3-1
).
Programming the Central
This chapter details how to create a Central App that
turns the Bluetooth radio on. The Bluetooth radio
requires permission to use and might be off by default.
The first thing to do before working with Bluetooth
Low Energy in Android is to enable it. This is a
two-step process:
•
Request the Bluetooth Feature
•
Enable Bluetooth Hardware
Request Bluetooth Feature
Every time you access hardware on Android, first
request access in the Android Manifest. Put the
following two lines in the Manifest between the
<manifest></manifest> tags.
Example 3-1. manifests/AndroidManifest.xml
<uses-feature
android:name="android.hardware.bluetooth_le" android:required="true" />
<uses-permission android:name="android.permission.BLUETOOTH"/> ...
Enable Bluetooth
To turn on Bluetooth:
Ask the Application if the BLE feature exits;
Grab the Bluetooth Manager; and then
Grab the Bluetooth Adapter.
...
// Does the BLE feature exist? if
(getPackageManager().hasSystemFeature(PackageManager.FEATURE_BLUETOOTH_LE))
{
final BluetoothManager bluetoothManager =
(BluetoothManager)getSystemService(Context.BLUETOOTH_SERVICE); // get Bluetooth Adapter
BluetoothAdapter bluetoothAdapter = bluetoothManager.getAdapter(); }
...
This can be done in the onCreate() method of the
Activity. If Bluetooth Low Energy is not supported by
the hardware, an error will happen then.
Check if Bluetooth is Enabled
The user might turn the Bluetooth radio off any time.
Therefore, every time the Application resumes, the
Activity needs to check if check if Bluetooth is still
enabled or has been disabled, using this function.
The Activity can alert the user that the Bluetooth Radio
is off, or the it can ask the user to to enable it. The
Activity can enable Bluetooth programmatically using
the BluetoothAdapter.ACTION_REQUEST_ENABLE
Intent.
Example 3-2. java/example.com.exampleble/MainActivity.java
private final static int REQUEST_ENABLE_BT = 1; if (bluetoothEnabled) {
Intent enableBtIntent = new
Intent(BluetoothAdapter.ACTION_REQUEST_ENABLE);
startActivityForResult(enableBtIntent, REQUEST_ENABLE_BT); }
It takes a moment for Bluetooth to turn on. To prevent
trying to access Bluetooth before it’s ready, the
IntentFilter filter = new
IntentFilter(BluetoothAdapter.ACTION_STATE_CHANGED); registerReceiver(mReceiver, filter);
private final AdvertiseReceiver mReceiver = new AdvertiseReceiver() { @Override
public void onReceive(Context context, Intent intent) { final String action = intent.getAction();
break;
case BluetoothAdapter.STATE_TURNING_ON: break;
} } } };
To turn on Bluetooth within the App, the
BLUETOOTH_ADMIN permission must be requested
in the Manifest. Do this by putting the following line
between <manifest></manifest> in the Manifest.
Example 3-3. manifests/AndroidManifest.xml
<uses-permission
android:name="android.permission.BLUETOOTH_ADMIN"/>
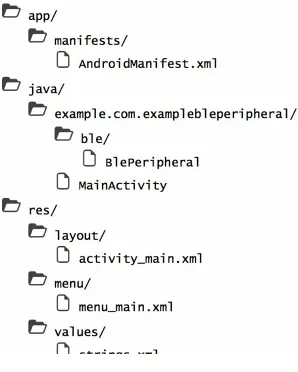
Putting It All Together
Create a new project called ExampleBle. Create
packages and classes so that the project structure
resembles this:
Figure 3-2. Project Structure
The BleCommManager is responsible for general
Android radio functions such as turning the radio on
and off.
private BluetoothAdapter mBluetoothAdapter; // Andrdoid's Bluetooth Adapter
/**
* Initialize the BleCommManager *
* @param context the Activity context
public BleCommManager(final Context context) throws Exception {
final BluetoothManager bluetoothManager = (BluetoothManager) context.getSystemService(Context.BLUETOOTH_SERVICE); mBluetoothAdapter = bluetoothManager.getAdapter();
} /**
* Get the Android Bluetooth Adapter */
public BluetoothAdapter getBluetoothAdapter() { return mBluetoothAdapter;
}
MainActivity will ask BleCommManager to turn the
radio on when the app turns on. When the radio turns
on, or if it is already on, the text in the
mBluetoothStatusTV TextView will be changed to
read “Bluetooth Active.”
Example
3-5. java/example.com.exampleble/ble/MainActivity.java
package example.com.exampleble;
public class MainActivity extends AppCompatActivity { /** Constants **/
private static final String TAG = MainActivity.class.getSimpleName(); private static final int REQUEST_ENABLE_BT = 1;
/** Bluetooth Stuff **/
private BleCommManager mBleCommManager; /** UI Stuff **/
/**
* Load Activity for the first time * @param savedInstanceState */
@Override
protected void onCreate(Bundle savedInstanceState) { super.onCreate(savedInstanceState);
setContentView(R.layout.activity_main);
Toolbar toolbar = (Toolbar) findViewById(R.id.toolbar); setSupportActionBar(toolbar);
@Override
public void onResume() { super.onResume(); initializeBluetooth(); }
@Override
public void onPause() { super.onPause(); try {
unregisterReceiver(mBluetoothAdvertiseReceiver); } catch (IllegalArgumentException e) {
Log.e(TAG, "receiver not registered"); }
}
@Override
public boolean onCreateOptionsMenu(Menu menu) { // Inflate the menu;
getMenuInflater().inflate(R.menu.menu_main, menu); return true;
}
@Override
public boolean onOptionsItemSelected(MenuItem item) { return false;
} /**
* Bluetooth Radio has been turned on. Update UI */
private void onBluetoothActive() {
mBluetoothStatusTV.setText(R.string.bluetooth_active); }
/**
* Initialize the Bluetooth Radio */
public void initializeBluetooth() {
IntentFilter filter =
new IntentFilter(BluetoothAdapter.ACTION_STATE_CHANGED); registerReceiver(mBluetoothAdvertiseReceiver, filter);
try {
mBleCommManager = new BleCommManager(this); } catch (Exception e) {
Toast.makeText(this, "Could not initialize bluetooth", Toast.LENGTH_SHORT).show();
Log.e(TAG, e.getMessage()); finish();
}
// should prompt user to open settings if Bluetooth is not enabled. if (mBleCommManager.getBluetoothAdapter().isEnabled()) { onBluetoothActive();
} else {
Intent enableBtIntent = n
} } /**
* Keep track of changes tho the Bluetooth Radio */
private final AdvertiseReceiver mBluetoothAdvertiseReceiver = new AdvertiseReceiver() {
@Override
public void onReceive(Context context, Intent intent) { final String action = intent.getAction();
if (action.equals(BluetoothAdapter.ACTION_STATE_CHANGED)) {
final int state =
intent.getIntExtra(BluetoothAdapter.EXTRA_STATE, BluetoothAdapter.ERROR);
switch (state) {
break;
case BluetoothAdapter.STATE_TURNING_OFF: break;
case BluetoothAdapter.STATE_ON: runOnUiThread(new Runnable() { @Override
public void run() { onBluetoothActive(); }
}); break;
case BluetoothAdapter.STATE_TURNING_ON: break;
Manifest
Finally, enable the Bluetooth functionality in the
Android Manifest:
Example 3-6. manifests/AndroidManifest.xml
...
<uses-feature
android:name="android.hardware.bluetooth_le" android:required="true" />
<uses-permission android:name="android.permission.BLUETOOTH"/> <uses-permission
android:name="android.permission.BLUETOOTH_ADMIN"/> ...
Figure 3-4. Main app screen
Programming the Peripheral
Peripheral Mode in Android requires API level 21
(Android 5) or greater. The first thing to do before
working with Bluetooth Low Energy as a Peripheral in
Android is to enable it. This is a two-step process:
Request the Bluetooth Feature
Enable Bluetooth Hardware
Request Bluetooth Feature
Every time you access hardware on Android, first
request access in the Android Manifest. Put the
following two lines in the Manifest between the
<manifest></manifest> tags.
...
<uses-feature
android:name="android.hardware.bluetooth_le" android:required="true" />
<uses-permission android:name="android.permission.BLUETOOTH"/> ...
Enable Bluetooth
To turn on Bluetooth:
Ask the Application if the BLE feature exits;
Grab the Bluetooth Manager; and then
Grab the Bluetooth Adapter.
...
// Does the BLE feature exist? if
// get the Bluetooth Manager
final BluetoothManager bluetoothManager =
(BluetoothManager)getSystemService(Context.BLUETOOTH_SERVICE); // get Bluetooth Adapter
BluetoothAdapter bluetoothAdapter = bluetoothManager.getAdapter(); }
...
This can be done in the onCreate() method of the
Activity or when initializing a new Peripheral. If
Bluetooth Low Energy is not supported by the
hardware, an error will happen then.
Check if Bluetooth Peripheral Mode
is available
mode. Therefore, it is important to check if this feature
is supported:
bool isPeripheralModeSupported = false;
// most devices support this method of checking. Some report true if (!mBluetoothAdapter.isMultipleAdvertisementSupported()) { isPeripheralModeSupported = true;
}
if (isPeripheralModeSupported) { mBluetoothAdvertiser =
mBluetoothAdapter.getBluetoothLeAdvertiser();
// For devices that incorrectly report true to the above condition // this method works
}
The Activity can alert the user that the Bluetooth Radio
is off, or it can ask the user to enable it. The Activity
can enable Bluetooth programmatically using the
BluetoothAdapter.ACTION_REQUEST_ENABLE
Intent. Bluetooth must be on in order to Advertize a
Peripheral
Example 3-7. java/example.com.exampleble/MainActivity.java
private final static int REQUEST_ENABLE_BT = 1; if (bluetoothEnabled) {
Intent enableBtIntent = new
Intent(BluetoothAdapter.ACTION_REQUEST_ENABLE);
startActivityForResult(enableBtIntent, REQUEST_ENABLE_BT); }
It takes a moment for Bluetooth to turn on. To prevent
trying to access Bluetooth before it’s ready, the
AdvertiseReceiver will alert the Activity to changes in
the Bluetooth radio status.
IntentFilter filter = new
IntentFilter(BluetoothAdapter.ACTION_STATE_CHANGED); registerReceiver(mReceiver, filter);
private final AdvertiseReceiver mReceiver = new AdvertiseReceiver() { @Override
public void onReceive(Context context, Intent intent) { final String action = intent.getAction();
case BluetoothAdapter.STATE_ON: // bluetooth radio has switched on break;
case BluetoothAdapter.STATE_TURNING_ON: break;
} } } };
To use turn on Bluetooth within the App, the
BLUETOOTH_ADMIN permission must be requested
in the Manifest. Do this by putting the following line
between <manifest></manifest> in the Manifest.
Example 3-8. manifests/AndroidManifest.xml
<uses-permission
Now the app can turn on Bluetooth when it’s been
disabled.
Putting It All Together
Create a new project called ExampleBlePeripheral.
Create packages and classes so that the project
structure resembles this:
Figure 3-5. Project Structure
Resources
String Resources will define the text to be used in the
App
<resources>
<string name="app_name">ExampleBLEPeripheral</string> <string name="bluetooth_on">Bluetooth On</string>
</resources>
Objects
The BlePeripheral is responsible for checking if
Peripheral mode is supported.
Therefore, BlePeripheral looks like this:
Example
3-10. java/example.com.exampleble/BlePeripheral.java
package example.com.examplebleperipheral.ble; public class BlePeripheral {
/** Constants **/
private static final String TAG = MyBlePeripheral.class.getSimpleName();
private BluetoothAdapter mBluetoothAdapter;
private BluetoothLeAdvertiser mBluetoothAdvertiser;
/**
* Construct a new Peripheral *
* @param context The Application Context
* @throws Exception Exception thrown if Bluetooth is not supported */
public BlePeripheral(final Context context) throws Exception { // make sure Android device supports Bluetooth Low Energy if (!context.getPackageManager().hasSystemFeature(
PackageManager.FEATURE_BLUETOOTH_LE)) {
throw new Exception("Bluetooth Not Supported"); }
// which allows us to talk to talk to the BLE radio final BluetoothManager bluetoothManager = \ (BluetoothManager) context.getSystemService( Context.BLUETOOTH_SERVICE
);
mBluetoothAdapter = bluetoothManager.getAdapter();
// Beware: this function doesn't work on some platforms
if(!mBluetoothAdapter.isMultipleAdvertisementSupported()) { throw new Exception ("Peripheral mode not supported"); }
mBluetoothAdvertiser =
mBluetoothAdapter.getBluetoothLeAdvertiser();
// Use this method instead for better support if (mBluetoothAdvertiser == null) {
throw new Exception ("Peripheral mode not supported"); }
/**
* Get the system Bluetooth Adapter *
* @return BluetoothAdapter */
public BluetoothAdapter getBluetoothAdapter() { return mBluetoothAdapter;
} }
Activities
MainActivity will ask to turn on the Bluetooth Radio,
then instantiate a BlePeripheral. When the Bluetooth
radio turns on, mBluetoothOnSwitch will switch to the
on position.
Example
package example.com.exampleble;
public class MainActivity extends AppCompatActivity { /** Constants **/
private static final String TAG = MainActivity.class.getSimpleName(); private static final int REQUEST_ENABLE_BT = 1;
/** Bluetooth Stuff **/
private MyBlePeripheral mMyBlePeripheral;
/** UI Stuff **/
private Switch mBluetoothOnSwitch;
@Override
protected void onCreate(Bundle savedInstanceState) { super.onCreate(savedInstanceState);
setContentView(R.layout.activity_main);
setSupportActionBar(toolbar);
// notify when bluetooth is turned on or off IntentFilter filter = \
new IntentFilter(BluetoothAdapter.ACTION_STATE_CHANGED); registerReceiver(mBleAdvertiseReceiver, filter);
loadUI(); }
@Override
public void onResume() { super.onResume(); initializeBluetooth(); }
@Override
unregisterReceiver(mBleAdvertiseReceiver); }
/**
* Load UI components */
public void loadUI() {
mBluetoothOnSwitch = (Switch)findViewById(R.id.bluetooth_on); }
/**
* Initialize the Bluetooth Radio */
public void initializeBluetooth() { // reset connection variables try {
Toast.makeText( this,
"Could not initialize bluetooth", Toast.LENGTH_SHORT ).show();
Log.e(TAG, e.getMessage()); finish();
}
mBluetoothOnSwitch.setChecked(
mMyBlePeripheral.getBluetoothAdapter().isEnabled() );
// should prompt user to open settings if Bluetooth is not enabled. if (!mMyBlePeripheral.getBluetoothAdapter().isEnabled()) { Intent enableBtIntent = \
new Intent(BluetoothAdapter.ACTION_REQUEST_ENABLE); startActivityForResult(enableBtIntent, REQUEST_ENABLE_BT); }
/**
* When the Bluetooth radio turns on, initialize the Bluetooth connection */
private final AdvertiseReceiver mBleAdvertiseReceiver = \ new AdvertiseReceiver()
{
@Override
public void onReceive(Context context, Intent intent) { final String action = intent.getAction();
if (action.equals(BluetoothAdapter.ACTION_STATE_CHANGED)) {
final int state = intent.getIntExtra(
BluetoothAdapter.EXTRA_STATE, BluetoothAdapter.ERROR
);
switch (state) {
initializeBluetooth(); break;
case BluetoothAdapter.STATE_TURNING_OFF: break;
case BluetoothAdapter.STATE_ON: Log.v(TAG, "Bluetooth turned on"); break;
case BluetoothAdapter.STATE_TURNING_ON: break;
} } } }; }
Example 3-12. res/layout/activity_main.xml
<?xml version="1.0" encoding="utf-8"?>
<android.support.design.widget.CoordinatorLayout
xmlns:android="http://schemas.android.com/apk/res/android" xmlns:app="http://schemas.android.com/apk/res-auto"
xmlns:tools="http://schemas.android.com/tools" android:layout_width="match_parent"
android:layout_height="match_parent" android:fitsSystemWindows="true" tools:context=".MainActivity">
<android.support.design.widget.AppBarLayout android:layout_height="wrap_content"
android:layout_width="match_parent"
android:theme="@style/AppTheme.AppBarOverlay">
<android.support.v7.widget.Toolbar android:id="@+id/toolbar" android:layout_width="match_parent"
app:popupTheme="@style/AppTheme.PopupOverlay" /> </android.support.design.widget.AppBarLayout>
<RelativeLayout
android:layout_width="match_parent" android:layout_height="match_parent"
android:paddingLeft="@dimen/activity_horizontal_margin" android:paddingRight="@dimen/activity_horizontal_margin" android:paddingTop="@dimen/activity_vertical_margin" android:paddingBottom="@dimen/activity_vertical_margin" app:layout_behavior="@string/appbar_scrolling_view_behavior"
tools:showIn="@layout/activity_main" tools:context=".MainActivity">
<LinearLayout
android:orientation="vertical"
android:layout_width="match_parent" android:layout_height="wrap_content"> <Switch
android:layout_width="match_parent" android:layout_height="wrap_content" android:text="@string/bluetooth_on" android:id="@+id/bluetooth_on" /> </LinearLayout>
</RelativeLayout>
</android.support.design.widget.CoordinatorLayout>
Manifest
Finally, enable the Bluetooth functionality in the
Android Manifest:
Example 3-13. manifests/AndroidManifest.xml
...
<uses-feature
android:name="android.hardware.bluetooth_le" android:required="true" />
android:name="android.permission.BLUETOOTH_ADMIN"/> ...
Figure 3-6. Main app screen
Example code
The code for this chapter is available online
CHAPTER 4
Scanning and Advertising
The first step to any Bluetooth Low Energy interaction
is for the Peripheral to make the Central aware of its
existence, through a process called Advertising.
During the Advertising process, a peripheral
Advertises while a Central Scans.
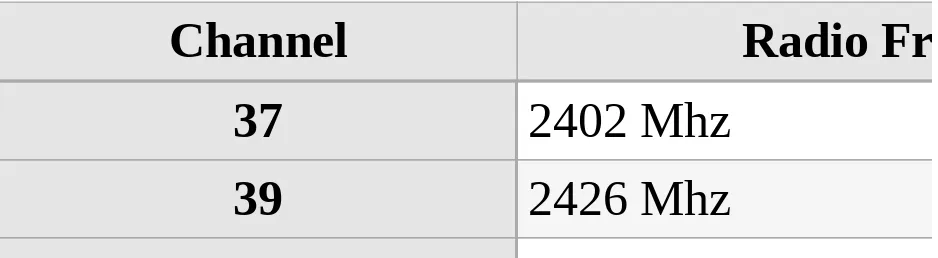
Bluetooth devices discover each other when they are
tuned to the same radio frequency, also known as a
Channel. There are three channels dedicated to device
discovery in Bluetooth Low Energy:
Table 4-1. Bluetooth Low Energy Discovery Radio Channels
Channel
Radio Frequency
37
2402 Mhz
39
2480 Mhz
The peripheral will advertise its name and other data
over one channel and then another. This is called
frequency hopping (
Figure 4-1
).
Figure 4-1. Advertise and scan processes
Similarly, the Central listens for advertisements first on
one channel and then another. The Central hops
are guaranteed to be on the same channel eventually.
Peripherals may advertise from 100ms to 100 seconds
depending on their configuration, changing channels
every 0.625ms (
Figure 4-2
).
Figure 4-2. Scan finds Advertise
Programming the Central
The previous chapter showed how to access the
Bluetooth hardware, specifically the BluetoothAdapter.
This chapter will show how to scan for Bluetooth
devices. This is done by scanning for Peripherals for a
short period of time. During that time any time a
Peripheral is discovered, the system will trigger a
callback function. From there discovered Peripheral
can be inspected.
The BluetoothAdapter gives you access to the
BluetoothLeScanner, which lets you scan for nearby
Peripherals.
// the device scanner allows us to scan for BLE Devices BluetoothLeScanner bluetoothScanner =
bluetoothAdapter.getBluetoothLeScanner();
In Android, it’s running CPU-intensive tasks in the
main thread prevents the user interface from
In this example, the App will scan for BLE devices for
3-5 seconds. 5 seconds is a reasonable amount of time
to assume that most devices will be discovered during
the scanning process.
The method for implementing scanning changed in
API level 21 (Android Lollipop).
APIs 18-20
Prior to API 21, scanning was performed like this:
// run the scan for SCAN_PERIOD_MS milliseconds inside a thread new Thread() {
@Override
public void run() {
// Scan for BLE devices in a new thread // scan for devices for 5 seconds
static final int SCAN_PERIOD_MS = 5000; // begin the scan
try {
// let the scan run for SCCAN_PERIOD_MS Thread.sleep(SCAN_PERIOD_MS);
} catch (InterruptedException e) { e.printStackTrace();
}
bluetoothAdapter.stopLeScan(scanCallback); // stop the scan }
}.start();
As each new Peripheral is discovered, an event is
triggered in the LeScanCallback:
Table 4-2. LeScanCallback
Event
Description
LeScanCallback can be implemented like this, to get
the Peripheral’s advertise name and MAC address:
private LeScanCallback scanCallback = new LeScanCallback() { // This function executes when a device is found
@Override
public void onLeScan(final BluetoothDevice device, int rssi, byte[] scanRecord) {
String advertiseName = device.getName(); String macAddress = device.getAddress(); }
};
APIs 21 and Up
Since API Level 21 (Lollipop), scanning is
implemented like this:
// set the scan settings filters
final ScanSettings settings = new ScanSettings.Builder()
final List<ScanFilter> filters = new ArrayList<ScanFilter>(); // Get the Bluetooth LE Scanner
bluetoothLeScanner = mBluetoothAdapter.getBluetoothLeScanner(); // run the scan inside a thread for SCAN_PERIOD milliseconds new Thread() {
@Override
public void run() {
// scan for devices for 5 seconds
static final int SCAN_PERIOD_MS = 5000;
bluetoothLeScanner.startScan(filters, settings, scanCallback); try {
Thread.sleep(SCAN_PERIOD); } catch (InterruptedException e) { e.printStackTrace();
}
bluetoothLeScanner.stopScan(scanCallback); }
The Scan settings can be changed depending on the
desired tradeoff between battery life and scanning
quality.
Table 4-3 . ScanSettings
Setting
Description
SCAN_MODE_BALANCED
Balance battery efficiency
and scan speed
SCAN_MODE_LOW_LATENCY
Prefer scan speed over
battery efficiency
SCAN_MODE_LOW_POWER
Prefer battery efficiency to
scan speed
SCAN_MODE_OPPORTUNISTIC
Eavesdrop for other
scanner’s scan response
results
corresponding events are triggered in the
ScanCallback:
Table 4-4. ScanCallback
Event
Description
onScanResult
Triggered when a new Peripheral is
discovered
onBatchScanResults
Triggered when several new
Peripherals are discovered
onScanFailed
Triggered when scanning did not start
successfully
A ScanResult contains information about the BLE
device and advertise information. From this it is
possible to determine the advertise name, mac address,
type of Bluetooth device, and even the Received Signal
Strength Indication (RSSI) - useful for determining
how far away the Peripheral is.
private ScanCallback scanCallback = new ScanCallback { /**
* New Peripheral found. *
* @param callbackType Tells how this callback was triggered * @param scanResult information about the result,
* including Bluetooth Device */
@Override
public void onScanResult(int callbackType, ScanResult scanResult) { BluetoothDevice bluetoothDevice = result.getDevice();
String advertiseName = bluetoothDevice.getName(); String macAddress = bluetoothDevice.getAddress(); int rssi = result.getRssi();
} /**
* @param results List: List of scan results that are previously scanned. */
@Override
public abstract void onBatchScanResults(List<ScanResult> scanResults) { // process each scanResult in the list
} /**
* Problem initializing the scan. See the error code for reason *
* @param errorCode int: Error code (one of SCAN_FAILED_*) * for scan failure.
*/
@Override
public abstract void onScanFailed(int errorCode) { switch (errorCode) {
case SCAN_FAILED_APPLICATION_REGISTRATION_FAILED: // App cannot be registered
break;
case SCAN_FAILED_FEATURE_UNSUPPORTED:
// Power optimization setting is not supported on this device break;
default: // SCAN_FAILED_INTERNAL_ERROR // Internal error
} } };
To support the widest array of Android devices, it may
be useful to implement both API 18 and API 21
versions of the scanner. This can be done as follows:
// Scan for SCAN_PERIOD milliseconds. // at the end of that time, stop the scan. new Thread() {
@Override
public void run() {
mBluetoothAdapter.startLeScan(bleScanCallbackv18); try {
Thread.sleep(SCAN_PERIOD_MS); } catch (InterruptedException e) { // handle exception
}
mBluetoothAdapter.stopLeScan(bleScanCallbackv18); }
}.start();
} else { // use BluetoothLeScanner.startScan() for API 21 (Lollipop) or greater
final ScanSettings settings = new ScanSettings.Builder()
final List<ScanFilter> filters = new ArrayList<ScanFilter>();
bluetoothLeScanner = mBluetoothAdapter.getBluetoothLeScanner(); new Thread() {
@Override
public void run() {
bluetoothLeScanner.startScan( filters,
settings,
bleScanCallbackv21 );
try {
Thread.sleep(SCAN_PERIOD_MS); } catch (InterruptedException e) { // handle exception
}
bluetoothLeScanner.stopScan(bleScanCallbackv21); }
}
The scan callbacks can then be implemented as
follows:
private LeScanCallback bleScanCallbackv18 = new LeScanCallback{ ... }; private ScanCallback bleScanCallbackv21 = new ScanCallback { ... };
Putting It All Together
Create a new app called ExampleBleScanner, and copy
everything from the previous example.
This example will feature some user interface
elements, including a list adapter. The list adapter will
populate a list of discovered Peripherals in the main
Activity.
Custom scanner callbacks will be created, which
respond to events when scanning has stopped.
Resources
To begin, define some dimensions and strings that will
be used by the rest of the app.
Add a text padding dimension:
Example 4-1. res/values/dimens.xml
<resources>
<!-- Default screen margins, per the Android Design guidelines. --> <dimen name="activity_horizontal_margin">16dp</dimen>
<dimen name="activity_vertical_margin">16dp</dimen> <dimen name="text_padding">5dp</dimen>
Add text for buttons and labels:
Example 4-2. res/values/strings.xml
<resources>
<string name="app_name">ExampleBLEScan</string> <string name="action_start_scan">Scan</string>
<string name="action_stop_scan">Stop</string> <string name="scanning">Scanning...</string>
<string name="peripheral_list_empty">No Peripherals Found</string> </resources>
Objects
Add the following functions to the BleCommManager
to give it functionality to start and stop scanning for
BLE devices.
Example
public class BleCommManager { private static final String TAG =
BleCommManager.class.getSimpleName();
private static final long SCAN_PERIOD = 5000; // 5 seconds of scanning time
private BluetoothAdapter mBluetoothAdapter; // Andrdoid's Bluetooth Adapter
private BluetoothLeScanner bluetoothLeScanner; // Ble scanner - API >= 21
* @param bleScanCallbackv18 APIv18 compatible ScanCallback * @param bleScanCallbackv21 APIv21 compatible ScanCallback * @throws Exception
*/
public void scanForPeripherals(
} }.start();
// alert the system that BLE scanning
// has stopped after SCAN_PERIOD milliseconds mTimer = new Timer();
mTimer.schedule(new TimerTask() { @Override
public void run() {
stopScanning(bleScanCallbackv18, bleScanCallbackv21); }
}, SCAN_PERIOD);
} else { // use BluetoothLeScanner.startScan() for API >21 (Lollipop) final ScanSettings settings = new ScanSettings.Builder()
.setScanMode(ScanSettings.SCAN_MODE_LOW_LATENCY) .build();
final List<ScanFilter> filters = new ArrayList<ScanFilter>(); mBluetoothLeScanner =
new Thread() { @Override
public void run() {
mBluetoothLeScanner.startScan( filters,
settings,
bleScanCallbackv21 );
try {
Thread.sleep(SCAN_PERIOD);
mBluetoothLeScanner.stopScan(bleScanCallbackv21); } catch (InterruptedException e) {
e.printStackTrace(); }
} }.start();
// alert the system that BLE scanning
mTimer = new Timer();
mTimer.schedule(new TimerTask() { @Override
public void run() {
stopScanning(bleScanCallbackv18, bleScanCallbackv21); }
}, SCAN_PERIOD); }
}
/**
* Stop Scanning *
* @param bleScanCallbackv18 APIv18 compatible ScanCallback * @param bleScanCallbackv21 APIv21 compatible ScanCallback */
final BleScanCallbackv18 bleScanCallbackv18, final BleScanCallbackv21 bleScanCallbackv21) {
mTimer.cancel();
// propagate the onScanComplete through the system if (Build.VERSION.SDK_INT <
Build.VERSION_CODES.LOLLIPOP) {
mBluetoothAdapter.stopLeScan(bleScanCallbackv18); bleScanCallbackv18.onScanComplete();
} else {
mBluetoothLeScanner.stopScan(bleScanCallbackv21); bleScanCallbackv21.onScanComplete();
} } }
Peripherals.
Example
4-4. java/example.com.exampleble/ble/callbacks/BleScanCallbackv18.java
package example.com.exampleble.ble.callbacks; public abstract class BleScanCallbackv18 implements BluetoothAdapter.LeScanCallback {
/**
* New Perpheral found. *
* @param bluetoothDevice The Peripheral Device * @param rssi The Peripheral's RSSI
* indicating how strong the radio signal is
* @param scanRecord Other information about the scan result */
//@Override
public abstract void onLeScan(final BluetoothDevice bluetoothDevice, int rssi, byte[] scanRecord);
* BLE Scan complete */
public abstract void onScanComplete(); }
Example
4-5. java/example.com.exampleble/ble/callbacks/BleScanCallbackv21.java
package example.com.exampleble.ble.callbacks;
public abstract class BleScanCallbackv21 extends ScanCallback { /**
* New Perpheral found. *
* @param callbackType int: Determines how this callback was triggered * @param result a Bluetooth Low Energy Scan Result
*/
@Override
* New Perpherals found. *
* @param results List: List of scan results that are previously scanned. */
@Override
public abstract void onBatchScanResults(List<ScanResult> results); /**
* Problem initializing the scan. See the error code for reason *
* @param errorCode int: Error code (one of SCAN_FAILED_*) * for scan failure.
*/
@Override
public abstract void onScanFailed(int errorCode); /**
* Scan has completed */
}
User Interface
In this app, a custom ListAdapter is used to visually
represent each of the discovered Peripherals.
The list_item_peripheral.xml defines what each list
item in the list of devices looks like. Ours will have
three text fields, one for the device name, one for the
address, and one for the RSSI (radio signal strength
indicator).
Example 4-6. res/layout/list_item_peripheral.xml
<?xml version="1.0" encoding="utf-8"?>
<LinearLayout xmlns:android="http://schemas.android.com/apk/res/android" android:layout_width="fill_parent"
android:layout_height="fill_parent" android:orientation="horizontal" > <LinearLayout
android:layout_width="wrap_content" android:layout_height="wrap_content" android:layout_weight="2">
<TextView
android:id="@+id/advertise_name" android:layout_width="wrap_content" android:layout_height="wrap_content" android:textSize="20sp"
android:paddingTop="@dimen/text_padding"/> <TextView
android:id="@+id/mac_address"
android:layout_width="wrap_content" android:layout_height="wrap_content" android:textSize="10sp"
android:paddingTop="@dimen/text_padding"/> </LinearLayout>
<TextView
android:layout_width="wrap_content" android:layout_height="wrap_content" android:textSize="10sp"
android:paddingTop="@dimen/text_padding"/> </LinearLayout>
The BLEDevicesListItem is the representation of the
data in each list_item.xml list item.
Example
4-7. java/example.com.exampleble/models/BlePeripheralListItem.java
package example.com.exampleble.models; public class BlePeripheralListItem {
private int mItemId; private int mRssi;
private BluetoothDevice mBluetoothDevice;
public BlePeripheralListItem(BluetoothDevice bluetoothDevice) { mBluetoothDevice = bluetoothDevice;
public void setItemId(int id) { mItemId = id; } public void setRssi(int rssi) { mRssi = rssi; } public int getItemId() { return mItemId; }
public String getAdvertiseName() { return mBluetoothDevice.getName(); }
public String getMacAddress() { return mBluetoothDevice.getAddress(); } public int getRssi() { return mRssi; }
public BluetoothDevice getDevice() { return mBluetoothDevice; } }
To relay data to the list, the list adapter must be able to
process data specific to the discovered Peripherals.
Example
4-8. java/example.com.exampleble/adapters/BlePeripheralsListAdapter.java
package example.com.exampleble.adapters;
public class BlePeripheralsListAdapter extends BaseAdapter { private static String TAG = \
private ArrayList<BlePeripheralListItem> mBluetoothPeripheralListItems = \
new ArrayList<BlePeripheralListItem>(); // list of Peripherals /**
return mBluetoothPeripheralListItems.size(); }
/**
* Add a new Peripheral to the ListView *
* @param bluetoothDevice Periheral device information
* @param rssi Periheral's RSSI, indicating its radio signal quality */
// update UI stuff
int listItemId = mBluetoothPeripheralListItems.size(); BlePeripheralListItem listItem = \
new BlePeripheralListItem(bluetoothDevice); listItem.setItemId(listItemId);
listItem.setRssi(rssi); // add to list
mBluetoothPeripheralListItems.add(listItem); }
/**
* Get current state of ListView
* @return ArrayList of BlePeripheralListItems */
public ArrayList<BlePeripheralListItem> getItems() { return mBluetoothPeripheralListItems;
} /**
*/
public void clear() {
mBluetoothPeripheralListItems.clear(); }
/**
* Get the BlePeripheralListItem held at some position in the ListView *
* @param position the position of a desired item in the list * @return the BlePeripheralListItem at some position */
@Override
public BlePeripheralListItem getItem(int position) { return mBluetoothPeripheralListItems.get(position); }
@Override
public long getItemId(int position) {
/**
* This ViewHolder represents what UI components are in each List Item */
public static class ViewHolder{
public TextView mAdvertiseNameTV; public TextView mMacAddressTV; public TextView mRssiTV;
} /**
* Generate a new ListItem for some known position in the ListView *
* @param position the position of the ListItem * @param convertView An existing List Item * @param parent The Parent ViewGroup * @return The List Item
*/
@Override
{
View v = convertView;
ViewHolder peripheralListItemView;
// if this ListItem does not exist yet, generate it // otherwise, use it
if(convertView == null) {
// convert list_item_peripheral.xml to a View
LayoutInflater inflater = LayoutInflater.from(parent.getContext()); v = inflater.inflate(R.layout.list_item_peripheral, null);
// match the UI stuff in the list Item to what's in the xml file peripheralListItemView = new ViewHolder();
peripheralListItemView.mAdvertiseNameTV =
(TextView) v.findViewById(R.id.advertise_name); peripheralListItemView.mMacAddressTV = (TextView) v.findViewById(R.id.mac_address);
peripheralListItemView.mRssiTV = (TextView) v.findViewById(R.id.rssi);
} else {
peripheralListItemView = (ViewHolder) v.getTag(); }
Log.v(TAG, "ListItem size: "+ mBluetoothPeripheralListItems.size()); // if there are known Peripherals, create a ListItem that says so
// otherwise, display a ListItem with Bluetooth Periheral information if (mBluetoothPeripheralListItems.size() <= 0) {
peripheralListItemView.mAdvertiseNameTV.setText( R.string.peripheral_list_empty);
} else {
BlePeripheralListItem item =
mBluetoothPeripheralListItems.get(position);
return v; }
}
A progress spinner will be used to inform the user of
the status of a scan:
Example 4-9. res/layout/progress_scanner.xml
<?xml version="1.0" encoding="utf-8"?>
<ProgressBar xmlns:android="http://schemas.android.com/apk/res/android" style="@android:style/Widget.ProgressBar.Small"
android:layout_width="wrap_content" android:layout_height="wrap_content" android:id="@+id/scan_progress" />
Activities
for 5 seconds, an arbitrarily reasonable scanning time.
The ListView is updated with each new Peripheral as
discovered.
If no Peripherals are discovered, the ListView will
display the text, “No Peripherals Found.”
The scan button and the progress spinner are defined in
menu_main.xml:
Example 4-10. res/menu/menu_main.xml
<menu xmlns:android="http://schemas.android.com/apk/res/android" xmlns:app="http://schemas.android.com/apk/res-auto"
xmlns:tools="http://schemas.android.com/tools" tools:context=".MainActivity">
<item android:id="@+id/action_start_scan" android:title="@string/action_start_scan"
android:orderInCategory="100" app:showAsAction="always" /> <item android:id="@+id/action_stop_scan"
android:title="@string/action_stop_scan"
<item
android:id="@+id/scan_progress_item" android:title="@string/scanning"
android:visible="true"
android:orderInCategory="100" app:showAsAction="always"
app:actionLayout="@layout/progress_scanner"
android:layout_marginRight="@dimen/activity_horizontal_margin" /> </menu>
The List View and the main menu are contained in
activity_main.xml:
Example 4-11. res/layout/activity_main.xml
<?xml version="1.0" encoding="utf-8"?>
<android.support.design.widget.CoordinatorLayout
xmlns:android="http://schemas.android.com/apk/res/android" xmlns:app="http://schemas.android.com/apk/res-auto"
android:layout_width="match_parent" android:layout_height="match_parent" android:fitsSystemWindows="true"
tools:context=".MainActivity">
<android.support.design.widget.AppBarLayout android:layout_height="wrap_content"
android:layout_width="match_parent"
android:theme="@style/AppTheme.AppBarOverlay">
<android.support.v7.widget.Toolbar android:id="@+id/toolbar" android:layout_width="match_parent"
android:layout_height="?attr/actionBarSize" android:background="?attr/colorPrimary"
app:popupTheme="@style/AppTheme.PopupOverlay" /> </android.support.design.widget.AppBarLayout>
<RelativeLayout
xmlns:android="http://schemas.android.com/apk/res/android" android:layout_width="match_parent"
android:layout_height="match_parent"