Operation / Installation Manual
操作
/
安装说明
Petunjuk Pemakaian / Pemasangan
Ho
ạt độ
ng /
Hướ
ng d
ẫ
n l
ắp đặ
t
คู่มือการติดตั้ง/การใช้งาน
Chimney Hood
塔形烟机
Tudung Hisap
Máy Hút Khói Mùi
–
Dòng Chimney
เครื่องดูดควันชนิดกระโจมติดผนัง
RH-C107-GC
RH-C109-GC
Rinnai Corporation
中
文
ệ
ภาษ
中
文
ệ
ภาษ
าไท
ย
En
g
li
sh
中
文
Ba
h
a
sa
I
n
d
o
n
e
si
a
Ti
ế
n
g
Vi
ệ
t
ภาษ
าไท
English
Page 1 - 7
中文
8 - 14
页
Bahasa Indonesia
Hal. 15-21
Ti
ế
ng Vi
ệ
t
Trang 22 - 28
ภาษาไทย
หน้า
29 - 35
Version: 2012 07
1
Safety warnings ---1
Specifications & components---3
Installation ---4
Operation---5
Maintenance and care ---6
Troubleshoot ---7
Unpacking
Do not use the appliance if there are obvious signs of transportation damage.
If the power supply cord is damaged, it must be replaced by the manufacturer, its service agent or qualified technician to avoid hazard.
Please ensure that young children do not play with plastic bag packaging.
For the installer
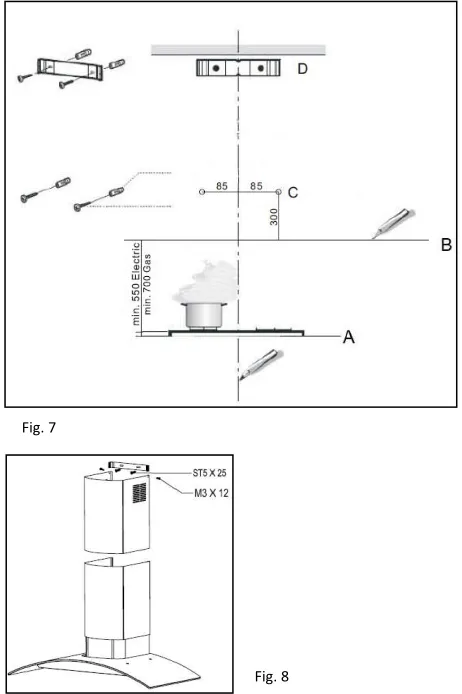
The extractor hood can be installed over gas and electric cook top. Minimum installation height from the bench top to the bottom of the hood is 700mm (gas range) and 550mm (electric range) (Fig. 1).
For the user
The extractor hood is designed for domestic use to eliminate unpleasant odors from the kitchen. Do not use the hood for uses other than its specific purpose.
Do not allow young children to play with or operate the appliance. Supervise its use by the elderly or infirm.
Installation and repair should be attempted by qualified technical personnel only.
It is dangerous to modify any part of this appliance. Tampering with electrical connections or mechanical parts can cause operation faults and may put the user at risk.
Never leave high naked flames under the extractor hood when it is in operation. Always cover lit burners with cookware.
CONTENTS
Please read this user manual thoroughly before attempting to use this appliance for the first time. This manual contains important information on safe installation, use and care of the appliance. Keep these instructions for reference and pass them on to future user.
IMPORTANT
To register your product warranty, please paste the serial numbers stickers enclosed with the packaging on your warranty card. Please contact your local Rinnai Customer Care Centre should you require further assistance.
SAFETY WARNINGS
En
gl
2
Alwaysmount the extractor hood over the center of the hob.
Ensure that the appliance is installed in a location with good and permanent ventilation.
When making the electrical connections, check thato
The mains voltage and frequency corresponds to the technical information shown on the Use anelectrical connector with earth that is correct for your location. The electrical connection of this
o Connect the extractor hood to the exhaust duct
through a pipe of minimum Ø120mm. Use the shortest and straightest duct route possible.
o Do not connect the extractor hood to exhaust
ducts carrying combustion fumes.
o Arrange proper ventilation if the extractor hood
is used in conjunction with other appliances which are not supplied by electrical power e.g. gas burning appliances. The kitchen must have a direct opening to the outside in order to allow entry of fresh air.
Note: The manufacturer accepts no responsibility for complaints attributed to the design and layout of the pipe work.
Do not flambé or grill with an open flame directly under the extractor hood. Flames could be drawn up into the hood by the suction and the grease filters may catch fire.
Monitor cooking continuously as overheated oil increases the risk of self-ignition.
Do not operate the extractor hood without a grease filter.
It is important to clean and/or replace the filters at appropriate intervals.
Grease deposits build-up increases the risk of fire.
Always disconnect the unit from the power supply before carrying out any cleaning or maintenance work on the hood.
Ensure that the power supply chord is free from any heat source or sharp objects.
Multiple plugs and extension cables must not be used. Overloading is dangerous and may cause a fire hazard.
Disposal
This appliance and its packaging are environmentally friendly and recyclable. Please help us to care for the environment by disposing the packaging in a proper manner and recycling any old appliances.
Before disposing an old appliance, disconnect it from the power supply and cut the power supply cord to prevent hazards.
The manufacturer will not be held liable for any damages resulting from improper installation nor failure to adopt proper safety measures during installation and operational use of the appliance.
Fig. 1
En
gl
3
Model RH-C107-GC
RH-C109-GC
Voltage 220V - 240V / 50Hz
Power of Motor 220W
Power of Lamps 2 x 20W
Cable Length 1.5m
Appliance Dimension (W x D x H): 70 cm model 90cm model
698 x 460 x 479-854mm 898 x 460 x 479-854mm
Note: The manufacturer reserves the right to effect any technological improvement or modification without prior notice.
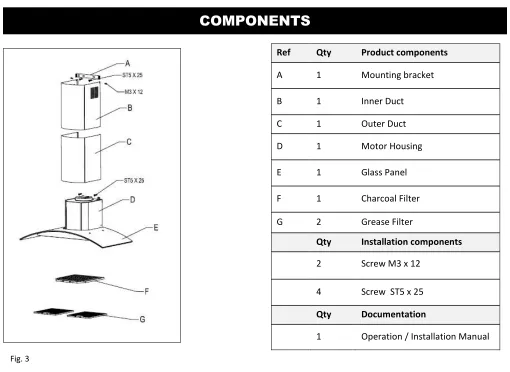
Ref Qty Product components
A 1 Mounting bracket
B 1 Inner Duct
C 1 Outer Duct
D 1 Motor Housing
E 1 Glass Panel
F 1 Charcoal Filter
G 2 Grease Filter
Qty Installation components
2 Screw M3 x 12
4 Screw ST5 x 25
Qty Documentation
1 Operation / Installation Manual
SPECIFICATIONS
COMPONENTS
Fig. 2
Fig. 3
En
gl
4
This appliance can be installed in ducted or recirculation mode.
Ducted mode (Fig. 4)
In ducted mode, the extractor hood fan extracts the cooking vapours and passes them through the grease filter. The air then flows to the outside.
The grease filter absorbs the solid particles in the cooking vapors.
In this mode, only grease filters are installed (charcoal filter is optional).
Recirculation mode (Fig. 5)
In recirculation mode, the extractor hood fan extracts the cooking vapors which are purified in the grease filter and charcoal filter.
The purified air is then recirculated into the kitchen via a vent opening in the hood. The grease filter absorbs the solid particles in the cooking vapors.
The charcoal filter is designed to absorb cooking odor. In this mode, both grease filters and charcoal filters are installed.
Connection to exhaust air pipe (Fig. 6 & 6.1)
Attach Ø150mm pipe directly to the air outlet and secure appropriately (Fig. 6).
If using Ø120mm pipe, connect to the air outlet using a reducing connector (not provided).
Secure both joints appropriately (Fig. 6.1).
Connect pipe to the outdoor duct.
Wall mounting (Fig. 7 & 8)
Do ensure that the appliance is mounted on a solid surface which could withstand the appliance’s weight.
Draw a vertical line at the center of the wall.
From bench top (see A), draw a horizontal line above minimum installation height level (see B).
Mark a reference point at C. Repeat this step on the other side.
Drill Ø 8mm holes at center of marking points. Insert wall plugs in the wall.
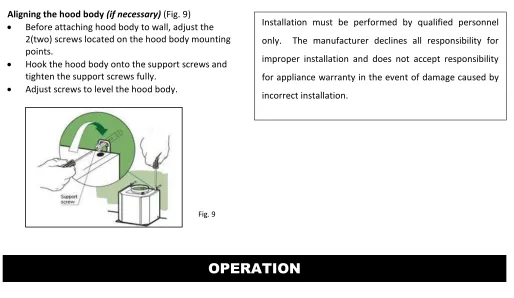
Fix the hood body to wall using 2 (two) ST5 x 25 screws provided. Tighten screws firmly. Note: Adjust the hood body alignment if necessary (Fig. 9).
Place mounting bracket on the wall at desired height level. Align bracket center at vertical line (see D).
Mark the center of the bracket holes and drill Ø 8mm holes. Insert wall plugs in the wall.
Secure mounting bracket firmly using 2 (two) ST5 x 25 screws provided.
Fix the inner duct to mounting bracket using 2 (two) M3 x 12 screws provided (Fig. 8).
Slide the outer duct downwards and ensure that it is well seated on the hood body.
5
To achieve better air extraction, we recommend you to switch on the blower a few minutes before starting to cook. Leave it on for approximately 15 minutes after cooking or till all cooking smell is completely removed.
Switch control
Note: Touch the sensor buttons gently to operate this appliance.
LIGHT:
Touch to select on/off.
LOW SPEED:
Touch to on/off the fan at low speed.
MEDIUM SPEED:
Touch to on/off the fan at medium speed.
HIGH SPEED:
Touch to on/off the fan at high speed.
DELAY STOP TIMER:
o
Touch to select delay stop timer at 3, 6, 9, 12 or 15 minutes. The timer setting & countdown is displayed in
the window. The fan turns off automatically after timer ends operation.
o
To deactivate this function before the timer stops, touch the speed button to turn off the fan completely.
Or, touch the delay stop timer to clear setting and fan remains running at the selected speed.
Aligning the hood body (if necessary) (Fig. 9)
Before attaching hood body to wall, adjust the 2(two) screws located on the hood body mounting points.
Hook the hood body onto the support screws and tighten the support screws fully.
Adjust screws to level the hood body.
Installation must be performed by qualified personnel
only. The manufacturer declines all responsibility for
improper installation and does not accept responsibility
for appliance warranty in the event of damage caused by
incorrect installation.
OPERATION
En
gl
ish
Fig. 9
ight ow
peed
ediu
6
Grease filter (Fig. 10)
Grease filters are used to absorb the grease particles formed during cooking process. The filters must be removed and cleaned every 4 weeks, depending on frequency of usage. Clean the filter either by hand or in the dishwasher. Note: Take care not to bend the filters during washing.
If by hand washing, soak the filters in warm detergent solution to simplify the removal of grease. Brush the filters, rinse thoroughly and leave it to dry before refitting.
If by dishwasher, select an appropriate wash program. Leave it to dry before refitting. Note: slight discoloration of the filter may occur.
Removing and inserting the grease filters:
o To remove, depress the handle and pull down
at the same time.
o To refit, slot the filter into position. Make sure
that the handle is visible on the outside.
Charcoal filter (where applicable) (Fig. 11)
The charcoal filters should be replaced when it is noticeably dirty or discolored, usually after 6 to 12 months depending on the conditions of use.
These filters are not washable and cannot be restored. To ensure that this appliance functions effectively, regular maintenance is necessary as clogged filters restrict airflow and may cause the motor to overheat.
Removing and inserting the charcoal filter:
o Remove the saturated charcoal filter from the
blower as shown.
o Fit in the new charcoal filter.
Cleaning the appliance body
Clean the extractor hood using warm detergent solution and a soft damp cloth. Wipe dry with a lint-free cloth.
Avoid using corrosive or abrasive products that could damage the surface.
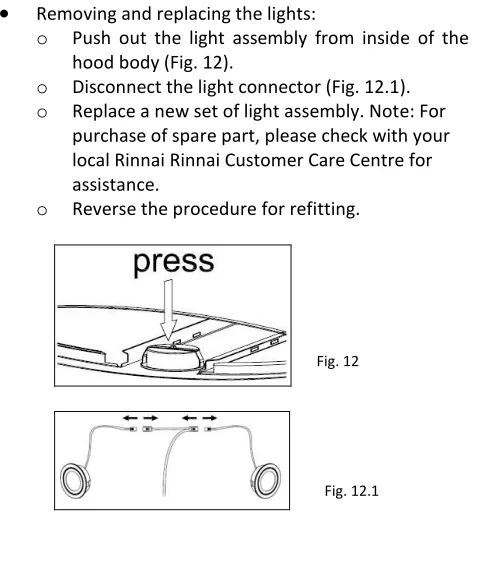
Light replacement (Fig. 12 & 12.1)
Replace the light bulb with another which has the same characteristics as a higher voltage bulb could
damage the electrical unit.
Removing and replacing the lights:o Push out the light assembly from inside of the
hood body (Fig. 12).
o Disconnect the light connector (Fig. 12.1). o Replace a new set of light assembly. Note: For
purchase of spare part, please check with your local Rinnai Rinnai Customer Care Centre for assistance.
o Reverse the procedure for refitting.
intervals as grease deposits build-up increases the risk of fire. Do not operate the extractor hood without grease filter.
You are strongly recommended to follow these safety instructions. The manufacturer will not be held liable for any damages to the appliance or any fire hazard due to failure to observe the above safety recommendations.
7
Problem Possible Cause Solution
Extractor hood does not function
No electrical supply Check that plug is
connected and main power switch is turned on
Poor airflow Grease filters clogged with
grease build-up
Clean the grease filters and refit when dry
Charcoal filters clogged with grease build-up
Replace charcoal filters with new sets
Hood suction is not effective Inadequate ventilation Ensure that the kitchen is sufficiently ventilated to allow entry of fresh air Charcoal filters are not
installed
Install charcoal filters for setting in recirculation mode
Motor is running but no airflow Poor exhaust Please contact Rinnai
Customer Care Service
Whirring sound Foreign object may be in
contact with fan blade
Please contact Rinnai Customer Care Service
Lights are not working Lamps are burnt out Replace the damaged lamps
Lamps are loose Tighten the lamps
TROUBLESHOOT
If problem persists after the above checks, please contact Rinnai Customer Care Centre for assistance.
Please quote the model number of your appliance as shown on the rating plate attached to your equipment (Fig. 13).
For service calls under warranty, please note that it is necessary to produce your proof of purchase and valid warranty card.
Fig.13 - Rating plate is for illustration purpose only and its specifications vary across models.
En
gl
8
安全警告 --- ---8
规格及零部件 ---10
安装---11
操作 ---12
维修与保养---13
常见故障的识别与处理--- -14
开箱
如有明显的运输过程造成的损伤,请不要使用该
器具。
如果电源线破损,则必须由生产商,服务代理或
者合格的技术人员进行更换,防止伤害风险。
请确保孩童远离塑料包装。
给安装人员
此油烟机罩可以安装在燃气炉和电炉上方。从台
面到烟机底部的最小的安装高度为 700mm (燃气灶) 和 550mm (电炉) (图. 1).
请把油烟机罩安装在灶的正上方。
请确保器具的安装地点有良好的通风。
连接电源时,请按照铭牌所示信息确认电源电压
与频率。
给用户
烟机是适合国内使用的,用于消除厨房的异味。
请不要把烟机使用于其他用途。
请不要让孩童玩弄或者操作器具。请监督年老体
弱者的使用。
安装与维修只能让合格的技术人员进行。
对烟机任意的修改将导致危险。篡改电气连接配
件或机器配件都会导致运行错误并会使使用人员 陷入危险。
当烟机运行时请不要使用较高火焰的燃烧器。会
点燃燃烧器上面的炊具。
请不要在烟机下方直接燃火或烤火。火焰会被吸
进烟机,里面的油脂过滤器会着火。
目录
在使用本器具前,请仔细阅读本使用手册。本手册包括重要的涉及人身安全以及器具使用和保养方面的信息。
要注册您的产品保修,需要把序列号贴纸贴到随机器包装的保用证上。请联系当地的林内客户售后服务中心咨
询更新信息。
安全警告
重要提示
中
9
电源连接必须符合当地标准。请在插入电源之前
确认当地的电压是否正确。
请使用符合当地的接地连接器。此器具的电源连
接必须接地(合适的):
绿色 & 黄色 = 接地; 蓝色 = 零线; 褐色 = 相线
管道模式:
请使用管径最小为120mm的管来连接烟机与排
气管。请尽量使用最短与最直的管道。
请不要将火焰排进与烟机连接的排气管。
如果烟机与其他非电器器具如燃气器具一起使
用,请务必做好适当的通风。厨房必须打开直 接通往室外的窗门来换气。
注意:生产商没有任何义务接受管道安装与设计的投
诉。
请注意不断观察,因为过热的热油会增加自燃的
危险。
请不要操作没有油脂过滤器的器具。
定期清理与更换过滤器很重要,因为油脂积聚会
增大着火的危险。
请在取出清理或维修之前务必切断电源。
请确认电源线远离任何热源或尖锐的物体。
禁止使用多用插头与延长电线。有超负荷的危
险,会引发火灾。
处理
此器具与其包装都是环保及可循环再用的。
请帮助我们爱护环境,用适当的方式处置包装以
及旧的器具。
在处置旧器具前,请切断电源以及移走电源线防
止危险发生。
注意: 生产商不会对由于任何安装或者通过非正当的
方式安装与运行产生的损坏负责。
图. 1
中
10
型号 RH-C107-GC
RH-C109-GC
电压 220V - 240V / 50Hz
马达功率 220W
灯泡功率 2 x 20W
电源线 1.5m
器具尺寸
(W x D x H):
70 cm model
90cm model
698 x 460 x 479-854mm
898 x 460 x 479-854mm
注意: 生产商拥有改造器具而不预先对消费者进
行告知的权利。
参照 数量 产品配件
A 1 安装支架
B 1 内罩
C 1 外罩
D 1 电机组件
E 1 玻璃面板
F 1 木炭过滤器
G 2 油脂过滤器
数量 安装配件
2 Screw M3 x 12
4 Screw ST5 x 25
数量 文件
1 操作 / 安装说明手册
规格
部件名称
图.2
图. 3
中
11
该器具必须以管道模式或回流模式安装。
管道模式 (图. 4)
在管道模式中,烟机的风扇会把煮食的油烟吸进管
道并通过油脂过滤器排出屋外。
油脂过滤器吸收煮食过程中油烟的固体物质。因此
在此模式中, 只安装油脂过滤器 (木炭过滤器是
可选择的).
回流模式 (图. 5)
在回流模式里,烟机的风扇将吸走被油脂过滤器
与木炭过滤器净化后的煮食气体。
净化后的气体之后通过烟机里的一个排气孔回流
进厨房.
油脂过滤器吸收煮食气体的固体物质。
木炭过滤器是设计吸收煮食气味的。
在此模式里,要安装油脂过滤器与木炭过滤器。
链接 (图. 6 & 6.1)
把 Ø150mm 管直接装到出风口,并紧固(图. 6).
如果使用 Ø120mm 管道,连接到出风口就要使
用变径连接器 (不提供).
紧固所有的连接件 (图. 6.1).
把管道连接到屋外管道。
墙面安装与固定架 (图. 7 & 8)
务必确保安装器具的墙面够坚固,以承受器具的重 量。
在墙面的中央到台面画一条垂直的线.
从台面 (参照 A), 在最少安装高度处画一条水平
线 (参照 B) 。
在 C处画一个参照点。在另外一面重复画一点。
在这些点的中央钻一个 Ø 8mm 的孔。插入 膨胀
螺钉。
用配套的两个( ST5 x 25)螺丝把 机体固定到墙
上。注意:根据需要调整机身的直线水平(图. 9).
把安装架安装在希望的高度处,对准架子的中心
画垂直线 (参照 D)。
在架子孔的中间标注,钻一个 Ø 8mm 的孔。 把
膨胀螺钉钉进去。
用配套的两个ST5 x 25螺丝固定安装架。
请用配套的 两个M3 x 12螺丝固定内罩到安装
架。(图. 8).
向下滑动外罩并确保固定在机体上。
安装
中
文
图. 4
图. 5
图. 7
12
为了达到更好的抽气效果,我们建议在煮饭前几分钟先启动抽风。而在煮饭后 15 分钟左右或者等油烟完全消失之
后再关闭烟机。
开关控制
控制钮注意: 轻轻接触感应按键来启动机器.
灯: 轻触,选择启动/关闭.
低速: 轻触启动/关闭低速的风扇。
中速:轻触启动/关闭中速的风扇。
高速: 轻触启动/关闭高速的风扇。
延迟停止计时器:
o 接触此键选择延迟停止时间,可选择 3, 6, 9, 12 或 15 分钟。计时器设置是以倒计时方式显示在窗口。风扇
就会在计时器倒数完之后自动关闭。
o 要在计时器倒数完之后停用,轻触速度键来完全关闭风扇。或者,轻触延迟停止键来清除设置,风扇就会
在选择速度下继续运转。
对准机体 (尽可能)(图. 9)
在把机体贴到墙上之前,调整在机体安装点上的
两个螺丝的位置。
把机体挂到支撑螺丝上面,拧紧螺丝。
调整螺丝来调整机体的水平。
注意
: 生产商不会对由于任何安装或者通过非正当的
方式安装与运行产生的损坏负责。
图. 9
操作
中
文
14
问题 可能导致问题的原因 解决方法
烟机不运作 没电 确认插头已经插上,电源已经开
启。
风量小 油脂过滤器被油脂堵塞 清洗油脂过滤器,晾干后安装回去
木炭过滤器被油脂堵塞 更换新的木炭过滤器
抽油烟率太低 通风不足 确保厨房通风情况良好以使新
鲜空气能进入厨房内
木炭过滤器没安装 安装木炭过滤器,以设置为回流模
式
马达启动但是不能抽风 排风不好 请联系林内的售后服务中心
呼呼的声音 风扇页可能有外物碰触到 请联系林内的售后服务中心
灯不亮 灯泡损坏 更换掉烧坏的灯泡
灯泡松了 拧紧灯泡
常见故障的识别与处理
如果进行了以上的确认之后问题依然存在,请联系林内的售后服务中心请 求帮助。
请找出产品的型号,型号在机体的铭牌上,如图所示。(图. 13).
如果需要保修服务,请提供购买产品的证明与有效的保修证。
图.13 - 注意: 铭牌只起插图提示的
作用,不同产品的铭牌不同。
中
15
Peringatan Keselamatan ---15
Spesifikasi & Komponen---17
Pemasangan---18
Pengoperasian---19
Pemeliharaan & Perawatan---20
Pemecahan Masalah---21
Membuka Bungkusan
Jangan gunakan alat ini jika terdapat tanda kerusakan saat transportasi.
Jika kabel listrik rusak, harus diganti oleh pihak perusahaan atau pabrik, agen service atau orang yang ahli untuk mengatasi kerusakan.
Pastikan bahwa anak kecil tidak bermain dengan plastik pembungkus ini.
Cara Pemasangan
Tudung hisap bisa dipasang diatas kompor gas dan juga pemasak elektrik lainya. Tinggi minimum pemasangan dari atas tungku ke bagian bawah tudung adalah 700mm (kompor gas ) dan 550mm ( kompor listrik ). Gam.1
Selalu arahkan tudung hisap tepat ditengah kompor.
Untuk pengguna
Tudung hisap didesain untuk mengurangi bau tidak sedap dari dapur. Jangan menggunakan tudung hisap untuk tujuan yang tidak semestinya.
Jangan biarkan anak kecil mengoperasikan alat ini. Awasi oleh orang tua.
Pemasangan dan perbaikan harus dilakukan oleh orang yang berpengalaman.
Sangat berbahaya untuk memodifikasi bagian dari alat ini. Merusak sambungan listrik atau bagian mekanik bisa menyebabkan kesalahan penggunaan dan mungkin menyebabkan pengguna dalam bahaya.
Jangan pernah biarkan api tinggi langsung dibawah tudung hisap. Selalu tutupi dengan alat memasak.
DAFTAR ISI
Silahkan anda membaca panduan manual ini sebelum anda menggunakannya. Pentujuk manual ini berisi informasi yang penting yang berhubungan dengan keselamatan pribadi anda dan juga cara penggunaan dan perawatanya.
PENTING
Untuk meregristrasi garansi produk anda, silahkan menyalin nomer seri pada stiker yang ada pada kemasan kartu garansi anda. Silahkan hubungi layanan purna jual dikota anda jika anda memerlukan bantuan lebih lanjut.
PERINGATAN KESELAMATAN
Ba
h
asa
In
d
on
esi
16
Pastikan bahwa alat anda terpasang pada lokasiyang mempunyai ventilasi udara yang permanen.
Saat membuat saluran listrik, periksa bahwa sumber arus utama dan frekuensi sama dengan yang ada di data plate.
Penghubung listrik harus dibuat sesuai pada standar local. Pastikan bahwa tegangan diarea anda benar sebelum dinyalakan.
Gunakan penghubung listrik yang sesuai dengan lokasi anda. Penghubung listrik dari alat ini harus terhubung dengan ground (yang berlaku):
o Hijau dan kuning = Bumi, Biru = netral, Cokelat =
Arus
Untuk mode ventilasi:
o Hubungkan tudung hisap pada saluran pipa
dengan diameter minimum Ø120mm. Cari langkah terpendek dan terlurus yang paling mungkin.
o Jangan hubungkan tudung hisap pada penghisap
yang membawa sisa pembakaran.
o Atur ventilasi yang tepat jika tudung hisap
digunakan dengan alat lain yang tidak didukung oleh tegangan listrik misalnya alat pembakar gas. Dapur harus mempunyai ventilasi udara yang terhubung langsung keluar untuk memungkinkan adanya sirkulasi udara.
Catatan: Perusahaan tidak akan bertanggung jawab
untuk keluhan yang menyangkut disain dan tata letak pipa.
Jangan memasak atau memanggang langsung dibawah tudung hisap. Api bisa menyebabkan tudung terbakar karena terhisap dan mungkin filter bisa terkena api.
Selalu pantau saat memasak secara terus menerus karena jika terlalu panas bisa meningkatkan resiko kebakaran.
Jangan mengoperasikan tudung hisap tanpa grease filter.
Sangat penting untuk membersihkan atau mengganti penyaring dengan interval waktu tertentu. Tumpukan endapan minyak bisa meningkatkan resiko kebakaran.
Jangan pernah menyambungkan alat ini dengan sumber arus saat akan melakukan pembersihan atau perawatan tudung.
Pastikan bahwa sumber arus bebas dari sumber panas lainnya atau benda tajam.
Jangan gunakan colokan yang ganda dan kabel yang terlalu panjang. Sesuatu yang terlalu berlebihan berbahaya dan bisa menyebabkan kerusakan.
Pembuangan
Alat ini dan pembungkusnya sangat ramah lingkungan dan bisa didaur ulang.
Tolong bantu kami untuk menjaga lingkungan dengan membuang pembungkus pada tempat yang sesuai dan medaur ulang alat yang sudah lama.
Sebelum membuang alat yang lama, matikan dari sumber arus dan pindahkan tegangan untuk menghindari kerusakan.
Catatan: Perusahaan tidak bertanggung jawab atas
kerusakan akibat pemasangan yang tidak benar atau kegagalan untuk mengambil tindakan-tindakan keselamatan yang tepat selama pemasangan dan penggunaan operasional alat ini.
17
Model RH-C107-GC
RH-C109-GC
Tegangan 220V - 240V / 50Hz
Daya Motor 220W
Daya Lampu 2 x 20W
Panjang kabel 1.5m Dimensi alat
(W x D x H): 70 cm model 90cm model
698 x 460 x 479-854mm 898 x 460 x 479-854mm
Catatan: Perusahaan mempuyai hak untuk
melakukan peningkatan dan memodifikasi alat ini tanpa ada pemberitahuan terlebih dahulu.
Ref Jml Komponen Produk
A 1 Mounting bracket
B 1 Inner Duct
C 1 Outer Duct
D 1 Motor Housing
E 1 Glass Panel
F 1 Charcoal Filter
G 2 Grease Filter
Jml Komponen Pemasangan
2 Screw M3 x 12
4 Screw ST5 x 25
Jml Dokumentasi
1 Pengoperasian/ Petunjuk
manual
SPESIFIKASI
KOMPONEN
Gam. 2
Gam. 3
Ba
h
asa
In
d
on
esi
18
Peralatan ini bisa dipasang dengan menggunakan mode ventilasi dan juga mode recycle.
Ducted mode (Mode ventilasi ) (Gam. 4)
Dalam mode ventilasi, kipas filter membersihkan uap masakan dan menyalurkanya ke grease filter. Udara kemudian mengalir keluar.
Grease filter menyerap partikel padat dalam uap masakan.
Dalam mode ini, hanya grease filter yang dipasang
(charcoal filter hanya tambahan).
Mode recycle (Gam. 5)
Cara ini, kipas tudung hisap mengubah asap yang dibersihkan di grease filter dan charcoal filter.
Udara bersih kemudian disirkulasikan lagi kedalam ruang dapur melalui lubang angin yang terbuka di bagian atas tudung hisap.Grease filter menyerap partikel solid asap saat memasak.
Charcoal filter didesign untuk menyerap bau tidak sedap. Pada mode ini baik grease filter dan charcoal filter dipasang.
Saluran atau penghubung (Gam. 6 & 6.1)
Pasang pipa berdiameter 150mm langsung ke udara luar (Gam. 6).
Jika menggunakan pipa berdiameter 120mm, hubungkan ke udara luar menggunakan penghubung yang lebih kecil (tidak tersedia).
Pasang kedua sambungan dengan benar (Gam. 6.1).
Sambungkan pipa ke luar ruangan.
Pemasangan pada dinding cabinet (Gam. 7 & 8)
Pastikan alat menempel pada lapisan dinding yang keras sehingga bias menopang berat alat ini.
Buat garis vertikal ditengah dinding.
Dari atas tungku (lihat A), buat garis horisontal (lihat B) diatas minimum level tinggi pemasangan.
Tandai titik refensi pada titik C. Ulangi langkah ini pada sisi lain.
Bor lubang berdiameter 8mm pada tengah titik. Masukan penopang kedinding.
Tentukan posisi tudung ke dinding menggunakan 2 baut ST5 x 25 yang tersedia. Catatan: Sesuaikan posisi tudung jika diperlukan (Gam. 9).
Tempatkan mounthing braket pada posisi tinggi yang diinginkan. Luruskan braket pada garis vertikal (lihat D).
Tandai pusat lubang braket dan bor dengan diameter Ø 8mm. Masukan penopang kedinding.
Pasang mounthing bracket dengan benar menggunakan 2 baut ST5 x 25 yang sudah ada.
Pasang inner duct ke mounting bracket
menggunakan 2 baut M3 x 12 yang ada (Gam. 8).
Geser outer duct kebawah dan pastikan bahwa outer duct terpasang dengan benar pada badan kap.
19
Untuk mendapatkan udara yang lebih baik. Kami menyarankan anda untuk menyalakan penghisap udara beberapa menit sebelum mulai memasak. Diamkan menyala selama kurang lebih 15 menit setelah memasak atau sampai bau masakan sudah hilang.
Tombol Pengaturan
Catatan: Tekan tombol sensor secara halus untuk menghidupkan alat ini.
LIGHT: Tekan untuk mematikan atau menghidupkan lampu.
LOW SPEED: Tekan untuk on/off kipas pada kecepatan rendah.
MEDIUMSPEED:Tekan untuk on/off kipas pada kecepatan sedang.
HIGH SPEED: Tekan untuk on/off kipas pada kecepatan tinggi.
DELAY STOP TIMER:
o Tekan untuk memilih delay stop timer pada 3, 6, 9, 12 atau 15 menit. Pengaturan waktu & penghitungan waktu
tampak dilayar. Kipas berhenti otomatis saat waktu beroperasi berakhir.
o Untuk menonaktifkan fungsi ini sebelum timer habis,tekan tombol speed untuk mematikan kipas. Atau, pencet
delay stop timer untuk menghapus setingan awal dan seting kipas pada kecepatan yang diinginkan.
Luruskan tudung body hisab (jika perlu) (Gam. 9)
Sebelum memasang body tudung hisap pada dinding, setelah 2 baut yang akan dipasang pada titik body tudung .
Kaitkan body tudung pada baut penyangga dan kuatkan baut penyangga sekuatnya.
Kaitkan body tudung pada baut penyangga dan kuatkan baut penyangga sekuatnya.
Pemasangan harus dilakukan oleh teknisi ahli.
Perusahaan tidak bertanggung jawab terhadap instalasi
yang tidak tepat dan tidak bertanggung jawab atas
garansi alat jika terjadi kerusakan yang diakibatkan oleh
instalasi pemasangan yang salah.
PENGOPERASIAN
Gam. 9
Ba
h
asa
In
d
on
esi
a
ight ow
peed
ediu
20
Grease filter / Penyaring minyak (Gam. 10)
Grease filter digunakkan untuk menyerap minyak yang berbentuk partikel selama proses memasak. Penyaring ini harus dipindah dan dibersihkan setiap 4 minggu sekali, tergantung dari banyaknya penggunaan. Bersihkan penyaring dengan tangan atau dengan pencuci piring.
Catatan: Hati hati selama mencuci jangan sampai membengkokkan penyaring/filters.
Jika dengan pencuci piring, Pilih program yang sesuai. Keringkan dulu sebelum memasang kembali. Catatan: Mungkin akan terjadi pemudaran warna.
Memindah dan memasukan kembali grease filter:
Untuk memindahkan,Tekan pegangan dan tarik kebawah pada waktu bersamaan.
Untuk memasang kembali,pasang saringan pada posisi yang tepat. Pastikan pegangan terlihat dari luar.
Charcoal Filter / Penyaring asap (Dimana diterapkan)
(Gam. 11)
Charcoal filter harus diganti saat kelihatan kotor atau kusam, biasanya setelah 6 sampai 12 bulan tergantung kondisi penggunaan.
Penyaring ini tidak bisa dicuci dan tidak bisa diperbaiki. Untuk memastikan alat ini berfungsi efektif, perawatan berkala sangat diperlukan misal tersumbatnya sirkulasi udara bisa menjadi
penyebab motor terlalu panas
Penyaring ini tidak bisa dicuci dan tidak bisa diperbaiki. Untuk memastikan alat ini berfungsi efektif, perawatan berkala sangat diperlukan misal tersumbatnya sirkulasi udara bisa menyebabkan motor terlalu panas.
Memindah dan memasang lagi charcoal filter:
o Pindah charcoal filter yang lama dari blower
seperti terlihat disamping ini.
o Cocokan dengan charcoal filter yang baru.
Membersihkan badan tudung hisap
Bersihkan tudung hisap menggunakan air detergen yang hangat dan kain yang lembut. Lap sampai kering dengan kain yang kering.
Hindari penggunaan zat kimia yang bias menyebabkan kerusakan permukaan tudung hisap.
Penggantian lampu (Gam. 12 & 12.1)
Ganti lampu dengan yang baru yang mempunyai tipe yang sama karena lampu yang mempunyai tegangan lebih tinggi bisa menyebabkan kerusakan unit.
Mengganti dan memindahkan lampu :
o Tekan keluar rangkain lampu dari dalam badan
hisap.(Gam.12)
o Matikan saluran lampu.(Gam.12.1) o Ganti dengan rangkaian lampu yang baru.
Catatan: Untuk pemesanan spare part, silahkan periksa dengan Rinnai after sales service daerah anda untuk bantuan lebih lanjut.
o Lakukan langkah yang sebaliknya untuk memasang
lagi.
PEMELIHARAAN & PERAWATAN
Pastikan bahwa alat ini tidak terhubung dengan sumber arus sebelum melakukan aktivitas perbaikan atau perawatan. Sangat penting untuk membersihkan atau mengganti filter dengan rentang waktu tertentu karena endapan minyak dapat meningkatkan resiko kebakaran. Jangan mengoperasikan tudung hisap tanpa grease filternya.
Gam. 10
Gam. 11
Gam. 12
Gam. 12.1
21
Masalah Kemungkinan Penyebab Cara mengatasinya
Tudung hisab tidak berfungsi Tidak ada suplai arus masuk cek konektor yang terhubung dan hidupkan tombol power utama
Sirkulasi Udara yang minim Grease filter tersumbat oleh endapan minyak
Bersihkan grease filter dan pasang kembali saat sudah kering
Charcoal filter tersumbat oleh cairan minyak
Ganti charcoal filter dengan set yang baru
Tudung hisap tidak efektif Ventilasi yang tidak memadai
Pastikan bahwa dapur memiliki ventilasi yang memadai untuk memungkinkan terjadinya sirkulasi udara segar.
Charcoal filter tidak terpasang
Pasang Charcoal filter untuk setingan pada mode recycle.
Motor berjalan tapi tidak ada aliran udara
Minimnya alat pembuangan udara. Silahkan hubungi Layanan purna jual Rinnai
Suara yang berisik Benda asing mungkin masuk atau bersinggungan dengan kipas
Silahkan hubungi Layanan purna jual Rinnai
Lampu tidak menyala Lampu yang mati / terbakar Ganti lampu yang rusak
Lampu yang longgar Kencangkan lampunya
PEMECAHAN MASALAH
Jika masalah tetap ada setelah pengecekan diatas, silahkan hubungi Layanan purna jual Rinnai untuk bantuan lebih lanjut.
Silahkan kutip nomer model dari peralatan anda seperti yang tertera pada data plate yang ada dalam peralatan anda. (Gam.13)
Untuk panggilan service bergaransi, perlu diketahui bahwa anda harus mempunyai bukti pembelian dan kartu garansi yang masih berlaku.
Gam.13 - Data plate hanya untuk gambaran saja dan spesifikasinya sangat banyak tergantung dari model.
Ba
h
asa
In
d
on
esi
24
Model RH-C107-GC
RH-C109-GC
Điện nguồn 220V - 240V / 50Hz Công suất motor 220W
Công suất đèn 2 x 20W Chiều dài cáp nguồn 1.5m
Kích thước
(W x D x H): Nhóm 70 cm Nhóm 90cm
698 x 460 x 479-854mm 898 x 460 x 479-854mm
Lưu ý: Nhà sản xuất có quyền thực hiện bất kỳ công nghệ cải tiến hay sửa đổi mà không cần thông báo trước.
Chi
tiết SL Linh kiện sản phẩm
A 1 Bát định vị máng che ống thoát
B 1 Máng trong
C 1 Máng ngoài
D 1 Buồng hút
E 1 Kính ngang
F 1 Than khử mùi
G 2 ưới lọc
SL Phụ trợ lắp đặt
2 Vít M3 x 12
4 Vít ST5 x 25
SL Tài liệu đính kèm
1 ướng dẫn lắp đặt/sử dụng
THÔNG S
Ố
K
Ỹ
THU
Ậ
T
CHI TI
Ế
T LINH KI
Ệ
N
Hinh. 2
Hinh. 3
Ti
ế
n
g
Vi
ệ
26
Đểđạt được hiệu quả tốt
Cho máy hoạt động trước khi bắt đầu nấu ăn.
Sau khi nấu ăn xong, cho á hoạt động thêm khoảng 15 phút để máy hút hết khói ùi còn đọng lại trong gian bếp và trong máy.
Bảng điều khiển
LIGHT: Chạ vào để tắt/mởđèn chiếu sáng
HIGH SPEED: Chạ vào để tắt/mở quạt ở tốc độ cao.
MEDIUM SPEED: Chạ vào để tắt/mở quạt ở tốc độ trung bình.
LOW SPEED:
Ch
ạ vào để
t
ắ
t/m
ở
qu
ạ
t
ở
t
ốc độ
th
ấ
p
.DELAY STOP TIMER:
o Chạ vào đồng hồđể chọn thời gian tắt, có thể chọn 3-6-9-12 hoặc 15 phút.
o Sau khoảng thời gian nhất định đã chọn, quạt sẽ tựđộng tắt.
Điều chỉnh thân máy nếu cần thiết (Hình 9)
rước khi gắn thân á vào tường, điều chỉnh hai vít treo máy.
Dùng các vít hỗ trợ (kè theo ) để cốđịnh máy cho chắc chắn
Canh chỉnh máy cho chính xác theo chiều cao và cân bằng theo chiều ngang.
Việc lắp đặt phải được thực hiện bởi các người có
chuyên môn. Nhà sản xuất sẽ từ chối bảo hành trong
các trường hợp lắp đặt sai hoặc sử dụng sai mục đích
thiết kế của sản phẩm.
Hinh. 9
V
Ậ
N HÀNH
Ti
ế
n
g
Vi
ệ
t
ight ow
peed
ediu peed
igh
28
Sự cố Nguyên nhân Cách khắc phục
Quạt không hoạt động Không có nguồn Kiểm tra kết nối nguồn hoặc bo nguồn
Áp lực gió yếu ưới lọc bịđầy dầu mỡ Vệsinh lưới lọc
Than hoạt tính đã bảo hòa (no dầu) Thay than hoạt tính mới
Hiệu quả hoạt động thấp Thiếu thông gió Đảm bảo gian bếp có gió ra vào
Không lắp lưới than
Gắn lưới than vào nếu sử dụng chếđộ tự
hủy
Motor hoạt động nhưng không có gió
Cửa thoát bị tắt hoặc quá hẹp
Vui lòng liên hệ Trung tâm DVCSKH Rinnai hoặc trạm bảo hành được ủy quyền
Có âm thanh lạ bên trong máy Có thểlà do tác động từ bên ngoài lên cánh quạt
Vui lòng liên hệ Trung tâm DVCSKH Rinnai hoặc trạm bảo hành được ủy quyền
Đèn không sáng Bóng đèn bị cháy
Thay thế bóng đèn bị hỏng
Liên kết điện của bóng hoặc chân đèn không chặt
Gắn cho chặt
S
Ự
C
Ố
VÀ CÁCH KH
Ắ
C PH
Ụ
C
Nếu những trường hợp trên vẫn còn sau khi đã kiểm tra, hãy liên hệ với Trung
tâm DVCSKH Rinnai hoặc trạm bảo hành được ủy quyền.
Vui lòng báo tên, sốseri được in trên tem hàng hóa và dán theo sản phẩm (Hình 13).
Với sản phẩm còn nằm trong thời gian bảo hành, đó là những điều kiện quan trọng và cần thiết cùng với phiếu bảo hành đính kè .
Hình 13. Lưu ý: tem hàng hóa là bao gồm việc thể hiện mục đích chỉ dẫn và thông sốđặc thù liên
quan đến các sản phẩm khác nhau.
Ti
ế
n
g
Vi
ệ
29
ค ำเตือนด้ำนควำมปลอดภัย
---29คุณสมบัติและส่วนประกอบของผลิตภัณฑ์
--- 31ค ำแนะน ำกำรติดตั้ง
---32ค ำแนะน ำกำรใช้งำน
---33กำรดูและและบ ำรุงรักษำผลิตภัณฑ์
--- 34กำรแก้ปัญหำเบื้องต้น
---35ค ำแนะน ำก่อนกำรใช้งำน
อย่าน าผลิตภัณฑ์นี้ไปใช้งาน
หากมีการเสียหายอันเนื่องมาจากการจัดส่งอย่างเห็นได้ชัด
หากสายไฟต่างๆได้รับความเสียหาย ผู้ผลิตต้องทดแทนให้
โดยช่างผู้ช านาญหรือผู้ให้บริการจะเป็นผู้ด าเนินการติดตั้งให้เพื่อหลีกเ
ลี่ยงอันตราย
ระวังอย่าให้เด็กเล็กๆน าพลาสติกที่ห่อบรรจุภัณฑ์ไปเล่น
ค ำแนะน ำก่อนกำรติดตั้ง
เครื่องดูดควันนี้สามารถติดตั้งได้ทั้งการใช้เตาแก๊สและเตาไฟฟ้า
โดยให้มีระยะห่างจากเตาแก๊สอย่างน้อย
700
มม.
และเตาไฟฟ้าอย่างน้อย
550
มม.
(
รูปที่
1)
ค ำแนะน ำก่อนกำรใช้งำน
เครื่องดูดควันได้ถูกออกแบบมาเพื่อใช้ก าจัดกลิ่นอันไม่พึงประสงค์ในห้องครัว
ดังนั้นไม่ควรใช้เครื่องดูดควันนอกเหนือจากคุณสมบัติที่ระบุไว้
ไม่อนุญาตให้เด็กใช้งานหรือเล่นเครื่องดูดควัน
และต้องก ากับดูแลหากใช้งานโดยผู้สูงอายุหรือผู้ที่มีปัญหาสุขภาพ
ในการติดตั้งหรือการซ่อมเครื่องดูดควัน ควรกระท าโดยช่างผู้ช านาญเท่านั้น
การดัดแปลงส่วนต่างๆของผลิตภัณฑ์เป็นเรื่องที่อันตราย
การแก้ไขดัดแปลงส่วนที่เป็นการต่อไฟฟ้าหรือชิ้นส่วนต่างๆ
อาจจะท าให้การท างานผิดพลาดและท าให้ผู้ใช้งานมีความเสี่ยงอันตราย
ขณะใช้งานเครื่องดูดควัน และมีการเปิดเตาเพื่อที่จะท าการปรุงอาหาร
จะต้องมีภาชนะหุงต้มวางไว้บนเตาเสมอ
อย่าปล่อยให้เปลวไฟกระทบกับที่ดูดควันโดยตรง
อย่าท าการย่างหรือท าอาหารที่มีแอลกอฮอล์ผสมโดยปล่อยให้เปลวไฟกระทบ
ที่ดูดควันโดยตรง เพราะ เปลวไฟอาจถูกดูดเข้าไปโดนตะแกรงกรองไขมัน
จะท าให้ตะแกรงไหม้ได้
สำรบัญ
โปรดอ่านคู่มือการใช้งานอย่างละเอียดก่อนการใช้งานครั้งแรก คู่มือนี้มีสาระส าคัญเกี่ยวกับความปลอดภัยในการใช้งาน รวมทั้งการดูแลรักาาผลิตภัณฑ์
ข้อส ำคัญ
โปรดใส่หมายเลขเครื่อง (
SerialNumber)
ที่ระบุไว้ข้างกล่องบรรจุภัณฑ์ลงในใบรับประกันสินค้าเพื่อท าการลงทะเบียนรับการประกันสินค้า
ค ำเตือนด้ำนควำมปลอดภัย
ภำษ
ำไท
31
รุ่น
RH-C107-GC
RH-C109-GC
แรงดันไฟฟ้า
220-240 / 50
220
2 x 20
ค ย ย 1.5
( x ย x ):
70 . 90 .
698 x 460 x 479-854 . 898 x 460 x 479-854 .
หมายเหตุ:ผู้ผลิตขอสงวนสิทธิ์ในการพัฒนาเทคโนโลยีโดยไม่ต้องแจ้งให้ทราบ
ล่วงหน้า
จ
A 1 อ
B 1
C 1
D 1 ค ค
E 1 จ
F 1 ค
G 2
จ
2 M3 x 12
4 ST5 x 25
จ
1 คู่มือการติดตั้งและคู่มือการใช้งาน
คุณสมบัติผลิตภัณฑ์
ส่วนประกอบผลิตภัณฑ์
รูปที่
2
ภำษ
ำไท
ย
33
กำรปรับกำรติดตั้งเครื่องดูดควัน
(
หากจ าเป็น
) (
รูปที่
9)
ก่อนการติดกระโจมเข้ากับผนัง
ให้ใส่สกรูจ านวน
2
ตัว
เข้ากับเครื่องดูดควันก่อนตรงจุดที่ต้องใช้แขวน
แขวนเครื่องดูดควันเข้ากับสกรูที่รองรับตัวเครื่อง แล้วขันสกรูให้แน่น
ขันสกรู เพื่อปรับระดับของเครื่องดูดควัน
เพื่อให้การระบายอากาศมีประสิทธิภาพดี แนะน าให้เปิดพัดลมดูดทิ้งไว้ก่อนท าการปรุงอาหารประมาณ
15
นาที
และหรือจนกว่ากลิ่นจากการปรุงอาหารหมดไปหลังการปรุงอาหารเสร็จ
สวิตช์ควบคุมพัดลมดูด
หมำยเหตุ
:
เพียงสัมผัสปุ่มสัญญาน พัดลมดูดควันก็จะท างาน
.
ไฟแสงสว่าง
: ON/OFF
แรงพัดลดต ่า
:
LOW
แรงพัดลมปานกลาง
:
MEDIUM
แรงพัดลมสูง
:
HIGH
ตั้งเวลาท างานอัตโนมัติ
:
DELAY STOP TIMER
o
กดปุ่ม
delay stop timer
ที่
3, 6, 9, 12
หรือ
15
นาที
หน้าจอจะแสดงตัวจับเวลานับถอยหลัง และพัดลมจะหยุดท างานอัตโนมัติเมื่อเวลาที่ตั้งค่าไว้หมดลง
o
การยกเลิกการจับเวลา ท าได้โดยการกดปุ่มปิดพัดลม
หรือกดปุ่ม
delay stop timer
เพื่อล้างข้อมูลที่ตั้งค่านับถอยหลัง
และให้ความเร็วพัดลมท างานตามที่ตั้งค่าไว้
การติดตั้งจะต้องด าเนินการโดยบุคลากรที่มีคุณภาพหรือช่างผู้ช านาญเท่านั้น
ผู้ผลิตขอปฏิเสธความรับผิดชอบทั้งหมดจากการติดตั้งที่ไม่ถูกต้องตามค าแนะน า
และไม่รับผิดชอบตามใบรับประกันสินค้ากรณีที่ความเสียหายนั้นเกิดจากการติดตั้งที่ไม่ถูกต้อง
ค ำแนะน ำกำรใช้งำน
รูปที่
9
ภำษ
ำไท
ย
รูปที่
8
ไ แสงสว่ำง แรงพัดลม
ต ่ำ
แรงพัดลมปำนกลำงแรงพัดลม
35
ค ค
จ ย
การไหลเวียนอากาศไม่ดี
ค
จ สนิท
ค
ย ค
ค
ย ย
ค ย
ย ย
ค
ค ค
ย
ค ย
ย
รินไน
ย ค
จ
ย
รินไน
ย
ย
กำรแก้ปัญหำเบื้องต้น
หากยังมีปัญหาในการใช้งานหลังจากได้ท าการแก้ปัญหาเบื้องต้น
ให้ติดต่อศูนย์บริการลูกค้าเพื่อให้ค าแนะน าหรือท าการช่วยเหลือ
กรุณาระบุหมายเลขรุ่นของผลิตภัณฑ์ที่ได้แสดงไว้บนตัวเครื่อง
(
รูปที่
13)
ส าหรับการให้บริการภายใต้เงื่อนไขการรับประกันนั้น
ต้องเป็นไปตามข้อมูลการซื้อและระยะเวลาในการเอาประกันตามที่ระบุไว้ในใบรับประกันสินค้า
–
ฉ ค ประกอบการอธิบา ย
ข้อมูลจ าเพาะของ จะแตกต่ างกัน
ภำษ
ำไท
Rinnai Customer Care Centres
China |中国
Guangzhou Rinnai Gas & Electric Room 2805, No.31 Jianghe Building, Tianshou Road, Guangzhou, China 广州林内燃具电器有限公司
中国广州天河区天寿路31号江河大厦2805室
Tel 电话 : (86) 20 3821 7976
Email 邮箱 : [email protected]
URL 网址 : www.gzrinnai.com.cn
Philippines
Mitsui Industia Corporation
10 Buenaventura St., Cor MacArthur Highway, Dalandan Valenzuela City, Philippines
Tel : (63) 2 292 9177 / 292 9179
Fax : (63) 2 292 8187
Indonesia
Customer Care of PT. Rinnai Indonesia Jl. Raya Pejuangan No.21,
Komp. Ruko Sastra Graha No.11 -13 Jakarta 11530
Tel : (62) 0800 1 889 889 (toll free) / 0815 112 99999 (SMS Center) Email : [email protected] URL : www.rinnai.co.id
Singapore
Rinnai Holdings (Pacific) Pte Ltd 47 Tannery Lane #05-01/02,
Elite Industrial Building II, Singapore 347794 Tel : (65) 6748 9478
Fax : (65) 6745 9240 Email : [email protected] URL : www.rinnai.sg
Macau |澳門
Fu Lei (Leong Si) Trading Limited
Avenida do Almirante Lacerda No. 14-14C, Edf. Industrial Iao Son 11-And-A, Macau 冨利(粱氏)貿易有限公司
澳門提督馬路14-14C,祐順工業大厦11樓A
Tel 电话 : (853) 2822 0889
Fax 传真 : (853) 2822 2733
URL 网址: www.rinnai.com.hk/mo
Thailand |
ประเทศไทย
Rinnai (Thailand) Co., Ltd.
61/1 Soi Kingkaew 9, Kingkaew Rd.
Racha Thewa, Bangphli, Samutprakarn 10540, Thailand
บริษัท รินไน (ประเทศไทย) จ ำกัด
D2-3-G & D2-3-1, Block D2, Pusat Perdagangan Dana 1, Jalan PJU 1A/46, 47301 Petaling Jaya,
Selangor Darul Ehsan, Malaysia
Tel : (60) 3 7832 0037 / 7832 0038 / 7832 0039 Fax : (60) 3 7832 0036
URL : www.rinnai.com.my
Vietnam | Việt Nam
Rong Viet Commerce Company Limited 120 3/2 Street, Ward 12, District 10, Ho Chi Minh City, Vietnam
Công Ty TNHH Thương Mại Rồng Việt URL : www. rongviet-rinnai.com
Myanmar | ျမန္မာ
Myanmar Kowa International Co., Ltd
No.199, Ground Floor, 34th Street (Upper Block), Kyauktada Township, Yangon, Myanmar
အမွတ္ (၁၉၉)၊ ၃၄ လမ္း ( )၊ ေက်ာက္တံတားၿမိဳ႕နယ္၊ ရန္ကုန္ၿမိဳ႕။
Tel ဖုန္း: (95-1) 245925 / 246304 / (95-9) 7300 7773 Fax ဖက္(စ္) : (95-1) 245925