Manage Partitions
with GParted How-to
A task-based, step-by-step guide that empowers you
to use your disk space effectively
Curtis Gedak
Manage Partitions with GParted How-to
Copyright © 2012 Packt Publishing
All rights reserved. No part of this book may be reproduced, stored in a retrieval system, or transmitted in any form or by any means, without the prior written permission of the publisher, except in the case of brief quotations embedded in critical articles or reviews.
Every effort has been made in the preparation of this book to ensure the accuracy of the information presented. However, the information contained in this book is sold without warranty, either express or implied. Neither the author, nor Packt Publishing, and its dealers and distributors will be held liable for any damages caused or alleged to be caused directly or indirectly by this book.
Packt Publishing has endeavored to provide trademark information about all of the companies and products mentioned in this book by the appropriate use of capitals. However, Packt Publishing cannot guarantee the accuracy of this information.
First published: November 2012
Production Reference: 1161112
Published by Packt Publishing Ltd. Livery Place
35 Livery Street
Birmingham B3 2PB, UK.
ISBN 978-1-84951-982-3
Credits
Author
Curtis Gedak
Reviewers
Andrew Bradford
Peter Wu
Acquisition Editor
Mary Nadar
Commissioning Editors
Priyanka Shah
Yogesh Dalvi
Technical Editor
Vrinda Amberkar
Project Coordinator
Shraddha Bagadia
Proofreader
Lydia May Morris
Production Coordinator
Prachali Bhiwandkar
Cover Work
Prachali Bhiwandkar
Cover Image
About the Author
Curtis Gedak
has managed the GParted project for the past 4 years, coordinating volunteer efforts and resources, managing releases, maintaining the website, developing new features,fixing bugs, and much more. For over 2 decades, Curtis developed a solid set of technical and
management skills while working for a variety of companies in industries such as utilities, agriculture, and oil and gas. During this time he specialized in applying relational database technology, managing heterogeneous environments, and developing applications in a
multitude of programming languages. With his strong interpersonal skills and sound technical ability he has been instrumental in the success of many projects. Curtis holds a Bachelor of Science degree in Computer Engineering from the University of Alberta.
About the Reviewers
Andrew Bradford
has been a developer on the Cross Linux From Scratch(http://cross-lfs.org) project and an active participant in the BeagleBoard.org community (http://beagleboard.org) since 2010. He's been using Linux since RedHat 7 and since then, except for 1 year with a Mac, has been running Linux on the
desktop quite successfully. His current interests involve Debian, embedded Linux, flash
memories, and Ruby on Rails.
I'd like to thank my wife, Meghan, and my daughter, Erin. They're both amazing and they inspire me every day.
www.PacktPub.com
Support files, eBooks, discount offers and more
You might want to visit www.PacktPub.com for support files and downloads related to your book.Did you know that Packt offers eBook versions of every book published, with PDF and ePub
files available? You can upgrade to the eBook version at www.PacktPub.com and as a print book customer, you are entitled to a discount on the eBook copy. Get in touch with us at [email protected] for more details.
At www.PacktPub.com, you can also read a collection of free technical articles, sign up for a range of free newsletters and receive exclusive discounts and offers on Packt books and eBooks.
http://PacktLib.PacktPub.com
Do you need instant solutions to your IT questions? PacktLib is Packt's online digital book
library. Here, you can access, read and search across Packt's entire library of books.
Why Subscribe?
f Fully searchable across every book published by Packt
f Copy and paste, print and bookmark content
f On demand and accessible via web browser
Free Access for Packt account holders
Table of Contents
Preface
1
Manage Partitions with GParted How-to
5
Creating live media and running GParted (Must know) 7
Identifying proper disk device (Must know) 11
Identifying partitions and actions available (Must know) 14
Checking and repairing a partition (Should know) 17
Getting space by shrinking a partition (Should know) 21
Creating a new partition (Should know) 23
Moving a partition (Become an expert) 27
Adding space by growing a partition (Should know) 31
Formatting a partition (Should know) 33
Preparing a new disk device for use (Become an expert) 37
Copying a partition (Become an expert) 41
Deleting a partition (Should know) 45
Moving space between partitions (Become an expert) 47
Preparing for dual boot with GNU/Linux (Become an expert) 51
Adding space to GPT RAID (Become an expert) 61
Rescuing data from a lost partition (Become an expert) 63
Preface
Manage Partitions with GParted is a practical, hands-on guide that provides step-by-step instructions, including screenshots, to effectively use your hard drive.
With this book you start with simple tasks that help you to identify drives and partitions. Next you progress to tasks covering the basics of how to grow, shrink, move, and copy
partitions without data loss. You finish with advanced tasks that leverage the basic tasks
to prepare for new operating systems, migrate space between partitions, and share data among Windows, GNU/Linux, and Mac OS X.
By following through the tasks, from basic to advanced, this book will empower you with the knowledge and tools to manage partitions with GParted.
What this book covers
Creating live media and running GParted (Must know), introduces the best way to access all of the features of GParted and walks you through the steps to create and boot your very own GParted Live CD.
Identifying proper disk device (Must know), describes how to identify a variety of disk
device types through the GParted application so that you can be confident in selecting
the correct device.
Identifying partitions and actions available (Must know), points out how to distinguish between different partitions and the types of operations available, increasing your knowledge of the potential options open to you for partition editing.
Checking and repairing a partition (Should know), discloses how to spot problems with partitions and outlines how you can approach resolving these problems.
Getting space by shrinking a partition (Should know), expresses how to locate partitions with unused space, leading you through the steps to free up this space for use in other areas.
Creating a new partition (Should know), describes the different types of partitions and shows
Moving a partition (Become an expert), points out the implications of moving a partition, outlining how you can move a partition and address potential issues.
Adding space by growing a partition (Should know), details how to increase a partition's size, enabling you to resolve issues when a partition is short of space.
Formatting a partition (Should know), explains why you might wish to format an existing partition and the steps to accomplish this task.
Preparing a new disk device for use (Become an expert), covers which type of partition table
to use with different operating systems and firmware, and demonstrates how you can create
a new partition table.
Copying a partition (Become an expert), outlines the impact of duplicate UUID and label issues, showing you the steps to copy a partition and address these considerations.
Deleting a partition (Should know), describes the steps to delete a partition and outlines how you can address a potential unexpected outcome.
Moving space between partitions (Become an expert), reveals how you can use a combination of recipes to migrate free disk space to where it is most needed.
Preparing for dual boot with GNU/Linux (Become an expert), breaks out the steps to prepare your disk partitions, including an example of how to install a popular GNU/Linux distribution
and therefore enabling you to share files between Windows and Linux.
Adding space to GPT RAID (Become an expert), discloses how to resolve a common problem that occurs when you add storage space to a GPT RAID.
Rescuing data from a lost partition (Become an expert), covers the steps needed to attempt rescuing data from a lost partition, enabling you to try recovering from accidental partition deletion.
Appendix: Tips and tricks, outlines additional tasks you can do with GParted, such as maintaining a Mac OS X hybrid partition table, editing iPod partitions, and adding space to virtual machines.
What you need for this book
You will need a basic understanding that disk devices can be divided into separate areas, called partitions, and that these partitions can be used for different purposes.
To follow the recipes in this book you will need an x86 or x86_64 based computer running an operating system, such as Windows, GNU/Linux, or Mac OS X, and a copy of GParted Live (software available for free download from the Internet).
Alternatively, if your computer does not have a CD/DVD drive, a blank USB flash drive can be
used to install a bootable GParted Live image.
Who this book is for
Are you a computer enthusiast keen to maximize your computer's potential?
Have you ever wanted to run multiple operating systems, store data separate from the OS,
or otherwise improve the effectiveness of your disk space?
If so, this book is for you.
Conventions
In this book, you will find a number of styles of text that distinguish between different kinds
of information. Here are some examples of these styles, and an explanation of their meaning.
Code words in text are shown as follows: "Download the disk image file gparted-live-w.x.y-z.iso for the latest stable release of GParted Live from the GParted website."
Any command-line input or output is written as follows:
sudo mkdir /mnt/myusb
New terms and important words are shown in bold. Words that you see on the screen, in menus or dialog boxes for example, appear in the text like this: "To select a device, go to the GParted | Devices menu option and select a device of the correct size".
Warnings or important notes appear in a box like this.
Tips and tricks appear like this.
Reader feedback
Feedback from our readers is always welcome. Let us know what you think about this book—what you liked or may have disliked. Reader feedback is important for us to develop titles that you really get the most out of.
If there is a topic that you have expertise in and you are interested in either writing or contributing to a book, see our author guide on www.packtpub.com/authors.
Customer support
Now that you are the proud owner of a Packt book, we have a number of things to help you to get the most from your purchase.
Downloading the example code
You can download the example code files for all Packt books you have purchased from your
account at http://www.PacktPub.com. If you purchased this book elsewhere, you can visit http://www.PacktPub.com/support and register to have the files e-mailed directly to you.
Errata
Although we have taken every care to ensure the accuracy of our content, mistakes do happen.
If you find a mistake in one of our books—maybe a mistake in the text or the code—we would be
grateful if you would report this to us. By doing so, you can save other readers from frustration
and help us improve subsequent versions of this book. If you find any errata, please report them
by visiting http://www.packtpub.com/support, selecting your book, clicking on the errata submissionform link, and entering the details of your errata. Once your errata are verified, your
submission will be accepted and the errata will be uploaded on our website, or added to any list of existing errata, under the Errata section of that title. Any existing errata can be viewed by selecting your title from http://www.packtpub.com/support.
Piracy
Piracy of copyright material on the Internet is an ongoing problem across all media. At Packt, we take the protection of our copyright and licenses very seriously. If you come across any illegal copies of our works, in any form, on the Internet, please provide us with the location address or website name immediately so that we can pursue a remedy.
Please contact us at [email protected] with a link to the suspected pirated material.
We appreciate your help in protecting our authors, and our ability to bring you valuable content.
Questions
Manage Partitions with
GParted How-to
Welcome to Manage Partitions with Gparted where we will lead you on a path to knowledge and discovery that will empower you to take control of your disk storage partitions.
Your first question might be—Why would this be of interest to me?
That is a good question.
f Have you ever run out of storage space on your C: drive, while having plenty of free space in your D: drive?
f Perhaps you have an interest in installing a new operating system, or upgrading your
current one?
f Or, maybe you wondered if there is a way to make computer maintenance tasks
quicker, or data backup more manageable?
This book will help you meet these challenges by providing the steps and knowledge needed to successfully manage your disk device partitions.
In the beginning...
In the early days of computing and disk storage devices, file system and partition tools were very basic. You could create a partition, format the partition with a file system, and read and write data to the file system. For a long time, these basic tools were all that was available.
As disk storage grew, a need arose to be able to add and change partitions to better utilize the
Fortunately a number of people who believed in Free Software took it upon themselves to address these shortcomings. Some researched and developed tools to permit editing
partitions. Others focused on tools to resize file systems without losing the contents. These
tools were then published as Free Software with Open Source licenses, enabling all of us to use and share this software with our friends, family, and co-workers.
Many of these partition and file system tools are available only as text-based commands. To
reach a wider audience, the GParted team saw a need for making these tools easier to use. This resulted in the creation of GParted, which provides a graphical interface to these partition
libraries and file system tools.
GParted software
In the recipes that follow, we will be using the GParted application from live media containing the GParted Live image.
GParted Live is a small bootable GNU/Linux distribution for x86- and x86_64-based computers that enables you to use all the features of the GParted application on Windows, GNU/Linux, and Intel-based Mac OS X computers.
Importance of computer system backups
Editing partitions has the potential to cause loss of data; there is always the possibility that something could go wrong due to software bugs, hardware failure, or power outage.
As such you are strongly advised to backup your computer system. Backup, test your backups, and backup again. Believe me, there might come a time when you will be glad you did this.
There are many different ways to backup your computer system. Some people make a complete image backup of their storage devices. Others such as myself backup the data only, with the realization that if something goes horribly wrong then I will need to re-install the operating system and applications from original media, in addition to restoring my valuable data. How you backup your computer information is up to you. The important thing is to make good backups.
Disclaimer
This book is distributed in the hope that it will be useful, but without any warranty; without
even the implied warranty of merchantability or fitness for a particular purpose.
And now with the necessities out of the way, let us get on with learning how to manage our partitions.
Creating live media and running GParted
(Must know)
We will need a copy of the GParted software for all of the recipes that follow. As such, we will start by downloading GParted Live, burning the image to a CD, and then booting from the CD.
Getting ready
You will need a blank CD-R or CD-R/W disc, a CD burner, and CD writing software.
How to do it...
Follow these steps to create a Live CD:
1. Download the disk image file gparted-live-w.x.y-z.iso for the latest stable release of GParted Live from the GParted website, http://gparted.org/ download.php.
2. Optionally, verify the integrity of the downloaded file by running a program to determine the MD5SUM of the .iso file and ensuring that this value matches the MD5SUM checksum listed on the above mentioned web page.
Now, boot your computer using the Live CD:
1. Reboot your computer with GParted Live CD in the CD tray of your computer.
2. Press the Enter key when the GParted Live boot screen is displayed:
4. Press the Enter key to use the US English language:
6. You are now ready to begin using GParted.
How it works...
The best way to use GParted is from Live media, such as GParted Live burned to a CD or
written to a USB flash drive. When your computer is booted from the hard drive, the operating
system has access to the partitions. To prevent this access and hence enable all supported partition editing actions, boot your computer using GParted Live removable media.
By downloading and using the latest stable release of GParted Live, you will have access to all
the latest features and bug fixes.
There's more...
Missing MD5SUM
If the MD5SUM program is not available on your computer, you can locate this software on the Internet with search criteria such as md5sum download.
Missing CD writer software
If you do not have CD writing software, you can locate this type of software on the Internet with search criteria such as cd burning software.
Additional help
The GParted website contains additional resources to help you. See http://gparted.org/ help.php.
For example, you can learn how to install GParted Live on a USB flash drive, on a hard drive, or
on a PXE server.
Identifying proper disk device (Must know)
Before performing any partition editing, it is important to select the correct disk device. To do this we look at details, such as size, model, manufacturer, and device name. These details contain valuable information that will guide selection of the correct device.How to do it...
1. Size is the first indicator of which device to choose. To select a device, go to the
2. If there is more than one device of the same size, additional information is needed. To view more device information, select the View | Device Information
menu option, which will toggle the display of the device information pane, as shown in the following screenshot:
3. Examine the device details, such as model, partition table, and sector size, to see if this is the device to modify.
4. If there are two or more identical disk drives from the same manufacturer, then look at the partition layout.
5. Examine the partitions in the graphical display area, and also in the text list of details to see if this is the correct device.
6. If there are two identical disks with the same partition layout, then this might be a
RAID configuration. In this situation examine the device name as well. RAID arrays, which are configured using the motherboard BIOS, will have device names that start
with /dev/mapper/.... With RAID configurations choose the RAID device name. Please note that the /dev/mapper directory might also contain Logical Volume Management (LVM) or encrypted (dm-crypt) entries.
If the correct device has not yet been chosen, then go back to step 1 and start over by selecting a different device.
How it works...
Often, size alone can distinguish among different disk devices. Disk sizes can be a little tricky
though because disk manufacturers use SI decimal prefixes (for example, 1 MB = 1,000,000 bytes), whereas GParted uses IEC binary prefixes (for example, 1 MiB = 1,048,576 bytes). The
The device name is also useful to help distinguish among different disk devices. Device names vary by disk device as shown in the following table:
Disk device types Sample device names
Hard disk drives (IDE, SATA, SCSI), USB flash drives, and dedicated hardware RAID drives
/dev/sda /dev/sdb
/dev/sdc Memory Cards (SD, SDHC, MMC) /dev/mmcblk0
/dev/mmcblk1
Motherboard BIOS (ATA) RAID drives /dev/mapper/isw_...
/dev/mapper/nvidia_... /dev/mapper/jmicron_... Linux Software RAID drives /dev/md0
/dev/md1
Historically IDE drives in Linux had device names such as /dev/hda and /dev/hdb. With Linux kernels >= 2.6.20 the device names became the same as for SATA, SCSI, and USB (for example, /dev/sda).
There's more...
There is another handy way to select a disk device. You can select a disk device from the drop-down menu in the upper-left hand corner of the window.
Device containing data shown as unallocated
Check for partition table problems by double-clicking on the unallocated disk device. This will bring up an information window, as shown in the following screenshot, which displays possible warnings about the device:
Two examples of warning messages that indicate partition table problems are as follows. A valid partition table:
f Can't have overlapping partitions
f Can't have a partition outside the disk
Resolution of these problems usually requires manually editing the partition table. The
GParted website FAQ contains instructions on how to approach fixing these problems.
See http://gparted.org/faq.php.
You can also seek help in the GParted forum. See http://gparted.org/forum.php.
Identifying partitions and actions available
(Must know)
With the proper disk device selected, it is important to choose the correct partition. In the following steps we will discover how to identify partitions and the actions available.
Getting ready
Before picking a partition, it helps to know some background information about the primary
types of file systems for each operating system. A brief summary of default file systems for
Default File System Operating System
EXT2/3/4 Linux
FAT16 Windows 95/NT/3.x, DOS
FAT32 Windows XP/ME/98
HFS+ Mac OS X
JFS IBM AIX
NTFS Windows 7/Vista/XP/2000/NT,
Windows Server 2008/2003
UFS BSD, SunOS/Solaris, HP-UX
XFS SGI IRIX
Note that many operating systems support more than just the above listed default file
systems. For example FAT16 and FAT32 are supported by many operating systems. As such, FAT16 and FAT32 are useful for sharing information between operating systems.
Typically drive letters in Windows and DOS correspond to partitions, except when the file
system is not recognized by these operating systems.
With Windows and DOS, C: is often the first, and perhaps the only, partition on the disk device. Normally this partition is used in the boot process and has the boot flag set, as shown
in the following screenshot. Note that only one partition on a disk device can have the boot flag set.
Many other partition layouts are possible. For example, some disk devices contain an Original Equipment Manufacturer (OEM) rescue partition at the start of the drive and hence the main operating system resides in a later partition.
How to do it...
1. Select the partition you wish to modify.
2. If the partition has a padlock icon, or key icon beside the partition entry, then the partition is in use. To be able to modify the partition, select the menu option,
3. Note that Linux swap and lvm2 physical volumes will display a different
menu name. Specifically:
For linux-swap, the menu option is:
Partition | Swapoff
For lvm2 pv, the menu option is:
Partition | Deactivate
4. If you wish to view the actions available for file systems, select the menu option, View |
How it works...
When a partition is selected, the partition editing actions that are not available will be grayed out in the menus, and the corresponding buttons in the taskbar will be disabled.
Many partition editing actions require that the file system is not in use. Hence to be able to perform the widest range of editing actions, the file system must not be mounted, enabled
as swap space, or in use in any other way.
There's more...
Operating systems, such as Linux, can use many different types of file systems and do not
require the boot flag to be set to boot the computer.
Labeling the partitions
To make it easier to identify partitions in the future, you can set a label on the file system in
the partition. The steps to set a label on a partition will be covered later under the Formatting a partition recipe.
Checking and repairing a partition
(Should know)
Sometimes problems arise with the file systems in partitions. In the following section you will learn how to identify and address problems with file systems.
How to do it...
You can identify possible file system problems by following these steps:
1. GParted indicates possible file system problems by placing an exclamation mark triangle icon beside the partition entry. If GParted displays the exclamation mark triangle icon, as shown in the following screenshot, select the partition:
3. View the problem in the Warning section at the bottom of the window.
4. Click on Close to close the Information window.
You can attempt repair of file system problems by following these steps:
1. Choose the Partition | Check menu option to queue the check operation. The queued check operation is shown in the operations pane at the bottom of the window. The operations pane appears when at least one operation is queued.
2. Choose the Edit | Apply All Operations menu option to apply the queued operations to disk.
3. Click on Apply to apply operations to disk.
How it works...
When GParted reads information from the device partitions and file systems, it makes notes
of any problems encountered. The presence of these problems is indicated by an exclamation mark triangle icon beside the partition entry.
Examples of problems that occur are as follows:
f The file system contains inconsistencies and requires repair
f The file system is smaller than the containing partition and could be grown to use
space more effectively
f Some required software is missing from the Linux installation so GParted is unable
to determine space usage in a file system
Note that the GParted Live image contains all of the required software
There's more...
While GParted operations are in the process of being applied, you can click on Details to open a details pane. Inside this pane you can click on each of the hierarchy of operations to expand and view more detailed information.
Checking and fixing NTFS file systems
An NTFS file system can become inconsistent if Windows is not cleanly shut down, for
example, if the computer was powered off while it was running. To repair the NTFS file system,
the preferred practice is to boot into Windows, open a command prompt (press Windows logo + R and enter cmd.exe) and use the check disk program by entering the following command:
chkdsk /f /r
Where the parameters indicate the following:
f /f: Fixes errors on the disk. The disk must be locked.
Note that if chkdsk cannot lock the drive, a message appears that asks you if you want to check the drive the next time you restart the computer. Answer y to this question, as shown in the following screenshot:
After entering the chkdsk command, go through two reboot cycles to ensure that Windows
has completely repaired the file system. A screen similar to the following is shown while
Getting space by shrinking a partition
(Should know)
When a partition contains extra space it can be beneficial to free up this space for use in
other partitions. This section demonstrates how to get space by shrinking a partition.
Note that the resize and move functionality is a core building block of re-organizing partitions. As shrinking, moving, and growing partitions involve different considerations and levels of risk, these three actions have been separated into their own individual tasks.
Getting ready
Before before performing this task, we highly recommend that you backup your data. This recipe involves moving the end of a partition boundary which is a moderate risk activity.
When you shrink a partition, the freed up space will be available immediately to the right of the partition. If this freed up space is required in a different location on the disk, you might need to consider moving other partitions, or resizing the start or end of the extended partition. Moving or growing partitions is covered in later tasks.
Remember that to perform operations on a partition, the partition must not be mounted or otherwise active. For operations on the extended partition, none of the logical partitions can be mounted or otherwise active. You can use the Partition menu to unmount, swapoff, or deactivate partitions as needed.
How to do it...
1. Select a partition containing unused space.
3. Click on the right-hand side of the partition and drag the right-hand side to the left.
Leave at least 10 percent or more unused space in the partition
because many file systems require some unused space to be
able to function properly.
4. Click on Resize/Move to queue the shrink operation. The queued shrink operation is shown in the operations pane.
5. Choose the menu option Edit | Apply All Operations to apply the queued operations to disk.
6. Click on Apply to apply operations to disk.
7. Click on Close to close the apply operations to disk window.
How it works...
In the above steps, we moved the right-hand side of the partition, also known as the end of the partition. This instructs GParted to resize (shrink) the partition.
In this example, we left many options at the default values. If you wish to maintain
If you require more precise partition sizing, you can enter values or use the arrows in the New size, or Free space following spin boxes.
There's more...
If you resize a partition containing an NTFS file system, you should reboot into Windows twice. This permits Windows to perform file system consistency checks.
Moving the left-hand side of a partition
If the left-hand side of the partition, also known as the beginning of the partition, is moved, the operation is no longer simply a partition resize. Two steps are required due to the
metadata contained at the beginning of the file system. One operation is needed to shrink the
partition, and another to move the partition.
Moving the start of a partition involves extra considerations that will be discussed later in the
Moving a partition recipe.
Creating a new partition (Should know)
In this recipe we will cover the steps to create a new partition for storing data. We also discuss options for creating different types of partitions.
How to do it...
1. Select unallocated space on a disk device.
3. Optionally, you can set the partition New size to a smaller value.
To adjust the partition size click on one of the side arrows on the partition graphic (shown in the following screenshot) and drag it to left or right. Alternatively enter a new value for New Size or click on the up and down spin button arrows beside the number.
To move the entire partition click on the partition and drag it to left or right.
4. Select a File system for the partition; for example, fat32. A list of default file systems
used by operating systems can be found in the Identifying partitions and actions available recipe.
5. Enter a Label for the file system; for example, MYDATA. 6. Click on Add.
7. Choose the Edit | Apply All Operations menu option to apply the queued operations to disk.
8. Click on Apply to apply operations to disk.
How it works...
The above steps instruct GParted to create a partition using all of the unallocated
space. Further, the partition is formatted with a file system with the label specified
(for example, MYDATA).
We left many options at the default values. Some other things to consider are:
f Creating the partition as a different type. For example, with an MSDOS partition table you might try using Create as an Extended Partition, or Create as a Logical Partition. Read on to learn why you might want to use different partition types.
f Setting the Align to drop-down list to Cylinder setting if you wish to maintain compatibility with older operating systems, such as DOS.
There's more...
One of the most common partition tables in use is the MSDOS partition table. This partition table has a limitation of four partition slots. The four slots can consist of up to four primary partitions, or up to three primary partitions and one extended partition. The extended partition is a special type of partition that can contain multiple logical partitions. If you wish to have more than four partitions in an MSDOS partition table, you need to create one extended partition. Inside the extended partition you can create more than one logical partition.
The choice of partition type is important because after a partition has been created, the partition type cannot be easily changed. For example, a primary partition cannot be easily turned into a logical partition, or vice versa. To change the partition type the partition must be deleted.
The three partition types use device numbers in the device name as follows:
f Primary partitions use device numbers 1 through 4 (for example, /dev/sda3).
f An extended partition uses one of the device numbers from 1 through 4.
f Logical partitions use device numbers 5 and higher (for example, /dev/sda12).
The following diagram depicts a primary partition (sda1), followed by an extended partition (sda2), which contains three logical partitions (sda5, sda6, and sda7).
The extended and logical partitions in this example were set up by first creating the extended
partition sda2. Then, within the extended partition we created the logical partitions sda5, sda6, and sda7.
Managing partition flags
Most computer users will not need to be concerned about setting partition flags. However, for users configuring more complex storage scenarios, such as RAID or Logical Volume Management (LVM), the following steps demonstrate how to toggle partition flags to be
set or unset.
1. Select an existing partition; for example, a partition that has already been created.
2. Choose the Partition | Manage Flags menu option and a Manage flags window will be displayed.
3. As shown in the following screenshot, select the checkbox to toggle the flag between set and unset (for example, lvm)
Moving a partition (Become an expert)
Moving a partition is a complex and long running operation. As there are implications to moving a partition, we will discuss these along with the steps to move a partition.Getting ready
Before performing this task, we highly recommend that you backup your data. This task involves moving the start of a partition boundary, which is a high-risk activity.
One implication of moving a system partition is possibly breaking the boot process. The boot process can be repaired, so before moving a partition you should be prepared to repair the
boot configuration. Specifically, you will need your operating system install media, and to be
ready to check the GParted website for details on how to repair the boot process.
How to do it...
1. Select a partition to move.
3. Click in the middle of the partition and drag the partition in the direction you want to move. (for example, to the right). Note that if grow and/or shrink are supported for the
file system then you can also change the size of the partition.
4. Click on Resize/Move to queue the move operation. 5. Click on OK to acknowledge the warning.
7. Click on Apply to apply operations to disk.
8. Click on Close to close the apply operations to disk window.
How it works...
Before moving a partition, GParted reads all sectors to check for bad sectors. After a successful read of all sectors, GParted will begin copying sectors to their new location. This process can take a very long time since many sector read and write actions are required.
The move process is different for an extended partition. Since an extended partition is a
container for logical partitions, it does not have its own file system. As such, moving an
extended partition involves moving the partition boundaries only.
Moving can be combined with resizing a partition. Since the move operation is distinct from the resize operation, GParted will optimally determine the order of the resize and move steps to minimize the amount of data to be moved.
In this example, we left many options at the default values. If you wish to maintain compatibility with old operating systems, such as DOS, then you should set the
Align to drop down list to the Cylinder setting.
There's more...
If you resize a partition containing an NTFS file system, you should reboot into Windows twice. This permits Windows to perform file system consistency checks.
Booting problems after moving
The configuration for boot loaders often includes data on specific disk locations in order
to boot an operating system. If a partition is involved in the boot process, and the partition is moved then this can break the boot process. When the boot process is broken, the boot
configuration must be repaired. A brief summary of repair commands is in the next section.
Windows 7/Vista repair commands
The following commands are entered at the command line when using the Recovery Console from the Windows Vista or Windows 7 installation disk.
f To repair the Master Boot Record of the boot disk:
bootrec /fixmbr
f To write a new partition boot sector to the system partition:
bootrec /fixboot
f To rebuild the Boot Configuration Data (BCD) store:
bootrec /rebuildbcd
Windows XP repair commands
The following commands are entered at the command line when using the Recovery Console from the Windows XP installation disk.
f To repair the Master Boot Record of the boot disk:
fixmbr
f To write a new partition boot sector to the system partition:
fixboot
f To rebuild the boot.ini configuration file:
bootcfg /rebuild
Adding space by growing a partition
(Should know)
When a partition is running out of free space it can be useful to add more space to the partition. Adding space is possible if unallocated space is available, or can be made available, immediately adjacent to the partition. In this recipe we cover the steps to add space to a partition.
Getting ready
Before performing this task, we highly recommend that you backup your data. This task involves moving the end of a partition boundary which is a moderate risk activity.
Note that in order to perform actions on a partition, the partition must be unmounted. In the case of an extended partition, all of the logical partitions must be unmounted or otherwise inactive.
If there is no unallocated space immediately adjacent to the partition you wish to grow, then you might need to shrink, move, or delete other partitions to free up adjacent unallocated space.
The location of the unallocated space is important. To add space to a primary partition the unallocated space must be outside of the extended partition. To add space to a logical partition the unallocated space must be within the extended partition. Hence you might need to resize the extended partition, placing the unallocated space outside or inside the extended partition.
How to do it...
2. Choose the Partition | Resize/Move menu option and a Resize/Move window is displayed:
3. Click on the right-hand side of the partition and drag it to the right.
4. Click on Resize/Move to queue the grow operation. The queued grow operation is shown in the operations pane.
5. Choose the Edit | Apply All Operations menu option to apply the queued operations to disk.
6. Click on Apply to apply operations to disk.
How it works...
In the above steps, we expanded the right-hand side of the partition, also known as the end of the partition. This instructs GParted to resize (grow) the partition.
In this example, we left many options at the default values. If you wish to maintain compatibility with old operating systems, such as DOS, you should set the Align to drop down list to the
Cylinder setting. If you require more precise partition sizing, you can enter values or use the arrows in the for New size, or Free space following spin boxes.
There's more...
If you resize a partition containing an NTFS file system, you should reboot into Windows twice. This permits Windows to perform file system consistency checks.
Moving the left-hand side of a partition
If the left-hand side of the partition, also known as the beginning of the partition, is moved then the operation is no longer simply a partition resize. Two steps are required due to the
metadata contained at the beginning of the file system. One operation is needed to move the
partition, and another to grow the partition.
Moving the start of a partition involves extra considerations that are discussed earlier in the
Moving a partition recipe.
Formatting a partition (Should know)
Normally you choose the file system type when creating a new partition. However, sometimes you want to keep an existing partition location exactly the same, but format it with a new file
system so you can use the partition for a different purpose. The following steps describe how to accomplish this task.
Getting ready
As formatting a partition will overwrite the existing data, if you wish to keep the data you must
How to do it...
1. Select the partition to format:
2. Choose the Partition | Format menu optionand select a file system; for example,
fat32.
A list of default file systems used by operating systems can be found
3. Choose the Edit | Apply All Operations menu option to apply the queued operations to disk.
4. Click on Apply to apply operations to disk.
5. Click on Close to close the apply operations to disk window.
How it works…
By selecting an existing partition and choosing format, you maintain the existing partition
boundaries and the partition number. The process of formatting writes new file system metadata to the partition, which destroys the links to previously existing files. Often
software recovery tools can be used to recover this data, but for our purposes all data in the partition is lost.
There's more...
Formatting the partition with a new file system will overwrite the label and UUID used by the previous file system. The next two sections cover how to set a new label, and also the
implications of the UUID change.
Labeling the partition
After formatting a partition you can choose to place a label on the file system to make it
easier to identify the partition. You can also label other existing partitions too.
1. Select the partition to label.
3. Enter a Label for the file system; for example, MUSIC.
4. Click on OK.
5. Choose the Edit | Apply All Operations menu option to apply the queued operations to disk.
6. Click on Apply to apply operations to disk.
7. Click on Close to close the apply operations to disk window.
Formatting creates a new UUID
Formatting an existing partition with a new file system results in the creation of a new Universally Unique Identifier (UUID) for the file system. Additionally, the previous volume label on the file system is lost. As the UUID or volume label is often used to identify the partition, this can impact how the operating system treats the file system.
For example, in Linux, if the file system was previously automatically mounted, then it might
cease to be mounted due to the change in UUID or volume label. To address this situation
you might need to update configuration files, such as /etc/fstab, to reflect the new UUID or volume label.
For file systems recognized by Windows (ntfs, fat16, and fat32), Windows will reuse the drive letter for the new file system and UUID. For example if G: was used for an NTFS partition, then after you reformat the partition with fat32 Windows will reuse G: as the drive letter. For file systems not recognized by Windows, no drive letter is assigned.
Preparing a new disk device for use
(Become an expert)
Often, a brand new disk device has no partition table. In this recipe we will write a partition table to the disk device. A partition table is required to be able to divide a disk device into distinct areas known as partitions.
Getting ready
Connect a new disk device to your computer.
If you wish to write a new partition table to an existing device, be sure to first backup the
data on the device because you will lose the partitions and the data.
For disk devices larger than 2 TB, you should consider using gpt instead of the default msdos partition table. More information on gpt and msdos partition tables can be found later in this recipe.
How to do it...
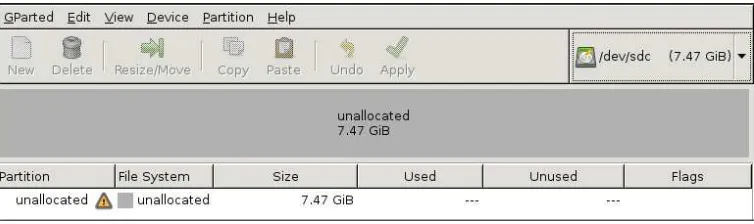
1. Select the new disk device using the Gparted | Devices | [your-new-disk-device]
menu option and the new device is displayed in the main window:
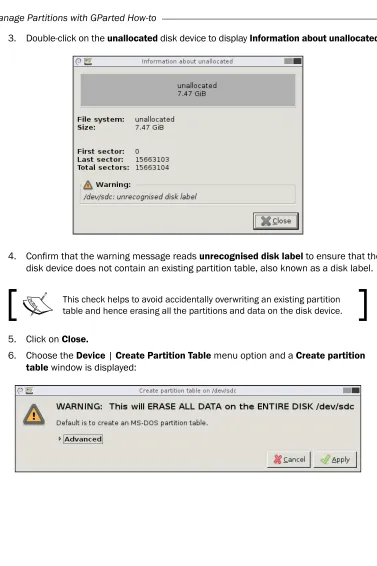
3. Double-click on the unallocated disk device to display Information about unallocated:
4. Confirm that the warning message reads unrecognised disk label to ensure that the disk device does not contain an existing partition table, also known as a disk label.
This check helps to avoid accidentally overwriting an existing partition table and hence erasing all the partitions and data on the disk device.
5. Click on Close.
7. Optionally, click on Advanced and select a different type of partition table, such as gpt:
8. Click on Apply to write the partition table to the disk device.
9. Choose the View | Device Information menu option to toggle on the device information panel display:
How it works...
In this example we confirm that the disk device is missing a partition table, also known as a
disk label. Then we write a new partition table to the disk device. At this point the disk device is now ready for new partitions to be created.
There's more...
GParted supports many more types of partition tables. While the gpt and msdos partition tables are commonly used, others are also supported such as mac for MacIntosh computers, and amiga for Amiga computers. Note that Mac OS X uses a hybrid gpt and msdos partition table which is described later in the appendix at the end of this book.
MSDOS partition table 2 tebibyte limit
On devices with a 512 byte sector size, the maximum size of a partition in an MSDOS partition table is about 2 tebibytes (2,199,023,255,040 bytes, or one sector less than 2 TiB). The
partition must also start within the first 2 tebibytes of the disk device. Hence if you have a
larger disk device, you will need to use a different partition table, such as a GUID Partition Table (GPT), to be able to access the all of the available disk space.
Booting from GPT disk device
Operating systems such as GNU/Linux and Mac OS X are able to boot from disk devices with GPT on Personal Computer/Basic Input Output System (PC/BIOS) hardware and newer
Extensible Firmware Interface (EFI) firmware.
Only the newer 64-bit Windows Vista SP1, Windows 7, Windows Server 2008, and higher can
boot from disk devices with GPT on newer EFI firmware. Other versions of Windows, including
32-bit versions, cannot boot from a GPT Disk and must boot from an MSDOS partition table on PC/BIOS hardware.
References
The partition table name mdsos dates back to 1983 when support for partitioned media was introduced with IBM PC DOS 2.0. IBM PC DOS was a rebranded version of Microsoft MS DOS.
For more information on disk partitioning, the msdos partition table—also known as Master Boot Record (MBR), the GUID partition table, PC/BIOS, and EFI, see:
f http://en.wikipedia.org/wiki/Disk_partitioning
f http://en.wikipedia.org/wiki/Master_boot_record
f http://en.wikipedia.org/wiki/GUID_Partition_Table
f http://en.wikipedia.org/wiki/BIOS
Copying a partition (Become an expert)
Copying a partition can be a complex and long running operation. As there are implications to copying a partition, we discuss these along with the steps to copy a partition.
How to do it...
1. Select the source partition to copy:
2. Choose the Partition | Copy menu option to place a copy of the partition in the copy buffer.
3. Optionally, if the destination device is different from the source device then select the destination disk device by choosing the GParted | Devices | [your-destination-disk-device] menu option, and the disk device is displayed in the main window. 4. Select unallocated space for the destination. The destination must be equal or
5. Choose the Partition | Paste menu option and a Paste window is displayed:
6. Click on Paste to queue an operation to copy the partition.
7. Choose the Edit | Apply All Operations menu option to apply the queued operations to disk.
8. Click on Apply to apply operations to disk:
11. Choose the Partition | New UUID menu option to queue an operation to set a new
Universally Unique Identifier (UUID) on the file system.
12. If the source file file system is NTFS or FAT then a warning will be displayed. Click on
OK to acknowledge the warning.
13. Select the copy of the partition.
14. Choose the Partition | Label menu option and a Set partition label window is displayed.
15. Enter a new label different from the source partition; for example, DATA-TWO. 16. Click on OK.
17. Choose the Edit | Apply All Operations menu option to apply the queued operations to disk.
18. Click on Apply to apply operations to disk.
How it works...
GParted performs copy operations either by using file system tools or by copying sector by sector. For file systems such as NTFS and XFS, GParted uses native file system tools to perform the copy. For file systems lacking native file system copy tools, GParted performs
a sector by sector copy.
The copied partition has the same UUID and label as the source partition. These duplicate UUIDs and labels can cause grief to operating systems because these values are supposed to be unique. To avoid such problems this task sets a new UUID and changes the label.
There's more...
In this example, we left many options at the default values. If you wish to maintain compatibility with old operating systems, such as DOS, then set the Align to drop down list to the Cylinder setting.
If you require more precise partition sizing, you can enter values or use the arrows in the Free space preceding, New size, or Free space following spin boxes. Note that the destination
partition size can be set larger than the source partition. For XFS file systems only, the
destination partition can be set smaller than the source partition.
UUID and Windows Product Activation
The UUID in the Windows system partition (normally C: drive) is used in the Windows Product Activation (WPA) scheme. Changes to this UUID might invalidate the WPA key. An invalid WPA key prevents login until you reactivate Windows. As such, if you change the UUID in the Windows system partition, you should be prepared to reactivate Windows.
Copying a partition for backup
If you copy a partition for the purpose of a backup, you will want the partition to be an exact copy (for example, the same UUID and label).
The steps to make a backup copy are first to connect the backup disk device. Then perform the copy operation steps as listed above, but skip steps 10 and higher. After you finish using
GParted, shut down your computer and remove the backup disk device. Failure to remove the backup disk device may cause confusion due to duplicate UUIDs or duplicate labels.
Pasting into existing partition
Copying all partitions
GParted can be used to copy all partitions on one disk device to another disk device. The process must be performed one partition at a time. If the destination disk is smaller, you might consider shrinking partitions with free space prior to copying the partitions.
GParted does not copy the boot code needed to start an operating system. To boot from the destination disk device, you will need to restore the boot process. To learn how to restore the boot process, see the earlier recipe, Moving a partition.
Deleting a partition (Should know)
Deleting a partition will free up space, enabling you to use the space in other new or existing partitions. This recipe covers the steps to delete a partition and describes a boot problem that might arise.
Getting ready
When you delete a partition you lose all of the data inside the partition. Hence, if you need any of the data, be sure to make a backup before deleting the partition.
How to do it...
1. Select a partition to delete:
2. Choose the Partition | Delete menu option.
3. Choose the Edit | Apply All Operation menu option to apply the queued operations to disk.
5. Click on Close to close the apply operations to disk window.
How it works...
Deleting a primary or extended partition removes the partition entry from the partition table.
Deleting a logical partition is different. Logical partitions are a special case because each logical partition has an Extended Boot Record (EBR) associated with the partition. The EBR is used to track the partition boundaries, and also to link to the next logical partition. Due to this linking nature, deleting a logical partition affects the device names of all higher numbered logical partitions. For example, if logical partition sda5 is deleted, then logical partitions sda6 and higher will have their partition number reduced by one (for example, sda6 will become sda5).
Changes in logical partition device names can adversely affect operating system boot process. As Windows can only be installed in a primary partition, the Windows boot process will not be affected. However, for operating systems that do permit booting from a logical partition,
such as GNU/Linux, you might need to edit configuration files such as /etc/fstab, or other
specific boot loader configuration files to restore the ability to boot.
There's more...
Deleting a partition that is part of the boot process, such as the C: drive or a system reserved partition in Windows, might cause a computer to fail to boot. If your intention was to remove
only one operating system, such as Windows, you might be surprised to find your other
operating systems also fail to boot. If this occurs you should be able to restore the ability to boot using the original operating system install media.
The GParted website contains additional resources to help you restore the operating system boot. See http://gparted.org/faq.php.
Deleting a partition by accident
If you have recently deleted a partition and have not yet used this space, then there is a chance you can recover the data or restore the partition.
Moving space between partitions
(Become an expert)
It can be frustrating to run out of free space in one partition (for example, C:) when another partition (for example, D:) has plenty. In this recipe we cover the steps to migrate free space from one partition to another.
Getting ready
Before before performing this task, we highly recommend that you backup your data. This task involves moving the start of a partition boundary, which is a high risk activity.
How to do it...
1. Select the partition with plenty of free space.
2. Choose the Partition | Resize/Move menu option and a Resize/Move window is displayed.
4. Click on Resize/Move to queue the operation.
5. Click on OK to acknowledge the move partition warning.
6. Select the extended partition.
7. Choose the Partition | Resize/Move menu option and a Resize/Move window is displayed.
9. Click on Resize/Move to queue the operation. 10. Select the partition that needs more free space:
11. Choose the Partition | Resize/Move menu option and a Resize/Move window is displayed.
12. Click on the right-hand side of the partition and drag it as far to the right as possible:
Notice the unallocated space between sda1 and sda2. This gap, which can be up to about 8 MiB, occurs due to having cylinder aligned and MiB aligned partitions on the same disk device. In this example, the sda1 partition was created with cylinder alignment to demonstrate this potential gap.
14. Choose the Edit | Apply All Operations menu option to apply the queued operations, to disk.
15. Click on Apply to apply operations to disk.
16. Click on Close to close the apply operations to disk window.
How it works...
In order to add space to a partition, unallocated space must be available immediately adjacent to the partition. To free up this space, we use many of the recipes covered earlier.
There's more...
As mentioned in previous recipes, if you resize or move a partition containing an NTFS file system, then you should reboot into Windows twice to permit Windows to perform file system
consistency checks.
Growing or moving a partition
To grow or move a partition, unallocated space must be available adjacent to the partition:
f When growing a logical partition, the unallocated space must be within the extended partition.
f When growing a primary partition, the unallocated space must not be within the extended partition.
You can move unallocated space inside or outside of an extended partition by resizing the extended partition boundaries.
Preparing for dual boot with GNU/Linux
(Become an expert)
In this recipe we pre-create partitions for the GNU/Linux operating system, the virtual memory swap space, and data sharing.
Getting ready
Before performing this task, we highly recommend that you backup your data. This task involves moving the end of a partition boundary, which is a moderate risk activity.
How to do it...
1. Select the current operating system primary partition.
3. Click on the right-hand side of the partition and drag it to the left so that at least 10 percent free space remains in the partition.
The 10 percent figure is a safe minimum to ensure that Windows runs properly. We need to balance the space allocated to Windows with the amount of space desired for a GNU/Linux installation (OS and swap space) plus a shared data partition. For example, with Ubuntu 12.04, the absolute minimum hard disk space needed for the operating system is 500 MB.
4. Click on Resize/Move to queue the operation. 5. Select the unallocated space.
7. Click on the right hand side of the partition and drag it to the left so that the partition is bigger than the minimum size required by the GNU/Linux distribution, but leaves some space for swap (for example, twice the RAM memory size) and data partitions (for example, any space left over).
8. Click on the File system drop down list and select ext4.
The ext4 file system is commonly used by many modern GNU/Linux distributions.
9. Click on Add to queue the operation. 10. Select the unallocated space.
12. Click on the Create as drop down list and select Extended Partition.
At least one extended partition is needed because an msdos partition table does not permit more than 3 primary partitions and 1 extended partition. Inside the extended partition we can create multiple logical partitions.
13. Click on Add to queue the operation.
14. Select the unallocated space from the extended partition.
16. Click on the right-hand side of the partition and drag it to the left so that the new size
is twice the amount of RAM in your computer (for example, 2 * 256 MiB = 512 MiB).
A value larger than the amount of RAM will enable the use of hibernation on devices such as laptop computers.
17. Click on the File system drop down list and select linux-swap. 18. Click Add to queue the operation.
19. Select the unallocated space from the extended partition:
21. Click on the File system drop-down list and select fat32.
The fat32 file system is freely supported by a wide range of operating systems. If you need to create files larger than 4 GB, then consider choosing an NTFS file system instead. Modern GNU/Linux distributions can read from and write to NTFS file systems by using the ntfs-3g FUSE driver.
22. Click on the Label text entry box and enter a label; for example, MYDATA. 23. Click on Add to queue the operation.
24. Choose the Edit | Apply All Operations menu option to apply the queued operations to disk.
25. Click on Apply to apply operations to disk and click on Close to close the apply operations to disk window.
How it works...
To make room for GNU/Linux we freed up unallocated space by shrinking the operating
system primary partition. Then we created a partition with the ext4 file system, and another with linux-swap. The extra step to create a data partition in fat32 format adds flexibility
because this partition can be shared with other operating systems.
Since the MSDOS partition table permits up to 4 primary partitions, we could have created the linux-swap and fat32 partitions as primary partitions too. However, this would prevent
creating additional partitions in the future. That is why we chose to place these two file
systems in logical partitions within an extended partition.
You are now ready to install GNU/Linux. Be sure to choose the manual partition option
when installing your distribution. That way you can configure Linux to use the partitions
you just created.
The following steps demonstrate how to choose a manual partition layout while installing Ubuntu 12.04.
1. After you have downloaded the distribution .iso file and burned it to a CD, boot your computer using the Ubuntu Live CD.
2. Choose your Language and the Install Ubuntu option. 3. At the Preparing to install Ubuntu screen, click on Continue.
5. Select the ext4 partition (for example, sda2) and click on Change....
7. Scroll down and select the fat32 partition (for example, sda6) and click on Change....
8. Set Use as to FAT32 file system, type in a Mount point (for example, /data), and click on OK.
10. Ensure that the Device for boot loader installation is correct (for example, /dev/sda).
11. Click on Install Now.
12. When you are prompted Do you want to return to the partitioner, click on Continue.
All data stored in the fat32 partition will be available to both operating systems. In this example Ubuntu installation, the fat32 partition data is accessible in the top level /data directory. In Windows, it is accessible through a drive letter, such as the G: drive.
There's more...
Remember from previous recipes that if you resize a partition containing an NTFS file system, you should reboot into Windows twice. This permits Windows to perform file
system consistency checks.
OEM Partition
Some personal computers have an Original Equipment Manufacturer (OEM) partition. This partition is usually at the start of the disk device and is often involved in the boot process. Most often the OEM partition contains tools to restore your PC to original factory condition. As such we suggest keeping this partition in case you ever need to restore your PC to factory condition.
Adding space to GPT RAID (Become an
expert)
Adding disk space to a Redundant Array of Inexpensive Disks (RAID) can increase the storage capacity of the RAID. With large RAIDs, the GUID Partition Table (GPT) is often used because msdos partition tables are limited to 2 TB. Since the GPT stores a backup copy of the partition table at the end of the disk device, the GPT must be updated to take advantage of the increased storage capacity. The steps to update the GPT are covered in this recipe.
Getting ready
Add the extra disk space to your RAID. As RAID configurations vary widely in the hardware and
How to do it...
1. The following screen shot shows RAID prior to adding the extra disk space:
2. Boot GParted with the extra space already added to the RAID.
3. Optionally, if the following window is displayed then click on Fix.
This window is displayed only when the RAID contains no partitions. If you choose Cancel or Ignore then you will not be able to use the recently added extra disk space.
4. Click on Fix when the following window is displayed.
5. The GPT now permits access to all of the RAID capacity.
How it works...
When extra disk space is added to RAID, the extra space is not immediately available for partitioning. This is because a GUID Partition Table has a backup copy of itself stored at the end of the device. To remedy this situation, update the GPT so that the backup partition table is moved to the end of the RAID. Then the GPT is able to see all of the extra storage capacity.
There's more...
If you do not fix the GPT, GParted will still show the additional disk space but you will be
unsuccessful when applying operations that create or adjust partitions to use the additional disk space.
With today's larger disks devices and with support built into modern operating systems, GPT is taking over from the msdos partition table. One of the main reasons is that an msdos partition
table cannot access partitions larger than 2 TB, or partitions that start beyond the first 2 TB of
the disk device. Another reason is that GPT supports 128 primary partitions, whereas msdos is limited to 4 primary partitions.
Note that RAIDs that use msdos partition tables do not require this repair step because there is only one copy of the msdos partition table, which is located at the start of the disk device.
Reference information
For more information on RAIDand the GUID partition table, see http://en.wikipedia. org/wiki/RAID, http://en.wikipedia.org/wiki/GUID_Partition_Table.
Rescuing data from a lost partition
(Become an expert)
Getting ready
While we hope it never happens to you, if you lose a partition by accidental deletion or by some other method and you do not have a backup of your data, this recipe may help you to rescue data from your partition. To improve the chances of rescuing data, do not write to the partition table by creating new partitions or resizing existing partitions.
This data rescue method supports searching for the following file systems: ext2, fat16, fat32, ntfs, reiserfs, and jfs. If you lost a different file system, then see the Restoring a deleted partition section at the