Dynamic Learning: Dreamweaver CS3
by Fred Gerantabee; Aquent Graphics Institute (AGI)
Publisher: O'Reilly
Pub Date: October 15, 2007
Print ISBN-10: 0-596-51057-8
Print ISBN-13: 978-0-59-651057-2
Pages: 416 Table of Contents | Index
Overview
Learning Dreamweaver CS3 is like having access to a top-notch team of your very own instructors. Written by product experts and trainers who have produced many of Adobe's training titles, the book takes you step-by-step through the process of learning to use Dreamweaver X like a pro.
This full-color book is organized into lessons, with easy-to-follow instructions, tips, examples, and review questions at the end of every lesson. Each lesson is self-contained, so you can go through the entire book sequentially or just focus on
individual lessons.
Topics covered include:
What's new in Dreamweaver CS3 Dreamweaver CS3 Jumpstart
Creating web sites
Styling pages with CSS
Adding Flash, video, and audio content
Dynamic Learning: Dreamweaver CS3
by Fred Gerantabee; Aquent Graphics Institute (AGI)
Publisher: O'Reilly
Pub Date: October 15, 2007
Print ISBN-10: 0-596-51057-8
Print ISBN-13: 978-0-59-651057-2
Pages: 416 Table of Contents | Index
Starting up
Chapter 1. Dreamweaver CS3 Jumpstart Section 1.1. Starting up
Section 1.2. What is Dreamweaver?
Section 1.3. Spry Widgets and the Spry framework for Ajax Section 1.4. Photoshop CS3 integration
Section 1.5. CSS layouts
Section 1.6. Adobe Device Central Section 1.7. Adobe Bridge CS3
Section 1.8. An overview of features Section 1.9. How web sites work
Section 1.10. An introduction to HTML
Section 1.11. A look at the Welcome Screen
Section 1.12. Creating, opening, and saving documents Section 1.13. Self study
Section 1.14. Review
Chapter 2. Creating a New Site Section 2.1. Starting up
Section 2.2. Creating a new site Section 2.3. Adding pages
Section 2.5. Work views
Section 2.6. A look at the Files panel Section 2.7. Self study
Section 2.8. Review
Chapter 3. Adding Text and Images Section 3.1. Starting up
Section 3.2. Typography and images on the Web Section 3.3. Adding text
Section 3.4. Understanding styles
Section 3.5. Previewing pages in a web browser Section 3.6. Understanding hyperlinks
Section 3.7. Creating hyperlinks Section 3.8. Creating lists
Section 3.9. Using the Text Insert bar Section 3.10. Inserting images
Section 3.11. Linking images
Section 3.12. Using Image Placeholders Section 3.13. Editing images
Section 3.14. Self study Section 3.15. Review
Chapter 4. Styling Your Pages with CSS Section 4.1. Starting up
Section 4.2. What are Cascading Style Sheets (CSS)? Section 4.3. A look at the CSS panel
Section 4.4. Creating new styles
Section 4.5. Internal vs. external style sheets Section 4.6. Self study
Section 4.7. Review
Chapter 5. Creating Page Layouts with Tables Section 5.1. Starting up
Section 5.4. Inserting a table Section 5.5. Selecting tables Section 5.6. Modifying tables
Section 5.7. Nesting a table inside a row Section 5.8. Adding content to tables Section 5.9. Formatting tables
Section 5.10. Other ways to work with tables Section 5.11. Importing table data
Section 5.12. Self study Section 5.13. Review
Chapter 6. Creating Page Layouts with CSS Section 6.1. Starting up
Section 6.2. The CSS Box model
Section 6.3. Positioning content with AP Divs Section 6.4. Box overlap and z-index
Section 6.5. The Insert Div button
Section 6.6. Styling boxes and adding content Section 6.7. Attaching a style sheet
Section 6.8. Fine-tuning layouts Section 6.9. Self study
Section 6.10. Review
Chapter 7. Fine-Tuning Your Workflow Section 7.1. Starting up
Section 7.2. Customizing panels and panel groups Section 7.3. Using the Favorites tab on the Insert bar Section 7.4. Resizing the Document window
Section 7.5. Using guides Section 7.6. Using grids
Section 7.7. The tag selector
Section 7.9. Zooming Section 7.10. Self study Section 7.11. Review
Chapter 8. Working with Frames Section 8.1. Starting up
Section 8.2. How frames work Section 8.3. Creating framesets Section 8.4. The Frames panel Section 8.5. Splitting a frame
Section 8.6. Specifying frame content Section 8.7. Self study
Section 8.8. Review
Chapter 9. Adding Flash, Video, and Sound Content Section 9.1. Starting up
Section 9.2. Making web content interesting Section 9.3. Inserting Flash movies
Section 9.4. Creating Flash content Section 9.5. Adding video
Section 9.6. Inserting sound Section 9.7. Self study
Section 9.8. Review
Chapter 10. Getting Modular with Reusable Items Section 10.1. Starting up
Section 10.2. Creating reusable page elements Section 10.3. Introducing snippets
Chapter 11. Under the Hood: Editing in the Code View Section 11.1. Starting up
Section 11.2. Getting to your code
Section 11.3. Working in the Code view Section 11.4. Validating your code
Section 11.5. Formatting code Section 11.6. Self study
Section 11.7. Review
Chapter 12. Building Web Forms Section 12.1. Starting up
Section 12.2. Forms in everyday (web) life Section 12.3. Building a contact form
Section 12.4. Adding form elements Section 12.5. Styling forms with CSS
Section 12.6. Form processing and validation Section 12.7. Adding form validation
Section 12.8. Self study Section 12.9. Review
Chapter 13. Managing Your Web Site: Reports, Optimization & Maintenance
Section 13.1. Starting up
Section 13.2. Working with the Files panel
Section 13.3. Using Check In/Check Out and design notes Section 13.4. Testing site integrity
Section 13.5. Generating site reports
Section 13.6. Optimizing pages for launch Section 13.7. Launching your site
Section 13.8. Site Launch Checklist
Section 13.9. Getting help and using the reference guides Section 13.10. Self study
Dynamic Learning: DreamweaverCS3
By Fred Gerantabee & AGI Creative Team
Additional writing: Jeremy Osborn, Jeff Ausura, Sean McKnight, Greg Heald
Series Editor: Christopher Smith
Technical Editors: Caitlin Smith, Cathy Auclair, Haziel Olivera, Linda Forsvall
Additional Editing: Edie Freedman
Video Project Manager: Jeremy Osborn
Cover Design: Edie Freedman, O'Reilly Media
Interior Design: Ron Bilodeau, O'Reilly Media
Graphic Production: Lauren Mickol
Additional Production: Aquent Studios
Indexing: Caitlin Smith
Video Editor: Trevor Chamberlin
Proofreading: Jay Donahue
Copyright © 2007 Aquent Graphics Institute (AGI). All rights reserved.
Published by O'Reilly Media, Inc., 1005 Gravenstein Highway North, Sebastopol, CA 95472.
O'Reilly books may be purchased for educational, business, or sales promotional use. Online editions are also available for most titles (safari.oreilly.com). For more information, contact our corporate/institutional sales department: 800.998.9938 or
Inc. Dynamic Learning Dreamweaver CS3, the cover images, and related trade dress are trademarks of O'Reilly Media, Inc. Many of the designations used by manufacturers and sellers to distinguish their products are claimed as trademarks. Where those designations appear in this book, and O'Reilly Media, Inc. was aware of a trademark claim, the designations have been printed in caps or initial caps. Adobe Dreamweaver™ is a registered trademark of Adobe Systems, Inc. in the United States and other countries. O'Reilly Media, Inc. is independent of Adobe Systems, Inc.
While every precaution has been taken in the preparation of this book, the publisher and author assume no responsibility for
errors or omissions, or for damages resulting from the use of the information contained herein.
Please report any errors by sending a message to
Print History: September 2007, First Edition. ISBN 10: 0-596-51057-8
ISBN 13: 978-0-596-51057-2 [F]
Starting up
About Dynamic Learning
Adobe® Dreamweaver® CS3 lets you design, develop, and maintain web sites and web pages. Both designers and
developers use Dreamweaver CS3 which lets you create and edit content using a visual layout or a coding environment. Dreamweaver CS3 also provides tight integration with other Adobe products such as Photoshop® CS3 and Flash® CS3 Professional.
Dynamic Learning: Dreamweaver CS3 is like having your own personal instructor guiding you through each lesson while you work at your own speed. This book includes 13 self-paced lessons that let you discover essential skills and explore the new features and capabilities of Dreamweaver CS3. Each lesson includes step-by-step instructions and lesson files, along with video tutorials that complement the topics covered in each lesson. These accompanying files are provided on the included Dynamic Learning: Dreamweaver CS3 DVD, developed by the same team of Adobe Certified Instructors and Dreamweaver experts who have created many of the official training titles for Adobe Systems.
Prerequisites
Before you start the lessons in Dynamic Learning:
Dreamweaver CS3, you should have a working knowledge of your computer and its operating system. You should know how to use the directory system of your computer so that you can navigate through folders. You need to understand how to locate, save, and open files. You should also know how to use your mouse to access menus and commands.
Before starting the lessons files in Dynamic Learning:
included with this book. You may use the 30-day trial version of Adobe Dreamweaver CS3 available at the Adobe.com web site, subject to the terms of its license agreement.
System requirements
Before starting the lessons in Dynamic Learning: Dreamweaver CS3, make sure that your computer is equipped for running Adobe Dreamweaver CS3, which you must purchase separately. The minimum system requirements for your computer to
effectively use the software are listed below and on the following page.
System requirements for Adobe Dreamweaver CS3: Windows OS
Intel® Pentium® 4, Intel Centrino®, Intel Xeon®, or Intel Core™ Duo (or compatible) processor
Microsoft® Windows® XP with Service Pack 2 or
Windows Vista™ Home Premium, Business, Ultimate, or Enterprise (certified for 32-bit editions)
512MB of RAM (1GB recommended)
1 GB of available hard-disk space (additional free space required during installation)
1,024x768 monitor resolution with 16-bit video card DVD-ROM drive
Internet or phone connection required for product activation
Macintosh OS
Mac OS X v.10.4.8 or later
512MB of RAM (1GB recommended)
1GB of available hard-disk space (additional free space required during installation)
1,024x768 monitor resolution with 16-bit video card DVD-ROM drive
Internet or phone connection required for product activation
Starting Adobe Dreamweaver CS3
As with most software, Adobe Dreamweaver CS3 is launched by locating the application in your Programs folder (Windows) or Applications folder (Mac OS). If necessary, follow these steps to start the Adobe Dreamweaver CS3 application:
Windows
1.
Choose Start > All Programs > Adobe
Dreamweaver CS3.
2.
Close the Welcome Screen when it appears. You
are now ready to use Adobe Dreamweaver CS3.
Mac OS
1.
Open the Applications folder, and then open the
Adobe Dreamweaver CS3 folder.
2.
Double-click on the Adobe Dreamweaver CS3
3.
Close the Welcome Screen when it appears. You
are now ready to use Adobe Dreamweaver CS3.
Menus and commands are identified throughout the book by using the greater-than symbol (>). For example, the command to print a document would be identified as File > Print.
Fonts used in this book
Dynamic Learning: Dreamweaver CS3 includes lessons that refer to fonts that were installed with your copy of Adobe Dreamweaver CS3. If you did not install the fonts, or have removed them from your computer, you may substitute different fonts for the exercises or re-install the software to access the fonts.
If you receive a Missing Font Warning, press OK and proceed with the lesson.
Resetting the Dreamweaver workspace
To make certain that your panels and working environment are consistent, you should reset your workspace at the start of each lesson. To reset your workspace, choose Window > Workspace Layout > Designer (Windows) or Window > Workspace Layout > Default (Mac OS).
Loading lesson files
lessons. You may copy the entire lessons folder from the
supplied DVD to your hard drive, or copy only the lesson folders for the individual lessons you wish to complete.
For each lesson in the book, the files are referenced by the file name of each file. The exact location of each file on your
computer is not used, as you may have placed the files in a unique location on your hard drive. We suggest placing the
lesson files in the My Documents folder (Windows) or at the top level of your hard drive (Mac OS).
Copying the lesson files to your hard drive:
1. Insert the Dynamic Learning: Dreamweaver CS3 Digital Classroom DVD supplied with this book.
2. On your computer desktop, navigate to the DVD and locate the folder named dwlessons.
3. You can install all of the files, or just specific lesson files. Do one of the following:
Install all lesson files by dragging the dwlessons folder to your hard drive.
Install only some of the files by creating a new folder on your hard drive, named dwlessons. Open the dwlessons folder on the supplied DVD, select the lesson you wish to complete, and drag the folder(s) to the dwlessons folder you created on your hard drive.
Macintosh users should see the important note on the next page.
dwlessons info window, click the You can drop-down menu labeled Read Only, which is located in the Ownership section of this window. From the You can drop-down menu, choose Read & Write. Click the arrow to the left of Details, then click the Apply to enclosed items... button at the bottom of the window. You may need to click the padlock icon before the Mac OS allows you to change these permissions. After making these changes, close the window.
Working with the video tutorials
Your Dynamic Learning: Dreamweaver CS3 Digital Classroom DVD comes with video tutorials developed by the authors to help you understand the concepts explored in each lesson. Each tutorial is approximately five minutes long and demonstrates and explains the concepts and features covered in the lesson. The videos are designed to supplement your understanding of the material in the chapter. We have selected exercises and examples that we feel will be most useful to you. You may want to view the entire video for each lesson before you begin that lesson. Additionally, at certain points in a lesson, you will encounter the DVD icon. The icon, with appropriate lesson number, indicates that an overview of the exercise being described can be found in the accompanying video.
Setting up for viewing the video tutorials
The DVD included with this book includes video tutorials for each lesson. Although you can view the lessons on your
computer directly from the DVD, we recommend copying the folder labeled Videos from the Dynamic Learning: Dreamweaver CS3 Digital Classroom DVD to your hard drive.
Copying the video tutorials to your hard drive:
1. Insert the Dynamic Learning: Dreamweaver CS3 Digital Classroom DVD supplied with this book.
2. On your computer desktop, navigate to the DVD and locate the folder named Videos.
3. Drag the Videos folder to a location onto your hard drive.
Viewing the video tutorials with the Adobe Flash
Player
To view the video tutorials, you need the Adobe Flash Player 8 or later (Adobe Flash Player 9). Earlier versions of the Flash Player will not play the videos correctly. If you're not sure that you have the latest version of the Flash Player, you can
download it for free from the Adobe web site:
http://www.adobe.com/support/flashplayer/downloads.html
The accompanying video files use the Adobe Flash Video format to make universal viewing possible for users on both Windows and Mac OS
Playing the video tutorials:
1. Make sure you have at least version 8 of the Adobe Flash Player.
2. On your computer desktop, navigate to the Videos folder on your hard drive or DVD.
3. Open the Videos folder and right-click (Windows) or
Ctrl+click (Mac OS) on the Dynamic_Learning_DW_CS3.swf file.
4. Choose Open > Open With > Flash Player. If there is no Flash Player option available, you may need to install the latest version of Flash Player.
Macintosh users on the new Intel-based Mac OS computers may need to download the standalone Flash Player from Adobe.com to see this option. If the Flash Player is installed, you can just double-click the video tutorial file you wish to view.
5. The video tutorial opens, using the Flash Player, and begins to play. The Flash Player has a simple user interface that allows you to control the viewing experience, including stopping, pausing, playing, and restarting the video. You can also rewind or fast-forward, and adjust the playback volume.
A. Go to beginning. B. Play/Pause. C.
Playback volume is also affected by the settings in your operating system. Be certain to adjust the sound volume for your computer, in addition to the sound controls in the Player window.
Additional resources
The Dynamic Learning series goes beyond the training books. You can continue your learning online, with training videos, and at seminars and conferences.
Video training series
Expand your knowledge of the Adobe Creative Suite 3
applications with the Digital Classroom video training series that complements the skills you'll learn in this book. Learn more at
agitraining.com or oreilly.com.
Seminars and conferences
The authors of the Dynamic Learning seminar series frequently conduct in-person seminars and speak at conferences, including the annual CRE8 Conference. Learn more at agitraining.com or
oreilly.com.
Resources for educators
Visit oreilly.com to access resources for educators, including instructors' guides for incorporating Dynamic Learning into your curriculum.
Images and animations used in this book
not be reproduced, copied, or used by you for any other
Chapter 1. Dreamweaver CS3 Jumpstart
Whether you are a novice web designer or an experienced developer, Dreamweaver is a comprehensive tool you can use for site design, layout, and management. In this lesson, you'll take a tour of Dreamweaver's key features and get a better understanding of how web pages work.
1.1. Starting up
Before starting, make sure that your tools and panels are consistent by resetting your workspace. See "Resetting the Dreamweaver workspace" on page 3.
See
Lesson 1
in action!
Use the accompanying video to gain a better
1.2. What is Dreamweaver?
Dreamweaver is an excellent coding and development tool for new and experienced users alike, and has quickly become the preferred web site creation and management program,
providing a creative environment for designers. Whether you design web sites, develop mobile phone content, or script
complex server-side applications, Dreamweaver has something to offer.
1.2.1. Design and layout tools
Dreamweaver's many icon-driven menus and detailed panels make it easy to insert and format text, images, and media
(such as video files and Flash movies). This means that you can create great-looking and functional web pages without knowing a single line of code—Dreamweaver takes care of building the code behind the scenes for you. Dreamweaver does not create graphics from scratch; instead, it is fully integrated with Adobe Photoshop CS3, so you can import and adjust graphics from within the application.
Figure 1-1. The Insert bar features icons in several categories that let you easily add images, web forms, and
media to your page.
1.2.2. Site management and File Transfer
Protocol (FTP)
Dreamweaver has everything you need for complete site management, including built-in file transfer (FTP) capabilities between a server and your local machine, reusable objects (such as page templates and library items), and several safety mechanisms (such as link checkers and site reports) so you can ensure that your site works well and looks good. If you're
new Browser Compatibility Check and CSS Advisor features will help you to locate and troubleshoot any potential display issues that may occur across different web browsers.
1.2.3. Coding environment and text editor
Dreamweaver lets you work in a code-only view of yourdocument, which acts as a powerful text editor. Edit HTML code directly and switch views to see the results of your code as you work. Enhancements such as color coding, indentation, and visual aids make Dreamweaver a perfect text editing or coding environment for web designers of any level.
For more experienced developers, Dreamweaver also supports popular coding and scripting languages, such as JavaScript, and several server-side languages, including ColdFusion, PHP, and ASP.NET. Specialized insert menus and code panels help you to build pages and applications in the language of your choice.
Figure 1-2. Code view is a full-featured text editor that color-codes tags and scripts for editing that's easier to
decipher.
Client-side languages (such as JavaScript) run in your browser, while server-side languages (such as ColdFusion) require special software installed on the server to run.
1.2.4. Who uses Dreamweaver?
Dreamweaver's popularity is a result of its diversity. Its ability to take a site from conception through launch—and
maintenance afterward—makes it a preferred tool among
industry professionals, businesses, and educational institutions. However, it remains easy and accessible enough for novice
designers to get up and running quickly. It's not unusual to see Dreamweaver utilized for personal projects or by small
businesses and media professionals, such as photographers and painters, to maintain a web presence.
1.2.5. What's new in Dreamweaver CS3?
CS3 introduces many innovative design and coding features as well as improvements to Dreamweaver's flagship features. Now that Dreamweaver is part of the industry-standard Adobe
1.3. Spry Widgets and the Spry
framework for Ajax
Asynchronous JavaScript and XML (AJAX) is a popular
combination of technologies used to create highly interactive web applications, or Rich Internet applications (RIAs). The Spry framework for Ajax is a JavaScript library for web designers that enhances user interactivity through navigation and form
components as well as XML data-driven objects. Users of all levels can add visual effects, create intuitive menus, and
develop within the Spry framework without having to climb the steep learning curve normally required to create these
advanced features from scratch.
The Insert bar features a new Spry Widgets category with XML data-driven objects, self-validating form components, and
enhanced navigation items, such as drop-down and accordion-style menus that you can easily customize and format with CSS (Cascading Style Sheets).
Figure 1-3. The new Spry Widgets section of the Insert bar.
To view and customize a navigation bar created using the new Spry Widgets pane, follow these steps:
1. Launch Dreamweaver CS3.
2. Choose File > Open, or press the Open button ( ) on the Welcome Screen.
3. When the Open dialog box appears, navigate to the dw01lessons folder and select SpryWidgets.html. Press Open.
Browser, or by pressing the Preview/Debug in browser button ( ) in the Document toolbar. Choose the default web browser or pick from a list of browsers installed on your computer. The document will open in a browser
window. You can roll over the menu elements to see them expand to reveal more menus.
If you are using Internet Explorer on the Windows platform, you may need to select the Allow Blocked Content option under the toolbar and press OK. This is a security feature in this browser which prevents the external javascript file used in this widget from automatically running.
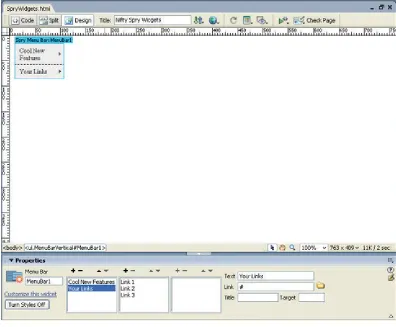
Figure 1-4. A customized Spry menu bar with
pop-up submenus.
5. Close the browser and return to the document in
Dreamweaver. Customizing Spry menus is easy. In the Document window, click on the tab at the top of the menu that reads Spry Menu Bar: MenuBar1. In the Property inspector at the bottom of your screen, locate and select Your Links in the first column to expand the menu.
Figure 1-5. Select the entire menu by its label;
you can view and modify all of the menu
6. In the Property inspector, Link 1, Link 2, and Link 3
represent locations in the menu where you can place any links you want. Select Link 1. In the text field labeled Text, enter the words Adobe Dreamweaver.
7. In the text field labeled Link, type
http://www.adobe.com/dreamweaver in place of the pound sign (#). Press Enter (Windows) or Return (Mac OS) to commit the change.
8. Choose File > Save to save the page, and preview the new changes you made by choosing File > Preview in Browser or by pressing the Preview/Debug in browser button in the Document toolbar. The new link you added appears when you move the cursor over Your Links; you can now click the link to jump to the Adobe site.
The method is the same to customize the other two links— try it to see how easy it is to create interactive menus to navigate around your web site or other web sites.
See Spry effects in action!
Use the video that accompanies this lesson to gain a better understanding of how to take advantage of Spry effects. Open the Dynamic_Learning_DW_CS3.swf file located in the Videos folder and select Lesson 1 to view the video training file for this lesson.
1.3.1. Spry effects
Elements on a page can adopt some very cool behaviors—boxes can fade in and out, shrink and grow; menus and images can slide in when a user loads a page. Spry effects make all this possible. Take a look at some of the new Dreamweaver Spry effects through the Behaviors panel (open by going to Window > Behaviors). Choose the plus-sign symbol > Effects and check out the Spry effects options.
Figure 1-7. The new Effects group contains highly interactive Spry effects.
navigate to the dw01lessons folder. Select the file named SpryEffects.html, then Press Open.
2. Choose File > Preview in Browser or press the
Preview/Debug in browser button ( ) on the Document toolbar. The page will launch in a new browser window.
3. Use your cursor to roll over and select the different boxes on the page to see how Spry effects can make objects disappear, highlight, and fade to bring life and interactivity to an otherwise simple web page.
1.4. Photoshop CS3 integration
Users of the industry-standard Adobe Photoshop CS3 application can now easily bring designs and components
they've created in Photoshop into Dreamweaver for use in their web pages. The new Optimization panel lets you specify
settings for how to import a Photoshop document. Editing the document later is a snap; just double-click it and edit the
original layered.psd file directly in Photoshop CS3. You can even select portions of documents in Photoshop CS3 and paste them directly into a document in Dreamweaver.
Now you will see how easy it is to import Photoshop images in the .psd file format into your web pages.
1. Choose File > Open. When the Open dialog box appears, navigate to the dw01lessons folder and select the file named PhotoshopDoc.html. Press Open.
2. Locate the Insert bar above the Document window, and select the Image icon ( ).
Figure 1-9. Click the image icon on the Insert
bar and choose Insert Image to choose an
image for your page.
Accessibility Attributes dialog box appears, choose Cancel.
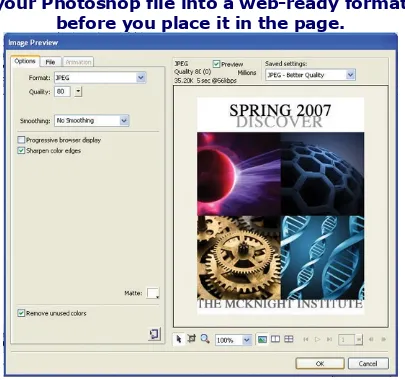
4. The Image Preview dialog box appears. Here's where you can set the quality, file type, and other options for the image file that you're about to place. Leave the default settings at JPEG, Quality 80%. Press OK.
Figure 1-10. The Image Preview window saves
your Photoshop file into a web-ready format
before you place it in the page.
5. Now you must save the converted image. In the Save Web Image dialog box that appears, navigate to the images
folder within the dw01lessons folder. In the Name field, type
Discover.jpg, then press Save.
6. Next, the Image Tag Accessibility Attributes dialog box appears. Press OK. The image is placed in your document.
7. Choose File > Save to save your work, then choose File > Close.
You can also drag and drop .psd files from a folder on the Desktop directly into a Dreamweaver
1.5. CSS layouts
The continuing efforts of web designers to find the best design practices have resulted in a migration from table-based to CSS-based layouts. The use of tables for web page layouts is an old technique, preferred for their easy grid-like structure and
guaranteed compatibility in most older browsers. However, the positioning flexibility that only CSS offers has made it the
standard for today's web designers.
If you're a CSS novice but you want to get started on the right foot, the new CSS layouts in Dreamweaver will quickly get you up and running. Extensive inline comments included in the code will help you learn so that you can sharpen your CSS expertise while being creative and productive.
Figure 1-13. Choose from lots of ready-to-customize CSS layouts that you can modify with your own content,
colors, and images.
2. To see an example of a page based on one of these layouts, Choose File > Open. Navigate to the dw01lessons folder and select the CSSLayouts.html document. Press Open. This page is based on the three-column liquid-header and footer CSS layout, which you can find under New Document > HTML.
Figure 1-14. Dreamweaver's built-in,
three-column, liquid-header and footer CSS layout.
3. Leave this file open, as you will use it in the next exercise.
1.5.1. Browser compatibility check
For years, web site designers have battled with consistency issues across different browsers, which often leads to sites being geared toward one specific browser or another. This is especially true of CSS-dependent web pages, where varying standards among browsers means lots of testing, trial, and error. Dreamweaver's new Browser Compatibility Check feature locates any potentially buggy CSS and HTML combinations and displays them in the Results panel. By combining Browser
Compatibility Check with the CSS Advisor, you can address and resolve any potential compatibility issues without juggling
browsers.
1.5.2. The Manage CSS feature and the CSS
Advisor
to get you up and running with CSS. Not all designers follow the same workflow; some like to create styles before adding
content, and others may add and edit styles as they progress further into a project. The Manage CSS feature in Dreamweaver makes it possible to easily adjust, move, and transition styles as you work so that you can add and fine-tune styles across multiple pages.
1.6. Adobe Device Central
The widespread use of Internet-ready devices, such as mobile phones and PDAs, makes it more necessary than ever to adapt your work for multiple sizes and platforms. Dreamweaver CS3 is now integrated with Adobe Device Central, which displays and simulates the appearance of HTML content in a variety of
mobile, PDA, and handheld device skins and environments. Adobe adds new device profiles quarterly so that you can always stay on top of the market and make sure your content looks its best. Small Screen Rendering (SSR) mode shrinks images and text to emulate how they will display in a selected device, making it easier and more intuitive to develop rich mobile content.
To preview a page in Device Central:
1. With the CSSLayouts.html file open, choose File > Preview in Browser > Device Central. Device Central, which is a separate application, launches.
2. The Device Central application shows the page in the default mobile device. To see how this page will look in a popular mobile phone or PDA, double-click a device name from the Available Devices list on the left. Try the Motorola RAZR listing.
Figure 1-17. The CSSLayouts.html page, as it
would appear in the popular Motorola RAZR
1.7. Adobe Bridge CS3
All editions of Adobe Creative Suite 3 now feature Bridge CS3, a new standalone application designed to provide you with easy access to, and organization and management tools for, files across CS3 applications. Use Dreamweaver with Bridge CS3 for a more fluid workflow between your web site projects and
essential resources such as images, stock photos, and source files.
Bridge CS3 provides full search capability and XMP metadata tagging, so you can easily find and add resources within the Dreamweaver environment. If your Dreamweaver site is part of a larger project that spans print, video, and mobile applications, Bridge CS3 keeps you connected to common resources and
1.8. An overview of features
This book is dedicated to exploring, learning, and putting to use all that Dreamweaver has to offer. In this section, we will
discuss some of the application's coolest features.
Three different points of view: When you edit a document, Dreamweaver lets you see your work in one of three views: the Design, Split, or Code view. Dreamweaver's easy-to-use Design view lets you build visually and see everything come to life as you create your pages. More experienced web designers and coders can use the Code view to edit a document's HTML code and scripts directly, enhanced with easy-to-read color coding and visual aids.
For those who like something in between, the Split view
provides a split-pane Design and Code view all at once. You can easily change views at any time with a single click in the
Document toolbar.
Figure 1-18. The Split view lets you edit your page visually while seeing the code being created behind the
Built-in FTP: You can easily upload and download files to your web server from the Files panel's drag-and-drop interface, or use the Get/Put button at any time to post pages you're
currently working on. There's no need for separate software. Dreamweaver also provides Check In/Check Out functionality and synchronization features for easy management.
Page and code object Insert bars: You can find intuitive icons for most common web page elements on a categorized Insert bar, from which you can add elements to your page with a single click. You can use additional panels to fine-tune any page element to ensure that you see exactly what you want. Included in the default Insert bar are tools for formatting text, building forms, and creating layouts. Customize a Favorites tab with your most-used icons.
Customizable workspace layouts: You can save
combinations and positions of panels and toolbars for easy
recall at any time. Save multiple workspace layouts for different users, or create different workspaces for specific tasks, such as coding or designing page layouts.
Figure 1-20. You can customize the Favorites bar with icons from any of the other Insert bar categories.
Powerful visual aids: Take advantage of the precision you're accustomed to in other design programs through
Dreamweaver's guides, rulers, measuring tools, and
customizable positioning grid. Dreamweaver's Design-Time style sheets let you customize the look of your page exclusively for the editing process, making layout quicker and easier
without permanently altering the page's appearance.
1.9. How web sites work
Before embarking on the task of building web pages (and in turn, a web site), it's a good idea to know the basics of how web sites work, how your users view them, and what you need to know to make sure your web site looks and works its best.
1.9.1. A simple flow chart
What happens when you type in a web site address? Most
people don't even think about it; they just type in a URL, and a web site appears in a flash. They likely don't realize how many things are going on behind the scenes to make sure that pages gets delivered to their computers so that they can do their shopping, check their email, or research a project.
When you type in a URL or IP address, you are connecting to a remote computer (referred to as a server) and downloading the documents, images, and resources necessary to reconstruct the pages you will view at that site. Web pages aren't delivered as a finished product; your web browser (Internet Explorer, Firefox, Safari, etc.) is responsible for reconstructing and formatting the pages based on the HTML code included in the pages. HTML (Hypertext Markup Language) is a simple, tag-based language that instructs your browser how and where to insert and format pictures, text, and media files. Web pages are written in HTML, and Dreamweaver builds HTML for you behind the scenes as you construct your page in the Design view.
using a browser, such as Internet Explorer, Firefox, or Safari. A browser can decipher and display web pages and their content, including images, text, and video.
1.9.2. Domain names and IP addresses
When you type in a web site address, you usually enter the web site's domain name (e.g., Ebay.com). The web site owner
purchased this domain name and uses it to mask an IP address, which is a numerical address used to locate and dial up the
pages and files associated with a specific web site.
So how does the Web know what domains match what IP
address (and in turn, which web sites)? It uses a DNS (Domain Name Service) server, which makes connections between
domain names and IP addresses.
1.9.3. Servers and web hosts
A DNS server is responsible for matching a domain name with its companion IP address. Think of the DNS server as the
operator at the phone company that connects calls through a massive switchboard. DNS servers are typically maintained by either the web host or the registrar from which the domain was purchased. Once the match is made, the request from your user is routed to the appropriate server and folder where your web site resides. When the request reaches the correct account, the server directs it to the first page of the web site, which is
typically named index.html, default.html, or whatever the server is set up to recognize as a default starting page.
A server is a machine very much like your desktop PC, but it's capable of handling traffic from thousands of users (often at the same time!), and it maintains a constant connection to the
Internet so that your web site is available 24 hours a day.
including well-known Internet service companies, such as Yahoo!, and large, dedicated hosting companies, such as
GoDaddy. It is also common for a large company to maintain its own servers and web sites on its premises.
1.9.4. The role of web browsers
1.10. An introduction to HTML
HTML is what makes the Web work; web pages are built using HTML code, which in turn is read and used by your web browser to lay out and format text, images, and video on your page. As you design and lay out web pages in Design view, Dreamweaver writes the code behind the scenes necessary to display and
format your page in a web browser.
Contrary to what you may think, HTML is not a programming language, but rather a simple text-based markup language. HTML is not proprietary to Dreamweaver—you can create and edit HTML in any text editor, even simple applications such as Windows Notepad and Mac OS X's TextEdit. Dreamweaver's job is to give you a visual way to create web pages without having to code by hand. If you like to work with code, however,
Dreamweaver's Code view, discussed earlier, is a fully featured text editor with color-coding and formatting tools that make it far easier to write and read HTML and other languages.
1.10.1. Tag structure and attributes
HTML uses tags, or bracketed keywords, that you can use to place or format content. Many tags require a closing tag, which is the keyword preceded by a forward slash (/).
1. Choose File > Open. When the Open dialog box appears, navigate to the dw01lessons folder. Select BasicHTML.html and press Open.
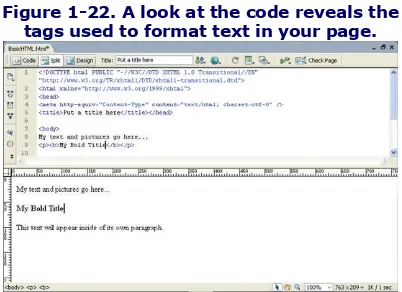
Figure 1-22. A look at the code reveals the
tags used to format text in your page.
Tags can also accept attributes that specify additional information for how the tag should display the content. Attributes are always placed inside the opening tag, and very often they can take a number of different values, such as a size, a color, or a direction in which to align something. Take a look at the line that reads This text will appear inside of its own paragraph. This line is enclosed in a p
(paragraph) tag, which separates it from the other text by a line above and below. You can add attributes to this to align the text in whichever direction you want.
3. Highlight the entire line that reads This text will appear inside of its own paragraph at the bottom of the Design view.
4. Locate the paragraph align buttons in the Property inspector. Click the one that centers text ( ).
opening <p> tag, and has been set to a value of center.
Figure 1-23. Align or format text in the
Property inspector, then see the appropriate
tags and attributes created in HTML.
6. Choose File > Save to save your work, then choose File > Close.
1.10.2. The structure of an HTML document
Although you use many HTML tags to format text, certain tags are devoted to establishing structures, such as lists, tables or, most importantly, the HTML documents themselves. The HTML tag is the most fundamental tag. It is used to specify the
beginning and end of HTML in a document:
<html></html>
your page contains items that are not visible to your user, but are important nonetheless, such as search engine keywords, page descriptions, and links to outside scripts or style sheets. You create the head of the document inside the HTML tags using the <head> tag:
<html>
<head></head> </html>
The body of your page is where all of the visible elements of your page are contained. Here is where you'll place and format text, images, and other media. You define the body of the page using the <body> tag:
<html>
<head></head> <body>
My text and pictures go here...
</body> </html>
Whenever you create a new HTML document in Dreamweaver, this framework is created automatically before you add
anything to the page. Any visual elements you add to the page will be added, using the appropriate HTML code inside the
<body> tags.
1.10.3. Placing images in HTML
common example; its job is to place and format an image on the page. To place an image and see the resulting code, follow these steps:
1. Choose File > Open. When the Open dialog box appears, navigate to the dw01lessons folder. Select the Images.html file and press Open to edit the file.
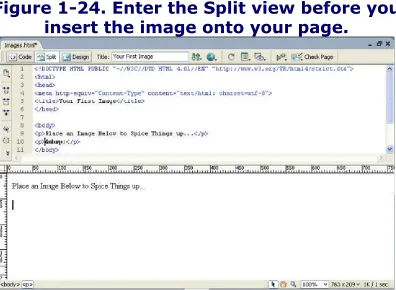
2. Click the Split button ( ) in the Document toolbar so
you're viewing both the layout and the code for your page. In the Design view portion of the Split view, click below the line of text to place your cursor underneath it. This is where you'll place a new image.
Figure 1-24. Enter the Split view before you
insert the image onto your page.
Figure 1-25. Choose Insert Image from the
Common tab on the Insert bar.
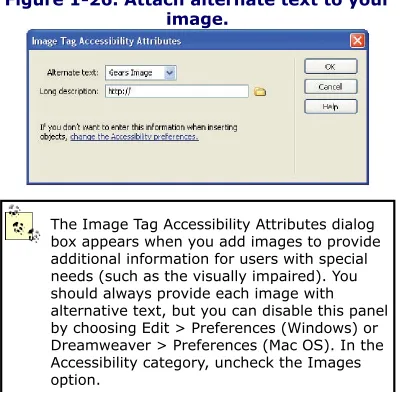
4. Press OK (Windows) or Choose (Mac OS); when the Image Tag Accessibility Attributes dialog box appears, enter the words Gears Image in the Alternate text field and press OK to place the image.
Figure 1-26. Attach alternate text to your
image.
The Image Tag Accessibility Attributes dialog box appears when you add images to provide additional information for users with special needs (such as the visually impaired). You should always provide each image with
5. The code shows that the HTML <img> tag has been used to place the image. Click once on the image in the Document window to select it. The Property inspector at the bottom of the page displays and sets the properties for the image.
6. In the Border box of the Property inspector, type 3 to set a three-pixel border around the image, then press Enter (Windows) or Return (Mac OS). The <img> tag now
contains the border attribute, which is set to a value of 3, just the way you typed it in the Property inspector.
Figure 1-27. As you change or add options to a
selected image, Dreamweaver changes code
behind the scenes.
7. Choose File > Save to save your work, then choose File > Close.
Note that in HTML, images and media are not embedded, but placed. This means that the tags point to files in their exact locations relative to the page. The tags count on those files always being where they're supposed to be in order to display them. This is why HTML pages are typically very lightweight in terms of file size.
1.10.4. Colors in HTML
This code is called hexadecimal code, and is the system that HTML pages use to identify and use colors. You can reproduce almost any color using a unique hexadecimal code. For
example, you represent dark red in HTML as #CC0000.
The first, middle, and last two digits of the hexadecimal code correspond to values in the RGB spectrum. For instance, white, which is represented in RGB as R:255 G:255 B:255, is
represented in HTML as #FFFFFF (255|255|255). Choosing colors is easy in Dreamweaver, thanks to a handy Swatches panel, which you can find in many places throughout the work area.
Figure 1-28. The Swatches panel makes it easy to work with colors.
The color pickers in Adobe Photoshop and
Illustrator also display and accept hexadecimal codes, making it easy to copy and paste colors between these applications and Dreamweaver.
1.10.5. Case sensitivity and whitespace rules
1. Choose File > Open. When the Open dialog box appears, navigate to the dw01lessons folder. Select the
Whitespace.html file, then press Open.
2. If your file is not in Split view, press the Split button ( ) in the Document toolbar, so you can view both the layout and the code. You'll notice three seemingly identical tags
beneath line 9 in your code:
Figure 1-29. All of these tags are valid, even
though they have very different case
structures.
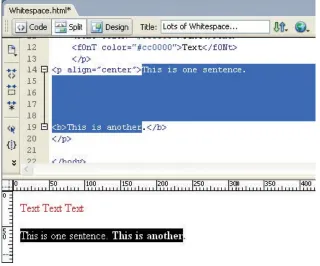
All three tags use a completely different case structure, but all are valid and are treated in the same way. Take a look at the text that reads This is one sentence. This is another. The code shows lots of space between the two lines, but the Design view shows no space at all. This is because
whitespace or line returns between two pieces of text or tags are not recognized.
Figure 1-30. Despite the large amount of space
between the two sentences, they appear
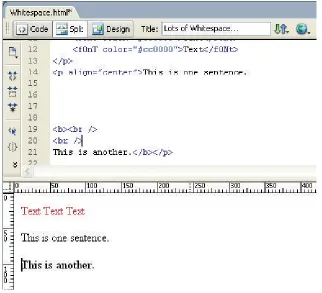
3. To create a line return, or a new paragraph, you need to enter the HTML tags necessary to do so. In the Design view at the bottom, position your cursor after the word sentence, then press Shift+Enter (Windows) or Shift+Return (Mac OS) twice. This creates two line returns—you can see that each line return is created in your code by a <br> (break) tag.
Figure 1-31. To create a line return, hold down
the Shift key while pressing the Enter/Return
4. To create a new paragraph, position your cursor before the phrase, This is another, and press Enter/Return. The text is separated by a line above and below, and is wrapped inside a set of <p> (paragraph) tags.
Other than a standard single space (such as the ones used in between words), several consecutive spaces created by the Space bar are ignored, and are still be displayed as only one space in Design view and in a browser.
5. Choose File > Save to save your work then, choose File > Close.
1.10.6. Tag hierarchy
(image), and <strong> (bold) tags. In addition, structural tags (such as those that create paragraphs, lists and tables) hold more weight than formatting tags such as <strong> (bold) and <em> (italic). Take this line of code for example:
<strong><p>Big bold paragraph</p></strong>
Although code such as this may work in certain browsers, it isn't recommended, because the <strong> tag technically holds less weight than the <p> tag. The following code represents a safer and more proper way to include the bold type:
<p><strong>Big bold paragraph</strong></p>
Dreamweaver generally does a great job of keeping tags properly nested, or contained within each other. When you choose to manipulate the code by hand, you should always keep good coding techniques in mind.
1.10.7. XHTML 1.0 Transitional
The latest recommended version of HTML is XHTML 1.0, a stricter version of HTML that makes the language more
compatible with newer platforms, such as mobile phones and handheld devices, that require code to be perfectly formed. XHTML combines elements of HTML and XML, a language used to describe data. XML, or Extensible Markup Language, has become a popular method of exchanging information among seemingly unrelated applications, platforms, and systems. By default, Dreamweaver creates new web pages using the XHTML 1.0 Transitional standard.
1.10.8. What's the difference?
HTML was very forgiving of sloppy coding practices such as overlapping or unclosed tags, XHTML requires all tags to be closed and properly nested. HTML doesn't care which case you use when constructing tags, but in XHTML, all tags must be lowercase.
For example, a <br> (break) tag, which normally doesn't
require a closing tag, now must be closed. You can write tags to self-close, using a forward slash—making sure there is a space between the keyword (br) and the forward slash—and closing the bracket like so:
<br />
The result is a well-formed language that takes advantage of newer browsers and device platforms, while remaining
compatible with older browsers. Working with XHTML in
Dreamweaver requires nothing more than selecting XHTML 1.0 Transitional as the Document Type (DocType) when creating a new page.
1.10.9. Explorations in code
Although this book occasionally refers to the code for examples, hand coding is not a primary goal of the included lessons. The best way to learn how code represents the layouts you are building visually is to switch to the Code view and explore what's happening behind the scenes.
It's important to remember that every button, panel, and menu in Dreamweaver represents some type of HTML tag, attribute, or value; very rarely will you learn something that is unrelated or proprietary to Dreamweaver alone. Think of the
1.11. A look at the Welcome Screen
A common fixture in most CS3 applications is the Welcome Screen, which is a launching pad for new and recent
documents. In Dreamweaver, the Welcome Screen appears
when the application launches or when no documents are open. From the Welcome Screen, you can create new pages, create a new site definition, open a recent document, or use one of
Dreamweaver's many starter pages or layouts.
Figure 1-33. The Welcome Screen appears when you launch the application, or when no documents are open.
Here's what you'll find on the Welcome Screen:
Open a Recent Item: A list of the last few documents you worked on appear in the leftmost column, or you can browse to open a different file using the Open button ( ) at the bottom.
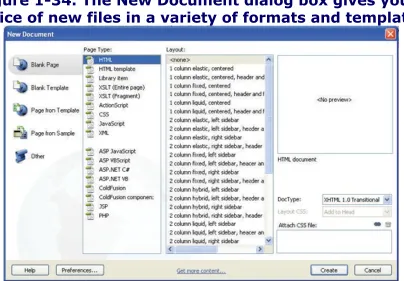
a variety of new document formats such as CSS, JavaScript, and XML. Dreamweaver is not just a web page-building tool, but a superior text editor, making it ideal for creating many non-HTML files. You can also define a new Dreamweaver site using the link at the bottom, or choose the More folder for even more new file options.
Create from Samples: If you're not up to creating a design from scratch, or if you need a little inspiration, Dreamweaver features several starter files, ranging from complete page
1.12. Creating, opening, and saving
documents
The lessons throughout this book require that you create, save, and open existing files. You can accomplish most file-related tasks from the File menu at the top, or from the Start page that appears when you launch Dreamweaver.
1.12.1. Creating new documents
Dreamweaver creates text files, commonly in the form of HTML files (or web pages). It can also create files in a variety of text-based languages, including CSS, XML, JavaScript, and even Flash ActionScript.
You can create blank files that you build from the ground up, or get started with a variety of layout templates and themes. You can create new documents from the File menu or from the Start page.
1. To create a new document, choose File > New. The New Document dialog box will appear.
2. Select Blank Page > HTML. Under Layout, choose <none> to start a new blank document.
3. To save a document, choose File > Save or File > Save As.
4. When prompted, choose a location for your file and assign it a name. Note that you must save HTML files with an .html extension, or they will not be interpreted properly in a browser. This rule applies for files of any type (.xml, .css, .cfm, etc.).
5. To open an existing document, choose File > Open.
6. Select an existing document and choose Open.
Figure 1-35. Choose a file from the Welcome Screen or choose File > Open Recent to select a recently opened
1.13. Self study
1.14. Review
Questions
Q:From what two locations in Dreamweaver can a new document can be created?
Q:In what three views does Dreamweaver allow you to view and edit documents?
Q:True or False: When a web page is requested, it is delivered to a user's browser as a completed, flat file ready for viewing.
Answers
A:From the Welcome Screen or by choosing File > New.
A:Design, Split, and Code views.
Chapter 2. Creating a New Site
Dreamweaver's strength lies in its powerful site creation and management tools. You can use the software to create
everything from individual pages to complete web sites. The pages you create within your site can share similar topics, a cohesive design, or a common purpose. And, once your
Dreamweaver site is complete, you can efficiently manage and distribute it from within the program itself.
2.1. Starting up
Before starting, make sure that your tools and panels are consistent by resetting your workspace. See "Resetting the Dreamweaver workspace" on page 3.
See
Lesson 2
in action!
Use the accompanying video to gain a better
2.2. Creating a new site
In Dreamweaver, the term site refers to the local and remote storage locations where the files that make up a web site are stored. A site can also include a testing server location for processing dynamic pages. To take full advantage of
Dreamweaver's features, you should always start by creating a site.
The easiest way to create a new site in Dreamweaver is to use the Site Definition wizard. Choose Site > New Site, and the wizard appears.
You can also use the Manage Sites dialog box to create a new site. We discuss this and other functions of the Manage Sites dialog box later in this book.
In this lesson, we begin by using the Site Definition wizard to accomplish the following tasks:
Define the site Name the site
Define the local root folder Set up a remote folder Explore advanced settings Save the site
By default, the Site Definition wizard opens with the Basic tab selected. The options available here will help guide you through the essentials of defining your site. The Advanced tab allows you to set up local, remote, and/or testing servers directly.
wizard allows you to name your site. Avoid using spaces (use underscores instead), periods, slashes, or any other
punctuation in your site name, as doing so will likely cause the server to misdirect your files.
To create a new site:
1. Launch Dreamweaver CS3, if it is not already open, then choose Site > New Site. First, you have to name the site. In the Name field, type museum_site.
2. If you are working directly on a web server (instead of
locally), you can also enter the HTTP address of your server in this window. Because we'll be working locally in this
lesson, entering an HTTP address isn't necessary, so leave the HTTP Address field blank and press Next.
3. You can use Dreamweaver to build web applications using any of five server technologies: ColdFusion, ASP.NET, ASP, JSP, or PHP. Each technology corresponds to a document type in Dreamweaver. Since we won't be using any of these server-scripting environments for this lesson, leave the radio button next to No, I do not want to use server
technology selected, then press Next to proceed to the next screen in the wizard.
At this point, you need to set up a local root folder, which is where Dreamweaver stores the files with which you're
currently working. The local root folder definition screen allows you to enter information regarding where you'll be working with your files during development.
4. In this lesson, you'll be working locally and uploading to the server when you're ready, so click the first of the two radio buttons listed, labeled Edit local copies on your machine. Dreamweaver asks where you want to store your files
locally. You can either create a folder on your hard drive and build your site from scratch, or use a pre-existing folder of content that you've already created for this site. You'll use the second option for this lesson.
To ensure that the links you set up on your computer will work when you upload the site to a web server, it is essential that you store all of the site's resources in one main folder on your hard drive, then identify it within
5. Click on the folder icon ( ) to the right of this field to navigate to your prebuilt files.
6. Navigate to your desktop and locate the museum_files folder inside the dw02lessons folder you copied to your desktop earlier.
7. Click Open to open this folder, then press Select (Windows) or Choose (Mac OS) to choose this as your local root folder. The field will now show the path to your newly defined local root folder. Press Next.
Figure 2-3. Define the path to your local root
folder.
9. Additional fields for FTP address, folder location, login, and password appear. These fields are required to gain FTP access to a server.
Figure 2-4. Set up access to your remote
folder.
10. You do not have to define your remote folder at this stage. Dreamweaver allows you to define your remote folder at a later time, like when you're ready to upload. In this lesson, you'll work locally now and define your remote folder using the Files panel later. From the drop-down menu, choose None for the remote connection choice. Press Next.
11. The final screen in the Basic tab of the Site Definition wizard is a summary of all the settings you just selected. Check that your local information, including the site name and the location of your local root folder (museum_files), are
correct. If they aren't, press the Back button to bring you back to the screen containing the error.
Note that the Remote Server and Testing Server options reflect that you'll set them up later
You've now completed the site definition process, using the Basic interface of the Site Definition wizard. Don't close the wizard yet, though, as you'll now explore the options found under the Advanced tab.
2.2.1. Advanced site-creation options
Don't ignore the Advanced tab of the Site Definition window, as it offers access to many settings that aren't available in the Site Definition wizard.
To create a new site, using Advanced options:
1. Click the Advanced tab in the Site Definition dialog box.
2. From the categories on the left, choose Local Info.
3. Note that the Site Name and the Local Root Folder fields are populated by the information you entered using the wizard.
Figure 2-7. The information you entered using
the wizard is reflected here.
The information you set in the Local Info window identifies the site files in Dreamweaver and enables the software's site management features. One of the more important Local Info settings is case-sensitive link checking.
The case-sensitive link checking feature ensures that your links will work on a Unix server, where links are
4. Click the checkbox next to Use case-sensitive link checking. Figure 2-8. Activate the case-sensitive link checking
option.
The remaining categories to the left of the Advanced tab of the Site Definition window help to define your site's production, collaboration, and deployment capabilities. They include the following:
Remote Info is necessary to upload the site files to the web server. Contact your server administrator to determine which method to use for your site.
Testing Servers act like public servers in order to test dynamic pages and connections to the database.
Cloaking allows you to specify file types or specific files that you do not want uploaded to the server.
Design Notes are a collaboration tool that keeps notes regarding the development of the page or site.
Site Map Layout is useful for understanding how your site files connect to one another.
Contribute enables users with basic word processing and web browser skills and little or no HTML knowledge to create and maintain web pages.
Templates can be automatically updated with rewritten document paths using this option.
Spry is a JavaScript library for web designers. It allows
designers to build pages that provide a richer experience for their users.
Figure 2-9. Additional category options found in the Advanced tab.
At this point, you are finished defining your settings, so press OK; Dreamweaver creates a site with the settings you have defined. Note that the Files panel on the right side of your screen displays your local root folder and all of its enclosed content files.
2.3. Adding pages
Dreamweaver contains many features to assist you in building pages for your site. With these features, you can define
properties for those pages, including titles, background colors or images, and default text and link colors.
It's important to consider that users will view your pages with different browsers on different platforms (and in different
languages). Fortunately, Dreamweaver also includes tools that allow you to create and test pages to ensure compatibility with most users.
To add a page to your site:
1. Choose File > New. The New Document dialog box opens.
Figure 2-11. Use the New Document dialog box
to add a page to your site.
Blank Page category on the left side of the New Document window.
Figure 2-12. Use predefined page layouts to
create your page.
3. In the Page Type column, you can select the type of page you want to create (e.g., HTML, ColdFusion, etc.). Select HTML.