App Inventor
Create Your Own Android Apps
David Wolber, Hal Abelson,
Ellen Spertus & Liz Looney
Copyright © 2011 David Wolber, Hal Abelson, Ellen Spertus & Liz Looney. All rights reserved. Printed in Canada.
Published by O’Reilly Media, Inc., 1005 Gravenstein Highway North, Sebastopol, CA 95472.
O’Reilly books may be purchased for educational, business, or sales promotional use. Online editions are also available for most titles (safari.oreilly.com). For more information, contact our corporate/insti-tutional sales department: 800-998-9938 or corporate@oreilly.com.
Editors: Courtney Nash and Brian Jepson
Production Editor: Holly Bauer
Copyeditor: Rachel Monaghan
Proofreader: Holly Bauer
Indexer: Denise Getz
Cover Designer: Mark Paglietti
Interior Designer: Ron Bilodeau
Illustrator: Robert Romano
Printing History:
April 2011: First Edition.
Nutshell Handbook, the Nutshell Handbook logo, and the O’Reilly logo are registered trademarks of O’Reilly Media, Inc. App Inventor and related trade dress are trademarks of O’Reilly Media, Inc. Many of the designations used by manufacturers and sellers to distinguish their products are claimed as trademarks. Where those designations appear in this book, and O’Reilly Media, Inc., was aware of a trademark claim, the designations have been printed in caps or initial caps.
While every precaution has been taken in the preparation of this book, the publisher and authors assume no responsibility for errors or omissions, or for damages resulting from the use of the informa-tion contained herein.
Contents
Foreword . . . .
xiii
Preface. . . .
xv
1.
Hello Purr . . . .
1
What You’ll Learn 1
The App Inventor Environment 2
Designing the Components 3
Adding Behaviors to the Components 8
Packaging the App for Downloading 14
Sharing the App 15
Variations 15
Summary 16
Part I.
12 Customizable Apps
2.
PaintPot . . . .
19
What You’ll Learn 20
Getting Started 20
Designing the Components 20
Adding Behaviors to the Components 24
The Complete App: PaintPot 35
Variations 35
Summary 36
3.
MoleMash . . . .
37
What You’ll Build 37
What You’ll Learn 38
Getting Started 38
The Complete App: MoleMash 49
The Complete App: No Texting While Driving 66
Variations 66
Displaying the Energy Level 74
Adding an Aphid 78
Adding a Restart Button 82
Adding the Frog 83
Setting the Properties of ActivityStarter 90
Adding Behaviors to the Components 91
Setting Up a Virtual Tour 94
Contents ix
Adding Behaviors to the Components 102
The Complete App: Android, Where’s My Car? 111
Variations 111
Adding Behaviors to the Components 116
Making the Quiz Easy to Modify 122
Switching the Image for Each Question 124
Checking the User’s Answers 126
The Complete App: The Presidents Quiz 129
Variations 130
Recording and Playing Back Notes 138
Variations 145
Adding Behaviors to the Components 150
The Complete App: MakeQuiz 163
TakeQuiz: An App for Taking the Quiz in the Database 164
TakeQuiz: Modifying the Blocks to Load the Quiz from the Database 164
The Complete App: TakeQuiz 166
Variations 166
11.
Broadcast Hub . . . .
169
What You’ll Learn 170
Getting Started 170
Designing the Components 171
Adding Behaviors to the Components 172
The Complete App: Broadcast Hub 184
Variations 186
Summary 186
12.
NXT Remote Control . . . .
187
What You’ll Learn 188
Getting Started 188
Designing the Components 189
Adding Behaviors to the Components 192
Variations 201
Summary 201
13.
Amazon at the Bookstore . . . .
203
What You’ll Learn 203
What Is an API? 204
Designing the Components 207
Designing the Behavior 208
Customizing the API 215
Variations 216
Summary 216
Part II.
Inventor’s Manual
14.
Understanding an App’s Architecture . . . .
219
Components 220
Behavior 221
Summary 227
15.
Engineering and Debugging an App . . . .
229
Software Engineering Principles 229
Debugging an App 236
Contents xi
16.
Programming Your App’s Memory . . . .
241
Named Memory Slots 241
Properties 242
Defining Variables 243
Setting and Getting a Variable 244
Setting a Variable to an Expression 245
Summary 248
17.
Creating Animated Apps . . . .
249
Adding a Canvas Component to Your App 249
The Canvas Coordinate System 250
Animating Objects with Timer Events 251
High-Level Animation Functions 253
Interactive Animation 256
Specifying Sprite Animation Without a Clock Timer 257
Summary 258
18.
Programming Your App to Make Decisions: Conditional Blocks . . . .
259
Testing Conditions with if and ifelse Blocks 260
Programming an Either/Or Decision 261
Programming Conditions Within Conditions 262
Programming Complex Conditions 263
Summary 266
19.
Programming Lists of Data . . . .
267
Creating a List Variable 268
Selecting an Item in a List 269
Using an Index to Traverse a List 269
Creating Input Forms and Dynamic Lists 273
Lists of Lists 277
Summary 280
20.
Repeating Blocks: Iteration . . . .
281
Controlling an App’s Execution: Branching and Looping 281
Repeating Functions on a List Using foreach 282
A Second foreach Example: Displaying a List 284
Repeating Blocks with while 286
21.
Defining Procedures: Reusing Blocks . . . .
291
Eliminating Redundancy 293
Defining a Procedure 294
Calling a Procedure 295
The Program Counter 296
Adding Parameters to Your Procedure 296
Returning Values from a Procedure 299
Reusing Blocks Among Apps 301
A Second Example: distanceBetweenPoints 301
Summary 303
22.
Working with Databases . . . .
305
Storing Persistent Data in TinyDB 306
Retrieving Data from TinyDB 307
Storing and Sharing Data with TinyWebDB 308
Storing Data with TinyWebDB 309
Requesting and Processing Data with TinyWebDB 310
GetValue-GotValue in Action 311
Setting Up a Web Database 315
Summary 317
23.
Reading and Responding to Sensors . . . .
319
Creating Location-Aware Apps 319
Using the Orientation Sensor 324
Using the Accelerometer 328
Summary 332
24.
Communicating with Web APIs . . . .
333
Talking to Web APIs That Generate Images 335
Talking to Web Data APIs 341
Creating Your Own App Inventor–Compliant APIs 345
Summary 348
Foreword
Our consumer culture gives us all sorts of opportunities for entertainment, pleasure and sometimes even learning. However, by and large, these are passive activities. That’s OK—we all like to kick back sometimes and be entertained—but it shouldn’t be the whole picture. In addition to the appeal of consuming, there’s the satisfaction of producing—that is, of creating. It’s the joy and pride that results when we draw a picture, build a model airplane, or bake some bread.
The high-tech objects (like cell phones, tablet computers, TVs, etc.) that we use today to consume entertainment and information are black boxes to most of us. Their work-ings are incomprehensible and, while there are capabilities in some of them that en-able the user to draw pictures, make videos, etc., they are not, in and of themselves, creative media. In other words, most people can’t create the apps that run on these gadgets.
What if we could change that? What if we could take creative control of our everyday gadgets, like cell phones? What if building an app for your cell phone was as easy as drawing a picture or baking a loaf of bread? What if we could close the gap between the objects of our consumer culture and the media of our creative lives?
For one, it could demystify those objects. Rather than being black boxes, impenetrable to our sight, they become objects that can be tinkered with. They become objects capable of our understanding. We gain a less passive and more creative relationship to them, and we get to play with these devices in a much deeper, more significant way when we can actually build things for them.
and exhilarating to build apps for their phones! When one of Dave’s students built the simple but powerful “No Texting While Driving” app, we really started to imagine what would happen if anybody, not just professional software engineers, could build an app.
So we worked hard to make App Inventor easier and more fun to use. We’ve worked to make it more powerful (but still simple) as well. And we’re continuing this work—App Inventor is still a beta product and we have exciting plans for it.
The authors of this book are truly world-class educators and software engineers. I’d like to personally thank them for their work in building, testing, and documenting the App Inventor for Android product and, of course, for writing this wonderful book.
Now go, unleash your creativity and build an app!
0
Preface
You’re on your regular running route, just jogging along, and an idea for the next killer mobile app hits you. All the way home, you don’t even care what your time is, all you can think about is getting your idea out there. But how exactly do you do that? You’re no programmer, and that would take years, and time is money, and…well, someone has probably done it already anyway. Just like that, your idea is dead in the water.
Now imagine a different world, where creating apps doesn’t require years of program-ming experience, where artists, scientists, humanitarians, health-care workers, attor-neys, firefighters, marathon runners, football coaches, and people from all walks of life can create apps. Imagine a world where you can transform ideas into prototypes without hiring programmers, where you can make apps that work specifically for you, where you can adapt mobile computing to fit your personal needs.
This is the world of App Inventor, Google’s new visual programming tool for building mobile apps. Based on a visual “blocks” programming method that’s proven success-ful even with kids, App Inventor dramatically lowers the barriers to creating apps for Android phones and devices. How about a video game where the characters look like you and your friends? Or a “did you pick up the milk?” app that reminds you if it’s after 3 p.m. and you’re near the grocery store? Or a quiz app you give your significant other that’s in fact a surprise marriage proposal? “Question 4: Will you marry me? Press the button to accept by sending a text message.” Someone really created an App Inventor app to propose marriage like this, and she said yes!
A Blocks Language for Mobile Phones
App Inventor is a visual, drag-and-drop tool for building mobile apps on the Android platform. You design the user interface (the visual appearance) of an app using a web-based graphical user interface (GUI) builder, then you specify the app’s behavior by piecing together “blocks” as if you were working on a puzzle.
Figure 0-1. App Inventor blocks specify the functionality of your app
The app is a text “answering machine.” You launch it when you’re driving and it auto-responds to the texts you receive.
Because the blocks are more understandable than traditional programming code, you’re immediately drawn in, and the real-world utility gets you asking questions like: Can I make it so the received texts are spoken aloud? Can I make it so the response sent back could be customized? Can I write an app that lets people vote for something by text, like on American Idol? The answer to all these questions is “yes,” and in this book, we’ll show you how.
What Can You Do with App Inventor?
PlayCreating apps for your phone is fun, and App Inventor promotes exploration and discovery. Just open App Inventor in a web browser, connect your phone, and start putting together blocks like those in Figure 0-1. You can immediately see and interact with the app you’re building on the phone. So you’re programming, but you’re also emailing your friend to send you a text to test your app, or you’re controlling a LEGO NXT robot with the app you just built, or you’re unplugging the phone and walking outside to see if your app is using the location sensor correctly.
Prototype
Preface xvii
Build apps with personal utility
In the current state of the mobile app world, we’re stuck with the apps we’re given. Who hasn’t complained about an app and wished it could be personalized or ad-justed in some way? With App Inventor, you can build an app exactly how you want it. In Chapter 3, you’ll build a MoleMash game that lets you score points by touching a randomly moving mole. But instead of using the image of the mole in the tutorial, you can customize it so that you mash a picture of your brother or sister—something that only you might want to do, but who cares? In Chapter 8, you’ll write a quiz app that asks questions about US Presidents, but you can easily customize it to ask questions on any topic you want, from your favorite music to your family history.
Develop complete apps
App Inventor is not just a prototyping system or an interface designer—you can build complete, general-purpose apps. The language provides all the fundamen-tal programming building blocks like loops and conditionals, but in block form.
Teach and learn
Whether you’re at a middle school, high school, or university, App Inventor is a great teaching and learning tool. It’s great for computer science, but is also a ter-rific tool for math, physics, entrepreneurship, and just about any other discipline. The key is that you learn by creating. Instead of memorizing formulas, you build an app to, say, find the closest hospital (or mall!). Instead of writing an essay on Black History, you create a multimedia quiz app with video and speeches from Martin Luther King, Jr., and Malcolm X. We think App Inventor, and this book, can be a great tool in classes throughout the curriculum.
Why App Inventor Works
Most people say that App Inventor is easy to use because of its visual, drag-and-drop interface. But what does this mean? Why is App Inventor so easy to use?
You don’t have to remember and type instructions
One of the biggest sources of frustration for beginning programmers comes from typing in code and having the computer spit back indecipherable error messages. This frustration discourages many beginners from programming before they even get to the more fun, logical problem solving.
You choose from a set of options
Only some blocks plug in to each other
Instead of chastising programmers with cryptic error messages, App Inventor’s blocks language restricts you from making many mistakes in the first place. For instance, if a function block expects a number, you can’t plug in text. This doesn’t eliminate all errors, but it sure helps.
You deal with events directly
Traditional programming languages were designed when programming was like working with recipes, or sets of instructions. But with graphical interfaces, and especially with mobile apps where events can happen at any time (for example, receiving a text message or phone call), most programs are not recipes, but are instead sets of event handlers. An event handler is a way of saying, “When this happens, the app does this.” In a traditional language like Java, you have to un-derstand classes, objects, and special objects called listeners to express a simple event. With App Inventor, you can say, “When a user clicks this button...” or “When a text is received...” by dragging out a “When” block.
What Kind of Apps Can You Build?
You can build many different types of apps with App Inventor. Use your imagination, and you can create all kinds of fun, useful apps.
Games
People often begin by building games like MoleMash (Chapter 3) or apps that let you draw funny pictures on your friend’s faces (Chapter 2). As you progress, you can build your own versions of more complex games like Pac-Man and Space Invaders. You can even use the phone’s sensors and move characters by tilting the phone (Chapter 5).
Educational software
App building is not limited to simple games. You can also build apps that inform and educate. You can create a quiz app (Chapter 8) to help you and your class-mates study for a test, or even a create-a-quiz app (Chapter 10) that lets the users of your app create their own quizzes (think of all the parents that would love this one for those long road trips!).
Location-aware apps
Preface xix
High-tech apps
You can create apps that scan bar codes, talk, listen (recognize words), play music, make music (Chapter 9), play video, detect the phone’s orientation and accelera-tion, take pictures, and make phone calls. Smartphones are like Swiss-Army knives for technology, and a group of Google engineers has dedicated themselves to making that technology easy to control through App Inventor.
SMS apps
“No Texting While Driving” (Chapter 4) is just one example of the SMS processing apps you can build. You can also write an app that periodically texts “missing you” to your loved ones, or an app like “Broadcast Hub” (Chapter 11) that helps coordi-nate large events. Want an app that lets your friends vote for things by texting, like on American Idol? You can build it with App Inventor.
Apps that control robots
Chapter 12 shows how to create an app that acts as a controller for a LEGO robot. You can use the phone as a remote control, or you can program it to be a “brain” that the robot carries around with it. The robot and phone communicate via Bluetooth, and App Inventor’s Bluetooth components let you create similar apps that control other Bluetooth devices.
Complex apps
App Inventor dramatically lowers the entrance barrier to programming and lets you build flashy, high-tech apps within hours. But the language also provides loops, conditionals, and other programming and logic constructs necessary to build apps with complex logic. You’ll be surprised at how fun such logic problems can be when you’re trying to build an app.
Web-enabled apps
App Inventor also provides a way for your apps to communicate with the Web. You can write apps that pull in data from Twitter or an RSS feed, or an Amazon Bookstore Browser that lets you check the online cost of a book by scanning its barcode.
Who Can Build Apps?
App Inventor is freely available for anyone to use. It runs online (instead of directly on your computer) and is accessible from any browser. You don’t even need a phone to use it: you can test your apps on an included Android emulator. As of January 2011, there were tens of thousands of active App Inventor users and hundreds of thousands of apps.
USF, App Inventor is taught as part of a general education computer science course targeting primarily business and humanities students. Many students take the course because they either hate or are afraid of math, and the course fulfills the dreaded Math Core requirement. The vast majority have never even dreamed of writing a computer program.
Despite their lack of prior experience, the students have been successful in learning App Inventor and building great apps. An English major created the first “No Texting While Driving” app; two communications majors created “Android, Where’s My Car?”; and an International Studies major created the “BroadcastHub” app (Chapter 11). When an art major knocked on Wolber’s office door one night well after hours, asking how to write a while loop, he knew that App Inventor had dramatically changed the landscape.
The media grasped the significance as well. The New York Times called App Inventor “Do-It-Yourself App Creation Software.” The San Francisco Chronicle reported on the USF students’ work in an article, “Google brings app making to the masses.” Wired magazine featured Daniel Finnegan, the author of “No Texting While Driving,” and wrote that “Finnegan’s story illustrates a powerful point: It’s time for computer pro-gramming to be democratized.“
The cat is, as they say, out of the bag (your first app will involve a kitty, by the way). App Inventor is now used in high school courses; in the Technovation Challenge, a San Francisco Bay Area after-school program for high school girls; the Lakeside School in Seattle; and in new introductory courses at several universities. There are now thou-sands of hobbyists, businesspersons, marriage-proposers, and tinkerers roaming the App Inventor site and forum (http://appinventor.googlelabs.com/forum/). Want to get in on the action? No programming experience is required!
Conventions Used in This Book
This book uses the following typographical conventions:
Bold, green text
Used to refer to program blocks that appear in App Inventor programs.
Italic
Used to indicate email addresses, URLs, filenames, pathnames, and to emphasize terms when they’re first introduced.
Constant width
Preface xxi
This icon signifies instructions for testing the app being developed.
This icon indicates a tip, suggestion, or general note.
How to Use This Book
This book can be used as a textbook for middle school, high school, and university courses or as a how-to guide for aspiring app developers. The book is split into two sections: a set of tutorials for building specific apps, and an Inventor’s Manual section organized more like a typical programming textbook. The tutorials progress in com-plexity as you go, from “Hello Purr” in Chapter 1—which lets you click a cat to make it meow—to a web-enabled app that lets you scan a book to view information from the Amazon web service (Chapter 13).
Working through the tutorials in order is advantageous from a conceptual viewpoint, but as you start to feel comfortable with the system, you may want to jump around. The tutorials provide step-by-step instructions and snapshots of the blocks to help, and you’ll be referred to chapters in the Inventor’s Manual section to help solidify your understanding of the concepts.
One advantage of having a book at hand is that the App Inventor environment takes up most of your computer screen, so there’s not really room for an on-screen tutorial window. We envision folks setting the book next to them as they walk through the tutorials and build each app. Then, we hope, people will be so engrossed that they’ll use the book away from the computer, to read the more conceptual Inventor’s Manual chapters.
For teachers and students, the book can serve as a textbook for an introductory com-puter science course, or as a resource for any course in which students learn by build-ing. In our experience, a sequence of tutorial→discussion→creativity works best. So you might first assign the task of completing a couple of the apps in the tutorial chap-ters, with the minimal expectation of the students mechanically building the apps. Then you can assign a chapter from the Inventor’s Manual section and slow the process down with some in-class discussion and lecture. The third phase encourages explora-tion: have the students build some of the suggested variations at the end of each tuto-rial, without detailed instruction, and then follow this up with a creative assignment in which students come up with their own ideas for apps and then implement them.
Acknowledgments
The educational perspective that motivates App Inventor holds that computing can be a vehicle for engaging powerful ideas through active learning. As such, App Inventor is part of an ongoing movement in computers and education that began with the work of Seymour Papert and the MIT Logo Group in the 1960s, and whose influence persists today through many activities and programs designed to support computational thinking.
App Inventor’s design draws upon prior research in educational computing and upon Google’s work with online development environments. The visual programming framework is closely related to the MIT Scratch programming language. The specific implementation here is based on Open Blocks, which is distributed by MIT’s Scheller Teacher Education Program and derives from MIT thesis research by Ricarose Roque. We thank Eric Klopfer and Daniel Wendel of the Scheller Program for making Open Blocks available and for their assistance in working with it. The compiler that translates the visual blocks language for implementation on Android uses the Kawa Language Framework and Kawa’s dialect of the Scheme programming language, developed by Per Bothner and distributed as part of the GNU Operating System by the Free Software Foundation.
The authors would like to thank Google and the App Inventor team for their support of our work and teaching efforts at USF, Mills College, and MIT. Special thanks go to App Inventor Technical Lead Mark Friedman, Project Manager Karen Parker, and engineers Sharon Perl and Debby Wallach.
We also owe a special thanks to our O’Reilly editors, Courtney Nash and Brian Jepson, as well as Kathy Riutzel, Brian Kernighan, Debby Wallach, and Rafiki Cai for their feed-back and insights.
CHAPTER 1
Hello Purr
This chapter gets you started building apps. It presents the key elements of App Inventor—the Component Designer and the Blocks Editor—and leads you through the basic steps of creating your first app, HelloPurr. When you’re finished, you’ll be ready to build apps on your own.
A typical first program with a new computer system prints the message “Hello World” to show that everything is connected correctly. This tradition goes back to the 1970s and Brian Kernighan’s work on the C programming language at Bell Labs (Brian is now a visiting scholar at Google working on the App Inventor team!). With App Inventor, even the simplest apps do more than just show messages: they play sounds and react when you touch the phone. So we’re going to get started right away with something more exciting; your first app (as shown in Figure 1-1) will be “HelloPurr,” a picture of a cat that meows when you touch it and purrs when you shake it.
What You’ll Learn
The chapter covers the following topics:
• Building apps by selecting components and then telling them what to do and when to do it.
• Using the Component Designer to select components. Some components are visible on the phone screen and some aren’t.
• Adding media (sounds and images) to apps by uploading them from your computer.
• Working in the Blocks Editor to assemble blocks that define the components’ behavior.
• Testing apps with App Inventor’s live testing. This lets you see how apps will look and behave on the phone step by step, even as you’re building them.
The App Inventor Environment
You can set up App Inventor using the instructions at http://appinventor.googlelabs .com/learn/setup/. App Inventor runs primarily through the browser, but you need to download some software to your computer’s desktop and change some settings on your phone. Typically you can get set up in just a few minutes, though sometimes there are issues with setting up device drivers for particular Android phones. If you have any phone issues, we suggest you get started using the Android emulator that comes packaged with the App Inventor download.
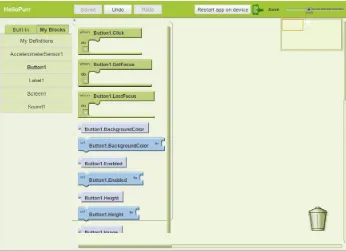
The App Inventor programming environment has three key parts, all shown in Figure 1-2:
• The Component Designer, shown on the left side of Figure 1-2, runs in your browser window. You use it to select components for your app and specify their properties.
• The Blocks Editor runs in a window separate from the Component Designer—it is often easiest to arrange this to the right of the Component Designer on your screen while you are working on your app. You use the Blocks Editor to create behaviors for the components.
• A phone allows you to actually run and test your app as you are developing it. If you don’t have an Android phone handy, you can test the apps you build using the Android emulator (shown in the bottom right of Figure 1-2) that comes inte-grated with the system.
Designing the Components 3
You start App Inventor by browsing to http://appinventor.googlelabs.com. If this is the first time you’ve used App Inventor, you’ll see the Projects page, which will be mostly blank because you haven’t created any projects yet. To create a project, click New at the top left of the page, enter the project name “HelloPurr” (one word with no spaces), and click OK.
The first window that opens is the Component Designer. When it appears, click Open Blocks Editor in the menu at the top right. The Blocks Editor comes up in a separate window, aided by a tool called Java Web Start. (You don’t have to worry about all the Java messages—App Inventor is using Java, which should already be installed on your computer, to help launch the Blocks Editor.) This process usually takes about 30 seconds.
If everything is OK, the Blocks Editor will appear and you’ll see two buttons near the top right of the screen, as shown in Figure 1-3.
Figure 1-3. Plug a phone into your computer or click “New emulator”; then, click “Connect to Device”
If you have an Android phone and a USB cable, plug the phone into the computer and select “Connect to Device.” If instead you want to test the apps you build using an emulator, click “New emulator” and wait about 30 seconds while the Android emulator loads. When it is fully operational, click “Connect to Device” so that App Inventor will run your app in the emulator.
If all is well, you should see a window for the Component Designer, a window for the Blocks Editor, and the emulator window if you chose that option (your screen should look something like Figure 1-2, shown previously, but with the windows mostly empty). If you’re having problems here, review the setup instructions at http://app inventor.googlelabs.com/learn/setup/.
Designing the Components
The first tool you’ll use is the Component Designer (or just Designer). Components are the elements you combine to create apps, like ingredients in a recipe. Some compo-nents are very simple, like a Label component, which shows text on the screen, or a
When you open the Designer, it will appear as shown in Figure 1-4.
Figure 1-4. The App Inventor Component Designer
The Designer is divided into several areas:
• Toward the center is a white area called the Viewer. This is where you place com-ponents and arrange them to map out what you want your app to look like. The Viewer shows only a rough indication of how the app will look, so, for example, a line of text might break at a different place in your app than what you see in the Viewer. To see how your app will really appear, you’ll need to either download the app to your phone (we’ll go through how to do this a bit later, in the section “Packaging the App for Downloading”) or view it in the emulator that comes with App Inventor.
Designing the Components 5
• To the right of the Viewer is the Components list, which lists the components in your project. Any component that you drag into the Viewer will show up in this list. Currently, the project has only one component listed: Screen1, which represents the phone screen itself.
• Under the Components list is an area that shows the Media (pictures and sound) in the project. This project doesn’t have any media yet, but you’ll be adding some soon.
At the far right is a section that shows the Properties of components; when you click a component in the Viewer, you’ll see its Properties listed here. Properties are details about each component that you can change. (For example, when clicking on a Label
component, you might see properties related to color, text, font, and so on.) Right now, it shows the properties of the screen (called Screen1), which include a back-ground color, a backback-ground image, and a title.
For the HelloPurr app, you’ll need two visible components (you can think of these as components you can actually see in the app): the Label component reading “Pet the Kitty” and a Button component with an image of a cat in it. You’ll also need a non-visible Sound component that knows how to play sounds, such as “meow,” and an Accelerometer component for detecting when the phone is being shaken. Don’t worry—we’ll walk you through each component step by step.
Making a Label
The first component to add is a Label:
1. Go to the Palette, click Label (which appears about five spots down in the list of components), and drag it to the Viewer. You’ll see a rectangular shape appear on the Viewer, with the words “Text for Label1.”
2. Look at the Properties box on the right side of the Designer. It shows the proper-ties of the label. There’s a property called Text about halfway down, with a box for the label’s text. Change the text to “Pet the Kitty” and press Return. You’ll see the text change in the Viewer.
Figure 1-5. The app now has a label
Be sure you have your phone connected and the Blocks Editor open. You should see the label appear on the phone as you add it in the Designer. In App Inventor, you build the application on the phone as you pick the components in the Designer. That way, you can see right away how your application will look. This is called live testing, and it also applies to the behaviors you create for the components in the Blocks Editor, as you’ll see shortly.
Adding the Button
The kitty for HelloPurr is implemented as a Button component—you create a normal button, and then change the button image to the kitty. To make the basic button first, go to the Palette in the Designer and click Button (at the top of the list of com-ponents). Drag it onto the Viewer, placing it below the label. You’ll see a rectangular button appear on the Viewer. After about 10 seconds, the button should appear on the phone. Go ahead and tap the phone button—do you think anything will happen? It won’t, because your app hasn’t told the button to do anything yet. This is the first important point to understand about App Inventor: for every component you add in the Designer, you have to move over to the Blocks Editor and create the code to make something happen with that component (we’ll do that after we finish adding the components we need in the Designer).
Designing the Components 7
1. First, you need to download a picture of the kitty and save it on your computer desktop. You can download it from the site for this book at http://examples .oreilly.com/0636920016632/. The picture is the file called kitty.png. (.png is a standard image format similar to .jpg and .gif; all of these file types will work in App Inventor, as will most standard sound files like .mpg or .mp3.) You can also download the sound file we need, meow.mp3.
2. The Properties box should show the properties of the button. If it doesn’t, click the image of the button in the Viewer to expose the button’s properties on the right. In the Properties box, click the area under Image (which currently reads None). A box appears with a button marked Add.
3. Click Add and you’ll see “Upload file.” Click Choose File, browse to select the kitty.png file you downloaded to your computer earlier, and click OK.
4. You’ll see a yellow message at the top of the screen: “Uploading kitty.png to the AppInventor server.” After about 30 seconds, the message and the upload box will disappear, and kitty.png should be listed as the image property for the button. You’ll also see this listed in the Media area of the Designer window, just below the Components list. And if you look at the phone, you’ll see the kitty picture displayed—the button now looks like a kitty.
5. You may have also noticed that the kitty picture on your phone has the words “Text for button 1” displayed on it. You probably don’t want that in your app, so go ahead and change the Text property of Button1 to something like “Pet the Kitty,” or just delete the text altogether.
Now the Designer should appear as shown in Figure 1-6.
Adding the Meow Sound
In your app, the kitty will meow when you tap the button. For this, you’ll need to add the meow sound and program the button behavior to play that sound when the button is clicked:
1. If you haven’t downloaded the meow.mp3 file to your computer’s desktop, do so now at http://examples.oreilly.com/0636920016632/.
2. Go to the Palette at the left of the Designer window and click the header marked Media to expand the Media section. Drag out a Sound component and place it in the Viewer. Wherever you drop it, it will appear in the area at the bottom of the Viewer marked “Non-visible components.” Non-visible components are objects that do things for the app but don’t appear in the visual user interface of the app.
3. Click Sound1 to show its properties. Set its Source to meow.mp3. You’ll need to follow the same steps to upload this file from your computer as you did for the kitty picture. When you’re done, you should see both kitty.png and meow.mp3 listed in the Media section of the Designer.
You should now have the components depicted in Table 1-1.
Table 1-1. The components you’ve added to the HelloPurr app
Component type Palette group Name of component Purpose
Button Basic Button1 Press to make the kitty meow.
Label Basic Label1 Shows the text “Pet the Kitty.”
Sound Media Sound1 Play the meow sound.
Adding Behaviors to the Components
You’ve just added Button, Label, and Sound components as the building blocks for your first app. Now let’s make the kitty meow when you tap the button. You do this with the Blocks Editor. If your Blocks Editor isn’t yet open, click “Open the Blocks Editor” in the top right of the Component Designer.
Adding Behaviors to the Components 9
Making the Kitty Meow
At the top left of the window, you’ll see buttons labeled “Built-In” and “My Blocks.” Click My Blocks, and you’ll see a column that includes a drawer for each component you created in the Designer: Button1, Label1, Screen1, and Sound1. When you click a drawer, you get a bunch of options (blocks) for that component you created. (Don’t worry about the Built-In column for now—we’ll get to that in Chapter 2.) Click the drawer for Button1. The drawer opens, showing a selection of blocks that you can use to tell the button what to do, starting with Button1.Click at the top, as shown in Figure 1-7.
Figure 1-7. Clicking Button1 shows the component’s blocks
Figure 1-8. You’ll specify a response to the user clicking within the Button.Click block
Click Sound1 in My Blocks to open the drawer for the sound component, and drag out the call Sound1.Play block. (Remember, earlier we set the property for Sound1
to the meow sound file you downloaded to your computer.) You may notice at this point that the call Sound1.Play block is shaped so it can fit into a gap marked “do” in the Button1.Click block. App Inventor is set up so that only certain blocks fit together; this way, you always know you’re connecting blocks that actually work together. In this case, blocks with the word “call” make components do things. The two blocks should snap together to form a unit, as shown in Figure 1-9, and you’ll hear a snapping sound when they connect.
Figure 1-9. Now when someone clicks the button, the meow sound will play
Adding Behaviors to the Components 11
Test your app. Let’s check to make sure everything is working properly—it’s important to test your app each time you add some-thing new. Tap the button on the phone (or click it using the emula-tor). You should hear the kitty meow. Congratulations, your first app is running!
Adding a Purr
Now we’re going to make the kitty purr and meow when you tap the button. We’ll simulate the purr by making the phone vibrate. That may sound hard, but in fact, it’s easy to do because the Sound component we used to play the meow sound can make the phone vibrate as well. App Inventor helps you tap into this kind of core phone functionality without having to deal with how the phone actually vibrates. You don’t need to do anything different in the Designer; you can just add a second behavior to the button click in the Blocks Editor:
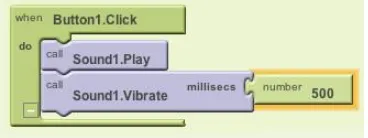
1. Go to the Blocks Editor and click Sound1 in My Blocks to open the drawer. 2. Select call Sound1.Vibrate and drag it under the call Sound1.Play block in the
Button1.Click slot. The block should click into place, as shown in Figure 1-10. If it doesn’t, try dragging it so that the little dip on the top of call Sound1.Vibrate touches the little bump on the bottom of call Sound1.Play.
Figure 1-10. Playing the sound and vibrating on the Click event
a value of 500 milliseconds. To put in a value of 500, you need to grab a number block. Click in an empty spot on the Designer screen, and then click the green Math button in the menu that pops up, as shown in Figure 1-11. You should see a drop-down list, with 123 as the first item; 123 indicates a block that represents a number.
Figure 1-11. Opening the Math drawer
4. Click the 123 at the top of the list and you’ll see a green block with the number 123, as shown in Figure 1-12.
Figure 1-12. Choosing a number block (123 is the default value)
5. Change the 123 to 500 by clicking it and typing a new value, as shown in Figure 1-13.
Figure 1-13. Changing the value to 500
Adding Behaviors to the Components 13
Figure 1-14. Plugging the 500 into the millisecs slot
Test your app. Try it! Tap the button on the phone, and you’ll feel the purr for half a second.
Shaking the Phone
Now let’s add a final element that taps into another cool feature of Android phones: make the kitty meow when you shake the phone. To do this, you’ll use a component called AccelerometerSensor that can sense when you shake or move the phone around.
1. In the Designer, expand the Sensors area in the Palette components list and drag out an AccelerometerSensor. Don’t worry about where you drag it—as with any non-visible component, no matter where you place it in the Viewer, it will move to the “Non-visible components” section at the bottom of the Viewer.
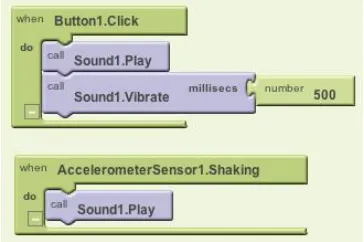
2. You’ll want to treat someone shaking the phone as a different, separate event from the button click. That means you need a new event handler. Go to the Blocks Editor. There should be a new drawer for AccelerometerSensor1 under My Blocks. Open it and drag out the AccelerometerSensor1.Shaking block—it should be the second block in the list.
3. Just as you did with the sound and the button click, drag out a call Sound1.Play block and fit it into the gap in AccelerometerSensor1.Shaking. Try it out by shak-ing the phone.
Figure 1-15. The blocks for HelloPurr
Packaging the App for Downloading
App Inventor is a cloud computing tool, meaning your app is stored on Google’s online servers as you work. So if you close App Inventor, your app will be there when you return; you don’t have to save anything on your computer as you would with a Word file or a music track. This also allows you to easily test the app while connected to your phone (what we call live testing), without having to download anything to your phone, either. The only problem is that if you disconnect your phone from App Inventor, the app running on the phone will stop, and you won’t find an icon for it anywhere because it was never truly installed.
You can package up and install the completed app so that it works on any phone, even when it’s not connected to the computer. First, make sure your phone allows apps to be downloaded from places other than the Android Market. Typically, you do this by going toSettings→Applications on your phone and checking the box next to “Unknown sources.” Then, go to back into the Designer in App Inventor, click “Package for Phone,” and select “Download to Connected Phone.” You should see the messages “Saving” and then “Packaging,” a process that takes up to a minute. After the “Packaging” message disappears, continue to wait for another 10–15 seconds while the finished app is downloaded to the phone. You’ll get a download confirmation when everything is complete.
Once you’ve downloaded it, look at the apps available on your phone, and you’ll now see HelloPurr, the app we just built. You run it just like any other app. (Make sure that you run your new app, not the App Inventor Phone application.) You can now unplug or even reboot the phone and kill all applications, and your new packaged application will still be there.
Sharing the App 15
change the packaged app that is now installed on your phone. If you make further changes to your app in App Inventor, you’ll want to package the result and download the new version to replace the old one on the phone.
Go ahead and package your HelloPurr app so you have it on your phone. Once you’ve done this, you can share it with your family and friends, too!
Sharing the App
You can share your app in a couple of ways. To share the executable app, first click “Package for Phone” and choose “Download to this Computer.” This will create a file with a .apk extension on your computer.You need to upload this file so that it is accessible on the Web. Once the app is on the Web, other people can install it on their phones by opening the phone’s browser and downloading it. Just let them know they need to allow “unknown sources” in their phone’s Application settings in order to install apps that aren’t from the Android Market.
You can also share the source code (blocks) of your app with another App Inventor developer. To do this, click My Projects, check the app you want to share (in this case, HelloPurr), and select More Actions→Download Source. The file created on your computer will have a .zip extension. You can email this file to someone, and she can open App Inventor, choose More Actions→Upload Source, and select the .zip file. This will give the user her own complete copy of your app, which she can then edit and customize without affecting your version.
The process of sharing apps will soon be easier and more fun—work is currently underway on a community sharing site.
Variations
Now that you’ve built a complete app and had the chance to play with it (and maybe download it to share with other people), you might have noticed a couple of things. Take a look at the following items and consider how you’d address them in your app. As you’ll likely soon discover, you’ll often build an app, find ways to improve and change it, and then go back into it to program those new ideas. Don’t worry, that’s a good thing—it means you’re on your way to becoming a full-fledged app developer!
• If you run the packaged app and walk around with the phone in your pocket, your phone will meow every time you move suddenly—something you might find embarrassing. Android apps are typically designed to keep running even when you’re not looking at them; your app continues to communicate with the accelerometer and the meow just keeps going. To really quit the app, bring up HelloPurr and press the phone’s menu button. You’ll be offered an option to stop the application.
Summary
Here are some of the concepts we’ve covered in this chapter:
• You build apps by selecting components in the Designer and then telling them what to do and when to do it in the Blocks Editor.
• Some components are visible and some aren’t. The visible ones appear in the user interface of the app. The non-visible ones do things like play sounds.
• You define components’ behavior by assembling blocks in the Blocks Editor. You first drag out an event handler like Button1.Click, and then place command blocks like Sound.Play within it. Any blocks within Button1.Click will be per-formed when the user clicks the button.
• Some commands need extra information to make them work. An example is
Vibrate, which needs to know how many milliseconds to vibrate. These values are called arguments.
• Numbers are represented as number blocks. You can plug these into commands that take numbers as arguments.
• App Inventor has sensor components. The AccelerometerSensor can detect when the phone is moved.
PART I
12 Customizable Apps
This section provides step-by-step instructions for building 12 Android apps. Though the apps are very different in nature, they build upon each other conceptually, the later chapters being the most complex in terms of the programming knowledge required.
CHAPTER 2
PaintPot
This tutorial introduces the Canvas component for creating simple, two-dimensional (2D) graphics. You’ll build PaintPot, an app that lets the user draw on the screen in different colors, and then update it to allow him to take his own picture and draw on that instead. On a
historical note, PaintPot was one of the first programs developed to demonstrate the potential of personal computers, as far back as the 1970s. Back then, making something like this simple drawing app was a very complex undertaking, and the results were pretty unpolished. But now with App Inventor, anyone can quickly put together a fairly cool drawing app, which is a great starting point for building 2D games.
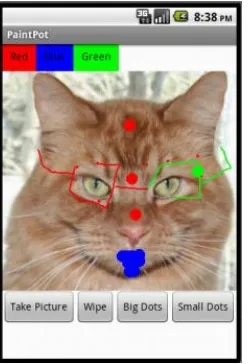
With the PaintPot app shown in Figure 2-1, you can:
• Dip your finger into a virtual paint pot to draw in that color.
• Drag your finger along the screen to draw a line.
• Poke the screen to make dots.
• Use the button at the bottom to wipe the screen clean.
• Change the dot size to large or small with the buttons at the bottom.
• Take a picture with the camera and then draw on that picture.
What You’ll Learn
This tutorial introduces the following concepts:
• Using the Canvas component for drawing.
• Handling touch and drag events on the phone’s surface.
• Controlling screen layout with arrangement components.
• Using event handlers that take arguments.
• Defining variables to remember things like the dot size the user has chosen for drawing.
Getting Started
Make sure your computer and your phone are set up to use App Inventor, and browse to the App Inventor website at http://appinventor.googlelabs.com. Start a new project in the Component Designer window and name it “PaintPot”. Open the Blocks Editor, click “Connect to Device,” and make sure the phone has started the App Inventor app.
To get started, go to the Properties panel on the right of the Designer and change the screen title to “PaintPot” (no more Screen1 here!). You should see this change on the phone, with the new title displayed in the title bar of your app.
If you’re concerned about confusing your project name and the screen name, don’t worry! There are three key names in App Inventor:
• The name you choose for your project as you work on it. This will also be the name of the application when you package it for the phone. Note that you can click Save As in the Component Designer to start a new version or rename a project.
• The component name Screen1, which you’ll see in the panel that lists the applica-tion’s components. You can’t change this name in the current version of App Inventor.
• The title of the screen, which is what you’ll see in the phone’s title bar. This starts out being Screen1, which is what you used in HelloPurr. But you can change it, as we just did for PaintPot.
Designing the Components
You’ll use these components to make the app:• Three Button components for selecting red, blue, or green paint, and a
Designing the Components 21
• One Button component for wiping the drawing clean, and two for changing the size of the dots that are drawn.
• A Canvas component, which is the drawing surface. Canvas has a
BackgroundImage property, which we’ll set to the kitty.png file from the
HelloPurr tutorial in Chapter 1. Later in this chapter, you’ll modify the app so the background can be set to a picture the user takes.
Creating the Color Buttons
First, create the three color buttons using the following instructions:
1. Drag a Button component onto the viewer and change its Text attribute to “Red” and make its BackgroundColor red.
2. Click Button1 in the components list in the Viewer to highlight it (it might already be highlighted) and click Rename to change its name from Button1 to
RedButton. Note that spaces aren’t allowed in component names, so it’s com-mon to capitalize the first letter of each word in the name.
3. Similarly, make two more buttons for blue and green, named BlueButton and
GreenButton, placing them under the red button vertically. Check your work up to this point against Figure 2-2.
Figure 2-2. The Viewer showing the three buttons created
Note that in this project, you’re changing the names of the components rather than leaving them as the default names as you did with HelloPurr. Using more meaning-ful names makes your projects more readable, and it will really help when you move to the Blocks Editor and must refer to the components by name. In this book, we’ll use the convention of having the component name end with its type (for example,
RedButton).
Using Arrangements for Better Layouts
You should now have three buttons stacked on top of one another. But for this app, you want them all lined up next to one another at the top of the screen, as shown in Figure 2-3. You do this using a HorizontalArrangement component:
1. From the Palette’s Screen Arrangement category, drag out a
HorizontalArrangement component and place it under the buttons.
2. In the Properties panel, change the Width of the HorizontalArrangement to “Fill parent” so that it fills the entire width of the screen.
3. Move the three buttons one by one into the HorizontalArrangement component. Hint: You’ll see a blue vertical line that shows where the piece you’re dragging will go.
Figure 2-3. The three buttons within a horizontal arrangement
If you look in the list of project components, you’ll see the three buttons indented under the HorizontalArrangement component to show that they are now its sub-components. Notice that all the components are indented under Screen1.
Test your app. You should also see your three buttons lined up in a row on the phone screen, although things might not look exactly as they do on the Designer. For example, the outline around
HorizontalArrangement appears in the Viewer but not on the phone.
In general, you use screen arrangements to create simple vertical, horizontal, or tabu-lar layouts. You can also create more complex layouts by inserting (or nesting) screen arrangement components within each other.
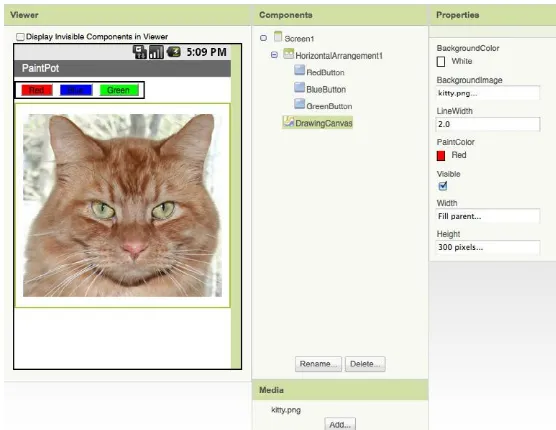
Adding the Canvas
Designing the Components 23
1. From the Palette’s Basic category, drag a Canvas component onto the Viewer. Change its name to DrawingCanvas. Set its Width to “Fill parent.” Set its Height
to 300 pixels.
2. If you’ve completed the HelloPurr tutorial (Chapter 1), you have already down-loaded the kitty.png file. If you haven’t, you can download it from http://examples .oreilly.com/0636920016632/.
3. Set the BackgroundImage of the Canvas to the kitty.png file. In the Property editor, the BackgroundImage will be set to None. Click the field and choose Add to upload the kitty.png file.
4. Set the PaintColor of the Canvas to red so that when the user starts the app but hasn’t clicked on a button yet, his drawings will be red. Check to see that what you’ve built looks like Figure 2-4.
Figure 2-4. The Canvas component has a BackgroundImage of the kitty picture
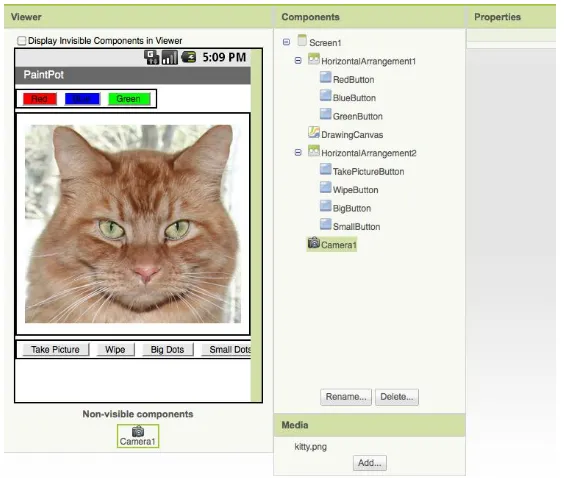
Arranging the Bottom Buttons and the Camera Component
1. From the Palette, drag out a second HorizontalArrangement and place it under the canvas. Then drag two more Button components onto the screen and place them in this bottom HorizontalArrangement. Change the name of the first but-ton to TakePictureButton and its Text property to “Take Picture”. Change the name of the second button to WipeButton and its Text property to “Wipe”.
3. Name the buttons BigButton and SmallButton, and set their Text to “Big Dots” and “Small Dots”, respectively.
4. From the Media Palette, drag a Camera component into the Viewer. It will appear in the non-visible component area.
You’ve now completed the steps to set the appearance of your app as shown in Figure 2-5.
Figure 2-5. The complete user interface for PaintPot
Test your app. Check the app on the phone. Does the kitty picture now appear under the top row of buttons? Does the bottom row of buttons appear?
Adding Behaviors to the Components
Adding Behaviors to the Components 25
In the Designer, you added a Canvas component named DrawingCanvas. Like all canvas components, DrawingCanvas has a Touched event and a Dragged
event. You’ll program the DrawingCanvas.Touched event so that it calls
DrawingCanvas.DrawCircle. You’ll program the DrawingCanvas.Dragged event to call DrawingCanvas.DrawLine. You’ll then program the buttons to set the
DrawingCanvas.PaintColor property, clear the DrawingCanvas, and change the
BackgroundImage to a picture taken with the camera.
Adding the Touch Event to Draw a Dot
First, you’ll arrange things so that when you touch the DrawingCanvas, you draw a dot at the spot you touch:
1. In the Blocks Editor, click My Blocks, select the drawer for the DrawingCanvas, and drag the DrawingCanvas.Touched block to the workspace. As soon as you drag the block out, the three plugs on the right automatically fill in with name blocks for x, y, and touchedSprite, as shown in Figure 2-6.
Figure 2-6. The event comes with information about where the screen is touched
Note. If you’ve completed the HelloPurr app in Chapter 1, you’re familiar with Button.Click events, but not with Canvas events. Button.Click events are fairly simple because there’s nothing to know about the event other than that it happened. Some event handlers, however, come with information about the event called arguments. The DrawingCanvas.Touched event tells you the x and y coordinates of the touch within the canvas. It also tells you if an object within the DrawingCanvas (in App Inventor, this is called a sprite) was touched, but we won’t need that until Chapter 3. The x and y coordinates are the arguments we’ll use to note where the user touched the screen, so we can then draw the dot at that position.
Figure 2-7. When the user touches the canvas, the app draws a circle
On the right side of the DrawingCanvas.DrawCircle block, you’ll see three slots for the arguments we need to fill in: x, y, and r. The x and y arguments specify the location where the circle should be drawn, and r determines the radius (or size) of the circle. The yellow warning box with the exclamation point at the top of the DrawingCanvas.Touched event handler denotes that these slots haven’t yet been filled. We’ll build the blocks to do that next.
This event handler can be a bit confusing because the DrawingCanvas .Touched event also has x and y slots; just keep in mind that the x and y for the DrawingCanvas.Touched event tell you where the user touched, while the x
and y for the DrawingCanvas.DrawCircle event are open slots for you to specify where the circle should be drawn.
Because you want to draw the circle where the user touched, plug in the x and y
values from DrawingCanvas.Touched as the values of the x and y parameters in DrawingCanvas.DrawCircle.
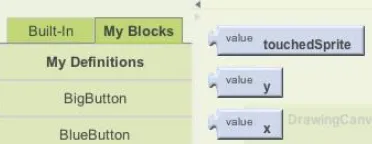
Note. Do not grab the arguments of the Touched event directly, even though this might seem logical! The fact that the arguments can even be grabbed is an unfortunate design aspect of App Inventor. Instead, you want to grab these values from the My Definitions drawer, as shown in Figure 2-8.
Adding Behaviors to the Components 27
3. Open the My Definitions drawer within My Blocks and find the blocks for value x and value y.
The blocks were automatically created for you by App Inventor when you dragged out the DrawingCanvas.Touched event handler block: they are references to the x and y arguments (or names) of that event. Drag out the value x and value y blocks and plug them into the corresponding sockets in the DrawingCanvas .DrawCircle block so they resemble what is shown in Figure 2-9.
Figure 2-9. The app knows where to draw (x,y), but we still need to specify how big the circle should be
4. You’ll also need to specify the radius, r, of the circle to draw. The radius is measured in pixels, which is the tiniest dot that can be drawn on the screen. For now, set it to 5: click in a blank area of the screen to bring up the shortcut menu, and then select the Math folder. Select 123 from the drop-down list to create a number block. Change the 123 to 5 and plug that in for the r slot. When you do, the yellow box in the top-left corner will disappear as all the slots are filled. Figure 2-10 illustrates how the final DrawingCanvas.Touched event handler should look.
Figure 2-10. When the user touches the canvas, a circle of radius 5 will be drawn at (x,y)
Test your app. Try out what you have so far on the phone. Touch the canvas—your finger should leave a dot at each place you touch. The dots will be red if you set the Canvas.PaintColor property to red in the Component Designer (otherwise, it’s black, as that’s the default).
Adding the Drag Event That Draws a Line
Next, you’ll add the drag event handler. Here’s the difference between a touch and a drag:
• A touch is when you place your finger on the canvas and lift it without moving it.
• A drag is when you place your finger on the canvas and move it while keeping it in contact with the screen.
In a paint program, dragging your finger across the screen appears to draw a giant, curved line along your finger’s path. What you’re actually doing is drawing hundreds of tiny, straight lines; each time you move your finger, even a little bit, you extend the line from your finger’s last position to its new position.
1. From the DrawingCanvas drawer, drag the DrawingCanvas.Dragged block to the workspace. You should see the event handler as it is shown in Figure 2-11.
The DrawingCanvas.Dragged event comes with seven arguments:
startx, starty
The position of your finger back where the drag started.
currentx, currenty
The current position of your finger.
prevx, prevy
Adding Behaviors to the Components 29
draggedSprite
The argument that will be true if the user drags directly on an image sprite. We won’t use this argument in this tutorial.
Figure 2-11. A Dragged event has even more arguments than Touched
2. From the DrawingCanvas drawer, drag the DrawingCanvas.DrawLine block into the DrawingCanvas.Dragged block, as shown in Figure 2-12.
Figure 2-12. Adding the capability to draw lines
3. Click the My Definitions drawer. You should see the blocks for the arguments you need. Drag the corresponding value blocks to the appropriate slots in
DrawingCanvas.Dragged. value prevX and value prevY should be plugged into the x1 and y1 slots. value currentX and value currentY should be plugged into the x2 and y2 slots, as shown in Figure 2-13.
Figure 2-13. As the user drags, the app will draw a line from the previous spot to the current one
Test your app. Try this behavior on the phone: drag your finger around on the screen to draw lines and curves. Touch the screen to make spots.
Adding Button Event Handlers
The app you’ve built lets the user draw, but it always draws in red. Next, add event handlers for the color buttons so users can change the paint color, and another for
WipeButton so they can clear the screen and start over.
In the Blocks Editor:
1. Switch to the My Blocks column.
2. Open the drawer for RedButton and drag out the RedButton.Click block. 3. Open the DrawingCanvas drawer. Drag out the set DrawingCanvas.PaintColor
Adding Behaviors to the Components 31
4. Switch to the Built-In column. Open the Colors drawer and drag out the block for the color red and plug it into the set DrawingCanvas.PaintColor to block.
5. Repeat steps 2–4 for the blue and green buttons.
6. The final button to set up is WipeButton. Switch back to the My Blocks column and drag out a WipeButton.Click from the ButtonWipe drawer. From the DrawingCanvas drawer, drag out DrawingCanvas.Clear and place it in the WipeButton.Click block. Confirm that your blocks show up as they do in Figure 2-14.
Figure 2-14. Clicking the color buttons changes the canvas’s PaintColor; clicking Wipe clears the screen
Letting the User Take a Picture
App Inventor apps can interact with the powerful features of an Android device, including the camera. To spice up the app, we’ll let the user set the background of the drawing to a picture she takes with the camera.
1. The Camera component has two key blocks. The Camera.TakePicture block launches the camera application on the device. The event Camera.AfterPicture is triggered when the user has finished taking the picture. You’ll add blocks in the Camera.AfterPicture event handler to set the DrawingCanvas.Background Image to the just-taken Switch to the My Blocks column and open the
TakePictureButton drawer. Drag the TakePictureButton.Click event handler into the workspace.
2. From Camera1, drag out Camera1.TakePicture and place it in the TakePictureButton.click event handler.
3. From Camera1, drag the Camera1.AfterPicture event handler into the workspace.
4. From DrawingCanvas, drag the set DrawingCanvas.BackgroundImage to block and place it in the Camera1.AfterPicture event handler.
The blocks should look like Figure 2-15.
Figure 2-15. When the picture is taken, it’s set as the canvas’s background image
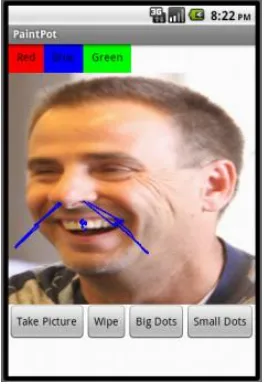
Test your app. Try out this behavior by clicking Take Picture on your phone and taking a picture. The cat should change to the picture you take, and then you can draw on that picture. (Drawing on Professor Wolber is a favorite pastime of his students, as exemplified in Figure 2-16.)
Changing the Dot Size
The size of the dots drawn on the canvas is deter-mined in the call to DrawingCanvas.DrawCircle when the radius argument r is set to 5. To change the thickness, you can put in a different value for r. To test this, try changing the 5 to a 10 and testing it out on the phone to see how it looks.
The catch here is that whatever size you set in the radius argument is the only size the user can use. What if he wants to change the size of the dots? Let’s modify the program so that the user, not just the programmer, can change the dot size. We’ll change it so that when the user clicks a button labeled “Big Dots,” the dot size is 8, and when he clicks a button labeled “Small Dots,” it is 2.
To use different values for the radius argument, the app needs to know which one we want to apply. We have to tell it to use a specific value, and it has to store (or remember) that value somehow so it can keep using it. When your app needs to remember