Other Microsoft Windows resources from O’Reilly
Related titles Windows Vista: The Definitive Guide Windows Vista
Administration: The Definitive Guide Windows Vista in a
Nutshell
Windows Vista: The Missing Manual Windows Vista for Starters:
The Missing Manual Windows Vista Pocket
Reference
Windows Books Resource Center
windows.oreilly.com is a complete catalog of O’Reilly’s Windows and Office books, including sample chapters and code examples.
oreillynet.comis the essential portal for developers inter-ested in open and emerging technologies, including new
platforms, programming languages, and operating
systems.
Conferences O’Reilly brings diverse innovators together to nurture the ideas that spark revolutionary industries. We specialize in documenting the latest tools and systems, translating the innovator’s knowledge into useful skills for those in the trenches. Visitconferences.oreilly.comfor our upcoming events.
Windows Vista Annoyances
David A. Karp
Windows Vista Annoyances by David A. Karp
Copyright © 2008 O’Reilly Media, Inc. All rights reserved. Printed in the United States of America.
Published by O’Reilly Media, Inc., 1005 Gravenstein Highway North, Sebastopol, CA 95472.
O’Reilly books may be purchased for educational, business, or sales promotional use. Online editions are also available for most titles (safari.oreilly.com). For more information, contact our corporate/institutional sales department: (800) 998-9938 or[email protected].
Editors: John Osborn and Laurel R.T. Ruma
Production Editor: Rachel Monaghan Proofreader: Rachel Monaghan
Indexer: Lucie Haskins
Cover Designer: Karen Montgomery Interior Designer: David Futato Illustrator: Robert Romano
Printing History:
December 2007: First Edition.
Nutshell Handbook, the Nutshell Handbook logo, and the O’Reilly logo are registered trademarks of O’Reilly Media, Inc.Windows Vista Annoyances, the image of a horned frog, and related trade dress are trademarks of O’Reilly Media, Inc.
Many of the designations used by manufacturers and sellers to distinguish their products are claimed as trademarks. Where those designations appear in this book, and O’Reilly Media, Inc. was aware of a trademark claim, the designations have been printed in caps or initial caps.
While every precaution has been taken in the preparation of this book, the publisher and author assume no responsibility for errors or omissions, or for damages resulting from the use of the information contained herein.
This book uses RepKover™, a durable and flexible lay-flat binding.
v
Table of Contents
Preface
. . .xiii
1. Get Started with Windows Vista
. . .1
Editions of Vista 1
More Than This 4
Install Windows Vista 6
Install Vista on a New (Clean) System 7
Upgrade from a Previous Version 12
Potential Problems During Setup 15
Set Up a Dual-Boot System 15
Migration to Windows Vista 20
Sentimental Fool 20
2. Shell Tweaks
. . .22
Customize Windows Explorer 24
Force Explorer to Remember Its Own Settings 30
Start Explorer with Any Folder 32
Get to the Desktop 34
Save Your Desktop Layout 36
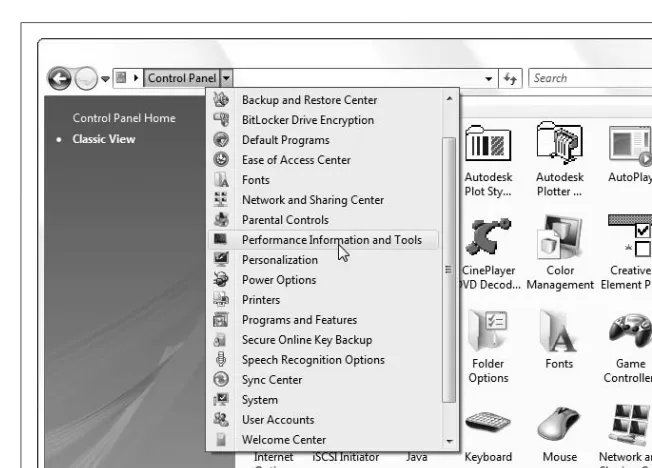
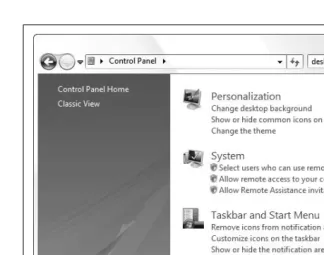
Quick Access to Control Panel 38
Who Doesn’t Love Keyboard Shortcuts? 44
Massage the Start Menu 50
Clean Up the Tray 57
vi | Table of Contents
Working with Files and Folders 60
Why It Takes So Long to Copy Files 60
Slicker Ways to Select Files 62
Take Charge of Drag-Drop 64
Copy or Move to a Specified Path 67
More Ways to Rename Files 68
Delete In-Use Files 71
Zip It Up 73
Customize Drive and Folder Icons 75
Search Tricks 77
3. The Registry
. . .83
The Registry Editor 84
The Structure of the Registry 87
The Meat of the Registry: Values 89
Registry Tasks and Tools 94
Search the Registry 94
Search and Replace Registry Data 97
Find the Registry Key That Does... 98
Create an Interface for a Registry Setting 103 Export and Import Data with Registry Patches 108
Prevent Changes to a Registry Key 113
Back Up the Registry 116
File Type Associations 122
Anatomy of a File Type 124
Change the Icon for All Files of a Type 127
Customize Context Menus for Files 131
Lock Your File Types 139
Expand the Scope of Your File Types 141
Customize Windows Explorer’s New Menu 142
Fix Internet Shortcuts 145
4. Working with Media
. . . .148
Playing Video 148
Repair Broken and Incomplete Videos 151
Fix Other Playback Problems 153
Table of Contents | vii
Handling Online Video 158
Rewind or Fast-Forward Streaming Video 160
Control Video Buffering 160
Download Online Video Clips 161
Sound and Music 167
Get Sound Where There Is None 168
Get Windows to Listen 172
Fix Garbled Music 173
Crossfade Your Music 174
Extract Sound from Video 175
Convert Audio Files 176
Fix Music Tags 178
Photos, Pictures, Images 180
Choose a New Pictures Folder 184
Get Thumbnails for RAW Photos 185
Get Rid of the Windows Photo Gallery 186
Get Accurate Color Output 187
Sort Photos Chronologically 191
Media Center Annoyances 195
Watch TV on Your TV 196
Fix Broken TV Listings 198
CD and DVD Drives 200
Troubleshoot CD and DVD Playback Problems 202
5. Performance
. . . .204
Trim the Fat 205
Tame Mindless Animation and Display Effects 205
Make Menus More Mindful 211
Start Windows in Less Time 211
Start Windows Instantly (Almost) 215
Shut Down Windows Quickly 222
Start Applications Faster 224
Make Your Hardware Perform 225
Get Glass 226
Maximize the Windows Performance Rating 232
viii | Table of Contents
Manage IRQ Priority 239
Overclock Your Processor 240
Hard Disk 242
A Defragmentation Crash Course 242
If in Doubt, Throw It Out 246
Optimize Virtual Memory and Cache Settings 249
Choose the Right Filesystem 254
Advanced NTFS Settings 255
Transfer Windows to Another Hard Disk 258
Work with Partitions 263
6. Troubleshooting
. . . .274
Crashes and Error Messages 276
Viruses, Malware, and Spyware 277
What to Do When Windows Won’t Start 286
Manage Startup Programs 291
Check Your Drive for Errors with Chkdsk 294
What to Do When a Program Crashes 298
What to Do When a Program Won’t Start 303
Green Ribbon of Death 305
Blue Screen of Death 307
Dealing with Drivers and Other Tales of
Hardware Troubleshooting 313
How to Add Hardware 314
Interpret Device Manager Errors 318
Go Back in Time with Restore Points and Shadow Copies 322
Test for Bad Memory (RAM) 326
Don’t Overlook the Power Supply 328
Fix USB Power Management Issues 328
Fix Printer Problems 329
Preventive Maintenance and Data Recovery 329
Patch Windows with Windows Update 330
Quick, On-the-Fly Backups 331
Back Up Your Entire System 332
Table of Contents | ix
7. Networking and Internet
. . . .341
Build Your Network 341
Terminology Primer 342
To Wire or Not to Wire 346
Set Up a Wireless Router 350
Sniff Out WiFi Hotspots 357
Troubleshoot Wireless Networks 362
Lock Out Unauthorized PCs 367
Connect to a Public Wireless Network 372
Add Wireless Support to Any Device 376
Get Bluetooth to Work 379
Troubleshoot Network Connections 382
Test an IP Address 387
Internet Me 388
Share an Internet Connection 390
Test Your Throughput 395
Do Download Accelerators Really Work? 398
Set Up Virtual Private Networking 399
Control Your PC Remotely 403
Manage the Nameserver (DNS) Cache 410
Secure Your Networked PC 412
Close Vista’s Backdoors 413
The Security Center and the Firewall 415
Set Up the Windows Firewall 417
Scan Your System for Open Ports 425
Web and Email 428
Lock Down Internet Explorer 428
Change Internet Shortcut Icons 432
Live with Firefox in an IE World 434
Fix Symbols in Web Pages 436
Fix Broken Pictures in Web Pages 436
Improve Any Web Site 437
Put an End to Pop Ups 439
x | Table of Contents
Stop Annoying Animations 441
Opt Out of Tabbed Browsing 443
Surf Anonymously 444
Change the Default Email Reader 448
Stop Spam 450
Send Large Files 454
Email Long URLs 455
8. Users and Security
. . . .457
Manage User Accounts 457
Permissions and Security 462
Set Permissions for a File or Folder 463
Protect Your Files with Encryption 470
Control User Account Control 480
Logon and Profile Options 487
Hide the List of User Accounts 487
Log In Automatically 488
Reset a Forgotten Administrator Password 490
Prevent Users from Shutting Down 491
Log In As the Administrator 491
Customize the Welcome Screen Background 493 Customize the Default Profile for New Users 494
Rename Your Profile Folder 495
Change the Locations of Personal Folders 496
Share Files and Printers 498
Share a Folder 499
Access a Shared Folder Remotely 503
Turn Off Administrative Shares 505
Share a Printer 508
Use a Print Server Without Software 510
Table of Contents | xi
9. Scripting and Automation
. . . .512
Windows Script Host 514
Build a VBScript Script 514
Use Variables to Store and Manipulate Information 515 Give Your Scripts an Interface with the InputBox and
MsgBox Commands 516
Creating Interactive Scripts with Conditional Statements 518 Using Loops, Using Loops, Using Loops 519 Make Building Blocks with Subroutines and Functions 520
Object References 523
How to Run Applications 523
How to Access the Registry 524
How to Manipulate Files 526
How to Create Windows Shortcuts and Internet Shortcuts 530
How to Use the Network 531
How to Control Internet Explorer 533
How to Use Command-Line Parameters 534
How to Manage Windows Services 536
How to Write CGI Scripts for Web Servers 537
Decipher Script Errors 540
Find a Better Editor 543
Further Study 543
Make a Startup Script 544
Wacky Script Ideas 546
Quick and Dirty Backup Tool 546
Internet Fishtank 548
Quick SendTo Shortcut Creator 550
Rename Files with Search and Replace 551
Command Prompt Scripting 552
DOS Commands 553
Batch Files 556
xii | Table of Contents
Flow Control 559
Command-Line Parameters 559
Conditional Statements 561
Loops 562
Simulating Subroutines 563
Get to the Command Prompt Quickly 563
Windows PowerShell 564
CmdLets and Aliases 565
Pipelines 567
PowerShell Variables 568
PowerShell Scripts 570
Automate Scripts with the Task Scheduler 571
A. BIOS Settings
. . . .575
B. TCP/IP Ports
. . . .585
xiii
Preface
Why Am I Annoyed?
Imagine a windowless room in a nondescript office building. Inoffensive tan carpet lines the floors, fluorescent lights hum softly overhead, and 20 seated Microsoft employees flank a rectangular folding table in the center of the room. On the table rests a Windows PC, and at its helm, a slack-jawed cipher punches blindly at the controls in a vain attempt to carry out a task requested by the team leader.
“OK, here’s the next exercise: find a picture of a badger on the Internet and print it out on that printer there,” says the leader.
The observers—members of Microsoft’s Usability Research Group—dili-gently note each click, keypress, and hesitation, hoping they’ll learn the answer to the industry’s big secret: why do so many people find computers difficult to use?
Over the years, Microsoft has uncovered many startling facts about PC users with this system, and the software has been changed accordingly. For instance, people new to computers apparently have a hard time with the concept of overlapping windows. (Did I say “startling”? I meant “idiotic.”) So, Microsoft spent six years designing a “Glass” interface for Windows Vista with translucent borders that sort of show stuff underneath. Of course, most people new to PCs figure out the concept of stacking windows after about 10 minutes of fiddling, so is this actually a solution to a genuine usability problem, or just glitzy eye candy included to give those still using XP a compelling reason to upgrade?
xiv | Preface
found in earlier versions of Windows (including XP) and Microsoft Office— which caused about half the items in a menu to vanish sonobodycould find them. In Windows Vista, Microsoft took a different tack and removed the menus altogether. The good news is that you’ll no longer get lost looking through menus. Of course, you won’t be able to find anything, either.
Or take the fact that, for years, people have been complaining about the time it takes to load Windows. Rather than making the operating system leaner and cleaner so that it starts faster, Microsoft’s designers have contin-ued to add features and complexity to the software, which results in longer load times. The solution? Replace the Shut Down button in the Start menu with a Sleep button, so once Windows starts, it’ll stay loaded in memory even when you shut it off. Thereafter, it’ll take only a few seconds to get your desktop back.
Truth be told, features like Sleep have been around for years, but they’ve always sat on the sidelines, waiting for inquisitive people to discover them. But thanks to Vista, Sleep is now the main dish, which means Windows should start much faster now—whether you’re the inquisitive type or not— and this should make a lot of people happy. The downside, of course, is that it takes a constant supply of electricity to keep Windows loaded in memory, causing your PC to suck power 24 hours a day, 7 days a week...even when you’re not using it. This means shorter-lasting laptop batteries, higher elec-tricity bills, and more pollution from the power plants that now have to power millions of sleeping Vista PCs.
What most people don’t know is that Sleep is actually a hybrid of the old Standby and Hibernate power-saving modes, which means you can now completely power off your PC and still get it to load quickly. Once again, only the inquisitive—you, presumably—will be in the know, leaving the masses to leave their PCs on all night.
Probably the most substantive change in Vista’s interface is the prominence of the Search tool. Rather than being a separate window, it’s now perma-nently lodged in the Start menu and at the top of every Explorer window. What’s more, Windows now invisibly indexes most of your data, making search results more or less instantaneous (a feat possible in earlier versions of Windows only with free add-on desktop search software).
Preface | xv
In short, the new Search feature shows promise, but its competence is lim-ited by a company that values marketable features over usable ones.
Hundreds of design decisions are made this way. Take content protection, Vista’s copy-protection initiative for so-called “premium content” like high-definition movies from Blu-Ray and HD DVD discs. According to Microsoft’s standards, software and hardware manufacturers are supposed to disable “premium content” across allinterfaces that don’t provide copy protection. One such interface is the S/PDIF digital audio port—usually in the form of a TOSlink optical plug—that comes on most high-end audio cards. Since S/PDIF doesn’t support copy protection—meaning that you could theoretically plug it into another PC and rip the soundtrack off an HD movie—Vista requires that your TOSlink plug be disabled whenever you play back that HD movie on your PC. As a result, you’ll only be able to use your analog audio outputs when watching HD content, and that expensive sound card you just bought is now trash. Why would Microsoft hobble an important feature? For you, the consumer? Of course not. Vista’s content-protection feature is intended to appease piracy-wary movie studios, so Microsoft won’t be left behind as the home theater industry finds new ways to rake in cash. And ironically, Microsoft boasts “content protection” as a feature of Vista.
Would Microsoft be making decisions like these if it had to compete fairly for your business? After Europe’s second-highest court upheld a ruling that Microsoft had abused its market power and stifled innovation, Neelie Kroes, the European Union competition commissioner, stated that “the court has confirmed the commission’s view that consumers are suffering at the hands of Microsoft.”
So that leaves us lowly Vista users with a choice: do we continue to suffer with Windows’ shortcomings, or take matters into our own hands?
Of Bugs and Features
The point of this book is to help you solve problems. Sometimes those prob-lems are the result of bad design, such as the aforementioned shortcomings of Vista’s search tool, and sometimes the problems are caused by bugs.
xvi | Preface
The User Account Control (UAC) feature in Windows Vista is a perfect example of a feature gone awry. Most of the time, UAC does precisely what it was designed to do—prevent programs from doing harm to your PC, occa-sionally asking your permission when it deems it appropriate to do so—but the result is a system that frequently bothers you with UAC prompts, while intermittently breaking your applications without telling you why. Because this behavior isn’t caused by a bug per se, fixing the problem is instead just a matter of customizing the system so that it suits your needs.
This inevitably leads to an important conclusion: one person’s annoyance is another’s feature. Although Microsoft may be motivated more by profit than excellence, often leading to products designed for the lowest common denominator, you’re not bound to that fate. In other words, you shouldnot be required to adjust the way you think in order to complete a task on your computer; rather, you should learn how to adjust the computer to work in a way that makes sense to you.
But I prattle on. Feel free to dive in to any part of the book and start elimi-nating annoyances.
How To Use This Book
Windows Vista Annoyances is not documentation; you can get that any-where. Rather, it’s a unique and thorough collection of solutions, hacks, and time-saving tips to help you get the most from your PC.
Most topics begin by describing the problem, annoyance, or task at hand, and include something you don’t often find in technical references: why you’d want to complete the particular solution (and sometimes, why you wouldn’t). Of course, if you’re in a hurry, you can always skip ahead to the actual solution, easily identifiable by subheadings and numbered steps.
Although you certainly don’t need to read the chapters in order, the solu-tions and chapters are arranged so that you can progress easily from one topic to the next, expanding your knowledge and experience as you go. You should be able to jump to any topic as you need it, but if you find that you don’t have the proficiency required by a particular solution, such as familiar-ity with the Registry, you can always jump to the appropriate section (Chapter 3, in the case of the Registry).
Preface | xvii
Chapter 1,Get Started with Windows Vista. Get the low-down on what’s
special about Vista, as well as what’s annoying. Learn how to install (or reinstall) the operating system in a variety of scenarios.
Chapter 2,Shell Tweaks. Customize Windows Explorer, the desktop, the
Start menu, and the Search tool to be less annoying and more useful. Then, learn a host of file management tricks to help you work with your stuff more effectively.
Chapter 3,The Registry. Dive inside Windows’ giant database of settings
and system configuration data, and learn about the various tools you can use to explore, hack, and manage this valuable resource.
Chapter 4,Working with Media. Improve your experience with videos,
pictures, and music in Vista, and solve problems with CDs and DVDs.
Chapter 5,Performance. Speed up your PC and get it to work better. Get
the new Glass interface working, and take care of your hard disk.
Chapter 6,Troubleshooting. Learn what to do when Windows won’t start,
when applications crash, and when Windows can’t set up your new hardware. Deal with the Blue Screen of Death, fix the Green Ribbon of Death, and prevent data loss by backing up your PC.
Chapter 7,Networking and Internet. Get your local network up and
run-ning, get your wireless working (safely), and connect to the Internet. Once you’ve connected, close all of Vista’s backdoors, and then improve your experience with the Web and email.
Chapter 8,Users and Security. Protect your privacy and your data with
permissions, encryptions, and user account management. Tame the User Account Control (UAC) prompt, customize your login, and share your files and printers with others on your network.
Chapter 9,Scripting and Automation. Automate Vista with scripts,
Com-mand Prompt Batch files, Task Scheduler, and the new Windows PowerShell. Explore the good ol’ DOS commands still used in the Command Prompt, not to mention the times when Windows won’t boot.
Appendix A,BIOS Settings. This is a brief glossary of the often-neglected
motherboard settings that can significantly affect the stability and per-formance of your PC.
Appendix B,TCP/IP Ports. Look up common network port numbers, used
xviii | Preface
Conventions Used in This Book
The following typographical conventions are used in this book:
Constant width
Indicates text you’re supposed to type, output from a command-line program, code examples, Registry keys, and paths to Registry keys.
Constant width italic
Indicates user-defined elements within constant-width text (such as file-names or command-line parameters). For example, Chapter 8 discusses a file encryption utility,cipher.exe, which has a variety of command-line options. A particular solution might instruct you to type:
cipher /r:filename
The italicized portion of this code,filename, signifies the element you’ll need to replace with whatever is applicable to your system or needs. The rest—the non-italicized portion—should be typed exactly as shown. Bold
Identifies captions, menus, buttons, checkboxes, tabs, keyboard keys, drop-down lists and list options, and other interface elements. Bolding interface elements makes it easy to distinguish them from the rest of the text. For example, you may wish to turn off the Force Windows to
crash option.
Window/dialog titles are typically not bolded, but some objects (such as Control Panel contents) can appear as icons or menu items, and there-fore typically appear bolded.
Italic
Introduces new terms, indicates web site URLs, and sets apart file and folder names.
Italic is also used to highlight chapter titles and, in some instances, to visually separate the topic of a list entry.
{Curly braces}
Denote user-defined elements in paths or filenames, e.g., C:\Users\ {username}\AppData\Roaming\Microsoft\Windows\Start Menu.
“Quotation marks”
Preface | xix
Path Notation
Occasionally, the following shorthand path notation is used to show you how to reach a given user-interface element or option. The path notation is always presented relative to a well-known location. For example, the following path:
Control Panel➝Date and Time➝Internet Time tab
means “Open Control Panel, then open Date and Time, and then choose theInternet Time tab.”
Keyboard shortcuts
When keyboard shortcuts are shown, a hyphen (such asCtrl-Alt-Del) or a plus sign (Winkey+R) means that you should press the keys simultaneously.
This is an example of a tip, often used to highlight a particu-larly useful hint or time-saving shortcut. Tips often point to related information elsewhere in the book.
This is an example of a warning, which alerts you to a poten-tial pitfall of the solution or application being discussed. Warnings can also refer to a procedure that might be danger-ous if not carried out in a specific way.
Request for Comments
Please address comments and questions concerning this book to the publisher:
O’Reilly Media, Inc.
1005 Gravenstein Highway North Sebastopol, CA 95472
800-998-9938 (in the United States or Canada) 707-829-0515 (international/local)
707-829-0104 (fax)
You can also send messages electronically. To be put on the mailing list or request a catalog, send email to:
To comment or ask technical questions about this book, send email to:
xx | Preface
The O’Reilly web site has a section devoted especially to this book, on which can be found errata, sample chapters, reader reviews, and related information:
http://www.oreilly.com/catalog/9780596527624/
For software mentioned in this book, as well as additional tips, online dis-cussion forums, and Windows news, visit:
http://www.annoyances.org/
For more information about books, conferences, software, Resource Cen-ters, and the O’Reilly Network, see the O’Reilly web site at:
http://www.oreilly.com/
Safari® Books Online
When you see a Safari® Books Online icon on the cover of your favorite technology book, it means the book is available online through the O’Reilly Network Safari Bookshelf.
Safari offers a solution that’s better than e-books. It’s a virtual library that lets you easily search thousands of top technical books, cut and paste code samples, download chapters, and find quick answers when you need the most accurate, current information. Try it for free athttp://safari.oreilly.com.
Acknowledgments
I’d like to start by thanking the folks at O’Reilly Media, Inc. It’s a supreme pleasure to work with people who are dedicated to quality and are passion-ate about their work. Special thanks to Tim O’Reilly for his enthusiasm, support, and commitment to quality. Thanks to John Osborn, Laurel Ruma, Kyley Caldwell, and Rachel Monaghan for helping me get this edition together and out in time.
Thanks also to Debbie Timmins, Rob Cohen, and Tim Vander Kooi for their comments, and thanks to everyone on the team who worked on this book.
I’d like to thank my family, friends, and well-wishers—in that they didn’t wish me any specific harm—all of whom put up with my deadlines and late-night writing binges.
Bye bye, Maeby.
1
Chapter 1Making the Most of Vista
CHAPTER 1
Get Started with Windows Vista
Windows Vista is like a papaya: sleek on the outside, but a big mess on the inside.
Love it or hate it, Vista is what Microsoft is serving up right now. Whether it goes down smoothly or gives you heartburn is up to you.
On the plus side, Vista gives you a new, faster Search tool; the shiny, trans-lucent “Glass” interface; and a revamped Windows Explorer. It’s also the first version of Windows where you can get Tablet PC and Media Center in the same package, which means you can use it to build a DVR(Digital Video Recorder) without a keyboard. And Vista handles videos and pictures much better than earlier versions of Windows, with improved thumbnail and metadata support built right into Windows Explorer.
As for the minuses, Vista seems intolerably slow compared with its prede-cessors, and its reliability leaves something to be desired. TheGreen Ribbon of Deathis an everyday occurrence, bringing down Windows Explorer if you so much as bat your eyes at it. And the horrendously annoying User Access Control (UAC) prompt forces you to endure repeated prompts for even the most mundane tasks in Control Panel.
Fortunately, you can deal with most of the minuses. For instance, to tame UAC, see Chapter 8. Or, to fix the Green Ribbon of Death (or the Blue Screen of Death for that matter), see Chapter 6. And to make Vista run faster, check out Chapter 5. But if you want to take stock of what you have and install the operating system on your PC, then Chapter 1 is for you.
Editions of Vista
2 | Chapter 1: Get Started with Windows Vista
basis for its operating systems for the next few years at least. (It’s been seven years since Windows 2000.)
Windows Vista is available in several different editions, each of which is sup-posedly intended for a different market. They’re all the same version—effec-tively, the same software—differing only in the toys included in the box.
The top of the line is theUltimateedition, available at more than twice the cost of the baseline Home Basic edition. The Home Premium and Business editions include most of the extras found in Ultimate, but at a cost only slightly higher than Home Basic. On the fringe, you’ll find the Starterand Enterpriseeditions, as well asWindows Home Server. See the “What Does 64-Bit Vista Get Me?” sidebar, next, for details on the 64-bit versions of Vista.
What Does 64-Bit Vista Get Me?
More bits gets you access to more memory. The processor inside your PC communicates with your system memory (RAM) with numericaddressing.
Thus the maximum amount of memory a 32-bit processor can address is 232 bytes, or 4 gigabytes. Newer 64-bit processors—not to mention the 64-bit operating systems that run on them—can address 264bytes of memory, or 17,179,869,184 gigabytes (16 exabytes) of RAM.
(17 million gigabytes may sound like a lot of space now, but it won’t be long before you’ll be taking baby pictures with an 8-gigapixel digital camera.) Windows NT, released in 1993, was Microsoft’s first fully 32-bit operating system. But it took eight years before the platform, which had since evolved into Windows 2000 and then XP, became mainstream. (For those keeping track, Windows 9x doesn’t count because it was a hybrid OS that ran 32-bit applications on a 16-bit DOS foundation, which was one of the reasons it was so unstable.) 64-bit Windows became a reality in XP, but Vista is Microsoft’s first serious attempt to make 64-bit computing mainstream. But the question is, how mainstream is it?
While 64-bit Vista can run most 32-bit applications without a problem, it’s not compatible with 32-bit hardware drivers or 32-bit utilities like Windows Explorer extensions (e.g., context menu add-ons). This means that you need a native 64-bit driver for every device on your PC. And since 64-bit Vista won’t loadunsigned drivers(see Chapter 6), finding support for all your hard-ware may be a bit of a challenge, at least presently. Since most Vista installa-tions are still 32-bit, most manufacturers aren’t bothering to compile, test, and support 64-bit drivers and software.
Editions of Vista | 3
Get
Started
with
Windows Vista
The differences among the editions are outlined in Table 1-1. See the next section for ways you can make up the difference if you’re not using the Ulti-mate edition.
Now, 64-bit software running on 64-bit Windows has been known to run as much as 10% faster, which illustrates the other reason—aside from memory addressing—that people find 64-bit Vista alluring. Just be prepared for lacklus-ter industry support, at least for the next few years until Microsoft releases a 64-bit-only OS.
It should also be noted that, at the time of this writing, most 64-bit antivirus programs running on 64-bit Vista performed very poorly compared with their 32-bit counterparts. Of course, there aren’t a lot of 64-bit viruses out there right now, but that doesn’t mean a 32-bit virus can’t do some harm. All editions of Vista (except Starter) are available in both the 32-bit or 64-bit varieties; the retail Ultimate edition even includes both 32-bit and 64-bit DVDs right in the box. If you have 32-bit Vista (other than Ultimate), you can get the 64-bit version of your edition (http://www.microsoft.com/windowsvista/ 1033/ordermedia/), and assuming your license key checks out, you only pay shipping. But beware: once you “convert” your key to work with the 64-bit version, you won’t be able to use it to reinstall the 32-bit version, should you decide to go back.
Regardless, all of the solutions in this book apply to both the 32-bit and 64-bit versions of Windows Vista unless otherwise noted.
Table 1-1. What you get (and what you don’t) with the various editions of Windows Vista
Home Basic
Home Premium
Business Enterprise Ultimate
Aero Glass interface ✓ ✓ ✓ ✓
Back Up Files wizard ✓ ✓ ✓ ✓ ✓
Backup scheduler ✓ ✓ ✓ ✓
Complete PC Backup and Restore ✓ ✓ ✓
Dual processor support ✓ ✓ ✓
Encryption – BitLocker drive encryption ✓ ✓
Encryption – file and folder encryption (EFS) ✓ ✓ ✓
Fax and Scan ✓ ✓ ✓
4 | Chapter 1: Get Started with Windows Vista
More Than This
Got Vista envy? Are you using the Home Basic, Home Premium, or Busi-ness editions, and wish you could have the benefits of Ultimate? Here are the big-ticket differences among the editions, and, when applicable, how to get the extra features at little or no extra cost:
Aero Glass
The translucent “Glass” interface is available on every edition except Home Basic, although Vista’s basic Aero interface (without transpar-ency effects) is available on all editions. See “Get Glass,” in Chapter 5, for alternatives for Home Basic.
IIS (Internet Information Services) 7.0 Web server
✓ ✓ ✓ ✓
Join a corporate network domain ✓ ✓ ✓
Local Security Policy Editor (secpol.msc) ✓ ✓ ✓ Local Users and Groups Manager (lusrmgr.msc) ✓ ✓ ✓ Multi-Lingual User Interface ✓ ✓
Offline files and folders (sync with network folders)
✓ ✓ ✓
Premium games (InkBall, Mahjong Titans, Chess Titans)
✓ ✓
Remote Desktop ✓ ✓ ✓
Shadow Copies ✓ ✓ ✓
Subsystem for UNIX-based Applications (SUA) ✓ ✓
System Memory supported (64-bit only) 8 GB 16 GB 128 GB 128 GB 128 GB
Tablet PC extras (Handwriting recognition, pen flicks, Windows Touch technology)
✓ ✓ ✓ ✓
Windows DVD Maker ✓ ✓
Windows Media Center ✓ ✓
Windows Meeting Space Join only ✓ ✓ ✓ ✓
Windows Movie Maker high definition support SD only HD+SD SD only SD only HD+SD
Windows SideShow support ✓ ✓ ✓ ✓
Windows Ultimate Extras ✓
Table 1-1. What you get (and what you don’t) with the various editions of Windows Vista (continued)
Home Basic
Home Premium
Editions of Vista | 5
Get
Started
with
Windows Vista
Backup and Restore Center
See “Preventive Maintenance and Data Recovery,” in Chapter 6, for details on Windows’ various versions of its backup software, as well as free alternatives.
BitLocker Drive Encryption
BitLocker, included only with the Ultimate and Enterprise editions, is a method by which you can encrypt an entire drive, as opposed to the more basic folder and file-level encryption features included in the Business, Enterprise, and Ultimate editions. Freeware alternatives include FreeOTFE (http://www.freeotfe.org/) and TrueCrypt (http://www.truecrypt.org/). See Chapter 8 for the skinny on encryption.
Group Policy Object Editor
Several solutions in this book use the Group Policy Object Editor (gpedit.msc) to change a few esoteric settings, but this tool isn’t included in the Home Basic or Home Premium editions. If thegpedit.mscfile isn’t on your system, you can access most of these settings with Vista’snet
command-line tool (provided you open the Command Prompt in administrator mode), as explained in Chapter 8.
Local Security Policy
The Local Security Policy tool (secpol.msc) provides access to advanced settings, the useful ones relating mostly to Vista’s UAC feature; see “Control User Account Control,” in Chapter 8, for details.
Local Users and Groups
The Local Users and Groups tool (lusrmgr.msc) duplicates some user account management features found elsewhere in Windows, and offers a few extras. See “Log In As the Administrator,” in Chapter 8, for a workaround if you don’t have this tool.
Media Center
See Chapter 4 for free alternatives to the Media Center application included with the Home Premium and Ultimate editions.
Remote Desktop
TightVNC, a freeware remote control application, works with any ver-sion of Windows, or for that matter, Mac OS X, Linux, and even Apple’s iPhone. See “Control Your PC Remotely,” in Chapter 7, for details. Shadow Copies
6 | Chapter 1: Get Started with Windows Vista
Tablet PC
You can use a tablet with any edition of Vista, as long as its manufac-turer provides a native Vista driver. But the Tablet PC subsystem, which adds handwriting recognition and a few other gimmicks like gestures, isn’t available in Home Basic. If you want handwriting in Home Basic, you may be able to use the “Microsoft Windows XP Tablet PC Edition 2005 Recognizer Pack”; just go to http://search.microsoft.com/ and search forTRPSetup.exe.
Windows Movie Maker
You can download Windows Movie Maker for all editions of Vista; just go tohttp://search.microsoft.com/ and search forMM26_ENU.msi.
Install Windows Vista
Installing an operating system is not among the 10 “must have” experiences in your life. Rather, it can be a slow, agonizing process, and can be uncere-moniously aborted for a variety of reasons.
Depending on your hardware, just booting up the setup disc can be a head-ache. You then must sit and wait...and wait...for Windows to copy some 2,000 files to your hard disk and then go through the excruciating process of “configuring” your computer. When it finally boots—assuming it even makes it this far—you then have the unenviable task of having to download and install more than a hundred megabytes’ worth of updates and fixes. And when all is said and done, you still will need to go through and turn off all of the annoying “features” littered throughout the interface and then fix the myriad of problems that are sure to pop up.
But the worst part is the feeling you can’t shake: that you chose to install Windows Vista on your machine, and now you’ve got to live with it. (Of course, this may not apply to you if you got Vista preinstalled on a new PC, at least not yet....)
Install Windows Vista | 7
Get
Started
with
Windows Vista
Install Vista on a New (Clean) System
Use this method to set up Vista on a brand-new, empty hard disk, or if you don’t want to upgrade an earlier version of Windows (discussed in the next section). See the upcoming sidebar, “Reduce Vista’s Footprint,” before you proceed if you want to customize the installation.
The Windows Vista installation disc is bootable, which means that you can pop it in your drive, turn on the computer, and the installation process will start automatically.
If your PC doesn’t boot off your Vista disc, you’ll need to do one of the following:
BIOS setup
Enter your BIOS setup utility (discussed in Appendix A), navigate to the Bootsection, and change theboot device priorityorboot sequenceso that your DVD drive appearsbefore your hard disk. Save your changes and exit BIOS setup when you’re finished.
Boot menu
Alternatively, some PCs provide a “boot menu” that lets you choose the boot drive on the fly. Look for a message above or below the boot screen right after you power on your PC; usually, all you do is press the F12 key (before the beep; don’t dawdle), select your CD/DVD drive from a list, and hitEnter.
When your PC detects a bootable disc, you’ll usually see this message for three to four seconds:
Press any key to boot from CD or DVD...
Table 1-2. Vista upgrade compatibility chart; a checkmark (✓) means you can upgrade from within the older version, no checkmark means you need to perform a clean install
Vista Home Basic
Vista Home Premium
Vista Business
Vista Ultimate
Windows XP Professional ✓ ✓
Windows XP Home ✓ ✓ ✓ ✓
Windows XP Media Center ✓ ✓
Windows XP Tablet PC ✓ ✓
Windows XP 64-bit
8 | Chapter 1: Get Started with Windows Vista
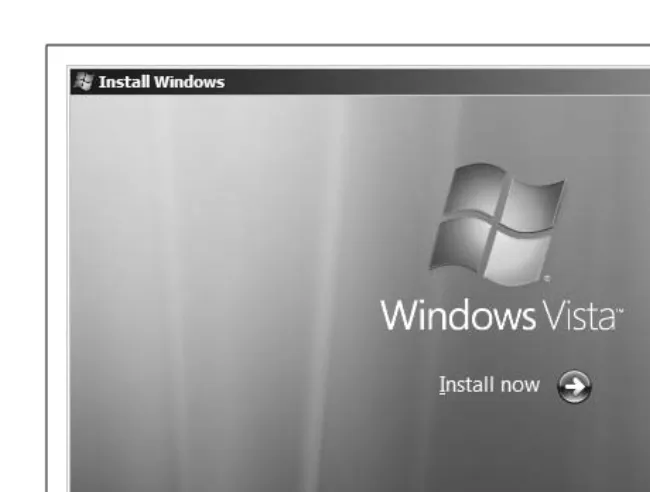
Press a key on the keyboard, and in a few moments, setup should load nor-mally and display its Welcome screen. On the first screen, clickNextto dis-play the Install Windows screen shown Figure 1-1. From here, clickInstall now to proceed.
On the next page, setup asks for your product key, which you can read off the DVD sleeve or the sticker on your PC case. Mercifully, Microsoft now allows you to skip this step—leave the field blank, click Next, and then answerNo—so you don’t have to waste time fishing around for the sticker and typing the excruciating 25-digit key. This is a particularly nice time-saver in the event that setup fails and you have to start over, or if you’re only set-ting up a temporary Vista installation for software tesset-ting or data recovery.
Reduce Vista’s Footprint
When you install Vista, the setup program basically unpacks a standard installation from a disc image on the DVD. This is why there are so few ques-tions asked during setup, no optional components to include, and no way to exclude the tons of sample media files Vista includes. Sure, once Vista is installed, you can subsequently go through it and thin out this bloated behemoth, but wouldn’t it be easier to lighten the load before you install? Fortunately, there’s vLite, a free utility available at http://www.vlite.net/, which lets you customize your Vista installation before you install a single file to your PC. It requires a functional PC (and a DVD burner) to run, but, of course, you can always install Vista as-is first, and then wipe your hard disk clean before you install the vLite version.
Using your original setup disc as a template, vLite walks you through the pro-cess creating a new, custom disc, allowing you to:
• Integrate available Windows updates, language packs, and hardware drivers, so you don’t have to install them later (a great time-saver if you’re setting up more than one PC).
• Remove unwanted components.
• Tweak default settings, like disabling UAC, enabling Hibernation, and unhiding filename extensions in Windows Explorer.
• Split a DVD disc into CDs so you can install Vista on a PC without a DVD reader, or consolidate a set of CDs into a DVD-based install to save time.
Install Windows Vista | 9
Get
Started
with
Windows Vista
If you complete setup without typing your key, make sure you choose the edition of Vista you actually own. If you choose the wrong edition, you won’t be able to change it later without reinstalling from scratch. When Vista boots, it’ll operate in a fully functional “evaluation mode” you can use normally for 30 days. If you don’t enter a valid product key for the edition you chose during setup in time—through the System page in Control Panel—Vista goes into a lock-down mode. (See the next section, “Install clean with only an upgrade disc,” for a way to extend this evaluation period.) So, if this installation ends up being a keeper, don’t put this step off, lest you risk making the data on your hard disk more-or-less inaccessible.
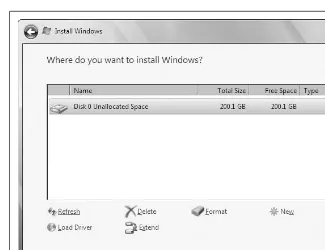
A few pages later, you’ll be asked “Which type of installation do you want?,” at which point you can selectUpgradeorCustom (advanced). The Upgrade option is only available if you install Vista from within a previous version of Windows, as described later in this chapter. So, click Custom
(advanced) to advance to the “Where do you want to install Windows?”
page, and then click the Drive options link to reveal the partition editor shown in Figure 1-2. See Chapter 5 for more information on partitions and the tools included with Vista to manage them.
10 | Chapter 1: Get Started with Windows Vista
If the hard disk is clean, and you want to use the entire hard disk for your Vista installation, just clickNextto proceed. Otherwise, useDeleteto wipe out any existing partitions—as well as the data on them (warning:there’s no undo here)—andNew to create new partitions on the drive.
Follow the screens to complete setup. If setup crashes along the way, or Vista won’t boot after you’re done, see “Potential Problems During Setup,” later in this chapter.
Install clean with only an upgrade disc
So you thought you’d save a little money by purchasing the “upgrade” ver-sion of Vista, but now you find yourself in a bit of a jam. Your hard disk crashed, and without a full backup (see Chapter 6), you need to rebuild your system. Or perhaps you’ve decided against upgrading XP directly to avoid passing on six years of accumulated junk to your new operating system. Either way, you’ve undoubtedly discovered that your upgrade disc won’t install if it can’t find an eligible Windows installation to upgrade.
Install Windows Vista | 11
Get
Started
with
Windows Vista
In this scenario, Microsoft suggests that you install XP and then install Vista over it. Not bloody likely.
Instead, just follow these steps to get a fresh Vista installation from an upgrade disc:
1. Use your Vista disc to boot your PC, as described in “Install Vista on a New (Clean) System.”
2. When setup loads, clickInstall now and proceed normally.
3. When prompted for the product key, leave the field blank, and just click Next.
4. Without the key, setup will ask you which edition of Vista you’d like to install; make sure you choose the edition you’ve actually purchased. 5. When setup is complete, you’ll be operating in the 30-day evaluation
period, but you won’t be able to activate Vista until you enter your product key.
To enter the product key, open a Command Prompt window in admin-istrator mode, as explained in “Control User Account Control” in Chapter 8, and then type this at the prompt:
cscript \windows\system32\slmgr.vbs -ipk xxxxx-xxxxx-xxxxx-xxxxx-xxxxx wherexxxxx-xxxxx-xxxxx-xxxxx-xxxxxis your Vista product key, taken from the DVD sleeve or the sticker on your PC case. Press Enter to proceed.
If this doesn’t work, you may need to temporarily deactivate the UAC feature as described in Chapter 8, and then try again. Then, reactivate UAC when you’re done (should you so desire).
6. Next, activate Vista with this command: cscript \windows\system32\slmgr.vbs –ato
and pressEnter. To verify that activation was successful, type this: cscript \windows\system32\slmgr.vbs –dlv
7. Typeexit or close the Command Prompt window when you’re done.
12 | Chapter 1: Get Started with Windows Vista
Upgrade from a Previous Version
Microsoft suggests that anyone installing Vista on a PC that already has a recent version of Windows on it should use the Upgrade feature; that is, boot into the old Windows installation and start Vista setup from within. There are a few reasons you may want to do this:
Preserve your programs. If you upgrade to Vista from within, you won’t
have to reinstall all your applications and their settings. Of course, most of your programs will need to be updated or eventually reinstalled to work with Vista, but at least you won’t have to do it all at once.
Preserve your settings. Some of your custom file type associations
(Chapter 3) and Windows Explorer settings (Chapter 2) will be pre-served during the upgrade, as will most of the settings (custom tool-bars, etc.) in your installed programs.
Preserve your drive letters. If you have more than one hard disk (or more
than one partition), the upgrade process preserves your drive letters. Sure, you can reassign drive letters at any time, with the exception of the Windows drive. When you do a “clean” install, setup insists on naming the Vista drive C:, regardless of the partition you choose during setup (see Figure 1-2, earlier).
Save time, sort of. It takes a lot less time, at least initially, to upgrade a
pre-vious version than to install Vista “clean” and subsequently install and set up all your programs. Of course, down the road, you’ll spend a lot more time troubleshooting your upgraded system than you would a fresh install. And there’s also the fact that a freshly installed Vista will easily outperform an upgraded one (more below).
It’s easier. Upgrading is easier, but again, only initially.
As you can see, it’s not all lollipops and rainbows. Here’s why you may want to install fresh rather than upgrade a previous version:
Time for a little spring cleaning. How long have you been using that
previ-ous version of Windows? If you got XP when it came out, you’ve amassed as much as six years of junk—drivers, software, spyware, video codecs, and countless leftovers from software you don’t even use anymore—that will continue to bog down Vista once you upgrade. If you take this opportunity to start anew, you’ll have a leaner, faster PC when all is said and done, even if it does take more time to set up at the outset.
Be free of old hardware drivers. Even if Vista updates every hardware
Install Windows Vista | 13
Get
Started
with
Windows Vista
old versions—will remain on your system and undoubtedly cause head-aches down the road. Don’t be surprised if you can’t get your sound card—or any sound card, for that matter—to work on an upgraded Vista installation.
It’s harder. OK, this may not seem like a selling point for a fresh install, but
why back away from a challenge? It’s not that much harder than upgrading.
Set up a dual-boot system. You’ll need to install fresh if you want to keep
your old Windows installation intact; see “Set Up a Dual-Boot System,” later in this chapter, for details.
Before upgrading or installing fresh on a hard disk contain-ing data, you’d be wise to back up the entire system. But make sure the backup software you use—not to mention the backupdevice—will also operate in Windows Vista so you can read the media after the install is complete; otherwise, your backup will be worthless. See Chapter 6 for details on restoring data from a backup made in an earlier version of Windows.
So, if you want to proceed to upgrade your old software, just pop in the Vista disc and start the setup program. See “Install Vista on a New (Clean) System,” earlier in this chapter, for details on some of the screens you’ll encounter, and some tips about the product key. Otherwise, the upgrade pretty much takes care of itself. If setup crashes along the way, or Vista won’t boot after you’re done, see “Potential Problems During Setup,” later in this chapter.
Special case: Reinstall Vista
You may find yourself in a position where you’ll need to reinstall Windows Vista, usually in an effort to solve a nasty problem or to repair a damaged installation. The procedure you choose depends on the current state of your computer.
If Vista won’t start, see “What to Do When Windows Won’t Start” in Chapter 6. In most cases, you’ll need to use your Vista setup disc, but you won’t need to reinstall.
14 | Chapter 1: Get Started with Windows Vista
An in-place reinstallation is the easiest way to go, and despite the warnings in the previous section, probably won’t make things any worse. Just pop the DVD in your drive and follow the prompts. When asked what type of instal-lation you want, selectUpgrade and then follow the prompts.
But if your Vista installation is sufficiently munged, you may choose to install Vista fresh without harming your existing installation, as described next.
Fresh install on a dirty drive
As opposed to a “clean” drive, adirtydrive in this context is one that already has data on it. There are times you need to install Vista on a hard disk that already has a Windows installation, yet you don’t want to perform an in-place upgrade or set up a dual-boot system.
For instance, if Vista won’t start, and none of the solutions in Chapter 6 help you fix the problem, then you can do what’s called aparallel installa-tion, which allows you to start your PC and access your data. You may also want to do this if you have a Windows XP installation you don’t want to upgrade.
If you have more than one hard disk or partition, you can install Vista on a drive other than the one currently contain-ing Windows. See “Set Up a Dual-Boot System,” later in this chapter, for details.
To install Vista fresh on a drive with data on it, follow these steps:
1. Insert a Vista disc in your drive and boot off the DVD, as described in “Install Vista on a New (Clean) System,” earlier in this chapter.
2. When you see the “Install Now” page, click the Repair your computer link at the bottom to get to the System Recovery Options window shown in Figure 6-3 (in Chapter 6).
3. From the list, selectCommand Prompt.
4. When the Command Prompt appears, change to your Windows drive, usuallyC:, by typing the drive letter and a colon (c:) and pressingEnter. 5. Rename theWindows folder towindows.old, like this:
ren windows windows.old
6. Rename theProgram Files folder toprograms.old, like this: ren "program files" programs.old
7. Typeexit or close the Command Prompt when you’re done. 8. Restart your PC and boot onto the Vista setup DVD again.
Install Windows Vista | 15
Get
Started
with
Windows Vista
When setup is complete, Vista will boot normally, at which point you’ll be able to glean old files off of the Windows.old andPrograms.old folders as needed. Eventually, you can delete these relics.
Potential Problems During Setup
The most common cause of a failed installation of Windows Vista is an out-of-date BIOS. If setup crashes, or if Vista won’t boot after you finish installing, check with the manufacturer of your system or motherboard for any BIOS updates, and update your BIOS if needed. Better yet, make sure you have the latest BIOS before you begin installation, particularly if your PC is more than a year old.
Another common stumbling block to a successful Windows Vista setup is your video card (display adapter). If setup stops with an unintelligible error message, reboots unexpectedly during setup, or just hangs at a blank screen, your video card may be at fault. Unfortunately, setup will rarely, if ever, warn you about such an incompatibility before you begin. If replacing the video card permits Windows Vista to install, then the culprit is obvious.
Next, if you see an error that says something like “failed to open the win-dows image file,” this is an indictment of your DVD drive. Setup installs Vista from a single, huge hard-disk image file, and some older drives can’t handle files larger than 3 gigabytes in size. The solution is to replace the drive, or, if you’re particularly attached to the drive and you’re not in a hurry, purchase a copy of Vista setup on a stack of CDs (which Microsoft calls “alternate media”) and try again.
Lastly, if it’s an older disc, the culprit might be nothing more than a little dust; wipe the disk against your shirt and try again.
Set Up a Dual-Boot System
With a dual-boot (or multiboot) setup, you can install multiple operating systems side-by-side on the same computer, and simply choose which one to use each time you boot. So, why would you want to do this?
Both ends burning
16 | Chapter 1: Get Started with Windows Vista
Just testing
If you’re in the process of upgrading from an earlier version of Win-dows to WinWin-dows Vista, you may wish to test Vista with your existing software and hardware without having to commit to the new OS until you’re certain it will meet your needs. Of course, you can also do this with Microsoft Virtual PC 2007, freely available fromhttp://www.microsoft.com/ virtualpc/. Depending on your timing, you may even be able to down-load certain versions of Windows preinstalled on a Virtual Hard Disk that you can run in place on your PC; seehttp://www.microsoft.com/vhd for details.
Software testbed
Install two copies of Windows Vista on your system—one for normal use, and one as a testbed for new software and hardware. That way, you can try out a potentially buggy product without jeopardizing the main OS on which you rely. Again, you can also use Virtual PC for this pur-pose, but it’s just so darn slow....
Backdoor
Got disk space to burn? Install Vista twice, and keep the second installa-tion around to easily access your data in case your primary installainstalla-tion fails.
For that matter, you can set up a dual-boot systemaftera Vista installa-tion fails, and get to your valuable data without first having to repair Windows.
Windows Vista comes with built-in support for a dual-boot system. The dual-boot feature, called theWindows Boot Manager, is installed automati-cally when you install Vista, whether you set up a dual-boot system or not. If, at the end of the installation, Windows Vista is the only operating sys-tem on your computer, it boots automatically without giving you a choice. Otherwise, you’ll see a menu of installed operating systems, from which you can choose the OS you wish to use.
To set up a dual-boot system, you’ll need at least two partitions: one for each operating system. Install the first OS on any drive you like. Then, during Vista setup, when you see the “Where do you want to install Windows?” page (Figure 1-2), just select the empty drive, and setup will do the rest.
Install Windows Vista | 17
Get
Started
with
Windows Vista
In most cases, the boot manager of the most-recently installed operating sys-tem is the one that will be used for all your operating syssys-tems, so the sequence in which you install your operating systems is very important. Most of the time, you’ll need to install older operating systemsbeforenewer ones. For instance, on a PC with Windows 98, just install Vista on a differ-ent drive, and voilà: you’ll have a functional dual-boot system.
Some other operating systems, such as FreeBSD and Win-dows 2000, have boot managers of their own, and can there-fore be installed either bethere-fore or after Vista is installed with little additional fuss. However, those operating systems without their own boot managers, such as Windows 9x/ Me, will break the Windows Vista boot manager if installed subsequently.
Modify the Boot Manager configuration
The Windows Boot Manager is responsible for loading Vista, and, option-ally, booting any other operating systems you may have installed.
The Boot Manager in both Windows XP and 2000 stored its configuration in a tiny, easily editable file calledboot.iniin the root folder of yourC:drive, but in Windows Vista, this file is no longer used. If you install Vista on an XP system, and then open theboot.ini file left behind, you’ll see this message:
;Warning: Boot.ini is used on Windows XP and earlier operating systems. ;Warning: Use BCDEDIT.exe to modify Windows Vista boot options.
The BCDEdit (bcdedit.exe) tool that comes with Vista is a command-line tool, and isn’t exactly user-friendly. Open a Command Prompt window (in administrator mode, as described in Chapter 8), type bcdedit and press
Enter, and you’ll see output that looks something like this:
Windows Boot Manager
---identifier {bootmgr} device partition=C: description Windows Boot Manager locale en-US
18 | Chapter 1: Get Started with Windows Vista
Windows Legacy OS Loader ---identifier {ntldr} device partition=C: path \ntldr
description Earlier version of Windows
Windows Boot Loader
---identifier {default} device partition=D:
path \Windows\system32\winload.exe description Microsoft Windows Vista locale en-US
inherit {bootloadersettings} osdevice partition=D: systemroot \Windows
resumeobject {70c7d34d-b6b4-12db-cc71-d30cdb1ce261} nx OptIn
detecthal Yes
What a mess. In short, the first section describes the menu you see when you first boot; the second section here—Windows Legacy OS Loader—describes the older version of Windows (XP); and finally, the third section—Windows Boot Loader—describes your new Vista installation.
If you typebcdedit /?at the prompt, you’ll see a bunch of command-line parameters you can use to add or remove entries, choose a new default (the OS that’s loaded if you don’t choose one before the timer runs out), or run a variety of debugging tools.
But if all you want to do is choose a default and maybe change the timeout, there’s a better tool. Open your Start menu, typemsconfigin theSearchbox and pressEnterto open the System Configuration window, and choose the Boot tab as shown in Figure 1-3.
Here, the easy options are truly self-evident, and the advanced options are at least accessible. On the right, you can adjust theTimeoutfrom its default of 30 seconds; type5here, and you’ll instantly shave off 25 seconds from your unattended boot time. (Don’t use a value so small that you won’t have time to change it, lest you set an inoperable installation as the default and have no way to get around it.)
Install Windows Vista | 19
Get
Started
with
Windows Vista
Of operating systems and filesystems
When setting up a dual-boot system for day-to-day use, you’ll need to con-sider the matter of sharing files between your operating systems.
In order to share files between operating systems, both partitions must use filesystems supported by at least one OS. For instance, if you have a dual-boot setup with both Windows Vista and Windows 98, you’ll be able to see both drives while you’re in Vista, but you’ll only be able to see the 98 drive while 98 is running. (Although Vista can read drives formatted with the FAT32 filesystem, it can’t be installed on one.) See Chapter 5 for details.
Now, if both your partitions use the NTFS filesystem—which is what you’d likely get if you set up a dual-boot system with Vista and XP—you also may have ownership problems to contend with. As explained in Chapter 8, every file and folder on your PC has an “owner,” a user tied to a specific account on your PC. If, for instance, you create a file in Windows XP and then attempt to modify it in Vista, you may be denied permission until you “take ownership,” as explained in “Protect Your Files with Encryption” in Chapter 8.
And in regards to protecting your data, encryption is also effective at pre-venting an intruder from reading your files by installing a second operating system on your PC.
20 | Chapter 1: Get Started with Windows Vista
Migration to Windows Vista
Migrationis typically a term used by system administrators to describe the lengthy process of upgrading some or all the computers in an organization to a new software product, but nearly all of the issues apply to anyone upgrading to Windows Vista from an earlier version.
As you’ve probably discovered on your own, there are a number of hard-ware and softhard-ware products that just won’t work with Vista (particularly if you’re using the 64-bit version). Some of these products are simply awaiting driver updates from their respective manufacturers, while others have been abandoned because their manufacturers don’t want to invest the resources into supporting retired products.
If you haven’t yet upgraded to Windows Vista, the easiest way to predict what will work and what won’t is to use the Windows Vista Upgrade Advi-sor (UA), available at http://www.microsoft.com/vista. Although UA is unlikely to give you any false positives—wherein it tells you something works with Vista when in fact it won’t—it will construct a laundry list of potential problems with which you can follow up on your own. (Unfortu-nately, UA won’t run on 64-bit XP.)
For instance, UA might bring to your attention that your printer, antivirus software, backup software, CD burning software, and perhaps your Blue-tooth adapter are all unsupported on Vista. So, this means you’ll definitely need new versions of your antivirus and backup software (see Chapter 6) and your CD burning software (Chapter 4). You’ll also need to check with the manufacturers of your printer and Bluetooth adapter to see whether they’ve released native Vista drivers; if not, and you don’t want to wait, you’ll need to replace those devices.
Sentimental Fool
Disorientation is not an uncommon sensation among those users coming to Vista from earlier versions of Windows. Here’s where you can find some of the more elusive entities you may have grown accustomed to in Windows XP:
Add or Remove Programs
This is still in Control Panel, but now it’s calledPrograms and Features. Address Bar
Migration to Windows Vista | 21
Get
Started
with
Windows Vista
Display Properties
Right-click an empty area of the desktop and selectPersonalize(or open
thePersonalizepage in Control Panel), and then click theDisplay
Set-tings link at the bottom of the page.
File Types window
Sorry, you don’t get one of these in Vista. The best Microsoft could do is theDefault Programspage in Control Panel. If you want to edit your context menus, you’ll need File Type Doctor, explained in Chapter 3. Menus in Windows and Internet Explorer
Microsoft took the menus out of both Windows Explorer and Internet Explorer, and replaced them with drop-down buttons that do pretty much the same thing. But you can always press theAltkey on the key-board to temporarily show the old, familiar menu bar in either applica-tion. See Chapter 2 if you want to make it permanent in Windows Explorer.
Network Connections
As explained in Chapter 7, the Network Connections window has been subjugated in Vista, and is now only accessible as a link on the left side of the Network and Sharing Center page.
Shut Down button
The red button at the bottom of the Start menu doesn’t shut down Win-dows any more, but rather puts it to sleep. Click the tiny arrow to the right of the red button to shut down, restart, or log off. To reconfigure the red button to shut down instead, see Chapter 5.
System
The familiar System Properties window that has been around since Windows 2000, and the only way to change your PC’s name on your network, is now buried under the Advanced system settings link on the System page in Control Panel. Alternatively, you can type
SystemPropertiesAdvanced.exein the Start menu’sSearchbox and press
22
Chapter 2efBasic Explorer Coping Skills
CHAPTER 2
Shell Tweaks
What makes an ideal user interface? Of course, the phrase “easy to use” springs to mind, but that could mean anything. Some of us find large, friendly controls that need no explanation to be “easy,” while those more experienced may consider smaller, less obtrusive controls to be easier to use on a daily basis. And some might argue that the best interface is no interface at all.
At first glance, it seems like Microsoft messed around with the shell—the desktop interface, including the Start menu and Windows Explorer—more than anything else when assembling Windows Vista. Sure, Microsoft made tons of changes under the hood (covered in subsequent chapters), but to those familiar with, say, Windows XP, the most immediately apparent changes to the operating system have been made to Windows Explorer and its cohorts.
As a result, the sensation most seasoned Windows users will likely experi-ence when they open Vista’s Explorer for the first time is...disorientation.
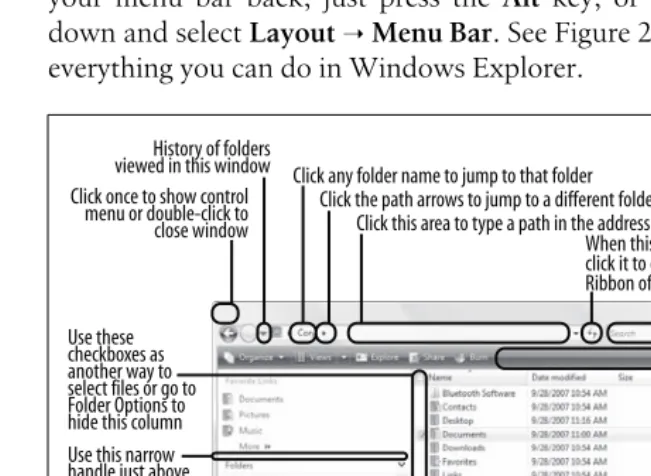
Figure 2-1 shows Windows Explorer as it appears right out of the box.
The formal Windows Explorer shortcut is buried deep in the Start menu, underAll Programs➝ Accessories, but you can open an Explorer window by double-clicking any folder icon on the desktop or selecting one of the locations on the righthand column of the Start menu (e.g.,Documents,
Pic-tures, Music, Games). Mercifully, Microsoft finally dropped the cutesy
“My” prefix used in earlier versions of Windows, so theMy Picturesfolder is now merelyPictures.