THE EXPERT’S VOICE
®IN JAVA
™TECHNOLOGY
Pro
NetBeans
™
IDE 6
Rich Client Platform Edition
Adam Myatt
ailable
Leverage the open source NetBeans
™IDE platform to build powerful rich
client/internet applications.
Includes new
NetBeans
™(J)Ruby/Rails IDE
Includes new
NetBeans
™Adam Myatt
with Brian Leonard and Geertjan Wielenga
Pro NetBeans
™
IDE 6
Pro NetBeans™ IDE 6 Rich Client Platform Edition Copyright © 2008 by Adam Myatt
All rights reserved. No part of this work may be reproduced or transmitted in any form or by any means, electronic or mechanical, including photocopying, recording, or by any information storage or retrieval system, without the prior written permission of the copyright owner and the publisher.
ISBN-13 (pbk): 978-1-59059-895-5
ISBN-10 (pbk): 1-59059-895-4
ISBN-13 (electronic): 978-1-4302-0439-8
ISBN-10 (electronic): 1-4302-0439-7
Printed and bound in the United States of America 9 8 7 6 5 4 3 2 1
Trademarked names may appear in this book. Rather than use a trademark symbol with every occurrence of a trademarked name, we use the names only in an editorial fashion and to the benefit of the trademark owner, with no intention of infringement of the trademark.
Java™ and all Java-based marks are trademarks or registered trademarks of Sun Microsystems, Inc., in the US and other countries. Apress, Inc., is not affiliated with Sun Microsystems, Inc., and this book was writ-ten without endorsement from Sun Microsystems, Inc.
Lead Editor: Steve Anglin Technical Reviewer: Sumit Pal
Editorial Board: Clay Andres, Steve Anglin, Ewan Buckingham, Tony Campbell, Gary Cornell, Jonathan Gennick, Kevin Goff, Matthew Moodie, Joseph Ottinger, Jeffrey Pepper, Frank Pohlmann, Ben Renow-Clarke, Dominic Shakeshaft, Matt Wade, Tom Welsh
Project Manager: Richard Dal Porto
Distributed to the book trade worldwide by Springer-Verlag New York, Inc., 233 Spring Street, 6th Floor, New York, NY 10013. Phone 1-800-SPRINGER, fax 201-348-4505, e-mail [email protected], or visit http://www.springeronline.com.
For information on translations, please contact Apress directly at 2855 Telegraph Avenue, Suite 600, Berkeley, CA 94705. Phone 510-549-5930, fax 510-549-5939, e-mail [email protected], or visit http://www.apress.com. Apress and friends of ED books may be purchased in bulk for academic, corporate, or promotional use. eBook versions and licenses are also available for most titles. For more information, reference our Special Bulk Sales–eBook Licensing web page at http://www.apress.com/info/bulksales.
The information in this book is distributed on an “as is” basis, without warranty. Although every precaution has been taken in the preparation of this work, neither the author(s) nor Apress shall have any liability to any person or entity with respect to any loss or damage caused or alleged to be caused directly or indirectly by the information contained in this work.
Contents at a Glance
About the Author
. . . xviiAbout the Technical Reviewer
. . . xixAcknowledgments
. . . xxiPreface
. . . xxiii■
CHAPTER 1
Downloading, Installing, and Customizing NetBeans
. . . 1■
CHAPTER 2
The Source Editor
. . . 25■
CHAPTER 3
Code Completion and Templates
. . . 53■
CHAPTER 4
Debugging
. . . 73■
CHAPTER 5
Profiling
. . . 103■
CHAPTER 6
Managing Version Control
. . . 143■
CHAPTER 7
Generating and Accessing Javadoc
. . . 169■
CHAPTER 8
Managing Builds with Ant and Maven
. . . 183■
CHAPTER 9
JUnit Testing
. . . 203■
CHAPTER 10
Refactoring
. . . 217■
CHAPTER 11
Code-Quality Tools
. . . 241■
CHAPTER 12
Developing JRuby/Ruby on Rails Applications
. . . 269■
CHAPTER 13
Developing Web Applications
. . . 299■
CHAPTER 14
Developing Web Services: JAX-WS, SOA, BPEL,
and RESTful
. . . 359Contents
About the Author
. . . xviiAbout the Technical Reviewer
. . . xixAcknowledgments
. . . xxiPreface
. . . xxiii■
CHAPTER 1
Downloading, Installing, and Customizing NetBeans
. . . 1Downloading Files
. . . 1Installing the NetBeans IDE
. . . 2Customizing the NetBeans JVM Startup Options
. . . 5Managing Plugins and Updates
. . . 5Using the Plugin Manager
. . . 6Setting a Proxy
. . . 10Customizing the IDE
. . . 11Setting the Internal Web Browser
. . . 11Setting Code Editor Indentation
. . . 11Choosing Fonts and Colors
. . . 15Configuring Keymaps
. . . 17Setting Advanced Options
. . . 18Navigating and Understanding the IDE Layout
. . . 21Initial Layout
. . . 21Windows
. . . 22Summary
. . . 24■
CHAPTER 2
The Source Editor
. . . 25Working in the Projects Window
. . . 25■
CHAPTER 4
Debugging
. . . 73What Is IDE Debugging?
. . . 74Project-Level Debugging Settings
. . . 74Breakpoints
. . . 76Adding a Breakpoint
. . . 76Disabling Breakpoints
. . . 83Deleting Breakpoints
. . . 83Customizing Breakpoints
. . . 83Breakpoints Window
. . . 84Grouping Breakpoints
. . . 85Debugging Java Code
. . . 86Starting a Project Debug Session
. . . 86Starting a File Debug Session
. . . 87Stopping a Debug Session
. . . 87Stepping Through Code
. . . 88Step Into
. . . 89Step Out
. . . 90Step Over
. . . 91Step Over Expression
. . . 92Run to Cursor
. . . 93Run Into Method
. . . 94Evaluate Expression
. . . 95Debugging with Watches
. . . 97Local Variables Window
. . . 99Summary
. . . 101■
CHAPTER 5
Profiling
. . . 103Configuring Profiler Properties
. . . 103Profiler Calibration
. . . 105Profiling Java Applications
. . . 106Attaching the Profiler to a Project
. . . 106Understanding the Profiler Control Panel Window
. . . 107Understanding the Profiler Telemetry
. . . 134Viewing the Telemetry Overview
. . . 134Viewing the Main VM Telemetry Window
. . . 136Profiling External and Remote Applications
. . . 137Profiling a Remote Java Application Server Running
in NetBeans
. . . 137Accessing Javadoc
. . . 178Attaching to Libraries and Platforms
. . . 178Viewing Context-Sensitive Javadoc
. . . 179Searching Javadoc
. . . 181Summary
. . . 182■
CHAPTER 8
Managing Builds with Ant and Maven
. . . 183Ant Tasks and Targets
. . . 183Configuring Ant Properties in NetBeans
. . . 187NetBeans Project Build Files
. . . 188The build.xml File
. . . 188The build-impl.xml File
. . . 190The build-before-profiler.xml File
. . . 191The profiler-build-impl.xml File
. . . 192The project.properties File
. . . 193Working with Targets
. . . 193Running Targets
. . . 193Debugging Targets
. . . 194Stopping and Rerunning Targets
. . . 195Creating Shortcuts to Ant Targets
. . . 196Introduction to Maven
. . . 197Working with Maven Projects
. . . 197Configuring Maven Properties
. . . 198Creating Maven Projects
. . . 199Configuring Maven Project Properties
. . . 200Adding Library Dependencies
. . . 201Summary
. . . 202■
CHAPTER 9
JUnit Testing
. . . 203Creating a JUnit Test Case
. . . 203Creating a New Test Class
. . . 203Creating a Test for an Existing Class
. . . 206Creating a Ruby on Rails Project
. . . 273Ruby on Rails Application
. . . 273Ruby on Rails with Existing Sources
. . . 276Adding Files to the Project
. . . 276Working with Generators
. . . 278The Ruby Editor
. . . 280Code Completion
. . . 280Code Templates
. . . 283Running Rake Tasks
. . . 284Customizing the Ruby Project
. . . 285Ruby Project Properties
. . . 285Ruby on Rails Project Properties
. . . 286The Ruby Gem Manager
. . . 286Managing Rails Plugins
. . . 288Testing Your Ruby Project
. . . 289Creating Tests
. . . 289Running Tests
. . . 290Debugging Your Project
. . . 291IRB and the Rails Console
. . . 292JRuby
. . . 292Calling Java from Ruby
. . . 292Running Rails on Your Favorite Servlet Container
. . . 293Putting It All Together
. . . 295Creating the Database
. . . 295Creating the Project
. . . 296Running the Project
. . . 296Summary
. . . 297■
CHAPTER 13
Developing Web Applications
. . . 299Create a Web Application Project
. . . 299Navigating the Web Application Project
. . . 302Web Pages
. . . 302Configuration Files
. . . 302Building a Web Application
. . . 308Creating RESTful Web Services
. . . 397Installing the RESTful Module
. . . 397Creating RESTful Web Services from Patterns
. . . 398Creating a Client to Read the Service
. . . 401Summary
. . . 402■
CHAPTER 15
Developing GUI Applications
. . . 403Creating a Simple GUI Application
. . . 403Working with the Palette Window
. . . 403Creating the Project
. . . 406Creating the Initial JFrame Class
. . . 407Working with the Form Editor
. . . 408Using FreeTTS
. . . 418Using the Swing Application Framework
. . . 420Creating a Java Desktop Application Project
. . . 420Using Actions
. . . 422Working with the Application Actions Window
. . . 428Using Beans Binding
. . . 430Creating the Database
. . . 430Creating the Project
. . . 432Exploring the Generated Application
. . . 435Understanding the “Update Source When” Field
. . . 439Writing a Custom Validator
. . . 441Summary
. . . 443■
CHAPTER 16
Developing Rich Client Applications
. . . 445Features Provided by the NetBeans Platform
. . . 446Getting Started
. . . 447Terminology
. . . 447NetBeans Platform SDK
. . . 448Project Templates
. . . 449File Templates
. . . 450Assembling a NetBeans Platform Application
. . . 463Getting Started
. . . 463Using the Window System API
. . . 464Branding the Application
. . . 466Running the Application
. . . 469Distributing the Application
. . . 469Updating the Application
. . . 470Further Reading
. . . 471Summary of the Main NetBeans APIs
. . . 471Summary
. . . 473■
INDEX
. . . 475About the Author
■ADAM MYATTcurrently works as the Principal Technologist of Software Development for GE Global Research, the worldwide R&D headquarters of General Electric, located in Niskayuna, New York. Adam is an experienced Java developer and a Sun Microsystems Certified Java Programmer. His work entails leading globally developed Java software and web applications through a rigorous software development life-cycle process, researching new technologies, and setting long-term strategies.
He is an active participant in a local Java users’ group and is an avid enthusiast of open source software. Adam has previously published the book Pro NetBeans IDE 5.5 Enterprise Edition(Apress, 2007), which focuses on Java EE 5 technology and its use in NetBeans. He recently served on the Tools & Languages Track Committee for selecting presenters for JavaOne 2008.
Adam has also worked for several area software firms prior to joining General Electric. He is a graduate of the Computer Science Department at the State University of New York College at Potsdam.
About the Technical Reviewer
■SUMIT PALhas about 14 years of experience with software archi-tecture, design, and development on a variety of platforms, includ-ing Java, J2EE. Sumit has worked in the SQLServer Replication group while with Microsoft for two years and with Oracle’s OLAP Server group while with Oracle for seven years.
Apart from certifications such as IEEE-CSDP and J2EE Archi-tect, Sumit also has an MS in computer science.
Sumit has a keen interest in database internals, algorithms, and search engine technology.
He currently works as an OLAP Architect for LeapFrogRX. Sumit has invented some basic generalized algorithms to find
divisibility between numbers and has also invented divisibility rules for prime numbers less than 100.
Acknowledgments
I
would like to thank the many people without whom this book would not have been possible. First, thanks to my editor, Steve Anglin, for his advice and guidance on this project. I also want to thank my project manager, Richard Dal Porto, for working hard to try to keep me on schedule and accountable. Thanks to my technical reviewer, Sumit Pal, who helped make this a stronger, more accurate book. You have my continued appreciation for your insightful sug-gestions and comments. A big thanks to my editors Elliot Simon and Jill Ellis for the fantastic job they did on making what I wrote actually read well and look good. I greatly appreciate the entire Apress team and all their efforts.Many thanks to my contributing authors, Brian Leonard and Geertjan Wielenga, for pro-viding Chapters 12 and 16, respectively. It’s thrilling to work with well-known members of the NetBeans team and to be able to include their excellent contributions in this book.
I would also like to express my thanks to the entire GEGR ITMS organization for their sup-port at work. Balancing work and personal projects can be difficult at times, but having a great team to work with certainly made it easier. This was especially true on the days when I would walk around like a zombie from having stayed up late writing on the previous night. Having patient co-workers, visiting the cafeteria to get Rich’s pancakes, and guzzling gallons of Dr Pepper™ were often the only things that kept me going some days.
Preface
I
n the beginning, code was written using simple text-based tools like Notepad. For the pur-poses of this discussion, I’ll define “beginning” as the early to mid-1990s, when Java first started to become popular. Using the combination of a text editor and command prompt, users could write and compile code.It was quickly determined that this approach did not provide the most efficient develop-ment environdevelop-ment. For example, if you made a code syntax mistake in the text editor, there was no way to identify the problem until you saved and compiled the file. You would then review the compilation error, locate the offending line in the code, and attempt to determine the cause. Compilation errors are not always entirely helpful in diagnosing a problem with your code.
Many novice programmers start out using the Notepad and command-prompt environ-ment. There is nothing inherently wrong with this approach, since some professionals still do the same thing. For an absolute beginner learning Java, using a plaintext editor can some-times be the easiest and fastest approach. However, text editors do not provide assistance with language syntax, compiler integration, intelligent refactoring support, or other code-writing capabilities.
One of the useful features most text editors possess is called Find and Replace. With this simple capability, programmers could replace occurrences of a word or phrase with another. This worked for certain situations, but could cause problems. Suppose you created the follow-ing class:
public class SomeCode {
public void myMethod1(String var) { String FirstName = var.toUpperCase(); // do something with FirstName }
lines long and FirstNameappeared in many places, then manual editing of the code could take quite a long time. You could also use the text editor’s Find and Replace functionality to quickly replace all occurrences of FirstNamewith the new variable name. However, the original change request specified only the FirstNamevariable in the myMethod1method and notin the
myMethod2method. Using Find and Replace could incorrectly replace the wrong occurrences of FirstNamein myMethod1and myMethod2. Of course, it’s possible to replace occurrences one by one, but that can take time and be prone to human error.
Some text editors provide more advanced support for programming languages. The popu-lar Unix-based tool Emacs offers many interesting features, including advanced text matching and replacement capabilities. Through plugins, it can also provide Java syntax highlighting, code indentation, basic debugging, and compilation support. These are great pieces of func-tionality, but they still do not offer the most flexible and productive environment.
The first question anyone who uses Emacs or text editors might ask is, “Why use an IDE?” Some programmers tend to grow attached to a specific tool set or programming language and are resistant to change. An important quality in today’s ever-changing world is the ability to adapt to new technology.
New tool sets can help professional programmers in many ways. As a programmer, your time should be spent writing code, rewriting code, and testing code. You shouldn’t need to waste time trying to figure out how to rename methods across your code, generate project documentation, or correctly compile all the classes in a package. Once you have identified the action you need to perform, your tool should do it for you easily.
Integrated development environments (IDEs) literally provide an entire environment for your work. They bring together many different tools in a coherent way so that the services and actions you need are seamlessly integrated together.
Some technical benefits of IDEs include the following:
• Graphical user interface (GUI) for performing actions
• Grouping of source code and configuration files into the concept of a project
• Tight integration with the compiler
• Coupling with a source code repository
• Ability to performance tune, analyze, and load test code
• Integration with reusable test frameworks
• Capability to utilize third-party plugins and tools
• Ability to debug code by executing one line at a time
• Quick access to and ease of generating project documentation
Some of the more tangible business benefits of using an IDE include the following:
• Reduces the cycle time of development
• Increases the quality and reliability of your code
• Standardizes your software development processes
• Provides a common platform for programming staff to reduce training time
Some of these benefits are definitely arguable and can sometimes be realized only after careful analysis, implementation, and execution. Many other factors come into play, but a really good Java IDE tool can be the foundation for accomplishing important milestones such as the examples I provided.
NetBeans is my Java IDE of choice. This might be obvious, since I wrote this book, but I have many valid reasons for loving and using NetBeans. My experience with development tools covers a wide range of products, such as Notepad, TextPad, Emacs, vi, Macromedia UltraDeveloper, Macromedia Dreamweaver, Oracle JDeveloper, IntelliJ IDEA, Borland JBuilder, Microsoft Visual Studio, and Eclipse.
Each of these tools has its pros and cons. They all have devoted users and entire commu-nities centered around them. After a while, distinguishing between the tools can be difficult, since they offer many similar features. I was on the fence deciding between IntelliJ IDEA and Eclipse. After only a few hours of working with NetBeans and viewing various tutorials, I was convinced. I downloaded, installed, and started working with it. I quickly discovered that the features were located in places I expected them to be, they functioned as I thought they would, and there were few or no configuration issues. In my opinion, that is how a tool should function out of the box.
In no particular order, the top ten reasons I think programmers should use NetBeans over another Java IDE are summarized as follows:
Intuitive and easy-to-use Matisse GUI designer for Swing development: With little or no Swing knowledge, users can be up and running, dragging-and-dropping elements into a WYSIWYG design window. The Matisse GUI designer actually generates real Swing code and not the usual boilerplate fluff code many tools tend to create. At the last JavaOne conference I attended, I sat next to a gentleman who used the GUI design capabilities of JBuilder. After only two minutes of watching me use Matisse, he was completely blown away and ran off to download it for himself.
Strong refactoring support: This is particularly true for the Jackpot engine, allowing for Java type-aware refactoring using a regular expression-like query language. Designed by James Gosling, the query language is quite simple to use and allows for pattern matching and replacement. The interesting aspect to the queries is that they can be tested to match specific Java types or instances of objects.
One of the best code profilers: Given that I haven’t used every code profiler out there, but with an amazing array of options, I consider the NetBeans Profiler to be among the best. Users can profile for memory, CPU, and performance problems as well as monitor threads. The NetBeans 6 Profiler introduces the concept of profiling points. The Profiler can also be attached and detached from a currently running process or application. It provides 32-bit and 64-bit support as well as allows you to profile Enterprise JavaBeans
Ant integration: Java projects in NetBeans are structured using Ant build files. When a project is first created, the IDE generates the build script and associated targets. Users can then trigger specific targets or completely customize the structure of their build file to suit the needs of their project. For users unfamiliar with Ant, there is almost no impact, since execution of Ant targets is linked directly to the menus and buttons in NetBeans. Many users will also find it easy to import existing build files from external projects and quickly get up to speed. For beginners, it is ridiculously easy to use. For experts, it is ridiculously easy to customize.
J2ME mobile application support: Even if you don’t do much mobile application develop-ment, after viewing the samples and reading an introductory tutorial, you should quickly see the power of NetBeans mobile tools. The sample applications provided are impressive enough as it is. With support for Java 2 Micro Edition (J2ME) Mobile Information Device Profile (MIDP) 2.0, a visual mobile designer, a wireless connection wizard, and over-the-air download testing, mobile application developers have some impressive and powerful tools.
Developer collaboration tools: Developers can log in to a public or private environment and share code. You can join public conversations or start your own restricted private ones. One of the greatest features I’ve seen in a while is the ability to drag-and-drop code or entire projects in the chat window and share code with one or more programmers. NetBeans supports multiuser team coding. As one user starts to change a block of code, it is highlighted and locked for the other users sharing it. In the current global economy, where development teams are spread across numerous locations, this tool can prove very beneficial.
Easy-to-use Update Center: The NetBeans Update Center allows you to quickly select which update distribution sites you wish to check for changes, updates, and new mod-ules. You can also choose to install modules that you previously downloaded but chose not to install. The Update Center is more intuitive than many other Java IDE update tools and makes updating NetBeans a snap.
Out-of-the-box JSP and Tomcat support: NetBeans comes bundled with Apache Tomcat. Once you have used the New Project wizard to create a web application project, you can create your JavaServer Pages (JSP) files. Then you can right-click any JSP file and select Run File. The bundled Tomcat server starts immediately, your default Internet browser opens, and the JSP file executing in Tomcat is displayed. NetBeans is even smart enough to activate the HTTP Monitor.
NetBeans HTTP Monitor: I do a lot of web-related Java development. To me, this is one of the coolest and most unique features of any Java IDE on the market. The HTTP Monitor can be activated during the debugging or execution of a web application. It allows you to monitor the request, HTTP headers, cookies, session, servlet context, and client/server parameters. You no longer need to write server-side code to read these variables, output them to a log, and view the log file. Inside NetBeans, you can debug your code, step line by line through it, and watch the attributes you need.
These features are only a sampling of what NetBeans has to offer. Other Java IDEs may provide some of the capabilities described here, but none can match the NetBeans IDE’s intu-itive interface and integrated tool set. To learn about everything NetBeans has to offer, I invite you to continue reading the rest of the chapters in this book.
This book focuses on many new features of the NetBeans IDE 6. One can focus on many types of technologies and areas when learning NetBeans. With this latest release, developers have access to an impressive array of new and updated features, including, but not limited to,
• A new and improved Source Editor
• Improved refactoring capabilities
• Improved code completion
• Greatly improved Profiler with profiling points and HeapWalker
• Maven support
• JUnit 4 support
• Ruby and JRuby support
I wanted to write a book that really showcased the fantastic tools for working with these technologies.
Pro NetBeans IDE 6 Rich Client Platform Edition is meant for all levels of developers. Whether you are new to NetBeans, a student programmer, or an experienced professional, you will find this book provides direct explanations of features and straightforward examples. It also focuses on many of the core features of NetBeans that assist professional software developers, such as Ant, JUnit, CVS, Subversion, and static analysis tools, among others.
My personal web site,www.ProNetBeans.com, contains a variety of content, such as Java and NetBeans news, articles, and tutorials, among others. It will also contain updates, correc-tions, and errata to the book. If you have any questions or would like to provide feedback, please feel free to contact me at [email protected].
Downloading, Installing, and
Customizing NetBeans
S
ince the NetBeans 5.5 release, many changes have been made in the core of the tool. One of these is the installation process. The NetBeans team has experimented with many different kinds of installation options over the years, such as bundled downloads, separate add-on packs, and individual downloadable modules.To start using NetBeans, you merely need to download and install it. This chapter describes how to do that as well as how to check for updates and customize some NetBeans settings to suit your own preferences. Finally, we take a quick look at the NetBeans windows you’ll use most often.
Downloading Files
Starting with the NetBeans 6 release, you have several types of bundled downloads you can use to install the IDE: basic, standard, and full.
Basic: The basic bundle comprises the stripped-down IDE and basic Java Standard Edition functionality, including the Profiler tool and GUI building capabilities.
Standard: The standard bundle expands on the basic by adding mobility, web, and Java EE features. It also includes several Java application servers, such as Apache Tomcat 6 and the latest build of GlassFish.
Full: The full bundle includes all the preceding features as well as the UML, SOA, and Ruby modules. This is the largest download. But unless you really want a stripped-down version of the IDE, I suggest downloading this bundle. During the installation process, you can pick and choose which features you actually want. If you download a smaller
subject to change. You should select the bundle you need and click the Download button. You will then be immediately prompted to download the file.
Installing the NetBeans IDE
Since NetBeans can be installed across numerous platforms, I will mention only the important installation concepts. NetBeans 6 can be installed on almost any operating system for which there is a Java Virtual Machine (JVM) that runs a minimum of Java 1.5.0.11 or later. I am run-ning NetBeans using Java 6, unless otherwise specified.
On the download page at netbeans.org, a list of release documents is provided. In this list is a link to the installation instructions as recommended by NetBeans. These instructions cover the basic installation process for Windows, Solaris, Linux, and Macintosh OS X.
As of version 6.0 of the Profiler, it is recommended that you run it with JDK 1.5.11 or later as previously mentioned with NetBeans 6. However, for optimal performance I suggest using the most recent Java 6 release. In NetBeans 5.5 and 5.5.1 it is possible to profile against JDK 1.4, but an experimental add-on is needed to allow this functionality. Sun does not support the add-on, so you would be using it at your own risk. If your application is written for Java 1.4 and you want to use NetBeans 6 and its profiler, I recommend that you install the latest release of Java 6.0 and set the source compatibility in NetBeans to 1.4. This should resolve any issues with running the Profiler as well as maintain your Java 1.4–based code.
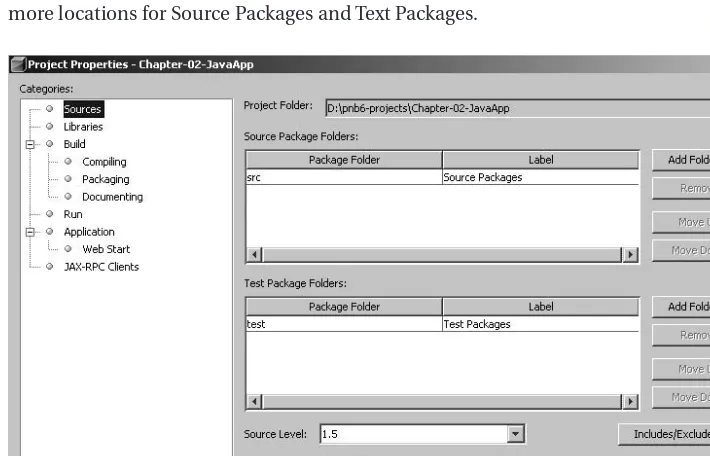
To set the source compatibility for a project, right-click the project name and select Prop-erties from the context menu. With the Sources category selected, you should see a field called “Source Level.” Using the drop-down list, you can set the version of Java with which your source code should be compatible.
The first time I downloaded and installed NetBeans, I used Sun’s Java 5 on Windows XP, but I have since upgraded to Java 6. After executing the Windows installer, I clicked the Next button, accepted the license agreement, and selected a directory in which to install NetBeans. Personally, I like to group all my Java-related products in one location. I typically start with a
c:\javadirectory. Within that directory, I install several JDKs, Java tools such as NetBeans, as well as a directory for all my Java-related projects and applications. I usually end up with the following:
• c:\java\1.6.0.02
• c:\java\1.5.0.12
• c:\java\netbeans\6.0
• c:\java\projects
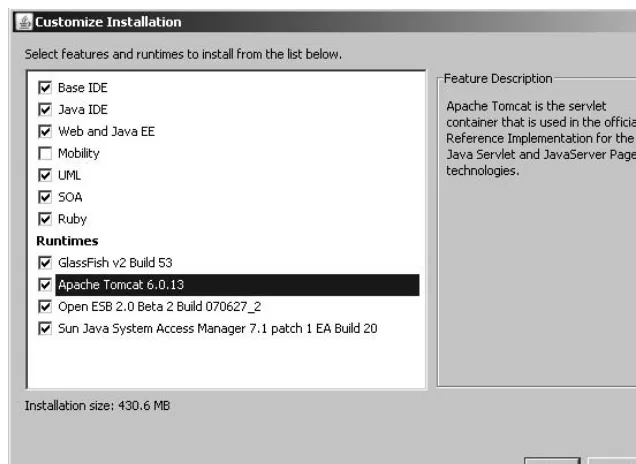
When you execute the installation you will see the NetBeans 6 welcome page. Click the Customize button to select which features you want to install. The list may vary depending on the bundle you downloaded from netbeans.org. You can select or unselect the check box next to each item. By default, the Tomcat application is not checked, so to install the feature you must select it, as shown in Figure 1-1.
Figure 1-1.List of features to include in the installation
Once you have finished customizing the installation items, click the OK button to con-tinue. The list of items you selected will be displayed. If any of the items under the Runtimes section were previously installed, then the text “Already Installed” will appear next to each name. If you click the OK button, the installation will initialize and display the license page and acknowledge.
Select the check box next to the text “I Accept the terms in the license agreement” and click the Next button. The installation wizard will search your local machine for JDKs and prompt you for several pieces of information. For the “Install NetBeans 6 IDE to” field, click the Browse button and select a directory. As mentioned earlier, I recommend a common directory structure such as c:\java\netbeans\6.0. For the “JDK for running NetBeans IDE” field, a JDK is already selected. You can click the Browse button to select a directory for the JDK as well. Click the Next button to proceed to the server runtimes installation configuration.
If you selected to have GlassFish installed, the installation wizard displays a configuration form with suggested values already filled out. The “Install GlassFish to” field specifies the directory where the application server will be installed. The form also allows you to specify which JDK you wish to use when running GlassFish in case it differs from the JDK you are
Figure 1-2.The GlassFish application server installation configuration form
When you have finished setting the GlassFish server fields, click the Next button to con-tinue. Read the section on Java Application Servers in Chapter 13 if you want to know how to change these configuration settings. If you selected Tomcat to be installed, the installation wizard will display a Tomcat application server configuration form. The screen allows you to specify where to install Tomcat 6 by clicking the Browse button next to the “Installation Loca-tion” field. After you have set the location, click the Next button to proceed to the summary screen. The summary screen lists the various installation directories, the features you selected to install, and the estimated installation size of the entire package.
Click the Install button to execute the full installation. The installation process runs and installs the features. When installation is complete, click the Finish button to close the instal-lation wizard.
When you load NetBeans for the first time, it creates a new .netbeansdirectory in the user directory. On Windows this is typically c:\documents and settings\<username>\.netbeans, and on Unix it’s /home/<username>/.netbeans. You can safely remove this directory without hurting the core NetBeans installation. However, removing it will essentially undo all the con-figurations you have set in the IDE and uninstall all the modules you may have downloaded.
Starting with NetBeans 6, you no longer need to download and install the NetBeans Pro-filer separately. It is included in the core IDE. For usage instructions and best practices, see Chapter 5.
Customizing the NetBeans JVM Startup Options
One thing most people will probably never think to use is the ability to customize the NetBeans JVM startup options. By including several arguments in a NetBeans configuration file, you can tweak the memory usage settings for the JVM in which NetBeans starts up. You can also change the type of garbage-collection algorithm that is used.
If you are working on a semistandard computer (32-bit single processor), you probably won’t benefit from changing the garbage-collection routine the JVM uses. However, if you use a JVM other than the Sun JVM or have a machine that is either multiprocessor, multicore, or 64-bit, you might want to consider these options. Your JVM vendor should provide some sort of documentation regarding the garbage-collection routines that run and how to configure them via command-line arguments. These can be passed along to NetBeans during startup.
In NetBeans, you can configure JVM startup arguments by editing the file /etc/ netbeans.confin your NetBeans home directory. In this file, you should see a property named netbeans_default_options. This property allows you to pass JVM customization arguments to NetBeans.
• The -J-Xms32margument specifies that the initial heap size allocated to the JVM should be 32MB.
• The -J-XX:+UseConcMarkSweepGCargument specifies that the JVM should use a more efficient garbage-collection algorithm. It can be especially useful on multiprocessor and multicore machines.
• The -J-XX:+CMSClassUnloadingEnabledargument is used to enable class unloading. • The -J-XX:+CMSPermGenSweepingEnabledargument must be used in conjunction with
the CMSClassUnloadingEnabledargument.
• The -J-Xmx256margument may not be present, by default; but if it is added, it specifies that the maximum heap size that can be allocated to the JVM should be 256MB.
Increasing the value of the Xmsargument can improve performance in some applications, since the JVM would not have to keep reallocating heap space each time it needed to increase the available space. There is a lot of discussion in the Java industry about the correct way to set these parameters. The safest bet is to set the Xmsargument to 64MB or 128MB and to set the
Xmxargument to about 50 to 60 percent of the total memory on your system. This value may need to increase if you work with massive code bases.
You should also note that the Xmsand Xmxarguments specify only the heap size of the JVM and not the total amount of memory the JVM will use, since there are items in the JVM that do not live inside the heap.
that checks one or more remote sites for any software updates that may be available. You can also check a remote site for new plugins as well as manually install an update module that was previously downloaded.
Using the Plugin Manager
In NetBeans 6 the Update Center and Module Manager are merged into one new tool named the Plugin Manager. This new tool enables you to
Download NetBeans plugins to install into the IDE
Manually install previously downloaded NetBeans modules
Check for updates to existing NetBeans plugins
Manage already installed plugins (and be able to deactivate them)
Configure Update Centers to check for plugins
To access the Plugin Manager, select Tools ➤Plugins. In the window that opens, you should see five tabs along the top: Updates, New Plugins, Downloaded, Installed, and Settings. I next cover them individually, although slightly out of the order in which they appear in the Plugin Manager.
Settings Tab
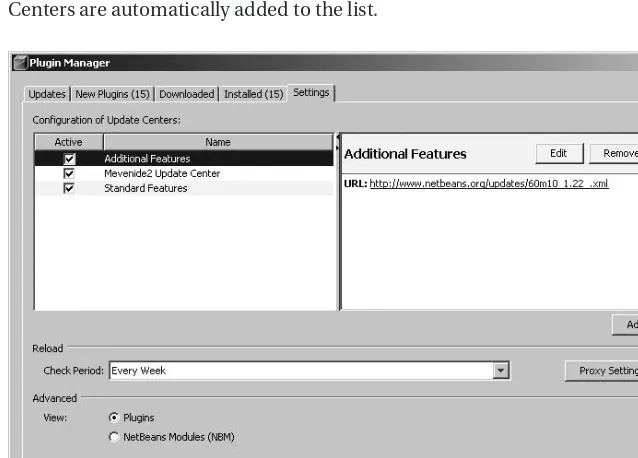
If you click the Settings tab you will see the list of Update Centers currently configured in NetBeans, as shown in Figure 1-3. As you download and install new plugins, various Update Centers are automatically added to the list.
The left pane of the Settings tab displays the list of Update Centers. If you unselect the check box next to an Update Center, it will not be searched for updates or new plugins. If you select an Update Center in the list, its information is displayed in the right pane. You can view the Update Center URL, and choose to edit or remove it from the list using the buttons dis-played in the right pane, as shown in Figure 1-3.
If you wish to add a new Update Center manually, you can easily do so using the Add but-ton at the center right of the Settings tab pane. If you click the Add butbut-ton, the Update Center Customizer window is displayed, as shown in Figure 1-4. The window allows you to type in an arbitrary name to identify the Update Center as well as enter the Update Center’s URL. If the check box next to the “Check for update automatically” field is selected, then the Update Center is automatically polled during the time frequency specified in the Check Period drop-down on the Settings tab. Once you have configured the desired settings for the Update Center, click the OK button and it will be added to the list.
Figure 1-4.The Update Center Customizer window
Under the Advanced section at the bottom of the Settings tab are the View options. You can set this field to “Plugin” or “NetBeans Modules.” If it is set to “NetBeans Modules,” you will be able to view individual features and libraries. This setting can be useful if you are trying to understand a plugin’s dependencies. If the View field is set to “Plugin,” then you will not see the underlying libraries. Only the top-level plugins will be listed. This setting can make it much easier to see what is installed in your IDE without having to scroll through long lists of plugins.
The “Install into shared directories” field appears at the bottom of the Settings tab. If selected, this will install plugins into a shared folder so that they are available to all users and not to just the one who installed the plugin.
The last item to note on the Settings tab is the Proxy Settings button. If you click it, the Basic Options window will appear and display the General section. This is covered later in this chapter in the section “Setting a Proxy.”
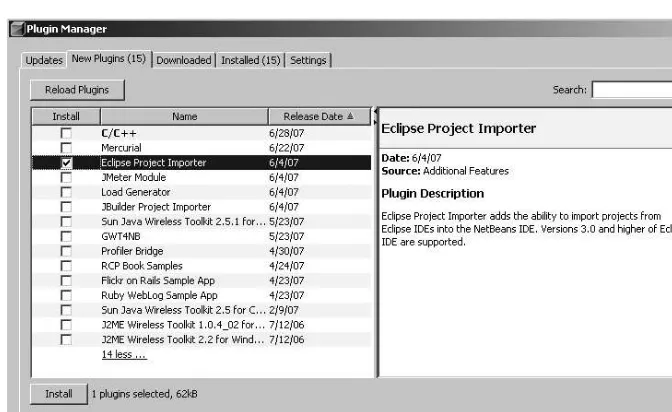
New Plugins Tab
The New Plugins tab will display a list of new plugins and libraries that have been released on the Update Centers. If you add new Update Centers, you can refresh the list of new plugins by clicking the Reload Plugins button.
You can click each plugin name and view the release date, source, and description in the right pane, as shown in Figure 1-5.
Figure 1-5.The New Plugins tab displaying a list of plugins and libraries
You can install each plugin by selecting the check box next to the name in the Install column. As you select each check box, a summary appears along the bottom of the window, displaying the number of plugins to be installed and the total installation size.
If the list of plugins is quite long (which it can be if you are viewing the list as NetBeans Modules versus Plugins), you can search the description text. A text box labeled Search appears in the upper right of the window. If you enter text into the Search field and press the Enter key, the list will be filtered to include only plugins that match the search criteria. This is especially useful if you are searching for plugin dependencies or libraries.
Once you have finished determining which plugins you want to install, click the Install button. A summary screen will pop open and display the plugins you selected. Review the items for correctness and click the Next button. The plugin installer will display a screen of license agreements.
In older versions of NetBeans you had to view and approve multiple licenses. In NetBeans 6 you can toggle back and forth between different license agreements and approve them all at once. You can view the different licenses by selecting them from the “Display license for” drop-down. You can then approve them all by clicking the radio button next to “I accept the terms in all license agreements” and clicking the Install button.
Each of the plugins will then download and be verified. When they are done downloading, click the Finish button. Depending on which plugins you chose to install, you may be prompted
to restart the IDE. If the IDE does not need to be restarted, then you will see the list of plugins on the New Plugins tab refresh.
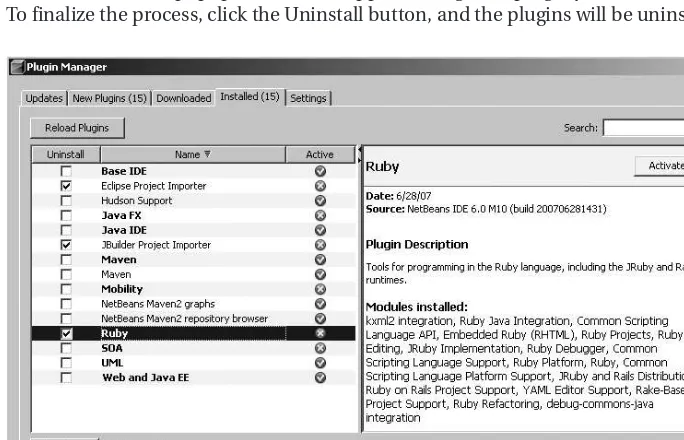
Installed Tab
The Installed tab lists the plugins and modules that you have previously installed. This section of the Plugin Manager allows you to uninstall and deactivate plugins and modules.
If you select a plugin from the list, you can view the date, source, description, and required modules in the right pane. You will also see a Deactivate button in the upper right. If you click the Deactivate button, it will disable the plugin without having to restart NetBeans.
■
Tip
Disabling modules or features that you rarely use can improve the startup time and memory usage of NetBeans. When NetBeans opens, its splash screen displays several status messages, such as “Reading module storage,” “Turning on modules,” “Loading modules,” and “Starting modules.” Much of the process-ing and work that goes on behind the scenes durprocess-ing startup involves activatprocess-ing modules. The fewer modules NetBeans must activate, the better.If a plugin is deactivated, it will appear in the plugin list with a red X icon in the Active column. If you select a deactivated plugin from the list, the right-hand information pane will display an Activate button. If you click the Activate button, the plugin will be enabled again.
You can also uninstall plugins by clicking the check box next to each plugin in the Unin-stall column, as shown in Figure 1-6. After you have selected one or more plugins, click the Uninstall button. A popup window will appear listing each plugin you selected to uninstall. To finalize the process, click the Uninstall button, and the plugins will be uninstalled.
Downloaded Tab
The Downloaded tab allows you to install plugins you previously downloaded but never installed. It also allows you to install plugins you manually downloaded as .nbm files from a web site.
On the Downloaded tab, click the Add Plugins button to get a file dialog to appear. Navigate your file system, select one or more .nbm files, and click the Open button. The list of plugins to install will appear in a list. Once you have added the correct plugins to the list, click the Install button. A summary screen will pop up and allow you to review the plugins prior to installation. Click the Next button to finish installing the plugins.
Setting a Proxy
Many programmers, whether in corporations or on college campuses, need to work behind a proxy. The NetBeans IDE uses an Internet connection for numerous operations, such as downloading updates, linking to certain types of help documentation, and connecting to external database and web servers.
To configure the proxy settings for NetBeans, select Tools ➤Options. The Basic Options window is displayed by default, and it contains a Proxy section. If it is not visible, click the General tab to see the proxy settings.
You can choose to select No Proxy, Use System Proxy Settings, or Manual Proxy Settings. If you select the radio button next to the Manual Proxy Settings label, then several fields will be enabled, allowing you to specify additional settings. The HTTP Proxy and Port text box allows you to enter specific proxy information. If you click the More button, you can view the Advanced Proxy Options window, as shown in Figure 1-7.
Figure 1-7.The Advanced Proxy Options window
The Advanced Proxy Options window allows you to enter the proxy host and port. You can also choose to select the “Use the same proxy settings for all protocols” check box. If this is selected, then the proxy you entered is used for HTTP, HTTPS, and SOCKS. If not selected, you can enter different proxies for each protocol.
An additional field, named No Proxy Hosts, will also appear in the Advanced Proxy Options window. This field allows you to specify a list of hosts to ignore that can be accessed by NetBeans without going through the proxy. If selected, the “Proxy Requires Authentication” check box allows you to specify a username and password that is used to authenticate to your proxy server. By default this field is not selected. Once you have configured the proxy settings to your needs, click the OK button to return to the Basic Options window. Click the OK button again to save the changes and exit the Basic Options window.
Customizing the IDE
Many Java IDE tools allow a wide array of customizations. NetBeans is no exception. Users can customize a variety of settings, such as fonts, colors, text messages, coding preferences, menus, toolbars, shortcuts, and much more. You could spend an exhaustive amount of time examining each and every possible customization, so I have highlighted several key items that I believe are the most relevant and useful.
Setting the Internal Web Browser
I personally do a lot of development with web-based content, so I need to be able to view that content in a convenient manner in the web browser of my choice. Sometimes I need to test web content in different browsers, especially if I am writing cross-browser JavaScript code. One of the nice features of NetBeans is the ability to set which Internet browser is used to view web content.
If you have a JSP file named index.jspopen and want to run it, select Run ➤Run File ➤
Run and choose index.jsp. In the Output window, you will first see the application compiled, packaged, and deployed. Then the bundled Java application server will start, and finally a web browser will open.
NetBeans is initially configured to use the default browser for your system. You can change this by selecting Tools ➤Options and selecting General in the top pane of the Options window. The Web Browser drop-down list offers Default System Browser and any browsers you have installed on your system. If you always prefer to test your web applications with Firefox, you could select it from the list.
Setting Code Editor Indentation
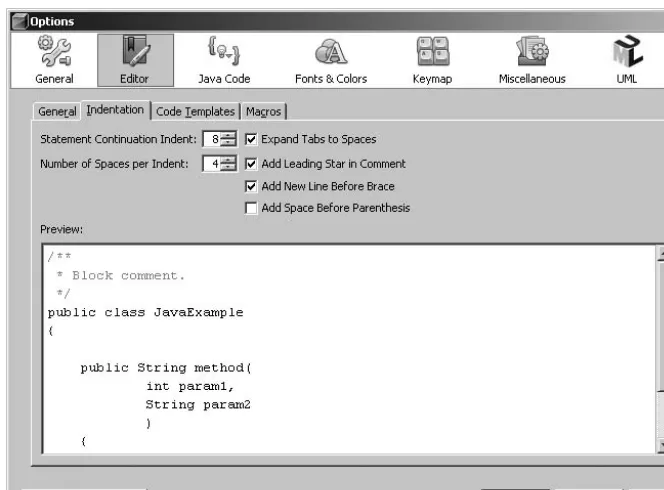
NetBeans allows some flexibility when configuring code indentation and formatting. When NetBeans formats source code (select Source ➤Reformat Code) or autogenerates code, it applies several code styles. You can modify these by choosing Tools ➤Options ➤Editor and clicking the Indentation tab. As shown in Figure 1-8, this tab contains the code formatting
Figure 1-8.Code indentation features
Statement Continuation Indent
When writing code such as a method declaration with parameters, the line of characters can become quite long, as in this example:
public void setEmployeeData(String FirstName, String LastName)
Some coders believe it a best practice to leave the entire method declaration and defined parameters on one line. Popular practice is to separate long lines:
public void setEmployeeData(String FirstName, String LastName)
or:
public void setEmployeeData( String FirstName, String LastName )
This type of syntax formatting is especially useful if you are defining a method with many parameters. It is far easier to read the parameter name and data type on a separate line than to have to scroll far to the right in a very long line.
In NetBeans, you can control the amount of space by which the continued code is indented. The Statement Continuation Indent option on the Indentation tab allows you to set the number
of spaces the continued line is indented. The minimum indent is 1 space, and the maximum is 50 spaces. Try changing the number of spaces and watching the preview at the bottom of the tab.
Number of Spaces per Indent
Part of writing easy-to-maintain and legible code is indenting a statement such as if-else,
switch-case, or any nested statement. Most modern IDE tools have some level of default indentation. When you finish typing a statement and press the Enter key, the cursor is posi-tioned on the next line and indented one or more spaces.
In NetBeans, you can customize this formatting. The default number of spaces for indenta-tion is four. The Number of Spaces per Indent opindenta-tion on the Indentaindenta-tion tab allows you to adjust this setting from 1 to 50. To see this in action, type a line of code like if(myBooleanValue)and the opening curly brace, and press Enter. You should see the following:
if(myBooleanValue) { //start here }
The beginning of the comment marks where the cursor should be positioned. It should be indented four spaces from the position of the enclosing parent element. If you continued to press the Enter key and enter comments, you would see code like this:
if(myBooleanValue) {
Notice that the line spacing for each of the lines inside the ifblock is the same. The IDE monitors the fact that all the statements you are typing have the same scope (I use this term loosely) and attempts to maintain similar spacing. After the fifth comment line, add another
ifblock and see how the spacing is maintained. After typing if(myNextBooleanValue)and an opening curly brace, and pressing Enter, add several lines of comments. The following code should appear:
if(myBooleanValue) { //start here //comment2
If you want to see a better example of this, try setting the Number of Spaces per Indent option to 20 and typing several nested if-elseblocks of code.
Expand Tabs to Spaces
When indenting code, some developers like to add tabs and some like spaces. For many people this is not a huge issue; but if you open code in different tools, it can cause formatting problems. If your development team works on a variety of operating systems or uses a variety of tools such as Emacs, vi, NetBeans, and Notepad, you may have run into this issue.
The Expand Tabs to Spaces option in NetBeans automatically converts any tab characters into an equivalent number of spaces. One tab character is the number of spaces set for the Number of Spaces per Indent option. This can help reduce formatting issues and spacing problems.
Add New Line Before Brace
A lot of development shops enforce a set of standard coding practices. One element of good coding is to use a consistent method of placing curly braces after method declarations, if
blocks, elseblocks, switchstatements, forloops, and so on.
If you’ve ever worked on code that another developer created, you’ve probably seen bad coding styles. A typical piece of code for a method might look like this:
public int calculate(int x, int y, int z) {
Notice that the opening curly brace for each block is either on the same line immediately fol-lowing the statement or on the folfol-lowing line. Depending on how intricate your code is, this can lead to hard-to-read files, especially if numerous code blocks are embedded within code blocks embedded within code blocks.
I remember a project where I inherited code from another developer. I needed to trace what happened throughout a very long method. In the method were numerous loops and
if-elseblocks. Lining up curly braces to see where one block ended and another started soon grew frustrating. Using the NetBeans Add New Line Before Brace option and applying the for-matting to the source code would have saved me a lot of headaches.
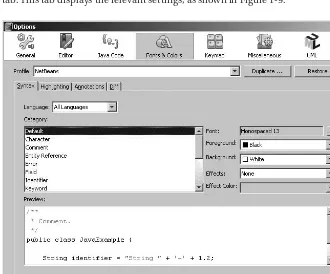
Choosing Fonts and Colors
NetBeans provides the ability to customize the overall appearance of fonts and colors. With the variety of development tools on the market, many developers are familiar with a different look and feel. For example, if you’ve been coding in Emacs and now are making the move to NetBeans, perhaps you want the code syntax to reflect the color scheme you used in Emacs. NetBeans provides several levels of customization.
Fonts and Color Profiles
The font and color customizations are grouped into a color profile. The profile contains the set-tings for customizing colors for language-specific syntax, highlighting, and annotations. Color profiles allow you to change numerous settings and toggle back and forth between them.
To customize color profiles, select Tools ➤Options ➤Fonts & Colors and select the Syntax tab. This tab displays the relevant settings, as shown in Figure 1-9.
restored; it can only be deleted. The Duplicate button is also the mechanism for creating new color profiles. After clicking the Duplicate button, you are prompted for a new color profile name.
I use color profiles most often when giving presentations. For writing code, I typically use a color profile similar to the system default profile. When giving presentations, where I need to project my screen, I switch to an alternate profile that uses a larger font size and darker font color scheme.
The standard code syntax highlighting and coloring changed in NetBeans 6. Many devel-opers used to the older NetBeans syntax coloring can switch to the NetBeans 5.5 profile by selecting it from the Profile drop-down.
Language-Specific Color Settings
For each color profile in the Fonts & Colors section, a list of language-specific settings is avail-able. The list includes settings such as Java, JSP, HTML, SQL, XML, and more. By selecting one item from the list, you can customize the language-specific syntax elements. For example, if you select JSP, you will see a category list of items such as EL, HTML, JSP, and XML elements. Once you have selected an item from the category list, you can change the font size and color and other attributes using the options on the right (see Figure 1-9).
Highlighting
Through the Highlighting tab of the Fonts & Colors window, you can customize the fore-ground and backfore-ground colors for elements that appear highlighted in various places in NetBean’s Source Editor window. One possible use of this includes changing the color of the line numbers in the line number bar so that they are easier to see at a glance. I like to set the Code Folding Bar foreground to red so that the lines that appear next to each method stand out and are easier to trace when I am scrolling quickly through a class.
Diff Coloring
The Diff tab of the Fonts & Colors section allows you to specify the coloring for the new NetBeans 6 Diff tool. The Diff tool is used by the various version control modules and local history in NetBeans (see Chapter 6).
You can modify the color scheme for the Added, Changed, and Removed Text. If you select each field, you can specify the color using the Background drop-down at the right of the window. Then when you use the Diff tool, the color changes will display.
Annotation Coloring
The Annotations tab of the Fonts & Colors window allows you to customize several items related to glyphs that appear in the glyph margin. The glyph margin is the gray vertical strip that appears in the Source Editor to the immediate left of any source code. If you select View ➤
Show Line Numbers, the line numbers are also displayed in the glyph margin. You can change the foreground color and the background color of annotations as well as set the color of the Wave Underlined property for the Parser Annotation (Error) category. The Wave Underlined property pertains to the wavy line that appears under parser errors in your code, such as state-ments that will not compile.
■
Tip
If you really want a parser error to stand out, you can set the background color to black, the foreground color to green, and the Wave Underlined property to red. Once you have done this, it should not be too diffi-cult to spot compilation errors.Configuring Keymaps
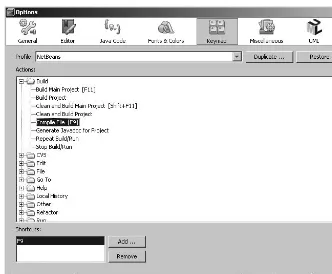
Every good software tool should provide shortcut keys (also known as hotkeys). NetBeans is no exception. Since the majority of the work carried out in NetBeans involves typing code, it is obviously convenient not to have to take your hands off the keyboard very often. Many menu commands, actions, and tools can be activated via keyboard shortcuts. NetBeans categorizes a group of shortcuts as a keymap.
Keymaps can be configured in the Basic Options window. Select Tools ➤Options and choose Keymap from the top pane in the Options window. The default set of keyboard short-cuts (the keymap) is named NetBeans. You can copy any of the existing keymaps by selecting one from the Profile drop-down list and clicking the Duplicate button. The new keymap pro-file can then be customized any way you wish.
■
Tip
The Profile drop-down contains an entry named Eclipse. If you select this option, then the NetBeans keymap will attempt to use the standard keyboard shortcuts prevalent in the Eclipse IDE. This is useful for developers who switch between the two IDEs.To modify a specific keyboard shortcut, select the profile and locate which action you want to change. For example, you may want to change the shortcut used to compile a single file. To modify the shortcut, do the following:
1. Select the profile in the Keymap section of the Options window.
2. Click the plus sign next to the Build node.
3. Select the Compile File node under the Build node.
4. In the Shortcuts section at the bottom of the window, click the Remove button.
5. Click the Add button.
Figure 1-10.Customizing keymaps in the Basic Options window
Setting Advanced Options
In the Basic Options window (select Tools ➤Options), you’ll find a button to access the Advanced Options window. From the Advanced Options section, you can customize a wider variety of fea-tures than is possible through the Basic Options section. The settings for toolbars and menu bars are covered here. Other Advanced Options settings, such as those for system and external tools, are covered in later chapters.
Menu Bars
NetBeans allows you to customize the system menu bars. In the Advanced Options section, select IDE Configuration ➤Look and Feel ➤Menu Bar. Here, you can rename the menu options such as File, Edit, View, and so on. If you really wanted to, you could rename the View menu to Look At Stuff.
By right-clicking menu names, you can delete menus, change menu-item ordering, and add menu separators. By right-clicking menu items, you can cut or copy a menu item and paste it into another menu.
A useful application of this feature is to reorder menu items to be grouped in a manner that makes more sense to you. For example, on the Refactoring menu, I have rearranged the items I use most often to appear on the top, followed by a separator and the rest of the items. I have also found this functionality useful on the Run and Window menus.
Toolbars
NetBeans also allows you to customize toolbars in much the same way you customize menu bars. You can create new toolbars, reorder the elements of a toolbar, and copy and paste ele-ments from one toolbar to another.
Being able to create custom toolbars is an important feature if you have installed a lot of plugins that are similar and want to group quick-access icons in one toolbar location.
Server and External Tool Settings
As previously mentioned, you can set a default web browser in the NetBeans Basic Options section. However, you were not previously able to determine where the browsers were located on your system or to add new ones. The Advanced Options window allows you to do so.
Navigate to IDE Configuration ➤Server and External Tool Settings ➤Web Browsers. Expand the Web Browsers node to view the list of Web Browsers that have automatically been configured. On a Windows machine you would typically only see a listing for Internet Explorer. If you installed Firefox, it would also be listed.
If the browser you want to use is not in the list but is installed on your machine, you can easily add it. Right-click the Web Browsers node and select New ➤External Browser. In the New External Browser window that appears, type in the name of the browser and click the Fin-ish button.
The new browser will appear under the Web Browsers node, allowing you to select it. Once you have selected it, the right pane of the Advanced Options window will display the Browser Executable property. This field specifies where on your machine NetBeans must look to find the browser. You can change this location anytime by clicking inside the field and typing or by clicking the ellipsis button next to it. If you click the ellipsis button, the Browser Executable Properties window will appear, as shown in Figure 1-11.
saving time. The {URL}argument specifies a placeholder that NetBeans will replace with the actual URL you choose to load when you run a web application, single JSP or HTML file, etc.
There are a number of web browser–specific command-line arguments you can specify to assist you in web application development; see Tables 1-1 and 1-2. Once you have entered any command-line argument, click the OK button to close the window.
Table 1-1.Firefox Command-Line Arguments
Argument Description
ProfileManager Starts Firefox with a Profile Manager dialog. Allows you to specify which profile you wish to use to load Firefox.
Jsconsole Loads a JavaScript console. This can be a big time saver when doing web development.
height Specifies the height the browser window will be when it opens. Example: height 500.
width Specifies the width the browser window will be when it opens. Example: width 500.
inspector Displays the DOM inspector. Loads the DOM inspector into the top half of Firefox and the web page to be displayed in the bottom half.
{URL} Loads the specified URL in Firefox when it opens.
Table 1-2.Internet Explorer Command-Line Arguments
Argument Description
nohome Specifies that the default browser homepage will not load
k Specifies that the browser will open in full-screen mode
new Specifies that the browser window will open a new browser, and thus a new process, instead of reloading in the same window
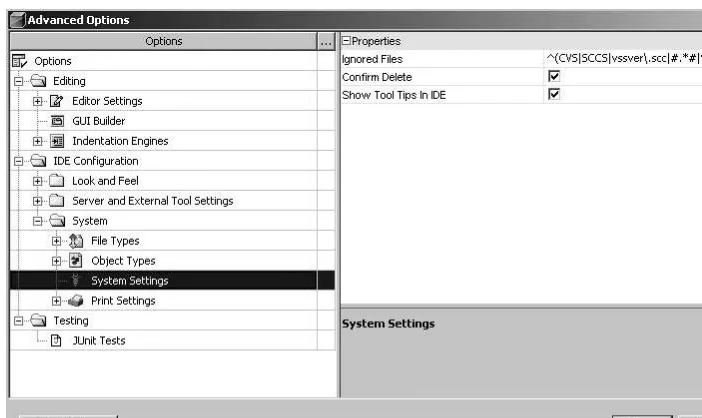
System
There are also several system settings you can customize in the Advanced Options window. Select IDE Configuration ➤System ➤System Settings. Several properties will appear in the right-hand pane, as shown in Figure 1-12. If you select the “Show Tool Tips in IDE” check box, then tool tips will be displayed throughout NetBeans as you mouse over various icons and features.
The “Confirm Delete” check box is a nice safety feature. If this is selected, you will be prompted to confirm a deletion before a file, folder, or other item can be deleted. I recom-mend leaving this checked, which it is by default, since even the most experienced users can mistakenly delete something.
Figure 1-12.The Confirm Delete setting in the Advanced Options window
Navigating and Understanding the IDE Layout
Once you have installed NetBeans and customized it to your liking, it is time to start working on projects. But first you need to become familiar with the general layout of the NetBeans IDE. It provides numerous windows that enable you to view specific items or pieces of data.
Initial Layout
When the IDE first opens, the Projects, Files, and Services window is displayed on the left. The primary menu and toolbar are displayed along the top, allowing quick access to commonly used features. Other than those features, it is up to you to decide what to display and which windows you will use. See the following section (“Windows”) for an explanation of some of the different windows.
The primary toolbar displayed along the top contains only a bare minimum of icons that allow you to perform frequently used operations, icons such as Open Project, New Project, New File, Cut, Copy, Paste, Build Main Project, and Run Main Project. You can customize the toolbars that are displayed and items that appear in them by right-clicking on an empty spot
Figure 1-13.The Customize Toolbars window
One of the nice features on the toolbar context menu I like to use is the Small Toolbar Icons option. If this option is selected, then the primary toolbar in the IDE will shrink the icons to a smaller size. This saves space on the screen. (I like to have as much visual space as possible when working with code in the Source Editor.)
If you’re programming an application and you have concerns about memory, I highly rec-ommend selecting to display the Memory toolbar from the context menu that is displayed by right-clicking the primary toolbar. You can also activate it by going to View ➤Toolbars ➤
Memory. This will display a JVM memory meter in the toolbar that lists the amount of memory currently used versus allocated. The memory toolbar can be useful when you launch web applications, since you can watch the memory allocated as a web application server starts up. This can be a quick and dirty way of monitoring memory usage without having to profile an application or use a tool such as JConsole.
■
Tip
If you haven’t already figured it out, you can click the Memory toolbar to force garbage collection. If you have a long-running process or a running application server started from inside NetBeans that is hog-ging resources, you can try to reclaim it.Windows
There are multiple windows you can open and use throughout the IDE windowing system. Each window has a specific purpose and can be opened, minimized, or closed. Each window can also be dragged around and docked in virtually any place in NetBeans. I cover some of the more commonly used windows next.