iOS 6 Programming Cookbook
iOS 6 Programming Cookbook by Vandad Nahavandipoor
Copyright © 2013 Vandad Nahavandipoor. All rights reserved. Printed in the United States of America.
Published by O’Reilly Media, Inc., 1005 Gravenstein Highway North, Sebastopol, CA 95472.
O’Reilly books may be purchased for educational, business, or sales promotional use. Online editions are also available for most titles (http://my.safaribooksonline.com). For more information, contact our corporate/institutional sales department: 800-998-9938 or [email protected].
Editors: Andy Oram and Rachel Roumeliotis Production Editor: Rachel Steely
Copyeditor: Jasmine Kwityn Proofreader: Jason Schneiderman
Indexer: Bob Pfahler
Cover Designer: Karen Montgomery Interior Designer: David Futato Illustrator: Rebecca Demarest
December 2012: First Edition.
Revision History for the First Edition: 2012-11-19 First release
See http://oreilly.com/catalog/errata.csp?isbn=9781449342753 for release details.
Nutshell Handbook, the Nutshell Handbook logo, and the O’Reilly logo are registered trademarks of O’Reilly Media, Inc. iOS 6 Programming Cookbook, image of a shrew tenrec, and related trade dress are trademarks of O’Reilly Media, Inc.
Many of the designations used by manufacturers and sellers to distinguish their products are claimed as trademarks. Where those designations appear in this book, and O’Reilly Media, Inc., was aware of a trademark claim, the designations have been printed in caps or initial caps.
While every precaution has been taken in the preparation of this book, the publisher and author assume no responsibility for errors or omissions, or for damages resulting from the use of the information con-tained herein.
ISBN: 978-1-449-34275-3
Table of Contents
Preface . . . xi
1. The Basics . . . 1
1.1 Creating a Simple iOS App in Xcode 2
1.2 Understanding Interface Builder 5
1.3 Compiling iOS Apps 7
1.4 Running iOS Apps on the Simulator 11
1.5 Running iOS Apps on iOS Devices 12
1.6 Packaging iOS Apps for Distribution 15
1.7 Declaring Variables in Objective-C 20
1.8 Allocating and Making Use of Strings 23
1.9 Comparing Values in Objective-C with an if Statement 27
1.10 Implementing Loops with for Statements 30
1.11 Implementing while Loops 32
1.12 Creating Custom Classes 35
1.13 Defining Functionality for Classes 38
1.14 Defining Two or More Methods with the Same Name 43
1.15 Allocating and Initializing Objects 46
1.16 Adding Properties to Classes 48
1.17 Moving from Manual Reference Counting to Automatic Reference
Counting 52
1.18 Typecasting with Automatic Reference Counting 57
1.19 Delegating Tasks with Protocols 60
1.20 Determining Whether Instance or Class Methods Are Available 66 1.21 Determining Whether a Class Is Available at Runtime 69
1.22 Allocating and Making Use of Numbers 70
1.23 Allocating and Making Use of Arrays 72
1.24 Allocating and Making Use of Dictionaries 77
1.25 Allocating and Making Use of Sets 80
1.26 Creating Bundles 83
1.27 Loading Data from the Main Bundle 84
1.29 Sending Notifications with NSNotificationCenter 91 1.30 Listening for Notifications Sent from NSNotificationCenter 94
2. Implementing Controllers and Views . . . 99
2.1 Displaying Alerts with UIAlertView 100
2.2 Creating and Using Switches with UISwitch 107
2.3 Customizing the UISwitch 111
2.4 Picking Values with UIPickerView 114
2.5 Picking the Date and Time with UIDatePicker 122
2.6 Implementing Range Pickers with UISlider 126
2.7 Customizing the UISlider 130
2.8 Grouping Compact Options with UISegmentedControl 135
2.9 Customizing the UISegmentedControl 140
2.10 Presenting and Managing Views with UIViewController 146 2.11 Presenting Sharing Options with UIActivityViewController 151 2.12 Implementing Navigation with UINavigationController 155 2.13 Manipulating a Navigation Controller’s Array of View Controllers 161
2.14 Displaying an Image on a Navigation Bar 162
2.15 Adding Buttons to Navigation Bars Using UIBarButtonItem 163 2.16 Presenting Multiple View Controllers with UITabBarController 171
2.17 Displaying Static Text with UILabel 177
2.18 Customizing the UILabel 181
2.19 Accepting User Text Input with UITextField 183
2.20 Displaying Long Lines of Text with UITextView 192 2.21 Adding Buttons to the User Interface with UIButton 196
2.22 Displaying Images with UIImageView 200
2.23 Creating Scrollable Content with UIScrollView 204
2.24 Loading Web Pages with UIWebView 209
2.25 Presenting Master-Detail Views with UISplitViewController 213
2.26 Enabling Paging with UIPageViewController 219
2.27 Displaying Popovers with UIPopoverController 223
2.28 Displaying Progress with UIProgressView 232
2.29 Listening and Reacting to Keyboard Notifications 234
2.30 Constructing and Displaying Styled Texts 248
3. Auto Layout and the Visual Format Language . . . 253
3.1 Placing UI Components in the Center of the Screen 256 3.2 Defining Horizontal and Vertical Constraints with the
Visual Format Language 259
3.3 Utilizing Cross View Constraints 265
4. Constructing and Using Table Views . . . 279
4.1 Instantiating a Table View 279
4.2 Assigning a Delegate to a Table View 281
4.3 Populating a Table View with Data 283
4.4 Receiving and Handling Table View Events 287
4.5 Using Different Types of Accessories in a Table View Cell 288
4.6 Creating Custom Table View Cell Accessories 290
4.7 Displaying Hierarchical Data in Table Views 293
4.8 Enabling Swipe Deletion of Table View Cells 294
4.9 Constructing Headers and Footers in Table Views 297 4.10 Displaying Context Menus on Table View Cells 306
4.11 Moving Cells and Sections in Table Views 310
4.12 Deleting Cells and Sections from Table Views 317 4.13 Utilizing the UITableViewController for Easy Creation of Table
Views 325
4.14 Displaying a Refresh Control for Table Views 332
5. Storyboards . . . 337
5.1 Creating a Project with Storyboards 338
5.2 Adding a Navigation Controller to a Storyboard 340
5.3 Passing Data From One Screen to Another 350
5.4 Adding a Storyboard to an Existing Project 352
6. Concurrency . . . 355
6.1 Constructing Block Objects 361
6.2 Accessing Variables in Block Objects 365
6.3 Invoking Block Objects 371
6.4 Dispatching Tasks to Grand Central Dispatch 372
6.5 Performing UI-Related Tasks with GCD 373
6.6 Executing Non-UI Related Tasks Synchronously with GCD 377 6.7 Executing Non-UI Related Tasks Asynchronously with GCD 380
6.8 Performing Tasks After a Delay with GCD 386
6.9 Performing a Task Only Once with GCD 389
6.10 Grouping Tasks Together with GCD 391
6.11 Constructing Your Own Dispatch Queues with GCD 394
6.12 Running Tasks Synchronously with Operations 397
6.13 Running Tasks Asynchronously with Operations 404
6.14 Creating Dependency Between Operations 411
6.15 Creating Timers 413
6.16 Creating Concurrency with Threads 418
6.17 Invoking Background Methods 423
7. Core Location and Maps . . . 429
7.1 Creating a Map View 430
7.2 Handling the Events of a Map View 432
7.3 Pinpointing the Location of a Device 434
7.4 Displaying Pins on a Map View 437
7.5 Displaying Pins with Different Colors on a Map View 439
7.6 Displaying Custom Pins on a Map View 446
7.7 Converting Meaningful Addresses to Longitude and Latitude 448 7.8 Converting Longitude and Latitude to a Meaningful Address 450
8. Implementing Gesture Recognizers . . . 453
8.1 Detecting Swipe Gestures 455
8.2 Detecting Rotation Gestures 457
8.3 Detecting Panning and Dragging Gestures 460
8.4 Detecting Long Press Gestures 463
8.5 Detecting Tap Gestures 466
8.6 Detecting Pinch Gestures 468
9. Networking, JSON, XML, and Twitter . . . 471
9.1 Downloading Asynchronously with NSURLConnection 471 9.2 Handling Timeouts in Asynchronous Connections 474 9.3 Downloading Synchronously with NSURLConnection 475 9.4 Modifying a URL Request with NSMutableURLRequest 478 9.5 Sending HTTP GET Requests with NSURLConnection 479 9.6 Sending HTTP POST Requests with NSURLConnection 481 9.7 Sending HTTP DELETE Requests with NSURLConnection 484 9.8 Sending HTTP PUT Requests with NSURLConnection 486 9.9 Serializing Arrays and Dictionaries into JSON 488 9.10 Deserializing JSON into Arrays and Dictionaries 491 9.11 Integrating Twitter Functionality into Your Apps 494
9.12 Parsing XML with NSXMLParser 499
10. Audio and Video . . . 505
10.1 Playing Audio Files 505
10.2 Handling Interruptions while Playing Audio 507
10.3 Recording Audio 508
10.4 Handling Interruptions while Recording Audio 515
10.5 Playing Audio over Other Active Sounds 516
10.6 Playing Video Files 519
10.7 Capturing Thumbnails from a Video File 523
11. Address Book . . . 535
11.1 Requesting Access to the Address Book 537
11.2 Retrieving a Reference to an Address Book 540
11.3 Retrieving All the People in the Address Book 543 11.4 Retrieving Properties of Address Book Entries 544 11.5 Inserting a Person Entry into the Address Book 549 11.6 Inserting a Group Entry into the Address Book 552
11.7 Adding Persons to Groups 555
11.8 Searching the Address Book 557
11.9 Retrieving and Setting a Person’s Address Book Image 562
12. Files and Folder Management . . . 571
12.1 Finding the Paths of the Most Useful Folders on Disk 573
12.2 Writing to and Reading from Files 575
12.3 Creating Folders on Disk 580
12.4 Enumerating Files and Folders 581
12.5 Deleting Files and Folders 586
12.6 Securing Files on Disk 590
12.7 Saving Objects to Files 595
13. Camera and the Photo Library . . . 599
13.1 Detecting and Probing the Camera 601
13.2 Taking Photos with the Camera 606
13.3 Taking Videos with the Camera 610
13.4 Storing Photos in the Photo Library 613
13.5 Storing Videos in the Photo Library 616
13.6 Retrieving Photos and Videos from the Photo Library 618
13.7 Retrieving Assets from the Assets Library 620
13.8 Editing Videos on an iOS Device 627
14. Multitasking . . . 633
14.1 Detecting the Availability of Multitasking 634
14.2 Completing a Long-Running Task in the Background 635 14.3 Receiving Local Notifications in the Background 638
14.4 Playing Audio in the Background 646
14.5 Handling Location Changes in the Background 648
14.6 Saving and Loading the State of Multitasking iOS Apps 651 14.7 Handling Network Connections in the Background 654 14.8 Handling Notifications Delivered to a Waking App 657
14.9 Responding to Changes in App Settings 659
15. Core Data . . . 663
15.1 Creating a Core Data Model with Xcode 666
15.2 Generating Class Files for Core Data Entities 670
15.3 Creating and Saving Data Using Core Data 672
15.4 Reading Data from Core Data 674
15.5 Deleting Data from Core Data 677
15.6 Sorting Data in Core Data 680
15.7 Boosting Data Access in Table Views 682
15.8 Implementing Relationships in Core Data 693
16. Dates, Calendars, and Events . . . 701
16.1 Retrieving the List of Calendars 704
16.2 Adding Events to Calendars 706
16.3 Accessing the Contents of Calendars 710
16.4 Removing Events from Calendars 713
16.5 Adding Recurring Events to Calendars 718
16.6 Retrieving the Attendees of an Event 722
16.7 Adding Alarms to Calendars 727
16.8 Handling Event Changed Notifications 729
16.9 Presenting Event View Controllers 732
16.10 Presenting Event Edit View Controllers 735
17. Graphics and Animations . . . 739
17.1 Enumerating and Loading Fonts 747
17.2 Drawing Text 749
17.3 Constructing, Setting, and Using Colors 750
17.4 Drawing Images 756
17.5 Constructing Resizable Images 759
17.6 Drawing Lines 765
17.7 Constructing Paths 771
17.8 Drawing Rectangles 774
17.9 Adding Shadows to Shapes 778
17.10 Drawing Gradients 783
17.11 Displacing Shapes Drawn on Graphic Contexts 790
17.12 Scaling Shapes Drawn on Graphic Contexts 794
17.13 Rotating Shapes Drawn on Graphic Contexts 797
17.14 Animating and Moving Views 798
17.15 Animating and Scaling Views 807
17.16 Animating and Rotating Views 808
18. Core Motion . . . 811
18.1 Detecting the Availability of an Accelerometer 812
18.3 Retrieving Accelerometer Data 816
18.4 Detecting Shakes on an iOS Device 819
18.5 Retrieving Gyroscope Data 822
19. iCloud . . . 825
19.1 Setting Up Your App for iCloud 826
19.2 Storing and Synchronizing Dictionaries in iCloud 831 19.3 Creating and Managing Folders for Apps in iCloud 835
19.4 Searching for Files and Folders in iCloud 841
19.5 Storing User Documents in iCloud 851
19.6 Managing the State of Documents in iCloud 865
19.7 Handling Conflicts in iCloud Documents 868
20. Pass Kit . . . 879
20.1 Creating Pass Kit Certificates 882
20.2 Creating Pass Files 890
20.3 Providing Icons and Images for Passes 899
20.4 Preparing Your Passes for Digital Signature 901
20.5 Signing Passes Digitally 903
20.6 Distributing Passes Using Email 908
20.7 Distributing Passes Using Web Services 911
20.8 Enabling Your iOS Apps to Access Passes on iOS Devices 913
20.9 Interacting with Passbook Programmatically 917
Preface
The long-awaited iOS 6 SDK (Software Development Kit) is finally out, and we need to learn about all the great features that this release offers us. Apple did a great job adding new features to the SDK and, of course, to iOS itself. iOS 6 is much more stable than the previous versions of iOS, as you would expect. Things move very fast in Apple’s world, and the iOS SDK is no exception. Obviously, picking up this book is an indi-cation that you are ready to start learning all there is to know about iOS 6 SDK, and that is fantastic.
I’ve personally worked with companies of various sizes around the world and have been developing software pretty much since I was about seven years old. (I started out on my father’s Commodore 64 before moving on to an Intel 80186 machine, an 80286, and then Pentium machines.) I did a lot of assembly development as well as some OS programming, including writing a kernel of a toy operating system. I really enjoy soft-ware development and have true passion for it. I can express myself using programming, and that’s probably the main reason I enjoy writing apps and software in general. Since 2007, I’ve solely focused on writing iOS apps, and have been working with some really high-profile companies around the world to help them with their projects. I’ve worked with Scrum Masters (for whom I have much respect), project managers, delivery man-agers, release manman-agers, testers, and fellow iOS developers—and have done my best to learn as much as possible from them. This edition of the book is the product of all the knowledge that I have gained in many years writing iOS apps.
Audience
I assume you are comfortable with the iOS development environment and know how to create an app for the iPhone or iPad. This book does not get novice programmers started, but presents useful ways to get things done for iOS programmers ranging from novices to experts.
Organization of This Book
In this book, we will discuss frameworks and classes that are available in iOS 6 SDK. This book does its best to teach you the latest and the greatest APIs. As you know, some users of your apps may still be on older versions of iOS, so please consider those users and choose your APIs wisely, depending on the minimum iOS version that you want to target with your apps.
Here is a concise breakdown of the material each chapter covers: Chapter 1, The Basics
Explains how Objective-C classes are structured and how objects can be instanti-ated. The chapter talks about properties and delegates as well as memory man-agement in Objective-C. Even if you are competent in Objective-C, I strongly suggest that you read this chapter, even if you only skim through it, to understand the basic material that is used in the rest of the book.
Chapter 2, Implementing Controllers and Views
Describes various approaches to constructing your iOS application’s user interface by taking advantage of different tools the SDK provides. This chapter also intro-duces you to features that are only available on the iPad, such as the popover and split view controllers.
Chapter 3, Auto Layout and the Visual Format Language
Explains how you can take advantage of Auto Layout in the iOS SDK in order to construct your UI in such a way that it can be resized and stretched to pretty much any screen dimension.
Chapter 4, Constructing and Using Table Views
Shows how you can work with table views to create professional-looking iOS applications. Table views are very dynamic in nature, and as a result, programmers sometimes have difficulty understanding how they should work with them. By reading this chapter and trying out the example code, you will gain the knowledge that is required to comfortably work with table views.
Chapter 5, Storyboards
independently of developers to gain knowledge of the UI components iOS offers and to build more robust products. Programmers can also take advantage of story-boarding to easily create prototypes. Storystory-boarding is just fun, whether you do it on paper or using Xcode.
Chapter 6, Concurrency
As humans, we can do many things simultaneously without thinking much about it. With advances in computer technology, mobile devices are also able to multi-task, and provide programmers with tools and mechanisms that can accomplish more than one task at the same time. This is called concurrency. In this chapter, you will learn about Grand Central Dispatch, Apple’s preferred way of achieving concurrency in iOS. You will also learn about timers, threads, and operations. Chapter 7, Core Location and Maps
Describes how you should use Map Kit and Core Location APIs to develop loca-tion-aware iOS applications. First you will learn about maps, and then you will learn how to detect a device’s location and tailor your maps with custom annota-tions. You will also learn about geocoding and reverse geocoding, as well as some of the methods of the Core Location framework, which are only available in the iOS 4 SDK and later.
Chapter 8, Implementing Gesture Recognizers
Demonstrates how to use gesture recognizers, which enable your users to easily and intuitively manipulate the graphical interface of your iOS applications. In this chapter, you will learn how to use all available gesture recognizers in the iOS SDK, with working examples tested on iOS 5 on different devices such as the iPhone 3GS, iPhone 4, and iPad.
Chapter 9, Networking, JSON, XML, and Twitter
Demonstrates how to download data from a URL and parse XML files. You will learn about synchronous and asynchronous connections and their pros and cons. You will also learn about caching files in memory and on disk to avoid consuming the possibly limited bandwidth of an iOS device on which your application could be running.
Chapter 10, Audio and Video
Discusses the AV Foundation and Media Player frameworks that are available on the iOS SDK. You will learn how to play audio and video files and how to handle interruptions, such as a phone call, while the audio or video is being played in iOS 6. This chapter also explains how to record audio using an iOS device’s built-in microphone(s). At the end of the chapter, you will learn how to access the iPod Library and play its media content, all from inside your application.
Chapter 11, Address Book
that provide an Objective-C interface. After reading this chapter and trying the examples for yourself, you will feel much more confident using the Address Book framework.
Chapter 12, Files and Folder Management
One of the most important tasks that, as developers, we want to perform in our iOS apps is manipulating files and folders. Whether this means creating, reading from, writing to, or deleting them, this chapter contains enough material to get you up and running with file and folder management in iOS SDK.
Chapter 13, Camera and the Photo Library
Demonstrates how you can determine the availability of front- and back-facing cameras on an iOS device. Some of the recipes in this chapter are specific to iOS 4 and above. You will also learn how to access the Photo Library using the Assets Library framework, which is available in iOS 4 and later. At the end of the chapter, you will learn about editing videos right on an iOS device using a built-in view controller.
Chapter 14, Multitasking
Explains, with examples, how to create multitasking-aware applications that run beautifully on iOS 4 and above. You will learn about background processing, in-cluding how to play audio and retrieve users’ locations in the background, as well as how to download content from a URL while your application is running in the background.
Chapter 15, Core Data
Describes how to maintain persistent storage for your iOS applications using Core Data. You will learn how to add to, delete from, and edit Core Data objects and how to boost access to data in a table view. In addition, you will learn how to manage relationships between Core Data objects.
Chapter 16, Dates, Calendars, and Events
Demonstrates the use of the Event Kit and Event Kit UI frameworks, which are available on iOS 4 and later, in order to manage calendars and events on an iOS device. You will see how to create, modify, save, and delete events. You will also learn, through examples, how to add alarms to calendar events and how to set up CalDAV calendars so that you can share a single calendar among multiple devices. Chapter 17, Graphics and Animations
Introduces the Core Graphics framework. You will learn how to draw images and text on a graphics context, grab the contents of a graphics context and save it as an image, and much more.
Chapter 18, Core Motion
accelerometer and a gyroscope, so you will also learn how to detect the availability of the required hardware.
Chapter 19, iCloud
Shows how to use the iCloud service, which ties devices together and allows them to share data to provide a seamless user experience as the user moves from one device to another.
Chapter 20, Pass Kit
Perhaps one of the most important updates in iOS 6 is the introduction of Pass-book: a virtual wallet, if you will, capable of managing your coupons, boarding passes, rail and bus tickets, and much more. In this chapter, you will learn all there is to know in order to be able to create your own digitally signed passes and dis-tribute them to your users easily.
Additional Resources
From time to time, I refer to official Apple documentation. Some of Apple’s descriptions are right on the mark, and there is no point in trying to restate them. Throughout this book, I have listed the most important documents and guides in the official Apple documentation that every professional iOS developer should read.
For starters, I suggest that you have a look at the iOS Human Interface Guidelines for all iOS devices. This document will tell you everything you need to know about devel-oping engaging and intuitive user interfaces for all iOS devices. Every iOS programmer should read this document. In fact, I believe this should be required reading for the product design and development teams of any company that develops iOS applications. I also suggest that you skim through the “iOS Application Programming Guide” in the iOS Reference Library for some tips and advice on how to make great iOS applications: One of the things you will notice when reading Chapter 14 is the use of block objects. This book concisely explains block objects, but if you require further details on the subject, I suggest you read “A Short Practical Guide to Blocks,” available at this URL:
http://bit.ly/TsSMNU.
Throughout this book, you will see references to “bundles” and loading images and data from bundles. You will read a concise overview about bundles in this book, but if you require further information, head over to the “Bundle Programming Guide,” avail-able at this URL: http://bit.ly/XdLKE6.
Conventions Used in This Book
The following typographical conventions are used in this book: Italic
Constant width
Indicates variables and other code elements, the contents of files, and the output from commands
Constant width bold
Highlights text in examples that is new or particularly significant in a recipe Constant width italic
Shows text that should be replaced with user-supplied values
This icon signifies a tip, suggestion, or general note.
Using Code Examples
This book is here to help you get your job done. In general, you may use the code in this book in your programs and documentation. You do not need to contact us for permission unless you’re reproducing a significant portion of the code. For example, writing a program that uses several chunks of code from this book does not require permission. Selling or distributing a CD-ROM of examples from O’Reilly books does require permission. Answering a question by citing this book and quoting example code does not require permission. Incorporating a significant amount of example code from this book into your product’s documentation does require permission.
We appreciate, but do not require, attribution. An attribution usually includes the title, author, publisher, and ISBN. For example: “iOS 6 Programming Cookbook by Vandad Nahavandipoor (O’Reilly). Copyright 2013 Vandad Nahavandipoor, 978-1-4493-4275-3.”
If you feel your use of code examples falls outside fair use or the permission given here, feel free to contact us at [email protected].
We’d Like to Hear from You
Every example and code snippet in this book has been tested on the iPhone 3GS, iPhone 4, iPhone 4S, iPhone 5, iPad, and an iPhone/iPad Simulator, but occasionally you may encounter problems—for example, if you have a different version of the SDK than the version on which the example code was compiled and tested. The information in this book has also been verified at each step of the production process. However, mistakes and oversights can occur, and we will gratefully receive details of any you find, as well as any suggestions you would like to make for future editions. You can contact the author and editors at:
1005 Gravenstein Highway North Sebastopol, CA 95472
(800) 998-9938 (in the United States or Canada) (707) 829-0515 (international or local)
(707) 829-0104 (fax)
We have a web page for this book, where we list errata, examples, and any additional information. You can access this page at:
http://oreil.ly/iOS6_Programming_CB
To access the source codes for this book, please see the author’s website at:
https://github.com/vandadnp/ios-6-programming-cookbook-source-codes
To comment or ask technical questions about this book, send email to the following address, mentioning the book’s ISBN (9781449342753):
For more information about our books, conferences, Resource Centers, and the O’Reil-ly Network, see our website at:
http://www.oreilly.com
Safari® Books Online
Safari Books Online (www.safaribooksonline.com) is an on-demand digital library that delivers expert content in both book and video form from the world’s leading authors in technology and business.
Technology professionals, software developers, web designers, and business and cre-ative professionals use Safari Books Online as their primary resource for research, problem solving, learning, and certification training.
Safari Books Online offers a range of product mixes and pricing programs for organi-zations, government agencies, and individuals. Subscribers have access to thousands of books, training videos, and prepublication manuscripts in one fully searchable da-tabase from publishers like O’Reilly Media, Prentice Hall Professional, Addison-Wesley Professional, Microsoft Press, Sams, Que, Peachpit Press, Focal Press, Cisco Press, John Wiley & Sons, Syngress, Morgan Kaufmann, IBM Redbooks, Packt, Adobe Press, FT Press, Apress, Manning, New Riders, McGraw-Hill, Jones & Bartlett, Course Tech-nology, and dozens more. For more information about Safari Books Online, please visit us online.
Acknowledgments
Rou-meliotis, Brian Jepson, Rachel B. Steely, and Maria Stallone. Thanks also go to Sarah Schneider for helping me get my repository sorted out.
I am also grateful to my wonderful reviewers, Chris Devers, Mikhail Madnani, and Niklas Saers, for the fantastic job they did reviewing this edition of the book. When I was a kid, I thought I could do everything on my own. But as I’ve matured, it has become more and more apparent to me that although we humans are limitless in what we can achieve, without a good support system there is just so much we cannot do. Realizing and constantly reminding myself of this when I am surrounded by my friends, I would like to take this opportunity and thank them for their continuous support and uncon-ditional love.
CHAPTER 1
The Basics
1.0 Introduction
A lot has changed in iPhone, iPad, and iPod touch programming since the introduction of iOS 5. The whole runtime and the way we write Objective-C code have dramatically changed. ARC (Automatic Reference Counting) is now introduced into the LLVM Compiler, which in some ways gives us more flexibility and in other ways makes the runtime more fragile. In this chapter, we will get down and dirty with objects and how we can use them using the modern Objective-C runtime under ARC.
As the name of the language hints at, Objective-C is all about manipulating objects. These are containers for all the things you manipulate in the program, ranging from something simple, like a point at the corner of a rectangle, to entire windows containing all kinds of widgets. Apple’s Cocoa libraries even define simple values such as integers as objects. Objects are defined according to classes, and therefore these two terms are commonly used interchangeably. But actually, a class is just a specification for defining objects; each object is said to be an instance of its class. Each class—and therefore the objects that are created from that class—is a set of properties, tasks, methods, enu-merations, and much more. In an object-oriented programming language, classes can inherit from each other much like a person can inherit certain traits and characteristics from his parents.
Objective-C does not allow multiple inheritance. Therefore, every class is the direct descendant of, at most, one other class.
1.1 Creating a Simple iOS App in Xcode
Problem
You’ve started to learn iOS Programming and you want to create a really simple iOS Project and app in Xcode.
Solution
Create a new iOS Project in Xcode and then run it in the iOS Simulator using Command +Shift+R.
Discussion
I’ll assume you have a Mac and you have already installed the Xcode set of tools. Now you want to create an iOS Project and run that app on the iOS Simulator. This process is really straightforward:
1. Open Xcode if you don’t have it open yet.
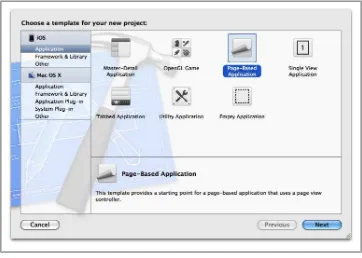
2. Select File on the menu bar, select New, and then select New Project. You will be greeted with a screen similar to that shown in Figure 1-1.
3. In the New Project dialog (Figure 1-1), on the left, make sure the Application cat-egory is selected under the iOS main catcat-egory. Then select Page-Based Application on the right-hand side and press the Next button.
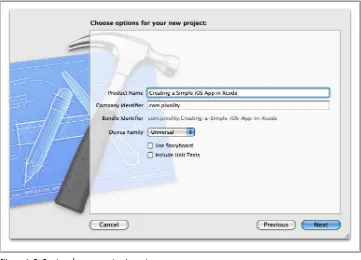
4. You will now need to enter your product name (App Name) and your company identifier. This uniquely identifies your product for your own company. Set your product name to Creating a Simple iOS App in Xcode. The company identifier is normally a domain name with the components reversed. My company name is Pixolity, and therefore I will set the Company Name to com.pixolity as shown in Figure 1-2. Leave the rest of the values in this screen just the way I’ve left them in Figure 1-2 and press the Next button.
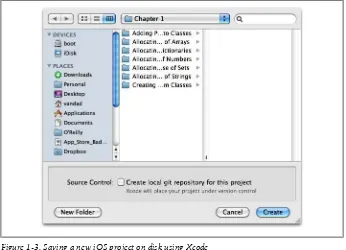
5. You will now be asked to save your project on a disk. Select your desired location and press the Create button, as shown in Figure 1-3. Xcode will now create your project files and the structure of your project.
6. Now, before running your app, make sure you have unplugged any iPhones or iPads/iPods that you have connected to your computer. The reason behind this is that if a device is connected to your Mac, Xcode will try to run your apps on the device instead of the simulator, and if you haven’t configured your device for de-velopment, you might get blocked and not be able to run your apps.
7. From the drop-down on the top-left corner of Xcode, make sure iPhone Simulator or iPad Simulator is selected. In this example, I will make sure iPad Simulator is selected, as shown in Figure 1-4.
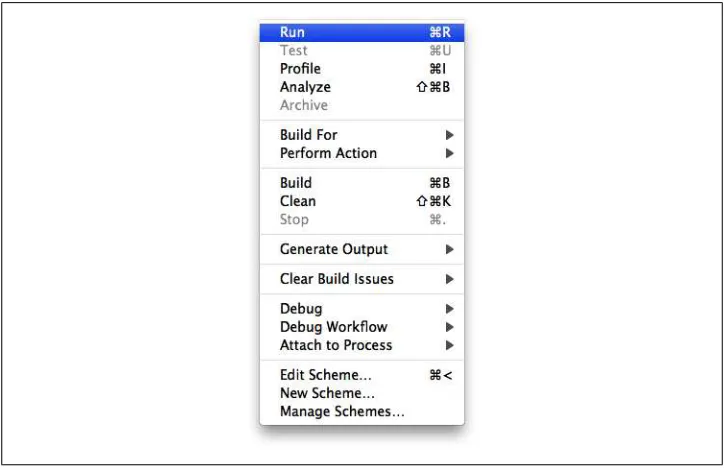
8. Now that everything is ready, press the Command+Shift+R keys on your keyboard or simply go to the Product menu and then press the Run button as shown in Figure 1-5.
Congratulations. Now you have a simple app running in iOS Simulator. As you saw, there are various different iOS project templates that you can choose from (Fig-ure 1-1). Here is a list of some of the handy project templates that you can use:
Figure 1-3. Saving a new iOS project on disk using Xcode
Master-Detail Application
This project template will set up a split view controller for your us. Split view controllers are explained in Chapter 2, Implementing Controllers and Views. Page-Based Application
This template will allow your app to have an iBooks user interface, where the user will be able to flip through the pages that are drawn by the app. You’ll learn more about this in Chapter 2.
Empty Application
An empty application is simply made out of the most basic components that any iOS app has. I use this template a lot to set up my iOS apps the way I like them to be set up, without any preconfiguration by Xcode.
1.2 Understanding Interface Builder
Problem
You want to start designing a user interface for your iOS apps but don’t want to waste time coding.
Solution
Use Interface Builder.
Discussion
Interface Builder, or IB, is integrated into Xcode as a tool for creating a user interface for your Mac and iOS apps. IB manipulates .xib files, which are sometimes called nib files to reflect the file extension they had in past Apple products. A nib file is basically the compiled (binary) version of an XIB file which itself is an XML file that is managed by IB. XIB files are in XML format to make them easier to use with version control systems and text-based tools.
Let’s go ahead and start using IB. To do this, first create an iOS App using the Single View Application iOS Project template in Xcode. Follow the instructions in Recipe 1.1, but instead of Page-Based Application template (Figure 1-1), use the Single View Application template and follow it to the last dialog to save your project to disk. I’ve named the project Understanding Interface Builder.
Make sure your app is a Universal app, as shown in Figure 1-2.
After your project is created, the first thing you need to do is make sure it is going to run on iPhone Simulator, as shown in Figure 1-6.
Now press Command+Shift+R to run your application. You will then see the iOS Sim-ulator showing your empty application, as shown in Figure 1-7.
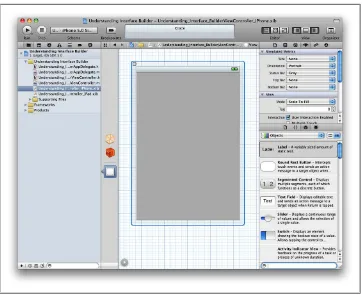
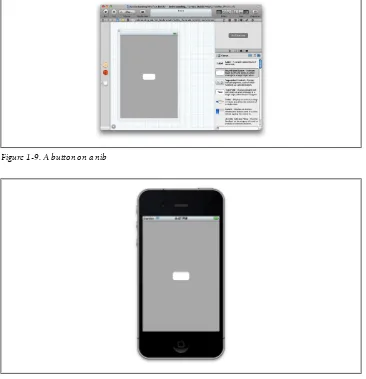
Now find the file Understanding_Interface_BuilderViewController_iPhone.xib in your project and click on it. Interface Builder will open up within Xcode and will display your user interface to you. Now that you have IB open, select from Xcode menus the View option, and then Utilities, and finally select Show Object Library (Figure 1-8). Now if you have a look at the Object Library, you can see that you have plenty of choice as to what you want to put on your interface. This includes buttons, on/off switches, progress bars, table views, etc. For now, drag and drop a button on your user interface. It’s as simple as that (Figure 1-9).
Right after this, from the Xcode menus, select File and then Save to make sure your Understanding_Interface_BuilderViewController_iPhone.xib is saved. Then go ahead and run your app on iOS Simulator (Figure 1-10).
You might be surprised, but for now that is all that we need to know about Interface Builder.
See Also
Recipe 1.11.3 Compiling iOS Apps
Problem
You have learned how to create an iOS app and wonder how it behaves.
Solution
Compile and run your iOS apps using Apple’s latest compiler. Then test your app on iOS Simulator and also, preferably, on a device.
Discussion
Creating an iOS App can be categorized under the following tasks: 1. Planning
2. Prototyping 3. Designing
4. Implementing and Testing 5. Delivering
During the implementation of an app, you will constantly need to run your app on a simulator or on various devices to make sure it is consistent, adheres to the design guidelines that you or your teammates created for this project, and most importantly, is stable enough for the App Store.
Crashes provide one of the major reasons for app rejections in the Apple App Store. Apps that are not stable and crash often are not good enough for consumers, and Apple is very likely to reject them. So always make sure that you thoroughly test your apps on iOS Simulator and on devi-ces.
When we write our code, as we will learn very soon, we need to make sure that what we are writing is correct. The process by which Xcode changes our code into executable instructions is called compilation. The compiler does the compilation. In Xcode, we use various build commands to compile our apps:
Build for Running
Use this when you want to debug your applications on the simulator or on a device. Debugging is the process by which you can find mistakes in your code.
Figure 1-9. A button on a nib
Build for Testing
Use this build setting to run unit-tests that you’ve written for your apps. Unit tests, in short, are a set of instructions that you provide to Xcode. Xcode will run these instructions before it makes the final build. These instructions have one purpose only: to make sure that each part of the app you’ve written is in full working order. Build for Profiling
If you want to test the performance of your app, use this setting. Profiling is the process by which you can find bottlenecks, memory leaks, and other quality-related issues not covered by unit testing.
Build for Archiving
When you are sure your app is production quality or simply want to distribute it to testers, use this setting.
To compile your apps in Xcode, simply select the Product menu item, choose Build For, and then choose whichever build setting you believe is relevant to the task you want to accomplish.
What do you think happens if you have an error in your code? In Recipe 1.1 we created a simple Page-Based Application, so let’s go back to that app. Now open the Root-ViewController.m file in your project and look for this code:
- (void)viewWillAppear:(BOOL)animated {
[super viewWillAppear:animated]; }
Change this code to the following: - (void)viewWillAppear:(BOOL)animated {
[super nonExistentMethod]; [super viewWillAppear:animated]; }
If you now try to use Product menu, Build For, and then Build For Running, you will get the following error from Xcode:
error: Automatic Reference Counting Issue: Receiver type 'UIViewController' for instance message does not declare a method
with selector 'nonExistentMethod'
This is what the compiler is telling you: the code that you’ve written cannot be compiled and translated to proper instructions to the CPU. In this particular case, this is because the compiler doesn’t understand what nonExistentMethod actually is. This illustrates a good compiler that warns of—and sometimes stops you from making—mistakes that make your apps unstable.
1.4 Running iOS Apps on the Simulator
Problem
You’ve prepared an iOS project in Xcode and would like to run it in iOS Simulator to make sure it works.
Solution
You need to use the Scheme breadcrumb button on the top-left corner of Xcode to first select the project that you wish to run on the iOS Simulator and then select the simulator that you wish to run your app on (iPhone/iPad).
Discussion
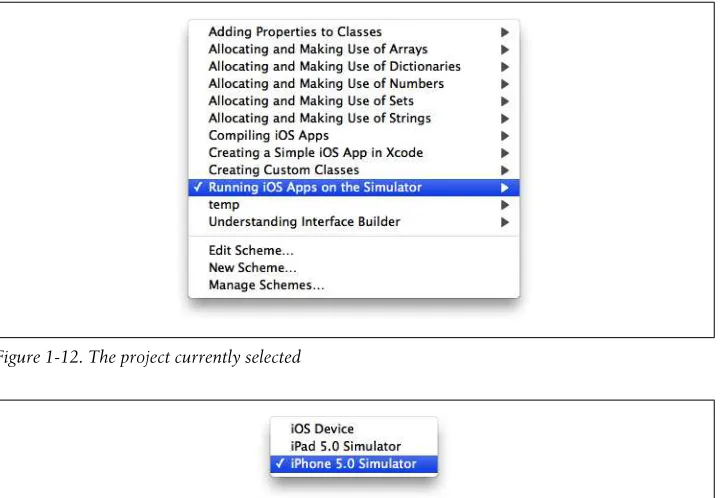
Follow these steps:1. Find the Scheme breadcrumb button on the top-left corner of Xcode’s window. This button looks like that shown in Figure 1-11.
Figure 1-11. The Scheme breadcrumb button in Xcode
2. In Xcode, you can have multiple projects on the same workspace. For example, at the time of writing this recipe, I have one project per recipe, added to one big project that I’ve created for this book. The left side of the Scheme button shows you the project that’s currently selected. So if I click on the left side of the Scheme button, I’ll see something similar to Figure 1-12. So go ahead and click on the left side of the Scheme button and select the project that you wish to run on the iOS Simulator. 3. The right side of the Scheme button lets you choose which device/simulator you wish to run your app on. I’ve selected iPhone Simulator. Go ahead and press the right side of the Scheme button to select which simulator you would like to run your app on (Figure 1-13).
Now that you have selected which simulator you would like to run your app on, simply go to the Product menu in Xcode and select Run. Xcode will compile your app (Recipe 1.3) if it’s not compiled yet and will then run it on your selected simulator.
See Also
Recipe 1.31.5 Running iOS Apps on iOS Devices
Problem
You’ve created an iOS App and now you want to run it on a device.
Solution
Simply plug your device into your computer using the USB cable that comes with your device. Follow the steps in Recipe 1.4 to make sure you have selected the right project in Xcode. Instead of choosing the simulator (as shown in Recipe 1.4) in the Scheme breadcrumb button, choose your device, go to Product, and press Run.
Figure 1-12. The project currently selected
Discussion
Each version of Xcode supports a series of iOS versions. By support I mean that the latest version of Xcode, for instance, may not be capable of compiling and running an iOS app on a second-generation iPod touch with iOS 3.0 installed on it. The reason is that the utilities built for each version of Xcode allow you to run your iOS apps on a limited number of versions of iOS on devices. The same is true for iOS Simulator. If you download the latest version of Xcode, you will notice that you might only be able to simulate your apps on iOS Simulator 5.0 and nothing before that.
The way to detect whether Xcode has detected your device is to plug in your device, wait a few seconds for the sync to happen, and see whether the name of your device appears in the right half of the Scheme breadcrumb button.
If you’ve waited for the device to sync and still the Scheme button is showing iOS Device in its list instead of the name of your device, you need to make sure that your device can be used for development purposes. Simply follow these instructions:
1. Select the Window menu.
2. Under the Window menu, select Organizer.
3. On top of Organizer, make sure the Devices item is selected, as shown in Fig-ure 1-14.
Figure 1-14. Selecting the Devices button in Organizer
4. On the left side of Organizer’s Devices screen, make sure you’ve selected your device by clicking on it (Figure 1-15).
5. As you can see, the device has a gray light instead of green. The gray light tells us that this device is not ready for development. After clicking on the device in the list, you will then see a button on the right side of the screen labeled Use for De-velopment. Press that button. Once you press this button, you will see a progress bar appear on the screen and Xcode will start detecting this device.
7. If everything goes fine and Xcode detects that the iOS version on your device is something that it can support, it will display the green light next to your device on the left-hand side of Organizer’s Devices screen, as shown in Figure 1-17. 8. Now close Organizer and come back to Xcode. If you now click on the right side
of the Scheme breadcrumb button, you will be able to see your device listed there, as shown in Figure 1-18.
If Xcode cannot detect the version of iOS installed on your device, it will display an amber light next to it. In this case, you either need to get a version of Xcode that does support your device’s iOS version, or you need to change the version of iOS on your device to match what Xcode supports. Xcode will display the list of iOS versions that it supports after displaying the amber light next to your device. Xcode, in fact, will give you the reason why it cannot run iOS apps on your device. If the reason stems from the version of iOS on your device, the supported versions of iOS will certainly be dis-played in Organizer’s Devices section.
Figure 1-15. A device that is not ready for development
See Also
Recipe 1.41.6 Packaging iOS Apps for Distribution
Problem
You want to send your iOS app to others so that they can test your app or have a look at it before you submit your app to the App Store.
Solution
You need to archive your application.
Discussion
In order to archive an application, you need to follow certain steps:
1. Make sure that you have fully tested the app on the simulator and you are happy that your app is stable.
Figure 1-17. An iOS device ready for development
2. Gather the UDIDs (Unique Device Identifiers) of all those devices on which you want to run your app. You can ask your friends and colleagues for these if the devices belong to them.
3. Add these UDIDs to your iOS Portal.
4. Create an Ad Hoc Distribution provision profile. Provision profiles are a mix of binary and XML content that allow an application to be executed on devices that have been linked to that provision profile.
5. After you have your provision profiles (a file that ends with the .mobileprovision extension), tell Xcode to use that provision profile for release purposes, as we will soon see.
6. Within Xcode, select the Product menu and then choose Archive. Xcode will now archive your application and, when that is done, display Organizer to you. Here you can export your archived application as a file (with the .ipa extension) that your testers/colleagues/friends can drag and drop into their iTunes or iPhone Con-figuration Utility to install your app on their iOS devices.
To distribute your iOS app to testers/colleagues and friends, you have to create an Ad Hoc provision profile. Follow these steps to create your Ad Hoc provision profile:
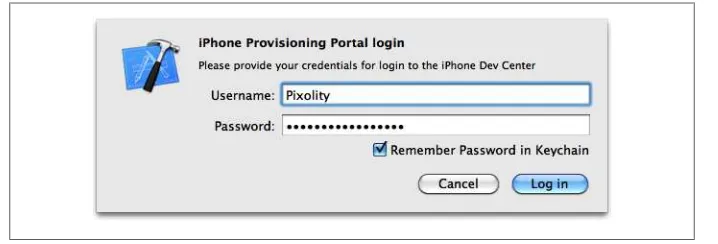
1. Log into the iOS Dev Center.
2. Select iOS Provision Portal from the right side of the screen.
3. If you have not created a Distribution certificate yet, follow these steps: • On the lefthand side of iOS Provision Profile, select Certificates.
• On the righthand side, select the Distribution tab on the top of the screen. • Follow the instructions on the screen, which will ask you to use Keychain
Access to create a new certificate on your computer and then upload that cer-tificate to the portal. After this, you will have your Distribution cercer-tificate. • Click on the Download button to the right side of your Distribution certificate
to download it. After you’ve downloaded it on your computer, double-click on it to install it in your Keychain Access.
4. Now move to the Devices item on the left side of the screen. 5. Select the Add Devices button on the right side of the screen.
After a device is added to your iOS portal, it cannot be removed for the period that you hold this portal (which is usually a year). After your portal has expired and when it has been renewed, you will get a chance to delete any unwanted devices, so make sure you are not adding devices to your portal without considering this.
7. Once you are done adding the devices, press the Submit button. 8. Select Provisioning on the left side of the screen.
9. Select the Distribution tab on the righthand side of the screen. 10. Select the New Profile button on the right side of the screen.
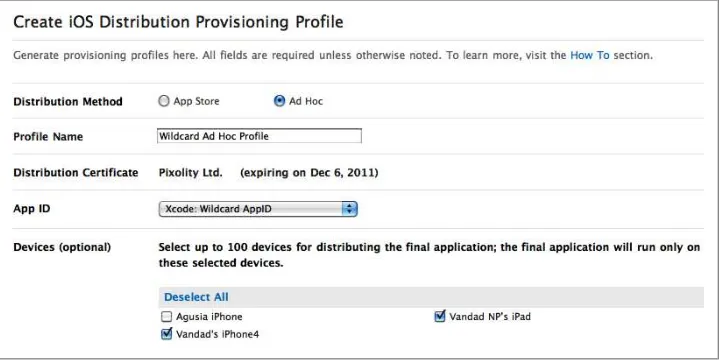
11. In the Create iOS Distribution Provisioning Profile screen, make sure the Distri-bution Method is Ad Hoc (Figure 1-19).
Figure 1-19. Creating a new Ad Hoc provision profile
12. Under Profile Name, give a descriptive name to your provision profile. For instance, something like Wildcard Ad Hoc Profile. Be creative and descriptive.
13. In the App ID drop-down, pick Xcode: Wildcard AppID. This will allow you to provision your apps regardless of their App Identifiers so that you can use the same Ad Hoc provision profile for all your iOS apps.
14. In the Devices section, select all the devices on which you want this provision profile to work. Devices that are not selected in this list will not be able to run your apps.
15. After you are done selecting the devices, press the Submit button.
this profile is Pending, refresh your page in your browser until the provision profile is created.
17. Now that you have this provision profile downloaded on your computer, drag and drop it into iTunes. iTunes will then install this profile for you.
All done. We are now ready to create an archived app. Follow these steps: 1. Select your profile file in Xcode (this is the file with the blue icon). 2. Now you will see the targets your app supports. Select the desired target. 3. Select Build Settings on the right side of the screen (Figure 1-20).
4. In the Build Settings tab, scroll down until you get to the Code Signing category, as shown in Figure 1-20.
5. Under Code Signing Identity → Release and Code Signing Identity → Release → Any iOS SDK, make sure you pick the provision profile that you created earlier in this recipe.
6. On the Scheme breadcrumb (Figure 1-11), make sure you’ve chosen iOS Device/ Your Device Name instead of iOS Simulator (iPad or iPhone). Under the simulator, you cannot create an app for distribution.
7. Head over to the Product menu and choose Archive.
Figure 1-20. Xcode Displaying the Build Settings of an iOS App
Figure 1-21. An archived application in Organizer
8. Select the Share button on the top-right side of the screen. You will be presented with a dialog similar to that shown in Figure 1-22.
9. Keep the Contents selection as iOS App Store Package (.ipa file), as shown in Figure 1-22.
10. In the Identity drop-down, again, choose the provision profile with which you want to sign your app. We created this provision profile before, remember? Choose the same profile again. Once you are done, press Next.
11. You will now be asked to specify the location where you would like to save this file. Select your desired location and filename, then press Save.
(or iCU) since it is certainly more robust when it comes to installing Ad Hoc apps on devices. iTunes has some issues when installing archived apps on devices, which I am not going to bore you with. The more you work with these two pieces of software, the more you get to know about their advantages and disadvantages.
1.7 Declaring Variables in Objective-C
Problem
You want to use variables with clear names in your iOS apps.
Solution
Apple conventions dictate certain rules for variable names. Determine the type of the variable (for instance, integer, array, string, etc.) and then a descriptive name for it. In an empty line of code, place the type of your variable first, following by its name. Variable names are advised to follow these rules:
1. Follow the camelCase naming convention. If the variable name is one word, all letters must be lowercase. If the variable name is more than one word, the first word must be entirely lowercase and the subsequent words must have their first letter uppercase and the rest of their letters lowercase. For instance, if you want to
have a counter variable, you can simply name it counter. If you want to call your variable “first counter”, declare it firstCounter. The variable name “my very long variable name” would become myVeryLongVariableName. (Names of that length are quite common in iOS programs.)
2. Variables should ideally have no underline in their names. For instance, my_ variable_name can and perhaps should be changed to myVariableName.
3. Variable names should contain only letters and numbers (no punctuation such as commas or dashes). This is a restriction in the Objective-C language and many other languages, but this helps keeping variable names tidy.
Let’s have a look at a few examples. There are a few primitive data types in Objective-C. A data type is a name that specifies the type of a variable. For instance, you can say that you have an integer variable of type NSInteger or an integer variable of type NSUIn teger, where the former is a signed variable and the latter is unsigned (note the “U” after “NS”) in the latter example).
Signed integers can contain negative numbers, whereas unsigned inte-gers cannot.
We can then define these variables in our source code like so:
NSInteger signedInteger = -123; /* Can take negative numbers */
NSUInteger unsignedInteger = 123; /* Cannot take negative numbers */
There are certain rules, as mentioned before, about naming your variables (for instance, the camelCase rule). However, other aspects of your variable naming convention de-pend entirely on your choice. In general, I advise that you always assume you are working for a big organization (whether it is your own company or somebody else’s company) and follow these rules:
1. Give descriptive names to your variables. Avoid names such as “i” or “x.” These names will never make any sense to anybody else but yourself and chances are that they won’t make sense to you either if you leave the project for some time and come back to it after a few months. The compiler doesn’t really care if the variable name is 50 letters long. If that makes your variable name more descriptive and you cannot do without it, then go for it.
3. Avoid giving names to your variables that are likely to lead to mistyping. For in-stance, it is much better to call your variable “fullName” rather than “__full______name.” It is best to avoid underlines in variables all together.
Discussion
Variables are placeholders for data that you want to hold in memory. For instance, if you want to delete 100 files from the disk and those files are named 1.png, 2.png, on to 100.png, it would be best to create a counter variable that starts from 1 and goes all the way to 100 and then use the content of that variable (the number) to delete the files. Programmers use variables to do arithmetic or simple operations, such as prefixing the last name of a person with their first name to create the resulting full name.
Every variable has to have a type. The type of a variable tells the compiler and the machine that runs that program, what type of variable that is and what sort of value it holds. For example, a variable that is an integer can hold the value 123 but cannot hold a value with decimal places such as 123.456. For the latter, we will need a floating-point variable. Integer and floating-floating-point here are the data types and, in Objective-C, are defined with NSInteger and float. Here are some of the commonly used data types in Objective-C:
NSInteger
Variables of this type can store signed (positive or negative) integer values. NSUInteger
Variables of this type can store unsigned (only positive or zero) integer values. float
Variables of this type can store floating-point values (values that have decimals in them, such as 1.23 or 73.12).
NSString
Variables of this type can store strings, such as “my string” or “Mrs Thomson.” NSArray
Variables of this type can store an array of objects. For instance, if you have read 10 files from the disk, you can store their data in an array. An array can contain more than one instance of the same value.
NSSet
1.8 Allocating and Making Use of Strings
Problem
You want to work with strings in Objective-C
Solution
Use NSString and NSMutableString classes.
Discussion
The NSString and NSMutableString classes allow you to store a string of characters in memory. The NSString class is immutable, meaning that once it is created, its contents cannot be modified. Mutable strings represented with the NSMutableString can be modified once they are created. We will see an example of both of these classes very soon.
Objective-C strings should be placed inside double quotes. The starting double-quote should be prefixed with an at sign (@). For instance, the sentence Hello, World, rep-resented as a string in Objective-C, is written like so:
@"Hello, World"
There are various ways of placing a string inside an instance of NSString or NSMutable String classes. Here is how:
NSString *simpleString = @"This is a simple string";
NSString *anotherString =
[NSString stringWithString:@"This is another simple string"];
NSString *oneMorestring =
[[NSString alloc] initWithString:@"One more!"];
NSMutableString *mutableOne =
[NSMutableString stringWithString:@"Mutable String"];
NSMutableString *anotherMutableOne =
[[NSMutableString alloc] initWithString:@"A retained one"];
NSMutableString *thirdMutableOne =
[NSMutableString stringWithString:simpleString];
NSString *userName = ...; if ([userName length] == 0){
/* The user didn't enter her name */ } else {
/* The user did in fact enter her name */ }
Another thing that you might want to know about strings is how you can convert a string to its equivalent integral value, i.e., converting a string to an integer, float, or double. You can use the integerValue, floatValue, and doubleValue methods of NSString (or any of its subclasses) to retrieve the integer, float and double values of a string, like so:
NSString *simpleString = @"123.456";
NSInteger integerOfString = [simpleString integerValue];
NSLog(@"integerOfString = %ld", (long)integerOfString);
CGFloat floatOfString = [simpleString floatValue];
NSLog(@"floatOfString = %f", floatOfString);
double doubleOfString = [simpleString doubleValue];
NSLog(@"doubleOfString = %f", doubleOfString); The output of this code is:
integerOfString = 123
floatOfString = 123.456001
doubleOfString = 123.456000
If you would like to work with C Strings, you can! You will use them like NSString without the leading at sign, like so:
char *cString = "This is a C String";
If you want to convert an NSString to a C String, you must use the UTF8String method of NSString, like so:
const char *cString = [@"Objective-C String" UTF8String];
NSLog(@"cString = %s", cString);
You can use the %s format specifier to print a C String out to the console. In contrast, use the %@ format specifier to print out NSString objects.
To convert a C String to NSString, you must use the stringWithUTF8String: method of the NSString class, as demonstrated here:
NSString *objectString = [NSString stringWithUTF8String:"C String"];
In order to find a string inside another string, you can use the rangeOfString: method of NSString. The return value of this method is of type NSRange:
typedef struct _NSRange { NSUInteger location; NSUInteger length; } NSRange;
If the string that you are looking for (needle) is found inside the target string (haystack), the location member of the NSRange structure will be set to the zero-based index of the first character of needle in haystack. If needle cannot be found in haystack, the location member gets set to NSNotFound. Let’s have a look at an example:
NSString *haystack = @"My Simple String";
NSString *needle = @"Simple";
NSRange range = [haystack rangeOfString:needle]; if (range.location == NSNotFound){
/* Could NOT find needle in haystack */ } else {
/* Found the needle in the haystack */ NSLog(@"Found %@ in %@ at location %lu", needle,
haystack,
(unsigned long)range.location); }
The search done by the rangeOfString: method of NSString class is case-sensitive.
In the Platform Dependencies section of the String Programming Guide published by Apple, it’s been explained why we need to typecast integral values with specifiers such as unsigned long. I highly recommend that you visit the aforementioned guide online.
If you want to have more control over how your search is done on a string, you can use the rangeOfString:options: method, where the options parameter is of type NSString CompareOptions.
enum {
NSCaseInsensitiveSearch = 1, NSLiteralSearch = 2, NSBackwardsSearch = 4, NSAnchoredSearch = 8, NSNumericSearch = 64,
};
typedef NSUInteger NSStringCompareOptions;
As you can see, the values in this enumeration are multiples of 2. That indicates that you can mix them with the logical OR operator (the | pipe character). Let’s say we want to search for a string inside another string but we are not concerned about the case-sensitivity of the search. All we want is to find a string inside another string, whether the case matches or not. Here is how we can do it:
NSString *haystack = @"My Simple String";
NSString *needle = @"simple";
NSRange range = [haystack rangeOfString:needle
options:NSCaseInsensitiveSearch]; if (range.location == NSNotFound){
/* Could NOT find needle in haystack */ } else {
/* Found the needle in the haystack */ NSLog(@"Found %@ in %@ at location %lu", needle,
haystack,
(unsigned long)range.location); }
You can see that we are using the rangeOfString:options: method of NSString with the NSCaseInsensitiveSearch value, which tells the runtime that we want the search to be performed without any regard to case-sensitivity.
Mutable strings are similar to immutable strings. However, they can be modified during runtime. Let’s see an example:
NSMutableString *mutableString =
[[NSMutableString alloc] initWithString:@"My MacBook"]; /* Add string to the end of this string */
[mutableString appendString:@" Pro"]; /* Remove the "My " string from the string */ [mutableString
replaceOccurrencesOfString:@"My "
withString:[NSString string] /* Empty string */ options:NSCaseInsensitiveSearch /* Case-insensitive */
range:NSMakeRange(0, [mutableString length])]; /* All to the end */
NSLog(@"mutableString = %@", mutableString);
When the mutableString string gets printed to the console, you will see this:
mutableString = MacBook Pro
1.9 Comparing Values in Objective-C with an if Statement
Problem
You want to compare two values in Objective-C.
Solution
Use if statements. Please refer to the Discussion section of this recipe for more infor-mation about different scenarios under which you might want to use if statements.
Discussion
We use if statements in our everyday conversations. For instance, you might say “If I get a hold of him, I’ll tell him...” or “I would put the computer to sleep if it didn’t take so long to come back up.” All these statements have a condition. If statements in Objective-C also have a condition. You can even make them more sophisticated, having your app do something if a condition is met and something else if the condition is not met. The basic form of an if statement is:
if (condition){
/* Your code to get executed if the condition is met */ }
As long as the condition is a value other than zero/nil/NULL, the code inside the if statement will run.
An if statement that has an “otherwise” clause in it is known as an if-else statement, and its format is:
if (condition){
/* Your code to get executed if the condition is met */ } else {
/* Code to get executed if condition is not met */ }
if (Coffee place A is open){
Get a Tall Latte from coffee place A} else if (Coffee place B is open){ Get a Cappuccino from coffee place B
} else {
Come back home and make tea
}
The condition for an if statement, regardless of whether it is a standalone if statement (like the first condition in the last example) or embedded inside an else statement, must resolve to a boolean value. A boolean value is either YES or NO. For instance, the following code will always get executed, regardless of which condition/device you run it on:
if (YES){
/* This code will get executed whenever the app gets to it */ } else {
/* The app will NEVER get here */ }
The reason behind this is that the condition for the if statement in this example is always met as long as the YES is the condition. To make things more exciting, you can do comparisons in the condition supplied to an if statement, like so:
NSInteger integer1 = 123;
Note that a double equal sign is used inside the conditional. A common error is to use a single equal sign, which is a totally different operator. The double equal sign does a comparison and returns a Boolean result, which is what you normally want in a conditional. A single equal sign changes the value of the left-hand variable and returns the value set, which the condition tries to interpret as a Boolean value. Although oc-casionally appropriate, it’s usually a serious error to use a single equal sign.
If you are comparing objects, it is best to use the isEqual: instance method of the NSObject class:
NSObject *object1 = [[NSObject alloc] init];
NSObject *object2 = object1; if ([object1 isEqual:object2]){ NSLog(@"Both objects are equal."); } else {