2013 Bible
Indianapolis, IN 46256
www.wiley.com
Copyright© 2013 by John Wiley & Sons, Inc., Indianapolis, Indiana Published simultaneously in Canada
ISBN: 978-1-118-48811-9 ISBN: 978-1-118-64715-8 (ebk) ISBN: 978-1-118-68009-4 (ebk) ISBN: 978-1-118-64708-9 (ebk)
Manufactured in the United States of America 10 9 8 7 6 5 4 3 2 1
No part of this publication may be reproduced, stored in a retrieval system or transmitted in any form or by any means, electronic, mechanical, photocopying, recording, scanning or otherwise, except as permitted under Sections 107 or 108 of the 1976 United States Copyright Act, without either the prior written permission of the Publisher, or authorization through payment of the appropriate per-copy fee to the Copyright Clearance Center, 222 Rosewood Drive, Danvers, MA 01923, (978) 750-8400, fax (978) 646-8600. Requests to the Publisher for permission should be addressed to the Permissions Department, John Wiley & Sons, Inc., 111 River Street, Hoboken, NJ 07030, (201) 748-6011, fax (201) 748-6008, or online at http://www.wiley.com/go/permissions.
LIMIT OF LIABILITY/DISCLAIMER OF WARRANTY: THE PUBLISHER AND THE AUTHOR MAKE NO REPRESENTATIONS OR WARRANTIES WITH RESPECT TO THE ACCURACY OR COMPLETENESS OF THE CONTENTS OF THIS WORK AND SPECIFICALLY DISCLAIM ALL WARRANTIES, INCLUDING WITHOUT LIMITATION WARRANTIES OF FITNESS FOR A PARTICULAR PURPOSE. NO WARRANTY MAY BE CREATED OR EXTENDED BY SALES OR PROMOTIONAL MATERIALS. THE ADVICE AND STRATEGIES CONTAINED HEREIN MAY NOT BE SUITABLE FOR EVERY SITUATION. THIS WORK IS SOLD WITH THE UNDERSTANDING THAT THE PUBLISHER IS NOT ENGAGED IN RENDERING LEGAL, ACCOUNTING, OR OTHER PROFESSIONAL SERVICES. IF PROFESSIONAL ASSISTANCE IS REQUIRED, THE SERVICES OF A COMPETENT PROFESSIONAL PERSON SHOULD BE SOUGHT. NEITHER THE PUBLISHER NOR THE AUTHOR SHALL BE LIABLE FOR DAMAGES ARISING HEREFROM. THE FACT THAT AN ORGANIZATION OR WEB SITE IS REFERRED TO IN THIS WORK AS A CITATION AND/OR A POTENTIAL SOURCE OF FURTHER INFORMATION DOES NOT MEAN THAT THE AUTHOR OR THE PUBLISHER ENDORSES THE INFORMATION THE ORGANIZATION OR WEBSITE MAY PROVIDE OR RECOMMENDATIONS IT MAY MAKE. FURTHER, READERS SHOULD BE AWARE THAT INTERNET WEBSITES LISTED IN THIS WORK MAY HAVE CHANGED OR DISAPPEARED BETWEEN WHEN THIS WORK WAS WRITTEN AND WHEN IT IS READ.
For general information on our other products and services please contact our Customer Care Department within the United States at (877) 762-2974, outside the United States at (317) 572-3993 or fax (317) 572-4002.
Wiley publishes in a variety of print and electronic formats and by print-on-demand. Some material included with standard print versions of this book may not be included in e-books or in print-on-demand. If this book refers to media such as a CD or DVD that is not included in the version you purchased, you may download this material at
http://booksupport.wiley.com. For more information about Wiley products, visit www.wiley.com.
Library of Congress Control Number: 2012924233
Acquisitions Editor
Mariann Barsolo
Development Editor
Susan Herman
Technical Editor
Glenna Shaw
Production Editor
Christine O’Connor
Copy Editor
Judy Flynn
Editorial Manager
Pete Gaughan
Production Manager
Tim Tate
Vice President and Executive Group Publisher
Richard Swadley
Vice President and Executive Publisher
Neil Edde
Project Coordinator, Cover
Katie Crocker
Proofreader
Josh Chase, Word One New York
Indexer
Nancy Guenther
Cover Image
© Aleksandar Velasevic / iStockphoto
Cover Designer
Preface ...
xxxv
Part I: Building Your Presentation . . . 1
Chapter 1: A First Look at PowerPoint ... 3
Chapter 2: Creating and Saving Presentation Files ...41
Chapter 3: Creating Slides and Text Boxes ... 71
Chapter 4: Working with Layouts, Themes, and Masters ... 99
Chapter 5: Formatting Text ... 141
Chapter 6: Formatting Paragraphs and Text Boxes ... 179
Chapter 7: Correcting and Improving Text ...207
Chapter 8: Creating and Formatting Tables ...229
Part II
:
Using Graphics and Multimedia Content . . . 255
Chapter 9: Drawing and Formatting Objects ...257
Chapter 10: Creating SmartArt Graphics ...313
Chapter 11: Working with Clip Art and Photos ...335
Chapter 12: Working with Charts ...377
Chapter 13: Incorporating Content from Other Programs ... 419
Chapter 14: Adding Sound Effects, Music, and Soundtracks ...435
Chapter 15: Incorporating Motion Video ...459
Chapter 16: Creating Animation Effects and Transitions ...485
Part III
:
Interfacing with Your Audience . . . 517
Chapter 17: Creating Support Materials ... 519
Chapter 18: Preparing for a Live Presentation ...543
Chapter 19: Designing User-Interactive or Self-Running Presentations ...577
Chapter 20: Preparing a Presentation for Mass Distribution ...609
Chapter 21: Sharing and Collaborating ...627
Chapter 22: Customizing PowerPoint ...647
Part IV: Project Labs . . . 673
Lab 1: Presenting Content without Bulleted Lists ...675
Appendix B: Essential SkyDrive Skills ...775
Preface . . . . xxxv
Part I: Building Your Presentation
1
Chapter 1: A First Look at PowerPoint . . . . 3
Who Uses PowerPoint and Why? ... 4
Sales ... 4
Marketing ... 5
Human Resources ... 6
Education and Training ... 7
Hotel and Restaurant Management ... 8
Clubs and Organizations ... 9
What’s New in PowerPoint 2013? ... 9
Cloud Integration ... 10
Online Pictures and Videos ... 13
Improved Presenter Tools ... 14
…And Other New Features ... 14
Learning Your Way around PowerPoint ... 15
Starting and Exiting PowerPoint ... 15
Understanding the Screen Elements ... 16
Working with the Ribbon ... 18
Working with Collapsible Tab Groups ... 19
Working with Backstage View ... 20
Working with Dialog Boxes and Panes ... 21
Changing the View ... 23
Normal and Outline Views ... 25
Slide Sorter View ... 27
Slide Show View and Reading Views ... 27
Notes Page View ... 29
Zooming In and Out ... 29
Enabling Optional Display Elements ... 31
Ruler ... 31
Guides ... 33
Ribbon ... 34
Color/Grayscale/Pure Black and White Views ... 35
Opening a New Display Window for the Same Presentation ... 35
Arranging Windows ... 36
Switching among Windows ... 36
Using the Help System ... 36
Summary ... 39
Chapter 2: Creating and Saving Presentation Files . . . 41
Starting a New Presentation ...41
Starting a Blank Presentation ...41
Starting a Presentation from a Template ... 43
Using a Personal Template ... 44
Basing a New Presentation on Existing Content ... 46
Saving Your Work ... 46
Understanding Save Locations ...47
Saving for the First Time... 48
Saving Subsequent Times ... 50
Changing Drives and Folders ...51
Saving in a Different Format ...51
Saving Slides as Graphics ... 56
Saving Slide Text Only ... 57
Specifying Save Options ... 58
Setting Passwords for File Access ... 60
Closing and Reopening Presentations ... 62
Closing a Presentation ... 62
Opening a Presentation ... 62
Opening a File from a Different Program... 65
Finding a Presentation File to Open ... 67
Setting File Properties ... 68
Summary ... 70
Chapter 3: Creating Slides and Text Boxes . . . . 71
Creating New Slides ... 71
Creating New Slides from Outline View ... 71
Creating a Slide from the Slides Pane ... 73
Creating a Slide from a Layout ...74
Copying Slides ...74
Inserting Content from External Sources ...76
Copying Slides from Other Presentations ...76
Inserting New Slides from an Outline ... 78
Tips for Better Outline Importing ... 78
Importing from Other Text-Based Formats ... 80
Opening a Word Document as a New Presentation ... 80
Importing Text from Web Pages ... 81
Managing Slides ... 82
Inserting Content into a Placeholder ... 88
Placeholders versus Manually Inserted Objects ... 88
Creating Text Boxes Manually ... 88
When Should You Use a Manual Text Box? ... 89
Creating a Manual Text Box ... 91
Working with Text Boxes ... 91
Selecting Text Boxes ... 91
Sizing a Text Box ... 92
Positioning a Text Box ... 94
Changing a Text Box’s AutoFit Behavior ... 95
Summary ... 97
Chapter 4: Working with Layouts, Themes, and Masters . . . . 99
Understanding Layouts and Themes ... 99
Themes versus Templates ...100
Where Themes Are Stored ...101
Themes, Layouts, and Slide Master View ...101
Changing a Slide’s Layout ...103
Applying a Theme ...105
Applying a Theme from the Gallery ...106
Applying a Theme from a Theme or Template File ...107
Applying a Theme Variant ...108
Managing Themes ...109
Creating a New Theme ...109
Renaming a Theme ... 110
Deleting a Theme... 111
Copying a Theme from Another Presentation ... 111
Changing Colors, Fonts, and Effects ...112
Understanding Color Placeholders ...112
Changing the Color Theme ...113
Understanding Font Placeholders ... 114
Changing the Font Theme ... 115
Changing the Effect Theme ... 115
Creating a Custom Color Theme ...118
Creating a Custom Font Theme ... 119
Sharing a Custom Color or Font Theme with Others ...120
Changing the Background ...121
Applying a Background Style ...122
Applying a Custom Background Fill ...123
Working with Background Graphics ...124
Displaying and Hiding Background Graphics ...125
Deleting Background Graphics ...126
Adding Your Own Background Graphics ...126
Working with Placeholders ...127
Formatting a Placeholder ...128
Moving, Deleting, or Restoring Placeholders ...128
Displaying the Date, Number, and Footer on Slides ...129
Date and Time ...130
Slide Number ...130
Footer ...131
Don’t Show on Title Slide ...131
Customizing and Creating Layouts...131
Understanding Content Placeholders ...132
Adding a Custom Placeholder ...132
Deleting and Restoring a Custom Placeholder ...133
Overriding the Slide Master Formatting for a Layout ...134
Creating a New Layout ...134
Renaming a Layout ...135
Duplicating and Deleting Layouts ...135
Copying Layouts Between Slide Masters ...136
Managing Slide Masters ...136
Creating and Deleting Slide Masters ...137
Renaming a Slide Master ...137
Using the Font Dialog Box ...146
Applying Text Effects ...160
Tips for Using the Follow Path Transformations ... 170
Copying Formatting with Format Painter ... 172
Inserting Symbols ...173
Inserting Math Equations ... 174
Inserting a Preset Equation ... 174
Creating a New Equation ... 174
Switching Between Professional and Linear Layout ...177
Formatting an Equation ...177
Summary ... 178
Chapter 6: Formatting Paragraphs and Text Boxes . . . 179
Formatting Bulleted Lists ... 179
Bullets and the Slide Master ...180
Using Bullet Presets ...181
Changing Bullet Size and Color ...182
Chapter 7: Correcting and Improving Text . . . . 207
Finding and Replacing Text ...207 Correcting Your Spelling and Grammar ...209 Checking an Individual Word ...210 Checking the Entire Presentation ...211 Setting Spelling and Grammar Options ...213 Working with Custom Dictionaries ...215 Specifying the Default Custom Dictionary ...215 Editing a Custom Dictionary ...216 Creating a New Custom Dictionary ...217 Setting the Editing Language ...218 Using AutoCorrect to Fix Common Problems ...219 Using AutoFormat As You Type ...222 Using the Research Tools ...223 Looking Up a Word in a Dictionary ...223 Finding Synonyms and Antonyms with the Thesaurus ...224 Translating Text into Another Language ...225 Using Research Sites ...226 Summary ...228
Chapter 8: Creating and Formatting Tables . . . . 229
Using Tables from Word ... 251 Integrating Excel Cells into PowerPoint ...252 Summary ...254
Part II
:
Using Graphics and Multimedia Content
255
Chapter 9: Drawing and Formatting Objects . . . . 257
Applying an Object Border ...288 Border Attributes ...288 Creating a Semitransparent Border ...289 Applying an Object Fill ...290 Solid Fills ...290 Copying a Fill Color with the Eyedropper Tool ...291 Gradient Fills ...292 Applying a One-Color Gradient Preset ...293 Applying a Custom Gradient ...294 3-D Rotation and 3-D Formatting ...305 Applying 3-D Rotation ...307 Applying 3-D Formatting ...309 Tips for Creating Common 3-D Objects ...310 Summary ... 311
Chapter 10: Creating SmartArt Graphics . . . . 313
Modifying a Hierarchy Graphic Structure ...324 Inserting and Deleting Shapes ...324 Changing a Person’s Level in the Organization ...326 Controlling Subordinate Layout Options ...326 Formatting a SmartArt Graphic ...328 Applying a SmartArt Style ...328 Changing SmartArt Colors ...328 Manually Applying Colors and Effects to Individual Shapes ...330 Manually Formatting SmartArt Text ...330 Making a Shape Larger or Smaller ...330 Resizing the Entire SmartArt Graphic Object ...330 Editing in 2-D ...332 Changing the Shapes Used ...332 Saving a SmartArt Graphic as a Picture...333 Summary ...333
Chapter 11: Working with Clip Art and Photos . . . . 335
Applying Artistic Effects ...367 Applying Picture Styles and Effects ...368 Compressing Images ...369 Reducing Resolution and Compressing Images in PowerPoint ...370 Reducing Resolution with a Third-Party Utility ...371 Exporting a Photo from PowerPoint to a Separate File ...371 Exporting a Graphic with Save As Picture ...372 Exporting a Graphic with the Clipboard ...372 Exporting Entire PowerPoint Slides as Graphics...372 Creating a Photo Album Layout ...373 Creating a New Photo Album ... 374 Modifying a Photo Album ...375 Summary ...375
Chapter 12: Working with Charts . . . . 377
Chapter 13: Incorporating Content from Other Programs . . . . 419
Working with External Content: An Overview ... 419 Copying Content from Other Programs ...421 Using the Clipboard ...421 Using the Drag-and-Drop Feature ...424 Inserting Graphics from a File ...424 Introducing OLE ...424 Linking and/or Embedding Part of a File ...426 Embedding an Entire File ...427 Embedding a New File ...428 Working with Linked and Embedded Objects ...430 Opening and Converting Embedded Objects ...431 Editing a Linked or Embedded Object ...431 Changing How Links Update ...432 Breaking a Link ...433 Changing the Referenced Location of a Link ...433 Exporting PowerPoint Objects to Other Programs ...434 Summary ...434
Chapter 14: Adding Sound Effects, Music, and Soundtracks . . . . 435
Using the Advanced Timeline to Fine-Tune Sound Events ...456 Summary ...458
Chapter 15: Incorporating Motion Video . . . . 459
Chapter 16: Creating Animation Effects and Transitions . . . . 485
Assigning Transitions to Slides ...486 Setting Transition Effects and Timings ...486 More about Transition Sounds ...489 Rehearsing and Recording Transition Timings ...490 Animating Slide Content ...491 Special Options for Text Animation ...497 Changing the Grouping Level ...497 Animating Each Individual Word or Letter ...499 Removing an Animation Effect ...499 Assigning Multiple Animation Effects to a Single Object ...499 Reordering Animation Effects ...500 Setting Animation Event Triggers ...500 Associating Sounds with Animations ...502 Making an Object Appear Differently after Animation ...503 Working with Motion Paths ...504 Using a Preset Motion Path ...504 Editing a Motion Path ...506 Drawing a Custom Motion Path ...508 Animating Parts of a Chart ...508 Controlling Animation Timing with the Advanced Timeline ... 512 Animation Tips ... 513 Layering Animated Objects ... 513 Summary ... 515
Part III
:
Interfacing with Your Audience
517
Chapter 17: Creating Support Materials . . . . 519
Creating Speaker Notes ...532 Typing Speaker Notes ...533 Changing the Notes Page Layout ...534 Printing Notes Pages ...535 Printing an Outline ...535 Exporting Handouts or Notes Pages to Word ...536 Changing the Margins in Word ...538 Change the Table Alignment ...538
Chapter 18: Preparing for a Live Presentation . . . . 543
Setting Copy Options ...569 Copying a Presentation to Other Locations ...570 Working with Audio-Visual Equipment ...570 Presenting with Two Screens ...571 Confi guring Display Hardware for Multi-Screen Viewing ...572 Setting Up a Presentation for Two Screens ...573 Presenting with Two Screens Using Presenter View ... 574 Summary ... 576
Chapter 19: Designing User-Interactive or Self-Running Presentations . . . . 577
Chapter 20: Preparing a Presentation for Mass Distribution . . . . 609
Working with File Properties ...609 Changing a File’s Properties ... 610 Removing Personal Information from a File ... 612 Checking for Compatibility and Usability ... 614 Assessing Prior-Version Compatibility... 614 Checking Accessibility ... 615 Compressing Media ... 617 Limiting User Access to a Presentation ... 618 Finalizing a Presentation ... 618 Encrypting a File with a Password ... 618 Restricting Access ... 619 Adding a Digital Signature ... 619 Creating a PDF or XPS Version of a Presentation ... 619 Converting a Presentation to a Video File ...621 Making a Movie DVD of a Presentation ...622 Presenting Online ...623 Working with the PowerPoint Viewer ...625 Downloading the PowerPoint Viewer ...625 Playing a Presentation with the PowerPoint Viewer ...625 Summary ...626
Chapter 21: Sharing and Collaborating . . . . 627
Chapter 22: Customizing PowerPoint . . . . 647
Setting Program Defaults ...647 Confi guring the Trust Center ...654 Setting Up Trusted Locations ...654 Working with Trusted Publishers ...656 Trusted Documents and Protected View Settings ...656 Add-Ins ...657 Displaying or Hiding Ribbon Tabs ...660 Creating or Deleting a Tab or a Custom Group ...661 Creating a Custom Tab ...661 Importing and Exporting Customization Settings ...664 Exporting Customization ...665 Importing Customization ...665 Customizing the Quick Access Toolbar ...665 Adding Common Commands ...665 Adding Already-Available Commands to the QAT ...666 Removing Commands from the QAT ...666 Adding Other Commands to the QAT ...666 Managing Add-Ins ...667
Lab 1: Presenting Content without Bulleted Lists . . . . 675
Lab 2: Adding Sound and Movement to a Presentation . . . . 693
Lab 2A: Fading Text and Graphics In and Out ...693 Lab 2B: Replacing One Picture with Another ...701 Lab 2C: Zooming In on a Picture ...704 Lab 2D: More Animation Practice ...705 Lab 2E: Using Transitions and Soundtracks ...709
Lab 3: Creating a Menu-Based Navigation System . . . . 713
Lab 3A: Making Room for a Navigation Bar ...713 Lab 3B: Creating a Navigation Bar ...722 Lab 3C: Creating a Graphical Navigation System ...726
Lab 4: Creating a Classroom Game . . . . 733
Lab 4A: Making the Game Board ...733 Lab 4B: Creating the Question Slides ...740 Lab 4C: Creating the Answer Slides ... 745 Lab 4D: Linking Up the Game Board... 749
Appendix A: What Makes a Great Presentation? . . . . 753
Appendix B: Essential SkyDrive Skills . . . . 775
Understanding Your SkyDrive Interface Options ...776 Signing into the SkyDrive Web Interface ...776 Installing and Using SkyDrive for Windows ...776 Managing SkyDrive Files Within PowerPoint ...778 Using the Windows 8 SkyDrive App ...778 Managing Files on Your SkyDrive ...779 Uploading a File ...779 Downloading a File from Your SkyDrive ...780 Renaming a File or Folder ...781 Moving or Copying a File or Folder ...781 Deleting a File or Folder ...783 Sharing SkyDrive Files ...783
S
ome books zoom through a software program so fast it makes your head spin. You’ll come out dizzy but basically able to cobble together some sort of result, even if it doesn’t look quite right. This is not one of those books.PowerPoint® 2013Bible is probably the only PowerPoint book you will ever need. In fact, it might even be the only book on giving presentations you’ll ever need. No, seriously! I mean it.
As you probably guessed by the heft of the book, this is not a quick-fi x shortcut to PowerPoint expertise. Instead, it’s a thoughtful, thorough educational tool that can be your personal trainer now and your reference text for years to come. That’s because this book covers PowerPoint from “cradle to grave.” No matter what your current expertise level with PowerPoint, this book brings you up to the level of the most experienced and talented PowerPoint users in your offi ce. You might even be able to teach those old pros a thing or two!
When you fi nish this book, you will not only be able to build a presentation with PowerPoint, you’ll also be able to explain why you made the choices you did, and you’ll deliver that presentation smoothly and with confi dence.
If you are planning a presentation for remote delivery (for example, posting it on a website or setting up a kiosk at a trade show), you’ll fi nd lots of help for these situations too. In fact, an entire section of the book is devoted to various nontraditional presentation meth-ods, such as live Internet or network delivery, trade show booths, and interactive presenta-tion distribupresenta-tion on a disk or CD.
How This Book Is Organized
This book is organized into parts, which are groups of chapters that deal with a common general theme. Here’s what you’ll fi nd:
■ Part I: Building Your Presentation. In this part, you start building a robust, content-rich presentation by choosing a template, entering your text, and applying text formatting.
art, diagrams, photos, charts, sound effects, movies, and music. You’ll also learn here how to create movement with animation effects and transitions.
■ Part III: Interfacing with Your Audience. This part helps you prepare your pre-sentation for various delivery scenarios, including printing handouts for a live audience, running a live show on a computer screen, designing visual aids for user-interactive or self-running presentations, and sharing and collaborating with others.
■ Part IV: Project Labs. This part provides four step-by-step walk-throughs that demonstrate how to create some of the most powerful and sought-after PowerPoint effects and projects, including creating navigation systems, classroom games, complex animations, and graphically presented text. Please visit www.wiley.com /go/powerpoint2013bible to download the fi les you need for the project labs.
Special Features
Every chapter in this book opens with a quick look at what’s in the chapter and closes with a summary. Along the way, you also fi nd icons in the margins to draw your attention to specifi c topics and items of interest.
Here’s what the icons mean:
These icons point you to chapters or other sources for more information on the topic under discussion.
Notes provide extra information about a topic, perhaps some technical tidbit or background explanation.
Tips offer ideas for the advanced user who wants to get the most out of PowerPoint.
Cautions point out how to avoid the pitfalls that beginners commonly encounter.
Building Your Presentation
IN THIS PART
Chapter 1
A First Look at PowerPoint
Chapter 2
Creating and Saving Presentation Files
Chapter 3
Creating Slides and Text Boxes
Chapter 4
Working with Layouts, Themes, and Masters
Chapter 5
Formatting Text
Chapter 6
Formatting Paragraphs and Text Boxes
Chapter 7
Correcting and Improving Text
Chapter 8
1
A First Look at PowerPoint
IN THIS CHAPTER
Who uses PowerPoint and why?
What’s new in PowerPoint 2013? Learning your way around PowerPoint
Changing the view
Zooming in and out
Displaying and hiding screen elements Working with window controls
Using the help system and getting updates
P
owerPoint 2013 is a member of the Microsoft Offi ce 2013 suite of programs. A suite is a group of programs designed by a single manufacturer to work well together. Like its siblings — Word (the word processor), Excel (the spreadsheet), Outlook (the personal organizer and e-mail manager), and Access (the database) — PowerPoint has a well-defi ned role. It creates materials for presentations.A presentation is any kind of interaction between a speaker and audience, but it usually involves one or more of the following: computer-displayed slides, noncomputerized visual aids (such as transparencies or 35mm slides), hard-copy handouts, and/or speaker’s notes. PowerPoint can create all of these types of visual aids, plus many other types that you’ll learn about as you go along.
Because PowerPoint is so tightly integrated with the other Microsoft Offi ce 2013 components, you can easily share information among them. For example, if you have created a graph in Excel, you can use it on a PowerPoint slide. It goes the other way too. You can, for example, take the outline from your PowerPoint presentation and copy it into Word, where you can dress it up with Word’s powerful document formatting commands. Virtually any piece of data in any Offi ce program can be linked to any other Offi ce program, so you never have to worry about your data being in the wrong format. PowerPoint also accepts data from almost any other Windows-based application and can import a variety of graphics, audio, and video formats.
Who Uses PowerPoint and Why?
PowerPoint is a popular tool for people who give presentations as part of their jobs and also for their support staff. With PowerPoint, you can create visual aids that help get the message across to an audience, whatever that message may be and whatever the format in which it is presented. Although the traditional kind of presentation is a live speech presented at a podium, advances in technology have made it possible to give several other kinds of presentations, and PowerPoint has kept pace nicely. The following list outlines the most common PowerPoint formats:
■ Podium. For live presentations, PowerPoint helps the lecturer emphasize key points through the use of computer-based shows (from a notebook or tablet PC, for exam-ple) or overhead transparencies.
■ Kiosk shows. These are self-running presentations that provide information in an unattended location. You have probably seen such presentations listing meeting times and rooms in hotel lobbies and as sales presentations at trade show booths. ■ CDs and DVDs. You can package a PowerPoint presentation on a CD or DVD and
distribute it with a press release, a marketing push, or a direct mail campaign. The presentation can be in PowerPoint format, or it can be converted to some other for-mat, such as PDF or a video clip.
■ Internet formats. You can use PowerPoint to create a show that you can present live over a network or the Internet, while each participant watches from their own computer. You can even store a self-running or interactive presentation on a web-site in a variety of formats and make it available for the public to download and run on a PC.
When you start your fi rst PowerPoint presentation, you may not be sure which deliv-ery method you will use. However, it’s best to decide the presentation format before you invest too much work in your materials because the audience’s needs are different for each medium.
Need help structuring a presentation or planning for its delivery? See Appendix A, “What Makes a Great Presentation?”
Most people associate PowerPoint with sales presentations, but PowerPoint is useful for people in many other lines of work as well. The following sections present a sampling of how real people just like you are using PowerPoint in their daily jobs.
Sales
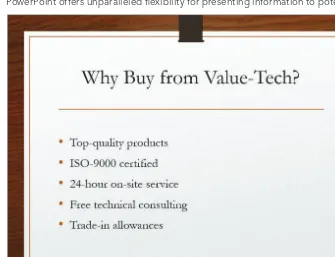
1
FIGURE 1.1
PowerPoint offers unparalleled fl exibility for presenting information to potential customers.
These are just some of the sales tools you can create with PowerPoint:
■ Live presentations in front of clients with the salesperson present and running the show. This is the traditional kind of sales pitch that most people are familiar with. ■ Self-running presentations that fl ip through the slides at specifi ed intervals so that
passersby can read them or ignore them as they wish. These types of presentations are great for grabbing people’s attention at trade show booths.
■ User-interactive product information demos distributed on CD/DVD that potential customers can view at their leisure on their own PCs. This method is very inexpen-sive because you can create a single presentation and distribute it by mail to mul-tiple customers.
See Chapter 19, “Designing User-Interactive or Self-Running Presentations,” to learn about controlling a live presentation. You create a self-running or user-interactive presentation in Chapter 20, “Preparing a Presentation for Mass Distribution.”
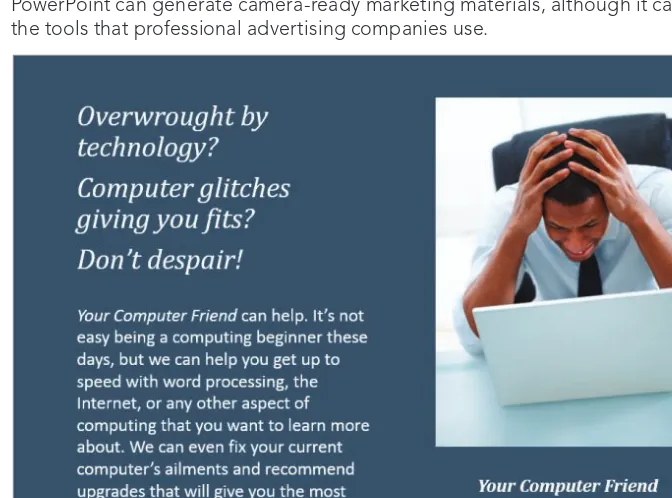
Marketing
to a particular company or individual. Marketing representatives are often called upon to write advertising copy, generate camera-ready layouts for print advertisements, design marketing fl yers and shelf displays, and produce other creative selling materials.
PowerPoint is not a drawing program per se, and it can’t substitute for one except in a crude way. However, by combining the Offi ce 2013 clip art collection and drawing tools with some well-chosen fonts and borders, a marketing person can come up with some very usable designs in PowerPoint. Figure 1.2 shows an example. You learn about clip art in Chapter 11, “Working with Clip Art and Photos.” You can also integrate video clips in PowerPoint presen-tations that can tell the story of your product; see Chapter 15 for more information.
FIGURE 1.2
PowerPoint can generate camera-ready marketing materials, although it can’t substitute for the tools that professional advertising companies use.
Human Resources
1
One of the most helpful features in PowerPoint for the human resources professional isthe SmartArt tool. With it, you can easily diagram the structure of the company and make changes whenever necessary with a few mouse clicks. Figure 1.3 shows an organiza-tion chart on a PowerPoint slide. You can also create a variety of other diagram types. Organization charts and other SmartArt diagrams are covered in Chapter 10, “Creating SmartArt Diagrams.”
FIGURE 1.3
Microsoft’s SmartArt feature lets you easily create organizational diagrams from within PowerPoint.
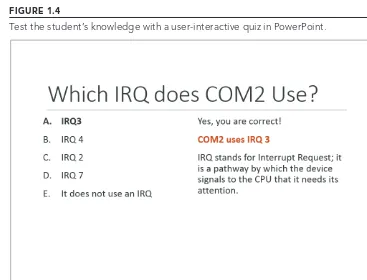
Education and Training
Most training courses include a lecture section in which the instructor outlines the general procedures and policies. This part of the training is usually followed up with individual, hands-on instruction. PowerPoint can’t help much with the latter, but it can help make the lecture portion of the class go smoothly.
PowerPoint’s interactive controls even let you create quizzes that each student can take on-screen to gauge their progress. Depending on the button the student clicks, you can set up the quiz to display a “Yes, you are correct!“ or “Sorry, try again“ slide. See Figure 1.4. For details about this procedure, see Chapter 19 and Lab 4 in the Project Labs section at the end of the book.
FIGURE 1.4
Test the student’s knowledge with a user-interactive quiz in PowerPoint.
Hotel and Restaurant Management
Service organizations such as hotels and restaurants often need to inform their customers of various facts but need to do so unobtrusively so that the information will not be obvious except to those looking for it. For example, a convention center hotel might provide a list of the meetings taking place in its meeting rooms, or a restaurant might show pictures of the day’s specials on a video screen in the waiting area.
In such unattended situations, a self-running (kiosk) presentation works best. Typically the computer box and keyboard are hidden from passersby, and the monitor displays the information.
1
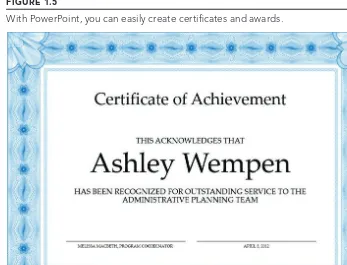
Clubs and Organizations
Many nonprofi t clubs and organizations, such as churches and youth centers, operate much the same way as for-profi t businesses and need sales, marketing, and informational materi-als. But clubs and organizations often have special needs too, such as the need to recognize volunteers for a job well done. Microsoft provides a certifi cate template for PowerPoint that’s ideal for this purpose. Figure 1.5 shows a certifi cate generated in PowerPoint. Another popular use for PowerPoint is to project the lyrics of a song on a big screen for sing-alongs at churches and meetings.
FIGURE 1.5
With PowerPoint, you can easily create certifi cates and awards.
What’s New in PowerPoint 2013?
PowerPoint 2013 is very much like PowerPoint 2010 in its basic functionality. It uses a tabbed Ribbon across the top, rather than a traditional menu system, and employs dialog boxes and a Quick Access Toolbar in the same ways that 2010 did.
Cloud Integration
You can purchase Offi ce 2013 (or the standalone PowerPoint 2013) either as a traditional boxed application or as a cloud-based subscription called Offi ce 365. There are several ben-efi ts to the cloud version, including lower price, automatic updates, the ability to use Offi ce on multiple PCs without paying extra (with some editions), and the ability to access your Offi ce applications and fi les from multiple locations. The cloud-based version is marked primarily to businesses, but versions are also available for university students and home users too. See http://www.microsoft.com/en-us/office365/small-business-home.aspx for more information.
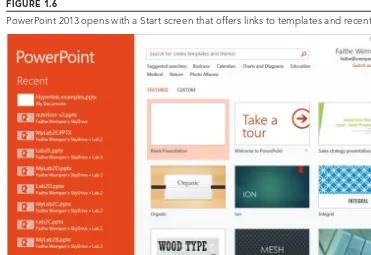
Start Screen
In earlier PowerPoint versions, you started up in a blank new presentation, which some beginners found intimidating. PowerPoint 2013 opens with a Start screen (Figure 1.6), pro-viding easy access to both local and online templates as well as recently used fi les.
FIGURE 1.6
1
Improved Shape Merging
If you have ever tried to create anything with the drawing tools in an Offi ce app, you know that it can be frustrating because the shapes provided don’t always match the shapes you want. Offi ce 2013’s drawing tools contain several new commands and capabilities that make the process of creating just the right shapes much easier. You can fi nd the Merge Shapes button on the Insert Shapes section of the Drawing Tools Format tab when two or more shapes are selected. Clicking Merge Shapes opens a menu of merge types.
These new commands are all focused around merging two or more shapes into a single shape, using actions like Union, Combine, Intersect, Fragment, and Subtract. For example, suppose you want a shape that consists of a rounded rectangle with two arrows emerging from it. You could start with the three separate shapes shown at the left in Figure 1.7 and then use the Union command to join them into a single shape, as shown on the right.
FIGURE 1.7
Drawn shapes, before and after merging.
You will learn a lot more about these in Chapter 9, “Drawing and Formatting Objects.”
Improved Smart Guides
PowerPoint 2013 makes it easier than ever to precisely align and evenly space objects with one another. When you drag an object to position it, dotted guidelines called Smart Guides appear, showing its relationship to other objects on the slide and allowing you to eas-ily snap the object into precise alignment and spacing. Earlier versions of PowerPoint had alignment commands, but you had to specifi cally issue them; Smart Guides present them-selves automatically whenever they might be needed. Figure 1.8 shows an example. Smart Guides are covered in Chapter 9.
FIGURE 1.8
Alignment guides make it easier to align objects on slides.
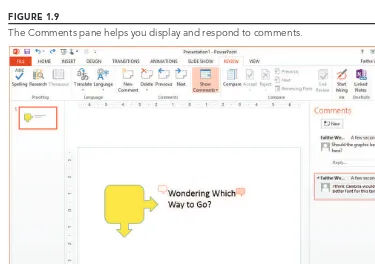
Improved Comments
PowerPoint has included a Comments feature in the past, but it hasn’t been very robust. In PowerPoint 2013, there is a Comments pane that you can use in Normal view to display and manage comments. See Figure 1.9.
FIGURE 1.9
1
SkyDrive Integration
SkyDrive is Microsoft’s online fi le storage service. Each user gets a certain amount of free space there (usually 2GB), and you can purchase additional space.
In Offi ce 2013 apps, the logged-in user’s SkyDrive is the default save location, making it as easy to save fi les to your SkyDrive as it is to save to any local folder on your hard disk. Files saved to SkyDrive are private and secure, and you can access them from any Internet-connected computing device, no matter where you are. For more information about SkyDrive, see Appendix B.
Online Pictures and Videos
PowerPoint 2013, like other Offi ce 2013 applications, includes integration with online pic-ture and video sharing services such as YouTube and Flickr, enabling you to easily access your own and other people’s online content for use in your presentations.
Microsoft’s clip art collection is now accessed entirely online from Offi ce.com. You can also easily import pictures from your own SkyDrive and from a Bing image search. To help you avoid copyright problems, by default the Bing image search returns only results that are free to use under Creative Commons (a public user license).
For videos, you can embed video code from any website that provides it. (PowerPoint 2010 also allowed this.) But what’s new now is that you can search for videos with Bing video search and select and embed clips directly from YouTube. See Figure 1.10.
FIGURE 1.10
Improved Presenter Tools
PowerPoint 2013 improves on-screen presentation capabilities in several ways. First, the tools available to you in Slide Show view are now more robust, including the ability to zoom in on a particular area of a slide and to select a slide to jump to from an array of thumbnail images.
Presenter view can now be viewed on one monitor, allowing you to rehearse without con-necting anything else. Presenter view has also been been enhanced, with extra display set-tings and easier-to-use slide controls. See Figure 1.11.
FIGURE 1.11
Presenter view is now easier to use.
…And Other New Features
Besides the features I’ve just outlined, there are plenty more nice surprises awaiting upgraders:
1
■ Touch controls. All of the Offi ce 2013 apps, including PowerPoint, are more easilycontrolled with touch screens than their predecessors. You can use PowerPoint 2013 in the traditional way, with a mouse, or by pointing, tapping, swiping, and drag-ging on a touch screen.
■ Eyedropper tool. Some graphics programs enable you to use an Eyedropper tool to pick up a color from one object and copy that color to another object. Now you can do that in Offi ce applications too. For example, you could pick up a color from a photograph on a slide and apply it to the text on the slide so that everything matches. This is great for matching colors for themes. You’ll fi nd the Eyedropper tool on the Shape Fill and Shape Outline buttons’ menus on the Drawing Tools Format tab when working with shapes.
■ MP4 support. PowerPoint 2010 was revolutionary in that it allowed users to create their own video versions of their presentations. However, only one video format was supported: AVI. PowerPoint 2013 adds MP4 support, making the resulting vid-eos much more widely shareable because MP4 is one of the most common video for-mats for online use.
■ Welcome Back. When you reopen a presentation that you were previously working on, the last slide you were editing automatically reappears.
Learning Your Way around PowerPoint
Now that you have seen some of the potential uses for PowerPoint and toured the new fea-tures, let’s get started using the program.
PowerPoint is one of the easiest and most powerful presentation programs available. You can knock out a passable presentation in a shockingly short time by skimming through the chapters in Part I and Part II of the book, or you can spend some time with PowerPoint’s advanced features to make a complex presentation that looks, reads, and works exactly the way you want.
Starting and Exiting PowerPoint
You can start PowerPoint just as you would any other program in Windows: from the Start screen (in Windows 8) or the Start menu (in Windows 7). Offi ce 2013 runs only under those two operating systems.
In Windows 8:
1. Press the Windows key, , on the keyboard to display the Start screen, or on a touch screen, swipe in from the right and tap Start. The Start screen appears. 2. Scroll to the right if needed to find the PowerPoint 2013 tile, and click or tap
In Windows 7:
1. Click the Start button. The Start menu opens. 2. Click All Programs.
3. Click Microsoft Office.
4. Click Microsoft PowerPoint 2013. The program starts.
When PowerPoint 2013 opens, a Start screen appears, as you saw back in Figure 1.6, offering help for opening existing fi les or starting new ones. If you want to bypass the Start screen and jump immediately to a new blank presentation (as in earlier versions of PowerPoint), just press the Esc key.
If you want quick access to PowerPoint from the Windows 8 Desktop, add a shortcut to PowerPoint to the taskbar. To do so, right-click the PowerPoint 2013 tile on the Start screen and click Pin to Taskbar. From then on, you can start PowerPoint by clicking the PowerPoint 2013 icon on the left end of the taskbar.
When you are ready to leave PowerPoint, click the Close (X) button in the top-right corner of the PowerPoint window. If you have any unsaved work, PowerPoint asks if you want to save your changes. Because you have just been playing around in this chapter, you prob-ably do not have anything to save yet. (If you do have something to save, see Chapter 2, “Creating and Saving Presentation Files,” to learn more about saving.) Click No to decline to save your changes, and you’re outta there.
Understanding the Screen Elements
PowerPoint’s interface is typical of any Windows desktop program in many ways, but it has some special Offi ce-specifi c features as well. The PowerPoint window contains these ele-ments, as shown in Figure 1.12:
■ Title bar. Identifi es the program running (PowerPoint) and the name of the active presentation. If the window is not maximized, you can move the window by drag-ging the title bar.
■ Ribbon. Functions as a combination of menu bar and toolbar, offering tabbed “pages“ of buttons, lists, and commands. The next section describes it in more detail.
■ File tab. Opens the File menu (Backstage view), from which you can open, save, print, and start new presentations.
■ Quick Access Toolbar. Contains shortcuts for some of the most common commands. You can add your own favorites here as well.
1
■ Maximize/Restore button. If the window is maximized (full screen), it changes towindowed (not full screen). If the window is not maximized, clicking here maxi-mizes it.
■ Close button. Closes PowerPoint. You may be prompted to save your changes, if you made any.
■ Work area. Where active PowerPoint slide(s) appear. Figure 1.10 shows it in Normal view, but other views are available that make the work area appear differently.
See the section “Changing the View“later in this chapter for details.
■ Status bar. Reports information about the presentation and provides shortcuts for changing the view and the zoom and accessing the Notes and Comments panes.
FIGURE 1.12
The PowerPoint window is a combination of usual Windows features and unique Offi ce elements.
Quick Access toolbar
Thumbnails pane Slide pane (work area) Title bar
Close Minimize
Maximize/Restore
Because this isn’t a Windows book, Windows controls are not covered in detail here. However, if you’re interested in learning more about Windows-based programs in general, pick up my book Windows8eLearningKitForDummies
(Wiley, 2013). A Windows 7 version is also available.
Working with the Ribbon
PowerPoint 2013’s user interface is based on the Ribbon, which is a bar across the top of the window that contains tabbed pages of commands and buttons. Rather than opening a menu and selecting a command, you click a tab and then click a button or open a list on that tab.
Here are some important terms you need to know when working with tabs:
■ Ribbon. The whole bar, including all of the tabs.
■ File tab. A rectangular orange button that opens Backstage view (also called the File menu), from which you can choose to start a new presentation and save, print, and perform other fi le-related activities. See Figure 1.12 for this button’s location. ■ Quick Access Toolbar. A small toolbar adjacent to the Offi ce button from which you
can select commonly used commands.
To add a command to the Quick Access Toolbar, right-click the icon for it and choose Add to Quick Access Toolbar. To remove the command from there, right-click its icon and choose Remove from Quick Access Toolbar.
■ Tab. A tabbed page of the Ribbon. Figure 1.13 shows the Home tab, for example.
FIGURE 1.13
The Ribbon is PowerPoint 2013’s primary user interface.
Tabs
1
■ Contextual tab. A tab that appears only when certain content is selected, such asa graphic or a chart. The context name appears above the tab name. In Figure 1.13, Drawing Tools is the context name for the Format tab.
■ Group. A section of a tab. The Home tab shown in Figure 1.13 has the following groups: Clipboard, Slides, Font, Paragraph, Drawing, and Editing.
■ Dialog box launcher. A small icon that is in the bottom-right corner of a group and from which you can open a dialog box related to that group.
To fi nd out what a toolbar button does, point the mouse at it. A ScreenTip pops up explaining it.
Working with Collapsible Tab Groups
Within a tab, groups can expand or collapse depending on the width of the PowerPoint window. When the window is large enough, everything within each group is fully expanded so that each item has its own button. When the window is smaller, groups start collapsing so that all groups remain visible. At fi rst, large buttons get smaller and stack vertically; if that’s not enough, then groups collapse into single large buttons with drop-down lists from which you can select the individual commands. Figure 1.14 shows the same tab in three different widths for comparison.
FIGURE 1.14
Because the Ribbon collapses, the exact steps for performing certain procedures depend on the active PowerPoint window’s width. A small window may require an extra step of opening a button’s menu to select a command, for example. For a large window, each command appears directly on the tab. This book assumes a PowerPoint app win-dow size of 1024 x 768 pixels; if you run PowerPoint at a smaller resolution, you may occasionally have an extra step to access a command.
Working with Backstage View
When you open Backstage view by clicking the File tab, a multilayered menu system appears. Many of the commands along the left side of the screen are categories that open submenus when you click them. For example, in Figure 1.15, the Export command has been selected, revealing additional choices.
FIGURE 1.15
Backstage view is a hierarchical menu system; fi rst select a category on the left, then a com-mand in the middle, and then an option on the right.
The top-level categories and commands in Backstage View are as follows:
1
■ New. Displays a list of templates available for starting a new presentation.■ Open. Displays the Open dialog box, from which you can select a fi le to open. ■ Save. Saves the current presentation.
■ Save As. Saves the current presentation and prompts you for fi lename and location information, even if the fi le has been previously saved.
■ Print. Provides access to printing options, including setting a print range, choos-ing a printer, and specifychoos-ing settchoos-ings like color and collation.
■ Share. Offers access to features for distributing the presentation via e-mail or fax, sharing it on your SkyDrive, presenting it online, or publishing slides to a SharePoint server.
■ Export: Provides commands for creating PDF and XPS fi les, creating videos, export-ing handouts to Word, packagexport-ing a presentation for CD, and changexport-ing the fi le type. ■ Close. Closes the active presentation.
■ Account. Enables you to see the user account information that you are logged in with and manage your connected services, such as your SkyDrive. You can also check for updates from here and view software version information.
■ Options. Opens a dialog box where you can customize the interface, also described in Chapter 22, “Customizing PowerPoint.”
PowerPoint 2010 had an Exit command on the File menu, but PowerPoint 2013 does not. You can exit PowerPoint by clicking the Close (X) button in the upper-right corner of the app window.
Working with Dialog Boxes and Panes
PowerPoint sometimes uses dialog boxes to prompt you for more information. When you issue a command that can have many possible variations, a dialog box appears so you can specify the particulars.
Figure 1.16 illustrates some of the controls you may encounter in PowerPoint’s dialog boxes:
■ Check box. These are individual on/off switches for particular features. Click to toggle them on or off.
■ Increment buttons. Placed next to a text box, these buttons allow you to incre-ment the number in the box up or down by one digit per click. For example, the Size text box has increment buttons in Figure 1.16.
■ Command button. Click one of these big rectangular buttons to jump to a different dialog box. OK and Cancel are also command buttons; OK accepts your changes and Cancel rejects them.
■ Tabs. Click a tab along the top of the dialog box to see a different page of options. In Figure 1.16, there are two tabs: Font and Character Spacing.
Dialog boxes that open or save fi les have some special controls and icons all their own, but you learn about those in more detail in Chapter 2, where you also learn to open and save your fi les.
FIGURE 1.16
The Font dialog box illustrates several types of controls.
Tab
Drop-down list
Increment buttons
Command button Checkbox
Offi ce 2013 has moved away from using dialog boxes for some features; you may also encounter panes that ask for more information when you issue a command. A pane is a rectangular area along the left or right side of the screen, as shown in Figure 1.17. Notice that the Format Shape pane in Figure 1.17 has two tabs: Shape Options and Text Options. Click one or the other of those terms near the top of the pane to switch among the differ-ent pages of options. Beneath the selected tab are several icons; each icon shows a differdiffer-ent page of options as well.
Some of the additional controls are shown in Figure 1.17:
■ Option buttons. Option buttons are round, and operate in mutually exclusive groups. In Figure 1.17, under the Line heading, there are three Option buttons: No line, Solid line, and Gradient line. Option buttons are sometimes called radio buttons.
1
FIGURE 1.17
Some features use panes instead of dialog boxes.
Option buttons
Slider
Changing the View
A view is a way of displaying your presentation on-screen. PowerPoint comes with several views because at different times during the creation process, it is helpful to look at the presentation in different ways. For example, when you add a graphic to a slide, you need to work closely with that slide, but when you rearrange the slide order, you need to see the presentation as a whole.
PowerPoint offers the following presentation views:
■ Normal. A combination of several resizable panes so you can see the presentation in multiple ways at once. Normal is the default view.
■ Outline. A variant of Normal view in which slide content appears as a text outline in the left pane rather than as graphical slide thumbnails. This view is available only from the View tab.
■ Slide Sorter. A light-table-type overhead view of all the slides in your presenta-tion, laid out in sections and rows, suitable for big-picture rearranging.
is available in several other places, including in the status bar and in the Quick Access Toolbar.
■ Reading. Similar to Slide Show view, except it’s windowed and the status bar remains in view. You can use Reading view to check your work as if you were show-ing the slide show but still retain access to certain commands.
■ Notes Page. A view with the slide at the top of the page and a text box below it for typed notes. (You can print these notes pages to use during your speech.) This view is available only from the View tab.
This chapter covers only the presentation views (that is, regular views in which you can see the individ-ual content of each slide). The master views are discussed in Chapter 4; master views enable you to make global changes to many slides at once.
There are two ways to change a view: Click a button on the View tab, or click one of the view buttons at the right end of the status bar at the bottom of the screen, shown in Figure 1.18. Not every view is available in both places.
FIGURE 1.18
Select a view from the View tab or from the viewing controls in the bottom-right corner of the screen.
1
When you save, close, and reopen a fi le, PowerPoint opens it in the view in which you left the fi le. To have the fi les always open in a particular view, choose File ➪ Options ➪ Advanced, and in the Display section, click the drop-down arrow on the Open All Documents Using This View list and select the desired view. The options on this list include some custom versions of Normal view that have certain panes turned off. For example, you can open all documents in Normal – Slide Only to always start in Normal view with just the main editing pane open.
Normal and Outline Views
Normal view, shown in Figure 1.19, is a very fl exible view that contains a little bit of every-thing. In the center is the Slide pane, where the active slide appears, and to its left is the Thumbnails pane, containing a set of thumbnail images that represent the presentation’s slides.
FIGURE 1.19
Normal view, the default, shows slide thumbnails at the left and an editing window at the right.
Click here to toggle Notes pane on/off
Slide pane Notes pane
(optional) Thumbnails
Outline view (shown in Figure 1.20) is identical to Normal view except instead of the slide thumbnails on the left, you see a text outline.
FIGURE 1.20
Outline view shows a text outline at the left and an editing window at the right.
Outline pane
Slide pane
An optional Notes pane is available at the bottom of the window in Normal or Outline view; click Notes on the status bar to display or hide it. An optional Comments pane appears and disappears on the right when you click Comments on the status bar. (Normal view only, as shown in Figure 1.19).
1
The left pane is useful because it lets you jump quickly to a specifi c slide by clicking itsthumbnail (Normal view) or some of its text content (Outline view).
Slide Sorter View
If you have ever worked with hard copies of slides, such as 35mm slides, you know that it can be helpful to lay the slides out on a big table and plan the order in which to show them. You rearrange them, moving this one here, that one there, until the order is perfect. You might even start a pile of backups that you will not show in the main presentation but will hold back in case someone asks a pertinent question. That’s exactly what you can do with Slide Sorter view, as shown in Figure 1.21. It lays out the slides in miniature, so you can see the big picture. You can drag the slides around and place them in the perfect order. You can also return to Normal view to work on a slide by double-clicking the slide.
FIGURE 1.21
Use the Slide Sorter view for a bird’s-eye view of the presentation.
Slide Show View and Reading Views
in Figure 1.22. You can move from slide to slide by pressing the Page Up and Page Down keys or by using one of the other movement methods available (covered in Chapter 19).
The default slide dimensions in PowerPoint 2013 are set for a wide-screen monitor (16:9 aspect ratio). If you are using a regular monitor (4:3) but showing wide-screen slides, black bars fi ll in the extra space at the top and bottom. You can correct this problem by changing the slide size on the Design tab. When you change the slide size, PowerPoint prompts you to specify how to adjust the existing content to fi t the new format.
FIGURE 1.22
Slide Show view lets you practice the presentation in real life.
When you move your mouse in Slide Show view, buttons appear in the bottom-left corner for controlling the show without leaving it (These aren’t shown in Figure 1.22.). To leave the slide show, choose End Show from the menu or just press the Esc key.
1
Reading view is like Slide Show view except it runs within the PowerPoint app windowrather than full screen and it doesn’t have the powerful slide show tools that you get with Slide Show view (covered in Chapter 18), such as the ability to draw on a slide or skip to a certain slide. You still see the PowerPoint app’s title bar, and you still see the status bar at the bottom. You can move between slides by clicking with the mouse or by using the arrow keys on the keyboard. As with Slide Show view, you can exit from Reading view by pressing Esc to return to the previously accessed view.
Notes Page View
When you give a presentation, your props usually include more than just your brain and your slides. You typically have all kinds of notes and backup material for each slide — fi g-ures on last quarter’s sales, sources to cite if someone questions your data, and so on. In the old days of framed overhead transparencies, people used to attach sticky notes to the slide frames for this purpose and hope that nobody asked any questions that required div-ing into the four-inch-thick stack of statistics they brought.
Today, you can type your notes and supporting facts directly in PowerPoint. As you saw earlier, you can type them directly into the Notes pane below the slide in Normal or Outline view. Just click the Notes button in the status bar to display the Notes pane, and start typ-ing away. However, if you have a lot of notes to type, you might fi nd it easier to work with Notes Page view instead.
Notes Page view is accessible only from the View tab. In this view, you see a single slide (uneditable) with an editable text area below it called the notes placeholder, which you can use to type your notes. See Figure 1.23. You can refer to these notes as you give an on-screen presentation, or you can print notes pages to stack neatly on the lectern next to you during the big event. If your notes pages run off the end of the page, PowerPoint even prints them as a separate page. If you have trouble seeing the text you’re typing, zoom in on it, as described in the next section.
Zooming In and Out
If you need a closer look at your presentation, you can zoom the view in or out to accom-modate almost any situation. For example, if you have trouble placing a graphic exactly at the same vertical level as some text in a box next to it, you can zoom in for more precision. (The new Smart Guides feature in PowerPoint 2013 helps with that situation too.) You can view your work at various magnifi cations on-screen without changing the size of the sur-rounding tools or the size of the print on the printout.
FIGURE 1.23
Notes Page view offers a special text area for your notes, separate from the slides.
The larger the zoom number, the larger the details on the display. A zoom of 10% would make a slide so tiny that you couldn’t read it. A zoom of 400% would make a few letters on a slide so big they would fi ll the entire pane.
An easy way to set the zoom level is to drag the Zoom slider in the status bar, or click its plus or minus buttons to change the zoom level in increments, as shown in Figure 1.24. You can also hold down the Ctrl key and roll the scroll wheel on your mouse, if it has one.
FIGURE 1.24
Zoom in or out to see more or less of the slide(s) at once.
Zoom slider
1
To resize the current slide so that it is as large as possible while still fi tting completelyin the Slides pane, click the Fit Slide to Current Window button, or Choose View ➪ Fit to Window.
Another way to control the zoom is with the Zoom dialog box. Choose View ➪ Zoom to open it. (You can also open that dialog box by clicking the % next to the Zoom slider in the lower-right corner of the screen.) Make your selection, as shown in Figure 1.25, by click-ing the appropriate button, and then click OK. Notice that you can type a precise zoom percentage in the Percent text box. You can specify any percentage you like, up to 400%. (Some panes and views will not go higher than 100%.)
FIGURE 1.25
You can zoom with this Zoom dialog box rather than the slider if you prefer.
Enabling Optional Display Elements
PowerPoint has a lot of optional screen elements that you may (or may not) fi nd useful, depending on what you’re up to at the moment. The following sections describe them.
Ruler
Vertical and horizontal rulers around the Slide pane can help you place objects more pre-cisely. To toggle them on or off, select or deselect the Ruler check box on the View tab, as shown in Figure 1.26. Rulers are available only in Normal, Outline, and Notes Page views.
FIGURE 1.26
Rulers and gridlines help position objects on a slide.
Toggle Rulers on/off
Toggle Gridlines
on/off Horizontal ruler
Vertical ruler
The ruler’s unit of measure is controlled from Regional Settings in Control Panel in Windows. Choose Clock and then Language and Region, and then click the Region heading in Windows 8 (or Region and Language in Windows 7) to open the Region (or Region and Language) dialog box. On the Formats tab, click Additional Settings and choose U.S. or Metric from the Measurement System drop-down list.
1
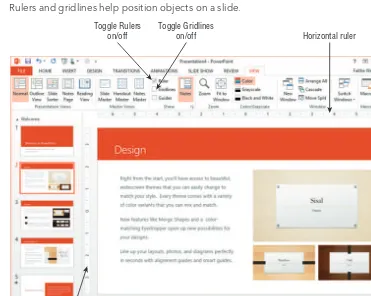
Gridlines
Gridlines are nonprinting dotted lines at regularly spaced intervals that can help you line up objects on a slide. Figure 1.26 shows gridlines (and the ruler) enabled.
To turn gridlines on or off, use either of these methods:
■ Press Shift+F9.
■ On the View tab, in the Show group, select or deselect the Gridlines check box. There are many options you can set for the gridlines, including whether objects snap to it, whether the grid is visible, and what the spacing should be between the gridlines. To set grid options, follow these steps:
1. On the View tab, click the dialog box launcher in the Show group. The Grid and Guides dialog box opens (see Figure 1.27).
FIGURE 1.27
Set grid options and spacing.
2. In the Snap To section, select or deselect the Snap Objects to Grid check box.
This setting specifi es whether or not objects will automatically align with the grid. 3. In the Grid Settings section, enter the amount of space you want between
gridlines.
4. Select or deselect the Display Grid On Screen check box to display or hide the grid. (Note that you can make objects snap to the grid without the grid being displayed.)
5. Click OK.
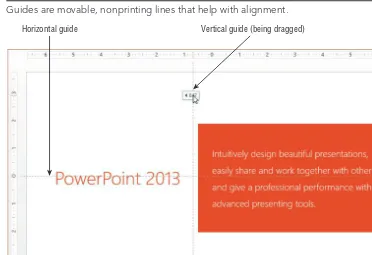
Guides
indicator appears to let you know the ruler position, as shown in Figure 1.28. Use the Grid and Guides dialog box shown in Figure 1.27 to turn guides on/off, or press Alt+F9.
FIGURE 1.28
Guides are movable, nonprinting lines that help with alignment.
Horizontal guide Vertical guide (being dragged)
You can create additional sets of guide lines by holding down the Ctrl key while dragging a guide (to copy it). You can have as many horizontal and vertical guides as you like, all at positions you specify. You can also save your custom guides (new in PowerPoint 2013).
Ribbon
1
Color/Grayscale/Pure Black and White Views
Most of the time you will work with your presentation in color. However, if you plan to print the presentation in black and white or grayscale (for example, on black-and-white handouts), you should check to see what it will look like without color.
This Color/Grayscale/Pure Black and White option is especially useful when you are preparing slides that will even-tually be faxed because a fax is pure black and white in most cases. Something that looks great on a color screen could look like a shapeless blob on a black-and-white fax. It doesn’t hurt to check.
Click the Grayscale or the Pure Black and White button on the View tab to switch to one of those views. When you do so, a Grayscale or Black and White tab becomes available. The Grayscale tab is shown in Figure 1.29. From its Change Selected Object group, you can fi ne-tune the grayscale or black-and-white preview. Choose one that shows the object to best advantage; PowerPoint will remember that setting when printing or outputting the presen-tation to a grayscale or black-and-white source.
FIGURE 1.29
Select a grayscale or a black-and-white preview type.
When you are fi nished, click the Back to Color View button on the Grayscale or Black and White tab. Changing the Black and White or Grayscale settings doesn’t affect the colors on the slides; it only affects how the slides will look and print in black and white or grayscale.
Opening a New Display Window for the Same
Presentation
Have you ever wished you could be in two places at once? Well, in PowerPoint, you actually can. PowerPoint provides a way to view two spots in the presentation at the same time by opening a new window.