Pro Jakarta Tomcat 5
MATTHEW MOODIEApress
© 2005 by Matthew Moodie
All rights reserved. No part of this work may be reproduced or transmitted in any form or by any means, electronic or mechanical, including photocopying, recording, or by any information storage or retrieval system, without the prior written permission of the copyright owner and the publisher.
ISBN (pbk): 1590593316
use the names only in an editorial fashion and to the benefit of the trademark owner, with no intention of infringement of the trademark.
Lead Editor: Steve Anglin
Technical Reviewer: Scott Davis
Editorial Board: Steve Anglin, Dan Appleman, Ewan
Buckingham, Gary Cornell, Tony Davis, John Franklin, Jason Gilmore, Chris Mills, Dominic Shakeshaft, Jim Sumser
Project Manager: Tracy Brown Collins Copy Edit Manager: Nicole LeClerc Copy Editor: Kim Wimpsett
Production Manager: Kari Brooks-Copony Production Editor: Katie Stence
Compositor: Susan Glinert Proofreader: Liz Welch Indexer: Kevin Broccoli Artist: April Milne
Cover Designer: Kurt Krames
Manufacturing Manager: Tom Debolski
Distributed to the book trade in the United States by Springer-Verlag New York, Inc., 233 Spring Street, 6th Floor, New York, NY 10013, and outside the United States by Springer-Verlag GmbH & Co. KG, Tiergartenstr. 17, 69112 Heidelberg, Germany.
[email protected], or visit http://www.springer.de.
For information on translations, please contact Apress directly at 2560 Ninth Street, Suite 219, Berkeley, CA 94710. Phone 510-549-5930, fax 510-549-5939, e-mail [email protected], or visit
http://www.apress.com.
The information in this book is distributed on an “as is” basis, without warranty. Although every precaution has been taken in the
preparation of this work, neither the author(s) nor Apress shall have any liability to any person or entity with respect to any loss or damage caused or alleged to be caused directly or indirectly by the information contained in this work.
The source code for this book is available to readers at
http://www.apress.com in the Downloads section. Dedication
To Laura
About the Author
MATTHEW MOODIE is a native of southwest Scotland and is a
graduate of the University of Edinburgh, where he obtained a master’s degree in linguistics and artificial intelligence.
Matthew enjoys a life of fun in Glasgow, Scotland. He’s a keen novice gardener with a houseful of plants.
About the Technical Reviewer
SCOTT DAVIS is a senior software engineer and instructor in the Denver, Colorado, area. He has worked on a variety of Java
platforms, including J2EE, J2SE, and J2ME (sometimes all on the same project). He’s a frequent presenter at national conferences and local user groups. He was the president of the Denver Java Users Group (http://www.denverjug.org) in 2003 when it was voted one of the top-ten JUGs in North America. Keep up with him at
Acknowledgments
Matthew would like to thank Laura for her love and friendship.
Love to his mum, Valla, Alexandra, Harcus, Angus, Howard and his grandparents. Thanks go to Andrew, Brian, Katy, Lindsey and Disco Robot Craig for the good times. Big shout out to the Lochmaben boys Billy and Dave. See you down the gaff. And not forgetting the
Pro Jakarta Tomcat 5
byMatthew Moodie
Apress 2005 (400 pages) ISBN:1590593316
Ideal for Tomcat administrators and those who wish to configure Tomcat, this succinct text describes
configuration files, as well as administration features like security, auto-deployment, remote deployment, and datasources.
Table of Contents
Pro Jakarta Tomcat 5
Chapter 1
- Introducing Tomcat
Chapter 2
- Installing Tomcat
Chapter 3
- Examining Tomcat’s Directories
Chapter 4
- Working with Tomcat’s Configuration Files
Chapter 5
- Administering Web Applications
Chapter 6
- Using Tomcat’s Administration Tools
Chapter 7
- Configuring Tomcat
Chapter 8
- Understanding Tomcat’s Class Loaders
Chapter 9
- Using Tomcat’s Connectors
Chapter 10
- Connecting to Databases Using JDBC
Chapter 11
- Working with User Authentication
Chapter 12
- Securing Tomcat
Chapter 13
- Implementing Shared Tomcat Hosting
Chapter 14
- Testing Tomcat’s Performance
Chapter 1: Introducing Tomcat
Understanding the Web Today
The Web isn’t solely made up of static pages that show the same document to every user; many pages contain content generated independently for each viewer. Although static files still have their place, many useful and necessary Web sites would be unable to
function without dynamic content. For example, Amazon.com is one of the major success stories of the Web and is often the reason people go online for the first time. Without dynamic content, such as shopping baskets, personal recommendations, and personalized welcome
messages, Amazon.com wouldn’t be the success it has been, and many people wouldn’t be online.
The Common Gateway Interface (CGI) was the original dynamic content mechanism that executed programs on a Web server and allowed Webmasters to customize their pages, which was extremely popular in the early days of the Web. The CGI model is as follows:
1. The browser sends a request to the server just as it would for a Hypertext Markup Language (HTML) page.
2. The server maps the requested resource to an external program.
3. The server runs the external program and passes it the original Hypertext Transfer Protocol (HTTP) request.
4. The external program executes and sends its results to the server.
5. The server passes the program’s output to the browser as an HTTP response.
CGI has been implemented in many programming languages, but Perl was, and still is, the most popular language for developing CGI
So, if only a small number of users request a CGI program
simultaneously, it’s not too big of a problem. However, it’s a different story if hundreds or thousands of users request the resource
simultaneously. Every copy of the program requires a share of the server’s processing power, which is rapidly used up as requests pile up. The situation is made even worse with CGI programs that are written in interpreted languages such as Perl, which result in the launch of large runtime interpreters with each request.
Looking Beyond CGI
Many alternative solutions to CGI have been developed since the Web began. The more successful of these provide an environment that exists inside an existing server or even functions as a server on its own.
Many CGI replacements have been built on top of the Apache server (http://www.apache.org) because of Apache’s popular modular
application programming interface (API). Developers can use the API to extend Apache’s functionality with persistent programs, and thus it’s ideal for creating programs that create dynamic content. Apache loads modules into its memory when it starts and passes the appropriate HTTP requests to them as appropriate. It then passes the HTTP responses to the browser once the modules have processed the requests. Because the modules are already in the server’s memory, the cost of loading an interpreter is removed and scripts can execute faster.
Although few developers actually create modules themselves (they’re relatively difficult to develop), many third-party modules provide a basis for applications that are much more efficient than normal CGI. The following are a few examples:
mod_php4: This module speeds up PHP in the same way that mod_perl speeds up Perl.
mod_fastcgi: This is similar to straight CGI, but it keeps programs in memory rather than terminating them when each request is finished.
Microsoft provides an interface to its Internet Information Services (IIS) Web server, called the Internet Server Application Programming Interface (ISAPI). This API doesn’t have the following that Apache’s API has because of its complexity, but it’s nevertheless a high-performance API. However, IIS is widely used, mainly because it comes as part of many versions of Windows. In Chapter 9 you’ll configure Tomcat to work with IIS so you can combine the best features of both.
Microsoft also developed the Active Server Pages (ASP) technology, which lets you embed scripts, typically VBScript, into standard HTML pages. This model has proved extremely successful and was the catalyst for Java Web technology, which I’ll discuss next.
Introducing Java on the Web
alternatives aren’t stand-alone programs (because they require a Web server), servlets require a servlet container to load servlets into
memory. The servlet container then receives HTTP requests from browsers and passes them to servlets that generate the response. The servlet container can also integrate with other Web servers to use their more efficient static file abilities while continuing to produce the dynamic content. You’ll find an example of this in Chapter 9 when you integrate Tomcat with Apache and IIS.
Unfortunately, although servlets are an improvement over CGI,
especially with respect to performance and server load, they too have a drawback. They’re primarily suitable for processing logic. For the creation of content (that is, HTML), they’re less usable. First, hard-coding textual output, including HTML tags, in code makes the
application less maintainable. This is because if text in the HTML must be changed, the servlet must be recompiled.
Second, this approach requires the HTML designer to understand enough about Java to avoid breaking the servlet. More likely,
however, the programmer of the application must take the HTML from the designer and then embed it into the application: an error-prone task if ever there was one.
To solve this problem, Sun Microsystems created the JavaServer Pages (JSP) technology.
Adding to Servlets: JavaServer Pages
Although writing servlets requires knowledge of Java, a Java newbie can quickly learn some useful JSP techniques. As such, JSP
represents a viable and attractive alternative to Microsoft’s ASP.
write software whose output is easy to verify visually and that the result works like a piece of software. In fact, JSP took off mainly as a result of its suitability for creating dynamic visual content at a time when the Internet was growing in popularity.
Introducing Servlet Containers
JSP pages and servlets require a servlet container to operate at all. Tomcat, the subject of this book, is the reference implementation (RI) servlet container, which means that Tomcat’s first priority is to be fully compliant with the Servlet and JSP specifications published by Sun Microsystems. However, this isn’t to say that Tomcat isn’t worthy of use in production systems. Indeed, many commercial installations use Tomcat.
An RI has the added benefit of refining the specification, whatever the technology may be. As developers add code per the specifications, they can uncover problems in implementation requirements and conflicts within the specification.
As noted previously, the RI is completely compliant with the
specification and is therefore particularly useful for people who are using advanced features of the specification. The RI is released with the specification, which means that Tomcat is always the first server to provide the new features of the specification when it’s finished.
Looking at Tomcat
Tomcat has its origins in the earliest days of the servlet technology. Sun Microsystems created the first servlet container, the Java Web Server, to demonstrate the technology, but it wasn’t terribly robust. At the same time, the Apache Software Foundation (ASF) created JServ, a servlet engine that integrated with the Apache Web server.
In 1999, Sun Microsystems donated the Java Web Server code to the ASF, and the two projects merged to create Tomcat. Version 3.x was the first Tomcat series and was directly descended from the original code that Sun Microsystems provided to the ASF. It’s still available and is the RI of the Servlet 2.2 and JSP 1.1 specifications.
In 2001, the ASF released Tomcat 4.0, which was a complete
specifications.
Understanding Tomcat’s Architecture
The latest version of Tomcat is 5.x, which supports the Servlet 2.4 and JSP 2.0 specifications. It consists of a nested hierarchy of
components.
Top-level components exist at the top of the configuration hierarchy in a rigid relationship with one another.
Connectors connect the servlet container to requests, either from a browser or another Web server that’s handling the static resources.
Container components contain a collection of other components.
Nested components can reside in containers but can’t contain other components.
Figure 1-1 illustrates the structure of a Tomcat configuration.
Figure 1-1: An example Tomcat configuration. The components marked with a star can occur multiple times.
When configuring Tomcat, you can remove some of these objects without affecting the server. Notably, the engine and host may be unnecessary if you’re using a Web server such as Apache.
Extensible Markup Language (XML) file that mirrors the component hierarchy. You’ll learn about this file, called server.xml, in Chapter 4.
In the next couple of sections, you’ll look into each component in turn.
Top-Level Components
The top-level components are the Tomcat server, as opposed to the other components, which are only parts of the server.
The Server Component
The server component is an instance of the Tomcat server. You can create only one instance of a server inside a given Java virtual machine (JVM).
You can set up separate servers configured to different ports on a single server to separate applications so that you can restart them independently. So, if a given JVM crashes, the other applications will be safe in another instance of the server. This is sometimes done in hosting environments where each customer has a separate instance of a JVM so that a badly written application won’t cause others to crash.
The Service Component
A service component groups an engine component with its connectors. An engine is a request-processing component that represents the servlet engine. It examines the HTTP headers to determine to which host or context (that is, which Web application) it should pass the request. Each service is named so that administrators can easily identify log messages sent from each service.
So, this component accepts requests, routes them to the appropriate Web application, and returns the result of the request processing.
Connectors connect Web applications to clients. They’re the point where requests are received from clients, and each has a unique port on the server. Tomcat’s default HTTP port is 8080 to avoid
interference with any Web server running on port 80, the standard HTTP port. However, you can change this as long as the new port doesn’t already have a service associated with it.
The default HTTP connector implements HTTP 1.1. The alternative is the Apache JServ Protocol (AJP) connector, which is a connector for linking with Apache in order to use its Secure Sockets Layer (SSL) and static content-processing capabilities. I’ll discuss each of these in Chapter 9.
The Container Components
The container components receive the requests from the top-level components as appropriate. They then deal with the request process and return the response to the component that sent it to them.
The Engine Component
The engine component is the top-level container and can’t be contained by another container component. Only one may be contained in each service component.
The top-level container doesn’t have to be an engine, because it only has to implement the container interface. This interface ensures the object implementing it is aware of its position in the component hierarchy, provides a realm for user authentication and role-based authorization, and has access to a number of resources including its session manager and some important internal structures.
components down the hierarchy of components.
If Tomcat is used as a stand-alone server, the defined engine is the default. However, if Tomcat is configured to provide servlet support with a Web server providing the static pages, the default engine is overridden, as the Web server has normally determined the correct destination for the request.
The host name of the server is set in the engine component if
required. An engine may contain hosts representing a group of Web applications and contexts, each representing a single Web
application.
The Host Component
A host component is analogous to the Apache virtual host
functionality. This allows multiple servers to be configured on the same physical machine and be identified by separate Internet
Protocol (IP) addresses or host names. In Tomcat’s case, the virtual hosts are differentiated by a fully qualified host name. Thus, you can have http://www.apress.com and http://www.moodie.com on the same server. In this case, the servlet container routes requests to the
different groups of Web applications.
When you configure a host, you set its name; the majority of clients will usually send both the IP address of the server and the host name they used to resolve the IP address. The engine component inspects the HTTP header to determine which host is being requested.
The Context Component
The final container component, and the one at the lowest level, is the context, also known as the Web application. When you configure a context, you inform the servlet container of the location of the
application’s root folder so that components that contain this component can route requests effectively. You can also enable dynamic reloading so that any classes that have changed are
the application. However, this is resource intensive and isn’t recommended for deployment scenarios.
A context component may also include error pages, which will allow you to configure error messages consistent with the application’s look and feel.
Finally, you can also configure a context with initialization parameters for the application it represents and for access control (authentication and authorization restrictions). More information on these two aspects of Web application deployment is available in Chapter 5.
The Nested Components
The nested components are nested within container components and provide a number of administrative services. You can’t nest all of them in every container component, but you can nest many of them this way. The exception to the container component rule is the global resources component, which you can nest only within a server component.
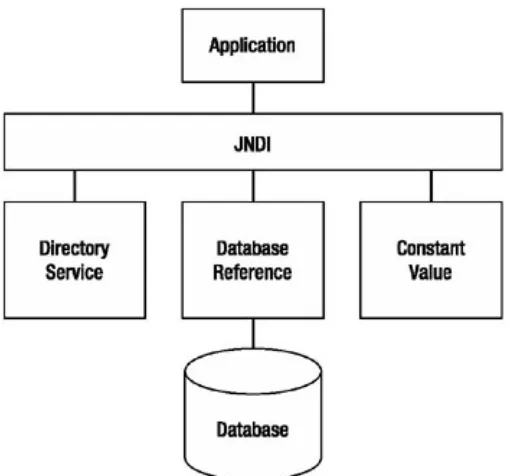
The Global Resources Component
As already mentioned, this component may be nested only within a server component. You use this component to configure global Java Naming and Directory Interface (JNDI) resources that all the other components in the server can use. Typically these could be data sources for database access or serverwide constants for use in application code.
The Loader Component
The loader component may be nested only within a context
The Logger Component
This component is available only in Tomcat 5.0.x and not in Tomcat 5.5.x. You should use a logging implementation such as Log4J with Tomcat 5.5.x, more of which is covered in Chapter 4.
A logger component reports on the internal state of its parent component. You can include a logger in any of the container components. Logging behavior is inherited, so a logger set at the engine level is assigned to every child object unless overridden by the child. The configuration of loggers at this level can be a convenient way to decide the default logging behavior for the server.
This allows you to configure a convenient destination for all logging events for the components that aren’t configured to generate their own logs.
The Manager Component
The manager component represents a session manager for working with user sessions in a Web application. As such, it can be included only in a context container. A default manager component is used if you don’t specify an alternative, and, like the loader component mentioned previously, you’ll find that the default is perfectly good.
The Realm Component
The realm for an engine manages user authentication and
authorization. As part of the configuration of an application, you set the roles that are allowed to access each resource or group of resources, and the realm is used to enforce this policy.
Realms can authenticate against text files, database tables, Lightweight Directory Access Protocol (LDAP) servers, and the Windows network identity of the user. You’ll see more of this in Chapter 11.
resources. By default, a user must still authenticate separately to each Web application on the server. (This is called single sign-on.) You’ll see how you can change this in Chapter 7.
The Resources Component
You can add the resources component to a context component. It represents the static resources in a Web application and allows them to be stored in alternative formats, such as compressed files. The default is more than sufficient for most needs.
The Valve Component
You can use valve components to intercept a request and process it before it reaches its destination. Valves are analogous to filters as defined in the Servlet specification and aren’t in the JSP or Servlet specifications. You may place valve components in any container component.
Valves are commonly used to log requests, client IP addresses, and server usage. This technique is known as request dumping, and a request dumper valve records the HTTP header information and any cookies sent with the request. Response dumping logs the response headers and cookies (if set) to a file.
Valves are typically reusable components, so you can add and remove them from the request path according to your needs; Web applications can’t detect their presence, so they shouldn’t affect the application in any way. (However, performance may suffer if a valve is added.) If your users have applications that need to intercept requests and responses for processing, they should use filters as per the
Servlet specification.
Summary
This chapter was a quick introduction to dynamic Web content and the Tomcat Web server. You learned about the emergence of CGI, its problems, and the various solutions that have been developed over the years. You saw how servlets are Java’s answer to the CGI
problem and that Tomcat is the reference implementation of the Servlet specification as outlined by Sun Microsystems.
The chapter then discussed Tomcat’s architecture and how all its components fit together in a flexible and highly customizable way. Each component is nested inside another to allow for easy
configuration and extensibility.
Overview
In the previous chapter you saw a brief history of the Internet and the Web that built up to the development of servlets and the release of Tomcat. Continuing in this abstract manner, you learned about
Tomcat’s modular architecture. However, none of this is useful if you don’t have the Tomcat server, so in this chapter you’ll do the following:
You’ll install Java if you haven’t done so already. You’ll install Tomcat on your platform of choice. You’ll install the Ant build tool.
Installing Java
Your choice of JVM can significantly affect the performance of your Tomcat server, and it’s worth evaluating a few to see which gives you the best performance. This is a subject that many people don’t
concern themselves with or have never thought about, so you won’t be alone if you think that this isn’t an issue. Sun Microsystems’ JVM is all you need, right?
Well, if performance is really an issue and you want to squeeze as much out of your server setup as possible, you should look into this area. You can find a lot of information on the Internet, and Sun
provides its own guidance at http://java.sun.com/docs/performance/. IBM (http://www.ibm.com/developerworks/java/jdk/) and the
Blackdown project (http://www.blackdown.org), which is a Linux port of source donated by Sun Microsystems, provide the main
alternatives to Sun Microsystems’ Java development kit (JDK).
Installing Java on Windows
Download the Java installer from http://java.sun.com/j2se/downloads/. You can choose either JDK 1.4 or JDK 5.0, though the latter option isn’t a final release and you must use Tomcat 5.5.x.
The Java installer on Windows is a standard installation package with easy-to-follow steps. Start the installation by double-clicking the
downloaded installer, and you’ll shortly have the JDK installed.
Choose the folder where you want to install Java, which is referred to as %JAVA_HOME%. The %JAVA_HOME%\bin directory is where the installer places all the Java executables, including the JVM, the compiler, the debugger, and a packaging utility.
You’ll probably have noted that the installation directory was specified as if it were an environment variable. This is because you now have to add the installation folder as an environment variable called
packages need to know where Java is, and Tomcat is no exception. Finally, add the %JAVA_HOME%\bin directory to the Windows path. This avoids clashes with other JVMs that may be on the system.
Setting Environment Variables
To set environment variables, select Start Settings Control Panel, and choose the System option. Now choose the Advanced tab, and click the Environment Variables button. You’ll see a screen like the one in Figure 2-1.
Figure 2-1: The Windows Environment Variables dialog box
Next, modify the %Path% variable to include %JAVA_HOME%\bin, making sure it’s the first entry in the path to avoid any naming clashes. Adding this directory to the path will make the Java
executables available at the command prompt. To test the installation, open an instance of the command prompt and type the following:
> java -version
You should then see version information as follows:
java version "1.4.2_03"
Java(TM) 2 Runtime Environment, Standard Edition (build 1.4.2_03-b02) Java HotSpot(TM) Client VM (build 1.4.2_03-b02, mixed mode)
In this example, JDK 1.4.2_03 is installed as the default Java. If you have the wrong version information, check that you’ve added the correct Java to the Windows path.
Setting Environment Variables in Windows 9x
In Windows 9x, you set the environment variables by editing the
c:\autoexec.bat file. Open the file, and add the following path to your installation:
set JAVA_HOME=c:\j2sdk1.4.2
For Windows ME, you can use the System Configuration utility to set environment variables. To run it, choose Start Programs
Accessories System Tools System Information. You’ll see a Microsoft help and support page, from which you should select the Tools menu and then the System Configuration utility. From here, select the Environment tab, and set the JAVA_HOME variable to point to your Java installation directory. Test the installation as mentioned previously.
Installing Java on Linux
Download a suitable distribution from
RPMs. You can choose either JDK 1.4 or JDK 5.0; the latter option isn’t a final release, and you must use Tomcat 5.5.x.
Installing Java Using the Self-Extracting Binary
Once you’ve obtained the self-extracting binary, you must set its execute permissions. Note that you don’t need to be a root user to install Java using the self-extracting binary, though you do need to be a root user if you want to install it in a system directory such as
/usr/local; this is because the binary won’t overwrite any system files otherwise. To change the execute permissions, type the following command from the directory where the binary is located:
# chmod +x j2sdk-1_4_2-linux-i586.bin
Now change the directory to the one where you want to install Java and execute the binary. You must prefix the binary’s filename with any path information that’s necessary, like so:
# ./j2sdk-1_4_2-linux-i586.bin
This command will display a license agreement and, once you’ve agreed to the license, install Java in a j2sdk-1_4_2 directory in the current directory.
You need to add the $JAVA_HOME environment variable to your system to specify the location of the JDK. So, if you installed it in
/usr/java/j2sdk-1_4_2_05-linux-i386, you should give
$JAVA_HOME this value. To add it permanently, you can add it to your
~/.bashrc file or, if you want all users to have access to Java, to
/etc/profile.
Alternatively, /etc/profile runs any shell scripts in
/etc/profile.d, so you can add the following lines to a file named
tomcat.sh:
JAVA_HOME=/usr/java/j2sdk-1_4_2_05-linux-i386/ export JAVA_HOME
export PATH
You may have to log out and log in again for your system to read
/etc/profile or tomcat.sh. You should also add execute
permissions for the $JAVA_HOME/bin folder for all the users who will be using Java as appropriate.
To test the installation, type the following:
# java -version
If the installation succeeded, you’ll see version information.
Installing Java Using the RPM Installer
To install the JDK using the RPM, you must first download the file. Unlike with the self-extracting binary, you must be a root user to install the RPM.
Sun Microsystems supplies the RPM as an executable to allow you to agree to the licensing terms. If you agree to the licensing terms, the RPM installer decompresses an RPM into the current directory.
Before you can run the RPM, you have to set execute permissions for the file, like so:
# chmod a+x j2sdk-1_4_2-linux-i586-rpm.bin # ./j2sdk-1_4_2-linux-i586-rpm.bin
# rpm -iv jdk-1_4_2-linux-i586.rpm
The RPM will install Java as a replacement of the Linux system version. You should now follow the previous instructions to add
execute permissions for the JDK executables and modify the path to include them. Again, you can test the installation as described
Installing Tomcat
Now that you’ve installed Java, it’s time for you to install the Tomcat server. The Windows installations are first, followed by instructions for Linux.
The first step for all systems is obtaining the appropriate distribution. This may be a binary or source distribution, depending on your needs. Whatever your requirements, Tomcat is available from
http://jakarta.apache.org/site/binindex.cgi. Choose the most stable version of Tomcat 5.0.x or Tomcat 5.5.x provided. The choice will largely depend on what version of Java you’re using. If you have JDK 5, then choose Tomcat 5.5.x; otherwise you can pick either, because Tomcat 5.5.x can be modified to work with earlier versions of Java (download the appropriate compatibility zipped file).
You can select a binary installer if you’re a Windows user and want to use Tomcat as a service, or you can select a zipped version of the binaries for any system.
If you’re interested in the latest version of Tomcat or want to download an older version, you’ll find both of these options below the binary downloads.
Note Tomcat 5.5 doesn’t come with documentation for Tomcat’s internal APIs. If you require this documentation, click the title link for the Tomcat 5.5 distribution (the link above the list of download options starting with KEYS). This will take you to a directory listing of an Apache download mirror. Click bin, and then select
jakarta-tomcat-5.5.x-fulldocs.tar.gz. This is a Web application to replace the default tomcat-docs Web application.
You’ll also require Ant for various deploy and build tasks later in the book. Ant is a build tool like make and is another excellent Jakarta project.
If you choose to install Tomcat with the installer, save it in a
convenient location and double-click it to begin installation. As always, you must agree with the license agreement before you can continue with the installation.
Figure 2-2 shows the screen where you choose which components to install.
Figure 2-2: Tomcat’s installation options
Installing Tomcat As a Service
If you select the Service option, as shown in Figure 2-2, you’ll install Tomcat as a service, with all the functionality that entails. This is a useful option if you want Tomcat to run every time you start your machine or if you want it to run as a unique user so you can track its behavior. Remember that this isn’t available on Windows 98 and its derivatives. However, you’ll see a work-around for this a bit later in the “Running Tomcat in the Background” section.
Tomcat will run at startup and will run in the background even when no user is logged in. This is the option you’d use on a deployment server, but it’s probably not the option you’d use on a development machine.
check this box or not. The difference is that the installer will install the service to start automatically by default if you check the box. Otherwise it’s set to manual startup.
Installing Tomcat’s Source Code
If you want to compile Tomcat from source, select this option. Note that you’ll require Ant for this process, which I’ll cover in the “Installing Tomcat from Source” section.
Installing Tomcat’s Documentation
You should install the Tomcat documentation; it’s a useful resource and includes the Servlet and JSP API javadocs. You’ll find these invaluable if you do any Web development.
Installing Tomcat’s Start Menu Items
If you want to add shortcuts to Windows’ Start menu, then select this option.
Installing Tomcat’s Example Web Applications
If you want to examine Tomcat’s example Web applications, then select this option. This is unlikely if you’ll be using Tomcat as a production server because they will simply take up space and are certainly a security risk. The examples aren’t written with security or performance in mind, and, as well-known applications, they’re
vulnerable to denial-of-service attacks and attempts to gain root
access. If your users want to have them in a deployment environment, by all means let them.
Finishing the Installation
Once you’ve chosen the components you want to install, click Next. The installer will then ask you for information on installation
installation.
Note All public Web servers run on port 80, which is the default HTTP port. When a browser attempts to connect to a Web site, it uses port 80 behind the scenes; that is, you don’t have to specify it. Tomcat’s HTTP service runs on port 8080 by default to avoid a clash with other Web servers that may already be running. You’ll see how to change this in Chapter 4.
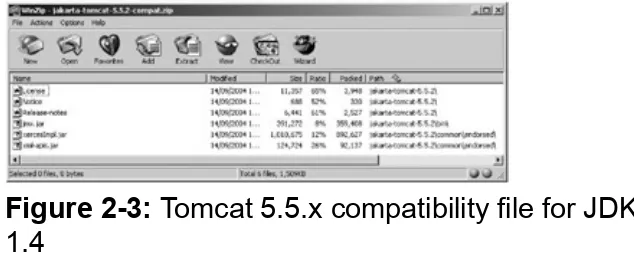
If you’re using Tomcat 5.5.x and JDK 1.4, then extract the contents of
jakarta-tomcat-5.5.x-compat.zip to the appropriate
subdirectory of %CATALINA_HOME%. You can see where the files are to be placed in Figure 2-3.
Figure 2-3: Tomcat 5.5.x compatibility file for JDK 1.4
Here jakarta-tomcat-5.5.2 is %CATALINA_HOME%, so move the files to the corresponding directory of your %CATALINA_HOME% like this:
%CATALINA_HOME%\bin\jmx.jar
%CATALINA_HOME%\common\endorsed\xercesImpl.jar %CATALINA_HOME%\common\endorsed\xml-apis.jar
These APIs are now part of the new Java specification and as such are missing from Tomcat 5.5.x.
The scripts provided with Tomcat will usually be able to guess at your setup so that no further intervention is strictly necessary. However, it’s prudent to add the following environment variables.
Adding the CATALINA_HOME Environment Variable
%CATALINA_HOME% is the directory where you chose to install
Tomcat. Tomcat needs to know this information to find the resources that are referenced as relative paths to this folder. If you chose the default directory while installing, this will be C:\Program
Files\Apache Software Foundation\Tomcat 5.x.
To add the environment variable in Windows XP, navigate to Start Settings Control Panel, and choose System. Now choose the Advanced tab, and click the Environment Variables button. Click the New button in the System Variables section, call the new variable
CATALINA_HOME, and enter the path to your installation.
In Windows 98, set the environment variables in c:\autoexec.bat. Open the file, and add the following path to your installation:
set CATALINA_HOME=c:\tomcat5.x
For Windows ME, you can use the System Configuration utility to set environment variables. To run it, choose Start Programs
Accessories System Tools System Information. You’ll see a Microsoft help and support page, from which you should select the Tools menu and then the System Configuration utility. From here, select the Environment tab, and set the CATALINA_HOME variable to point to your Tomcat installation directory.
CATALINA_HOME in Windows 9x
In Windows 9x, problems with file length and spaces in the path make it safer to install Tomcat directly onto c:\ rather than under Program Files. You’ll also need to increase the default environment space to Tomcat by opening a DOS prompt window, right-clicking it, choosing Properties, selecting the Memory tab, and setting the initial
Testing the Installation
To test the installation, you must first start the server. You can start the server in two ways: manually or as a service.
Starting the Server Manually
You can start the server manually by selecting Start Programs Apache Tomcat 5.x and then selecting the Tomcat 5.x Program Directory option. Navigate to the bin directory, and double-click
startup.bat. A new terminal window will start that shows the server is running. You can also run it from a command prompt, like so:
> %CATALINA_HOME%\bin\startup.bat
Note that if the window appears and promptly disappears again, you can try the tips in the “Troubleshooting and Tips” section.
If you want to shut down the server, use the shutdown.bat file in the
bin directory.
Starting the Server As a Service
If you want to start the server as a service, you have three choices. First, you could have selected to start the server at the end of
installation.
Figure 2-4: The Services administrative tool with the Tomcat service highlighted
To start the service, right-click the Tomcat entry, and then choose Start. You won’t see a console window, as described previously, because the server is running as a service. Once you’ve started the service, you can then restart and stop it by right-clicking the service’s entry in the Services window.
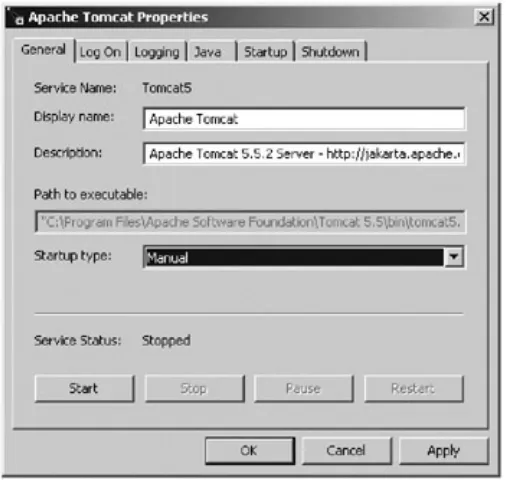
You can also start and stop the service using the Tomcat monitor. To start the monitor, select Start Programs Apache Tomcat 5.x
Figure 2-5: The Apache Tomcat Properties box
You can start, stop, pause, and restart the service here as you could in the Services utility. You can also start and stop the service by right-clicking the monitor’s icon and selecting the action you want to
perform.
Running Tomcat in the Background
If you don’t want to run Tomcat as a service, or are unable to because you’re running Windows 9x/ME, you can still run Tomcat without a command prompt/DOS prompt window open while Tomcat is running by modifying the catalina.bat file in %CATALINA_HOME%\bin. Replace the following text:
%_RUNJAVA%
with this:
%_RUNJAVAW%
You should now check that the server is indeed running (the absence of a window makes it hard to check by the usual means) by going to the server’s home page as described in the next section. If you find a problem, run the startup batch file from the %CATALINA_HOME%\bin
directory and note the error messages.
Viewing the Default Installation
Tomcat, like most servers, comes with a default home page that you can use to check the installation. Enter the following address in a browser: http://localhost:8080/. You should see a page similar to the one in Figure 2-6.
Figure 2-6: The Tomcat default home page
As mentioned, Tomcat connects to port 8080 by default. This is to avoid problems with other servers, such as Apache or IIS, that may be running on the machine.
If you have any problems, refer to the “Troubleshooting and Tips” section later in this chapter.
Installing Tomcat on Windows Using the Zipped File
uncompress the contents to a convenient directory.
The final step of installation is to add the %CATALINA_HOME%
environment variable as described previously. To start the server, you need to navigate to %CATALINA_HOME%\bin (no shortcut this time, though you should create your own).
Now start the server as per the previous manual instructions; that is, double-click startup.bat. A new terminal window will start that shows the server is running.
You can also run it from a command prompt, like so:
> %CATALINA_HOME%\bin\startup.bat
If you’re using Tomcat 5.5.x and JDK 1.4, then extract the contents of
Installing Tomcat on Linux
You’ll find that installing Tomcat on Linux or Unix is easy. Download either the zipped file or the gzipped tar file if you have GNU gzip. Whatever your requirements, Tomcat is available from
http://jakarta.apache.org/site/binindex.cgi. Choose the most stable version of Tomcat 5.0.x or Tomcat 5.5.x provided. The choice will largely depend on what version of Java you’re using. If you have JDK 5, then choose Tomcat 5.5.x; otherwise you can pick either, because Tomcat 5.5.x can be modified to work with earlier versions of Java (download the appropriate compatibility archive).
You should now export the $CATALINA_HOME environment variable, using the following commands:
# CATALINA_HOME=/usr/java/jakarta-tomcat-5.x # export CATALINA_HOME
Alternatively, add these to ~/.bashrc or /etc/profile as you did for the JDK installation previously, or create a shell file, tomcat.sh, and place it in the /etc/profile.d. /etc/profile will run it automatically at startup to make the variable available to all users. You can now start Tomcat by running the following shell command:
# $CATALINA_HOME/bin/startup.sh
You can shut down Tomcat using
$CATALINA_HOME/bin/shutdown.sh.
If you’re using Tomcat 5.5.x and JDK 1.4, then extract the contents of
jakarta-tomcat-5.5.x-compat.tar.gz to the same location as the Tomcat zipped file. You can see where to place the files in Figure 2-3. The Tomcat zipped file and the compatibility file have the same structure so that installation is simple.
have to specify it. Tomcat’s HTTP service runs on port 8080 by default to avoid a clash with other Web servers that may already be running. Another reason is that Linux and Unix systems require a user to have root permission to assign port numbers below 1024 to a process. You’ll see how to change this in Chapter 4.
Viewing the Default Installation
To check that Tomcat is running, point your browser to
http://localhost:8080. You should see a screen like the one in
Figure 2-6.
Running Tomcat with the Server Option
You can run Tomcat with Java’s server option, which will increase efficiency and thus increase performance. To run Tomcat with the server option, you’ll need to modify a number of files in the bin
directory. For Windows, you need to edit setclasspath.bat. Change the last three lines as follows:
set _RUNJAVA="%JAVA_HOME%\bin\java" -server set _RUNJAVAW="%JAVA_HOME%\bin\javaw" -server set _RUNJDB="%JAVA_HOME%\bin\jdb" -server
Of course this assumes you’re starting Tomcat manually. The process is similar in Linux. This time you modify
setclasspath.sh, like so:
Installing Ant
Before you install Tomcat from source, or indeed before you start any serious based project, you should install Ant. Ant is a Java-based build tool that has become ubiquitous. You use it to build and deploy applications. It benefits from platform independence and can use a single build file on multiple platforms. However, the build files must minimize dependency on a specific file path. (Windows paths, for example, will cause problems on Linux, and vice versa.)
You can download the latest binary distribution of Ant from
http://ant.apache.org/ bindownload.cgi. Ant is easy to install; simply unpack the distribution to a convenient location.
Because Ant is a program that you’ll use on a number of projects, you should make it available from any directory. To do this, add it to your path and then add an ANT_HOME environment variable as you did with
CATALINA_HOME. It’s a good idea to set the entry in the path to
ANT_HOME\bin to allow for any updates to Ant that you may make. To test that you’ve installed Ant, type ant -version in a terminal window. If everything has gone to plan, you’ll see Ant’s usage message.
You won’t use Ant for anything but compiling the source code and deploying Web applications in this book, so you won’t see the details of it. However, you should be aware that it uses an XML file, called
Installing Tomcat from Source
If you want to obtain the latest version of Tomcat with the newest bug fixes and upgrades, then installing it from the source code is a good option. In Linux it’s far more common for servers to be built for the system. However, this isn’t strictly necessary for a Java-based server such as Tomcat.
Tomcat is easily built using the Ant build utility. You use Ant for
automated project building, including compilation and deployment. It has all the system-independent benefits that Java enjoys because it’s written in Java.
You can also use Ant to carry out a number of administrative actions on Tomcat, each of which is described in Chapter 6. The deployer application mentioned previously also uses Ant.
It used to be the case that you had to manually download a huge number of libraries from many different sources to compile Tomcat, but now Ant can do it for you. In fact, it will even download the Tomcat’s source for you.
All you need to download and build Tomcat is the
http://jakarta.apache.org/tomcat/tomcat-5.0-doc/build.xml file (or
http://jakarta.apache.org/tomcat/tomcat-5.5-doc/build.xml) and a file called build.properties that you create for the purpose.
Download the build.xml file to a convenient directory where you’ll carry out the build. Create a build.properties file in the same directory with the appropriate lines from Listing 2-1. Those with #
marks are commented out and can be ignored if they don’t apply to your installation. You should ensure that base.path points to the place you want to download.
Listing 2-1: Ant’s build.properties File
# Default Base Path for Dependent Packages # Linux/Unix path
# Windows path ---#base.path=C://TomcatBuild
# Proxy setup
---# Uncomment if using a proxy server #proxy.host=proxy.domain
#proxy.port=8080 #proxy.use=on
Once you’re satisfied with your setup, you can build Tomcat using the following line in the base directory:
> ant
The build will take a few minutes, and the resultant build is the
subdirectory jakarta-tomcat-5/build. To deploy the new server, move (and rename) it out of the source folder and into a folder of its own, and set the CATALINA_HOME variable using the instructions given previously.
If you want to update the source code and recompile it, use the following commands in the source directory:
> ant checkout > ant build
The second command will compile only those files that have changed, so you can also use it to compile the server if you’ve made any
Troubleshooting and Tips
Finally, before I close this chapter, I’ll cover the typical problems that may occur when you install Tomcat. If you have further problems, you can find more material on the Tomcat Web site at
http://jakarta.apache.org/tomcat/ and at http://java.sun.com as well as on various forums. You should also read the release notes available with each download.
The following are a number of problems typically encountered when first installing Tomcat.
The Tomcat Window Disappears
This is particularly difficult to diagnose and applies especially to
Windows. Since the problem usually has one of two causes, however, you can start by diagnosing it and then move on to the known
solutions.
If Tomcat doesn’t start, it can be run in the current shell or command prompt so you can see what the problem is. Type the following on Linux:
# $CATALINA_HOME/bin/catalina.sh run
Or type the following on Windows:
> %CATALINA_HOME%/bin/catalina run
This will produce the normal startup messages, and any errors will be displayed. These errors also appear in the log file in the
CATALINA_HOME/logs directory. (You may have to set up logging for Tomcat 5.5.x; see Chapter 4.)
Check that you’re using the correct version of Java for the Tomcat version you’re trying to run. If you’re using JDK 1.4 with Tomcat 5.5, make sure the following files exist:
CATALINA_HOME\common\endorsed\xercesImpl.jar CATALINA_HOME\common\endorsed\xml-apis.jar
If not, download the compatibility files from the Jakarta Web site.
The Port Number Is in Use
Tomcat uses port 8080 by default, as mentioned previously. You can check if another program is using this port by using netstat. Typing netstat (netstat -ln on Linux) into your shell/command prompt will list open ports on your system and should show the process that’s
interfering with Tomcat. You have two options: shut the process down or change Tomcat’s port as described earlier.
A common problem is trying to start a new Tomcat instance when one is still running. This is especially true if it’s running as a daemon
thread. If you suspect this is the case, you can check it by using
telnet to connect to the socket, as follows, and see if you’re given a connection:
$ telnet localhost 8080
If you’re awarded a connection, the screen goes blank rather than giving an error.
When you’re connected, type GET / and press Return or Enter. (Echo is turned off by default on Windows, so it looks a little strange
because typing doesn’t appear to achieve anything.) On Windows, this results in the following output:
HTTP/1.0 302 Found
Content-Type: text/html
Location: http://127.0.0.1:8080/ /index.jsp
Content-Length: 167
Servlet-Engine: Tomcat Web Server/3.2.1 (JSP 1.1; Servlet 2.2; Java 1.3.0; Windows
<head><title>Document moved</title></head> <body><h1>Document moved</h1>
This document has moved <a href="http://127.0.0.1:8080/ /index.jsp">here</a>.<p>
</body>
Connection to host lost.
>
Summary
I’ve gone through a great deal of information in the course of this chapter to select and install a JDK, Ant, and Tomcat in a variety of ways. In the majority of cases, the installation of the server is a
straightforward process, because binary versions are available for the common platforms.
Overview
In the previous chapter you saw how to install Tomcat on various platforms, using the binaries or the source as the fancy takes you. Now it’s time to look at the directories that make up the Tomcat
installation. You’ll be introduced to the main configuration files and the structure of a Web application. However, I’ll leave the details on
configuration until Chapter 4.
In this chapter you’ll do the following:
You’ll examine the default Tomcat installation.
Looking at CATALINA_HOME
The best place to start a discussion of Tomcat’s directory structure is in the default installation directory, commonly called
CATALINA_HOME. If you’ve installed Tomcat, then you’ll have an
environment variable pointing to this directory. Let’s start by examining the bin directory and all the scripts it contains.
The bin Directory
The bin directory contains many scripts (in Windows they’re called
batch files, but the term scripts will do for the sake of brevity) for
starting Tomcat in different modes and for stopping Tomcat, a number of utilities, and some Windows-specific executables.
The catalina and catalina.50 (Tomcat 5.0.x Only) Scripts
You can use the catalina script to start and stop the server. In addition, a number of the other scripts in the bin directory call it.
catalina.50 does the same job as catalina but has the following command-line parameter removed:
-Djava.endorsed.dirs="%JAVA_ENDORSED_DIRS%"
This means you use catalina.50 to start Tomcat without enabling its endorsed mechanism. Therefore, Tomcat won’t load any of the classes in CATALINA_HOME/common/endorsed. You may want to do this to force Web applications to use Java’s default classes. However, none of the other scripts refers to this file; they still use
catalina. Tomcat 5.5 doesn’t contain the new script at all. From now on, catalina is the only script that will be referenced.
You can use it to start Tomcat in a variety of modes. For example, you can start it with or without debugging, with or without a security
manager, and in embedded mode to use it as part of a bigger application.
described in Table 3-1.
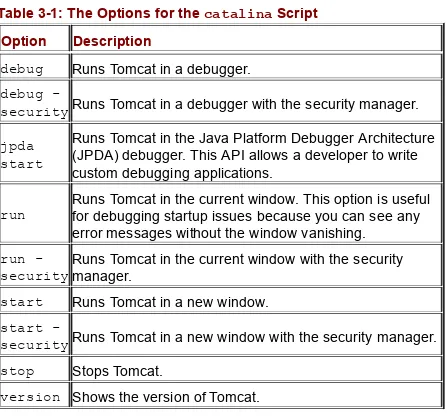
Table 3-1: The Options for the catalina Script Option Description
debug Runs Tomcat in a debugger.
debug
-securityRuns Tomcat in a debugger with the security manager.
jpda start
Runs Tomcat in the Java Platform Debugger Architecture (JPDA) debugger. This API allows a developer to write custom debugging applications.
run Runs Tomcat in the current window. This option is usefulfor debugging startup issues because you can see any error messages without the window vanishing.
run
-securityRuns Tomcat in the current window with the securitymanager.
start Runs Tomcat in a new window.
start
-securityRuns Tomcat in a new window with the security manager. stop Stops Tomcat.
version Shows the version of Tomcat.
The cpappend Script
Other scripts use the cpappend script to create the classpath dynamically before starting the server. You can override the setting provided here to allow each user to have personalized configuration files for the same server installation, whether for different instances of the server running at the same time or for a development environment for nonconcurrent users. This means each user can configure the server without affecting the work of other users.
You can use the digest script to create digested passwords. This is a particularly useful feature if you’re using Tomcat’s security features and want to implement container-managed security. By digesting a user’s password, you make it harder for someone to obtain it,
especially if you’re using the file-based version of container-managed security. Plain-text passwords in text files are very vulnerable.
Digesting a password doesn’t mean that the password can’t be discovered, but it does make it more difficult. Chapter 12 covers container-managed security.
The following is an example of digesting a password with the MD5 algorithm:
> digest -a md5 tomcat
The -a switch specifies the algorithm to use and is mandatory. The following is the result, with the clear-text password followed by a colon and then the digested password:
tomcat:1b359d8753858b55befa0441067aaed3
The digest script also supports the SHA algorithm, like so:
> digest -a sha tomcat
tomcat:536c0b339345616c1b33caf454454d8b8a190d6c
The service Script
The service script is a Windows-only script. You can use it to install and remove Tomcat as an NT service. Table 3-2 describes the
options.
Table 3-2: The Options for Running the service Script Option Description
installInstalls Tomcat as a service called alternative name is given Tomcat5 unless an
The following is an example of installing a service called TomcatServ
and then removing it:
service install TomcatServ service remove TomcatServ
The setclasspath Script
The catalina script calls the setclasspath script to check that all the necessary binaries, such as the Java compiler, are on the system, to set any Java options that have been specified, and to set its
classpath.
The startup and shutdown Scripts
You can use the startup and shutdown scripts to start and stop the server, just as you could use the catalina script. However, in this case you don’t have to specify any command-line options, so you can create shortcuts to start and stop Tomcat.
The startup-using-launcher and
shutdown-using-launcher Scripts (Tomcat 5.0.x Only)
You can use the startup-using-launcher and
shutdown-using-launcher scripts to start and stop the server using Ant’s launcher mechanism. The catalina.xml file in the bin directory is used as the Ant project file. For this to work, you must place the
ANT_HOME/lib/ant-launcher.jar file in your path. Note that this isn’t the classpath, because the ant-launcher.jar file is
considered an executable in this case.
Windows users should note that they may have to change the
shutdown-using-launcher.bat file as follows for the shutdown command to work. Delete the following bold line:
rem %0 must have been found by DOS using the %PATH% so we assume that rem setenv.bat will also be found in the %PATH%
goto doneSetenv
However, in most cases the script will complete its execution with an error message as follows:
'setenv.bat' is not recognized as an internal or external command, operable program or batch file.
The tomcat5 Windows Executable
You can use the tomcat5 executable to run the server if it’s installed as an NT service. You can install Tomcat as a service either when you first install Tomcat, as described in the previous chapter, or using the
service.bat file as described earlier in this chapter.
Note that the name of this executable must be the same as that of the service you want to start. So, if you install the service as
TomcatServ, you must rename this file TomcatServ.exe if you want to use its services.
The tomcat5w Windows Executable
You can use the tomcat5w executable to run the Tomcat Properties box if Tomcat is installed as a service. Chapter 2 described this utility. You can use it to start and stop the service and set other options. Note that the name of this executable must be the same as that of the service you want to start, with a w appended. So, if you install the service as TomcatServ, you must rename this file
TomcatServw.exe if you want to use its services.
The tool-wrapper and tool-wrapper-using-launcher
(Tomcat 5.0.x Only) Scripts
This script allows command-line tools to be called in the same environment as Tomcat so that they have a common set of
same as for the server, then obviously classpath issues can’t be identified, and so on.
The same instructions apply for the launcher version of this script as for the startup and shutdown scripts described previously. Windows users should remove the line that called setenv.bat.
The version Script
The version script calls the version option of the catalina script and produces the same results.
The common Directory
The common directory contains three subdirectories: classes,
endorsed, and lib. Tomcat 5.5 also has the i18n directory. Classes in the subdirectories of common will be available to Tomcat and all the Web applications running on the server. Common contents of these directories, bar the defaults that come with Tomcat, will be database drivers for serverwide data sources.
You should place class files in the classes folder and utility Java archive (JAR) files (that is, packaged classes and supporting
resources) in lib. Never place application-specific classes in either of these directories. The endorsed directory is a special case for
working with JDK 1.4 and later.
JDK 1.4 (and later JDKs) comes packaged with a number of APIs, the most important of which, from your point of view, are XML parsers. It used to be the case that to change the systemwide XML parser you simply dropped the new parser’s JAR files into common/lib.
However, the class-loading mechanism always prefers the JDK’s XML parser to any other XML parser in the classpath. The good news is that the JDK allows you to override this setting, and Tomcat does so by providing the endorsed directory and the following switch to the startup command in the bin/catalina script (though not the
-Djava.endorsed.dirs="%JAVA_ENDORSED_DIRS%"
You can set the JAVA_ENDORSED_DIRS variable in the
bin/setclasspath script.
If you place JAR files here, they will be used by the class loader in preference to the JDK’s classes and will be available to all Web applications running on the server.
The Tomcat 5.5 i18n directory contains optional internationalization messages that Tomcat uses to customize its output when dealing with browsers from a country other than your own. They can be removed if you don’t require them.
The conf Directory
The conf directory contains the following Tomcat configuration files:
catalina.policy sets up the necessary permissions for Catalina when it’s run within the context of a security
manager.
catalina.properties sets the locations of the various class loader directories. The defaults are the common,
server, and shared directories and their subdirectories. The settings in this file determine which classes are available to all Web applications and which classes are available to Tomcat. In other words, these settings configure the classpath of Tomcat and all Web applications.
context.xml is a Tomcat 5.5–only file that sets the defaults for individual contexts.
jk2.properties sets the properties for the Tomcat
connector that connects to an external Web server. You’ll see more of this in Chapter 9.
discussed in detail in Chapter 4. You use it to configure everything from the shutdown command to logging, filtering, connections to other Web servers, the port and host on which the server is running, and the location of each Web
application’s files.
server-minimal.xml is a minimal version of server.xml.
tomcat-users.xml is the default user database for
container-managed authentication. You can change the name and location of the file in server.xml. You’ll see more on this mechanism in Chapter 4.
web.xml is the default deployment descriptor for all Web applications. Tomcat processes it before processing the
web.xml files in the server’s Web applications.
The Subdirectories of the conf Directory
If you have to configure a Web application context, you should place the XML configuration file for that context in the
conf/[Service_name]/[Host_name] subdirectory.
Tomcat 5.5 also allows you to configure host-level context defaults by placing the context.xml file in
conf/[Service_name]/[Host_name]. This is analogous to the
context.xml file described in the previous section. You’ll see how to do all this in Chapter 5.
The logs Directory
The logs directory is the default location for application log files. The default Tomcat 5.0.x installation generates time-stamped logs for the
You may have to schedule housekeeping tasks to ensure that the size of the logs directory doesn’t grow out of hand.
The server Directory
The server directory contains three subdirectories: classes, lib, and webapps. Classes in the subdirectories of server will be
available to Tomcat only.
You should place class files in the classes folder and utility JAR files (that is, packaged classes and supporting resources) in lib.
The webapps directory contains classes and resources for admin
and manager, Tomcat’s two admin Web applications. If you’re using Tomcat 5.5, you’ll have to download the admin application separately. However, the source distribution of Tomcat 5.5 includes the admin application, which means you will install it if you build Tomcat 5.5 from source.
The shared Directory
The shared directory contains two subdirectories: classes and
lib. Classes in the subdirectories of shared will be available to all the Web applications running on the server but not to Tomcat.
You should place class files in the classes folder and utility JAR files (that is, packaged classes and supporting resources) in lib. Never place application-specific classes in either of these directories.
The temp Directory
Tomcat uses the temp directory for storing temporary files.
The webapps Directory
The webapps directory is the default location of Tomcat’s Web
you do so, as you can then separate the application files that change relatively frequently from the server files that don’t tend to change much. As a bonus, the installation directory for Tomcat can be kept as read/write for the administrator only, thus maintaining greater security —read/write access for other users need be provided only for the now separate webapps folder.
You can deploy Web applications in webapps by placing them here, in both packaged and unpackaged formats, and they will be
automatically deployed at the next server bootup. This is an
alternative to the conf/[Service_name]/[Host_name] method and the various deployer (such as Ant and the Tomcat manager application) methods.
The work Directory
Understanding Web Application Structure
A Web application is a collection of Web resources, such as JSP
pages, HTML pages, servlets, and configuration files, organized into a hierarchy as specified in the Servlet specification. You have two ways in which to organize a Web application: packed and unpacked. The packed form is called a Web archive (WAR) file, and the unpacked form is a collection of directories stored on the file system.
The unpackaged format is convenient for Web application developers, as it allows them to replace individual files while the application is being developed and debugged.
However, in a deployment environment, it’s often more convenient to provide a single file that can be automatically deployed. This reduces the deployment process to placing the file and setting up system resources. Tomcat can also automatically expand a Web application once the server has booted. The automatic expansion of WAR files is configured in the server.xml file as part of the <Host> element that configures hosts.
Web Application Context
Each Web application corresponds to a context component, as discussed in Chapter 1, and you assign a context path to each. The default context is called ROOT and corresponds to the name of the server with no other context information. For example, the ROOT Web application on your local machine will correspond to
http://localhost:8080. If you’ve configured Domain Name System (DNS) settings for your server, it may also be accessible from a location such as http://www.companyname.com/.
Users access other Web applications by requesting a context relative to the server. For example, users can access Tomcat’s manager Web application with the following URL:
Applications that you place in the webapps folder are named after the directory they’re in. So, you can access the Web application in the
tomcat-docs directory with the following:
http://localhost:8080/tomcat-docs/. Each application on the server is known by its name, and users can access resources according to the remain