I dedicate this book to my wonderful wife, Leila, a creative and kindred spirit who loves to make things with her own hands.
To my son, Joshua, who spent many hot summer days helping put up electric fences, chasing bears away, and lifting equipment as we checked the hives, and who hand-cranked literally hundreds and hundreds of pounds of honey through
the extractor before we put a motor on it.
To my daughter, Mackenzie, my biggest cheerleader, who has always had faith in my abilities and has encouraged me all the way, even though she is terribly
afraid of bees.
Contents
Cover
Title Page
Dedication
Contents
Acknowledgments
Preface
Chapter One: Before We Begin
Safety First and Always
The Tools
Materials
Special Techniques
Planning Your Project
Chapter Two: Starting at the Bottom
Solid Bottom Board
Screened Bottom Board
Slatted Rack
Chapter Three: Hive Bodies and Supers
Hive Body with Butt Joints
Chapter Four: Put a Lid on It
Chapter Six: It’s All in the Details
Hive Spacer
Entrance Reducer
Paint Can Feeder
Bucket Feeder with Screened Plug Insert
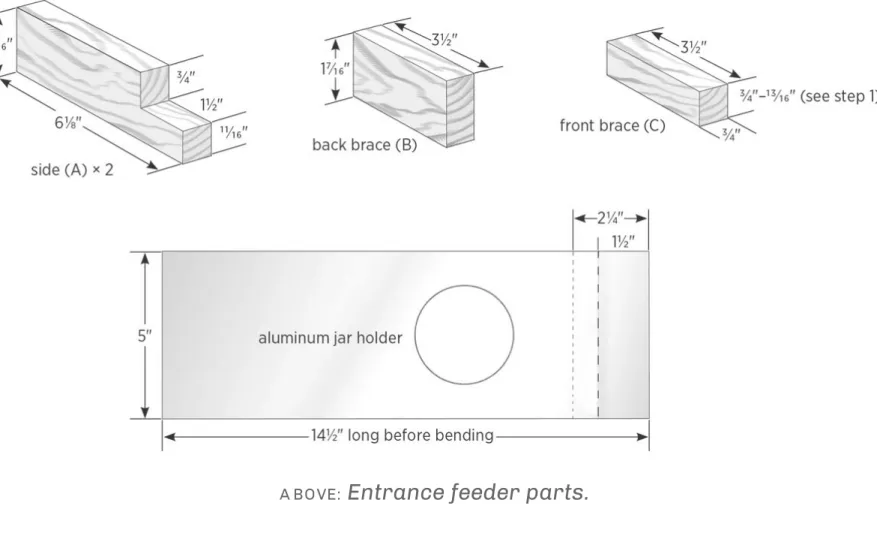
Traditional Boardman-Style Entrance Feeder
Escape Boards
Chapter Seven: Let’s Do a Little Jig
Simple Bending Jig
Frame Assembly Jig
The Best-Ever Jig for Installing Foundation
Simple Bucket Swarm Catcher
Variation: Swiveling-Bucket Swarm Catcher
Wire-Frame Swarm Catcher
Chapter Nine: Building 8-Frame Hive and Nucs
8-Frame Deep Hive Body
8-Frame Solid Bottom Board
8-Frame Screened Bottom Board
8-Frame Slatted Rack
8-Frame Inner Cover
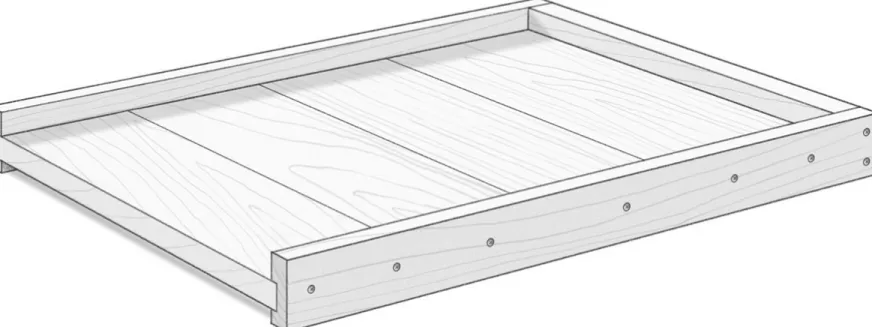
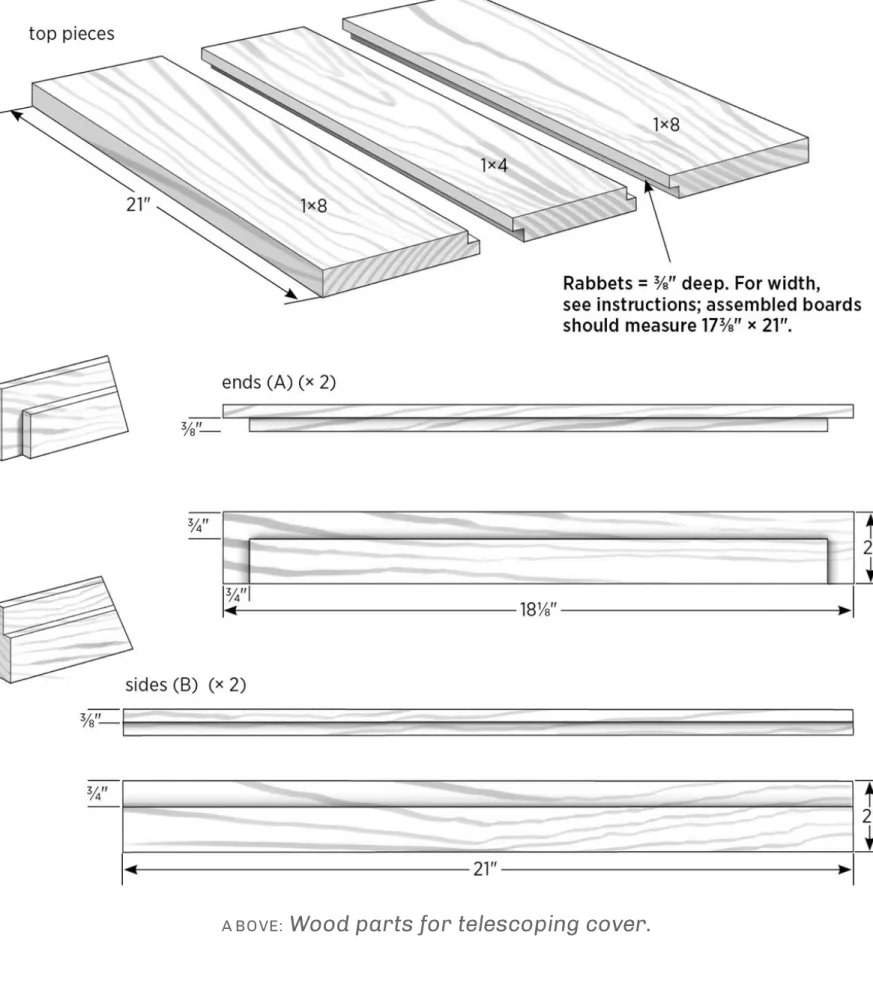
8-Frame Telescoping Outer Cover
Nuc Hive Body
5-Frame Nuc Bottom Board
Chapter Ten: Specialty Hives
Top-Bar Hive
Demonstration Hives
Appendix: Finished Projects
Resources
Other Storey Titles
AC KNOW LE DGME NTS
This book would never have been possible without the help of many people, and I’d like to give them thanks.
First of all, to my dear friend Paul Dugal, Sr., who sparked my interest and got me started in this crazy business of keeping honey bees. When I was just observing from a safe distance, he gave me his extra veil and got me up close. We’ve spent many hours sipping coffee, planning strategies, smoking the hives, and taking trips to Betterbee.
Thanks to my beekeeping buddies Lloyd Vosburgh and Jeff Burdick. They enthusiastically share their years of knowledge and experience. Lloyd and Jeff are everyone’s “go-to” beekeepers when they have a question or a problem or need a queen or frame or brood. Thanks to Tom Stefanik, who has a great love for bees and people and has done a lot to help promote our club, the Northern Berkshire Beekeepers Association, and beekeeping in general.
Thanks to Doone Mackay, my musical partner, who shared her plan for the double hive stand.
I’d also like to thank Deb Burns, Alethea Morrison, and Becca Bradburd, who all convinced me that I could write this book in the first place, and everyone who works behind the scenes at Storey Publishing to organize a pile of papers, sketches, and pictures into something presentable.
Preface
Beekeeping is a fascinating adventure, whether you have one hive in the backyard to help pollinate your garden and supply a little honey to family and friends, or enough hives to produce honey for sale at your local farmers’ market or co-op.
When I decided to get honey bees after a season of observing and helping my friend Paul Dugal, I jumped right in with both feet and really wanted to be immersed in the process. I ordered five packages of bees from Betterbee, in Greenwich, New York. I cut, ground, and filed an old lawnmower blade into a hooked hive tool. I scavenged the local landfill for cans to build a homemade smoker, and I built two complete hives plus most of the parts for the other three, minus the frames.
Bear in mind that everything didn’t come out perfect. My boxes were a little too wide and the bees attached some extra comb to the sides. The spring I used for the smoker bellows was a little weak, and the nozzle was made from copper pipe fittings, so it didn’t puff out clouds of smoke like the fancy store-bought models.
That didn’t matter. What mattered was that I made them with my own hands, and they worked. At the end of the season, which, as beginner’s luck would have it, was a banner year, I extracted 400 pounds of honey from those five hives! I will never forget it.
Why should you build your own beekeeping equipment? The sheer pleasure of doing it yourself is reason enough. Continuing the tradition of people working with their hands and solving their own problems is another good one. By the time you are finished, you will have a much better understanding of the parts that make up a hive, how they are constructed, and how they all work together as a unit. You can find and use sources of scrap wood that will save you money and keep stuff out of the landfill. I guess a harder question to answer would be: Why not?
The chapters are arranged somewhat in order from the bottom of the hive up to the outer cover. There is a separate section on building 8-frame hives. Go in order from beginning to end or jump around; the choice is yours. You can browse the book and start with the simplest projects first, like a hive spacer or entrance reducer, and work your way through the harder ones as you gain confidence and skills. None of the projects are all that hard, and once you learn to make the basic cuts you’ll feel like a pro.
This book is not meant to be the last word on building beekeeping equipment. If it were, then I would have failed miserably. What it will do is show you how to build entire 8-frame and 10-frame hives (in traditional Langstroth style) that will be ready for frames and bees, as well as a top bar hive (if you want to keep things basic), and many other projects that make beekeeping easier. Hopefully the book also will spark your own imagination and creativity. By all means, use it as a reference and a starting point. Make changes and improvements to the projects in these pages, and share them with others. Come up with totally new ideas. That’s how we make progress.
Being prepared is important for building a successful project. This means having a safe work area, using safe methods and the proper tools, and having the materials you need on hand. If you read more than once that safety is first and foremost, it’s because it can’t be stressed enough. This chapter is a rundown of all the tools and materials used for the projects that follow. The project instructions are written for those with a basic level of knowledge about working with wood. If your experience is less than basic, so to speak, see Getting Help on page 13 for some ideas on places to start.
Safety First and Always
The one thing that should constantly be on your mind while doing any of these projects is safety. I could devote this entire book to the safe use of power tools and equipment, but that would leave no room for projects. Here are some tips:
Know your machinery; read and reread the owner’s manuals.
Use all tool guards and safety devices. Some pictures in the book show tools with guards removed for clarity. In these cases, the tools were turned off and
unplugged, and the photo was set up to show a particular step. Always use the guards that came with your machinery.
Wear ear, eye, and dust protection or a respirator. Many people protect their eyes, but not their ears. Constant, loud, high-pitched noise can damage your hearing. Anything can cause injury, from a flying nail sent your way by a glancing hammer blow to a piece of wood caught by a bound-up saw blade. Cutting pressure-treated and other woods can produce harmful dust. Protect your lungs from sawdust, fumes, and other hazards by using an appropriate dust mask or respirator.
Wear gloves as appropriate. You should always wear gloves when cutting screen and sheet metal. As a general rule, you should not wear gloves when operating power tools. A drill bit or other rotating part can easily snag a cuff or fingertip of a glove and pull your hand into the moving parts.
Don’t wear jewelry or loose clothing. Keep your work area clean.
pushing a board through a saw that’s spinning at 3,500 rpm.
The Tools
I’ve tried to minimize the number of tools and techniques needed for these projects. If you have tools other than the ones listed, by all means use them. Whatever makes the work go easier and faster is fair game. For example, I usually use a shaper to cut rabbets on the ends of my boxes and for frame rests, but here I used the single blade on a table saw to be sure that it could be done with the simplest of setups. I also kept my dado blades packed away in the drawer. What follows is the mainstay of what I used to make everything.
Measuring and Marking
After planning your project, the next steps usually are measuring and marking the stock to be cut. This critical step must be done accurately. After all, the straightest saw cut on a line that’s marked in the wrong place will not make for good work. As always, high-quality tools are a pleasure to use and will last for generations. Take your time and start off on the right foot, and your project will go smoothly.
Tape measure. I use a tape measure for quickly checking if a board is long or wide enough to use, or to measure for a rough cut. Other than that, it sits on the bench most of the time, and I use a scale instead.
Scale or ruler. For most measuring I use a 24" rigid aluminum scale. It has accurate markings and is my go-to tool when setting the fence on my saw or measuring something to cut. It’s long enough to measure any piece of wood for beehive building and I wouldn’t be without it.
Combination square. Though not essential, this is helpful for setting stops and saw blade heights. It also provides a quick way to draw a measured line down the side of a board for a nail or screw guide. A square with a protractor head lets you measure and mark angles as well.
find something the right size to trace around for a circle, and none of the round cuts we will make are critical.
Prick or center punch. This is used mostly for marking metal to keep the drill bit from wandering when you start a hole, such as with the extending pole for the swarm catcher or some of the sheet metal parts.
Dial calipers. I use calipers for measuring something with a close tolerance, like checking the size of unmarked drill bits. I also used them for measuring the spacer and frame guides for the frame assembly fixture.
Pencil and marker. I prefer mechanical pencils because you can renew the point with a simple twist of the barrel. A marker is handy for marking screen.
Plan for Slips and Mishaps
Back in the early ’70s, when I entered vocational school, our machine shop teacher gave us this advice: “Don’t fear your machines; learn to respect them.” What he meant by this was, intimately learn how your tools operate. Get to know their dangers and also learn their limits. Don’t try to make a tool perform something it’s not made to do. And keep your tools sharp. A sharp tool is less likely to slip or jam.
Whenever I’m working with a tool even as simple as a screwdriver or chisel, I think, “Where are my hands in relation to the business end of this tool, and is there any chance my hands and the tool might meet?" If the answer is "yes," then I’m doing something wrong that needs to change immediately. The day will come when a chisel or screwdriver will slip or a drill bit will snap.
Always be alert. The best advice I can give you is: If anything you are doing, or are about to do, doesn’t feel safe, chances are it isn’t.
Cutting and Shaping
bits hold their edges many times longer than high-speed tool steel. Even today’s handsaws have blade configurations that allow them to cut much faster than their older counterparts. No matter how advanced tools get with computerized controls, the old standbys still get the job done.
Handsaw. A good standard handsaw comes in handy for rough-cutting long boards for easy handling when you don’t want to bother dragging out a circular saw and extension cord.
Keyhole saw. A keyhole saw has a long, narrow blade that tapers to a point. I use mine to cut out the slot in my inner covers.
Hacksaw. Hacksaws are used primarily to cut metal, but a new blade will give a really smooth cut in wood. I find myself using it for things like cutting the small stops for the foundation board or the angles on strips for bee escapes. Of course, a coping saw or fretsaw will also work for small wood parts.
Miter box. The miter box has been around for a long time. It’s a hand-powered version of the miter saw. You set a backsaw (a small handsaw with a rectangular blade that has a stiff spine to keep the blade rigid) in the box and can accurately cut boards square or at angles easily by hand. Simple miter boxes have fixed slots to guide the blade for 90-degree and 45-degree cuts, while adjustable miter boxes can cut a full range of angles. A miter box is great for parts like the risers on hive stands or the angled strips on the bee escape boards found in this book.
Tin snips. Snips are necessary for cutting sheet metal for hive tops and feeders, and to cut screen for various projects.
File. A mill-bastard file is a good general-purpose file for deburring metal after you cut it. A wood rasp can be used to round over the corners of boxes and covers.
Sandpaper. I don’t mention sanding often in the instructions, but a quick once-over with a piece of 100-grit paper will quickly smooth edges and prevent splinters in your fingers.
Fastening
adhesives. If you’ve ever driven a number of slotted screws with a standard screwdriver, you know why the word “frustration” is in the dictionary. Today’s modern deck screws are corrosion-resistant, need no pilot hole (in many cases), have self-countersinking heads, and can be driven with one hand, using a power drill or driver. There also are a number of waterproof glues at our disposal.
Of course, the hammer and nail will never go out of style, and clamps allow us to perform tasks that would require many extra hands.
Hammer. A well-made hammer will last a lifetime and is less fatiguing to use than a budget tool since it absorbs shock more effectively. I have more than one size and select the one that’s appropriate for the job.
Work tip: I once won the frame-nailing contest at the Massachusetts State Beekeepers Field Day. I chose the hammer with the smallest head because I knew it would be easier to use for starting small nails but was still heavy enough to drive them home quickly.
Screwdrivers. Not much to say here. Screwdrivers that fit the screw you are driving are essential. I use my cordless driver almost exclusively, with the exception of installing hinges and other small hardware. Many of the different screws available come with a bit to fit the screw heads right in the box.
Staple gun. I use this with an assortment of staple lengths for attaching the screen on screened bottom boards and inner covers, as well as for installing mouse guards on hives.
Drilling
Right off the bat I’ll say, get yourself a variety of good drill bits. This is one area where the saying “you get what you pay for” really rings true. A good-quality cutter will stay on-center, drill a clean and accurate hole, not overheat under normal circumstances, and stay sharp for a long time. No matter how shiny and nice it may look, a cheap cutter will not be accurate or hold an edge and may even bend or break on first use. Buy good brand names. Besides your local lumberyard or home center, see if there is an industrial supply store in your area. They will have good-quality tools and a full range of bit sizes you may not find in the hardware store.
A set of drill bits. Different bits are useful for so many things. Good-quality brad-point bits are the ticket for wood. They won’t walk when you start them, and they cut a clean hole. They also drill through aluminum flashing easily.
Forstner bits. Forstner bits cut around the perimeter of the hole first so they don’t leave a ragged hole, due to tearout, when they break through the material. They can also be used to make two or more holes close together for roughing out slots.
Hole saws. Hole saws are used for larger-diameter holes, such as for making escape boards. They typically are used for rough work and can create significant tearout on the back side of the material, but you can prevent this by drilling partway through the material from one side, then completing the cut from the other side. The hole made by the guide bit in the hole saw’s center ensures the two cuts are aligned.
Spade bit. Like Forstner bits, spade bits are used for fairly large-diameter holes (over " or so) but aren’t quite as clean-cutting. You have to watch for tearout with these; for a clean cut, drill from both sides of the material, as with a hole saw.
Work tip: The guide bits or points on Forstner bits, hole saws, and spade bits are there to keep the rest of the bit in place while it works against the material. You can start these bits in solid wood or small pilot holes, but if you try to start it in an existing hole that is larger in diameter than the guide bit or point, the drill bit (or hole saw) won’t stay centered and will walk all over the place.
⁄
Center drill. A center drill is a metalworking bit used to create a guide hole for drilling through metal. First, punch the location of the hole, using a center punch, then drill a guide hole with the center drill. This ensures that the larger drill bit you’ll use to make the final hole starts in the right location and, more importantly, that the hole comes out round.
Combination drill/countersink bit. You can buy these individually or in small sets of three sizes. They are great because they drill a pilot hole so that your screw won’t split the wood, and they also countersink the hole for accepting the screw head, so the head finishes flush with or slightly recessed below the wood surface. Depending on the type of screws you buy, you may not need to predrill the holes, but it helps.
Getting Help
If you’re new to building projects and basic woodworking, take advantage of any expert advice you can find. Here are a few sources that have helped me:
Find a mentor, if possible, who will show you the ropes and work with you on some projects. When I got started, I took a night course in woodworking at our local trade school. Before that, I didn’t know that a 1×4 doesn’t
actually measure 1" by 4" (see Lumber Dimensions, page 15). If you belong to a beekeeping club, this book is a great opportunity to get together and build some equipment, and to share tools, resources, and ideas.
Read a good book on power tools and woodworking. While a book won’t replace a good mentor or hands-on experience, I can assure you that many of the skills I’ve learned came from reading a book about how to do
something and then just going out and doing it. A couple of good ones that come to mind are Woodworking Tools and Techniques: An Introduction to Basic Woodworking, by Chris Marshall, and Woodworking FAQ, by Spike Carlsen (see Resources).
Support your local lumberyard. I find that the quality of wood sold by many large chain stores usually doesn’t compare to that of a smaller
good advice. Become their patron and friend. If you take care of them, they’ll take care of you (and you’ll help them stay in business!).
Power Tools
Now on to the bigger stuff. Again, I didn’t use a lot of different power tools, but those listed here are pretty much required to build your hives. Also keep in mind that often there are easier ways of performing many of the operations covered in this book. I’m showing the basic way you can do things using the simplest of tools.
I actually made just about every cut in the book using the single blade on my table saw. Normally I’d use my shaper if I were going to cut a lot of rabbets, but not everyone has one of those, or even a router table, for that matter. If you do, by all means use them and make your work as easy as possible.
Table saw. This is the workhorse of the group. A good saw with a cast-iron table is hard to beat. I have a Craftsman 10" saw that I bought secondhand in the mid-1970s, and it’s still going strong. Mine is mounted on a heavy wooden table and has an induction motor with belt drive. It’s not a Cadillac, but it gets the job done. I would avoid buying a new saw with light plastic housings and direct-drive motors, if possible. They are much noisier and vibrate more than heavier-duty saws, and often they don’t have the capacity needed to cut larger pieces safely. If money is a big concern, shop for a better saw secondhand.
Drill and driver. While a drill press would be handy for many of the drilling operations in the book, I stuck to using a hand drill to be sure everything could be done that way. I did go cordless, though.
It’s most handy to have a drill for drilling pilot holes (and other holes) and a driver for driving screws, so you don’t have to keep changing bits between operations. But if you have only one tool, all drills and most drivers can be used for both drilling and driving. You can buy drill bit sets with hex shanks for use in impact drivers. One advantage to these is that it takes about 2 seconds to change bits, and there’s no chuck key or loosening and tightening of drill chucks to deal with.
showed up to work one day with a Makita cordless set that included a drill with a variable clutch and an impact driver, which has a hammer-like action for driving tough screws. After using them, I was convinced and bought a set myself. Today’s models have a lot more power than earlier versions, and the batteries last longer between charges and also charge much faster. They’re probably the most-used tools I own. I even used the impact driver to push the 2 " hole saw through the plywood on the escape boards.
Miter saw. A powered miter saw is a real workhorse in the shop. When set up with an adjustable stop, it can’t be beat for cutting multiple parts to length or for cutting accurate angles.
Circular saw. I occasionally use one for cutting plywood into more manageable sizes, or right to size with a guide board clamped to it. With a good guide, the circular saw can manage many of the cutting tasks generally relegated to the table saw.
Jigsaw. You’ll use this for cutting holes, in place of hole saws or larger Forstner bits, and also for making slots.
Router. A router can cut rabbets and dadoes that you might otherwise cut on a table saw, and it can round over edges for a professional look. I used mine for making the winter cover and demonstration hive.
Electric brad nailer. While also not a necessity, a brad nailer sure is handy for attaching things like slats on the slatted racks, filler pieces on bottom boards, and wedges when assembling frames. I have an Arrow brand nailer that I love. It takes about 10 seconds to switch nail sizes. Be sure to wear eye and ear protection while using this tool. An assortment of wire nails and a hammer will also serve the purpose, so don’t run right out and buy a nailer if you won’t have other uses for it.
Extension cords. Always use extension cords that are heavy enough to carry the load you will put on them. This is indicated by the cord’s amperage rating, which should be marked, and your power tools have nameplates that specify how much amperage they draw. If you are working outside, be sure to plug the cord into a GFCI (ground-fault circuit interrupter) outlet or use a GFCI-protected cord to reduce the
⁄
risk of shock due to moisture and other fault situations.
Materials
Honey bees can and have been kept in almost anything imaginable, from clay pots to straw skeps and hollow logs (bee gums). However, in the United States, bees must be kept in a hive with removable frames so they can be inspected for disease. You can use all kinds of materials to build your bee equipment, from rough-sawn lumber to milled wood from the lumberyard, leftovers from a construction site, or a barrel cut in half and used for a top bar hive. There are even hives made out of Styrofoam.
For the projects in the book, I stuck with standard materials you can pick up at any well-stocked lumberyard. If you want to substitute with salvaged materials or extra supplies you have lying around, great. I do it all the time.
Wood
Almost every project in this book was made with pine, readily available at your local lumberyard, with a good amount of scrap wood salvaged from various places. Cedar, though more expensive, is a good choice for its natural resistance to rot.
Lumber Dimensions
If you’re new to woodworking, it’s important to know that usually there’s a difference between the nominal size of a solid-lumber board (what it’s called) and the actual size (what it actually measures to). The nominal comes from the board’s original rough-sawn size, while the smooth milled piece you buy often is smaller. For example, the actual dimensions of a 1×3 are about " × 2 ". The actual size of a 2×4 is about 1 " × 3 ". Most of the lumber in this book is “1-by,” or about " thick.
As far as the width goes, the differences between the nominal and actual dimensions are slightly more tricky. The actual width of a board is about " less than its nominal width — up through 7". For example, a 1×4 is actually 3 " wide, and a 1×6 is 5 " wide. However, starting at 8" in width, the actual dimension typically is
surfaces, which often add to the wood’s actual dimensions. For example, a rough-sawn cedar 1×4 might be " thick. The bottom line is that you have to measure the material before you buy it. This is the only way to ensure you’ll have what you need. You can always make a wide board narrower, but trying to grow a board that’s too narrow is a lot more difficult.
What this means to us as beekeepers is that a 1×10 measures " × 9 ", not quite wide enough to make a deep super. You can either buy a 1×12, which gives you extra material to make handles and spacers, or you can glue boards together on-edge to get the width you need. I’ve found that both methods work fine. If I glue up boards, I tend to put the narrow section on the bottom. There is usually more stress on the top of the hive, where the edge is used for leverage to pry out frames.
If you encounter some cupping of the wood, which you probably will, plan so that when you clamp the board during assembly, you will be pulling the center down flat with the mating surface.
Dealing with Outdoor Exposure
Plywood that will be exposed to a lot of moisture should be exterior grade, although lauan (a.k.a. Philippine mahogany, a thin, inexpensive plywood) is fine for inner covers. Don’t build your hives using pressure-treated materials, due to the toxicity of chemicals used in the process.
Finishing your project is your chance to get really creative. You’ll want to apply some kind of finish to the outside parts of your hive to resist weathering. Some beekeepers use a linseed oil mixture for a natural wood look. The traditional finish for beehives is white paint on everything. One of my favorite parts about building hives is painting them a variety of colors.
I start with a good coat of exterior primer. Then the fun begins. You can buy mis-mixed paint from paint stores or the paint departments of larger hardware stores (even with computerized coloring equipment, paint mixtures often turn out wrong, leaving the store with gallons of unwanted paint). If you really want variety, go to a craft store where you’ll find small containers of almost endless shades of colors. It’s more expensive this way but widens your horizons.
I want my hives to be a joy to look at as well as work with, and if you have more than one hive, you’ll be helping the bees as well: they will recognize the different colors or patterns and have an easier time finding their own hive entrance, which will cut down on drifting.
⁄
7 8
⁄
Hardware Cloth
I’ve talked to many beekeepers who say they can’t find hardware cloth needed for beekeeping. Hardware cloth is square-grid metal mesh made with galvanized wire (or sometimes other materials). It’s sold in rolls in various sizes, with the mesh size indicating the distance from wire to wire. It can be expressed by that dimension or by the number of wires per inch. One of the most common sizes we use is #8 mesh, which means " from one wire to the next, or eight wires per inch. The actual space between the wires will be that distance minus the diameter of the wire. If you can’t find the right hardware cloth at your local hardware store or home center, it’s usually available from beekeeping supply houses.
Fasteners
The three primary fasteners we will use are screws, nails, and glue. The screws specified most commonly throughout the projects here are deck screws, which are coarse-thread wood screws designed for outdoor exposure.
Unless directed otherwise, always drill countersunk pilot holes for deck screws, to prevent splitting the wood and to create a clean, cone-shaped recess for the screw head to fit into. Screws with square-drive heads slip less than Phillips-head screws when installing. Star-head screws are great too, and I use them a lot.
Work tip: Screws get better all the time; my current favorites are Power-Pro star-drive screws. They have crosscut threads and need no pre-drilling. The head cuts its own countersink, and the star drive makes bit slippage virtually a thing of the past. They come in a variety of lengths for most any application.
The nails you use on the outside of your hives should be galvanized for rust resistance. In some cases, especially with the smaller wire nails, it’s hard to find galvanized, but nails used inside the hive don’t need the same amount of protection against the elements.
Most wood glue manufacturers make a high-quality waterproof glue, which is essential when it comes to building beehives. Pick a brand that you like. Just make sure it’s rated for outdoor exposure; most standard wood glues are not.
⁄
Special Techniques
Here are a few woodworking tips and tricks for working with — or without — a table saw.
Making Straight Cuts (without a Table Saw)
One area that has been a real boon for woodworking is accessories. You can find any number of saw guides that quickly clamp to a workpiece to guide your circular saw or jigsaw for cuts that are straight and square. Of course the tried and true method of using a square, two clamps, and a straight board as a guide works as well as ever.
Whatever guide you decide to use, clamp it to a piece of scrap and make a cut with your saw. Measure the exact distance from the guide to the cut you just made, and write this dimension right on your tool. That way you’ll know exactly how far you’ll need to place your guide away from the line you intend to cut.
Zero-Clearance Fence
A zero-clearance fence is simply a sacrificial board attached to your regular table saw fence. The setup allows you to make a cut lengthwise on the very edge of a workpiece, such as when rabbeting the long edge of a board (for rabbeting short ends, you typically use a miter gauge).
To make a zero-clearance fence:
1. Screw, bolt, or clamp a straight piece of wood to the face of your saw fence. Make sure that any clamps hold the board flat against the saw fence and don’t obstruct the movement of your workpiece, your push stick, or any safety
devices.
2. Slide the fence over until the edge of the board just touches the blade. Lower the saw blade below table level, then nudge the fence over just a hair toward the blade and lock it into place.
A BOVE: Zero-clearance fence.
Cutting Dadoes and Rabbets with a Router
Making rabbet and dado cuts with a router is a viable alternative to using a table saw. A good router will have a quality adjustable guide (often sold as an accessory) that you can set to control the width of a rabbet or the distance of a dado from the edge of a board. You can also buy router bits with interchangeable bearings that roll along the edge of the work to control the width of a rabbet. A router mounted on a router table with a good fence and miter gauge will easily tackle all the rabbet and dado cuts in the book. (For examples of dadoes and rabbets, see pages 27–29.)
No Dado Blade? No Problem
Don’t worry if you don’t own a dado blade for your table saw. For most of the projects in the book, I just used the regular blade on my table saw and made multiple passes.
Set the blade height for the desired dado depth, and position the fence to cut the side (shoulder cut) nearest the fence.
pass to clear out more of the dado.
Continue moving the fence and cutting until your dado is the desired width.
Planning Your Project
The best way to plan for these projects is to read through each one completely before you start. Review the illustrations and get a sense of what cuts you’ll be making, how each project will be assembled, and what the finished product will look like. Gather your tools and materials and get started.
I’ve tried to do most of the hard work and planning for you ahead of time. I started with commercially available frames, made lots of measurements, and built the hives from the inside out to fit them, striving to maintain proper bee space. The projects you will find here have spent practical time in the bee yards and are bee-approved.
Most boxes available for purchase don’t exactly follow bee space. They’re usually made bigger to allow for variations in frame sizes, swelling of wood, and propolizing. When setting up your hive, you typically keep the frames pushed tightly together, so that proper bee space is maintained between them. This whole group of frames is then centered side-to-side in the hive. Bees usually store honey in the outermost frames, taking advantage of any extra space there and drawing out those frames on the outer sides.
Starting at the Bottom
CHA PTER CONTENTS
Solid Bottom Board
Screened Bottom Board
Bottom boards — both solid and screened — and slatted racks make up the first components in your hive. Deciding which to use may be the hardest part. You can use all three together or any combination of them. Talk to other beekeepers in your area to see what works for them, then decide how you want to set up your hive.
Bottom Boards Defined
Solid bottom boards provide the base on which all other hive parts will rest. The bottom board must carry the full weight of the hive, which can be more than a few hundred pounds if you are running two deep boxes for brood and have several full honey supers on top. When a solid bottom board is used alone, it becomes the landing board for the bees as they fly off in search of nectar, pollen, propolis, and water, and return with their load of goods. For this reason, the bottom board is usually a few inches longer than the hive bodies themselves.
Screened bottom boards, commonly called varroa screens, are used as part of a n integrated pest management (IPM) program to help reduce the number of varroa mites in the hive. The way they work is very simple. When varroa mites fall off the bees, either naturally or with the use of a control method such as powdered sugar dusting, they fall through the screen, below the hive, and are unable to attach themselves to another incoming bee.
P RO JE C T
Solid Bottom Board
The simple bottom board in this project will fit the hive bodies I show you how to build in chapter 3. Tongue-and-groove boards make for the strongest solid bottom board, but you can also use half-lap joints, or even straight sides, butted together and glued. What you use for these pieces may change your material list. The plan below is for using ⅜" half-lap joints. The parts consist of two sides (A), four platform boards (B-1 through B-4), and a filler strip (C), as shown in Assembling the Solid Bottom Board, on page 21.
Any sturdy solid wood will work as material, such as pine, spruce, cypress, or cedar. You may want to use a solid bottom board in conjunction with a screened bottom board (page 22), making it easy to slide a sticky board or tray underneath to check for mites.
Tools
Table saw
Drill with combination drill/countersink bit
One 6-foot pine or cedar 1×6
One pine or cedar 1×8, 16" minimum
Waterproof glue
Twelve 1 " deck screws
Four 1 " deck screws
A BOVE: Joint options for bottom board.
1. Make the sides.
⁄3 4
⁄
Square off the 1×6 and cut one piece to length at 22" long and three pieces at 15 ". Square off the piece of 1×8 and cut it to length at 15 ". On a table saw, rip the 22" 1×6 into two pieces that are 1 " wide for the sides (A). Save the cut-off piece and trim it to length at 14 ", then set it aside; this is the filler strip (C).
Set the saw fence at " from the blade, and set the blade height at ". Make a test cut using scrap, then cut a "-wide dado in both of the side pieces, moving the fence away a little at a time and testing the fit until the pine boards will slide in the slot. Don’t make it too tight, because the boards may have some cupping. Using a combination square set to ", draw a screw guideline down each side piece centered over the dado.
A BOVE: Solid bottom board parts. flush. When placed together, your platform boards should measure 22". If necessary, trim the 1×8 (B-4) to get the 22" dimension.
3. Assemble the bottom board.
Dry-fit all of the bottom board pieces. If everything fits right, generously glue the dadoes in the sides and the half-lap joints and reassemble the boards. Use two pipe or bar clamps to clamp the assembly. Check for squareness. Drill countersunk pilot holes for 1 " screws, and install the screws. I put two screws in the end boards (B-1 and B-4), about (B-1" from each edge, and one screw centered in the two center boards (B-2 and B-3). Let the glue cure as directed.
A BOVE: Assembling the solid bottom board.
4. Install the filler strip.
You can install the filler strip permanently by driving screws or nails through the sides, or make it removable for easier cleaning of the bottom board. To make it removable, drill through the sides into the filler with the drill/countersink bit. Remove the filler and open up the holes in the sides with a " drill bit. Replace the filler strip and drive two 1 " screws through the holes and into the filler.
Next, looking from the back of the bottom board, drill pilot holes about 2" in from each end of the filler strip and drive two 1 " screws, leaving the screw shanks and heads sticking out enough to grab onto; these will act as pulls for removing the filler piece.
5. Finish the board.
P RO JE C T
Screened Bottom Board
Screened bottom boards were offered in the Dadant catalog (see Resources) beginning in 2002. Virtually all companies that sell beekeeping supplies now offer varroa screens in their catalogs. They were probably predated by the use of open mesh floors in the UK, referenced in a July 1990 article by Helmut Horn in Bee Craft
magazine.
Varroa screens can also help with ventilation and the prevention of moisture buildup in the hive. If you use a screened bottom board on top of a solid one, the screened board becomes the landing board, so it’s best to block off the space between the two to prevent bees from going under the screen.
Some beekeepers (even here in the cold Northeast) use the screened boards as stand-alone bottom boards, so the mites fall directly on the ground. One member of our club leaves them wide open all year round with great success and low hive losses, but I’m too chicken to try it with our long and cold New England winters.
Tools
Table saw
Tin snips
One pine 1×6, 15 " minimum
One piece #8 galvanized hardware cloth, 18" × 14 " minimum
Waterproof glue the blade and rip two strips from the 22" piece. Cut each of these to length at 16 "; these are the filler strips (C).
Adjust the table saw fence to " from the blade and rip one strip from the 1×6, then cut it to length at 14 "; this is the top end piece (E).
leftover piece to size at 1 " wide × 15 " long; this is the bottom end piece (D).
Rip the remaining piece from the 1×6 to 4 " wide; this will be the landing board (B).
⁄
1 4 1 4⁄
⁄
A BOVE: Screened bottom board parts.
2. Prepare for assembly.
Sand the edges of all the wood parts, then dry-assemble the project, as shown in
Assembling the screened bottom board (facing page): Fit the landing board (B) into the dado slots of the side pieces (A) so it’s flush with the front ends of the sides. Place the side fillers in the dado slots against the landing board, then slide the bottom end piece (D) into place. Confirm that everything fits well, then disassemble the parts.
Cut a piece of hardware cloth to size at 14 " × 18", using tin snips.
Drill three countersunk pilot holes in each side piece, as shown. Be sure to make one left-hand and one right-hand.
⁄
A BOVE: Screened bottom board assembly layout.
3. Assemble the project.
Apply glue to the dadoes of the side pieces and assemble the parts as before. Check the assembly for square, then tighten two pipe or bar clamps across the sides to hold everything in place. You can use C-clamps or spring clamps to hold the side fillers in place.
Drive 2" deck screws through the sides and into the landing board, and drive one screw into each side to hold the bottom end piece in place. Fasten the fillers with five 1 " brads, spaced evenly and nailed from the outside. Remove the clamps.
Clamp the top end piece (E) in place for reference and staple hardware cloth along its edges using " or " staples. You have the option of attaching the top end piece or not, so it’s removable for easy screen cleaning (that’s what I prefer). If desired, you can drive in a couple of nails or screws partway, leaving them sticking out the end, to give you something to pull on for removal.
⁄
1 4
⁄
P RO JE C T
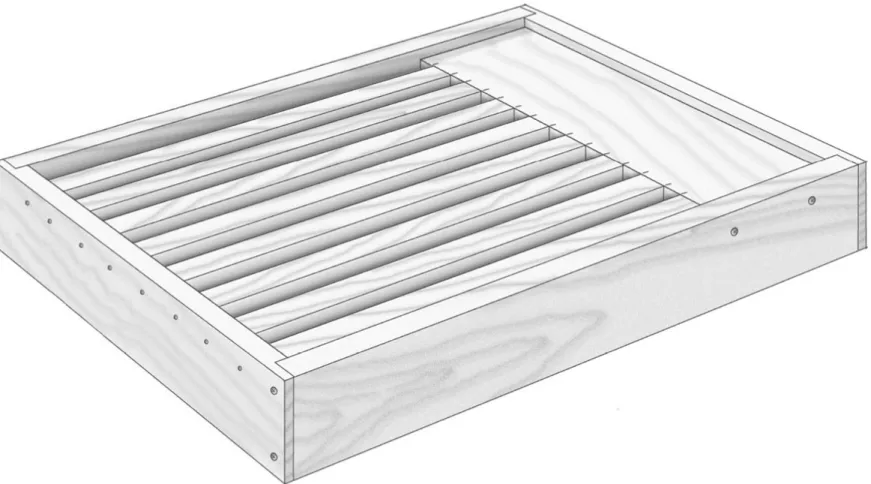
Slatted Rack
I’m not sure when slatted racks were first developed. The first reference I found was in the June 1968 edition of Gleanings in Bee Culture, published by the A.I. Root Company. In early versions, the slats went from side to side, but with the advent of IPM, slats were reoriented to go from front to back and line up with the frames. This allows varroa mites to fall through a screened bottom board.
This slatted rack design consists of two identical ends, two identical sides, a shelf, and 10 slats. It’s a good idea to read through all the instructions to familiarize yourself with the procedure before you get started. This project has a fair number of parts, and a brad nailer makes assembly a lot faster and easier.
Tools
Table saw
Router table (optional)
Twenty 1 " brads (for brad nailer) or ten 4d galvanized box nails
Twenty " brads (for brad nailer) or " or " wire nails
1. Cut the ends and sides.
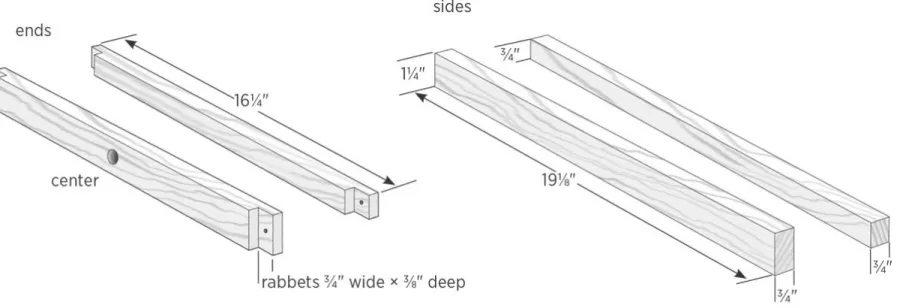
Square the end of the 1×8, then cut two pieces to length at 15 ". Square the end of the 1×6 and cut one piece to length at 16 " and one piece at 19".
Set your table saw fence to 2 " and rip two pieces from the 16 " board; these are the ends. Rip two pieces from the 19" board to create the sides.
A BOVE: Slatted rack sides.
2. Mill dadoes and rabbets into the ends.
Each end piece gets a full-length, "-wide × "-deep dado, starting " from the top edge of the piece; these will accept the unmilled slat ends and the shelf. Each end piece also gets a rabbet at each end to accept the side pieces. The rabbets create strong corner joints and help to keep things square during assembly.
Make the dadoes using a table saw and standard blade or dado blade (see No Dado Blade? No Problem, on page 17) or a router table. Test-fit a piece of the 1×8 material (which will be used for the slats and shelf) in the dadoes, and make any necessary adjustments.
Keeping the blade height at ", set your fence so the distance to the far side of the blade is ". Make a test cut with a piece of scrap material, using the miter gauge. Test-fit the cut with a side piece, and make any necessary adjustments. Position each end piece with the dadoes facing down, and cut rabbets in both ends, using the miter gauge.
3. Dado the sides.
The side pieces also get " × " dadoes, but these are blind dadoes and don’t run the full length of the boards. Also note that there is a left side and a right side, and they’re not interchangeable. This dado will hold the shelf, which is 4 " wide, so the full-depth portion of the side dado must be at least that long.
from the high point on the blade 4 " toward the back of the table and clamp a stop to the fence. This ensures that the full depth of cut is enough to accept the shelf. Once you are set up, the process is the same as cutting the dados in the sides.
The right side piece is a mirror image of the left. Move the saw fence to the other side of the blade and repeat the same process to cut the dado.
Safety note: When cutting the blind dado, cut until your board hits the stop, then shut off the saw. Let the blade come to a complete stop before backing off your piece and moving the fence.
You can also make the blind dadoes with the router table, using the same technique of measuring to the center of the router bit and setting a stop. If you want a very tight fit, you could make the dado 4 " long and round over the shelf for a precise fit, or chisel the end of the slot square. But we’re not building fine furniture here, and I really don’t think the bees will notice the difference.
A BOVE: Setting stop for blind dado in sides.
⁄
1 4
⁄
A BOVE: Completed dadoes.
4. Cut and dado the shelf.
Cut the shelf piece from one of the 15 "-long 1×8s. Set the table saw fence to 4 " and rip one piece for the shelf. Save the leftover piece; you will use it for some slats. The shelf needs a "-wide × "-deep tenon slot centered along the length of one edge. Set the blade height to ", and set the fence to ". After making a test cut, cut one slot, then rotate the board and cut another slot. Move the fence and clean out the center to complete the slot.
⁄
1 4 1 8⁄
⁄
3 8 7 16⁄ ⁄
A BOVE: Slatted rack shelf and slats.
5. Make the slats.
Use the two remaining 15 " pieces to make the 10 slats. There is enough material for a few extras. The slats get a tenon that fits into the dado of the shelf. Set the saw blade back to " high, and set the fence so that the distance to the far side of the blade is ". After making a test cut, cut a rabbet in one end of each board that measures " wide × " deep. Flip the board and repeat to cut a second rabbet, thus completing the tenon. Check the fit of the tenon in the shelf. Raise the blade and set the fence to ", then rip the slats.
⁄
1 4
⁄
3 16
⁄
7 16
⁄
7 16 3 16⁄
⁄
A BOVE: Slatted rack parts layout.
6. Begin the rack assembly.
Dry-fit the pieces of the frame, shelf, and a few slats as shown. Mark the locations of all screws and the slats. Disassemble the rack and apply glue to the dadoes of the side pieces and the end piece with the five screw holes only. Note: Do not apply glue to the other end piece or the dadoes that the slats will fit into.
A BOVE: Square up the rack, clamp together, and attach the shelf using 2" screws
(2 at each end).
7. Install the ends.
To install the first end, drill pilot holes and drive five screws into the end piece, making sure everything stays straight and square. Three of these screws will go into the shelf and two will go into the sides. Install the second end using four screws, but don’t tighten them all the way. Remove the bar clamps. The ends should be loose enough for you to get the slats lined up with their marks.
Once you have the slats pretty much lined up, fully tighten the four screws in the second end. You’ll still be able to tweak them a little if needed.
8. Attach the slats to the end piece.
Draw a line across the end piece, " down from the top edge; this is the nailing line for your (non-tenoned) slat ends. Fasten each slat end with two 1 " brads if you have an electric brad nailer, or one 4d galvanized box nail if you’re nailing by hand. Be sure to check the alignment of the slats as you go. It’s a lot easier to get them in the right place the first time.
⁄
5 8
⁄
A BOVE: Nailing slats to end piece.
Work tip: If you have enough scrap pieces of pine, you can cut them to use as " spacers for lining up the slats. This will be helpful if you plan to build a lot of slatted racks, because you can use this first finished one as a template for building an assembly jig.
9. Fasten the tenoned slat ends.
Draw a nailing line across the shelf about " from the edge. If you didn’t use spacers, readjust the tenon ends of your slats to line up with their marks. If you’re using a brad nailer, switch to " brads. If you’re nailing by hand, use " or " wire nails. Nail down through the shelf into each slat in two places.
⁄
3 4
⁄
1 4
⁄
Hive Bodies and Supers
CHA PTER CONTENTS
Hive Body with Butt Joints
Hive Body with Rabbet Joints
Making your bee boxes is pretty simple. It involves cutting parts to size and making rabbets that your store-bought bee frames will rest on. You’ll have joint options for assembling the boxes. By attaching angled handholds to the outsides of the boxes, you’ll create a slip-free grip, which is important when it comes to working the hive.
Hive Terminology
Some new beekeepers are confused by beekeeping lingo, and nowhere is there more confusion than with the terms hive bodies, brood chambers, and supers. They are all boxes of the same length and width. The only difference is the height, or “depth,” as it’s known. Many beekeepers refer to the deep boxes, or “deeps,” which are about 9 " high, as the brood chambers. They call medium and shallow boxes “supers” or “honey supers.”
As a general rule, no matter what height the box is, if a beekeeper is using it for raising brood, it’s referred to as a hive body; if it’s used for collecting honey, it’s called a honey super. In this book we call the deep boxes the hive bodies and the medium and shallow boxes honey supers.
You can use any size of box for raising brood or storing honey. Personally, I’ve shifted toward having more room for brood. I’ve been leaving two 10-frame deeps and one medium on the hive year-round. These hives seem to do better. By leaving that extra super of honey on in the fall, there is less chance of the bees dying of starvation, and any honey not used gives them a good start in the spring as the queen kicks into gear. More room in the summer means more room for the queen to lay and less swarming. And more bees in the hive means more resiliency and better honey production. (See 10-Frame vs. 8-Frame Boxes on page 36 for more information.)
The thought of building your own hive boxes can be intimidating to some people. After all, the commercially made ones you see have those pretty, tight-fitting box joints and nicely cut, rounded handholds. For the most part, this is done on some very expensive, often computerized machinery. I watched a video of a machine that could make one end of a hive body in less than 10 seconds; the cost of the machine was a paltry $80,000, plus tooling. It’s going to take us a little longer to build our hive boxes, but the cost won’t break the bank.
⁄
P RO JE C T
Hive Body with Butt Joints
With the modern glue and screws available today, we can make a perfectly strong and good-looking hive body using a simple butt joint. The project on page 37 is virtually the same but uses rabbet joints for a slightly fancier treatment. So what are we waiting for? Let’s get going. The hive body consists of two sides, two ends, and either two or four handholds.
Tools
Circular saw
Combination square with protractor head (see step 3)
Drill with combination drill/countersink bit
Framing square
Pipe or bar clamps
Materials
One 6-foot pine 1×12 (you can also edge-glue narrower boards to get the width you need)
Twelve 1 " deck screws
Twenty 2" deck screws
Waterproof glue
Sandpaper
1. Cut the side and end pieces.
Check the end of the 1×12 board with a square and trim it square, if necessary. Cut two pieces to length at 19 ". Cut two more pieces to length at 14 ". Set the fence on the table saw and rip all four pieces to 9 ". The longer pieces are the sides (A), and you’re done with them. You’ll use the leftover strips later for the handholds.
Work tip: For crosscutting the wide boards, a circular saw and an accurate crosscut guide will work. If you are using the table saw to cut the sides to length, it’s best to cut the boards in half first. These shorter boards are easier and safer to handle, and you can get one side and one end from each piece.
The 14 " × 9 " end pieces (B) each get a rabbet in their top inside edges to create rests for your store-bought frames. To cut the rabbets with a standard blade on a table saw, set up the saw with a zero-clearance fence (see page 16). Set the saw blade height to ", and set the saw fence so it’s " from the wood fence board to the far side of the saw blade.
Make a test cut in a piece of scrap, check the dimensions, and adjust as necessary. Make the shoulder cut (at ") on both end pieces, then make the waste cuts by gradually moving your fence closer to the blade until the rabbet is finished.
Butt-joint hive body parts and cutting plan
A BOVE: Predrill and counterbore ¼" deep for 1¼" deck screws.
3. Create the handholds.
The leftover pieces from the ripped 1×12 are around 1 " wide, a good size for the handholds. First, set up the saw: Remove the zero-clearance fence. Using a combination square with a protractor head or whatever tool you have for measuring an angle, tilt your saw blade to approximately 15 degrees. Set the saw fence so that it’s about 1 " to the nearest part of the saw blade.
Ideally, when you make the cut, there will be a small flat left on the top, as shown in Butt-Joint Hive Body Parts and Cutting Plan, on previous page. If you end up without a flat spot, just use some sandpaper to take off the sharp edge.
Make the beveled cut on enough material for four pieces at 7" long and four pieces at 9 " long, then crosscut the pieces to length. (You can save the extras to use on your honey supers; see page 39.) If desired, you can make your handholds shorter; the handhold cutouts on commercially made hives are about 4 ".
Sand the edges of the handholds for smoothness. Mark each piece for three screws, as shown as shown on the previous page, then drill a countersunk pilot hole at each mark. Size the holes for 1 " deck screws.
Safety note: As careful as I am with a table saw, I use extra caution when making any cut with the blade tilted. Always be aware of where the blade is and where your fingers are; you don’t want the two to meet. Always use all appropriate guards, push sticks, and other safety devices.
⁄
3 4
⁄
1 2
⁄
A BOVE: Butt-joint hive body assembly.
4. Assemble the hive body box.
Mark each side piece for screws, as shown in Butt-Joint Hive Body Assembly, on page 35, and drill countersunk pilot holes at the marks, sizing the holes for 2" deck screws.
Apply a generous amount of glue on the ends of the end pieces, and clamp the box together, as shown. It’s nice to have a helper for this step, or you can do one side at a time, if you wish. Tighten the clamps enough to hold things together, then check that all edges are flush and the box is square. It’s also a good idea to make sure the frames you are using fit nicely with a little bit of play end-to-end.
Tighten the clamps. You should get some glue squeezed out. Confirm that the box is square and edges are still flush. Drill countersunk pilot holes on your marks and fasten the box with 2" deck screws. The hardest part about making the box with butt joints is dealing with warped boards; sometimes you have to start with one or two screws, then work the edge as you go, tapping the pieces one way or the other to keep them flush. Let the glue cure and remove the clamps.
Work tip: I used my table saw top to assemble my hive bodies. I lowered the blade and put a sheet of plastic down so the glue wouldn’t stick or mar the surface. Also, the fence is perfect for use as a backstop when you line up and clamp everything together.
5.Install the handholds.
Use a combination square to draw layout lines for the handholds, 2" below the top of the box, near the center of each side. Then, mark the center of each side of the box on that line. Apply glue to the side of the handle that will go against the box. Position each handhold so its top edge is on the layout line and its center hole is over the center mark (the short handholds go on the end pieces). Fasten each handhold to the box with three 1 " deck screws.
Congratulations. You have finished your first hive box. You must be dying to get ⁄
some bees to put in it, but what’s a house without a roof? We’re not quite ready for bees yet. We still need to build inner and outer covers. See page 40 to get started.
10-Frame vs. 8-Frame Boxes
Here in the Northeast, the tradition has been to use two deep, 10-frame boxes year-round for the bees, and add medium or shallow boxes for comb and extracted honey. But nowadays many new beekeepers, young and old, are leaning toward using all medium boxes, or using 8-frame hives (see page 121). Both are lighter to lift than the 10-frames, and there are other theories about the benefits of using 8-frame boxes:
They are more similar to the shape and size of a hollow tree, where bees might nest if they were feral.
P RO JE C T
Hive Body with Rabbet Joints
This deep hive body has the same overall dimensions as the butt-joint version (page 33), but it has rabbets on the end pieces (for joining the ends to the sides), as well as for the frame rests on the hive body. The different construction means the cutting list is somewhat different from that of the butt-joint body.
The advantages of a rabbet joint over a plain butt joint include a larger surface area for gluing and a solid surface to help line up the boards during assembly. When the sides are clamped together, any cupping is pulled in tight to the joint.
The tools and materials needed for this project are the same as for the butt-joint body, and the steps here follow many of the same techniques, so be sure to read that project first before starting this one.
Tools
Circular saw
Table saw
Combination square with protractor head (see step 3)
Drill with combination drill/countersink bit
Framing square
Pipe or bar clamps
Materials
Sandpaper
1. Cut the box parts.
Cut the two end pieces to length at 16 ", and cut the two sides at 19 ". Rip all of the pieces to a width of 9 ", saving the cutoff strips for the box handholds.
A BOVE: Cutting layout for deep hive body.
2. Cut the rabbets.
Set up the table saw with a zero-clearance fence (see page 16), and set the table saw height at ". Position the saw fence and cut a "-wide rabbet along one long edge of each end piece; these rabbets are the frame rests.
Reset the saw fence and cut a "-wide rabbet along both short edges of each end piece; these are for the joints with the side pieces, so the width must match the thickness of the side pieces. Touch up any rough edges with sandpaper.
3. Assemble the hive box.
Dry-assemble the box with pipe or bar clamps to check the fit, then drill countersunk pilot holes, following the layout shown below.
A BOVE: Rabbet-joint hive body assembly.
A BOVE: Predrill and counterbore ¼" deep for 1¼" deck screws.
4. Cut and install the handholds.
Create four handholds using the cutoffs from the side/end pieces, following step 3 on page 35. Install the handholds as described in step 5 on page 36.
Now that you’ve seen two methods for making hive bodies, you can use the same techniques to build your supers. It’s nice to build one box each way so you get the hang of it. Once you’ve got it down, building more than one box at a time will really make things go faster. You can cut all of your boards and then set up just once for each operation, such as cutting the frame rests or making the rabbets for the sides.
Medium and shallow boxes are made exactly like the deep hive bodies described in the other projects in this chapter. The only differences lie in the heights of the boxes. The chart here shows cutting sizes for making supers with either butt-joint or rabbet-joint construction. The only additional wood you might need is for making the handholds. If you make short handholds for the deep boxes, you may have enough leftover material for your supers. Another option is to start with a board one nominal size wider than you need, leaving plenty over for handholds and possibly a few other items. The medium and shallow supers call for 1×8 boards. The leftover strips from making shallow boxes will be enough for handholds.
Put a Lid on It
CHA PTER CONTENTS
Basic Inner Cover
Insulated Inner Cover for Winter
Screened Inner Cover
There are two covers typically used on a hive: an outer cover and an inner cover. The standard outer cover found here is used all year round. It’s heavy and protects the hive from the elements. It extends over all four sides, can be made of solid wood or plywood, and has a metal top for long life.
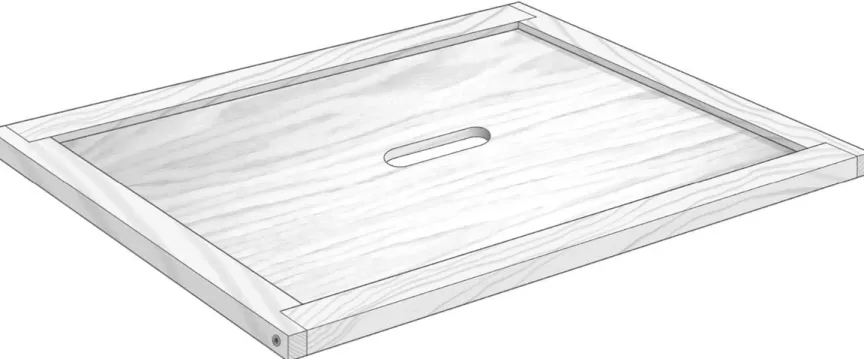
Inner Cover Design
The inner cover, while being a simple piece of beekeeping equipment, can be made in many different ways to serve many purposes. First of all, it acts as the top of the brood chamber and defines the space in which the bees live and work. Bees don’t usually build comb above it unless they are really cramped for space. It also creates an insulating air space between the top of the frames and the outer cover, which can get pretty hot in the afternoon sun.
Standard inner covers usually come with a center slot that is made to fit a bee escape. When it comes time to remove honey supers, a bee escape is placed in the slot. This contraption allows the bees to go back down into the hive through two channels that have flexible spring wire at the ends. The bees can go through the springs into the hive, but not in the other direction to get back up into the supers. While this type of bee escape is still available, and manufacturers still make slotted inner covers, many other methods have been devised for getting the bees out of the supers faster and more efficiently. For our purposes, this also gives us more flexibility with slots or holes in our inner covers. Inner covers can have several special features, including:
Screening for ventilation Holes for feeding
Insulation for keeping the hive warmer and drier in wintertime
P RO JE C T
Basic Inner Cover
Inner covers are very easy to make, and you’ll get a sense of satisfaction when you assemble yours and feel how solid they are. You can build this cover with almost any type of wood. Some cover designs have a center board made of hardboard, but this material can sag under the weight of a feeder placed on top. I prefer to use plywood for the center board and regular pine for the frame. I usually save strips of wood from other projects and use them for the inner cover frames. Lauan plywood is fairly strong and inexpensive, and it works well for the center board.
Tools
Table saw
Drill with bits:
Combination drill/countersink bit
1 " or " drill bit (see step 3)
Jigsaw ⁄
Materials
One 3-foot pine 1×4
One piece " lauan (or other) plywood, 17 " × 14 " minimum
Waterproof glue
Four 1 " deck screws
1. Dado and cut the side and end pieces.
The center board is captured in dadoes cut into the frame’s end and side pieces, all of which are cut from the single piece of 1×4. First, you’ll mill a dado on each long edge of the board, then you’ll rip the side and end pieces to width.
Set the blade height on the table saw to ", and position the fence away from the blade a distance equal to one-half the thickness of the 1×4 minus one-half the thickness of the lauan plywood. Cut one side of the dado, then flip the board end-to-end and cut the other side. (If your blade’s kerf — the width of its cut — is at least ", you can complete the dado with these two passes; otherwise, you’ll have to move the fence out a bit to clean up the middle of the dado.) Make sure the plywood fits nicely into the dado, then repeat the process to dado the other long edge of the 1×4.
A BOVE: Basic inner cover — exploded view.
2. Rabbet the end pieces.
Each of the 16 " end pieces gets a "-deep × 1 "-wide rabbet on both ends; these are on the same side as the dado for the center board. You can cut the rabbets with a router table, a radial arm saw, or a table saw (with a standard or dado blade). Here’s the process for using a table saw with a standard blade:
Set the blade height at ", and set the fence so it measures 1 " from the fence to the far side of the blade.
⁄
1 4 3 4⁄ 1 4⁄
⁄