FREE Monthly
Technolog y Up d ates
One-year Vend or
Prod uct Up g rad e
Protection Plan
FREE Membership to
Access.Globalknowledge
WI NDOWS 2 0 0 0
SUPPORT TOOLS
D E P L O Y I N G
W I T H
Gary Rosenfeld, M CSE, M CP+ I, CCNA Robin Walshaw, M CSE
Eriq Oliver Neale
TECHNICAL EDITOR:
Ralph Crump, M CSE, CCNA, M aster CNE “This book is a valuable and concise guide to the many new deployment tools available in Window s 2000.”
With over 1,000,000 cop ies of our MCSE, MCSD, Com p TIA, and Cisco stud y g uid es in p rint, w e have com e to know m any of you p ersonally. By listening , w e've learned w hat you like and d islike ab out typ ical com p uter b ooks. The m ost req uested item has b een for a w eb -b ased service that keep s you current on the top ic of the b ook and related technolog ies. In resp onse, w e have created [email protected], a service that includ es the follow ing features:
■ A one-year w arranty ag ainst content ob solescence that occurs as
the result of vend or p rod uct up g rad es. We w ill p rovid e reg ular w eb up d ates for affected chap ters.
■ Monthly m ailing s that resp ond to custom er FAQs and p rovid e
d etailed exp lanations of the m ost d ifficult top ics, w ritten b y content exp erts exclusively for [email protected].
■ Reg ularly up d ated links to sites that our ed itors have d eterm ined
offer valuab le ad d itional inform ation on key top ics.
■ Access to “Ask the Author”™ custom er q uery form s that allow
read ers to p ost q uestions to b e ad d ressed b y our authors and ed itors.
Once you've p urchased this b ook, b row se to
www.syngress.com/solutions
.
To reg ister, you w ill need to have the b ook hand y to verify your p urchase.
Thank you for g iving us the op p ortunity to serve you.
WI NDOWS 2 0 0 0
SUPPORT TOOLS
D E P L O Y I N GSyngress Media, Inc., the author(s), and any person or firm involved in the writing, editing, or produc-tion (collectively “Makers”) of this book (“the Work”) do not guarantee or warrant the results to be obtained from the Work.
There is no guarantee of any kind, expressed or implied, regarding the Work or its contents. The Work is sold AS IS and WITHOUT WARRANTY. You may have other legal rights, which vary from state to state.
In no event will Makers be liable to you for damages, including any loss of profits, lost savings, or other incidental or consequential damages arising out from the Work or its contents. Because some states do not allow the exclusion or limitation of liability for consequential or incidental damages, the above limi-tation may not apply to you.
You should always use reasonable case, including backup and other appropriate precautions, when working with computers, networks, data, and files.
Syngress Media® and Syngress® are registered trademarks of Syngress Media, Inc. “Career Advancement Through Skill Enhancement™” is a trademark of Syngress Media, Inc. Brands and product names men-tioned in this book are trademarks or service marks of their respective companies.
KEY SERIAL NUM BER
Troubleshooting Window s 2000 TCP/IP
Copyright © 2000 by Syngress Media, Inc. All rights reserved. Printed in the United States of America. Except as permitted under the Copyright Act of 1976, no part of this publication may be reproduced or distributed in any form or by any means, or stored in a database or retrieval system, without the prior written permission of the publisher, with the exception that the program listings may be entered, stored, and executed in a computer system, but they may not be reproduced for publication. Printed in the United States of America
1 2 3 4 5 6 7 8 9 0 ISBN: 1-928994-12-1
Product Line Manager: Julie Smalley Proofreading by: Beth Roberts
Technical edit by: Ralph Crump Page Layout and Art by: Emily Eagar and Index by: Robert Saigh Kate Glennon
We would like to acknowledge the following people for their kindness and support in making this book possible.
Richard Kristof, Duncan Anderson, Jennifer Gould, Robert Woodruff, Kevin Murray, Dale Leatherwood, Laurie Hedrick, Rhonda Harmon, Lisa Lavallee, and Robert Sanregret of Global Knowledge, for their generous access to the IT industry’s best courses, instructors and training facilities.
Ralph Troupe and the team at Rt. 1 Solutions for their invaluable insight into the challenges of designing, deploying and supporting world-class enterprise networks.
Karen Cross, Kim Wylie, Harry Kirchner, John Hays, Bill Richter, Kevin Votel, Brittin Clark, Sarah Schaffer, Luke Kreinberg, Ellen Lafferty and Sarah MacLachlan of Publishers Group West for sharing their incredible marketing experience and expertise.
Peter Hoenigsberg, Mary Ging, Caroline Hird, Simon Beale, Julia Oldknow, Kelly Burrows, Jonathan Bunkell, Catherine Anderson, Peet Kruger, Pia Rasmussen, Denelise L'Ecluse, Rosanna Ramacciotti, Marek Lewinson, Marc Appels, Paul Chrystal, Femi Otesanya, and Tracey Alcock of Harcourt International for making certain that our vision remains worldwide in scope.
Melissa Heinlein at CoreTech Consulting Group, for all her help.
Special thanks to the professionals at Osborne with whom we are proud to publish the best-selling Global Knowledge Certification Press series.
v
At Global Knowledge we strive to support the multiplicity of learning styles required by our students to achieve success as technical professionals. As the world's largest IT training company, Global Knowledge is uniquely positioned to offer these books. The expertise gained each year from pro-viding instructor-led training to hundreds of thousands of students world-wide has been captured in book form to enhance your learning experience. We hope that the quality of these books demonstrates our commitment to your lifelong learning success. Whether you choose to learn through the written word, computer based training, Web delivery, or instructor-led training, Global Knowledge is committed to providing you with the very best in each of these categories. For those of you who know Global Knowledge, or those of you who have just found us for the first time, our goal is to be your lifelong competency partner.
Thank your for the opportunity to serve you. We look forward to serving your needs again in the future.
Warmest regards,
Duncan Anderson
President and Chief Executive Officer, Global Knowledge
vi
vii
John M. Gunson II(MCSE, MCNE, CCNA) is a Consultant for CoreTech Consulting Group, Inc. CoreTech is an e-business Professional Services firm in suburban Philadelphia that excels at helping companies realize the potential of e-business through a mix of Internet technology and tradition-al business systems, maximizing business benefit while minimizing disrup-tion and risk.
With over eleven years in the Information Technology field, John has a very broad background. His experience includes a number of years sup-porting desktop clients, as well as network administration and design in both Windows NT and Netware environments. Currently, John is working with an international corporation on its Windows 2000 migration project.
John graduated from Salisbury State University with a Bachelor of Science Degree in Geography. He holds a membership with the Network Professional Association and is also an officer in the US Army Reserve.
John lives in Phoenixville, PA with his wife, Jennifer, and two children, Molly and Brady.
Eriq Oliver Neale is a technology strategist with Nortel Networks,
researching new technology solutions for inclusion in the designer work-place. He has worked in the computer support industry for eleven years and in that time has contributed to several computing technology publica-tions. When not writing, he and his wife try to keep up with seven cats, two dogs, and a plethora of tropical fish.
Gary Rosenfeld(MCSE, MCP+I, CCNA) works as a Senior Network Systems Consultant for Lucent NetworkCare Services in Philadelphia, Pennsylvania. NetworkCare is a global provider of network consulting and software solutions for the full lifecycle of a network, including planning, design, implementation, and operations. Gary is involved in designing and implementing complex Windows NT and Windows 2000 solutions for Fortune 1000 companies. Gary lives in Pennsylvania with his beautiful wife, Jill, their wonderful son, Noah, and their lovable cat, Georgie.
Amy Thomson (A+, MOUS Master) is a software and A+ instructor for a prominent Canadian private college. She began her career in the computer industry over 10 years ago, during her military service as a communica-tions operator. She has taught in several Canadian provinces, and has an Honours B.Sc. in Psychology. Amy currently lives in Halifax, Nova Scotia with her husband, Jeff and hedgehog, Hannah.
Robin Walshaw (MCSE, DipProjMan) was born in England, but has spent most of his life in South Africa. One of the first MCSEs in Africa, he enjoys being at the forefront of new developments in network architecture and operating systems. With a flair for developing strategic IT solutions for diverse clients, he has worked in the world of computers in eight coun-tries, and has traveled to over thirty in the last ten years. Besides travel-ing, Robin is a keen sportsman and has managed to balance work with a passion for climbing the world's highest mountains, culminating in an attempt on Mount Everest.
Technical Editor
Ralph Crump(MCSE, CCNA, and a CNE 3.x, 4.x, and 5.x, with a Master CNE in Integrating Windows NT) manages a team responsible for a large scale Windows NT and Novell NetWare infrastructure for a major telecom-munications company in Atlanta, Georgia. He specializes in Windows NT and BackOffice applications as well as Novell NetWare solutions. He is cur-rently working in cooperation with Microsoft on Windows 2000 Rapid Deployment projects.
Technical Review er
Stace Cunningham(CCNA, MCSE, CLSE, COS/2E, CLSI, COS/2I, CLSA, MCPS, A+) is a Systems Engineer with SDC Consulting located in Biloxi, MS. SDC Consulting specializes in the design, engineering, and installation of networks. Stace has coauthored or technical edited 19 books published by Microsoft Press, Osborne/McGraw-Hill, and Syngress Media. He
received a quality initiative award for his contribution to the design of a Windows NT network at Keesler Air Force Base, Mississippi. His wife
ix
Chapter 1—Tools and Techniques for
Deploying M icrosoft Window s 2000 Professional 1
Introduction 2
An Introduction to Deployment Planning 3
Change and Configuration Management—Owning Your Network 4 Windows 2000 Professional Setup Design Goals 6
Automating Windows 2000 Setup 7
Windows 2000 Setup 9
Hardware Requirements 9
Application Compatibility 11
Upgrades vs. Clean Installs 13
Deployment Tools in Windows 2000 33
Windows 2000 Support and Deployment Tools 33
Automated Installation File 36
Setup Manager 38
Sysprep 42
Additional Tools to Help Deployment 43
Deployment Techniques 45
Remote Installation Services 45
Disk Imaging 48
Automated Installation Scripts 50
A Comparative View of Deployment Techniques 51
Summary 53
FAQs 55
Chapter 2—Automating Window s 2000 Professional Installation 57
Introduction 58
Preparing for Setup 59
Inside WINNT32.EXE 59
Network Distribution Point 61
Distribution Point Directory Structure 61
Customizing Windows 2000 Professional Setup 63
Answer Files 63
Setup Manager 65
Further Customization with UDF 90
Preparing the Destination Computer 93
Looking Out for Incompatibilities 93
Please, Back Up Your Data 94
Do a Disk Checkup 95
Summary 95
FAQs 96
Chapter 3—Imaging Window s 2000 Professional 99
Introduction 100
Selecting an Imaging Tool 100
x Cont ent s
Determine Requirements 102
Third-Party Tools 104
Symantec Norton Ghost 104
Innovative Software ImageCast IC3 104
Altiris RapidDeploy 104
Preparing Windows 2000 for Imaging Using Sysprep 105
Overview of Sysprep 105
Sysprep Requirements 105
Sysprep Step by Step 107
Running Sysprep During Automated Installation 111
Automating Setup of a Target Computer 112
Creating an Answer File Using Setup Manager 112 Running Additional Programs After Mini Setup 135
Imaging vs. Automated Installation Scripts 136
Summary 137
FAQs 138
Chapter 4—Remote Installation Client and Server 141
Introduction 142
Planning for Remote Installation Services 142
Hardware Requirements 143
Server Requirements 143
Client Net PC Requirements 143
Client Non-Net PC Requirements 144
Active Directory Planning 144
Examining the Technology Behind
RIS—PXE, BINL, TFTP, and SIS 146
Pre-boot Execution Environment (PXE) 146
Boot Image Negotiation Layer (BINL) 148
Trivial File Transfer Protocol (TFTP) 149
Single Instance Store (SIS) 149
Installing and Configuring Remote Installation Services 149
Installing RIS during Server Setup 150
Installing RIS from Add/Remove Programs 150
RIS Setup 151
Authorizing RIS Servers in Active Directory 156
Advanced RIS Configuration 158
Client Support 161
Check Server 161
Show Clients 161
Advanced Settings 162
Group Policy Settings 166
Remote Installation Services Administration 169
Remote Installation Preparation Wizard 170
CD-Based Images 173
Restricting Access to the Images 173
Cont ent s xi
Remote Client Installation 176
Remote Boot Disk Generator 177
The Client Installation Wizard 178
Press F12 for Network Boot 179
The Welcome Screen Appears 179
User Logs On 179
Image Selection Takes Place 180
Disk Format Warning Appears 181
The GUID Is Confirmed 181
OS Installation Takes Place 182
Summary 182
FAQs 183
Chapter 5—Deploying Softw are w ith Group Policy 185
Introduction 186
Change and Configuration Management 188
IntelliMirror 189
Group Policy 194
System Policies vs. Group Policies 198
Components of Group Policy 198
How Group Policies Work 199
Group Policy Objects 201
Slow-Link Detection 202
Group Policy Filtering and Security 205
Deploying Software 206
Assigning Software 208
User Assignments 208
Computer Assignments 209
Publishing Software 209
Enhancements within Add/Remove Programs 210
Packaging an Application 212
Windows Installer 212
Creating a Package 217
Repackaging 217
ZAP Files 218
Customizing a Package 219
Creating Distribution Points 220
Targeting Software and Using the Software MMC Snap-In 220
Using the Group Policy MMC Snap-In 221
Using the Software Policy MMC Snap-In 223
Using Group Policy to Assign or Publish an Application 225
Managing Software 227
Upgrading Software 228
Upgrading Windows 2000 230
Removing Software 230
Redeploying Software 231
xii Cont ent s
Group Policy Settings 234
Delegating Control of Group Policy 237
Application Deployment Walkthrough 238
Planning for Software Deployment 241
Application Deployment Performance 241
Active Directory and Group Policy Design 242
Deployment Methods 243
Summary 243
FAQs 246
Chapter 6—M anaging User and Computer Settings 249
Introduction 250
Group Policy for Users and Computers 251
What Exactly Is Group Policy? 251
Group Policy Inheritance 254
Group Policy Editor 255
Computer Configuration 261
User Policies 267
Example: Modifying User Policy Settings 271
Roaming Profiles 274
Creating Roaming Profiles 276
Administering Roaming Profiles 277
Exercise: Creating an Account and Roaming Profile Template 278
Mandatory and Group Profiles 282
Folder Redirection and Offline Folders 282
Folder Redirection 284
Redirection for Data Integrity 286
Example: Redirecting the My Documents and My Pictures Folders 287
Redirection for Laptop Users 292
Offline Folders 294
Managing Offline Files with Group Policy 298
Cache Settings 300
Summary 301
FAQs 304
Chapter 7—M anaging User Data 309
Introduction 310
Planning User Data Management 310
Developing Data Management Strategies 312
Managing User Documents 313
Managing Personal Files 314
Allocating Local Resources 314
Allocating Server Resources 317
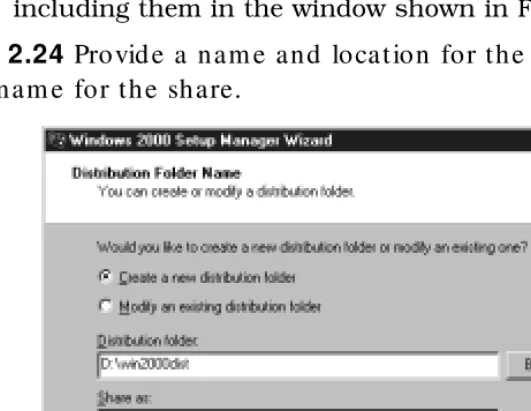
Creating Shares 319
Server Shares 320
Local Shares 330
Managing Shares 332
Cont ent s xiii
Managing User Disk Quotas 337
Quota Options 339
Remote Management of Quota Settings 342
Securing User Data 345
NTFS Permissions 346
Encrypting File System 349
Summary 354
FAQs 357
Chapter 8—Developing a Deployment Plan for Window s 2000 361
Introduction 362
Defining the Project 362
Defining the Scope of the Rollout 362
Defining Business Objectives 364
Assessing the Current Environment 366
Network Infrastructure 366
Existing Network Operating System Environment 368 Existing Client Operating Systems Environment 369
Building the Test Lab 371
Designing the Lab 371
Managing the Lab 375
Testing in the Lab 377
Training the Support Staff 379
Evaluating Existing Knowledge Base 379
Determining Training Requirements 380
Conducting and Evaluating the Pilot Rollout 381
Criteria for a Successful Pilot 381
Define the Pilot Scope 382
Prepare a Support Model 382
Develop a Contingency Plan 382
Develop a Communication Plan 383
Select and Train Pilot Users 383
Conduct the Pilot and Reevaluate Plan 384
The Production Rollout 385
Prepare Facilities 385
Develop Outage Service Plans 385
Turn Over Production-Ready Systems 386
Summary 386
FAQs 387
Chapter 9—The Window s 2000 Fast Track 389
Introduction 390 What Is Windows 2000, and Why You Need to Know about It 390
A Brief History 390
The Windows 2000 Family 391
Windows 2000 Professional 391
xiv Cont ent s
Windows 2000 Advanced Server 392
Windows 2000 Datacenter Server 393
Important New Features in Windows 2000 393
Plug and Play 394
Industries and Companies Affected by Windows 2000 396 Organizations with Small- to Medium-Sized Networks 397
Organizations with Large Networks 397
Gamers 398
Home Users 398
Advantages and Disadvantages 399
Advantages of Windows 2000 399
Disadvantages and Problems with Windows 2000 401
Plug and Play 401
Device Driver Compatibility 401
Application Compatibility 402
Hardware Requirements 402
Upgrading Problems 404
Windows 2000 Summary Points 404
FAQs 406
Appendix A—Window s 2000 Professional Deployment Secrets 411
For Experts Only 412
Driver Signing 412
Security Configuration Tool Set 413
Under-Documented Features and Functions 415
Windows 2000 Professional Resource Kit 415
ADMINPAK 416
WINNT32.EXE Switches 417
/DEBUG [level]:[filename] 417
/CMDCONS 418
/COPYDIR VS. /COPYSOURCE 418
/CHECKUPGRADEONLY 418 /MAKELOCALSOURCE 419
MAKEBOOT.EXE & MAKEBT32.EXE 420
High Encryption Pack 421
Windows Update 422
Additional Resources 423
Deployment Planning Guide (DPG) 423
TechNet 424
Microsoft Web Site 424
Preface
The release of Windows 2000 brings an end to the largest computer software development project to date. With millions of lines of code, this is sure to be one of the largest software upgrades you have ever faced. As administrators prepare for this massive undertaking, many white papers, tools, and utilities have been and are being developed to help with deploying Windows 2000.
Despite the fact that companies use a variety of server-based technologies, such as mainframes, UNIX, and Windows NT, most organizations use a Windows-based client for some portion of their day-to-day activities. Incorporated into this new release comes Windows 2000 Professional, the client-based Windows 2000 plat-form. Although based upon previous operating systems such as
Windows 9xand Windows NT, Windows 2000 has a number of
changes and additions that will have to be addressed by all IT pro-fessionals.
Understanding how to deploy Windows 2000 Professional can be a large task in itself. It is important that as an administrator, you understand each of the methodologies that are available and the toolsets that have been provided. Not only has Microsoft prepared utilities to meet this need, but many third-party vendors are also participating in this venture. Be sure to properly investigate to ensure that the deployment process that is created meets the needs of your organization.
Org anization
This book follows a pattern to not only help you understand how to deploy Windows 2000 Professional, but also to develop a deployment strategy. Each chapter provides a comprehensive view of the various components of a successful Windows 2000 Professional deployment. The chapters are broken down as follows:
■ Chapter 1:Tools and Techniques for Deploying Windows
2000 Professionalintroduces some of the concepts and
xvi Preface • Deploying Window s 2000 w it h Support Tools
methodologies in addition to the tools provided by Microsoft for deploying Windows 2000 Professional. It provides a comprehensive introduction to the remainder of the book, including how to plan a Windows 2000 Professional deployment.
■ Chapter 2:Automating Windows 2000 Professional
Installationprovides a detailed look at unattended installation scripts. This chapter focuses on how to use unattended installation scripts, various methods for creating and customizing them, and once completed, how to
implement them.
■ Chapter 3:Imaging Windows 2000 Professional discusses
imaging technologies in reference to deploying this operating system. It discusses various imaging tools and techniques, how to properly prepare a computer for imaging, and also compares these methodologies to other available techniques.
■ Chapter 4: Remote Installation Client and Server delves into
a newer installation methodology used by Microsoft. This chapter provides a look at Remote Installation Services, how to set up and manage this service, and how to use it to deploy Windows 2000 Professional.
■ Chapter 5: Deploying Software with Group Policy introduces
change and configuration management and how group policy can be used to help administer a Windows 2000 Professional deployment.
■ Chapter 6: Managing User and Computer Settings digs a
little deeper into the details of a Windows 2000 Professional deployment. This chapter discusses some additional
features, such as Folder Redirection, Roaming Profiles, and Offline Folders.
■ Chapter 7: Managing User Data helps plan user data
Deploying Window s 2000 w it h Support Tools • Preface xvii
■ Chapter 8: Developing a Deployment Plan for Windows 2000
discusses the finer points of pulling these methodologies together and making it happen. Primarily focusing on the project management aspect, this chapter outlines the various features and concepts that need to be addressed during a Windows 2000 Professional deployment.
■ Chapter 9: Windows 2000 Fast Track provides an overview
of the various Windows 2000 platforms, discusses the pros and cons of Windows 2000, including new features and the advantages of performing upgrades versus clean
installations.
Aud ience
Tools and
Techniques for
Deploying M icrosoft
Window s 2000
Professional
Solut ions in t his chap t er:
■ Automating Window s 2000 Setup ■ Deployment Tools in Window s 2000 ■ Deployment Techniques
Chapter 1
2 Chapt er 1 • Tools and Techniques for Deploying M icrosoft Window s 2000 Professional
Introduction
Just a few years ago no one could have foreseen the impact that the personal computer would have on the working lives of so many peo-ple. Today the modern PC is almost as ubiquitous, if not as reliable, as the pen. Idling on the desk of millions of office workers around the world is a tireless instrument that extends and facilitates our ability to deliver work. In an effort to tap the capabilities of these marvelous tools, the majority of PCs run a version of the Microsoft operating system family.
In response to the evolving world of technology, businesses have sought to adopt new operating systems in the swiftest and most eco-nomical manner possible. The Windows 2000 product group repre-sents the largest, most technically advanced body of work
undertaken by the most successful software company in the world. It is considered by many to be the single most important milestone in the evolutionary development of the Windows family. By providing a computing platform that offers stability, high productivity, and compatibility, Microsoft is hoping to extend its software presence even further. Windows 2000 includes a multitude of new features and additions, several of which address current concerns and issues with Windows NT 4.0, Windows 95, Windows 98, and Windows 98
SE (to simplify the naming scheme we will use Windows 9x when
referring to Windows 95, Windows 98, and Windows 98 SE). Other features, such as Active Directory, extend the scope of computing into new and exciting territory.
As the complexity of operating systems has increased, so has the requirement to strategically deploy the operating system within the
business. When Windows NT 4.0 and Windows 9xwere released,
they included basic tools to facilitate their deployment and adoption. These tools, while adequate, had several shortcomings that ham-pered effective distribution. Businesses of all sizes quickly realized the benefit of developing operating system deployment strategies, but there was still room for considerable improvement. With
Tools and Techniques for Deploying M icrosoft Window s 2000 Professional • Chapt er 1 3
One of the goals of the Windows 2000 design team was to ensure that it was the easiest, most efficient, and least expensive Microsoft operating system to deploy within the enterprise. The common cry of the network manager is that the expense of deploying a new operat-ing system is exhorbitant. The requirement for skills and resources of a deployment project often outstrips supply. Even on the rare occasion when resourcing and budgetary requirements can be ignored, the complexity of deployment tools and techniques often proves problematic. Using the Windows 2000-specific deployment tools and techniques, it is possible to put an end to the network manager’s lament—at least, for the time being!
An Introd uction to Dep loym ent Planning
After all the technical detail that is involved in justifying an operat-ing system migration, the project plannoperat-ing stages are often over-looked. It is essential to draw up a comprehensive deployment plan to ensure the success of the project—something that we will look into in greater detail in Chapter 8, “Developing a Deployment Plan for Windows 2000.”
Each business has a unique environment that influences and directs the creation and growth of a project plan. Many businesses have a well-defined project management methodology that incorpo-rates certain variances in business processes in an attempt to lever-age them as strengths. What can be established, regardless of the diversity of companies, are the common denominators to all Windows 2000 Professional deployment plans.
Assuming the common denominators listed below, what should the project be asking itself?
Project definition
■ What should the scope and nature of the rollout be?
■ Who should get Windows 2000 Professional?
4 Chapt er 1 • Tools and Techniques for Deploying M icrosoft Window s 2000 Professional
Assessing the current network environment
■ What do we have?
■ What do the clients and servers look like?
■ What is the logical and physical network structure?
Constructing the test lab
■ How do we build a test lab?
■ What do we test and who should be involved?
Training support personnel
■ What is the current level of expertise?
■ What level of technical excellence should be aimed for?
Conducting and evaluating the pilot rollout
■ When and how do we conduct a pilot?
■ What are the metrics that we use to evaluate its success?
Production rollout
■ How do we incorporate the findings of the pilot rollout?
■ What do we rollout? How are end users to be trained?
Chang e and Config uration Manag em ent—
Ow ning Your Netw ork
A number of factors have contributed to the increased costs associat-ed with managing and owning a network and its infrastructure—more demanding users, increasingly complex products, and a growing user base are just a few. Windows 2000 Professional certainly does not break the mold when it comes to developing complex products, but what it does provide is an infrastructure to reduce the cost of owning a Windows-based infrastructure.
Tools and Techniques for Deploying M icrosoft Window s 2000 Professional • Chapt er 1 5
while supporting their user base. Two main concepts that support the new change and configuration management techniques are IntelliMirror and remote operating system installation. IntelliMirror is a set of tools and technologies that increase availability, reduce support costs, and allow the users’ software, settings, and data to follow them. Three pillars support the IntelliMirror technology:
■ User Data Management Allows users to access their data
whether they are online or offline. This includes features such as folder redirection, disk quotas, and file
synchronization.
■ User Settings Management Allows preferences to follow
the user. This includes such features as roaming profiles and particular shell enhancements.
■ Software Installation and Maintenance Ensures that
users have their required software. This can include features such as self-repairing software and application deployment.
The second concept, remote operating system installation, allows administrators to build a functional, standardized workstation remotely. Providing a solid, flexible, and scalable infrastructure for operating system deployment is imperative for a successful operat-ing system installation strategy.
Group policies can be used throughout Windows 2000 to define user and computer configuration settings such as scripts, software policies, security settings, application deployment, user settings, and document options. Using group policies allows these settings to be controlled centrally and applied across the business. Group Policy leverages the Active Directory and supports the IntelliMirror technology to control the scope and granularity of changes in config-uration. By providing a well-managed desktop environment through Group Policies, Windows 2000 eases the resolution and elimination of change and configuration management issues.
6 Chapt er 1 • Tools and Techniques for Deploying M icrosoft Window s 2000 Professional
have the tools to reduce the cost of owning PCs and supporting users.
Wind ow s 2000 Professional Setup Desig n Goals
Regardless of how advanced an operating system is, an oft-neglected feature is the capability to set up and deploy it effectively. In an effort to speed the adoption of Windows 2000 Professional, Microsoft worked with customers and IT professionals to provide a new frame-work for operating system deployment. With the lessons learned from the existing crop of deployment technologies and methods, Microsoft began to construct a scalable and flexible deployment framework.
The setup and installation design goals of the Windows 2000 Professional development team included:
■ Simplicity and reliability Ensuring that the operating
system is simple to install and exhibits reliability and recoverability during installation.
■ Deployment friendly Designing the setup process in such
a way that it can be deployed throughout the organization without extensive technical know-how.
■ Customization options Providing flexibility during the
installation process to satisfy the need to tailor operating systems to the needs of diverse organizations.
■ Reduction of deployment time As operating systems have
increased in size and complexity, so has their deployment time.
■ The support of disk duplication Disk imaging has proven
to be a swift and effective deployment technique that is gaining popularity.
■ Automation Ensuring that the installation process can be
fully automated.
■ Ease of deployment Providing tools and features to make
Tools and Techniques for Deploying M icrosoft Window s 2000 Professional • Chapt er 1 7
■ Service Pack slipstreaming Providing the facility to
incorporate service pack upgrades into the deployment process with no additional impact.
Within this framework are a number of new tools and techniques targeted at easing the deployment process without sacrificing con-trol or disrupting service. In the coming chapter we will introduce the tools and elaborate on the techniques that make Windows 2000 Professional the easiest and most versatile to deploy of the Microsoft Windows family.
Automating Window s 2000 Setup
In these days of the mega-merger it is not unusual to come across a company with more than 20,000 computer users scattered across geographically disparate areas. There are also large numbers of small-to-medium-sized corporations with a computing base ranging from a couple of hundred users to thousands of users. All these companies have one thing in common (other than a user base
demanding lightning-fast service)—the requirement to deploy operat-ing systems quickly and efficiently with maximum control.
The deployment of an operating system within a business can prove to be a complicated and repetitive task. Manual installation of even the most user-friendly operating system requires a substantial investment in time and resources. Each time an operating system is installed it requires general configuration and installation informa-tion. Such information can range from the preferred display resolu-tion to the domain of a workstaresolu-tion. The process of collating the installation information and feeding it to the operating system so that it no longer requires human interaction during the installation process is called automating setup.
The information required during the setup of Windows 2000 Professional can be quite varied and includes:
■ Acceptance of the end-user license agreement (EULA)
8 Chapt er 1 • Tools and Techniques for Deploying M icrosoft Window s 2000 Professional
■ Browser and shell settings
■ Installation folder
■ Printer setup
Often the operating system settings are the same along lines of business, functional groups, or even throughout the enterprise. Installing a thousand similar configurations of Windows 2000 Professional is no one’s idea of fun nor a constructive use of resources. Setup automation is undertaken by organizations that need to eliminate dead time (like repetitive operating system instal-lation) or deploy a number of workstations within a particular time frame. The ability to rapidly deploy operating systems is considered to be of essential importance to the modern IT department. Today’s operating systems are complex and sometimes difficult to under-stand, so it comes as no surprise to learn that the deployment
process at times requires special skills and understanding. A certain level of preparation is also required before the automation of setup can take place. A knowledge of the business, project requirements and constraints, target workstations, network environment, and other technical considerations are just a few of the factors that will affect how Windows 2000 Professional is deployed.
Tools and Techniques for Deploying M icrosoft Window s 2000 Professional • Chapt er 1 9
imaging, on the other hand, depends on an administrator preparing a model workstation and then taking a snapshot of the model work-station. This snapshot is then distributed to other similarly config-ured machines.
The process of automating setup can include:
■ The design of a model Windows 2000 Professional
workstation.
■ The creation of answer files and scripts to generate the
model workstation. Alternatively, a snapshot of the model workstation could be taken using a disk imaging tool.
■ Creating a centrally managed distribution point for the
Windows 2000 Professional model workstation files.
■ Deploying the operating system by using one of the
deployment techniques mentioned later in this chapter.
Wind ow s 2000 Setup
In order to understand how to automate the Windows 2000
Professional setup process, it is essential to understand the require-ments prior to installation. A good grasp of the upgrade and instal-lation process also helps in determining what type of instalinstal-lation best meets the needs of the business.
Hardw are Requirements
Windows 2000 Professional provides a greater degree of stability and flexibility than its predecessors at the cost of increased hardware requirements. Microsoft has published recommended minimum hard-ware guidelines for running Windows 2000 Professional, but unfortu-nately, these recommendations provide the lowest common
10 Chapt er 1 • Tools and Techniques for Deploying M icrosoft Window s 2000 Professional
Windows 2000 Professional has a larger base operating system
footprint than Windows NT 4.0 and Windows 9x, but, when coupled
with sufficient hardware, it can outperform its older brothers. In particular, good performance gains have been associated with an increase in RAM.
Windows 2000 Professional integrates hardware and computer accessories more thoroughly than any previous Microsoft operating system, and as a result, requires hardware to undergo meticulous compatibility testing. Microsoft regularly publishes (usually quarterly) the Hardware Compatibility List (HCL), a list of Windows-compatible hardware that has passed hardware compatibility tests. Windows 2000 Professional does not yet have the same driver and manufacturer
sup-port as Windows 9xand Windows NT, so it is necessary to check the
HCL before attempting any installations. This should be done to
ensure that Windows 2000 Professional supports the hardware you are planning to use. A plain-text version of the HCL can be found on the Windows 2000 Professional CD-ROM in the \SUPPORT directory. As with Windows NT, a list of compatible hardware devices is located on the Microsoft site (www.microsoft.com/hcl). Another initiative
(www.hardware-update.com) provides additional information on topics such as BIOS revisions and PC model compatibility for Windows 2000. Microsoft also provides www.microsoft.com/windows2000/upgrade/ compat as a compatibility resource.
Table 1.1 Minim um Hard w are Req uirem ents
M icrosoft Recommendations for Window s 2000
Professional
133MHz or hig her Pentium -com p atib le CPU
200MHz or hig her Pentium -com p atib le CPU
64 Meg ab ytes (MB) RAM 96 Meg ab ytes (MB) RAM (p referab ly 128MB)
2GB hard d isk w ith a m inim um of 650MB free hard -d isk sp ace
2GB hard d isk w ith a m inim um of 1GB free hard -d isk sp ace
Tools and Techniques for Deploying M icrosoft Window s 2000 Professional • Chapt er 1 11
The Hard w are Com p atib ility List (HCL) p rovid es a list of all hard w are that is sup p orted —m eaning that Microsoft has com m itted to g uaranteeing that sp ecific hard w are is com p atib le w ith Wind ow s 2000. Unsup p orted hard w are d oes not im p ly that the hard w are w ill not w ork w ith Wind ow s 2000, or that it is of inferior q uality. What it d oes im p ly is that the Microsoft sup p ort staff cannot offer a full rang e of sup p ort services if p rob lem s arise w ith the sp ecific unsup p orted hard w are or d river.
Most businesses have an eclectic mix of hardware, and you will have to formulate a strategy on what action should be taken when a workstation does not meet the hardware or compatibility require-ments for Windows 2000 Professional.
Actions that may be taken include:
■ Replacing the hardware
■ Upgrading the hardware
■ Leaving non-complaint hardware in place
An excellent extension to the setup process called the pre-upgrade check can be used to check hardware and software com-patibility and will be discussed in the sections on upgrades and clean installations
Application Compatibility
The function of the network and the supporting infrastructure is to service users to provide them with the tools that they need to per-form their work as effectively as possible. The tools that the majority of users require are applications. Deploying Windows 2000
Professional should provide an environment that supports applica-tion requirements to an equal or greater degree than does the exist-ing infrastructure.
12 Chapt er 1 • Tools and Techniques for Deploying M icrosoft Window s 2000 Professional
The aim of application testing is to force compatibility and integra-tion issues into the open before they become a producintegra-tion problem. Depending on the environment, testing can become increasingly more complex, requiring both time and skilled resources. At a minimum, there should be these two areas of exploration:
■ Application compatibility
■ Application integration
Testing for application compatibility is the process of ensuring that applications perform as expected. Application testing is of criti-cal importance, even in environments that use Windows NT exclu-sively. Windows 2000 has undergone major architectural
enhancements, several of which may change the way applications function.
Testing application integration involves determining whether applications can leverage the new and existing technology that Windows 2000 provides. A slew of exciting new technologies are available with Windows 2000, many of which are targeted at enabling applications. Some applications may need to be rewritten or may require updates to leverage the new technology.
The testing process is where a good relationship with your
ven-dor is essential. If the application sports the Made for Windows
2000 logo, you can be sure it is Windows 2000 compatible. Applications that comply to the Windows 2000 Application
Specification (http://msdn.microsoft.com/certification) are guaran-teed to be compatible and leverage the new technology afforded by Windows 2000.
Commercial applications can undergo testing by VeriTest, an independent testing company, provided they comply with the
Windows 2000 Application Specification. Applications that pass the tests conducted by VeriTest can then be certified. It is important to note that applications can comply with the Windows 2000
Tools and Techniques for Deploying M icrosoft Window s 2000 Professional • Chapt er 1 13
Many applications have already undergone testing, the results of which can be found on the Microsoft Web site (www.microsoft.com/ windows2000/upgrade/compat/). The directory hosted by Microsoft classifies applications according to the following criteria:
■ Certified The application completed tests run by VeriTest
and takes advantage of new Windows 2000 features.
■ Ready The application has been tested for compatibility by
the vendor and supports Windows 2000.
■ Planned The application is intended to achieve Certified or
Ready status sometime in the future.
Upgrades vs. Clean Installs
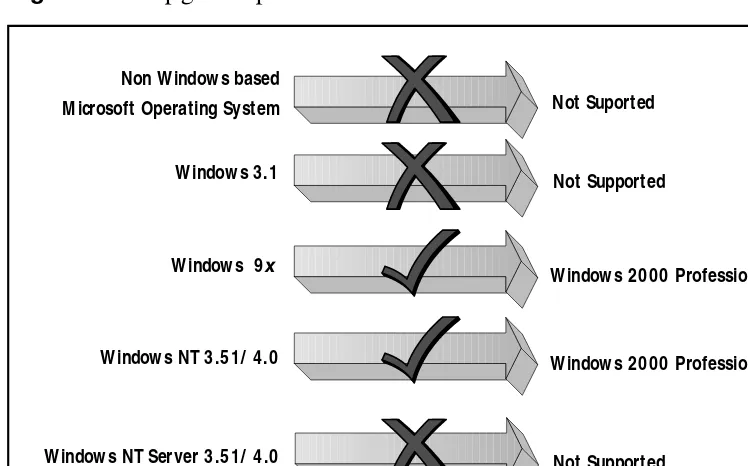
Microsoft supports two methods of installing Windows 2000 Professional on target workstations: through upgrading or clean installs. Upgrading to Windows 2000 Professional implies that the target workstation already has an existing operating system that may have its own settings and configuration. If the target work-station is configured with an operating system that is supported for upgrading (see Figure 1.1 in the following section), then the setup program can be instructed to upgrade in place, migrating all user settings and applications available.
If, however, the target workstation is a new machine, requires reinstallation, or is configured with a non-supported operating sys-tem, then a clean installation must be applied to the workstation. The primary drive of the target workstation is then installed with Windows 2000 Professional without searching for existing data (though data can be preserved), applications, or configuration settings.
14 Chapt er 1 • Tools and Techniques for Deploying M icrosoft Window s 2000 Professional
such as that the application does not work, may be a great deal eas-ier than handling issues (such as the profile directory has changed to the Documents and Settings folder) that manifest much more subtly.
Several factors will influence your decision whether to upgrade or to apply a clean installation of Windows 2000 Professional. These include:
■ Current workstation management levels If modifications
to the workstation’s operating system and applications have followed strict change controls, then the current state of the workstation will be well known. An upgrade would best suit a well-managed environment, preserving the investment in your configuration information. If the state of the
workstations is indeterminate, then a clean install of Windows 2000 Professional would allow you to revert the configuration of the workstations back to a known state.
■ User preferences and settings If your users have a level of
control over their workstations, they may have personalized certain settings and preferences. It can be difficult to
determine what settings exist. To preserve these settings the best option would be to perform an upgrade.
■ Applications and data Some users may store data on their
local workstations, or install applications locally. An upgrade would be the best choice to prevent inadvertently deleting data, and would also ensure that applications would still function (if compatible with Windows 2000 Professional). Many businesses store data centrally for backup and
management purposes and as a result, a clean install could be considered.
■ Existing operating systems on client workstations The
installation type you choose will also be dictated by the operating system of the client (see Figure 1.1) prior to
Tools and Techniques for Deploying M icrosoft Window s 2000 Professional • Chapt er 1 15
installation. Upgrading from previous versions of Windows NT (version 3.51 and later) is inherently easier than
upgrading from Windows 9x. This is due to the commonality
between the operating system kernel architecture, device driver models, registry database, security architecture, and file systems. Upgrading from existing Windows 9x
installations can present additional issues to be resolved.
■ Operating system history If your client workstations have
been through a regular cycle of upgrades, the preferred option would be to perform a clean install, thus resolving possible legacy issues. Migrating the workstation to
Windows 2000 Professional from a platform that has been repeatedly upgraded could negate some of the advantages (such as stability) of deploying Windows 2000 Professional in the first place.
There are a number of ways to start the Windows 2000
Professional setup process. The setup or upgrade process can be initiated by executing Winnt32.exe from a command line on a host operating system that is compliant with the upgrade paths in
Figure 1.1 (Windows 3.51 Workstation or greater, and Windows 9x).
The setup executable, Winnt32.exe, is found in the i386 directory on the Windows Professional CD-ROM. It is also possible to execute setup from a bootable CD-ROM containing the relevant installation files. Other solutions include using a network management applica-tion such as Microsoft’s Systems Management Server (SMS), or a bootable floppy disk with network drivers and a connection to the Windows 2000 Professional installation source.
16 Chapt er 1 • Tools and Techniques for Deploying M icrosoft Window s 2000 Professional
To summarize:
■ To clean install Windows 2000 Professional on an MS-DOS,
Windows 3.1, Windows 3.11, or Windows for Workgroups, run Winnt.exe from an MS-DOS prompt.
■ To clean install or upgrade from Windows 9x or Windows
NT, use Winnt32.exe.
TIP
Microsoft recom m ends a clean install of Windows 2000 Professional rather than an upgrade. The upgrade process has been extensively tested but cannot take into account every scenario. In addition, problem s that existed before an upgrade m ay just be transferred to the new operating system .
Up g rad es
Windows 2000 Professional supports the upgrade of the most recent of the Windows-based family; this includes Windows 95 (OSR 1, OSR 2, OSR 2.5), Windows 98 (and service pack), Windows 98 Second Edition, Windows NT 3.51, and Windows NT 4.0. Upgrading from Windows 3.1, Windows 3.11, Windows for Workgroups,
Windows NT 3.1, or Windows NT 3.5 is not supported and will require a clean install. Additionally, those users still using Windows 2000 Professional Beta 3 and earlier must first upgrade to Windows 2000 Professional RC2 or higher before upgrading to the official release of Windows 2000 Professional.
Network installations of Windows 95 shared from a server are also not supported for upgrade to Windows 2000 Professional. To install Windows 2000 Professional on these machines, a clean installation must be completed. Other points to remember are that during the upgrade process Windows 2000 Professional searches the workstation's hard drive for other installations of Windows and will fail if there are multiple operating systems installed on the
Tools and Techniques for Deploying M icrosoft Window s 2000 Professional • Chapt er 1 17
2000 Professional if another Microsoft Windows-based operating
sys-tem is installed simultaneously. The other operating syssys-tem must be removed before proceeding with the upgrade (Figure 1.1).
Figure 1.1 Up g rad e p aths to Wind ow s 2000 Professional.
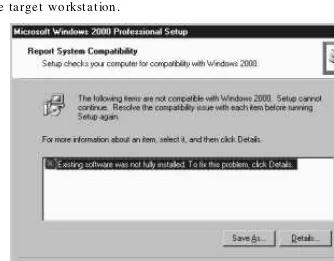
The setup program can also provide a pre-upgrade check that interrogates hardware and software for compatibility with Windows 2000 Professional before installation takes place (Figure 1.2). This check may indicate that you have to uninstall certain applications to proceed, or replace hardware or device drivers. Particular information generated may include reference to DOS configuration, Plug and Play hardware, Windows Messaging Services, and software compatibility. The check upgrade command generates a clear text report that includes all the relevant information generated and additional data, such as the amount of memory on the workstation, free disk space on the target drive, and a breakdown of the Start menu. The report can also be viewed during manual setup. The pre-upgrade check, which
works for both Windows NT and Windows 9x, can be initiated from the
i386 directory on the Windows 2000 Professional CD as follows:
W indow s 3.1
W indow s 9x
W indow s NT 3.51/ 4.0
Not Supported
W indow s 2000 Professional
W indow s 2000 Professional Non W indow s based
M icrosoft Operating System Not Suported
18 Chapt er 1 • Tools and Techniques for Deploying M icrosoft Window s 2000 Professional
Winnt32 /checkupgradeonly
When upgrading from Windows 9x, the following command line
may also be used:
Winnt32 /unattend:\\srv1\9xupgrades\answer.txt
Replace \\srv1 and the path as necessary for your environment.
Figure 1.2 The p re-up g rad e check has found an incom p atib ility on the targ et w orkstation.
The file answer.txt referred to in the Windows 9x example above
is a clear text file that may resemble the code:
[unattended]
win9xupgrade=yes
[win9xupg]
ReportOnly=yes
Tools and Techniques for Deploying M icrosoft Window s 2000 Professional • Chapt er 1 19
The option to use an answer file (a file that contains details on how setup should run) to specify that a pre-upgrade check must be executed allows the administrator greater flexibility in collating the information gathered from the workstations. An answer file to store the results of the pre-upgrade check centrally will only work for
Windows 9x. Answer files are extremely useful in automating setup,
and their format will be explained in greater detail in later chapters.
It is p ossib le to check the hard w are and softw are com p atib ility of w orkstations w ithout using the Winnt32.exe p re-up g rad e check. A
com p atib ility tool, chkup g rd .exe, is availab le from the Microsoft Web site. This tool p rovid es the sam e functionality as the p re-up g rad e check
includ ed in the Wind ow s 2000 setup p rog ram , b ut can b e run as a stand alone ap p lication w ithout req uiring Wind ow s 2000 source files.
The Windows NT pre-upgrade check stores its report in the winnt32.log file in the %windir% directory and could be used in a batch file similar to:
winnt32.exe /CheckUpgradeOnlyQ
copy %windir%\winnt32.log \\srv1\ntupgrades\%computername%.txt
To automate the pre-upgrade check of Windows NT workstations, use winnt32.exe /CheckUpgradeOnlyQ instead of winnt32.exe
/CheckUpgradeOnly. Appending the Q to CheckUpgradeOnly forces setup to create the winnt32.log file without requiring user input.
To minimize issues during the upgrade process it is always rec-ommended that you visit your vendors’ Web sites for compatibility information, updated drivers, and other information. During the setup of a test lab you will be able to run the upgrade process on production-type machines to gain an understanding of what issues may need to be resolved. As a general rule, custom power-management tools and
20 Chapt er 1 • Tools and Techniques for Deploying M icrosoft Window s 2000 Professional
custom Plug and Play solutions should be removed before upgrading
Windows NT and Windows 9x.
The p re-up g rad e check can b e run m anually at any tim e, the results of w hich w ill b e saved to %w ind ir%\up g rad e.txt for Wind ow s 9x and %w ind ir%\w innt32.log for Wind ow s NT. This w ill d etail the ap p lications that m ay not w ork, w hat d evice d rivers m ay req uire up g rad ing , and w hich hard w are is incom p atib le. This rep ort can also b e run from the autom ated setup p rocess, log in scrip t, or other m anag em ent utilities and m ay b e saved to a netw ork share for later p erusal. Each rep ort can b e uniq uely saved in the central location as the com p uter nam e of the m achine w here the p re-up g rad e check ran.
Up g rad ing from Wind ow s 9
x
A great deal of effort has been invested to ensure that the upgrade
from Windows 9x to Windows 2000 Professional is as smooth as
possible. This said, upgrading from Windows 9x is the least optimal
of the upgrade paths available. Most administrators will be familiar with the fact that there are distinct differences between Windows NT
and Windows 9x, notably with the registry, the accounts database,
and operating system structures. This implies that some
applica-tions designed specifically for Windows 9xwill not work under
Windows 2000 Professional, and that some hardware that functions
under Windows 9xwill not function with Windows 2000.
During compatibility testing, Windows 2000 Professional devel-opers found that applications would not function as expected after
the upgrade process from Windows 9x for several reasons:
■ The application setup routine detected that it had been
installed on Windows 9x and had installed Windows 9x
-specific files.
Tools and Techniques for Deploying M icrosoft Window s 2000 Professional • Chapt er 1 21
■ Some applications made calls to Windows 9x application
programming interfaces (APIs) not found in Windows 2000 Professional.
■ During application setup certain registry data would be
stored under Windows 9x in a different place than where it
is installed in Windows NT or Windows 2000 Professional.
■ Changes to the operating system. As part of the design
criteria, Windows 2000 developers always chose stability or robustness of the operating system over application
compatibility.
To allow companies to resolve application compatibility issues, Microsoft provides an extension mechanism called migration DLLs that plug into setup. These migration DLLs attempt to resolve appli-cation compatibility issues during setup through a software-based
solution, and can be used to replace Windows 9x specific binaries
and registry settings with Windows 2000-compatible binaries and registry settings. These DLLs are quite easy to integrate into the upgrade process as they are based on the standard Win32 API and comprise a single DLL and any files that must be copied to the tar-get workstation to resolve the particular application issue. A possi-ble issue to beware of is the uninstallation of applications changed by the migration DLLs. Unless the uninstall log for the specific application is modified by the migration DLL, notifying it of file and registry changes, the uninstallation process may be unsuccessful. A toolkit is available to aid in the DLL development and can be down-loaded from www.microsoft.com/msdn.
Several system utilities are not migrated during the upgrade process, such as Scandisk, Defragger, and DriveSpace, since they are replaced with equivalent functionality within Windows 2000 Professional. Compressed drives will also not be upgraded and must
be decompressed before upgrading. Certain Windows 9x specific
binaries, called VxDs, will not migrate during the upgrade to Windows 2000 Professional along with .386 drivers. The [386Enh]
section of the system.ini file on Windows 9x workstations details the
22 Chapt er 1 • Tools and Techniques for Deploying M icrosoft Window s 2000 Professional
As stated earlier, all released versions of Windows 9x are
sup-ported for upgrade. The upgrade process will preserve the system and user state; that is, the file system, drive letters, and user accounts. Windows 2000 Professional supports a wide range of file
systems, including FAT32 introduced with Windows 9x. The upgrade
process supports FAT32, though no changes are made to the file system during the migration. The setup process can be instructed to convert partitions to NTFS v5, or to leave the file system alone. Networking components may also not upgrade, though Windows 2000 does ship with some clients in the /i386/win9xupg folder on the Windows 2000 Professional CD-ROM.
NTFS v5 p rovid es a num b er of ad vantag es over FAT32, includ ing
encryp ted file system , volum e m ount p oints, increased security, and NTFS d irectory junctions. Wind ow s 2000 Professional w orkstations should b e converted to NTFS to leverag e these ad vantag es.
The method with which the setup program detects
incompatibili-ties in Windows 9xis more complex than that used for Windows NT.
The Plug and Play IDs of the hardware devices are compared against those listed as compatible in the Windows 2000 Professional source files. If entries for 16-bit drivers are found in the config.sys, they are flagged in the pre-upgrade check.
Additional considerations when upgrading include:
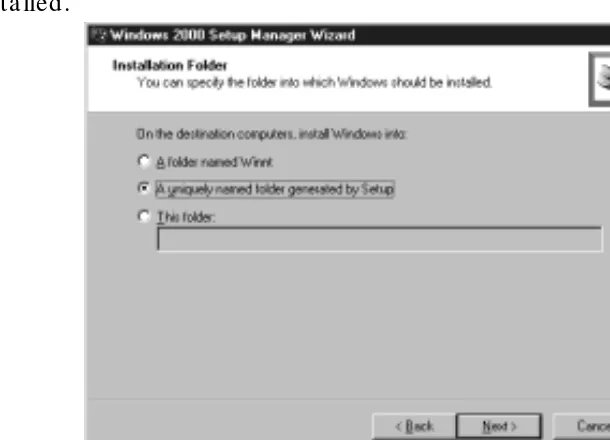
■ Specifying the installation directory This cannot be
changed from the current Windows directory.
■ Machine accounts Windows 9x machines do not require
machine accounts in the domain, but Windows 2000 Professional workstations do.
■ User accounts and profiles During the migration process
the setup program will attempt to migrate profiles and user accounts.
Tools and Techniques for Deploying M icrosoft Window s 2000 Professional • Chapt er 1 23
Software incompatibilities are found by examining installed applications for API calls that will not work with Windows 2000. The setup process also compares executable files on the target work-station with a database of known issues in the Windows 2000 source. Setup writes incompatibilities to the pre-upgrade check under the following categories:
■ Programs that do not work under Windows 2000 A flag is
raised for all those applications that must be upgraded, or an alternate compatible application installed.
■ Programs that work but with minor issues
■ Programs that must be removed before upgrading Some
applications have been found to adversely affect the installation process and must be removed before proceeding with setup.
■ Programs that are removed by Setup Some programs
become redundant, with similar or identical functionality built into the operating system.
■ Programs that should be reinstalled Programs that are
identified to install differently when installed on different operating systems should be reinstalled.
To summarize, resolving compatibility issues when upgrading
from Windows 9x to Windows 2000 Professional could entail:
■ Obtaining updated device drivers Drivers based on the
Windows Driver Model (WDM) will work on Windows 2000, but manufacturers may have to release updated drivers to replace VxDs and other non-compatible drivers.
■ Securing a migration DLL Application-specific migration
DLLs are coded to resolve compatibility issues encountered after the migration process.
■ Re-installing the application after upgrade This may resolve
issues caused by the initial installation program detecting that it
was installed on Windows 9xand installing Windows 9xspecific
binaries, modifying registry keys specifically for a Windows 9x
24 Chapt er 1 • Tools and Techniques for Deploying M icrosoft Window s 2000 Professional
■ Sourcing third-party network drivers not distributed with
the Windows 2000 Professional source.
■ Removing custom Plug and Play and custom power
management solutions.
■ Acquiring software or hardware to replace components that
are not compatible.
Up g rad ing from Wind ow s NT
Windows NT 4.0 and Windows 2000 share a common architecture in many key areas, such as the registry, file system, security, and operating system kernel structures. This eases the upgrade path. Applications also have common compatibility requirements for
Windows NT and Windows 2000. Testing has revealed that there is a significantly higher success rate in upgrading from Windows NT
than from Windows 9x. So much so, in fact, that Microsoft
recom-mends that part of the preparation process for Windows 2000 Professional deployment is to migrate as many workstations to Windows NT as possible.
When upgrading, Windows 2000 Professional supports a great deal of the Windows NT 4 legacy hardware, though this does not nec-essarily imply that the same hardware is supported for clean installs.
The main software incompatibility culprits include anti-virus programs, file system filters (as used by backup programs and even storage devices such as CD-ROMs), and disk quota software. Third-party networking components may also need close examination, though Windows 2000 does ship with some clients in the
/i386/winntupg folder on the Windows 2000 Professional CD-ROM. It is always a good idea to ensure that the machines’ BIOS revisions are up to date. Migration DLLs cannot be used for Windows NT, but an alternate process can be used to help resolve upgrade issues.
Tools and Techniques for Deploying M icrosoft Window s 2000 Professional • Chapt er 1 25
or even to halt the installation process, if necessary. This is done by copying the Dosnet.inf from the i386 directory on the Windows 2000 Professional CD and modifying the [ServicesToDisable] section to include items that you wish to disable during the upgrade. Editing the [ServicesToStopInstallation] will determine what services will prevent setup from continuing.
When examining Dosnet.inf, the following key determines func-tion type:
■ (d) DLL ■ (f) File
■ (s) Service
■ (r) Registry
To allow Setup to halt installation or disable a service, the cor-rect entries need to be detailed in the Dosnet.inf in a format similar to that detailed below:
r, key_name, value_name, expected_value, html_file, text_file,
%description%
f, file_name, version, html_file, text_file, %description%
s, service_name, html_file, text_file, %description%
■ key_name is the registry key to search for. Correct format
should be HKEY_LOCAL_MACHINE.
■ value_name is the value name to search for under the key
specified in key_name.
■ expected_value is the registry value to search for. If it is
found, then the appropriate action is taken according to which section the entry appears in.
■ html_file is the name of a .htm file that will be displayed
when the entry is found.
■ text_file is the name of a .txt file that will be displayed when
26 Chapt er 1 • Tools and Techniques for Deploying M icrosoft Window s 2000 Professional
■ %description%is the name of the incompatibility displayed to
the user. The friendly name is expanded with a
corresponding entry in the [Strings] section of Dosnet.inf. [Strings]
Description = “A description of the incompatibility.”
■ file_nameis a fully qualified file name of a file to detect. ■ versionis the file version of file_name to detect. If this
version is not detected, no action is taken. Multiple file entries can be used to detect multiple versions.
■ service_nameis the name of the service as it appears in the
Windows NT registry. This name is the same as that shown in Control Panel. It is important to know that the majority of device drivers run as services.
Associated HTML and text files are provided to supply more infor-mation on what corrective action to take when an incompatibility is encountered. The HTML file can even be used to point the user to the location of a replacement file as required. These parameters (even if they point to empty files) must be included or the entry in the
Dosnet.inf file will not be executed. The HTML and text files should all be contained in the Compdata directory, a child of the i386 directory.
The p re-up g rad e check can b e m od ified to contain ad d itional
incom p atib ilities as you d eem ap p rop riate, such as inhouse, custom -w ritten ap p lications. By m od ifying the Dosnet.inf file, -w hich is p arsed w hen the p re-up g rad e check is initiated , you can p rovid e your ow n incom p atib ility entries.
The setup program can then be run with the /m switch to copy replacement files from an alternate location. In the following
Tools and Techniques for Deploying M icrosoft Window s 2000 Professional • Chapt er 1 27
ple, a replacement Dosnet.inf has been copied to the \\srv1\ntup-grades share to prevent the running of a particular service.
\\srv1\distribution\winnt32.exe /unattend /m:\\srv1\ntupgrades
Clean Install
The process of installing Windows 2000 on a workstation whose hard drive can be formatted (thus erasing all data), or on a work-station that will be booting between operating systems, is known as a clean install. In order to proceed with a clean installation, the only requirements are that the workstation should meet the minimum hardware specifications for Windows 2000 Professional and that the hardware be present on the HCL. A clean install will not have any settings other than those entered during setup and may require individual customization.
To speed up the installation process, winnt32 can be run with the Syspart switch. The Syspart switch causes all of the installation files to be copied to the target disk drive. When the drive is then removed and placed in another workstation, it will continue with the next stage of setup. This option is particularly useful for reducing deployment time in environments with dissimilar hardware, or for use with disk imaging software. Syspart can only be used on work-stations that already have Windows NT 3.51, Windows NT 4.0, or
Windows 2000 installed—it is not supported on the Windows 9x
platform. Another consideration is that Syspart must be used with the Tempdir switch.
You must perform a clean install when:
■ Target workstations are configured to use a shared copy of
Windows 95 running from a server
■ Target workstations are running Windows 3.1, Windows