Red Hat Linux 7.3
Red Hat Linux 7.3: The Official Red Hat Linux Getting Started Guide Copyright © 2002 by Red Hat, Inc.
Red Hat, Inc.
1801 Varsity Drive Raleigh NC 27606-2072 USA Phone: +1 919 754 3700 Phone: 888 733 4281 Fax: +1 919 754 3701 PO Box 13588
Research Triangle Park NC 27709 USA
rhl-gsg(EN)-7.3-Print-RHI (2002-05-02T15:11-0400)
Copyright © 2002 by Red Hat, Inc. This material may be distributed only subject to the terms and conditions set forth in the Open Publication License, V1.0 or later (the latest version is presently available at
http://www.opencontent.org/openpub/).
Distribution of substantively modified versions of this document is prohibited without the explicit permission of the copyright holder.
Distribution of the work or derivative of the work in any standard (paper) book form for commercial purposes is prohibited unless prior permission is obtained from the copyright holder.
The admonition graphics (note, tip, and so on) were created by Marianne Pecci <[email protected]>. They may be redistributed with written permission from Marianne Pecci and Red Hat, Inc..
Red Hat, Red Hat Network, the Red Hat "Shadow Man" logo, RPM, Maximum RPM, the RPM logo, Linux Library, PowerTools, Linux Undercover, RHmember, RHmember More, Rough Cuts, Rawhide and all Red Hat-based trademarks and logos are trademarks or registered trademarks of Red Hat, Inc. in the United States and other countries.
Linux is a registered trademark of Linus Torvalds.
Motif and UNIX are registered trademarks of The Open Group.
Intel and Pentium are a registered trademarks of Intel Corporation. Itanium and Celeron are trademarks of Intel Corporation.
AMD, AMD Athlon, AMD Duron, and AMD K6 are trademarks of Advanced Micro Devices, Inc. Netscape is a registered trademark of Netscape Communications Corporation in the United States and other countries.
Windows is a registered trademark of Microsoft Corporation.
SSH and Secure Shell are trademarks of SSH Communications Security, Inc. FireWire is a trademark of Apple Computer Corporation.
All other trademarks and copyrights referred to are the property of their respective owners. The Red Hat Linux Product Documentation Team consists of the following people:
Sandra A. Moore, Product Documentation Manager— Primary Writer/Maintainer of theOfficial Red Hat Linux x86 Installation Guide; Contributing Writer to theOfficial Red Hat Linux Getting Started Guide
Tammy Fox, Product Documentation Technical Lead— Primary Writer/Maintainer of theOfficial Red Hat Linux Customization Guide; Contributing Writer to theOfficial Red Hat Linux Getting Started Guide; Writer/Maintainer of custom DocBook stylesheets and scripts
Edward C. Bailey, Technical Writer— Contributing Writer to theOfficial Red Hat Linux x86 Installation Guide
Johnray Fuller, Technical Writer— Primary Writer/Maintainer of theOfficial Red Hat Linux Reference Guide
Table of Contents
Introduction ...ix
1. Changes to This Manual ...ix
2. Document Conventions ... x
3. Copying and Pasting Text With X...xiii
4. Using the Mouse ...xiii
5. We Need Feedback!...xiii
6. Sign Up for Support...xiv
1. Getting Started ... 15
1.1. Introductory Terms ... 15
1.2. Logging In ... 16
1.2.1. Graphical Login... 16
1.2.2. Virtual Console Login... 17
1.3. Graphical Interface... 18
1.4. Opening a Terminal Window (Shell Prompt) ... 19
1.5. Creating a User Account ... 19
1.6. Documentation Resources ... 21
1.7. Logging Out... 23
1.7.1. Graphical Logout ... 23
1.7.2. Virtual Console Logout ... 25
1.8. Shutting Down your Computer... 25
1.8.1. Graphical Shutdown... 25
1.8.2. Virtual Console Shutdown ... 25
2. The GNOME Desktop Environment ... 27
2.1. Introducing GNOME... 27
2.2. Finding Help... 27
2.3. Using the Desktop... 27
2.4. Using the Panel... 28
2.4.1. Using theMain Menu... 28
2.4.2. Using Applets ... 29
2.4.3. Adding Icons and Applets to the Panel... 30
2.4.4. Configuring the GNOME Panel... 30
2.5. Using Nautilus... 30
2.6. Using the Start Here Icon... 31
2.6.1. Customizing GNOME ... 32
2.6.2. Customizing your System ... 32
2.7. Logging Out of GNOME... 33
3. The KDE Desktop Environment ... 35
3.1. Introducing KDE ... 35
3.2. Setting Up KDE ... 35
3.3. Finding Help... 35
3.4. Using The Desktop ... 36
3.5. Using The Panel ... 37
3.5.1. Using TheK Menu... 38
3.5.2. Using Applets ... 38
3.5.3. Adding Icons and Applets to the Panel... 40
3.5.4. Configuring the KDE Panel ... 40
3.6. Managing Files ... 40
3.6.1. The Navigation Panel ... 41
3.7. Customizing KDE ... 42
4. Diskettes and CD-ROMs... 45
4.1. Using Diskettes... 45
4.1.1. Mounting and Unmounting a Diskette ... 45
4.1.2. Reading MS-DOS formatted Diskettes ... 46
4.1.3. Putting Linux Files on an MS-DOS Diskette... 46
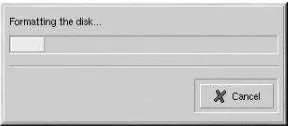
4.1.4. Formatting a Diskette ... 47
4.2. CD-ROMs ... 49
4.2.1. Using CD-ROMs with GNOME... 49
4.2.2. Using CD-ROMs From a Shell Prompt ... 49
4.3. CD-Rs and CD-RWs... 50
4.3.1. UsingX-CD-Roast... 50
4.3.2. Using CD-Rs and CD-RWs with Command Line Tools ... 53
4.4. Additional Resources ... 55
4.4.1. Installed Documentation... 55
4.4.2. Useful Websites ... 55
5. Getting Online... 57
6. Web Browsing... 59
6.1. TheMozillaWeb Browser ... 59
6.1.1. Mozilla Navigator ... 61
6.1.2. Mozilla Composer... 62
6.2.Nautilusas a Web Browser ... 62
6.3. Web Surfing withKonqueror... 63
6.4. UsingGaleonto Browse the Web... 65
7. Email Applications ... 69
7.1. Evolution ... 69
7.2. KMail ... 71
7.3. Mozilla Mail... 73
7.3.1. Mozilla and Newsgroups... 74
7.4. Plain Text Email Clients ... 75
7.4.1. UsingPine... 76
7.4.2. Usingmutt... 77
8. Printer Configuration ... 79
8.1. Adding a Local Printer ... 81
8.1.1. Printing a Test Page ... 83
8.2. Modifying Existing Printers ... 83
8.2.1.Names and Aliases... 84
8.2.2.Queue Type... 84
8.2.3.Driver... 85
8.2.4.Driver Options... 85
8.3. Additional Resources ... 85
8.3.1. Installed Documentation... 86
8.3.2. Useful Websites ... 86
9. Audio, Video, and General Amusement ... 87
9.1. Playing CDs ... 87
9.2. Playing MP3s ... 87
9.3. Troubleshooting Your Sound Card... 88
9.3.1. IfsndconfigDoes Not Work... 88
9.4. Troubleshooting Your Video Card ... 89
9.5. Games ... 89
9.6. Amusements ... 89
10. Working with Images ... 93
10.1. Viewing Images ... 93
10.1.1. UsingNautilusto view Images ... 93
10.1.2. UsingKonquerorView Images ... 94
10.1.3. Using GQview ... 95
10.1.4. Electric Eyes ... 97
10.2. Manipulating Images with theGIMP... 98
10.2.1. GIMP Basics ... 98
10.2.2. Loading a File ... 98
10.2.3. Saving a File ... 99
10.2.4.GIMPOptions ... 99
10.3. Additional Resources ... 101
10.3.1. Useful Websites ... 101
10.3.2. Related Documentation... 101
11. Shell Prompt Basics ... 103
11.1. Why Use a Shell Prompt ... 103
11.2. The History of the Shell... 103
11.3. Determining Your Current Directory withpwd... 104
11.4. Changing Directories withcd... 104
11.5. View Directory Contents with ls... 107
11.6. Locating Files and Directories... 108
11.7. Printing From The Command Line ... 109
11.8. Clearing and Resetting the Terminal... 110
11.9. Manipulating Files withcat... 110
11.9.1. Using Redirection... 110
11.9.2. Appending Standard Output ... 112
11.9.3. Redirecting Standard Input ... 113
11.10. Pipes and Pagers ... 113
11.10.1. The more Command... 114
11.11. More Commands for Reading Text Files ... 114
11.11.1. The head Command ... 115
11.11.2. The tail Command ... 115
11.11.3. The grep Command ... 115
11.11.4. I/O Redirection and Pipes... 115
11.11.5. Wildcards and Regular Expressions... 115
11.12. Command History and Tab Completion ... 117
11.13. Using Multiple Commands ... 118
11.14. Ownership and Permissions ... 118
11.14.1. The chmod Command... 120
11.14.2. Changing Permissions With Numbers ... 123
12. Managing Files and Directories ... 127
12.1. A Larger Picture of the File System ... 127
12.2. Identifying and Working with File Types... 128
12.2.1. Compressed and Archived Files ... 128
12.2.2. File Formats... 128
12.2.3. System Files... 128
12.2.4. Programming and Scripting Files... 129
12.3. File Compression and Archiving ... 129
12.3.1. File Compressing... 130
12.3.2. File Archiving ... 132
12.4. Manipulating Files at a Shell Prompt... 133
12.4.1. Creating Files ... 133
12.4.2. Copying Files ... 134
12.4.3. Moving Files ... 134
12.5. Viewing PDFs ... 136
13. Updating and Adding Packages to Red Hat Linux ... 139
13.1. Red Hat Network ... 139
13.2. Errata List ... 139
13.3. Installation CD-ROMs ... 140
14. Frequently Asked Questions ... 141
14.1. Localhost Login and Password ... 141
14.2. Displaying ls in color... 141
14.3. Error Messages During Installation of RPMs ... 142
14.4. Starting Applications... 142
14.4.1. Editing Your PATH ... 143
14.5. Accessing a Windows Partition ... 143
14.6. Finding Commands Quickly ... 144
14.7. Keep ls Output from Scrolling ... 145
14.7.1. Printing ls Output ... 145
14.8. Tips on Using Command History... 145
14.8.1. Other Shortcuts... 145
14.9. Forgotten Password ... 146
14.10. Password Maintenance ... 146
14.11. Changing Login from Console to X at Startup ... 147
14.12. Configuring X ... 147
A. Applications... 151
B. A Comparison of Common DOS and Linux Commands ... 153
C. System Directories ... 155
D. Keyboard Shortcuts... 157
Introduction
Welcome to theOfficial Red Hat Linux Getting Started Guide!
By now, you should have read theOfficial Red Hat Linux Installation Guideand successfully installed Red Hat Linux. This manual is designed to help new and intermediate Linux users navigate and perform common tasks. Keep in mind that Linux looks, feels, and performs differently from other operating systems you may have used. Forget about the conventions of other operating systems and, with an open mind, approach Red Hat Linux as a new, interesting, and versatile alternative.
This manual is task-oriented. You will find useful tips, hints, warnings, and screen shots interspersed throughout. First, you will learn the basics of using Red Hat Linux, such as customizing a desktop, configuring a printer, and getting online. Once the basics are covered, the tasks covered in this manual become progressively more advanced.
Most users choose to work within either the GNOME or KDE graphical desktop environ-ments (other desktop environenviron-ments are also available). TheOfficial Red Hat Linux Getting Started Guidefocuses primarily on how to perform tasks in these two environments. Topics discussed include:
• Using the GNOME and KDE graphical desktop environments • Managing files and directories
• Navigating the filesystem • Connecting to the Internet • Upgrading applications
• Pointers to additional resources covering common questions and answers, computer ba-sics, an explanation of Red Hat Linux system directories, and more.
After conquering the basics of your Red Hat Linux system, you may need information on more advanced topics. You can find this information in theOfficial Red Hat Linux Customiza-tion Guideand theOfficial Red Hat Linux Reference Guide.
HTML and PDF versions of the Official Red Hat Linux manuals are available on the Docu-mentation CD and online at http://www.redhat.com/docs/.
Note
Although this manual reflects the most current information possible, you should read theRed Hat Linux Release Notesfor information that may not have been available prior to our documentation being finalized. They can be found on the Red Hat Linux CD #1 and online at:
http://www.redhat.com/docs/manuals/linux
1. Changes to This Manual
x Introduction
Email Applications
TheOfficial Red Hat Linux Getting Started Guidehas been reorganized to include a chapter on using popular email clients includingEvolution,KMail, andMozilla Mail.
Web Browsing
TheOfficial Red Hat Linux Getting Started Guidehas been reorganized to include a chapter on using various Web browsers includingMozilla,Galeon,Nautilus, andKonqueror.
Working with Images
TheManipulating Images with GIMPchapter has been renamedWorking with Images. This chapter now includes information on the latest version of theGIMPas well asGQView andElectric Eyes.
The KDE Desktop Environment
This chapter has been updated for KDE 3.0.
The GNOME Desktop Environment
This chapter revised to include more information onNautilus.
Diskettes, CD-ROMs and CD-Rs
The Diskettes, CD-ROMs and CD-Rs chapter has been added with instructions on mounting and using (floppy) diskettes and CD-ROMs as well as a section on using CD-writables (CD-Rs) and CD-rewritables (CD-RWs) with Red Hat Linux.
2. Document Conventions
When you read this manual, you will see that certain words are represented in different fonts, typefaces, sizes, and weights. This highlighting is systematic; different words are rep-resented in the same style to indicate their inclusion in a specific category. The types of words that are represented this way include the following:
command
Linux commands (and other operating system commands, when used) are represented this way. This style should indicate to you that you can type the word or phrase on the command line and press [Enter] to invoke a command. Sometimes a command contains words that would be displayed in a different style on their own (such as filenames). In these cases, they are considered to be part of the command, so the entire phrase will be displayed as a command. For example:
Use thecat testfilecommand to view the contents of a file, namedtestfile, in the current working directory.
filename
Filenames, directory names, paths, and RPM package names are represented this way. This style should indicate that a particular file or directory exists by that name on your Red Hat Linux system. Examples:
The.bashrcfile in your home directory contains bash shell definitions and aliases for your own use.
Introduction xi
Install thewebalizerRPM if you want to use a Web server log file analysis program.
application
This style should indicate to you that the program named is an end-user application (as opposed to system software). For example:
Use NetscapeNavigatorto browse the Web.
[key]
A key on the keyboard is shown in this style. For example:
To use [Tab] completion, type in a character and then press the [Tab] key. Your terminal will display the list of files in the directory that start with that letter.
[key]-[combination]
A combination of keystrokes is represented in this way. For example:
The [Ctrl]-[Alt]-[Backspace] key combination will exit your graphical session and return you to the graphical login screen or the console.
text found on a GUI interface
A title, word, or phrase found on a GUI interface screen or window will be shown in this style. When you see text shown in this style, it is being used to identify a particular GUI screen or an element on a GUI screen (such as text associated with a checkbox or field). Example:
Select theRequire Passwordcheckbox if you would like your screensaver to require a password before stopping.
top level of a menu on a GUI screen or window
When you see a word in this style, it indicates that the word is the top level of a pull-down menu. If you click on the word on the GUI screen, the rest of the menu should appear. For example:
UnderSettingson a GNOME terminal, you will see the following menu items: Prefer-ences,Reset Terminal,Reset and Clear, andColor selector.
If you need to type in a sequence of commands from a GUI menu, they will be shown like the following example:
Click onPrograms=>Applications=>Emacsto start the Emacs text editor.
button on a GUI screen or window
This style indicates that the text will be found on a clickable button on a GUI screen. For example:
xii Introduction
computer output
When you see text in this style, it indicates text displayed by the computer on the command line. You will see responses to commands you typed in, error messages, and interactive prompts for your input during scripts or programs shown this way. For ex-ample:
Use thelscommand to display the contents of a directory: $ ls
Desktop axhome logs paulwesterberg.gif
Mail backupfiles mail reports
The output returned in response to the command (in this case, the contents of the direc-tory) is shown in this style.
prompt
A prompt, which is a computer’s way of signifying that it is ready for you to input something, will be shown in this style. Examples:
$
#
[stephen@maturin stephen]$
leopard login:
user input
Text that the user has to type, either on the command line, or into a text box on a GUI screen, is displayed in this style. In the following example,textis displayed in this style:
To boot your system into the text based installation program, you will need to type in thetextcommand at theboot:prompt.
Additionally, we use several different strategies to draw your attention to certain pieces of information. In order of how critical the information is to your system, these items will be marked as note, tip, important, caution, or a warning. For example:
Note
Remember that Linux is case sensitive. In other words, a rose is not a ROSE is not a rOsE.
Tip
Introduction xiii
Important
If you modify the DHCP configuration file, the changes will not take effect until you restart the DHCP daemon.
Caution
Do not perform routine tasks as root — use a regular user account unless you need to use the root account for system administration tasks.
Warning
If you choose not to partition manually, a server installation will remove all existing partitions on all installed hard drives. Do not choose this installation class unless you are sure you have no data you need to save.
3. Copying and Pasting Text With X
Copying and pasting text is easy using your mouse and the X Window System. To copy text, simply click and drag your mouse over the text to highlight it. To paste the text somewhere, click the middle mouse button in the spot where the text should be placed.
4. Using the Mouse
Red Hat Linux is designed to use a three-button mouse. If you have a two-button mouse, you should have selected three-button emulation during the installation process. If you’re using three-button emulation, pressing both mouse buttons at the same time equates to pressing the missing third (middle) button.
In this document, if you are instructed to click with the mouse on something, that means click the left mouse button. If you need to use the middle or right mouse button, that will be explicitly stated. (This will be reversed if you’ve configured your mouse to be used by a left handed person.)
The phrase "drag and drop" may be familiar to you. If you’re instructed to drag and drop an item on your GUI desktop, click on something and hold the mouse button down. While continuing to hold down the mouse button, drag the item by moving the mouse to a new location. When you’ve reached the desired location, release the mouse button to drop the item.
5. We Need Feedback!
xiv Introduction
When submitting a bug report, be sure to mention the manual’s identifier: rhl-gsg(EN)-7.3-Print-RHI (2002-05-02T15:11-0400)
If you have a suggestion for improving the documentation, try to be as specific as possible when describing it. If you have found an error, please include the section number and some of the surrounding text so we can find it easily.
6. Sign Up for Support
If you have an official edition of Red Hat Linux 7.3, please remember to sign up for the benefits you are entitled to as a Red Hat customer.
You will be entitled to any or all of the following benefits, depending upon the Official Red Hat Linux product you purchased:
• Official Red Hat support — Get help with your installation questions from Red Hat, Inc.’s support team.
• Red Hat Network — Easily update your packages and receive security notices that are customized for your system. Go to http://rhn.redhat.com for more details.
• Under the Brim: The Official Red Hat E-Newsletter— Every month, get the latest news and product information directly from Red Hat.
To sign up, go to http://www.redhat.com/apps/activate/. You will find your Product ID on a black, red, and white card in your Official Red Hat Linux box.
To read more about technical support for Official Red Hat Linux, refer to theGetting Technical SupportAppendix in theOfficial Red Hat Linux Installation Guide.
Good luck, and thank you for choosing Red Hat Linux!
Chapter 1.
Getting Started
The first step to using your Red Hat Linux system is to log in. When you log in, you are basically introducing yourself to the system.
Note
Like UNIX, Linux is case sensitive. That means that typingrootrefers to a different account than Root. As far as Linux is concerned, the lowercase root refers to the root user (also known as the superuser), or system administrator.
When you installed Red Hat Linux, you had the opportunity to install the X Window System (also simply called X), which provides the display of graphical information. You were also asked whether you wanted to use a graphical screen, rather than a console (or shell prompt) to log in. A graphical screen has icons, lots of menus, and is generally more approachable for a new user. A console, or shell prompt, resembles an MS-DOS screen and requires the use of specific phrases or commands, which the user types at the command line. Although the emphasis throughout this book will be on navigation and productivity using X, it will cover both the graphical and console methods of logging in and starting the X Window System.
1.1. Introductory Terms
When you learn about a new operating system, you also need to learn new terminology. Here are a few basic terms you should learn. You will see these terms often:
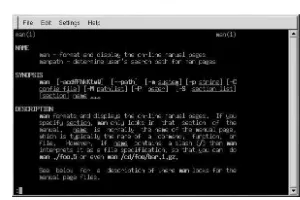
• Shell prompt: A command line interface (similar to a DOS screen) between the user and the operating system (Figure 1-1). The shell interprets commands entered by the user and passes them on to the operating system.
Figure 1-1. Shell Prompt and Command Line
• Command line: The place in the shell prompt where commands are typed.
• Command: An instruction given to the computer, most often with the keyboard or mouse. • Graphical User Interface (GUI): A screen with icons, menus, and panels for the user to click
16 Chapter 1. Getting Started
• GNOME and KDE: Two popular GUIs included with Red Hat Linux.
• Panel: A GUI environment toolbar, usually located across the bottom of the screen (Figure 1-2). The panel contains the main menu button and shortcut icons to start commonly used programs. It can be customized by the user.
Figure 1-2. A Panel
• Root: The root user account is created during installation and has complete access to your system. You must be logged in as root to accomplish certain system administration tasks. User accounts are created so typical user tasks can be done without using the root account, to reduce the chance of damaging your OS.
• suandsu -: The commandsugives you access to the root account or other accounts on your system. When yousuto root, or switch to your root account while still inside your user account shell, you have access to important system files that you can change, or damage, permanently. Logging in with thesu -command makes you root within the root account shell. Use caution when you are logged in as root.
• Man pageandinfo page: Man (short for manual) and info pages give detailed information about a command or file (man pages tend to be brief and provide less explanation than info pages). To read the man page for thesucommand, for example, typeman suat a shell prompt (or typeinfo sufor the info page). To close one of these pages, press [q]. • XorX Window System: These terms refer to the graphical user interface environments. If
you are "in X" or "running X" you are working in a GUI rather than a console environment. • Console: Console, shell prompt, terminal, "the screen that looks like DOS" — these are all the same thing: a non-graphical interface (Figure 1-1). This environment has no icons, lim-ited menus, and requires that you type commands to perform tasks, rather than pointing and clicking with your mouse.
• RPM: RPM stands for Red Hat Package manager and is how Red Hat builds and delivers its software files. An RPM is a software package file you can install on your computer.
1.2. Logging In
Unlike some other operating systems, your Red Hat Linux system uses accounts to manage privileges, maintain security, and more. Not all accounts are created equal: some accounts have fewer rights to access files or services than others.
If you have already created and logged into a user account, you can skip ahead to Chapter 2. If you created only the root account, read on to learn how to set up a user account. If you did not create a user account during installation, you must log in as root. After you create a user account, it is highly recommended that you log in as that user instead of root.
Caution
Chapter 1. Getting Started 17
1.2.1. Graphical Login
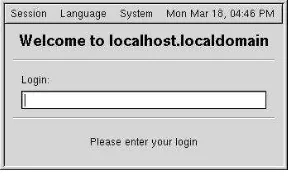
During installation, if you selected graphical as the login type and GNOME as the default desktop, you will see a graphical login screen as shown in Figure 1-3. Again, unless you have chosen to give your machine its own hostname, which is primarily used in a network setting, your machine will proabably be calledlocalhost.
Figure 1-3. The GNOME Graphical Login Screen
During installation, if you selected graphical as the login type and KDE as the default desk-top, you will see the KDE graphical login screen as shown in Figure 1-4 instead.
Figure 1-4. The KDE Graphical Login Screen
To log in as root from either graphical login screen, typerootat the login prompt, press [Enter], type the root password that you chose during installation at the password prompt, and press [Enter]. To log in as a regular user, type your username at the login prompt, type your password that you selected when creating the user at the password prompt, and press [Enter].
Logging in from the graphical login screen automatically starts the X Window System (the graphical interface) for you.
1.2.2. Virtual Console Login
During installation, if you selected text as the login type, you will see a login prompt similar to the following after booting your system:
Red Hat Linux release 7.3 Kernel 2.4.18-0.1 on an i686
18 Chapter 1. Getting Started
Unless you have chosen to give your machine its own hostname, which is primarily used in a network setting, your machine will proabably be calledlocalhost.localdomain. To log in as root from the console, typerootat the login prompt, press [Enter], type the root password that you chose during installation at the password prompt, and press [Enter]. To log in as a regular user, type your username at the login prompt, press [Enter], type your password that you selected when creating the user at the password prompt, and press [Enter].
After logging in, you can type the commandstartxto start the X Window System graphical interface.
1.3. Graphical Interface
When you installed Red Hat Linux you had the opportunity to install the GNOME desktop environment, the KDE desktop environment, or both desktops. If you installed both desk-tops, you were given the opportunity to choose a default desktop. Once you start theX Window System, you will find a graphical interface known as a desktop similar to Figure 1-5 in GNOME or Figure 1-6 in KDE.
Chapter 1. Getting Started 19
Figure 1-6. A KDE Desktop
If you want to log in to your Red Hat Linux system with a different desktop, select it from the pulldown menu on the graphical login screen, and then log in to the system. The desktop that you selected will appear.
For more information about GNOME and KDE, refer to Chapter 2 and Chapter 3.
1.4. Opening a Terminal Window (Shell Prompt)
Both GNOME and KDE offer quick launch buttons on their panels to open a terminal win-dow, also referred to as ashell prompt. While this manual focuses on performing task using the graphical interface and graphical tools, it is sometime useful and faster to perform tasks from a shell prompt. Refer to Chapter 11 for more details.
On the GNOME panel, the button that launches a shell prompt looks like .
You can also open a shell prompt in GNOME by selectingGNOME Main Menu=> Pro-grams=>System=>GNOME Terminal.
Similar to GNOME, the KDE panel prominently features a quick launch button for a shell
prompt. The launcher looks like .
You can also open a shell prompt in KDE by selectingKDE Main Menu=>System=>Shell. To exit a terminal window, click theXbutton on the upper right corner of the window, type
exitat the prompt, or type [Ctrl]-[D] at the prompt.
1.5. Creating a User Account
20 Chapter 1. Getting Started
There are two ways to create new and/or additional user accounts: using theRed Hat User Manageror from a shell prompt.
To create a user account graphically:
1. In GNOME, click theStart Hereicon on the panel at the bottom of your desktop. In the new window that opens, click theSystem Settingsicon, and then click theUser Managericon. You can also selectGNOME Main Menu=>Programs=>System=> User Manager.
In KDE, selectKDE Main Menu=>System=>User Manager.
2. If you are not logged in as root, you will be prompted for your root password. 3. The window shown in Figure 1-7 will appear. Click onNew User.
Figure 1-7. The User Configuration Tool
4. In theNew Userdialog box, enter a username (this can be an abbreviation or nick-name), the full name of the user for whom this account is being created, and a password (which you will enter a second time for verification). The name of this user’s home di-rectory and the name of the login shell should appear by default. For most users, you can accept the defaults for the other configuration options. Refer to theOfficial Red Hat Linux Customization Guidefor details about the additional options.
5. ClickOK. The new user will appear in the user list, and the user account creation is complete.
To create a user account from a shell prompt:
1. Open a shell prompt.
2. If you are not logged in as root, type the commandsu -and enter the root password. 3. Typeuseraddfollowed by a space and the username for the new account you are
cre-ating at the command line (for example,useradd carole). Press [Enter]. Often, user-names are variations on the user’s name, such as jsmith for John Smith. User account names can be anything from the user’s name, initials, or birthday to something more creative.
Chapter 1. Getting Started 21
5. At theNew password:prompt enter a password for the new user and press [Enter]. 6. At theRetype new password:prompt, enter the same password to confirm your
se-lection.
Important
You can be fancy or plain when you pick a user account name, but take precautions when you choose a password. The password is the key to your account, so it should be both unique and easy for you to remember. Your password should be at least six characters. You can use both uppercase and lowercase letters, as well as numbers and characters. Avoid easy selections, such asqwertyorpassword. If you want to pick an easy-to-remember but somewhat unique password, consider a variation of a word, such asa!rPl8nEforairplane.
1.6. Documentation Resources
If you have the Official Red Hat Linux boxed set, remember to take a look through the Red Hat Linux 7.3 Documentation CD. All of the Official Red Hat Linux manuals are on this CD. Once you have logged in to your Red Hat Linux user account, inserting the Documen-tation CD in the CD-ROM drive should automatically open the file manager (Nautiluson the GNOME desktop orKonqueroron the KDE desktop). If the file manager does not open automatically after a minute or so, refer to Section 4.2 for details on mounting a CD-ROM. When the file manager opens, click on theRH-DOCSdirectory to open it. You can view the Official Red Hat Linux manuals using three methods:
View in PDF format
TheRH-DOCS/pdf-endirectory on the Red Hat Linux Documentation CD contains files that end inpdf. To view the PDF versions of the manuals, use thexpdfprogram. Refer to Section 12.5 for details.
View in HTML format from the CD-ROM
Look underRH-DOCSin the file manager tree. Open theindex-en.htmlfile in a Web browser (theenlanguage abbreviation might vary for your language). Click on the name of the manual you want to read.
You can also go to http://www.redhat.com/docs/ and read the documentation online. All of the Red Hat Linux 7.3 manuals are available online in PDF, HTML, and RPM formats on the website.
View in HTML format after installing to your hard drive
The manuals are also available inRPMformat. Installing theRPMpackages copies the HTML versions of the manuals to your hard drive so that you can view them without the CD-ROM or an Internet connection. For more information on usingRPM, refer to theOfficial Red Hat Linux Customization Guide.
22 Chapter 1. Getting Started
shell prompt by typing thesu -command, entering the root password when prompted, and typing the commandgnorpm. The screen as shown in Figure 1-8 appears.
Figure 1-8. GnoRPM
Click on theInstallbutton in the upper left corner of this window. Another screen ap-pears, similar to Figure 1-9.
Figure 1-9. GnoRPM Installation Screen
Scroll through the list of documents on the left. Files beginning withrhlare Red Hat Linux manuals. The lettersig,gsg,cg, andrgfollowrhl, corresponding to the Instal-lation,Getting Started,Customization, andReferenceguides respectively.
Select the manual(s) you want to install by clicking on the checkbox to the right of the filename. Then, click on theInstallbutton. An installation status screen appears and closes when installation is complete.
The manual(s) you installed now appear on the main menu underPrograms=> Docu-mentation=>Official Red Hat Linux.
The manuals can also be installed from a shell prompt. Open a shell prompt, and type the following at the command line:
-Chapter 1. Getting Started 23
Press [Enter]. You will be asked for your root password. Enter the password at the prompt and press [Enter]. You are now logged in as root. To install all four manuals, type the following:
rpm -ivh /mnt/cdrom/rhl-*.rpm
Press [Enter].
To install only certain manuals, replacerhl-*.rpmwith the full file name of the manual that you want to install. For example, the file name for theOfficial Red Hat Linux Getting Started Guidewill look something likerhl-gsg-en-7.2-5.noarch.rpm, so you would type the following to install theOfficial Red Hat Linux Getting Started Guideon your computer:
rpm -ivh /mnt/cdrom/rhl-gsg-en-7.2-5.noarch.rpm
Press [Enter]. Typeexitat the command line and press [Enter]. This takes you out of the root login and back to your user account.
Now go toMain Menu=>Programs=>Documentation=>Official Red Hat Linux and select the manual you want to open.
1.7. Logging Out
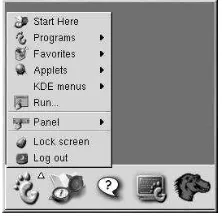
1.7.1. Graphical Logout
To log out of GNOME, selectGNOME Main Menu Button=>Log out(as shown in Figure 1-10).
Figure 1-10. GNOME Log Out Selection
24 Chapter 1. Getting Started
Figure 1-11. Logout Confirmation
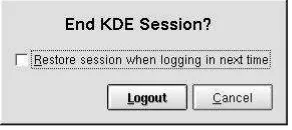
Similarly, in KDE, you can log out by selectingKDE Main Menu=>Logout.
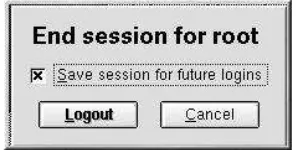
If you chose KDE as your default desktop environment during your installation of Red Hat Linux, your logout screen will look like Figure 3-10:
Figure 1-12. KDE Default Logout Confirmation
If you chose GNOME as your default desktop environment during your installation of Red Hat Linux, your logout screen will look like Figure 3-9:
Figure 1-13. KDE Logout Confirmation
At the logout screen, KDE offers you the chance to save your current settings, which will preserve your panel configuration and start any applications that you left open in your ses-sion.
Chapter 1. Getting Started 25
you see this dialog, you can simply select theCancelbutton, save your work, then log out again. If you continue without saving your work, you will lose the unsaved data.
By default, the KDE panel also contains a quick launch button to log out; it is located on the right-side of the panel, and looks like .
1.7.2. Virtual Console Logout
If you are not using the X Window System, and you logged in at the console, typeexitor [Ctrl]-[D] to log out of the console session.
1.8. Shutting Down your Computer
Before turning off your computer, it is important to shut down Red Hat Linux.Neversimply turn off your computer.
1.8.1. Graphical Shutdown
If you are in the X Window System, log out as discussed in Section 1.7. If you are using the GNOME graphical login screen as shown in Figure 1-3, selectSession=>Halt...from the pulldown menu, and clickYesto confirm. If you are using the KDE graphical login screen as shown in Figure 1-4, click theShutdown...button, selectHalt, and clickOK.
Some computers automatically turn the power off after shutting down Red Hat Linux. If your computer does not, you can turn off the power to your computer after you see the message:
Power down.
1.8.2. Virtual Console Shutdown
If you are logged in to a console, type the following command to shutdown your computer:
halt
Some computers automatically turn the power off after shutting down Red Hat Linux. If your computer does not, you can turn off the power to your computer after you see the message:
Chapter 2.
The GNOME Desktop Environment
2.1. Introducing GNOME
GNOME is one of several graphical desktop environments included with Red Hat Linux. GNOME offers a user-friendly environment where you can easily access your applications and system. Both new and experienced users will be able to take full advantage of their Red Hat Linux system using the GNOME desktop environment.
This chapter covers the fundamentals of the GNOME desktop environment.
If you would like to learn about GNOME in more detail, you will find the latest GNOME-related information at the official GNOME website: http://www.gnome.org.
Tip
If you have both GNOME and KDE installed on your system, you can use applications from the other environment. For example, you can use the KDE email client,KMail, while you are working in GNOME. You will find access to the KDE applications in theMain Menu(the stylized foot at the bottom of the screen) underKDE Menus.
2.2. Finding Help
Additional documentation on the GNOME desktop can be found by clicking on theHelp tab on the left side of theNautiluswindow. This brings up the built-in help browser which presents you with a great deal of documentation already installed on your system.
Clicking on the icon on GNOME Panel displays theGNOME User’s Guide.
2.3. Using the Desktop
28 Chapter 2. The GNOME Desktop Environment
Figure 2-1. A GNOME Desktop
As stated previously, the GNOME desktop gives you access to the applications and system settings on your computer. You will notice that GNOME offers three main tools to make use of the applications on your system: panel icons, desktop icons, and menu systems. The long bar across the bottom of the desktop is thepanel. The panel contains application launchers, status indicators, and small applications.
The icons elsewhere on the desktop can be file folders or application launchers. To open a folder or launch an application, double-click on its icon.
The menu systems can be found by clicking on the GNOMEMain Menubutton. They can also be found by clicking on theStart Hereicon and then clicking theProgramsicon. The GNOME desktop works in the manner you might expect it to when working with other operating systems. You can drag and drop files and application icons to areas that are easily accessible. You can add new icons for files and applications to the desktop, panel, and file manager. You can change the appearance of most of the tools and applications, as well as changing system settings with provided configuration tools.
2.4. Using the Panel
The GNOME Panel is the bar that stretches across the bottom of the screen and holds icons and small applications which makes using your system easier. The panel also contains the Main Menu(the stylized foot icon) which contains menu items for all of your applications. The small applications (calledapplets) allow you to run specific tasks or monitor your system or services, like Red Hat Network, while remaining out of your way.
Chapter 2. The GNOME Desktop Environment 29
2.4.1. Using the Main Menu
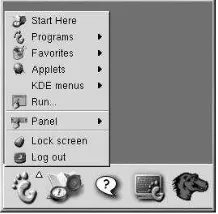
You can click on the GNOMEMain Menubutton to expand it into a large set of menus that allows you to access the applications on your system.
From here, you can start most applications included in Red Hat Linux. You will notice that you may access KDE applications under theKDE Menusentry (if KDE is installed on your machine). These sub-menus give you access to a full range of applications on your system. From theMain Menu, you can also log out, run applications from a command line, and lock your screen, which runs a password protected screen saver (the password being your user password).
2.4.2. Using Applets
Applets are small applications that run on the panel. These usually let you monitor things on your system or the Internet. Some have more specific tasks while others are simply enter-taining.
There are a few applets that run on your panel by default. These applets are fairly important and are covered in the following list.
GNOME Pager
TheGNOME Pageris a simple applet that allows you to see what applications you have open on your desktop(s). GNOME gives you the ability to use multiple desktops so you do not have to have all your running applications crowding one workspace. The GNOME Pagerwill represent each desktop in small squares and show the applications running in each. You may click on one of the squares with your mouse to move to that desktop. You can also use the keyboard shortcut [Meta]-[right-arrow] or [Shift]-[Meta]-[left-arrow] to switch between desktops. (The [Meta] key is usually the [Alt] key.)
Figure 2-3. GNOME Pager
Taskbar
To the left of theGNOME Pageris theGNOME Taskbar. The taskbar is an applet which shows you the titles of running applications on any desktop. This is very helpful if you decide to minimize an application as it will seem to disappear from the desktop. Once it disappears, you can bring it back by clicking on its title in theGNOME Taskbar.
Figure 2-4. The GNOME Taskbar
Red Hat Network Alert Notification Tool
30 Chapter 2. The GNOME Desktop Environment
needs an upgrade. If you click on the applet, theRed Hat Update Agentwill run so you can connect to Red Hat Network. If you are not registered with Red Hat Network, it will launch the registration application. Right-click on the applet icon and selectHelp for details.
Figure 2-5. Red Hat Network Alert Notification Tool
2.4.3. Adding Icons and Applets to the Panel
To make the panel fit your work environment, you may want to add more applets and icons (or launchers).
To add an applet to the panel, click on the GNOMEMain Menubutton and selectPanel=> Add to Panel=>Appletand choose from the list of applets. When you select an applet, it will appear on your panel as that is the only place it will run.
To add a launcher (new icon) to the panel, click on the GNOMEMain Menubutton and selectPanel=>Add to Panel=>Launcher. This will launch a dialog box which allows you to enter the system command that will launch the application.
Tip
Another quick and easy way to add a launcher to the panel is to click on theGNOME Main Menu
button and selectPanel=>Add to Panel=>Launcher from menu. Then select an application that appears on theMain Menu. This will automatically add a launcher based on the properties of the item in theMain Menu.
2.4.4. Configuring the GNOME Panel
You can hide the panel automatically or manually, place it on any edge of your desktop, change its size and color, and change the way it behaves. To alter the default panel settings, click on the GNOMEMain Menubutton and selectPanel=>Properties. Then selectAll Propertiesto open a general window for adjusting all panel settings, or any one of the spe-cific properties (Type,Hiding Policy,Size,Background Type, and so on).
2.5. Using Nautilus
Nautilusis the file manager for the GNOME desktop.Nautiluswas designed, however, to be much more than a simple file manager.Nautilusallows you to configure your GNOME desktop, configure your Red Hat Linux system, play your mp3s, browse your photo col-lection, access your SMB network, surf the Web, and more all from the same interface. In essence,Nautilusbecomes a "shell" for your entire desktop experience.
Chapter 2. The GNOME Desktop Environment 31
To startNautilusas a file manager, double-click on your home directory icon:
Once you haveNautilus, you can navigate through your home directory or the rest of the file system. To return to your home directory, click theHomebutton.
When you are navigating through your file system, you will always be able to see where you are by looking at the frame on the left hand side ofNautiluswhich shows you the current directory.
The main frame contains folders and files which you can drag with your mouse to move and copy them into new locations. If you prefer, you may click on theTreetab on the bottom left to display a hierarchical view of your complete file system which may make moving and copying easier for you.
If you do not want to use the tree view, you can always open anotherNautiluswindow by selectingFile=>New Window. Once you have anotherNautiluswindow, dragging files to different directories is easy to accomplish. By default, dragging a file from one directory to another will move the file. If you wish to copy the file to another directory, press the [Ctrl] key while dragging and dropping the file.
By default, text-based files and images in your home directory will be seen asthumbnails. For text files, this means you will see the beginning of the actual text in the icon. For images you will see a scaled-down version of the image. To turn off this feature, selectPreference =>Edit Preferences. SelectSpeed Tradeoffsfrom the menu on the left. SelectNeverfor the visual enhancements that you want to disable. Disabling these features will increase the speed ofNautilus.
2.6. Using the Start Here Icon
Figure 2-6. The Start Here Window
TheStart Herescreen was designed to hold all of the tools and applications you need to access when using your system. From your favorite applications to system configuration tools, theStart Herewindow provides a central location.
32 Chapter 2. The GNOME Desktop Environment
TheStart Herescreen includes icons that allow you to access your favorite applications, desktop preferences,Main Menuitems, server configuration tools, and system settings. You may want to add your own favorite applications to theFavoritessection off of theStart Herearea. To add an application to theFavoritessection, select the application from the Main Menu, click on it with your right mouse button, and select theAdd this to Favorites menuitem from the pop-up menu. You will see an icon for the application in theFavorites section immediately.
2.6.1. Customizing GNOME
Within theStart Herearea you can select thePreferencesicon to configure your GNOME desktop. Once selected, you will be presented with a wide selection of options for configur-ing your desktop. Below you will find a list of a few of the configuration options and tools in each area.
Desktop
This contains items which are associated with the appearance of your desktop. For ex-ample, you may configure your background, panel, and screen saver.
Multimedia
In this section you will be able to configure the system sounds associated with various functions. For example, if you would like to have a sound play when you log in to GNOME, you will set that here.
Peripherals
If you have any items plugged into your system that GNOME understands or has as-sociated applications, this area will contain configuration tools for them. Keyboard and mice will always be here, but you may also have a tool to help you configure GNOME for a PDA as well.
Sawfish window manager
By default, GNOME uses the Sawfish window manager. The window manager deter-mines when, where, and how windows are placed on the screen, as well as how the borders for windows are decorated. These tools allows you to change the behavior and appearance of the Sawfish window manager.
2.6.2. Customizing your System
TheStart Herepage inNautiluscontains additional configuration tools that help you with your new Red Hat Linux system and the server applications included.
TheSystem Settingsicon includes tools that help you set up your system for personal ev-eryday use. Below you will find a list of some of the tools included inSystem Settingsand what you can do with them.
Date/Time Properties
Chapter 2. The GNOME Desktop Environment 33
Hardware Browser
TheHardware Browserprobes your machine for all available hardware, whether it is internal or external. Each hardware device will bring up different information depend-ing on the device. For example, a hard drive will display partitiondepend-ing information as well as the amount of available space. Refer to theOfficial Red Hat Linux Customization Guidefor details.
Network Configuration
TheNetwork Configurationtool allows you to set up any type of network connection whether it is a modem, a network card, a wireless card, or broadband connection. Refer to theOfficial Red Hat Linux Customization Guidefor details.
Printer Configuration Tool
ThePrinter Configurationtool allows you to add a new printer to your system. The printer may be connected to your machine or available on a network. Refer to Chapter 8 and theOfficial Red Hat Linux Customization Guidefor details.
As mentioned before, you will also find server configuration tools in theStart Herearea. These tools help you configure services and applications you are using on the local machine to serve other machines. The server configuration tools are found by clicking on theServer Configurationicon. A couple of examples of the tools found in this area are the tools for the Apache Web Server and a DNS/Bind tool. You must have those server applications installed before these tools appear in this section. Refer to theOfficial Red Hat Linux Customization Guidefor details.
2.7. Logging Out of GNOME
When you have finished working and want to quit GNOME, you are presented with the choice of simply logging out of GNOME (leaving the system running), restarting the ma-chine, or halting the system completely.
Figure 2-7. The GNOME Log Out Confirmation
Chapter 3.
The KDE Desktop Environment
3.1. Introducing KDE
KDE is a graphical desktop environment that allows you to access your Red Hat Linux sys-tem and applications using your mouse and keyboard.
This chapter covers the fundamental apsects of using the KDE desktop environment includ-ing system navigation, workinclud-ing with files and applications, and customizinclud-ing the desktop to suit your needs.
If you would like to learn more about KDE, visit the official website at http://www.kde.org.
Tip
If you have both KDE and GNOME installed on your system, you can use applications from the other environment. For example, you can use the GNOME email and personal information management suite,Evolution, while you are working in KDE. You can access GNOME applications by clicking the
Start Applicationbutton (the ’K’ icon at the bottom of the screen), then choosingProgramsfrom the menu.
3.2. Setting Up KDE
The first time you log into KDE (refer to Chapter 1 for more information about logging into your Red Hat Linux machine), a setup wizard will appear that allows you to set some initial preferences prior to using the desktop. This wizard guides you through setting up your language and locale settings, choosing how to interact with the KDE interface, configuring your desktop visual effects, and even customizing the look of your desktop. Figure 3-1 shows the welcome screen of the KDE setup wizard. You can elect to skip the setup wizard and run with KDE defaults by clickingSkip Wizard.
36 Chapter 3. The KDE Desktop Environment
3.3. Finding Help
You can access a comprehensive set of documentation about KDE through the KDE Help-Center.
Figure 3-2. The KDE HelpCenter
There are several ways to access the KDE HelpCenter:
• From the panel — click on theHelpicon • From theMain Menu— selectHelp.
• From the desktop — Right-click on the desktop and select theHelp on desktop. The opening screen of the KDEHelpCenterbrowser will appear like Figure 3-2. From this main page, you can view help documentation on topics such as using and configuring the desktop, working with the many applications included with KDE, and working with the Konquererfile manager.
TheHelpCenterallows you to perform searches based on keyword entries and Web queries. To do this, click on the search tab and type in a keyword, subject, or significant phrase in the Keywordsfield. Click onSearchor press [Enter] to begin searching the Internet for your subject.
3.4. Using The Desktop
Chapter 3. The KDE Desktop Environment 37
Figure 3-3. A Typical KDE Desktop
The KDE desktop displays application launchers, document windows, file folders, and so on. You can also access the main menu and configure the desktop to suit your needs. The long bar across the bottom of the desktop is thepanel. The panel contains application launchers, status indicators, and the desktop manager. You can have up to 16 desktops run-ning at the same time in KDE. The panel taskbar shows your currently runrun-ning applications. Icons located on the desktop can be files, folders, device links, or application launchers. Click on an icon to open the associated resource.
The KDE desktop works similarly to other graphical desktop environments. You can drag and drop files and application icons to any location on the desktop. You can also add new icons for all types of applications and resources to the desktop, panel, or file manager. The desktop itself is also highly customizable. You can change the appearance of buttons, win-dow and frame decorations, and backgrounds easily. Configuration tools are also available which allow you to customize the way the desktop behaves at events such as single- and double-clicking mouse buttons and combining (also calledchording) keystrokes to create time-saving shortcuts.
The default KDE desktop displays icons for the trash can, your home directory, the KDE Control Panel, and a link to the Red Hat website. You can access any one of these resources by clicking on the associated icon.
When you right-click on these icons, you will see several options for working with these resources, such asDelete Rename Move to Trash, andCopy.
You can drag and drop unwanted items such as files you no longer need to theTrashicon. Right-click on the trashcan and selectEmpty Trash Binto delete the items from your system permanently.
3.5. Using The Panel
38 Chapter 3. The KDE Desktop Environment
Figure 3-4. The Panel
The panel is highly configurable. You can add and remove buttons that launch applications easily. Right-click on the panel and selectPanel=>Configurationto open the panelSettings. Other tabs inSettingscontain options to further customize your panel. Click onHelpfor more information on these options.
Applications and utilities can be added easily to the panel. To add an application to the panel, right-click on the panel and choosePanel=>Add. Then selectButton,Applet,Extension, orSpecial Button, and make your choice from the corresponding menus.
3.5.1. Using The K Menu
TheK Menu is the main menu for KDE. Clicking on theK Menuicon on the panel dis-plays a large master menu from which you can perform tasks such as launch applications, find files, and configure your desktop. The main menu also contains several submenus that organize applications and tools into several categories, includingUtilities,Graphics, Inter-net, andMultimedia.
From theK Menu, you can lock your screen, which will display a password-protected screensaver. You can also run applications from a command line as well as logout of your KDE session.
3.5.2. Using Applets
Applets are small applications that run on the panel. There are several types of applets per-forming functions such as system/network monitoring, launching applications by typing commands in a text box, and even checking the local weather.
There are some applets that run on the panel by default. This section covers them in detail.
3.5.2.1. Working with Multiple Desktops
By default, KDE provides four desktops that you can use to display multiple applications without having to crowd all of them onto one desktop. Each desktop can hold icons, open applications, and have individually customized backgrounds.
For example, while you are writing a message inKMailon desktop one, you can have Kon-querorbrowsing the Web on desktop two, theKWordword processor open on desktop three, and so on.
You can change the number and names of desktops available in KDE by making these ad-justments:
Chapter 3. The KDE Desktop Environment 39
Figure 3-5. The Desktops Tab in the Panel Configuration
You can change the names of your desktops (fromDesktop 1,Desktop 2, etc.) by deleting the default names and typing a new name in each desktop’s corresponding text box. You can also change the number of desktops available to you by adjusting the slider at the top of theDesktopstab. For more desktops, drag the bar to the right; for fewer desktops, drag the bar to the left.
TheDesktop,Appearance, andBorderstabs are where you can make various desktop con-figuration selections, like icon arrangement and font size.
After you make any adjustments to your desktop configuration, clickApplyto save the changes and close the panel configuration tool.
Buttons for your desktops appear on the panel in theDesktop Pager. Simply click on the tiles to move to a different desktop.
Tip
You can use the keyboard combination of the [Ctrl] and Function keys to switch desktops. For ex-ample, [Ctrl]-[F2] will switch you from desktop one to desktop two, [Ctrl]-[F3] will take you to desktop three, and so on.
3.5.2.2. Viewing The Taskbar
The taskbar displays all running applications — both minimized and on the desktop.
40 Chapter 3. The KDE Desktop Environment
You can maximize running applications or bring them to the front of your working windows by clicking on the associated item on the taskbar.
Tip
Another way to bring minimized or background windows to the front is to use the [Alt] and [Tab] keys. To pick an item from the taskbar, hold down [Alt]-[Tab]. To scroll through the tasks, hold down the [Alt] key, while pressing the [Tab] key in succession. When you have found the task you want to maximize and bring to the front, release both keys.
3.5.3. Adding Icons and Applets to the Panel
To further customize the panel for your particular needs, you can include additional applets and icons (launchers).
To add an applet to the panel, clickK Menu=>Configure Panel=>Add=>Applet. Choose the applet you want from the menu and it will immediately appear on the panel. You can move the applet by clicking on the applet bar and choosingMovefrom the menu.
To add a new launcher to the panel, clickK Menu=>Configure Panel=>Add=>Button and choose the application or resource you wish to add to the panel. This will automatically add an icon on the panel.
3.5.4. Configuring the KDE Panel
You can hide the panel automatically or manually, place it on any edge of your desktop, change its size and color, and change the way it behaves. To alter the default panel settings, clickK Menu=>Configure Panel=>Preferences. TheSettingswindow will appear, allow-ing you to adjust all panel settallow-ings, or any one of the specific properties (Position,Hiding, Look & Feel,Menus, and so on).
3.6. Managing Files
Konqueroris the file manager and Web browser for the KDE desktop.Konquerorallows you to configure your KDE desktop, configure your Red Hat Linux system, play multimedia files, browse digital images, surf the Web, and more from one interface. This section explains some of the waysKonquerorcan help you work with and enjoy your Red Hat Linux expe-rience.
To startKonquerorfor file management, click on your home directory icon .
Chapter 3. The KDE Desktop Environment 41
Figure 3-7. The Konqueror File Manager
You can navigate through the file system by clicking on folders within the main window frame or through the hierarchical file system viewer on the navigation panel as shown in Figure 3-7. Files and folders in the main window frame can be moved or copied to another folder or sent to the trash. You can also delete files and folders by right-clicking on the item and choosingDelete.
Konquerorcan also generate thumbnail icons for text, images, PostScript/PDF files, and Web files. You can even generate preview sounds from mp3 files. From the toolbar choose View=>Previewand choose the file types for which you would like to see thumbnail icons generated. Thumbnails will be immediately generated for any associated files in the Kon-querorwindow.
3.6.1. The Navigation Panel
Another useful feature ofKonqueroris thenavigation panel. This panel appears on the left side of theKonquerorwindow by default. The navigation panel makes many of your per-sonalized resources available to you in convenient tabbed icons. Figure 3-8 shows the navi-gation panel.
42 Chapter 3. The KDE Desktop Environment
The navigation panel lets you access your Web bookmarks, browsing history, network re-sources, file system, and has a built-in media player for playing multimedia files without having to open a separate application. The navigation panel makesKonqueroran effieient solution for users who wish to have fast and easy access to all of their information.
3.7. Customizing KDE
KDE allows you to configure the desktop and your system to suit your needs. TheKDE Control Centerlets you customize the look and behavior of the desktop. The following list explains some of the configuration options in detail.
File Browsing
This section lets you configure theKonquerorfile manager and customize certain file operations. You can also associate files to applications that you prefer (for example, assigning all MP3 files to open inXMMSinstead of the default player).
Look & Feel
This sections allows you to customize the visual aspect of your desktop environment. You can customize background images and configure fonts, themes, icons, panel ele-ments, screensavers, and window header decorations. You can also customize mouse and keyboard events which makes working with the desktop as efficient for your needs as possible.
Note
KDE features support for smooth (anti-aliased) fonts. However, not all fonts are smooth by de-fault. In order to have smooth fonts for your entire desktop (whether you are reading text files, webpages, or text in menus and icons) you must choose fonts that are designed to be anti-aliased, such as LucidaTypewriter or Courier).
Personalization
This section allows you to set country and language options to your particular locale. You can also configure accessibility features such as audible and visual cues and key-board/mouse customization. You can also configure your shell prompt settings via the Konsoleoption. Privacy and encryption settings can be configured via theCrypto op-tion.
System
This section is an advanced administration interface. You will need your root password to configure most of these options. This section allows you to configure system boot settings, Linux kernel configuration, printer settings, and install fonts system-wide. It is
stronglyrecommended that you leave these settings at their default values unless you understand the consequences of changing them.
Web Browsing
Chapter 3. The KDE Desktop Environment 43
3.8. Logging Out of KDE
There are several easy ways to log out from your KDE session:
• From theK Menu, selectLogout.
• From the panel, select theLogouticon
• From the desktop, right-click on the desktop and selectLogoutfrom the menu.
If you chose GNOME as your default desktop environment during your installation of Red Hat Linux, your logout screen will look like Figure 3-9:
Figure 3-9. KDE Logout Screen (GNOME default)
If you chose KDE as your default desktop environment during your installation of Red Hat Linux, your logout screen will look like Figure 3-10:
Figure 3-10. KDE Logout Screen (KDE default)
At the logout screen, KDE offers you the chance to save your current settings, which will preserve your panel configuration and start any applications that you left open in your ses-sion.
Chapter 4.
Diskettes and CD-ROMs
Using diskettes and CD-ROMs with Red Hat Linux requires some understanding about re-movable media. This chapter discusses how to read and write files to and from diskettes, how to format diskettes, and how to read and copy data from a CD-ROM. This chapter also covers using CD-writable and CD-rewritable drives.
4.1. Using Diskettes
Diskettes are one of the oldest removable media solutions available for the personal com-puter (PC). Diskettes are ideal as a portable storage solution used for files that need to be physically moved around. For example, if two PCs are not on the same network, diskettes are a great solution to transfer files from one computer to the other.
4.1.1. Mounting and Unmounting a Diskette
A diskette must be mounted first before it can be used. Insert a diskette into the diskette drive and typemount /mnt/floppy/at a shell prompt.
The diskette drive activity light should blink as the diskette’s file system is mounted to the /mnt/floppydirectory.
You can access the contents of the diskette by changing into that directory with thecd /mnt/floppy/command.
Alternatively, you can also mount a diskette in the GNOME desktop environment by right-clicking on the desktop and choosingDisks=>Floppy. This mounts the diskette and adds a
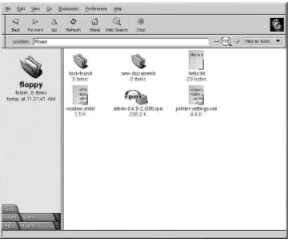
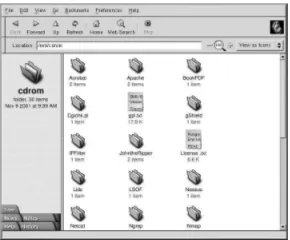
desktop icon which you can double-click to explore the diskette contents inNautilus. Now that the diskette has been mounted it is available to be copied from or written to. You can open, save, and copy files to/from it as you would normally do to your hard drive. You can even explore the diskette’s contents inNautilusorKonqueror, as shown in Figure 4-1.