Red Hat Linux 7.3
Red Hat Linux 7.3: The Official Red Hat Linux Customization Guide Copyright © 2002 by Red Hat, Inc.
Red Hat, Inc.
1801 Varsity Drive Raleigh NC 27606-2072 USA Phone: +1 919 754 3700 Phone: 888 733 4281 Fax: +1 919 754 3701 PO Box 13588
Research Triangle Park NC 27709 USA
rhl-cg(EN)-7.3-HTML-RHI (2002-05-02T12:45-0400)
Copyright © 2002 by Red Hat, Inc. This material may be distributed only subject to the terms and conditions set forth in the Open Publication License, V1.0 or later (the latest version is presently available at
http://www.opencontent.org/openpub/).
Distribution of substantively modified versions of this document is prohibited without the explicit permission of the copyright holder.
Distribution of the work or derivative of the work in any standard (paper) book form for commercial purposes is prohibited unless prior permission is obtained from the copyright holder.
The admonition graphics (note, tip, and so on) were created by Marianne Pecci <[email protected]>. They may be redistributed with written permission from Marianne Pecci and Red Hat, Inc..
Red Hat, Red Hat Network, the Red Hat "Shadow Man" logo, RPM, Maximum RPM, the RPM logo, Linux Library, PowerTools, Linux Undercover, RHmember, RHmember More, Rough Cuts, Rawhide and all Red Hat-based trademarks and logos are trademarks or registered trademarks of Red Hat, Inc. in the United States and other countries.
Linux is a registered trademark of Linus Torvalds.
Motif and UNIX are registered trademarks of The Open Group.
Intel and Pentium are a registered trademarks of Intel Corporation. Itanium and Celeron are trademarks of Intel Corporation.
AMD, AMD Athlon, AMD Duron, and AMD K6 are trademarks of Advanced Micro Devices, Inc. Netscape is a registered trademark of Netscape Communications Corporation in the United States and other countries.
Windows is a registered trademark of Microsoft Corporation.
SSH and Secure Shell are trademarks of SSH Communications Security, Inc. FireWire is a trademark of Apple Computer Corporation.
All other trademarks and copyrights referred to are the property of their respective owners. The Red Hat Linux Product Documentation Team consists of the following people:
Sandra A. Moore, Product Documentation Manager— Primary Writer/Maintainer of theOfficial Red Hat Linux x86 Installation Guide; Contributing Writer to theOfficial Red Hat Linux Getting Started Guide
Tammy Fox, Product Documentation Technical Lead— Primary Writer/Maintainer of theOfficial Red Hat Linux Customization Guide; Contributing Writer to theOfficial Red Hat Linux Getting Started Guide; Writer/Maintainer of custom DocBook stylesheets and scripts
Table of Contents
Introduction ...ix
1. Changes to This Manual ...ix
2. Document Conventions ... x
3. More to Come ...xiii
3.1. Send in Your Feedback ...xiii
4. Sign Up for Support...xiv
I. Installation-Related Reference ... xv
1. Kickstart Installations... 17
1.1. What are Kickstart Installations? ... 17
1.2. How Do You Perform a Kickstart Installation? ... 17
1.3. Creating the Kickstart File ... 17
1.4. Kickstart Options ... 18
1.5. Where to Put A Kickstart File... 38
1.6. Starting a Kickstart Installation... 40
2.Kickstart Configurator... 43
2.1. Basic Configuration ... 43
2.2. Boot Loader Options... 44
2.3. Installation Method... 45
2.4. Partition Information... 46
2.5. Network Configuration... 47
2.6. Authentication... 48
2.7. Firewall Configuration ... 49
2.8. X Configuration... 50
2.9. Package Selection ... 53
2.10. Pre-Installation Script ... 53
2.11. Post-Installation Script ... 54
2.12. Saving the File ... 56
3. Rescue Mode... 59
3.1. What is Rescue Mode?... 59
3.2. Booting Rescue Mode ... 60
3.3. Booting Single-User Mode... 61
4. Redundant Array of Independent Disks (RAID) ... 63
4.1. What is RAID? ... 63
4.2. Who Should Use RAID?... 63
4.3. Hardware RAID versus Software RAID... 63
4.4. RAID Levels and Linear Support ... 64
5. Software RAID Configuration... 67
II. Network-Related References... 71
6. Network Configuration... 73
6.1. Overview... 73
6.2. Establishing an Ethernet Connection ... 74
6.3. Establishing an ISDN Connection ... 75
6.4. Establishing a Modem Connection... 76
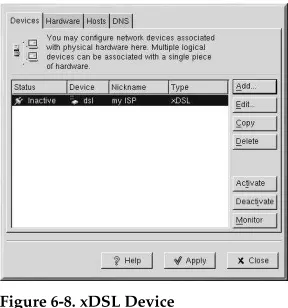
6.5. Establishing an xDSL Connection ... 78
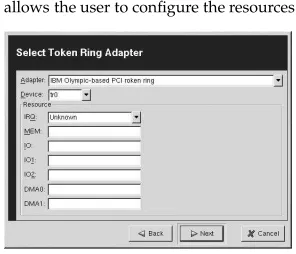
6.6. Establishing a Token Ring Connection ... 79
6.7. Establishing a CIPE Connection ... 81
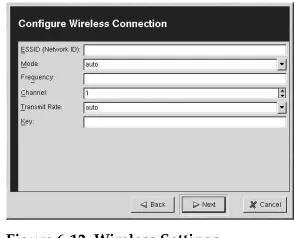
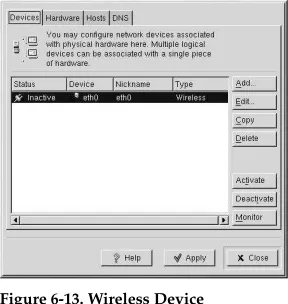
6.8. Establishing a Wireless Connection... 81
6.9. Managing Hosts ... 83
6.10. Managing DNS Settings ... 84
7. Basic Firewall Configuration ... 87
7.1. Basic ... 87
7.2. Local Hosts... 88
7.4. Configuring Services ... 89
7.5. Activating the Firewall... 90
8. Controlling Access to Services ... 91
8.1. Runlevels ... 91
8.2. TCP Wrappers... 92
8.3.Serviceconf... 93
8.4.ntsysv... 94
8.5.chkconfig... 95
8.6. Additional Resources ... 95
9. OpenSSH ... 97
9.1. Why Use OpenSSH? ... 97
9.2. Configuring an OpenSSH Server... 97
9.3. Configuring an OpenSSH Client ... 97
9.4. Additional Resources ... 102
10. Network File System (NFS) ... 103
10.1. Why Use NFS?... 103
10.2. Mounting NFS Filesystems... 103
10.3. Exporting NFS Filesystems... 104
10.4. Additional Resources ... 106
11. Samba... 107
11.1. Why Use Samba?... 107
11.2. Configuring Samba ... 107
11.3. Connecting to a Samba Share ... 109
11.4. Additional Resources ... 110
12. Dynamic Host Configuration Protocol (DHCP)... 111
12.1. Why Use DHCP?... 111
12.2. Configuring a DHCP Server... 111
12.3. Configuring a DHCP Client ... 116
12.4. Additional Resources ... 116
13. Apache Configuration ... 119
13.1. Basic Settings ... 119
13.2. Default Settings ... 121
13.3. Virtual Hosts Settings ... 127
13.4. Server Settings ... 132
13.5. Performance Tuning ... 134
13.6. Saving Your Settings ... 135
13.7. Additional Resources ... 135
14. Apache Secure Server Configuration ... 137
14.1. Introduction ... 137
14.2. An Overview of Security-Related Packages ... 137
14.3. An Overview of Certificates and Security... 139
14.4. Using Pre-Existing Keys and Certificates ... 140
14.5. Types of Certificates... 141
14.6. Generating a Key... 142
14.7. Generating a Certificate Request to Send to a CA... 143
14.8. Creating a Self-Signed Certificate ... 145
14.9. Testing Your Certificate ... 146
14.10. Accessing Your Secure Server ... 147
14.11. Additional Resources ... 148
15. BIND Configuration ... 149
15.1. Adding a Forward Master Zone ... 150
15.2. Adding a Reverse Master Zone ... 152
15.3. Adding a Slave Zone ... 154
III. System Configuration ... 157
17. Console Access ... 159
17.1. Disabling Shutdown Via Ctrl-Alt-Del... 159
17.2. Disabling Console Program Access... 160
17.3. Disabling All Console Access... 160
17.4. Defining the Console ... 160
17.5. Making Files Accessible From the Console... 160
17.6. Enabling Console Access for Other Applications ... 161
17.7. ThefloppyGroup ... 162
18. Time and Date Configuration... 163
18.1. Time and Date Properties ... 163
18.2. Time Zone Configuration... 165
19. User and Group Configuration ... 167
19.1. Adding a New User ... 167
19.2. Modifying User Properties ... 168
19.3. Adding a New Group... 169
19.4. Modifying Group Properties ... 169
20. Gathering System Information... 171
20.1. System Processes ... 171
20.2. Memory Usage ... 172
20.3. Filesystems ... 173
20.4. Hardware ... 175
20.5. Additional Resources ... 176
21. Printer Configuration ... 179
21.1. Adding a Local Printer ... 180
21.2. Adding a Remote UNIX Printer... 182
21.3. Adding a Samba (SMB) Printer... 184
21.4. Adding a Novell NetWare (NCP) Printer... 185
21.5. Adding a JetDirect Printer ... 186
21.6. Selecting the Print Driver and Finishing ... 188
21.7. Printing a Test Page ... 190
21.8. Modifying Existing Printers ... 190
21.9. Saving the Configuration File ... 192
21.10. Managing Your Print Jobs... 193
21.11. Configuring the CUPS Printing System... 193
21.12. Additional Resources ... 195
22. Automated Tasks... 197
22.1. Cron... 197
22.2. Anacron ... 199
22.3. At and Batch ... 200
22.4. Additional Resources ... 202
23. Upgrading the Kernel... 205
23.1. The 2.4 Kernel ... 205
23.2. Preparing to Upgrade... 205
23.3. Downloading the Upgraded Kernel... 207
23.4. Performing the Upgrade ... 207
23.5. Configuring the Boot Loader... 208
24. Kernel Modules ... 211
24.1. Kernel Module Utilities... 211
IV. Package Management ... 215
25. Package Management withRPM... 217
25.1.RPMDesign Goals... 217
25.2. UsingRPM... 218
25.3. Checking a Package’s Signature ... 223
25.4. Impressing Your Friends withRPM... 224
25.5. Additional Resources ... 227
26.Gnome-RPM... 229
26.1. StartingGnome-RPM... 230
26.2. The Package Display... 231
26.3. Installing New Packages ... 232
26.4. Configuration... 233
26.5. Package Manipulation... 238
27. Red Hat Network ... 243
V. Appendixes ... 245
A. Building a Custom Kernel ... 247
A.1. Building a Modularized Kernel ... 247
A.2. Making an initrd Image ... 249
A.3. Configuring the Boot Loader ... 249
A.4. Building a Monolithic Kernel... 252
A.5. Additional Resources ... 252
B. Getting Started withGnu Privacy Guard... 253
B.1. An Introduction toGnuPG... 253
B.2. Generating a Keypair ... 253
B.3. Generating a Revocation Certificate ... 255
B.4. Exporting your Public Key... 256
B.5. Importing a Public Key... 258
B.6. What Are Digital Signatures? ... 259
B.7. Additional Resources ... 259
Introduction
Welcome to theOfficial Red Hat Linux Customization Guide.
TheOfficial Red Hat Linux Customization Guidecontains information on how to customize your Red Hat Linux system to fit your needs. If you are looking for a step-by-step, task-oriented guide for configuring and customizing your system, this is the manual for you. This manual discusses many intermediate topics such as the following:
• Setting up a network interface card (NIC)
• Performing a Kickstart installation
• Configuring Samba shares
• Managing your software withRPM
• Determining information about your system
• Upgrading your kernel
This manual is divided into the following main categories:
• Installation-Related Reference
• Network-Related Reference
• System Configuration
• Package Management
This guide assumes you have a basic understanding of your Red Hat Linux system. If you need reference material which covers more basic issues such as configuring your desktop or playing audio CD-RPMs, please refer to theOfficial Red Hat Linux Getting Started Guide. If you need more advanced documentation such as an overview of the Red Hat Linux filesystem, please refer to theOfficial Red Hat Linux Reference Guide.
HTML and PDF versions of the Official Red Hat Linux manuals are available on the Docu-mentation CD and online at http://www.redhat.com/docs/.
Note
Although this manual reflects the most current information possible, you should read theRed Hat Linux Release Notesfor information that may not have been available prior to our documentation being finalized. They can be found on the Red Hat Linux CD #1 and online at:
http://www.redhat.com/docs/manuals/linux
1. Changes to This Manual
This manual has been expanded to include new features in Red Hat Linux 7.3 as well as topics requested by our readers. Changes to this manual include:
Kickstart Options
x Introduction
Network Configuration
This chapter has been written to discussed the revisedRed Hat Network Administra-tion Tool. It is now more task-oriented.
Samba
This chapter now includes how to usepam_smbpassto sync users’ Samba passwords with their system passwords when thepasswdcommand is used.
Squid Configuration
This new chapter discusses theRed Hat Squid Configurator, a graphical tool for con-figuring the Squid Web Proxy Cache server.
Mail Transport Agent (MTA) Configuration
This new chapter discusses theRed Hat Mail Transport Agent Switcherapplication, which allows users to select eithersendmailorpostfixas the default MTA for the system.
Monitoring Filesystems
TheGathering System Informationchapter has been expanded to include aMonitoring Filesystemssection, which covers thediskcheckutility.
Printer Configuration
This chapter has been expanded to include information on the alternative printing sys-tem called CUPS.
Automated Tasks
Theatandbatchcommands have been added to this chapter.
Upgrading the Kernel
TheUpgrading the Kernelchapter has been expanded to include information on Red Hat Linux kernels built for different x86-architecture chips such as the AMD Athlon™ and the Intel® Pentium® 4.
Building a Custom Kernel
TheBuilding a Custom Kernelchapter included instructions for using the Red Hat .con-figfiles to recompile the kernel with the existing configuration options.
Kerberos
All the Kerberos information has been merged into one location in theOfficial Red Hat Linux Reference Guide.
2. Document Conventions
Introduction xi
command
Linux commands (and other operating system commands, when used) are represented this way. This style should indicate to you that you can type the word or phrase on the command line and press [Enter] to invoke a command. Sometimes a command contains words that would be displayed in a different style on their own (such as filenames). In these cases, they are considered to be part of the command, so the entire phrase will be displayed as a command. For example:
Use thecat testfilecommand to view the contents of a file, namedtestfile, in the current working directory.
filename
Filenames, directory names, paths, and RPM package names are represented this way. This style should indicate that a particular file or directory exists by that name on your Red Hat Linux system. Examples:
The.bashrcfile in your home directory contains bash shell definitions and aliases for your own use.
The/etc/fstabfile contains information about different system devices and filesys-tems.
Install thewebalizerRPM if you want to use a Web server log file analysis program.
application
This style should indicate to you that the program named is an end-user application (as opposed to system software). For example:
Use NetscapeNavigatorto browse the Web.
[key]
A key on the keyboard is shown in this style. For example:
To use [Tab] completion, type in a character and then press the [Tab] key. Your terminal will display the list of files in the directory that start with that letter.
[key]-[combination]
A combination of keystrokes is represented in this way. For example:
The [Ctrl]-[Alt]-[Backspace] key combination will exit your graphical session and return you to the graphical login screen or the console.
text found on a GUI interface
A title, word, or phrase found on a GUI interface screen or window will be shown in this style. When you see text shown in this style, it is being used to identify a particular GUI screen or an element on a GUI screen (such as text associated with a checkbox or field). Example:
xii Introduction
top level of a menu on a GUI screen or window
When you see a word in this style, it indicates that the word is the top level of a pull-down menu. If you click on the word on the GUI screen, the rest of the menu should appear. For example:
UnderSettingson a GNOME terminal, you will see the following menu items: Prefer-ences,Reset Terminal,Reset and Clear, andColor selector.
If you need to type in a sequence of commands from a GUI menu, they will be shown like the following example:
Click onPrograms=>Applications=>Emacsto start the Emacs text editor.
button on a GUI screen or window
This style indicates that the text will be found on a clickable button on a GUI screen. For example:
Click on theBackbutton to return to the webpage you last viewed.
computer output
When you see text in this style, it indicates text displayed by the computer on the command line. You will see responses to commands you typed in, error messages, and interactive prompts for your input during scripts or programs shown this way. For ex-ample:
Use thelscommand to display the contents of a directory: $ ls
Desktop axhome logs paulwesterberg.gif
Mail backupfiles mail reports
The output returned in response to the command (in this case, the contents of the direc-tory) is shown in this style.
prompt
A prompt, which is a computer’s way of signifying that it is ready for you to input something, will be shown in this style. Examples:
$
#
[stephen@maturin stephen]$
leopard login:
user input
Text that the user has to type, either on the command line, or into a text box on a GUI screen, is displayed in this style. In the following example,textis displayed in this style:
Introduction xiii
Additionally, we use several different strategies to draw your attention to certain pieces of information. In order of how critical the information is to your system, these items will be marked as note, tip, important, caution, or a warning. For example:
Note
Remember that Linux is case sensitive. In other words, a rose is not a ROSE is not a rOsE.
Tip
The directory/usr/share/doccontains additional documentation for packages installed on your system.
Important
If you modify the DHCP configuration file, the changes will not take effect until you restart the DHCP daemon.
Caution
Do not perform routine tasks as root — use a regular user account unless you need to use the root account for system administration tasks.
Warning
If you choose not to partition manually, a server installation will remove all existing partitions on all installed hard drives. Do not choose this installation class unless you are sure you have no data you need to save.
3. More to Come
xiv Introduction
3.1. Send in Your Feedback
If you spot a typo in theOfficial Red Hat Linux Customization Guide, or if you have thought of a way to make this manual better, we would love to hear from you! Please submit a report in Bugzilla (http://www.redhat.com/bugzilla) against the componentrhl-cg.
Be sure to mention the manual’s identifier:
rhl-cg(EN)-7.3-HTML-RHI (2002-05-02T12:45-0400)
By mentioning this manual’s identifier, we will know exactly which version of the guide you have.
If you have a suggestion for improving the documentation, try to be as specific as possible. If you have found an error, please include the section number and some of the surrounding text so we can find it easily.
4. Sign Up for Support
If you have an official edition of Red Hat Linux 7.3, please remember to sign up for the benefits you are entitled to as a Red Hat customer.
You will be entitled to any or all of the following benefits, depending upon the Official Red Hat Linux product you purchased:
• Official Red Hat support — Get help with your installation questions from Red Hat, Inc.’s support team.
• Red Hat Network — Easily update your packages and receive security notices that are customized for your system. Go to http://rhn.redhat.com for more details.
• Under the Brim: The Official Red Hat E-Newsletter— Every month, get the latest news and product information directly from Red Hat.
To sign up, go to http://www.redhat.com/apps/activate/. You will find your Product ID on a black, red, and white card in your Official Red Hat Linux box.
To read more about technical support for Official Red Hat Linux, refer to theGetting Technical SupportAppendix in theOfficial Red Hat Linux Installation Guide.
Good luck, and thank you for choosing Red Hat Linux!
Chapter 1.
Kickstart Installations
1.1. What are Kickstart Installations?
Many system administrators would prefer to use an automated installation method to install Red Hat Linux on their machines. To answer this need, Red Hat created the kickstart instal-lation method. Using kickstart, a system administrator can create a single file containing the answers to all the questions that would normally be asked during a typical Red Hat Linux installation.
Kickstart files can be kept on single server system, and read by individual computers dur-ing the installation. This installation method can support the use of a sdur-ingle kickstart file to install Red Hat Linux on multiple machines, making it ideal for network and system admin-istrators.
Kickstart lets you automate most of a Red Hat Linux installation, including:
• Language selection
• Mouse configuration
• Keyboard selection
• Boot loader installation
• Disk partitioning
• Network configuration
• NIS, LDAP, Kerberos, Hesiod, and Samba authentication
• Firewall configuration
• Package selection
• X Window System configuration
1.2. How Do You Perform a Kickstart Installation?
Kickstart installations can be performed using a local CD-ROM, a local hard drive, or via NFS, FTP, or HTTP.
To use kickstart, you must:
1. Create a kickstart file.
2. Create a boot disk with the kickstart file or make the kickstart file available on the network.
18 Chapter 1. Kickstart Installations
1.3. Creating the Kickstart File
The kickstart file is a simple text file, containing a list of items, each identified by a keyword. You can create it by editing a copy of thesample.ksfile found in theRH-DOCSdirectory of the Red Hat Linux Documentation CD, using theKickstart Configuratorapplication, or writing it from scratch. The Red Hat Linux installation program also creates a sample kick-start file based on the options that you selected during installation. It is written to the file /root/anaconda-ks.cfg. You should be able to edit it with any text editor or word proces-sor that can save files as ASCII text.
First, be aware of the following issues when you are creating your kickstart file:
• Items must be specifiedin order. That order is:
• Command section — Refer to Section 1.4 for a list of kickstart options. You must include the required options.
• The%packagessection — Refer to Section 1.4.29 for details.
• The%preand%postsections — These two sections can be in any order and are not required. Refer to Section 1.4.30 and Section 1.4.31 for details.
• Items that are not required can be omitted.
• Omitting any required item will result in the installation program prompting the user for an answer to the related item, just as the user would be prompted during a typical installation. Once the answer is given, the installation will continue unattended (unless it finds another missing item).
• Lines starting with a pound sign ("#") are treated as comments and are ignored.
• For kickstartupgrades, the following items are required: • Language
• Installation method
• Device specification (if device is needed to perform installation)
• Keyboard setup
• Theupgradekeyword
• LILO configuration
If any other items are specified for an upgrade, those items will be ignored (note that this includes package selection).
1.4. Kickstart Options
Chapter 1. Kickstart Installations 19
1.4.1.
autostep
autostep(optional)
Similar tointeractiveexcept it goes to the next screen for you. It is used mostly for debugging.
1.4.2.
auth
authorauthconfig(required)
Sets up the authentication options for the system. It’s similar to theauthconfig com-mand, which can be run after the install. By default, passwords are normally encrypted and are not shadowed.
--enablemd5
Use md5 encryption for user passwords.
--enablenis
Turns on NIS support. By default,--enablenisuses whatever domain it finds on the network. A domain should almost always be set by hand (via--nisdomain).
--nisdomain
NIS domain name to use for NIS services.
--nisserver
Server to use for NIS services (broadcasts by default).
--useshadowor--enableshadow Use shadow passwords.
--enableldap
Turns on LDAP support in/etc/nsswitch.conf, allowing your system to retrieve information about users (UIDs, home directories, shells, etc.) from an LDAP direc-tory. To use this option, you must have thenss_ldappackage installed. You must also specify a server and a base DN with--ldapserver=and--ldapbasedn=.
--enableldapauth
Use LDAP as an authentication method. This enables thepam_ldapmodule for au-thentication and changing passwords, using an LDAP directory. To use this option, you must have thenss_ldappackage installed. You must also specify a server and a base DN with--ldapserver=and--ldapbasedn=.
--ldapserver=
If you specified either--enableldapor--enableldapauth, the name of the LDAP server to use. This option is set in the/etc/ldap.conffile.
--ldapbasedn=
20 Chapter 1. Kickstart Installations
--enableldaptls
Use TLS (Transport Layer Security) lookups. This option allows LDAP to send en-crypted usernames and passwords to an LDAP server before authentication.
--enablekrb5
Use Kerberos 5 for authenticating users. Kerberos itself does not know about home directories, UIDs, or shells. So if you enable Kerberos you will need to make users’ accounts known to this workstation by enabling LDAP, NIS, or Hesiod or by using the/usr/sbin/useraddcommand to make their accounts known to this worksta-tion. If you use this option, you must have thepam_krb5package installed.
--krb5realm
The Kerberos 5 realm to which your workstation belongs.
--krb5kdc
The KDC (or KDCs) that serve requests for the realm. If you have multiple KDCs in your realm, separate their names with commas (,).
--krb5adminserver
The KDC in your realm that is also running kadmind. This server handles password changing and other administrative requests. This server must be run on the master KDC if you have more than one KDC.
--enablehesiod
Enable Hesiod support for looking up user home directories, UIDs, and shells. More information on setting up and using Hesiod on your network is in /usr/share/doc/glibc-2.x.x/README.hesiod, which is included in the glibcpackage. Hesiod is an extension of DNS that uses DNS records to store information about users, groups, and various other items.
--hesiodlhs
The Hesiod LHS ("left-hand side") option, set in/etc/hesiod.conf. This option is used by the Hesiod library to determine the name to search DNS for when looking up information, similar to LDAP’s use of a base DN.
--hesiodrhs
The Hesiod RHS ("right-hand side") option, set in/etc/hesiod.conf. This option is used by the Hesiod library to determine the name to search DNS for when look-ing up information, similar to LDAP’s use of a base DN.
Tip
To look up user information for "jim", the Hesiod library looks up jim.passwd LHS✁ RHS✁ , which should resolve to a TXT record that looks like what his passwd entry would look like (jim:*:501:501:Jungle Jim:/home/jim:/bin/bash). For groups, the situation is identical, exceptjim.group LHS✁ RHS✁ would be used.
Chapter 1. Kickstart Installations 21
--enablesmbauth
Enables authentication of users against an SMB server (typically a Samba or Windows server). SMB authentication support does not know about home directories, UIDs, or shells. So if you enable it you will need to make users’ accounts known to the workstation by enabling LDAP, NIS, or Hesiod or by using the/usr/sbin/useraddcommand to make their accounts known to the workstation. To use this option, you must have thepam_smbpackage installed.
--smbservers=
The name of the server(s) to use for SMB authentication. To specify more than one server, separate the names with commas (,).
--smbworkgroup=
The name of the workgroup for the SMB servers.
--enablecache
Enables thenscdservice. Thenscdservice caches information about users, groups, and various other types of information. Caching is especially helpful if you choose to distribute information about users and groups over your network using NIS, LDAP, or hesiod.
1.4.3.
bootloader
bootloader(required)
Specifies how the boot loader should be installed and whether the boot loader should be LILO or GRUB.
--append
Specifies kernel parameters.
--location=
Specifies where the boot record is written. Valid values are the following:mbr(the default),partition(installs the boot loader on the first sector of the partition containing the kernel), ornone(do not install the boot loader).
--password=mypassword
If using GRUB, sets the GRUB boot loader password tomypassword. This should be used to restrict access to the GRUB shell where arbitrary kernel options can be passed.
--md5pass=mypassword
If using GRUB, similar to--passwordexceptmypasswordshould be the password already encrypted.
--useLilo
22 Chapter 1. Kickstart Installations
--linear
If using LILO, use thelinearLILO option; this is only for backwards compatibility (and linear is now used by default).
--nolinear
If using LILO, use thenolinearLILO option; linear is the default.
--lba32
If using LILO, force use of lba32 mode instead of autodetecting.
--upgrade1
Upgrade the existing boot loader configuration. This option is only available for upgrades.
1.4.4.
clearpart
clearpart(optional)
Removes partitions from the system, prior to creation of new partitions. By default, no partitions are removed.
--linux
Erases all Linux partitions.
--all
Erases all partitions from the system.
--drives
Specifies which drives to clear partitions from.
--initlabel
Initializes the disk label to the default for your architecture (msdosfor x86 andgpt for Itanium). It is useful so that the installation program does not ask if it should initialize the disk label if installing to a brand new hard drive.
Note
If theclearpartcommand is used, then the--onpartcommand cannot be used on a logical parti-tion.
Chapter 1. Kickstart Installations 23
1.4.5.
device
device(optional)
On most PCI systems, the installation program will autoprobe for Ethernet and SCSI cards properly. On older systems and some PCI systems, however, kickstart needs a hint to find the proper devices. Thedevicecommand, which tellsAnacondato install extra modules, is in this format:
device ✂ type✄☎✂ moduleName✄ --opts ✂ options✄
✆
type✝ should bescsioreth, and
✆
moduleName✝ is the name of the kernel
mod-ule which should be installed.
--opts
Options to pass to the kernel module. Note that multiple options may be passed if they are put in quotes. For example:
--opts "aic152x=0x340 io=11"
1.4.6.
deviceprobe
deviceprobe(optional)
Forces a probe of the PCI bus and loads modules for all the devices found if a module is available.
1.4.7.
driverdisk
driverdisk(optional)
Driver disks can be used during kickstart installations. You will need to copy the driver disk’s contents to the root directory of a partition on the system’s hard drive. Then you will need to use thedriverdiskcommand to tell the installation program where to look for the driver disk.
driverdisk ✂ partition✄ [--type ✂ fstype✄ ]
✆
partition✝ is the partition containing the driver disk.
--type
Filesystem type (for example, vfat, ext2, or ext3).
1.4.8.
firewall
firewall(optional)
24 Chapter 1. Kickstart Installations
firewall [--high | --medium | --disabled] [--trust ✞ device✟ ] -dhcp] -ssh] [--telnet] [--smtp] [--http] [--ftp] [--port ✞ portspec✟ ]
Levels of security
Choose one of the following levels of security:
• --high
• --medium
• --disabled
--trust ✞ device✟
Listing a device here, such as eth0, allows all traffic coming from that device to go through the firewall. To list more than one device, use--trust eth0 --trust eth1. Do NOT use a comma-separated format such as--trust eth0, eth1.
Allow incoming
Enabling these options allow the specified services to pass through the firewall. • --dhcp
• --ssh
• --telnet
• --smtp
• --http
• --ftp
--port✠ portspec✡
You can specify that ports be allowed through the firewall using the port:protocol for-mat. For example, if you wanted to allow IMAP access through your firewall, you can specifyimap:tcp. You can also specify numeric ports explicitly; for example, to allow UDP packets on port 1234 through, specify1234:udp. To specify multiple ports, sepa-rate them by commas.
1.4.9.
install
install(optional)
Tells the system to install a fresh system rather than upgrade an existing system. This is the default mode.
1.4.10. Installation Methods
Chapter 1. Kickstart Installations 25
nfs
Install from the NFS server specified.
• --server ☛ server☞
Server from which to install (hostname or IP).
• --dir ☛ dir☞
Directory containing the Red Hat installation tree.
For example:
nfs --server ☛ server☞ --dir ☛ dir☞
cdrom
Install from the first CD-ROM drive on the system. For example:
cdrom
harddrive
Install from a Red Hat installation tree on a local drive, which must be either vfat or ext2.
• --partition ☛ partition☞
Partition to install from (such as, sdb2).
• --dir ☛ dir☞
Directory containing the Red Hat installation tree.
For example:
harddrive --partition ☛ partition☞ --dir ☛ dir☞
url
Install from a Red Hat installation tree on a remote server via FTP or HTTP. For example:
url --url http://☛ server☞ /☛ dir☞
26 Chapter 1. Kickstart Installations
1.4.11.
interactive
interactive(optional)
Uses the information provided in the kickstart file during the installation, but allow for inspection and modification of the values given. You will be presented with each screen of the installation program with the values from the kickstart file. Either accept the values by clickingNextor change the values and clickNextto continue. See also Section 1.4.1.
1.4.12.
keyboard
keyboard(required)
Sets system keyboard type. Here is the list of available keyboards on i386, Itanium, and Alpha machines:
azerty, be-latin1, be2-latin1, fr-latin0, fr-latin1, fr-pc, fr, wangbe, ANSI-dvorak, dvorak-l, dvorak-r, dvorak, pc-dvorak-latin1, tr_f-latin5, trf, bg, br-abnt2, cf, cz-lat2-prog, cz-lat2, defkeymap, defkeymap_V1.0, dk-latin1, dk, emacs, emacs2, es, fi-latin1, fi, gr-pc, gr, hebrew, hu101, is-latin1, it-ibm, it, it2, jp106, la-latin1, lt, lt.l4, nl, no-latin1, no, pc110, pl, pt-latin1, pt-old, ro, ru-cp1251, ru-ms, ru-yawerty, ru, ru1, ru2, ru_win, se-latin1, sk-prog-qwerty, sk-prog, sk-qwerty, tr_q-latin5, tralt, trf, trq, ua, uk, us, croat, cz-us-qwertz, de-latin1-nodeadkeys, de-latin1, de, fr_CH-latin1, fr_CH, hu,
sg-latin1-lk450, sg-latin1, sg, sk-prog-qwertz, sk-qwertz, slovene
Here is the list for SPARC machines:
sun-pl-altgraph, sun-pl, sundvorak, sunkeymap, sunt4-es, sunt4-no-latin1, sunt5-cz-us, sunt5-de-latin1, sunt5-es,
sunt5-fi-latin1, sunt5-fr-latin1, sunt5-ru, sunt5-uk, sunt5-us-cz
1.4.13.
lang
lang(required)
Sets the language to use during installation. For example, to set the language to English, the kickstart file should contain the following line:
lang en_US
Valid language codes are the following (please note that these are subject to change at any time):
Chapter 1. Kickstart Installations 27
1.4.14.
langsupport
langsupport(required)
Sets the language(s) to install on the system. The same language codes used withlang can be used withlangsupport.
If you just want to install one language, specify it. For example, to install and use the French languagefr_FR:
langsupport fr_FR
--default
If you want to install language support for more than one language, you must spec-ify a default.
For example, to install English and French and use English as the default language: langsupport --default en_US fr_FR
If you use--defaultwith only one language, all languages will be installed with the specified language set to the default.
1.4.15.
lilo
lilo(replaced bybootloader)
Warning
This option has been replaced bybootloaderand is only available for backwards compatibility. Refer to Section 1.4.3.
Specifies how the boot loader should be installed on the system. By default, LILO in-stalls on the MBR of the first disk, and inin-stalls a dual-boot system if a DOS partition is found (the DOS/Windows system will boot if the user typesdosat theLILO:prompt).
--append✌ params✍
Specifies kernel parameters.
--linear
Use thelinearLILO option; this is only for backwards compatibility (and linear is now used by default).
--nolinear
28 Chapter 1. Kickstart Installations
--location=
Specifies where the LILO boot record is written. Valid values are the following: mbr(the default) orpartition(installs the boot loader on the first sector of the partition containing the kernel). If no location is specified, LILO is not installed.
--lba32
Forces the use of lba32 mode instead of autodetecting.
1.4.16.
lilocheck
lilocheck(optional)
Iflilocheckis present, the installation program checks for LILO on the MBR of the first hard drive, and reboots the system if it is found — in this case, no installation is performed. This can prevent kickstart from reinstalling an already installed system.
1.4.17.
mouse
mouse(required)
Configures the mouse for the system, both in GUI and text modes. Options are:
--device✎ dev✏
Device the mouse is on (such as --device ttyS0).
--emulthree
If present, simultaneous clicks on the left and right mouse buttons will be recog-nized as the middle mouse button by the X Window System. This option should be used if you have a two button mouse.
After options, the mouse type may be specified as one of the following: alpsps/2, ascii, asciips/2, atibm, generic, generic3, genericps/2, generic3ps/2, genericusb, generic3usb, geniusnm, geniusnmps/2,geniusprops/2, geniusscrollps/2, geniusscrollps/2+, thinking, thinkingps/2, logitech, logitechcc, logibm, logimman, logimmanps/2, logimman+, logimman+ps/2, logimmusb, microsoft, msnew, msintelli, msintellips/2, msintelliusb, msbm, mousesystems, mmseries, mmhittab, sun, none
Chapter 1. Kickstart Installations 29
1.4.18.
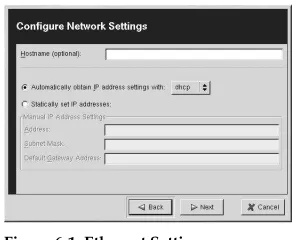
network
network(optional)
Configures network information for the system. If the kickstart installation does not require networking (in other words, it is not installed over NFS, HTTP, or FTP), net-working is not configured for the system. If the installation does require netnet-working and network information is not provided in the kickstart file, the Red Hat Linux instal-lation program assumes that the instalinstal-lation should be done over eth0 via a dynamic IP address (BOOTP/DHCP), and configures the final, installed system to determine its IP address dynamically. Thenetworkoption configures networking information for kick-start installations via a network as well as for the installed system.
--bootproto
One ofdhcp,bootp, orstatic(defaults to DHCP, anddhcpandbootpare treated the same). Must bestaticfor static IP information to be used.
--device✑ device✒
Used to select a specific Ethernet device for installation. Note that using--device
✑ device✒ will not be effective unless the kickstart file is a local file (such as ks=floppy), since the installation program will configure the network to find the kickstart file. Example:
network --bootproto dhcp --device eth0
--ip
IP address for the machine to be installed.
--gateway
Default gateway as an IP address.
--nameserver
Primary nameserver, as an IP address.
--nodns
Do not configure any DNS server.
--netmask
Netmask for the installed system.
--hostname
Hostname for the installed system.
There are three different methods of network configuration:
• DHCP
• BOOTP
• static
30 Chapter 1. Kickstart Installations
The static method requires that you enter all the required networking information in the kickstart file. As the name implies, this information is static, and will be used during the installation, and after the installation as well.
To direct a system to use DHCP to obtain its networking configuration, use the following line:
network --bootproto dhcp
To direct a machine to use BOOTP to obtain its networking configuration, use the fol-lowing line in the kickstart file:
network --bootproto bootp
The line for static networking is more complex, as you must include all network config-uration information on one line. You must specify:
• IP address
• Netmask
• Gateway IP address
• Nameserver IP address Here is an example static line:
network --bootproto static --ip 10.0.2.15 --netmask 255.255.255.0 --gateway 10.0.2.254 --nameserver 10.0.2.1
If you use the static method, be aware of the following two restrictions:
• All static networking configuration information must be specified ononeline; you cannot wrap lines using a backslash, for example.
• You can only specify one nameserver here. However, you can use the kickstart file’s %postsection (described in Section 1.4.31) to add more name servers, if needed.
1.4.19.
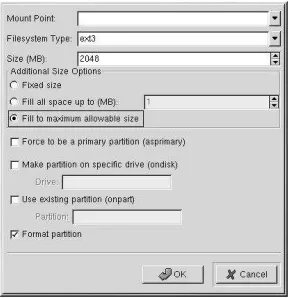
part
partorpartition(required for installs, ignored for upgrades)
Creates a partition on the system.
If more than one Red Hat Linux installation exists on the system on different partitions, the installation program prompts the user and asks which installation to upgrade.
The✓ mntpoint✔ is where the partition will be mounted and must be of one of the
following forms:
/✕ mntpoint✖
For example,/,/usr,/home
swap
The partition will be used as swap space.
To determine the size of the swap partition automatically, use the--recommended1
option:
Chapter 1. Kickstart Installations 31
swap --recommended
The minimum size of the automatically-generated swap partition will be no smaller than the amount of RAM in the system and no bigger than twice the amount of RAM in the system.
raid.✗ id✘
The partition will be used for software RAID (see the Section 1.4.20 below).
--size ✗ size✘
The minimum partition size in megabytes. Specify an integer value here such as 500. Do not append the number with MB.
--grow
Tells the partition to grow to fill available space (if any), or up to the maximum size setting.
--maxsize ✗ size✘
The maximum partition size in megabytes when the partition is set to grow. Specify an integer value here, and do not append the number with MB.
--noformat
Tells the installation program not to format the partition, for use with the--onpart command.
--onpart ✗ part✘ or--usepart ✗ part✘
Tells the installation program to put the partition on thealready existingdevice
✙
part✚ . For example, partition /home --onpart hda1 will put /home on /dev/hda1, which must already exist.
--ondisk ✗ disk✘ or--ondrive ✗ drive✘
Forces the partition to be created on a particular disk. For example,--ondisk sdb will put the partition on the second disk on the system.
--asprimary
Forces automatic allocation of the partition as a primary partition or the partition-ing will fail.
--bytes-per-inode=✗ N✘
✙
N✚ represents the number of bytes per inode on the filesystem when it is created. It must be given in decimal format. This option is useful for applications where you want to increase the number of inodes on the filesystem.
--type=✗ X✘ (replaced byfstype)
This option is no longer available. Usefstype.
--fstype
32 Chapter 1. Kickstart Installations
--start
Specifies the starting cylinder for the partition. It requires that a drive be specified with--ondiskorondrive. It also requires that the ending cylinder be specified with--endor the partition size be specified with--size.
--end
Specifies the ending cylinder for the partition. It requires that the starting cylinder be specified with--start.
--badblocks
Specifies that the partition should be checked for bad sectors.
All partitions created will be formatted as part of the installation process unless --noformatand--onpartare used.
Note
If partitioning fails for any reason, diagnostic messages will appear on virtual console 3.
1.4.20.
raid
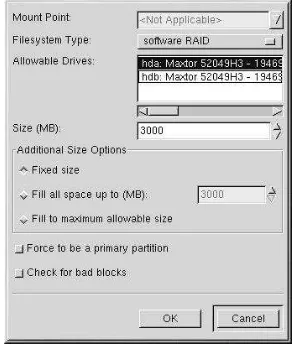
raid(optional)
Assembles a software RAID device. This command is of the form:
raid ✛ mntpoint✜ --level ✛ level✜ --device ✛ mddevice✜✢✛ partitions*✜
The✣ mntpoint✤ is the location where the RAID filesystem is mounted. If it is/, the RAID level must be 1 unless a boot partition (/boot) is present. If a boot partition is present, the/bootpartition must be level 1 and the root (/) partition can be any of the available types. The✣ partitions*✤ (which denotes that multiple partitions can be listed) lists the RAID identifiers to add to the RAID array.
--level ✛ level✜
RAID level to use (0, 1, or 5).
--device ✛ mddevice✜
Name of the RAID device to use (such as md0 or md1). RAID devices range from md0 to md7, and each may only be used once.
--spares=N
Specifies that there should be N spare drives allocated for the RAID array. Spare drives are used to rebuild the array in case of drive failure.
--fstype
Chapter 1. Kickstart Installations 33
--noformat
Do not format the RAID array.
The following example shows how to create a RAID level 1 partition for/, and a RAID level 5 for/usr, assuming there are three SCSI disks on the system. It also creates three swap partitions, one on each drive.
part raid.01 --size 60 --ondisk sda part raid.02 --size 60 --ondisk sdb part raid.03 --size 60 --ondisk sdc part swap --size 128 --ondisk sda part swap --size 128 --ondisk sdb part swap --size 128 --ondisk sdc part raid.11 --size 1 --grow --ondisk sda part raid.12 --size 1 --grow --ondisk sdb part raid.13 --size 1 --grow --ondisk sdc
raid / --level 1 --device md0 raid.01 raid.02 raid.03 raid /usr --level 5 --device md1 raid.11 raid.12 raid.13
1.4.21.
reboot
reboot(optional)
Reboot after the installation is complete (no arguments). Normally, kickstart displays a message and waits for the user to press a key before rebooting.
1.4.22.
rootpw
rootpw(required)
rootpw [--iscrypted] ✥ password✦
Sets the system’s root password to the✧ password★ argument.
--iscrypted
If this is present, the password argument is assumed to already be encrypted.
1.4.23.
skipx
skipx(optional)
34 Chapter 1. Kickstart Installations
1.4.24.
text
text(optional)
Perform the kickstart installation in text mode. Kickstart installations are performed in graphical mode by default.
1.4.25.
timezone
timezone(required)
timezone [--utc] ✩ timezone✪
Sets the system time zone to✫ timezone✬ which may be any of the time zones listed bytimeconfig.
--utc
If present, the system assumes the hardware clock is set to UTC (Greenwich Mean) time.
1.4.26.
upgrade
upgrade(optional)
Tells the system to upgrade an existing system rather than install a fresh system.
1.4.27.
xconfig
xconfig(optional)
Configures the X Window System. If this option is not given, the user will need to con-figure X manually during the installation, if X was installed; this option should not be used if X is not installed on the final system.
--noprobe
Do not probe the monitor.
--card ✩ card✪
Use card✫ card✬ ; this card name should be from the list of cards inXconfigurator. If this argument is not provided,Anacondawill probe the PCI bus for the card. Since AGP is part of the PCI bus, AGP cards will be detected if supported. The probe order is determined by the PCI scan order of the motherboard.
--videoram ✩ vram✪
Chapter 1. Kickstart Installations 35
--monitor ✭ mon✮
Use monitor ✯ mon✰ ; this monitor name should be from the list of monitors in Xconfigurator. This is ignored if--hsyncor--vsyncis provided. If no monitor information is provided, the installation program tries to probe for it automatically.
--hsync ✭ sync✮
Specifies the horizontal sync frequency of the monitor.
--vsync ✭ sync✮
Specifies the vertical sync frequency of the monitor.
--defaultdesktop=GNOMEor--defaultdesktop=KDE
Sets the default desktop to either GNOME or KDE (and assumes that GNOME and/or KDE has been installed through%packages).
--startxonboot
Use a graphical login on the installed system.
--resolution ✭ res✮
Specify the default resolution for the X Window System on the installed system. Valid values are 640x480, 800x600, 1024x768, 1152x864, 1280x1024, 1400x1050, 1600x1200. Be sure to specify a resolution that is compatible with the video card and monitor.
--depth ✭ cdepth✮
Specify the default color depth for the X Window System on the installed system. Valid values are 8, 16, 24, and 32. Be sure to specify a color depth that is compatible with the video card and monitor.
1.4.28.
zerombr
— Partition Table Initialization
zerombr(optional)
Ifzerombris specified, andyesis its sole argument, any invalid partition tables found on disks are initialized. This will destroy all of the contents of disks with invalid parti-tion tables. This command should be in the following format:
zerombr yes
No other format is effective.
1.4.29.
%packages
— Package Selection
36 Chapter 1. Kickstart Installations
Use the%packages --resolvedeps1
to install the listed packages and automatically resolve package dependencies.
Use the%packages --ignoredeps1to ignore the unresolved dependencies and install the listed packages without the dependencies.
Packages can be specified by component or by individual package name. The installation program defines several components that group together related packages. See the Red-Hat/base/compsfile on any Red Hat Linux CD-ROM for a list of components. The compo-nents are defined by the lines that begin with a number followed by a space and then the component name. Each package in that component is then listed, line-by-line. Individual packages lack the leading number found in front of component lines.
Additionally, there are three other types of lines in thecompsfile:
Architecture specific (i386:, ia64:, alpha:, and sparc64:)
If a package name begins with an architecture type, you only need to type in the package name, not the architecture name. For example:
Fori386: apmdyou only need to use theapmdpart for that specific package to be in-stalled.
Lines beginning with?
Lines that begin with a?are used by the installation program and should not be altered.
Lines beginning with--hide
If a package name begins with--hide, you only need to type in the package name, without the--hide. For example:
For--hide Network Serveryou only need to use theNetwork Serverpart for that specific package to be installed.
In most cases, it is only necessary to list the desired components and not individual pack-ages. Note that theBasecomponent is always selected by default, so it is not necessary to specify it in the%packagessection.
Here is an example%packagesselection:
%packages
As you can see, components are specified, one to a line, starting with an@symbol, a space, and then the full component name as given in thecompsfile. Specify individual packages with no additional characters (theImageMagickline in the example above is an individual package).
You can also direct the kickstart installation to install the default packages for a workstation (KDE or GNOME) or server installation (or choose an everything installation to install all packages). To do this, simply addoneof the following lines to the%packagessection:
Chapter 1. Kickstart Installations 37
@ GNOME @ KDE @ Server @ Everything
1.4.30.
%pre
— Pre-Installation Configuration Section
You can add commands to run on the system immediately after theks.cfghas been parsed. This section must be at the end of the kickstart file (after the commands) and must start with the%precommand. Note that you can access the network in the%presection; however,
name servicehas not been configured at this point, so only IP addresses will work. Here is an example%presection:
%pre
# add comment to /etc/motd
echo "Kickstart-installed Red Hat Linux ‘/bin/date‘" ✱ /etc/motd
# add another nameserver
echo "nameserver 10.10.0.2" ✱✢✱ /etc/resolv.conf
This section creates a message-of-the-day file containing the date the kickstart installation took place. It also gets around thenetworkcommand’s limitation of only one name server by adding another nameserver to/etc/resolv.conf.
Note
Note that the pre-install script is not run in the change root environment.
1.4.31.
%post
— Post-Installation Configuration Section
You have the option of adding commands to run on the system once the installation is com-plete. This section must be at the end of the kickstart file and must start with the%post command. This section is useful for functions such as installing additional software and configuring an additional nameserver.
Note
If you configured the network with static IP information, including a nameserver, you can access the network and resolve IP addresses in the%postsection. If you configured the network for DHCP, the /etc/resolv.conffile has not been completed when the installation executes the%postsection. You can access the network, but you can not resolve IP addresses. Thus, if you are using DHCP, you must specify IP addresses in the%postsection.
Here is an example%postsection that creates a message of the day file containing the date that the kickstart installation took place, and gets around thenetworkcommand’s limitation of one nameserver only by adding another nameserver to/etc/resolv.conf.
38 Chapter 1. Kickstart Installations
# add comment to /etc/motd
echo "Kickstart-installed Red Hat Linux ‘/bin/date‘" ✲ /etc/motd
# add another nameserver
echo "nameserver 10.10.0.2" ✲✳✲ /etc/resolv.conf
Note
The post-install script is run in a chroot environment; therefore, performing tasks such as copying scripts or RPMs from the installation media will not work.
--nochroot
Allows you to specify commands that you would like to run outside of the chroot envi-ronment.
The following example copies the file/etc/resolv.confto the filesystem that was just installed.
%post --nochroot
cp /etc/resolv.conf /mnt/sysimage/etc/resolv.conf
--interpreter /usr/bin/perl
Allows you to specify a different scripting language, such as Perl. Replace
/usr/bin/perlwith the scripting language of your choice.
The following example uses a Perl script to replace/etc/HOSTNAME. %post --interpreter /usr/bin/perl
# replace /etc/HOSTNAME open(HN, ">HOSTNAME");
print HN "1.2.3.4 an.ip.address\n";
More examples of post-installation scripts can be found in Section 2.11.
1.4.32.
%include
— Include Contents of Another File Section
1Use the%include /path/to/filecommand to include the contents of another file in the kickstart file as though the contents were at the location of the%includecommand in the kickstart file.
Chapter 1. Kickstart Installations 39
1.5. Where to Put A Kickstart File
A kickstart file must be placed in one of two locations:
• On a boot disk
• On a network
Normally a kickstart file is copied to the boot disk, or made available on the network. The network-based approach is most commonly used, as most kickstart installations tend to be performed on networked computers.
Let us take a more in-depth look at where the kickstart file may be placed.
1.5.1. Creating a Kickstart Boot Disk
To perform a diskette-based kickstart installation, the kickstart file must be namedks.cfg and must be located in the boot disk’s top-level directory. Note that the Red Hat Linux boot disks are in MS-DOS format, so it is easy to copy the kickstart file under Linux using the mcopycommand:
mcopy ks.cfg a:
Alternatively, you can use Windows to copy the file. You can also mount the MS-DOS boot disk andcpthe file over.
1.5.2. Making the Kickstart File Available on the Network
Network installations using kickstart are quite common, because system administrators can easily automate the installation on many networked computers quickly and painlessly. In general, the approach most commonly used is for the administrator to have both a BOOTP/DHCP server and an NFS server on the local network. The BOOTP/DHCP server is used to give the client system its networking information, while the actual files used during the installation are served by the NFS server. Often, these two servers run on the same physical machine, but they are not required to.
To perform a network-based kickstart installation, you must have a BOOTP/DHCP server on your network, and it must include configuration information for the machine on which you are attempting to install Red Hat Linux. The BOOTP/DHCP server will provide the client with its networking information as well as the location of the kickstart file.
If a kickstart file is specified by the BOOTP/DHCP server, the client system will attempt an NFS mount of the file’s path, and will copy the specified file to the client, using it as the kickstart file. The exact settings required vary depending on the BOOTP/DHCP server you use.
Here is an example of a line from thedhcpd.conffile for the DHCP server shipped with Red Hat Linux:
filename "/usr/new-machine/kickstart/"; next-serverblarg.redhat.com;
Note that you should replace the value afterfilenamewith the name of the kickstart file (or the directory in which the kickstart file resides) and the value afternext-serverwith the NFS server name.
40 Chapter 1. Kickstart Installations
✴
ip-addr✵ -kickstart
The✴
ip-addr✵ section of the filename should be replaced with the client’s IP address in dotted decimal notation. For example, the filename for a computer with an IP address of 10.10.0.1 would be10.10.0.1-kickstart.
Note that if you do not specify a server name, then the client system will attempt to use the server that answered the BOOTP/DHCP request as its NFS server. If you do not specify a path or filename, the client system will try to mount/kickstartfrom the BOOTP/DHCP server, and will try to find the kickstart file using the same✴
ip-addr✵ -kickstartfilename as described above.
1.6. Starting a Kickstart Installation
To begin a kickstart installation, you must boot the system from a Red Hat Linux boot diskette or the CD-ROM and enter a special boot command at the boot prompt. If the kick-start file is located on a boot diskette that was created from theboot.imgorbootnet.img image file, the correct boot command would be:
boot: linux ks=floppy
Thelinux ks=floppycommand also works if theks.cfgfile is located on a vfat or ext2 filesystem on a floppy diskette and you boot from the Red Hat Linux CD-ROM.
An alternate boot command for booting off the Red Hat Linux CD-ROM and having the kickstart file on a vfat or ext2 filesystem on a floppy diskette is:
boot: linux ks=hd:fd0/ks.cfg
If you need to use a driver disk with kickstart, you can still have the kickstart file on a floppy disk:
boot: linux ks=floppy dd
The Red Hat Linux installation program looks for a kickstart file if thekscommand line argument is passed to the kernel. The command line argument can take a number of forms:
ks=nfs:✴
server✵ :/
✴
path✵
The installation program will look for the kickstart file on the NFS server✶ server✷ , as file ✶ path✷ . The installation program will use DHCP to configure the Ethernet card. For example, if your NFS server is server.example.com and the kickstart file is in the NFS share /mydir/ks.cfg, the correct boot command would be ks=nfs:server.example.com:/mydir/ks.cfg.
ks=http:✴
server✵ :/
✴
path✵
The installation program will look for the kickstart file on the HTTP server
✶ server✷ , as file ✶ path✷ . The installation program will use DHCP to configure
the Ethernet card. For example, if your HTTP server is server.example.com and the kickstart file is in the HTTP directory /mydir/ks.cfg, the correct boot command would beks=http:server.example.com:/mydir/ks.cfg.
ks=floppy
Chapter 1. Kickstart Installations 41
ks=hd:✸ device✹ /✸ file✹
The installation program will mount the filesystem on✺ device✻ (which must be vfat or ext2), and look for the kickstart configuration file as✺ file✻ in that filesystem (for example,ks=hd:sda3/mydir/ks.cfg).
ks=file:/✸ file✹
The installation program will try to read the file ✺ file✻ from the filesystem; no mounts will be done. This is normally used if the kickstart file is already on theinitrd image.
ks=cdrom:/✸ path✹
The installation program will look for the kickstart file on CD-ROM, as file✺ path✻ .
ks
Ifksis used alone, the installation program will configure the Ethernet card in the sys-tem using DHCP. The syssys-tem will use the "bootServer" from the DHCP response as an NFS server to read the kickstart file from (by default, this is the same as the DHCP server). The name of the kickstart file is one of the following:
• If DHCP is specified and the bootfile begins with a/, the bootfile provided by DHCP is looked for on the NFS server.
• If DHCP is specified and the bootfile begins with something other then a/, the boot-file provided by DHCP is looked for in the/kickstartdirectory on the NFS server.
• If DHCP did not specify a bootfile, then the installation program tries to read the file /kickstart/1.2.3.4-kickstart, where1.2.3.4is the numeric IP address of the machine being installed.
ksdevice=✸ device✹
Chapter 2.
Kickstart Configurator
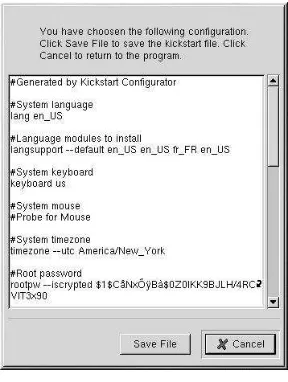
Kickstart Configuratorallows you to create a kickstart file using a graphical user interface, so that you do not have to remember the correct syntax of the file. After choosing the kick-start options, click theSave Filebutton, verify the options you have chosen, and save the kickstart file to a desired location.
To useKickstart Configurator, you must by running the X Window System. To start Kick-start Configurator, use one of the following methods:
• On the GNOME desktop, go to theMain Menu Button(on the Panel) =>Programs=> System=>Kickstart Configurator.
• On the KDE desktop, go to theMain Menu Button(on the Panel) =>System=>Kickstart Configurator.
• Type the command/usr/sbin/ksconfigat a shell prompt (for example, in an XTerm or GNOME terminal).
2.1. Basic Configuration
Figure 2-1. Basic Configuration
Choose the language to use during the installation from theLanguagemenu. Select the system keyboard type from theKeyboardmenu.
44 Chapter 2. Kickstart Configurator
If you have a two-button button mouse, you can emulate a three-button mouse by selecting Emulate 3 Buttons. If this option is selected, simultaneously clicking the left and right mouse buttons will be recognized as a middle mouse button click.
From theTime Zonemenu, choose the time zone to use for the system.
Enter the desired root password for the system in theRoot Passwordtext entry box. If you want to save the password as an encrypted password in the file, selectEncrypt root pass-word. When the file is saved, the plaintext password that you typed will be encrypted and written to the kickstart file. Do not type an already encrypted password and select to encrypt it.
Choose one or more languages to install and use after installation from theLanguage Sup-portlist.
ChoosingReboot system after installationwill reboot your system automatically after the installation is finished.
Kickstart installations are performed in graphical mode by default. To override this default and use text mode instead, check thePerform installation in text modebutton.
You can perform a kickstart installation in interactive mode. This means that the installation program will use all the options pre-configured in the kickstart file, but it will allow you to preview the options in each screen before you can continue to the next screen. To continue to the next screen, click theNextbutton after you have approved the settings. If you are not satisfied with the pre-configured options, you can change them before continuing the instal-lation. If you prefer this type of installation, check thePerform installation in interactive modebutton.
2.2. Boot Loader Options
Figure 2-2. Boot Loader Options
Chapter 2. Kickstart Configurator 45
If you choose to install a boot loader, you must also choose which boot loader to install (GRUB or LILO) and where to to install the boot loader (the Master Boot Record or the first sector of the/bootpartition). Install the boot loader on the MBR if you plan to use it as your boot loader. If you are using a different boot loader, install LILO or GRUB on the first sector of the/bootpartition and configure the other boot loader to boot Red Hat Linux.
If you need to pass any special parameters to the kernel to be used when the system boots, enter them in theKernel parameterstext field. For example, if you have an IDE CD-ROM burner, you can tell the kernel to use the SCSI emulation driver that must be loaded before usingcdrecordby typinghdd=ide-scsias a kernel parameter (wherehddis the CD-ROM device).
If you choose LILO as the boot loader, choose whether you want to use linear mode and whether you want to force the use of lba32 mode.
If you choose GRUB as the boot loader, you can password protect it by configuring a GRUB password. Enter a password in theUse GRUB Passwordtext entry area. If you want to save the password as an encrypted password in the file, selectEncrypt GRUB password. When the file is saved, the plaintext password that you typed will be encrypted and written to the kickstart file. Do not type an already encrypted password and select to encrypt it.
2.3. Installation Method
Figure 2-3. Installation Method
TheInstallation Methodscreen allows you to choose whether you want to perform a full installation or an upgrade. If you choose upgrade, thePartition InformationandPackage Selectionoptions will be disabled. They are not supported for kickstart upgrades.
Also choose the type of kickstart installation to perform from this screen. You can choose from the following options:
• CD-ROM— Choose this option if you wish to install Red Hat Linux from the Red Hat Linux CD-ROMs.