WordPress For Dummies, 2nd Edition
viii
Your Stuff ... 42
What’s Hot ... 42
QuickPress ... 43
Recent Drafts ... 43
Stats ... 43
Setting Important Options Before You Blog ... 44
Setting your General options ... 45
Adjusting your Date and Time settings ... 46
Setting your profi le: Tell us a little about yourself ... 48
Getting Help ... 54
Chapter 4: Writing and Managing Your Blog . . . .55
Ready? Set? Blog! ... 55
Inserting media fi les into your post ... 58
Refi ning your post options ... 62
Publishing your post ... 63
Organizing Your Blog by Subject ... 66
Creating categories and subcategories ... 66
Filing posts in categories and subcategories ... 68
Creating and Categorizing Your Blogroll ... 68
Creating link categories ... 69
Adding new links to your blogroll ... 69
Managing and Inviting Users ... 72
Managing authors and users ... 73
Inviting friends to WordPress.com ... 74
Managing Comments and Comment Spam ... 75
Setting discussion options for your blog ... 76
Viewing comments... 79
Managing comment spam with Akismet ... 80
Creating a Static Page ... 81
Setting Up Your Front Page ... 83
Publishing a Public or Private Blog ... 85
Establishing Trust Relationships with OpenID ... 86
Chapter 5: Enhancing Your Blog with Themes,
Widgets, and Upgrades . . . .87
Changing Your Blog’s Look ... 87
Widget Wonder: Adding Handy Tools to Your Sidebar ... 89
Selecting and activating widgets ... 89
Using Text widgets... 91
Using the RSS widget ... 92
Upgrading Your Hosted Service (For a Fee) ... 93
ix
Table of Contents
Part III: Self-Hosting with WordPress.org ... 97
Chapter 6: Setting Up Blogging Base Camp . . . .99
Establishing Your Domain ... 99
Understanding domain name extensions ... 100
Considering the cost of a domain name ... 101
Registering your domain name ... 101
Finding a Home for Your Blog ... 102
Getting help with hosting WordPress ... 103
Dealing with disk space and bandwidth ... 104
Transferring Files from Point A to Point B ... 106
Installing WordPress ... 107
Setting up the MySQL database ... 108
Uploading the WordPress fi les ... 110
Last step: Running the install script ... 112
Chapter 7: Understanding the WordPress.org
Administration Panel. . . .119
Logging In to the Administration Panel ... 119
Navigating the Dashboard ... 121
Right Now ... 122
Recent Comments ... 124
Incoming Links ... 124
Plugins ... 125
QuickPress ... 127
Recent Drafts ... 127
WordPress Development Blog ... 128
Other WordPress News ... 129
Arranging the Dashboard to Your Tastes ... 130
Setting Options in the Administration Panel ... 132
Confi guring the Settings ... 133
General ... 133
Creating Your Personal Profi le ... 151
Setting Your Blog’s Format ... 154
WordPress For Dummies, 2nd Edition
Staying on Topic with Categories ... 159
Changing the name of a category ... 160
Creating new categories ... 162
Link Lists: Sharing Your Favorite Sites ... 165
Organizing your links ... 165
Adding new link loves ... 167
Editing existing links... 171
Examining a Blog Post’s Address: Permalinks ... 171
Making your post links pretty ... 172
Customizing your permalinks ... 173
Making sure that your permalinks work with your server ... 175
Discovering the Many WordPress RSS Options ... 177
Blog It!: Writing Your First Entry ... 179
Composing your blog post ... 179
Dressing up your posts with images, video, and audio ... 182
Refi ning your post options ... 182
Publishing your post ... 184
You are your own editor ... 186
Look Who’s Talking on Your Blog ... 186
Managing comments and trackbacks ... 187
Moderating comments and trackbacks... 189
Tackling spam with Akismet... 189
Part IV: Flexing and Extending WordPress ... 191
Chapter 9: Media Management: Images, Audio, and Video . . . .193
Inserting Images into Your Blog Posts ... 194
Aligning your images ... 197
Inserting a photo gallery ... 198
Inserting Video Files into Your Blog Posts ... 203
xi
Table of Contents
Chapter 10: Making the Most of WordPress Plugins. . . .209
Finding Out What Plugins Are ... 210
Exploring Manage Plugin page ... 211
Discovering the one-click plugin upgrade ... 212
Getting the Most out of the Plugins Included with WordPress ... 215
Akismet... 215
Hello Dolly... 218
Using Plugins: Just the Basics ... 218
Installing Plugins Manually ... 220
Finding and downloading the fi les ... 221
Reading the instructions ... 224
Uploading and Activating Plugins ... 225
Uploading the fi les ... 225
Activating the plugin ... 226
Setting Plugin Options ... 227
Uninstalling Plugins ... 228
Understanding the Open Source Environment ... 230
Chapter 11: Finding and Installing WordPress Themes . . . .233
Getting Started with Free Themes ... 233
Finding free themes ... 234
Previewing themes... 236
Downloading themes ... 237
Activating a New Theme ... 238
Deciding to Use Premium Themes ... 240
Thesis ... 242
WP Remix ... 243
iThemes ... 244
Part V: Customizing WordPress ... 245
Chapter 12: Understanding Themes and Templates . . . .247
Using WordPress Themes: The Basics ... 248
Understanding theme structure... 248
Connecting templates... 250
Contemplating the Structure of a WordPress Blog ... 250
Examining the Anatomy of a Template Tag ... 253
Getting Familiar with the Four Main Templates ... 254
The Header template ... 254
The Main Index template ... 259
WordPress For Dummies, 2nd Edition
xii
The Sidebar template ... 263
The Footer template ... 263
Other templates ... 264
Customizing Your Blog Posts with Template Tags ... 265
Putting a Theme Together ... 266
Using Tags with Parameters for Sidebars ... 270
The Calendar ... 272
List pages ... 272
Bookmarks (blogroll) ... 274
Post archives ... 278
Categories ... 279
Checking Out Miscellaneous but Useful Template Tags ... 281
Chapter 13: Tweaking WordPress Themes . . . .283
Styling with CSS: The Basics ... 284
CSS selectors ... 284
Classes and IDs... 285
CSS properties and values ... 286
Changing the Background Color ... 288
Using Your Own Header Image ... 290
Changing Font Styles, Colors, and Sizes ... 293
Finding Additional CSS Resources ... 295
Chapter 14: Beyond Blogging: WordPress As
a Content Management System. . . .297
Creating the Front Page of Your Web Site ... 298
Creating the static page ... 300
Assigning a static page as the front page ... 300
Tweaking the layout ... 302
Adding a Blog to Your Web Site ... 304
Defi ning Specifi c Templates for Static Pages ... 306
Uploading the template ... 307
Assigning the template to a static page ... 307
Creating a Template for Each Post Category ... 310
Pulling in Content from a Single Category ... 311
Finding the category ID number ... 312
Adding the <query_post> tag ... 313
Using Sidebar Templates ... 314
Custom Styles for Sticky, Category, and Tag Posts ... 316
Optimizing Your WordPress Blog ... 317
Planting keywords in your Web site ... 318
Optimizing your post titles for search engine success ... 319
xiii
Table of Contents
Chapter 15: Deciding to Bring in the Pros . . . .325
Checking Out the Types of Blog Professionals ... 325
Designers ... 327
Developers ... 329
Consultants ... 329
Hiring a Professional ... 330
Finding professionals ... 330
Auditioning your prospects ... 331
Making contact ... 334
Agreeing on the contract ... 335
Part VI: The Part of Tens ... 337
Chapter 16: Ten WordPress Web Sites Used As a CMS . . . .339
Chapter 17: Ten Popular WordPress Plugins . . . .349
Chapter 18: Ten Free WordPress Themes . . . .357
Appendix: Migrating Your Existing Blog
to WordPress ... 365
Index ... 379
2
WordPress For Dummies, 2nd Edition
WordPress has been a huge part of the blogging boom. Today, it’s the most popular blogging platform for personal, business, and corporate bloggers alike.
To a brand-new user, some aspects of WordPress can seem a little bit intimi-dating. After you take a look under the hood, however, you begin to realize how intuitive, friendly, and extensible the software is.
This book presents an in-depth look at two popular versions of WordPress:
✓ The hosted version available at WordPress.com ✓ The self-hosted version available at WordPress.org
The book also covers managing and maintaining your WordPress blog through the use of WordPress plugins and themes.
If you’re interested in taking a detailed look at the blogging and Web site ser-vices provided by WordPress, you happen to have just the right book in your hands.
About This Book
This book covers all the important aspects of WordPress that new users need to know to begin using the software for their own blog (or blogs). I cover the two most popular versions of WordPress, highlighting all the important topics, such as these:
✓ Setting up and using a hosted blog at WordPress.com
✓ Locating good hosting services for the self-hosted version of the soft-ware (available at WordPress.org)
✓ Installing and setting up the WordPress.org software
✓ Navigating the Administration panels of both the hosted and self-hosted versions of WordPress
✓ Adding media files to your blog
✓ Finding and installing free themes to use in your WordPress blog ✓ Using basic coding to design your own WordPress theme or modify the
3
Introduction
✓ Using templates and tags in WordPress
✓ Installing, activating, and managing WordPress plugins ✓ Discovering the potential pitfalls associated with each version ✓ Understanding the challenges you face when running a WordPress–
powered site, such as dodging comment and trackback spam ✓ Exploring RSS feed syndication
✓ Migrating your existing blog to WordPress (if you are using a different blogging platform, such as Blogspot, Movable Type, or TypePad) ✓ Discovering the power of WordPress as a Content Management System
(CMS) to create a full Web site, not just a blog
✓ Finding support, tips, and resources for using the WordPress software
With WordPress, you can truly tailor a blog to your own tastes and needs. All the tools are out there. Some of them are packaged with the WordPress soft-ware; others are third-party plugins and add-ons created by members of the WordPress user community. It takes a little research, knowledge, and time on your part to put together a blog that suits your needs and gives your readers an exciting experience that keeps them coming back for more.
Conventions Used in This Book
Throughout the book, I apply the following typography conventions to guide you through some of the information I present:
✓ When I ask you to type something, the text that you’re supposed to type is in bold.
✓ When I suggest a keyword that you may want to enter in a search engine, that term appears in italics.
✓ Text that appears in this special font is certain to be a URL (Web address), e-mail address, filename, folder name, or code.
✓ When I use a term that I think you may not be familiar with, I apply italics to that term to let you know that I’m defining it.
✓ In some instances, I give you a basic idea of what a Web address or block of code looks like. When the text that you see may be different, depending on your settings and preferences, I apply italics to that text.
4
WordPress For Dummies, 2nd Edition
What You Are Not to Read
Don’t read supermarket tabloids. They’re certain to rot your brain.
This book covers the details of how to set up, use, and maintain the software for WordPress.com and WordPress.org. I don’t intend for you to read this book from cover to cover (unless you’re my mother — then I won’t forgive you if you don’t). Rather, hit the Table of Contents and the Index of this book to find the information you need.
If you never intend to run a hosted WordPress blog on your own Web server, you can skip Chapters 6, 7, and 8.
If you have no interest in setting up a hosted blog at WordPress.com, skip Chapters 3, 4, and 5.
If you aren’t interested in digging into the code of a WordPress template, and don’t want to find out how to apply CSS or HTML to enhance your design, you can skip Part V of this book, which contains Chapters 12, 13, 14, and 15.
Long story short: Take what you need, and leave the rest.
Foolish Assumptions
I’ll never know what assumptions you’ve made about me at this point, but I can tell you a few things that I already assume about you:
✓ You know what a computer is. You can turn it on, and you understand that if you spill coffee on your keyboard, you’ll have to run out and get a replacement.
✓ You understand how to hook yourself into the Internet and know the basics of using a Web browser to surf Web sites and blogs.
5
Introduction
If, when you approach your computer, you break out into a cold sweat, look-ing similar to a deer caught in headlights, and say to yourself, “Here goes nothing!” before you even sit down in front of your monitor, you may want to brush up on your basic computer skills before you begin this book.
How This Book Is Organized
This book is made up of six parts that introduce you to the WordPress platform, including detailed information on two very popular versions of WordPress: the hosted version of WordPress.com and the self-hosted ver-sion of WordPress.org. Also included is detailed information on WordPress themes and templates.
Part I: Introducing WordPress
The first part gives you an overview of WordPress and the advantages of making it your blogging platform. You might think of WordPress as coming in three “flavors”: vanilla (WordPress.com hosted solution), chocolate (WordPress.org self-hosted solution), and Neapolitan (WordPress MU, the multiuser solution). In this part, you also discover some of the fun aspects of blogging, such as RSS feed syndication and reader interaction through comments.
Part II: Using the WordPress
Hosted Service
Part II takes you through signing up with the hosted service for a blog. You tour the Administration panel, explore writing and managing your blog, find out how to change the various themes available in this version, and discover how to enhance your blog and widgets.
Part III: Self-Hosting with WordPress.org
Part III explores the single-user version of the WordPress software available at WordPress.org. You install this software on your own hosted Web server, so I give you valuable information about domain registration, Web hosting providers, and a few of the basic tools (such as FTP) that you need to install to set up a WordPress blog. I also familiarize you with the Administration panel, where you personalize your blog and explore many of the settings that you need to manage and maintain your WordPress–powered blog.
6
WordPress For Dummies, 2nd Edition
Part IV: Flexing and Extending WordPress
This part shows you how to add images to your pages, including how to create a photo gallery on your site.
This part also reveals how to find, install, and use various WordPress plug-ins to extend the functionality of your blog. It also steps into the world of WordPress themes, showing you where to find free themes, install them, and use them.
Part V: Customizing WordPress
Part V takes an in-depth look at the structure of a WordPress theme by taking you through each of the templates and explaining the template tags each step of the way. You find information on basic CSS and HTML that helps you tweak the free theme that you are using or even create your own theme.
This part also looks at the use of WordPress as a Content Management System (CMS) to power a full-blown Web site as well as a blog.
If the topics covered in this part of the book aren’t ones you’re interested in getting involved with yourself, the last chapter of this part talks about bringing in the professionals — the consultants who can help you achieve a custom-designed blog, as well as assist you with search engine optimization.
Part VI: The Part of Tens
The Part of Tens is in every For Dummies book that you will ever pick up. This part introduces ten Web sites that have really stretched the functionality of WordPress through plugins and themes. This part also shows you ten popular free WordPress themes that you can use to create a nice, clean look for your blog. Further, in this part you discover ten great WordPress plugins that you can use to provide your visitors (and yourself) some great functionality.
Icons Used in This Book
15
Chapter 1: What WordPress Can Do for You
Don’t worry if you’re not a member of the WordPress community. Joining is easy: Simply start your own blog by using one of the three WordPress software options. If you’re already blogging on a different platform, such as Blogspot or Movable Type, WordPress makes it simple for you to migrate your current data from that platform to a new WordPress setup. (See the appendix for information about moving your existing blog to WordPress.)
Choosing a WordPress Platform
Among the realities of running a blog today is choosing among the veritable feast of software platforms to find the one that will perform the way you need it to. You want to be sure that the platform you choose has all the options
The origins of WordPress
Once upon a time, there was a simple,PHP-based blogging platform called b2. This soft-ware, developed in 2001, slowly gained a bit of popularity among geek types as a way to publish content on the Internet. Its developer, Michel Valdrighi, kept development active until early 2003, when users of the software noticed that Valdrighi seemed to have disappeared. They became a little concerned about b2’s future.
Somewhere deep in the heart of Texas, one young man in particular was very concerned, because b2 was his software of choice for pub-lishing his own content on the World Wide Web. He didn’t want to see his favorite publishing tool go to waste or to face a tough decision about moving on to something new and unknown. You can view the original post to his own blog in which he wondered what to do (http:// m a . t t / 2 0 0 3 / 0 1 / t h e b l o g g i n g -software-dilemma).
In that post, he talked briefly about some of the other software that was available at the time, and he tossed around the idea of using the b2 software to “to create a fork, integrating all the cool stuff that Michel would be working on right now if only he was around.”
Create a fork, he did. In the absence of b2’s developer, this young man developed from the original b2 code base a brand-new blogging application called WordPress.
That blog post was made on January 24, 2003, and the young man’s name was (and is) Matt Mullenweg. On December 26, 2003, with the assistance of a few other developers, Mullenweg announced the arrival of the first official version of the WordPress software. The rest, as they say, is history. The history of this particular piece of software surely is one for the books, as it is the most popular blogging plat-form available today.
16
Part I: Introducing WordPress
you’re looking for. WordPress is unique in that it offers three versions of its software. Each version is designed to meet the various needs of bloggers. The three different versions of WordPress are the following:
✓ The hosted version at WordPress.com. (Part II of this book focuses on this version.)
✓ The self-installed and self-hosted version available at WordPress.org. (Part III focuses on this version.)
✓ The multiuser version, WordPress MU, available at http:// mu.wordpress.org.
Certain features are available to you in every WordPress blog setup, whether you’re using the software from WordPress.org, the hosted version at
WordPress.com, or the multiuser version of WordPress MU. These features include but aren’t limited to the following:
✓ Quick-and-easy installation and setup
✓ Full-featured blogging capability, letting you publish content to the Web through an easy-to-use Web-based interface
✓ Topical archiving of your posts, using categories
✓ Monthly archiving of your posts, with the ability to provide a listing of those archives for easy navigation through your site.
✓ Comment and trackback tools
✓ Automatic spam protection through Akismet ✓ Built-in gallery integration for photos and images ✓ Media Manager for video and audio files
✓ Great community support
✓ Unlimited number of static pages, letting you step out of the blog box and into the sphere of running a fully functional Web site
✓ RSS capability with RSS 2.0, RSS 1.0, and Atom support
✓ Tools for importing content from different blogging systems (such as Blogger, Movable Type, and LiveJournal)
17
Chapter 1: What WordPress Can Do for You
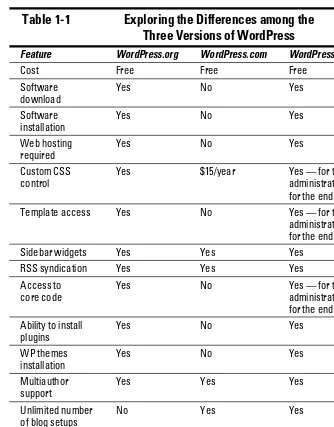
Table 1-1
Exploring the Differences among the
Three Versions of WordPress
Feature WordPress.org WordPress.com WordPress MU Cost Free Free Free
Software for the end user Template access Yes No Yes — for the MU
administrator, not for the end user Sidebar widgets Yes Yes Yes
RSS syndication Yes Yes Yes Access to
core code
Yes No Yes — for the MU administrator, not for the end user Ability to install
18
Part I: Introducing WordPress
Choosing the hosted version
from WordPress.com
WordPress.com is a free service. If downloading, installing, and using soft-ware on a Web server sound like Greek to you — and are things you’d rather avoid — the WordPress folks provide a solution for you at WordPress.com.
WordPress.com is a hosted solution, which means it has no software requirement, no downloads, and no installation or server configurations. Everything’s done for you on the back end, behind the scenes. You don’t even have to worry about how the process happens; it happens quickly, and before you know it, you’re making your first blog post using a WordPress. com blog solution.
WordPress.com has some limitations. You can’t install plugins or custom themes, for example, and you can’t customize the base code files. But even with its limitations, WordPress.com is an excellent starting point if you’re brand new to blogging and a little intimidated by the configuration require-ments of the self-installed WordPress.org software.
The good news is this: If you outgrow your WordPress.com hosted blog in the future and want to make a move to the self-hosted WordPress.org software, you can. You can even take all the content from your WordPress.com-hosted blog with you and easily import it into your new setup with the WordPress. org software.
So in the grand scheme of things, you’re really not that limited.
Self-hosting with WordPress.org
The self-installed version from WordPress.org (covered in Part III) requires you to download the software from the WordPress Web site and install it on a Web server. Unless you own your own Web server, you need to lease one — or lease space on one.
19
Chapter 1: What WordPress Can Do for You
✓ PHP version 4.3 or greater ✓ MySQL version 4.0 or greater
After you have WordPress installed on your Web server (see the installa-tion instrucinstalla-tions in Chapter 6), you can start using it to blog to your heart’s content. With the WordPress software, you can install several plugins that extend the functionality of the blogging system, as I describe in Chapter 10. You also have full control of the core files and code that WordPress is built on. So if you have a knack for PHP and knowledge of MySQL, you can work within the code to make changes that you think would be good for you and your blog.
You don’t need design ability to make your blog look great. Members of the WordPress community have created more than 1,600 WordPress themes (designs), and you can download them for free and install them on your WordPress blog (see Chapter 11). Additionally, if you’re creatively inclined, like to create designs on your own, and know Cascading Style Sheets (CSS), you have full access to the template system within WordPress and can create your own custom themes (see Chapters 12 and 13).
Running a network of blogs
with WordPress MU
Although the WordPress.com hosted service runs on the WordPress MU software, and the end-user configuration settings are very similar, setting up, administering, and managing this version of WordPress differ a great deal from the same processes in the WordPress.com or WordPress.org versions.
WordPress MU lets you run thousands of blogs on one installation of its software platform, on one domain. Its biggest claim to fame, of course, is the hosted version of WordPress.com, which uses the MU platform to run more than 1 million blogs and climbing.
When you install and use WordPress MU, you become administrator of a net-work of blogs. The administration interface for WordPress MU differs from WordPress.com and the software from WordPress.org, in that you’re config-uring options and settings for your blog as well as for multiple blogs across your network.
WordPress MU does everything the original software from WordPress.org does, so you can provide bloggers all the functionality that WordPress users have come to expect and enjoy.
20
Part I: Introducing WordPress
WordPress MU isn’t meant for the casual user or beginner. It’s also not meant for bloggers who want to run five to ten of their own blogs on one domain. Who is it meant for, then?
✓ Blog networks (such as Edublogs.org) that currently have more than 150 blogs.
✓ Newspapers and magazines, such as The New York Times, and universi-ties such as Harvard Law School that currently use WordPress MU to manage the blog sections of their Web sites.
✓ Niche-specific blog networks, such as Edublogs.org, that use WordPress MU to manage their full networks of free blogs for teachers, educators, lecturers, librarians, and other education professionals.
22
Part I: Introducing WordPress
✓ Personal: This type of blogger creates a blog as a personal journal or diary. You’re considered to be a personal blogger if you use your blog mainly to discuss topics that are personal to you or your life — your family, your cats, your children, or your interests (for example, technol-ogy, politics, sports, art, or photography). My own blog, which you’ll find at http://justagirlintheworld.com, is an example of a per-sonal blog.
✓ Business: This type of blogger uses the power of blogs to promote her company’s business services and/or products on the Internet. Blogs are very effective tools for promotion and marketing, and these blogs usually offer helpful information to readers and consumers, such as ad tips and product reviews. Business blogs also let readers provide feed-back and ideas, which can help a company improve its services. Search engines (such as Google, Yahoo!, and MSN) really like Web sites that are updated on a regular basis, and using a blog for your business lets you update your Web site regularly with content and information that your readers and consumers may find helpful. At the same time, you can increase your company’s exposure in the search engines by giving the search engines a lot of content to sift through and include in the search results. A good example of this is a company called ServerBeach — it keeps a blog on the hosted WordPress.com service at http:// serverbeach.wordpress.com.
✓ Media/journalism: More and more popular news outlets such as Fox News, MSNBC, and CNN are adding blogs to their Web sites to provide information on current events, politics, and news on a regional, national, and international level. These news organizations often have editorial bloggers as well. Editorial cartoonist Daryl Cagle, for example, maintains a blog on MSNBC’s Web site at http://cagle.msnbc.com/news/ blog, where he discusses his cartoons and the feedback he receives from readers.
✓ Citizen journalism: At one time, I might have put these bloggers in the Personal category, but blogs have really opened opportunities for aver-age citizens to have a great effect on the analysis and dissemination of news and information on a national and international level. The emer-gence of citizen journalism coincided with the swing from old media to new media. In old media, the journalists and news organizations direct the conversation about news topics.
28
Part I: Introducing WordPress
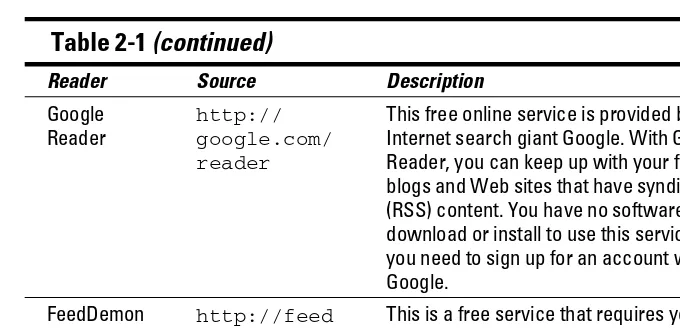
Table 2-1
(continued)
Reader Source Description
This free online service is provided by Internet search giant Google. With Google Reader, you can keep up with your favorite blogs and Web sites that have syndicated (RSS) content. You have no software to download or install to use this service, but you need to sign up for an account with Google.
FeedDemon http://feed demon.com
This is a free service that requires you to download the RSS reader application to your own computer.
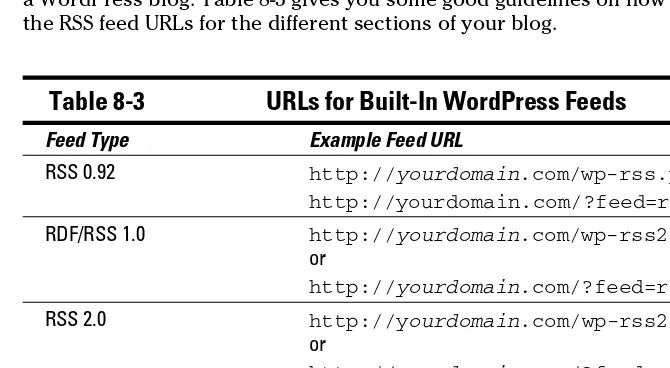
For your blog readers to stay updated with the latest and greatest content you post to your site, they need to subscribe to your RSS feed. Most blogging plat-forms allow the RSS feeds to be autodiscovered by the various feed readers — meaning that the reader needs only to enter your site’s URL, and the program will automatically find your RSS feed.
Most browser systems today alert visitors to the RSS feed on your site by dis-playing the universally recognized orange RSS feed icon, shown in the margin.
WordPress has built-in RSS feeds in several formats. Because the feeds are built into the software platform, you don’t need to do anything to provide your readers an RSS feed of your content. Check out Chapter 8 to find out more about using RSS feeds within the WordPress program.
Tracking back
The best way to understand trackbacks is to think of them as comments, except for one thing: Trackbacks are comments that are left on your blog by other blogs, not by actual people. Sounds perfectly reasonable, doesn’t it?
Actually, it does.
29
Chapter 2: WordPress Blogging Basics
That memo is sent via a network ping (a tool used to test, or verify, whether a link is reachable across the Internet) from your site to the site you link to. This process works as long as both blogs support trackback protocol. WordPress does, and so do almost all the other major blogging platforms except Blogspot. (Blogspot users need to sign up for a third-party program called HaloScan to have trackback functionality in their blogs.)
Sending a trackback to a blog is a nice way of telling the blogger that you like the information she presented in her blog post. Every blogger appreciates the receipt of trackbacks to their posts from other bloggers.
Dealing with comment and
trackback spam
Ugh. The absolute bane of every blogger’s existence is comment and track-back spam. When blogs became the “It” things on the Internet, spammers saw an opportunity. If you’ve ever received spam in your e-mail program, the concept is similar and just as frustrating.
Before blogs came onto the scene, you often saw spammers filling Internet guestbooks with their links but not leaving any relevant comments. The reason is simple: Web sites receive higher rankings in the major search engines if they have multiple links coming in from other sites. Enter blog soft-ware, with comment and trackback technologies — prime breeding ground for millions of spammers.
Because comments and trackbacks are published to your site publicly — and usually with a link to the commenters’ Web sites — spammers got their site links posted on millions of blogs by creating programs that automatically seek Web sites with commenting systems and then hammer those systems with tons of comments that contain links back to their own sites.
No blogger likes spam. As a matter of fact, blogging services such as
WordPress have spent untold hours in the name of stopping these spammers in their tracks, and for the most part, they’ve been successful. Every once in a while, however, spammers sneak through. Many spammers are offensive, and all of them are frustrating because they don’t contribute to the ongoing conversations that occur in blogs.
All WordPress systems have one very major, very excellent thing in common: Akismet, which kills spam dead. Chapter 10 tells you more about Akismet, which is brought to you by Automattic, the maker of WordPress.com.
30
Part I: Introducing WordPress
Moving On to the Business of Blogging
Before getting started with blogging, you need to take a long look at your big plans for your Web site. A word of advice: Organize your plan of attack before you start. Have a good idea of what types of information you want to publish, how you want to present and organize that information, and what types of services and interaction you want to provide your audience.It doesn’t matter whether you’re planning to start a personal blog as a diary of your daily life or a business blog to provide useful information to readers who are interested in your area of expertise. All potential bloggers have ideas about what type of information they want to present, and you wouldn’t be considering starting a new blog if you didn’t want to share that information (no matter what it is) with the rest of the world via the Internet. So having a plan of attack is helpful when you’re starting out.
Ask this question out loud: “What am I going to blog about?” Go ahead — ask it. Do you have an answer? Maybe you do, and maybe not — either way, it’s all right. There’s no clear set of ground rules you must follow. Having an idea of what you’re planning to write about in your blog makes planning your attack a little easier. You may want to write about your personal life. Maybe you plan to share only some of your photography and provide very little commentary to go along with it. Or maybe you’re a business owner, and you want to blog about your services and current news within your industry.
Having an idea of your subject matter will help you determine how you want to deliver that information. My design blog, for example, is where I write about Web design projects, client case studies, and news related to design and blogging. You won’t find pictures of my cats there, but you will find those pictures on my personal blog. I keep the two blogs separate, much in the same way that most of us like to keep a distinct line of separation between our personal and professional lives, no matter what industry we work in.
With your topic in mind, ask yourself these questions:
✓ How often will I update my blog with new posts? Daily? Weekly? ✓ Do I want to encourage discussion by letting my readers comment on
my blog posts?
✓ Do I want to make every post available for public display? Am I okay with my boss or my family finding and reading my blog posts? ✓ How will I categorize my posts?
35
Chapter 3: Getting Started with WordPress.com
7. Select either Gimme a Blog! or Just a Username, Please.
The Gimme a Blog! option signs you up with a WordPress.com account and sets you up with a new WordPress.com blog. The Just a Username, Please option just signs you up with a new WordPress.com account, without the blog-setup part. You may want only to reserve a username in WordPress.com for now, which is why you might choose the second option.
8. Click the Next button.
9. In the Blog Domain text box, enter what you choose as your blog domain name.
Whatever you enter here becomes the URL address of your blog. It must be at least four characters (letters and numbers only), and you can’t change it later, so choose carefully! (The domain name of your blog does not have to be the same as your username, although WordPress. com already fills in this text box for you, with your username. You can choose any domain name you want; WordPress.com lets you know whether that domain name is available within its network.)
10. In the Blog Title text box, enter the name you’ve chosen for your blog.
Your blog title doesn’t have to be the same as your username, and you can change it later in the Options section in your Administration panel.
11. Choose your language preference from the Language drop-down menu.
Choose the primary language that you will be blogging in.
12. Select the Privacy check box if you want your blog to be public. Deselect this box if you want your blog to be private and not show up in search engines. (By default, this box is checked for you.)
Some bloggers actually do not want their blogs to be indexed by search engines, amazingly enough. Like them, you may want to run a private blog for which you decide who can, and cannot, view the contents of your blog.
13. Click the Sign-Up button, and you’re done!
A new page opens with a message telling you that WordPress.com has sent you an e-mail containing a link to activate your account.
14. Check your e-mail and click the link contained within it to activate your new WordPress.com blog.
A page loads with a message that your blog is now active. That page also displays your username and password. You receive another e-mail from WordPress.com that contains your username and password, as well as some useful links for navigating around WordPress.com — for example, the sign-in page, the Write Post page, and so on.
37
Chapter 3: Getting Started with WordPress.com
✓ My Account: Hover your mouse pointer over this link, and you see a drop-down menu that consists of the following:
• Global Dashboard: Takes you to the Dashboard panel.
• Stats: Takes you to your statistics page in your WordPress.com Dashboard that displays information about your blog such as how many visitors you have on a daily basis, referrers, and keywords. • Tag Surfer: Takes you to the Tag Surfer, where you can find out
what people are talking about based on keywords.
• My Comments: Takes you to the My Comments section in the WordPress Administration panel, where you can view all comments you’ve left anywhere within the WordPress.com network of blogs. • Edit Profile: Takes you to the Your Profile section in your
Administration panel, where you can edit your own user profile. • Support: Takes you to an area where you can get assistance from
the folks who run WordPress.com (http://support.word press.com).
• WordPress.com: Takes you to the main WordPress.com Web site.
• Logout: Lets you log out.
✓ My Dashboard: Click this link to go to the Dashboard page. I discuss the Dashboard page in detail in the next section.
✓ New Post: Click this link to go to the Write Post page, where you can write and publish a new post to your blog. If you want to get started right away with a new post, see Chapter 4.
✓ Blog Info: Hover your mouse pointer over this link to see a drop-down menu with the following elements:
• Random Post: Loads, in the same window, a random post from the blog you are visiting.
• Subscribe to Blog: Loads the Blog Surfer page within your
Administration panel, allowing you to subscribe to the blog you’re visiting.
• Add to Blogroll: Automatically adds the blog you are visiting to your blogroll.
• Report as Spam: Reports the blog to WordPress.com administra-tion as a spam blog.
• Report as Mature: Reports the blog to WordPress.com administra-tion as a blog containing mature content.
38
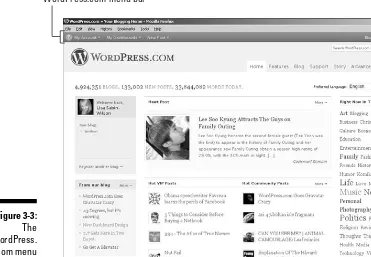
Part II: Using the WordPress Hosted Service
Figure 3-3: The WordPress.
com menu bar.
WordPress.com menu bar
Using the WordPress.com Dashboard
When you click the My Dashboard link in the WordPress.com menu bar (covered in the preceding section), you go directly to your WordPress.com Administration panel, starting at the Dashboard page (see Figure 3-4). Several modules within your Dashboard provide you with information about your blog, as well as actions you can take to navigate to other areas of the Administration panel, such as writing a new post, and adding a new link or blogroll.40
Part II: Using the WordPress Hosted Service
The Dashboard displays the following information under the At a Glance header:
✓ The number of posts: The number here always reflects the total number of posts you currently have in your WordPress blog. Figure 3-4 shows I currently have 10 posts on my blog. The number is blue; click the number and you go to the Edit Posts page, where you can edit the posts on your blog. I cover editing posts in Chapter 4.
✓ The number of pages: This is the current number of pages on your blog, which will change as you add or delete pages. (Pages, in this context, refer to the static pages you have created in your blog.) Figure 3-4 shows that my blog has 1 page.
Clicking this link takes you to the Edit Pages page, where you can view, edit, and delete your current pages. (Find the difference between WordPress posts and pages in Chapter 4.)
✓ The number of categories: This is the current number of categories you have on your blog, which will change as you add and delete categories. Figure 3-4 shows that I currently have 23 categories for my blog. Clicking this link takes you to the Categories Page, where you can view,
edit, and delete your current categories or add brand new ones. (For details about the management and creation of categories, see Chapter 4.)
✓ The number of tags: This is the current number of tags you have in your blog, which will change as you add and delete categories in the future. Figure 3-4 shows that I have 8 tags.
Clicking this link takes you to the Tags page, where you can add new tags and view, edit, and delete your current tags. (You can find more information about Tags in Chapter 4.)
✓ The number of comments: This is the total number of the com-ments that are currently on your blog. Figure 3-4 shows that I have 6 Comments, 6 Approved, 0 Pending (waiting to be approved), and 0 Spam. Clicking any of these four links takes you to the Edit Comments page, where you can manage the comments on your blog. I cover the management of comments in Chapter 4.
The last section of the Dashboard’s Right Now module in the Dashboard shows the following information:
41
Chapter 3: Getting Started with WordPress.com
✓ How many widgets you’ve added to your blog: This is the number of WordPress widgets you’re using in your blog. Figure 3-4 shows that I have 8 widgets. The number is a link that, when clicked, takes you to the Widgets page, where you can change your widget options by edit-ing them, movedit-ing them, or removedit-ing them. (I cover widgets in detail in Chapter 5.)
✓ Change Theme: Clicking this button takes you to the Manage Themes page, which lists your currently active and all available themes for your WordPress blog.
✓ Akismet Spam stats: This is the last statement in the Right Now section and it gives you a quick look into how many spam comments and track-backs the Akismet application has successfully blocked from your site. Figure 3-4 shows that Akismet has protected my blog from 2,936 spam comments. It’s nice to know the spam protection is there, and working!
Recent Comments
The next module is Recent Comments. Within this module, you find
✓ Mostrecent comments published to your blog: WordPress displays a maximum of five comments in this area.
✓ The author of each comment: The name of the person who left the com-ment appears below it. This section also displays the author’s picture (or avatar), if they have one.
✓ A link to the post the comment was left on: The post title appears to the right of the commenter’s name. Click the link, and you go to that post in the Administration panel.
✓ An excerpt of the comment: This is a short snippet of the comment left on your blog.
✓ Comment management links: Hover your mouse over the comment, and five links appear that give you the opportunity to manage those com-ments right from your Dashboard (I discuss Comment management later in Chapter 4):
• Unapprove: This link only appears if you have comment modera-tion turned on.
• Edit: This link opens the Edit Comment page where you can edit the comment.
• Reply: This link displays a text box where you can quickly reply to the comment right from your Dashboard.
42
Part II: Using the WordPress Hosted Service
• Spam: Clicking this link marks that comment as spam. • Delete: Clicking this link deletes the comment from your blog.
✓ View All button: This button invites you to see all the comments that have been left on your blog. Clicking the View All button takes you to the Edit Comments page, where you can view and edit, moderate, or delete any comments that have been left for your blog.
You’ll find even more information on managing your comments in Chapter 4.
Incoming Links
Directly to the right of the Recent Comments section in the Dashboard is the Incoming Links section, which lists all the blog-savvy people who wrote blog posts that link to your blog. Figure 3-4, earlier in this chapter, shows that I don’t have any incoming links to my blog. How sad is that? Because my blog is brand new, people haven’t discovered it yet, but I’m sure as soon as they do, my Incoming Links list will start filling up in no time.
In the meantime, a message in the Incoming Links section says, “This dash-board widget queries Google Blog Search so that when another blog links to your site it will show up here. It has found no incoming links. . . yet. It’s okay — there is no rush.” The phrase Google Blog Search is underlined because it’s a link; when you click it, you go to the Google Blog Search page, which is a search engine for blogs only.
Your Stuff
In the Your Stuff section of the Dashboard, you see the following sections:
✓ Today: Click the links here to go to a page with options that let you manage today’s posts. This page contains new or updated posts you’ve made during the current day.
✓ A While Ago: Click the links here to go to a page with options that let you manage posts and updates you made in past days.
43
Chapter 3: Getting Started with WordPress.com
QuickPress
The QuickPress module is a handy form that allows you to write, save, and publish a blog post right from your WordPress Dashboard. The options are very similar to the ones I cover in the section on writing posts in Chapter 4.
Recent Drafts
If you’re using a brand new WordPress.com blog, the Recent Drafts module displays the message: There are no drafts at the moment. That is because you have not written any drafts. As time goes on, however, and you have written a few posts in your blog, you may save some of those posts as drafts to be edited and published at a later date. It is those drafts that will be shown in the Recent Drafts module. Figure 3-4 shows that I have 4 Recent Drafts show-ing in this box.
WordPress displays up to five drafts in this module and displays the title of the post, the date it was last saved, and a short excerpt. Click the View All button to go to the Manage Posts page where you can view, edit, and manage your blog posts. Check out Chapter 4 for more information on that.
Stats
The last module of the Dashboard page is Stats (see Figure 3-5). It includes a visual graph of your blog stats for the past several days. These stats rep-resent how many visitors your blog received each day. The right side of the Stats module shows some specific information:
✓ Top Posts: This display lists the most popular posts in your blog, deter-mined by the number of visits each post received. It also shows you exactly how many times each post has been viewed. Figure 3-5 shows that my post titled About Lisa Sabin-Wilson has been viewed 70 times. You can click the title of a post, and WordPress loads that post in your browser window.
✓ Top Searches: This area tells you the top keywords and search phrases people used to find your blog in search engines. Figure 3-5 shows that people used these search phrases to find my blog: WordPress MU For Dummies and WordPress For Dummies. It’s nice to know how people are finding your site in the search engines!
✓ Most Active: This area tells you which posts in your blog are the most active, as determined by the number of comments left on each post. You can click the title of a post, and WordPress loads that post in your browser window.
52
Part II: Using the WordPress Hosted Service
✓ TheWordPress.com directory (by topic) of its community blogs: This directory is called the Tags page (http://wordpress.com/tags). Bloggers on WordPress.com can tag their posts with keywords that help define the topics of their posts; WordPress.com collects all those tagged posts and sorts them by name on the Tags page.
At the On the Tag: Blogging page (http://wordpress.com/tags/ blogging), for example, you find the most recent posts that WordPress. com bloggers have made on the topic of blogging. If your blog appears in this directory, so does a thumbnail of your picture.
Follow these steps to insert a picture or avatar into your profile:
1. Choose the image you want to attach to your profile, and save it to your computer.
To be safe in your image selection, be sure to upload an image that is at least 128 pixels wide and 128 pixels tall: 128 x 128. Later in these steps, you see how you can crop a larger image to the perfect size.
2. In the My Gravatar section of the Profile page, click the Change Your Gravatar link.
The Gravatar.com window appears where you click the Upload a New Image from Your Computer link that opens the Select File from Your Computer window.
3. Click the Browse button and select an image from your computer. 4. Click the Next button.
No matter what size image you chose, the Gravatar.com page allows you to crop your image to the correct size and lets you decide which part of your image to use for your picture display. When you click the Next button, the crop image page appears, and you can crop (cut) your chosen picture to the right size to be used as an avatar or icon (see Figure 3-10).
5. Use the crop tool to highlight the area of the picture that you want to remain after cropping.
In Figure 3-10, the box with a dotted line (the crop tool) outlines the image I’ve chosen to use. This dotted outline indicates the size the pic-ture will be when I’m done cropping it. You can move that dotted box around to choose the area of the image you want to use as your avatar. The Gravatar.com crop tool gives you two previews of your cropped image on the right side of the window: Small Preview and Large Preview.
54
Part II: Using the WordPress Hosted Service
Getting Help
I would be remiss if I didn’t mention some of the places on the Internet you can visit to find more information on using WordPress.com (see Table 3-1) — beginning with the super bunch of users in the WordPress.com community.
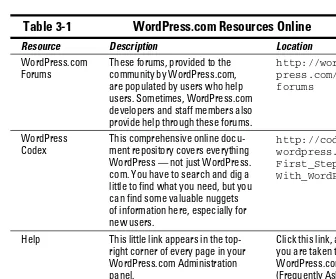
Table 3-1
WordPress.com Resources Online
Resource Description Location
WordPress.com Forums
These forums, provided to the community by WordPress.com, are populated by users who help users. Sometimes, WordPress.com developers and staff members also provide help through these forums.
http://word press.com/ forums
WordPress Codex
This comprehensive online docu-ment repository covers everything WordPress — not just WordPress. com. You have to search and dig a little to find what you need, but you can find some valuable nuggets of information here, especially for new users.
http://codex. wordpress.org/ First_Steps_ With_WordPress
Help This little link appears in the top-right corner of every page in your WordPress.com Administration panel.
Click this link, and you are taken to the WordPress.com FAQ (Frequently Asked Questions) page at
60
Part II: Using the WordPress Hosted Service
3. Choose an image or multiple images to upload. 4. Click Open.
The image is uploaded from your computer to your Web server.
WordPress displays a progress bar on the upload and displays an image options box when the upload is finished.
5. Edit the details for the image(s) by clicking the Show link that appears to the right of the image thumbnail.
Clicking Show drops down a box (see Figure 4-3) that contains several image options:
• Title: Type a title for the image.
• Caption: Type a caption for the image (such as This is a flower from my garden).
• Description: Type a description of the image.
• Link URL: Type the URL you want the image linked to. Whatever option you choose determines where your readers go when they click the image you’ve uploaded:
None: You don’t want the image to be clickable.
File URL: Readers can click through to the direct image itself.
Post URL: Readers can click through to the post that the image appears in. You can type your own URL in the Link URL text box.
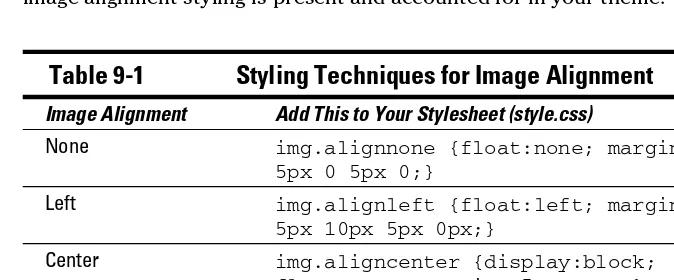
• Alignment: Choose None, Left, Center, or Right. (See Table 9-1, in the following section, for styling information regarding image alignment.)
• Size: Choose Thumbnail, Medium, Large or Full Size.
6. Click the Insert into Post button.
The HTML code needed to display the image within your published post is inserted automatically. The media uploader window closes and returns you to the Write Post page. (Alternatively, you can click the Save All Changes button to save the options you’ve set for the image(s) and then return at a later date to insert the image(s) in your post, without having to reset those options again.)
72
Part II: Using the WordPress Hosted Service
Table 4-1
(continued)
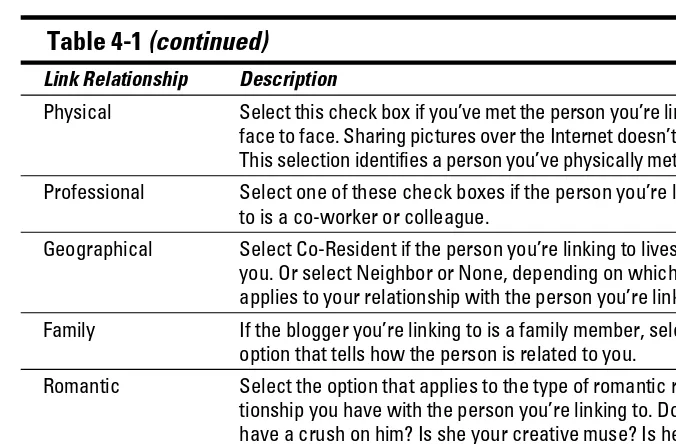
Link Relationship Description
Physical Select this check box if you’ve met the person you’re linking to face to face. Sharing pictures over the Internet doesn’t count. This selection identifies a person you’ve physically met. Professional Select one of these check boxes if the person you’re linking
to is a co-worker or colleague.
Geographical Select Co-Resident if the person you’re linking to lives with you. Or select Neighbor or None, depending on which option applies to your relationship with the person you’re linking to. Family If the blogger you’re linking to is a family member, select the
option that tells how the person is related to you. Romantic Select the option that applies to the type of romantic
rela-tionship you have with the person you’re linking to. Do you have a crush on him? Is she your creative muse? Is he someone you consider to be a sweetheart? Select the option that most closely identifies the romantic relationship, if any.
You can find more information on XFN at http://gmpg.org/xfn.
Revisit the Manage Links page any time you want to add a new link, edit an old link, or delete an existing link. You can create an unlimited amount of blogroll categories to sort your blogrolls by topics. I know one blogger who has 50 categories for his links, so the options are limitless.
Managing and Inviting Users
What’s a blog without blog users? Of course, your WordPress.com blog always has at least one user: you. To see your list of users, click the Users link that is in the navigation menu. The Users page opens and the Users menu expands to show three different links:
✓ Authors & Users
✓ Your Profile (See Chapter 3 for information on the Profile page.)
73
Chapter 4: Writing and Managing Your Blog
Managing authors and users
The Users page tells you about all the users on your blog. It lists each user’s username, name, e-mail address, role on your blog, and number of posts made to your blog. This page also has the Add User from Community sec-tion, where you can add a new user to your blog. (By user, WordPress means simply a person who is a member of your blog as a contributor, an author, an editor, or an administrator. You can have an unlimited amount of users on one WordPress.com blog.)
To manage user roles, you need to understand the distinct differences among the roles. The following list explains the type of access each role provides:
✓ Contributor: A Contributor can upload files and write/edit/manage her own posts. When a Contributor writes a post, however, that post is saved as a draft to await administrator approval; Contributors can’t pub-lish their posts. This feature is a nice way to moderate content written by new authors.
✓ Author: In addition to having the access and permissions of a
Contributor, an Author can publish his own posts without administrator approval. Authors can also delete their own posts.
✓ Editor: In addition to having the access and permissions of an Author, an Editor can moderate comments, manage categories, manage links, edit pages, and edit other Authors’ posts. Editors can also read and edit private posts.
✓ Administrator: An Administrator has the authority to change any of the Administration options and settings in the WordPress blog. You, as the account owner, are listed as an Administrator already. You can also assign other users as Administrators.
WordPress.com lets you have an unlimited amount of users and authors on one blog, which is a nice feature if running a multiauthor blog is something you’d like to do.
At the bottom of the Authors & Users page, in the Add User from Community section, you can add new users to your blog. Enter the person’s e-mail address, assign a user role, and click the Add User button. The user you add must be a registered user in the WordPress.com system. If you enter someone who isn’t registered, WordPress.com gives you the option to send that person an invitation to become a member. (The WordPress people have thought of everything, haven’t they?)
74
Part II: Using the WordPress Hosted Service
To change a user’s role, follow these steps:
1. Find that person’s username on the Users page. 2. Select the box next to the username.
3. From the Change Role To drop-down menu at the top the page, choose the role you want to assign; then click the Change button.
The Users page refreshes with the new role assignment applied.
To view all the posts made by an author, click the number that appears below the Posts column for that user.
Inviting friends to WordPress.com
Now that you’ve experienced the fun, ease, and excitement of having your very own WordPress.com blog, why not tell your friends, so that they can tell their friends, and their friends can tell their friends, and so on?
Click the Invites link on the Links menu, and you can do just that. Figure 4-10 shows the form that lets you invite people you know to sign up for WordPress.com accounts. You can also tell WordPress to add a user to your blogroll after she joins. Additionally, you can tell WordPress to add the new member to your own blog as a Contributor, if you want. (This option is especially helpful if you’re setting up new users or authors for your own WordPress.com blog.)
Follow these instructions to invite as many people as you want to join WordPress.com:
1. Click the Invites link on the Users menu.
The Invites page opens.
2. In the appropriate text boxes, type the user’s first name, last name, and e-mail address.
3. Type a personal message to the prospective member in the Personal Message text box, or use the default message WordPress.com provides. 4. (Optional) Select the Add to My Blogroll after Signup check box if you
also want to add this person to your own WordPress.com blogroll. 5. (Optional) Select the Add User to My Blog as a Contributor check box if
77
Chapter 4: Writing and Managing Your Blog
✓ Automatically Close Comments on Articles Older Than X days: This option helps decrease spam comments on older posts. You can select this option and then enter the number of days (for example: 30) in the text box provided.
E-Mail Me Whenever
The two options in the E-Mail Me Whenever section, Anyone Posts a Comment and A Comment Is Held for Moderation, are selected by default. This feature tells WordPress that you want to receive an e-mail any time anyone leaves a comment on your blog and/or any time a comment is await-ing your approval in the moderation queue. This feature can be very helpful, particularly if you don’t visit your blog daily. Everyone likes to get comments on his blog posts, and it’s good to be notified when it happens so that you can revisit that post, respond to your readers, and keep the conversation active. You can disable this feature, however, by deselecting these options.
Before a Comment Appears
The three options in the Before a Comment Appears section tell WordPress how you want WordPress to handle comments before they appear in your blog:
✓ An Administrator Must Always Approve the Comment: Selecting this option holds every new comment on your blog in the moderation queue until you log in and approve it. This feature is particularly helpful if you want to review the content of comments before they’re published to your blog.
✓ Comment Author Must Have a Previously Approved Comment: When this box is selected, the only comments that are approved and pub-lished on your blog are those that have been left by commenters who have already been approved by you. Their e-mail addresses are stored in the database, and WordPress runs a check on their e-mails. If the e-mail address matches a previously approved comment, the new com-ment is published automatically. If no match occurs, WordPress places the comment in the moderation queue, awaiting your approval. This measure is yet another feature that helps prevent comment spam.
Comment Moderation
In the Comment Moderation section, you can set options to specify what types of comments are held in the moderation queue to await your approval. Frequently, comment spammers try to spam your blog with a ton of links in the hope of promoting their own sites through your comment form. You can set the number of links that are allowed in a comment before it is tossed into the moderation queue to await approval. The default is 2. Give that a try, and if you find that you’re getting lots of spam comments with multiple links, you may want to revisit this page and increase that number.
80
Part II: Using the WordPress Hosted Service
To manage a comment, find one that you want to edit, delete, unapprove (or remove it from your blog page), or mark as spam. If you need to, you can find a specific comment by using the search feature. Just type a keyword in the search box located in the top-right corner of the page and click the Search Comments button.
When you’ve found the comment you want to manage, hover your mouse over the comment and six different links appear beneath the comment text, and include:
✓ Approve or Unapprove: If the comment has not yet been approved, the Approve link appears here. Click Approve to publish the comment to your blog. If the comment was approved, click the Unapprove link to . . . well, unapprove it. This link puts the comment back into the moderation queue.
✓ Spam: This link tells WordPress that this comment is spam and removes it from your blog.
✓ Delete: This link deletes the comment from your blog.
✓ Edit: Clicking this link takes you to the Edit Comment page where you can edit the text of the comment, if you need to (correcting typos anyone??)
✓ Quick Edit: This link accomplishes the same as the Edit link except instead of taking you to a new Edit Comment page, it drops down a quick edit text box that allows you to do a fast edit right on the same page.
✓ Reply: This link drops down a text box on the same page to allow you to reply to the comment right from the Edit Comments page.
Managing comment spam with Akismet
Comment spam, as I discuss in Chapter 2, is a sneaky method that spammers are fond of using to post links to their sites on yours. Akismet is the answer to combating comment and trackback spam; it kills spam dead. Created by the Automattic team, headed by Matt Mullenweg, Akismet is a “collaborative effort to make comment and trackback spam a non-issue and restore inno-cence to blogging, so you never have to worry about spam again,” according to Akismet.com.