•
•
•
•
•
•
Pro
iOS Continuous
Integration
Romain Pouclet
Implement continuous integration and delivery in your iOS projects
iOS C
on
tinuous In
tegra
For your convenience Apress has placed some of the front
matter material after the index. Please use the Bookmarks
Contents at a Glance
About the Author ...
xiii
About the Technical Reviewers ...
xv
Acknowledgments ...
xvii
Introduction ...
xix
Chapter 1: Introduction to Continuous Integration
■
...
1
Chapter 2: Continuous integration features in iOS and Xcode
■
...
5
Chapter 3: Using Xcode to Release an Application Outside the App Store
■
...
29
Chapter 4: Invoking the Power of the Command Line
■
...
41
Chapter 5: Automatic Builds with Jenkins
■
...
67
Chapter 6: Automated builds with Bamboo
■
...
93
Chapter 7: Over-The-Air distribution
■
...
117
Chapter 8: Day-to-day use of Xcode bots
■
...
141
Chapter 9: Adding Unit testing to the mix
■
...
161
Chapter 10: Quality assurance
■
...
183
xix
Introduction
There are as many definitions of Continuous integration as there is programming language out there, probably more. All of these opinionated definitions have been discussed all over the Internet: what it is, how it can help, which tools to use… Only a few of them are complete, exhaustive guides about where to start and where to go, let alone in the iOS ecosystem. In all fairness, the iOS platform is still relatively new.
Because you have to learn how to walk before you can run, this book will give you a tour of the iOS ecosystem from a developer point of view. If you’re interested in reading this book, you probably already have spent a few hours in front of Xcode, but do you know that it will make your life a lot easier with automated testing and versioning? Did you know that you could easily use multiple versions of Xcode? Even more importantly, do you know how it works under the hood? That’s the kind of thing this book will teach you.
Continuous integration is a matter of deciding of the best workflow and choosing the right tools. We didn’t want to sound as if you should take our opinion as a work of gospel, so we chose to give you all the knowledge you need before covering two different continuous integration platforms, Jenkins and Bamboo. We’ll show you how to get started as quickly as possible and how to take a sample application, build it, test it, and finally release it to your testers. Once we’ll have covered how these third party tools, we’ll cover the OS X Server and the Xcode, which are official tools provided by Apple. Far from being perfect, they provide enough neat advantages to give all those non-official alternatives a scare.
For all those solutions, we’ll show you how to integrate tools to run your automated tests and analyze your code, making sure you’re spending all this time to automate the workflow of an application that is well coded and works has expected.
Chapter
1
Introduction to Continuous
Integration
In the world of software engineering, the more time that passes the bigger your software usually becomes. It may be because your application is a huge, full-featured tool that does a lot of things or it may be simply because your code has become more and more complex. At this point, you have to start making decisions and choosing the tools you will use and the principles you will follow to make your life easier. The sole purpose of continuous integration is exactly that - making your life easier.
You may be reading this book because you’re an independent software engineer or leading a team of iOS developers. We will help you find the tools you need and teach you how to make them fit in your day-to-day workflow.
What is Continuous Integration?
Continuous integration is a software engineering principle with a very self-explanatory name. During the life cycle of a project, you will be continuously integrating small pieces of software into your project. Then, as the project grows, you’ll need to make sure these pieces actually fit the way they are supposed to. It may sound like a very metaphoric way of saying you will merge branches using your favorite version control system, but that’s actually what happens - no matter which tool you will be using or how often you will be integrating code.
Apple History 101
At the time of writing this book, Apple has just released the final version of Xcode 5.1. This 5.0 version was a pretty big release for Apple. It arrived at the same time that iOS 7 did, which was a whole new operating system with a completely new paradigm. What is even more interesting for us is that Apple finally stepped up in the world of continuous integration by starting to promote new tools. We will try to cover as many of these tools as we can in the following chapters.
Of course, the community of iOS developers didn’t wait for Apple to finally make a move, and the principle of continuous integration had been advocated for way before the first public release of the iOS SDK. In the case of Cruise Control, Jenkins, Apache Continuum, etc., it was mostly a matter of adapting existing tools to new technologies.
The first version of Xcode was released in 2003. More than ten years later, Apple has finally started giving us officially supported tools such as the Xcode Bots. Needless to say, we have come a long way!
Pros & Cons
The advantages of continuous integration are numerous. The most important is the immediate feedback you get when working on a part of your application. It may be because you broke your test suite or you did not follow your team’s coding conventions. It may even be simply because one of the generated reports told you that you were writing code that was too complex. In the end, that feedback results in considerable time saved and not spent - or even wasted - debugging.
Equally important is the peace of mind you and your team will get from being able to diagnose broken code, bugs, or poor quality code early.
Finally, integrating a new, significant, portion of code usually means deploying a new version of your application that a member of your QA team will need to test. When working as part of a team, there is always someone coming to your desk, asking you to install the latest version of the application you are working on on his device; don’t be that guy! Be the smart one who automated everything. Building, automated testing, code coverage… all these concepts are simply a shell command execution away; why not let them work for you? As Douglas McIlroy, a well-known UNIX contributor said, “What you do today can be automated tomorrow.” That could not be more true in the world of iOS development.
Making a build of your application available for the member of your team, your clients, or your boss to download, is complicated. For mobile, it’s actually a multi-step process requiring building, code-signing, and finally deploying.
While we will show in the next chapters that it is totally achievable to do this by yourself, some services were born with the purpose of easing that process. Testflight, Hockey, or even Cloudbees, to name a few are some of the numerous services out there filling the gap. Some are free, some come with a price, some are in the cloud, and some are self-hosted, but all of them share the same common goal.
“There is no single development, in either technology or management technique, which by itself promises even one order of magnitude [tenfold] improvement within a decade in productivity, in reliability, in simplicity.”
“No Silver Bullet — Essence and Accidents of Software Engineering” - Fred Brooks (1986)
Of course, all of this is not magic. Being able to receive immediate feedback, while a neat
advantage, comes at a cost. Setting up a continuous integration system takes time. This time is not lost - don’t get us wrong - but that’s something you have to take into account. You may not need a full-featured, continuous integration platform that builds your app every five minutes when you are working alone on a two-screen application. Sometimes, you have to be pragmatic.
Plus, your tools are only as good as the way you use them. You may not be able to take the feedback from your CI platform for granted if you set it up incorrectly.
The Road Ahead
Each chapter will try to cover a very specific part of the principle of continuous integration for iOS. Reading this book is kind of like taking a journey. You will start by learning how to build an iOS application and release it to your team using the simplest approach, and end with a fully set up continuous integration installation. Here is an overview of the chapters we will cover together.
Chapter 2 - Continuous Integration Tools and Features in iOS and Xcode - We will create a simple iOS application that we will use as an example for our continuous integration process, and use it as an example for the rest of the book. In this chapter, we’ll see what tools Xcode provides to help you in your day-to-day workflow.
Chapter 3 - Using Xcode to Release an Application Outside the App Store - With the application created in Chapter 2, we will see how we can create a build that you will be able to send to your testers. This will be the simplest approach of all, but you have to start somewhere, right?
Chapter 4 - Invoking the Power of the Command Line - Pressing a bunch of buttons is one thing, but knowing what they mean is another. In this chapter, you will learn how to leverage the power of the command line and what Xcode actually means by “build,” among other things.
Chapter 5 - Automating Builds with Jenkins - Jenkins is probably the de-facto solution for
continuous integration. You will learn how to get it started and how it can build your iOS applications.
Chapter 6 - Automating Builds with Bamboo - Atlassian is an Australian enterprise software company that develops products for software developers and project managers. One of their products is a commercial alternative to Jenkins. You will learn how to get it started and how you can use it to build your iOS applications.
Chapter 7 - Over The Air (OTA) Distribution - Continuous shipping is a bit different than continuous integration and usually the final step of a successful build process. You will learn how you can make your life and the life of your testers easier by sending them new builds of your application as soon as they are available.
Chapter 9 - Adding Unit Testing to the mix - Whether you’ve decided to go for the free solution that is Jenkins, the enterprise one that is Bamboo, or a totally different solution we haven’t
included, you will learn how to automate the execution of your unit and functional testing as part of your build process.
Chapter 10 - Quality Assurance - As the cherry on top, we will show you which tool can be used to maintain high-quality code.
During this journey, don’t hesitate to jump directly to a chapter. You may after all want to learn how to use Jenkins, but don’t care about how Bamboo works, and that would be totally fine with us!
Sample Application: Github Jobs
This book’s goal is not to teach you how to create iPhone or iPad applications using Objective-C and Xcode. To get the most out of this book, make sure you’re comfortable with Objective-C and Xcode first.
As an example, we will create an iOS application communicating with Github jobs’ API. This application will be a very simple master/detail application. Coding the application won’t take long, but be prepared to spend a lot of time configuring your project.
Prerequisites
Make sure you have Xcode 5.1 installed, as all screenshots in this book will use this version specifically. You wouldn’t want to get lost because of an outdated Xcode, would you?
Without any further ado, let’s dive in!
Summary
Chapter
2
Continuous integration features
in iOS and Xcode
Continuous integration is a matter of choosing the right tools, and the iOS community didn’t wait for Apple before setting up their environments. How could they have? It has been known that Apple works in secret and releases all their new tools once a year, usually at WWDC. First, let’s have a look at the things that have always been around, in Xcode specifically or in the community abroad.
If Xcode 5 came with a couple of shiny new tools for continuous integration, like the Xcode bots we will talk about later in this book, the previous versions already came with useful integrations to help you get some work done. Even if alternatives are getting more and more popular nowadays (for example, AppCode), and even if there are still people using their favorite text editor and a terminal to build the app, Xcode remains the de-facto IDE.
Of course it has its flaws, like the famous website “Text from Xcode,” available at textfromxcode.com, has funnily shown in the past few years. No software is perfect, and we as developers tend to take everything for granted, but Xcode actually handles a lot for you. Let’s see what it can do and how it will help us in setting up our continuous integration environment.
In this book we will be spending a lot of time in Xcode. As it wouldn’t make sense to give you random screenshots to adapt to your existing application yourself, we will create a very simple application using the GitHub Jobs API.
Sample application: Github jobs
GitHub is a hosting service, available at github.com, for software development projects that uses the Git revision control system. It comes with free, paying, and enterprise plans and is very well known in the community. Among other services, it comes with a dedicated job offers section for both job hunters and companies. If you want to know more about this service, visit https://jobs.github.com.
As we said earlier, this book does not does aim at teaching you how to code in Objective-C. Chances are you know enough of it if you’re reading this book. That’s why we are keeping the application very simple: it will call the GitHub API, retrieve a bunch of job offers, and display them in a list using a UITableView. Nothing fancy.
Creating the Application
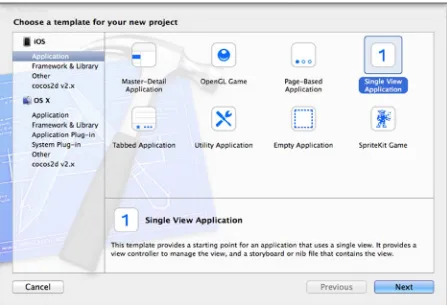
Start by setting up a new iOS project using Apple’s template. Open Xcode and hit the “Create a new Xcode project” button or, with Xcode open, choose “New Project . . .” from the “File” menu. Make sure the iOS application templates are selected from the sidebar and choose “Single view application,” as seen in Figure 2-1.
Using “Github Jobs” as the product name, “com.perfectly-cooked” as the company identifier and “PCS” as the class prefix. It’s the one we’ll use and it will make it easier for you to understand the screenshots. The other options don’t matter much, just make sure to check the “Create Git repository on . . .” and select “My Mac” for now. Xcode allows you to use OS X server to host your code, among other things, but we will talk about that later.
What Xcode Gives Us
We are using a standard template given by Xcode. It comes with a simple Storyboard file, an application delegate, and a UIViewController subclass. Let’s take a look at the things we can use in our day-to-day workflow and how they’ll fit in our continuous integration process.
Application’s Info file
Every application comes with an Info file written in the property list format, you will find it under the name “MyApplicationInfo.plist” or in our case, “Github Jobs-Info.plist.” When you open that file, you will basically find all the public information about the application, among other things: The name of the application and the product identifier you set earlier when you created the project.
Note About property list format: Property list files are files that store serialized objects using the filename extension “.plist,” and thus are often referred to as Plist files. Because there are all the APIs you need in the iOS and OSX SDKs, property list files usually are the de-facto file format to store information about an application and other various settings and data.
First, open the file from your favorite text editor either by going manually to the directory where you created the application and navigating to the “Github Jobs” directory that corresponds to your application’s main target (the other one is the testing target, more on that later) or by right-clicking on the file in Xcode file explorer and selecting “Open with external editor.” The first lines should look like something similar to the following:
<?xml version="1.0" encoding="UTF-8"?>
<!DOCTYPE plist PUBLIC "-//Apple//DTD PLIST 1.0//EN" "http://www.apple.com/DTDs/PropertyList-1.0.dtd"> <plist version="1.0">
<dict>
<key>CFBundleDevelopmentRegion</key> <string>en</string>
<key>CFBundleDisplayName</key> <string>${PRODUCT_NAME}</string> <key>CFBundleExecutable</key> <string>${EXECUTABLE_NAME}</string> <key>CFBundleIdentifier</key>
This is not really human friendly, to say the least. Don’t worry though: Xcode doesn’t expect you to edit this file manually. In fact, Xcode comes with a property list editor that will make it easier to view this file. It also turns the keys into comprehensible sentences. This way, “LSRequiresIPhoneOS” turns into “Application requires the iPhone environment.”
Note that you can still view the name of the keys underneath. This can be helpful for debugging or simply because tutorials on the Internet often refers to these raw keys. From the editor, right-click on and select “Show Raw Keys/Values.”
What interests us most are the two versions properties, by default, their values should be 1.0. The first one, the “Bundle versions string, short” a.k.a. CFBundleShortVersionString is the main version of the application. If you have already shipped an application on the app store, you’ve probably already changed its value. The second one, “Bundle version” a.k.a. CFBundleVersion, is the full version number and doesn’t have to be human-readable. Most people tend to keep both in sync, but that would be a waste of configuration in our case, as the long version will be proven useful in the future.
Later in the book we will start talking about automated builds. These builds always come with an incrementing number and this is when the CFBundleVersion key comes in handy. According to Apple documentation, the CFBundleVersion specifies a version of the application, released or not, which fits perfectly. Every time our application is built, we will use the build’s number to change the CFBundleVersion. To keep things clear, it is important to have coherence between those two versions.
This Info property list file contains information about the application that is made available from the NSBundle class. Its content is not limited to the keys available now, there are in fact a lot of other keys that will be added if, for example, you want your application to be opened when a certain URL scheme is called from a webpage. Xcode manages most of these keys for you, so you don’t need to know them all.
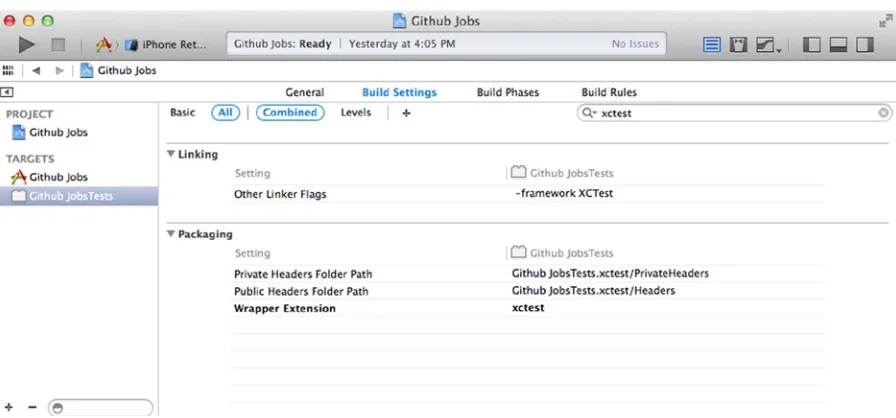
Tests
An Xcode project comes with a testing target, a test class, and your very first test case. This last one is a failing one, as it basically just calls XCTFail, a C macro used to force-fail a case. Still, that’s something.
Everything has been configured so you can get to work right away and start writing tests at the beginning of your project. That’s something you’ll be very happy about when your project becomes big and complex.
When we started writing the book, we talked a bit about how Apple took its time before actually giving you tools for continuous integration. That’s not entirely true. Since Xcode 2.1, Xcode came with a version of the testing tools SenTestingKit and OCUnit, which wasn’t an official Apple-labelled tool back then, but a framework created by a company called “Sen:te” (http://sente.ch).
In the 5.1.1 release, OCUnit and the SenTestingKit framework were marked as deprecated and will be removed from a future release of Xcode. In fact, source code using OCUnit now generates warnings at compilation time.
For starters, Xcode 5 comes with a test navigator available in your sidebar or by pressing “ + 5.” This navigator allows you to see the recently run test cases and to re-run them by pressing a single button, making every refactoring a breeze. That’s not all there is. Xcode 5 comes with new assistant editors that will help you unit-test your code. The assistants, called “Test Callers” and “Test Classes,” provide access to unit tests related to the current source code in the primary editor. In our example shown in Figure 2-3, we have created a fake PCSGithubJob class (on the left) with a method whose purpose is to analyze a job offer and tell you if it will make you happy. The “Test Callers” editor (on the right) automatically jumped to the related testing method.
Last but not least, the xcodebuild command line tool now supports the test action for iOS projects. Before this release it was not possible directly to run your unit-tests from the command line. We will cover more about the command line equivalent of these tools in Chapter 3.
Back in Xcode 4, when you created an iOS or OSX application, you had to check an option to add a testing target to your project and now this is the default behavior. This is a nice touch from Apple since the community of the iOS developers has always had this image of one that mostly focuses on the design and the user experience. It shows a clear will of helping the iOS developers to become more professional and start using the proper tools.
Finally, the new testing framework was actually announced at the same time as the “Xcode Bots.” They are meant to help you embrace the concept of continuous integration and they fit perfectly with XCTest. Make sure to read Chapter 8 to learn more about them!
A good test suite is key in a continuous integration environment. We talked earlier about how a good environment will provide you with maximum feedback. Automated testing is one of the tools for this purpose. Whether you are an independent iOS developer working alone or a developer wondering if you should integrate the feature your coworker has been working on, making sure all the tests are green first sure will help you in making a decision.
Git Integration
Integrating pieces of codes in your project as we said in the introduction usually means merging branches using your favorite version control system. A successfully continuous integration usually means a well-established workflow. When you are working on an application, there are a couple of things that will happen. Once the first version has been released, you will start working on new features, some of them will take time, and that’s why you will be working on separate branches of your repository. During this process, your users will probably send you bug reports and feedback about various glitches in the application. These will have to be fixed as soon as possible and be
shipped as new minor versions of your application. Once again, because you don’t want to mess with the application, you will work on separate branches just as you work on new features.
The main thing to keep in mind is that at any and every time you work you will want feedback about the tasks you are working on. You will want to know if you are currently breaking something while implementing your new feature, or if the bug that has been reported to you is being fixed. Plus, your QA team, your boss, or even your client may want that feedback as well, and probably a fresh build of your application. Because, “I’m sorry, I broke the app for now, please call me back in an hour or two” is not an acceptable answer, you will have to keep everything separated.
The good news is that branches are cheap in Git. You can create as much as you want without any trouble for you or your coworkers. The great news is Xcode comes with Git support right out of the box, as you may have noticed when you created the Github Jobs project or by looking at the big “Source Control” menu in Xcode.
Back in the old days, Xcode only supported Subversion and CVS. While the first one still exists, even if it’s grown a bit out of date due to the arrival of Decentralized Version Control System (DVCS), such as Git and Mercurial, the second one was clearly a legacy from the sad old days of versioning control.
Git is a really popular Version Control Systems that works in a decentralized way. Meaning the opposite way of how SVN works, every single working copy of a project can be used as a remote and even better, can work independently.
To show you how useful it is to have Git deeply integrated in your Xcode project, let’s break it. That’s right, let’s create a very simple conflict and see what happens. In the world of Version Control Systems, conflicts are what happen when merging two versions of a file is not possible. If you changed the same part of the same file differently in the two branches you’re merging together, it won’t be able to merge them and a manual intervention will be required.
In Xcode, from the Source Control menu, select “Github Jobs – master” and then, select “New Branch . . . ”. In the field that appears, fill the branch name field with “saying-hi” and press “Create.” At the end of this process, you will be working on a dedicated branch for your “Saying Hi” feature. This means that your application will evolve while a stable version, the master branch, is still available somewhere.
Now, open the “AppDelegate.m” file and add a simple NSLog instruction that greets the user when the application finishes launching:
NSLog(@"Hi, I'm a sample application for a book.");
return YES; }
With this greeting implemented, open the Source control menu and select “Commit . . .”. In the form that appears, enter a simple commit message such as “Saying hi when the application starts” and press the “Commit 1 File” button. You’ve now made your very first commit in this feature branch.
To create a conflict, a file must have been modified at a similar place in the file in a different branch, so we need to go back to the master branch and create a commit similar to the one we’ve just made.
From the Source Control menu, select “Github Jobs – saying-hi” and then “Switch to Branch . . .”. In the list that appears, select the master branch and press “Switch.” We are now back to the master branch, and the NSLog instruction we’ve added is no longer here.
Let’s repeat the process with a slightly different greeting message while still on the master branch. We chose to go with “Hi, I’m a book created for a sample application,” which indeed doesn’t make much sense. Commit your modification like we did before. We now have 2 branches, both with a slightly different greeting instruction at the same position in the same file.
Finally, from the Source Control menu, select “Github Jobs – master” and then “Merge from Branch . . .”. In the list that appears, select “saying-hi” and press “Merge”: a window similar to the one shown in Figure 2-4 will appear. Select the third button in the menu at the bottom of the screen to integrate the modifications on the right and press the “Merge.”
Figure 2-4. Xcode has detected a conflict and will help you to fix it
That’s the kind of thing Xcode will understand. When that happens and some of your files become disfigured with weird characters all over the place, building your application could simply throw you some random syntax error and let you find out why your build is failing. Xcode is much more clever than that. Indeed, you won’t even be able to build your application unless the conflict is marked as resolved manually using your shell or your favorite Git client, or directly in Xcode, as shown in Figure 2-5.
Figure 2-5. Xcode has detected a conflicted file and marked it as such in the sidebar and the primary editor
To fix this conflict and mark it as resolved, edit the “AppDelegate.m” file until it looks good to you. In our case, that would be keeping only one “application:didFinishLaunchingWithOptions:” method and choosing the second message. You must remove all the conflict markers, which are the lines with the multiple chevrons and equal signs, for your application to build again. After all, in this context, they are nothing more than syntax errors. Once this is done, simply right-click on the conflicted file and select “Mark Selected File as Resolved” in the “Source Control” menu item.
Versioning control in Xcode is not all sparkles and rainbows. There are edge cases that come with Apple using file formats such as the one for the “xcodeproj” file or even “xib” and “storyboards.” In Xcode 5, Apple came with a much simpler file format for those Interface Builder files, making merge operations and conflict resolutions a lot easier. From NIB to bloated XIB, to almost-readable, ten-times shorter XIB, Apple is indeed working at easing this process. Once again, we’ve come a long way, even if we are still waiting for a simpler file format for those “xcodeproj,” which still uses an old-style brace based format to delimit the configuration hierarchy.
There are still a couple of downsides to this integration directly in the IDE. For starters, it is pretty limited. You’ll only be able to do the basic Git operations and will probably end up using your shell or a dedicated Git client. Also, Xcode ships its own version of Git. At the time of writing this book, the current stable version of Git is the 2.0.1, as shown in a shell after running git --version:
$ git --version git version 1.9.1
This version can be easily installed using a package manager such as Homebrew or even compiled and installed manually, if you have some spare time on your hands. However, if you open a terminal and run a simple command, you should see that the version of Git used by Xcode is Apple’s own version, based on 1.8.5.2:
bash-3.2$ $(xcode-select -print-path)/usr/bin/git --version git version 1.8.5.2 (Apple Git-48)
In most cases, it won’t cause any trouble, but incompatibilities between Xcode’s Git version and the one you’re using may arise. This was the case when Xcode 4 was the current version and the latest Git was a couple of versions ahead of the one that was shipped with it.
Note About xcode-select: xcode-select is one of those very useful tools shipped with a bunch of others provided by Apple’s official command line tools and is very helpful if you are playing with multiple installations of Xcode, during betas for example. We’ll talk about this more in Chapter 4.
CocoaPods
Someone once said, “with great projects come huge dependencies” and managing dependencies with external libraries in an iOS project has pretty much always been a pain. This is a pain you don’t need in your iOS project, but Apple doesn’t seem to be willing to provide an official tool besides workspaces, subprojects, and manually managing the search paths of your dependencies. This was before CocoaPods.
CocoaPods is a dependency manager written in Ruby, unsurprisingly inspired from RubyGems
(https://rubygems.org/). If you don’t know about it but have been writing Ruby in the past, its
syntax used in the PodFile, in which you’ll declare all your dependencies, is really easy to understand and should not give you too much of a hard time.
The use of CocoaPods really is up for debate in the iOS and Mac community. Whether you hate it or love it, in this book we definitely stand with the people who love it. In the process of continuously integrating pieces of code, letting a well-designed tool handling the management of your dependencies makes something less to worry about and gives you more time to focus on other things.
Once again, there is no silver bullet. As it is written on the website, “CocoaPods is not ready for prime-time yet.” At the time of writing this book, 0.33.1 is the latest version. It’s far from being perfect but it’s a lot better than no tools at all. We will be using CocoaPods in the sample application.
Speaking of which, let’s code.
Coding the Sample Application
Open the “Github Jobs” project we created earlier in Xcode, select the only view controller header class present in the file explorer, and make it an UITableViewController instead of a simple UIViewController. Go to the associated implementation file, declare a “jobs” property of type NSArray, and implement the required methods from UITableViewDataSource: “tableView:numb erOfRowsInSection:” and “tableView:cellForRowAtIndexPath:.” At the end of this process, your implementation file should look like this:
UITableViewCell *cell = [tableView dequeueReusableCellWithIdentifier:@"Cell" forIndexPath:indexPath];
return cell; }
@end
“iOS jobs.” In the TableViewController, select the first prototype cell and give it the “Cell” reuse identifier to avoid getting an exception on run later on. That’s pretty much all there will be in this application. We are trying to keep it very simple.
The Github Jobs API is very simple, all you need is calling a specific URL to retrieve a
JSON-encoded list of iOS job offers in New-York. Using the iOS 7.0 new NSURLSession API, go back to the implementation file of your view controller and fetch content from that famous URL in the viewWillAppear: method as follows:
- (void)viewWillAppear:(BOOL)animated { NSURL *url = [NSURL URLWithString:
@"https://jobs.github.com/positions.json?description=ios&location=NY"];
NSURLSessionDataTask *jobTask = [[NSURLSession sharedSession] dataTaskWithURL: url completionHandler:^(NSData *data, NSURLResponse *response, NSError *error) { dispatch_async(dispatch_get_main_queue(), ^{
if (error) {
self.jobs = [NSJSONSerialization JSONObjectWithData: data options: 0 error: &jsonError]; [self.tableView reloadData];
}); }];
[jobTask resume]; }
Note that we wrapped the whole content of the completion block using a function from Grand Central Dispatch (GCD) so all the UI job is performed on the main thread. Don’t forget to update the
tableView:cellForRowAtIndexPath: method to display the “title” property of a job.
- (UITableViewCell *)tableView:(UITableView *)tableView cellForRowAtIndexPath:(NSIndexPath *)indexPath {
UITableViewCell *cell = [tableView dequeueReusableCellWithIdentifier:@"Cell" forIndexPath:indexPath];
cell.textLabel.text = self.jobs[indexPath.row][@"title"];
return cell; }
book, selecting a cell with simply . . . will open Safari mobile. To do that, implement the delegate method that will be called when the user taps on a cell in the “PCSViewController.m,” as follows:
- (void)tableView:(UITableView *)tableView didSelectRowAtIndexPath:(NSIndexPath *)indexPath { NSURL *jobUrl = [NSURL URLWithString: self.jobs[indexPath.row][@"url"]];
[[UIApplication sharedApplication] openURL: jobUrl]; }
The only missing part of this application is a way to show the user that work is being done and content is not available yet. We will use a very simple library called SVProgressHUD for this very purpose and we will install it using – that’s right, CocoaPods.
Close your Xcode project and open a terminal. Navigate to the location of your iOS project and install CocoaPods if you haven’t already, using RubyGems (see instructions below). Run the pod init
command to create an empty-ish Podfile and open it. Add SVProgressHUD as a dependency, as shown in Figure 2-6:
Figure 2-6. Using vim, we are adding the SVProgressHUD library as a dependency
Finally, run pod install and open the generated `Github Jobs.xcworkspace` instead of the previous `Github Jobs.xcodeproj`. This is why we asked to close Xcode.
Here is the whole process:
$ (sudo) gem install cocoapods $ cd path/to/Github\ Jobs $ pod init
$ vim Podfile // edit Podfile... $ pod install
Installing CocoaPods The installation of CocoaPods may, of course, vary in case you are using a Ruby version management system such as rbenv (http://rbenv.org) or RVM (https://rvm.io).
SVProgressHUD provides really easy methods to use to display messages. Let’s go back to the view controller and use these methods, before and after fetching the content from the Github Jobs API. Before calling the resume method of the NSURLSessionDataTask object that we created, import the SVProgressHUD .h file and call the following class method:
#import <SVProgressHUD/SVProgressHUD.h>
// ...
- (void)viewWillAppear:(BOOL)animated { NSURL *url = [NSURL URLWithString:
@"https://jobs.github.com/positions.json?description=ios&location=NY"]; NSURLSessionDataTask *jobTask = ...
[SVProgressHUD showWithStatus: @"Fetching jobs..."];
[jobTask resume]; }
The SVProgressHUD library comes with two different methods, “showWithStatus:” and
“showWithStatus:maskType.” We are using the second one so we can have a dark background. Otherwise we wouldn’t be able to properly see the HUD being animated.
Once the jobs have been fetched and the JSON has been properly decoded and turned into a list of jobs to display, we want to give the user a small indication that the process is over. To do that, add the following snippet at the end of the NSURLSession’s “dataTaskWithURL: completionHandler:” completion block, as follows. Calling showWithStatus: will show a temporary confirmation message, there is no need to dismiss it manually.
NSURLSessionDataTask *jobTask = [[NSURLSession sharedSession] dataTaskWithURL: url completionHandler:^(NSData *data, NSURLResponse *response, NSError *error) { // ...
[SVProgressHUD showSuccessWithStatus: [NSString stringWithFormat: @"%lu jobs fetched", (unsigned long)[self.jobs count]]];
}];
Installing dependencies using CocoaPods creates two things in addition to the generated PodFile: a Podfile.lock managing the state of the dependencies in the project and a Pods folder containing the actual dependencies. It’s really a hot debate in the community, but automation has been created for a reason and we strongly suggest you ignore this folder by adding “Pods” to your “.gitignore” file: create a .gitignore file at the root of the directory where you created your project, and add “Pods.” This folder will be ignored and Git will not try to commit it when your dependencies change, for example because you’ve switched to a more recent version.
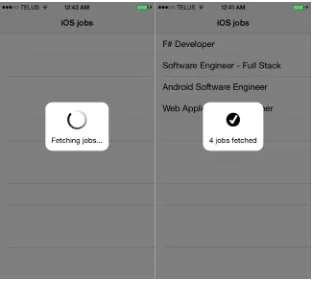
Figure 2-7. Fetching the jobs shows a spinning animation and getting the results shows a confirmation message
About “.gitignore” files A gitignore file specifies a pattern of files that Git should ignore. If you don’t have one already, which is totally possible considering Xcode doesn’t generate one automatically, grab the one available on GitHub: https://github.com/github/gitignore/blob/master/Global/Xcode.gitignore.
Why Have We Done All This?
Getting Ready to Release the Application
During the lifecycle of a project, there will be multiple versions of the application. First, there will be the one you are developing on your computer that will run in your iOS simulator or on one of your testing devices. Then, there will be one that will be used by your QA team that will review the latest features you’ve implemented and the bug you’ve fixed. Once this is done, there will be a version of your application that you will send to your client. This is the final step before pushing the application on the official App Store. Finally, there will be the production-ready application, once the client is satisfied with the version that you have sent. All of these versions will have specificities. For example, you may not be showing the same level of information when an error occurs in the application. Also, you won’t probably have your application crash because of a failing assertion in your code. This multiple-configuration is easily achievable thanks to Xcode.
Of course, this is not the way it has to work; you may be an independent iOS developer and/or may not have a QA team at your disposal. We will make it easier for everybody and only have three levels of configuration:
Debug: the level of configuration you will use when you are working on the
application. It may crash from time to time when you are misusing some code and display a lot of information when errors occur. Debugging tools such as the awesome Reveal (http://revealapp.com) or libraries relaying on private APIs may be linked with your application in this configuration.
Adhoc: this is the configuration used by the version you will send to your QA
team and/or your client. The debug and development tools are gone and the error messages are much more user-friendly. It may be linked with a crash log reporter to ease the back and forth with your client, for example.
Release: this will be the configuration used by your application when it goes live
on the store.
Because we want a third one called “AdHoc,” click on the plus sign right beneath the configuration list and select “Duplicate Debug configuration” as it’s much easier to remove the things we don’t want from the Debug configuration than putting back in one we need to the Release configuration. In the first cell of the row that just appeared, fill in “AdHoc.” We now have three levels of configuration.
You may wonder why we chose “AdHoc” as a configuration name. “Ad Hoc” comes from Latin and means “for this.” It is a popular convention given by Apple. In fact, when you go in the iOS developer center to create a distribution certificate, you can choose to create an “Ad Hoc” provisioning profile so you can deploy your application without using the App Store. We will talk a lot more about Ad Hoc provisioning profiles and over the air distribution in Chapter 7.
We now have our three configuration levels. Let’s see how it will help us in our continuous integration process. Go to the build settings tab in your project configuration. You will see a lot of settings you don’t want to play with, mostly because some of them look like gibberish and honestly, Apple did a good job setting up these proper default values. Let’s take a look at a couple of them. You can easily jump to a specific setting by using the search field at the top of the interface and compare the different settings depending on the configuration, for example the “Build Active Architecture Only” one.
When you work on your application, you want the build to be as fast as possible. That’s why you don’t want to build for all the valid architectures. With the current active devices out there, from iPad 3 to iPhone 5S, you end up having to build for three different architectures: armv7, armv7s, and arm64, which makes the build slower.
If you take a look at the “Build active architecture only” you will see that this option is set to YES for the Debug configuration and set to NO for the Adhoc and Release builds. It is very important to keep the build as fast as possible, that’s why there are other settings, such as “Validate Product” that are
tool every once in a while, you don’t care if the build is slower and actually want the extra feedback provided by these settings.
For the AdHoc configuration, select NO for this build setting, as shown in Figure 2-9. We want the extra feedback provided by the Debug configuration but we actually need the three architectures since we don’t know which devices the application will be installed on. We will talk a little bit more about these architectures in chapter 4.
Figure 2-9. A project comes with multiple levels of configuration for settings that can be inherited or overridden
It is this way for a very simple reason: static analysis of code is slow. It is even slower when you want to have a more in depth analysis instead of a shallower one. Let’s activate it for the AdHoc configuration as shown in Figure 2-11.
Figure 2-11. Static code analysis is now enabled for build using the Adhoc configuration
Of course, we are not telling you to avoid quality assurance at all in your projects. In fact, Chapter 10 will be dedicated to that subject.
Custom Build Settings
Having multiple configurations for your application does not only allow you to play with the build settings that came with the project. In a real application you may want to interact with different web services, such as YouTube, Twitter, or even a custom backend. Of course, you don’t want to pollute the live application and with the example of Twitter, post a lot of testing tweets on a real account. In your different configurations, you will want different endpoints for your web services and different security tokens.
In our case, we will assume we have the source of the application and run multiple instances: a local one on our computer, a staging one for testing and review purposes, and a live one, located at
http://jobs.github.com.
There is a very simple way of switching between developing tokens and web services endpoints. One of the settings provided by the compiler and easily editable from Xcode are preprocessor macros, which are evaluated at compile time, once and for all. This setting is named
In your code, it’s pretty easy to use this information using preprocessor conditionals. These conditions will be evaluated during compilation and portions of code will actually be compiled and some of them will be ignored. You can use this simple trick to handle a debug environment and a production one. For example, in our code:
- (void)viewWillAppear:(BOOL)animated { #if DEBUG
NSURL *url = [NSURL URLWithString:
@"https://127.0.0.1:9000/positions.json?description=ios&location=NY"]; #else
NSURL *url = [NSURL URLWithString:
@"https://jobs.github.com/positions.json?description=ios&location=NY"]; #endif
}
While this solution works despite the fact it will only handle two configurations, it has a couple of cons. The most important downside to this solution is the code getting more complicated. A few lines back we talked about three configurations, so we will need to add a new conditional block using #elseif.
Keeping your code clean has to be your main objective and with this approach, the code will get a lot less clear while you keep using this solution for tokens, endpoints, and images. What we really need is a way to link a URL endpoint to a configuration, and that is easily achievable with Xcode using custom build settings.
Open the “Editor” menu, then from “Add Build Setting,” select “Add User-Defined Setting.” In the cell that will appear, fill in “GITHUB_JOBS_ENDPOINT” and press enter. We now have a new build setting, able to contain different values depending on the configuration, as shown in Figure 2-13.
Now that this setting is available to us, there are a couple of ways to access it within our code. The easiest one is to make it available in your application Info property list file and fetch it from there during runtime.
Open the `Github Jobs-Info.plist` and click on the plus sign that appears when you hover the “Information Property List” cell. In the row that appears, enter “GithubJobsEndpoint” as the new property’s key, as shown in Figure 2-14. Make sure “string” is selected in the type column and use “$(GITHUB_JOBS_ENDPOINT)” as the value: the value of this property will be automatically replaced by the content of the GITHUB_JOBS_ENDPOINT build setting, which may vary across our different configurations.
The content of this file is available as a property named infoDictionary of the NSBundle class. All we need to do is use it in our view controller, instead of the hardcoded endpoint.
NSString *endpoint = [[NSBundle bundleForClass: [self class]] infoDictionary] [@"GithubJobsEndpoint"];
NSURL *url = [NSURL URLWithString: [endpoint stringByAppendingString: @"?description=ios&location=NY"]];
Note that if you try to run the application, you will get an error since you don’t really have a server running on your computer and listening for requests on port 9000. In case you wanted to give it a try anyway, you can easily create an HTTP server on your computer, using ruby. To do that, create a folder called “Github Jobs Server.” Fetch the JSON response from the GitHub Jobs API and store into a positions.json file. Then from the command line, start your HTTP server using the following command:
$ ruby -run -e httpd -- --bind-address 0.0.0.0 --port 9000.
It’s okay to feel lost if you are not very comfortable with the command line; you haven’t read Chapter 4 yet! We are only talking about this local HTTP server for the most advanced of you.
Build Phases
There is one more feature that will help you called “build phases.” As the name would suggest, the build process is split into multiple subtasks. Select the Github Job top item at the top of Xcode’s file navigator, select the “Github Jobs” target and navigate to the Build Phases tab. As you can see in Figure 2-15, our project comes with several build phases already.
First, you will find “Compile source” (we are deliberately ignoring the Target Dependencies build phase), which turns all your implementation files into machine code. This is the most important part of the build process. Then, the frameworks and libraries you are using are linked into the generated binary, in the Link Binary With Libraries build phase. Finally, the “Copy Bundle resources” build phase copies your resources (images, sounds, etc.), into the final bundle.
These are the default phases when you create a project, but if you look at the build phases in the Github Jobs application, you will notice two other phases we haven’t talked about. These two phases were added to your project when you ran pod init and started using CocoaPods. Their goal is to make sure your project is up to date with its dependencies, meaning you did not forgot to run a pod install after you or your coworker added a dependency. The final one copies all CocoaPods-related assets into your project. That comes in handy when you use dependencies that come with images, sounds, or even if you decided to split your application into multiple modules, as CocoaPods can also handle XIB and Storyboard files.
More important than that, this shows you that it is possible to implement custom build phases with multiple purposes. To add a new build phase, select Editor ➤ Add Build Phase ➤ Add Run Script Build Phase. A new phase will appear at the bottom with a first text field so your can select your favorite shell – most of the time, sh or bash - and a text area to enter your script. This could do anything - from incrementing the build number, to the application main icon being printed with the name of the Git branch you are on. This will bring several advantages when we talk about quality assurance in Chapter 10.
Summary
We’ve shown you that Xcode comes will all the tools you need to set up a more than decent
continuous integration environment, from versioning system integration to testing tools. We are now ready to answer the question that comes after the build process: What should I do with my build?
29
Chapter
3
Using Xcode to Release
an Application Outside the
App Store
The question we need to ask ourselves now is, "What should I do with my application now?” In the previous chapter, we created a simple application that displayed a few iOS job offers around New York. This application is simple enough to be entirely explained and developed in one chapter, along with all the tools we have at our disposal, directly integrated into Xcode or not.
This sample application is far from being ready to be sent to the public. To be honest, one quick look to the application from the Apple review team would probably make them laugh before clicking the big red “reject” button. Assuming there is such a button and that it is red. That is why, at this point in the process, you will start needing feedback from your team. Let’s see how we can use Xcode to get that feedback.
What We Need
For our team to test the application and send us feedback, what we need is a build of the application installed on a testing device. If you are reading this book, you may have already released an
In chapter 2, we explained why you should always create multiple environments for your application. In our case, we have a simple application with Debug, Adhoc, and Release configurations. As we are releasing a first version of the application without using the App Store, we will be using the AdHoc configuration.
Getting Ready to Release the Application
The template we used came with default values about the application, like the version number, set to 1.0. The definition of 1.0 and what it means from a developer point of view could raise an interesting debate. For example, in the SCRUM methodology the definition of “complete” must be defined early on before actually starting to work on the project. In this context, it usually means defining a clear and concise list of requirements that a feature must adhere to for all the members of your team to call it “complete.” As a convention, the 1.0 version usually means the “good enough” version, the one that can be shared with the public. Let’s be honest here: we are far from the 1.0 version. We are actually closer to the “0.1” version, the one we are not ready to show to anyone.
Even if we are only aiming at the 1.0 version, an iOS application comes with two version numbers: the short version called the “marketing” one and the long version called the “build” one. In the Info. plist file, the two versions are called “Bundle versions” and the “Bundle version string, short”. Let’s set the short version number and the long version number to “0.1”. When we will create new internal builds, we will only bump the build version number. To change the versions of the application, open the “Github JobsInfo.plist” file and change the values, as shown in Figure 3-1.
We now have the 0.1 version of our application. It’s not pretty and it doesn’t do many things beside loading a simple JSON file and displaying the results in a table view. We mentioned earlier that reading this book would be like taking a journey. Well, we have the earliest version possible of our application and it’s a good time to start setting up the continuous integration of our project. Being able to build the application many times a day and sending a build to a selected bunch of users is all about collecting feedback. Let’s start with an important one that will help us understand why our application crashed, a.k.a. crash logs.
Collecting Feedback from Crash logs
There are multiple kinds of feedback you hope you will get once your build is out to your QA team, to your beta testers or to your client. There is the obvious one about glitches in the user experience and graphical decisions, and there is the other one about how your application crashed. Once collected and converted in a human readable format, a crash log or crash report, looks like this (it’s actually much longer than that but we’re only showing the interesting parts):
Incident Identifier: 9A230C6E-370E-413E-801C-D1182081BFDA Hardware Model: iPhone3,1
Process: Github Jobs [2001]
Path: /var/mobile/Applications/D4B64242-327D-486C-A2A6-ABBDB76F7B92/ Github Jobs.app/ Github Jobs
Identifier: com.perfectly-cooked.Github-Jobs Version: 1.0 (1.0.1)
This is an actual crash log coming from a different app, we’ve only replaced the name of the application with ours so we can describe it a bit without confusing anyone. The report shows a lot of information about the application itself (build and marketing versions, identifier...) with information about the device that runs the application. This makes it easy to determine if the application only crashes on a specific device, for example the not-so-new-anymore iPhone 5S that came with support for arm64 processors. It also shows, and that’s the more interesting part, which part of the code crashed. Here we are talking about a “EXC_BAD_ACCESS” in a piece of code that perform tasks with Core Data. This can mean many things but it is usually caused by calling a method on a pointer that is no longer valid.
Apple already provides the ability to collect crash logs from applications that are distributed throught the App Store but for applications that are not ready to be sent to the store, there are tools out there that will help you to achieve the same goal, such as “PLCrashReporter”, available at
http://plcrashreporter.org.
To make sure you will be able to use these reports and fix the crashes, there is one setting you need to check before building the application. Go back to the “Github Jobs” Xcode project, open the build settings of the main target and look for the “Debug Information Format” setting. Apple uses a standard debugging data format called DWARF, a medieval fantasy reference standing for “Debugging With Attributed Record Formats.” In this setting, make sure the “DWARF with dSYM File” is selected, it will generate a dSYM foder in the same folder that your application, as shown in Figure 3-2. This file is mandatory to understand potential crash logs.
Figure 3-2. The build folder contains the application and the dSYM file, among other things
To see an example, navigate to your ~/Library/Developer/Xcode/DerivedData/ folder where your temporary .app files are stored every time you build your application. Using your shell or right-clicking on the “Github Jobs.app” file in the Products groups of your Xcode project, select the “Reveal In Finder” option. You should see a dSYM file.
Creating the IPA file
We are now officially ready to build the very first version of our application and send it to our beta testers. To do that, all we need is to create an IPA file.
1. Unplug your devices and make sure you’ve selected “iOS device” in the menu that lets you select where to run the application.
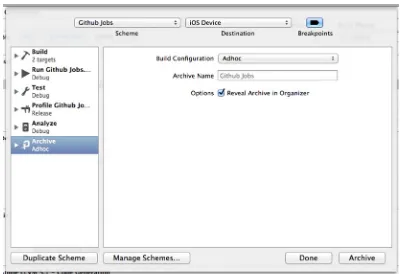
2. In the Product menu, instead of pressing “Archive” directly, hold the ALT key. The “Archive” menu will turn into “Archive...” and this will open a window allowing you to select the configuration to use for the build, like the one shown in the Figure 3-4.
3. Change the build configuration to “AdHoc” instead of release and press “Archive”. If you’ve checked the “Reveal Archive in Organizer” option, the organizer should appear with your archive selected.
4. The next steps are just as easy, and you probably already went through them when you released an application to the App Store. Press the “Distribute...” button, select “Save for Enterprise or Ad Hoc Deployment” and select the location where to save the IPA file. Congratulations, you are now ready to distribute the very first build of your application!
Let’s step back for a second and see what we have done. In Chapter 2 we created a very simple application that we are now getting ready to release. In this chapter, you’ve been through a boring process composed of many, many clicks only to end up with an IPA file on your desktop, probably. Well, stay with us for a couple more pages, because we are about to use the least convenient process ever invented to distribute an iOS application: iTunes!
Most people have some kind of a love/hate relationship with iTunes. From playing music and videos, to connecting to the app store and buying apps and albums as well as subscribing to podcasts, iTunes is this bloated OSX application that’s been around since the beginning of this millennium, which is starting to mean something. When the iPhone came out, while Apple could have come up with a dedicated iPhone synchronization application, it instead chose to integrate this process into its historic application.
Installing the Application on the Tester’s Device
Open iTunes and click on the “update later” button (there’s always an update of iTunes waiting for you). Then, open a finder window and navigate to the directory where you exported the IPA file: in our case, the desktop directory. Double click on the “Github jobs.ipa” file and wait for the magic to happen. iTunes should activate and display your application in the “Apps” section, as shown in Figure 3-5.
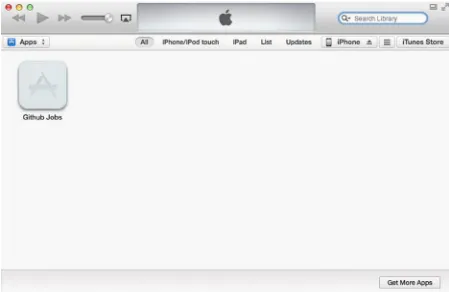
Figure 3-5. iTunes has added the Github Jobs app to your library
With this very simple operation, iTunes took the IPA file and copied it in its media folder. If you haven’t changed this folder, you should be able to retrieve your application in “~/Music/iTunes/iTunes Media/Mobile Applications”, one folder away from your music. Don’t delete the original IPA file: we will need it later.
That’s as easy as it gets. Once you’ve created a build of an iOS application, you can simply send it by mail to your testers and be done with it.
But... This is a Terrible Process!
You may be thinking this is a terrible process right now and it would be hard to argue with you. To be fair, we did warn you earlier.
This is exactly what we needed: more clicks! After a boring process only resulting in an IPA file generated on our desktop, we’ve added more steps involving another software and many clicks.
There is one more downside to this approach that comes with the complex code signing and provisioning profile process Xcode requires in order to build and ship applications. You can send the IPA to anyone but it has to be explicitly authorized in the application’s provisioning profile as we will show in Chapter 7 where we’ll talk about how provisioning profiles work. If you try to install an application for which you’re not authorized, iTunes will fail silently and you will end up with a disabled application on your home screen.
Installing the Application on the Tester's Device
It is actually possible to understand what is going on using the iPhone Configuration Utility
application available at http://support.apple.com/downloads/#iphone. This nifty little tool is exactly the kind of tool that Apple could have made, dedicated to managing iOS devices. If you are not familiar with this tool already, you really should become familiar. Go grab it and let’s try again.
Open the iPhone Configuration Utility and a new Finder window. Navigate back to where you stored the original IPA file – remember when we asked you not to delete it? This is why – select it and drop it to the Utility window. Just as it was in iTunes, the “Github Jobs” application is now available for you to be installed via the desktop.
With your iPhone still plugged in, select it in the left menu and navigate to the applications tab. You should see the “Githubs Jobs” API with an “Install” button. Press it and the application will be installed automatically to your phone.
This is a little better than using iTunes to install intermediate builds of your application. Indeed, where iTunes fails miserably when you try to install an unauthorized application, the iPhone configuration utility was created for a different audience: the power users and developer. If you click on your phone in the left sidebar and open the console app you will be able to get a much more detailed feedback of what’s happening in your phone. Digging into these provided logs information should get you to lines such as:
Mar 31 19:26:43 DEV-iPhone5S-iOS-7 lsd[75] <Warning>: LaunchServices: installation failed for app com.perfectly-cooked.Github-Jobs
Even if this tool is slightly better than iTunes, distributing builds through e-mail is not very convenient and would only work with power users. But that’s good news! Now that we have described the worst solution to distribute builds, from now on we can only get better. The next chapters will focus on how to build the application in a “smarter” way, for lack of a better term (but it’s really in Chapter 7 that the magic will happen). In Chapter 7, we will show you how to automate the process we’ve been covering in the past 10 pages.
Installing Multiple Versions of the Application
In case the installation worked, there is still a very important thing to take care of. When you create an iOS application using Xcode, the project creation wizard asks you for a bundle identifier. Unlike the Java world where you need a complex reverse-DNS based namespace to be one of the cool guys, the bundle identifier of an iOS app is important: it is a unique identifier that helps differentiate your application from other ones and you can’t have multiple applications sharing the same bundle ID.
In practice this is not a big deal, all the application does is use a reverse-DNS based bundle identifier, like in this case perfectly-cooked.com turning into “com.perfectly-cooked.GithubJobs”. On the other hand, when you start distributing and asking people to install beta versions of your application, it prevents people from having the stable application and the beta one at the same time.
Fortunately for you, we showed you in chapter 2 how to manage multiple environments for your application using configurations. The bundle identifier is just one more setting that you can customize, depending on the configuration.
Go back to Xcode and select the main property list file, “Github JobsInfo.plist” and look for the “Bundle identifier” key. If your own Xcode is configured to display the raw names of these keys, look for the “CFBundleIdentifier” key.
The current bundle identifier contains “com.perfectly-cooked.${PRODUCT_NAME:rfc1034identifier}” which, once the application is compiled, is evaluated and transformed to com.perfectly-cooked. githubs-jobs. This RFC parameter describes DNS and its use for host address support. In our case, the “:rfc1034identifier” right after the wrapping brackets we’ve seen in Chapter 2 is a filter that turns the Product Name of the application into a RFC1034-compliant identifier (no more spaces...) and because of that, we can easily change it only for the AdHoc configuration. We want the version we’ll send to our beta users to be codenamed “Github Jobs (beta)”. This way, people will be able to see that they are using the beta version. They will also be able to keep the stable version of the application because thanks to the “:rfc1034identifier”, the bundle identifier will be different.
Open the build settings application and look for the “Product Name” setting. Its default value should be “$(TARGET_NAME)” where TARGET_NAME is one of the many environment variables available. To change the bundle identifier, all we need to do is to change the product name of the Ad Hoc configuration, as shown in Figure 3-8.
Figure 3-8. The product name will change for the Ad Hoc configuration
Updating the PRODUCT_NAME build setting will change the bundle identifier depending on the configuration. Your testers will then be able to have multiple versions of your application installed on their devices.
Summary
In this chapter, we have shown you the tools available to distribute beta versions of your application. Whether they use iTunes or the iPhone Configuration Utility, this is actually a terribly constraining workflow, far from giving you any flexibility whatsoever. It requires a lot of clicks, multiple softs, and doesn’t handle potential errors very well.
41
Chapter
4
Invoking the Power of
the Command Line
Multiple user interfaces, even well-designed and obvious ones such as the ones provided by Xcode are not enough. Indeed, the previous chapter showed you what a tedious process it was to release an application outside of the app store using Xcode and iTunes or the iPhone Configuration Utility. A good interface doesn’t make everything right. In this chapter, we will go deeper and cover the tools on which most of these interfaces are based by calling them directly using the command line.
Command Line Interface?
The command line interface (often referred to as CLI) is a way for the user to interact with the computer at a lower level using text-based commands in syntax understandable by the computer. This syntax is a good compromise for both parts in terms of readability. A lot of developers are scared of it and some of them will spend their entire career without using a shell (the provided interface to execute commands) once. Why would they? Using Photoshop to design the application, Xcode to code it, while using a graphical client for the version control (if any) and the application loader to send a build to the app store, it’s completely doable to develop an application without opening the shell once. The thing is using the command line gives you access to power user features and will actually come in very handy when we set up our continuous integration environment.
One of the reasons developers are scared or simply not inclined to dig into their shell, is probably because of the way it looks the first time you open it on OSX. You get a black on white interface with no indication whatsoever of what you should do. We are not going to lie - the command line interface is puzzling and is mostly designed for the power user. The good news is it’s actually pretty easy to become comfortable with the command line. The hard part is to know which command to run, with which parameters and when, but that will only come with experience and time.
Let’s see how we can achieve what we did in the past chapter with creating a release build and using the command line.
Introducing Shenzhen
The iOS and OSX developers’ community is full of remarkable people who keep writing blog posts, and releasing libraries and tools that we’ll use in our project. Matt Thompson is one of these people. In addition to the NSHipster (available at http://nshipster.com) website where he writes about hidden gems and tips about the “overlooked bits in Objective-C and Cocoa”, he created Shenzhen, a command line tool for building IPA files. Shenzhen also handles distributing apps to third-party services such as Testflight and HockeyApp, but we won’t be talking about over the air (OTA) distribution until Chapter 7.