MindManager
®FOR
DUMmIES
‰MindManager
®FOR
MindManager
®FOR
DUMmIES
‰111 River Street Hoboken, NJ 07030-5774
Copyright © 2004 by Wiley Publishing, Inc., Indianapolis, Indiana Published by Wiley Publishing, Inc., Indianapolis, Indiana Published simultaneously in Canada
No part of this publication may be reproduced, stored in a retrieval system or transmitted in any form or by any means, electronic, mechanical, photocopying, recording, scanning or otherwise, except as permit-ted under Sections 107 or 108 of the 1976 Unipermit-ted States Copyright Act, without either the prior written permission of the Publisher, or authorization through payment of the appropriate per-copy fee to the Copyright Clearance Center, 222 Rosewood Drive, Danvers, MA 01923, (978) 750-8400, fax (978) 646-8600. Requests to the Publisher for permission should be addressed to the Legal Department, Wiley Publishing, Inc., 10475 Crosspoint Blvd., Indianapolis, IN 46256, (317) 572-3447, fax (317) 572-4447, e-mail: [email protected].
Trademarks: Wiley, the Wiley Publishing logo, For Dummies, the Dummies Man logo, A Reference for the Rest of Us!, The Dummies Way, Dummies Daily, The Fun and Easy Way, Dummies.com, and related trade dress are trademarks or registered trademarks of John Wiley & Sons, Inc. and/or its affiliates in the United States and other countries, and may not be used without written permission. All other trademarks are the property of their respective owners. Wiley Publishing, Inc., is not associated with any product or vendor mentioned in this book.
LIMIT OF LIABILITY/DISCLAIMER OF WARRANTY: THE PUBLISHER AND THE AUTHOR MAKE NO REP-RESENTATIONS OR WARRANTIES WITH RESPECT TO THE ACCURACY OR COMPLETENESS OF THE CONTENTS OF THIS WORK AND SPECIFICALLY DISCLAIM ALL WARRANTIES, INCLUDING WITHOUT LIMITATION WARRANTIES OF FITNESS FOR A PARTICULAR PURPOSE. NO WARRANTY MAY BE CRE-ATED OR EXTENDED BY SALES OR PROMOTIONAL MATERIALS. THE ADVICE AND STRATEGIES CON-TAINED HEREIN MAY NOT BE SUITABLE FOR EVERY SITUATION. THIS WORK IS SOLD WITH THE UNDERSTANDING THAT THE PUBLISHER IS NOT ENGAGED IN RENDERING LEGAL, ACCOUNTING, OR OTHER PROFESSIONAL SERVICES. IF PROFESSIONAL ASSISTANCE IS REQUIRED, THE SERVICES OF A COMPETENT PROFESSIONAL PERSON SHOULD BE SOUGHT. NEITHER THE PUBLISHER NOR THE AUTHOR SHALL BE LIABLE FOR DAMAGES ARISING HEREFROM. THE FACT THAT AN ORGANIZATION OR WEBSITE IS REFERRED TO IN THIS WORK AS A CITATION AND/OR A POTENTIAL SOURCE OF FUR-THER INFORMATION DOES NOT MEAN THAT THE AUTHOR OR THE PUBLISHER ENDORSES THE INFORMATION THE ORGANIZATION OR WEBSITE MAY PROVIDE OR RECOMMENDATIONS IT MAY MAKE. FURTHER, READERS SHOULD BE AWARE THAT INTERNET WEBSITES LISTED IN THIS WORK MAY HAVE CHANGED OR DISAPPEARED BETWEEN WHEN THIS WORK WAS WRITTEN AND WHEN IT IS READ.
For general information on our other products and services or to obtain technical support, please contact our Customer Care Department within the U.S. at 800-762-2974, outside the U.S. at 317-572-3993, or fax 317-572-4002.
Wiley also publishes its books in a variety of electronic formats. Some content that appears in print may not be available in electronic books.
Library of Congress Control Number: 2004101957 ISBN: 0-7645-5653-3
Manufactured in the United States of America 10 9 8 7 6 5 4 3 2 1
About the Authors
Hugh Cameron began his seemingly random career with a degree in clinical electrical engineering from Purdue University. In an attempt to satisfy his entre-preneurial urges, Hugh started Camtech, Inc., a clinical engineering company that soon extended its reach to incorporate a diverse group of projects — from impedance cardiography and patient data acquisition (in the healthcare world) to computerized evidence analysis workstations (for use in the law enforcement arena). After earning his MBA from Indiana Wesleyan University, Hugh took a consulting position with a Fortune 100 company where he orga-nized and set up the company’s national and international service groups. He also initiated and received a National Institutes of Health, Small Business Innovation Research grant.
Throughout his career, Hugh has played the role of instructor at every oppor-tunity. He is certified as a Myers-Briggs trainer, Law Enforcement instructor, and Project Management Professional (PMP). Hugh applied his project man-agement expertise and PMP certification to the role of technical editor on the recently published PMP Certification For Dummies. Currently, Hugh travels all over the world (well, to 40 countries, at least) to provide instruction in pro-ject management, leadership, systems integration, and requirements manage-ment to industry-leading companies such as BP, IBM, Hewlett-Packard, Abbott Laboratories, and Novartis.
Roger Voight, PhD, is a certified project manager with over 30 years of expe-rience in software architecture, design, development and software project management, as well as training and business consulting in each of these areas. His experience includes many diverse industries such as travel, public accounting, wholesale and retail merchandising, medical, legal, insurance, education, and government. He has provided project management training and consulting on a world-wide basis to many of the Fortune 100 corporations such as IBM, AT&T, Nortel, Motorola, Eli Lilly, and Hewlett-Packard. With his experience as both an executive level manager as well as a business consul-tant, he understands very well the time pressures on managers and the des-perate need for effective and pragmatic solutions to business problems.
He is a certified trainer for Microsoft Project and for Mindjet and has exten-sive experience customizing and integrating the Microsoft Office Suite for customer applications using VBA. He has developed numerous software-based tools which together facilitate the gathering of detailed and accurate user requirements and the development of reliable time and cost estimates in project management. Over the last 15 years he has developed many appli-cations, some of which won national awards, based on the Pick operating system family of application development tools.
Authors’ Acknowledgments
Hugh Cameron: I want to thank our Acquisitions Editor Steve Hayes, Project Editor Andrea Boucher, and the other special person at Wiley Publishing for their help in making this book a reality.
Thanks also go out to Hobie, Don, and the others at Mindjet. Their continued cooperation as MindManager Pro came to life is greatly appreciated.
Nick, the technical editor, is much more than his title infers. His expertise with MindManager is fantastic. He helped us over hurdles and kept us honest.
My co-author, Roger Voight, made this book possible. His focus on comple-tion and detail kept the book going. Thank you, Roger, for being a true friend.
Roger Voight: Many people have made it possible for me to contribute to this book. They certainly include all of those who have participated in my training classes over the years and have helped me to understand just how challenging it can be to learn to use a rich software package. Our project editor, Andrea Boucher, was unbelievably patient and helpful in getting me started in the right way and was always there with hints and help whenever asked. Dagmar Herzog provided early inspiration with her passion for MindManager and her writing about the software that was genuinely fun to read. My sisters read parts of some of the chapters, laughed at the right places, and encouraged me to press on. Nick Duffill of MindManuals contributed advice, help, and encour-agement, as well as much of the material for Appendix C, with a generosity that was awe-inspiring.
None of this could have happened without my very good friend and co-author, Hugh Cameron, who first introduced me to MindManager and then to the pos-sibilities of this book project. It has been a blast, good buddy, and I’m looking forward to whatever our next project might be.
Some of the people who helped bring this book to market include the following:
Acquisitions, Editorial, and Media Production
Development Project Coordinator: Courtney MacIntyre
Project Editor: Andrea C. Boucher Layout and Graphics: Joyce Haughey, Acquisitions Editor: Steve Hayes LeAndra Hosier, Michael Kruzil, Technical Editor: Nick Duffill Jacque Schneider, Julie Trippetti Editorial Manager: Carol Sheehan Proofreaders: Carl William Pierce
Media Development Manager: Laura Indexer: TECHBOOKS Production Services
VanWinkle Special Help
Media Development Supervisor: Richard Andrea Dahl Graves
Editorial Assistant: Amanda Foxworth Cartoons: Rich Tennant
(www.the5thwave.com)
Publishing and Editorial for Technology Dummies
Richard Swadley, Vice President and Executive Group Publisher Andy Cummings, Vice President and Publisher
Mary C. Corder, Editorial Director Publishing for Consumer Dummies
Diane Graves Steele, Vice President and Publisher Joyce Pepple, Acquisitions Director
Composition Services
Contents at a Glance
Introduction ...1
Part I: Discovering Visual Organization ...7
Chapter 1: Getting Organized — Visually ...9
Chapter 2: Making Your First Map ...19
Chapter 3: Exploring the Neighborhood ...37
Part II: The Path Takes You There ...53
Chapter 4: Icons and Colors ...55
Chapter 5: Images: Graphic Ideas ...69
Chapter 6: Grouping and Relating Topics ...81
Chapter 7: Getting Wordy ...89
Chapter 8: Catapulting Your Creativity ...99
Part III: Maps and Buried Treasure ...105
Chapter 9: Putting Plans in Place ...107
Chapter 10: Big Maps for Big Ideas or Projects ...119
Chapter 11: Adding Supplemental Information ...131
Chapter 12: Putting the World at Your Mouse Click ...141
Chapter 13: Finding and Filtering the Information You Need ...155
Chapter 14: Getting a Fast Start with Templates and Styles ...163
Chapter 15: Letting a Wonderful Wizard Guide You ...189
Chapter 16: Recombining the Building Blocks with Scripting ...211
Part IV: Maps through Webs and Windows ...221
Chapter 17: Mining and Managing Information ...223
Chapter 18: To the Host with It: Creating Web Pages ...237
Chapter 19: Presenting Your Maps with PowerPoint ...255
Chapter 20: Word Wonders ...269
Chapter 21: Out to Outlook ...279
Chapter 24: Ten (Or So) Shortcuts ...317
Chapter 25: Ten Useful Things You Won’t Need Every Day ...323
Part VI: Appendixes ...333
Appendix A: Differences in MindManager Editions ...335
Appendix B: Using Tablets and PDAs ...343
Appendix C: Useful Scripts...347
Table of Contents
Introduction ...1
About This Book ...2
How to Use This Book ...2
Who Are You? ...3
How This Book Is Organized ...3
Part I: Discovering Visual Organization ...3
Part II: The Path Takes You There ...4
Part III: Maps and Buried Treasure ...4
Part IV: Maps through Webs and Windows...5
Part V: The Part of Tens...5
Icons Used in This Book ...6
Feedback, Please ...6
Part I: Discovering Visual Organization ...7
Chapter 1: Getting Organized — Visually . . . .9
MindManager: An Organized Beginning ...10
Visual organization ...10
Recording your brainstorms ...11
Analyzing problems ...11
Taking meeting notes ...12
Setting up project tasks ...12
Chain Linking ...13
Linking map to map ...13
Linking to the URL world ...13
Linking to other programs ...13
Linking to documents ...14
Information Inclusion ...14
News feeds ...14
Searching ...14
Building on the Strengths of Other Programs ...15
Microsoft Outlook ...15
Microsoft Project or other MPX project tools ...16
Presenting MindManager Map Information to Others ...17
MindManager presentation mode ...17
Export to Microsoft Word ...17
Chapter 2: Making Your First Map . . . .19
Switching on MindManager ...19
Scoping Out the Workspace ...21
Finding your home on the pane ...21
Gliding through the menus ...22
Toolin’ around the toolbars ...23
Objects and Things ...26
Creating Your First Map ...27
Exploring on Your Own ...29
Setting up a document ...30
Adding topics ...31
Rearranging topics ...33
Adding text notes to a topic ...34
Managing your maps ...35
Chapter 3: Exploring the Neighborhood . . . .37
Moving In ...37
Making yourself at home ...38
Rearranging the furniture ...40
Getting it on paper ...48
Exporting ...50
The Plumbing and Heating ...50
Part II: The Path Takes You There ...53
Chapter 4: Icons and Colors . . . .55
Inserting Icons ...55
Icons in the Map Marker menu ...56
Switch to another Map Marker set ...59
Brains up ...60
Color Inside the Lines ...62
Color the Text and Give It a Name ...64
Topical Application of Color ...65
Chapter 5: Images: Graphic Ideas . . . .69
Opening the Door of the Library ...70
Installing Images into a Map ...72
Subliminal Background Images ...75
Searching Images by Keyword ...77
Table of Contents
xiii
Chapter 6: Grouping and Relating Topics . . . .81
Corralling Topics with Borders ...82
Pointing the Way to Other Topics ...84
Creating and adjusting a pointer ...84
Adding words to the pointer ...85
Making fancy pointers ...86
Chapter 7: Getting Wordy . . . .89
When the Topic Just Doesn’t Say It All ...90
Getting Off the Topic Path ...91
Transforming Topics into Paragraphs ...93
The Topic Notes toolbar ...93
Tables instead of tabs ...95
Tables your way ...96
A picture is worth a thousand words ...98
Chapter 8: Catapulting Your Creativity . . . .99
Filling the Idea Pipeline ...100
Organizing Your Ideas ...102
Part III: Maps and Buried Treasure ...105
Chapter 9: Putting Plans in Place . . . .107
The Task Info Pane ...108
Defining Map Markers ...110
Working with Assignments ...115
Chapter 10: Big Maps for Big Ideas or Projects . . . .119
Fixing Maps That Are Too Big for the Screen ...120
Using Map Overview ...120
Cheap indexing with bookmarks ...122
Breaking Up a Big Map ...124
A topic here, a topic there ...124
Breaking the branch ...126
Making the Most of the Multimap Workspace ...128
Entering the multimap workspace ...128
Working in the multimap workspace ...129
Chapter 11: Adding Supplemental Information . . . .131
Topics Floating in Space ...132
Informing with Callout Topics ...134
Becoming Legendary ...135
Chapter 12: Putting the World at Your Mouse Click . . . .141
Putting Pointers to Information on Your Map ...142
It’s on my map ...144
It’s on another map ...146
I want something besides a map ...150
Starting Other Things from Your Map ...151
Keeping Your Links Fit and Healthy ...153
Chapter 13: Finding and Filtering the Information You Need . . . .155
Selecting Topics to be Filtered ...156
Understanding selection criteria ...156
Filtering the Selected Topics ...159
Getting the Most Out of Filtering ...160
Chapter 14: Getting a Fast Start with Templates and Styles . . . .163
Making It Look the Way You Want ...164
Fonts ...164
Shape and color ...165
I want my own shape! ...166
Layout ...168
Reusing Styles ...174
Changing styles in your current map ...174
Making a place for my stuff ...176
Creating a style sheet master ...178
Using style sheet masters ...180
Managing your style library ...180
Subject Templates ...182
Once organized, keep going ...182
Using and changing the default template ...185
Creating flexibility using map parts ...186
Chapter 15: Letting a Wonderful Wizard Guide You . . . .189
Creating a Wizard ...190
Adding multiple subtopics to an anchor topic ...193
Adding repeating variable subtopics ...195
Adding fixed subtopics from a list ...196
Changing a Wizard ...197
Using a Wizard ...198
Adding Pizzazz with Smart Map Parts ...203
File Explorer SMPs ...204
Outlook Linker SMPs ...206
Chapter 16: Recombining the Building Blocks with Scripting . . . .211
What on Earth is an “Object”? ...212
Table of Contents
xv
Part IV: Maps through Webs and Windows ...221
Chapter 17: Mining and Managing Information . . . .223
Packaging Everything Together ...224
Sending It Off ...227
Knowledge Management Themes ...228
Finding the needle in the haystack ...229
Archive reference ...230
Mail management ...232
Lessons learned ...233
Knowledge structuring ...234
Chapter 18: To the Host with It: Creating Web Pages . . . .237
Going from Map to Web Page in Seconds ...238
Making Template Choices and Taking Credit for Great Web Pages ...241
Dishing Up a Web Template ...244
Creating a presentation style Web page ...244
Creating a one page Web page with the One Page template ...246
Using the Tag Team of Multimap Workspace and Dynamic Outline ...248
Performing Web Page Template Surgery ...251
Chapter 19: Presenting Your Maps with PowerPoint . . . .255
Introducing Your Map to PowerPoint Transformation ...256
Creating a Presentation Using the Default Settings ...257
Sending your map to PowerPoint ...257
Reviewing your presentation ...258
Adjusting the Global and Topic Settings in Your Presentation ...259
Going to PowerPoint to View the Templates ...261
Setting the Topic Defaults in PowerPoint ...262
Choosing a Slide Layout in PowerPoint ...263
Engaging with PowerPoint ...264
Chapter 20: Word Wonders . . . .269
Getting Ready for the Export to Word ...270
Exporting Your Map to Word ...274
Importing Your Word Document to a Map ...276
Chapter 21: Out to Outlook . . . .279
Getting a New Outlook on Life with Tasks ...280
Combining Topics with Tasks on Your MindManager Map ...281
Getting, Sending, and Synching Task Data ...283
Getting Outlook tasks into MindManager ...284
Sending MindManager tasks to Outlook ...288
Synching MindManager and Outlook ...290
Chapter 22: Linking with Microsoft Project . . . .297
Sending Your Map to Microsoft Project ...298
Bringing Your Project Back to MindManager ...302
Importing and Exporting Maps with Microsoft Project Exchange, er MPX ...304
Setting your MPX preferences ...305
Exporting to an MPX file ...306
Importing from an MPX file ...306
Part V: The Part of Tens ...309
Chapter 23: Ten Helpful Add-Ins and User Groups . . . .311
Add-Ins ...311
MindManuals.com, Ltd (Coventry, United Kingdom) ...311
Gyronix (Kent, United Kingdom) ...312
I and A Research (Saint Sauveur, QC, Canada) ...313
Mindsystems/Teamlink (Mt. Eliza, Victoria, Australia) ...315
User Groups ...315
Yahoo MindManager user group ...315
MindManager User to User Forum ...316
Chapter 24: Ten (Or So) Shortcuts . . . .317
Keyboard Shortcuts: Fast, Fun, and Fastidious ...317
MindManager map documents ...318
MindManager screen management ...318
MindManager objects ...319
Editing the MindManager map ...320
Formatting the text ...320
Strategic Shortcuts ...321
Opening and closing files en masse ...321
Naming images ...321
Scripting is the shortcut shortcut ...322
Chapter 25: Ten Useful Things You Won’t Need Every Day . . . .323
Searching for a Map ...323
Select Special ...325
Autocorrect ...326
Number Topics ...326
Sort Topics ...327
Creating Custom Buttons ...328
News Service ...330
Google Searching ...330
Protecting Your Document ...331
Table of Contents
xvii
Part VI: Appendixes ...333
Appendix A: Differences in MindManager Editions . . . .335
Changes from MindManager 2002 ...335
Terminology ...335
Branches to objects ...336
Dropped commands (with replacements) ...336
Dropped commands (without replacements) ...336
Mouse and keyboard ...337
Command changes ...337
Keyboard shortcuts ...338
Toolbars, windows, and dialog boxes ...338
Wizards ...339
New features ...339
X5 Pro Features Not Found in X5 ...340
Visual elements and formatting options ...340
Microsoft Office integration ...341
Miscellaneous ...341
Appendix B: Using Tablets and PDAs . . . .343
Using MindManager for Tablet PCs ...343
Mobile MindManager ...344
Appendix C: Useful Scripts . . . .347
Closing All Open Maps ...347
Converting Topics to Callouts (And Back) ...348
Converting Topics to Notes ...350
Creating a Submap from a Topic ...352
Adding a Submap to a Topic ...354
Adding an Action Item ...356
Aligning Topics ...358
Introduction
W
elcome to MindManager For Dummies, your portal to levels of produc-tivity and creaproduc-tivity that you have only dreamt about! You’ve heard of thinking outside of the box? MindManager doesn’t even know where the box is. Open this book to any page and you will find ideas and examples that will open your mind and stimulate you to see new solutions in your world. This is a down-to-earth, practical book based on real ways to use the program. We remain astounded at the richness of MindManager: even as we were writing the last sentences in this book we continued to discover new ideas, new con-nections, and new possibilities.We discovered MindManager by word of mouth. Most of the 300,000 plus users did, too. You can’t walk into the local computer store and pick up a box with MindManager marketing hype. Go to www.minjet.com where a free download of MindManager Pro awaits you. The download is a fully functioning program that gives you a full three weeks to explore every facet of the software. You are not going to be bombarded with Mindjet extras and advertising. You’ll get an e-mail thanking you for downloading the program and one inviting you to purchase and register the program. The program and this book get you going at warp speed.
You are going to find that the number of uses for MindManager grows each day you use the program. Imagine sitting in a large room. Innumerable things you have to solve, organize, or communicate surround you. There are doors on the opposite side of the room marked Web Interface, Document Publishing, Professional Presentations, and Task Tools, but they are all locked. A computer screen rises in front of you. MindManager is running. External information links are active. You look at each problem and solve it. One of the previously locked doors opens, easily, effortlessly. You take the tasks and organize them. Another door springs open. You structure and data mine seemingly unrelated bits of information. Now all the doors are open. You link stakeholder needs to activities. The mountain of tasks disappears, handled brilliantly. The sun shines, the birds sing, and work has become joyful and fulfilling.
About This Book
Take a look at the table of contents. The folks at Wiley Publishing look at the table of contents like a businessperson looks at a business plan. You should be able to see the flow of the book. Find a few chapters that stimulate your interest and dive in. Don’t expect to read this book straight through. We didn’t write it with that in mind. Pick the book up and put it down as the need arises.
Strategically placed throughout the book in the margin are cool little icons. Browse through and see what jewels you can find. Power users of MindManager may want to start your discovery by specifically seeking out the icons.
The stories used in this book are designed to stimulate your thinking. We use MindManager for a multitude of activities in our real world. Benefit from our experiences and make the solutions yours.
We hope you appreciate our humor. Good things happen when you laugh and smile.
We created this book using MindManager, in case you were wondering.
How to Use This Book
Get started with the first three chapters. You are going to find the book’s overview and a few key definitions and basics. MindManager Pro Version 5.0 is significantly different than past versions of MindManager. You may want to start at the beginning even if you are a power user.
We don’t assume you have MindManager running in front of you. The exam-ples should be clear enough without the program. Mark interesting places in the book and try the examples when you are in front of your computer.
You can also approach this book from your current use of Windows software. Microsoft PowerPoint, Outlook, Word, and Project each have separate chap-ters. Check out these chapters if you use these products. You’ll see how MindManager works together with some of your favorite programs.
3
Introduction
Who Are You?
We made some assumptions about you as we wrote this book. You may be any-where in the world. MindManager is an international program. You’re adept at using your computer and aren’t afraid to press the buttons. You know your way around some of the Microsoft programs like Outlook, PowerPoint, Project, and Word. You may not have ever heard of MindManager, but the name is pretty cool, and who doesn’t want to get a little better at mind-managing? You could be a power user. There are a bunch of folks currently using MindManager. You might be a project manager, a banker, a lawyer, a pilot, an administrator, an artist, a police officer, an engineer, a student, or a software developer. We know people using MindManager in these professions and many more.
We wrote the book as though we were talking to you. We are excited to be working with you and we sincerely appreciate you taking the time to work with us.
How This Book Is Organized
We used MindManager extensively as we wrote this book. We’ll use some examples of MindManager’s simple brilliance to explain how this book is organized. There are five parts to the book.
Part I
Part II
In the second part you explore how to add depth to your MindManager map. Icons, images, and borders are just a few of the additions. The foundation is now set.
5
Introduction
Part III explores the depth of the MindManager program. The examples show you new possibilities. You are putting the building blocks of the program together and creating solutions.
Part IV
Part IV links MindManager to the outside world. The Microsoft suite of Word, Outlook, PowerPoint, and Project takes center stage. Web pages structured in powerful templates make a MindManager map quite impressive on the Internet. You’ll learn ways to make your map communicate to others.
Part V
Icons Used in This Book
The information provided is used by a fraction of the people reading the book. A description like the techno framer jammer is linked to the sky sourced plastimagnet might be fair game. Skip these if you don’t want your brain to explode. Should you decide to read them, you get in-depth information found at the substructure of program operation.
Don’t go there. This is not a wet paint sign. Something is lurking in the corner that is going to bite you if you do this. Save the program, batten the hatches, mayday, mayday, mayday! Information preceded by this symbol describes some action that, if performed, causes the program to crash or some other computer disaster.
A tip is a tidbit of knowledge that can usually make your life easier. Grab the tips out of the book as you go. We promise they do not pop up as you turn the page.
Be Careful is a bit less than a warning but you should still take notice. The information presented gives you a heads up about a nasty surprise if you aren’t careful.
You may need the information now or later, but you are going to need it. You could cut it out and use it as a bookmark, but something equally important on the other side of the page would go with it. Go back to this icon if some-thing just doesn’t seem to work right.
You see this icon when we reference another chapter or another book entirely that you might want to check out — one that provides additional details on the topic at hand.
Feedback, Please
Organization
Part I
Y
ou just had an idea! It was a solution to your latest visually experience your ideas. Dive into the chapters infolks have found www.Mindjet.com
dilemma at work. Quickly now, get to your keyboard at once. You must share your ideas with MindManager. MindManager guides you in a new way to organize and
this part to discover the basics of exploring MindManager. The building blocks, such as creating a basic MindManager map, are right here at your fingertips.
One more thing while you’re here — don’t visit the local computer store to get MindManager Pro. Over 300,000
Chapter 1
Getting Organized — Visually
In This Chapter
䊳 Beginning to get organized
䊳 Seeing the depths of MindManager
䊳 Dealing with complexity
䊳 Linking to the outside
䊳 Sharing with other programs
䊳 Managing perceptions
G
etting organized. Who has time? Project managers and just about every-body in business are under constant pressure to get their jobs done with fewer resources, less time, and less money. Organizations are flatter. The boss is not as close to the work being performed. Cross-functional teams are all the rage. Presentations and communication are more important up, down, and across the organization. Information haystacks are getting bigger and the needle is becoming more elusive. Efficiency is needed to sort through the information. You need a solution.Imagine that your team completes a brainstorming session. You now have a map that shows how their ideas link together and identifies the next action steps. The elements of your map link to your calendar and to your project planning tool. Peer review and external information are added. Now the map is a dynamic picture. You look at the picture and see activity status with just one glance. The map is translated and sent to stakeholders. Stakeholders get a personal presentation with information specific to their needs. The dream continues with the thought that you need only one software program to make all this happen. You wake up and find that such a program does exist — MindManager X5 Pro. Throughout the book, I refer to this version of the pro-gram simply as MindManager.
The map you can create is dynamic. Links can be formed between news ser-vices, search engines, and third party vendors to feed information into a MindManager map. Does it stop there? No! The MindManager map is shared and reviewed between colleagues. Comments are captured and added to the informational content of the map.
MindManager integrates with other programs such as Microsoft Outlook and Microsoft Project. The MindManager map takes presentation, exporting, and printing of the map to a new industry standard. Use an internal presentation mode to walk through the entire map in an interactive format. Microsoft PowerPoint presentations are a button click away. Complete Web sites com-posed of MindManager Web pages are as easy as choosing a design and saying go.
Visit www.Mindjet.com to get a fully functional, 21-day, free trial version of MindManager X5 Pro.
MindManager: An Organized Beginning
MindManager starts with simplicity. The user interface is understandable and uses a style similar to Windows. Plan on expending only a minimal amount of effort getting your first map started. The simplicity of construction is decep-tive. You may have more difficulty getting your arms around the full power and uses of the program. Microsoft Excel is similar in this way. You can create a spreadsheet quite easily and be proud of your work. Humility arrives when someone shows you just how far you can actually take the Excel program.
Visual organization
Chapter 1: Getting Organized — Visually
11
MindManager combines the speed of visual delivery with informative textual details. Figure 1-1 shows one of the tutorial MindManager maps found in the program.
Figure 1-1: A basic Mind-Manager
map.
You can use MindManager’s visual organization in many different ways. I want to begin by describing an excellent starting point for your road to discovery.
Recording your brainstorms
Ideas come from many places, and one of the most common places is the brain-storming session. You assemble your team and each team member begins to contribute ideas. You use the Brainstorm mode in MindManager to capture all the ideas, and a MindManager map is then created. The generated ideas become MindManager topics. Refer to Figure 1-1. The topics are grouped together and new topics are added as headings. A productive brainstorming session can gen-erate hundreds of ideas and, therefore, topics. MindManager makes it easy for the team to organize, reorganize, and re-reorganize the topics. Text and graphic notes can be added to each topic for further clarification.
Analyzing problems
the map, and external sources of information, such as a Google search, can be included in the map contents as well. The result is an excellent high-level view of a problem. Links between the problem issues can be identified using symbols, icons, graphics, and colors. You continue to add topics as you investigate, work through, and solve the problem. The finished map delivers a complete perspective of the problem and solution.
Taking meeting notes
MindManager includes several suggested templates, which can easily be modified to meet your needs. The template shown in Figure 1-2 is a meeting template. A MindManager meeting map is a planning, note taking, and action follow-up tool. You set the agenda in the map and then send it to team mem-bers for review. Review comments are added to the map, and notes are taken in MindManager. Links to Outlook are created after the meeting to schedule individual tasks. A presentation of key meeting items is made and sent to the boss. MindManager makes all of this easy. The template is filled out in minutes, using the template wizard. Did I mention that MindManager has more wizards than Lord of the Rings? You can even make your own wizards. The wizards hide among the templates, and they appear only when you activate one.
Figure 1-2: A blank meeting template.
Setting up project tasks
Chapter 1: Getting Organized — Visually
13
task info menu. The previous examples identified team brainstorming and meetings. Either activity can result in work to be assigned and accomplished. The MindManager map shows percent complete and priority as an icon attached to the topic. The task information can be sent to Microsoft Project and/or Outlook. However, it’s not necessary to have either of these programs to make MindManager a useful project management tool.
Chain Linking
MindManager lets you visually connect your ideas. MindManager can link a map to a map, a map to the Web, a map to other programs, or a map to docu-ments. The links are discussed in the following sections.
Linking map to map
Maps can get quite large if you pack all of your information into just one map. Links are used between maps like transporter beams are used on Star Trek. Click on the link symbol and you are whisked to a different map. The map-to-map links are useful in breaking down a topic into more detail. If you have a high level of detail, you may need another map. Individual topics can each contain a link. For example, I am currently working on a large device develop-ment project and I have 27 map-to-map links.
Linking to the URL world
A MindManager topic may need clarification or additional information, or it may be a gateway to somewhere else. URLs are the vehicle, and any topic in a MindManager map can connect to the Internet. The amount of information contained in a MindManager map grows exponentially with the addition of Internet URLs.
Linking to other programs
Linking to documents
The key to a good map is having the right information available. Sometimes, text notes associated with a topic are the way to go; other times, a link to a specific document works better. Almost any format works, as long as you have the necessary programs on your computer.
You have been developing your map up to this point. The basics of topics, icons, graphics, links, and so on have been added, but the potential for your map is far from realized. Now you can bring in topics from the outside.
Information Inclusion
MindManager is an information vacuum. New Web technology has expanded the number of ways you can get information. MindManager handles both the acquisition of the information and the organization of the information. Infor-mation quickly gets added to a MindManager map using news feeds and search tools.
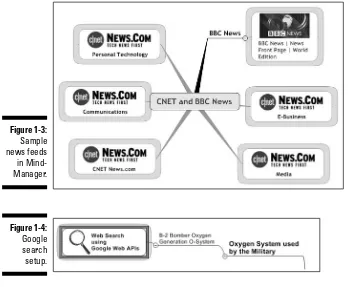
News feeds
How much information is easily available? A bunch. The question then becomes how to organize all the information sources that are out there. Once again, MindManager has a solution. I have a map that includes news feeds from around the world from different news and information organizations. I organize them by purpose, so I have all my healthcare topics in one part of the map, and I have my technology, world, and aviation news in another part of the map. I continually refresh the news feeds and get headlines from each type of source. Sample news feed services are provided in MindManager. Figure 1-3 shows sample news feeds included in MindManager.
Searching
Chapter 1: Getting Organized — Visually
15
Figure 1-3: Sample news feeds in Mind-Manager.
Figure 1-4: Google search setup.
Building on the Strengths
of Other Programs
MindManager does not pretend to be the ultimate program. It knows its own limitations and lives by the old credo “if you can’t beat ’em, join ’em.” For tricky tasks that are beyond its own capabilities, MindManager interfaces with Outlook and Microsoft Project.
Microsoft Outlook
⻬ Keep track of travel information. Link Outlook calendar dates and tasks to MindManger topics that identify the reason for travel.
⻬ Create a map with all your monthly bills. Attach the credit card com-pany URLs to the topic. Use Outlook’s task list as a reminder of when to pay each bill. After a bill is paid, Outlook updates MindManager and generates the next month’s due date for MindManager — all of which happens automatically. One glance at the MindManager map, and you know the status of all your bills.
⻬ Tie a map to an Outlook calendar. Your team has tasks to perform and deadlines have been established. You make a map directly from your team meeting map to identify each person and the expected completion dates. The team uses Outlook, so the tasks are in each person’s calendar. Each day, you refresh your map to see whether tasks are being accom-plished as expected.
⻬ Connect to a contact list. You have developed a MindManager map as an emergency contact list. The map has different groupings depending on the type of emergency. A master list of all personnel is kept up to date in an Outlook contact list that you link to, so you simply refresh the MindManager map and the necessary contact information is there.
Microsoft Project or other
MPX project tools
MindManager is a great tool for determining what tasks need to be completed in order to have a successful project, but it has no tools for actually developing a schedule and determining the start and finish dates for those tasks based on task dependencies, external constraint dates and resource availability. You must use project management scheduling software for this purpose.
With MindManager, you can export your map directly to Microsoft Project, the most widely used scheduling and project management software on the market today. You can also create a Microsoft Project Exchange (MPX) file from your MindManager map. This file can be read by all the other popular scheduling software packages, so you can use whichever package is standard at your company or is simply your personal preference.
Chapter 1: Getting Organized — Visually
17
Presenting MindManager Map
Information to Others
The MindManager program presents map information in three ways. The first is an internal presentation mode. The second exports the map information in outline form to a Microsoft Word document. The third uses map information to create a Microsoft PowerPoint presentation.
MindManager presentation mode
You can project the MindManager map on a screen with the MindManager tool screen present. You must do all the opening, closing, and moving around on the map, which is rather cumbersome. MindManager presentation mode makes it easy. The map is interactive. When you click on different topics in the map, MindManager moves to those topics and opens all the subtopics. The previous topic closes automatically. Links are active and operational. You can enter topics, icons, and other map elements while in this mode, which works well when you are working with your team.
Export to Microsoft Word
You may want to change the format of MindManger from the visual organiza-tion style to a linear outline. When MindManager exports map informaorganiza-tion to Microsoft Word, an outline is created based upon the level of the topic. You can specify export characteristics that structure the export using Microsoft heading characteristics. The outline contains topic information and any asso-ciated text. A MindManager map can also import from Word to make a visual organization representation from a linear outline.
PowerPoint presentations
Chapter 2
Making Your First Map
In This Chapter
䊳 Welcome to MindManager!
䊳 Exploring the landscape
䊳 Templates are terrific (ways to begin)
䊳 Mapping your own course
䊳 Map-making basics: adding and changing paths
A
few years ago, I got very excited about martial arts and decided to enroll in an introductory course. I had visions of myself quickly being able to toss people around, block punches with blinding speed, and say wise and fundamental truths like that guy in the “Kung Fu” television series. Reality actually turned out to be rather depressing. I spent many lessons just learning what to look for when I face an opponent, where to grab my practice partner, and how to fall down and get back up again. It was only later, after noticing that I was the one that was doing most of the flying through the air, that I understood just how important those early lessons really were.In this chapter, I help you recognize what to look for when you work with MindManager: how you grab the right tool for the task at hand; how to add, change, and delete paths; and how to “get back up again” if you make a mis-take or run into trouble.
I describe skills in this chapter that are necessary in order to explore almost every other technique described in this book. Like my martial arts skills (or whatever word would better describe my pathetic efforts), you cannot learn these skills just by reading about them. Fire up your computer and try out these things yourself!
Switching on MindManager
Figure 2-1: Mind-Manager greets you with this screen when you start the application.
This welcome screen gives you choices for previewing bits of MindManager’s functionality, sample maps, and ways to find help. You can also make all these choices from the MindManager menus, but this dialog box provides a good path to get you started on the right foot.
Here is a brief description of your choices in the Welcome to MindManager dialog box:
⻬ Quick Overview: This multimedia presentation shows many key features of MindManager, and it really does take only 90 seconds to view. Watching the Quick Overview show gives you a sense of the rich functionality of MindManager.
⻬ Preview Sample Maps: This is also a multimedia presentation. It dis-plays several different styles of maps and things that maps can be used for. If you want to actually work with any of these maps, you can open them in MindManager by clicking the Library tab and selecting the map from the Map Gallery section.
⻬ Learning Center: Selecting this option launches MindManager and dis-plays a help map that summarizes some important keystrokes and capa-bilities of the product. On the right side of the screen, you see a list of a wide range of help topics. In the section “Creating your first map,” later in this chapter, I show you how to create a map from a template via the Learning Center.
If you want to explore some of the Learning Center topics right away, just click the topic of interest. You hide the Learning Center by clicking the Learning tab. Click the Learning tab again to restore the Learning Center display.
Chapter 2: Making Your First Map
21
Scoping Out the Workspace
My father loved creating things and putting things together, and one of his many gifts to me was this same passion. When he was teaching me these skills as a young boy, however, I was always frustrated at his insistence that I must first organize and count all the parts to whatever I was assembling, as well as lay out all the tools that I would need. “A good craftsman always knows where his tools are and the materials he has to work with,” he would say repeatedly. Being a bit stubborn, it took me many years of having to do work over before I understood that his guidance actually saved me time.
In this section, I tell you about the tool compartments in the MindManager toolbox: the panes, the menus, and the toolbars. In the remaining sections of this chapter, I explore some of the tools themselves.
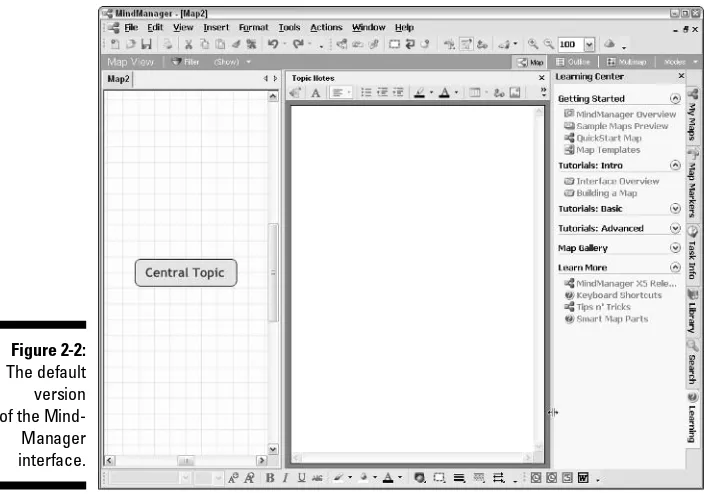
Finding your home on the pane
Most of the work you do in MindManager (creating, editing, and outputting maps) takes place in three panes:
⻬ The Map pane: This is the left side of your workspace (called a frame) where MindManager draws your maps. You use this pane to do much of your work as you create and refine your maps.
⻬ The Topic Notes pane: This is the middle frame in your workspace where you can associate topic notes with any topic in your map and can include formatting, tables, and graphics.
If you have started your map but don’t see the Topic Notes pane, the pane’s view status may be set to invisible. In this case, press F11 or click on the Topic Notes Toggle button on the Insert Toolbar to make the Topic Notes pane visible again.
⻬ The Task pane: This is the right frame in your workspace where MindManager gives you single-click access to many additional tools as well as help topics. Select the Task pane page you want to display by clicking its tab at the far right-hand side of the workspace. If the Task pane is not visible, clicking one of the Task pane tabs will make it appear.
Figure 2-2: The default version of the Mind- Manager interface.
It is also possible to completely hide the Topic Notes pane or the Task pane by dragging their left boundaries completely to the right-hand side of the workspace. If you have done this, the F11 key (for Topic Notes pane) or click-ing a Task pane tab (for the Task pane) will not appear to have any effect at all. If MindManager “thinks” it is displaying these panes, however, the mouse cursor will change when you point to the right-hand edge of your workspace (as shown in Figure 2-2), and you can drag the edge of the pane to the left to make it visible again.
You can also restore them by selecting Tools➪Options➪Save and then clicking the Reset button. This also resets any menu or toolbar customizations that you may have made.
Gliding through the menus
Chapter 2: Making Your First Map
23
These are the additional function groups that you will find on the main menu selections that are unique to MindManager:
⻬ File: The Pack and Go wizard compresses your map and any other documents that are hyperlinked on your map into a zip folder, ready for e-mailing. See Chapter 17 for details.
⻬ View: Determines the map display options (outline or multimap) and function modes (brainstorming, reviewing, and presentation). See Chapter 3 for details.
⻬ Format: Specifies details for exporting a map to PowerPoint or to an MPX file. See Chapter 22 for details.
⻬ Tools: Provides access to the template and style organizer (Chapter 14), wizards (Chapter 15), and macro scripts (Chapter 16).
⻬ Actions: Exports tasks to Outlook and synchronizes topic display and exported Outlook tasks. See Chapter 21 for details.
MindManager displays the keyboard shortcuts associated with many menu items right next to the description of the function.
MindManager also has numerous context menus that are displayed when you right-click something in your workspace (a topic, something in your Notes pane or Task pane, or even the background of your map). They are called context menus because they display just those menu commands (from the menu bar) that are most likely to be used on the thing you just clicked. Because you must almost always select an item (by clicking it) before you can execute any menu item anyway, right-clicking the item and then selecting the desired command from the context menu will normally save you a great deal of time building your map. This is the approach recommended through-out this book.
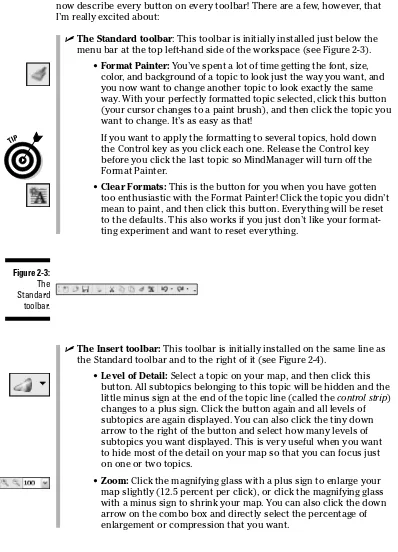
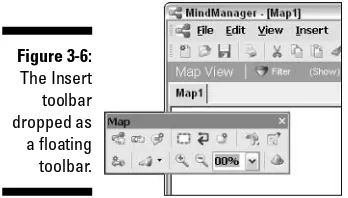
Toolin’ around the toolbars
The toolbars allow you to accomplish with one mouse click what might require two, three, or even four mouse clicks if you use only the Menu Bar. Some people love toolbars and others hardly ever use them. I tell you how you can customize each toolbar, reposition it, or even hide it in Chapter 3.
happy to know that I haven’t forgotten that early pain, though, so I will not now describe every button on every toolbar! There are a few, however, that I’m really excited about:
Figure 2-3: The Standard toolbar.
⻬ The Standard toolbar: This toolbar is initially installed just below the menu bar at the top left-hand side of the workspace (see Figure 2-3).
• Format Painter: You’ve spent a lot of time getting the font, size, color, and background of a topic to look just the way you want, and you now want to change another topic to look exactly the same way. With your perfectly formatted topic selected, click this button (your cursor changes to a paint brush), and then click the topic you want to change. It’s as easy as that!
If you want to apply the formatting to several topics, hold down the Control key as you click each one. Release the Control key before you click the last topic so MindManager will turn off the Format Painter.
• Clear Formats: This is the button for you when you have gotten too enthusiastic with the Format Painter! Click the topic you didn’t mean to paint, and then click this button. Everything will be reset to the defaults. This also works if you just don’t like your format-ting experiment and want to reset everything.
⻬ The Insert toolbar: This toolbar is initially installed on the same line as the Standard toolbar and to the right of it (see Figure 2-4).
• Level of Detail: Select a topic on your map, and then click this button. All subtopics belonging to this topic will be hidden and the little minus sign at the end of the topic line (called the control strip) changes to a plus sign. Click the button again and all levels of subtopics are again displayed. You can also click the tiny down arrow to the right of the button and select how many levels of subtopics you want displayed. This is very useful when you want to hide most of the detail on your map so that you can focus just on one or two topics.
Chapter 2: Making Your First Map
25
Figure 2-4: The Insert toolbar.
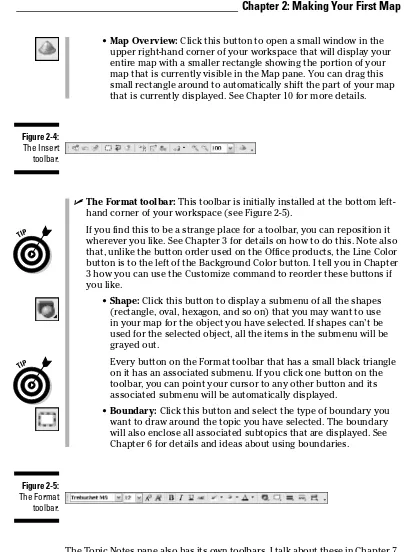
• Map Overview: Click this button to open a small window in the upper right-hand corner of your workspace that will display your entire map with a smaller rectangle showing the portion of your map that is currently visible in the Map pane. You can drag this small rectangle around to automatically shift the part of your map that is currently displayed. See Chapter 10 for more details.
Figure 2-5: The Format toolbar.
⻬ The Format toolbar: This toolbar is initially installed at the bottom left-hand corner of your workspace (see Figure 2-5).
If you find this to be a strange place for a toolbar, you can reposition it wherever you like. See Chapter 3 for details on how to do this. Note also that, unlike the button order used on the Office products, the Line Color button is to the left of the Background Color button. I tell you in Chapter 3 how you can use the Customize command to reorder these buttons if you like.
• Shape: Click this button to display a submenu of all the shapes (rectangle, oval, hexagon, and so on) that you may want to use in your map for the object you have selected. If shapes can’t be used for the selected object, all the items in the submenu will be grayed out.
Every button on the Format toolbar that has a small black triangle on it has an associated submenu. If you click one button on the toolbar, you can point your cursor to any other button and its associated submenu will be automatically displayed.
• Boundary: Click this button and select the type of boundary you want to draw around the topic you have selected. The boundary will also enclose all associated subtopics that are displayed. See Chapter 6 for details and ideas about using boundaries.
Objects and things
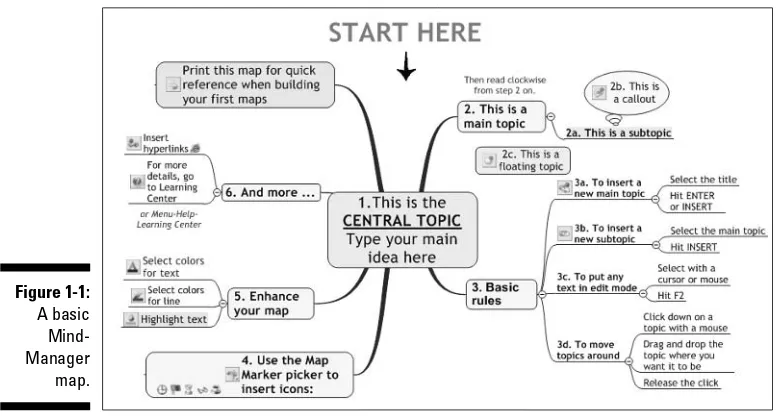
MindManager can display many different things on a map. In this sense, even the background of the map is a “thing.” Programmers don’t like to talk about “things” (it doesn’t sound complicated enough, I guess), so they call them objects instead. I’ll use this term from now on when I want a simple term to refer to many different things that may appear on a map.
Look at Figure 2-6. Notice that items 1 and 2 (including 2a, 2b, and 2c) are all different types of Topics. (Topics are simply objects where I can type a small amount of text to capture a key idea, a task to be performed, some kind of instruction, or some other similar thing.) Main topics (#2 on the map) and callouts (#2b) are different in some important ways, but they also have many important things in common. So, when I want to talk about the differences, I’ll say specifically what type of topic I’m referring to. However, when I want to talk about the things that are common to all topics, I’ll talk about Topic Objects.
Figure 2-6: The QuickStart map created from a template.
One thing that can be particularly confusing when I am talking about Topic Objects is that a given topic can be both a topic and a subtopic, depending upon whether I want to talk about that topic’s children or its parent (see Figure 2-7). The siblings are, at the same time, topics with respect to the next lower level of topics and subtopics, with respect to the next higher topic level. There will be a few times in this book where I will need to say something about three levels of topics all at one time, so I’ll need to talk about sub-subtopics, as shown in Figure 2-7. Theoretically, I could even go to four levels . . . nah, I think I would get totally lost if I tried that.
Chapter 2: Making Your First Map
27
Figure 2-7: Names of different levels of topics and groups of topics.
Creating Your First Map
Creating maps is what MindManager is all about, but creating a useful map can take some effort and creative energy. You want to use maps that are already started, called templates, whenever possible. In this section, I tell you how to use an existing template to give you a head start on creating the map that you need. In Chapter 14, I discuss how to make maps you have created into templates. Finally, in Chapter 15, I explain how you can write wizards that will guide others in using the templates you have created!
Create your first map by opening your MindManager program and following these steps:
1. Click the Learning tab at the bottom right-hand edge of the Task pane.
The Learning Center page opens in the Task pane.
2. In the “Getting Started” section, select QuickStart Map.
This should be the third choice from the top of the list. The template opens as a sample map in the Map pane of your workspace, as shown in Figure 2-6. This is a map to use for practicing your basic MindManager skills. You can start over with this practice map as often as you like, so don’t be afraid to experiment! Look through the topics on the map, read-ing in a clockwise direction. This will orient you to the names of the vari-ous things that may appear on a map and some of the basic keystrokes that you can use to build your map.
3. Click anywhere on the Central Topic.
4. Type a new title for this map and then press Enter.
You are just discovering how to change text in a map, so it really doesn’t matter what title you give it — “My First Map” or even “adshka!$” will do just fine.
Your typing replaces the text that was there, and MindManager resizes the central topic so that it is just large enough to contain your text.
5. Click the words “Start here” and then press Delete.
MindManager first draws the blue selection rectangle around the words and the down arrow, and then it deletes both the words and the image from the map. MindManager then draws the blue selection rectangle around the central topic again.
The object you just deleted is an example of something called a floating topic because it isn’t attached to anything else on the map. You can also use this technique to highlight an important part of your map. I tell you how to add a floating topic in Chapter 6.
6. Press the Enter key.
MindManager draws another thick line from the central topic to a blue rectangle containing no text.
7. Type a few words to represent your new main topic and press Enter.
It doesn’t matter what you type — “This is my main topic” is as good as anything else. The blue rectangle expands to surround the text that you typed.
8. Click twice just to the left of the letter “a” on the first line of topic 2.
MindManager displays the blue selection rectangle on the first click, and then it displays a flashing vertical line just before the letter “a.” You are now in insert mode, and anything you type will appear at the point of the vertical line without deleting any of the existing text.
You can select part or all the text by clicking and holding the mouse button down as you drag across the text. Your typing will then replace the highlighted text.
9. Type MindManager’s and then delete the “a.”
Topic 2 now reads “2. This is MindManager’s main topic” and it remains selected.
10. Click the topic with the yellow-green background that begins “Print this map . . . ”
MindManager draws the blue selection rectangle around the topic.
11. Press Insert.
Chapter 2: Making Your First Map
29
12. Type in any text for the subtopic.
MindManager replaces the word “subtopic” with your typing. You have now created a subtopic.
13. Click the Library tab on the Task pane, and then click Icons.
MindManager displays all the icons in its library in the lower half of the pane.
14. Click the red check mark in the library display.
MindManager adds a small red check mark to the left of your new subtopic.
15. Right-click the check mark in the subtopic and select Remove.
MindManager deletes the check mark from the subtopic.
16. Click Images➪Landmarks in the top half of the Library pane, and then click the picture that you would most like to visit on your next vacation.
The image appears to the left of your subtopic.
Go ahead and play with this map as much as you like. When you are finished, just close it and click the No button when MindManager asks you if you want to save your map. Of course, if you have done something wonderful, do save it (but you will have to give it a different name since this particular map is a read-only map)! Then grab a soda and c’mon back for the next part.
Exploring on Your Own
My father was an avid fisherman but had no patience at all with fishing from a lake or a boat. His passion was to quietly sneak up on a small eddy in a stream under a rock or bank overhang and lay his fly softly on the water, just advertising, “Here’s breakfast.” For him, actually catching a trout was almost incidental and quite unimportant.
I started fishing with him when I was four years old, listening carefully to his advice and then practicing a short ways up or downstream. However, the real moment of triumph came when I was 11 and, for the first time, went out to explore a tiny creek entirely alone and brought back my own trout. I assure you, this particular fish was far from incidental!
Setting up a document
The first step in creating your map is to set up your central topic to look like you want it to look. You do this using the following steps:
1. Start MindManager and open the Task pane to the Library Page.
Refer to the section “Finding your home on the pane,” earlier in this chapter, if you need help doing this.
2. Click the New (standard) button on the Standard toolbar.
MindManager opens the new file with a Central Topic.
3. Click the central topic, type in the title you want for your map, and press Enter.
Your map title replaces the words “Central Topic.” The central topic remains selected.
4. Click the plus sign next to Shapes in the upper part of the Library Task pane page and select one of the shape categories.
You see many choices for the shape and color of the Title block displayed in the lower half of the Task pane.
5. Point your mouse to any format that you like and drag it on top of the central topic, then release the mouse button.
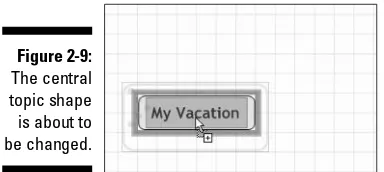
As you drag the shape near the central topic, MindManager displays a red shadow and connecting line indicating that it will attach the shape as a main topic if you release the mouse button at that point (see Figure 2-8). When you drag the shape on top of the central topic, the red shadow and connecting line disappear and the red box changes to green (see Figure 2-9). After you release the mouse button, the central topic acquires the shape and color you selected.
You can change the color, font, and size of the text in the central topic after applying the shape, but you can no longer change the background or line color of the shape. See Chapter 14 for details about creating your own custom shapes.
Chapter 2: Making Your First Map
31
Figure 2-9: The central topic shape is about to be changed.
Adding topics
Now the creative work begins! Whatever the purpose of your map is, you want to identify the highest-level items that break down your purpose into smaller segments. Here are some ideas to get you started:
⻬ What are the main ideas you want to capture?
⻬ What are the main tasks you want to accomplish?
⻬ What are the main organizational themes you want to represent?
⻬ What are the main agenda items you want to cover?
Don’t worry if some of your ideas seem to be less “high-level” than other ones. The next section explains how to move topics to other places in your map. What is important right now is just to capture your ideas.
You can see the start of my map in Figure 2-10. I have entered all my first level items (or at least all that I can think of at the moment) and have changed the appearance of the central topic to something I like better. MindManager, how-ever, has displayed my topics in a rather random way. No problem — I’ll take care of this in a moment.
If you need help adding and changing main topics, refer to the section “Creating Your First Map,” earlier in this chapter.
Eventually, you will run out of main ideas and find that you have one too many main topics. This really isn’t a problem; after you add one branch too many, you can either click the Undo button or simply press the Delete key.
Now choose one of your main topics and identify as many of the sub-ideas that belong to that main topic as you can. In the case of the “My Vacation” map, shown in Figure 2-10, I asked myself what steps I needed in order to “decide where we want to go” and came up with the following list:
⻬ Conduct “interest and wishes” meeting with family members. (Very important if I don’t want to spend my vacation listening to whining and complaining about “Why did we haaave to come heeeere anyway?”)
⻬ Collect travel brochures.
⻬ Estimate vacation costs.
⻬ Choose three best prospects for further analysis.
Look at each of your other main topics and repeat this process of identifying the sub-ideas that belong to each main topic. You can also look at one or more subtopics and break each of them down into sub-subtopics. On the other hand, if you get bored after doing two or three, it’s okay to stop. After all, the goal is only to practice adding topics!
The process I am describing is called brainstorming, and MindManager has a special mode to support this kind of creative work. I tell you all about this in Chapter 8.
To add a subtopic, follow these steps:
1. Click the topic to which you want to attach a subtopic.
The topic is selected (MindManager draws a blue rectangle around the topic).
2. Press the Insert key.
MindManager attaches a new subtopic to the selected topic, inserts the text “Subtopic,” and places the text in edit mode.
3. Type in the text you want and press Enter.
You have successfully created a new subtopic.
Selecting a topic and then pressing Enter always adds a new topic at the same level as the selected topic. Pressing Insert always adds a subtopic to the selected topic.
An alternative method to create a subtopic is to select the desired topic and then click the Insert Subtopic button on the Insert toolbar.