Developing Microsoft
®SharePoint
®Applications
Using Windows Azure
™O’Reilly Media, Inc.
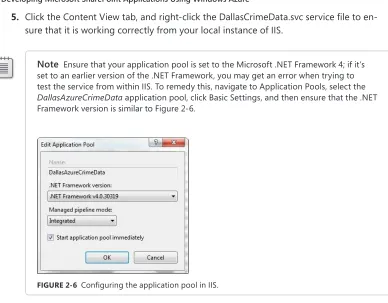
1005 Gravenstein Highway North Sebastopol, California 95472
Copyright © 2011 by Steve Fox
All rights reserved. No part of the contents of this book may be reproduced or transmitted in any form or by any means without the written permission of the publisher.
ISBN: 978-0-7356-5662-8
1 2 3 4 5 6 7 8 9 M 6 5 4 3 2 1
Printed and bound in the United States of America.
Microsoft Press books are available through booksellers and distributors worldwide. If you need support related to this book, email Microsoft Press Book Support at [email protected]. Please tell us what you think of this book at http://www.microsoft.com/learning/booksurvey.
Microsoft and the trademarks listed at http://www.microsoft.com/about/legal/en/us/IntellectualProperty/ Trademarks/EN-US.aspx are trademarks of the Microsoft group of companies. All other marks are property of their respective owners.
The example companies, organizations, products, domain names, email addresses, logos, people, places, and events depicted herein are fictitious. No association with any real company, organization, product, domain name, email address, logo, person, place, or event is intended or should be inferred.
This book expresses the author’s views and opinions. The information contained in this book is provided without any express, statutory, or implied warranties. Neither the authors, O’Reilly Media, Inc., Microsoft Corporation, nor its resellers, or distributors will be held liable for any damages caused or alleged to be caused either directly or indirectly by this book.
Acquisitions and Developmental Editor: Russell Jones Production Editor: Kristen Borg
Editorial Production and Illustration: Online Training Solutions, Inc. Technical Reviewers: Andrew Whitechapel and Scot Hillier
Copyeditor: Jaime Odell
“SharePoint has taken business by storm and developers want to take their collaborative applications built on this platform to the cloud! This book arrives right on time to fill this demand, giving you the conceptual approach and hands-on guidance to extend SharePoint in the cloud and take advantage of
this powerful, accessible, next-generation cloud collaboration platform.”
— Eric Swift
Contents at a Glance
1
Welcome to SharePoint and Windows Azure . . . . 1
2
Getting Started with SharePoint and Windows Azure . . . . 21
3
Consuming SQL Azure Data . . . . 55
4
SQL Azure and Advanced Web Part Development . . . . 83
5
Using Windows Azure BLOB Storage in SharePoint Solutions . 115
6
Integrating WCF Services and SharePoint . . . . 153
7
Using SQL Azure for Business Intelligence . . . . 183
8
Using the Windows Azure Service Bus with SharePoint . . . . 209
Table of Contents
Introduction . . . .xiii
1
Welcome to SharePoint and Windows Azure . . . . 1
Welcome to the Cloud . . . . 1
What Is Windows Azure? . . . . 3
What About SharePoint? . . . . 4
Integrating SharePoint 2010 and Windows Azure . . . . 7
What Are the Possibilities? . . . . 8
Getting Ready to Develop . . . . 10
Getting Started with Windows Azure . . . . 10
Setting Up Your Development Environment . . . . 12
Windows Server 2008 R2 Hyper-V . . . . 14
Summary . . . . 20
Additional References . . . . 20
2
Getting Started with SharePoint and Windows Azure . . . . 21
Windows Azure Marketplace DataMarket . . . . 21
WCF Data Services and Publicly Consumable Data Feeds . . . . 21
Getting Started with Windows Azure Marketplace DataMarket . . . . 24
Integrating DataMarket Data with Excel and SharePoint . . . . 27
Integrating DataMarket Data with a Visual Web Part . . . . 35
Integrating Silverlight, Windows Azure DataMarket, and SharePoint . . . . . 48
Summary . . . . 53
Additional References . . . . 53
3
Consuming SQL Azure Data . . . . 55
Introduction to Business Connectivity Services . . . . 55
What Is Business Connectivity Services? . . . . 55
External Content Types . . . . 58
Integrating SQL Azure with BCS by Using SharePoint Designer 2010 . . . . . 61
Securing the Connection to SQL Azure . . . . 64
Summary . . . . 82
Additional References . . . . 82
4
SQL Azure and Advanced Web Part Development . . . . 83
Interacting with SQL Azure Data . . . . 83
Integrating the SharePoint Server Object Model and the Entity Data Model . . . . 84
Surfacing SQL Azure Data in Bing Maps by Using the Client Object Model . . . . 99
Summary . . . . 112
Additional References . . . . 113
5
Using Windows Azure BLOB Storage in SharePoint Solutions . 115
Overview of Windows Azure BLOB Storage . . . . 115Integrating BLOB Storage and SharePoint . . . . 118
Creating the Application . . . . 119
Deploying the Application . . . . 129
Integrating the Application with SharePoint . . . . 133
Consuming BLOB Storage Data with a Simple Listbox . . . . 135
Consuming BLOB Storage Data with Silverlight . . . . 141
Summary . . . . 152
Additional References . . . . 152
6
Integrating WCF Services and SharePoint . . . . 153
Creating and Deploying a WCF Service to Windows Azure . . . . 154
Creating a Web Part . . . . 161
Creating a Silverlight Web Part . . . . 169
Creating a Custom List and Event Receiver . . . . 175
Summary . . . . 182
7
Using SQL Azure for Business Intelligence . . . . 183
Preparing the Data . . . . 184
Creating a Report . . . . 187
Using a WCF Service to Integrate SQL Azure Data with SharePoint . . . . . 193
Creating a WCF Service . . . . 193
Creating a Dashboard . . . . 199
Summary . . . . 207
Additional References . . . . 208
8
Using the Windows Azure Service Bus with SharePoint . . . . 209
Windows Azure AppFabric . . . . 209
Integrating with SharePoint by Using Windows Azure AppFabric . . 210 Creating a Service Namespace . . . . 211
Using the Service Bus to Interact with SharePoint . . . . 214
Accessing SharePoint via a WCF Service Proxy . . . . 222
Calling an On-Premises Service via the Service Bus . . . . 232
Summary . . . . 241
Additional References . . . . 241
9
Using Windows Azure WCF Services in SharePoint and Office 243
Custom WCF Services and Windows Azure . . . . 244Modeling Data by Using Business Connectivity Services . . . . 250
Exposing the External System Data in Office . . . . 259
WCF Services in Windows Azure and Excel Services . . . . 265
Summary . . . . 277
Additional References . . . . 277
10
Securing Your SharePoint and Windows Azure Solutions . . . . 279
Options for Securing Your Applications . . . . 279
Configuring BCS Security . . . . 281
Configuring Shared Access Permissions for BLOB Storage . . . . 286
Using the Service Bus and Access Control Service . . . . 290
Using Certificate-Based Authentication . . . . 294
Using Claims-Based Authentication . . . . 299
Summary . . . . 302
To my wife, who continually supports my extracurricular projects that always seem to involve code and writing.
Introduction
Microsoft SharePoint and Windows Azure are two sizeable platforms unto themselves. SharePoint is one of Microsoft’s leading server productivity platforms—a collaborative plat-form for the enterprise and the web. Windows Azure is Microsoft’s operating system in the cloud. Separately, they have their own strengths, market viability, and developer following. Together, they are very powerful. For example, together they expand how and where you can deploy your code and data; they offer more opportunities to take advantage of the Windows Azure ”metered usage’” model while at the same time reducing the storage and failover costs of on-premises applications; using Windows Azure, you can move code off of your SharePoint servers; and they provide new business models and offerings that you can take to your customers to increase your own solution offerings. In short, there are interesting and compelling reasons to bring these two platforms together.
In this book, you’ll get introductory, hands-on experience with integrating SharePoint and Windows Azure. These integrations range from the simple (such as data integration with Windows Azure Marketplace DataMarket and Excel Services) to the more complex (such as using the Windows Azure AppFabric service bus to connect remote Windows Phone 7 devic-es (as well as other devicdevic-es and languagdevic-es) to SharePoint on-premisdevic-es data). The underlying goal of the book, though, is to provide a prescriptive and introductory guide through some fundamental methods of integration.
Who Should Read This Book
This book was primarily written for SharePoint developers who are looking to expand their knowledge into the terrain of the cloud—specifically that of Windows Azure. This book was secondarily written to help Microsoft .NET Framework and ASP.NET developers understand how they can take advantage of Windows Azure and SharePoint together. The book tries not to delve too deeply into explanation of specific concepts and APIs; rather, it provides you with step-by-step code-centric examples in Microsoft Visual C# that walk you through vari-ous ways to achieve integration between SharePoint and Windows Azure.
There are also some great resources that you can download as supplementary guidance and practical samples:
■ SharePoint 2010 Developer Training Kit: http://www.microsoft.com/downloads/en/details.
aspx?FamilyID=83A80A0F-0906-4D7D-98E1-3DD6F58FF059&displayLang=en
Assumptions
This book expects that you have at least a minimal understanding of .NET Framework devel-opment and object-oriented programming concepts. This book also assumes that you have a basic understanding of SharePoint 2010 and perhaps have even written some code for SharePoint. Also, this book includes examples in C# only. If you have not yet picked up C#,
you might consider reading John Sharp’s Microsoft Visual C# 2010 Step by Step (Microsoft
Press, 2010).
Given that the backdrop against which this book was written is cloud computing, it might also help if you have some understanding of what cloud computing is and how you go about building applications for the cloud.
Who Should Not Read This Book
Not every book is aimed at every possible audience. If you don’t have a solid familiarity with .NET Framework development in C#, you should brush up on the .NET Framework, the C# language, and web development concepts before tackling this book.
Although this book is introductory in nature, it covers the integration of two hefty plat-forms with extensive capabilities and is more practical as opposed to theoretical. So if you’re not comfortable just jumping in and trying things out, you might want to consult a
begin-ning book on either topic. A good introduction to SharePoint is Beginning SharePoint 2010
Development by Steve Fox (Wrox, 2010); and for Windows Azure, Programming Windows Azure by Sriram Krishnan (O’Reilly, 2010).
Organization of This Book
This book is divided into 10 chapters.
■ Chapter 1, “Welcome to SharePoint and Windows Azure”
■ Chapter 2, “Getting Started with SharePoint and Windows Azure”
■ Chapter 3, “Consuming SQL Azure Data”
■ Chapter 4, “SQL Azure and Advanced Web Part Development”
■ Chapter 5, “Using Windows Azure BLOB Storage in SharePoint Solutions”
■ Chapter 6, “Integrating WCF Services and SharePoint”
■ Chapter 7, “Using SQL Azure for Business Intelligence”
Each chapter provides exercises that range from simple to complex, with the more complex topics towards the end of the book.
Within each chapter, you will find three or four examples; most have downloadable code that accompanies the example (see the “Code Samples” section later in this Introduction).
Conventions and Features in This Book
This book presents information by using conventions designed to make the information readable and easy to follow.
■ Each exercise consists of a series of tasks, presented as numbered steps (1, 2, and so on)
listing each action that you must take to complete the exercise.
■ Boxed elements with labels such as “Note” provide additional information or alternative
methods for completing a step successfully.
■ Text that you type appears in bold.
■ A plus sign (+) between two key names means that you must press those keys at the
same time. For example, “Press Alt+Tab” means that you hold down the Alt key while you press the Tab key.
■ A vertical bar between two or more menu items (such as File | Close), means that you
should select the first menu or menu item, then the next, and so on.
System Requirements
You will need the following software to complete the practice exercises in this book:
■ A Windows 64-bit–compliant operating system (preferably Windows Server 2008 R2,
but you could use Windows 7)
■ Microsoft SharePoint Foundation 2010 or Microsoft SharePoint Server 2010 (SharePoint
Foundation is the free version of SharePoint and could be used for many of the exer-cises in this book)
■ Microsoft SharePoint Designer 2010
■ Microsoft Office (Professional Plus) 2010
■ Microsoft Visual Studio 2010 Professional (or newer)
■ The Microsoft .NET Framework 4
■ Windows Azure Tools and SDK
■ Windows Azure AppFabric SDK
■ Windows Phone 7 Developer Tools
The hardware used to install and run the preceding list of software should have:
■ A Centrino or equivalent processor
■ 4 to 8 GB RAM (64-bit) (8 GB is recommended)
■ 50 GB of available hard disk space
■ A DirectX 9–capable video card running at 1024 x 768 or a higher-resolution display
■ A DVD-ROM drive (if installing Visual Studio from DVD)
■ An Internet connection so that you can download software or chapter examples and
use Windows Azure
Depending on your Windows configuration, you might require local administrator rights to install or configure Visual Studio 2010 and SQL Server 2008 products.
Code Samples
Most of the chapters in this book include exercises that let you interactively try out new material learned in the main text. All sample projects, in both their pre-exercise and post-exercise formats, are available for download from the following page:
http://go.microsoft.com/FWLink/?Linkid=220877
Follow the instructions to download the SharePointAndAzureCode.zip file.
Note Because some of the code samples are quite lengthy, error checking has been excluded. As a best practice for production code, you should always include some measure of error checking (for example, try and catch). Treat the code samples as core illustrative samples with which you can build proof-of-concept applications, not code that you would copy and paste into production.
Beyond the companion code that was written for each of the chapters in this book, you can also download some additional code walkthroughs that build on what you learn in this book. These samples are included in the SharePoint and Windows Azure Development Kit, which can be downloaded from here:
Installing the Code Samples
Follow these steps to install the code samples on your computer so that you can use them with the exercises in this book.
1. Unzip the SharePointAndAzureCode.zip file that you downloaded from the book’s
website.
2. If prompted, review the displayed license agreement. If you accept the terms, select the
accept option, and then click Next.
Using the Code Samples
As you work through the book, you’ll find numerous step by step procedures. The projects in the downloaded code samples correspond to these procedures. You can use these as a check on your own work as you progress through the examples, or you can use them as a starting point. Many of the examples can also serve as the basis for code in your own future projects.
Acknowledgments
No man is an island, and I’d like to call out and thank a few people.
First, I’d like to call out some of the developers and authors whom I’ve researched and read as prep for this book. Your books and kits have helped guide me in this book, and as such are called out throughout so that the readers of this book can continue the journey. I’d like to call
out Chris Hay and Brian Prince (Azure in Action, Manning Publications, 2010), Sriram Krishnan
(Programming Windows Azure, O’Reilly Media, 2010), Tejaswi Redkar (Windows Azure Plat form,
Apress, 2009), and Scott Klein and Herve Roggero (Pro SQL Azure, Apress, 2010).
Second, I’d also like to call out Todd Baginski and Ravi Vridhagiri, who have been working with me on several developer training kits and have helped me without hesitation when asked. They helped with the SharePoint and Windows Azure Development Kit, which is one of the companion elements to this book, and they’ve done some terrific work there.
I’d also like to thank Andrew Whitechapel and Scot Hillier for being the technical reviewers for this book, and Russell Jones for seeing the possibility in the idea and running with it as the lead editor on the book.
Errata and Book Support
We’ve made every effort to ensure the accuracy of this book and its companion content. Any errors that have been reported since this book was published are listed on our Microsoft Press site at oreilly.com:
http://go.microsoft.com/FWLink/?Linkid=221242
If you find an error that is not already listed, you can report it to us through the same page.
If you need additional support, email Microsoft Press Book Support at mspinput@microsoft. com.
Please note that product support for Microsoft software is not offered through the addresses above.
We Want to Hear from You
At Microsoft Press, your satisfaction is our top priority, and your feedback our most valuable asset. Please tell us what you think of this book at:
http://www.microsoft.com/learning/booksurvey
The survey is short, and we read every one of your comments and ideas. Thanks in advance for your input!
Stay in Touch
Chapter 1
Welcome to SharePoint and
Windows Azure
After completing this chapter, you’ll be able to:
■ Describe cloud computing, Windows Azure, and SharePoint.
■ Explain the different ways in which you can integrate Windows Azure and SharePoint.
■ Set up your development environment for building integrated solutions.
■ Build your first Windows Azure application.
Welcome to the Cloud
If you’ve picked up this book, then you’ve surely heard the phrase cloud computing before.
Cloud computing is not new, but it is definitely becoming more mainstream. There are many differing opinions on the definition of cloud computing, but for this book we’ll define it as follows: the ability to use the Internet (or the cloud) for computation, software deployment, data access and retrieval, and data storage.
Many companies offer different types of cloud services, covering such diverse areas as sales management tools (such as salesforce.com) virtualization and virtual hosting (such as Amazon Web Services), cloud productivity tools (such as Microsoft Office 365), and much more. In fact, it seems that each week a new cloud computing offering hits the news.
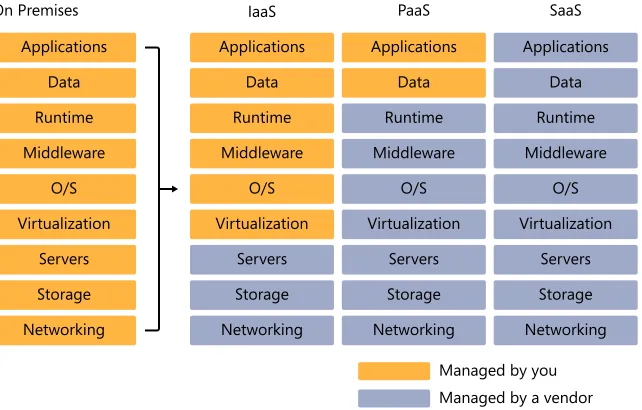
Applications FIguRE 1-1 The range of cloud service options.
The promise of cloud computing is to help reduce the costs of running IT infrastructure. The possibilities, at a high level, are shown in Figure 1-1, which shows the different types of cloud computing alternatives—IaaS, PaaS, and SaaS—as classifications of cloud-based services. But what are these options?
With infrastructure as a service (IaaS), you use the cloud to host your core infrastructure, such
as hosting a virtual machine (VM)—in essence, the cloud becomes your operating system.
With platform as a service (PaaS), you use the cloud for more than just virtualizing an
envi-ronment; you also build and deploy code to that environment. And with software as a service
(SaaS), you use the cloud for software (either yours that you build, deploy, and sell to others, or software such as Microsoft Office 365 that you purchase on a subscription basis). And as you can see in the figure, the more you move towards SaaS, the less you need to manage yourself. The value of moving code, data, services, and hardware into a cloud-hosted envi-ronment is that you’re charged on a subscription basis (for example, per person per month) or for metered usage for running code and data access, as opposed to supporting the cost of servers in your lab or data center that might not be operating at full capacity and might only be utilized part of the time.
but at the heart of the process are a data storage mechanism (such as Microsoft SQL Server), a dashboard to display the KPIs (such as Microsoft SharePoint and Excel Services), and an in-put mechanism (such as a Microsoft Excel spreadsheet or a rich-client application). However, if you analyze the usage of the scorecard servers (one for the SharePoint server and the other for the SQL Server), you can begin to see that if that server is only being used at high capac-ity four times a year (two weeks near the close of each quarter) but you are paying for full utilization for those servers, you might not be getting the best value out of that hardware. Thus, for the scorecard scenario, you could migrate your data to the cloud and then continue to use SharePoint as your dashboard. Alternatively, you could create web applications hosted in the cloud (in Office 365, for example) and then also use the data you’ve migrated to the cloud. This gives you the potential to use the cloud in a hybrid fashion (integrating on-premises and cloud resources) or as a fully cloud-hosted application. In either case, you’re taking ad-vantage of the cloud and optimizing your IT infrastructure costs.
However, it’s fallacious to think that every single company will move completely to the cloud in the near-term; it’s just not tenable given infrastructure, time, budgets, data protection and governance, and other concerns that companies have. However, many companies are moving parts of their IT infrastructure to the cloud today to take advantage of the value that the cloud offers, and then looking at broader ways of taking advantage of the cloud as they look at their longer-term plans. According to one article “...by 2012, 80% of Fortune 1000 enterprises will be using some cloud computing services, [and] 20% of businesses will own no IT assets” (“Executive Summary: Optimizing IT Assets: Is Cloud Computing the Answer?” by Andy Rowsell-Jones and Barbara Gomolski, Gartner, Inc., 2011). Even accounting for hype, that’s a significant shift to the cloud.
Given this cloud computing movement, where does Windows Azure fit in?
What Is Windows Azure?
Windows Azure is Microsoft’s cloud-computing platform. It offers all the standard service types discussed in the previous section: IaaS, PaaS, and SaaS. Windows Azure is a flexible cloud-computing platform that allows you to virtualize, manage data and services, and build cloud-based applications and websites. By using Windows Azure, you gain the benefits of scalability (the hardware expands as your data and application needs grow), patch and OS management (your cloud-hosted environment is always up to date), and a 99.9 percent uptime guarantee.
FIguRE 1-2 The different parts of Windows Azure.
Windows Azure represents the core compute and management capabilities. For example, it provides the core service management capabilities; developer tools, a portal through which you can configure your applications data, and services; and different types of storage (table, BLOB [binary large object], and queue) that offer non-relational data storage capabilities. It also provides the Windows Azure Marketplace DataMarket as an offering that provides the ability to integrate directly with subscription-based data that can be consumed program-matically or via the Marketplace browser user interface.
SQL Azure represents the relational data storage for the cloud. You might think of SQL Azure as the SQL Server for the cloud; you can migrate or build relational databases that provide rich and queryable data sources for your cloud-based or hybrid applications.
Finally, Windows Azure AppFabric provides a set of middleware services and a way for you to build, connect, and manage services directly through the AppFabric service bus. This gives you more flexibility and control over your cloud-hosted applications and also allows you to take advantage of core security features within the service bus.
What About SharePoint?
parts, websites, document libraries, lists, blogs, wikis, and more. Beyond the basic artifacts of SharePoint, there are many out-of-the-box features that make it one of the most pervasively used collaboration platforms on the market today. It has competition, yes, but the growth of SharePoint has been incredible—it is one of Microsoft’s fastest growing server products, and its use and popularity continue to grow. Features such as the Business Intelligence Center, KPIs, Excel Services, and many others collectively provide a platform that enhances produc-tivity. For example, because SharePoint provides a core platform for checking documents in and out, you don't have to send documents in email messages anymore. SharePoint also pro-vides versioning, workflow, and other collaborative capabilities that improve productivity.
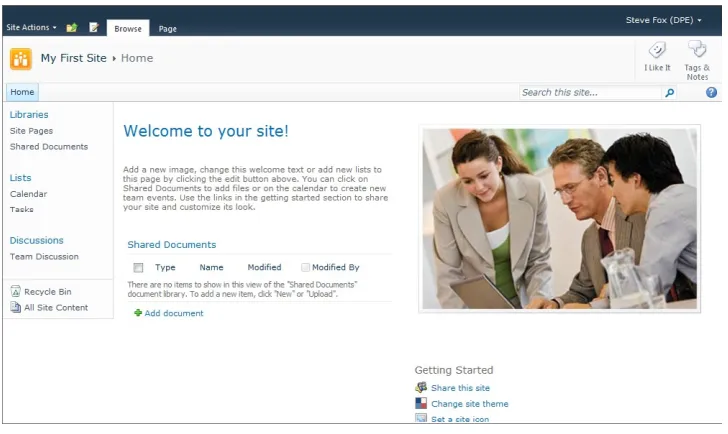
SharePoint provides many types of site templates, within which are additional native capabili-ties such as permissions, theming, site provisioning, and other configuration and manage-ment capabilities. Figure 1-3 shows a standard Team Site template that provides a set of libraries (for example, the Shared Documents document library), lists (such as Calendar and Tasks), and other integrated features that allow you to get up and running very quickly in your collaboration.
FIguRE 1-3 The standard Team Site template in SharePoint.
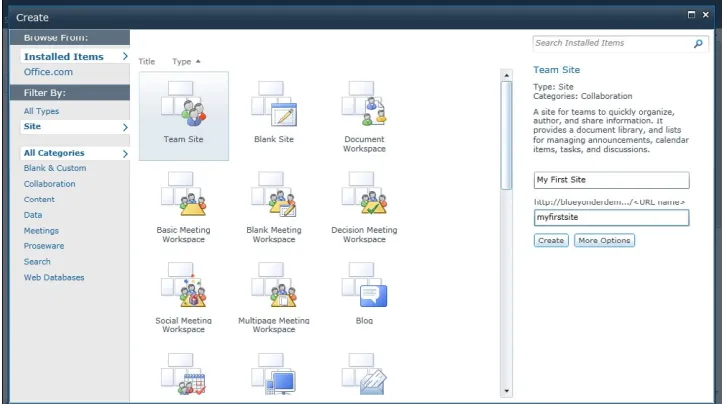
FIguRE 1-4 The Create gallery in SharePoint.
SharePoint also integrates its core out-of-the-box applications with other applications, such as Microsoft Outlook 2010, Excel 2010, and Microsoft Word 2010. Beyond that, it can be in-tegrated with systems such as SAP, Oracle's Siebel and PeopleSoft, and Microsoft Dynamics using the new Business Connectivity Services (BCS). Also, the unified infrastructure enables your organization to rally around a central point of collaboration—be it through an orga-nizational portal, a team site, or your own personal My Site. Finally, SharePoint responds to business needs by acting as a set of tools for your everyday work needs—for example, rout-ing documents through managed processes, providrout-ing business intelligence dashboards, and supplying audit tracking for documents in the Record Center. In essence, SharePoint 2010 represents the platform that offers a lot of functionality to do many different things, with collaboration lying at the heart of them.
You can program each of the core SharePoint artifacts in some way in SharePoint 2010. In fact, SharePoint 2010 provides a very rich development platform in which to write code. This book shows you how to do so through the integration of SharePoint and Windows Azure. For
example, you’ll see how to create what are called external lists—SharePoint lists that
More Info As an additional supplement to this book, my team and I have also created the Microsoft SharePoint and Windows Azure Development Kit, which expands on what’s covered in this book to provide you with even more practice, guidance, and code. In many ways, this book and the Development Kit complement one another, so I would recommend using them both for your learning. You can download the kit from here: http://www.microsoft.com/downloads/en /details.aspx?FamilyID=6d2dc556-650a-484f-8f52-f641967b42ea (or http://tinyurl.com/3uyzkn7). Although SharePoint has historically been pervasive in enterprise computing, this is about to
change. Office 365 includes a cloud-hosted version of SharePoint called SharePoint Online.
And though SharePoint Online Standard (the multitenant version of SharePoint) has a lim-ited set of capabilities when compared to SharePoint Server 2010, you’ll find that Windows Azure can be the port of entry for a lot of custom code. For example, you can use Microsoft Silverlight as the client application (deployed as a SharePoint Web Part) to integrate WCF ser-vices deployed to Windows Azure or data deployed to Windows Azure/SQL Azure, and bring that into the SharePoint Online experience. You can further use the native SharePoint APIs (for example, the SharePoint client object model) to then update data that is in the cloud-hosted SharePoint lists. The point is that you’ll have a rich set of capabilities that enable you to not only create powerful integrations between an on-premises instance of SharePoint and Windows Azure, but you’ll also be able to create applications that exist in a complete cloud environment.
Let’s now take a look at how SharePoint integrates with Windows Azure.
Integrating SharePoint 2010 and Windows Azure
Each of the core technology pillars in Windows Azure can be integrated within SharePoint. In this book, you’ll be exploring PaaS and SaaS more than IaaS. (At the time of writing, de-ployment of SharePoint on the Windows Azure virtual machine role was not yet supported.) Within this context, it is helpful to think of three possible types of integration: reach, re-source, and reusability. These are in one sense convenient ways to break out the integration, but in another sense they represent very real and in-demand ways to integrate SharePoint and Windows Azure. These are the three key pillars around which this book is designed.
Resource represents data storage and management. For example, think of a training solution that takes advantage of high-fidelity, community-driven videos; storing these video files on a file server can take up precious space—and you will run into the storage wall at some point. Extending the storage capabilities to Windows Azure enables you to either store data (that is, the videos) outright or archive it. The data can then be integrated within the SharePoint col-laborative experience.
Reusability refers to creating a service layer that connects your remote applications to your on-premises data and services. This enables you to not only reuse the code that might be serving other on-premises applications, but it also serves the needs of mobile applications. For example, suppose you want to create a Windows Phone 7 application that reads and writes data to and from your on-premises SharePoint instance; you can use the Windows Azure AppFabric service bus to mediate this relationship.
There are most assuredly more ways than those few described here in which these two tech nologies come together. You are all smart developers and will surely exploit these two technologies in very interesting ways. For this book, you might think of reach, re-source, and reusability as the top-level scenarios that guide many of the chapters. This book assumes that you are a developer, but it acts as an introduction to some of the ways in which you can integrate SharePoint and Windows Azure.
What Are the Possibilities?
Although this book has defined just three top-level pillars, the development possibilities are really limitless: with the mix of imagination and API, you will be able to design and deploy many interesting and compelling applications that take advantage of Windows Azure. With that in mind, the following table provides a starting point to the different ways in which you can integrate SharePoint with Windows Azure. This table is specific to SharePoint and Microsoft Office 2010, and some of these options require more coding than others.
Windows Azure Integration Approach to Integration
SP COM Integrate cloud-based data with data from lists or document libraries by using the SharePoint client object model.
BCS Model data from Windows Azure and/or build an external list to SQL Azure or WCF services deployed to Windows Azure. Silverlight Create a user interface against Windows Azure services or data
by using Silverlight.
Silverlight Create a Silverlight application that uses Windows Azure de-ployed as a Web Part—to either SharePoint on-premises or SharePoint Online.
ex-Windows Azure Integration Approach to Integration
Web Part Leverage services and data from Windows Azure.
Open XML Manage Windows Azure data into a document by using an OpenXML format.
REST Use REST (or oData standards) to interact with Windows Azure data to integrate with SharePoint.
Office Server Services Use JavaScript and jQuery to manage data client-side in SharePoint.
Workflow/Event Receivers Create a state or events that tie into Windows Azure service, workflows, or data.
LINQ Use for querying Windows Azure data objects.
Search Federate search to include Windows Azure data.
To reiterate, whatever type of integration you choose to build, it is important to note that in
this book, SharePoint is considered consumptive (in other words, SharePoint is not a service
or infrastructure that is hosted by Windows Azure; rather, it consumes it in some way). So you can use Windows Azure as a way to provide different applications or resources that will be consumed by SharePoint artifacts such as Web Parts or Silverlight applications. Within the classifications discussed earlier, this book treats Windows Azure as a PaaS.
With these possibilities in mind, this book was designed for existing SharePoint developers to learn how to integrate SharePoint and Windows Azure through step-by-step exercises that start from the simpler and end with more complex examples within each chapter. The goal of the book is to get you started with some integration possibilities so that you can take that knowledge and apply it to other areas. The areas that this book will cover are as follows:
■ Integrating Windows Azure Marketplace DataMarket data with Excel documents,
us-ing Excel Services in SharePoint, and programmatically usus-ing Visual Web Parts and a Silverlight application (Chapter 2)
■ Consuming SQL Azure data by using Business Connectivity Services (BCS) and an
exter-nal list, through a Visual Web Part (Chapter 3)
■ Advanced SQL Azure web development with the Entity Data Model (EDM), Web Parts,
Bing Maps, and Silverlight (Chapter 4)
■ Using Windows Azure BLOB storage to move files from your local system to Windows
Azure, which you can then expose in SharePoint (exposing image files in a Silverlight image viewer) (Chapter 5)
■ Deploying WCF services to Windows Azure and then integrating the service capabilities
■ Using the Windows Azure AppFabric service bus to create a service layer for remote application integration with on-premises SharePoint data (Chapter 8)
■ Advanced uses of WCF services that are deployed to Windows Azure and SharePoint,
specifically integrating BCS and WCF services and using the Excel Services JavaScript object model and jQuery to update client-side data (Chapter 9)
■ Securing your Windows Azure solution by using BCS security, Shared Access
Permissions, Access Control Service, claims-based authentication, and WS-Trust (Chapter 10)
With experience in these areas, you should be able to do quite a bit with SharePoint and Windows Azure. You’ll also surely generate many ideas for more compelling solutions and integrations. Further, my team has also helped build an additional set of resources through the Microsoft SharePoint and Windows Azure Development Kit, which provides even more information on how to integrate these sizeable platforms. To download the SharePoint and
Windows Azure Development Kit, visit http://tinyurl/com/3uyzkn7.
To get started, though, the first thing you’ll need to do is set up your development environ-ment. Let’s walk through how you can do that.
getting Ready to Develop
Before you think about getting your development environment set up, the first thing you need to do is set up your Windows Azure account. This is an important step, because without it you cannot deploy any code to the cloud and you are relegated to the test environment that is installed along with the Windows Azure SDK. Although the test environment can be useful for debugging, it doesn’t give you the "full fidelity" experience that you really need to understand how applications are designed and deployed, and how they act in the cloud.
Getting Started with Windows Azure
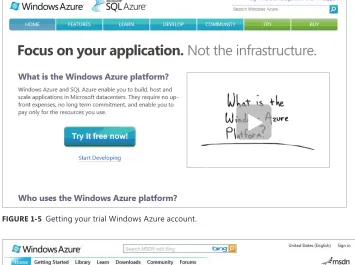
To get started with Windows Azure, go to http://www.microsoft.com/windowsazure/. Here
you can click the Start Developing button (see Figure 1-5) to get yourself set up with a Windows Azure account. Note that you can get a free trial account, which should be suf-ficient for working through this book and beyond, allowing you to build some proof-of-concept applications.
After you get set up with a Windows Azure account, you’ll be able to access your Windows
Azure Developer portal, which can be found here: http://msdn.microsoft.com/en-us/
FIguRE 1-5 Getting your trial Windows Azure account.
FIguRE 1-6 Logging on to the Windows Azure developer portal.
FIguRE 1-7 The Windows Azure developer portal.
You’ll use this portal quite a bit throughout the book, so explore the portal to become famil-iar with it.
Setting Up Your Development Environment
After you get your developer portal set up, you then need to ensure that you have your de-velopment environment set up; the developer portal is used to deploy code, and your devel-opment environment is where you build and test the code.
There are a couple of ways to set up your development environment. The first is to install ev-erything natively on your laptop or PC. The second is to create a virtual machine that runs in a virtualized environment.
Installing everything natively in your development environment can take some time, and if your machine becomes corrupted for some reason, you will need to start anew. The upside is that your performance can potentially be better than that in a virtualized environment because you’re running your applications natively. The environment I used for this book was installed natively on my development machine—a Lenovo T61p, 8 GB RAM laptop that per-formed very well.
down-Whether you choose the native or Hyper-V approach, you’ll need the following software installed in your development environment to complete the walkthroughs in this book.
For SharePoint 2010:
■ A Windows 64-bit compliant operating system (preferably Windows Server 2008 R2,
but you could use Windows 7)
■ Microsoft SharePoint Foundation 2010 or SharePoint Server 2010 (SharePoint
Foundation is the free version of SharePoint and can be used for many of the exercises in this book)
■ Microsoft SharePoint Designer 2010
■ Microsoft Office (Professional Plus) 2010
■ Microsoft Visual Studio 2010
■ The Microsoft .NET Framework 4
■ Microsoft Expression Blend (optional but recommended for Silverlight programming)
■ SQL Server 2008 R2 (you could install just the Express version)
For Windows Azure:
■ Windows Azure Tools and SDK, downloadable from http://www.microsoft.com
/downloads/en/details.aspx?FamilyID=7A1089B6-4050-4307-86C4-9DADAA5ED018&displaylang=en
■ Windows Azure AppFabric SDK, downloadable from
http://www.microsoft.com/down-load/en/details.aspx?displaylang=en&id=19925
If you want to build Windows Phone 7 applications (which you’ll have the option to do in the latter part of the book), you’ll also need to install the Windows Phone 7 Developer tools.
You can find the installation instructions here: http://msdn.microsoft.com/en-us/library/
ff402530(v=VS.92).aspx. (Note that at the time this book was written, you could only install Windows Phone 7 tools on a Windows 7 operating system. To avoid having to set up mul-tiple laptops, you could use Hyper-V and then add two virtual machines—one for the IW VM (downloadable from the web) and another for the Windows Phone 7 VM, which you can then use for Windows Phone 7 development.)
If you’re averse to installation but don’t mind clicking Download and grabbing a coffee (and maybe something to eat), then you can opt for the full Information Worker (IW) virtual ma-chine. This is a 180-day trial Hyper-V–compliant image that has all the SharePoint 2010 soft-ware on it. After you download and install the virtual image, you would then need to install the Windows Azure Tools and SDK and Windows Azure AppFabric SDK on the image. You also would need to ensure that you have your network switches set up correctly so that your virtual image can connect to the wider Internet to call out and interact with the code and data you deploy to Windows Azure.
You can download the IW VM from this location: http://www.microsoft.com/downloads/en/
details.aspx?FamilyID=751fa0d1-356c-4002-9c60-d539896c66ce&displaylang=en.
Because many of you will likely choose the virtual machine route, the following walkthrough provides instructions for installing and setting up your Hyper-V image.
Windows Server 2008 R2 Hyper-V
In Windows Server 2008 R2 (64 bit), you can use Hyper-V to manage and run your virtual
environments. The environment is a server role that you configure when setting up your
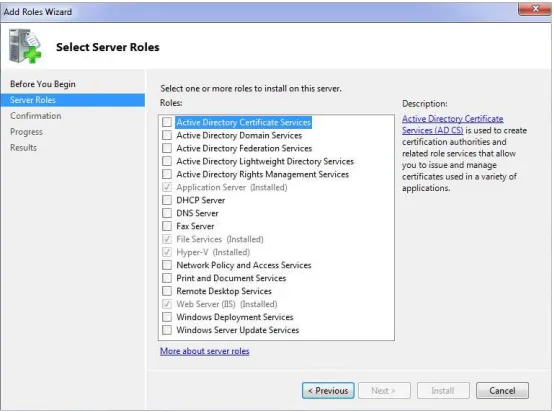
Windows Server 2008 R2 operating system. After you install Windows Server 2008 R2, you add the Hyper-V role through the Server Manager. For example, Figure 1-8 shows the Select Server Roles step of the Add Roles Wizard , showing Hyper-V already installed.
Configure Hyper-V for the IW VM
1. Click Start | Administrative Tools, and select Server Manager.
2. In the Server Manager, scroll to the Roles Summary, and then click Add Roles. Select
Hyper-V from the list.
3. The Server Manager takes you through several steps. Accept the default options and
click Next until the Install button is enabled.
4. Click Install to complete the Hyper-V installation. Note that Windows will prompt you
for a system restart. Restart your computer to complete the Hyper-V installation.
5. After you have Hyper-V installed, you can then add a Hyper-V–compliant .vhd file if
your team has already prepared one, or you can create one.
6. To add an existing image, open the Hyper-V snap-in by clicking Start | Administrative
Tools | Hyper-V Manager.
7. Under Actions, click New | Virtual Machine, specify a name and location for the image,
and click Next.
8. You now need to assign a level of RAM to the image—specify 6500 MB or more.
9. Accept the default option for Configure Networking, and click Next.
10. Click the Use An Existing Hard Disk option, browse to that disk, and then click Finish.
After you finish installing Hyper-V and adding the IW VM, you need to set up a network switch with your Hyper-V instance. This will make it easy for you to both access your Hyper-V development environment via a remote desktop and create a network share on your virtual hard disk, to which you can move software to be installed on your virtual hard disk. Note that the virtual machine must not be started and must be shut down before you can configure the settings.
Configure Your Network Switches
1. In your Hyper-V manager, click Virtual Network Manager.
2. Select New Virtual Network, provide a name for the network (for example, Internal
Switch), select Internal, and click Add. This adds a new internal virtual network that will allow your host machine and virtual machine to communicate.
3. Add a second virtual network by going through the same process, but this time add
4. On the host machine, click Start | Control Panel | Network And Internet, and then select Network And Sharing Center.
5. Click Change Adapter Settings, right-click the internal network adaptor you just added,
and select Properties.
6. Select Internet Protocol Version 4 (TCP/IPv4), and click Properties.
7. Click Use The Following IP Address, and add a unique IP address in the IP Address field,
as shown in the following graphic (192.168.150.1). Click the Subnet Mask field to have a subnet mask automatically generated.
You now need to start the virtual image. You can do this by right-clicking the virtual machine entry in Hyper-V and selecting Start.
8. When your virtual machine arrives at the logon page, log on to your virtual image and
click Start | Control Panel | Network And Internet. Then select Network And Sharing Center (or right-click the network icon in the Windows tray and select Open Network And Sharing Center).
9. Click Change Adapter Settings.
10. Configure the internal network adaptor properties as you did earlier, by right-clicking
12. The external network adaptor should use DHCP, so it should be set to Obtain An IP Address Automatically.
You can now use a remote desktop to access the image, and you can connect to your host computer’s Internet connection from the virtual machine. To test this out, ensure that your virtual machine is logged on, and then click Start | All Programs | Accessories | Remote Desktop Connection. Type the IP address you configured within the virtual image (for exam-ple, 192.168.150.1), and then click Connect. Windows will connect you to your development environment via Remote Desktop, and you’ll need to enter in the credentials for the virtual
machine (for example, Administrator is the user name and pass@word1 is the password for
the IW VM).
After you’ve done this, you can locate and install the remaining software (that is, the Windows Azure Tools and SDK and the Windows AppFabric SDK) on the Hyper-V virtual machine. With your development environment set up, you are now ready to get busy cod-ing! And that’s what this book is about: making sure you gets lots of hands-on practice with both simple and complex examples that will help you learn the different ways to integrate SharePoint and Windows Azure.
With that in mind, let’s jump in and create your first Windows Azure application.
Create Your First Windows Azure Application
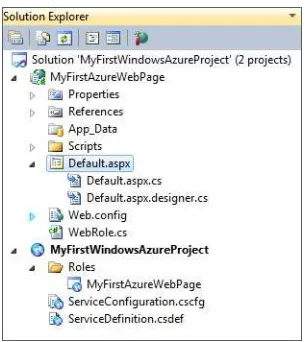
1. Open Visual Studio 2010, and click New Project.
2. In the Installed Templates gallery, select Cloud (the Windows Azure Project template).
Provide a name for the project (for example, MyFirstWindowsAzureProject), a
3. Click OK. In the New Windows Azure Project wizard, select ASP.NET Web Role, and click the right-arrow (>) button. You can click the small pencil icon to rename the new web
role (for example, MyFirstAzureWebPage).
4. Click OK when you are done.
More specifically, the ServiceDefinition.csdef file contains metadata that is used by Windows Azure to properly implement your application. The ServiceConfiguration.cscfg file stores information for settings stored in the service definition file, such as role name and the number of instances to run in Windows Azure. The following code snippet shows what should appear in your service configuration file:
<?xml version="1.0" encoding="utf-8"?>
<ServiceConfiguration serviceName="MyFirstWindowsAzureProject" xmlns="http://schemas. microsoft.com/ServiceHosting/2008/10/ServiceConfiguration" osFamily="1" osVersion="*"> <Role name="MyFirstAzureWebPage">
<Instances count="1" /> <ConfigurationSettings>
<Setting name="Microsoft.WindowsAzure.Plugins.Diagnostics.ConnectionString" value="UseDevelopmentStorage=true" />
</ConfigurationSettings> </Role>
</ServiceConfiguration>
You’ll also note that the Windows Azure tools enable you to configure project set-tings and add resource variables (such as data connection strings), among other properties. You can explore these properties by double-clicking the role reference beneath the main Windows Azure project in the Solution Explorer (for instance, MyFirstWindowsAzureProject). For more information about the configuration files, settings, and project properties for Windows Azure applications, see “Configuring
the Windows Azure Application with Visual Studio” at http://msdn.microsoft.com/en-us/
library/ee405486.aspx.
5. Right-click Default.aspx, select View Designer, and type a simple string such as Hello
World! in the designer. Press F5 to build and view your application.
You’ll notice that the new application invokes within the local Windows Azure devel-oper fabric—which enables you to code your applications and test them locally before deploying them to the hosted instance of Windows Azure (and thus to the cloud). Take note of the IP address, which is standard for the debug environment.
You’ll get a chance to explore how to use the IFRAME technique in Chapter 5, “Using Windows Azure BLOB Storage in SharePoint Solutions.” You’ll also get a chance to explore many other types of integration techniques throughout this book and in the companion code and the Development Kit.
Summary
In this chapter, you were introduced to the concept of cloud computing, Windows Azure, and how SharePoint and Windows Azure integrate with one another. You also learned about two ways to set up your development environment: installed natively on your PC, or within a vir-tualized environment. You then learned how to install the Hyper-V role and then set up the role and configure it to load the IW VM that is available for free download. You also created your first Windows Azure application and learned a simple way to integrate with SharePoint. Now that you are finished with the chapter, you are ready to get busy coding!
Additional References
To help you with your learning process, here are some additional references (hard copy and online) that you might find useful.
■ Velte, Toby, Anthony Velte, and Robert Elsenpeter. Cloud Computing: A Practical
Approach. McGraw Hill, 2009.
■ “Introduction to the Windows Azure Platform.” http://msdn.microsoft.com/en-us/
library/ff803364.aspx
■ Download location for IW VM: http://www.microsoft.com/downloads/en/details.
aspx?FamilyID=751fa0d1-356c-4002-9c60-d539896c66ce&displaylang=en
■ Download location for SharePoint 2010 Easy Setup Script: http://www.microsoft.com/
downloads/en/details.aspx?FamilyID=54dc2eef-e9ea-4c7b-9470-ec5cb58414de
Chapter 2
Getting Started with SharePoint and
Windows Azure
After completing this chapter, you’ll be able to:
■ Surface Windows Azure DataMarket data in Excel, and expose data in SharePoint by
using Excel Services.
■ Integrate Windows Azure DataMarket data in a Visual Web Part.
■ Integrate Windows Azure DataMarket data in a Silverlight application, and deploy to
SharePoint.
Windows Azure Marketplace DataMarket
As you saw in Chapter 1, “Welcome to SharePoint and Windows Azure,” working with Windows Azure can mean many different things—from interacting with the service bus, to deploying services, to storing data in the cloud, to interacting with marketplace data. Within each of these areas, you can use the cloud, and more specifically, Windows Azure, to bring increased power and value to Microsoft SharePoint. In this chapter, you’ll explore the Windows Azure Marketplace DataMarket data (originally codenamed “Dallas”), and you’ll also see how to integrate this data with SharePoint—using both no-code and coded solutions.
WCF Data Services and Publicly Consumable Data Feeds
Windows Azure Marketplace DataMarket (referred to in this chapter as Marketplace
DataMarket or just DataMarket), is a service Microsoft offers through Windows Azure that facilitates the publishing and hosting of data by using Windows Communication Foundation (WCF) Data Services, so organizations and individuals can consume that data via a subscrip-tion model. For example, in this chapter, you’ll use the U.S. Crime Data statistics data service (DATA.gov) to build a dashboard in SharePoint by using Microsoft Excel Services, and then integrate that data into SharePoint by using a WCF service. There are, of course, many types of DataMarket data feeds that you can explore and use in your application development.
applies web technologies such as HTTP, the Atom Publishing Protocol (AtomPub), and JavaScript Object Notation (JSON) to access information from different web-based sources. These web-based sources can range from relational databases and file systems to web and content management systems—and of course, include information that resides in normal
websites. An open-standards protocol provides guidance on oData through the site http://
www.odata.org/. Using oData, you can both publish and consume data feeds. You can pub-lish data by using WCF Data Services, and you can consume it using REST Uniform Resource Identifiers (URIs) that expose the data in different formats (such as AtomPub). The results can be consumed by a browser or used in application development.
Microsoft provides a free-for-use oData data set (called Northwind), available at http://
services.odata.org/Northwind/Northwind.svc/Customers. When you navigate to this URI by using your web browser, the returned customer data looks similar to the XML code snippet shown in Listing 2-1. (You should take note that, by default, Windows Internet Explorer and many other browsers render this as an RSS feed, so you may have to turn this return data feed off to see the data as XML.)
Note The returned XML data shown in Listing 2-1 is a trimmed snippet from the full returned data and includes only two customers: ALFKI and ANATR.
LISTINg 2-1 Two-customer snippet of the full customer XML from Northwind
<?xml version="1.0" encoding="utf-8" standalone="yes" ?>
<feed xml:base="http://services.odata.org/northwind/Northwind.svc/" xmlns:d="http:// schemas.microsoft.com/ado/2007/08/dataservices" xmlns:m="http://schemas.microsoft.com/ ado/2007/08/dataservices/metadata" xmlns="http://www.w3.org/2005/Atom">
<title type="text">Customers</title>
<id>http://services.odata.org/Northwind/Northwind.svc/Customers</id> <updated>2010-11-27T20:34:27Z</updated>
<link rel="self" title="Customers" href="Customers" /> <entry>
<id>http://services.odata.org/northwind/Northwind.svc/Customers('ALFKI')</id> <title type="text" />
<updated>2010-11-27T20:34:27Z</updated> <author>
<name /> </author>
<link rel="edit" title="Customer" href="Customers('ALFKI')" />
ado/2007/08/dataservices/scheme" /> <content type="application/xml"> <m:properties>
<d:CustomerID>ALFKI</d:CustomerID>
<d:CompanyName>Alfreds Futterkiste</d:CompanyName> <d:ContactName>Maria Anders</d:ContactName>
<d:ContactTitle>Sales Representative</d:ContactTitle> <d:Address>Obere Str. 57</d:Address>
<d:City>Berlin</d:City> <d:Region m:null="true" /> <d:PostalCode>12209</d:PostalCode> <title type="text" />
<updated>2010-11-27T20:34:27Z</updated> <author>
<name /> </author>
<link rel="edit" title="Customer" href="Customers('ANATR')" />
<link rel="http://schemas.microsoft.com/ado/2007/08/dataservices/related/Orders"
<d:CompanyName>Ana Trujillo Emparedados y helados</d:CompanyName> <d:ContactName>Ana Trujillo</d:ContactName>
<d:ContactTitle>Owner</d:ContactTitle>
<d:Address>Avda. de la Constitución 2222</d:Address> <d:City>México D.F.</d:City>
You can, for example, issue queries through a specific REST query syntax to return more
detailed information. For example, http://services.odata.org/Northwind/Northwind.svc/
Customers('ALFKI') returns only the information for the customer with the ID ALFKI.
More Info To learn more about oData, visit http://www.odata.org/.
After the data has been returned to the calling application, you can parse the XML and use the underlying data in your application. To do this, you would use standard XML objects (such as XDocument or XElement) or custom classes and list collections to manage the data inter-nally in your application. You’ll see how to do this later in the chapter.
As mentioned earlier, you use WCF Data Services (formerly Microsoft ADO.NET Data Services) to expose a data set for public (or subscription) consumption. In this chapter, you’ll use ser-vices that have already been published to the DataMarket by using WCF Data Serser-vices, and you’ll learn how to consume those services in your applications.
More Info To learn more about WCF Services, visit http://msdn.microsoft.com/en-us/library/ cc668794.aspx.
Getting Started with Windows Azure Marketplace DataMarket
To get started with the DataMarket, navigate to https://datamarket.azure.com/. Here, you’ll
be able to register with the Windows Azure Marketplace DataMarket by using your Windows Live ID (click the Windows Live Sign In icon in the upper-right corner of the landing page as shown in Figure 2-1, add your information where requested, accept the license agree-ment, and then click Register), get a developer account, and explore the available data sets. Note that you can explore the data published to the DataMarket by clicking the Explore The Marketplace button without logging on to the site. After you register, you can click My Account and then Account Keys to get your developer account key.
Important To complete the exercises in this chapter, you’ll first need to register and get your developer account key.
FIguRE 2-1 Windows Azure DataMarket landing page.
Important You will need to register for the DATA.gov (2006-2008 Crime in the United States) feed to complete the exercises in this chapter. It is a free data feed, so it is a good test data set to use when learning how to use the Windows Azure Marketplace DataMarket.
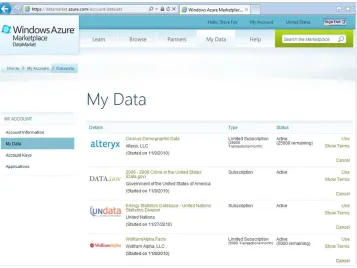
You’ll need to accept a license agreement, so go ahead and accept by clicking Sign Up. After you sign up for the data feed, the DataMarket adds the feed to your subscriptions. If you return to the DataMarket home page and click My Data, you’ll see the newly added subscrip-tion listed on the My Data page—see Figure 2-3.
FIguRE 2-3 The My Data page lists information about your current subscriptions.
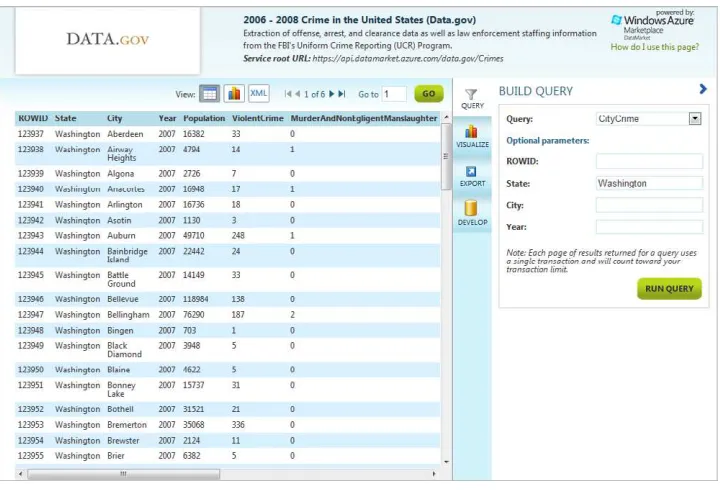
To explore a specific data set, click the data feed and then click Explore This Data Set. This provides you with a way to interact with the DataMarket data via your web browser. For ex-ample, Figure 2-4 shows the DATA.gov data feed, and the fact that “Washington” has been submitted as a filter for the State field. If you enter any filters, click Run Query to see the re-sults of the query displayed (by default) in tabular HTML format. You can toggle the views by clicking Atom Pub to view the Atom feed publishing format.
You should also note that when you submit the query to the DataMarket, the page displays the query URI for you. For example, Figure 2-4 displays the query with “Washington” as the filter as follows:
FIguRE 2-4 DATA.gov feed filtered for Washington as the state.
With the subscription now added to your DataMarket account, you’ll want to download the
DataMarket add-in for Excel 2010, which you can download from https://datamarket.azure.
com/addin. When you click the Click Here To Download link, you’ll be taken to a Microsoft.com download page where you can download and install the DataMarket add-in for Excel 2010.
Important You must have Excel 2010 installed to run the add-in, and you must have the add-in installed to complete the exercises in this chapter.
You are now ready to begin the exercises.
Integrating DataMarket Data with Excel and SharePoint
Consume Windows Azure Data in Excel 2010
1. Open Excel 2010, and click the Data tab on the Excel 2010 ribbon.
2. Click the Import Data From Windows Azure Marketplace DataMarket button. This
opens the Marketplace DataMarket custom task pane.
3. In the custom task pane, add your account key, and then click Sign In. The data feeds
you added to your Marketplace DataMarket subscriptions will appear in the custom task pane.
4. Find the DATA.gov feed listed in the custom task pane, and then click Import Data.
5. In the Query Builder dialog box, click Add Filter, and select State. Then type
6. Click Import Data to import the data from Windows Azure Marketplace DataMarket into your Excel 2010 document.
7. The data is imported as a table object, so you can filter, sort, hide, and show columns, and create charts, PivotTables, and so on, to create an analysis of the data.
More than likely, you’ll want to create a filtered analysis of DataMarket data within Excel, and this is where you have some great capabilities at your fingertips. For exam-ple, you can use the formatting, charting, or PivotTable and PivotChart capabilities built into Excel to create compelling analyses. Explore the different features of Excel after you’ve imported the data to gain an understanding of the types of analyses you can build. For now, continue this exercise to create a PivotChart and PivotTable.
More Info You can find more information on how to use Excel 2010 at http://office. microsoft.com/en-us/excel-help/what-s-new-in-excel-2010-HA010369709.aspx.
8. Click the Insert tab, click the PivotTable arrow (not the button), and then select
PivotChart. Select the default table range and location, and then click OK.
You’ve now completed the first exercise. However, the document you just created is one that only you have access to on your local computer. To expose this type of information to others in your organization, you’ll often want to publish documents or elements of documents such as this to SharePoint. By publishing, you can share the entire document or build dashboards out of, for example, the charts or tables that are generated automatically during the PivotChart and PivotTable creation process.
Next, you’ll walk through the process to expose elements of the document to SharePoint by using Excel Services.
Publish Excel Objects to Excel Services
1. Open your SharePoint site, and navigate to a document library.
2. Click the Documents tab, click Upload Document, and then click Upload Document.
3. Click Browse in the Upload Document dialog box, and then select the Excel document
you created in the previous exercise and saved to your local drive.
4. Click the Options menu beside the document, and select Edit In Microsoft Excel.
5. Click File, select Save & Send, and then click Save To SharePoint.
6. Click Publish Options, which is located in the upper-right corner of the Backstage view.
7. In the Publish Options dialog box, select Items In The Workbook in the drop-down list.
8. Click OK, and save the Excel document back to your SharePoint site by clicking Save.
9. Lastly, right-click the link to the Excel document in the document library, and select
Copy Shortcut. Paste the link somewhere convenient (for example, in a Notepad file) because you’ll need the link later in the chapter.
At this point, you’ve saved the Excel document that contains Marketplace DataMarket data to SharePoint and have published the objects that make up the document to SharePoint by using Excel Services; that is, the chart and table objects. With Excel Services, you can expose worksheets, charts, named ranges, and other objects in an Excel document.
Note To get a more controlled view of your data, you can copy and paste data (just the values) from the table into a new worksheet, create a separate named range, and then style that table as you like. That involves some manual work—but you’ll end up with a new named range that ex-poses the exact data you want to create within a cleanly formatted named range.
Surface Windows Azure Marketplace DataMarket Data by Using SharePoint Excel Services
1. Navigate to your SharePoint site, and click Site Actions | View All Site Content.
2. Click Create, select Web Part Page, click Create, and provide a name for your page (for
example, Crime Data). Leave the default location in Site Assets.
3. After you’ve created the Crime Data page, navigate to it and click Site Actions, and then
4. Click Add A Web Part, and select Business Data.
5. Within the Business Data category, select Excel Web Access, and click Add.
6. After the Web Part has been added to the page, click the Click Here To Open The Tool
Pane option.
7. In the Workbook field, enter the shortcut you copied to Notepad (or your Clipboard) in
the previous exercise, which points to the Excel document that you uploaded into your SharePoint site. (If you didn’t copy and paste the link, navigate to the document library where you uploaded the Excel document, right-click the document, and select Copy Shortcut.)
8. In the Named Item field, add the item you want to expose—these are the items you
published using Excel Services and the Publish Options dialog box. The following image
illustrates the link and PivotTable1 object configured in the Excel Web Access Web Part.
(Note that you may need to configure the height and width of the Web Part. You can do this by expanding the Appearance section in the Options pane and entering a cus-tom height and width.)
9. When done, click OK.
You can also create other Excel Web Access Web Parts and expose different parts of the Excel document to create a Crime dashboard. It is noteworthy that you can also go beyond just using the Excel Web Access Web Part and use the Excel Services REST URI to expose ele ments in the Excel document to SharePoint. For example, the following REST URI exposes the chart
that was automatically created in the PivotChart process (Chart 1) in the web browser:
http://blueyonderdemo/_vti_bin/ExcelRest.aspx/newprops/Crime/Contoso_Store_Crime_ Supplement.xlsx/Model/Charts(‘Chart%201’)
You can use this same REST URI to expose this image in an Image Viewer Web Part. To do this, simply navigate to your SharePoint site, click Site Actions | Edit Page, and then insert a new Image Viewer Web Part. Click the Open The Tool Pane link in the newly added Web Part and paste the Excel Services REST URI into the Image Link field. What results is something similar to Figure 2-5, which you can use in your dashboards. This reference then uses the Excel document (within which the chart object lives) as the common point of reference; every time you update the chart, the image in the Web Part also updates without any intervention on your part.
Thus far, you’ve seen how to integrate Marketplace DataMarket data to SharePoint without using any code. This type of integration is great for quickly building dashboards and reports that you can expose in SharePoint by using the different features of Excel Services.
In the next section of this chapter, you’ll see more programmatic ways of integrating