FOR
DUMmIES
‰by John Paul Mueller
FOR
DUMmIES
‰111 River Street Hoboken, NJ 07030-5774
www.wiley.com
Copyright © 2013 by John Wiley & Sons, Inc., Hoboken, New Jersey Published by John Wiley & Sons, Inc., Hoboken, New Jersey Published simultaneously in Canada
No part of this publication may be reproduced, stored in a retrieval system or transmitted in any form or by any means, electronic, mechanical, photocopying, recording, scanning or otherwise, except as permitted under Sections 107 or 108 of the 1976 United States Copyright Act, without either the prior written permission of the Publisher, or authorization through payment of the appro-priate per-copy fee to the Copyright Clearance Center, 222 Rosewood Drive, Danvers, MA 01923, (978) 750-8400, fax (978) 646-8600. Requests to the Publisher for permission should be addressed to the Permissions Department, John Wiley & Sons, Inc., 111 River Street, Hoboken, NJ 07030, (201) 748-6011, fax (201) 748-6008, or online at http://www.wiley.com/go/permissions.
Trademarks: Wiley, the Wiley logo, For Dummies, the Dummies Man logo, A Reference for the Rest of Us!, The Dummies Way, Dummies Daily, The Fun and Easy Way, Dummies.com, Making Everything Easier, and related trade dress are trademarks or registered trademarks of John Wiley & Sons, Inc. and/or its affiliates in the United States and other countries, and may not be used without written permission. Windows is a registered trademark of Microsoft Corporation. All other trademarks are the property of their respective owners. John Wiley & Sons, Inc. is not associated with any product or vendor mentioned in this book.
LIMIT OF LIABILITY/DISCLAIMER OF WARRANTY: THE PUBLISHER AND THE AUTHOR MAKE NO REPRESENTATIONS OR WARRANTIES WITH RESPECT TO THE ACCURACY OR COMPLETENESS OF THE CONTENTS OF THIS WORK AND SPECIFICALLY DISCLAIM ALL WARRANTIES, INCLUDING WITHOUT LIMITATION WARRANTIES OF FITNESS FOR A PARTICULAR PURPOSE. NO WARRANTY MAY BE CREATED OR EXTENDED BY SALES OR PROMOTIONAL MATERIALS. THE ADVICE AND STRATEGIES CONTAINED HEREIN MAY NOT BE SUITABLE FOR EVERY SITUATION. THIS WORK IS SOLD WITH THE UNDERSTANDING THAT THE PUBLISHER IS NOT ENGAGED IN RENDERING LEGAL, ACCOUNTING, OR OTHER PROFESSIONAL SERVICES. IF PROFESSIONAL ASSISTANCE IS REQUIRED, THE SERVICES OF A COMPETENT PROFESSIONAL PERSON SHOULD BE SOUGHT. NEITHER THE PUBLISHER NOR THE AUTHOR SHALL BE LIABLE FOR DAMAGES ARISING HEREFROM. THE FACT THAT AN ORGANIZATION OR WEBSITE IS REFERRED TO IN THIS WORK AS A CITATION AND/OR A POTENTIAL SOURCE OF FURTHER INFORMATION DOES NOT MEAN THAT THE AUTHOR OR THE PUBLISHER ENDORSES THE INFORMATION THE ORGANIZATION OR WEBSITE MAY PROVIDE OR RECOMMENDATIONS IT MAY MAKE. FURTHER, READERS SHOULD BE AWARE THAT INTERNET WEBSITES LISTED IN THIS WORK MAY HAVE CHANGED OR DISAPPEARED BETWEEN WHEN THIS WORK WAS WRITTEN AND WHEN IT IS READ.
For general information on our other products and services, please contact our Customer Care Department within the U.S. at 877-762-2974, outside the U.S. at 317-572-3993, or fax 317-572-4002. For technical support, please visit www.wiley.com/techsupport.
Wiley publishes in a variety of print and electronic formats and by print-on-demand. Some material included with standard print versions of this book may not be included in e-books or in print-on-demand. If this book refers to media such as a CD or DVD that is not included in the version you pur-chased, you may download this material at http://booksupport.wiley.com. For more information about Wiley products, visit www.wiley.com.
Library of Congress Control Number: 2012949509
ISBN: 978-1-118-13243-2 (pbk); ISBN 978-1-118-23855-4 (ebk); ISBN 978-1-118-26320-4 (ebk); ISBN 978-1-118-22505-9 (ebk)
John Paul Mueller is a freelance author and technical editor. He has writing in his blood, having produced 90 books and over 300 articles to date. The topics range from networking to artificial intelligence and from database management to heads-down programming. Some of his current books include Windows command-line references, books on VBA and Visio, several books on C#, and an IronPython programmer’s guide. His technical editing skills have helped more than 63 authors refine the content of their manuscripts. John has provided technical editing services to both Data Based Advisor and Coast Compute magazines. He’s also contributed articles to magazines such as Software Quality Connection, DevSource, InformIT, SQL Server Professional, Visual C++ Developer, Hard Core Visual Basic, asp.netPRO, Software Test and Performance, and Visual Basic Developer. Be sure to read John’s blog at http://blog. johnmuellerbooks.com/.
Thanks to my wife, Rebecca, for working with me to get this book completed. I really don’t know what I would have done without her help in researching and compiling some of the information that appears in this book. She also did a fine job of proofreading my rough draft and helping me with the Glossary. Rebecca keeps the house running while I’m buried in work. Russ Mullen deserves thanks for his technical edit of this book. He greatly added to the accuracy and depth of the material you see here. Russ is always providing me with great URLs for new products and ideas. However, it’s the testing Russ does that helps most. He’s the sanity check for my work. Russ also has different computer equipment than mine, so he’s able to point out flaws that I might not otherwise notice.
Matt Wagner, my agent, deserves credit for helping me get the contract in the first place and taking care of all the details that most authors don’t really consider. I always appreciate his assistance. It’s good to know that someone wants to help. A number of people read all or part of this book to help me refine the approach, test the coding examples, and generally provide input that all readers wish they could have. These unpaid volunteers helped in ways too numerous to mention here. I especially appreciate the efforts of Eva Beattie, Glenn Russell, and Hamid Ramazani, who provided general input, read the entire book, and selflessly devoted themselves to this project.
I especially appreciated the help I received from Lee Chantrey and the use of ViStart during the writing of this book. Lee was quite receptive to my input, and I can’t wait to see the finished product.
Finally, I would like to thank Katie Feltman, Blair Pottenger, Becky Whitney, and the rest of the editorial and production staff at Wiley for their assistance in bringing this book to print. It’s always nice to work with such a great group of
custhelp.com. For other comments, please contact our Customer Care Department within the U.S. at 877-762-2974, outside the U.S. at 317-572-3993, or fax 317-572-4002. Some of the people who helped bring this book to market include the following:
Acquisitions and Editorial
Project Editor: Blair J. Pottenger
Senior Acquisitions Editor:
Katie Feltman
Copy Editor: Becky Whitney
Technical Editor: Russ Mullen
Editorial Manager: Kevin Kirschner
Editorial Assistant: Leslie Saxman
Sr. Editorial Assistant: Cherie Case
Composition Services
Project Coordinator: Katie Crocker
Layout and Graphics: Jennifer Creasey,
Joyce Haughey, Christin Swinford
Proofreaders: ConText Editorial
Services, Inc., John Greenough
Indexer: Valerie Haynes Perry
Publishing and Editorial for Technology Dummies
Richard Swadley, Vice President and Executive Group Publisher
Andy Cummings, Vice President and Publisher
Mary Bednarek, Executive Acquisitions Director
Mary C. Corder, Editorial Director
Publishing for Consumer Dummies
Kathleen Nebenhaus, Vice President and Executive Publisher
Composition Services
The Big Picture: Windows 8 ... 7
Part 1: Navigating the Start Screen ... 29
Part 2: Navigating the Desktop Interface ... 59
Part 3: Using the Standard Applications ... 79
Part 4: Working with Gadgets ... 97
Part 5: Using Internet Explorer ... 109
Part 6: Configuring Your System ... 137
Part 7: Interacting with External Devices ... 163
Part 8: Accessing the Network ... 181
Part 9: Performing Administrative Tasks ... 201
Introduction ...1
About Windows 8 For Dummies Quick Reference ...1
Foolish Assumptions ...1
Conventions Used in This Book ...2
How This Book Is Organized ...2
The Big Picture: Windows 8 ...2
Part 1: Navigating the Start Screen ...3
Part 2: Navigating the Desktop Interface ...3
Part 3: Using the Standard Applications ...3
Part 4: Working with Gadgets ...3
Part 5: Using Internet Explorer ...4
Part 6: Configuring Your System ...4
Part 7: Interacting with External Devices ...4
Part 8: Accessing the Network ...4
Part 9: Performing Administrative Tasks ...4
Icons Used in This Book ...5
The Big Picture: Windows 8 ... 7
Part 1: Navigating the Start Screen ... 29
Defining a Windows 8 App ...30
Employing the Start Screen ...30
Accessing apps ...31
Zooming in and out ...34
Interacting with the App Bar ...34
Accessing all the applications ...35
Altering the Start screen ...36
Creating a new group ...40
Displaying the administrative tools ...41
Removing personal information...43
Using Charms ...44
Using the Search charm ...44
Using the Share charm ...51
Using the Start charm ...53
Using the Devices charm ...54
Utilizing the Settings charm...55
Using Location Data ...56
Part 2: Navigating the Desktop Interface ... 59
Moving Between the Start Screen and Desktop ...60
Displaying the Desktop interface ...60
Bringing Back the Start Menu ...62
Downloading the ViStart replacement ...63
Installing ViStart ...63
Using ViStart ...65
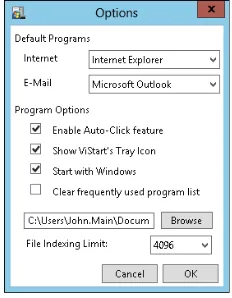
Modifying the ViStart options ...67
Configuring the Desktop Icons ...69
Adding icons to the Desktop ...69
Organizing the icons ...70
Configuring the Taskbar ...72
Setting Up Jump Lists ...75
Setting Up Toolbars ...77
Part 3: Using the Standard Applications ... 79
Finding Your Applications ...80
Installing Applications ...82
Using a CD or DVD ...83
Using a downloaded file ...84
Running from a remote location ...85
Turning Windows Features On or Off ...85
Pinning Common Applications to the Taskbar ...87
Using a running application ...88
Using File Explorer ...88
Setting Up Applications to Run Under Windows 8 ...89
Making use of the Program Compatibility Troubleshooter.... 90
Modifying the configuration manually ...92
Revising settings for all users...94
Uninstalling Applications ...95
Part 4: Working with Gadgets ... 97
Adding Gadgets to the Desktop ...98
Making gadgets appear on the Desktop ...98
Using the Calendar gadget ...99
Using the Clock gadget ...101
Using the CPU Meter gadget ...103
Using the Currency gadget ...103
Using the Feed Headlines gadget ...103
Using the Picture Puzzle gadget ...105
Using the Slideshow gadget ...105
Using the Weather gadget ...106
Eliminating Gadgets from the Desktop ...107
Obtaining New Gadgets ...107
Part 5: Using Internet Explorer ... 109
Knowing Where You Go ...110
Accessing favorites ...110
Accessing feeds ...113
Making Internet Explorer Configuration Changes...114
Setting the General options ...115
Setting the Security options ...117
Setting the Privacy options...119
Setting the Content options ...121
Setting the Connections options ...123
Shaping the Programs options ...124
Working with the Advanced options ...126
Managing Add-Ons ...127
Getting things done with toolbars and extensions ...128
Managing search providers ...129
Setting up accelerators ...130
Setting up tracking protection ...132
Using the Safety Features ...132
Deleting the browsing history ...133
Finding out the web page privacy policy ...134
Using InPrivate browsing ...134
Utilizing ActiveX Filtering ...135
Working with the SmartScreen Filter ...135
Part 6: Configuring Your System ... 137
Personalizing a Theme ...138
Adding a Desktop background ...138
Adjusting the system colors ...140
Calibrating your monitor for optimal appearance ...142
Modifying ClearType ...145
Setting up system sounds ...146
Accessing the Control Panel ...148
Turning Windows 8 features on or off ...149
Making your system more accessible ...150
Modifying the default programs...151
Choosing a Power Usage Plan ...153
Interacting with Device Manager ...154
Setting Up System Protection ...157
Accessing the restore points ...157
Choosing drives to protect ...159
Creating a restore point ...160
Reverting to a restore point ...161
Part 7: Interacting with External Devices ... 163
Adding Device Support ...164
Configuring a Printer ...165
Controlling Print Jobs ...167
Accessing the list of print jobs ...167
Pausing a print job ...168
Altering print job priorities ...168
Setting Up a Scanner ...170
Checking the profiles ...170
Creating a new profile or editing an existing profile ...171
Establishing a profile as the default ...173
Removing a profile ...173
Scanning a Document ...173
Working with Pictures ...177
Viewing pictures directly ...177
Opening the picture folder ...179
Part 8: Accessing the Network ... 181
Adding a Network Connection...182
Becoming Part of a Domain ...184
Becoming Part of a Workgroup ...188
Configuring a HomeGroup ...189
Configuring the Firewall ...192
Allowing applications through the firewall ...193
Modifying the firewall notifications ...194
Turn the firewall on ...195
Connecting to Remote Resources ...195
Accessing remote printers ...196
Working with remote drives ...196
Interacting with Windows Defender ...198
Part 9: Performing Administrative Tasks .... 201
Opening a Command Prompt ...202
Adding a command prompt entry to the Start menu ...202
Opening a new window ...202
Opening the Properties dialog box ...204
Pasting, selecting, copying, and otherwise manipulating text ...206
Seeking help ...207
Using commands ...209
Starting Applications with the Administrator Account...210
Working from the Start screen ...211
Working with the Taskbar ...211
Using the Administrative Tools Folder Consoles...212
Using the Remote Desktop to Access a System ...213
Configuring the remote settings ...214
Connecting to the remote system ...216
Microsoft has said that Windows 8 is “Windows reimagined.” In fact, anyone who looks at Windows 8 for the first time will see something that looks completely different from anything Microsoft has done in the past. The fact is that Microsoft wants to provide an operating system that’s simpler and more intui-tive; one that works equally well on a desktop system and a tablet. Windows 8 For Dummies Quick Reference is designed as an aid to making it easier to work with Windows 8 — to make the differences easier to understand.
About Windows 8 For Dummies
Quick Reference
With all the changes you see, you might feel a little overwhelmed when you use Windows 8 at first. Windows 8 For Dummies Quick Reference is designed to provide you with assistance in perform-ing common tasks. You use this book to quickly determine the exact set of steps you need to perform to move between the Start screen and the Desktop interface, or to access the Control Panel to make some much needed changes. The goal of this book isn’t to teach you everything about Windows 8 — it’s to make those tasks you perform every day a lot easier.
This book also focuses on reducing the learning curve for read-ers who’ve worked with Windows for years and now find them-selves completely lost in a new environment. By using the tips and techniques in this book, you can get up and running with Windows 8 considerably faster than if you try hunting on your own for the features you need. Along the way, you discover some new features that Windows 8 provides to make your com-puting experience better, and you even get a glimpse of some nice-to-have features, such as the Windows Store.
Foolish Assumptions
Windows experience. For example, you should know the basics of how to install, configure, and start an application. It’s also a good idea to know how to use hardware features such as the touch system on your computer (assuming that you have a touch-enabled computer).
You definitely don’t need to be an expert Windows user to ben-efit from this book. All the tasks are described using easily understandable, step-by-step procedures. A wealth of screen shots make it easy for you to see what your display should look like when you complete a task.
Conventions Used in This Book
A few style conventions will help you navigate this book efficiently: ✓ Terms or words that I truly want to emphasize appear in
italics. You can also find them defined in the Glossary, at the end of this book.
✓ Website addresses, or URLs, are shown like this:
www.dummies.com.
✓ Numbered steps that you need to follow, and characters that you need to type (such as a user ID or a password) are set in bold.
How This Book Is Organized
Windows 8 For Dummies Quick Reference is divided into ten parts. You don’t have to read these parts sequentially, and you don’t even have to read all the sections in any particular part. You can use the table of contents and the index to search for the information you need and quickly find your answer. This section provides a brief description of each part.
The Big Picture: Windows 8
Part 1: Navigating the Start Screen
The biggest change in Windows 8 is its Start screen. What you see is a touch screen interface that’s similar to those used by smartphones and tablets. However, the Start screen provides considerably more functionality, and this part of the book pre- sents this functionality in a way that gets you started quickly. For example, you discover how to access the Control Panel when you need to make an adjustment to your system’s configuration.
Part 2: Navigating the Desktop Interface
All your Windows 7 applications should work just fine in Windows 8. However, getting to them is a bit different from the way you did it in the past. For one thing, you start on the Start screen and then must switch to the Desktop interface as needed to work with older applications. The Start menu is also missing, so you need to know how to work around that issue. This part of the book provides these bits of information and much more. Many people are wary of the new Windows 8 setup and plan to spend most of their time working with the Desktop interface. If you fall into this category, you’ll also want to read about ViStart, a Start menu replacement product, in this part. Using ViStart will make your Windows 8 computing experience a lot better if you plan to spend most of your time working with Desktop
applications.
Part 3: Using the Standard Applications
This part of the book helps you get your Desktop interface appli-cations going. You’ll see sections devoted to installation and con-figuration. One section tells you how to overcome compatibility issues in Windows 8. Even your Windows 7 applications can experience compatibility issues, so this particular section is especially important. You’ll also see sections on performing tasks such as setting application security to ensure that the application can work as intended.
Part 4: Working with Gadgets
Part 5: Using Internet Explorer
Microsoft is always adding new functionality to Internet Explorer. This part of the book discusses many of the new fea-tures found in the version of Internet Explorer that comes with Windows 8. You see how to configure Internet Explorer and how to work with the add-ons created for it. Most importantly, this part of the book describes all the new safety features that make your online computing experience safer.
Part 6: Configuring Your System
Part 6 discusses many of the most common configuration tasks in Windows 8. One of the most important sections discusses how to ensure that all your devices work properly with Windows 8. You also find sections on working with themes, accessing the Control Panel, selecting a new power plan, and using the Windows 8 safety features, which are designed to protect your data.
Part 7: Interacting with External Devices
Most people have external devices that they need to use with their systems. For example, you probably have a camera that you attach to the system in order to see the pictures it contains. This part of the book tells how to make these external devices work better with Windows 8.
Part 8: Accessing the Network
Even home computers are networked today. This part provides pointers on making your network setup work better with Windows 8. Part 8 doesn’t discuss networks in detail, but it provides enough information to overcome some of the most common hurdles that users have experienced.
Icons Used in This Book
The familiar and helpful For Dummies icons point you in the direction of truly great information that’s sure to help you as you look up information in the book. Look for these icons throughout Windows 8 For Dummies Quick Reference:
The Tip icon points out helpful information that’s likely to make your job easier.
Windows 8
Windows 8 comes with an entirely new interface — one that will surprise many users with its ease of use. Microsoft’s overriding goal in creating Windows 8 is to make the user interface easier to understand and more intuitive to use. This is also the first version of the operating system designed with tablet and phone users in mind. If you know how to perform a task on a phone or tablet, it’s quite likely that you also know how to perform that task using Windows 8. The new Start screen provides a fully touch-interactive environment in which you can use the same gestures as you use for any of the smaller devices you own.
Of course, most people also need to perform tasks that rely on a more standard computer interface. With this in mind, you can also access the traditional Desktop interface and use it to work with applications such as Office or your organization’s database appli-cation. The traditional Desktop interface also provides access to the same configuration and setup features you’ve used in the past. Administrators will still find all their favorite tools in Windows 8 and rely on the traditional Desktop interface to use them.
In this part . . .
✓ What You See
✓ Ribbon Toolbar
✓ Keyboard Shortcuts
✓ The Basics
BP-8
What You See: The Start Screen
The following figure shows the Start screen as it might appear on your machine. Microsoft has made the Start screen extremely flexible, so you may see many of the same elements, but possibly in different locations. The Start screen uses some new technology, so this figure has labeled the new elements you need to know about. This terminology is used through-out the book, so be sure to pay close attention.
Group
Desktop
Tile App
Charm Charms bar
What You See: The Desktop Interface
BP-9
Desktop icons
Pinned application
Taskbar Notification Area
Notification Area icon
Ribbon Toolbar
BP-10
Split button
Normal button
Tab
Split button with option selected
Large button Gallery
Group
The Ribbon provides a standard look across applications, and it won’t surprise you to know that most applications have the same common tab elements, arranged in the same way. Seeing how to work with a single application helps you know what to expect in other applications that also rely on the Ribbon interface. The most common tabs provided with applications are File, Home, and View. The following table contains a listing of the controls that you com-monly find on these tabs and provides a short description of their use.
Icon Name Tab What It Does Shortcut(s)
New File Creates a new document. Alt+F+N
Ctrl+N
Open File Opens a file for editing. Alt+F+O
Ctrl+O
Save File Saves the file you have just
edited.
Alt+F+S Ctrl+S
Save As File Saves a file using a different
name.
Alt+F+A F12
Print File Displays a menu of options
for printing the document.
Alt+F+P Ctrl+P
Properties File Displays a dialog box
contain-ing options for configurcontain-ing the application.
BP-11
Icon Name Tab What It Does Shortcut(s)
About File Tells you about the application. Alt+F+T
Exit File Ends the current application
session.
Alt+F+X
Paste Home Pastes the data found on the
Clipboard into the current document.
Alt+H+V Ctrl+V
Cut Home Cuts the selection from the
document and places it on the Clipboard.
Alt+H+X Ctrl+X
Copy Home Copies the selection and
places it on the Clipboard.
Alt+H+C Ctrl+C
Zoom in View Displays a larger image of the
document with less content.
Alt+V+I Ctrl+PgUp
Zoom out View Displays a smaller image
of the document with more content.
Alt+V+O Ctrl+PgDn
100% View Displays the document at 100
percent of its normal size.
Alt+V+M
Rulers View Displays rules along the top
and side of the editing area to make it easier to measure items in the
document.
Alt+V+R Ctrl+R
Gridlines View Displays a grid to make it
easier to align document items.
Alt+V+G Ctrl+G
Status bar View Displays status information
on a bar at the bottom of the application.
Alt+V+S
BP-12
Keyboard Shortcuts
Using keyboard shortcuts can make accessing Windows 8 features faster and easier, in some cases, especially if you’re a touch typist. Every version of Windows has had its own unique set of special keyboard shortcuts, and Windows 8 is no different. Besides common keyboard shortcuts, such as Ctrl+V to paste content from the Clipboard to the current application, Windows 8 supports the unique keyboard shortcuts shown in the follow-ing table that will improve your computfollow-ing experience.
Shortcut What It Does
Win Displays the Start screen.
Win+C Opens the Charms bar.
Win+D Shows the Desktop interface.
Win+E Opens File Explorer.
Win+F Opens the Search pane so that you can look for files.
Win+H Opens the Share charm.
Win+I Opens the Settings charm.
Win+K Opens the Connect charm.
Win+L Locks the computer.
Win+M Minimizes all applications in the Desktop interface.
Win+O Locks the screen rotation.
Win+P Lets you select from a list of available displays when
work-ing with a multimonitor system.
Win+Q Opens the Search pane so that you can look for applications.
Win+R Opens the Run dialog box.
Win+U Open the Ease of Access Center.
Win+V Cycles through toasts, which are notifications that your
application can display when something has happened and the application isn’t viewable.
Win+Shift+V Reverse-cycles through toasts.
Win+W Opens the Search pane so that you can look for settings.
Win+X Launches the Start menu (a list of actions you can perform).
Win+Z Displays the App bar, which is a special area at the
bottom of the Start screen that holds application settings.
Win+Spacebar Changes the language selection and keyboard layout.
Win+Enter Launches the Narrator.
BP-13
Shortcut What It Does
Win+PgDn Moves tiles to the right.
Win+Tab Cycles through the list of running apps, including
Windows 8 apps on the Start screen.
Win+Shift+Tab Cycles through the list of running apps in reverse order.
Win+. Moves the split between groups to the right.
Win+Shift+. Moves the split between groups to the left.
Win+, Lets you peek at the desktop.
Ctrl+Tab Displays a list of all available apps when working on the
Start screen.
The Basics: Accessing a Windows 8
App on the Start Screen
For anyone who has long used Windows applications, Windows 8 apps on the Start screen require a somewhat different approach because they work differently. When you click a Windows 8 app tile to start the appli-cation, it runs until Windows decides that you aren’t using it. You don’t actually stop the Windows 8 app.
Windows 8 apps always run in full-screen view. You don’t generally see multiple applications at the same time.
When a developer designs a Windows 8 app, it can run equally well on any screen size. The same Windows 8 app runs on a smartphone, tablet, laptop, or desktop system. Though the various devices may not access the same amount of information, the application automatically sizes itself to meet the requirements of the particular device.
In most cases, the control system for a Windows 8 app is small. You don’t see long lists of options, menus, or other items that you may be used to seeing in your Windows environment. Some Windows 8 apps may not even have much of a control system — a simple click here or there is all you can do. The following sections discuss a typical Windows 8 app in two ways: at the interface level and within the application itself.
Interacting with an application using the App bar
BP-14
App bar
Different apps support different App bar features. In this case, you can perform four different tasks. The following list describes the most common actions you can perform using the App bar:
✓ Unpin from Start: The application is removed from Start. However, the application is still available when you look for it in the list of all applications. If you later decide that you want quick access to this app, you can pin it on Start again.
✓ Uninstall: Windows uninstalls the app and makes it unavailable. You don’t see it in the listing of all apps, either. To access the app again, you must reinstall it.
✓ Smaller: Tiles come in different sizes. If you don’t use an app often, you can make its tile smaller so that it uses less screen “real estate.” ✓ Turn Live Tile On: The Live Tile feature can display a small version of what the app is doing in the background. Turning on this feature would show you the latest news or weather, as an example. If the app isn’t doing anything, you see a static display of the latest con-tent. When an application does perform an update, it uses the same network bandwidth as usual, so you’ll want to turn this feature off when network bandwidth is at a premium.
BP-15
✓ Open New Window (Desktop applications only): A new copy of the application opens in a separate window.
✓ Run as Administrator (Desktop applications only): To gain the rights required by the application, you may have to run it using administrator credentials. Windows may ask you to provide an appropriate username and password to use this feature.
✓ Open File Location (Desktop applications only): This feature starts the application and sends it the name of a file that you want to open. You see the file opened in the application as soon as it starts.
✓ Pin (or Unpin) from Taskbar (Desktop applications only): In addi-tion to pinning the applicaaddi-tion to Start so that you can access it from the Start screen, you can pin it to the Taskbar so that you can access it from the Desktop interface.
✓ All Apps: Display a list of every installed app on your system. You can use this display to interact with apps much as you would when working with Start. This includes pinning the application to Start or to the Taskbar (for applications that run in the Desktop interface).
Interacting with an application’s controls
After you start a Windows 8 app, you see a full-screen view of it. A scroll bar lets you move left or right to access other features of the applica-tion. If you don’t see the scroll bar, simply move the mouse down to the bottom of the display.
When Windows displays the scroll bar, you see the Minus (–) button on the right side of the display. Click this button to see a list of app features. Click a feature and you’ll see that feature displayed onscreen.
BP-16
In this case, the controls at the top let you choose the location you want to see. The Home button displays the default weather location you choose. Places displays a list of locations you configure for the app. When you want to see the weather in general, click World Weather.
The lower App bar displays a list of actions you can perform with the current location. For example, you can choose to remove this location from your list of places or set it as your default location. Click Pin to Start to pin this particular location to Start so that you can access it immedi-ately and see updates as they occur using the Live Tile feature. The app defaults to using the unit of measure for your location (Fahrenheit, for the United States). You can choose to use Celsius instead. The app also pro-vides automatic updates, but you can choose to refresh the information manually whenever you want.
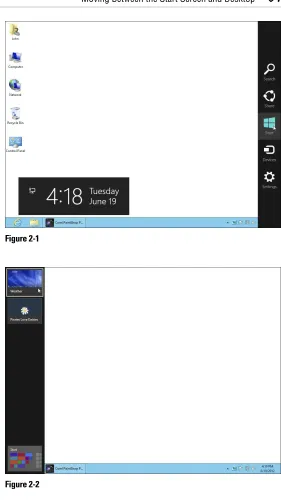
The Basics: Moving Between the
Start Screen and the Desktop
BP-17
✓ Click the Desktop tile.
✓ Press Win+D.
✓ Click an app tile that uses the Desktop (such as Calculator or Notepad).
✓ Press Win+C to display the Charms bar and then click the Start charm. ✓ Press Win+F to display the Files Search pane, locate a file that
requires a Desktop application, and click that file.
✓ Press Win+Q to display the Apps Search pane, locate an application that requires the Desktop interface, and click that application.
The Basics: Accessing a Traditional
Windows Application
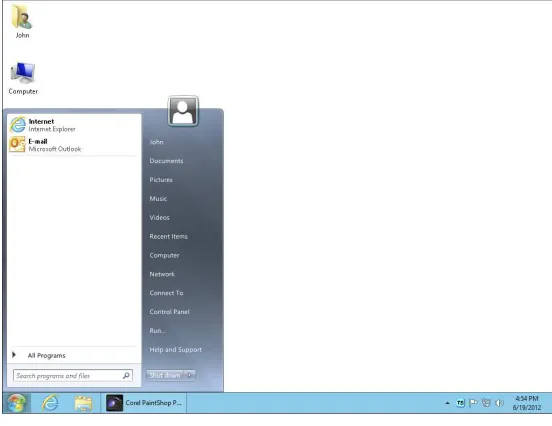
The default Desktop interface presentation is devoid of icons, except for having Internet Explorer pinned to the Taskbar. Therefore, you can always access Internet Explorer by clicking its icon. In addition, you’ll find no Start menu of the sort found in older versions of Windows. (The “Restoring the Start Menu” section in Part II shows how to install a third-party Start menu alternative.)
When you want to access other Desktop applications, you must config-ure the Desktop interface to support them or provide another means of accessing them. The following sections describe three common methods for accessing traditional Windows applications using the Desktop inter-face with no form of third-party Start menu support.
Pinning applications to the Taskbar
The applications you use most often are easily accessible when you place them on the Taskbar. Just as Internet Explorer is pinned to the Taskbar, you can pin any other application that you need to access often. The fol-lowing steps describe how to pin a Desktop application to the Taskbar when starting on the Start screen:
1. Press Win+Z to display the App bar.
BP-18
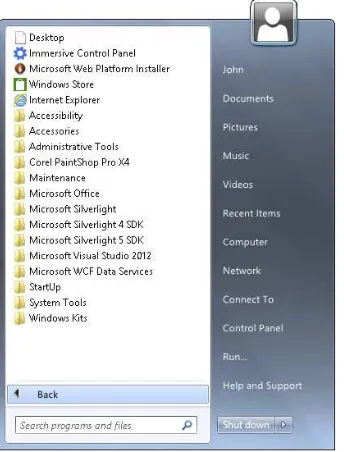
2. Click All Apps.
You see a listing of all of the applications on your system, as shown here. (The Start screen scrolls left and right, versus up and down, so you scroll left to see the other icons shown in this screen shot.)
3. Right-click the application you want to pin to the Taskbar.
BP-19
4. Click Pin to Taskbar.
Windows pins the application to the Taskbar. The application automatically appears on the Taskbar the next time you open the Desktop interface.
Using the Run dialog box
Use the Run dialog box to access applications that you use less often. The Run dialog box can accept these elements:
✓ An application’s executable name
✓ The human-readable name of the application, such as Outlook or Notepad
✓ The name of a file associated with a particular application
BP-20
Click Browse in the Run dialog box when you don’t remember the name of the application or associated file that you want to open. You see the Browse dialog box, which you can use to locate the resource on disk.
Placing applications on the Desktop
As an alternative to pinning applications to the Taskbar, you can create shortcuts to applications on the Desktop. In fact, Windows uses this approach for providing access to these default features:
✓ Computer ✓ User’s files ✓ Network ✓ Recycle Bin ✓ Control Panel
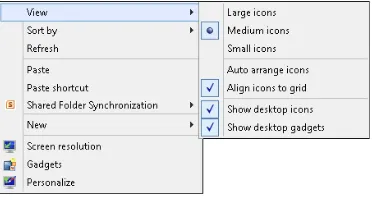
Use the following procedure to place the standard icons on the Desktop: 1. Right-click the Desktop and choose Personalize from the context
menu.
You see the Personalization window, shown here.
2. Click Change Desktop Icons.
BP-21
3. Select the icons you want to work with and click OK.
Windows adds the icons you requested to the Desktop.
When working with applications, folders, or files, all you need to do is right-click the item you want to place on the Desktop and then choose Copy from the context menu. Next, right-click the Desktop and choose Copy Shortcut from the context menu. Windows creates the shortcut you requested, and you can access the resource.
What You Can Do: Using a Local Account
When you install Windows 8, it forces you to use a remote account — one that’s based on your Windows Live ID. A remote account works fine for interacting with the Start screen. In fact, you need it in order to perform certain tasks with Windows 8 apps, such as accessing a SkyDrive. However, the remote account doesn’t allow you to perform certain tasks that Desktop users need to perform, such as working with the features of the Computer Management folder.
BP-22
1. Press Win+C.
You see the Charms bar appear. 2. Click the Settings charm.
Windows displays the Settings panel, shown here.
3. Click Change PC Settings at the bottom of the Settings panel.
You see the PC Settings charm, shown here.
BP-23
Windows displays the Add a User Wizard, as shown here. Notice that there doesn’t appear to be any way to create a local account, though Step 5 fixes this problem.
5. Click Sign In Without a Microsoft Account.
The wizard changes to include a new button, Local Account. 6. Click Local Account.
BP-24
7. Fill in the local user information and click Next.
You see the new user’s information onscreen. 8. Click Finish.
The local account is ready for use.
The remainder of this book assumes that you’re using a local account to ensure maximum Windows functionality, so you have to log in to your remote account at times to perform Start screen–specific tasks. The procedures always tell you when a remote login is required.
What You Can Do: Visiting
the Windows Store
The Windows Store is one of the Windows 8 apps that most people will likely use at some point. The term store is a bit of a misnomer because you can find both paid and free items there. At the Windows Store, you can obtain Windows 8 apps to use with Windows 8.
To work with the Windows Store, all you need to do is click the Store tile (the one with the Shopping Bag icon). You see the Windows Store appear. Here’s an example of what you might see:
BP-25
have the word Free displayed in the lower-left corner of the tile, while paid products will display pricing information. The bottom of the tile has a rating for the particular application.
To install any of these applications, simply click its tile. You see a descrip-tion of the applicadescrip-tion. On the left side of the display is the Install button, as shown in the figure. Clicking the button installs the application on your machine.
BP-26
Immediately after you enter your credentials, it appears that something has failed because you return to the Windows Store. Don’t worry: The app is installing in the background. If you look at the Start screen, you see the app’s tile with the word Installing in the lower-left corner, as shown in the figure. When this process is complete, a pop-up message appears telling you that the app is ready for use.
The Windows Store includes all sorts of applications that you can use with Windows 8 — everything from games to productivity apps. It even has Windows 8 tools, business apps, and apps to secure your system, so take time to explore the Windows Store for the Windows 8 apps you need.
What You Can Do: Shutting
Down Your System
It’s the end of the day and you want to shut down your system before you go home. When working with previous versions of Windows, you could open the Start menu and select the proper option for shutting down your system. Windows 8 doesn’t appear to provide this option — at least, not where you can see it.
Windows 8 has a few other options, not discussed in this book, for shutting down your system. For example, you can open an administrative command prompt and use the Shutdown com-mand. The following sections describe how to shut down your system from both the Start screen and Desktop interface.
Using the Start screen
The Start screen provides a quick method of shutting down your system. The following steps assume that you’re starting on the Start screen: 1. Press Win+C.
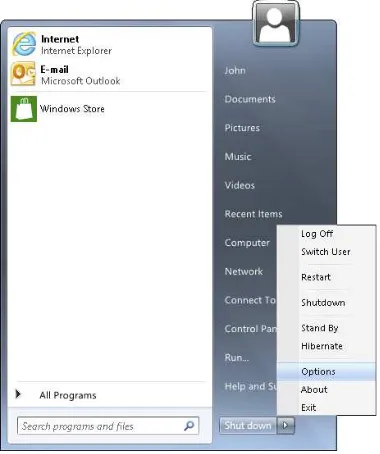
You see the Charms bar appear. 2. Click the Settings charm.
BP-27
3. Click Power.
Windows presents options for Sleep, Shutdown, and Restart. 4. Click Shutdown.
Your system closes all its applications and shuts down normally.
Using the Desktop interface
Navigating the
Start Screen
The Start screen presents Microsoft’s new method of providing apps to users. It uses a different approach for interacting with the user, one that’s supposed to be easier and more straightforward than traditional Windows applications of the past. The idea is that you should be able to sit down with a Windows 8 app and use it imme-diately without resorting to Help much (if at all). In short, Windows 8 apps are supposed to be more intuitive and simpler to use.
This part explores Windows 8 apps using five Microsoft-specified tenets as guidelines. You’ll discover how the new Start screen differs from the traditional Windows Desktop interface that you’ve used in the past.
In this part . . .
✓ Defining a Windows 8 App ✓ Employing the Start Screen ✓ Interacting with the App Bar
✓ Using Charms
Defining a Windows 8 App
Window 8 apps are different from Windows applications because Microsoft holds them to a stricter standard. Microsoft has specified that a Windows 8 app must uphold/adhere to all five of these tenets:
✓ Show pride in craftsmanship: To improve the quality of the application you receive, Microsoft is monitoring the kinds of applications that developers put together. The user experience must be complete and polished at every stage.
✓ Be fast and fluid: Microsoft has placed new emphasis on direct interaction with content and making this experi-ence as seamless as possible. The app should actually tell a story using motion (meaning that Windows 8 apps should be more interactive).
✓ Be authentically digital: Windows 8 apps make optimal use of the digital medium — to provide the end user with an experience that goes beyond the real-world experience by using bright colors and images.
✓ Do more with less: The app shouldn’t present any sort of distraction to working with content. In short, the user should be able to focus on content without even seeing the application. Microsoft seems to want a spartan appli-cation interface with a minimum of controls.
✓ Win as one: An app should be able to work with all devices and other apps, as well as with the host system, no matter which platform is in use. In short, an app should work equally well on mobile devices, laptops, and PCs.
Employing the Start Screen
example, you can see updates of the news and current weather in miniature in a single glance.) The following sections describe how to use the Start screen to access Windows 8 apps in more detail.
Accessing apps
In The Big Picture, you see that you can start a Windows 8 app by simply clicking it. The app always opens in full-screen mode, which means that you see only that app presented onscreen. The focus is on content, so you don’t even see any controls in many cases. The app can contain multiple panels, each of which contains specific content. Clicking an element within the content can display additional information when it’s available. For example, in the News app presentation shown in Figure 1-1, each tile presents a different story. Clicking a tile displays spe-cifics about that story. You don’t need any controls because the interface is simple enough to work without them.
Figure 1-1
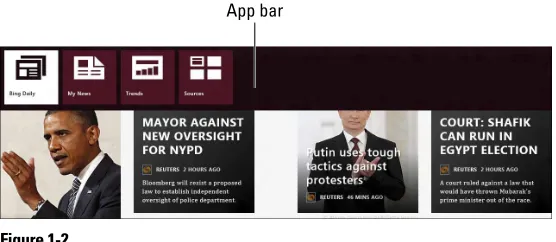
Right-clicking the display presents the App bar in the applica-tion. When you right-click the News app, the App bar contains options for moving to different news focuses. (See Figure 1-2.) For example, click My News and you’ll see a series of stories specifically tailored to address the kinds of content you request by specifying keywords. Click Sources and you’ll see news sto-ries from each newswire or publisher.
App bar
Figure 1-2
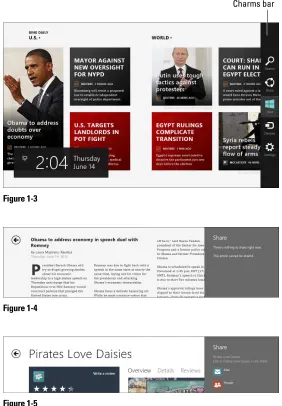
Every Windows 8 app also has access to the Charms bar. Simply press Win+C to display it. You can also move the mouse cursor toward the right side of the display or swipe the right side of the display when using a touch interface. The Charms bar will contain the same charms as normal. (See Figure 1-3.) However, some charms, such as Settings, will contain options specifically for the app in use. For example, click Rate and Review on the Settings charm to rate the News app.
A Windows 8 app provides you with the functionality needed to work with content, but with the rights of the content provider in mind. For example, you may click a story heading, press Win+C to display the Charms bar, and then click Share to share the story with someone else. If the content provider has pro-tected the story, you see a simple message saying that you can’t share the content, as shown in Figure 1-4.
Charms bar
Figure 1-3
Figure 1-4
Figure 1-5
Zooming in and out
All Windows 8 apps support zooming. This feature may not be useful in a game, but every app supports it. Either an app is zoomed or not zoomed — an app can’t support multiple levels of zoom. When you have the app zoomed, you see an overview of what the app has to offer. Otherwise, you see the specific content you requested.
To zoom an app, place the mouse in the lower-right corner of the display (or swipe in that location when using a touch inter-face). You see the minus (–) sign in a square block. Click the minus sign to zoom the app. For example, Figure 1-6 shows what the News app looks like when zoomed.
Figure 1-6
The display shows several categories of news. The main story in each category appears as a Live Tile in that category’s tile. Select a specific category of news by clicking the tile you want. The stories in that category appear so that you can see them and choose a story to read.
Interacting with the App Bar
of content you want. The App bar also makes it possible to choose different content areas and to customize the content to meet your needs. However, you won’t find controls in the sense that traditional Windows applications use controls. The App bar is focused on content, and it helps determine how to manip-ulate content to suit your needs.
The Start screen is a kind of application, so it too has the App bar. Just as the App bar in the apps mentioned earlier in this part vary their content to meet specific needs, so does the App bar on the Start screen. The Big Picture shows you how to per-form tasks using the App bar. The following sections refine that information.
Accessing all the applications
No matter what you’re doing at the Start screen, you can always access all registered applications on a system. Registered appli-cations install themselves in Windows. If an application simply resides on the hard drive and you didn’t perform an installation for it, the application doesn’t appear as part of the Apps list by default.
To display the list of all applications, right-click the Start screen, press Win+Z, or swipe at the bottom of the display to display the App bar. Click All Apps and you’ll see the Apps screen. Windows 8 apps appear first in the list. Desktop applica-tions, including Windows utilities, appear within groups after the Windows 8 apps, as shown in Figure 1-7 (your display may look slightly different than the one shown).
To select an app (or multiple apps) for configuration, right-click its tile in the list. A check mark appears in the upper-right corner of the selected tile. The information you see on the App bar after selecting a tile depends on the application type. Windows 8 apps provide the fewest options, as shown in Figure 1-8.
Figure 1-8
Desktop applications present more options because you can configure them in a number of ways. For example, you can’t pin a Windows 8 app to the Taskbar, but you can pin a Desktop application to the Taskbar. Windows 8 apps load with the con-tent that you’ll see when using them. Desktop applications can work with different files, so you can choose to start the Desktop application with a particular file. Figure 1-9 shows the typical set of options for a Desktop application.
Figure 1-9
Altering the Start screen
constant access to the Calculator, feel free to add it to the Start screen. With this in mind, your Start screen may not match the one you see in the figures throughout this book because you’ll make plenty of changes to it. The following sections describe methods you can use to change the Start screen.
Pinning or unpinning an app
When you pin an app, you place it on either the Start screen or the Taskbar (in the Desktop interface). Pinning an app is the easiest and fastest way to make the apps you use most often easily accessible. When you unpin an app, you remove it from either the Start screen or the Taskbar. The app is still available, but you need to go to the Apps screen to see it. (See the “Accessing all the applications” section, earlier in this part, for details.)
Pin apps to the Start screen or Taskbar carefully. Many users have the urge to pin every app they’ll ever use to the Start screen or Taskbar (or possibly both). The more apps you pin, the more apps you have to look through before starting the application. At some point, the technique that you thought would increase your efficiency ends up slowing you down because you have too many items.
When you want to make an app readily available for use, you pin it to the Start screen. Use these steps to pin an app to the Start screen:
1. Press Win+Z or right-click the Start screen to display the App bar.
You see the Apps screen.
2. Right-click the app you want to pin to the Start screen.
Figure 1-10
There are many ways to right-click an app. For example, you can use the arrow keys to select it and then press the spacebar. To right-click a touch screen, press your finger on the screen and hold it there until you see the right-click result.
3. Click the Pin to Start option.
Windows adds the application to the Start screen. To select the Pin to Start option by using keyboard
commands, press Tab to select the App bar, use the arrow keys to select Pin to Start, and then press Enter. You can unpin any app that’s pinned to the Start screen. Use these steps to unpin an app:
1. Right-click the app you want to unpin from the Start screen.
You see the App bar for that app. 2. Click the Unpin from Start option.
Windows removes the app tile from the Start screen.
Uninstalling an app
that no one can access it, you must uninstall it. Use the following steps to uninstall an app:
1. Right-click the app you want to uninstall.
You see the App bar showing the options for that app. 2. Click the Uninstall option.
Windows immediately returns you to the Apps screen and starts uninstalling the app in the background. You see a toast message (a brief, onscreen notification that the uninstall is complete) when Windows completes the process.
Making an app tile smaller or larger
An app tile can appear in one of two different sizes on the Start screen. Use large tiles for apps that you use often or that have live feeds you need to view. Small tiles make apps accessible, but in a smaller space. The following steps tell how to make an app tile smaller or larger:
1. Right-click the app tile you want to resize.
You see the App bar showing the options for that app. 2. Click Smaller (to make the tile smaller) or Larger (to
make the tile larger).
Windows resizes the app tile and moves the remaining tiles to accommodate the change.
Moving an app tile
Presenting app tiles in the right order can make it easier for you to find the app you want to use. To move an app tile, simply click and drag it to a new location. If you want to use the key-board, highlight the tile you want to move and then press Alt+arrow key (where arrow key is the direction you want to move the tile: up, down, left, or right).
Turning Live Tiles on or off
Only certain apps support Live Tiles. The following steps show how to turn Live Tile support on or off:
1. Right-click the app tile you want to modify.
You see the App bar showing the options for that app. 2. Click Turn Live Tile On or Turn Live Tile Off.
Windows modifies the Live Tile status for the selected tile.
Creating a new group
Groups help you organize tiles into a usable form. A group is an associated set of tiles. For example, you might want to create a group for games and another group for business apps you use every day. Another group can contain utilities you use often enough to place them on the Start screen, but not often enough to keep them with your business apps. Windows separates each group by a space, as shown in the zoomed view in Figure 1-11 (groups are used in both zoomed and unzoomed views, but are easier to see when you zoom the screen).
Space separating the groups
Figure 1-11
games — you drag the first game outside the group it resides in. This action creates a new group containing only that tile. To add new tiles to this group, drag the tile so that it touches the first tile. The two tiles become part of the same group.
Displaying the administrative tools
Administrative tools are specialized utilities used to manage the Windows 8 setup. For example, when you want to manage the printers on a system, you need access to the administrative tools.
The administrative tools are potentially dangerous. Misusing them can damage your Windows 8 setup. If you aren’t sure whether you should work with the administrative tools, you probably shouldn’t attempt to gain access to them. You must also have the proper rights to use these tools. When you try to use a tool that you shouldn’t access, Windows displays the “Access Denied” error message.
Obtaining access to the administrative tools is one reason why you need a local account in Windows 8. Because a remote account presents potential security issues, Windows 8 locks access to some of the administrative tools, even if you have an administrator account. Even elevating your account security by using the Run As Administrator option doesn’t unlock these applications because using them with a remote account is dangerous.
All the administrative tools are still accessible by using the Administrative Tools folder of the Control Panel. As with any version of Windows, you must have administrator privileges for the system in order to access most of these features. (If any of this information sounds mysterious, you really don’t need it.) The following steps show how to add administrative tools access to the Start screen:
1. Press Win+C.
You see the Charms bar. 2. Click Settings.
Figure 1-12
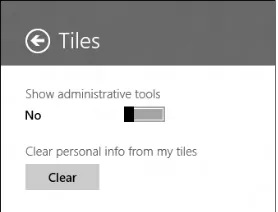
3. Click Tiles.
You see the Tiles panel, as shown in Figure 1-13.
4. Click the Show Administrative Tools switch.
The switch moves into the On position. Windows adds the administrative tools to the Start screen. Figure 1-14 shows a typical example of what you see. The two groups on the right hold the administrative tools.
Figure 1-14
You can turn off the Show Administrative Tools switch if you decide that you don’t want the administrative tools tiles added to the Start screen. As with any other tile, you can move these tiles, create special groups with them, or hide the ones you don’t use.
Removing personal information
People have many concerns about privacy issues on the Internet, and for good reason — you read about a new privacy breach almost every day in the news. With this in mind, it’s possible to clear the personal information used by Windows 8 apps. The app may require reconfiguration the next time you use it, but your identity will be safer. The following steps describe how to clear personal information from Windows 8 tiles:
1. Press Win+C.
You see the Charms bar. 2. Click Settings.
3. Click Tiles.
You see the Tiles panel.
4. Click Clear under the Clear Personal Info from My Tiles heading.
Windows clears any personal information found within the tiles.
Personal information appears in many places on your machine. For example, the browser you use probably contains personal information in the form of cookies and other data stored on your hard drive. The previous steps clear only the tile informa-tion, not any other source of personal information on your machine. You must clear information from other sources to ensure complete system security.
Using Charms
The Charms bar contains five charms: Search, Share, Start, Devices, and Settings. These charms are always accessible, and they help you configure the system and apps while you work in the Start screen. In some cases, charms include contextual set-tings. For example, the Settings charm often contains special settings for the app you’re using. The following sections describe the common features of each charm that Windows 8 supports. In later parts of this book, you encounter some app-specific settings information.
Using the Search charm
Microsoft has worked hard to continue improving the search capability of Windows over the years. You can search content in a wealth of ways in Windows 8. However, the emphasis in this version of Windows is on simplifying things (tasks, inter-face, and everything else you can think of). You can search for something without having to jump through hoops to do it. The following sections describe four common methods of searching for content on your system using the Search charm.
Performing an Apps search
Windows installed it. An app search can make it a lot easier for you to find a particular app. The following steps tell you how to perform an app search:
1. Press Win+C.
You see the Charms bar. 2. Click Search.
3. Highlight the Apps option.
You see the Search panel, shown in Figure 1-15. Notice that a list of apps appears to the left of the panel. This list contains all registered apps on your system. You won’t be able to find an executable file on your system that the Windows installer hasn’t registered.
Figure 1-15
4. Begin typing the name of the app you want to find.
Figure 1-16
5. Click the app tile for the app you want to start.
Windows starts the app so that you can use it. You can also perform every other app-related task in this panel, such as pinning the app to the Start screen.
Performing a Settings search
Past versions of Windows could sometimes make it hard to figure out how to change a setting. In fact, entire books discuss the topic of how to make settings changes with the least amount of difficulty. Even with the help these books provided, individual system differences sometimes made it difficult to figure out how to change a setting. Windows 8 partially corrects this problem by creating a Settings search feature that helps you locate the set-tings you need to change. The feature works only partially because it appears to help only with Windows 8 features and (possibly) certain Windows 8 apps. You can’t use this feature to locate and change settings for your Desktop application. Even so, having this feature available means that you spend a lot less time trying to figure out how to change a setting. The following steps describe how to search for a setting you need to modify:
1. Press Win+C.
You see the Charms bar. 2. Click Search.
3. Highlight the Settings option.
You see a blank Search panel. Trying to show all the set-tings that Windows has to offer would be confusing, so you should expect to see nothing at this point.
4. Type a term that reflects the setting you want to change.
Figure 1-17
The icon next to a Settings tile tells you what sort of setting the tile represents. Figure 1-17 shows four commonly used Settings icons:
• Personal: The gear-shaped icon always provides access to your personal settings.
• Group: When you see an icon with two people in it, the associated setting affects a group, or multiple people. In most cases, you must have an administrator account to change a group setting.
• Action Center: A number of settings, such as those used to control the User Account Control (UAC) and the network firewall, appear as part of the Action Center, which Windows always represents by an icon with a flag in it.
5. Click the Settings tile for the setting you want to change.
Windows displays the screen or dialog box for the setting you want to change. You see a number of these screens and dialog boxes in later parts of this book.
Performing a Files search
Finding the files you need is hard at times, especially with people storing, in some cases, tens of thousands of data files on their systems. The Files search looks for files in either your per-sonal or HomeGroup locations. It doesn’t search for files just anywhere on the system. For example, if you tell the Files search to look for a data file on your network drive, it simply tells you that it can’t find anything.
To use the HomeGroup locations, you must be part of a HomeGroup (a place where people with a common interest or as part of a common workgroup can share data) that has shared file resources. (The “Becoming Part of a Workgroup” section of Part 8 describes how to become part of a HomeGroup.) Otherwise, as when you look for files on a network drive, the File search doesn’t find anything for you. With this in mind, the following steps describe how to use the Files search to locate one or more files in one of the locations that it can work with:
1. Press Win+C.
You see the Charms bar. 2. Click Search.
3. Highlight the Files option.
You see a blank Files panel. Windows needs some criteria on which to search for files:
• *.*: The most common criterion is to search for all files by using the *.* wildcard. The asterisk means “search for everything,” and *.* means “search for every filename with every extension”.
• Specific file type: Most applications produce one or more specific file types. For example, when you work with Word, you can create either .DOC (old style) or
• Files with specific letters: As with any other search, you don’t need to know anything about fancy file-names or file extensions to use Files search. If you type the word welcome, Windows locates every file with the word welcome anywhere in its name for you.
4. (Optional) Select a search location, either Files or HomeGroup, by clicking the down arrow next to Files and choosing an option from the drop-down list box.
The default setting is to search your personal files. When you select HomeGroup, the heading changes from Files to HomeGroup.
5. Type a criterion for your search in the Search field and click Search (the magnifying glass icon).
Windows displays the results of the search. Figure 1-18 shows typical results for the *.* wildcard search. Notice that the search displays all results by default. However, you can click specific folder results (Pictures and Other, in this case) to see only the results from that folder.
Figure 1-18
6. Click the file tile for the file you want to open.
Performing an app-specific search
Many Windows 8 apps can use the Search charm provided with Windows. (Desktop applications can’t use the Search charm, for the most part.) For example, you might choose to look for spe-cific news items. To perform a search for spespe-cific news, you click the News option in Search and type the keyword for the item you want to see. The following steps describe how to per-form an app-specific search:
1. Press Win+C.
You see the Charms bar. 2. Click Search.
3. Highlight the option for the application you want to use.
Windows starts the application if you haven’t already started it.
Always wait for the application to start before you type a search term.
4. After the application has started, type a search term in the search field and click Search (the magnifying glass icon).
Windows performs the search. Figure 1-19 shows some results of working with the News app.