Table of Contents
Title Page
Copyright
Dedication
Credits
About the Authors
About the Technical Editor
Acknowledgments
Introduction
Who Should Read This Book
How This Book Is Organized
Minimum Requirements
Where to Go from Here
Part I: The Linux Command Line
Chapter 1: Starting with Linux Shells
What Is Linux?
Linux Distributions
Summary
Chapter 2: Getting to the Shell
Terminal Emulation
Chapter 3: Basic bash Shell Commands
Starting the Shell
The Shell Prompt
The bash Manual
Filesystem Navigation
File and Directory Listing
File Handling
Directory Handling
Viewing File Contents
Summary
Chapter 4: More bash Shell Commands
Monitoring Programs
Monitoring Disk Space
Working with Data Files
Summary
Chapter 5: Using Linux Environment Variables
What Are Environment Variables?
Setting Environment Variables
Removing Environment Variables
Default Shell Environment Variables
Setting the PATH Environment Variable
Locating System Environment Variables
Variable Arrays
Using Command Aliases
Summary
Chapter 6: Understanding Linux File Permissions
Linux Security
Using Linux Groups
Decoding File Permissions
Changing Security Settings
Sharing Files
Summary
Chapter 8: Installing Software
Package Management Primer
The Debian-Based Systems
The Red Hat–Based Systems
Installing from Source Code
Summary
Chapter 9: Working with Editors
The vim Editor
The emacs Editor
The KDE Family of Editors
The GNOME Editor
Summary
Part II: Shell Scripting Basics
Chapter 10: Basic Script Building
Using Multiple Commands
Creating a Script File
Displaying Messages
Using Variables
Redirecting Input and Output
Pipes
Performing Math
Exiting the Script
Summary
Chapter 11: Using Structured Commands
Working with the if-then Statement
The if-then-else Statement
Nesting ifs
The test Command
Compound Condition Testing
Advanced if-then Features
The case Command
Summary
Chapter 12: More Structured Commands
The for Command
The while Command
The until Command
Nesting Loops
Looping on File Data
Controlling the Loop
Processing the Output of a Loop
Summary
Chapter 13: Handling User Input
Command Line Parameters
Special Parameter Variables
Being Shifty
Working with Options
Standardizing Options
Getting User Input
Summary
Chapter 14: Presenting Data
Understanding Input and Output
Redirecting Output in Scripts
Redirecting Input in Scripts
Creating Your Own Redirection
Listing Open File Descriptors
Suppressing Command Output
Using Temporary Files
Logging Messages
Summary
Chapter 15: Script Control
Handling Signals
Running Scripts in Background Mode
Running Scripts Without a Console
Job Control
Being Nice
Running Like Clockwork
Summary
Part III: Advanced Shell Scripting
Returning a Value
Using Variables in Functions
Array Variables and Functions
Function Recursion
Creating a Library
Using Functions on the Command Line
Summary
Chapter 17: Writing Scripts for Graphical Desktops
Creating Text Menus
Doing Windows
Getting Graphic
Summary
Chapter 18: Introducing sed and gawk
Text Manipulation
The sed Editor Basics
Summary
Chapter 19: Regular Expressions
What Are Regular Expressions?
Defining BRE Patterns
Extended Regular Expressions
Regular Expressions in Action
Summary
Chapter 20: Advanced sed
Multiline Commands
The Hold Space
Negating a Command
Changing the Flow
Pattern Replacement
Using sed in Scripts
Creating sed Utilities
Summary
Chapter 21: Advanced gawk
Using Variables
Working with Arrays
Using Patterns
Formatted Printing
Built-in Functions
User-Defined Functions
Summary
Chapter 22: Working with Alternative Shells
What Is the dash Shell?
The dash Shell Features
Scripting in dash
The zsh Shell
Parts of the zsh Shell
Scripting with zsh
Summary
Part IV: Advanced Shell Scripting Topics
Chapter 23: Using a Database
The MySQL Database
The PostgreSQL Database
Working with Tables
Using the Database in Your Scripts
Summary
Chapter 24: Using the Web
The Lynx Program
The cURL Program
Networking with zsh
Summary
Chapter 25: Using E-mail
The Basics of Linux E-Mail
Setting Up Your Server
Sending a Message with Mailx
The Mutt Program
Summary
Chapter 26: Writing Script Utilities
Monitoring Disk Space
Summary
Chapter 27: Advanced Shell Scripts
Monitoring System Statistics
Problem-Tracking Database
Summary
Appendix A: Quick Guide to bash Commands
Built-in Commands
bash Commands
Environment Variables
Appendix B: Quick Guide to sed and gawk
The sed Editor
The gawk Program
Linux® Command Line and Shell Scripting Bible, Second Edition
Published by
Wiley Publishing, Inc.
10475 Crosspoint Boulevard
Indianapolis, IN 46256
www.wiley.com
Copyright © 2011 by Wiley Publishing, Inc., Indianapolis, Indiana
Published simultaneously in Canada
ISBN: 978-1-118-00442-5
ISBN: 978-1-118-08777-0 (ebk)
ISBN: 978-1-118-08778-7 (ebk)
ISBN: 978-1-118-08779-4 (ebk)
No part of this publication may be reproduced, stored in a retrieval system or transmitted in any form or by any means, electronic, mechanical, photocopying, recording, scanning or otherwise, except as permitted under Sections 107 or 108 of the 1976 United States Copyright Act, without either the prior written permission of the Publisher, or authorization through payment of the appropriate per-copy fee to the Copyright Clearance Center, 222 Rosewood Drive, Danvers, MA 01923, (978) 750-8400, fax (978) 646-8600. Requests to the Publisher for permission should be addressed to the Permissions Department, John Wiley & Sons, Inc., 111 River Street, Hoboken, NJ 07030, (201) 748-6011, fax (201) 748-6008, or online at
http://www.wiley.com/go/permissions.
Limit of Liability/Disclaimer of Warranty: The publisher and the author make no representations or warranties with respect to the accuracy or completeness of the contents of this work and specifically disclaim all warranties, including without limitation warranties of fitness for a particular purpose. No warranty may be created or extended by sales or promotional materials. The advice and strategies contained herein may not be suitable for every situation. This work is sold with the understanding that the publisher is not engaged in rendering legal, accounting, or other professional services. If
professional assistance is required, the services of a competent professional person should be sought. Neither the publisher nor the author shall be liable for damages arising herefrom. The fact that an organization or Web site is referred to in this work as a citation and/or a potential source of further information does not mean that the author or the publisher endorses the information the organization or website may provide or recommendations it may make. Further, readers should be aware that Internet websites listed in this work may have changed or disappeared between when this work was written and when it is read.
For general information on our other products and services please contact our Customer Care Department within the United States at (877) 762-2974, outside the United States at (317) 572-3993 or fax (317) 572-4002.
Wiley also publishes its books in a variety of electronic formats. Some content that appears in print may not be available in electronic books.
Library of Congress Control Number: 2011921770
Credits
Acquisitions Editor
Mary James
Project Editor
Brian Herrmann
Technical Editor
Jack Cox
Production Editor
Daniel Scribner
Copy Editor
Nancy Rapoport
Editorial Director
Robyn B. Siesky
Editorial Manager
Mary Beth Wakefield
Freelancer Editorial Manager
Rosemarie Graham
Marketing Manager
Ashley Zurcher
Production Manager
Tim Tate
Vice President and Executive Group Publisher
Richard Swadley
Vice President and Executive Publisher
Barry Pruett
Associate Publisher
Jim Minatel
Katherine Crocker
Proofreader
Publication Services, Inc.
Indexer
Robert Swanson
Cover Designer
Ryan Sneed
Cover Image
About the Authors
Richard Blum has worked in the IT industry for more than 20 years as both a systems and network administrator, and has published numerous Linux and open source books. He has administered UNIX, Linux, Novell, and Microsoft servers, as well as helped design and maintain a 3,500 user network utilizing Cisco switches and routers. He has used Linux servers and shell scripts to perform automated network monitoring, and has written shell scripts in most of the common Linux shell
environments. Rich is an online instructor for an Introduction to Linux course that is used by colleges and universities across the U.S. When he's not being a computer nerd, Rich plays electric bass in a couple of different church worship bands, and enjoys spending time with his wife Barbara, and two daughters Katie Jane and Jessica.
Christine Bresnahan starting working with computers more than 25 years ago in the IT industry as a system
About the Technical Editor
Jack Cox is a Senior Manager with CapTech Ventures in Richmond, VA. He has more than 25 years of experience in IT, spanning a broad range of disciplines including mobile computing, transaction processing, RFID, Java development, and
Acknowledgments
First, all glory and praise go to God, who through His Son, Jesus Christ, makes all things possible, and gives us the gift of eternal life.
Many thanks go to the fantastic team of people at John Wiley & Sons for their outstanding work on this project. Thanks to Mary James, the acquisitions editor, for offering us the opportunity to work on this book. Also thanks to Brian Herrmann, the project editor, for keeping things on track and making this book more presentable. Thanks, Brian, for all your hard work and diligence. The technical editor, Jack Cox, did a wonderful job of double checking all the work in the book, plus making suggestions to improve the content. Thanks to Nancy Rapoport, the copy editor, for her endless patience and diligence to make our work readable. We would also like to thank Carole McClendon at Waterside Productions, Inc., for arranging this opportunity for us, and for helping us out in our writing careers.
Introduction
Welcome to the second edition of Linux Command Line and Shell Scripting Bible. Like all books in the Bible series, you can expect to find both hands-on tutorials and real-world information, as well as reference and background information that provides a context for what you are learning. This book is a fairly comprehensive resource on the Linux command line and shell commands. By the time you have completed Linux Command Line and Shell Scripting Bible you will be well prepared to write your own shell scripts that can automate practically any task on your Linux system.
Who Should Read This Book
If you're a system administrator in a Linux environment, you'll benefit greatly by knowing how to write shell scripts. The book doesn't walk you through the process of setting up a Linux system, but once you have it running you'll want to start automating some of the routine administrative tasks. That's where shell scripting comes in, and that's where this book will help you out. This book will demonstrate how to automate any administrative task using shell scripts, from monitoring system statistics and data files to generating reports for your boss.
If you're a home Linux enthusiast, you'll also benefit from Linux Command Line and Shell Scripting Bible. Nowadays, it's easy to get lost in the graphical world of pre-built widgets. Most desktop Linux distributions try their best to hide the Linux system from the typical user. However, there are times when you have to know what's going on under the hood. This book shows you how to access the Linux command line prompt and what to do once you get there. Often performing simple tasks, such as file management, can be done more quickly from the command line than from a fancy graphical interface. There's a wealth of commands you can use from the command line, and this book shows you how to use them.
How This Book Is Organized
This book leads you through the basics of the Linux command line and into more complicated topics, such as creating your own shell scripts. The book is divided into five parts, each one building on the previous parts.
Part I assumes that you either have a Linux system running, or are looking into getting a Linux system. Chapter 1, “Starting with Linux Shells,” describes the parts of a total Linux system and shows how the shell fits in. After describing the basics of the Linux system, this part continues with the following:
Using a terminal emulation package to access the shell (Chapter 2)
Introducing the basic shell commands (Chapter 3)
Using more advanced shell commands to peek at system information (Chapter 4)
Working with shell variables to manipulate data (Chapter 5)
Understanding the Linux filesystem and security (Chapter 6)
Working with Linux filesystems from the command line (Chapter 7)
Installing and updating software from the command line (Chapter 8)
Using the Linux editors to start writing shell scripts (Chapter 9)
In Part II, you begin writing shell scripts. As you go through the chapters you'll do the following:
Learn how to create and run shell scripts (Chapter 10)
Alter the program flow in a shell script (Chapter 11)
Iterate through code sections (Chapter 12)
Handle data from the user in your scripts (Chapter 13)
See different methods for storing and displaying data from your Script (Chapter 14)
Control how and when your shell scripts run on the system (Chapter 15)
Part III dives into more advanced areas of shell script programming, including:
Creating your own functions to use in all your scripts (Chapter 16)
Utilizing the Linux graphical desktop for interacting with your script users (Chapter 17)
Using advanced Linux commands to filter and parse data files (Chapter 18)
Using regular expressions to define data (Chapter 19)
Learning advanced methods of manipulating data in your scripts (Chapter 20)
Generating reports from raw data (Chapter 21)
Modifying your shell scripts to run in other Linux shells (Chapter 22)
The last section of the book, Part IV, demonstrates how to use shell scripts in real-world environments. In this part, you
will:
See how to use popular open source databases in your shell scripts (Chapter 23)
Learn how to extract data from Websites, and send data between systems (Chapter 24)
Use e-mail to send notifications and reports to external users (Chapter 25)
Write shell scripts to automate your daily system administration functions (Chapter 26)
Utilize all of the features you've learned from the book to create professional-quality shell scripts (Chapter 27)
Conventions and Features
There are many different organizational and typographical features throughout this book designed to help you get the most of the information.
Notes and Warnings
Whenever the authors want to bring something important to your attention the information will appear in a Warning.
Warning
This information is important and is set off in a separate paragraph with a special icon.
Warnings provide information about things to watch out for, whether simply inconvenient
or potentially hazardous to your data or systems.
For additional items of interest that relate to the chapter text, the authors will use Notes.
Note
Notes provide additional, ancillary information that is helpful, but somewhat
outside of the current presentation of information.
Minimum Requirements
Linux Command Line and Shell Scripting Bible doesn't focus on any specific Linux distribution, so you'll be able to follow along in the book using any Linux system you have available. The bulk of the book references the bash shell, which is the default shell for most Linux systems.
Where to Go from Here
Part I
The Linux Command Line
In This PartChapter 1: Starting with Linux Shells
Chapter 2: Getting to the Shell
Chapter 3: Basic bash Shell Commands
Chapter 4: More bash Shell Commands
Chapter 5: Using Linux Environment Variables
Chapter 6: Understanding Linux File Permissions
Chapter 7: Managing Filesystems
Chapter 8: Installing Software
Chapter 1
Starting with Linux Shells
In this Chapter
What is Linux?
Parts of the Linux kernel
Exploring the Linux desktop
Visiting Linux distributions
Before you can dive into working with the Linux command line and shells, it's a good idea to first understand what Linux is, where it came from, and how it works. This chapter walks you through what Linux is, and explains where the shell and command line fit in the overall Linux picture.
What Is Linux?
If you've never worked with Linux before, you may be confused as to why there are so many different versions of it available. I'm sure that you have heard various terms such as distribution, LiveCD, and GNU when looking at Linux packages and been confused. Wading through the world of Linux for the first time can be a tricky experience. This chapter takes some of the mystery out of the Linux system before you start working on commands and scripts.
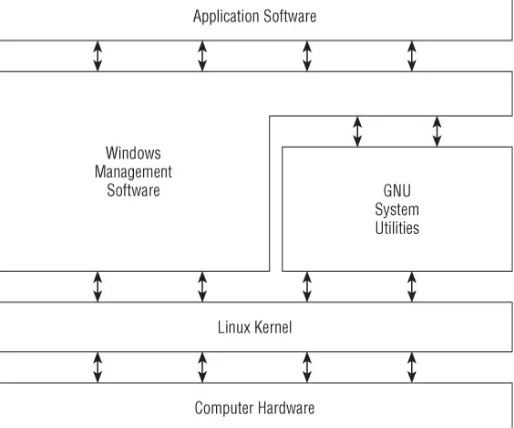
For starters, there are four main parts that make up a Linux system:
The Linux kernel
The GNU utilities
A graphical desktop environment
Application software
Each of these four parts has a specific job in the Linux system. Each of the parts by itself isn't very useful. Figure 1.1 shows a basic diagram of how the parts fit together to create the overall Linux system.
Figure 1.1 The Linux system
This section describes these four main parts in detail, and gives you an overview of how they work together to create a complete Linux system.
Looking into the Linux Kernel
The core of the Linux system is the kernel. The kernel controls all of the hardware and software on the computer system, allocating hardware when necessary, and executing software when required.
If you've been following the Linux world at all, no doubt you've heard the name Linus Torvalds. Linus is the person responsible for creating the first Linux kernel software while he was a student at the University of Helsinki. He intended it to be a copy of the Unix system, at the time a popular operating system used at many universities.
After developing the Linux kernel, Linus released it to the Internet community and solicited suggestions for improving it. This simple process started a revolution in the world of computer operating systems. Soon Linus was receiving suggestions from students as well as professional programmers from around the world.
Allowing anyone to change programming code in the kernel would result in complete chaos. To simplify things, Linus acted as a central point for all improvement suggestions. It was ultimately Linus's decision whether or not to incorporate suggested code in the kernel. This same concept is still in place with the Linux kernel code, except that instead of just Linus controlling the kernel code, a team of developers has taken on the task.
The kernel is primarily responsible for four main functions:
System memory management
Software program management
Hardware management
The following sections explore each of these functions in more detail.
System Memory Management
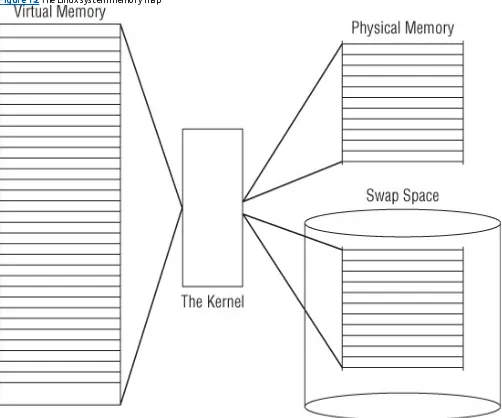
One of the primary functions of the operating system kernel is memory management. Not only does the kernel manage the physical memory available on the server, but it can also create and manage virtual memory, or memory that does not actually exist.
It does this by using space on the hard disk, called the swap space. The kernel swaps the contents of virtual memory locations back and forth from the swap space to the actual physical memory. This allows the system to think there is more memory available than what physically exists (shown in Figure 1.2).
Figure 1.2 The Linux system memory map
The memory locations are grouped into blocks called pages. The kernel locates each page of memory either in the physical memory or the swap space. The kernel then maintains a table of the memory pages that indicates which pages are in physical memory and which pages are swapped out to disk.
The kernel keeps track of which memory pages are in use and automatically copies memory pages that have not been accessed for a period of time to the swap space area (called swapping out), even if there's other memory available. When a program wants to access a memory page that has been swapped out, the kernel must make room for it in physical memory by swapping out a different memory page, and swap in the required page from the swap space. Obviously, this process takes time, and can slow down a running process. The process of swapping out memory pages for running applications continues for as long as the Linux system is running.
You can see the current status of the virtual memory on your Linux system by viewing the special /proc/meminfo file. Here's an example of a sample /proc/meminfo entry:
rich@rich-desktop:
∼
$
The MemTotal: line shows that this Linux server has 1GB of physical memory. It also shows that about 660MB is not currently being used (MemFree). The output also shows that there is about 2.5GB of swap space memory available on this system (SwapTotal).
By default, each process running on the Linux system has its own private memory pages. One process cannot access memory pages being used by another process. The kernel maintains its own memory areas. For security purposes, no processes can access memory used by the kernel processes.
To facilitate data sharing, you can create shared memory pages. Multiple processes can read and write to and from a common shared memory area. The kernel maintains and administers the shared memory areas and allows individual processes access to the shared area.
The special ipcs command allows you to view the current shared memory pages on the system. Here's the output from a sample ipcs command:
# ipcs -m
Each shared memory segment has an owner that created the segment. Each segment also has a standard Linux permissions setting that sets the availability of the segment for other users. The key value is used to allow other users to gain access to the shared memory segment.
Software Program Management
The Linux operating system calls a running program a process. A process can run in the foreground, displaying output on a display, or it can run in background, behind the scenes. The kernel controls how the Linux system manages all the processes running on the system.
The kernel creates the first process, called the init process, to start all other processes on the system. When the kernel starts, it loads the init process into virtual memory. As the kernel starts each additional process, it gives it a unique area in virtual memory to store the data and code that the process uses.
Some Linux implementations contain a table of processes to start automatically on bootup. On Linux systems, this table is usually located in the special file /etc/inittabs.
Other systems (such as the popular Ubuntu Linux distribution) utilize the /etc/init.d folder, which contains scripts for starting and stopping individual applications at boot time. The scripts are started via entries under the /etc/rcX.d folders, where X is a run level.
The Linux operating system uses an init system that utilizes run levels. A run level can be used to direct the init process to run only certain types of processes, as defined in the /etc/inittabs file or the /etc/rcX.d folders. There are five init run levels in the Linux operating system.
At run level 1, only the basic system processes are started, along with one console terminal process. This is called single user mode. Single user mode is most often used for emergency filesystem maintenance when something is broken. Obviously, in this mode only one person (usually the administrator) can log in to the system to manipulate data.
The standard init run level is 3. At this run level, most application software such as network support software is started. Another popular run level in Linux is run level 5. This is the run level where the system starts the graphical X Window software, and allows you to log in using a graphical desktop window.
The Linux system can control the overall system functionality by controlling the init run level. By changing the run level from 3 to 5, the system can change from a console-based system to an advanced, graphical X Window system.
In Chapter 4, you'll see how to use the ps command to view the processes currently running on the Linux system. Here's an example of what you'll see using the ps command:
$ ps ax
2 ? SW 0:00 [kflushd]
3 ? SW 0:00 [kupdate]
4 ? SW 0:00 [kpiod]
5 ? SW 0:00 [kswapd]
243 ? SW 0:00 [portmap]
295 ? S 0:00 syslogd
305 ? S 0:00 klogd
320 ? S 0:00 /usr/sbin/atd
335 ? S 0:00 crond
350 ? S 0:00 inetd
365 ? SW 0:00 [lpd]
403 ttyS0 S 0:00 gpm -t ms
418 ? S 0:00 httpd
423 ? S 0:00 httpd
424 ? SW 0:00 [httpd]
425 ? SW 0:00 [httpd]
426 ? SW 0:00 [httpd]
427 ? SW 0:00 [httpd]
428 ? SW 0:00 [httpd]
429 ? SW 0:00 [httpd]
430 ? SW 0:00 [httpd]
436 ? SW 0:00 [httpd]
437 ? SW 0:00 [httpd]
438 ? SW 0:00 [httpd]
470 ? S 0:02 xfs -port -1
485 ? SW 0:00 [smbd]
495 ? S 0:00 nmbd -D
533 ? SW 0:00 [postmaster]
538 tty1 SW 0:00 [mingetty]
539 tty2 SW 0:00 [mingetty]
540 tty3 SW 0:00 [mingetty]
541 tty4 SW 0:00 [mingetty]
542 tty5 SW 0:00 [mingetty]
543 tty6 SW 0:00 [mingetty]
544 ? SW 0:00 [prefdm]
549 ? SW 0:00 [prefdm]
559 ? S 0:02 [kwm]
585 ? S 0:06 kikbd
594 ? S 0:00 kwmsound
595 ? S 0:03 kpanel
596 ? S 0:02 kfm
597 ? S 0:00 krootwm
598 ? S 0:01 kbgndwm
666 ? S 0:00 /usr/libexec/postfix/master
The first column in the output shows the process ID (or PID) of the process. Notice that the first process is our friend the init process, and assigned PID 1 by the Linux system. All other processes that start after the init process are assigned PIDs in numerical order. No two processes can have the same PID (although old PID numbers can be reused by the system after the original process terminates).
The third column shows the current status of the process (S for sleeping, SW for sleeping and waiting, and R for running). The process name is shown in the last column. Processes that are in brackets are processes that have been swapped out of memory to the disk swap space due to inactivity. You can see that some of the processes have been swapped out, but most of the running processes have not.
Hardware Management
Still another responsibility for the kernel is hardware management. Any device that the Linux system must communicate with needs driver code inserted inside the kernel code. The driver code allows the kernel to pass data back and forth to the device, acting as a middle man between applications and the hardware. There are two methods used for inserting device driver code in the Linux kernel:
Drivers compiled in the kernel
Driver modules added to the kernel
Previously, the only way to insert device driver code was to recompile the kernel. Each time you added a new device to the system, you had to recompile the kernel code. This process became even more inefficient as Linux kernels supported more hardware. Fortunately, Linux developers devised a better method to insert driver code into the running kernel.
Programmers developed the concept of kernel modules to allow you to insert driver code into a running kernel without having to recompile the kernel. Also, a kernel module could be removed from the kernel when the device was finished being used. This greatly simplified and expanded using hardware with Linux.
The Linux system identifies hardware devices as special files, called device files. There are three different classifications of device files:
Character
Block
Network
Character device files are for devices that can only handle data one character at a time. Most types of modems and terminals are created as character files. Block files are for devices that can handle data in large blocks at a time, such as disk drives.
The network file types are used for devices that use packets to send and receive data. This includes network cards and a special loopback device that allows the Linux system to communicate with itself using common network programming protocols.
brw-rw---- 1 root disk 8, 5 2010-09-18 17:25 sda5
crw-rw---- 1 root dialout 4, 64 2010-09-18 17:25 ttyS0
crw-rw---- 1 root dialout 4, 65 2010-09-18 17:25 ttyS1
crw-rw---- 1 root dialout 4, 66 2010-09-18 17:25 ttyS2
crw-rw---- 1 root dialout 4, 67 2010-09-18 17:25 ttyS3
rich@rich-desktop:/dev$
Different Linux distributions handle devices using different device names. In this distribution, the sda device is the first ATA hard drive, and the ttyS devices are the standard IBM PC COM ports. The listing shows all of the sda devices that were created on the sample Linux system. Not all are actually used, but they are created in case the administrator needs them. Similarly, the listing shows all of the ttyS devices created.
The fifth column is the major device node number. Notice that all of the sda devices have the same major device node, 8, while all of the ttyS devices use 4. The sixth column is the minor device node number. Each device within a major number has its own unique minor device node number.
The first column indicates the permissions for the device file. The first character of the permissions indicates the type of file. Notice that the ATA hard drive files are all marked as block (b) device, while the COM port device files are marked as character (c) devices.
Filesystem Management
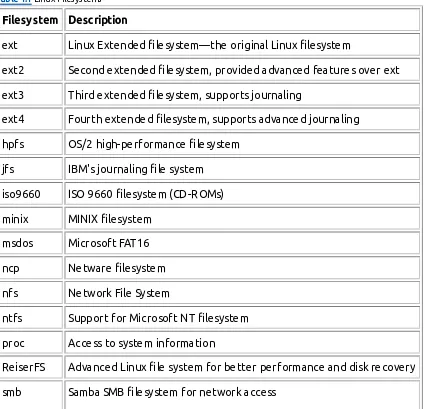
Unlike some other operating systems, the Linux kernel can support different types of filesystems to read and write data to and from hard drives. Besides having over a dozen filesystems of its own, Linux can read and write to and from filesystems used by other operating systems, such as Microsoft Windows. The kernel must be compiled with support for all types of filesystems that the system will use. Table 1.1 lists the standard filesystems that a Linux system can use to read and write data.
Table 1.1 Linux Filesystems
Filesystem Description
ext
Linux Extended filesystem—the original Linux filesystem
ext2
Second extended filesystem, provided advanced features over ext
ext3
Third extended filesystem, supports journaling
ext4
Fourth extended filesystem, supports advanced journaling
hpfs
OS/2 high-performance filesystem
jfs
IBM's journaling file system
iso9660
ISO 9660 filesystem (CD-ROMs)
minix
MINIX filesystem
msdos
Microsoft FAT16
ncp
Netware filesystem
nfs
Network File System
ntfs
Support for Microsoft NT filesystem
proc
Access to system information
sysv
Older Unix filesystem
ufs
BSD filesystem
umsdos
Unix-like filesystem that resides on top of msdos
vfat
Windows 95 filesystem (FAT32)
XFS
High-performance 64-bit journaling filesystem
Any hard drive that a Linux server accesses must be formatted using one of the filesystem types listed in Table 1.1. The Linux kernel interfaces with each filesystem using the Virtual File System (VFS). This provides a standard interface for the kernel to communicate with any type of filesystem. VFS caches information in memory as each filesystem is mounted and used.
The GNU Utilities
Besides having a kernel to control hardware devices, a computer operating system needs utilities to perform standard functions, such as controlling files and programs. While Linus created the Linux system kernel, he had no system utilities to run on it. Fortunately for him, at the same time he was working, a group of people were working together on the Internet trying to develop a standard set of computer system utilities that mimicked the popular Unix operating system.
The GNU organization (GNU stands for GNU's Not Unix) developed a complete set of Unix utilities, but had no kernel system to run them on. These utilities were developed under a software philosophy called open source software (OSS).
The concept of OSS allows programmers to develop software and then release it to the world with no licensing fees attached. Anyone can use the software, modify it, or incorporate it into his or her own system without having to pay a license fee. Uniting Linus's Linux kernel with the GNU operating system utilities created a complete, functional, free operating system.
While the bundling of the Linux kernel and GNU utilities is often just called Linux, you will see some Linux purists on the Internet refer to it as the GNU/Linux system to give credit to the GNU organization for its contributions to the cause.
The Core GNU Utilities
The GNU project was mainly designed for Unix system administrators to have a Unix-like environment available. This focus resulted in the project porting many common Unix system command line utilities. The core bundle of utilities supplied for Linux systems is called the coreutils package.
The GNU coreutils package consists of three parts:
Utilities for handling files
Utilities for manipulating text
Utilities for managing processes
Each of these three main groups of utilities contains several utility programs that are invaluable to the Linux system administrator and programmer. This book covers each of the utilities contained in the GNU coreutils package in detail.
The Shell
The GNU/Linux shell is a special interactive utility. It provides a way for users to start programs, manage files on the filesystem, and manage processes running on the Linux system. The core of the shell is the command prompt. The command prompt is the interactive part of the shell. It allows you to enter text commands, and then it interprets the commands and then executes them in the kernel.
The shell contains a set of internal commands that you use to control things such as copying files, moving files, renaming files, displaying the programs currently running on the system, and stopping programs running on the system. Besides the internal commands, the shell also allows you to enter the name of a program at the command prompt. The shell passes the program name off to the kernel to start it.
There are quite a few Linux shells available to use on a Linux system. Different shells have different characteristics, some being more useful for creating scripts and some being more useful for managing processes. The default shell used in all Linux distributions is the bash shell. The bash shell was developed by the GNU project as a replacement for the standard Unix shell, called the Bourne shell (after its creator). The bash shell name is a play on this wording, referred to as the “Bourne again shell.”
In addition to the bash shell, we will cover several other popular shells in this book. Table 1.2 lists the different shells we will examine.
Table 1.2 Linux Shells
Shell Description
ash
A simple, lightweight shell that runs in low-memory environments but has full
compatibility with the bash shell
korn
A programming shell compatible with the Bourne shell but supporting advanced
programming features like associative arrays and floating-point arithmetic
tcsh
A shell that incorporates elements from the C programming language into shell scripts
zsh
An advanced shell that incorporates features from bash, tcsh, and korn, providing
advanced programming features, shared history files, and themed prompts
Most Linux distributions include more than one shell, although usually they pick one of them to be the default. If your Linux distribution includes multiple shells, feel free to experiment with different shells and see which one fits your needs.
The Linux Desktop Environment
In the early days of Linux (the early 1990s) all that was available was a simple text interface to the Linux operating system. This text interface allowed administrators to start programs, control program operations, and move files around on the system.
With the popularity of Microsoft Windows, computer users expected more than the old text interface to work with. This spurred more development in the OSS community, and the Linux graphical desktops emerged.
Linux is famous for being able to do things in more than one way, and no place is this more relevant than in graphical desktops. There are a plethora of graphical desktops you can choose from in Linux. The following sections describe a few of the more popular ones.
The X Windows System
There are two basic elements that control your video environment—the video card in your PC and your monitor. To display fancy graphics on your computer, the Linux software needs to know how to talk to both of them. The X Windows software is the core element in presenting graphics.
The X Windows software is a low-level program that works directly with the video card and monitor in the PC, and controls how Linux applications can present fancy windows and graphics on your computer.
Linux isn't the only operating system that uses X Windows; there are versions written for many different operating systems. In the Linux world, there are only two software packages that can implement it.
The XFree86 software package is the older of the two, and for a long time was the only X Windows package available for Linux. As its name implies, it's a free open source version of the X Windows software.
The newer of the two packages, X.org, has made great inroads in the Linux world and is now the more popular of the two. It, too, provides an open source software implementation of the X Windows system, but has support for more of the newer video cards used today.
Both packages work the same way, controlling how Linux uses your video card to display content on your monitor. To do that, they have to be configured for your specific system. That is supposed to happen automatically when you install Linux.
The core X Windows software produces a graphical display environment, but nothing else. While this is fine for running individual applications, it is not too useful for day-to-day computer use. There is no desktop environment allowing users to manipulate files or launch programs. To do that, you need a desktop environment on top of the X Windows system software.
The KDE Desktop
The K Desktop Environment (KDE) was first released in 1996 as an open source project to produce a graphical desktop similar to the Microsoft Windows environment. The KDE desktop incorporates all of the features you are probably familiar with if you are a Windows user. Figure 1.3 shows a sample KDE 4 desktop running in the openSuSE Linux distribution.
Figure 1.3 The KDE 4 desktop on an openSuSE Linux system
The bar at the bottom of the desktop is called the Panel. The Panel consists of four parts:
The K menu: Much like the Windows Start menu, the K menu contains links to start installed applications.
Program shortcuts: These are quick links to start applications directly from the Panel.
The taskbar: The taskbar shows icons for applications currently running on the desktop.
Applets: These are small applications that have an icon in the Panel that often can change depending on information from the application.
All of the Panel features are similar to what you would find in Windows. In addition to the desktop features, the KDE project has produced a wide assortment of applications that run in the KDE environment. These applications are shown in
Table 1.3. (You may notice the trend of using a capital K in KDE application names.)
Table 1.3 KDE Applications
Application Description
amaroK
Audio file player
digiKam
Digital camera software
dolphin
File manager
K3b
CD-burning software
Kaffeine
Video player
Kmail
E-mail client
Koffice
Office applications suite
Konqueror
File and Web browser
Kontact
Personal information manager
Kopete
Instant messaging client
This is only a partial list of applications produced by the KDE project. There are lots more applications that are included with the KDE desktop.
The GNOME Desktop
The GNU Network Object Model Environment (GNOME) is another popular Linux desktop environment. First released in 1999, GNOME has become the default desktop environment for many Linux distributions (the most popular being Red Hat Linux).
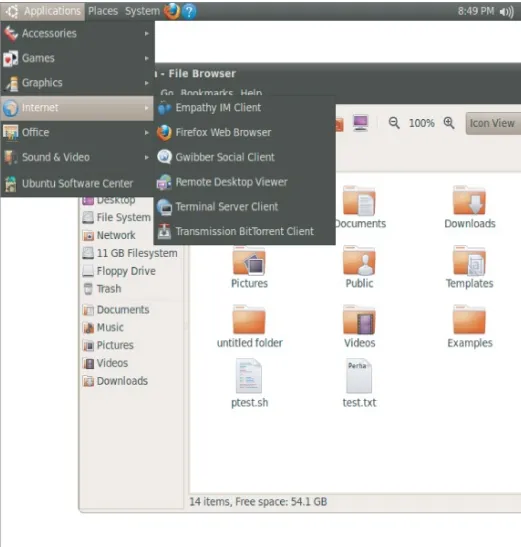
While GNOME chose to depart from the standard Microsoft Windows look-and-feel, it incorporates many features that most Windows users are comfortable with:
A desktop area for icons
Two panel areas
Drag-and-drop capabilities
Figure 1.4 shows the standard GNOME desktop used in the Ubuntu Linux distribution.
Figure 1.4 A GNOME desktop on an Ubuntu Linux system
Not to be outdone by KDE, the GNOME developers have also produced a host of graphical applications that integrate with the GNOME desktop. These are shown in Table 1.4.
As you can see, there are also quite a few applications available for the GNOME desktop. Besides all of these applications, most Linux distributions that use the GNOME desktop also incorporate the KDE libraries, allowing you to run KDE
applications on your GNOME desktop.
Table 1.4 GNOME Applications
Application
Description
gcalc-tool
Calculator
gedit
GNOME text editor
gnome-panel
Desktop panel for launching applications
gnome-nettool
Network diagnostics tool
gnome-terminal
Terminal emulator
nautilus
Graphical file manager
nautilus-cd-burner CD-burning tool
sound juicer
Audio CD–ripping tool
tomboy
Note-taking software
totem
Multimedia player
Other Desktops
The downside to a graphical desktop environment is that they require a fair amount of system resources to operate properly. In the early days of Linux, a hallmark and selling feature of Linux was its ability to operate on older, less powerful PCs that the newer Microsoft desktop products couldn't run on. However, with the popularity of KDE and GNOME desktops, this has changed, as it takes just as much memory to run a KDE or GNOME desktop as the latest Microsoft desktop environment.
If you have an older PC, don't be discouraged. The Linux developers have banded together to take Linux back to its roots. They've created several low-memory–oriented graphical desktop applications that provide basic features that run perfectly fine on older PCs.
While these graphical desktops don't have a plethora of applications designed around them, they still run many basic graphical applications that support features such as word processing, spreadsheets, databases, drawing, and, of course, multimedia support.
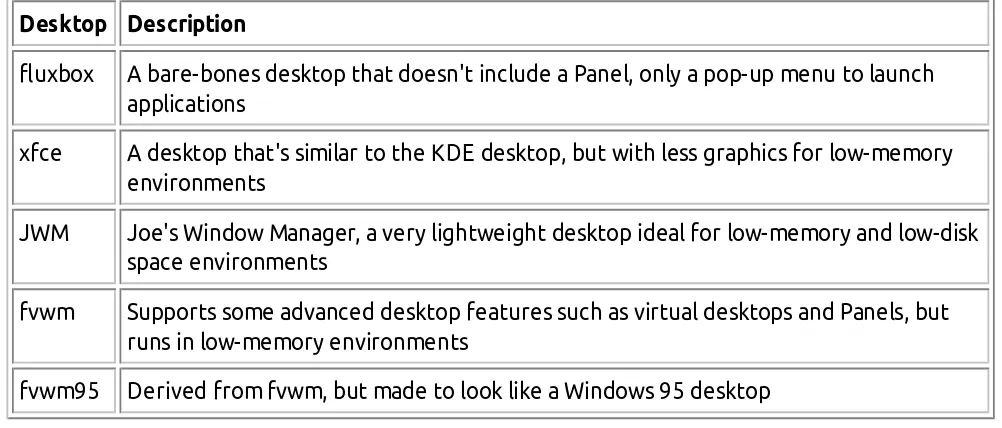
Table 1.5 shows some of the smaller Linux graphical desktop environments that can be used on lower-powered PCs and laptops.
Table 1.5 Other Linux Graphical Desktops
Desktop Description
fluxbox
A bare-bones desktop that doesn't include a Panel, only a pop-up menu to launch
applications
xfce
A desktop that's similar to the KDE desktop, but with less graphics for low-memory
environments
JWM
Joe's Window Manager, a very lightweight desktop ideal for low-memory and low-disk
space environments
fvwm
Supports some advanced desktop features such as virtual desktops and Panels, but
runs in low-memory environments
fvwm95
Derived from fvwm, but made to look like a Windows 95 desktop
These graphical desktop environments are not as fancy as the KDE and GNOME desktops, but they provide basic graphical functionality just fine. Figure 1.5 shows what the fluxbox desktop used in the Puppy Linux antiX distribution looks like.
Figure 1.5 The JWM desktop as seen in the Puppy Linux distribution
If you are using an older PC, try a Linux distribution that uses one of these desktops and see what happens. You may be pleasantly surprised.
Linux Distributions
Now that you have seen the four main components required for a complete Linux system, you may be wondering how you are going to get them all put together to make a Linux system. Fortunately, there are people who have already done that for you.
A complete Linux system package is called a distribution. There are lots of different Linux distributions available to meet just about any computing requirement you could have. Most distributions are customized for a specific user group, such as business users, multimedia enthusiasts, software developers, or average home users. Each customized distribution includes the software packages required to support specialized functions, such as audio- and video-editing software for multimedia enthusiasts, or compilers and integrated development environments (IDEs) for software developers.
The different Linux distributions are often divided into three categories:
Specialized distributions
LiveCD test distributions
The following sections describe these different types of Linux distributions, and show some examples of Linux distributions in each category.
Core Linux Distributions
A core Linux distribution contains a kernel, one or more graphical desktop environments, and just about every Linux application that is available, precompiled for the kernel. It provides one-stop shopping for a complete Linux installation.
Table 1.6 shows some of the more popular core Linux distributions.
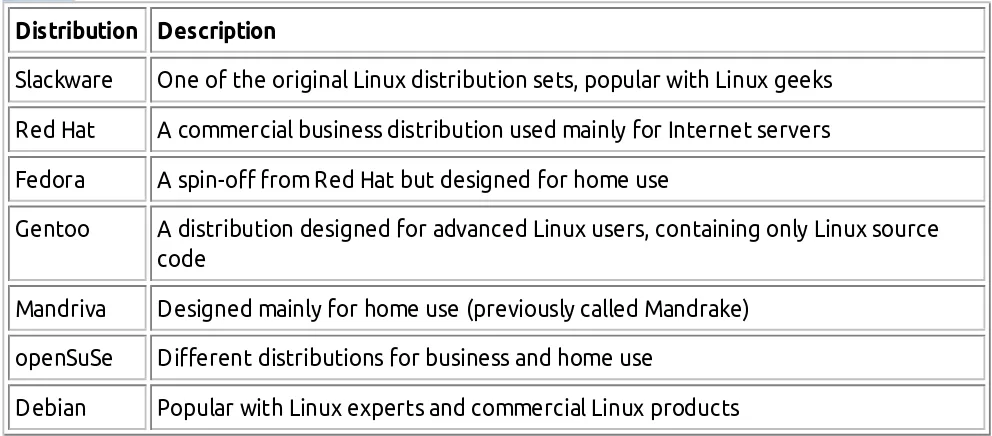
Table 1.6 Core Linux Distributions
Distribution Description
Slackware
One of the original Linux distribution sets, popular with Linux geeks
Red Hat
A commercial business distribution used mainly for Internet servers
Fedora
A spin-off from Red Hat but designed for home use
Gentoo
A distribution designed for advanced Linux users, containing only Linux source
code
Mandriva
Designed mainly for home use (previously called Mandrake)
openSuSe
Different distributions for business and home use
Debian
Popular with Linux experts and commercial Linux products
In the early days of Linux, a distribution was released as a set of floppy disks. You had to download groups of files and then copy them onto disks. It would usually take 20 or more disks to make an entire distribution! Needless to say, this was a painful experience.
Nowadays, with home computers commonly having CD and DVD players built in, Linux distributions are released as either a CD set or a single DVD. This makes installing Linux much easier.
However, beginners still often run into problems when they install one of the core Linux distributions. To cover just about any situation in which someone might want to use Linux, a single distribution has to include lots of application software. They include everything from high-end Internet database servers to common games. Because of the quantity of applications available for Linux, a complete distribution often takes four or more CDs.
While having lots of options available in a distribution is great for Linux geeks, it can become a nightmare for beginning Linux users. Most distributions ask a series of questions during the installation process to determine which applications to load by default, what hardware is connected to the PC, and how to configure the hardware. Beginners often find these questions confusing. As a result, they often either load way too many programs on their computer or don't load enough and later discover that their computer won't do what they want it to.
Fortunately for beginners, there's a much simpler way to install Linux.
Specialized Linux Distributions
A new subgroup of Linux distributions has started to appear. These are typically based on one of the main distributions but contain only a subset of applications that would make sense for a specific area of use.
In addition to providing specialized software (such as only office products for business users), customized Linux distributions also attempt to help beginning Linux users by autodetecting and autoconfiguring common hardware devices. This makes installing Linux a much more enjoyable process.
Table 1.7 shows some of the specialized Linux distributions available and what they specialize in.
Distribution
Description
Xandros
A commercial Linux package configured for beginners
SimplyMEPIS A free distribution for home use
Ubuntu
A free distribution for school and home use
PCLinuxOS
A free distribution for home and office use
Mint
A free distribution for home entertainment use
dyne:bolic
A free distribution designed for audio and MIDI applications
Puppy Linux
A free small distribution that runs well on older PCs
That's just a small sampling of specialized Linux distributions. There are literally hundreds of specialized Linux distributions, and more are popping up all the time on the Internet. No matter what your specialty, you'll probably find a Linux distribution made for you.
Many of the specialized Linux distributions are based on the Debian Linux distribution. They use the same installation files as Debian but package only a small fraction of a full-blown Debian system.
The Linux LiveCD
A relatively new phenomenon in the Linux world is the bootable Linux CD distribution. This lets you see what a Linux system is like without actually installing it. Most modern PCs can boot from a CD instead of the standard hard drive. To take advantage of this, some Linux distributions create a bootable CD that contains a sample Linux system (called a Linux LiveCD). Because of the limitations of the single CD size, the sample can't contain a complete Linux system, but you'd be surprised at all the software they can cram in there. The result is that you can boot your PC from the CD and run a Linux distribution without having to install anything on your hard drive!
This is an excellent way to test various Linux distributions without having to mess with your PC. Just pop in a CD and boot! All of the Linux software will run directly off the CD. There are lots of Linux LiveCDs that you can download from the Internet and burn onto a CD to test drive.
Table 1.8 shows some popular Linux LiveCDs that are available.
Table 1.8 Linux LiveCD Distributions
Distribution
Description
Knoppix
A German Linux, the first Linux LiveCD developed
SimplyMEPIS Designed for beginning home Linux users
PCLinuxOS
Full-blown Linux distribution on a LiveCD
Ubuntu
A worldwide Linux project, designed for many languages
Slax
A live Linux CD based on Slackware Linux
Puppy Linux
A full-featured Linux designed for older PCs
You may notice a familiarity in this table. Many specialized Linux distributions also have a Linux LiveCD version. Some Linux LiveCD distributions, such as Ubuntu, allow you to install the Linux distribution directly from the LiveCD. This enables you to boot with the CD, test drive the Linux distribution, and then if you like it, install it on your hard drive. This feature is extremely handy and user-friendly.
But there are advances being made in the Linux LiveCD world that help to solve some of these problems. These advances include the ability to:
Copy Linux system files from the CD to memory
Copy system files to a file on the hard drive
Store system settings on a USB memory stick
Store user settings on a USB memory stick
Some Linux LiveCDs, such as Puppy Linux, are designed with a minimum number of Linux system files. The LiveCD boot scripts copies them directly into memory when the CD boots. This allows you to remove the CD from the computer as soon as Linux boots. Not only does this make your applications run much faster (because applications run faster from memory), but it also gives you a free CD tray to use for ripping audio CDs or playing video DVDs from the software included in Puppy Linux.
Other Linux LiveCDs use an alternative method that allows you to remove the CD from the tray after booting. It involves copying the core Linux files onto the Windows hard drive as a single file. After the CD boots, it looks for that file and reads the system files from it. The dyne:bolic Linux LiveCD uses this technique, which is called docking. Of course, you must copy the system file to your hard drive before you can boot from the CD.
A very popular technique for storing data from a live Linux CD session is to use a common USB memory stick (also called a flash drive or a thumb drive). Just about every Linux LiveCD can recognize a plugged-in USB memory stick (even if the stick is formatted for Windows) and read and write files to and from it. This allows you to boot a Linux LiveCD, use the Linux applications to create files, store those files on your memory stick, and then access them from your Windows applications later (or from a different computer). How cool is that?
Summary
This chapter discussed the Linux system, and the basics of how it works. The Linux kernel is the core of the system, controlling how memory, programs, and hardware all interact with one another. The GNU utilities are also an important piece in the Linux system. The Linux shell, which is the main focus of this book, is part of the GNU core utilities. The chapter also discussed the final piece of a Linux system, the Linux desktop environment. Things have changed over the years, and Linux now supports several graphical desktop environments.
The chapter also discussed the various Linux distributions. A Linux distribution bundles the various parts of a Linux system into a simple package that you can easily install on your PC. The Linux distribution world consists of full-blown Linux distributions that include just about every application imaginable, as well as specialized Linux distributions that only include applications focused on a special function. The Linux LiveCD craze has created another group of Linux distributions that allow you to easily test drive Linux without even having to install it on your hard drive.
Chapter 2
Getting to the Shell
In This Chapter
Terminal emulation
The terminfo database
The Linux console
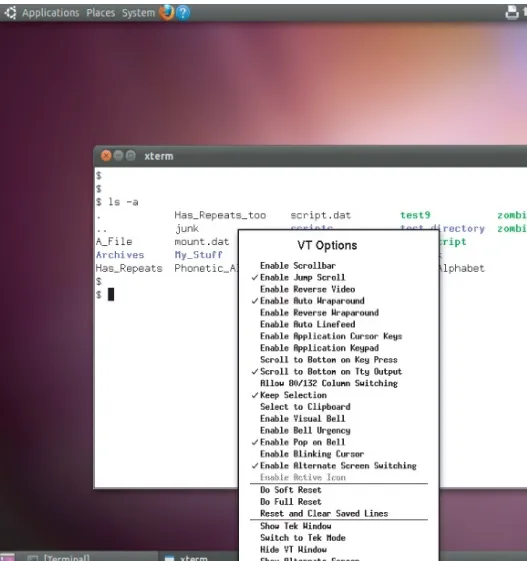
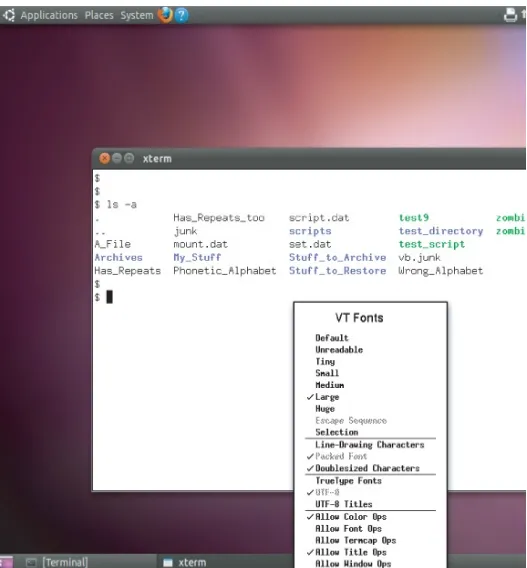
The xterm terminal
The Konsole terminal
The GNOME terminal
In the old days of Linux, all that was available to work with was the shell. System administrators, programmers, and system users all sat at the Linux console terminal entering text commands and viewing text output. These days, with our fancy graphical desktop environments, it's getting harder just to find a shell prompt on the system to work from. This chapter discusses what is required to provide a command line environment, and then walks you through the terminal emulation packages you may run into in the various Linux distributions.
Terminal Emulation
Back before the days of graphical desktops, the only way to interact with a Unix system was through a text command line interface (CLI) provided by the shell. The CLI allowed text input only, and could only display text and rudimentary graphics output.
Because of this restriction, output devices did not have to be very fancy. Often a simple dumb terminal was all that was required to interact with the Unix system. A dumb terminal was usually nothing more than a monitor and keyboard
(although later on in life they started getting fancier by utilizing a mouse) connected to the Unix system via a communication cable (usually a multi-wire serial cable). This simple combination provided an easy way to enter text data into the Unix system and view text results.
As you well know, things are significantly different in today's Linux environment. Just about every Linux distribution uses some type of graphical desktop environment. However, to access the shell you still need a text display to interact with a CLI. The problem now is getting to one. With all of the new graphical Linux desktop features, sometimes finding a way to get a CLI in a Linux distribution is not an easy task.
One way to get to a CLI is to take the Linux system out of graphical desktop mode and place it in text mode. This provides nothing more than a simple shell CLI on the monitor, just like the days before graphical desktops. This mode is called the Linux console because it emulates the old days of a hard-wired console terminal and is a direct interface to the Linux system.
The alternative to being in the Linux console is to use a terminal emulation package from within the graphical Linux desktop environment. A terminal emulation package simulates working on a dumb terminal, all within a graphical window on the desktop. Figure 2.1 shows an example of a terminal emulator running in a graphical Linux desktop environment.
Figure 2.1 A simple terminal emulator running on a Linux desktop
Each terminal emulation package has the ability to emulate one or more specific types of dumb terminals. If you're going to work with the shell in Linux, unfortunately you'll need to know a little bit about terminal emulation.
Knowing the core features of the old dumb terminals will help you decide which emulation type to select when you're using a graphical terminal emulator, and use all of the available features to their full capabilities. The main features used in the dumb terminal can be broken down into two areas: the graphics capabilities and the keyboard. This section describes these features and discusses how they relate to the different types of terminal emulators.
Graphics Capabilities
The most important part of terminal emulation is how it displays information on the monitor. When you hear the phrase “text mode,” the last thing you'd think to worry about is graphics. However, even the most rudimentary dumb terminals supported some method of screen manipulation (such as clearing the screen and displaying text at a specific location on the screen).
Character Sets
All terminals must display characters on the screen (otherwise, text mode would be pretty useless). The trick is in what characters to display, and what codes the Linux system needs to send to display them. A character set is a set of binary commands that the Linux system sends to a monitor to display characters. There are several character sets that are supported by various terminal emulation packages:
ASCII: The American Standard Code for Information Interchange. This character set contains the English characters stored using a 7-bit code, and consists of 128 English letters (both upper and lower case), numbers, and special symbols. This character set was adopted by the American National Standards Institute (ANSI) as US-ASCII. You will often see it referred to in terminal emulators as the ANSI character set.
ISO-8859-1 (commonly called Latin-1): An extension of the ASCII character set developed by the International Organization for Standardization (ISO). It uses an 8-bit code to support the standard ASCII characters as well as special foreign language characters for most Western European languages. The Latin-1 character set is popular in multinational terminal emulation packages.
ISO-8859-2: ISO character set that supports Eastern European language characters.
ISO-8859-6: ISO character set that supports Arabic language characters.
ISO-8859-7: ISO character set that supports Greek language characters.
ISO-8859-8: ISO character set that supports Hebrew language characters.
ISO-10646 (commonly called Unicode): ISO 2-byte character set that contains codes for most English and non-English languages. This single character set contains all of the codes defined in all of the ISO-8859-x series of character sets. The Unicode character set is quickly becoming popular among open source applications.
By far the most common character set in use today in English-speaking countries is the Latin-1 character set. The Unicode character set is becoming more popular, and may very well one day become the new standard in character sets. Most popular terminal emulators allow you to select which character set to use in the terminal emulation.
Control Codes
In addition to being able to display characters, terminals must have the ability to control special features on the monitor and keyboard, such as the cursor location on the screen. They accomplish this using a system of control codes. A control code is a special code not used in the character set, which signals the terminal to perform a special, nonprintable operation.
Common control code functions are the carriage return (return the cursor to the beginning of the line), line feed (put the cursor on the next horizontal row), horizontal tab (shift the cursor over a preset number of spaces), arrow keys (up, down, left, and right), and the page up/page down keys. While these codes mainly emulate features that control where the cursor is placed on the monitor, there are also several other codes, such as clearing the entire screen, and even a bell ring (emulating the old typewriter end-of-carriage bell).
Control codes were also used in controlling the communication features of dumb terminals. Dumb terminals were connected to the computer system via some type of communication channel, often a serial communication cable. Sometimes data needed to be controlled on the communication channel, so developers devised special control codes just for data communication purposes. While these codes aren't necessarily required in modern terminal emulators, most support these codes to maintain compatibility. The most common codes in this category are the XON and XOFF codes, which start and stop data transmission to the terminal, respectively.
Block Mode Graphics
As dumb terminals became more popular, manufacturers started experimenting with rudimentary graphics capabilities. By far the most popular type of “graphical” dumb terminal used in the Unix world was the Digital Equipment Corporation (DEC) VT series of terminals. The turning point for dumb terminals came with the release of the DEC VT100 in 1978. The DEC VT100 terminal was the first terminal to support the complete ANSI character set, including block mode graphic characters.
The ANSI character set contains codes that not only allowed monitors to display text but also rudimentary graphics symbols, such as boxes, lines, and blocks. By far one of the most popular dumb terminals used in Unix operations during the 1980s was the DEC VT102, an upgraded version of the VT100. Most modern terminal emulation programs still emulate the operation of the VT102 display, supporting all of the ANSI codes for creating block mode graphics.