Bible
10475 Crosspoint Boulevard Indianapolis, IN 46256
www.wiley.com
Copyright © 2009 by Wiley Publishing, Inc., Indianapolis, Indiana Published simultaneously in Canada
ISBN: 978-0-470-34517-7
Manufactured in the United States of America 10 9 8 7 6 5 4 3 2 1
No part of this publication may be reproduced, stored in a retrieval system or transmitted in any form or by any means, electronic, mechanical, photocopying, recording, scanning or otherwise, except as permitted under Sections 107 or 108 of the 1976 United States Copyright Act, without either the prior written permission of the Publisher, or authorization through payment of the appropriate per-copy fee to the Copyright Clearance Center, 222 Rosewood Drive, Danvers, MA 01923, (978) 750-8400, fax (978) 646-8600. Requests to the Publisher for permission should be addressed to the Permissions Department, John Wiley & Sons, Inc., 111 River Street, Hoboken, NJ 07030, (201) 748-6011, fax (201)748-6008, or online at http://www.wiley.com/go/permissions.
LIMIT OF LIABILITY/DISCLAIMER OF WARRANTY: THE PUBLISHER AND THE AUTHOR MAKE NO REPRESENTATIONS OR WARRANTIES WITH RESPECT TO THE ACCURACY OR COMPLETENESS OF THE CONTENTS OF THIS WORK AND SPECIFICALLY DISCLAIM ALL WARRANTIES, INCLUDING WITHOUT LIMITATION WARRANTIES OF FITNESS FOR A PARTICULAR PURPOSE. NO WARRANTY MAY BE CREATED OR EXTENDED BY SALES OR PROMOTIONAL MATERIALS. THE ADVICE AND STRATEGIES CONTAINED HEREIN MAY NOT BE SUITABLE FOR EVERY SITUATION. THIS WORK IS SOLD WITH THE UNDERSTANDING THAT THE PUBLISHER IS NOT ENGAGED IN RENDERING LEGAL, ACCOUNTING, OR OTHER PROFESSIONAL SERVICES. IF PROFESSIONAL ASSISTANCE IS REQUIRED, THE SERVICES OF A COMPETENT PROFESSIONAL PERSON SHOULD BE SOUGHT. NEITHER THE PUBLISHER NOR THE AUTHOR SHALL BE LIABLE FOR DAMAGES ARISING HEREFROM. THE FACT THAT AN ORGANIZATION OR WEBSITE IS REFERRED TO IN THIS WORK AS A CITATION AND/OR A POTENTIAL SOURCE OF FURTHER INFORMATION DOES NOT MEAN THAT THE AUTHOR OR THE PUBLISHER ENDORSES THE INFORMATION THE ORGANIZATION OR WEBSITE MAY PROVIDE OR RECOMMENDATIONS IT MAY MAKE. FURTHER, READERS SHOULD BE AWARE THAT INTERNET WEBSITES LISTED IN THIS WORK MAY HAVE CHANGED OR DISAPPEARED BETWEEN WHEN THIS WORK WAS WRITTEN AND WHEN IT IS READ.
For general information on our other products and services or to obtain technical support, please contact our Customer Care Department within the U.S. at (800) 762-2974, outside the U.S. at (317) 572-3993 or fax (317) 572-4002. Library of Congress Control Number: 2008941628
Trademarks: Wiley and related trade dress are registered trademarks of Wiley Publishing, Inc., in the United States and other countries, and may not be used without written permission. All other trademarks are the property of their respective owners. Wiley Publishing, Inc., is not associated with any product or vendor mentioned in this book.
best son in the world), who provided help, love, and support during
the writing of this book, and my grandmother, Shirley Boswell
(a.k.a., the best grandmother in the world),
whose love and prayers never fail.
Simon Abrams:
I would like to dedicate this book to my lovely wife Stephanie — it’s
a cliché, but I really couldn’t have done it without you.
I’d also like to dedicate this book to my father, Donald Abrams, for
the opportunities and experiences he made possible for me.
Dan Moughamian:
I’d like to dedicate this book to my colleagues, family, and friends.
You have provided opportunity, ideas, and advice throughout my
been teaching Adobe Photoshop since 2001 and holds Adobe Certified Instructor and Comptia Certified Technical Trainer certifications, as well as a Georgia Institute of Technology Certificate in Web design. Her teaching experience ranges from one-on-one training to teaching college-level computer art courses. Stacy is experienced in a wide variety of practical applications for Photoshop and specializes in preparing images for printing, color correction, and retouching images. Stacy has earned numerous awards for publication design and an award for Web design from the Council for Advancement and Support of Education. Contact Stacey at [email protected]
Simon Abrams was smitten with computers ever since the day his dad gave him his first Commodore 64 back in the late ’80s. It wasn’t until he took a class called Intro to Microcomputer Graphicsin college that he discovered that the intersection of computers and art was where his true love was to be found. He later attended the Savannah College of Art & Design, where he studied 3D Modeling and Animation. Upon graduating with a BFA in Computer Art, Simon moved to New York City. After a brief stint at Tekserve (New York’s premier Mac repair shop), he got a job work-ing as a designer at an interactive advertiswork-ing agency durwork-ing the heady dot-com boom of the late ’90s. Along the way, he discovered his second love: photography, which he pursues vigorously as a serious amateur around the streets and subways of New York. His photography has been featured on various sites, including Yahoo! News, Gothamist, and Panasonic’s Digital Photo Academy. Simon is an Adobe Certified Photoshop Professional and regularly appears as a guest lecturer teaching Photoshop at New York University’s Courant Institute of Mathematical Sciences. He has also led workshops in the theater at Apple’s flagship retail location in SoHo, New York. Simon cur-rently lives in Brooklyn, with his wife Stephanie. He recently became a student of karate and works as a Flash developer at an advertising agency in New York City.
Senior Acquisitions Editor
Introduction . . . xxxi
Who the Book Is For ... xxxi
How the Book Is Organized ... xxxii
How to use this book ... xxxiv
Part I: Welcome To Adobe Photoshop CS4
1
Chapter 1: Working with Digital Images . . . .3
About Digital Images ...3
Color and lightness qualities of digital images ...4
Overview of the main types and characteristics of digital images ...6
Bit depth ...6
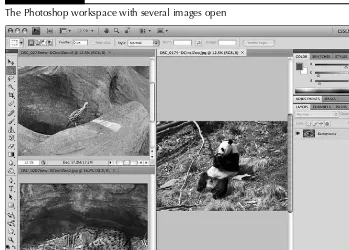
Chapter 2: The Photoshop Workspace, Preferences, and Tools . . . . 33
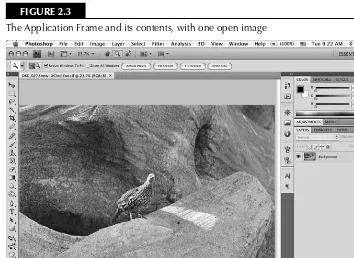
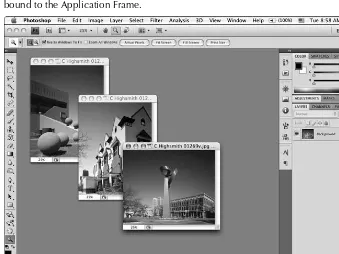
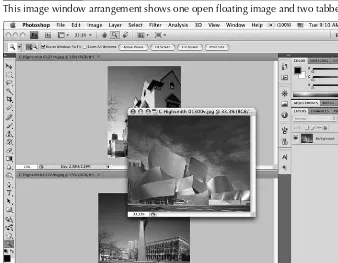
Image windows ...44
Prefer Adobe Camera Raw for supported RAW files ...65
Ignore EXIF profile tag ...65
Ask Before Saving Layered TIFF files ...66
Maximize PSD and PSB File Compatibility ...66
Enable Version Cue ...66
Recent file list contains __ files ...66
Guides, Grid & Slices preferences ...73
Show Font Names in English ...74
Font Preview Size ...74
Presets and the Preset Manager ...75
Selecting and using presets ...76
Quick Selection and the Magic Wand tools ...83
Crop tool...83
Slice and Slice Select tools ...83
Eyedropper tool ...84
The Blur, Sharpen, and Smudge tools ...90
The Dodge, Burn, and Sponge tools ...91
The Pen tool ...92
The Type tools ...93
The Path selection tools ...94
The Shape and Line tools ...94
The Hand, Rotation, and Zoom tools ...95
Foreground and Background Color tools ...96
The Mode buttons ...97
Summary ...98
Chapter 3: Finding and Processing Images with Bridge . . . . 99
Finding and Opening Images ...99
Importing images from a digital camera ...102
Grouping images as stacks ...104
Adding labels and ratings ...106
Processing images...107
Adding Descriptive and Searchable Data to Images ...107
Metadata panel ...107
Processing Batches of Images and Repetitive Tasks ...117
Batch renaming multiple images ...117
Chapter 4: Camera Raw Work Area . . . . 125
The RAW Format ...126
The DNG format ...128
The Camera Raw dialog box ...128
Using Adobe Camera Raw ...131
Importing RAW, JPEG, and TIFF images ...131
Processing multiple photos...132
Image improvement settings ...133
The Camera Raw toolbar ...133
Local adjustments in Camera Raw ...135
The Adjustment Brush ...135
The Graduated Filter ...137
The histogram ...138
The Image Adjustment tabs ...139
Tone Curve ...141
Part II: Working with Images
153
Chapter 5: Creating New Images, Resizing,
and Adjusting Resolution . . . . 155
Getting Started with New Images ...155
Units & Rulers Preferences ...157
Chapter 6: Undoing Mistakes . . . . 175
Save for Web & Devices Command ...193
Part III: Layers, Selections, Channels, and Curves
213
Chapter 8: Layers, Layer Masks, Blending Modes,
and Smart Objects . . . . 215
Working with Layers ...215
Getting images and image parts onto separate layers ...217
Chapter 9: Histograms, Levels,and Curves . . . . 263
Levels numeric input and output values ...275
Levels eyedroppers ...276
The Auto and Options buttons in Levels and Curves ...278
The Curves Command ...280
The Curves dialog box ...281
Using Curves ...285
Summary ...291
Chapter 10: Selections and Channels . . . . 293
Core Selection Tools and Options ...294
The Marquee tools...294
Quick Selection, Magic Wand, and Color Range ...305
Part IV: Paths, Shapes, and Text
329
Chapter 11: Working with Paths . . . . 331
Introduction to Bézier Paths ...331
Defining Paths and Vector Tools ...333
Dissecting a Photoshop path ...333
Types of paths ...333
Parts of a path ...335
Understanding vector tools and options ...338
The Pen tools ...338
Pen and path selection tool options ...340
The Paths panel ...345
The Masks panel ...348
Creating Vector Paths ...348
Making simple open and closed paths ...348
Creating complex paths ...351
Editing paths ...360
Aligning and distributing path components ...364
Path strokes and fills ...365
Path strokes ...365
Path fills ...366
Paths as selections ...367
Creating path selections ...367
From path to Alpha Channel ...369
Sharing paths between documents and applications ...370
Summary ...371
Chapter 12: Working with Vector Shapes . . . . 373
Vector Shapes Defined ...373
Aligning and distributing shape layer areas ...383
Editing Vector Shape Layers ...383
Using Vector Shape Presets ...384
Creating New Custom Shapes ...387
Creating New Shape Presets ...389
Summary ...390
Chapter 13: Working with Text . . . . 391
Entering Text ...392
Editing Text ...393
Type tools ...396
Paragraph Type ...397
Fractional Widths and System Layout ...406
Horizontal and vertical scaling...406
Adobe Single-Line Composer and Every-Line Composer ...415
Single-Line Composer ...415
Every-Line Composer ...415
Type on a Path ...415
Type on a curved, open path ...416
Type on a circle ...417
Type inside a closed shape ...419
Warping type ...419
Type in a Smart Object ...421
Type with Layer Styles ...424
Vector versus Rasterized Type ...429
Summary ...429
Part V: Enhancing, Correcting, and Retouching
431
Chapter 14: Lightening, Darkening,and Changing Contrast . . . . 433
Lightening ...433
Using curves to lighten ...434
Lightening broad areas with curves ...435
Lightening specifically targeted areas with curves ...440
Lightening specific colors with curves ...442
Lightening with Curves eyedroppers and color numbers ...444
Lightening by entering color numbers in curves ...446
Changing a curves lighten adjustment by readjusting curves settings ...447
Reducing a curves lighten adjustment by reducing opacity ...447
Confining a Curves lighten adjustment to a specific layer or set of layers ...448
Lightening with curves without shifting color ...449
Increasing a curves lighten adjustment with the Screen blending mode ...449
Lightening with an original, unadjusted curve and the Screen blending mode...450
Increasing a lighten adjustment by duplicating Curves adjustment layers ...450
Using duplicate layers and the Screen blending mode to lighten ...451
Using Levels to lighten ...452
Lightening broad areas with Levels ...452
Lightening specifically targeted areas with Levels ...454
Lightening specific colors with Levels ...454
Lightening with Levels eyedroppers and color numbers...456
Lightening by entering color numbers in Levels ...457
Changing a Levels adjustment ...457
Using the Clone tool to lighten ...457
Using the Dodge tool to lighten ...459
Using an Exposure adjustment to lighten ...459
Using the Shadows/Highlights command to lighten shadows ...461
Using a Brightness/Contrast adjustment to lighten ...461
Using a Black & White adjustment with Luminosity and a mask to lighten ...462
Using layers with different content and a blending mode to lighten ...462
Darkening ...463
Using curves to Darken ...463
Darkening broad areas with curves ...464
Darkening generally targeted areas with curves ...464
Darkening specific colors with curves ...466
Darkening with Curves eyedroppers and color numbers ...467
Darkening by entering color numbers in curves ...469
Changing a Curves darken adjustment by readjusting curves settings ...470
Reducing a Curves darken adjustment by reducing opacity ...470
Confining a Curves darken adjustment to a specific layer or set of layers ...470
Darkening with curves without shifting color ...471
Increasing a Curves darken adjustment with the Multiply blending mode ...471
Darkening with an original, unadjusted curve and the Multiply blending mode...472
Increasing a Darken adjustment by duplicating Curves adjustment layers ...472
Using duplicate layers and the Multiply blending mode to darken ...472
Using Levels to darken ...473
Darkening broad areas with Levels ...473
Darkening specific colors with Levels ...474
Darkening with Levels eyedroppers and color numbers ...475
Darkening by entering color numbers in Levels ...476
Changing a Levels adjustment ...477
Using the Clone tool to darken ...477
Using the Burn tool to darken ...478
Using an Exposure adjustment to darken ...478
Using the Shadows/Highlights command to darken highlights ...480
Using a Brightness/Contrast adjustment to darken ...480
Using a Black & White adjustment with Luminosity and a mask to darken ...481
Using layers with different content and a blending mode to darken ...481
Increasing Contrast and Detail ...482
Using curves to increase contrast ...482
Increasing contrast in broad areas with curves ...483
Increasing contrast in generally targeted areas with curves ...483
Increasing contrast in specifically targeted areas with curves ...484
Increasing contrast in specific colors with curves ...485
Increasing contrast with Curves eyedroppers and color numbers ...487
Changing a Curves contrast adjustment by readjusting curves settings ...487
Reducing a Curves contrast adjustment by reducing opacity ...487
Confining a Curves contrast adjustment to a specific layer or set of layers ...487
Increasing Contrast with curves without shifting color ...488
Increasing contrast with an original, unadjusted curve and the Soft Light blending mode ...488
Using Levels to increase contrast ...489
Using the Clone tool to add contrast ...489
Using the Dodge and Burn tools to increase contrast ...489
Using a Brightness/Contrast adjustment to increase contrast ...490
Decreasing Contrast and Detail ...490
Decreasing contrast with curves ...490
Decreasing contrast with Levels ...491
Using layers with different content to decrease contrast ...492
Using a Brightness/Contrast adjustment to decrease contrast ...493
Summary ...493
Chapter 15: Color Correctionand Color Changes . . . . 495
Preparing to Work with Color...495
Check the image size and resolution ...496
Consider working on a larger master file with preserved layers ...496
Think about correcting full-color images in RGB or Lab color mode ...496
Set the Color Settings appropriately ...497
Create a soft-proof profile so you can proof the image on-screen as you work ...498
Calibrate your monitor ...498
Color Correction ...499
Measuring color ...499
Color numbers and color correction ...501
Setting neutrals with Auto Color ...503 Setting neutrals with curves ...504 Adjusting memory colors ...507 Adjusting memory colors with Curves ...508 Using Hue/Saturation to adjust memory colors ...509 Color Changes ...510 Change colors by sampling and painting ...511 Changing a darker color to a lighter color ...511 Changing colors with adjustment layers ...512 Change colors with a Hue/Saturation adjustment layer ...513 Change colors with a Photo Filter adjustment layer ...515 Change colors with a Selective Color adjustment layer ...515 Change colors with a Black and White adjustment layer ...515 Change colors with the Replace Color command ...516 Change colors with the Color Replacement tool ...517 Change colors with filled selections or Fill layers ...519 Change colors with a Color Overlay style ...520 Change colors with gradients ...521 Using the Gradient Editor ...521 Change colors with Gradient Map ...522 Change colors with the Posterize command ...524 Change colors with Duotone mode ...524 Change colors with Lab-mode curves ...527 Change colors with the Match Color command ...529 Summary ...532
Chapter 16: Transparency, Opacity, Silhouettes,
and Image Collages . . . . 533
Drawing the Eye to Certain Areas ...554 Use blur and sharpen ...554 Add contrast and reduce contrast ...554 Use color to draw attention ...554 Summary ...556
Chapter 17: Noise, Grain, Dust, Pixelization, and Jagged Edges . . . . 557
Get Rid of Overall Pixelated Look ...557 Reducing noise ...558
Chapter 18: Retouching and Restoring Digital Images . . . . 571
Part VI: Painting and Special Effects
609
Chapter 19: Painting . . . . 611
Brushes and Tools That Work Like Brushes ...612 Painting tools ...612 Creating and saving brush sets ...630 Downloading brush sets ...632 Brushes Used with Blending Modes ...632 Painting Techniques ...639 Painting straight lines ...639 Undoing your strokes ...640 Creating Special Effects with Painting ...641 Painting with the Path tool ...641 Creating a chalkboard effect ...643 Summary ...646
Chapter 20: Filters and Layer Styles . . . . 647
Blurring and Sharpening ...654 Using the High Pass filter ...666 Special Effects Filters ...669 Creating Clouds and Fire ...672 Clouds ...672 Playing with fire ...679 Summary ...685
Chapter 21: Distortion Effects . . . . 687
Liquify ...687 Distortion tools ...688 Distortion options ...690 Tool options ...690 Reconstruction ...691 Protecting parts of your image ...691 View options ...692 Vanishing Point ...693 Warping Objects ...698 Warping with the Transform tool ...698 Creating a custom Warp ...698
Chapter 22: Text Effects . . . . 721
Part VII: Color Management and Workflow
743
Chapter 23: Color Management . . . . 745
Color Accuracy and Consistency ...745 ICC color profiles ...746 Embedding color profiles ...746 Device-dependent versus device-independent ...747 Calibrating Devices, Such as Monitors and Printers ...747 Specifying and Using Color Settings ...749 Color Settings ...750 Using color settings presets ...750 Loading and saving custom presets ...750 Working Spaces ...751 Assigning, converting, and embedding color profiles ...755 Synchronizing color using Bridge ...756 Printing Using Color Management ...757 Summary ...759
Chapter 24: Designing for the Web . . . . 761
Save for Web & Devices ...773 Previewing optimized images in a Web browser ...779 Saving files ...780 Optimizing images for the Web ...782 Optimizing GIF and PNG-8 images ...782 Color reduction ...783 Dithering options ...783 Transparency and matte settings ...785 Transparency dithering ...786 Interlaced images ...787 Optimizing JPEG and PNG-24 images ...787 Compressing JPEG images ...787 Transparency and matte settings for JPEG and PNG-24 ...788 Interlaced PNG-24 and progressive JPEG images ...788 Zoomify ...789
Chapter 25: Digital Workflow Overview and Automating Processes . . . 805
Leveraging Photoshop layers ...817 Use adjustment layers ...817 Use Smart Object layers ...818 Use iterative image layers to stay non-destructive ...818 Leveraging history ...819 General printing and proofing tips ...822 Page Setup ...822 Handling print color issues ...823 Profiling your printer and paper type ...823 Soft-proofing ...823
Part VIII: Video, 3D Images, and Technical Images
839
Chapter 26: Working with Video . . . . 841
Preparing video for use in After Effects ...850 Importing Video ...850 Using video layers ...850 Importing image sequences ...852 Placing video ...853 Using the Interpret Footage command ...853 Editing video and animation layers ...854 Transforming video layers ...854 Painting, drawing, and cloning ...854 Working with filters ...856 Set Work Area ...857 Setting layer In and Out points ...857 Lift Work Area and Extract Work Area ...858 Split Layer ...858 Previewing and exporting frame-based animations ...864 Converting to Timeline animation ...865 Saving Video and Animations ...865 Previewing video on a video monitor ...865 Rendering video ...866 Summary ...868
Chapter 27: Working with 3D Images . . . . 869
Transforming 3D models ...882 Using object position presets ...883 Using the 3D Axis widget ...883 Transforming meshes within a 3-D layer ...884 Colors and textures ...886 Types of textures ...887 Editing materials with the Layers panel ...888 3D Paint Mode ...891 Hiding and showing portions of a model ...893 Using materials presets ...893 Lighting...894 Viewing and modifying a scene’s lighting setup ...895 Using Light Guides ...896
Chapter 28: Working with Technical Images . . . . 903
Using DICOM Medical Scans in Photoshop ...903 Opening DICOM files in Photoshop ...904 Open a DICOM image sequence ...906 Saving DICOM files ...907
Part IX: Appendixes
915
Appendix A: Charts . . . . 917
Appendix B: Professional Resources . . . . 925
Appendix C: What’s on the CD? . . . . 929
inspiration.
Special appreciation to the following artists/photographers who donated their work to this book: Simon Abrams
Brad Barker, 706-766-5158, [email protected] Christopher Angel Alasa, 404-869-6637, [email protected] AJ Grier, www.theharleyartist.com, [email protected] Bobby DeLane Poole, 706-266-8788, [email protected] Rod McClain, www.rodmcclainphotography.net
Will Cates
The Library of Congress and Carol Highsmith, the Carol Highsmith Collection
Simon Abrams: I would like to acknowledge the following people, places and things that provided support, encouragement, and preservation of my sanity for the duration of this project:
Christopher Hayes, you really are the man, and I still want to be like you when I grow up. Evan Korth, thanks for the opportunities and the opened doors.
Wii nights with the Harfenists.
K-Dog Coffee Shop, for keeping the iced lattés and carrot cake in steady supply. My work family at Deutsch, Inc., the world’s greatest cheerleading squad. My entire family, thanks for the support. You guys are the best.
Photoshop Bible authors: Photoshop-Hall-of-Famer Deke McClelland, the original author, and Photoshop gurus Laurie Ulrich Fuller and Robert C. Fuller.
The Photoshop Bible traditionally has been the must-have comprehensive reference for Photoshop users around the world. It is the longest continuously published title on Photoshop, with more than 16 U.S. Editions, dozens of translated editions, and more than a million copies in print worldwide.
Who the Book Is For
This is an exciting time in the evolution of Adobe Photoshop, the world’s leading image-editing software, industry standard, and preventer of boredom. I am convinced that you can never run out of new things to do with Photoshop. And if you need to do anything with images, especially on a professional basis, chances are you either already use or would benefit from using Photoshop. It spans the gamut of users, from the home user retouching treasured family photos to the profes-sional user designing logos to the artist creating digital paintings for movies to NASA analyzing space mission photos. And never before has Photoshop had so many features that make working with images easier, more productive, more creative, or more alluring.
With this in mind, the Photoshop CS4 Bible is all new and includes information about the Extended version of Photoshop, which has additional features that can help you do more with 3D images; video; and scientific, architectural, or geographic images. We have endeavored to include in this book all the most commonly used features, but unlike the style of Photoshop’s Help files, we have incorporated our own experiences and opinions about features (whether positive or not-so-positive), put emphasis on the more important and useful aspects of features, and tried to describe features in a way that can be clear to even less-experienced users. Hopefully, some of our perspectives will be helpful to you in gaining a better understanding of Photoshop and maybe even provide some ideas about new ways to use it. No doubt, you also will discover your own unique ways to use this ground-breaking software.
How the Book Is Organized
This book is organized into nine main parts. • Part I: Welcome to Adobe Photoshop CS4 • Part II: Working with Images
• Part III: Layers, Selections, Channels, and Curves • Part IV: Paths, Shapes, and Text
• Part V: Enhancing, Correcting, and Retouching • Part VI: Printing and Special Effects
• Part VII: Color Management and Workflow • Part VIII: Video, 3D Images, and Technical Images • Part IX: Appendixes
Each of these parts is broken down into several chapters.
Part I
In Part I, Welcome to Adobe Photoshop CS4, four chapters are ready to introduce you to the fun-damentals of the new incarnation of Photoshop:
• Chapter 1: Working with Digital Images
• Chapter 2: The Photoshop Workspace, Preferences, and Tools • Chapter 3: Finding and Processing Images with Bridge • Chapter 4: Camera Raw Work Area
Part II
Working with Images, as Part II is called, contains three chapters that deal specifically with basic image treatment. To get you started tweaking your images, check these topics out:
• Chapter 5: Creating New Images, Resizing, and Adjusting Resolution • Chapter 6: Undoing Mistakes
• Chapter 7: Saving Files
Part III
Up the ante a bit with the more-involved information found in Part III: Layers, Selections, Channels, and Curves. Three chapters in this Part will guide you through some essential tools to flesh out your basic knowledge:
• Chapter 9: Histograms, Levels, and Curves • Chapter 10; Selections and Chanels
Part IV
Paths, Shapes, and Text are what Part IV is all about. The three chapters here show you how to tweak vector shapes and text to suit the exact needs of your project.
• Chapter 11: Working with Paths • Chapter 12: Working with Vector Shapes • Chapter 13: Working with Text
Part V
Part V, Enhancing, Correcting, and Retouching, contains five chapters with the image-editing tech-niques you need to bring out the best in your photos and even salvage images that you may give up on otherwise.
• Chapter 14: Lightening, Darkening, and Changing Contrast • Chapter 15: Color Corrections and Color Changes
• Chapter 16: Transparency, Opacity, Silhouettes, and Image Collages • Chapter 17: Noise, Grain, Dust, Pixelization, and Jagged Edges • Chapter 18: Retouching and Restoring Digital Images
Part VI
In the sixth part of this book, Painting and Special Effects are the focus. Four chapters walk you through techniques and effects that will lead you toward creating unique images.
• Chapter 19: Painting
• Chapter 20: Filters and Layer Styles • Chapter 21: Distortion Effects • Chapter 22: Text Effects
Part VII
Color Management and Workflow, discussed in Part VII, is covered with three chapters. The pro-cesses discussed here will help you maximize your efficiency with workflows, and manage color and design appropriately for each project.
• Chapter 23: Color Mangement • Chapter 24: Designing for the Web
Part VIII
Part VIII is appropriately entitled Video, 3-D Images, and Technical Images. The last three chapters of this book cover each of those topics, respectively.
• Chapter 26: Working with Video • Chapter 27: Working with 3-D Images • Chapter 28: Working with Technical Images
Part IX
The ninth and final Part contains three appendixes of resources, letting you know what shortcuts and file formats that Photoshop supports, pointing you toward other sources for more specific information if by chance a specific question isn’t answered within this book, and a short explana-tion of what to expect on this book’s accompanying CD.
• Appendix A: Charts
• Appendix B: Professional Resources • Appendix C: What’s on the CD?
How to use this book
At over 1000 pages, this book may be intimidating! Don’t feel obligated to read it from front to back…it’s designed with desktop reference in mind. Simply take a look at the Table of Contents or the Index for the topic you have in mind, and skip right to the chapters, even the sections, you need when you need them.
Of course, if you’re brand-new to Photoshop (and CS4 is a wonderful time to begin) and feeling a bit lost, the beginning is a good place to start. This book is written as a desktop reference, but the chapters do escalate in difficulty as their title numbers get higher. The four chapters in Part I serve as an excellent jumping-off point for newcomers, where you can familiarize yourself with
Photoshop’s workspace, enough tools to get you started, and customizing your own preferences so you can take charge of this robust program on your own terms.
Photoshop CS4
IN THIS PART
Chapter 1
Working with Digital Images
Chapter 2
The Photoshop Workspace, Preferences, and Tools
Chapter 3
Finding and Processing Images with Bridge
Chapter 4
C
amera film and photographic prints are not yet things of the past, and hopefully, there will always be a place for these beloved medi-ums. But humans continue to be endowed with certain irresistible compulsions, not the least of which is the pursuit of convenience. The instant gratification of digital imaging, along with the improvement of its quality, has contributed to making it the standard of today.On the downside, the convenience of this new technology comes with the inconvenience of having to learn new things. Thankfully, the eye-candy of imagery — and, of course, the anticipation of knowing how to nefariously alter friends’ photos — dulls the unpleasantness. Some might even say it makes it fun.
About Digital Images
You can save digital images in many different file formats — for example, JPEG and TIFF — but there are formats and types within the file formats. The characteristics and types of digital images are discussed in this chapter so you can learn how to create the kind of images you need for specific purposes.
First, it is important to know that all digital images contain pixels, usually square in shape, that describe their colors and brightness levels. You can see an image’s individual pixels on-screen if you zoom in and look at a magni-fied version, as shown in Figure 1.1.
IN THIS CHAPTER
About digital images
FIGURE 1.1
Some of the individual pixels in an image are magnified and shown here.
Color and lightness qualities of digital images
The following terminology is helpful to know when learning about the types of digital images:
n Tonal range (or dynamic range). This term refers to the range of dark to light values in an image, usually referred to as shadows, midtones, and highlights. An image that con-tains all or most of the possible tones, rather than a smaller portion of the possible tones, usually appears more detailed and is said to have a large tonal range, or dynamic range. Tones also may be referred to as levels or intensities.
n Brightness, lightness, luminosity, luminance. These terms refer todark to light tonal characteristics, as opposed to color characteristics. They can be thought of as describing the image as if the colors had been converted to blacks, grays, and whites.
n Hue. Hue is identified by the name of the color, such as red, orange, or green. The light-ness or darklight-ness of a color is thought of as separate from the hue. Hue can be measured on a location on the standard color wheel and expressed as a degree between 0° and 360°.
n Color. In many instances in Photoshop, color refers to the hue, as a separate quality from dark to light tonal qualities. For example, it is common to say, “The color in this image is good and needs to stay the same, but I need to make changes to the luminosity.” But sometimes color refers to the overall qualities of a color — the hue component together with the lighter or darker components of the color. For example, it is just as cor-rect to say, “I will use a darker blue color fo the type,” as it is to say, “I will use the same blue color but one that has a darker luminosity for the type.”
n Saturation. The strength or purity of the color, or chroma, saturation represents the amount of hue in the color compared to the amount of black, gray, or white in the color. If a color contains some black or gray, it may look darker, and/or muted; if iti contains some white, it may look lighter, muted, and/or pastel. The maximum amount of hue, with no black, gray, or white mixed in, would be fully saturated and look like pure vivid color.
NOTE
NOTE
In Photoshop, color is sometimes, and hue is always, thought of as a separateHue, Saturation, and Brightness
The Hue, Saturation, and Brightness (HSB) color model is not a color mode that can be assigned to an image in Photoshop, but it is a useful way of organizing color components. The HSB model is helpful in understanding the meaning of the terms Hue, Saturation, and Brightness. In the HSB model, the hue is specified as an angle from 0° to 360° that corresponds to a location on the color wheel. Saturation is expressed from 0 percent (no hue) to 100 percent (maximum amount of hue). Brightness is expressed from 0 percent (as dark as possible) to 100 percent (as light as possible).
Colors and their degrees are shown in the color wheel: R for Red, Y for Yellow, G for Green, C for Cyan, B for Blue, and M for Magenta. Cyan corresponds to 180 degrees, Yellow-Green corresponds to 90 degrees, and Red can be expressed as either 0 degrees or 360 degrees.
The Color Picker is a common tool used to define colors in Photoshop and is shown in the following figure. You can access it by clicking the foreground color box in the Toolbox. In the HSB section of the Color Picker shown, H is set to 180 degrees, which specifies the color Cyan, as shown on the color wheel; S is set to 100 percent, which specifies the maximum amount of hue; and B is set to 100 percent, which specifies the maximum amount of brightness. These values result in a picked color that is a vivid pure version of Cyan. The picked color is shown selected in the top-right corner of the color field box (the large square box on the left side of the Color Picker dialog box).
Overview of the main types and characteristics
of digital images
Following are basic descriptions of digital image types and characteristics:
n Bit depth. The higher an image’s bit depth, the more colors each of its pixels can be; therefore, the more colors and degrees of brightness the image can contain.
n Bitmap (raster) and vector. A bitmap, or raster, image gets its detail from the number of pixels it contains. The more pixels a bitmap image has, the more detail the image can contain. A vector image gets its detail from shapes and lines that are mathematically cal-culated, so its detail does not depend on the number of pixels in the image.
n Color mode. The color mode of an image specifies which basic set of colors is used to make up an image. Some common basic sets of colors used to make up full-color images are Red, Green, and Blue (RGB mode) and Cyan, Magenta, Yellow, and Black (CMYK mode; Black is represented by the letter K). Colors within color modes are stored in their own color channels. You can view the channels in the Channels palette.
CROSS-REF
CROSS-REF
See Chapter 10 for more information about the Channels palette.n Color space, color profile, gamut. Within the basic sets of colors used to make up each color mode, such as RGB or CMYK, there are different sets of combinations of these col-ors. These subordinate sets can be thought of as color palettes chosen for images so they will look better when they reach their final destinations.
n File format. Various destinations for an image, such as other software or a computer screen display, require certain file formats because of the software language or properties of the device. Some common file formats are JPEG and GIF, usually used for Web page display, and TIFF, often used for page layout programs and printing.
NOTE
NOTE
The color-mode term Bitmap mode (images that are limited to black and/or white;no gray; no color) is different from the image-type term bitmap, or raster (images that get their detail from the number of pixels they contain). Not all bitmap images are Bitmap mode.
Bit depth
Bit depth is measured in bits per channel (bpc):
n 1 bit/channel. An image with a bit depth of 1 has pixels with only two possible values, black or white. A Bitmap mode image has one channel with pixels that can be either black or white. There is no 1 Bit/Channel option that can be selected in Photoshop, but Bitmap mode images are 1-bpc images.
n 8 bits/channel. An image with a bit depth of 8 has 28, or 256, possible values per chan-nel. An 8-bpc Grayscale mode image’s pixels can only be black, white, or shades of gray. Since a Grayscale mode image has only one channel, each 8-bpc Grayscale mode image can have only 256 possible values. An 8-bpc RGB mode image has 256 possible values in each of its three color channels (red, green, and blue). It is possible for each pixel in an RGB image to be any mixture of those three colors. Therefore, each 8-bpc RGB image has 16,777,216 possible values (256 × 256 × 256).
n 16 bits/channel. An image with a bit depth of 16 has 216, or 65,536, possible values per channel.
n 32 bits/channel. Also known as a high dynamic range (HDR) image, an image with a bit depth of 32 has 232, or 4,294,967,296, possible values per channel.
TABLE 1.1
Limits of Photoshop’s Support for Bit Depths Above 8
16-bpc Images 32-bpc Images
Cannot use Bitmap, Duotone, or Indexed Color mode
Can use only RGB and Grayscale modes Cannot use Art History Brush tool Cannot use some blending modes
Cannot use Variations image adjustment Cannot use some commands from the Image ➪ Adjustments menu
Cannot use some filters Cannot use some filters Can save these formats only:
CAUTION
CAUTION
Eight-bpc RGB images are sometimes called 24-bit images (8 bits x 3 channels = 24bits of data for each pixel). This can be confusing. For example, sometimes 8-bpc RGB images are called 8-bit images and sometimes they are called 24-bit images.
Thirty-two-bpc HDR images can represent the entire dynamic range of the visible world, unlike the lower bit depths, which can represent only a portion of it. Among the advantages of HDR is that adjusting its exposure is like adjusting the exposure when photographing a scene in the real world. Blurs and other real-world lighting effects look realistic in HDR images. Motion pictures, 3-D work, and some high-end photography are mediums that sometimes use HDR images.
HDR images contain brightness levels that a standard monitor cannot display, so Photoshop lets you make choices about the appearance of the on-screen preview of HDR images by choosing View ➪ 32-bit Preview Options.
The Merge to HDR command lets you create HDR images from multiple photographs with differ-ent exposures, thereby gaining the larger dynamic range that 32-bpc images can support. Following are the steps to merge multiple images to HDR format:
1. Choose File ➪ Automate ➪ Merge to HDR.
2. In the Merge to HDR dialog box, click Browse, select the images, and click Open.
3. If you held your camera in your hands when you photographed your multiple images, select the Attempt To Automatically Align Source Images option.
4. Click OK.
5. Set view options by clicking the minus or plus button for zoom in or out, or choose a view percentage or mode from the pop-up menu below the preview image.
6. (Optional) Select or deselect check boxes under the filmstrip thumbnails to specify which images to use in the merge.
7. Choose a bit depth from the Bit Depth menu. Choose 32 Bits/Channel if you want the merged image to store the entire dynamic range of the merged images.
8. Move the slider below the histogram to preview the merged image (this does not remove any image data). This preview adjustment is stored in the HDR image file and applied when the image is open. It can be changed later by choosing View ➪ 32-bit Preview Options.
9. Click OK to create the merged image.
Following are the steps to convert from 32-bpc HDR to 16- or 8-bpc:
1. Choose Image ➪ Mode ➪ 16 Bits/Channel or 8 Bits/Channel.
2. Make sure the Preview box is checked and choose one of the following four methods for adjusting the brightness and contrast in the image until the image’s appearance and tonal range meets your requirements:
n Exposure and Gamma. Move the Exposure slider to adjust the gain, and move the Gamma (midtone) slider to adjust the contrast. If the result is acceptable, click OK to complete the conversion.
n Highlight Compression. This is an automatic method that compresses the highlight values in the HDR image so they fall within the range the lower bit depth can support. If the result is acceptable, click OK to complete the conversion.
n Equalize Histogram. This is an automatic method that compresses the dynamic range of the HDR image while trying to preserve some contrast. If the result is acceptable, click OK to complete the conversion.
n Local Adaptation. Move the radius slider to specify the size of the local brightness regions. Move the threshold slider to specify how far apart two pixels’ tonal values must be before they are no longer part of the same brightness region. You can also use the toning curve to make adjustments. It’s usually best to uncheck the corner option so the curve will be smooth. (For more about using curves, see Chapter 11.) If the result is acceptable, click OK to complete the conversion.
NOTE
NOTE
With the HDR dialog box open, you can use the Save or Load button to save or loadyour custom HDR conversion settings.
Tips for Taking Photos for Merging to HDR
n Use a tripod.
n Take at least five to seven photos to capture the dynamic range of the scene.
n Vary the shutter speed to create different exposures. (Caution: Changing the aperture can produce lower quality, and changing the ISO or aperture may cause noise or vignetting.)
n Keep in mind that auto-bracketing may not provide enough differences in exposures.
n Set exposure differences one or two EV (exposure value) steps apart (equivalent to about one or two f-stops).
n Don’t vary the lighting in the images.
Bitmap (raster) and vector
A bitmap, or raster, image gets its detail from the number of pixels it contains, which is called reso-lution. Since they depend on the number of pixels for detail, bitmap images are said to be resolu-tion-dependent. Resolution is commonly expressed in Photoshop as the number of pixels per inch (ppi). Choose Image ➪ Image Size to see the resolution of an image.
CROSS-REF
CROSS-REF
Appendix A includes a chart of required resolutions for different kinds of images.The more pixels a bitmap image has, the more detail the image can contain. Larger bitmap images need to have more pixels than smaller ones in order to preserve detail. Photos are bitmap images, and paintings or illustrations that donít have well-defined shapes are usually bitmap images. Very simple images can also be bitmap format (see Figure 1.2). It is necessary for bitmap images to have many pixels if they need to show a lot of detail, and in the case of photos or scanned images, the detail must be captured in the initial creation of the image. It is possible for an image to look deceptively good on-screen but bad in its printed form. If it doesnít have enough pixels, the printed version may lack detail and look blurry or pixilated (the undesirable appearance of individual square pixels or their jagged edges).
CROSS-REF
CROSS-REF
Photoshop images can have multiple layers that contain different parts of an image.Having parts on separate layers can make it easier to manipulate the individual parts. You can also create layer masks that can be used to hide and show parts of a layer. Layers are explained in more detail in Chapter 8.
FIGURE 1.2
A bitmap image
Images that are made up of some combination of solid colors, simple gradations between colors, distinct shapes, and lines can be constructed as vector images. Simple logos and cartoon-type illus-trations often have these characteristics, but some complex illusillus-trations do, too. While eliminating the worry about having enough resolution is an advantage, keep in mind that the vector compo-nents often have to be created or adjusted by hand, so creating vector images can be more time-consuming than creating bitmap images. Bitmap images can be created by taking a photo with a digital camera or by scanning an image. Vector images must be hand-drawn using vector tools in software such as Photoshop or Illustrato. Note that an image that is a good candidate for the vector format does not necessarily have to be in vector format. It can be a bitmap image.
Since numerous file formats can contain vector information, it is not immediately apparent whether an image is a vector image or contains vector information. If an image contains vector information, you can find it in any of four places in the image:
n On a vector layer mask (right-click [Ctrl-click on a Mac] on a layer mask; if you see vec-tor options, it is a vecvec-tor mask rather than a standard layer mask).
n On a type layer in the Layers palette. As long as you can still see the T in the layer thumb-nail, the type is made up of vectors.
n On a path in the Paths palette. All paths in the Paths palette are vectors.
n In a Smart Object layer. Some have vector information embedded. You can double-click the Smart Object layer to open its linked file and examine it for vector information. The linked file may be a Photoshop or Illustrator file. (Content in Illustrator files is typically vector.)
There can be a combination vector and bitmap image. If an image contains bitmap parts, the image has to have enough resolution to describe the detail in the bitmap parts.
In Figure 1.3, the vector information — the path of the dog — is shown on the vector layer mask.
FIGURE 1.3
The type of layer shown is a shape layer, a layer completely filled with a color (in this case, black) and that has a vector layer mask that hides part of the color on the layer, leaving visible what looks like a shape. White areas on a vector mask allow the color on the layer to be visible; gray on a vec-tor mask hides the layer’s color. The layer name is “Shape Layer-Black,” and the vecvec-tor layer mask is immediately to the left of the layer name.
The dog path on the mask allows the corresponding area of black color on the layer to be visible, and the leftover gray part of the vector mask hides all the other black on the layer (makes it invisi-ble, or transparent). The vector mask in Figure 1.3 is small, so it’s hard to see that the dog path on the vector mask is filled with white; if you examine the file on the CD, you can see that it is filled with white.The dog path has also been saved in the Paths palette, just for safekeeping. All paths in the Paths palette and on vector layer masks are vector components of the image.
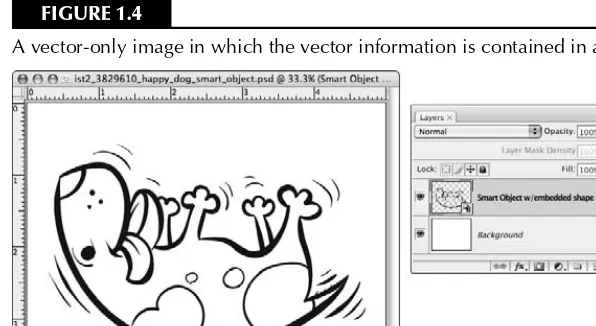
Figure 1.4 shows a vector image in which the vector information is stored in a Smart Object.
FIGURE 1.4
A vector-only image in which the vector information is contained in a Smart Object
Smart Object layers have a special icon at the lower right of the layer thumbnail and can contain linked Photoshop or Illustrator files. Smart Objects also allow certain Photoshop functions that regular layers may not allow. To confirm that a Smart Object contains vector information, you can double-click the Smart Object, and check the linked file that opens for vector information.
CROSS-REF
CROSS-REF
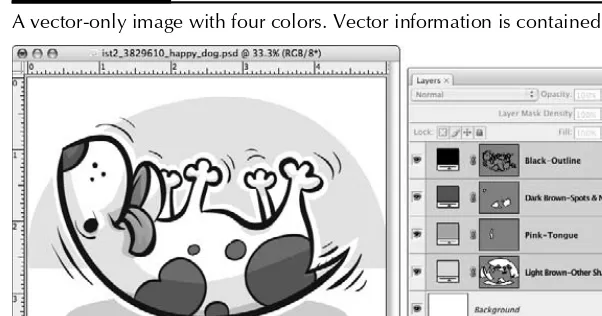
Smart Objects are discussed in Chapter 8.Figure 1.5 shows a vector-only image with four colors. The layers are linked so that they resize together.
Figure 1.6 shows a combination vector and bitmap image. The type layer contains vector informa-tion, the Star Shape Layer contains the star shape in the vector layer mask, and the Background layer contains a bitmap image.
FIGURE 1.5
A vector-only image with four colors. Vector information is contained in the vector layer masks.
FIGURE 1.6
While the vector parts of the image are still resolution-independent and can be resized with no worries, the image must have enough resolution to describe the detail in the bitmap photo. Printing an enlarged bitmap image that doesn’t have enough resolution to describe the detail in the enlarged size often results in a pixilated look, shown in Figure 1.7.
CROSS-REF
CROSS-REF
Part IV explains how to create vector paths, type, and shapes.FIGURE 1.7
Printing a bitmap image at a size larger than its resolution can result in a pixilated look.
You can print a vector-only image as large as you want without regard to image resolution, and it will still look smooth and not pixilated, as shown in Figure 1.8. A vector-only image will appear pixilated on-screen if you zoom in far enough, but it will print smoothly.
FIGURE 1.8
Color mode
The color mode of an image specifies which basic set of colors is used to make up an image. You can specify the color mode in the Image ➪ Mode menu.
Colors within most color modes are stored in color channels. You can view the channels in the Channels palette.
The color modes available in Photoshop are:
n RGB color mode. Red, Green, and Blue are used to make up the image’s color. In 8-bpc images, tonal values range from 0 (black) to 255 (white), for each of the three colors. When the values for all three colors are equal, the resulting color is a neutral color — black, white, or a shade of gray with no color hue. RGB mode (see Figure 1.9) is used to display images on-screen because monitors use Red, Green, and Blue light to display color. It is also commonly used when color-correcting images.
FIGURE 1.9
RGB mode channels
n CMYK color mode. Cyan, Magenta, Yellow, and Black are used to make up the image’s color. Tonal values range from 0 percent (no color) to 100 percent (maximum amount of color) for each of the four colors. In CMYK-colors that are neutral, Magenta and Yellow have equal values and Cyan has a higher value than either Magenta or Yellow; the amount of Black determines the lightness of the color.
CMYK mode (see Figure 1.10) is used when printing images with Cyan, Magenta, Yellow, and Black inks. Typically, RGB mode is used to color-correct images in order to preserve the maximum amount of colors and to make assigning neutral color values easier (all three color values are equal in neutral colors in RGB mode), then the image is converted to CMYK mode. But color correction can also take place in CMYK mode.
n Lab color mode. The Lab color mode (pronounced el, ay, bee, not lab) is based on a stan-dardized way to describe color that corresponds to the way a person with normal vision sees it. It is used by color management systems as an intermediate color reference to help accurately convert colors from one color space to another. It is sometimes used in color correction and image manipulation. Lab color (see Figure 1.11) uses the following com-ponents to make colors: an L (lightness) component, an a component that contains green and red, and a b component that contains blue and yellow. L values range from 0 to 100;
FIGURE 1.10
CMYK mode channels
FIGURE 1.11
Lab mode channels
n Grayscale mode. Black, white, and shades of gray are used to make up the “colors” in an image (no hue is present). In 8-bpc images, there can be 256 brightness values. Grayscale images’ values can be measured in a range from 0 (black) to 255 (white) or with 0 percent–100 percent of black ink coverage.
Grayscale mode (see Figure 1.12) can be used when preparing images to be printed with one color of ink. Grayscale images can be assigned a color within most page layout soft-ware, such as InDesign or Quark Xpress.
FIGURE 1.12
Grayscale mode channels
n Duotone mode. In Duotone mode, one to four custom inks can be used to make up the colors in an image. Figure 1.14 shows Duotone-mode channels, options, and curves. A dutone can be used to add a color tint to a black-ink photo printed in a brochure that uses only black ink plus one other color. A quadtone with custom inks can give a rich and uniquely colored look to a photograph. Pantone offers reference books that show sample duotones printed in various inks and their ink percentages.
FIGURE 1.13
Bitmap mode channel
FIGURE 1.14
The Duotone-mode images can be referred to as monotones, duotones, tritones, or quad-tones. Their values are typically measured with 0%–100% of ink coverage. Duotone mode is used when two, three, or four custom ink colors (other than the typical CMYK combina-tion) are used in printing.
Duotone mode separates the overall image into multiple custom colors, and the Duotone mode curves can be used to adjust the percentage of ink in specific areas of the tonal range of each color.
n Indexed color mode. Up to 256 colors can be used to make up the colors in an image. Colors are stored in a color lookup table (CLUT). Indexed color images are typically used for GIF format images destined for on-screen display (see Figure 1.15). When you save a GIF by choosing File ➪ Save for Web & Devices, the image is automatically converted to Index color mode.
You can generally or selectively reduce the number of colors in an indexed color image to reduce the image’s file size, which decreases download time for Web images. In an effort to improve an image’s appearance while at the same time using fewer colors, you can also take advantage of dithering, the simulation of a third color by generating the appearance of two colors being mixed together.
FIGURE 1.15
n Multichannel mode. Multichannel mode uses only spot channels (see Figure 1.16), chan-nels that store parts of an image that you want to print in custom-selected inks (sometimes called spot colors), such as inks from the Pantone color library. In Multichannel mode, you can put certain parts of an image on each spot channel and assign custom-selected inks to the spot channel.
For example, you can put a custom-red-ink logo on the spot channel for red ink and a custom-blue-ink background on the spot channel for blue ink. You can also put image areas that you want to print in clear varnishes on spot channels.
Spot channels result in inks overprinting each other, so if the logo mentioned previously is to print in red ink only, then the area corresponding to the logo in the blue spot chan-nel must contain no pixels in order to avoid blue ink printing on the red ink logo.
FIGURE 1.16
Multichannel mode spot color channels in a two-color image
NOTE
NOTE
Spot channels can be added to CMYK images by using the Channel palette menu.A common scenario would be adding a spot channel for a clear varnish to a CMYK image.
Color space
There are many colors that can be formed from combinations of the basic sets of colors that make up each color mode, such as RGB (Red, Green, Blue) or CMYK (Cyan, Magenta, Yellow, Black). But not all devices (monitors, presses, desktop printers) can reproduce all the possible color com-binations within each color mode. Therefore, there are sets of color-comcom-binations within each color mode that are customized for different devices and that you can use to make up the colors in your images. You can think of these sets of color-combinations as color palettes. They also can be referred to as color spaces, color gamuts, or color profiles.
Before you begin working on an image, you can specify the color spaces (also called color profiles or
gamuts) for various types of images, such as RGB, CMYK, Grayscale, and Spot Color. This enables Photoshop’s color management functions, which attempt to keep colors accurate across devices, such as a monitor, a desktop printer, and a printing press.
To specify color spaces, choose Edit ➪ Color Settings (see Figure 1.17). If you are working on images for the Web, the sRGB color space is a good set of RGB colors to work in because it resem-bles the set of colors available for display on many monitors.
If you are working on images for printing on a sheetfed press on coated paper, you may want to choose the CMYK color space U.S. Sheetfed Coated. Custom color profiles (color spaces) may also be created and loaded.
FIGURE 1.17
The Color Settings dialog box
You can change an image’s color profile by choosing Edit ➪ Assign Profile or Edit ➪ Convert Profile. Assign Profile uses a conversion method that pays more attention to keeping the color’s numeric values the same and does not prioritize keeping the color’s appearance consistent from one color space to another. Convert Profile attempts to keep the color’s appearance the same from one color space to another and does not prioritize keeping the color’s numeric values the same.
CROSS-REF
CROSS-REF
More about color management is discussed in Chapter 23.File format
Various destinations for an image, such as other software or a computer screen display, require certain file formats because of the software language or properties of the device. Some common file formats are JPEG and GIF, usually used for Web page display, and TIFF, often used for page layout programs and printing.
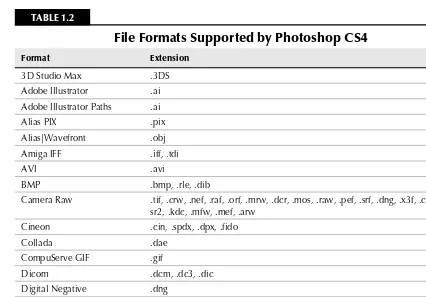
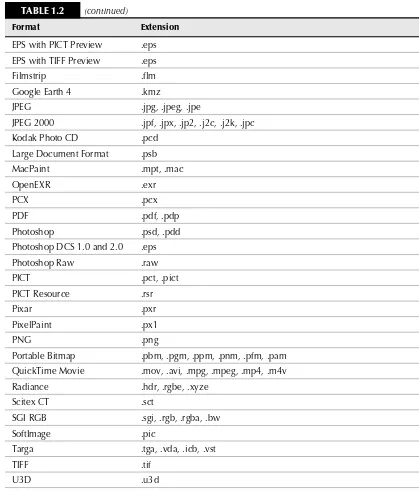
The file formats supported by Photoshop CS4 are listed in Table 1.2.
CROSS-REF
CROSS-REF
For descriptions and purposes of file formats, see Chapter 7 and Appendix A.TABLE 1.2
File Formats Supported by Photoshop CS4
Format Extension
Cineon .cin, .spdx, .dpx, .fido Collada .dae EPS with JPEG Preview .eps
Format Extension
EPS with PICT Preview .eps EPS with TIFF Preview .eps Filmstrip .flm Photoshop DCS 1.0 and 2.0 .eps
Photoshop Raw .raw
Portable Bitmap .pbm, .pgm, .ppm, .pnm, .pfm, .pam QuickTime Movie .mov, .avi, .mpg, .mpeg, .mp4, .m4v Radiance .hdr, .rgbe, .xyze
This file format list is taken from Adobe Tech Note: www.adobe.com/go/kb401022
Low versus high resolution
Bitmap images, as opposed to vector-only images, depend on the number of pixels in the image to describe the image’s detail. In Photoshop, image resolution is measured in pixels per inch (ppi) and can be seen and changed in the Image Size dialog box (choose Image ➪ Image Size), shown in Figure 1.18. If an image does not have enough resolution for its purpose, it may look blurry or pixilated.
Generally, images destined for print will have enough pixels if the resolution is 300 ppi at the final size in inches. Images destined for on-screen display should be 72 ppi at the final size in pixels. An adequate number of pixels needed to describe an image’s detail should be captured initially, for example, at the time a digital photo is taken or a photographic print is scanned. If the resolution is increased or the size of the image is enlarged after importing it into Photoshop, there may not be enough pixels in the image to adequately describe the image’s detail at a larger resolution or size. Even though you can increase the resolution or size in Photoshop, no new pixel information that describes detail is added.
FIGURE 1.18
The Image Size dialog box
Photoshop may simply guess at what kind of pixels to add, which is called resampling up or interpo-lation. This may result in an image that looks blurry or pixilated.
CROSS-REF
CROSS-REF
For more about image resolution and resizing, see Chapter 5.Getting Images into Photoshop
It’s great to know a lot about Photoshop, and if you’ve read the previous sections in this chapter, you have already gained knowledge that, believe it or not, many Photoshop users have not taken the time to learn. But to apply that knowledge, you need to know how to get images from their sources onto your computer and ready to open in Photoshop. Next are some tips that will help you get your images from point A to B.
Digital cameras
Digital cameras come with some type of memory card that holds your digital photos, and they usu-ally come with a cable that can connect the camera to your computer, often a USB-type cable. There are different types of memory cards for digital cameras. Some computers come with memory card slots that may or may not accept your camera’s type of memory card. Some desktop printers also come with memory card slots that you can use to transfer photos from the memory card to your computer, assuming that your printer is connected to the computer. If it’s not obvious that your type of memory card will fit in your device’s memory card slot, check the device’s documentation or contact the manufacturer of the device.
If you don’t have the device’s documentation, you may be able to find a downloadable operation manual on the manufacturer’s Web site that will give you the memory card slot information. Inexpensive card readers that accept virtually all types of memory cards, such as a 35-in-1 card reader, can also be purchased and connected to your computer via a USB- or FireWire-type connec-tion. Check to see which type of connection your computer has before you purchase a card reader. Transferring images from a memory card slot to your computer doesn’t use the camera’s battery and can be faster than a USB connection.
Figure 1.19 shows what USB-type connectors look like. Figure 1.20 shows what FireWire connec-tors look like.
If you want to use a cable connection to transfer images from your camera to your computer, the memory card must be inside the camera. You can purchase a cable that connects your camera to your computer if you don’t have one.
FIGURE 1.19
USB connectors
FIGURE 1.20
FireWire connectors
FireWire
You can also contact the manufacturer to find out what kind of cable you need for your camera model. The major manufacturers, like Canon and Nikon, have Web sites with lots of information, including downloadable camera operation manuals. You can also take the camera to an electronics store, such as Circuit City, for help finding the right cable.
When you either put your camera’s memory card into an appropriate card slot or connect your camera to your computer with a cable, an additional drive that represents the memory card should show up on your computer. Figure 1.21 shows a memory card called “NO NAME,” listed with the other drives on the computer: Macintosh HD, iDisk, and My Book. The path to the images inside the NO NAME memory card is shown as DCIM ➪ 101CANON ➪ images.
CROSS-REF
CROSS-REF
Adobe Bridge provides a useful visual interface to find, open, and process files onyour computer. Using Bridge is discussed in Chapter 3.
FIGURE 1.21
An example of a file path from a camera’s memory card to the images: NO NAME ➪ DCIM ➪ 101CANON ➪ images
After you connect your camera or memory card to your computer, you can use Adobe Bridge’s Photo Downloader by following these steps:
1. In Photoshop: Choose File ➪ Browse (opens Bridge).
2. In Bridge: Choose File ➪ Get Photos from Camera.
Bridge’s Photo Downloader (see Figure 1.22) automatically finds the camera’s images and allows you to choose a location on your computer to copy the images to and create a new subfolder to put them in. Using Photo Downloader, you can also rename the images with text and a serial number as they are being copied to your computer, preserve the old filename inside the image’s file infor-mation, and automatically display the images in Adobe Bridge.
Film cameras
A quick, convenient, and inexpensive way to get images from a film camera into digital form is to purchase a photo CD along with your prints when you get your film developed. Simply put the CD into your computer, copy the folder of images to your hard drive, and use Bridge or choose File ➪ Open from within Photoshop to open the files on your hard drive (not directly from the CD) into Photoshop.
FIGURE 1.22
The Adobe Bridge Photo Downloader
Scanners
You can scan negatives, slides, and other transparencies with a film scanner, or you can scan prints with a flatbed scanner. Some film scanners will do batch scans, which can save loads of scanning time. If you have a lot of slides or negatives, you may also find reasonably priced services on the Web that offer mass film scanning.
You can be confident that images for print will have enough resolution if they are scanned at 300ppi resolution or larger than their final printed size in inches. Images for on-screen display need to have 72ppi resolution at their final size in pixels. Web pages are often constrained to an 800 wide x 600 tall pixel area, so that should give you some idea of the pixel dimensions your images for the Web need to be. If in doubt, scan at a larger size. In Photoshop, enlarging image size comes with a much greater risk of loss of detail than reducing it.
If you scan images from printed publications, an undesirable moiré pattern will likely be included in the image because images printed in publications are made up of dots rather than continuous tone. You can attempt to avoid or reduce moiré patterns by using a blur option in your scanner software or by raising the image off the scanner bed slightly before you scan it (by mounting it on a firm substrate and placing it on top of coins, for example).
Images that are mostly gray can benefit from being scanned in RGB color mode. You have more initial information to work with in Photoshop, which can be useful even if you plan to convert the image to Grayscale mode. Many scanners also let you choose the color profile. Adobe RGB is a good color profile to use for scanning because it contains a relatively large amount of colors. You can convert the image to another color mode in Photoshop, if necessary.
Be sure to make a note of where you’ve told your scanner to save the scanned image on your com-puter. Then use Bridge or choose File ➪ Open from within Photoshop to open the files on your hard drive into Photoshop.
The Internet
You can save images from Web pages to your computer by right-clicking on the image or image link and choosing Save Image As or Save Linked File As. If you don’t have a mouse with a right-click or you are using a Mac, Ctrl+right-click to get the same context menu.
Images on the Web are low resolution, usually 72 ppi, so keep in mind resolution requirements for the purpose of your image.
If you are using Stock Art services, such as iStockPhoto, or photo collection sites, such as Flickr, there may be different sizes and resolutions available.