Core Servlets and JavaServer Pages, Volume 2: Advanced Technologies, Second Edition
by Marty Hall; Larry Brown; Yaakov Chaikin Publisher: Prentice Hall
Pub Date: December 27, 2007 Print ISBN-10: 0-13-148260-2
Print ISBN-13: 978-0-13-148260-9 Pages: 736
Table of Contents | Index
Overview
Java EE is the technology of choice for e-commerce
applications, interactive Web sites, and Web-enabled services. Servlet and JSP technology provides the link between Web clients and server-side applications on this platform. Core Servlets and JavaServer Pages, Volume 2: Advanced Technologies, Second Edition, is the definitive guide to the advanced features and capabilities provided by servlets and JSP. Volume 2 presents advanced capabilities like custom tag
libraries, filters, declarative security, JSTL, and Struts. Like the first volume, it teaches state-of-the-art techniques and best practices illustrated with complete, working, fully documented programs.
Volume 2 explains in detail the advanced tools and techniques needed to build robust, enterprise-class applications. You'll learn how to control application behavior through the web.xml deployment descriptor file, how to enhance application security through both declarative and programmatic methods, and how to use servlet and JSP filters to encapsulate common behavior. You'll also learn how to control major application lifecycle
Complete source code for all examples is available free for unrestricted use at www.volume2.coreservlets.com. For information on Java training from Marty Hall, go to
courses.coreservlets.com.
Volume 1 presents comprehensive coverage of the servlets and JSP specifications, including HTTP headers, cookies, session tracking, JSP scripting elements, file inclusion, the MVC
architecture, and the JSP expression language. It also covers HTML forms, JDBC, and best practices for design and
Core Servlets and JavaServer Pages, Volume 2: Advanced Technologies, Second Edition
by Marty Hall; Larry Brown; Yaakov Chaikin Publisher: Prentice Hall
Pub Date: December 27, 2007 Print ISBN-10: 0-13-148260-2
Print ISBN-13: 978-0-13-148260-9 Pages: 736
Table of Contents | Index Copyright
Introduction
Acknowledgments About the Authors
Chapter 1. Using and Deploying Web Applications Section 1.1. Purpose of Web Applications
Section 1.2. Structure of Web Applications
Section 1.3. Registering Web Applications with the Server Section 1.4. Development and Deployment Strategies
Section 1.5. The Art of WAR: Bundling Web Applications into WAR Files
Section 1.6. Building a Simple Web Application Section 1.7. Sharing Data Among Web Applications
Chapter 2. Controlling Web Application Behavior with web.xml Section 2.1. Purpose of the Deployment Descriptor
Section 2.2. Defining the Header and the Root Element Section 2.3. The Elements of web.xml
Section 2.4. Assigning Names and Custom URLs Section 2.5. Disabling the Invoker Servlet
Section 2.8. Specifying Welcome Pages
Section 2.9. Designating Pages to Handle Errors Section 2.10. Providing Security
Section 2.11. Controlling Session Timeouts Section 2.12. Documenting Web Applications Section 2.13. Associating Files with MIME Types Section 2.14. Configuring JSP Pages
Section 2.15. Configuring Character Encoding
Section 2.16. Designating Application Event Listeners Section 2.17. Developing for the Clustered Environment Section 2.18. J2EE Elements
Chapter 3. Declarative Security
Section 3.1. Form-Based Authentication
Section 3.2. Example: Form-Based Authentication Section 3.3. BASIC Authentication
Section 3.4. Example: BASIC Authentication Section 3.5. Configuring Tomcat to Use SSL
Section 3.6. WebClient: Talking to Web Servers Interactively Section 3.7. Signing a Server Certificate
Chapter 4. Programmatic Security
Section 4.1. Combining Container-Managed and Programmatic Security
Section 4.2. Example: Combining Container-Managed and Programmatic Security
Section 4.3. Handling All Security Programmatically Section 4.4. Example: Handling All Security
Programmatically
Section 4.5. Using Programmatic Security with SSL Section 4.6. Example: Programmatic Security and SSL Chapter 5. Servlet and JSP Filters
Section 5.3. Accessing the Servlet Context from Filters Section 5.4. Example: A Logging Filter
Section 5.5. Using Filter Initialization Parameters Section 5.6. Example: An Access Time Filter
Section 5.7. Blocking the Response
Section 5.8. Example: A Prohibited-Site Filter Section 5.9. Modifying the Response
Section 5.10. Example: A Replacement Filter Section 5.11. Example: A Compression Filter Section 5.12. Configuring Filters to Work with RequestDispatcher
Section 5.13. Example: Plugging a Potential Security Hole Section 5.14. The Complete Filter Deployment Descriptor Chapter 6. The Application Events Framework
Section 6.1. Monitoring Creation and Destruction of the Servlet Context
Section 6.2. Example: Initializing Commonly Used Data
Section 6.3. Detecting Changes in Servlet Context Attributes Section 6.4. Example: Monitoring Changes to Commonly Used Data
Section 6.5. Packaging Listeners with Tag Libraries Section 6.6. Example: Packaging the Company Name Listeners
Section 6.7. Recognizing Session Creation and Destruction Section 6.8. Example: A Listener That Counts Sessions Section 6.9. Watching for Changes in Session Attributes Section 6.10. Example: Monitoring Yacht Orders
Section 6.11. Identifying Servlet Request Initialization and Destruction
Section 6.14. Example: Stopping Request Frequency Collection
Section 6.15. Using Multiple Cooperating Listeners
Section 6.16. The Complete Events Deployment Descriptor Chapter 7. Tag Libraries: The Basics
Section 7.1. Tag Library Components Section 7.2. Example: Simple Prime Tag Section 7.3. Assigning Attributes to Tags
Section 7.4. Example: Prime Tag with Variable Length Section 7.5. Including Tag Body in the Tag Output Section 7.6. Example: Heading Tag
Section 7.7. Example: Debug Tag Section 7.8. Creating Tag Files
Section 7.9. Example: Simple Prime Tag Using Tag Files Section 7.10. Example: Prime Tag with Variable Length Using Tag Files
Section 7.11. Example: Heading Tag Using Tag Files Chapter 8. Tag Libraries: Advanced Features
Section 8.1. Manipulating Tag Body
Section 8.2. Example: HTML-Filtering Tag
Section 8.3. Assigning Dynamic Values to Tag Attributes Section 8.4. Example: Simple Looping Tag
Section 8.5. Assigning Complex Objects as Values to Tag Attributes
Section 8.6. Example: Table Formatting Tag Section 8.7. Creating Looping Tags
Section 8.8. Example: ForEach Tag
Section 8.9. Creating Expression Language Functions Section 8.10. Example: Improved Debug Tag
Section 9.1. Installation of JSTL Section 9.2. c:out Tag
Section 9.3. c:forEach and c:forTokens Tags Section 9.4. c:if Tag
Section 9.5. c:choose Tag
Section 9.6. c:set and c:remove Tags Section 9.7. c:import Tag
Section 9.8. c:url and c:param Tags Section 9.9. c:redirect Tag
Section 9.10. c:catch Tag
Chapter 10. The Struts Framework: Basics Section 10.1. Understanding Struts Section 10.2. Setting Up Struts
Section 10.3. The Struts Flow of Control and the Six Steps to Implementing It
Section 10.4. Processing Requests with Action Objects
Section 10.5. Handling Request Parameters with Form Beans Section 10.6. Prepopulating and Redisplaying Input Forms Chapter 11. The Struts Framework: Doing More
Section 11.1. Using Properties Files
Section 11.2. Internationalizing Applications Section 11.3. Laying Out Pages with Tiles Section 11.4. Using Tiles Definitions
Chapter 12. The Struts Framework: Validating User Input Section 12.1. Validating in the Action Class
Section 12.2. Validating in the Form Bean
Section 12.3. Using the Automatic Validation Framework Developing Applications with Apache Ant
Section A.5. Example: Writing a Simple Ant Project Section A.6. Using Ant to Build a Web Application Section A.7. Example: Building a Web Application Section A.8. Using Ant to Create a WAR File
Copyright
Many of the designations used by manufacturers and sellers to distinguish their products are claimed as trademarks. Where those designations appear in this book, and the publisher was aware of a trademark claim, the designations have been printed with initial capital letters or in all capitals.
The authors and publisher have taken care in the preparation of this book, but make no expressed or implied warranty of any kind and assume no responsibility for errors or omissions. No liability is assumed for incidental or consequential damages in connection with or arising out of the use of the information or programs contained herein.
The publisher offers excellent discounts on this book when ordered in quantity for bulk purchases or special sales, which may include electronic versions and/or custom covers and content particular to your business, training goals, marketing focus, and branding interests. For more information, please contact:
U.S. Corporate and Government Sales (800) 382-3419
For sales outside the United States please contact: International Sales
Visit us on the Web: www.prenhallprofessional.com Library of Congress Control Number: 2003058100 Copyright © 2008 Pearson Education, Inc.
reproduction, storage in a retrieval system, or transmission in any form or by any means, electronic, mechanical,
photocopying, recording, or likewise. For information regarding permissions, write to:
Pearson Education, Inc
Rights and Contracts Department 501 Boylston Street, Suite 900 Boston, MA 02116
Fax (617) 671 3447
ISBN-13: 978-0-13-148260-9
Text printed in the United States on recycled paper at Courier in Stoughton, Massachusetts.
Introduction
Suppose your company wants to sell products online. You have a database that gives the price and inventory status of each item. However, your database doesn't speak HTTP, the protocol that Web browsers use. Nor does it output HTML, the format Web browsers need. What can you do? Once users know what they want to buy, how do you gather that information? You want to customize your site for visitors' preferences and
interests, but how? You want to keep track of user's purchases as they shop at your site, but what techniques are required to implement this behavior? When your Web site becomes popular, you might want to compress pages to reduce bandwidth. How can you do this without causing your site to fail for those
visitors whose browsers don't support compression? In all these cases, you need a program to act as the intermediary between the browser and some server-side resource. This book is about using the Java platform for this type of program.
"Wait a second," you say. "Didn't you already write a book
about that?" Well, yes. In May of 2000, Sun Microsystems Press and Prentice Hall released Marty Hall's second book, Core
Servlets and JavaServer Pages. It was successful beyond
everyone's wildest expectations, selling approximately 100,000 copies, getting translated into Bulgarian, Chinese simplified script, Chinese traditional script, Czech, French, German, Hebrew, Japanese, Korean, Polish, Russian, and Spanish, and being chosen by Amazon.com as one of the top five computer programming books of 2001. What fun!
Since then, use of servlets and JSP has continued to grow at a phenomenal rate. The Java 2 Platform has become the
systems now support servlet and JSP technology either natively or by means of a plug-in. With only a small amount of
configuration, you can run servlets and JSP in Microsoft IIS, the Apache Web Server, IBM WebSphere, BEA WebLogic, Oracle Application Server 10g, and dozens of other servers.
Performance of both commercial and open-source servlet and JSP engines has improved significantly.
To no one's surprise, this field continues to grow at a rapid rate. As a result, we could no longer cover the technology in a single book. Core Servlets and JavaServer Pages, Volume 1: Core Technologies, covers the servlet and JSP capabilities that you are likely to use in almost every real-life project. This book, Volume 2: Advanced Technologies, covers features that you may use less frequently but are extremely valuable in robust applications. For example,
Deployment descriptor file. Through the proper use of the deployment descriptor file, web.xml, you can control many aspects of the Web application behavior, from
preloading servlets, to restricting resource access, to controlling session time-outs.
Web application security. In any Web application today, security is a must! The servlet and JSP security model
allows you to easily create login pages and control access to resources.
Custom tag libraries. Custom tags significantly improve the design of JSPs. Custom tags allow you to easily develop your own library of reusable tags specific to your business applications. In addition to creating your own tags, we cover the Standard Tag Library (JSTL).
application-Servlet and JSP filters. With filters, you can apply many pre- and post-processing actions. For instance, logging incoming requests, blocking access, and modifying the servlet or JSP response.
Apache Struts. This framework greatly enhances the
standard model-view-controller (MVC) architecture available with servlets and JSPs. More importantly, Apache Struts still remains one of the most common frameworks used in
industry.
Who Should Read This Book
The main audience is developers who are familiar with basic servlet and JSP technologies, but want to make use of advanced capabilities. As we cover many topics in this book—the
deployment descriptor file, security, listeners, custom tags, JSTL, Struts, Ant—you may want to first start with the
technologies of most interest, and then later read the remaining material. Most commercial servlet and JSP Web applications take advantage of the technologies presented throughout, thus, at some point you may want to read the complete book.
If you are new to servlets and JSPs, you will want to read Core Servlets and Java-Server Pages, Volume 1: Core Technologies. In addition to teaching you how to install and configure a
servlet container, Volume 1 provides excellent coverage of the servlet and JSP specifications. Volume 1 provides the foundation material to this book.
Both books assume that you are familiar with basic Java
programming. You don't have to be an expert Java developer, but if you know nothing about the Java programming language, this is not the place to start. After all, servlet and JSP
Programming, all from Prentice Hall.
Conventions
Throughout the book, concrete programming constructs or program output are presented in a monospaced font. For
example, when abstractly discussing server-side programs that use HTTP, we might refer to "HTTP servlets" or just "servlets," but when we say HttpServlet we are talking about a specific Java class.
User input is indicated in boldface, and command-line prompts are either generic (Prompt>) or indicate the operating system to which they apply (DOS>). For instance, the following indicates that "Some Output" is the result when "java SomeProgram" is executed on any platform.
Prompt> java SomeProgram Some Output
URLs, file names, and directory names are presented in a sans serif font. So, for example, we would say "the StringTokenizer class" (monospaced because we're talking about the class
name) and "Listing such and such shows SomeFile.java"
(sansserif because we're talking about the file name). Paths use forward slashes as in URLs unless they are specific to the
Windows operating system. So, for instance, we would use a forward slash when saying "look in install_dir/bin" (OS neutral), but use backslashes when saying "see
C:\Windows\Temp" (Windows specific).
Important standard techniques are indicated by specially marked entries, as in the following example.
Core Approach
techniques that should always or almost always be used.
Core Notes and Core Warnings are called out in a similar manner.
About the Web Site
The book has a companion Web site at
http://volume2.coreservlets.com/. This free site includes:
Documented source code for all examples shown in the book, which can be downloaded for unrestricted use. Links to all URLs mentioned in the text of the book. Up-to-date download sites for servlet and JSP software. Information on book discounts.
Acknowledgments
Many people helped us with this book. Without their assistance, we would still be on the second chapter. Chuck Cavaness
(Cypress Care, Inc.), Bob Evans (JHU Applied Physics
Laboratory), Randal Hanford (Boeing), Kalman Hazins (JHU Applied Physics Laboratory), Michael Kolodny (Raba
Technologies), Kyong Park (Raba Technologies), Eric Purcell (Lockheed-Martin), Ylber Ramadani (George Brown College), and Richard Slywczak (NASA Glenn Research Center) provided valuable technical feedback on many different chapters. Their recommendations improved the book considerably.
Teresa Horton spotted our errant commas, awkward sentences, typographical errors, and grammatical inconsistencies. She improved the result immensely. Vanessa Moore designed the book layout and produced the final version; she did a great job despite our many last-minute changes. Greg Doench of Prentice Hall believed in the concept from before the first edition and encouraged us to write a second edition. Thanks to all.
About the Authors
Marty Hall is president of coreservlets.com, Inc., a small
company that provides training courses and consulting services related to server-side Java technology. He also teaches Java and Web programming in the Johns Hopkins University part-time graduate program in Computer Science, where he directs the Distributed Computing and Web Technology concentration areas. Marty is the author of five books from Prentice Hall and Sun Microsystems Press: the first and second editions of Core Servlets and JavaServer Pages, More Servlets and JavaServer Pages, and the first and second editions of Core Web
Programming. You can reach Marty at [email protected]. Larry Brown is a Network and Systems manager at a U.S.
Navy Research and Development laboratory. He is the co-author of the second editions of Core Web Programming, also from Prentice Hall and Sun Microsystems Press. You can reach Larry at [email protected].
Yaakov Chaikin is a senior consultant at a software
development company based in Columbia, MD. Besides his day job, he teaches Web development technologies at the graduate Computer Science program of Loyola College in Maryland,
Chapter 1. Using and Deploying Web
Applications
Topics in This Chapter
The purpose of Web applications The structure of Web applications Web application registration
Development and deployment strategies WAR files
Web application data sharing
Web applications (or "Web apps") let you bundle a set of
servlets, JavaServer Pages (JSP) pages, tag libraries, Hypertext Markup Language (HTML) documents, images, style sheets, and other Web content into a single collection that can be used on any server compatible with the servlet specification. When designed carefully, Web apps can be moved from server to server or placed at different locations on the same server, all without making any changes to any of the servlets, JSP pages, or HTML files in the application.
This capability lets you move complex applications around with a minimum of effort, streamlining application reuse. In addition, because each Web app has its own directory structure,
sessions, ServletContext, and class loader, using a Web app simplifies even the initial development because it reduces the amount of coordination needed among various parts of your overall system.
resources, portably deploying your applications, and keeping different applications from interfering with each other. Let's look at each benefit in a bit more detail.
Organization
The first advantage of Web applications is that you know where everything goes: Web apps have a standard location for each type of resource. Individual Java class files always go in the directory called WEB-INF/classes, JAR files (bundles of Java class files) always go in WEB-INF/lib, the web.xml configuration file always goes in the WEB-INF directory, and so on. Files directly accessible to clients (e.g., Web browsers) go into the top-level directory of your Web app or any subdirectory under the top-level directory except WEB-INF.
In addition, it's very common for developers to move from one project to another. Having a standard way of organizing your application's resources saves you from having to come up with an application structure every time you start a new project and it also saves a new developer joining your project from having to learn your particular file organization.
Portability
Because the servlet specification provides a specific file
organization, any compliant server should be able to deploy and run your application immediately. This affords you much
freedom in choosing the vendor of your Web server. As long as a server is compliant, you can pick up your application and, with almost no changes, deploy and run it on a server from a different vendor, thus avoiding the dreaded "vendor lock-in." For example, you could start developing your applications using a free Web server and move to a more established, vendor-supported server closer to deployment time.
interfere with each other. Each application has its own uniform resource locator (URL) with which it can be accessed, its own
1.2. Structure of Web Applications
As mentioned earlier, a Web application has a standardized format and is portable across all compliant Web or application servers. The top-level directory of a Web application is simply a directory with a name of your choosing. Within that directory, certain types of content go in designated locations. This section provides details on the type of content and the locations in
which it should be placed.
Locations for Various File Types
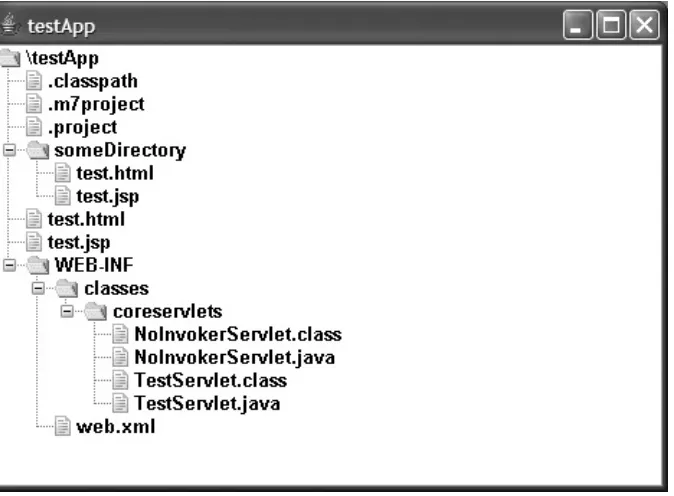
Figure 1-1 shows a representative example of a Web application hierarchy. For a step-by-step example of creating your own Web application, download the app-blank Web app from
http://volume2.coreservlets.com/ and follow the instructions in Section 1.6 (Building a Simple Web Application).
Figure 1-1. A representative Web application.
directory or in a subdirectory with any name other than WEB-INF or META-INF. Servers are prohibited from serving files from WEB-INF or META-INF to the user. When you register a Web application (see Section 1.3), you tell the server the URL prefix that designates the Web app and define where the Web app directory is located. It is common, but by no means mandatory, to use the name of the main Web application directory as the URL prefix. Once you register a prefix, JSP pages are then accessed with URLs of the form http://host/webAppPrefix/filename.jsp (if the pages are in the top-level directory of the Web
application) or http://host/webAppPrefix/subdirectory/filename.jsp (if the pages are in a subdirectory).
It depends on the server whether a default file such as index.jsp can be accessed with a URL that specifies only a directory (e.g., http://host/webAppPrefix/) without the developer first making an entry in the Web app's WEB-INF/web.xml file. If you want index.jsp to be the default file name, we strongly recommend that you make an explicit welcome-file-list entry in your Web app's web.xml file. For example, the following web.xml entry specifies that if a URL specifies a directory name but no file name, the server should try index.jsp first and index.html second. If neither is found, the result is server specific (e.g., a directory listing).
<welcome-file-list>
<welcome-file>index.jsp</welcome-file> <welcome-file>index.html</welcome-file> </welcome-file-list>
On the use of web.xml, see Chapter 2 (Controlling Web Application Behavior with web.xml).
GIF and JPEG images, style sheets, and other Web documents follow exactly the same rules as do JSP pages. They are placed in exactly the same locations and accessed with URLs of exactly the same form.
Individual Servlets, Beans, and Helper Classes
Servlets and other .class files are placed either in WEB-INF/classes or in a subdirectory of WEB-INF/classes that matches their
package name.
To access one of these servlets, you need to designate the specific URL for it by specifying the servlet-mapping element in the web.xml deployment descriptor file that is located within the WEB-INF directory of the Web application. See Section 1.3 (Registering Web Applications with the Server) for details. There is a second way to access servlets without having to specify a custom URL. It is with URLs of the form
http://host/webAppPrefix/servlet/packageName.ServletName. Using this way of accessing servlets is fine if you want to try capabilities or make a quick test case. However, we recommend you do not use this approach for real-world applications. There are several reasons for this advice. First, if you also specify a
servlet-mapping for this servlet, you will have two different ways of accessing the same servlet. This side effect could quickly grow to be a maintenance headache. Second, because declarative security depends on the URL with which the resource is
accessed, it could also be a potential security hole in your application. Third, the user is forced to type in a URL that contains the fully qualified name of your servlet. This name includes the entire package structure with the class name. Such URLs look ugly and users find them hard to remember.
Therefore, this approach would score very low on the Web
problem, this will also confuse users who have already
bookmarked the original URL, once again hurting usability of your application.
In fact, we recommend that you explicitly block the user from accessing the servlets in your Web application without mapping a custom URL. The mapping could be specified with the help of the servlet-mapping element of web.xml. See web.xml of the app-blank sample application for an example of this. You can
download app-blank from http://volume2.coreservlets.com/.
Servlets, Beans, and Helper Classes (Bundled in
JAR Files)
If the servlets or other .class files are bundled inside JAR files, then the JAR files should be placed in WEB-INF/lib. If the classes are in packages, then within the JAR file they should be in a directory that matches their package name. On most servers, JAR files can also be shared across multiple Web applications. However, this feature is not standardized, and the details vary from server to server. On Tomcat, you place shared JAR files in
tomcat_dir/shared/lib.
Deployment Descriptor
The deployment descriptor file, web.xml, should be placed in the WEB-INF subdirectory of the main Web application directory. For details on using web.xml, see Chapter 2 (Controlling Web
Application Behavior with web.xml). Note that a few servers have a global web.xml file that applies to all Web applications. For example, Tomcat uses tomcat_dir/conf/web.xml for global
configuration settings. That file is entirely server specific; the only standard web.xml file is the per-application one that is placed within the WEB-INF directory of the Web app.
WEB-INF directory or any subdirectory of WEB-INF. However, we recommend that you put them in a tlds directory within WEB-INF. Grouping them in a common directory (e.g., tlds) simplifies their management. JSP pages can access TLD files that are in WEB-INF using a taglib directive as follows:
<%@ taglib uri="/WEB-INF/tlds/myTaglibFile.tld" ...%>
Because it is the server, not the client (e.g., Web browser), that accesses the TLD file, the prohibition that content inside of
WEB-INF is not Web accessible does not apply.
When deployed inside a JAR file, the .tld file should be placed inside the META-INF directory or any subdirectory of META-INF. The switch in location from WEB-INF to META-INF is because JAR files are not Web application archives and thus don't contain a WEB-INF directory. See Chapter 7 (Tag Libraries: The Basics) for a more detailed discussion of TLD files.
Tag Files
Tag files should be placed in the WEB-INF/tags directory or a subdirectory of WEB-INF/tags. As with TLD files, tag files are still accessible to JSP pages even though they are located inside of the protected WEB-INF directory. Tag files are also declared inside a JSP page through the taglib directive. However, instead of uri, they use the tagdir attribute. For example, if we placed the myTagFile.tag file inside of the WEB-INF/tags
directory of our Web application, the taglib directive of a JSP page would look something like this:
the tag files, so no custom mapping is necessary.
You can also include tag files bundled in a JAR file. The JAR file itself would have to be placed inside of the WEB-INF/lib directory as we mentioned earlier. However, within the JAR file, the tag files should be placed inside of the META-INF/tags directory. In this case, the server does not automatically generate the TLD. You must declare the tag file and its path within a .tld file. Note that the .tld file can contain declarations of other types of
custom tags as well. See Chapter 7 (Tag Libraries: The Basics) for a more detailed coverage of tag files.
WAR Manifest File
1.3. Registering Web Applications with
the Server
As we explained earlier, Web applications are portable.
Regardless of the server, you store files in the same directory structure and access them with URLs of the same form. For example, Figure 1-2 summarizes the directory structure and URLs that would be used for a simple Web application called
myWebApp. This section illustrates how to install and execute this simple Web application on different platforms.
Figure 1-2. Structure of the myWebApp Web application.
Although Web applications themselves are completely portable, the registration process is server specific. For example, to move the myWebApp application from server to server, you don't have to modify anything inside any of the directories shown in Figure 1-2. However, the location in which the top-level directory
(myWebApp in this case) is placed will vary from server to server. Similarly, you use a server-specific process to tell the system that URLs that begin with http://host/myWebApp/ should apply to the Web application.
present a brief example, then give explicit details for Tomcat in one of the following subsections. For a complete step-by-step example of developing and deploying a simple Web application on Tomcat, see Section 1.6 (Building a Simple Web Application). As we show in Section 1.4 (Development and Deployment
Strategies), the usual strategy is to build Web applications in a personal development environment and periodically copy them to various deployment directories for testing on different
servers. We recommend that you avoid placing your
development directory directly within a server's deployment directory—doing so makes it hard to deploy on multiple servers, hard to develop while a Web application is executing, and hard to organize the files. Instead, use a separate development
directory and deploy by means of one of the strategies outlined in Section 1.4 (Development and Deployment Strategies). The simplest approach is to keep a shortcut (Windows) or symbolic link (UNIX/Linux) to the deployment directories of various
servers, and simply copy the entire development directory whenever you want to deploy. For example, on Windows you can use the right mouse button to drag the development folder onto the shortcut, release the button, and select Copy.
Registering a Web Application with Tomcat
With Tomcat, creating a Web application consists of creating the appropriate directory structure and copying that directory
structure into the tomcat_dir/webapps directory. Tomcat will take care of the rest. The ability to deploy a Web app by simply copying its directory structure into some server directory is usually referred to as hot-deployment or auto-deployment. The directory within the server that allows this functionality is
referred to as a hot-deploy directory or an auto-deploy directory. Most, if not all modern Web servers provide this feature. For extra control over the process, you can modify
The following steps walk you through what is required to create a Web app that is accessed by means of URLs that start with http://host/myWebApp/.
1. Create a Web application directory structure with the top-level directory called myWebApp. Because this is your personal
development directory structure, it can be located at any place you find convenient. This directory structure should be organized as we showed in Section 1.2 (Structure of Web Applications). You can reduce the amount of manual work you have to do in this step by simply
downloading the app-blank Web application from
http://volume2.coreservlets.com/. It already contains all the required
directories and a sample web.xml deployment descriptor. All you have left to do is rename the top-level directory from app-blank to myWebApp
However, if you decide to create these directories by hand, here is
what you will need to do. Create a directory called myWebApp anywhere on your system outside of your server's installation directory. Right under it, create a directory called WEB-INF. Under WEB-INF, create a directory called classes. Create the deployment descriptor file, web.xml and place it into the WEB-INF directory. We discuss the deployment descriptor in detail in Chapter 2 (Controlling Web Application Behavior with web.xml). For now, however, just copy the existing web.xml
from tomcat_dir/webapps/ROOT/WEB-INF or use the version that is bundled with app-blank.
Once you have created the proper directory structure, place a simple JSP page called myPage.jsp into the myWebApp directory. Put a simple servlet called MyServlet.class into the WEB-INF/classes directory.
2. Declare the servlet and map it to a URL by editing the web.xml deployment descriptor file. Unlike JSP files, servlets need to be explicitly declared. We need to tell the server that it exists by
adding the following entries in web.xml:
<servlet>
<servlet-name>MyName</servlet-name>
<servlet-class>mypackage.MyServlet</servlet-class>
</servlet>
<servlet-mapping>
<servlet-name>MyName</servlet-name>
<url-pattern>/MyAddress</url-pattern>
</servlet-mapping>
The servlet element and its subelements inform the server of the name we want to use for declaring our servlet as well as the fully
qualified name of the servlet class. The servlet-mapping element and its subelements tell the server which servlet should be invoked when the client requests a URL that matches the pattern provided by the value of the url-pattern element. Thus, the servlet declared as
MyName can be invoked with http://host/myWebApp/MyAddress.
3. Copy the myWebApp directory to tomcat_dir/webapps. For example, suppose you installed Tomcat in C:\tomcat_dir. You would then copy the myWebApp directory to the webapps directory, resulting in
C:\tomcat_dir\webapps\myWebApp\HelloWebApp.jsp,
C:\tomcat_dir\webapps\myWebApp\WEB-INF\classes\HelloWebApp.class, and
C:\tomcat_dir\webapps\myWebApp\WEB-INF\web.xml. You could also wrap the directory inside a WAR file (Section 1.5) and simply drop the WAR file into C:\tomcat_dir\webapps.
4. Optional: Add a Context entry to tomcat_dir/conf/server.xml By default, Tomcat configures your Web application to have a URL
registration process, you can supply a Context element in
tomcat_dir/conf/server.xml. If you do edit server.xml, be sure to make a backup copy first; a small syntax error in server.xml can completely prevent Tomcat from running. However, for the later versions of
Tomcat, the recommended approach is to place the Context element (and its subelements) by itself into the context.xml file. Then, place context.xml alongside the web.xml deployment descriptor into the INF directory of your Web application.
The Context element has several possible attributes that are
documented at http://jakarta.apache.org/tomcat/tomcat-5.0-doc/config/context.html For instance, you can decide whether to use cookies or URL rewriting for session tracking, you can enable or disable servlet reloading (i.e., monitoring of classes for changes and reloading servlets whose class file changes on disk), and you can set debugging levels. However, for basic Web apps, you just need to deal with the two required
attributes: path (the URL prefix) and docBase (the base installation directory of the Web application, relative to tomcat_dir/webapps.) This entry should look like the following snippet.
<Context path="/some-web-app" docBase="myWebApp" />
Note that you should not use /examples as the URL prefix; Tomcat already uses that prefix for a sample Web application.
Core Warning
http://host/myWebApp/myPage.jsp invokes the JSP page, and
http://host/myWebApp/MyAddress invokes the servlet. During development, you probably use localhost for the host name. These URLs assume that you have modified the Tomcat configuration file
(tomcat_dir/conf/server.xml) to use port 80 as recommended in the Tomcat setup and configuration guide at http://www.coreservlets.com/. If you
haven't made this change, use http://host:8080/myWebApp/myPage.jsp http://host:8080/myWebApp/MyAddress.
Registering a Web Application with Other Servers
The first two steps described earlier deal with creating the portable part of a Web application. These steps would be identical for any compliant server. The steps for the actual registration are specific to Tomcat. However, registering a Web app with other servers is very similar. In this subsection we summarize the server-specific registration process for some of the more popular servers today.
BEA WebLogic
Like Tomcat, WebLogic provides an auto-deploy directory used to register and deploy Web applications. First, if you haven't done so already, create a new domain called myDomain. This can be done by running WebLogic's configuration wizard config.cmd on Windows or config.sh on UNIX/Linux, both located in the
bea/weblogic_dir/common/bin directory, and following its instructions. Once this is done, simply copy your entire Web application
directory structure (including the top-level directory) or a WAR file to the bea/user_projects/domains/myDomain/applications directory. You can also use WebLogic's Web console application to deploy a Web app. Log into the console by going to
browser-based deployment wizard. Simply follow the step-by-step instructions for the wizard. After you deploy the Web application, the JSP page can be accessed by going to
http://localhost:7001/myWebApp/myPage.jsp and the servlet by going to http://localhost:7001/myWebApp/MyAddress.
JBoss
In JBoss, registering a Web application is almost as easy as in Tomcat. In fact, by default, JBoss uses Tomcat as its embedded Web server. To register your Web application, start by first
renaming your top-level directory myWebApp to myWebApp.war. Note that you are not actually creating a WAR file, but simply renaming the top-level directory to end with .war. JBoss insists that to be deployable, not only should WAR file names end in .war, which is required by the servlet specification, but the top-level directory name of your Web app should end in .war as well. Once this is done, copy the myWebApp.war directory to the
jboss_dir/server/default/deploy directory. Assuming you didn't change any default configuration settings when installing JBoss, you can invoke the JSP page by going to
http://localhost:8080/myWebApp/myPage.jsp and invoke the servlet by going to http://localhost:8080/myWebApp/MyAddress. If you do
package your Web application into a WAR file, you should place myWebApp.war into the same JBoss directory to deploy it.
Caucho Resin
To use the auto-deployment feature of Caucho Resin server, copy your entire Web application directory structure (including the top-level directory) or a WAR file to the resin_dir/webapps
1.4. Development and Deployment
Strategies
Whenever you are ready to start developing a new Web application, follow these three steps:
1. Create the Web app directory structure. In your
development directory, make a new directory structure that follows the Web application structure (including the web.xml file within WEB-INF) discussed earlier in this chapter. The easiest way to do this is to copy and rename the app-blank application. (Remember, you can download app-blank and all the other code from the book at http://volume2.coreservlets.com/.)
2. Create your code. Place HTML and JSP pages into the top-level directory or into subdirectories other than WEB-INF or META-INF. Place individual Java class files into
WEB-INF/classes/subdirectory-matching-package-name. Place JAR files into WEB-INF/lib. Place .tag and .tagx files into WEB-INF/tags and so on.
3. Deploy the app. Copy the entire Web application directory structure (including the top-level directory) to your server's auto-deploy directory. There are a number of strategies you can use to simplify this third step, but here are the most popular ones:
Copying to a shortcut or symbolic link
Using deployment features specific to an integrated development environment (IDE)
If you are just beginning with servlets and JSP, you should probably start with the first option. Learning how to use Ant or a specific IDE could get in the way of you getting comfortable with the servlet and JSP technology itself. Note, however, that we do not list the option of putting your code directly in the server's deployment directory. Although this is one of the most common choices among beginners, it scales so poorly to
advanced tasks that we recommend you steer clear of it from the start.
Details on these four options are given in the following subsections.
Copying to a Shortcut or Symbolic Link
On Windows, go to the directory that is one above the server's auto-deployment directory. On Tomcat, this would position you inside the root installation directory, tomcat_dir. Right-click the auto-deploy directory (e.g., webapps on Tomcat), and select Copy. Then go to the directory that is one above your top-level development directory (e.g., one above myWebApp), right-click, and select Paste Shortcut (not just Paste). Now, whenever you are ready to deploy your Web app, click and hold the right
mouse button on your development directory (e.g., myWebApp), then drag onto the deployment directory shortcut, and release the button. A pop-up menu will appear. Select the Copy Here option. Figure 1-3 shows an example setup that simplifies
testing of this chapter's examples on Tomcat, WebLogic, JBoss, and Resin. On UNIX, you can use symbolic links (created with
An advantage of this approach is that it is simple. Therefore, it is good for beginners who want to concentrate on learning servlets and JSP technology, not deployment tools or IDEs. One disadvantage of this approach is that it requires repeated copying if you use multiple servers. For example, we keep several different servers (Tomcat, Resin, etc.) on our
development system and regularly test the code on all servers. A second disadvantage is that this approach copies both the Java source code files and the class files to the server, although only the class files are needed. This may not matter much on your desktop server, but when you get to the "real" deployment server, you won't want to include the source code files.
Using IDE-Specific Deployment Features
Most servlet- and JSP-savvy development environments (e.g., IBM WebSphere Studio Application Developer, Sun ONE Studio, NetBeans, Oracle JDeveloper, Borland JBuilder, Eclipse with MyEclipseIDE or NitroX plug-ins) let you configure your
With all the clear advantages of IDEs, there are a number of disadvantages as well. Most worthwhile IDEs have a steep learning curve. This prevents you from concentrating on real development, at least at the beginning. In addition, it's very common for developers to switch projects and for projects to have one specific IDE everyone must use to have one common development environment on the team. If you switch, and the new project uses a different IDE for compilation and
deployment than the one you are used to, you will be forced to learn and get used to yet another IDE. This wastes additional time.
Using Ant, Maven, or a Similar Tool
Developed by the Apache Foundation, ant is a tool similar to the UNIX make utility. However, ant is written in the Java
programming language (and thus is portable) and is touted to be both simpler to use and more powerful than make. Many
servlet and JSP developers use ant for compiling and deploying. The usage of ant is discussed in the Appendix (Developing
Applications with Apache Ant).
For general information on using ant, see http://jakarta.apache.org/ant/manual/. See
http://jakarta.apache.org/tomcat/tomcat-5.5-doc/appdev/processes.html for specific guidance on using ant with Tomcat.
The main advantage of this approach is flexibility: ant is
powerful enough to handle everything from compiling the Java source code to copying files to producing Web archive (WAR) files (see Section 1.5).
Another tool that is attracting a lot of attention in the Java
world is maven. Maven extends ant, so it is very similar to ant in some respects and drastically different in another. Although
example, maven can compile the code without the developer ever specifying where the code is located with the project
folder. This is because maven assumes, by convention, that the Java code is located in the src/main/java folder. Of course, this assumption can be reconfigured, but why bother? Unlike ant, these conventions allow maven configuration files to be very short and easy to understand. You can learn more about maven at http://maven.apache.org.
The disadvantage of both ant and maven is the overhead of
learning to use them; there is a steeper learning curve with ant and maven than the previous two techniques in this section.
However, the big difference between investing time into learning a particular IDE and learning ant or maven is that more and
more projects are adapting the usage of ant or maven as their standard, non-IDE-specific deployment tool, so chances are high that learning ant or maven will pay off in the future.
Using an IDE in Combination with Ant
IDEs help us be more productive by helping us write the code, but restrict us in terms of portability. ant lets us develop
portably, but doesn't help at all with actual code writing. What should we do?
One way to bridge the gap a little between the two options is to adapt the use of an IDE that integrates with ant. This way you can still use your favorite IDE to help you write code and with the click of a button invoke ant scripts to compile and deploy your application. Even if your favorite IDE is not integrated with
ant (most modern IDEs are), you can still use this approach, but you'll have to switch between the command prompt and your IDE quite a bit.
deployment inconsistencies because the compilation and
deployment is done by the same portable ant script. We have participated in projects where several IDEs were used by
different developers on the team working on the same Web applications; some even used different operating systems for their environments. The application deployment stayed
1.5. The Art of WAR: Bundling Web
Applications into WAR Files
Web archive (WAR) files provide a convenient way of bundling Web apps in a single file. Having a single large file instead of many small files makes it easier to transfer the Web application from server to server.
A WAR file is really just a JAR file with a .war extension, and you use the regular jar command to create it. For example, to
bundle the entire some-web-app application into a WAR file named some-web-app.war, you would navigate to the some-web-app directory and execute the following command:
jar cvf some-web-app.war *
There is no special relationship between the jar command and WAR files. jar is just one tool among others to use for bundling files together. If you so choose, you can use WinZip (or tar on UNIX) to do the exact same thing. Just specify the file name to end with .war instead of .zip.
Of course, you can use other jar options (e.g., to digitally sign classes) with WAR files just as you can with regular JAR files. For details, see
1.6. Building a Simple Web Application
Well, enough talk. Let's get down to it and build our first Web application. We'll be using Tomcat as our server, but similar steps could be applied to other servers as well. See Section 1.3 (Registering Web Applications with the Server) for more details. Here is the outline of steps we'll be following.
1. Download and rename app-blank to testApp (http://volume2.coreservlets.com/).
2. Download test.html, test.jsp, and TestServlet.java (http://volume2.coreservlets.com/).
3. Add test.html, test.jsp to the testApp Web application.
4. Place TestServlet.java into the testApp/WEB-INF/classes/coreservlets directory.
5. Compile TestServlet.java.
6. Declare TestServlet.class and the URL that will invoke it in web.xml.
7. Copy testApp to tomcat_dir/webapps.
8. Start Tomcat.
9. Access testApp with the URL of the form http://localhost/testApp/someResource.
Download and Rename app-blank to testApp
This step is pretty easy. Simply download app-blank.zip from http://volume2.coreservlets.com/. This file contains the proper directory structure every J2EE-compliant Web application needs. It also contains a starting point for your application's deployment descriptor, web.xml, with a servlet mapping that disables the invoker servlet. We'll look at servlet mapping in a little more detail when we get to mapping our TestServlet to a URL. For now, just unzip app-blank.zip to a directory of your choosing and rename it testApp. Remember to place testApp somewhere on your system outside of Tomcat directories.
Download test.html, test.jsp, and TestServlet.java
As in the previous step, these files can be downloaded from http://volume2.coreservlets.com/. You can either download them one by one or bundled into testAppFiles.zip and unzip them into a directory of your choice.
Add test.html, test.jsp to the testApp Web
Application
Put test.html, test.jsp into the testApp directory, create someDirectory inside the testApp directory, put a copy of test.html, test.jsp into testApp/someDirectory. The test.html file contains a static message, and test.jsp contains a scriptlet that outputs the URL used to access the page. Listings 1.1 and 1.2 show the complete code of these files.
Listing 1.1. test.html
<!DOCTYPE HTML PUBLIC "-//W3C//DTD HTML 4.0 Transitional//EN"> <HTML>
<HEAD><TITLE>HTML Test</TITLE></HEAD> <BODY BGCOLOR="#FDF5E6">
</BODY></HTML>
Listing 1.2. test.jsp
<!DOCTYPE HTML PUBLIC "-//W3C//DTD HTML 4.0 Transitional//EN"> <HTML>
<HEAD><TITLE>JSP Test</TITLE></HEAD> <BODY BGCOLOR="#FDF5E6">
<H1>JSP Test</H1> URL you used:
<%= request.getRequestURL() %> </BODY></HTML>
Place TestServlet.java into the
testApp/WEB-INF/classes/coreservlets Directory
TestServlet.java declares that it belongs to the coreservlets package. Therefore, you have to place TestServlet.java into it before compiling. As with test.jsp, TestServlet.class contains code that outputs the URL used to access the servlet. See Listing 1.3 for the complete code of TestServlet.java.
Listing 1.3. TestServlet.java
Code View:
package coreservlets; import java.io.*;
import javax.servlet.*;
import javax.servlet.http.*;
HttpServletResponse response) throws ServletException, IOException {
response.setContentType("text/html"); PrintWriter out = response.getWriter(); String docType =
"<!DOCTYPE HTML PUBLIC \"-//W3C//DTD HTML 4.0 " + "Transitional//EN\">\n";
out.println (docType + "<HTML>\n" +
"<HEAD><TITLE>Servlet Test</TITLE></HEAD>\n" + "<BODY BGCOLOR=\"#FDF5E6\">\n" +
"<H1>Servlet Test</H1>\n" +
"URL you used: " + request.getRequestURL() + "\n" + "</BODY></HTML>");
} }
Compile TestServlet.java
Remember that your CLASSPATH should include the servlet application programming interface (API). Tomcat bundles it into the servlet-api.jar file, which is located in the tomcat_dir/common/lib directory. On Windows you can set your CLASSPATH by going to the DOS command prompt and typing the following command:
set CLASSPATH=tomcat_dir\common\lib\servlet-api.jar
Once the CLASSPATH is set, you can compile TestServlet.java by navigating to the testApp/WEB-INF/classes/coreservlets directory and typing the following command:
javac TestServlet.java
After compilation, TestServlet.class should reside in the testApp/WEB-INF/classes/coreservlets directory.
Declare TestServlet.class and the URL That Will
Invoke It in web.xml
Navigate to the testApp/WEB-INF directory and open web.xml with your favorite Extensible Markup Language (XML) or text editor. To declare TestServlet.class, you need to add the following lines right after the <!-- Your entries go here. --> XML
comment:
<servlet>
<servlet-name>Test</servlet-name>
<servlet-class>coreservlets.TestServlet</servlet-class> </servlet>
In these few lines, we declared a servlet with the name Test to represent our TestServlet.class. Note that the <servlet-class> element lists the fully qualified name of the servlet class, which has the form packageName.className (without the .class
ending.)
Now, we need to tell Tomcat which URLs will invoke the
<servlet-mapping>
<servlet-name>Test</servlet-name> <url-pattern>/test</url-pattern> </servlet-mapping>
These lines tell Tomcat that a client request to the testApp Web application with the URL of the form http://host/testApp/test should result in the invocation of the previously declared Test servlet. See Listing 1.4 for the complete code of web.xml.
Listing 1.4. web.xml
Code View:
<?xml version="1.0" encoding="ISO-8859-1"?>
<!-- web.xml from the app-blank template Web app
from http://courses.coreservlets.com/Course-Materials/. Includes two standard elements: welcome-file list
and a servlet-mapping to disable the invoker servlet. -->
<web-app xmlns="http://java.sun.com/xml/ns/j2ee"
xmlns:xsi="http://www.w3.org/2001/XMLSchema-instance" xsi:schemaLocation=
"http://java.sun.com/xml/ns/j2ee
http://java.sun.com/xml/ns/j2ee/web-app_2_4.xsd" version="2.4">
<!-- Your entries go here. --> <servlet>
<servlet-name>Test</servlet-name>
<servlet-class>coreservlets.TestServlet</servlet-class> </servlet>
<servlet-mapping>
<!-- Disable the invoker servlet. --> <servlet>
<servlet-name>NoInvoker</servlet-name>
<servlet-class>coreservlets.NoInvokerServlet</servlet-class> </servlet>
<servlet-mapping>
<servlet-name>NoInvoker</servlet-name> <url-pattern>/servlet/*</url-pattern> </servlet-mapping>
<!-- If URL gives a directory but no file name, try index.jsp first and index.html second. If neither is found,
the result is server-specific (e.g., a directory listing).
-->
<welcome-file-list>
<welcome-file>index.jsp</welcome-file> <welcome-file>index.html</welcome-file> </welcome-file-list>
</web-app>
See Chapter 2 (Controlling Web Application Behavior with web.xml) for a detailed discussion of web.xml.
Copy testApp to tomcat_dir/webapps
will be the same.
Start Tomcat
You can start Tomcat by executing tomcat_dir/bin/startup.bat on Windows and tomcat_dir/bin/startup.sh on UNIX/Linux. Tomcat detects a new directory in its auto-deploy directory and
automatically registers and deploys the testApp Web application.
Access testApp with the URL of the Form
http://localhost/testApp/someResource
The URLs http://localhost/testApp/test.html and
http://localhost/testApp/someDirectory/test.html retrieve test.html, http://localhost/testApp/test.jsp and
http://localhost/testApp/someDirectory/test.jsp invoke test.jsp, and http://localhost/testApp/test invokes TestServlet.class.
These URLs assume that you have modified the Tomcat configuration file (tomcat_dir/conf/server.xml) to use port 80 as recommended in Volume 1 of this book. If you haven't made this change, simply replace localhost with localhost:8080 in the URL. See Figures 1-4 through 1-8 for screenshots of what should appear in your browser as results of accessing these resources.
Figure 1-4. Result of http://localhost/testApp/test.html.
Figure 1-5. Result of http://localhost/testApp/test.jsp.
[View full size image]
Figure 1-6. Result of
http://localhost/testApp/someDirectory/test.html.
[View full size image]
Figure 1-8. Result of http://localhost/testApp/test.
1.7. Sharing Data Among Web
Applications
One of the major purposes of Web applications is to keep data and functionality separate. Each Web application maintains its own table of sessions and its own servlet context. Each Web application also uses its own class loader; this behavior
eliminates problems with name conflicts but means that static methods and fields can't be used to share data among
applications. However, it is still possible to share data with
cookies or by using ServletContext objects that are associated with specific URLs. These approaches are viable options for
sharing minimal information between Web applications, but if you are striving to achieve a lot of sharing, you should consider keeping the apps as one Web application. The two approaches for sharing data are summarized next.
Cookies. Cookies are maintained by the browser, not by the server. Consequently, cookies can be shared across
multiple Web applications as long as they are set to apply to any path on the server. By default, the browser sends
cookies only to URLs that have the same prefix as the one from which it first received the cookies. For example, if the server sends a cookie from the page associated with
http://host/path1/SomeFile.jsp, the browser sends the cookie back to http://host/path1/SomeOtherFile.jsp and
http://host/path1/path2/Anything, but not to http://host/path3/Anything. Because Web applications always have unique URL prefixes, this behavior means that default-style cookies will never be shared between two different Web applications.
Cookie c = new Cookie("name", "value"); c.setMaxAge(...);
c.setPath("/");
response.addCookie(c);
ServletContext objects associated with a specific URL. In a servlet, you obtain the Web application's servlet
context by calling the getServletContext method of the servlet itself (inherited from GenericServlet). In a JSP page, you use the predefined application variable. Either way, you get the servlet context associated with the servlet or JSP page that is making the request. However, you can also call the getContext method of ServletContext to obtain a servlet context—not necessarily your own—
associated with a particular URL. This approach is illustrated here.
ServletContext myContext = getServletContext(); String url = "/someWebAppPrefix";
ServletContext otherContext = myContext.getContext(url); Object someData = otherContext.getAttribute("someKey");
Neither of these two data-sharing approaches is perfect.
The drawback to cookies is that only limited data can be stored in them. Each cookie value is a string, and the length of each value is limited to 4 kilobytes. So, robust data sharing requires a database: You use the cookie value as a key into the database and store the real data in the database.
One drawback to sharing servlet contexts is that you have to know the URL prefix that the other Web application is using. You normally want the freedom to change a Web application's prefix without changing any associated code. Use of the getContext method restricts this flexibility. A second drawback is that, for security reasons, servers are permitted to prohibit access to the
versions, context sharing is enabled by default, whereas in others you have to explicitly enable it. For instance, in Tomcat 5.5.7 you can add the attribute crossContext="true" as part of the Context element in tomcat_dir/conf/context.xml, enabling context sharing as the default behavior for all deployed
applications. Leaving out the crossContext attribute altogether causes Tomcat to use its default behavior, which is to prohibit sharing of ServletContext between Web applications.
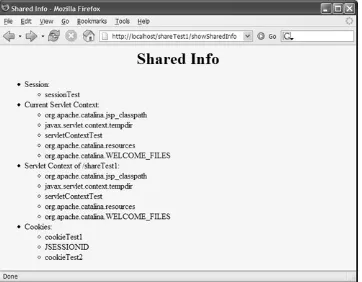
These two data-sharing approaches are illustrated by the
SetSharedInfo and ShowSharedInfo servlets shown in Listings 1.5 and 1.6. These servlets are mapped to URLs in the
deployment descriptor as shown in Listing 1.7. The
SetSharedInfo servlet creates custom entries in the session object and the servlet context. It also sets two cookies: one with the default path, indicating that the cookie should apply only to URLs with the same URL prefix as the original request, and one with a path of "/", indicating that the cookie should apply to all URLs on the host. Finally, the SetSharedInfo servlet redirects the client to the ShowSharedInfo servlet,
which displays the names of all session attributes, all attributes in the current servlet context, all attributes in the servlet
context that applies to URLs with the prefix /shareTest1, and all cookies.
Listing 1.5. SetSharedInfo.java
Code View:
package coreservlets; import java.io.*;
import javax.servlet.*;
import javax.servlet.http.*;
HttpServletResponse response) throws ServletException, IOException {
HttpSession session = request.getSession(true);
session.setAttribute("sessionTest", "Session Entry One"); ServletContext context = getServletContext();
context.setAttribute("servletContextTest",
"Servlet Context Entry One"); Cookie c1 = new Cookie("cookieTest1", "Cookie One"); c1.setMaxAge(3600); // One hour
response.addCookie(c1); // Default path
Cookie c2 = new Cookie("cookieTest2", "Cookie Two"); c2.setMaxAge(3600); // One hour
c2.setPath("/"); // Explicit path: all URLs response.addCookie(c2);
String url = request.getContextPath() +
"/servlet/coreservlets.ShowSharedInfo"; // In case session tracking is based on URL rewriting. url = response.encodeRedirectURL(url);
response.sendRedirect(url); }
throws ServletException, IOException { response.setContentType("text/html"); PrintWriter out = response.getWriter(); String title = "Shared Info";
out.println("<!DOCTYPE HTML PUBLIC \"-//W3C//DTD HTML 4.0 " + "Transitional//EN\">" +
HttpSession session = request.getSession(true);
Enumeration attributes = session.getAttributeNames(); out.println(getAttributeList(attributes));
out.println(" <LI>Current Servlet Context:");
ServletContext application = getServletContext(); attributes = application.getAttributeNames();
out.println(getAttributeList(attributes));
out.println(" <LI>Servlet Context of /shareTest1:"); application = application.getContext("/shareTest1"); if (application == null) {
out.println("Context sharing disabled"); } else {
attributes = application.getAttributeNames(); out.println(getAttributeList(attributes)); }
out.println(" <LI>Cookies:<UL>");
Cookie[] cookies = request.getCookies();
if ((cookies == null) || (cookies.length == 0)) { out.println(" <LI>No cookies found.");