SSH Mastery
OpenSSH, PuTTY, Tunnels and Keys
by Michael W Lucas
Praise for other books by Michael W Lucas
Network Flow Analysis
"Combining a great writing style with lots of technical info, this book provides a learning experience that's both fun and interesting. Not too many technical books can claim that." — ;login: Magazine, October 2010
"This book is worth its weight in gold, especially if you have to deal with a shoddy ISP who always blames things on your network." — Utahcon.com
"The book is a comparatively quick read and will come in handy when troubleshooting and analyzing network problems." — Mike Riley, Dr. Dobbs
Network Flow Analysis is a pick for any library strong in network administration and data
Absolute FreeBSD, 2nd Edition
"I am happy to say that Michael Lucas is probably the best system administration author I’ve read. I am amazed that he can communicate top-notch content with a sense of humor, while not offending the reader or sounding stupid. When was the last time you could physically feel yourself getting smarter while reading a book? If you are a beginning to average FreeBSD user, Absolute FreeBSD 2nd Ed (AF2E) will deliver that sensation in spades. Even more advanced users will find plenty to enjoy.” — Richard Bejtlich, CSO, MANDIANT, and TaoSecurity blogger
“Master practitioner Lucas organizes features and functions to make sense in the development environment, and so provides aid and comfort to new users, novices, and those with significant experience alike.” — SciTech Book News, Vol. 32, No.1
“…reads well as the author has a very conversational tone, while giving you more than enough
information on the topic at hand. He drops in jokes and honest truths, as if you were talking to him in a bar.” — Technology and Me Blog
Cisco Routers for the Desperate, 2nd Edition
strongly recommend this book for both IT Professionals looking to get started with Cisco routers, as well as anyone who has to deal with a Cisco router from time to time but doesn’t have the time or technological know-how to tackle a more in-depth book on the subject.” — BLOGCRITICS
MAGAZINE
"For me, reading this book was like having one of the guys in my company who lives and breathes Cisco sitting down with me for a day and explaining everything I need to know to handle problems or issues likely to come my way. There may be many additional things I could potentially learn about my Cisco switches, but likely few I'm likely to encounter in my environment." — IT World
"This really ought to be the book inside every Cisco Router box for the very slim chance things go goofy and help is needed 'right now.'" — MacCompanion
Absolute OpenBSD
"My current favorite is Absolute OpenBSD: Unix for the Practical Paranoid by Michael W. Lucas from No Starch Press. Anyone should be able to read this book, download OpenBSD, and get it running as quickly as possible." — Infoworld
“Absolute OpenBSD by Michael Lucas is a broad and mostly gentle introduction into the world of the OpenBSD operating system. It is sufficiently complete and deep to give someone new to OpenBSD a solid footing for doing real work and the mental tools for further exploration… The potentially boring topic of systems administration is made very readable and even fun by the light tone that Lucas uses.” — CHRIS PALMER, PRESIDENT, SAN FRANCISCO OPENBSD USERS GROUP
PGP & GPG
"...The World's first user-friendly book on email privacy...unless you're a cryptographer, or never use email, you should read this book." — Len Sassaman, CodeCon Founder
“An excellent book that shows the end-user in an easy to read and often entertaining style just about everything they need to know to effectively and properly use PGP and OpenPGP.” — SLASHDOT
“PGP & GPG is another excellent book by Michael Lucas. I thoroughly enjoyed his other books due to their content and style. PGP & GPG continues in this fine tradition. If you are trying to learn how to use PGP or GPG, or at least want to ensure you are using them properly, read PGP & GPG.” —
Author: Michael W Lucas
Copyeditor: Aidan Julianna "AJ" Powell
Cover: Bradley K McDevitt
Kindle Edition. Published by Tilted Windmill Press in January 2012.
For information on book distribution or translations, please contact Tilted Windmill Press (http://www.tiltedwindmillpress.com).
Copyright 2011 Michael W Lucas. All rights reserved. No part of this work may be reproduced or transmitted in any form or by any means, electronic or mechanical, including photocopying, recording, or by any information storage or retrieval system, without the prior written permission of the
copyright owner and the publisher.
Acknowledgments
Thanks to the folks who wrote OpenSSH and PuTTY in the first place, and those who encouraged me to write this book.
A special thanks to my technical reviewers: Chris Buechler, Jez Caudle, Sean Cody, Daniel Čižinský, James E Keenan, Alexander Leidinger, Brett Mahar, Philipp Marek, Glen Matthews, Damien Miller, Scott Murphy, Mike O'Connor, Phil Pennock, Amanda Robinson, George Rosamond, Richard
Toohey, and Giovanni Torres. Any errors in this book crept in despite the efforts of these fine folks.
Contents
Chapter 1: Introducing OpenSSH
Chapter 2: Encryption and Keys
Chapter 3: The OpenSSH Server
Chapter 4: Host Key Verification
Chapter 5: SSH Clients
Chapter 6: Copying Files over SSH
Chapter 7: SSH Keys
Chapter 8: X Forwarding
Chapter 9: Port Forwarding
Chapter 10: Keeping SSH Sessions Open
Chapter 12: Limiting SSH
Chapter 13: OpenSSH VPNs
Afterword
Chapter 1: Introducing OpenSSH
Over the last ten years, OpenSSH (http://www.openssh.com) has become the standard tool for remote management of Unix-like systems and many network devices. Most systems administrators use only the bare minimum OpenSSH functionality necessary to get a command line, however. OpenSSH has many powerful features that will make systems management easier if you take the time to learn about them. You'll find information and tutorials about OpenSSH all over the Internet. Some of them are poorly written, or only applicable to very specific scenarios. Many are well-written, but are ten years old and cover problems solved by a software update nine years ago. If you have a few spare days, and know the questions to ask, you can sift through the dross and find effective, current tutorials.
Who Should Read This Book?
Everyone who manages a UNIX-like system must understand SSH. OpenSSH is the most commonly deployed SSH implementation. Unless you're specifically using a different SSH implementation, read this book.
What is SSH?
What is OpenSSH?
OpenSSH is the most widely deployed implementation of the SSH protocol. It started as an offshoot of a freely-licensed version of the original SSH software, but has been heavily rewritten, expanded, and updated. OpenSSH is developed by the OpenBSD Project, a team known for writing secure software. OpenSSH is the standard SSH implementation in the Linux and BSD world, and is also used in products from large companies such as HP, Cisco, Oracle, Novell, Dell, Juniper, IBM, and so on.
OpenSSH comes in two versions, OpenBSD and Portable OpenSSH. OpenSSH's main development happens as part of OpenBSD. This version of OpenSSH is small and secure, but only supports
OpenBSD. The OpenSSH Portability Team takes the OpenBSD version and adds the glue necessary to make OpenSSH work on other operating systems, creating Portable OpenSSH. Not only do
different operating systems use different compilers, libraries, and so on, but they have very different authentication systems. This book applies to both versions.
Any non-Microsoft operating system probably comes with OpenSSH, or the operating system vendor provides a package. If not, download the Portable OpenSSH source code from
http://www.OpenSSH.org/ and follow the instructions to build the software.
SSH Server
SSH Clients
You use an SSH client to connect to your remote server or network device. The most popular SSH client for Windows systems is PuTTY, while the standard SSH client for Unix-like systems is ssh, from OpenSSH. Both clients are freely available and usable for any purpose, commercial or
SSH Protocol Versions
The SSH protocol comes in two versions, SSH-1 (version 1) and SSH-2 (version 2). Always use SSH-2. Verifying that your server only speaks SSH-2 requires checking a single entry (Protocol) in the SSH server configuration, as discussed in Chapter 3. If you promise to do that, you can skip the rest of section.
One person designed the original SSH protocol for his own needs, and it met those needs admirably. As SSH grew more popular and more people tried to break it, the protocol required revision. SSH-1 is vulnerable to attacks. While SSH-1 will encrypt your data in transit and prevent casual
eavesdropping, a knowledgeable attacker can capture your data, decrypt your data in transit, fool you into thinking that you logged onto the correct machine when you are actually connected to a different machine, insert arbitrary text into the data stream, or any combination of these. Attacking an SSH-1 data stream isn't quite a point-and-click process, but intruders do break SSH-1 in the real world. The appearance of security is worse than no security. Do not use SSH version 1.
It might seem harmless to permit SSH-1 for servers or clients that don't support SSH-2. The client and server negotiate the SSH version they will use, however. If either client or server accepts SSH
version 1 an intruder can hijack the connection, letting him capture your login credentials and all data you transmit. It's fairly straightforward to insert arbitrary text (such as rm -rf /*) into an SSH-1
session. This was discovered in 1998, and increases in computing power have only made the attack easier. Worst of all, version 1 sessions can now be decoded in real time by programs such as
Ettercap. Developers have added defenses into SSH-1, but they are not guaranteed to protect you. Do not let your SSH clients request SSH-1. Do not let your OpenSSH servers offer SSH-1.
You'll see references to several upgrades to SSH-1, such as SSH version 1.3 and 1.5. These
modifications to version 1 are vulnerable. Do not use them. SSH servers that offer SSH version 1.99 support SSH version 1 and version 2. Clients that can only speak SSH version 1 can connect to these servers, but clients capable of SSH version 2 will use the later protocol. SSH version 1.99 is just as vulnerable as any other SSH-1.
What Isn't In This Book?
This book is meant to get you to use the OpenSSH and PuTTY varieties of SSH with a minimum level of security and professional competence. This means eliminating passwords and restricting your SSH services to the minimum necessary privileges. You will be able to easily copy files over SSH. You'll manage server keys with a minimum of fuss.
This book is not intended to be a comprehensive SSH tome. I don't cover integrating SSH with
What Is In This Book?
Chapter 1 is this introduction.
Chapter 2, "Encryption and Keys," gives basic information about encryption and how SSH uses encryption.
Chapter 3, "The OpenSSH Server," discusses configuring the OpenSSH server sshd. While this
chapter covers basic configuration, more specific examples will appear throughout the rest of the book.
Chapter 4, "Host Key Verification," covers a frequently overlooked but vital part of using any SSH client: verifying host keys. This topic is so important that it gets its own chapter, even before SSH clients.
Chapter 5, "SSH Clients," discusses the two standard SSH clients, OpenSSH's ssh and PuTTY.
Chapter 6, "Copying Files over SSH," covers moving files across the network with the tools scp
(secure copy) and sftp (SSH file transfer).
Chapter 7, "SSH Keys," walks you through creating a personal key pair (public and private
cryptographic key). Key pairs make authentication more secure. When combined with agents, they eliminate the need to routinely type passwords but don't degrade SSH security.
Chapter 8, "X Forwarding," will teach you how to display graphics over your SSH connection while minimizing risk.
Chapter 10, "Keeping SSH Sessions Open," covers ways to keep OpenSSH sessions running despite the firewalls and proxy servers that want to shut them down after minutes or hours.
Chapter 11, "Host Key Distribution," tells systems administrators how to automatically distribute host keys and improve security while eliminating the need for users to manually compare server key
fingerprints.
Chapter 12, "Limiting SSH," discusses ways to use SSH encryption behind automated tools and tightly-controlled user tasks as well as creating single-purpose user keys.
Chapter 13, "OpenSSH VPNs," demonstrates how to use OpenSSH to create an encrypted tunnel between two sites.
Chapter 2: Encryption, Algorithms, and Keys
OpenSSH encrypts traffic. What does that mean, and how does it work? For a longer explanation check my book PGP & GPG, but here's the brief summary:
Encryption transforms readable plain text into unreadable ciphertext that attackers cannot understand. Decryption reverses the transformation, producing readable text from apparent gibberish. An
encryption algorithm is the exact method for performing this transformation. Most children discover the code that substitutes numbers for letters, so that A=1, B=2, Z=26, and so on. This is a simple encryption algorithm. Modern computer-driven encryption algorithms work on chunks of text at a time and perform far more complicated transformations.
Most encryption algorithms use a key; a chunk of text, numbers, symbols, or data used to encrypt messages. The key can be chosen by the user or randomly generated. (People habitually choose easily-guessed keys, so I strongly recommend random generation.) The encryption algorithm uses the key to encrypt the text, making it more difficult for an outsider to decrypt. Even if you know the
encryption algorithm, you cannot decrypt the message without the secret encryption key.
Algorithm Types
Encryption algorithms come in two varieties, symmetric and asymmetric.
A symmetric algorithm uses the same key for both encryption and decryption. Symmetric algorithms include but are not limited to the Advanced Encryption Standard (AES), Blowfish, 3DES, and IDEA. The child's substitution code is a symmetric algorithm. Once you know that A=1 and so on, you can encrypt and decrypt messages. Symmetric algorithms (more sophisticated than simple substitution) can be very fast and secure, so long as only authorized people have the key. And that's the problem: an outsider who gets the key can read your messages or replace them with his own. You must protect the key. Sending the key unencrypted across the Internet is like standing on the playground shouting "A is 1, B is 2." Anyone who hears the key can read your private message.
An asymmetric algorithm uses different keys for encryption and decryption. You encrypt a message with one key, and then decrypt it with another. This works because the keys are very large numbers, and very large numbers behave oddly when multiplied together. (There are very good explanations out on the Internet, if you want the details.) Asymmetric encryption became popular only with the wide availability of computers that can handle the very difficult math, and is much, much slower and more computationally expensive than symmetric encryption.
How SSH Uses Encryption
Symmetric encryption is fast, but offers no way for hosts to securely exchange keys. Asymmetric encryption lets hosts exchange public keys, but it's slow and computationally expensive. But how can you efficiently encrypt a session between two hosts that have never previously communicated?
Every SSH server has a key pair. Whenever a client connects, the server and the client use this key pair to negotiate a temporary key pair shared only between those two hosts. The client and the server both use this temporary key to derive a symmetric key that they will use to exchange data during this session, as well as related keys to provide connection integrity. If the session runs for a long time or exchanges a lot of data, the computers will intermittently negotiate a new temporary key pair and a new symmetric key. The SSH protocol is more complicated than this, and includes safeguards to prevent many different cryptographic attacks, but cryptographic key exchange is the heart of the protocol.
SSH supports many symmetric and asymmetric encryption algorithms. The client and server negotiate mutually agreeable algorithms at every connection. While OpenSSH offers options to easily change the algorithms supported and its preference for each, don't! People infinitely more knowledgeable about encryption than you or I, and with more encryption experience than both of us together, arrived at OpenSSH's encryption preferences after much hard thought and troubleshooting. Gossip, rumor, and innuendo might crown Blowfish as the awesome encryption algorithm du jour, but that doesn't mean you should tweak your OpenSSH server to use that algorithm and no other.
The most common reason people offer for changing the encryption algorithms is to improve speed. SSH's primary purpose is security, not speed. Do not abandon security to improve speed.
Chapter 3: The OpenSSH Server
The OpenSSH server sshd is highly configurable and lets you restrict who may connect to the server, what actions those users can take, and what actions it will permit. In this chapter, I assume that
OpenSSH has been installed as part of your base operating system, with the server program in
/usr/sbin. Your operating system might differ.
Test if sshd is listening to the network with the telnet command. Here, I connect to the host avarice
on the standard SSH port, 22.
$ telnet avarice 22
The host is listening on port 22. When you connect over raw TCP, sshd returns an SSH banner. If you
don't get something similar, sshd isn't running (or perhaps something on the network is blocking your
connection; check your firewall). Immediately upon connection, the server announces the supported version of the SSH protocol (SSH-2.0) and the server program and version (OpenSSH 5.6). Hit
Additionally, you should see sshd in the server's process list.
$ ps ax | grep sshd
u 24405 ?? Is 0:00.03 /usr/sbin/sshd
v 4062 ?? Is 0:00.04 sshd: mwlucas [priv] (sshd)
w 6385 ?? S 0:00.01 sshd: mwlucas@ttypB (sshd)
This server runs sshd as u process 24405. The second sshd entry is for the v privileged sshd
process required for every SSH session, while the third is the w unprivileged SSH session I'm actively using. (If someone has deliberately disabled sshd's privilege separation and is running sshd insecurely, you won't see the unprivileged session.)
Most operating systems run sshd as a standalone server without any command-line arguments. The
most common way to manage sshd's behavior is with the configuration file,
/etc/ssh/sshd_config. Before you start mucking with those settings, though, you should know how
Testing and Debugging sshd
OpenSSH makes debugging sshd configurations as simple as possible. You must be root to debug sshd. The simplest debugging methods are alternate configuration files, alternate ports, and
debugging mode.
Alternate Configurations and Ports
The -f command-line argument tells sshd to use an alternate configuration file. Here I tell sshd to
use a test configuration.
# /usr/sbin/sshd -f sshd_config.test
Note that I executed sshd by the full path. sshd needs a full path so it can re-execute itself when
accepting a connection.
Only one sshd instance can attach to a particular TCP port on a given IP address. Your test sshd
process cannot start because it cannot bind port 22. You could edit sshd_config.test to assign
your test process another port, but it's simpler to use an alternate port with the -p command-line
argument.
# /usr/sbin/sshd -f sshd_config.test -p 2022
Your test instance is now listening on TCP port 2022. (Note that a ListenAddress keyword binding
sshd to a port overrides a command-line -p; see "Configuring sshd" later this chapter.)
By setting an alternate configuration file and port on the command line, you make only the config file changes you want to test. Once you know your new configuration works, you can copy the test
configuration to /etc/ssh/sshd_config and restart the main system sshd process, confident that
saving your original sshd_config, preferably with some sort of version control, just in case your
change causes problems you don't immediately notice.
Remember to kill your test sshd process when finished testing.
Debugging sshd
The -d flag tells sshd to run in debugging mode, without detaching from the controlling terminal.
Debugging displays everything your sshd process does as it happens. Here I run sshd with
debugging.
# /usr/sbin/sshd -f sshd_config -p 2022 -d
debug1: sshd version OpenSSH_5.6 u
debug1: read PEM private key done: type RSA v
debug1: private host key: #0 type 1 RSA
debug1: read PEM private key done: type DSA
debug1: private host key: #1 type 2 DSA
debug1: read PEM private key done: type ECDSA
debug1: rexec_argv[0]='/usr/sbin/sshd' w
debug1: rexec_argv[1]='-f'
debug1: rexec_argv[2]='sshd_config'
debug1: rexec_argv[3]='-p'
debug1: rexec_argv[4]='2022'
debug1: rexec_argv[5]='-d'
debug1: Bind to port 2022 on ::. x
Server listening on :: port 2022. y
debug1: Bind to port 2022 on 0.0.0.0.
Server listening on 0.0.0.0 port 2022.
The debug session shows the u OpenSSH version you're running. You then see sshd v read the
server's private keys as specified in sshd_config and w parse the command-line arguments and
options. It x attempts to bind to your chosen IPv6 TCP port, y reports success, and repeats the process for IPv4. The server is now running and ready to accept connections.
If you attempt to connect to this server with an SSH client, the server will display more debugging output. (An OpenSSH server in debugging mode will not fork, so it can only accept one client
algorithms and keys, the user attempts to authenticate, and various SSH features like X11 forwarding are negotiated. I won't walk you through such a session, as the output varies widely depending on the client, the authentication method, and the SSH features requested and offered. If you have a problem with your SSH server, run it in foreground mode with debugging on a different port and read the output. sshd frequently states problems in plain language. If you don't understand the error message,
use it as an Internet search term.
When you finish debugging, exit out of your client and the sshd process will end. You can also hit CTRL-C in the sshd terminal, unceremoniously terminating sshd and disconnecting the client.
sshd can also run in quiet mode with the -q command-line option. In quiet mode, sshd doesn't send
messages to the system log when a user logs in, authenticates, or logs out. You want to be able to identify who logged into your production systems so quiet mode isn't useful on live servers, but -q
might help in special debugging situations. Try it and see.
Configuring sshd
All system-wide sshd (and client) configuration files reside in /etc/ssh by default. Some operating
systems use an alternate location – for example, Darwin puts the SSH configuration files directly in
/etc, while OSX uses /private. The standard files are:
· ssh_config – the system-wide OpenSSH client configuration (see Chapter 5)
· ssh_host_*_key – the server's private keys, in various encryption algorithms
· ssh_host_*_key.pub – the server's public keys, corresponding to the private keys using the same algorithms
· sshd_config – the OpenSSH server configuration
While you can tweak sshd with command-line options, permanent configuration is generally handled
in the configuration file. The configuration is a set of keywords and values, as shown in this snippet.
#Port 22 u
#AddressFamily any v
#ListenAddress 0.0.0.0 w
# The default requires explicit activation of protocol 1
#Protocol 2
...
We'll cover the function of each configuration option later; for now, just understand how the file is laid out.
The pound sign (#) indicates a comment. Everything after that is ignored. The OpenSSH team distributes sshd_config with options set to the defaults, all commented out. sshd can run just fine
with everything at the default setting. To change the defaults, remove the pound sign and change the value. For example, the configuration option u Port is set to 22, v AddressFamily is set to any, and ListenAddress is set to both w 0.0.0.0 (all IPv4 addresses on the local machine) and x :: (all IPv6 addresses on the local machine). These are defaults, and commented out. The rest of sshd_config
follows this keyword/value format.
I'll give some generally useful sshd options in this chapter. Most sshd_config options appear in the
sections where they're most useful. For example, sshd options affecting X11 forwarding appear in
Chapter 9. If you want the comprehensive master list of sshd_config keywords, read the sshd_config manual page.
Not all currently-deployed versions of OpenSSH support all the keywords described in this chapter. I've written this based on the most recent OpenSSH. Some operating systems either include older versions, or deliberately remove certain functions for their own reasons. If a configuration option doesn't work on your server, consult your operating system documentation or ask your vendor.
The HostKey keyword gives the full path to a file containing a private key.
# HostKey for protocol version 1
#HostKey /etc/ssh/ssh_host_key
# HostKeys for protocol version 2
#HostKey /etc/ssh/ssh_host_rsa_key
#HostKey /etc/ssh/ssh_host_dsa_key
#HostKey /etc/ssh/ssh_host_ecdsa_key
For your sanity, the default files are named after the type of key they normally contain. The file
ssh_host_rsa_key contains an RSA key, ssh_host_ecdsa_key is an ECDSA key, and so on. This
isn't mandatory – OpenSSH will figure out what type of key is in a file and load it if appropriate – but it's definitely best practice.
Operating systems handle missing key files differently. BSD-based and Red Hat systems usually create missing default key files automatically. Many Linux systems require the systems administrator to manually create missing key files, but use a familiar tool to create them. For example, Debian-based systems create missing key files when you run dpkg-reconfigure openssh-server.
Chapter 7 covers creating host keys by hand.
sshd lets you control which network protocols it uses, the addresses it uses, and the TCP port it
The Port keyword controls the TCP port. 22 is the standard port defined for SSH. Some organizations use a different port for SSH in the hope of improving security. Running SSH on an unusual port won't actually help secure SSH, but it will reduce the number of login attempts from SSH-cracking worms. You can override the Port keyword on the command line with -p (see "Testing and Debugging sshd"
earlier this chapter).
AddressFamily refers to the versions of TCP/IP sshd uses. To only use IPv4, set this to inet. To only
use IPv6, set this to inet6. The default, any, uses either version.
Many hosts have multiple IP addresses. By default, sshd listens for incoming requests on all of them.
If you want limit the IP addresses that sshd attaches to, use the ListenAddress keyword. Each
ListenAddress keyword takes a single IP address as an argument, but you can use as many
ListenAddress keywords as necessary. Explicitly list every IP address that you want the SSH server to accept connections on.
If a host has many IP addresses and you want to block SSH access to just a few of them, you might find blocking traffic with a packet filter easier than using many ListenAddress statements.
addresses, and you want sshd to listen to different ports on each, use ListenAddress statements.
ListenAddress 192.0.2.8:22
ListenAddress 192.0.2.9:25
ListenAddress 192.0.2.10:80
Three addresses, with three different ports. Mind you, having sshd listen to the SMTP and HTTP
ports is generally unwise, but OpenSSH is not designed to prevent you from doing unwise things. If you're stuck behind a packet filter that only allows outgoing connections to port 80, running sshd on
port 80 would let you evade the firewall. (The impact of evading the corporate firewall on your employment is left as an exercise for the reader.)
SSH Protocol Version
Always use SSH protocol version 2. Do not use SSH-1.
Protocol 2
If you cannot beg, batter, belabor, blackmail, or bludgeon your way out of offering SSH-1, sshd will
support you. The order doesn't matter, because the client will select the version it prefers from what the server offers.
Protocol 2,1
Banners and Login Messages
Many administrators want to display a message to the user before they log in. This is called a banner. Banners don't always work, however, depending on exactly how the client connects. You can create a file containing a banner message and set the keyword Banner to the full path of the file, but be aware that it won't always appear.
Banner /etc/ssh/ssh-banner
The SSH protocol does not guarantee banner display before clients authenticate.
You can reliably display the system message of the day, /etc/motd. This message does not appear
until after the client has authenticated, so it might not meet your needs. The PrintMotd keyword can be yes or no.
PrintMotd yes
Be aware that if the banner works, it might interfere with automated processes run over SSH. In some locations, though, a banner message can serve as legal notice to intruders. Choose the headache you prefer.
On systems that use Pluggable Authentication Modules (PAM), a PAM module can print /etc/motd.
If you're having trouble controlling the display of /etc/motd, check your PAM configuration.
Once a user has logged on, sshd prints the time of the user's last logon and where they logged in from.
If you want to turn this off, you can set PrintLastLog to no.
I recommend leaving this on. More than once, users have alerted me to intrusions when they logged in and saw that their previous login was from a foreign country or at a ridiculous hour.
Authentication Options
By default, a user can try to log in 6 times in 2 minutes in a single session. Twenty seconds should be long enough for most people to type their password correctly, but you can control the length of time and how many times the user can try.
The LoginGraceTime keyword controls how much time sshd gives a user to authenticate. If a user is
connected to sshd for this time without successfully authenticating, the connection is terminated. This
takes a number of seconds(s), minutes(m), or hours(h).
LoginGraceTime 2m
You can also control how many times a user may attempt to authenticate in a single connection with MaxAuthTries. The default is 6.
MaxAuthTries 6
After half of a user's permitted attempts in a single session have failed, the system logs further failures. Authentication attempts include both public key authentication and passwords. After MaxAuthTries failures, the user must initiate a new SSH session to try again. (My usual failure procedure is to fail to log in six times, then remember that I have a different username on this
machine. When I follow my own advice on changing usernames from Chapter 5, and install a public key everywhere as in Chapter 7, I don't have this problem.)
The owner of an IP address controls the reverse DNS for that address. By default, sshd uses reverse
DNS to generate log messages. A log message like "Login failed from secretary's computer" will make you sigh. A log message like "Login failed from Hacker Haven Nation" should trigger an alarm. An intruder who controls the reverse DNS for his IP address can change the apparent hostname to something within your company. For protection against this sort of attack, sshd can verify connection
attempts against DNS entries.
UseDNS yes
UseDNS verifies the forward and reverse DNS names for a client's IP address. When a client connects, sshd looks up the host name for the source IP, then looks up the IP address for that host
name. If the DNS names don't match, the connection will be rejected.
Suppose an intruder controls the reverse DNS for his IP address 192.0.2.99. He gives it a hostname within your company, such as desktop9.blackhelicopters.org, and connects to your SSH server.
Your SSH server will ask its DNS server for the IP address for desktop9.blackhelicopters.org.
If the DNS entry for that hostname doesn't match the IP the connection is coming from, the connection will be rejected. While an intruder might control the reverse DNS of his own IP address, he probably doesn't control the forward DNS of your domain. (If he does, get him out of your systems, secure them, and disable SSH passwords as discussed in Chapter 7.)
DNS checks also don't help if the intruder can poison the server's DNS cache. Also, DNS checks can increase system load. The additional load for any one session is small, but if you serve hundreds or thousands of SSH users, DNS checks just might topple the system. And when the DNS server is down, failed DNS checks will slow down all SSH logins.
Finally, many IPv6 sites haven't configured reverse DNS and will be slow for the foreseeable future.
Disable DNS checking by setting UseDNS to no.
Tell sshd where to stash its process ID file with the PidFile keyword in sshd_config.
PidFile /var/run/sshd.pid
This file is written before sshd reduces its privileges, so it and the directory it's in don't require
special permissions.
OpenSSH sshd uses syslog for logging, defaulting to the AUTH facility and the INFO level. Control
these with the SyslogFacility and LogLevel keywords.
SyslogFacility AUTH
LogLevel INFO
The SyslogFacility keyword accepts any valid syslog facility. Below is a list of accepted LogLevel values and what they send to syslogd.
· QUIET: logs nothing
· FATAL: when sshd dies
· ERROR: only problems
· VERBOSE: every detail that doesn't violate privacy, including the fingerprints of public keys used to authenticate
· DEBUG1, DEBUG2, DEBUG3: These log enough data to violate user privacy. Debug messages are sent to syslog. Most default syslog
installations don't capture this level of detail; you'll need to
configure your syslog server to capture all debugging data for this to be useful.
The defaults fit almost all environments.
Changing Encryption Algorithms
You might find the keywords Cipher and Mac in your configuration. (They don't appear in the
sshd_config provided by OpenSSH, but some operating systems add them.) These settings allow
Restricting Access by User or Group
I know of many applications – mainly industrial and business programs – that make use of user accounts from the underlying operating system. People use the application over a Web page or
proprietary client, but never actually log on to the operating system. If Fred down in shipping needs to access the application, the system needs a fred account. (This isn't ideal practice, but it is reality.) If
you're responsible for such an application, configure your system so that users who are not systems administrators cannot log on to the server. OpenSSH supports this with the DenyUsers, AllowUsers, DenyGroups, and AllowGroups options. These options take comma-delimited lists of users or groups as arguments, and are processed in the order listed in the configuration file on a first-match basis.
· If a user is listed in DenyUsers, he cannot log in via SSH. As the directives are processed in order, a user listed here will be
prevented from logging in even if he is listed in AllowUsers or is a member of a group in AllowGroups. This lets you make exceptions for individual users in a group.
· If a user is listed in AllowUsers he can log in via SSH, even if he is a member of a group in a DenyGroups entry.
· If a user is in a group listed in DenyGroups, he cannot log in via SSH. Override this by listing the user in AllowUsers.
· If a user is in a group listed in AllowGroups, he can log in via SSH. Both DenyUsers and DenyGroups overrides this.
Additionally, the presence of an AllowUsers or AllowGroups entry implies that nobody else can log in. The system denies SSH logins to all users who are not in one of these.
Confused? Let's look at some examples. My system has four users: backup, mwlucas, pkdick, and jgballard. They are in groups as below:
staff: mwlucas, pkdick, jgballard
support: pkdick, mwlucas
billing: jgballard
While these are small groups, the principles apply to groups with any number of users.
The billing application requires system accounts, but the user doesn't need access via SSH. If I just want to block the billing user from SSH, I could use DenyUsers.
DenyUsers jgballard
All users not listed would still have SSH access. When I add another billing user, though, I must explicitly list them in DenyUsers. I'm better served by blocking access by group.
On a BSD system, wheel is the group for systems administrators. (Ubuntu does something similar with sudo and the "admin" group.) To allow only systems administrators to log in, use the following configuration.
AllowGroups wheel
Anyone in the wheel group can log in. The presence of an AllowGroups entry tells sshd that it should
deny logins by default. The users pkdick and jgballard cannot SSH in.
AllowUsers mwlucas
The problem with this is that when I get another systems administrator, I must add him to the wheel group and edit sshd_config. I'm likely to forget one or the other. Whenever possible, use groups.
My users are globally distributed and synchronized via LDAP. While my support team has access to most of my systems, I have one particular system where a certain administrator is forbidden to log in. Here I block that user, but permit the group.
DenyUsers pkdick
AllowGroups support
Some applications, such as properly-configured rsync, need accounts with SSH access. This
requires a user account with public key authentication (see Chapter 7). These accounts can be
dangerous. While you can restrict the commands that can be run after authenticating with a public key, you don't want rsync connections from random hosts, and you don't want a user with shell access able to circumvent restrictions by editing a file he owns. You can use the Allow and Deny options to
restrict where users can connect from by adding an @ and a host or IP address after the username. List hosts by IP or hostname. Hostnames are verified with reverse DNS, so using hostnames carries the usual security problems. Here I restrict one user's access.
AllowUsers [email protected]/25
AllowGroups support
Users in the support group can log in from anywhere, and the user backup can log in from any host
Wildcards in OpenSSH Configuration Files
The configuration files for the OpenSSH server and client accept wildcards, called patterns. Rather than listing all possible IP addresses in a network, patterns let you say "anything that matches this expression." Wildcards are used for Match rules (see "Conditional Configuration with Match," later this chapter) and in ssh_config (see Chapter 5). Patterns let you write OpenSSH rules such as "all
hosts in this domain" or "all IP addresses in this network." The two wildcard characters are:
? matches exactly one character
* matches zero or more characters
For example, I could write a pattern indicating any host in blackhelicopters.org.
Host *.blackhelicopters.org
I must use the asterisk wild card, because one question mark matches exactly one character.
The next pattern matches all hosts in the blackhelicopters.org domain that have five-character
hostnames. It matches sloth.blackhelicopters.org, but not gluttony.blackhelicopters.org
or avarice.blackhelicopters.org.
Host ?????.blackhelicopters.org
We can use patterns for IP addresses as well. Here I match the hosts 192.0.2.10 through 192.0.2.19.
To match any host in 192.0.2.0/24, you can use an asterisk. The next pattern matches any address from 192.0.2.0 through 192.0.2.255.
Address 192.0.2.*
For IP addresses, you can also use actual netmasks.
Address 192.0.2.0/26, 192.0.2.192/26
Note that we used multiple IP addresses, separated with a comma. Most configuration options accept lists of patterns like this. (The Host option is slightly different, in that terms are separated by a white space. We'll go through several examples of per-host configuration in Chapter 5.)
We can negate patterns by putting an exclamation point in front. The next pattern excludes the hosts in blackhelicopters.org.
Host !*.blackhelicopters.org
Negation is most useful when combined with a larger entity – that is, to say "Match everything except that one little piece." If I want to match every host in blackhelicopters.org except for the customers in the subdomain vermin.blackhelicopters.org, I could use this pattern. The lead OpenSSH developer describes negation as "a little fiddly," so you might have trouble with it. Negation isn't supported everywhere; you'll have to try it and see if it works in your environment.
Host !*.vermin.blackhelicopters.org *.blackhelicopters.org
Conditional Configuration with Match
Your server might need to behave differently depending on the source address or hostname of an incoming connection, or the username, or even what groups a user belongs to. Some users might require chroot (se "Chrooting Users" later this chapter), or perhaps particular users may use X11 forwarding (Chapter 9) from the local LAN. The Match keyword lets you set special sshd
configurations for these situations.
A Match statement is followed by a set of conditions, then by a series of configuration statements
sshd should apply to connections that meet all of those conditions.
Before implementing a Match statement, configure sshd for the most common situation. You might
want to deny X11 forwarding to all but select users. Configure sshd to deny X11 forwarding, then
use a Match statement to check the username and permit X11 forwarding. While we haven't covered X11 forwarding yet, denying it is a single entry in sshd_config:
X11Forwarding no
In all of the examples below, assume this entry appears near the beginning of sshd_config.
Matching Users and Groups
The most common situation I encounter is when I want to enable an option for a particular user or group. The User or Group Match terms permit this.
Match User mwlucas
I am always permitted to use X11 forwarding, as my awesome psychic powers eliminate all possible security risks.
If all of my systems administrators share these powers, or if I settle for exterminating sysadmins who empower intruders, I could Match the whole group.
Match Group wheel
X11Forwarding yes
If you need multiple Match terms, separate them by commas.
Match User mwlucas,jgballard
X11Forwarding yes
I know when to use X11 forwarding. My user claims he does, too. We'll see.
Matching Addresses or Hosts
Perhaps you must permit X11 forwarding, but only from particular networks. You can Match on IP addresses or hostnames.
Match Address 192.0.2.0/29, 192.0.2.128/27
Similarly, Match accepts hostnames, with the usual DNS security caveats.
Match Host *.blackhelicopters.org, *.openssh.org
X11Forwarding yes
Multiple Match Conditions
You can list multiple Match terms on a single line. Here, we permit a single user to use password authentication if they connect from a specific IP address.
Match Address 192.0.2.8 User mwlucas
PasswordAuthentication yes
Permitted Match Configurations
You cannot use Match statements to adjust all possible sshd configuration options. Check the current sshd manual page for the complete list of supported options.
Placing Match Statements
All configuration statements that follow a Match statement belong to that Match statement, until either the file ends or another Match statement appears. This means that Matches must appear at the end of
…
X11Forwarding no
PasswordAuthentication no
…
Match Group wheel
X11Forwarding yes
Match Address 192.0.2.0/29, 192.0.2.128/27
PasswordAuthentication yes
The two Match statements override the defaults. When a user in the wheel group logs in, sshd sets the
X11Forwarding option to yes for that user. When a user logs in from the IP addresses in the ranges
192.0.2.0/29 or 192.0.2.128/27, the PasswordAuthentication option is set to yes. If a user in the
wheel group logs in from a listed address, he gets both options.
Root SSH Access
Sometimes, it seems that you need to allow users to SSH into the system as root. This is a colossally bad idea in almost all environments. When users must log in as a regular user and then change to root, the system logs record the user account, providing accountability. Logging in as root destroys that audit trail. It also encourages users to modify the root environment to suit their working habits. Server programs are frequently started by root, and those environment changes can make those services
unstable or actively destroy data. Tools such as sudo and pfexec permit user accounts limited degrees of privilege. If you need root access to run your backup program, use sudo instead of logging in as root.
Certain environments, particularly large server farms, are designed so that logging in as root is not only possible but preferable. These environments require public key authentication and log the key used to authenticate each session. Sudo can be configured to authenticate via an SSH agent so that a user's password is never exposed to the server. Most readers of this book do not work in that
environment.
It is possible to override the security precautions and make sshd permit a login directly as root. It's
such a bad idea that I'd consider myself guilty of malpractice if I told you how to do it. Chapter 12 discusses some ways to use sudo to avoid this requirement. Logging in as root via SSH almost
Chrooting Users
At times a user needs a command prompt or some specific program, but you don't want to let the user access files outside his home directory. A directory the user cannot escape is called a chroot. (A chroot is also useful for SFTP, as shown in Chapter 6, but that requires much less configuration.) OpenSSH supports chrooting users with the ChrootDirectory option.
ChrootDirectory none
By default, sshd does not chroot users.
Populating the Chroot
A chrooted user cannot access anything outside the chroot. Any chroot you create will not have device nodes, shells, or other programs unless you place them there. When your restricted user logs in, sshd will fail to find a shell or home directory and immediately disconnect them. At a minimum,
you must set permissions on the chroot directory, create a home directory for the imprisoned user, create device nodes, and install a shell.
The chroot directory must be owned by root and not be writable by the restricted user, just as you would not permit an unprivileged user to write to the system's root directory. If the restricted user can write to the chroot directory, sshd will not let them log in.
A user's home directory (as shown in the system's /etc/passwd) is expected to be available inside
the chroot. If user pkdick's home directory is listed as /home/pkdick, and he is chrooted into
/usr/prisonroot, you must create the directory /usr/prisonroot/home/pkdick. This directory
should be owned by the user, just like a regular home directory, and should contain any necessary dotfiles.
Create device nodes inside a dev directory inside the chroot. With a chroot directory of
varies between operating systems. OpenBSD and many Linuxes use the shell script /dev/MAKEDEV,
while FreeBSD and many commercial UNIX-like systems use a device file system. On most systems, the chroot will require the device nodes /dev/urandom, /dev/null, /dev/stderr, /dev/stdin, /dev/stdout, /dev/tty, and /dev/zero. Some operating systems might require additional device
nodes.
Finally, users need a shell. Copy a statically-linked shell into the chroot's /bin directory (e.g.,
/usr/prisonroot/bin). Also copy static versions of any other programs the user needs. You could
add dynamically linked programs, but then you must also copy any necessary libraries.
Note that your operating system might include tools to easily populate a chroot, such as jailkit (http://olivier.sessink.nl/jailkit/), or other methods to simplify chroot management. Check your operating system documentation.
Assigning Chroot Directories
To chroot users, specify the users' root directory as the ChrootDirectory.
ChrootDirectory /home/convict
This works for a single user, or if all SSH users have the same chroot directory, but sshd offers the
%%, %h, and %u macros to assign individual home directories.
If your chroot directory path includes a literal %, use the %% macro. Here, we chroot into the directory /home/disk%1/convict.
ChrootDirectory /home/disk%%1/convict
The %h macro expands to the users' home directory as specified in /etc/passwd. This entry will
ChrootDirectory %h
The %u macro expands to the user's username. This lets you assign a group of users unique home directories in a shared chroot directory.
ChrootDirectory /usr/prisonroot/home/%u
Choosing Users to Chroot
Use a Match statement to selectively chroot users.
…
ChrootDirectory none
…
Match Group billing
ChrootDirectory %h
If a majority of your users are chrooted, reverse the default and allow your systems administrator full access.
ChrootDirectory %h
…
Match Group wheel
ChrootDirectory none
Debugging a Chroot
If your chrooted user cannot log in, run sshd in debugging mode in a terminal window (see
"Debugging sshd" earlier this chapter). Log in as a chrooted user and watch sshd's output. sshd will
Protecting the SSH Server
Any Internet server will have random stuff poking at it. Worms, script kiddies, and other assorted scum would really like to break into your computer. If nothing else, someone wants to run an IRC bot on it. How can you protect your SSH service?
Some people recommend changing the TCP port that sshd runs on. This is a perfect example of
security through obscurity. Scanners constantly probe all open ports on all Internet-connected IP addresses, and they're pretty good at figuring out what service is actually running on which port. Changing ports might buy you a couple of minutes against a dedicated intruder, but no longer.
Changing ports can reduce the amount of random noise in your logs, increasing your odds of noticing real problems. You're better off having your firewall restrict access to known-friendly IP addresses.
Similarly, some people suggest changing the sshd banner. You see the banner when you telnet to
the SSH port. The banner usually identifies the type of server. All SSH servers differ slightly, and might require special client settings. SSH clients use the banner to detect any quirks needed for a reliable connection with a particular server. If you change the banner to report SSH-2.0-Paranoid instead of SSH-2.0-OpenSSH_5.6, you're depriving clients of information they need to connect reliably.
OpenSSH has built-in protection through privilege separation. Only a small section of sshd runs with
root privileges. Most of the server runs as an unprivileged user. This means that if an intruder successfully breaks into the OpenSSH server, he can only do a limited amount of damage to your system. It's still really, really annoying, mind you, but not devastating.
As with all Internet-facing services, a simple way to limit risk to your SSH service is to reduce the number of IP addresses that can access it. OpenSSH respects TCP wrappers (/etc/hosts.allow
and /etc/hosts.deny). If your server runs a firewall, use it instead. By only allowing authorized IP
addresses on your network to access your SSH server, you block the vast majority of attackers.
We'll return to configuring sshd when we cover particular SSH features, but for now let's examine
Chapter 4: Verifying Server Keys
If you're paranoid, or if you've been a system administrator for longer than a week, you need to be sure that the server you're actually logging into is the server you think you're logging into. Server keys help verify a server's identity before you enter your username and password into the wrong machine.
Network connections over unencrypted protocols (such as telnet) are easy to divert to the wrong machine. An intruder who controls a publicly accessible device, such as a server, can make it spoof a different server's identity. Every user that logs on to the spoof server gives his username and
password to the intruder. This is a classic network attack that is still widespread today; the protocols change, the applications change, but the underlying attack is identical.
When properly deployed and used, SSH-2 categorically eradicates these spoofing attacks. Even if an intruder can make one machine resemble another, even if he copies the login prompts and the Web site and the operating system version, the intruder cannot copy the target server's private key unless he already controls the server. Without the private key, the spoof server cannot decrypt anything sent using the server's public key. SSH server keys verify the server's identity.
Every SSH server has a unique public key, as discussed in Chapter 2. The first time an SSH client connects to an SSH server, it displays the server's public key fingerprint to the user. The user is expected to compare the fingerprint shown with the server's key fingerprint. If they match, the user tells their SSH client to cache the key and the connection continues. If the keys don't match, the user terminates the connection.
On all subsequent connection attempts to that server, the client compares its cached key to the key presented by the server. If the keys match, the connection continues. If the keys don't match, the client assumes that something has gone wrong. The client aborts the connection and notifies the user.
Key Fingerprints
A key fingerprint is an (almost) human-readable summary of a public key. View a key's fingerprint with the ssh-keygen program. Use -l to print the fingerprint and -f to specify a key file.
# ssh-keygen -lf /etc/ssh/ssh_host_rsa_key.pub
2048 99:8c:de:5d:59:b9:af:e7:ce:c6:20:92:94:e1:ce:04 /etc/ssh/ssh_host_rsa_key.pub (RSA)
This example displays the fingerprint of the server public key in the file
/etc/ssh/ssh_host_rsa_key.pub. The key is a 2048 bit RSA key, and the fingerprint itself is the
long string beginning with 99:8c and ending with ce:04. Record the fingerprint, as well as the fingerprints for the files ssh_host_dsa_key.pub and ssh_host_ecdsa_key.pub. You and your
users will need the fingerprints when first connecting to the server.
The simplest way to collect all the fingerprints is to copy the fingerprints to a file, as shown here.
# ssh-keygen -lf ssh_host_dsa_key.pub > $HOME/keys.txt
# ssh-keygen -lf ssh_host_ecdsa_key.pub >> $HOME/keys.txt
# ssh-keygen -lf ssh_host_rsa_key >> $HOME/keys.txt
Now get those key fingerprints to your users.
You can use ssh-keyscan to retrieve public key fingerprints from SSH servers, but you must still
Making Host Key Fingerprints Available
A user first connecting to an SSH server should compare the host key fingerprint that appears in their client to a known-good host key fingerprint. They will only do this if the comparison process is easy, however. The system administrator needs to make fingerprint comparisons simultaneously easy and secure. The easiest way is probably to display the key fingerprints on an encrypted Web site
accessible only from within your company or site. When an employee needs SSH access to the server, give them a link to the fingerprint page with their login credentials. Do not distribute key fingerprints over insecure media, such as email or an unencrypted Web site.
Host Keys and the OpenSSH Client
When you first connect to an SSH server with the OpenSSH client, you'll see a prompt asking you to verify the key.
# ssh envy
The authenticity of host 'envy (198.22.65.226)' can't be established.
ECDSA key fingerprint is 67:d4:4e:53:93:e6:c2:dd:e8:54:8b:e9:d8:ff:68:6d.
Are you sure you want to continue connecting (yes/no)?
This is your opportunity to verify that the OpenSSH server is actually the host you think it is. Get your list of keys and compare the ECDSA fingerprint in the list to the ECDSA key fingerprint shown in the client. If the key fingerprints match, type yes to cache the verified key and continue the connection.
You'll get a message much like the following.
Warning: Permanently added 'envy,198.22.65.226' (ECDSA) to the list of known hosts.
The next time you connect to this host, OpenSSH will compare the host key in the cache to the host key on the server and, if they match, connect silently and securely.
If you type no OpenSSH immediately disconnects. Immediately notify your systems administrator
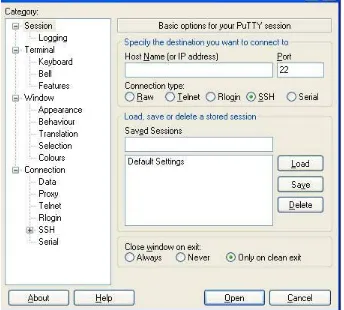
Host Keys and the PuTTY client
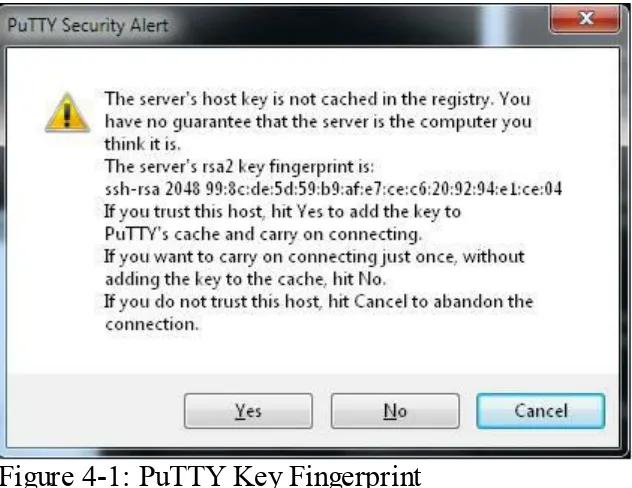
The first time you connect to a server with PuTTY, you'll see a warning much like in Figure 4-1.
Figure 4-1: PuTTY Key Fingerprint
Compare the key fingerprint shown in the client to the key fingerprint in your list. As of this writing, PuTTY doesn't understand ECDSA keys, so it uses the RSA key instead. Compare the RSA key fingerprint offered by PuTTY to the known-good server RSA key fingerprint.
If the keys match and you want PuTTY to connect and cache the key for future reference, hit "Yes."
If the keys match, and you want to continue connecting but don't want PuTTY to cache the key, hit "No."
Randomart Key Fingerprints
While verifying key fingerprints is much better than verifying the actual key, it's still annoying. The OpenSSH client and server support something easier than fingerprints, called randomart. A randomart image is a visual interpretation of a key fingerprint.
When Keys Don't Match
If a host key has changed, you'll get a message much like this:
$ ssh envy
@@@@@@@@@@@@@@@@@@@@@@@@@@@@@@@@@@@@@@@@@@@@@@@@@@@@@@@@@@@
@ WARNING: REMOTE HOST IDENTIFICATION HAS CHANGED! @
@@@@@@@@@@@@@@@@@@@@@@@@@@@@@@@@@@@@@@@@@@@@@@@@@@@@@@@@@@@
IT IS POSSIBLE THAT SOMEONE IS DOING SOMETHING NASTY!
Someone could be eavesdropping on you right now (man-in-the-middle attack)!
It is also possible that a host key has just been changed.
The fingerprint for the RSA key sent by the remote host is
99:8c:de:5d:59:b9:af:e7:ce:c6:20:92:94:e1:ce:04.
Please contact your system administrator.
Offending RSA key in /home/mwlucas/.ssh/known_hosts:33
RSA host key for envy has changed and you have requested strict checking.
Host key verification failed.
Scary-looking stuff, no? It's supposed to be. Your SSH client is screaming that something is Very Wrong. If your desktop was an ambulance, the lights would be spinning and the siren blaring. The super-secret host key pair used to protect this system has changed. You must talk to the systems administrator and determine if:
· The systems administrator destroyed the key pair (accidentally or deliberately) and generated a new one. He should have a new key
fingerprint for you.
· The fingerprint cached by your client is wrong. You might have a desktop security problem.
· The server has been replaced or upgraded, and now supports a new key pair algorithm. The systems administrator should have a new key fingerprint for you.
· The site uses round-robin DNS to have several servers share a single name, and you're connecting to the shared name rather than an individual server's unique name.
· An intruder controls the server, or has diverted your connection to a different server. You, your systems administrator, and/or your security team are about to have a bad day.
When a key changes, immediately contact the system administrator. DO NOT CONNECT TO THE SYSTEM UNTIL YOU KNOW WHY THE KEY CHANGED. All of these are serious errors that require investigation.
If the key has changed for a legitimate reason, verify the new key. If the new key is correct, replace the old key with the new one. PuTTY will offer to replace the key for you, while in OpenSSH you must edit the key cache yourself, as discussed in Chapter 5. If the key is still not correct, talk to the systems administrator again. A legitimate SSH key change might mask an illegitimate intruder; I've seen more than one freshly-installed server get compromised before the first legitimate logon.
You can override an SSH client's refusal to connect to machines when their host key has changed, but remember, an SSH connection doesn't just validate the server and protect your data in transit. A completed connection also hands your authentication information to the SSH server. If you give your password to a compromised machine, you've just given the intruder your username and password. If you use the same password on multiple machines, you can no longer trust any of them. Cancel your weekend plans right now, and possibly next weekend's as well. You'll be busy recovering from backup and managing irate customers.
Chapter 5: SSH Clients
Client software resides on a user's personal machine and permits connections to an OpenSSH server. We'll cover two common clients: the OpenSSH command-line client for UNIX-like clients (ssh) and
the freely available PuTTY client for Microsoft Windows clients. Both clients are freely usable and redistributable, in source or binary form, with very minimal restrictions, limitations, or license fees.
Purists will note that you can get an OpenSSH-based client for Windows systems, most easily through Cygwin. PuTTY has been ported to many Unix-like systems and mobile devices. These are less
common, so I won't specifically cover them.
Each client has its own section in this chapter. Further chapters about SSH clients will be divided into three sections: one for the theory of what we're doing, followed by separate sections on
OpenSSH Client
The OpenSSH SSH client, ssh, is developed synchronously with the OpenSSH server. As new
features often appear in OpenSSH before other SSH implementations, you'll get the bleeding edge of SSH features by using the OpenSSH client. The very newest OpenSSH client is available only in OpenBSD. Every so often, the OpenSSH software package is extracted from OpenBSD, modified to work on other operating systems, and released as OpenSSH-portable.
A user's personal SSH settings are recorded in files in the directory $HOME/.ssh/. This directory
must be writable only by the user and root. Various client and server functions will stop working if others can write to this directory. ($HOME/.ssh/ can be readable by other users.) While ssh creates
this directory with correct permissions, verify the permissions if your SSH suite is behaving oddly.
To run ssh, enter the command followed by the host you want to connect to.
$ ssh envy.blackhelicopters.org
This uses your system's default settings to connect to the host envy.blackhelicopters.org.
Debugging SSH
If ssh isn't behaving the way you expect, try running it in verbose mode with -v. You'll see the server
and client negotiate protocol version and encryption algorithms, the server present its host key, the client verify that key, and the two negotiate the various authentication methods. While this might not solve your problem, it will tell you where the login fails and give you a hint about where to look. Reading the output carefully might tell you that, for example, the server requires public key
authentication for logons.
$ ssh -v envy.blackhelicopters.org
SSH Configuration
Configure ssh's behavior by setting options on the command line or in a configuration file. Use
configuration files for permanent changes and the command line for temporary changes. We'll consider the configuration file first.
Two files control SSH client behavior: /etc/ssh/ssh_config and $HOME/.ssh/config. The
former sets default SSH client behavior for all users on the system. The latter is the user's personal SSH client configuration. A user's configuration file overrides all global settings, but most users can't be bothered to enter their own custom configurations. Changes to the client configuration files affect all SSH connections started after the change. There's no process to restart, but changing your client configuration doesn't affect existing SSH sessions. Both files have the same syntax, and accept exactly the same options. I'll refer to ssh_config for brevity, but everything applies to $HOME/.ssh/config
as well.
For example, certain worms search for SSH servers on TCP port 22 and try to guess legitimate user names and passwords for them. To avoid these scanners, you might run sshd on a port other than 22.
If your site has this policy, tell your client to connect to a different port with the Port option.
Port 2222
With this entry in ssh_config, your client will use port 2222 for every outgoing SSH connection.
While most connection options can also be set on the command line, I recommend storing permanent information in ssh_config. Programs such as scp and sftp (see Chapter 6) read ssh_config, and
the command-line options for each of these programs are slightly different. Using ssh_config gives
you central cross-program configuration.
Per-Host Configuration
to any host in the blackhelicopters.org domain, my SSH client will attempt to connect to port
2222. All other hosts will be contacted on port 22, as specified in /etc/services.
Host *.blackhelicopters.org
Port 2222
I could also specify an IP address, or a network of IP addresses.
Host 192.0.2.*
Port 2224
Note that ssh matches these ssh_config entries based on what the user enters on the command line.
Host entries must be an exact case-insensitive match with what the user types.
Assume that my ssh_config file contains both Host entries above. First, I type
$ ssh avarice.blackhelicopters.org
This matches the first Host entry, so ssh connects to port 2222.
My desktop's /etc/resolv.conf automatically appends the domain name blackhelicopters.org to
any lone hostnames, so I probably wouldn't type my whole domain name. Instead, I'd just do something like this.
This will not match my first Host entry, as I didn't explicitly type the domain name given in
ssh_config. If the host avarice has an IP address in 192.0.2.0/24, though, wouldn't the second Host
entry match? No, because the host entries match based on the command line; there is no check against DNS. To match based on the IP address in the Host entry, I would have to explicitly SSH to an IP address. Custom settings for this host require a Host entry like this.
Host avarice
Port 2222
ssh parses conditions on a first-match basis. Configuration options listed after Host entries remain in
effect until the next Host entry. This ssh_config is probably wrong.
Host *.blackhelicopters.org #WRONG
Host 192.0.2.*
Port 2222
We have an entry for any host under the blackhelicopters.org domain, but there's no special
configuration for it. Any hosts in 192.0.2.0/24 run SSH on port 2222. You probably wanted to use port 2222 for all hosts in blackhelicopters.org and all IP addresses in 192.0.2.0/24. Instead, list multiple hosts on the same line, separated by spaces.
Host 192.0.2.* blackhelicopters.org *.blackhelicopters.org