XML PROGRAMMING
THE ULTIMATE GUIDE TO FAST, EASY, AND
EFFICIENT LEARNING OF XML
PROGRAMMING (XML SYNTAX, XML
PROGRAMMING, DTD’S, XML PARSERS,
Table of Content
Introduction
Chapter 1 - What’s in a Markup language?
Chapter 2 - Why XML when there is HTML?
Chapter 3 - Show me the Syntax and Semantics
Chapter 4 - Document Type Definition
Chapter 5 - Get your hands dirty
Chapter 6 - Interpreting XML - XML Parsers
Chapter 7 - HTML5, why here?
Introduction
Have you ever felt learning XML as a nightmare? Discouraged by the huge volumes of beginner guides? I understand the difficulty of extracting the core from a book which runs to few hundred pages. It is not very interesting to read few thousand lines for creating a simple XML document on your own. How would you feel, if I say I can do that job for you? I have read through hundreds of pages for you and will give you the ready to drink juice from the fruit.
This book is a quick and easy guide, an extract from those heavy pillow-sized books, menacingly long examples and boring high level jargons. I wrote this book keeping in mind all the difficulties I faced as a beginner and thus the extract is simple, understandable and short.
Chapter 1 - What’s in a Markup
language?
Like all human languages, computer languages are also developed for the purpose of communication. Human to computer communication, computer program to computer program communication are supported by various computer languages. Every language that is developed has a set of rules and procedures and we call them syntax. Languages can be grouped based on the type of communication they are developed for.
Markup languages were primarily designed to instruct the software that displays text; they are designed to deliver information over the World Wide Web. Markup is a meta data, when it is added to a text or document it enhances its meaning. Precisely, markup language is a set of tags when added to a document can demarcate and highlight the various parts of that document.
Markup languages use tags which contain the necessary specifications for processing, defining and presenting a text. One of the most popular markup languages is Hyper Text Markup Language, they have predefined semantics for presentation. Their greater use is in describing the structure of a website semantically along with cues for presentation. The predefined elements in a HTML include: headings, paragraphs, lists, tables, images, and hyperlinks.
SNIPPET 1
This is a sample HTML page </H1>
<P>
SGML stands for Standard Generalized Markup Language. <BR>
<B><I> SGML is not in itself a document language. </I></B>
tidbits
Plain text: John Mathews
HTML File (Displaying the plain text, using pre-defined tags):
<HTML>
<HEAD><TITLE> Name </ TITLE ></ HEAD> <BODY><P> John Mathews </P><BODY> </HTML>
Chapter 2 - Why XML when there is
HTML?
XML is an acronym for eXtensible Markup Language; they provide means to share data and information between computer programs or computers. While HTML enables its users to process, define and present text using predefined presentation semantics, XML is a meta-markup language. Unlike HTML or troff in XML there aren’t any predefined tags, you need to create your tags and semantics as and how your communication demands. Also, XML concentrates on describing the structure and meaning of a document, it does not show how a document will look like. It does not
describe the document’s format but style sheets can be used for formatting an XML document. Once the data is shared, it is the receiving computer program’s discretion to interpret useful information from them. Initially, XML was created as a means of web publishing but later, their usage unfolded in new arenas.
The snippet 2 with no additional information illustrates that the data in the XML represents the list of items in a store or stock.
The following are some practical uses for XML:
Data transfer and storage: Snippet 2 is a perfect example for using XML for database records. XML uses tags to label each field of information, thus making the process of data processing (searching, sorting, filtering, etcetera,) simple.
Web publishing documents: Style sheets can be added easily to XML to get the desired layout.
Exchanging information between computer programs: One of the most popular uses of XML among programmers is their use in web services communication. XML can carry information across web services, independent of the language or platform in which the web services are built.
Creating KVM and boot for operating system: This is one of the least known usages of XML. Kernel-based Virtual Machine and a boot can be created using XML for any operating system.
XML Based Operating System
XML Based Interface Definition Language
tidbits
Plain text: John Mathews
XML File (Transforming the plain text into consumable information, using user-defined tags):
<name>
<firstname> John</firstname> <lastname> Mathews</lastname> </name>
Chapter 3 - Show me the Syntax and
Semantics
XML is not a programming language
Unlike programming languages, XML does not perform any computation or algorithm to process the data. It just holds the data in a structural way, which can be interpreted by an XML Parser.
</list:coffeeshopmanagementlist>
Color Codes:
XML version and the type of encoding Namespaces
Root Element
Elements
XML Declaration
XML Elements
Every XML has a root element, which mostly says what the collection of elements in the XML represents, with its name. In Snippet 3, the tag element marked in the green is the root element of that XML. The name
SNIPPET 4
<?xml version=‘1.0’ > <shoes>
<shoe>
<brand>Reebok</brand> <size>4</size>
<color>Brown </shoes> </shoe>
SNIPPET 5
<?xml version=‘1.0’ > <shoes>
<shoe>
<brand>Reebok</brand> <size>4</size>
<color>Brown</color> </shoe>
</shoes>
SNIPPET 6
<?xml version=‘1.0’ > <organizer>
<emails date =“10/12/2014” from=“Ann” >4 </emails> <calls>2</calls>
SNIPPET 7
<?xml version=‘1.0’ > <organizer>
<emails date =“10/12/2014” from=“Ann” date =“11/12/2014”>4 </emails> <calls>2</calls>
<messages> 25</messages> </ organizer>
Namespaces
SNIPPET 8
<?xml version=‘1.0’ > <coffeeshoptablelist>
<name>Family Table</name> <number>1</number> <seats>4</seats>
<type>Table and Chair</type> <tableattender>
<name>John</name>
<experience>4years</experience> </tableattender>
</coffeeshoptablelist>
Namespace declaration syntax
xmlns:prefix=“URI”
Namespace declaration example
xmlns:list=“http://www.xml.example.com/ns/list”
Tidbits
XML declaration has no closing tag.
XML declaration parameters are case sensitive.
There is only one root element in an XML.
All the XML elements are case sensitive.
All the XML elements must be closed properly with a closing tag.
All the XML elements’ attributes’ values must be inside a single or double quotes.
Chapter 4 - Document Type Definition
In real-time usage XML documents are used across computer applications. Hence, the XML documents must be built with standards. So an XML should not only be well formed but also be valid. A valid XML is one which is well formed and as well as it adheres to standards in relationship, data type, etcetera.
Why DTD?
Document Type Definition helps in the process of building a valid XML. It is a document with rules, which defines the structure and legal elements of an XML document. This makes the XML document comparable and eligible to be used for interchanging data across applications. The consuming application can validate the incoming XML document with the same DTD document.
For Example:
DTD syntax for declaring the element Size
<!ELEMENT SIZE (#PCDATA)>
How DTDs are created
DTD can be either internal or external. The internal DTD will be included as a part of the XML while, external DTD is a separate document. DTD groups the XML components into 5 blocks:
Elements Attributes Entities PCDATA CDATA
Element Declaration in DTD
The following snippet shows the syntaxes for declaring the elements with content in DTD:
<!ELEMENT element-name category>
<!ELEMENT element-name EMPTY>
<!ELEMENT element-name ANY>
Where,
The element-name will be replaced with the actual element name, the element-name is case sensitive. The category defines the type of data in the element-name.
The keyword EMPTY signifies the element will have no value. The keyword ANY signifies the element can hold any type of content.
Declaring an element with multiple children
Declaring an element with either or children
Declaring an element with zero or one child
Declaring an element with zero or many children
Declaring an element with minimum one child
Declaring an element with only one child
General Syntax
Mandatory Attribute Value
Optional Attribute Value
Fixed Attribute Value
Character Data type Attribute Value
Enumerator Attribute Value
Unique Id Attribute Value
Id Reference Attribute Value
Id Reference List Attribute Value
XML Name Attribute Value
XML Name List Attribute Value
Entity Attribute Value
Entity List Attribute Value
Notation Name Attribute Value
Pre defined XML Value Attribute Value
<!ATTLIST element-name attribute-name xml: attribute-value> <?xml version=“1.0”?>
<!DOCTYPE camera [
<!ELEMENT camera (lens,body,filter)> <!ELEMENT lens (#PCDATA)> <!ELEMENT body (#PCDATA)> <!ELEMENT filter (#PCDATA)> ]>
<camera>
An Example for Internal DTD is shown below: <?xml version=“1.0”?>
<!ELEMENT camera (lens,body,filter)> <!ELEMENT lens (#PCDATA)> <!ELEMENT body (#PCDATA)> <!ELEMENT filter (#PCDATA)>
An Example for external DTD and its corresponding valid XML is shown below: <?xml version=“1.0”?>
<!ELEMENT camera (lens,body,filter)> <!ELEMENT lens (#PCDATA)> <!ELEMENT body (#PCDATA)> <!ELEMENT filter (#PCDATA)>
The above DTD is saved as “camera.dtd”. The same is included in the XML, which abides to the standards of the DTD.
<?xml version=“1.0”?>
Chapter 5 - Get your hands dirty
Can we try our luck? How can we apply what we learnt so far?
Here you go, let us try to create an XML document which is valid with respect to the “excursion.dtd” below: <!DOCTYPE EXCURSION [
<!ELEMENT EXCURSION (PLACE+)> <!ELEMENT PLACE (TYPE, DAY+)>
<!ELEMENT DAY ((DATE, WEEKDAY) | (DATE, WEEKEND))+> <!ELEMENT WEEKDAY (#PCDATA)>
<!ELEMENT DATE (#PCDATA)> <!ELEMENT WEEKEND (#PCDATA)>
Just for a bite, before you proceed
Write an XML declaration. Include the excursion.dtd.
See if you have identified the root element and other sub elements. A valid XML must be well formed first.
Check if you map all the attributes right.
Look for the data types of the element and attribute values.
Once you have created your XML, validate it yourself with the DTD.
<?xml version=“1.0”?>
<!DOCTYPE EXCURSION SYSTEM ” excursion.dtd”>
<EXCURSION THEME = “OFFICE TEAM OUTING”>
<WEEKEND>YES</WEEKEND> </DAYSUGGESTED>
<DAYSUGGESTED HOLIDAY =“NO”> <DATE>29/08/2015</DATE>
<WEEKEND>YES</WEEKEND> </DAYSUGGESTED>
</PLACE>
Chapter 6 - Interpreting XML - XML
Parsers
We learnt to create a well formed, valid XML. Did you say that? What? I couldn’t hear you.
Yes you are right, I need not say a valid XML is well formed; it is implicit that a Valid XML is well formed. Back to the topic, we have an XML now and we need to know how to interpret it.
Parser is a program written to interpret a text or string. XML parser is therefore a program written to interpret an XML document. Computers are useless unless they are instructed, so an XML parser instructs the computer program on how to read the XML file. Parsers parse through the XML document for accessing or modifying the information present. XML parsers have become an integral part of development platforms and popular browsers. The parsers can also validate an XML on its nesting, declarations, etcetera, they also validate the XML against DTD or schema.
There are many types of XML parsers but the following two parsers are widely used:
DOM Parser
How DOM Works
A DOM parser creates an object model (tree structure) of the entire XML document, it parses through the XML in a hierarchical order. The DOM parser breaks the XML into three components: Elements, Attributes and Data.
Where,
-Elements are the XML elements from the XML file. -Attributes are the properties of the XML elements.
SNIPPET 9
<?xml version=‘1.0’ > <organizers>
<organizer>
<emails date =“10/12/2014” from=“Ann” >4 </emails> <calls>2</calls>
<messages> 25</messages> </organizer>
<organizer>
<emails date =“12/12/2014” from=“Jan” >1 </emails> <calls>0</calls>
<messages>4</messages> </organizer>
</organizers>
Parsing the XML document using DOM
Since a parser is used by a programming language to interpret an XML document, let see an example of DOM parsing in java. The three components: elements, attributes and data are all represented by a java class called “Node”. Java API has ready to use XML packages and DOM packages. These packages have necessary java classes and methods to help XML interpretations.
To parse the XML document “organizer.xml”(The XML in Snippet 9) through the java program, we need to write a java class. To write a java class which parse an XML document with the help of DOM parser, we must follow the steps below:
Create an instance of document builder.
DocumentBuilderFactorydbFactory = DocumentBuilderFactory.newInstance(); DocumentBuilderdBuilder = dbFactory.newDocumentBuilder();
Parse the XML File through the document builder and create a document.
File xmlFile = new File(“/user/organizer.xml”); Document doc = dBuilder.parse(xmlFile);
Extract the root element
Extract the sub elements
Extract the attributes and values
Element subElement = (Element) subElementNode;
String subElementAttribute = subElement. getAttribute(“date”));
Java Class
System.out.println(“Root element :” + document.getDocumentElement().getNodeName());
elementsNodeList = document.getElementsByTagName(“organizer”);
for (inti = 0; i<elementsNodeList.getLength(); i++) {
System.out.println(“No. Of Emails : “ +
subElement.getElementsByTagName(“emails”).item(0).getTextContent());
Element emailElement = (Element) subElement.getElementsByTagName(“emails”).item(0);
System.out.println(“Date of Email : “ + emailElement. getAttribute(“date”)); System.out.println(“Email was From : “ + emailElement. getAttribute(“from”));
System.out.println(“No. Of Calls : “ +
subElement.getElementsByTagName(“calls”).item(0).getTextContent());
System.out.println(“No. Of Messages : ” +
subElement.getElementsByTagName(“messages”).item(0).getTextContent()); }
} catch (Exception e) { e.printStackTrace();
Program Output
Root element : organizers
No. Of Emails : 4
Date of Email : 10/12/2014 Email was From : Ann No. Of Calls : 2 No. Of Messages : 25
No. Of Emails : 1
Interpreting an XML using Javascript
Load the XML file through javascript.
The loadXML function must be triggered, the XML document must be passed as parameter to the function.
The second statement in the function calls another function called verify. This function verifies whether the ActiveX DOM Object created is in ready state.
function verify() {
if (xmlDoc.readyState != 4){ return false;
} }
To view the XML document, the alert function of javascript can be used.
functionviewOrganizerXML() {
loadXML(“/user/organizer.xml”); alert(xmlObj.xml);
}
To interpret data from the XML document, the child nodes have to be accessed and their tag names have to be returned and the getAttribute function can be used to get the attribute values.
functionviewOrganizerXMLData() {
alert(xmlObj.tagName);
alert(xmlObj.childNodes(0).childNodes(0).hasChildNodes()); alert(xmlObj.childNodes(0).tagName);
alert(xmlObj.childNodes(0).childNodes(0).tagName); alert(xmlObj.childNodes(0).childNodes(0).firstChild.text); alert(xmlObj.childNodes(0).childNodes(0).getAttribute(“date”));
}
Output
First Alert: organizers
Second Alert: true
Third Alert: false
Fourth Alert: organizer
Fifth Alert: emails
Sixth Alert: 4
SAX Parser
SAX is an acronym for Simple API XML, where SAX unlike DOM is an even-based parser.
How SAX Works
Aren’t we familiar with event-driven approaches?
We are, we see them in our day to day use of computer applications. The GUI is based on event-driven programming, a pull-down menu dropping on scroll over a label, a pop up window opening on click of a button are all event-driven. Similarly, a SAX parser as it reads through the XML document, triggers the callback functions when it encounters a token (Example: start tag, an end tag, an element or an attribute).
SAX parser reads the XML in one way approach, it can read it only from top to bottom. It does not create an object for the XML document or store its content. So it is not possible to access any element in random. Tokens are accessed in the same order they are identified. This behaviour gives SAX a lead over DOM, SAX can process huge XML documents as they do not store content.
Callback Methods
The following are the callback methods triggered during events. The name of each method says it precisely, encounter with which token would trigger them.
voidstartDocument() voidendDocument()
voidstartElement(String uri, String localName, String qName, Attributes atts) voidendElement(String uri, String localName,StringqName)
void characters(char[] ch, int start, int length)
voidignorableWhitespace( char[] ch, int start, int length) voidprocessingInstruction(String target, String data) voidsetDocumentLocator(Locator locator))
voidskippedEntity(String name)
Parsing the XML document using SAX
Like the DOM parser example, the SAX parser example will also be explained with a java class.
SNIPPET 10
In the snippet 10, “<shoes>”, “<shoe>”, “<brand>”, “<size>”, “<color>”, “<type>”, “</shoes>”, “</shoe>”, “</brand>”, “</size>”, “</color>”, “</type>”, “itemno”, etcetera, are tokens and identifying them while parsing through the XML document are considered as events, which would trigger the respective callback method. Let us name this XML document as shoes.xml.
Import all the necessary packages.
importjava.io.File;
importjavax.xml.parsers.SAXParser; importjavax.xml.parsers.SAXParserFactory;
importorg.xml.sax.Attributes; importorg.xml.sax.SAXException;
importorg.xml.sax.helpers.DefaultHandler;
Create an instance of SAX parser.
SAXParserFactory factory = SAXParserFactory.newInstance(); SAXParsersaxParser = factory.newSAXParser();
Create a class which extents DefaultHandler
Override startElement method
@Override
public void startElement(String uri, String localName, String qName, Attributes atts) throws SAXException {
// Method implementation
Override endElement method
@Override
public void endElement(String uri, String localName, String qName) throwsSAXException {
// Method implementation
Override characters method
@Override
public void characters(char ch[], int start, int length) throws SAXException {
// Method implementation
}
}
•Parse the XML File through the sax parser and trigger the overridden callback methods in the SAXXMLHandler class. File xmlFile = new File(“/user/shoes.xml”);
SAXXMLHandlersaxHandler = new SAXXMLHandler(); saxParser.parse(xmlFile, saxHandler);
Java Classes
saxParser.parse(xmlFile, saxHandler);
booleanbrandFlag = false;
public void startElement(String uri, String localName, String qName, Attributes atts) throws SAXException {
SAXException {
public void characters(char ch[], int start, int length) throws SAXException {
System.out.println(“Shoe Item No: ” + shoeItemNo));
if (brandFlag) {
System.out.println(“Brand: ” + new String(ch, start, length)); brandFlag = false;
} else if (sizeFlag) {
System.out.println(“Size: ” + new String(ch, start, length)); sizeFlag = false;
} else if (colorFlag) {
System.out.println(“Color: ” + new String(ch, start, length)); colorFlag = false;
} else if (typeFlag) {
System.out.println(“Type: ” + new String(ch, start, length)); typeFlag = false;
}
Program Output
Shoe Item No: 1 Brand: Reebok Size: 5
Color: Brown Type: Sports Shoe End Element : shoe
tidbits
DOM parsers consume more memory and are very slow, when the XML files being parsed are large. A DOM implementation might use 10 bytes of memory to process one byte of XML.
When the data from the XML are repeatedly used, DOM parsers are preferred. When an XML document is deeply nested, DOM parsers are preferred. When an XML document arrives over a stream, SAX parsers are preferred. When an XML is huge, SAX parsers are preferred.
Chapter 7 - HTML5, why here?
HTML5 is an enhanced version of HTML, with more features. What is so fascinating about HTML5?
There are new canvas elements, which help in drawing graphics. There are new media elements.
There are new form elements. There are new structural elements. The syntax has been simplified.
There are new content-specific elements. There is support for local storage. There is application cache. It is cross-platform now.
Ok, HTML5 looks amazing, but why are we talking about it here, on the XML platform?
Conclusion
XML by itself, just a notation for well-formed text. It is a mechanism for defining structured data. But its application in information exchange had boosted up its reputation beyond a simple markup language. This book presented the ways for creating and interpreting valid XML documents, with real-time examples.
L
INUX
F
OR
B
EGINNERS
T
HE
U
LTIMATE
G
UIDE
TO
L
INUX
C
OMMAND
L
INE
, L
INUX
P
ROGRAMMING
AND
L
INUX
Table of Content
Introduction
Chapter 1 – History Highlights Chapter 2 – Installing Linux Chapter 3 – The Shell Chapter 4 – File Globbing Chapter 5 - User Management Chapter 6 - Linux Tips and Tricks Chapter 7 - Vi Editor
Introduction
This book is for all computer users eager to learn or consolidate bases acquired in the field.
As you will know when reading this book, there are different distributions of the Linux kernel. In this book we will focus a little more on the Red hat distribution because we consider it as the easier one to install and use. In the following chapters, important methods and Linux administration commands are presented and detailed.
A lot of computer users tend to avoid Linux for its “complexity” and “sophistication”. This book is specially written and tailored to prove those people are wrong.
This book really popularizes and simplifies the Linux operating system and its usage while following a good methodology. Linux for beginners covers all the important facets which all beginners should know about. I am asking you to imagine yourself using this great OS without having any difficulties or fogginess about it.
Reading and understanding this book will make it happen. In the beginning we will explore Linux history and genesis so we can have a clear vision and be methodological. Then, we will learn and understand how to install the system knowing the necessary equipments and devices needed to have an operational OS running.
We will also learn about the shell which is very important and all the relative commands. And of course we must not forget about command lines which are really useful and commonly used. File globbing will be covered too; it’s really indispensable for Linux beginners to know about.
Chapter 1 – History Highlights
History and genesis of Linux
Linus B.Torvalds is behind this entirely free OS. In the early 90s, Linus wanted to develop his own OSand present it as his graduation project. He was intended to develop a UNIX version that runs on a 80386 type architecture.Minixwasthe first UNIX clone running on PC, written by Andrew Tanenbaum. Linus Torvalds then decided to expand the
possibilities of Minix, creating what would become Linux. Amused by this initiative, many people contributed to help Linus Torvalds to complete this system, so that in 1992 a first version of the system was launched with almost no bug.
With the increasing number of developers working on this system, it has been able to integrate quickly free redevelopments of tools present in commercial UNIX systems. New tools for Linux now appear at breakneck speed.
The originality of this system lies in the fact that Linux was not developed for commercial purposes. Indeed no line of code has been copied from the original UNIX systems (Linux, in fact draws on many commercial UNIX versions: UNIX System V). So everyone, since its inception, is free to use but also to improve it.
Core concepts and distribution
Linux is built around a kernel responsible for taking care of the equipment. We call distribution assembling a set of software around a Linux kernel to provide a turnkey system. The kernel of a distribution can be updated to allow for the inclusion of recent material; however this operation consisting in rebuilding the kernel is difficult because it requires a certain level of knowledge of the system and equipment. The kernel
recompilation is reserved for specialists or users willing to make them unusable system to learn.
Most distributions also provide a graphical installation of their own and a package
management system to automatically install software by managing dependencies (software under Linux is sometimes linked to external libraries or rely on other software).
System features
Linux is an operating system similar to UNIX systems that can run on different hardware platforms: x86 (that is to say based platforms Intel, AMD, etc.), Sparc, PowerPC, Alpha, ARM, etc. So the Linux system can operate both on personal computers as game consoles or personal assistants!
Linux is therefore a multi-platform system. It is also multi-user (several people can
simultaneously work on the same computer), but also multi-task (several applications can be run simultaneously without any of them affects the other) and multiprocessor.
Linux is considered a reliable, robust and powerful. It is also capable of operating with very few resources on low end computers very few powerful.
The Linux system has the following advantages in particular:
- Support for Internet standards, that is to say, TCP/IP protocols, the groupof Internetprotocols. Linux is a free way to create a local network to connect to the Internet and to set up a server.
- More security due to its sourcecode’s transparency and the responsiveness of the community during the vulnerabilities advertisements.
- A partitioning of memory space and disk space coupled with a sharp rights management to manage large numbers of users with minimal risk.
Chapter 2 – Installing Linux
Necessary material
Linux does not require the latest computer with minimal configuration: - a 386SX processor minimum
- 4MB of memory (8MB recommended)
- a hard disk controller and a disk with free 20MB (100MB recommended) (Linux is able in practice to operate from a single disk)
- a CD-ROM
Prerequisite
Installation Phases
Installing Linux is done in several phases to implement a file system supported by Linux (ext2fs) on one or several dedicated partitions and then to proceed with the installation itself, finally configure the kernel before booting from disc, the steps are the following:
- creating floppy disks
- system boot from the diskette
- creating the primary partition of the hard drive - creation of the swap partition
- creation of the file system - Linux Installation
Creating boot and root disks
Through floppy disks to boot the system with minimal Linux kernel we will be able to install Linux. These disks will be created using a program to copy image files (all data to put on floppy disks) on a disk. These disks are two in number:
- Boot disk: containing a Linux kernel for booting the system - Root disk: contains the installation software
The image file to be chosen in each case depends on the configuration of your system, it will be called:
- scsi, in the case of a SCSI CD-ROM drive
- sbpcd, in the case of a Panasonic CD-ROM drive or connected to a Sound Blaster Pro
- nec260, in the case of a CD-ROM Nec 260 - Mitsumi, in the case of a CD-ROM Mitsumi
- cdu31a, in the case of a CD-ROM or Sony cdu31 CDU33a - cdu535, in the case of a CD-ROM or Sony CDU531 CDU535
It only remains for you for each of the two image files (boot and root) totype in the directory containing the proper image file “\rawrite”, the program will ask you the name of the image file (scsi for example), then the drive (a:)
Booting from the boot disk
Once the disks created, restart the computer taking care to place the boot disk in drive a :. After displaying some messages the system displays the line: “boot”, press enter to
Creating Partitions
To use Linux, you need to create a partition (preferably larger than 900MB to install all options) using the “Linux Ext2” file system and (optionally) a swap partition (virtual memory, that is, i.e. a part of the disk used in case of lack of memory) of tens of MBs. Creating partitions can be done in different ways:
Under a Microsoft system before booting the system with the diskette boot:
- In Windows 9x, the software Partition Magic 4 makes it very easy to create ext2fs and swap partitions without losing data on the disk
- Under MS-DOS, with the fdisk software supplied as standard, which is more ergonomic than his colleague of the same name supplied with Linux
- There’salsoa DOS utility called fips. It allows performing operations on partitions.
On Linux, after starting the system. Next distributing the installation procedure is different:
- with Slackware type distributions you will need to enter the commands manually, that is to say format, partition, create the file system and
installsuccessively
- withRedHat type distributions, these operations are automated, you will answer questions …
When creating partitions, you will surely be asked the type of the previous partitions Follow these steps:
- type 82 for the secondary memory - type 83 for the main partition
- The primary partition must be within the range of the disc between the first and 1023àme cylinder!
Creating the file system
Under certain distributions you will be asked to create a file system before launching the installation (this is not the case, among other things, distributions RedHat 5.2 and
Mandrake 6.0, for which all the following operations are automated through menus). When you have created the main partition and the secondary memory partition (swap partition), this is to activate the secondary memory and create the file system of the root partition.
Activating the secondary memory is done with the command:
<<mkswap -c partition size>>
For example, for a secondary memory using 10000 blocks on the second partition of the second disc (hdb2) command would be:
<<mkswap -c / dev / hdb2 11000>>
Then the “swapon” command to launch it
The creation of ext2 file system is done through the following command:
<<mke2fs -c partition size>>
for example:
Installing RedHat
The RedHat distribution is currently one of the most acclaimed distributions given that the installation procedure is quite simple. In fact, this procedure simply asks you to make choices from a drop-down list for your main devices and for choices related to language or packages needed to be installed. Here are the different steps to be followed:
- Choice of language: choose the language in which the installation procedure will be
- Choice of keyboard
- Choice of installation support: If your Linux distribution is on CD, choose CD-ROM, otherwise, choose the Hard drive if the copy is downloaded.
- Choice of installation style: if it is an update of a previous system or a full install - Type of installation: The system allows you to choose between workstation, server or customized. You have every interest to opt for custom configuration that will leave you more flexibility
- Choice of SCSI adapters: If you have a SCSI adapter, you should answer yes. The system will detect your hardware. If ever this automatic search is unsuccessful, you can simply enter a line of parameters enabling it to know what kind of SCSI
adapter in question, as well as knowing his IRQ and memory address. One Card “AHA1520” to address 0x140 and IRQ 10 will be located in the command line: = aha152x 0x140,10
- Hard diskpartitioning: RedHat allows you to partition your disk at this level of the installation (if you have not done it previously) and leaves you the choice between disk druid and fdisk
- choose the hard drive: the software lets you choose from a list the hard disk on which to create the partitions
-Unnecessary partitionsRemoval: under fdisk using the “d” key you can delete unnecessary partitions (be careful not to delete your Windows partitions!)
-Creating Linux partitions: the “n” button and the “p” button will allow you to create root and swap partitions, and all other partitions you may need. U The first cylinder number of the partition and its size (in MB) will be required
-fdisk output: by pressing the “q” key you exit fdisk abandoning the changes. By pressing the button “w” you save the changes before leaving - Selecting mount points: a screen offers several partitions, at this point you need to select the one you would like to use and name them one by one, that is to say,
specify the mount point. The root is mandatory, it is the master partition and must be named /. Each partition that you wish to use under Linux must be assigned a mount point (/home for example, or /mnt/dos for your DOS partition, if you want it to be mounted automatically after installation
- Selecting the swap partition: the system naturally asks you to select the partition that will be used as secondary memory
- Formatting partitions: you must select all new partitions that you have created. Be careful not to format partitions containing data!
- Choice of packages: this option requires you to simply select from a list, what to install
- Installing / copying packages: installs the system one by one all the required packages. This operation can be very long! (Up to half an hour …)
- Network configuration: these computers with a network card (not a modem) - Choice of the clock: Choose appropriate clock to your country
- Choice of start-up services: you can select from a list the services that will be activated at each start.
- choice of printer: a series of questions will allow you to configure your printer by choosing it from a list and specifying the port on which it is connected
- the password input: password You will be asked for the super user account (root), that is to say, a user who has all rights
Once you have completed all these steps, the computer will restart and you will be faced with a prompt indicating LILO: just type Linux to boot under Linux and dos to go to your DOS partition, on which is Windows 9 xs, DOS or other…
Installing XFree86
XFree86 is a graphical interface under Linux (XWindow is the interface of the UNIX stations). To configure XFree86, just type “XF86Setup” in the command line, in capital letters. A screen appears asking you for information on your screen and to be paid the display. A graphical window then appears in which you have tabs to configure each of the hardware in your computer.
So we must first configure the mouse which is mostly a Microsoft mouse type (PS / 2 or if it is connected to a special port) on COM1 (or COM2).
The keyboard is generally not to change, be careful with the settings of the video card since they will directly impact the display, causing an unstable display on error (screen flickers for example).
Chapter 3 –The Shell
Introduction to the shell
The interface between the operating system and the useris the command interpreter, hence its name “shell”.
The shell is thus responsible for making through the operating system and the user thanks to command lines entered by the latter. Its role is therefore to read command lines,
interpret their meanings, execute them, and then returns the result to the outputs.
The shell is thus an executable file responsible for interpreting orders, transmitting them to the system and sending the result in return. There is a wide range of different shells; the most common being sh (called “Bourne shell”), bash (“Bourne again shell”), csh (“C Shell”), Tcsh (“Tenex C shell”), ksh (“Korn shell”) and zsh (“Zero shell”). Their name is usually the name of the executable.
Each user has a default shell, which will be launched at the opening of a command
prompt. The default shell is specified in the configuration file /etc/passwd in the last field of the line corresponding to the user. It is possible to change the shell in a session by simply executing the corresponding file, here’s an example:
Command prompt (prompt)
The shell is initialized by reading its overall configuration (in a file in the /etc/), followed by reading the user-specific configuration (in a hidden file whose name starts with a dot, located in the directory user base, that is to say /home/username/. Configuration file), then displays a command prompt as follows:
Machine:/directory/current$
By default in most shells the prompt consists of the name of the machine,followed by a colon (:), the current directory, then a character indicating user type logged on:
- A normal user is indicated with a “$”
Command line concept
A command line is a character string consisting of a command corresponding to an executable system or a shell command and the Optional arguments (parameters):
ls –al /home/j/
In the above command, lsis the name of the command, -al and /home/jimmy/ are arguments. Arguments beginning with - are called options.
For each order there are usually a number of options available which can be detailed by typing the following commands:
Standard input-output
When executing a command, a process is created.This will then open three flows:
- Stdin: where the process will read the input data. It’s called standard input. By
default stdin is the keyboard. STDIN is identified by the number 0.
- Stdout: where the process will write the output data. It’s called standard output. By
default stdin corresponds to the screen; STDOUT is identified by the number 1. - Stderr: where the process will write error messages. It’s called standard error.
Default is stderr on the screen. STDERR is identified by the number 2.
Redirects
Linux, like any Unix-like system, has mechanisms to redirect the standard input-output to files.
Thus, the use of the character “>” redirectsthe standard of a command to the left output to the file locatedto the right:
ls -al /home/jf/> test.txt
echo “test”> /etc/myconfigurationfile
The following command is equivalent to copying files:
cat file1>file2
Redirection “>” aims to create a new file. So if a file with same name existed, it is overwritten. The following command simply creates an empty file:
> File
The use of a double character “>>” concatenatesstandard output to the file, that is to say, add the output after the file without overwriting it.
Similarly, the “<” character indicates a standard input’sredirection. The next command sends the foo.txt file content as input to the cat command, whose sole purpose is to display the content on the standard output (useless but trainer example):
cat<foo.txt
Finally the use of redirection “<<” can be read on standard inputuntil the chain to the right is encountered. Thus, the following example willread the standard input until the word STOP is encountered, and then will display the result:
Communicating tubes (pipes)
The pipes are a specific communication mechanism to all UNIX systems. A pipe,
symbolized by a vertical bar (“|” character), is used to assign the standard output of one command to the standard input of another, such as a pipe for communicating the standard input of a command with the standard output of another.
So in the following example, the standard output of the ls -al command is sent out on the program responsible for sorting the result in alphabetical order:
ls -al | sort
It is possible in this way to chain a number of commands through successive pipes. In the following example the command displays all files in the current directory, selects the lines containing the word “zip” (using the grep command)and counts the total number of lines:
Chapter 4 – File Globbing
The hierarchy of files in Linux
To ensure portability and compatibility, a Linux system conformsthe single standard FHS (File Hierarchy Standard). The base hierarchy is as follows:
the root, it contains the
/boot contains files that allow Linux to start
/dev contains the devices entry points
/home Personal Directory users
/lib contains shared libraries essential to the system during startup
(CD-ROM, floppy disk,
/sbin contains the essential binary system
(egadduser)
/tmp contains temporary files
/usr secondary hierarchy
/usr/X11R6 this directory is reserved for system X version 11 release 6
/usr/X386 used before by X version 5, that is a symlink to / usr / X11R6
/usr/bin contains the majority of binary files and user commands
/usr/local/include local C and C ++ header
/usr/share Reserved for non-dependent data architecture
/usr/src contains source code files
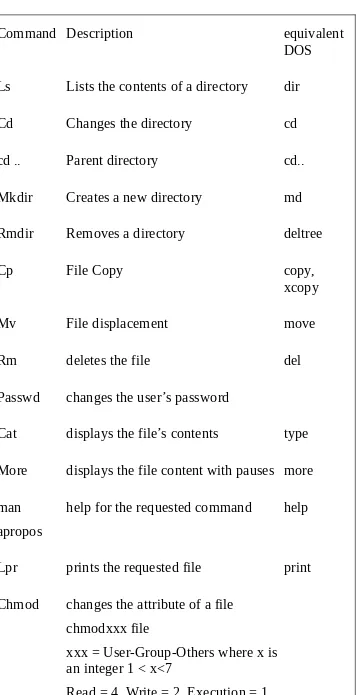
Table of main Linux Shell commands
Command Description equivalent DOS
Ls Lists the contents of a directory dir
Cd Changes the directory cd
cd .. Parent directory cd..
Mkdir Creates a new directory md
Rmdir Removes a directory deltree
Cat displays the file’s contents type
More displays the file content with pauses more
man apropos
help for the requested command help
Lpr prints the requested file print
Chmod changes the attribute of a file chmodxxx file
xxx = User-Group-Others where x is an integer 1 < x<7
x = Read + Write + Run
Chsh changes the shell : chsh user shell_location
Finger Lists online users
traceroute traces the path between the local machine and the remote machine
(talk user)
Mesg authorizes or not the talk command mesg n: Prevents reception of talk messages
mesg y: Authorizestalk messages reception
Chapter 5 - User Management
This chapter is also very important because it covers all the details about authentication and user management. It also covers a lot of useful information which you will certainly find very helpful as we advance more in our journey.
First step of the administrator
When several persons have access to a system, you need the system administrator manages users. For this, the common commands and files to configure must be known. Important files to know are:
The /etc/passwd file
The /etc/passwd file contains all the user information (login, password …). Only the super user (root) must be able to change it. We must therefore change the rights of this file so that it is read-only for other users.
This file has a special format for identifying each user; each line has the following format:
Sevenfields are explained and separated by the character “:”:
- The account name of the user
- User’s password (encrypted of course)
- The integer identifying the user for the operating system (UID = User ID, user ID) - The integer that identifies the user group (GID = Group ID, group ID)
- The comment in which one can find information on the user or simply its real name - Where the connection directory is located after connecting to the system
- The command is executed after the connection to the system (that is often a shell)
Here’s an example of a passwd file:
root:x:0:0:root:/root:/bin/bash
It is veryimportant to note that in this filethe passwordsareencrypted.
It is therefore useless to edit and replace the field password by directly typing the password that only leads to the blocking of the account. When a user connects, the login program compares the password typed by the user (once encrypted) to that in the passwd file. If they are different, the connection cannot be established. To prohibit use, simply replace the encrypted password by a star: “*”.
The account access may possibly be open with empty password field. In this case, anyone wanting to connect with this account can do so. To change the password of an account with the passwd command, you must be either system administrator or account owner (the system will then prompt the user to enter the old password before asking 2 times to enter the new password).
UID: identifier (unique) to each user account. The numbers ‘0’ to ‘99’ are reserved for frequently own accounts. Numbers greater than ‘100’ are reserved for these users.
It is possible to modify the commands interpreter from the Shell. To do this, use the chsh or passwd -s command. Linux then looks in the /etc/shells file the program you have specified. Only orders present in this file will be accepted and will replace the current value of the startup program field. These restrictions do not apply to the superuser account.
Make sure the permissions of the /etc/passwd file are the same as for the file /etc/shells. The root can be called names other than root. To change this, just replace the name of the root account with the one you desire.
The /etc/group file
The /etc/group contains a list of users belonging to different groups. Indeed, when many users can access the system, they are frequently combined in different groups each with their own access rights to files and directories.
It consists of various fields separated by “:”:
Group Name: Specialfield: Group number: member1, member 2
The special field is frequently blank.
The group number id the field that links the /etc/group and /etc/passwd files. Here is an example /etc/group:
-When using the ls command with the -l option, the group number is displayed with the user number who owns the file (or directory). This unique number corresponds to a unique group name (often 8 characters max.).
-The File protections must prevent editing by non-privileged users.
- To add a group, the administrator can edit the /etc/group using a text editor. He also can use the addgroup or groupadd command (not always present). In the first case, he will only have the row corresponding to the groups to add. For example, the line: admin:: 56: ccm
- To add a user to a group, simply edit the /etc/group and add the name at the end of the line separating the name of the members by a comma.
Customizing the shell
The /etc/profile configures the Shell. It concerns all users.
Firstly it includes Shell’s variables such asPATH,OPENWINHOME…
Then, the type of terminal and the TERM variable are accordingly defined. One part is dedicated to the prompt; finally a last one allows defining colors of the ls command. In Linux boot, it’s nice to have the lighted keypad, which is not the case by default. There are therefore a few lines that need to be added to the /etc/profile:
INITTY=/dev/tty[1-7]
for tty in $INITTY;
do setleds -D +num< $tty
Done
When connected to the Shell, the first thing that appears is the prompt; it can be configured to suit the user.
If the administrator wants to have a prompt that is called: “Hello #”, he only needs to edit the /etc/profile. It contains a variable called PS1. All lines related to this variable must then be preceded by a hash: #. It is then to add the line PS1 = ‘Hello #‘.
All there’s left to do is to save and log in again. Then we can see the changes. Tip: leave a blank after the prompt to improve readability. It is also possible to use variables in the prompt (for example to display the time or name of the machine …):
\d to add the date (English format)
\t to add the time (HH: MM: SS)
\u to add the user’s name
\r for a newline
\w to add the full path of the current directory
\W to add the current directory
\h to add the name of the machine
The color number will be taken from the following list:
An example showing the time followed by the user-name in red:
Chapter 6 - Linux Tips and Tricks
Mounting a CD-ROM
To mount a CD-ROM on Linux you must login as system administrator, i.e. with the login “root”.
Then just mount the drive, that is to say “hang” the contents of the CD-ROM drive in a directory (most of the time /mnt/cdrom/) by typing this command:
Mount -t iso9660 /dev/cdrom/mnt/cdrom
Do not forget to demount the drive with the command
Mount a DOS partition
It is possible for Linux to access MS-DOS partitions by mounting them in the UNIX file system. To mount the /dev/hda1 just type:
mount -t msdos/dev/hda1/mnt/hd
Do not forget to demount the partition
Mount a floppy drive
In the same way as for the MS-DOS partition, you can mount a floppy disk drive and access the data on a formatted disk in DOS with the command:
mount -t msdos/dev/fd0/mnt/fd
Do not forget to remove the floppy drive
Restart the computer
To correctly restart the computer, just use the command “shutdown“. The key sequence <CTRL><ALT><DEL> has on most Linux distributions programmed to match the shutdown command.
The SCSI controller forced recognition
When controllers have no bios they are generally not detected by Linux, in which case it must force the detection by typing prompt LILO:
Boot: linux tmx8xx = <IRQ>, <address>
tmx8xx represents a TMC-8xx controller, if you have another you need to know its
Making an Alias
First of all what is an alias?
This is a shortcut command to run in another it may also extend to other concepts; an alias can be a shortcut to an email.
The commands under Linux to mount a device are (as you saw above heavy typing. So instead of typing the command:
“Mount -t iso9660/dev/cdrom/mnt/cdrom”
type:
aliascdrom = “mount -t iso9660/dev/cdrom/mnt/cdrom ‘
Now just type “cdrom” to mount the device
However, you may ask yourself, why should I type this command if I have to declare it every time I reset the system?
To avoid that, edit the file “/etc/bashrc” and add the line:
Chapter 7 - Vi Editor
Introduction to Vi
Vi is one of the most popular text editors under Unix systems (with Emacs and pico) Despite its very limited ergonomics. In Linux there is a free version of Vi called Vim (Vi Improved). Vi (pronounced vee-eye) is an editor entirely in text mode, which means that each action is done using text commands. This editor although inconvenient at first sight is very powerful and can be very useful in case of operation of the GUI.
The syntax to launch Vi is as follows:
Vifile_name
The Vi modes
Vi has 3 modes of operation:
-Normal mode: the one in which you are opening the file. It allows you to type commands.
- The insert mode: This mode allows you to insert characters you type in the document. To switch to insert mode, simply press the Insert key on your keyboard, or, if the i key
The basic commands
Command Description
:q Quit the editor (without saving)
:q! Forces the editor to quit without saving (even if changes were made to the document)
:wq Saves the document and quits the editor
The editing commands
Command Description
X Deletes the current character under the cursor
Dd Deletes the current line under the cursor
Dxd Deletes x lines from the one currently under the cursor
Nx Delete n characters from the one currently under the cursor
x>> Indent x lines to the right from the one currently under the cursor
Search and replace
To find a word in a document, simply (in normal mode) type / followed by the search string, then confirm with the enter key.
It is then possible to go from occurrence to occurrence with the n button.
To replace a character string with another on a line, there is a very powerful command in Vi using regular expressions with the following syntax:
:S/string_to_be_replaced/new_string/
It is possible to generalize to the entire document with the following syntax:
The copy-paste and cut-paste
It is possible in Vi to copy and paste a selection of lines. To do this, just type the following command to copy n lines:
nyy
By way of example,here’s a command allowing to copy 16 lines in the buffer:
16yy
To paste the selection, just type the letter p.
Cutting and pasting n lines is similarly done with the command:
Ndd
Conclusion
C
HROMECAST
C
HROMECASTM
ADEE
ASY:
M
ASTERY
OURC
HROMECASTD
EVICE ANDE
NJOYTV
E
NTERTAINMENTW
ITHL
OW-C
OSTM
EDIAS
TREAMERTable of Contents
Introduction
CHAPTER ONE: THE GOOGLE CHROMECAST
CHAPTER TWO: CHROMECAST TIPS AND TRICKS
CHAPTER THREE: WHAT YOU NEED TO KNOW ABOUT THE CHROME BROWSER
CHAPTER FOUR: HOW TO SET UP YOUR CHROMECAST
Book Description
As many may want to put it, the Google Chromecast is a tiny but magical device offering so much. Am sure it is in your interest to find out what it is it does exactly and I should assure you will get to know that and much more having gone through the details of this book. Each chapter of it covers vital information when it comes to using or applying the Google Chromecast. Am sure you already know what it is and how it looks like and this is the reason why the book will focus more on other important basics.
Chapter One:this is where you will get to have a clear understanding of what the Chromecast is, and most importantly learn of its advantages which I believe is something you may want to know before getting one.
Chapter Two:chapter two is an important part of the book as it takes you through the essential tips and tricks of using the GoogleChromecast device and caution to take when using it.
Chapter Three:this chapter enlightens you on much that you need to know about the chrome browser and why it is unique and also a chance to learn of the different Chromecast apps.
Chapter Four:this chapter is a guideline on the effective usage of Chromecast right from the time you buy one and also what you get from owning one.