Stephen Moffat
PowerPoint 2010 Advanced
Slides, Animation and Layouts
Stephen Mofat, The Mouse Training Company
PowerPoint 2010
PowerPoint 2010
PowerPoint 2010 Contents
Contents
Introduction 7
Section 1 he basics 9
Launching powerpoint 10
he PowerpointScreen 11
Ribbon 13
Section 2 Creating a Presentation 23
Creating presentations 24
Changing the slide layout 30
Saving a presentation 33
Section 3 Powerpoint views 36
Diferent ways to view slides 37
Working with outline view 39
Slide sorter view 45
Slide show view 51
Stand out from the crowd
Designed for graduates with less than one year of full-time postgraduate work experience, London Business School’s Masters in Management will expand your thinking and provide you with the foundations for a successful career in business. The programme is developed in consultation with recruiters to provide you with the key skills that top employers demand. Through 11 months of full-time study, you will gain the business knowledge and capabilities to increase your career choices and stand out from the crowd.
Applications are now open for entry in September 2011.
For more information visit www.london.edu/mim/ email [email protected] or call +44 (0)20 7000 7573 Masters in Management
London Business School
Regent’s Park London NW1 4SA United Kingdom Tel +44 (0)20 7000 7573 Email [email protected]
www.london.edu/mim/
Fast-track
your career
PowerPoint 2010 Contents
Section 4 Formatting slides 53
Selecting placeholders and text 53
Formatting text 56
Formatting numbered and bulleted lists 65
Section 5 Objects 69
Charts 69
Formatting charts 79
Layout ribbon 83
Illustrations 94
Smartart 107
he Design Ribbon 111
Creating A SmartartOrganisation Chart 114
Pictures 115
Clip art 135
Tables 139
Section 6 Slide types and layouts 154
Slides 154
Slide formatting 156
Master slides 163
© UBS 2010. All rights reserved.
www.ubs.com/graduates
Looking for a career where your ideas could really make a difference? UBS’s Graduate Programme and internships are a chance for you to experience for yourself what it’s like to be part of a global team that rewards your input and believes in succeeding together.
Wherever you are in your academic career, make your future a part of ours by visiting www.ubs.com/graduates.
You’re full of
energy
and ideas
. And that’s
just what we are looking for.
PowerPoint 2010 Contents
Section 7 Transition and animation efects 173
Animation efects 173
Slide Timings On Transitions 175
Printing 189
Section 8 Organise and deliver presentations 192
Running a slide show 193
Saving as diferent types 201
PowerPoint 2010 Introduction
Introduction
How To Use This Guide
his manual should be used as a point of reference following attendance of the introductory level PowerPoint2010 training course. It covers all the topics taught and aims to act as a support aid for any tasks carried out by the user ater the course.
he manual is divided into sections, each section covering an aspect of the introductory course. he table of contents lists the page numbers of each section and the table of igures indicates the pages containing tables and diagrams.
Instructions
hose who have already used a spreadsheet before may not need to read explanations on what each command does, but would rather skip straight to the instructions to ind out how to do it. Look out for the arrow iconwhich precedes a list of instructions.
Appendices
he Appendices list the Ribbons mentioned within the manual with a breakdown of their functions and tables of shortcut keys.
Keyboard
Keys are referred to throughout the manual in the following way:
ENTER– Denotes the return or enter key, DELETE – denotes the Delete key and so on. Where a command requires two
keys to be pressed, the manual displays this as follows:
CTRLP – this means press the letter “p” while holding down the Control key.
Commands
When a command is referred to in the manual, the following distinctions have been made:
When Ribbon commands are referred to, the manual will refer you to the Ribbon – E.g.“Choose home from the Ribbons and then B for bold”.
When dialog box options are referred to, the following style has been used for the text – “In the Page Range section of the Print dialog, click the Current Page option”
PowerPoint 2010 Introduction
Within each section, any items that need further explanation or extra attention devoted to them are denoted by shading. E.G.:
PowerPoint 2010 1 The basics
Section 1 The basics
By the end of this section you will be able to identify
• Title Bar • Ribbons
PowerPoint 2010 1 The basics
Launching powerpoint
What Is Powerpoint?
PowerPoint is a presentation graphics package that lets you create formatted presentations which can be used in a number of ways. You can produce projects such as overheads for a team brieing, slides for a business meeting or interactive on-screen presentations on your company’s products. It allows you to produce:
PowerPoint 2010 allows you to create presentations for printing or on-line viewing using a variety of diferent tools. hese range from wizards to help you with the content and look and feel of your presentation to animation tools to create moving images. Whatever your presentation style PowerPoint has tools and enhancements to make your presentation easy and professional looking.
Animated Presentations shown on a monitor or overhead screen
Overhead Projector Transparencies
Paper Printouts of your slides
Notes for the Speaker
Hand-outs for the Audience
35 mm slides
PowerPoint 2010 1 The basics
The PowerpointScreen
Window Border
he box that surrounds the PowerPoint screen when it is not maximised is called the window border. When the mouse is over the border, the pointer changes from a single to a double-headed arrow – clicking and dragging with this shape allows the window to be resized.
Title bar
he coloured bar that appears at the top of the PowerPoint window. he title bar tells you which application you are using and if the document you are in is maximised, it will also contain the name of the document. If the Word window is not maximised, by positioning the mouse over the title bar and clicking and dragging, you can move the Word window to a new location on the screen.
Maximise button
When working in a document, the PowerPoint screen contains two windows, an application window and a document window. You can maximise both windows to capitalise on the space you have on-screen. If you would like the window that your PowerPoint application is in to ill up the whole screen, click the outermost maximise button. You may ind that the document you are in can still be bigger – click the inner maximise button to ill the remaining space within the PowerPoint application window.
Minimise button
his button is very useful if you need to temporarily switch from PowerPoint into another application without closing PowerPoint down completely. Click the minimise button to shrink PowerPoint to an icon on the task bar; you will then be able to view other icons and applications you may wish to access. When you are inished and ready to continue, click the PowerPoint icon from the task bar to resume. he innermost minimise button will minimise the current document window.
PowerPoint 2010 1 The basics
his button only appears when a window is maximised. A maximised window has no border and you cannot see what is behind it. If you want to put the window back inside its border so that you can move and size it, click the restore button.
Close button
his button is used to close a window. If you click the close button for a document window you close the document. he last button will close the PowerPoint application.
Dialog Box Launcher
his button launches dialog boxes speciic to the part of the ribbon you see them the category will be named such as font, clipboard, etc.
Backstage View – File Ribbon is the start of PowerPoint and has many important commands and option. Such as
PowerPoint 2010 1 The basics
Getting Started With Powerpoint
To launch PowerPoint:
Mouse
Click the Start button on the Taskbar, and select Programs. Click Microsot PowerPoint 2010 from the sub-menu list.
PowerPoint 2010 displays the Tri-pane displayed above when it is irst launched. his view is also known as Normal view. Underneath the ribbon on the let there are tabs to show you your slides or the outline (text structure) while below the main slide part of the window is the section to type notes on the slide.(hese will not be seen in the slideshow but can be printed to aid the presenter)
Ribbon
PowerPoint 2010 1 The basics
but a Ribbon with Tabs, groups and commands.
Tabs
Diferent tabs group together similar commands such as inserting ANYTHING you will go to the insert ribbon, to do animations you would go to the animation tab etc.
Contextual Tabs
If you select say a picture or a table then other tabs will appear these contextual tabs would have all the speciic commands for the selected object
To Activate a Button on the ribbon
Mouse
1. Select a tab on the ribbon
2. Click the let mouse button on the required tool.
your chance
to change
the world
Here at Ericsson we have a deep rooted belief that the innovations we make on a daily basis can have a profound effect on making the world a better place for people, business and society. Join us.
In Germany we are especially looking for graduates as Integration Engineers for
• Radio Access and IP Networks
• IMS and IPTV
We are looking forward to getting your application! To apply and for all current job openings please visit our web page: www.ericsson.com/careers
PowerPoint 2010 1 The basics
Dialog Box
To open a dialog box use the dialog box launcher when the dialog box is open, make a choice from the various options and click ok at the bottom of the dialog box. If you wish to change your mind and close the dialog box without making a choice then click on cancel. he dialog box will close without any choice being applied. If you would like help while the dialog box is open then click on the “? “in the top right hand corner this will bring up a help window that will display the relevant topics.
Groups
Look at a group type on the ribbon such as font and in the botom right hand corner of that group you may see a small
box with an arrow, clicking this is another method to call up a dialog box, this time, directly from the ribbon. Many dialog
PowerPoint 2010 1 The basics
Toolbars
here are only two toolbars within the new version of Oice 2010 there is the quick access toolbar seen here next to the File Tab, and there is the mini toolbar
Quick Access Toolbar
By default there are only three buttons on the quick access toolbar but these can be edited and other regularly used buttons can be placed there. Using the drop down menu next to the quick access toolbar will allow the customisation of
this toolbar adding your most oten used commands.
Mini Toolbar
Whenever text is selected within PowerPoint a small formatting toolbar will appear above the highlighted text it will disappear if the mouse cursor is moved away from the toolbar and will reappear when the mouse cursor is moved over the highlighted text again.
Status Bar
he Status bar, across the bottom of the screen, displays diferent information at diferent times. To the let is an indicator, which will display which page you are currently on, which column you are in number of words in document. If you right click on the empty area of the status bar a menu should appear showing the various items of information that can be given on the space bar merely click on the info that you wish displayed and it will appear on the status bar.
PowerPoint 2010 1 The basics
Task Pane
A task pane is a window that collects commonly used actions in one place. he task pane enables you to quickly create or modify a ile, perform a search, or view the clipboard.
WHAT‘S MISSING IN THIS EQUATION?
MAERSK INTERNATIONAL TECHNOLOGY & SCIENCE PROGRAMME
You could be one of our future talents
Are you about to graduate as an engineer or geoscientist? Or have you already graduated? If so, there may be an exciting future for you with A.P. Moller - Maersk.
www.maersk.com/mitas
PowerPoint 2010 1 The basics
It is a Web-style area that you can either, dock along the right or let edge of the window or loat anywhere on the screen. It displays information, commands and controls for choosing options. Like links on a Web page, the commands on a task pane are highlighted in blue text, they are underlined when you move the mouse pointer over them, and you run them with a single click.
A task pane is displayed automatically when you perform certain tasks.
• E.G. when you choose clipart from the Insert, Ribbon, to insert a picture
About Smart Tags
Smart Tags, irst introduced in Microsot Oice XP, make it easier for you to complete some of the most common tasks in PowerPoint 2010 and provide you with more control over automatic features.
You do not have to complete any additional steps to make the Smart Tags appear or disappear in PowerPoint. he Paste Options, AutoCorrect Options and AutoFit smart tags appear automatically to allow you to quickly choose actions and remain in place until you begin another action. For example, when you complete a paste operation, the Paste Options
smart tag (below) remains in place alongside your text until you begin typing new text.
A “smart tag” is a type of button in Microsot PowerPoint 2010 that appears ater certain actions, such as an automatic text correction or a copy-and-paste, have taken place. he button has a menu of options that help you control the result of the action. For instance, if PowerPoint automatically capitalizes the irst letter of a word, but you want the word lowercased in this instance, you can click the “undo capitalization” option on the button menu to reverse the action.
PowerPoint includes several of these smart tag buttons. hey function similarly but their look can vary and each has a speciic purpose.
PowerPoint 2010 1 The basics
he AutoCorrect Options Smart Tag appears ater an automatic correction or change, such as a lowercased letter that’s changed to a capital or a network path that’s converted to a hyperlink. he Smart Tag shows as a small, blue box when you rest the mouse pointer near text that was changed; it then becomes a button icon which, when you point to it and click it, displays a menu. If you don’t want the correction, use the options on the menu to undo it; turn of this type of correction completely; or connect to the AutoCorrect dialog box to adjust settings.
Paste Options Smart Tag
he Paste Options Smart Tag gives you greater control and lexibility in choosing the format for a pasted item. he Smart
Tag appears just below a pasted item, such as text, a table, or a slide, with options for formatting. For example, if you copy and paste a slide and insert it ater a slide that uses a diferent design template, you can choose to retain the original design for the slide or let the pasted slide assume the design of the slide it now follows.
Autoit Options Smart Tag
he AutoFit Options Smart Tag appears when PowerPoint resizes text you’re typing to make it it the current placeholder.
If you don’t want the text to be resized, you can select options on the Smart Tag menu to undo the resizing or to connect to the AutoCorrect dialog box to turn AutoFit settings of. Also, for single-column layouts, you can change to a two-column layout, start a new slide to accommodate the text, or split the text between two slides.
Automatic Layout Options Smart Tag
he Automatic Layout Options Smart Tag appears ater you insert an item, such as a picture, diagram, chart, or table,
PowerPoint 2010 1 The basics
Help
To Access Help:
1. Click the help button below the title bar on the far right 2. OR press f1.
3. OR Go to the File tab and help 4. he Help window will open: 5. his is very similar to a web page
6. You may enter search criteria and press Enter (like a search when on the internet)
PowerPoint 2010 1 The basics
To Find a speciic topic
Mouse
1. he contents page allows you to select from a list of topic headings. Like search results on the internet these are hyperlinks to help iles.
2. You may need to be online to access some of the help links. he search will be more extensive if you are online as it will search online help iles from Microsot.
3. Single click to access the help topic you need.
Using Screentips:
Use ScreenTips to see information about diferent items on the screen.
It all starts at Boot Camp. It’s 48 hours that will stimulate your mind and enhance your career prospects. You’ll spend time with other students, top Accenture Consultants and special guests. An inspirational two days
packed with intellectual challenges and activities designed to let you discover what it really means to be a high performer in business. We can’t tell you everything about Boot Camp, but expect a fast-paced, exhilarating
and intense learning experience. It could be your toughest test yet, which is exactly what will make it your biggest opportunity.
Find out more and apply online.
Choose Accenture for a career where the variety of opportunities and challenges allows you to make a difference every day. A place where you can develop your potential and grow professionally, working alongside talented colleagues. The only place where you can learn from our unrivalled experience, while helping our global clients achieve high performance. If this is your idea of a typical working day, then Accenture is the place to be.
Turning a challenge into a learning curve.
Just another day at the office for a high performer.
Accenture Boot Camp – your toughest test yet
Visit accenture.com/bootcamp
PowerPoint 2010 1 The basics
To use Screentips
Mouse
1. Move your mouse over any button on any ribbon a screentip will appear to give you information about what that command will do
PowerPoint 2010 2 Creating A Presentation
Section 2 Creating a Presentation
he following topics are covered in this chapter:
• Creating a New Presentation
• Adding New Slides – entering and editing Text
• Slide Layouts – title slide, bulleted list, two column text • Changing the Slide Layout
PowerPoint 2010 2 Creating A Presentation
Creating presentations
When you launch PowerPoint 2010, you are placed into a blank PowerPoint presentation, with one Title slide
To start a new presentation
Mouse
2. Launch PowerPoint. he following screen will automatically be shown, bringing you into a blank presentation, displaying a blank title slide.
PowerPoint 2010 2 Creating A Presentation
When you start your new presentation, you are automatically placed into a Title slide layout. Whilst this is the default, you are free to choose any layout listed in the Slide Layout Task pane (see page 21). here are a number of methods to add further slides to your presentation.
In Paris or Online
International programs taught by professors and professionals from all over the world
BBA in Global Business
MBA in International Management / International Marketing DBA in International Business / International Management MA in International Education
MA in Cross-Cultural Communication MA in Foreign Languages
Innovative – Practical – Flexible – Affordable
Visit: www.HorizonsUniversity.org
Write: [email protected]
Call: 01.42.77.20.66
www.HorizonsUniversity.org
PowerPoint 2010 2 Creating A Presentation
To add a new slide
Mouse
1. Click on the drop down arrow beneath the NEW SLIDE button in the slides group, on the HOME ribbon. A menu with the diferent layout types of slides will appear.
2. Make a selection by clicking on one of these with the let mouse button. Keyboard
Press CTRL + M
PowerPoint will create a new slide and this new slide and all subsequent new slides will be based on the bulleted list layout.
Entering And Editing Text
Both the Title and Bulleted list layouts are speciically designed so that you can easily enter titles and bulleted list items.
To Enter text on a Title slide
Mouse
PowerPoint 2010 2 Creating A Presentation
To create bullets on a Bulleted slide:
Mouse
1. Click in the bullets area placeholder to show the lashing cursor.
2. Type your list item. To begin a new item, press ENTER. he bullet will automatically appear next to your
PowerPoint 2010 2 Creating A Presentation
Multi-Level Bullets
PowerPoint can create ive levels of bullet points. Each has a diferent bullet point, a smaller text size and is progressively indented.
By 2020, wind could provide one-tenth of our planet’s electricity needs. Already today, SKF’s innovative know-how is crucial to running a large proportion of the world’s wind turbines.
Up to 25 % of the generating costs relate to mainte-nance. These can be reduced dramatically thanks to our systems for on-line condition monitoring and automatic lubrication. We help make it more economical to create cleaner, cheaper energy out of thin air.
By sharing our experience, expertise, and creativity, industries can boost performance beyond expectations.
Therefore we need the best employees who can meet this challenge!
The Power of Knowledge Engineering
Brain power
Plug into The Power of Knowledge Engineering. Visit us at www.skf.com/knowledge
PowerPoint 2010 2 Creating A Presentation
Demoting your bullets
Mouse
1. Use the INCREASE INDENT button in the PARAGRAPH Group on the Home Ribbon. Or
Keyboard
1. Press TAB Promoting your bullets
Mouse
2. Use the DECREASE INDENt button in the PARAGRAPH Group on the Home Ribbon
Or
Keyboard
1. Press SHIFT TAB
Editing Text
Once text has been entered on a slide it can easily be edited.
To edit text on a slide:
Mouse
1. Click on the text item to change – a shaded border will appear around the item and your cursor will lash somewhere within the text.
2. Click with your mouse or use the cursor keys on the keyboard to move the cursor around within the text, and the BACKSPACE and DELETE keys to remove characters.
3. When you have inished editing, click outside the text item to exit edit mode.
Adding Free Form Text
PowerPoint 2010 2 Creating A Presentation
To Insert a text box
1. On the Insertribbon, click Text Boxfrom the text group. 2. Click on your slide where you want to insert the text box. 3. Type in the text you wish to appear in the text box.
4. Resize the text box if necessary using the white resizing circles on each side and corner and format your text as appropriate.
• You can use the options on the FORMAT ribbon to enhance a text box for example, to change the ill colour just as you can with any other drawing object.
Changing the slide layout
Layout refers to the way things are arranged on a slide. A layout contains placeholders, which in turn hold text such as
PowerPoint 2010 2 Creating A Presentation
as tables, charts, pictures, shapes, and clip art.
he default slide that holds bulleted text in 2010 also allows the easy insertion of basic objects you might wish WITHOUT having to change the slide layout. In the centre of the main bulleted text area are faint icons that if you move over them will allow you, with one click on them, to insert a range of objects. (see right)
Slide layouts where the main placeholder or title placeholder needs to be in diferent positions can be selected. All available layouts are displayed in the Slide Layout drop down menu.
Are you considering a
European business degree?
LEARN BUSINESS at university level.
We mix cases with cutting edge research working individually or in teams and everyone speaks English. Bring back valuable knowledge and experience to boost your career.
MEET a culture of new foods, music
and traditions and a new way of studying business in a safe, clean environment – in the middle of Copenhagen, Denmark.
ENGAGE in extra-curricular activities
such as case competitions, sports, etc. – make new friends among cbs’
18,000 students from more than 80 countries.
See what we look like and how we work on cbs.dk
PowerPoint 2010 2 Creating A Presentation
To change a slide layout
Mouse
1. Click on the Slide you wish to change the layout for.
2. Click on the LAYOUT button in the SLIDES group on the HOME ribbon.
3. Select a layout you wish to apply by clicking on the desired layout from the displayed list with the let mouse button.
4. his will apply the selected slide layout to the current slide
Reapplying a slide layout
Mouse
1. A layout can be reapplied to a slide by repeating the steps above. Or
2. Select the slide you wish to return to the default content layout for that slide type 3. Click on the RESET button on the SLIDES group, HOME ribbon.
PowerPoint 2010 2 Creating A Presentation
Saving a presentation
It is important to save your presentation regularly so that your work is not lost in the event of a system crash or a power failure.
Name And Save A Presentation File
he irst time you save a presentation that you have created, you will need to allocate a ile name.
To save and name a presentation ile:
Mouse
1. Click on the File Tab and select, Save As.
2. Use the SAVE IN dropdown ield to select the drive in which to save the presentation
3. Double click on a folder to open it. Repeat as necessary until the required folder is displayed in the SAVE IN
ield.
4. Type in a FILE NAME. 5. Click on SAVE.
• Files, by default in 2010 are saved with the SAVE AS TYPE extension PPTX and are not compatible with earlier versions of PowerPoint.
To make compatible with earlier versions
PowerPoint 2010 2 Creating A Presentation
• File Names can contain up to 255 characters and can include characters such as spaces and hyphens.
Subsequent Saves
Once you have given a presentation a name and speciied a location, you should then save that ile regularly as you work.
To save a presentation:
Mouse
1. Select FILE TAB and SAVE Or
1. Click on theQUICK ACCESS toolbar
Or
1. Press CTRLS
www.simcorp.com
MITIGATE RISK REDUCE COST ENABLE GROWTH
The financial industry needs a strong software platform
That’s why we need youSimCorp is a leading provider of software solutions for the financial industry. We work together to reach a common goal: to help our clients succeed by providing a strong, scalable IT platform that enables growth, while mitigating risk and reducing cost. At SimCorp, we value commitment and enable you to make the most of your ambitions and potential.
Are you among the best qualified in finance, economics, IT or mathematics?
Find your next challenge at www.simcorp.com/careers
PowerPoint 2010 2 Creating A Presentation
Saving A Presentation With A New Name
If you need to copy a presentation then you can save the current presentation under a diferent name thus creating a copy of the original.
To save a presentation with a new name:
Mouse
1. Click on the File Tab and select, Save As. he original presentation ile name is automatically selected.
PowerPoint 2010 3 Powerpoint views
Section 3 Powerpoint views
he following topics are covered in this chapter:
• Normal (Tripane) View • Slide Sorter View • Outline View • Notes Pages View • View in Black and White • Print Preview
• Using Outline View to enter text • Creating slides in Outline View • he Outlining Toolbar
• Creating a Summary Slide • Using Slide Sorter View • Deleting Slides
• Moving and copying slides within the same presentation • Moving and copying slides between diferent presentations • Using colour/Greyscale options
PowerPoint 2010 3 Powerpoint views
Diferent ways to view slides
When you are creating your presentation you can switch between diferent views within PowerPoint, each of which allows you to work in diferent ways. he views available in PowerPoint 2010 are:
PowerPoint 2010 3 Powerpoint views
To switch between these diferent presentation views you simply need to select the view from the Viewribbon. In the presentation views group
Alternatively, you can click on the required view button at the bottom let of the screen.
However, this option only gives you access to NORMAL. SLIDE SORTER, and SLIDE SHOW views.
The Normal (Tri Pane) View
In the NORMAL view you can display the SLIDE, OUTLINE and NOTES views in their own adjustable panes, so you can see everything at once. NORMAL view is the main editing area, which you use to write and design your presentation. he view has three working areas: on the let, tabs that alternate between an outline of your slide text (OUTLINE tab) and your slides displayed as thumbnails (SLIDES tab); on the right, the SLIDE PANE, which displays a large view of the current slide; and on the bottom, the NOTES PANE. he notes area allows you to enter notes about the current slide
that will not be seen on screen but can be printed with a picture of the slide to aid a presenter in front of his audience.
PowerPoint 2010 3 Powerpoint views
Working with outline view
The Outline Tab
his pane enables you to edit your presentation quickly when it contains a large amount of text. You can add new slides and text in Outline View. his area is a great place to start writing your content, planning the logical order you want to present your ideas in, and move slides and text around.
To work in Outline View
Mouse
1. Click the OUTLINE tab from the NORMAL (Tri Pane) View
2. he outline format helps you edit your presentation’s content and move bullet points or slides around. It allows you to create new slides and add text to slides very quickly.
PowerPoint 2010 3 Powerpoint views
Keyboard
1. Make sure your slide layout is TITLE AND TEXt.
2. Type your title for the slide and make sure to position the cursor at the end of the title 3. Press CTRLENTER(this will take you to the next Placeholder if one is on this slide) 4. Type in irst line of bulleted text.
5. Press ENTER for each new line of bulleted text. 6. Text will appear in the appropriate place on the slide.
• When you save your presentation as a Web page, the text on the Outline tab becomes a table of contents so that you can navigate through the slides.
Creating Slides In Outline View
It is also possible to create new slides using Outline View.
Add a new slide
Keyboard
1. Position the cursor at the end of the previous slides text in the outline area. 2. PRESS CTRLENTER. (this will take you to the next Placeholder on new slide.)
3. Type in the title of the new slide. And continue with your text
• Outline View will display all slides with a slide icon to the let of the title.
• Outline View will not display graphic objectsor text from extra text objects placed on the slide but only text from placeholders
The Outlining Tools
You can increase or decrease text indents, collapse and expand content so that you see slide titles but no subordinate bullet points, and show or hide text formatting as you work.
To select text in Outline View.
Mouse
1. To select all text on a slide, on the OUTLINE tab in normal view, point to the slide icon, and when the pointer changes to a four-pointed arrow, click the icon.
PowerPoint 2010 3 Powerpoint views
Expand Or Collapse Text
When you work with text on the OUTLINE tab in normal view, you can collapse text so that you see only the irst outline
level (slide titles) as you organise. You can re-expand text at any time. You increase or decrease text indents, collapse and expand content so that you see slide titles but no subordinate bullet points, and show or hide text formatting as you work
To collapse text on one slide
Mouse
1. Double-click the SLIDE icon.
OR
1. Press ALT + SHIFT + MINUSSIGN. To Collapse all text in the presentation
Mouse
1. Right click and select COLLAPSE ALL.
OR
1. Press ALT + SHIFT + 1.
Do you want your Dream Job?
More customers get their dream job by using RedStarResume than
any other resume service.
RedStarResume can help you with your job application and CV.
Go to: Redstarresume.com
Use code “BOOKBOON” and save up to $15
(enter the discount code in the “Discount Code Box”)
PowerPoint 2010 3 Powerpoint views
To Expand text on one slide
Mouse
1. Double-click the slide icon. OR
1. Press ALT + SHIFT + PLUS SIGN. To Expand all text in the presentation
Mouse
1. Right click and select EXPAND ALL. OR
1. Press ALT + SHIFT + 9
Demote Or Promote Text
You can increase or decrease text indents, (demote or promote text) using the right click. On the Outline tab in normal view, click the text whose indent level you want to change.
To decrease an indent,
Mouse
1. Right click and select PROMOTE.
OR
1. Press SHIFT + TAB To increase an indent
Mouse
1. Right click and select DEMOTE.
OR
1. Press TAB.
Creating A Summary Slide
PowerPoint 2010 3 Powerpoint views
To create a summary
Mouse
1. On the HOME ribbon, in the SLIDES group, click the arrow under NEW SLIDE, and then click a slide layout that contains a large body text placeholder
• If you add a BLANK slide layout, you must then add a text box. To do this, on the INSERT tab, in the TEXT group, click TEXT BOX, and then drag to draw a large text box on the new slide.
2. In the pane that contains the OUTLINE and SLIDES tabs, click SLIDES.
3. For each slide that you want to add to the summary or table of contents, copy the title in the title placeholder, and then paste it onto the new slide in the order in which the slide appears in your presentation.
Importing An Outline
In some cases, you may prefer to use a Word Processor to create your slide show outline. As long as that document uses a format that PowerPoint understands (RTF, TXT, DOC, etc.), it can create a slide show outline directly from the document, saving you valuable time.
To Import a pre-existing outline
Mouse
1. Create a new presentation.
2. On the HOME ribbon, in the SLIDES group, click New Slide, and then click SLIDES FROM OUTLINE a
dialog appears
PowerPoint 2010 3 Powerpoint views
textual outline will be inserted within your presentaion generaing slides as necessary.
Add A Slide From Another Presentation File
he ile may be located on your computer or on a network share.
To add one or more slides, from a diferent presentation ile
Mouse
1. Open the presentation that you want to add a slide to.
2. In the pane that contains the OUTLINE and SLIDES tabs, click SLIDES, and then click where you want to
add a slide.
Challenging? Not challenging? Try more
Try this...
www.alloptions.nl/life
PowerPoint 2010 3 Powerpoint views
3. On the HOME ribbon, in the SLIDES group, click NEW SLIDE, and then click REUSE SLIDES. 4. In the REUSE SLIDES pane, click OPEN A POWERPOINT FILE.
OR
5. In the BROWSE dialog box, locate and click the presentation ile that contains the slide that you want, and then click OPEN.
• In the REUSE SLIDES pane, Microsot Oice PowerPoint 2010 displays thumbnails of the slides from the presentation that you selected. Rest the pointer on a thumbnail to see a larger version of the slide’s contents. 6. In the REUSE SLIDES pane, do one of the following:
• If you want the slide that you are adding to the destination presentation to maintain the formatting of the original presentation, select the KEEPSOURCE FORMATTING check box before you add the slide to the destination presentation.
7. To add a single slide, click the slide.OR
8. To add all of the slides, right-click any slide, and then click INSERT ALL SLIDES on the shortcut menu
Slide sorter view
PowerPoint 2010 3 Powerpoint views
Working With Slide Sorter View
When you are inished creating and editing your presentation, slide sorter gives you an overall picture of it - making it easy to reorder, add, or delete slides and preview your transition and animation efects.
To change to Slide Sorter View
Mouse
1. Choose SLIDE SORTER view from the VIEW ribbon
Or
1. Choose SLIDE SORTER view from the view icons to the bottom right of the STATUS BAR. To change the order of your slides:
Mouse
1. Switch to SLIDE SORTER view.
PowerPoint 2010 3 Powerpoint views
Deleting a slide
Mouse
Switch to SLIDE SORTER View
4. Select the slides you want to delete. (If you want to select slides in order, press SHIFT as you click; for slides not in order, press CTRL as you click.)
5. Press the DELETE buton from the slides group on the HOME ribbon.
Keyboard
1. You can also press the DELETE key to delete slides
Moving & Copying Slides In A Presentation
PowerPoint 2010 3 Powerpoint views
To Copy slides within a presentation
Mouse
1. Select the slides you want to copy. Click to select a single slide, press SHIFT while clicking to select adjacent slides, or press CTRL while clicking to select non-adjacent slides.
2. hen choose Copy from the clipboard group
3. Click between the slides you want your copied slide or slides to be, and choose Paste.
• If the slides you pasted use a diferent design template than the slide you pasted ater, and you want to keep the original formatting, go to the next step. Otherwise, the pasted slides assume the formatting of the slide they follow, and the paste is complete.
4. To retain the slides’ original formatting, click the Paste Options smart tag, which appears under the slides you pasted, and on the button menu, click Keep Source Formatting.
5. If you decide you want the current design template styles to apply, click Use Design template formatting
(this is the default). To Move slides within a presentation
Mouse
Select the slides you want to move. Click to select a single slide, press SHIFT while clicking to select slides in a row, or press CTRL while clicking to select slides not in a row.
6. hen choose Cut. Click the slide you want your cut slides to follow, and choose Paste.
• If the slides you pasted use a diferent design template than the slide you pasted ater, and you want to keep the original formatting, go to the next step. Otherwise, the pasted slides assume the formatting of the slide they follow, and the paste is complete.
7. To retain the slides’ original formatting, click the Paste Options button, which appears under the slides you pasted, and on the button menu, click Keep Source Formatting.
8. If you decide you want the current design template styles to apply, click Use Design template formatting
(this is the default).
PowerPoint 2010 3 Powerpoint views
Moving And Copying Between Presentations
Moving and copying slides between presentations allows you to easily access slides contained in diferent presentations and include them in your current presentation.
To copy slides between presentations
Mouse
1. Ensure that both the PowerPoint iles are open i.e. both the source of the PowerPoint slides being copied and the destination ile that the slides are being copied into.
2. On the VIEW menu in the WINDOW group, click ARRANGE ALL.
3. Select the slides you want to copy (within the source ile). Click to select a single slide, press SHIFT while clicking to select slides in a row, or press CTRL while clicking to select slides not in a row.
4. hen choose COPY.
5. Click into the slide you want your copied slides to follow (within the destination ile), and choose Paste.
If the slides you pasted use a diferent design template than the slide you pasted ater, and you want to keep
the original formatting, go to the next step. Otherwise, the pasted slides assume the formatting of the slide
they follow, and the paste is complete.
6. To retain the slides’ original formatting, click the PASTE OPTIONS button, which appears under the slides you pasted, and on the button menu, click KEEP SOURCE FORMATTING.
7. If you decide you want the current design template styles to apply, click USE DESIGN TEMPLATE FORMATTING(this is the default).
To move slides between presentations
Mouse
1. Ensure that both the PowerPoint iles are open i.e. both the source of the PowerPoint slides being copied and the destination ile that the slides are being copied into.
2. On the VIEW menu in the WINDOW group, click ARRANGE ALL.
3. Select the slides you want to Move (within the source ile). Click to select a single slide, press SHIFT while clicking to select slides in a row, or press CTRL while clicking to select slides not in a row.
4. hen choose Cut.
5. Click into the slide you want your copied slides to follow (within the destination ile), and choose PASTE.
If the slides you pasted use a diferent design template than the slide you pasted ater, and you want to keep
the original formatting, go to the next step. Otherwise, the pasted slides assume the formatting of the slide
PowerPoint 2010 3 Powerpoint views
6. To retain the slides’ original formatting, click the PASTE OPTIONS button, which appears under the slides you pasted, and on the button menu, click KEEP SOURCE FORMATTING.
7. If you decide you want the current design template styles to apply, click USE DESIGN TEMPLATE FORMATTING (this is the default).
View In Black And White
To see slides in Black and White or Greyscale.
Mouse
1. Select the view ribbon and select the black and white, ColourorGREYSCALE from the colour/greyscale group
PowerPoint 2010 3 Powerpoint views
Slide show view
Viewing A Slideshow
Instead of having OHP transparencies produced you can show your presentation directly from your computer, using the electronic slide show. You can show the presentation on the computer monitor or use an LCD panel and project the show onto an overhead screen.
Slides ill the whole screen and display exactly as formatted. As you click with your mouse or press ENTER on your keyboard you will automatically be taken through each slide.
Furthermore you can incorporate a range of extra features such as transitions (the way one slide makes way for the next) and animated build efects (which allow objects such as text and graphics to “ly” onto the slide in diferent ways). You can also include movies and sounds in your presentation as well as buttons which allow the user to branch from one slide to another. Transitions and Animations will be detailed in later sections.
When choosing the slide show button at the bottom let of your screen, your slide show is started from the slide
you have selected. However, when starting the slide show from View, Slide Show you will always be started
from the irst slide in the presentation.
Stand out from the crowd
Designed for graduates with less than one year of full-time postgraduate work experience, London Business School’s Masters in Management will expand your thinking and provide you with the foundations for a successful career in business. The programme is developed in consultation with recruiters to provide you with the key skills that top employers demand. Through 11 months of full-time study, you will gain the business knowledge and capabilities to increase your career choices and stand out from the crowd.
Applications are now open for entry in September 2011.
For more information visit www.london.edu/mim/ email [email protected] or call +44 (0)20 7000 7573 Masters in Management
London Business School
Regent’s Park London NW1 4SA United Kingdom Tel +44 (0)20 7000 7573 Email [email protected]
www.london.edu/mim/
Fast-track
your career
PowerPoint 2010 3 Powerpoint views
To view a slideshow presentation
Mouse
1. Go to the VIEW ribbon and select SLIDESHOW from the presentation views group. Or
1. Use the SLIDESHOW button from the status bar VIEW icons Or
Keyboard
1. Press the F5 key
2. Use the let mouse click or ENTER key to move through to the end of your presentaion.
PowerPoint 2010 4 Formatting slides
Section 4 Formatting slides
he following are covered in this section:
• Selecting Placeholders and Text • Formatting Text
• Formatting Backgrounds
• Formatting Numbered and Bulleted Lists • Changing Case
• Format Painter
Selecting placeholders and text
In order to change the appearance of text, it is irstly necessary to select or highlight either the text or the placeholder that the text sits in. here are a number of diferent methods used for selecting the text.
Selecting Placeholders
Selecting the entire frame or placeholder is a very quick, eicient and consistent method of selecting text. Any formatting applied to a selected place holder will format all text sitting in the place holder
To select the Placeholder:
Mouse
4. Click into the text to be formatted.
Click on the shaded border of the text box. his will change the pattern of the border line to indicate that all text in it is selected.
PowerPoint 2010 4 Formatting slides
© UBS 2010. All rights reserved.
www.ubs.com/graduates
Looking for a career where your ideas could really make a difference? UBS’s Graduate Programme and internships are a chance for you to experience for yourself what it’s like to be part of a global team that rewards your input and believes in succeeding together.
Wherever you are in your academic career, make your future a part of ours by visiting www.ubs.com/graduates.
You’re full of
energy
and ideas
. And that’s
just what we are looking for.
PowerPoint 2010 4 Formatting slides
Keyboard
1. Click into the text to be formatted. 2. Press .
Selecting Text
You may to apply diferent formaing to diferent parts of text within the one place holder or frame.
To select some of the text in a box:
Mouse
1. Click into the text to be formatted. 2. Click and drag through text to select it.
To select text by paragraph:
Mouse
1. Click into the text to be formatted.
PowerPoint 2010 4 Formatting slides
Formatting text
Text formatting allows you to change the font, size, colour and style of your text. Using similar formatting across your Word, Excel and PowerPoint documents helps to present a consistent and professional corporate image. Don’t forget, in order to format text, it is irstly necessary to select it.
he HOME ribbon contains a variety of diferent options for formatting text on a slide.
he FORMAT ribbon contains many options for changing the appearance of text radically or of formatting the whole
placeholder
Text Formatting Using The Home Ribbon
To format text using the home ribbon:
Mouse
1. Select the text you want to format. Either
2. Use the buttons on the HOME ribbon to change many aspects of the font style. Or
3. Use the dialog box launcher on the font group
4. Set the options for FONT, SIZE, COLOUR and EFFECTS. Choose from Efects such as SUPERSCRIPTand UNDERLINE.
5. Click on OK to apply your font selections
PowerPoint 2010 4 Formatting slides
Text Formatting Using The Format Ribbon
For more advanced and drastic formats, you can make use of the Format ribbon.
To apply formats using the Format Ribbon
PowerPoint 2010 4 Formatting slides
Mouse
1. Select the placeholder you want to format and click on the FORMAT ribbon.
2. In 2010 the placeholder text is easily formatted as Wordart by selecting one of the Wordart styles in that group
3. he buttons with drop down arrows to the right of the Wordart group allows the changing of colour, border colour or style of text. Clicking on the drop down arrow to the right of each button. Allows a selection to alter your text to your satisfaction.
4. he text style button allows dramatic changes to your text for a highly professional look. You may change the attributes for all aspects of your text:
• he shadow • Relection • A glow • he bevel • 3-d rotation • Transformations
PowerPoint 2010 4 Formatting slides
6. Further text efects and OPTIONS may be achieved by clicking on the DIALOG BOX LAUNCHER from the WORDART STYLES group and making further changes to your text options from the FORMAT TEXT EFFECTS dialog which ofers many options that will allow you to reine your initial choices from the
pre-setmenus. Such as:
• Text ill • Text outline
• he text outline style • 3-D format of the text • It’s rotation
• Text box options shown in the previous dialog.
The Format Painter
PowerPoint 2010 4 Formatting slides
To paint formats:
Mouse
1. Select the placeholder or the text that contains the formatting that you want to use.
2. Click the FORMAT PAINTER button from the HOME ribbon. Your mouse pointer will change to display a paintbrush next to the selection pointer
3. Select the placeholder you want to apply the formats to by clicking on it. As soon as you release the mouse, the format will appear.
• he format painter will paint the formats from your chosen placeholder and will then turn of. You can keep the format painter turned on to enable the painting of multiple placeholders by double clicking on the format painter instead of single clicking as above. To turn the format painter of when inished, press Esc or
click once on the Format Painter button.
Changing Case
If the case of the letters is wrong, rather than deleting and re-typing in the correct case, you can use the following formatting option.
To change text case:
Mouse
1. Select your text.
2. Select the drop down arrow next to the CHANGE CASE button in the FONT group on the HOME ribbon
3. Choose desired case.
Once your text is selected you can also use SHIFT + F3 to toggle between Upper, Lower and Sentence case.
Formatting The Placeholder
PowerPoint 2010 4 Formatting slides
To format a placeholder
Mouse
1. Use the pre-set styles by clicking on the drop down arrow to the bottom right of the viewable pre-set styles and make a selection from the displayed options
Or
2. Use the drop down arrows to right of the three buttons in the shape styles group to deine your own choices for the:
• Shape ill. • Shape outline. • Shape efects.
your chance
to change
the world
Here at Ericsson we have a deep rooted belief that the innovations we make on a daily basis can have a profound effect on making the world a better place for people, business and society. Join us.
In Germany we are especially looking for graduates as Integration Engineers for
• Radio Access and IP Networks
• IMS and IPTV
We are looking forward to getting your application! To apply and for all current job openings please visit our web page: www.ericsson.com/careers
PowerPoint 2010 4 Formatting slides
Or
1. Use the DIALOG BOX LAUNCHER to bring up a similar dialog as we did for the text efects but THESE
options are speciically for the placeholder shape and as you can see from the title the dialog is called FORMAT SHAPE.
2. When you have selected the desired options form the various categories displayed (which are immediately applied) click on CLOSE.
PowerPoint 2010 4 Formatting slides
Formatting Slide Backgrounds
he background colour of all new slides is, by default, white. It is possible to apply a diferent colour, graded ill colour, pattern, texture or picture, which will override the default setting. he change applies to all slides that follow the design template of the currently selected slide
To change the background formatting
1. On the DESIGN ribbon, click on the BACKGROUND STYLES button from the BACKGROUND group.
PowerPoint 2010 4 Formatting slides
To use a dialog
1. On the DESIGN ribbon, click on the BACKGROUND STYLES button from the BACKGROUND group. Select format background.
Or
2. On the DESIGN ribbon, click on the DIALOG BOX LAUNCHER from the BACKGROUND group. A dialog appears.
3. Make selections from the FILL category or click on the PICTURE category to select a picture for your background. When all desired selections have been made click CLOSE.
• DO NOT CLICK APPLY TO ALL THIS WILL BE DISCUSSED LATER
A picture you use as a slide background will be stretched to ill the slide background area. If it is not of suitable
proportions it will be distorted.
You can insert many popular graphics ile formats into your presentation including Enhanced Metaile (.emf), Joint
Photographic Experts Group (.jpg), Portable Network Graphics (.png), Windows Bitmap (.bmp, .rle, .dib) and Windows
Metaile (.wmf) graphics. To insert other ile formats you will need to install additional graphic ilters.
WHAT‘S MISSING IN THIS EQUATION?
MAERSK INTERNATIONAL TECHNOLOGY & SCIENCE PROGRAMME
You could be one of our future talents
Are you about to graduate as an engineer or geoscientist? Or have you already graduated? If so, there may be an exciting future for you with A.P. Moller - Maersk.
www.maersk.com/mitas
PowerPoint 2010 4 Formatting slides
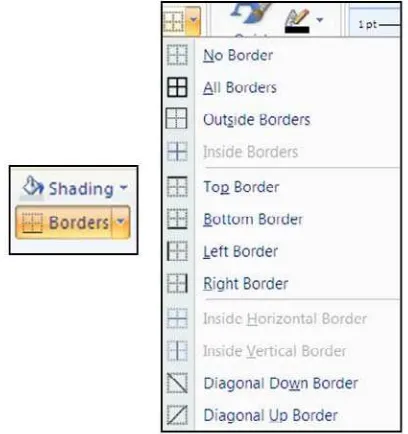
Formatting numbered and bulleted lists
he bullets that PowerPoint assigns when you switch them on or use a bulleted list auto layout are controlled by the slide master template You can however choose diferent bullet symbols if you wish. his can be done on each individual slide or for all slides on the master. However in this section we will deal with just formatting them on the slides themselves as slide masters will be dealt with later.
Formatting A Bulleted List
To change bullet symbols:
Mouse
1. Select the place holder to format all bullets or click in a paragraph to change just an individual bullet. 2. On the HOME ribbon in the PARAGRAPH group use the drop down arrow to the right of the BULLETS
button.
3. Make a selection with the let mouse button by clicking on the bullet format you want.
PowerPoint 2010 4 Formatting slides
1. On the HOME ribbon in the PARAGRAPH group use the drop down arrow to the right of the BULLETS button and select BULLETS AND NUMBERING at the bottom of the displayed options. A dialog will
appear.
2. Make a selection of bullet type, size and colour before clicking ok
3. For further options or to choose a diferent style of bullet then you could click on CUSTOMISE which
opens a further dialog to select the bullet from a selection of fonts.
4. To select a symbol from a diferent font change the FONT prompt in the top let of the dialog box. 5. Click on your chosen bullet point and click on OK.
• You will ind a good choice of symbols in the Webdings, Wingdings and Monotype Sorts fonts.
PowerPoint 2010 4 Formatting slides
he numbers that PowerPoint assigns when you switch them on or are controlled by the slide master template. You can however choose to edit the numbering if you wish.
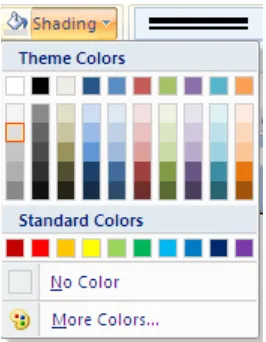
To change Number Styles:
Mouse
1. Select the placeholder to format all numbering or click in a paragraph to change just an individual numbered item.
2. On the HOME ribbon in the PARAGRAPH group use the drop down arrow to the right of the NUMBERING (LIST) button.
3. Make a selection with the let mouse button by clicking on the numbering format you want.
PowerPoint 2010 4 Formatting slides
1. On the HOME ribbon in the PARAGRAPH group use the drop down arrow to the right of the
NUMBERING (LIST) button and click on the BULLETS AND NUMBERING selection at the bottom of the displayed options a dialog appears.
2. Select a STYLE OF NUMBERING, SIZE and COLOUR before clicking OK
3. To change the colour, click the arrow next to COLOUR, and either select a COLOUR from the displayed choices — which represent the current colour scheme — or click More Colours for additional choices 4. Click on OK.
It all starts at Boot Camp. It’s 48 hours that will stimulate your mind and enhance your career prospects. You’ll spend time with other students, top Accenture Consultants and special guests. An inspirational two days
packed with intellectual challenges and activities designed to let you discover what it really means to be a high performer in business. We can’t tell you everything about Boot Camp, but expect a fast-paced, exhilarating
and intense learning experience. It could be your toughest test yet, which is exactly what will make it your biggest opportunity.
Find out more and apply online.
Choose Accenture for a career where the variety of opportunities and challenges allows you to make a difference every day. A place where you can develop your potential and grow professionally, working alongside talented colleagues. The only place where you can learn from our unrivalled experience, while helping our global clients achieve high performance. If this is your idea of a typical working day, then Accenture is the place to be.
Turning a challenge into a learning curve.
Just another day at the office for a high performer.
Accenture Boot Camp – your toughest test yet
Visit accenture.com/bootcamp
PowerPoint 2010 5 Objects
Section 5 Objects
By the end of this section you will be able to:
• Create and edit a chart • Insert and use quick parts • Use SmartArt
• Insert and format shapes
• Insert and format pictures and clipart • Work with photo albums
• Insert, format and work with tables
Charts
Charts in PowerPoint 2010 are very diferent from earlier versions and for the most part it is just like working in excel. In fact the underlying datasheet IS excel and when you select the data or edit the data you will be working in the underlying
spreadsheet. he charting program is exactly the same otherwise as you would ind in excel.
An embedded chart appears on the slide where it was created. It is an embedded object, which does not normally appear in its own window, and has no separate existence apart from the slide
Chart Elements
PowerPoint 2010 5 Objects
Chart Element Descripion
Titles This is the area where you can specify the itles to have on the chart (i.e. X-axis “1998”, Z-axis “GBP”
Axes Here you specify whether you want a Y/Z axis and whether you are using imescales to plot your data
Gridlines The gridline ribbon allows you to switch on and of horizontal and verical gridlines
Legend Use this ribbon to switch the legend on and of or reposiion it
Data Labels The Data Labels ribbon allows you to display the amount each point represents or display the label (i.e. in the example above, each cylinder would have Qtr1, Qtr2 displayed as appropriate at the top of each data marker)
Data Table The Data Table ribbon will display a grid underneath the chart that will show the infor-maion that is being ploted.
To Create A Chart
To create a chart
Mouse
1. Go to the INSERT ribbon and click on the CHART button
2. he INSERT CHART dialog will appear to enable you to insert a chart type of your choice
3. Select the chart type you wish and click on OK.
PowerPoint 2010 5 Objects
1. Click on the chart icon of a slide with a chart content 2. he same INSERT CHART dialog will appear
3. Make a selection and click OK.
Moving And Resizing Embedded Charts
Once the chart object has been created and stored as an embedded object, you can move and resize it.
To move an embedded chart:
Mouse
PowerPoint 2010 5 Objects
2. Click on the chart frame border and hold the mouse button down as you drag. Release the mouse when the chart is in the desired location.
To resize an embedded chart:
Mouse
1. Move your mouse over the dotted handles on the Chart frame border. 2. he mouse cursor should change to a double arrow.
In Paris or Online
International programs taught by professors and professionals from all over the world
BBA in Global Business
MBA in International Management / International Marketing DBA in International Business / International Management MA in International Education
MA in Cross-Cultural Communication MA in Foreign Languages
Innovative – Practical – Flexible – Affordable
Visit: www.HorizonsUniversity.org
Write: [email protected]
Call: 01.42.77.20.66
www.HorizonsUniversity.org
PowerPoint 2010 5 Objects
3. Click and Drag up, down, let or right.
• Hold down the ALT key if you wish the chart to resize by snapping to the cell gridlines
Data Layout
Depending on the “shape” of the data, Excel will assign categories and data series to either the rows or columns of information. Usually it will be assumed that there are more categories than data series, therefore, if there are more rows than columns of selected information, the data series will be based on columns, with the legend labels being picked up from the row across the top of the selected area and the category labels being picked up from the letmost column:
When building a chart in PowerPoint, excel automatically inputs some default data to give your chart some “volume” he data can be edited at any time by clicking on the Edit data button in the data group of the design ribbon. Excel will open the underlying data in a separate spreadsheet and tile the two windows side by side.
You may click in the spreadsheet at any time in the underlying data and edit the values and labels. he data is surrounded by a blue line so when all your data has been pasted or typed you may need to resize the blue border so that it just includes the data you wish on the chart.
PowerPoint 2010 5 Objects
Shortcut Menu (Right Click)
You may be familiar with the Shortcut menus associated with the selected cell(s) on the Excel worksheet. When working on a chart clicking on the chart with the secondary mouse button will call up a Charting Shortcut menu.
he Shortcut menu will contain a selection of choices from some of the Standard options mostly relating to the chart as an embedded object - almost like a graphic on the slide.
To enter or edit data
Mouse
1. On the DESIGN tab, in the DATA group click on the EDIT DATA button.
2. Click within the cells inside the blue border on the spreadsheet that opens. 3. Type in new values for the labels and the data.
4. Move your mouse to the bottom right of the blue border until you mouse cursor changes to a double pointed arrow
5. Resize the blue border to encompass all of the your entered data.
6. As your new data is entered your chart in PowerPoint will adjust automatically to display your new values. 7. Close the spreadsheet WITHOUT SAVING.
Chart Types
PowerPoint 2010 5 Objects
Available Types Of Chart
Selecting any of the types listed will apply a given chart type to the active chart. he most useful types available and some of their applications have been summarised below:
Area
Area charts can be 2 or 3-dimensional. hey are used to compare the change in volume of a data series over time, emphasising the amount of change rather than the rate of change. Area charts show clearly how individual data series contribute to make up the whole volume of information represented in the graph.
Bar
Bar charts can be 2 or 3-Dimensional. hey are used to show individual igures at a speciic time or to compare diferent items. Categories are listed vertically, so that bars appear on the horizontal, thus there is less emphasis on time low. Bars extending to the right represent positive values while those extending let represent negative values.
PowerPoint 2010 5 Objects
Column charts can be 2 or 3-Dimensional. hey are frequently used to show variation of diferent items over a period of time. Categories (oten days or months for example, representing a progression of time) are listed horizontally and columns are displayed side by side, making for easy comparisons. Two variations on the theme of Column charts are represented by further tools on the Chart toolbar. he Stacked Column chart can be used to show variations over a period of time, but also shows how each data series contributes to the whole. A furthe