SINNOWA
HB-7021
Automated Hematology
Analyzer
Operation Manual
CATALOGUE
Chapter 1 Instrument Introduction 6
1.1 Function Introduction 6 1.2Measurement Parameters 6 1.3 Instrument Front Panel 7 1.4 The Instrument Rear Panel 9 1.5 Equipment Components 10
1.5.1 Host 10 1.5.2 Reagents 11 1.6 Sample Dosages 13
1.7 One-sample Reagent Dosage 13 1.8 Test Speed 13
1.9 Memory Capacity 13
1.10 Measurement Repeatability Error 13 1.11 Accuracy 13
1.12 Linear Range of Measurement 14 1.13Storage and Transport Environment 14 1.14 Using Environment 14
1.15 Duration of Service 15
Chapter 2 Instruments Measuring Principle 15
2.1 Measuring Principle 15
2.1.1 PLT-I Amount and Size of Blood Cell Measurement 15 2.1.2 Flow Colorimetry Measurement HGB 16
2.2 Approach of Equipment Parameters Measuring 17
Chapter 3 Installation and Sample Analysis 18
3.1 Check Box 18
3.2 Installation Requirements 18 3.3 Power Supply Inspection 19 3.4 Reagents Tubing Connection 19
3.4.1 LYSE Tubing Connection 19 3.4.2 Diluents Tubing Connection 20
3.4.3 WASTE Tubing Connection 20
3.4.4 DETERGENT Tubing Connection 20
3.5 Recorder Paper Installation 21
3.6 Printer Installation (such as equipment) 21
3.8Startup 21
3.9 Background Test 22
3.10 Quality Control 24
3.11Calibration 24
3.12 Blood Sample Collection 24
3.12.1 Venous (whole) Blood Collection 25 3.12.2 Peripheral (pre-diluted Collection 25
3.13 Switch between Whole Blood and Pre-diluted Blood 26
3.14 Blood Sample Counting and Analysis 26
3.14.1 Counting and Analysis Process 26 3.14.2 Histogram Alarm Message 27
3.15 Report Output 29
3.16 Shutdown 29
3.17 Test Result Inquiry 30
3.17.1 Historical Data Choice Review and Output 30 3.17.2 Historical Data Deletion 31
Chapter 4 FUNC introduction 34
4.1 Maintenance Menu 34 4.2 Flush 35
4.3 Quality Control 35 4.4 Query Result 35
4.5 Normal Range Setting 35 4.6 Calibrations 36
4.7.7 Three-part Setting 40 4.7.8 Cleaning Time 41
4.7.9 Report Format Setting 41 4.7.10 Display Brightness 42 5.5.1 QC Data Inquiry 50 5.5.2 QC Data Deletion 51
Chapter 6 Calibration 52
6.1 Pre-calibration 52
6.1.1Calibrator 52 6.1.2Background Test 53
6.1.3Evaluation of Repetition Precision 53 6.2Calibration Coefficient Modification 54 6.3 Calibration Review 55
Chapter 7 Parameter limit 55
Chapter 8 Maintenance 58
8.1 Daily Maintenance 59 8.1.1 Rinse 59
8.1.2 Shutdown Prime 59 8.2Weekly Maintenance 59
8.2.1 Instrument Surface Maintenance 59 8.2.2 Tubing Maintenance 60
8.2.3 Probe Maintenance 60 8.3 Yearly Maintenance 60
8.4 Maintenance for a Prolonged Period of Non-use or for Shipping 60
Chapter 9
Troubleshooting 61
9.2Seeking for Technical Assistance 62 9.3 Troubleshooting Disposal 63
9.3.1 WBC clog or RBC clog 63
9.3.2 WBC Data Change Abnormally 64 9.3.3 WBC BUBBLES or RBC BUBBLES 65 9.3.4 VACUUM is Low 66
9.3.5 WASTE is full 66 9.3.6 HGB Problem 66 9.3.7 DILUENT Empty 66 9.3.8 LYSE Empty 66
9.3.9 Detergent Empty 67 9.3.10 Time Error 68
9.3.11 No Paper in Recorder 68 9.3.12 Recorder Temp is high 68 9.3.13 Recorder Head Error 69 9.3.14 Recorder Error 69 9.3.15 Recorder off-line 69 9.3.16 Printer Paper Out 69
Chapter 10 Precautions, Limitations and Hazards 69
10.1 Using Limitations 70
10.2Installation Limitations 70
Copyright and declaration
Copyright©, SINNOWA Medical Science & Technology Co., LTD2005, all rights reserved.
Congratulations to you for becoming the valued customers of SINNOWA Medical Science & Technology Co., LTD. Welcome to the HB-7021 automated hematology analyzer, it will bring you a new experience and convenience.
This statement is based on China's relevant laws, regulations and the specific circumstances of the HB-7021 automated hematology analyzer designed by SINNOWA Medical Science & Technology Co., LTD. It applies to the HB-7021 automated hematology analyzer whose installation and use in the People's Republic of China (excluding Taiwan, Hong Kong and Macao) only.
The statement includes the latest information right before the brochures printed. SINNOWA Medical Science & Technology Co., LTD takes full responsibility for simplified Chinese version and the amendment of the statement, and reserves the right of changing the contents without notice after printing the brochures.
The picture concerned in this manual is sketch, for reference purposes only, if the picture does not match with real, in-kind basis.
All the information in the brochures is protected by copyright law. Without prior written consent of SINNOWA Medical Science & Technology Co., LTD, not to the content of any statement in any form of reproduction, copying, translating into other languages.
The operator must operate strictly in accordance with the guidance of operating manuals. Or SINNOWA Medical Science & Technology Co., LTD is not responsible for any errors and equipment failure caused by illegal operation.
Limited responsibility for quality assurance:
HB-7021 automated hematology analyzer Manual clear the product quality assurance responsibility and the rights and obligations of after-sales service including the generation and termination of the agreement between SINNOWA Medical Science & Technology Co., LTD and the users.
Equipment of SINNOWA Medical Science & Technology Co., LTD and authorized sales agents, SINNOWA Medical Science & Technology Co., LTD will provide one-year free service since the installation of equipment.
Obligations under the guarantee of SINNOWA are only maintenance which not includes economic losses or additional costs caused by disabled due to equipment. For examples:
Ԙ Shipping costs (including customs fees).
ԙ The economic and time loss caused by the reason that the instruments can not
be used.
Ԛ Boarding, dining or other costs along the way. ԛ Loss caused by inconvenience.
SINNOWA Medical Science & Technology Co., LTD is not liable for the following direct, indirect or eventually damage. Since the following cases happen, SINNOWA Medical Science & Technology Co., LTD will not be responsible for safety, reliability of the equipment. Quality assurance responsibility, the rights and obligations of the after-sales service including the agreement produced and terminated by it and all the power of free services agreed will be deemed to unconditionally give up permanently at the same time.
Ԙ Equipment with non-normal use, without maintenance or has been damaged. ԙ The use of reagents and the annex which is non-recognition or not provided by
SINNOWA.
Ԛ As users or others not in accordance with the <HB-7021 automated
hematology analyzer Manual> operation which led to misuse, negligence caused damage to the equipment.
ԛ Replacement parts which is not allowed by SINNOWA Medical Science &
Technology Co., LTD or unauthorized personnel to equipment for maintenance, repairs or alterations to equipment.
Ԝ Components were dismantling, stretching, re-adjustment.
All hospitals or institutions use this equipment would cause equipment failure if not achieve a standard maintenance plan.
SINNOWA Medical Science & Technology Co., LTD will be paid to provide circuit at the request of the user, also list the calibration methods and other information, to help users by qualified technical personnel to repair an equipment part which is allowed to be repaired and maintained by users themselves.
Caution
SINNOWA Medical Science & Technology Co., LTD does not promise to any implied warranties to make some kind of special-purpose equipment including its marketability, the applicability.
We encourage you to call us when you encounter problems.
User Services Division opens user technology, services hotline to provide users with technical support and troubleshooting.
If the equipment is failure, please keep the samples and to immediately notify the authorized dealers of SINNOWA Medical Science & Technology Co., LTD or directly contact with User Services Division of SINNOWA Medical Science & Technology Co., LTD.
If the equipment failure can not be resolved by telephone guidance, SINNOWA Medical Science & Technology Co., LTD will send a professional engineer or regional service representatives to provide you with timely, comprehensive services. SINNOWA Medical Science & Technology Co., LTD is referred to SINNOWA for short hereinafter.
Standard ID: YZB/0511-2006HB Series of automated blood cell analyzer Production enterprises: SINNOWA Medical Science & Technology Co., LTD Production add: Qilin Industrial Park, Nanjing, Jiangsu, China (211135)
After-sales service units: SINNOWA Medical Science & Technology Co., LTD TEL :( 025)84127188
How to use this manual
This manual contains general information on the use of equipment; this is information guidance to the new user to use instruments. Many users read brochures all over before their first use. You will learn about the characteristics of the instruments and methods of operation after you read the manual. You can use the directory to quickly find the necessary information in the course of day-to-day use. The brochures include equipment operation, maintenance instructions and attention to issues, in order to maintain the performance of this equipment must be in accordance with the specification of the equipment to operate, maintain.
Practice in this manual:
Warning: information that you should be aware of how to avoid the operator or others suffered injuries
Appendix 1: Symbol note
Equipotential
Caution, Refer to random document
Beware of electric shock
Refer to manual
In vitro diagnostic equipment
Chapter 1 Instrument Introduction
1.1 Function Introduction
The full name of the instrument is HB-7021 automated hematology analyzer (hereinafter referred to as equipment) is an automated hematology analyzer mainly used for clinical testing and analyzing multi-parameter of the tiny particles.
Equipment will put blood sample, dilution, and the measurement, display screen and Recorder together.
Take the use of high-resolution display screen, 19 measured parameters and 3 histograms can be shown at the same time, and can be connected to the network, in order to achieve the real-time transmission of data.
The use of advanced front-end data acquisition system can provide accurate and stable test data for Human peripheral blood and blood samples, to provide the necessary clinical diagnosis of reference.
1.2Measurement Parameters
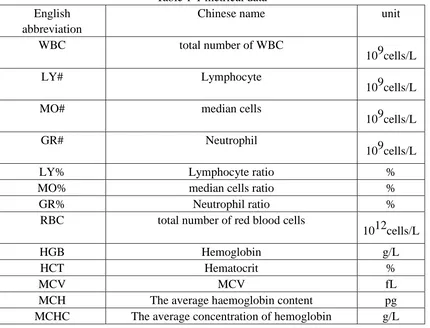
The instrument can make high-volume continuous measurement on human peripheral blood and blood samples, and shows 19 parameters of measurement data in Table 1-1. Machines can make analysis automatically of tested sample data. The histogram of WBC, RBC and platelet are given:
Table 1-1 metrical data
RBC total number of red blood cells
1012cells/L
HGB Hemoglobin g/L
HCT Hematocrit %
MCV MCV fL
RDW-CV the coefficient of variation of RBC distribution width
%
RDW-SD standard deviation of RBC distribution width fl PLT total number of platelets
109cells/L
MPV The average size of platelet fL
PDW Platelet distribution width fL
PCT Platelet pressure plot %
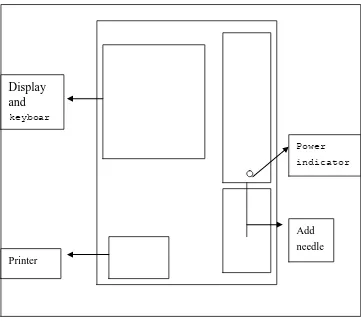
1.3 Instrument Front Panel
Structure of instrument front panel is as shown in Figure 1-1.
1. Work status indicators show that the power and state of the instrument: indicator light is on after the power equipment
Green: Equipment in a wait state, can count analysis.
Orange: Equipment in the state of Analysis, then the user should wait for 2. Sampling needle collect measuring samples
3. RUN countinganalysis starting button, press in analysis of blood cell and quality control operation window can do count and analysis, click in other window is invalid. 4. Printers print test results through the built-in thermal grapher recording meter 5. Keyboard
A total of 25 on the keyboard keys, its function is as follows: 0~9 the number keys: A digital input operation on instrument .KEY: can enter the decimal point when you input data
Figure 1-1
Printer: start recording Built-in devices to print the test results
Menu button: function menu button, menu function calls or out of the current selection and returned to the main window of the blood cells.
Dilution key: liquor drainage key, discharge dilute solution from the sample needle, mainly for the pre-diluted of the peripheral blood;
Delete key: delete the number and text messages
Cleaning key: the implementation of cleaning procedures Enter key: Enter key, to confirm the content of choice
ESC: In any interface, you can click here to exit the current menu
Mode keys: working methods conversion keys, the whole blood and pre-dilution mode conversion
key: direction Key, you can move your cursor; select the menu or project you need.
7. Display screen
5.5-inch LCD screen for liquid crystal display screen is divided into four regions, as shown in Figure 1-2:
Display and
keyboar
d
Printer
Add needle
Power
Figure 1-2
The district of the working status: show the "Please wait count" when counting, counting completed, show the counting time of WBC, RBC; when equipment failure, show fault alarm.
System time zone: showed that the current system date and time.
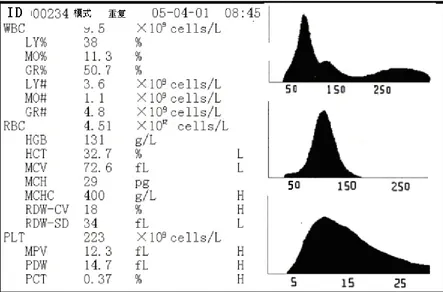
Current code area: showed that the ID number of the current testing results. Results: show that the current test results, also give three histograms. Model: shows that the current test mode.
Repeat: the implementation of retry, ID is not changed.
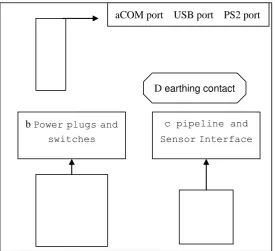
1.4 The Instrument Rear Panel
The instrument rear panel is as shown in Figure 1-3. a. COM
Communications port to connect an external standard RS-232 network, connect external printers, and connect an external keyboard.
b. mains jack for connecting external power.
Power switch for turning on or off the power of equipment. Current number
Results display
Current number Repeat Mode Time/Date Functional mode
aCOM port USB port PS2 port
D earthing contact b Power plugs and
switches
c pipeline and
c. SENSOR waste water sensor interface to connect waste water sensors.
d. equipotential ground terminals, used to connect the grounding of the hospital and the system.
1.5 Equipment Components
Instrument includes host, stylus printer (optional) and reagents three major components.
1.5.1 Host
Completion of the blood sample collection and the whole process of analysis, automatically displays test results after counting on the LCD screen. Host mainly includes the following components:
1.5.1.1 A / D and the Central Board
Central board is the control center of equipment, it controls the following parts: The switch of liquid solenoid valve, the suction and perfusion of reagent, and the discharging of the waste.
The operation force pump and vacuum air pump provide the motion for suction and perfusion. The control of the stepper motor is for inhalation and dilution of samples and adding reagents;
Control A /D transform of WBC, RBC/PLT, HGB, to provide front-end service for data processing; detect all of the actions of the photoelectric switch.
1.5.1.2 WBC Measurement Unit
WBC survey unit is composed of hard wares such as the signal collection plate, electroplate, mipor sensors, and liquid road.
Signal collection plate --- to provide a constant source for electrodes, will provide the collected pulse signal with amplification and processing to CPU Central Processing Unit.
Electrode --- WBC has two electrodes: one is internal, the other is external, the internal one is fixed in the internal of WBC probe, the external is fixed in the external, when the inner and outer electrodes immersed in the miscible liquid which is composed by diluents, constant flow source on electrode to form galvanic circle through Millipore sensors.
Millipore sensor --- WBC's Millipore sensors fixed in the front of the probe, its Millipore diameter is of 100 microns. To take a sample survey, the particle samples pass trough from the porous.
hemolytic agent adding and blending part, through control of the stepper motor control board, join the appropriate amount of hemolytic agent in the WBC samples Cup, and then mix air by the compressed gas produced by the force pump.
1.5.1.3 RBC/PLT Measurement Unit
RBC / PLT survey unit is composed of hard wares such as the signal collection plate, electroplate mipor sensors, and liquid road:
Signal collection plate --- to provide a constant source for electrodes, will provide the collected pulse signal with amplification and processing to CPU Central Processing Unit.
Electrode --- RBC/PLT has two electrodes: one is internal, the other is external, the internal one is fixed in the internal of RBC/PLT probe, the external is fixed in the external, when the inner and outer electrodes immersed in the miscible liquid which is composed by diluents, constant flow source on electrode to form galvanic circle through Millipore sensors.
Millipore sensor --- RBC/PLT's Millipore sensors fixed in the front of the probe, its Millipore diameter is of 100 microns. To take a sample survey, the particle samples pass trough from the porous.
Road --- Use the negative pressure as the driving force; inhale the diluted liquid, fluid, washing liquor and test samples from their own containers to measuring pipe, and then discharge the measured waste liquid.
1.5.1.4 Tubing
Tubing is composed of solenoid pilot actuated valve, breaking valves, force pumps, vacuum pumps, and plastic piping: solenoid pilot actuated valve: the one with feeler microscope two-way or tee joint T to control the circulate of the liquid road.
Breaking valves --- control the flow of road by breaking the plastic tube; vacuum pump - inhale dilute solution in the fluid reservoir;
Liquor drainage pump ---- inhale the waste liquid by counting into waste liquor pail. Force pump --- to provide positive pressure impetus for reverse washing and hemolytic blending.
Plastic tube - carrier of reagents, and the flow of waste water;
Vacuum chamber --- cause subpressure, and as a temporary waste water containers after sample test complete.
1.5.1.5 Display
In order to maintain the good performance of equipment, SINNOWA configuration on a special reagent for HB-7021. These reagents are took delivery inspection based on product standards and tested all the pre-qualified, the nominal metrics are obtained under the conditions that in the use of the reagents for HB-7021. Non-SINNOWA's reagent will affect the performance of equipment, lead a serious measurement error, and could lead to accidents.
All reagents must be kept at room temperature in order to maintain the ideal chemical properties, in the preservation process should avoid the cold, overheating and direct sunlight, when the temperature is below 0 ℃, the reagent will be frozen, the chemical properties, electrical conductivity of reagents will be changed. In the process of the use, in order to minimize the evaporation of reagents, reduce pollution outside to the reagent, the reagent containers should be covered, the pipeline is put into reagents through the cover of container. However, the mass of reagents with the time passing will change, all reagents should be used in period of validity.when the reagent is replaced, can not pour unspent reagents into the new reagent barrels (bottles), prevent the new reagent from contamination.
1.5.2.1 Diluent
Dilute solution is a steady dilution of isotonic. To meet the test requirements as follows:
a) dilute WBC, RBC, PLT, HGB;
b) maintain cell shape in the process of measuring; c) the provision of appropriate background values; d) cleaning WBC, RBC sensor porous and fluid direction. 1.5.2.2Lyse
Lyse solution is a new type of reagent without double nitrogen and cyanide. To meet the test requirements as follows:
a) quickly dissolve red blood cells, produce the matrix composites at least;
b) change the WBC epicyte, cytoplasm spread slowly, shrink the epicyte around the nucleus, WBC was granular.
c) Transformation of hemoglobin to form hemoglobin complex, suitable for testing under the optical wavelength of 540 nm;
d) non-cyanide, to avoid humans and the environment serious pollution 1.5.2.3Detergent
1.5.2.4 Probe Detergent
Probe cleaning fluid containing efficient oxides for cleaning equipment probe, mainly used for solution of WBC, RBC probe intractable plugging holes.
1.6 Sample Dosages
whole blood mode: whole blood (venous blood) 18ul prediluted mode distal blood 20ul
1.7 One-sample Reagent Dosage
diluent 30ml washing liquid hemolytic solution 0.7ml
With different versions of the machines the amount of reagents will be changed. 1.8 Test Speed
The testing speed of this instrument is to about 60 / h. 1.9 Memory Capacity
Instrument equips with internal memory, can store not less than 200,000 samples test results.
1.10 Measurement Repeatability Error
Measurement repeatability error should be consistent with the requirements of Table 1-2.
Table 1-2 test results of measurement repeatability error
Measurement Project Measuring repeatability error (CV/%)
WBC ≤2.0%
RBC ≤1.5%
HGB ≤1.5%
MCV ≤0.5%
PLT ≤5.0%
1.11 Accuracy
Measurements of WBC, RBC, PLT and HGB should be in the range of whole blood control standard value. The range of error should be consistent with the requirements of Table 1-3.
Measurement Project Measurement accuracy tolerances
1.12 Linear Range of Measurement
Linear measurement of equipment should meet the provisions of Table 1-4. Table 1-4 linear range of test results requested
Measurement Project measuring range Linear allow measurement error
1.13Storage and Transport Environment
a) the ambient temperature: -10 ℃ ~ 40 ℃;
b) relative humidity: ≤ 80% RH;
c) atmospheric pressure: 80 kPa ~ 106kPa. 1.14 Using Environment
a) the ambient temperature: 18 ℃ ~ 35 ℃;
b) relative humidity: ≤ 80% RH;
1.15 Duration of Service
Instrument duration of service is five years, no more than eight years.
Chapter 2 Instruments Measuring Principle
This chapter introduces the measuring principle of HB-7021 automated hematology analyzer system. Equipment measures the amount and volume of blood cells by PLT-I, and hemoglobin content by flow method. Give the explanation of measuring
parameters and method. 2.1 Measuring Principle
Measuring of instruments includes the amount of blood cells, the volume measurement and HGB measurement.
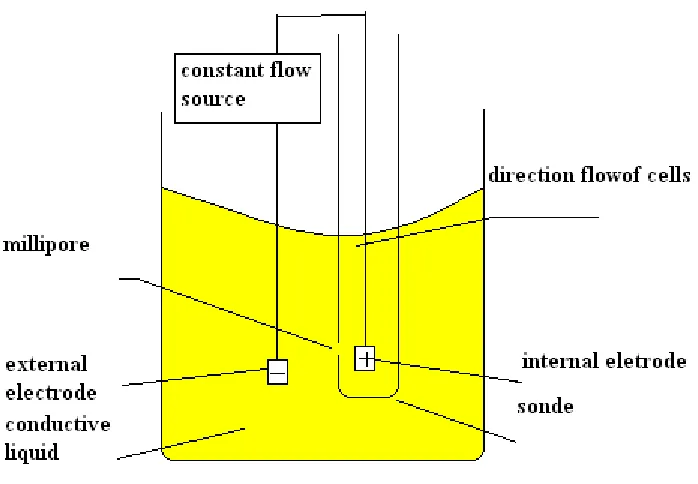
2.1.1 PLT-I Amount and Size of Blood Cell Measurement
Figure 2-1
As the number of pulses is corresponding with the cells which pass through the porous, amplitude of pulse has the same size with the cells through the porous, instrument measures each of the cells, and make size classification in accordance with the size of them, equipment classify RBC, WBC and platelet in accordance with the software pre-classification procedure, usually classified according to the specific size of the following:
WBC 35-450 fL
RBC 30-100 fL
PLT 2-30 fL
The WBC which is dealt with hemolytic agent can be divided into lymphocytes (LY), MO, neutrophilic granulocyte (GR) in accordance with its size, its interval of volume:
LY 35-98 fL
MO 98-135 fL
GR 135-450 fL
2.1.2 Flow Colorimetry Measurement HGB
2.2 Approach of Equipment Parameters Measuring
Parameters from blood sample test are composed of three forms: one is the direct parameters from the equipment measurement, such as the WBC, RBC, PLT, HGB, MCV; another is the parameters according to the histogram, such as LY%, MO%, GR%, HCT, RDW-CV, RDW-SD, MPV, PDW; the third is parameters derived from certain formula, such as LY #, MO #, GR #, MCH, MCHC, PCT.
Formula derivation is as follows: HCT % = RBC×MCV/10
MCH pg = 10×HGB/RBC
MCHC g/L = 100×HGB/HCT
PCT % =PLT×MPV/10
LY % = 100×AL / AL+AM+AG
MO % = 100× AM / AL+AM+AG
GR % = 100×AG/ AL+AM+AG Column diagram of WBC is as figure 2-2:
Figure 2-2 AL: cells quantity within the lymphatic region;
AM: cells quantity within the monocytes cells region between lymphocyte cells and granulocyte;
AG: cells quantity within the granulocyte region.
Lymphocyte 109L LY# = LY%×WBC/100 Monocyte 109L MO# = MO%×WBC/100 Granulocyte 109L GR# = GR%×WBC /100
RBC distribution width of the coefficient of variation (RDW-CV) is derived from red blood cells histogram, it said the volume of red blood cell volume distribution
coefficient of variation, and the unit is%.
RBC distribution width of standard deviation (RDW-SD) is derived from red blood cells histogram, it said red blood cell changes in the size of standard deviation, and the unit is fL.
Platelet distribution width (PDW) is derived from the platelet histogram, it said the volume distribution of platelet groups.
Chapter 3 Installation and Sample Analysis
To ensure that the performance equipment, achieved satisfactory clinical results, HB-7021 automated hematology analyzer must be installed and debugged by the engineers sent or authorized by SINNOWA for the first time, the equipment used mobile or off-site must in according with the installation process for installation and use.
CAUTION: Any unauthorized or without professional training of personnel for equipment installation may lead damage to equipment, such damage is not in the scope of the free warranty by SINNOWA. Personnel without SINNOWA authorize shall not install, off-site use this equipment.
3.1 Check Box
a) Carefully takes the instrument and enclosure out from packing chest, b) Check the annex according with the packing list inventory
c) check into whether there is an incoming-stream or water logging. d) check whether there were any mechanical defects.
e) Check all the exposed wires, the inserted parts and annexes. If you have any questions please immediately contact the company customer service agent or the Department.
3.2 Installation Requirements
WARNING: This equipment is not treatment equipment. NOTE: The equipment should avoid direct sunlight.
NOTE: Equipment working environment should avoid the cold and over-heated. NOTE: Equipment working environment should avoid centrifuges, X-ray machines, monitors, copiers, and those instruments interfere with the test results of the
equipment.
NOTE: Do not use mobile phones, cordless phones near the equipment, and so too have the radiation field equipment. A strong radiation field would interfere with the normal work of equipment.
3.3 Power Supply Inspection
Before installing equipment, have to check whether the power ground of the instruments is be up to the mustard, power specific requirements are as follows. Voltage: AC220 (1 ± 10%) V Frequency: (50 ± 1) Hz
Warning: The grounding-line after the instrument board must be grounded by connecting directly with the ground. The user places the obligation to ensure that to protect the reliability of power supply.
NOTE: inspection before equipment connected to power to ensure that all electrical equipment connected is plugs right and reliable.
NOTE: the regular fluctuations in voltage would result in equipment performance and reliability of the reduction, the user should resolve this issue before use the
instruments, such as the installation of the exchange regulator (to be equipped with their own users).
NOTE: frequent disruptions will lead to electricity equipment performance and reliability of the serious decrease, or even damage to equipment, users should use instruments to resolve this issue before, such as the installation of an uninterruptible power supply (UPS) (to be equipped with their own users).
connectors connect with the road connecting latter host board labeled LYSE, the other end of catheter insert into the hemolytic bottle, and screw the cap of hemolytic bottle. Hemolysis bottle must be placed in the same plane with equipment.
3.4.2 Diluents Tubing Connection
Remove the DILUENT tube with blue faucet from reagent kit and attach it to the connector marked “DILUENT” on the rear panel. Place the other end into the DILUENT container. Twist the cap until secure. Place the container on the same level as the analyzer.
3.4.3 WASTE Tubing Connection
Remove the WASTE tube with black faucet from reagent kit and attach it to the connector marked “WASTE” on the rear panel, connect BNC plug with the socket
marked “SENSOR” on the rear panel. Twist the tube’s cap clockwise onto the waste container until secure. Place the container on the level at least 50cm lower than the analyzer.
3.4.4 DETERGENT Tubing Connection
Remove the DETERGENT tube with yellow faucet from reagent kit and attach it to the connector marked “DETERGENT” on the rear panel. Place the other end into the DETERGENT container. Twist the cap until secure. Place the detergent container on the same level as the analyzer.
CAUTION:
Keep all the tubes loose and relaxed after installation, no contortion or folding. CAUTION:
All the tubes should be installed manually, no not utilize any tool. CAUTION:
If any damage or leakage occurs in the reagent container, or the reagents have exceeded expiry date, it can not be used online, please contact SINNOWA agency or suppliers for replacement, or contact with SINNOWA Customer Service.
WARNING:
3.5 Recorder Paper Installation
Please refer to Section 9.3.11 of Chapter 9 “Troubleshooting”.
3.6 Printer Installation (such as equipment)
Remove the printer from the shipping carton along with the manual, according to Section3.1to inspect the printer carefully and perform the following procedures: a) Find a suitable location adjacent to the analyzer, the recommended position is a distance of at least 30cm from right side of the analyzer.
b) Assemble the printer attachments as directed in the printer manual.
c) Attach cable plug to the side with “PRINTER” label on rear panel of the analyzer, the other end connect to the printer.
d) Be sure that the printer power switch is OFF, and plug one side of power cord into electric outlet.
e) Install printing ribbon, cable as directed in the manual. f) Install printing paper as directed in the manual.
g) Turn the printer on and begin the printer’s self-test. NOTE:
Do first turn on printer, and then turn on the instrument.
3.7
Power Cord Connection
Make sure the power switch on the backboard is off (O), and connect the analyzer with the power supply. The earth device on the rear panel should be well grounded.
NOTE:
The power cord should be connected to the special electric outlet.
3.8Startup
Turn on the power switch on the rear panel, then the indicator light on the front panel will become orange, the analyzer start initialization, and automatically absorb diluent, lyse and detergent, then rinse the tubing. The Blood Cell Analyze window appears after initialization (See Figure 3-1). Under this window, next sample number could be altered. Detailed as follows:
Figure 3-1
b) Shift to adjust the position of cursor, input the serial number, press ENTER,
then edit the patient’s data. Press ENTER, the serial number is altered successfully, and this serial number is that of next sample; if not want to alter serial number, select ESC, return to the Blood Cell Analyze window, current serial number plus 1
automatically is that of sample.
3.9 Background Test
Background test should be performed after startup and before blood sample test, the procedures are as follows:
a) Present clean tube beneath the probe. At Blood Cell Analyze window, press DILUENT to dispense the diluent into the tube.
b) Press FUNC in instrument surface, shift , select “Serial number” menu, press ENTER to modify the serial number to 0.
c) Put the tube beneath the probe; make sure the probe touch tube bottom lightly. d) Press Run key on the front panel, the tube can be moved away only after hearing
“Di”, instrument start to counting and measure automatically.
e) After counting, background test result display on screen, the acceptable range of the testing result for background test is listed in Table 3-1
f) Instrument will give trouble alarm and display on top right corner when the
Number Mode
Name Sex Age
Case Section
office Bed No.
送检者 Proofer 审 核 者
sensor clog, please consult Chapter 9 «Troubleshooting».
Table 3-1 the acceptable range of
parameter background u
WBC
≤
0.3
1
RBC
≤
0.03
1
PLT
≤
10
1
HGB
≤ 2
g
HCT
≤
0.5
%
If the test results are out of this range, repeat the above a) ~d) step until the test results are within the expected range. Refer to Chapter 9 for “Troubleshooting” if the results still do not meet performance expectation after 5 times’ repetition.
NOTE:
Serial number for background test is set to be 0 by the software. After set to 0, test result will not be stored.
NOTE:
Figure 3-11
3.10 Quality Control
Quality control should be performed before daily test or on the initial installation. Please refer to Chapter 5 “Quality control”.
3.11Calibration
SINNOWA measure the analyzer severely at the factory before shipment. On the initial installation, if the test results of background and quality control are normal, recalibration is not necessary. If not and there are shifts or trends in some parameters, recalibrate the analyzer referring to Chapter 6 “Calibration”.
CAUTION:
Consider all the clinical specimens, controls and calibrators etc, that probably contain human blood or serum as being potentially infectious, wear standard laboratory clothing, gloves and safety glasses and follow required laboratory or clinical procedures when handling these materials.
CAUTION:
Blood collection and disposal should be performed according to the municipal
government or laboratory’s requirements. NOTE:
Be sure the blood collection clean and contamination-free. Eligible gelation inhibitor is required.
NOTE:
Do not shake the sampler violently. NOTE:
Venous blood can only be stored for 4 hours at room temperature. SINNOWA recommends the blood sample be kept at temperature between 2-8℃ for longer storage, if the blood sample can not be disposed within short time.
3.12.1 Venous (whole) Blood Collection
Collect venous (whole) blood sample through vein-puncture and store in a clean sample tube with EDTA-K2· 2H2O, which can keep the configuration of WBC, RBC
and control platelets aggregation, gently shake the tube 5~10 times to make it well mixed.
3.12.2 Peripheral (pre-diluted Collection
Generally local puncture is employed for the collection of peripheral blood the
typical method of which is fingertip puncture.The volume of blood collection tub is set to be 20ul.
CAUTION:
Precision and repeatability of instrument except for related with reagent and instrument quality also largely with operating and clinical doctor’s quality. CAUTION:
the tissue fluid from mixing with blood, thus causes error in results. CAUTION:
Must insure blood collection is 20ul when collect blood sample by fingertip puncture, to avoid incorrect results due to blood volume insufficient.
3.13 Switch between Whole Blood and Pre-diluted Blood
Mode appears in the instrument screen is current operational mode.
In case current operational mode is “whole blood” mode, press mode key in the keyboard will pop up follow figure 3-2.
Switch to pre-diluted mode
OK ESC Figure 3-2
Shift to select “OK”, press ENTER, instrument returns to the Blood Cell Analyze window, current operational mode switches to “pre-diluent” mode.
Method of switching from “pre-diluent” to “whole blood” mode is the same as stated above.
3.14 Blood Sample Counting and Analysis
3.14.1 Counting and Analysis Process
Blood sample counting and analysis should be quickly done after collection, suggest within 3-5 minutes.
■
Pre-diluted Mode
a) Present the empty clean tube beneath the probe. At Blood Cell Analyze window, presses DILUENT; the diluent will be dispensed into the tube. Remove the tube. b) Add 20ul blood sample in the constant volume blood collection tube to the prepared tub filled with diluent quickly, and gently shake the tube to make them well mixed.
c) Present the tube filled with blood sample under the probe (keep probe touch the tube bottom lightly). Press Run key on the front panel and the working status indicator becomes orange. Only remove the tube after buzzer gives “Di”.
■
whole blood mode
a) Gently shake the tube to well mix the blood sample, then present the sample tube under the probe (keep the probe at the bottom of tube). Press Run key and the working status indicator in the front panel become orange. Only remove the tube after buzzer gives “Di”.
b Instrument starts analyzing the sample automatically, please wait for the result. The test results will be displayed behind relevant parameter at the Blood Cell Analyze Window after counting and analysis, and relative size histograms of WBC, RBC and PLT will be drawn. (As Figure 3-1 shown).
If problems like clogs or bubbles occur during the counting and analysis procedures, the analysis will be stopped automatically, the alarm rings and indication is given on the screen, the test results are invalid. Troubleshooting please refer to Chapter 9
“Troubleshooting” for solution.
If the test results for parameters exceed the expected limits, an “L” or “H” will appear in front of the parameter which appears in the screen and is printed out. “L” means test result is lower than the lower limit while “H” means test result is higher than upper limit.
If test result is ***, indicates that this data is invalid. CAUTION:
Insure correctly set work mode “whole blood” and “Pre-diluent” before counting, specific consult 3.13.
CAUTION:
Analyze in “Pre-diluent” mode, count the remaining sample again when necessary. CAUTION:
Analyze in “Pre-diluent” mode, must use one-off tube and fix-capacity sample tube, reusage will cause cross contamination and lead to incorrect result.
CAUTION:
According to the requirement of clinical medicine, blood cell does not distort, work temperature for correct counting is 18 ℃~35℃. Customer should take proper measure to keep this range to insure correct counting.
CAUTION:
To doubtful blood sample medically, artificial countercheck should be done according to relevant regulation.
3.14.2 Histogram Alarm Message
3.14.2.1 WBC Histogram Alarm
When WBC histogram appears unusual, R1 R2 R3 R4 RM means respectively as follows:
R1 It indicates that the left area of lymphocyte is abnormal.
Probable cause RBC 溶血不全 血小板凝结 巨大血小板 疟原虫 有核红细
胞 异常淋巴细胞 冷凝球蛋白及脂类颗粒等
RBC not lysed thoroughly, platelets aggregated, huge platelets, plasmodiums, nucleolate RBC, abnormal lymphocytes, condensed globins and lipid particles, ect.
R2 It indicates that the area between lymphocyte and monocyte is abnormal. Probable cause 原幼细胞等存在
Allotypic.lymphocytes, abnormal lymphocytes, plasma cells, eosinophilic granulocyte increased basophilic granulocytes, blasts and so on.
R3 It indicates the area between monocyte and granular cell is abnormal.
Probable cause Immature granulocytes, abnormal cells, eosinophilic granulocyte exist.
R4 It indicates that the right area of granular cell is abnormal. Probable cause Increased granular cells
RM It indicates that in the sub area of WBC, many areas except for above areas are abnormal.
Probable cause Above causes co-exist.
3.14.2.2 PLT Histogram Alarm
Pm It indicates that the broader area between platelet and RBC is abnormal. Probable cause The clotting of platelets, large platelets, small RBC, cell debris and fibrin exist.
3.15 Report Output
Inner thermal recorder and the outer printer are optional according to customers’ needs. The followings happen after blood sample analysis.
If Auto Print is on, parameter language is Chinese; Recorder will print parameter test report in Chinese.
If Auto Print is off, press REC, blood cell analyze report of current sample can be printed by inner recorder.
If Auto Print is off, press PRINT, blood cell analyze report of current sample can be printed by outer printer.
The modes of recorder, printer, and test reports are set up at Settings. Refer to section 4.5 in Chapter 4 for specific procedures.
CAUTION:
Do NOT pull the recorder paper violently but push it at an even pace 匀速的送出) when the recorder is running, or it may cause damage to the recorder.
3.16
Shutdown
Shutdown procedure is performed after daily operation and before turning the analyzer off. Daily maintenance and tubing-rinse is needed to ensure no protein aggregation exist during non-working and keep sampling system clean. Specific shutdown steps as follow:
a) Add about 4ml detergent into tube.
b)Press FUNC, shift , select “Shutdown “menu, press ENTER, “Shutdown
Figure 3-3
c) Press OK to turn off the instrument, present sample tube with detergent to the probe (insure probe touch tube bottom lightly). Press Enter and the working status indicator in the front panel will become orange. Remove the tube until hear “Di”.
d) Instrument begins cleaning and maintaining the tubing.
e) After turning off the instrument, “Thank you and now turn off power” will appear to instruct the operator to turn off the switch on the rear panel.
f) Tidy the work platform and dispose waste liquor.
g) Press Esc if the operator does not want to turn off the analyzer, it will return to Blood Cell Analyze window.
CAUTION:
Wrong operations on turnoff procedure will decrease reliability and performance of the analyzer, any problems derived from that will NOT be guaranteed free by SINNOWA.
CAUTION:
Wrong turnoff leads to system data loss easily, and cause system operation failure. CAUTION:
Wrong turnoff or not turnoff, instrument will not prime the tubing, it easily leads to albumen aggradations of blood sample in tubing and causes clog.
3.17
Test Result Inquiry
3.17.1 Historical Data Choice Review and Output
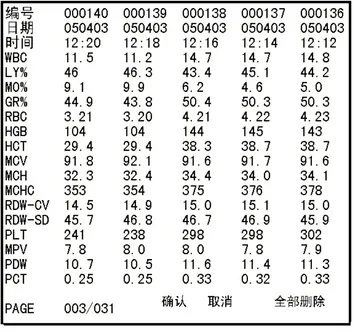
a) At Blood Cell Analyze window, press FUNC, shift to select “Data Inquiry”, press ENTER, instrument enter into data inquiry window, as Figure 3-4 shown.
b) Press to review the data backwards or forwards. The data of 5 samples at most can be reviewed in one page in sequence of test time.
c) Press on keyboard to select single sample, move cursor to the sample No. press ENTER into Details Inquiry window to browse specific historical sample data and print it out by recorder or printer.
d) Press FUNC, return to Test Result Inquiry window.
3.17.2
Historical Data Deletion
Figure 3-4
3.17.2.1Auto Deletion
When storage test data nearly reach 2,000, instrument will indicate “memory full, please backup”, hereafter, user still can count for 50 times. After 50 times counting, instrument will delete all the data automatically, so should backup the stored test data after appear “memory full, please backup”.
3.17.2.2
Manual Deletion
Manual deletion is divided into single data deletion and all data deletion. Details as follows:
All data deletion
a At blood cell analyze window, press FUNC, shift ,select “Data review”, press ENTER into Test Result Inquiry window, as Figure 3-4 shown:
b Confirm that cursor is at the last sample ID of first page; Press DILUENT, then press DEL, OK, ESC and all deletion will appear at the lower left, as Figure 3-5 shown.
Figure 3-5 single data deletion
a) At blood cell analyze window, press FUNC, shift , select “Data Inquiry”,
press ENTER into Test Result Inquiry window, as figure 3-4 shown.
b Press DEL, OK and ESC will appear in the screen.
c Select “OK” to delete the last data; Select “ESC” to return to Test Result Inquiry window.
NOTE:
After all data deletion, one historical data still displays at Blood Cell Analyze
Window, which can’t be inquired at Test Result Inquiry window. This data will be deleted automatically when a new data is stored.
NOTE:
Single data deletion, only can delete from the last one. NOTE:
Chapter 4 FUNC introduction
At Blood Cell Analyze window, press FUNC into function menu, as 4-1 shown.
Note Operation introduced in this chapter will change some run actions of the instrument, please confirm the necessity of these changes.
4.1 Maintenance Menu
←ser can press “OK” to enter into this menu, so as to do "daily maintenance", "weekly maintenance", "yearly maintenance" for the instrument and pipe cleaning and emptying. As follow 4-2 shown:
1 Maintenance menu
6 Calibrations
2 Flush 7 System setting
3 Quality control 8 Prime
4 Query result 9 External Keypad
5 Normal range setting
Figure 4-2 4.2 Flush
User can kick back the jewel hole under this window, so as to discharge blockage.
Attention: it is forbidden that changing the blood sample number into 0, because if the number is 0, the result will not be kept.
4.3 Quality Control
Specific method and step consult chapter 6 “Quality control”
4.4 Query Result
Users can inquiry the tested data, parameter and histogram of blood sample, and by the internally installed grapher recording meter or external connection printer, the data and parameter can be outputted. If necessary, users can delete selected test parameters or
all test parameters. Specific operations consult 3.17 “Query Result Inquiry” 4.5 Normal Range Setting
The analytic system in the instrument gives 19 upper and lower limits of parameters. If the tested data range exceeds the setting value range, system will mark “H” or “L,
H” besides the tested data, so as to indicate that it exceeds the upper limit of the parameters. If “L”, it means it exceeds the lower limit of that. Specific details consult chapter 7 “Parameter Boundary”. ←sers can set the normal ranges of people, children and animals. Attention: the software default it as “ordinary person”. If you want to
choose other ranges, enter into it, and then ESC, it will be confirmed. As 4-3 shown:
Figure 4-3 4.6 Calibrations
Refer to the details followed. 4.7 System Setting
At window in Figure 4-1, select “System setting”, press ENTER, system setting window appears, see figure 7-1.
Ordinary person
Children
Girl
Dog
Horse
Others
Others
Others
1 Printer
2 Measuring unit
7 Three–part setting
Figure 7-1
4.7.1 Printer Setting
Users can enter this menu to choose self-contained printer or off-line one, auto print. At system setting window as figure 7-1, shift to select Auto print, press ENTER,
and shift to select ON or OFF, press ENTER.
Select ON, after counting, test report will be printed by recorder (printer) automatically.
Users can alter instruments time, specific methods as follows:
a) At system setting window as figure 7-1, shift to select “Time setting”.
b) Press ENTER, cursor will move to date automatically. You can choose date format
as “YY-MM-DD”, “MM-DD-YY” and “DD-MM-YY”.
c) Press to control the position of cursor. Input 0-9, you can alter Y, M, D and time.
d) After alteration, press ENTER, System setting window will come back.
4.7.2 Measuring Unit
At system setting window as figure 4-7, shift to select “Alarm”, press ENTER, and
shift to select ON or OFF, press ENTER.
At system setting window as figure 4-3, shift to select “Key tone”, press ENTER,
and shift to select ON or OFF, press ENTER.
Select ON, you will hear bumming when press keyboard; select OFF, no bumming. 4.7.3 Hospital Name
Users can enter this menu to amend or increase hospital names in the printed report. First, at system setting window as figure 4-1, shift to select “System setting”, press ENTER, enter figure 7-1, choose “hospital name” with the direction key, then press
\
Figure 7-3
Note: At this window, you can only input Chinese or English. After input, press ENTER to conserve it.
4.7.4 Liquid Level Sensor
用户在此菜单下可以选择缺稀释液 缺溶血素 缺清洗剂报警???
Users can choose alarm of lacking diluent, lyse and detergent.
At system setting window as figure 4-7, shift to select “Alarm”, press ENTER, and
shift to select ON or OFF, press ENTER.
Select “ON”, after counting, when reagent is not enough, there is letter twinkling hint
on top right corner of screen, at the same time; buzzer gives “Di” for alarm. Select OFF, after counting, when reagent is not enough, there is no hint.
First, choose “Liquid level sensor” with the direction key, press “OK”, enter figure 7-3. You can choose all or certain ones. First, choose that with the direction key, then
pitch on it with pressing “OK”
Figure 7-4 4.7.5 Display Language
Parameter language
At system setting window as figure 4-7, shift to select “Display language”, press Hospital name
ENTER
Diluent alarm
Hemolysin alarm
Washing agent alarm
ENTER, shift to choose “Chinese” or “English”, and press ENTER.
Choose “Chinese”, parameter at the blood cell analyze window will display Chinese, as figure 4-5 shown. The printed report is Chinese format.
Figure 4-5
Choose “English”, parameter at the blood cell analyze window will display English, as figure 3-1 shown. The printed report is English format.
4.7.6 Measurement Gain
图7-6
4.7.7 Three-part Setting
Users can choose three –part setting or not.
First, at system setting window as shown in figure 4-1, shift to select “System
setting”, enter figure 7-1, then select “Three-part setting”, press “OK”, enter this menu. If three –part setting is needed, select it. If not, do not select it.
If “Thanks for your support” appears in the screen, it indicates serial-number has passed confirmation of system, so you can go on using the instrument.
If “Password error” appears in the screen, it indicates serial-number is wrong, please try again..
Press MENU, the main display will come back. NOTE:
1 The serial-number is on the barrelhead of the rubber drum which packs the diluents. 2 when input the serial-number:
WC gain
RC gain
1
1.25
1.5
a, press on the keyboard, , you can shift the position of cursor.
b, press the number key on the keyboard, you can input number.
c, “." key on the keyboard is used for letters input: single click to input A,
double-click to input B, triple-click to input C quadruple-click to input D,
quintuple-click to input E, sextuple-click to input F.
4.7.8 Cleaning Time
Users can set instrument auto-cleaning.
First, at system setting window as shown in figure 4-1, shift to select “System setting”, enter figure 7-1. On 7-1 interface, shift to select “cleaning time”, press ENTER to enter 7-8. According to need, users can clean instrument by pressing time or test times, and pressing both is ok.
Figure 7-8 4.7.9 Report Format Setting
User can choose a prefer format to print the report.
First, at the system setting window as figure 4-1 shown, shift to select “system
setting”, enter into figure 7-1. In 7-1 interface, shift to select “report format
setting”, press ENTER to figure 7-9, any format can be chosen. As per time cycle every hour clean one time
4.7.10 Display Brightness
User can increase or reduce brightness here.
First, at the system setting window as figure 4-1 shown, shift to select “system
setting”, enter into figure 7-1. In 7-1 interface, shift to select “display brightness”, press ENTER, and shift to increase or reduce the display brightness.
4.7.11 Landmark Setting
Users can set minimal and maximal cells of WBC RBC PLT which participated in counting originally here.
First, at system setting window as figure 4-1 shown, shift to select “system
setting”, press ENTER, enter into figure 7-1. In 7-1 interface, shift to select
“landmark setting”, press ENTER to enter it, as figure7-11 shown. WBC_L: minimal WBC volume participated in counting; WBC_L: maximal WBC volume participated in counting; LY-MO Delimitation landmark between lymphocyte and neutrophile cell; MO-GR: Delimitation landmark between neutrophile cell and granular cell; RBC_L: minimal RBC volume participated in counting; RBC_H Maximal RBC volume participated in counting; PLT_L minimal platelet volume participated in counting;
PLT_H Maximal platelet volume participated in counting; Report format 1 with
histogram
Report format 1 without histogram
Report format 2 with histogram
Report format 2 without histogram
Report format 3 with histogram
WBC-L WBC-H
LY-MO MO-GR
RBC-L RBC-H
PLT-L PLT-H
4.7.12 Time Setting
Users can set or alter time and date or date format here.
First, at system setting window as figure 4-1 shown, shift to select “system setting”, press ENTER, and enter into figure 7-1. In 7-1 interface, shift to select “time
setting”, press ENTER to enter to select “time format ” or “time setting”, as
figure7-12 shown.
Time format is divided into three types: YMD, DMY and MDY.
Figure 7-12 NOTE:
After the instrument goes into auto dormancy, press any key on the keyboard to esc dormancy.
4.8 Prime
Prime and rinse the wholetubing to keep the whole tubing full of diluents.
“Diluent prime”, “Lyse prime” and “Detergent prime” can be selected.
4.9 External Keypad
←sers can select “External keyboard”, then press ENTER to change it into PS2. Time format
Time setting
25FL
98FL
30FL
2FL
400FL
110FL
150FL
4.10 Tubing Clean
Clean the obstinate stem in probe with the probe detergent. Specific as follow: a) Put about 4 ml probe detergent to the clean test tube.
b) At the Blood Cell Analyze window, press FUNC into function menu window. c) At function menu window, shift to select “Tubing clean”, press ENTER,
“OK”and “ESC”will appear on the screen, as figure 4-6 shown.
Figure 4-6
d) Put the tube with probe detergent beneath sample probe, shift to move cursor to
“OK”, press ENTER, analyzer inhale probe detergent automatically into WBC and RBC probe cup separately, then soak for 6 minutes. Then progress bar will appear on the screen to show the progress, number on progress bar descending with course, as Figure 4-7 shown. Instrument will clean tubing automatically after 6 minutes, schedule bar disappear, back to Blood Cell Analyze window.
Figure 4-7
e) If users want to exit “Tubing clean” program in midway, Can press F←NC after
the number on progress bar descending to 5, “OK” and “ESC” will appear. Select
after progress bar disappears, back to Blood Cell Analyze window; select “ESC”, instrument continues soaking the tube.
4.11 Shutdown
Shutdown procedure must be performed after daily operation and before turning the analyzer off. Instrument does daily maintenance and tubing-rinse to avoid protein aggregation in tubing during non-working and keep sampling system clean.
Specific step consults §3.16 shutdown NOTE:
Wrong operation on turnoff procedure is prohibited, nor will it decrease reliability and performance of the analyzer. Any problems derived from that will NOT be guaranteed free by SINNOWA.
NOTE:
Wrong turnoff leads to system data loss easily and causes system operating failure. NOTE:
Wrong turnoff will cause instrument does not Prime and clean the tubing, easily lead to albumen aggradations of blood sample in tubing, cause clog.
Chapter 5 Quality Control
To ensure precision and accuracy of results produced by Sinnowa hematology analyzer, quality control (QC) measures are required. For quality control progress, it is strongly recommended to strictly follow the QC process and use Sinnowa recommended QC material.
QC measures should be performed:
a) After daily start-up, before beginning the analyses; b) After reagent replacement;
c) After calibration;
d) After maintenance, repair or part replacement; e) According to clinical laboratory QC regulation.
The instrument provides 12 parameters and 3 levels in a total of 9 groups of QC settings for users. During the QC program users can monitor 12 parameters at the same time or if required, an individual parameter also can be tested separately as well.
Because of the QC material produced by different manufacturers, there should be variations for their mixture and treatment. To ensure the result accuracy, users should pay attention to the following matters when dealing with QC material:
a) Stored under the manufacturer's recommended storage conditions. It's better to place the QC material in the central part of the refrigerator. Do not leave it on
refrigerator door or other places near the door, as these areas represent the extremes of temperature within the refrigerator.
b) Check the status of QC material and ensure there is no crack and breakage on it's container.
c) Be sure to follow the user's guide of QC material. Mix and warm it up slowly. d) Check the expiry date of QC material. The use of any expired product is prohibited.
e) Any opened QC material over the manufacturer's recommended time is prohibited.
f) Intensive heat or vigorous shake of QC material is prohibited;
g) A new batch of high, medium and low levels of QC materials is used and each of them should be tested for three times. Compare the data obtained with the last batch and check variance of the test results.
CAUTION:
As all human derived products including clinical specimen, control and calibrator should be treated as a potential biohazard, all staff must wear appropriate personal protective equipment (eg, protective clothing, gloves, and goggles) and follow safe laboratory practices for dealing with biological materials.
5.2 Edit
The QC material manufacturers stated reference values and ranges should be previously input by user prior to running the quality control program. Any incomplete or illegal data input lead to unexpected consequences: the QC program will not run or only effective parameters can be monitored. The detailed operation process shows below:
Fig. 5-1
b) Select "QC Groups" and press "confirm" to access the submenu. Press " " to select group 1,2 or 3. After selection, press "confirm" to return to QC screen.
c) Move the cursor to "QC Levels" by pressing " "/" " and press "confirm" to access
the submenu. Press " " to select level high, normal or low. After selection, press "confirm" to return to QC screen.
d) Move the cursor to "QC ↑alues Setup” by pressing " "/" " and press "confirm" to
access the submenu (fig. 5-2) for QC parameters setup. Move the cursor to "Lot" item and input QC material batch number by pressing numerical key on the keyboard.
e) Press " " to move the cursor to "QC material reference values". Input QC material
reference values by pressing numerical key on the keyboard.
f) Press " " to move the cursor to "QC material reference ranges". Input QC material reference ranges by pressing numerical key on the keyboard.
1 Run QC
2 QC Groups 3 QC Levels 4 QC Data
5 Absolute QC Chart
Fig. 5-2
g) While edit is completed, press "menu" button and two icons of "confirm" and "cancel" appear at the bottom of the screen. Press " " to select.
h) Return to QC screen for other QC operations.
NOTE:
If there is a illegal data input for one parameter, the reference value and range of which is a invalid data and will not be displayed. User should correct it. Otherwise, only effective parameters can be monitored.
5.3 Run QC
As the settings of QC groups, levels and relevant parameters are completed, QC program is able to run. According to the requirement of clinical laboratory, users can monitor one certain parameter or all 12 parameters for QC measurement. Users are advised to run QC program at high, medium and low levels everyday or follow the clinical laboratory regulation. The detailed operation process shows below:
a) From the blood cell analysis window, press the "menu" button and then " "/" " to access quality control item. Press "confirm" to execute to display the QC window as shown in fig.5-1.
b) Move the cursor to "QC Groups" by pressing " "/" " and press "confirm" to access the submenu. Press " " to select corresponding group. After selection, press
"confirm" to return to QC screen.
c) Move the cursor to "QC Levels" by pressing " "/" " and press "confirm" to access the submenu. Press " " to select corresponding level. After selection, press
"confirm" to return to QC screen.
d) Move the cursor to "R←N QC" by pressing " "/" " and press "confirm" to start QC program. The "Ready" sign is flashing on the screen
Fig 5-5
f) While the counting process is completed, return to the window shown in fig 5-4. Press "Menu" button to return to the QC window.
g) If blood cell counting is not required, Press "Menu" button after the step d (see fig 5-4) and return to QC window for other operations (see fig 5-1).
NOTE:
If total number of QC data reaches 31, a tip of “Memory full, Please backup” appears in the window. User should enter the QC data window and backup stored QC data. After deleting all QC data, run the QC program again.
5.4 QC Chart
Assigned values (target value and accepted range) as well as averages, standard deviations (SD) and coefficients of variation (CV) are calculated based on the QC measurements and are displayed together with LEVEY-JENNINGS chart which is a Gaussian distribution. On the x-axis the number of the control run is plotted. A mark is made indicating how far off the actual result was from the mean. The central line represents the mean which is the expected value for the control. The dotted line on either side of the mean represents the +2 and –2 SD which is the reference range for the control. The high, medium and low levels of LEVEY-JENNINGS charts are displayed together. Each LEVEY-JENNINGS chart contains 31 QC data at most. Select "QC data" and access the QC data window. The current LEVEY-JENNINGS chart can be sent to an external printer by pressing "Print" button.
5.5 QC Data
5.5.1 QC Data Inquiry
QC input data and output results are auto-stored in the memory in chronological order and they can be retrieved at any time. Users can check the system precision and accuracy by comparing the actual QC results with the reference values and ranges. The detailed operation process shows below:
access quality control item. Press "confirm" to execute to display the QC window as shown in fig.5-1.
b)Move the cursor to "QC Data" by pressing " "/" " and press "confirm" to access the QC Data Inquiry window (see fig 5-6).
Fig. 5-6
The current items can be sent to an external printer by pressing "print" button.
5.5.2 QC Data Deletion
When the QC data reached a large amount, it is time-consuming work for user to search one certain result by browsing many pages. Therefore, if required, users are advised to delete useless data routinely.
5.5.2.1 Auto-Delete