MySQL for Python
Integrate the flexibility of Python and the power of
MySQL to boost the productivity of your applications
Albert Lukaszewski, PhD
MySQL for Python
Copyright © 2010 Packt Publishing
All rights reserved. No part of this book may be reproduced, stored in a retrieval system, or transmitted in any form or by any means, without the prior written permission of the publisher, except in the case of brief quotations embedded in critical articles or reviews.
Every effort has been made in the preparation of this book to ensure the accuracy of the information presented. However, the information contained in this book is sold without warranty, either express or implied. Neither the author, nor Packt Publishing, and its dealers and distributors will be held liable for any damages caused or alleged to be caused directly or indirectly by this book.
Packt Publishing has endeavored to provide trademark information about all of the companies and products mentioned in this book by the appropriate use of capitals. However, Packt Publishing cannot guarantee the accuracy of this information.
First published: September 2010
Production Reference: 1160910
Published by Packt Publishing Ltd. 32 Lincoln Road
Olton
Birmingham, B27 6PA, UK. ISBN 978-1-849510-18-9 www.packtpub.com
Credits
Author
Albert Lukaszewski
Reviewers Swaroop C H
Andy Dustman
Geert JM Vanderkelen
Acquisition Editor Steven Wilding
Development Editor Wilson D'souza
Technical Editors Prashant Macha
Charumati Shankaran
Indexer
Hemangini Bari
Editorial Team Leader Aanchal Kumar
Project Team Leader Priya Mukherji
Project Coordinator Prasad Rai
Proofreader Aaron Nash
Production Coordinator Shantanu Zagade
About the Author
Albert Lukaszewski
is principal consultant for Lukaszewski Consulting Services in southeast Scotland. He has programmed computers for 30 years. Much of his experience has related to text processing, database systems, and Natural Language processing (NLP). Currently he consults on database applications for companies inthe financial and publishing industries.
In addition to MySQL for Python, Albert Lukaszewski has also written "About Python", a column for the New York Times subsidiary, About.com.
Many people had a hand in this work beyond my typing at the keyboard. Some contributed by their effort and others by
their sacrifice. Thanks to the team at Packt for their consistent
understanding and support. I am particularly thankful to Steven Wilding for help and support above and beyond the call of duty.
Thanks also to Andy Dustman, Geert Vanderkelen, and Swaroop for
their helpful review of this book and for making so many significant
and helpful recommendations. This book would be much the poorer were it not for their suggestions.
To Richard Goodrich, who first introduced me to Python, thank you
for liberating me from bondage to that other P-language. Funny what a little problem can lead to.
My heartfelt thanks and appreciation go to my wife, Michelle, and my sons, Cyrus and Jacob. The latter was born during the writing of this book and consistently brightens even the darkest Scottish
weather with his smile. I appreciate your sacrifice. I could not have
written this book without your support.
Finally, my thanks to my brother, Larry, who first introduced me to
About the Reviewers
Swaroop C H
has previously worked at Yahoo! and Adobe, has co-founded a startup, has written two technical books (one of which is used as a text book in more than ten universities worldwide), writes a popular blog that has been consistently rated one of the top ten blogs in India, and is a marathoner. More details athttp://www.swaroopch.com/about/.He has written two technical books—A Byte of Python and A Byte of Vim—beginner books to Python and Vim respectively. They are freely available under the Creative Commons license on his website www.swaroopch.com.
Andy Dustman
(http://profiles.google.com/farcepest) is the primary author of MySQLdb, the MySQL interface for Python.The MySQL-Python project is supported and funded purely by volunteers and donations by the user community at ( http://sourceforge.net/projects/mysql-python/).
Andy has been using Python since 1997, and currently works on Django applications (using MySQL, of course) when not doing system and network administration. In his spare time, he rides motorcycles.
I would like to thank Kyle VanderBeek, who has recently become a co-developer on MySQLdb, and has helped to push me a bit to get some things done. 12 years is a long time to be working on a project, and motivation is sometimes hard to come by.
Ed Landa, for taking a chance on a grad school dropout, and for giving me the opportunity to release MySQLdb under an open source license.
Laura Michaletz, who encourages me and somehow manages to make me feel like a superstar.
Table of Contents
Preface
1
Chapter 1: Getting Up and Running with MySQL for Python
7
Getting MySQL for Python 7
Using a package manager (only on Linux) 8
Using RPMs and yum 9
Using RPMs and urpm 9
Using apt tools on Debian-like systems 9
Using an installer for Windows 10
Using an egg file 10
Using a tarball (tar.gz file) 14
Importing MySQL for Python 17
Accessing online help when you need it 18
MySQLdb 18
_mysql 19
Connecting with a database 20
Creating a connection object 20
Creating a cursor object 22
Interacting with the database 22
Closing the connection 23
Multiple database connections 23
Summary 24
Chapter 2: Simple Querying
25
A brief introduction to CRUD 25
Forming a query in MySQL 26
SELECT 27
* (asterisk) 27
FROM 28
staff 28
Other helpful quantifiers 29
Passing a query to MySQL 37
A simple SELECT statement 38
Modifying the results 39
Using user-defined variables 40
Determining characteristics of a database and its tables 41
Determining what tables exist 42
Assigning each table a number 43
Offering the options to the user 43
Allowing the user to detail a search query 44
Changing queries dynamically 45
Pattern matching in MySQL queries 45
Putting it into practice 46
Project: A command-line search utility 48
Preparing a database for searching 49
Planning your work, then working your plan 50
Develop a well-abstracted search functionality 50
Specifying the search term from the command-line 52
Implementing and incorporating the other functions: -t, -f, and -o 55
Including an option for an output file 57
Room to grow 57
Summary 58
Chapter 3: Simple Insertion
59
Forming a MySQL insertion statement 60
INSERT 60
Helpful ways to nuance an INSERT statement 66
INSERT...SELECT... 66
INSERT DELAYED… 70
Passing an insertion through MySQL for Python 72
Setting up the preliminaries 72
A simple INSERT statement 73
More complex INSERT commands 75
Using user-defined variables 75
Using metadata 77
Querying the database for its structure 78
Retrieving the table structure 80
Changing insertion values dynamically 82
Validating the value of name 83
Validating the value of price 83
Querying the user for a correction 84
Passing fish and price for validation 84
Essentials: close and commit 85
In need of some closure 85
What happened to commit? 85
Why are these essentials non-essential? 85
Project: A command-line insertion utility 86
The necessary modules 86
The main() thing 87
Coding the flag system 88
Testing the values passed by the user 88
Try to establish a database connection 89
Showing the tables 90
Showing the table structure, if desired 90
Accepting user input for the INSERT statement 91
Building the INSERT statement from the user input and executing it 92
Committing changes and closing the connection 93
Coding the other functions 93
valid_digit() and valid_string() 93
Chapter 4: Exception Handling
101
Why errors and warnings are good for you 101
Errors versus warnings: There's a big difference 104
The two main errors in MySQLdb 104
DatabaseError 105
InterfaceError 105
Handling exceptions passed from MySQL 105
Python exception-handling 105
Catching an exception from MySQLdb 106
Raising an error or a warning 107
Making exceptions less intimidating 108
Catching different types of exceptions 109
Types of errors 109
Catching one type of exception 113
Catching different exceptions 114
Combined catching of exceptions 115
Raising different exceptions 115
Creating a feedback loop 116
Project: Bad apples 117
Chapter 5: Results Record-by-Record
129
The problem 129
Iteration: What is it? 137
while...if loops 138
The for loop 139
Iterators 140
Illustrative iteration 141
Iteration and MySQL for Python 141
Generators 142
Using fetchone() in a generator 142
Using fetchmany() in a generator 143
Project: A movie database 144
Getting Sakila 145
Creating the Sakila database 145
The structure of Sakila 146
Planning it out 148
The SQL statements to be used 148
Returning the films of an actor 148
Returning the actors of a film 149
Accepting user data 150
A MySQL query with class 150
The __init__ method: The consciousness of the class 151
Setting the query's type 151
Creating the cursor 152
Forming the query 153
Executing the query 154
Formatting the results 155
Formatting a sample 155
Formatting a larger set of results 156
The main() thing 157
Calling main() 158
Running it 159
Room to grow 159
Summary 160
Chapter 6: Inserting Multiple Entries
161
The problem 161
Why not a MySQL script? 162
Lack of automation 162
Debugging the process 162
Why not iterate? 163
A test sample: Generating primes 163
Comparing execution speeds 166
Introducing the executemany() method 166
executemany(): Basic syntax 167
executemany(): Multiple INSERT statements 168
executemany(): Behind the scenes 170
MySQL server has gone away 173
Command-line option configuration 173
Using a configuration file 174
More than 16 MB is often unnecessary 174
Project: Converting a CSV file to a MySQL table 175
The preamble 175
Chapter 7: Creating and Dropping
183
Creating databases 183
Test first, create second 184
CREATE specifications 185
Specifying the default character set 185
Specifying the collation for a database 186
Declaring collation 186
Finding available character sets and collations 187
Removing or deleting databases 187
Avoiding errors 188
Preventing (illegal) access after a DROP 188
Creating tables 189
Doing it in Python 193
Creating databases with MySQLdb 194
Testing the output 194
Dynamically configuring the CREATE statement 195
Dropping databases with MySQLdb 195
Creating tables in Python 195
Verifying the creation of a table 196
Another way to verify table creation 197
Project: Web-based administration of MySQL 198
CGI vs PHP: What is the difference? 199
Basic CGI 200
Using PHP as a substitute for CGI 202
CGI versus PHP: When to use which? 203
Some general considerations for this program 203
Program flow 203
The basic menu 204
Authorization details 206
Three operational sections of the dialogue 206
The variables 206
Planning the functions 207
Code of each function 207
Connecting without a database 207
Connecting with a database 208
Database action 208
Chapter 8: Creating Users and Granting Access
219
A word on security 219
Creating users in MySQL 220
Forcing the use of a password 221
Restricting the client's host 221
Creating users from Python 223
Removing users in MySQL 224
DROPping users in Python 225
GRANT access in MySQL 225
Important dynamics of GRANTing access 226
The GRANT statement in MySQL 226
Using a WITH clause 230
Granting access in Python 231
Removing privileges in MySQL 233
Basic syntax 233
After using REVOKE, the user still has access!? 233
Using REVOKE in Python 235
Project: Web-based user administration 236
New options in the code 236
Adding the functions: CREATE and DROP 239
Adding CREATE and DROP to main() 240
Adding the functions: GRANT and REVOKE 241
Adding GRANT and REVOKE to main() 241
Test the program 243
New options on the page 244
Room to grow 244
Summary 245
Chapter 9: Date and Time Values
247
Date and time data types in MySQL 247
DATETIME 248
Output format 248
Input formats 248
Input range 249
Using DATETIME in a CREATE statement 249
DATE 249
Output and Input formats 249
Input range 250
TIMESTAMP 250
Input of values 250
Range 251
Defaults, initialization, and updating 251
YEAR 252
Date and time types in Python 256
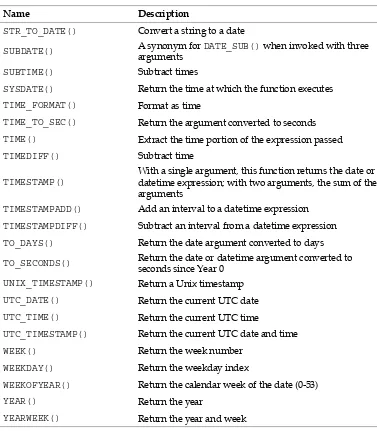
Date and time functions 257
NOW() 260
CURDATE() 260
CURTIME() 261
DATE_SUB() and DATE_ADD() 262
DATEDIFF() 266
DATE_FORMAT() 267
EXTRACT() 269
TIME() 270
Project: Logging user activity 270
The log framework 272
The logger() function 273
Creating the database 273
Using the database 274
Creating the table 274
Forming the INSERT statement 274
Ensure logging occurs 275
Room to grow 276
Summary 277
Chapter 10: Aggregate Functions and Clauses
279
Calculations in MySQL 280
The different kinds of average 285
Trimming results 287
DISTINCT 287
GROUP_CONCAT() 289
Specifying the delimiter 290
Customizing the maximum length 290
Using GROUP_CONCAT() with DISTINCT 291
Server-side sorting in MySQL 292
GROUP BY 293
ORDER BY 294
Using a universal quantifier 294
Sorting alphabetically or from low-to-high 295
Reversing the alphabet or sorting high-to-low 296
Sorting with multiple keys 298
Putting it in Python 298
Project: Incorporating aggregate functions 300
Adding to qaction() 300
New variables 301
New statement formation 302
Revising main() 305
Changing the HTML form 309
Summary 310
Chapter 11: SELECT Alternatives
311
HAVING clause 312
WHERE versus HAVING: Syntax 312
WHERE versus HAVING: Aggregate functions 312
WHERE versus HAVING: Application 314
Subqueries 317
Unions 319
Joins 321
LEFT and RIGHT joins 321
OUTER joins 323
INNER joins 324
NATURAL joins 326
CROSS joins 327
Doing it in Python 327
Subqueries 328
Unions 329
Joins 329
Project: Implement HAVING 330
Revising the Python backend 331
Revising qaction() 331
Revising main() 333
Revising the options 336
Revising the HTML interface 337
Room to grow 338
Summary 339
Chapter 12: String Functions
341
Preparing results before their return 341
CONCAT() function 342
Accessing and using index data 354
LENGTH() 354
INSTR() 356
Project: Creating your own functions 360
Hello() 361
Capitalise() 362
DELIMITER 362
The function definition 362
Calling the function 364
Defining the function in Python 365
Defining the function as a Python value 365
Sourcing the MySQL function as a Python module 366
Sourcing the function as MySQL code 366
Room to grow 367
Summary 367
Chapter 13: Showing MySQL Metadata
369
MySQL's system environment 370
ENGINE 371
The most popular engines 372
Transactions 372
Using the USE command 378
Accessing metadata about tables 378
SHOW TABLES 378
SHOW TABLE STATUS 379
Showing columns from a table 379
FUNCTION STATUS 380
Accessing user metadata 383
SHOW GRANTS 383
PRIVILEGES 384
Project: Building a database class 384
Defining fetchquery() and some core methods 385
Retrieving table status and structure 386
Retrieving the CREATE statements 386
Define main()—part 1 387
Writing resproc() 388
Define main()—part 2 389
The preamble 389
Modules and variables 390
Login and USE 390
Closing out the program 390
Room to grow 391
Summary 391
Chapter 14: Disaster Recovery
393
Every database needs a backup plan 394
Offline backups 394
Live backups 395
Choosing a backup method 395
Copying the table files 396
Locking and flushing 397
Unlocking the tables 398
Restoring the data 398
Delimited backups within MySQL 398
Using SELECT INTO OUTFILE to export data 398
Using LOAD DATA INFILE to import data 399
Archiving from the command line 400
mysqldump 400
mysqlhotcopy 403
Backing up a database with Python 405
Summary 406
Preface
Python is a dynamic programming language, which is completely enterprise ready, owing largely to the variety of support modules that are available to extend its capabilities. In order to build productive and feature-rich Python applications, we need to use MySQL for Python, a module that provides database support to our applications.
This book demonstrates how to boost the productivity of your Python applications by integrating them with the MySQL database server, the world's most powerful open source database. It will teach you to access the data on your MySQL database server easily with Python's library for MySQL using a practical, hands-on approach. Leaving theory to the classroom, this book uses real-world code to solve real-world problems with real-world solutions.
The book starts by exploring the various means of installing MySQL for Python on different platforms and how to use simple database querying techniques to improve your programs. It then takes you through data insertion, data retrieval, and error-handling techniques to create robust programs. The book also covers automation of both database and user creation, and administration of access controls. As the book progresses, you will learn to use many more advanced features of Python for MySQL that facilitate effective administration of your database through Python. Every chapter is illustrated with a project that you can deploy in your own situation.
What this book covers
Chapter 1, Getting Up and Running with MySQL for Python, helps you to install MySQL
for Python specific software, how to import modules into your programs, connecting
to a database, accessing online help, and creating a MySQL cursor proxy within your Python program. It also covers how to close the database connection from Python and how to access multiple databases within one program.
Chapter 2, Simple Querying, helps you to form and pass a query to MySQL, to look at
user-defined variables, how to determine characteristics of a database and its tables,
and program a command-line search utility. It also looks at how to change queries dynamically, without user input.
Chapter 3, Simple Insertion, shows forming and passing an insertion to MySQL, to
look at the user-defined variables in a MySQL insertion, passing metadata between
databases, and changing insertion statements dynamically without user input. Chapter 4, Exception Handling, discusses ways to handle errors and warnings thatdiscusses ways to handle errors and warnings thatto handle errors and warnings that are passed from MySQL for Python and the differences between them. It also covers several types of errors supported by MySQL for Python, and how to handle them effectively.
Chapter 5, Results Record-by-Record, shows situations in which record-by-record retrieval is desirable, to use iteration to retrieve sets of records in smaller blocks and how to create iterators and generators in Python. It also helps you in using fetchone() and fetchmany().
Chapter 6, Inserting Multiple Entries, discusses how iteration can help us execute several individual INSERT statements rapidly, when to use or avoid executemany(), and throttling how much data is inserted at a time.
Chapter 7, Creating and Dropping, shows to create and delete both databases and tables in MySQL, to manage database instances with MySQL for Python, and to automate database and table creation.
Chapter 8, Creating Users and Granting Access, focuses on creating and removing users in MySQL, managing database privileges with MySQL for Python, automating user creation and removal, to GRANT and REVOKE privileges, and the conditions under which that can be done.
Chapter 10, Aggregate Functions and Clauses, shows how MySQL saves us time and effort by pre-processing data, how to perform several calculations using MySQL's optimized algorithms, and to group and order returned data by column.
Chapter 11, SELECT Alternatives, discusses how to use HAVING clauses, how to create temporary subtables, subqueries and joins in Python, and the various ways to join tables.
Chapter 12, String Functions, shows how MySQL allows us to combine strings and return the single, resulting value, how to extract part of a string or the location of a part, thus saving on processing, and how to convert cases of results.
Chapter 13, Showing MySQL Metadata, discusses the several pieces of metadata about a given table that we can access, which system variables we can retrieve, and how to retrieve user privileges and the grants used to give them.
Chapter 14, Disaster Recovery, focuses on when to implement one of several kinds of database backup plans, what methods of backup and disaster recovery MySQL supports, and how to use Python to back up databases
What you need for this book
The content of this book is written against MySQL 5.5, Python 2.5.2, and MySQL for Python 1.2.2. Development of the examples was done with MySQL 5.0, but
everything was confirmed against the 5.5 documentation. As for operating systems,
any of the main three will do: Microsoft Windows, Linux, or Mac. Any additional requirements of modules are discussed in the book as they come up.
Who this book is for
This book is meant for intermediate users of Python who want hassle-free access to their MySQL database through Python. If you are a Python programmer who wants database-support in your Python applications, then this book is for you. This book is a must-read for every focused user of the MySQL for Python library who wants real-world applications using this powerful combination of Python and MySQL.
Conventions
In this book, you will find a number of styles of text that distinguish between
Code words in text are shown as follows: "We can include other contexts through the use of the include directive."
A block of code is set as follows: import MySQLdb
mydb = MySQLdb.connect(host = 'localhost', user = 'skipper', passwd = 'mysecret', db = 'fish')
Any command-line input or output is written as follows: >>> print results
((1L, 'tuna', Decimal('7.50')), (2L, 'bass', Decimal('6.75')), (3L, 'salmon', Decimal('9.50')), (4L, 'catfish', Decimal('5.00')),
New terms and important words are shown in bold. Words that you see on the screen, in menus or dialog boxes for example, appear in the text like this: "clicking the Next button moves you to the next screen".
Reference to a particular section or chapter are shown in italics.
Warnings or important notes appear in a box like this.
Tips and tricks appear like this.
Reader feedback
Feedback from our readers is always welcome. Let us know what you think about this book—what you liked or may have disliked. Reader feedback is important for us to develop titles that you really get the most out of.
To send us general feedback, simply send an e-mail to [email protected], and mention the book title via the subject of your message.
If there is a topic that you have expertise in and you are interested in either writing or contributing to a book on, see our author guide on www.packtpub.com/authors.
Customer support
Now that you are the proud owner of a Packt book, we have a number of things to help you to get the most from your purchase.
Downloading the example code for this book
You can download the example code files for all Packt books you have
purchased from your account at http://www.PacktPub.com. If you purchased this book elsewhere, you can visit http://www.PacktPub. com/support and register to have the files e-mailed directly to you.
Errata
Although we have taken every care to ensure the accuracy of our content, mistakes
do happen. If you find a mistake in one of our books—maybe a mistake in the text or
the code—we would be grateful if you would report this to us. By doing so, you can save other readers from frustration and help us improve subsequent versions of this
book. If you find any errata, please report them by visiting http://www.packtpub. com/support, selecting your book, clicking on the errata submission form link, and
entering the details of your errata. Once your errata are verified, your submission
will be accepted and the errata will be uploaded on our website, or added to any list of existing errata. Any existing errata can be viewed by selecting your title from http://www.packtpub.com/support.
Piracy
Piracy of copyright material on the Internet is an ongoing problem across all media. At Packt, we take the protection of our copyright and licenses very seriously. If you come across any illegal copies of our works, in any form, on the Internet, please provide us with the location address or website name immediately so that we can pursue a remedy.
We appreciate your help in protecting our authors, and our ability to bring you valuable content.
Questions
Getting Up and Running with
MySQL for Python
It may seem rather unnecessary to start a book on MySQL for Python with a chapter on setting it up. There are, in fact, several ways to get MySQL for Python in a place such that your local Python installation can use it. Which one you use will depend as much on your familiarity with your operating system and with Python itself, as it will on which operating system and version of Python you are running.
In this chapter we will cover the following: Where you can get MySQL for Python Installing MySQL for Python
Importing the module into your programs
Accessing online help about the MySQL for Python API and its accompanying modules
How to connect to a database
How to create a MySQL cursor proxy within your Python program How to close the database connection from Python
How to access multiple databases within one program
Getting MySQL for Python
How you get MySQL for Python depends on your operating system and the level of authorization you have on it. In the following subsections, we walk through the common operating systems and see how to get MySQL for Python on each.
• • • •
Using a package manager (only on Linux)
Package managers are used regularly on Linux, but none come by default with Macintosh and Windows installations. So users of those systems can skip this section. A package manager takes care of downloading, unpacking, installing, and
configuring new software for you. In order to use one to install software on your
Linux installation, you will need administrative privileges.
Administrative privileges on a Linux system can be obtained legitimately in one of the following three ways:
Log into the system as the root user (not recommended) Switch user to the root user using su
Use sudo to execute a single command as the root user
The first two require knowledge of the root user's password. Logging into a
system directly as the root user is not recommended due to the fact that there is no indication in the system logs as to who used the root account. Logging in as a normal user and then switching to root using su is better because it keeps an account of who did what on the machine and when. Either way, if you access the root account, you must be very careful because small mistakes can have major consequences. Unlike other operating systems, Linux assumes that you know what you are doing if you
access the root account and will not stop you from going so far as deleting every file
on the hard drive.
Unless you are familiar with Linux system administration, it is far better, safer,
and more secure to prefix the sudo command to the package manager call. This
will give you the benefit of restricting use of administrator-level authority to a
single command. The chances of catastrophic mistakes are therefore mitigated to a great degree.
More information on any of these commands is available by prefacing either man or info before any of the preceding commands (su, sudo).
Which package manager you use depends on which of the two mainstream package management systems your distribution uses. Users of RedHat or Fedora, SUSE, or Mandriva will use the RPM Package Manager (RPM) system. Users of Debian, Ubuntu, and other Debian-derivatives will use the apt suite of tools available for Debian installations. Each package is discussed in the following:
Using RPMs and yum
If you use SUSE, RedHat, or Fedora, the operating system comes with the yum package manager. You can see if MySQLdb is known to the system by running a search (here using sudo):
sudo yum search mysqldb
If yum returns a hit, you can then install MySQL for Python with the following command:
sudo yum install mysqldb
Using RPMs and urpm
If you use Mandriva, you will need to use the urpm package manager in a similar fashion. To search use urpmq:
sudo urpmq mysqldb
And to install use urpmi: sudo urpmi mysqldb
Using apt tools on Debian-like systems
Whether you run a version of Ubuntu, Xandros, or Debian, you will have access to aptitude, the default Debian package manager. Using sudo we can search for MySQLdb in the apt sources using the following command:
sudo aptitude search mysqldb
On most Debian-based distributions, MySQL for Python is listed as python-mysqldb.
Once you have found how apt references MySQL for Python, you can install it using the following code:
sudo aptitude install python-mysqldb
Using an installer for Windows
Windows users will need to use the older 1.2.2 version of MySQL for Python. Using a web browser, go to the following link:
http://sourceforge.net/projects/mysql-python/files/
This page offers a listing of all available files for all platforms. At the end of the file listing, find mysql-python and click on it. The listing will unfold to show folders containing versions of MySQL for Python back to 0.9.1. The version we want is 1.2.2.
Windows binaries do not currently exist for the 1.2.3 version of MySQL for Python. To get them, you would need to install a C compiler on your Windows installation and compile the binary from source.
This is outside the purpose of the present book, but tips for how to do this are contained in the README file that accompanies the 1.2.3 version.
Click on 1.2.2 and unfold the file listing. As you will see, the Windows binaries are differentiated by Python version—both 2.4 and 2.5 are supported. Choose the one that matches your Python installation and download it. Note that all available binaries are for 32-bit Windows installations, not 64-bit.
After downloading the binary, installation is a simple matter of double-clicking the
installation EXE file and following the dialogue. Once the installation is complete,
the module is ready for use. So go to the section Importing MySQL for Python.
Using an egg file
One of the easiest ways to obtain MySQL for Python is as an egg file, and it is best
to use one of those files if you can. Several advantages can be gained from working
with egg files such as:
They can include metadata about the package, including its dependencies They allow for the use of egg-aware software, a helpful level of abstraction Eggs can, technically, be placed on the Python executable path and used without unpacking
They save the user from installing packages for which they do not have the appropriate version of software
They are so portable that they can be used to extend the functionality of third-party applications
• • •
•
Installing egg handling software
One of the best known egg utilities—Easy Install, is available from the PEAK
Developers' Center at http://peak.telecommunity.com/DevCenter/EasyInstall. How you install it depends on your operating system and whether you have package management software available. In the following section, we look at several ways to install Easy Install on the most common systems.
Using a package manager (Linux)
On Ubuntu you can try the following to install the easy_install tool (if not available already):
shell> sudo aptitude install python-setuptools
On RedHat or CentOS you can try using the yum package manager: shell> sudo yum install python-setuptools
On Mandriva use urpmi:
shell> sudo urpmi python-setuptools
You must have administrator privileges to do the installations just mentioned.
Without a package manager (Mac, Linux)
If you do not have access to a Linux package manager, but nonetheless have a Unix variant as your operating system (for example, Mac OS X), you can install Python's setuptools manually. Go to:
http://pypi.python.org/pypi/setuptools#files
Download the relevant egg file for your Python version.
When the file is downloaded, open a terminal and change to the download directory.
From there you can run the egg file as a shell script. For Python 2.5, the command would look like this:
sh setuptools-0.6c11-py2.5.egg
This will install several files, but the most important one for our purposes is
easy_install, usually located in /usr/bin.
On Microsoft Windows
From the list located there, select the most appropriate Windows executable file. Once the download is completed, double-click the installation file and proceed
through the dialogue. The installation process will set up several programs, but the one important for our purposes is easy_install.exe. Where this is located will differ by installation and may require using the search function from the Start Menu. On 64-bit Windows, for example, it may be in the ProgramFiles(x86) directory. If in doubt, do a search. On Windows XP with Python 2.5, it is located here:
C:\Python25\Scripts\easy_install.exe
Note that you may need administrator privileges to perform this installation. Otherwise, you will need to install the software for your own use. Depending on the setup of your system, this may not always work.
Installing software on Windows for your own use requires the following steps: 1 Copy the setuptools installation file to your Desktop.
2 Right-click on it and choose the runas option.
3 Enter the name of the user who has enough rights to install it (presumably yourself).
After the software has been installed, ensure that you know the location of the easy_install.exe file. You will need it to install MySQL for Python.
Installing MySQL for Python from an egg file
After installing EasyInstall, you still need to install the MySQL for Python egg. The egg files for MySQL for Python can be downloaded from the following URL: http://sourceforge.net/projects/mysql-python/files/
There you will see a list of all available files relevant to MySQL for Python.
Which one you use depends on your operating system and your installed Python version. Currently, the only egg files available for MySQL for Python version 1.2.3c1 are for Linux running either Python 2.5 or 2.6. Mac users should use a tarball (tar. gz) file as discussed in the next section.
To get an egg file for Windows, click on the MySQL-python directory and select the 1.2.2 version. This is the same directory used for the Windows binaries discussed earlier in this chapter. This time, however, you need to select an egg for Windows
Once you have the egg file for MySQL for Python, you simply need to invoke EasyInstall over the newly-downloaded egg file. How you do that will depend on the permissions you have for your operating system.
With administrator permissions, you can simply call the EasyInstall binary. For Linux, it will look like this:
shell> easy_install <name of egg file>
For Windows, you will use a command similar to this one:
C:\Python25\Scripts\easy_install.exe <name of egg file>
Note that you must have administrator privileges to do this. Otherwise, Windows users will have to install the software locally. Linux users can use sudo.
EasyInstall will then unpack the archive, install it in your default Python
installation folders, and configure it for immediate use.
For Windows users, if you had to install setuptools locally, you may also require a local installation of Python itself in order to install MySQL for Python. See the section On Microsoft Windows under Installing egg-handling software, for help with this. If you
need to go through this process, all of your configurations will be local, so you are
best to use full path command-line calls.
If your system has MySQL, Python, and setuptools, but you still don't have administrative access, it is advisable to unpack the egg file manually and call
it as a local module. To do this, use an archiving program to unzip the file.
The content listing for the Windows egg will look like this: Egg-info
MySQLdb
_mysql_exceptions.py
_mysql_exceptions.pyc
_mysql.py
_mysql.pyc _mysql.pyd
And the Linux egg unpacks to the following files:
Egg-info
MySQLdb
_mysql_exceptions.py
_mysql_exceptions.pyc
_mysql.py
_mysql.pyc
_mysql.so
With the exception of the egg-info directory, the contents are the basic ingredients of a Python module and can be imported locally if one's program resides in the same
directory as the files are located.
Using a tarball (tar.gz file)
Due to the need for certain programming libraries, this method of installation applies only to users of Unix-derived operating systems. This method involves
installing from the source files and so requires the necessary C libraries to compile
a binary version. Windows users should therefore use one of the other methods discussed previously.
If you cannot use egg files or if you use an earlier version of Python, you should use the tar.gz file, a tar and gzip archive. The tar.gz archive follows the Linux egg
files in the file listing. The current version of MySQL for Python is 1.2.3c1, so the file
we want is as following:
MySQL-python-1.2.3c1.tar.gz
This method is by far more complicated than the others. If at all possible, use your operating system's installation method or an egg file.
This version of MySQL for Python is compatible up to Python 2.6. It is worth noting that MySQL for Python has not yet been released for Python 3.0 or later versions. In your deployment of the library, therefore, ensure that you are running Python 2.6 or
earlier. As noted, Python 2.5 and 2.6 have version-specific releases. Prior to Python
2.4, you will need to use either a tar.gz version of the latest release or use an older version of MySQL for Python. The latter option is not recommended.
Most Unix-derived operating systems (Linux, Mac) come with the tar and gzip utilities pre-installed. For users of these systems, unpacking the archive is as simple as the following command:
shell> tar xvzf MySQL-python-1.2.3c1.tar.gz
The archive will then unpack into a directory called MySQL-python-1.2.3c1. Windows users can use any of the following archive programs to unpack the tarball:
PowerArchiver 6.1 7-Zip
WinZip
Once the file is unpacked, you need to ensure that you have the program
mysql_config in your path. For Mac users, this usually comes with the
MySQL installation itself. For Linux, if you are using bash or another shell with command-line completion, you can check this by typing the following in a terminal: shell> mysql_conf
Then press the tab key. If the command is completed to mysql_config, there are no issues, otherwise your operating system does not know of any such command, and
you need to either find it or install it.
An alternative way of checking is to use the whereis command. Type the following from the command-line:
shell> whereis mysql_config
If it is installed, the system will return its location. Then echo your current PATH value by typing:
shell> echo $PATH
and compare the results. If the location of mysql_config is one of the values in your
path, there are no issues otherwise, we need to either find it or install it.
The mysql_config program comes with the MySQL client development libraries. If you have these installed, check the directory that holds the MySQL client binary (use whereis mysql if necessary). If you are unsure, you can check with a package manager using the following commands:
shell> aptitude search mysql | grep client | grep dev •
This will work for Debian-based systems. Users of RPM-based systems should substitute either yum search or urpmq for aptitude search. This query will return
results for the development files and for the MySQL client, and you can then see if
the appropriate package is installed. If it is not, you can install it with the install argument (for either aptitude or yum) or by using urpmi.
If the mysql_config program is installed, but is outside your path, you need to
indicate its location to the MySQL for Python setup configuration. Navigate to the
MySQL-python-1.2.3c1 directory and open the file site.cfg in your favorite text
editor. The file is not large, and the following section is easily seen as the second part of the file:
#The path to mysql_config
#Only use this if mysql_config is not on your PATH, or you have some weird setup that requires it #mysql_config = /usr/local/bin/mysql_config
If mysql_config is outside of your path, uncomment the last line of the part cited here and enter the correct path. So, if mysql_config is installed to:
/usr/local/bin/mysql/bin/mysql_config
The last line should read:
mysql_config = /usr/local/bin/mysql/bin/mysql_config
Then save the file and close it.
Next, we should build the package using the instructions that came with it in setup.py. Use the following command to attempt a build without installing it: shell> python setup.py build
If the process goes through without error, which it usually does, the build is successful. If there is an error, it usually involves the lack of a module or software
package. In which case, confirm that you have all the prerequisites needed for the
task by checking the list in the readme file that comes with the archive.
Be sure to read the readme file that comes with the source code. It contains a lot of help on the installation process.
Note that you will need superuser access for this. If you do not have administrative access to your system, you need to use one of the other methods.
Importing MySQL for Python
The name of the project MySQL for Python is the current version of a project that began under the rubric MySQLdb. Consequently, unlike most Python modules, the MySQL for Python module is not called by its name, but by its historic handle. To import the module, insert the following into a Python program or simply type it in a following Python shell:
import MySQLdb
To make working with the module easier, you can also import it with an alias: import MySQLdb as mysql
This allows us to use mysql instead of MySQLdb when we access parts of the module. When you do this, several things will occur. You need not be concerned about most of them, but you should be aware that MySQLdb depends upon a module called _mysql. The _mysql module is largely a Python adaptation of the MySQL C API.
This is important to note because it is this API that you will access through MySQL for Python.
MySQL for Python is a wrapper for accessing the _mysql API. A wrapper is
essentially a system of macros, or trusted code, that allows you to do common tasks quickly. It allows you to program without having to repeat commonly used or accessed variables and functions. The _mysql module is a powerful and proven way of accessing a MySQL database. However, controlling it within a Python program
can pose a challenge for some, like driving a Formula 1 car for the first time. So
consider MySQL for Python as a system that allows you to harness the power of a Formula 1 racing car even if you're merely driving a Hyundai.
Accessing online help when you need it
As with other modules, Python is able to provide online help about MySQL for Python. In the following sections, we look at the MySQLdb and _mysql modules in greater depth using Python's built-in help() function.
MySQLdb
After importing MySQLdb, you can read over the documentation that accompanies the module. In a Python shell, type:
help(MySQLdb)
You will then see a manual page detailing all of the functions and classes of MySQL for Python. It is well worth giving this a cursory read to familiarize yourself with the module. In the course of this book, we will cover most of these items from various angles.
As the help page indicates, MySQLdb includes the following modules:
connections: Initiating, maintaining, and closing a connection to MySQL cursors: Managing the execution of queries
converters: For converting between MySQL data types as well as between data types in MySQL and Python
times: Converting date and time values between MySQL and Python
Each of these is abstracted to the point of its own module in the source tree. Without a doubt, the most important part of the module is connections.py, without which we could not interface with MySQL. Where the others are static, the conversion module, convertors.py, allows you to define your own convertor on-the-fly. The MySQLdb module itself has only one operating class that does not pertain to errors—DBAPISet. This is MySQLdb's internal object class for processing data. To interface with MySQL, however, we use functions. Of the several listed at the end of the MySQLdb help page, one uses connect() in every MySQLdb program.
At first glance, it may here be confusing to see that MySQLdb seems to have three ways of connecting with a database. In the list of functions, these are as follows:
connect()
Connection Connect •
• •
•
Knowing the ins and outs of these functions is not necessary. It is, however, important to know that they exist and to recognize that the latter two are simply
different ways of transferring data to the first. Connect() then passes the arguments to the connections. Connection() class, MySQLdb's MySQL database connection class, in the connections.py module.
_mysql
In looking over the module, you may also note that reference is made to the _mysql module, but it is not explicitly detailed. This is because it is a dependency and not part of the module itself. However, you can access the documentation for _mysql without importing it directly by using the MySQLdb namespace:
help(MySQLdb._mysql)
In the previous discussion about connections.Connection(), we stopped following the trail of the connection and any ensuing data transmission where MySQLdb stopped. In reality, however, the data does not stop there. When a connection or operational request is received by connections.Connection(), it is processed and passed to _mysql and subsequently to the MySQL API in C to perform it.
To handle this interface, _mysql uses two classes: connection
result
The first is used to establish communication with MySQL and thus returns a
connection object. The second, as the name implies, returns a set containing the results from a MySQL command that a program sends. These results can be either the query results or an error. _mysql naturally passes the error to the calling process. In the case of MySQLdb, we then have a comprehensive toolbox to handle the errors that may arise.
Connecting with a database
In making a phone call, one picks up the handset, dials a number, talks and listens, and then hangs up. Making a database connection through MySQL for Python is nearly as simple. The four stages of database communication in Python are as follows:
Creating a connection object Creating a cursor object Interacting with the database Closing the connection
Creating a connection object
As mentioned previously, we use connect() to create an object for the program's connection to the database. This process automates logging into the database and selecting a database to be used.
The syntax for calling the connect() function and assigning the results to a variable is as follows:
[variable] = MySQLdb.connect([hostname], [username], [password], [database name])
Naming these variables as you assign the values is not required, but it is good practice until you get used to the format of the function call. So for the
first few chapters of this book, we will use the following format to call the
connect()function:
[variable] = MySQLdb.connect(host="[hostname]", user="[username]", passwd="[password]", db="[database name]")
Let's say we have a database-driven application that creates the menu for a seafood
restaurant. We need to query all of the fish from the menu database in order to input
them into a new menu. The database is named menu. •
If you do not have a database called menu, you will obviously not be able to connect to it with these examples. To create the database that we
are using in this example, put the following code into a text file with the
name menu.sql:
CREATE DATABASE `menu`; USE menu;
DROP TABLE IF EXISTS `fish`;
SET @saved_cs_client = @@character_set_client; SET character_set_client = utf8;
CREATE TABLE `fish` (
`ID` int(11) NOT NULL auto_increment, `NAME` varchar(30) NOT NULL default ‘’, `PRICE` decimal(5,2) NOT NULL default ‘0.00’, PRIMARY KEY (`ID`)
) ENGINE=MyISAM AUTO_INCREMENT=27 DEFAULT CHARSET=latin1;
SET character_set_client = @saved_cs_client;
LOCK TABLES `fish` WRITE;
INSERT INTO `fish` VALUES (1,’catfish’,’8.50’),(2,’catf ish’,’8.50’),(3,’tuna’,’8.00’),(4,’catfish’,’5.00’),(5 ,’bass’,’6.75’),(6,’haddock’,’6.50’),(7,’salmon’,’9.50 ’),(8,’trout’,’6.00’),(9,’tuna’,’7.50’),(10,’yellowfin tuna’,’12.00’),(11,’yellowfin tuna’,’13.00’),(12,’tuna’ ,’7.50’);
UNLOCK TABLES;
Then log into your MySQL session from the directory in which the file menu.sql is located and type the following:
source menu.sql
This will cause MySQL to create and populate our example database.
For this example, the database and program reside on the same host, so we can use localhost. The user for the database is skipper with password mysecret. After importing the MySQL for Python module, we would call the connect() function as follows:
The connect() function acts as a foil for the connection class in connections.py and returns an object to the calling process. So in this example, assigning the value of MySQLdb.connect() to mydb renders mydb as a connection object. To illustrate this, you can create the necessary database in MySQL, connect to it as shown previously, then type help(mydb) at the Python shell prompt. You will then be presented with large amounts of information pertinent to MySQLdb.connections objects.
Creating a cursor object
After the connection object is created, you cannot interact with the database until you create a cursor object. The name cursor belies the purpose of this object. Cursors exist in any productivity application and have been a part of computing since the beginning. The point of a cursor is to mark your place and to allow you to issue commands to the computer. A cursor in MySQL for Python serves as a Python-based proxy for the cursor in a MySQL shell session, where MySQL would create the real cursor for us if we logged into a MySQL database. We must here create the proxy ourselves.
To create the cursor, we use the cursor() method of the MySQLdb.connections object we created for the connection. The syntax is as follows:
[cursor name] = [connection object name].cursor()
Using our example of the menu database above, we can use a generic name cursor for the databasecursor and create it in this way:
cursor = mydb.cursor()
Now, we are ready to issue commands.
Interacting with the database
Many SQL commands can be issued using a single function as: cursor.execute()
Closing the connection
In MySQL, you are expected to close the databases and end the session by issuing either quit or exit.
To do this in Python, we use the close() method of the database object. Whether you close a database outright depends on what actions you have performed and whether MySQL's auto-commit feature is turned on. By default, MySQL has autocommit switched on. Your database administrator will be able to confirm whether auto-commit is switched on. If it is not, you will need to commit any changes you have made. We do this by calling the commit method of the database object. For mydb, it would look like this:
mydb.commit()
After all changes have been committed, we can then close the database: mydb.close()
Multiple database connections
In MySQL for Python, all database objects are discrete. All you need do is to connect with each under a different name. Consider the following:
mydb1 = MySQLdb.connect(host="localhost", user="skipper", passwd="mysecret", db="fish")
mydb2 = MySQLdb.connect(host="localhost", user="skipper", passwd="mysecret", db="fruit")
cursor1 = mydb1.cursor() cursor2 = mydb2.cursor()
Summary
In this chapter we have looked at where to find MySQL for Python, as it is not part
of Python by default. We have also seen how to install it on both Windows and non-Windows systems—UNIX-like and Linux distributions. The authors of MySQL for Python have taken the pain out of this by providing a very easy way to install through an egg utility like EasyInstall.
Like most modules, MySQL for Python must be imported before you can use it in Python. So we then looked at how to import it. Unlike most modules, we saw that MySQL for Python needs to be imported by its earlier moniker, MySQLdb.
After that, we took a peek at what is waiting for us under the MySQL for Python covers using help(). We saw that MySQL for Python is not an interface to MySQL itself but to a MySQL Database API that is built into Python. It has a large number of classes for handling errors, but only one for processing data (There are different kinds of cursors). Further, it does not even use classes to access MySQL, but uses functions to process and pass information to _mysql, which then passes it to the C MySQL database interface.
Following this trail, we also saw that _mysql does not have a robust facility for handling errors, but only passes them to the calling process. That is why MySQL for Python has such a robust error handling facility.
Next, we saw how to connect to a MySQL database. As with most parts of Python,
this is easy for beginners. But the function used is also sufficiently robust to handle
the more complex needs of advanced solutions.
After connecting, we created a MySQLdb cursor and prepared to interact with the database. This showed that, while there are many things that MySQLdb will take care of for us (like connection closure), there are some things we need to do manually. In this instance, it is creating the cursor object that represents the MySQL cursor. Finally, we saw that one can connect to multiple databases by simply using different object names for each connection. This has the consequence of necessitating different namespaces as we refer to the methods and attributes of each object. But it also allows one to bridge between databases across multiple hosts seamlessly and to
present a unified interface for a user.
Simple Querying
Record retrieval is without doubt the most common activity employed with regard to MySQL and other relational databases. Like most computer programs, MySQL functions on the basis of being invoked with parameters and returning results in accordance with them. As we seen, Python acts as an intermediary to that process. We can use it to access MySQL, login, and connect to a database of our choice. In this chapter, we will look at the following:
Forming a MySQL query directly Passing a query to MySQL
User-defined variables in a MySQL query
Determining characteristics of a database and its tables Changing queries dynamically, without user input
Working through each of these points will help you at the end of the chapter, when we get to the project: a command-line search tool.
A brief introduction to CRUD
The four basic functions of any persistent storage system like MySQL spell CRUD: Create
Read Update Delete
These are key concepts, which each of the basic MySQL commands reflect.
• • • • •
There is nothing technical about the words themselves, but the concepts are very important. They represent the four activities that you can expect to be able to do in every relational database system you use. There are several alternatives to this acronym and keyword series (for example, SCUD for "select, create, update, and delete" or SIDU for "select, insert, delete, and update"). The point of each of these is that database functionality boils down to two sets of opposing activities:
Creating and deleting database objects (for example, databases, tables, records)
Inserting and reading data (that is writing and reading)
Each of these will be addressed in the coming chapters. In this one, we start with reading data using SELECT.
Forming a query in MySQL
In order to best understand how to submit a query through MySQL for Python, it is important to ensure you understand how to submit a query in MySQL itself.
The similarities between the two outnumber the differences, but the first may seem
confusing if you don't properly understand the second.
MySQL statements have a basic structure. In following a set structure, they are formed like natural language statements. Being a computer program, it understandably responds very poorly to informational statements and only moderately well to questions. Almost all MySQL statements have an imperatival
tone, expressing your command. This is reflective of the client-server relationship.
The computer is the servant who exists to do the bidding of yourself as the client or, if you prefer, master.
The syntactic structure of a simple MySQL statement is not that different from the language you use every day. Where English would have:
Give me everything from the staff table! MySQL would need to hear:
SELECT * FROM staff;
Let's look at the MySQL statement, comparing it to the English in detail. •
•
•
SELECT
MySQL does not support natural language searching like Give me. Rather, like other programming languages including Python, MySQL has a set of reserved key words. These are largely single synonyms for common, core actions. For data retrieval, the key word is SELECT. It could have been GIMME or any of a score of similar ways of saying the same thing, but MySQL is consonant with the Zen of Python:
There should be one—and preferably only one—obvious way to do it
Therefore, the MySQL developers settled on a single keyword—one that just happens to be compliant with the SQL standard.
* (asterisk)
Being read up on your regular expressions, I am sure you recognize this universal
quantifier. While it is one of the most commonly used, MySQL supports several
metacharacters that you can use to nuance your searches.
MySQL supports different kinds of metacharacters in different contexts. The following is a full list of metacharacters. (Note that not all of them may be supported in a given situation.)
.: To match any single character
?: To match zero or one character
*: To match zero or more characters
+: To match one or more characters
{n}: To match an expression n times
{m,n}: To match an expression a minimum of m and a maximum of n times
{n,}: To match an expression n or more times
^: Indicates the bit-level indicator at the beginning of a line
$: Indicates the bit-level indicator at the end of a line
[[:<:]]: To match the beginning of words
[[:>:]]: To match the ending of words
[:class:]: To match a character class
[:alpha:]: For letters
[:space:]: For whitespace
[:punct:]: For punctuation
[:upper:]: For upper case letters
[abc]: To match one of the enclosed characters
[^xyz]: To match any character other than those enclosed
|: Separates alternatives within an expression
In the case of the SELECT command, the asterisk is the only metacharacter supported. In addition to the asterisk, however, SELECT also supports several arguments used to quantify results:
ALL: All matching rows (synonymous to using an asterisk (*) DISTINCT: Sort the results set into unique values
DISTINCTROW: Where the entire record is unique
Each of these can be prefaced before the field to be quantified as illustrated here
using the database structure from the last chapter: SELECT DISTINCT id FROM menu;
This would return the values of the id column from the menu table and remove any duplicates from the results.
FROM
As with the English equivalent, MySQL needs some context in order to retrieve anything. In English, if one simply said Give me! without non-verbal cues for the intended context, the listener would rightly be confused. So here we tell MySQL from which table in the current database we want it to extract information.
Note that this is technically optional. Leaving it off, however, typically means that you are using MySQL's built-in datasets. For example, here is a statement using the built-in functions for the current date, user, and version (the \G is the same command as \g, but it tells MySQL to display the results vertically):
mysql> SELECT NOW(), USER(), VERSION()\G
*************************** 1. row *************************** NOW(): 2009-08-29 12:29:23
USER(): skipper@localhost VERSION(): 5.1.31-1ubuntu2 1 row in set (0.00 sec)
staff
This is merely the name of the table to be searched. In English, there are many locations from which one may desire something. That is why we would need to clarify that we want the items from the far table. MySQL, on the other hand, only understands things in terms of databases and tables and so understands as the name of a table whatever immediately follows the FROM keyword.
; (semicolon)
The semicolon is the default statement delimiter in MySQL. When creating a MySQL script or interacting with MySQL dynamically through its shell, leaving off a semicolon at the end of a statement will result in either a second prompt or, if you press the matter, an error being thrown. As we will see shortly, the syntax of MySQL for Python and Python itself mandates a different way of showing the end of the line. Therefore when passing MySQL queries in Python, we do not need to end any statements with the semicolon.
You may wonder why certain portions of the MySQL query are capitalized. It is a standard presentation format for MySQL statements to present the static or standard elements of a MySQL statement in capitals. Variable parts of the statement, however, are case sensitive and must be called with the same case in which they were created (otherwise, MySQL will throw an error). This matter of
capitalization is not significant if you interact with MySQL directly, from a MySQL
prompt. There, MySQL will understand your statements whether they be in all caps or lowercase. However, in your code, proper capitalization is critical to making your SQL statements readable to the next developer—both in Python and in MySQL scripts.
Where the semicolon is the statement delimiter in the MySQL shell, the backslash (\) is used to delimit lines within a statement. So, if you want to break up a statement but not have it executed when you press return, simply use a backslash at the end of each line of the statement. For example:
mysql> SELECT \ -> * \ -> FROM \ -> menu;
Other helpful quantifiers
WHERE
WHERE is used to declare a condition under which MySQL is to narrow the results of the search. The basic syntax of the clause is:
[WHERE where_condition]
For example:
mysql> SELECT * FROM menu WHERE id='5'; +----+---+---+
| id | name | price | +----+---+---+ | 5 | trout | 6.00 | +----+---+---+ 1 row in set (0.00 sec)
GROUP BY
GROUPBY allows you to group results according to one of the following three parameters:
col_name:Isthe name of one of the table's columns expr: Is a regular expression
position: Is a position in the table
Once grouped, you can then tell MySQL to list the results in either ASCending or DESCending order through ASC and DESC, respectively. The former is the default. Additionally, MySQL provides for a summative line at the end of the results through the use of WITHROLLUP.
The syntax of a GROUPBY clause is:
GROUP BY {col_name | expr | position} [ASC | DESC], [WITH ROLLUP]
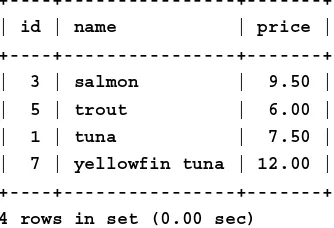
To appreciate the effect of GROUPBY, you can retrieve all of the values from a table. mysql> SELECT * FROM menu;
+----+---+---+ | ID | NAME | PRICE | +----+---+---+ | 4 | catfish | 5.00 | | 2 | bass | 6.75 | | 6 | haddock | 6.50 | | 3 | salmon | 9.50 | | 5 | trout | 6.00 | | 1 | tuna | 7.50 | | 7 | yellowfin tuna | 12.00 | +----+---+---+ 7 rows in set (0.00 sec)
Using GROUPBY on just one column can give us the same list in alphabetical order: mysql> SELECT * FROM menu GROUP BY name;