THE EXPERT’S VOICE
®IN MAC OS X
Foundations of
Mac OS X
Leopard Security
Charles S. Edge, Jr.,
William Barker,
and
Zack Smith
Foundations of Mac OS X
Leopard Security
■ ■ ■
FOUNDATIONS OF MAC OS X LEOPARD SECURITY
Copyright © 2008 by Charles S. Edge, Jr., William Barker
All rights reserved. No part of this work may be reproduced or transmitted in any form or by any means, electronic or mechanical, including photocopying, recording, or by any information storage or retrieval system, without the prior written permission of the copyright owner and the publisher.
ISBN-13 (pbk): 978-1-59059-989-1
ISBN-10 (pbk): 1-59059-989-6
ISBN-13 (electronic): 978-1-4302-0646-0
ISBN-10 (electronic): 1-4302-0646-2
Printed and bound in the United States of America 9 8 7 6 5 4 3 2 1
Trademarked names may appear in this book. Rather than use a trademark symbol with every occurrence of a trademarked name, we use the names only in an editorial fashion and to the benefit of the trademark owner, with no intention of infringement of the trademark.
Lead Editor: Jeffrey Pepper
Technical Reviewers: Mike Lee, Frank Pohlmann
Editorial Board: Clay Andres, Steve Anglin, Ewan Buckingham, Tony Campbell, Gary Cornell, Jonathan Gennick, Matthew Moodie, Joseph Ottinger, Jeffrey Pepper, Frank Pohlmann, Ben Renow-Clarke, Dominic Shakeshaft, Matt Wade, Tom Welsh
Distributed to the book trade worldwide by Springer-Verlag New York, Inc., 233 Spring Street, 6th Floor, New York, NY 10013. Phone 1-800-SPRINGER, fax 201-348-4505, e-mail [email protected], or visit http://www.springeronline.com.
For information on translations, please contact Apress directly at 2855 Telegraph Avenue, Suite 600, Berkeley, CA 94705. Phone 510-549-5930, fax 510-549-5939, e-mail [email protected], or visit http:// www.apress.com.
Apress and friends of ED books may be purchased in bulk for academic, corporate, or promotional use. eBook versions and licenses are also available for most titles. For more information, reference our Special Bulk Sales–eBook Licensing web page at http://www.apress.com/info/bulksales.
This book is dedicated to my loving wife, Lisa. —Charles
iv
Contents at a Glance
About the Authors . . . xvii
About the Technical Reviewer . . . xix
Acknowledgments . . . xxi
Introduction . . . xxiii
PART 1
■ ■ ■
The Big Picture
■
CHAPTER 1
Security Quick-Start
. . . 3■
CHAPTER 2
Security Fundamentals
. . . 27■
CHAPTER 3
Securing User Accounts
. . . 47PART 2
■ ■ ■
Security Essentials
■
CHAPTER 4
Malware Security: Combating Viruses, Worms, and Root Kits
. . . 75■
CHAPTER 5
Securing Web Browsers and E-mail
. . . 93■
CHAPTER 6
Reviewing Logs and Monitoring
. . . 125PART 3
■ ■ ■
Network Security
■
CHAPTER 7
Securing Network Traffic
. . . 149■
CHAPTER 8
Setting Up the Mac OS X Firewall
. . . 171■
CHAPTER 9
Securing a Wireless Network
. . . 197PART 4
■ ■ ■
Sharing
■
CHAPTER 10
File Services
. . . 227■
CHAPTER 11
Web Site Security
. . . 249■
CHAPTER 12
Remote Connectivity
. . . 271v
PART 5
■ ■ ■
Workplace Security
■
CHAPTER 14
Network Scanning, Intrusion Detection, and
Intrusion Prevention Tools
. . . 343■
CHAPTER 15
Backup and Fault Tolerance
. . . 373■
CHAPTER 16
Forensics
. . . 395■
APPENDIX A
Xsan Security
. . . 415■
APPENDIX B
Acceptable Use Policy
. . . 419■
APPENDIX C
Secure Development
. . . 425■
APPENDIX D
Introduction to Cryptography
. . . 427vii
Contents
About the Authors . . . xvii
About the Technical Reviewer . . . xix
Acknowledgments . . . xxi
Introduction . . . xxiii
PART 1
■ ■ ■
The Big Picture
■
CHAPTER 1
Security Quick-Start
. . . 3Securing the Mac OS X Defaults
. . . 3Customizing System Preferences
. . . 4Accounts Preferences
. . . 4Login Options
. . . 6Security Preferences
. . . 8FileVault
. . . 10Infrared Controls in Security Preferences
. . . 12Other System Preferences
. . . 13Software Update
. . . 14Bluetooth Security
. . . 16Printer Security
. . . 19Sharing Services
. . . 21Securely Erasing Disks . . . 21
Using the Secure Empty Trash Feature
. . . 23Using Encrypted Disk Images . . . 24
Securing Your Keychains
. . . 25Best Practices
. . . 26■
CHAPTER 2
Security Fundamentals
. . . 27What Can Be Targeted?
. . . 28The Accidental Mac Administrator . . . 28
Kinds of Attacks
. . . 29OS 9 vs. OS X
. . . 30viii ■C O N T E N T S
Introducing Authentication, Authorization, and Identification
. . . 47Managing User Accounts
. . . 48■
CHAPTER 4
Malware Security: Combating Viruses,
Worms, and Root Kits
. . . 75Classifying Threats
. . . 75The Real Threat of Malware on the Mac
. . . 77Script Virus Attacks
. . . 79xii ■C O N T E N T S
Cracking WEP Keys . . . 221
Cracking WPA-PSK
. . . 222General Safeguards Against Cracking Wireless Networks . . . 222
PART 4
■ ■ ■
Sharing
■
CHAPTER 10
File Services
. . . 227The Risks in File Sharing
. . . 227Peer-to-Peer vs. Client-Server Environments . . . 227
Using POSIX Permissions . . . 228
Getting More Out of Permissions with Access Control Lists
. . . 229Sharing Protocols: Which One Is for You? . . . 230
Apple Filing Protocol. . . 231
Samba
. . . 233Using Apple AirPort to Share Files
. . . 235DAVE. . . 239
FTP
. . . 245Permission Models
. . . 246■
CHAPTER 11
Web Site Security
. . . 249Securing Your Web Server . . . 249
Introducing the httpd Daemon. . . 250
Removing the Default Files . . . 251
Changing the Location of Logs . . . 251
Managing httpd . . . 252
Using ModSecurity . . . 252
Restricting Apache Access
. . . 252Running on a Nonstandard Port
. . . 252Use a Proxy Server
. . . 253Using CGI
. . . 253Disabling Unnecessary Services in Apache
. . . 254PHP and Security
. . . 254Securing PHP. . . 255
xiv ■C O N T E N T S
Further Securing LDAP: Implementing Custom LDAP ACLs . . . 311
Creating Open Directory Users and Groups
. . . 311Securing Kerberos from the Command Line
. . . 314Managed Preferences
. . . 315Enhanced Security for Managed Preferences in Leopard
. . . 317■C O N T E N T S xv
PART 5
■ ■ ■
Workplace Security
■
CHAPTER 14
Network Scanning, Intrusion Detection, and Intrusion
xvi ■C O N T E N T S
■
CHAPTER 16
Forensics
. . . 395Incident Response
. . . 395MacForensicsLab . . . 396
Installing MacForensicsLab
. . . 397Using MacForensicsLab
. . . 401Image Acquisition
. . . 403Analysis . . . 405
Salvage
. . . 407Performing an Audit . . . 410
Reviewing the Case
. . . 411Reporting
. . . 411Other GUI Tools for Forensic Analysis . . . 412
Command-Line Tools for Forensic Analysis
. . . 413■
APPENDIX A
Xsan Security
. . . 415■
APPENDIX B
Acceptable Use Policy
. . . 419■
APPENDIX C
Secure Development
. . . 425■
APPENDIX D
Introduction to Cryptography
. . . 427xvii
About the Authors
■CHARLES EDGE has been working with Apple products since he was a child. Professionally, Charles started with the Mac OS and Apple server offerings in 1999 after years of working with various flavors of Unix. Charles began his consulting career working with Support Technologies and Andersen Consulting. In 2000, he found a new home at 318, a consulting firm in Santa Monica, California, which is now the largest Mac consultancy in the country. At 318, Charles leads a team of more than 40 engineers and has worked with network architecture, security, and storage for various vertical and horizontal markets. Charles has spoken at a variety of conferences including DefCon, Black Hat, LinuxWorld, Macworld, and the WorldWide Developers Conference. Charles’ first book, Mac Tiger Server Little Black Book, can be purchased through Paraglyph Press. Charles recently hung up his surfboard and moved to Minneapolis, Minne-sota, with his wife, Lisa. Charles can be contacted at [email protected].
■WILLIAM BARKER is a technical consultant at 318 and a freelance writer. He has a penchant for all things Web 2.0 related and is eagerly anticipating the day he can wash his dishes and take out the trash online. His web site, techiestravel.com, is a hobby haven for two of his passions, technology and travel. He also wears a musician hat from time to time, making music: DJing, playing guitar, playing piano, and mixing CDs for friends. He lives in Venice, California, with his trusty automobile, Lucille.
xix
About the Technical Reviewer
xxi
Acknowledgments
I
’d like to thank all the folks at Apple for the hard work they have put into the various flavors of OS X and into educating the Mac community on their fantastic product, in particular, Joel Rennich, Schoun Regan, Josh Wisenbaker, Greg Smith, JD Mankovsky, David Winter, Stale Bjorndal, Eric Senf, Cawan Starks, Martin Libich, and a short list of others who have helped me through the years! This includes the late Michael Bartosh, who is sorely missed on many fronts.Thanks are also in order to the crew at 318 for their hard work, especially Kevin Klein. Without you guys I never would have been able to take the time to complete this book: David, Tim, Thomas, Beau, Zack, Kevin, Kevin, William, Joel, Robert, Jordan, Susie, Dan, Phil, Max, Daniel, Adrian, John, John, Jon, Marc, Monica, Karl, Chris, Cade, Christian, Eli, Drake, Erin, Ehren, Kennon, Theresa, Tony, and everyone else.
Also thanks to the fine staff at Apress for turning this book into something to be proud of: Jeffrey Pepper, Candace English, Kim Wimpsett, Tina Nielsen, Steve Anglin, and the myriad of others whose hard work went into this title. Thanks also to the technical reviewer, Mike Lee, and to my coauthors, Zack and William.
I also have to thank the organizers of SANS, DefCon, BlackHat, LayerOne, and the other security conferences and those in the white/gray hat and InfoSec communities for bringing to light many vulnerabilities before they are discovered by others with a flair for exploitation. Finally, a huge thanks goes out to the open source community. It is on the shoulders of these giants that we all sit!
Charles S. Edge, Jr.
Many thanks are in order for making this dream a reality. I’d be remiss if I didn’t thank my coauthor Charles Edge who brought me into this crazy experience in the first place. Thank you to everyone at Apress (Candace, Laura, Mike, Kim, and all the others) for their tireless work and dedication to this book. The development team at Apple should be acknowledged for their constant desire to improve and reinvent a product that continues to amaze novices and experts alike. My parents deserve a huge thank you for introducing me to the wonders of reading and computer technology at a very early age. A heartfelt thanks goes to my good friend Adam, who took a chance at giving me my first paid writing job and is a constant inspiration to my craft. Last but certainly not least, this book is inspired by the technical writers of the world. It is an unsung art to write technically, and the attention to detail that those who write books covering technical materials must provide is truly staggering. Because of their experimentation, we learn how to make our lives easier and more enjoyable.
xxiii
Introduction
A
common misconception in the Mac community is that the Mac is more secure than any other operating system on the market. Although this might be true in most side-by-side anal-yses of security features right out of the box, what this isn’t taking into account is that security tends to get overlooked once the machine starts to be configured for its true purposes. For example, when sharing is enabled or remote control applications are installed, then a variety of security threats are often established—no matter what the platform is.In the security sector, the principle of least privilege is a philosophy that security professionals abide by when determining security policies. This principle states that if you want to be secure, you need to give every component of your network the absolute minimum permissions required to do its job. But what are those permissions? What are the factors that need to be determined when making that decision? No two networks are the same; therefore, it’s certainly not a deci-sion that can be made for you. It’s something you will need to decide for yourself based on what kinds of policies are implemented to deal with information technology security.
Security Beginnings: Policies
Security in a larger organization starts with a security policy. When looking to develop security policies, it is important that the higher-level decision makers in the organization work hand in hand with the IT team to develop their policies and security policy frameworks. A security policy, at a minimum, should define the tools used on a network for security, the appropriate behavior of employees and network users, the procedures for dealing with incidents, and the trust levels within the network.
The reason policies become such an integral part of establishing security in a larger environ-ment is that you must be secure but also be practical about how you approach security in an organization. Security can be an impediment to productivity, both for support and for nonsupport personnel. People may have different views about levels of security and how to enforce it. A comprehensive security policy makes sure everyone is on the same page and that the cost vs. protection paradigm that IT departments follow are in line with the business logic of the organization.
xxiv ■I N T R O D U C T I O N
Everyone in an organization should be concerned about security policies because everyone is affected to some extent. Users are often affected the most, because policies often consist of a set of rules that regulate their behavior, sometimes making it more difficult for them to accomplish their tasks throughout their day. The IT staff should also be consulted and brought into the decision-making process since they will be required to implement and comply with these policies, while making sure that the policies are realistic given the budget available. In addition, you must notify people in advance of the development of the policy. You should contact members of the IT, management, and legal departments as well as a random sampling of users in your environment. The size of your policy development will be determined by the scope of the policy and the size of your organization. Larger policies may require many people to be involved in the policy development. Smaller policies may require participation by only one or two people within the organization.
As an example, a restrictive policy that requires all wireless users to use a RADIUS server would incur IT costs not only from the initial install but also with the installs and configurations necessary to set up the RADIUS clients on each of the workstations. A more secure RADIUS server would also cause additional labor over other less secure protocols such as WEP. You also need to consider IT budgeting and staffing downtime.
When developing your actual policy, keep the scope limited to what is technically enforce-able and easy to understand, while protecting the productivity of your users. Policies should also contain the reasons a policy is needed and cover the contacts and responsibilities of each user. When writing your policy, discuss how policy violations will be handled and why each item in the policy is required. Allow for changes in the policies as things evolve in the organization.
Keep the culture of your organization in mind when writing your security policy. Overly restrictive policies may cause users to be more likely to ignore them. Staff and management alike must commit to the policies. You can often find examples of acceptable use policies in prepackaged policies on the Internet and then customize them to fulfill your organization’s needs.
A Word About Network Images
Whether you are a home user or a corporate network administrator, the overall security policy of your network will definitely be broken down into how your computers will be set up on the network. For smaller environments, this means setting up your pilot system exactly the way you want it and then making an image of the setup. If anything were to happen to a machine on your network (intrusion or virus activity, for example), you wouldn’t need to redo everything from scratch. If you’re in a larger, more corporate environment, then you’ll create an image and deploy it to hundreds or thousands of systems using NetInstall, Casper Suite, LanDESK, or a variety of other tools that you may or may not have experience with.
Risk Management
■I N T R O D U C T I O N xxv
specific environment. Risk management involves making decisions about whether assessed risks are sufficient enough to present a concern and the appropriate means for controlling a significant risk to your environment. From there, it is important to evaluate and select alterna-tive responses to these risks. The selection process requires you to consider the severity of the threat.
For example, a home user would likely not be concerned with security threats and bugs available for the Open Directory services of Mac OS X Server. However, in larger environments running Open Directory, it would be important to consider these risks.
Risk management not only involves external security threats but also includes fault toler-ance and backup. Accidentally deleting files from systems is a common and real threat to a networked environment.
For larger environments with a multitude of systems requiring risk management, a risk management framework may be needed. The risk management framework is a description of streams of accountability and reporting that will support the risk management process for the overall environment, extending beyond information technology assets and into other areas of the organization. If you are managing various systems for a large organization, it is likely there is a risk management framework and that the architecture and computer policies you imple-ment are in accordance with the framework.
All too often, when looking at examples of risk management policies that have been imple-mented in enterprise environments, many Mac administrators will cite specific items in the policies as “not pertaining” to their environment. This is typically not the case, because best practices are best practices. There is a reason that organizations practice good security, and as the popularity of Mac based network environments grows, it is important that administrators learn from others who have managed these enterprise-class environments.
As mentioned earlier, managing IT risk is a key component of governmental regulations. Organizations that fall under the requirements of Sarbanes-Oxley, HIPPA, or the Gramm-Leach-Bliley Act need to remain in compliance or risk large fines and/or imprisonment. Auditing for compliance should be performed on a regular basis, with compliance documenta-tion ready and available to auditors.
Defining what is an acceptable risk is not something that we, the authors of this book, can decide. Many factors determine what is an acceptable risk. It is really up to you, the network administrator, to be informed about what those risks are so that you can make an informed decision. We will discuss options and settings for building out secure systems and a secure networked environment for your system. However, many of the settings we encourage you to use might impact your network or system in ways that are not acceptable to your workflow. When this happens, a choice must be made between usability and performance. Stay as close to the principle of least privilege as much as possible, keeping in mind that you still need to be able to do your job.
How This Book Is Organized
xxvi ■I N T R O D U C T I O N
Another goal of this book is to provide you with the things to tell users not to do. Adding items to enforce your policy and security measures will help you make your network, Mac, or server like a castle, with various levels of security, developed in a thoughtful manner. To help with this tiered approach, we’ve broken the book down into five parts.
Part 1: The Big Picture
First, an introduction to the world of security on the Mac comprises Part 1:
Chapter 1, “Security Quick-Start”: If you have time to read only one chapter, this is the chapter for you. In this chapter, we cover using the GUI tools provided by Apple to provide a more secure environment and the best practices for deploying them. We give recommen-dations and explain how to use these various features and when they should be used. We also outline the risks and strategies in many of their deployments.
Chapter 2, “Security Fundamentals”: In this chapter, we define many of the common risks to users and computers. We then focus on many of the common security principles used when securing an operating system and the network environment. This chapter is a birds’-eye view into the complex world of information security.
Chapter 3, “Securing User Accounts”: Mac OS X is a multiuser operating system. One of the most important security measures is to understand the accounts on your system and when you are escalating privileges for accounts. This chapter explains how to properly secure these users and groups.
Part 2: Security Essentials
Part 2 gets down to some of the essential elements of security on a Mac:
Chapter 4, “Malware Security: Combating Viruses, Worms, and Root Kits”: Viruses, spyware, and root kits are at the top of the list of security concerns for Windows users. However, Mac users are not immune. In this chapter, we go into the various methods that can be used to protect Mac systems against these and other forms of malware.
Chapter 5, “Securing Web Browsers and E-mail”: Safari, Firefox, Internet Explorer, Mail.app, and Entourage—with all these programs to manage, how do you lock them all down appropriately? In this chapter, we discuss cookies, Internet history, and browser preferences and when you should customize these settings. We also give some tips for third-party solutions for protecting your privacy. In addition, this chapter provides readers with best security practices for the mail clients that they likely spend much of their time using.
■I N T R O D U C T I O N xxvii
Part 3: Network Security
Part 3 describes how you secure a Mac network:
Chapter 7, “Securing Network Traffic”: As useful as securing the operating system is, securing the network backbone is a large component of the overall security picture. In this chapter, we explore some of the techniques and concepts behind securing the network infrastructure. This includes the common switches, hubs, and firewalls used in Mac envi-ronments and the features you may have noticed but never thought to tinker with. We also cover how to stop some of the annoying issues that pop up on networks because of unau-thorized (and often accidental) user behavior.
Chapter 8, “Setting Up the Mac OS X Firewall”: The firewall option in Mac OS X is just a collection of check boxes. Or is it? We discuss using and securing the Mac OS X software firewall, and we go into further detail on configuring this option from the command line. We also discuss some of the other commands that, rather than block traffic, allow an administrator to actually shape the traffic, implementing rules for how traffic is handled, and mitigate the effects that DoS attacks can have on the operating system.
Chapter 9, “Securing a Wireless Network”: Wireless networking is perhaps one of the most insecure things that users tend to implement themselves. In this chapter, we cover securing wireless networks, and then, to emphasize how critical wireless security is (and how easy it is to subvert it if done improperly), we move on to some of the methods used to exploit wireless networks.
Part 4: Sharing
File Sharing needs a section all to itself. Files are what hackers are after, and securing them should be a top priority in any environment. Part 4 covers the following:
Chapter 10, “File Services”: What is a permission model, and why do you need to know what it is, when all you want to do is allow people access to some of the files on my computer? Knowing the strategies involved in assigning file permissions is one of the most intrinsic security aspects of a shared storage environment. It is also important to under-stand the specific security risks and how to mitigate them for each protocol used, including AFP, FTP, NFS, and SMB, which are all covered in this chapter.
xxviii ■I N T R O D U C T I O N
Chapter 12, “Remote Connectivity”: One of the most dangerous aspects of administration is the exposure of the very tools you use to access systems remotely. Many of these programs do not always need to be running and can be further secured from their default settings. In this chapter, we cover many of the methods for protecting these services and some of the ways that vendors should change their default settings to make them more secure. We also cover some of the ways you can secure these tools, and we help adminis-trators make choices about how to best implement remote administration utilities to counteract these shortcomings.
Chapter 13, “Server Security”: Mac OS X Server is very much like Mac OS X Client, without many of the bells and whistles and with a more optimized system for sharing resources. This is true with many server-based operating systems. Because a Mac OS X server fills a different role in a networked environment, it should be treated differently from Mac OS X Client. For this reason, we cover many of the security options that are available as well as those that are crucial to securing Mac OS X Server. We also cover many of the security options from Mac OS X that should specifically not be used in Mac OS X Server.
Included with server security is directory services, which are critical to expanding tech-nology infrastructures. By interconnecting all the hosts of a network, you are able to better control the settings and accounts on systems. In this chapter, we also focus on the ways to securely deploy Mac OS X clients to various directory services and point out the items to ask for (if you are in a larger network infrastructure) or to set up in order to help make the directory service environment as secure as possible.
Part 5: Workplace Security
How secure is your work environment’s network? This part explores security as it pertains to environments with multiple Mac computers connected on a network:
Chapter 14, “Network Scanning, Intrusion Detection, and Intrusion Prevention Tools”: Host-based intrusion detection systems (IDS) are quickly becoming a standard for offering signature-based and anomaly-based detection of attacks. Some of these tools allow for augmenting the operating system settings to further secure the hosts on which they run. In this chapter, we provide a best practices discussion for deploying and using IDSs. We also cover the various attacks that have been developed over the past few years against IDS systems and explore add-ons for IDSs that provide rich aggregated data about the systems.
■I N T R O D U C T I O N xxix
Chapter 16, “Forensics”: What do you do when your systems are compromised? What happens after the attack? In this chapter, we cover the basics of computer forensics and how a user can be their own digital sleuth. The goal is not to have you testifying in court on large-scale network attacks but instead to help first responders get comfortable with safely imaging Mac systems for investigations without contaminating evidence.
Appendixes
The following are the appendixes:
Appendix A, “Xsan Security”: Here we provide tips on securing your Xsan.
Appendix B, “Acceptable Use Policy”: This appendix contains an acceptable use policy from the SANS Institute that has been reprinted here with their consent.
Appendix C, “Secure Development”: Here we give a brief rundown of Apple’s develop-ment architecture.
■ ■ ■
P A R T 1
3
■ ■ ■
C H A P T E R 1
Security Quick-Start
I
f you are looking for a quick-and-dirty start to securing your Mac, this is the chapter for you. This chapter is meant as a quick-start, written for the “I need to get my Mac secured right away” readers. For the quick-and-dirty basics of getting your Mac secured, follow the instructions in this chapter. From Chapter 2 on, you’ll be introduced to all the other intricacies surrounding securing the Mac OS, and we’ll explain why we suggest the quick-start steps in more detail. Keep in mind that Chapter 1 gives just the basics, and although it will leave you with a fairly secure system, it’s not as comprehensive as the subsequent chapters, where we delve deeper into the specifics of most settings. To get a more thorough understanding of Mac OS X security and the tools you can use to secure your Mac, we urge you to keep reading beyond the basics.Securing the Mac OS X Defaults
Mac OS X, because it is built on a Unix architecture, is a fairly secure and stable operating system right out of the box. There is a commonly held belief that the Mac can be further secured only through the Unix command line and that the graphical user interface (GUI) does not need to be tinkered with to make it more secure. This could not be further from the truth. There are many ways in which Mac OS X can and should be made more secure without dipping into the Unix command line.
In fact, there are many security holes built into the Mac OS intentionally. Why is that? The answer lies in the relationship between ease of use and security. Generally, in the world of operating systems, the easier an operating system becomes to use, the less secure it is. When the engineers at Apple redesigned their OS from 9 to X, with the most advanced operating system architecture out there, they considered security very heavily, but they also considered usability. To ensure the most secure operating system possible without sacrificing ease of use, many security features are disabled by default, giving you, the user, the choice of whether to practice good security by enabling or disabling the features.
4 C H A P T E R 1 ■ S E C U R I T Y Q U I C K - S T A R T
Customizing System Preferences
The default settings for Mac OS X’s System Preferences are fairly secure but can be further opti-mized to provide a higher level of protection. Seemingly innocuous settings can be used to exploit some of the Mac’s core features. Therefore, to reduce the likelihood that this will occur, you should go through the options listed throughout the next few pages and disable any that aren’t being used. You can then enable any security features that will not conflict with your needs along the way.
One of the most important concepts to understand with OS X security is that your computer is a multiuser operating system. Every machine has at least one user account and one local administrative account (sometimes referred to as the root account), which has access to take ownership of all the files on the system. There will always be more than one account on the machine and thus the potential for multiple breaches in security. In the next section, we will be getting a little more familiar with account settings and the ways in which you can secure users in the Accounts preference pane.
Accounts Preferences
In this section, we will tackle the most important topic: passwords. Your system is only as secure as your passwords. The stronger a password, the longer it will take to break. In Mac OS X, Apple has developed the Password Assistant to assist with password security. To set a password, open the Accounts preference pane, and click your account. This opens a window with your name, short name, and an option to change your password (see Figure 1-1). The name is typically your full name or the full name you may have entered when the account was created. The short name is a shortened version of the name (the first letter of the first word and the full second word by default).
■
Note
We’ll discuss users and groups in detail in Chapter 3. We will touch on a few of the important points in this section: disabling login items, setting account types, and basic user security.C H A P T E R 1 ■ S E C U R I T Y Q U I C K - S T A R T 5
Figure 1-1. Account settings
Figure 1-2. Changing a password
6 C H A P T E R 1 ■ S E C U R I T Y Q U I C K - S T A R T
Figure 1-3. Password Assistant
■
Note
When setting passwords, you should include numbers, letters, and special characters, such as !, @, #, or $. Using various sets of characters yields very secure passwords.Login Options
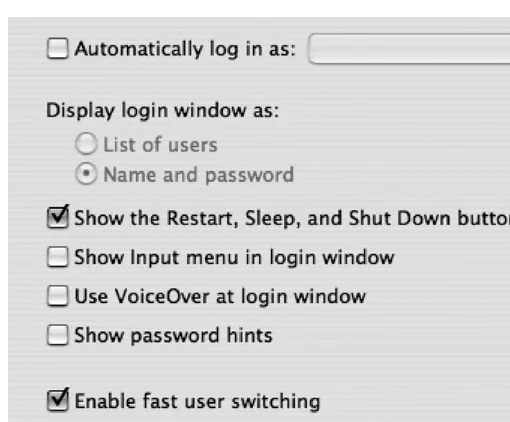
To make the login screen more secure, you should alter the default settings of the Login Options tab in the Accounts preference pane. Click the Login Options button of the Accounts preference pane. (You may need to click the little padlock icon at the bottom of the screen to access this screen as an administrator.) The Show the Restart, Sleep, and Shut Down Buttons option of the Login Options window (see Figure 1-4) is enabled by default. If this option is disabled, when the machine boots, it will hide these buttons at the login window so that users cannot shut the system down at the login screen. Any systems that provide services that need to be running for other users should have this option disabled.
The Show Password Hints option can be helpful if you need a hint to remind you of your password in case you forget it. However, this can also give someone trying to guess your pass-word valuable insight into what the passpass-word may be. For example, it is common to have a hint something along the lines of “My dog’s name.” This would require very little effort on the part of someone attempting to break into your system to guess your password. All too often, we find that users enter the actual password into the password hint field. Obviously, this is not best practice in any situation unless it is merely impossible for you to memorize your password.
C H A P T E R 1 ■ S E C U R I T Y Q U I C K - S T A R T 7
Figure 1-4. Login options
The Enable Fast User Switching option is a way to allow multiple users to log into the computer concurrently. This allows users to stay logged in while accessing other accounts. It poses a security risk, though, because it is possible to access or alter processes being run by other users. To limit what each user can do to access another user’s processes, make sure that all nonadministrative users are not allowed administrative access to the system. Better yet, if this is a feature that you are not likely to use, disable it by unchecking the Enable Fast User Switching option. If you do enable it, you will see the message in Figure 1-5 warning you that this is a security risk.
Figure 1-5. Fast user switching warning
8 C H A P T E R 1 ■ S E C U R I T Y Q U I C K - S T A R T
second account also gives you a path to get into the computer should something render your regular, nonadministrative login account inoperable.
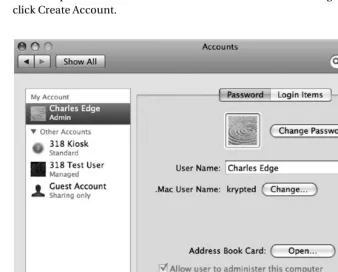
To create a second account to use, open System Preferences, and go to the Accounts pref-erence pane. From here, click the lock to unlock the prefpref-erence, and click the + symbol to add the account (see Figure 1-6). Leave the type set to User Account, and enter the name, short name, and password you want the account to have. Do not check the Allow User to Administer This Computer box if this is the nonadministrative account for regular use of your system. Now click Create Account.
Figure 1-6. Creating an account
Once you have created the new account, log out of the administrative account and log in as your nonadministrative account. Remember, you can always copy your documents, music, and other data out of your administrative account and, if need be, log in as the administrative user to access anything that won’t copy using the regular user. Migrating your user profile to a nonadministrative user creates a much more secure computing environment.
Security Preferences
C H A P T E R 1 ■ S E C U R I T Y Q U I C K - S T A R T 9
designed to protect. Some of these basic security features we will review later in this chapter. Others will be reviewed throughout the remainder of the book.
Figure 1-7. Security preference pane, General tab
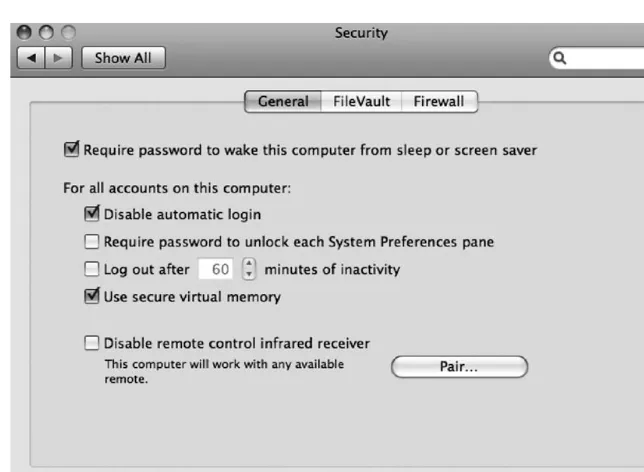
The first and most important of these options is the automatic login, which allows anyone with physical access to your computer to restart the computer and, if the password is remem-bered, not be required to enter a password in order to get your data. Automatic login is enabled by default. This is one of the first things you should change because it gives people the ability to log into your system and access your data. With automatic login enabled, few of the other options to secure your computer are relevant because they already have access to your computer.
You can use the option called Require Password to Wake This Computer from Sleep or Screen Saver on the General tab of the Security preference pane to force your computer to require a password to wake it up after it has gone to sleep or after the screen saver has been activated. This is critical and is not enabled by default. The Require Password to Wake This Computer from Sleep option makes it easy to lock your system, whether in a timed or manual way. Using the Exposé application to assign a key or hot corner (moving the cursor to a corner of the screen to activate the display) to put a system to sleep allows you to put your machine to sleep when you are finished using it. Later in this chapter we will review setting up automatic sleep, Exposé, and screen saver options.
10 C H A P T E R 1 ■ S E C U R I T Y Q U I C K - S T A R T
Virtual memory is a means of using hard drive space as temporary memory in order to allow the computer to perform more work than the computer has available memory for. Virtual memory creates virtual chunks of memory in files called swap files on your hard drive. When this transitory memory is no longer needed, the swap files are deleted (which doesn’t always happen immediately). Valuable information can be gleaned from a system by viewing the virtual memory swap files and reconstructing user operations. The option to secure virtual memory encrypts the swap files, preventing others from using them to gather private data. This is an important feature to enable.
FileVault
Let’s face it. We’re human, and we forget passwords all the time. What happens when you forget the password for your computer and you are the only one with an account on the machine? On the Web, there is a system that web sites use when users forget their passwords. It’s called a self-service password reset whereby they can reset the password on their own (usually by answering a secret question on a web prompt and then receiving a new temporary password via e-mail). For a machine with many users, this would certainly be a handy feature to have and would significantly reduce the volume of calls to the help desk. Apple supplied Mac owners with this feature via the password reset utility included on the Mac OS X CD. You can boot a computer to the CD and reset the password at any time by rebooting the computer and holding down the C key.
But what if you want to limit someone’s ability to access your data if they were able to reset the password? Many of us travel with laptops that, if stolen and the password were to be reset, would give users access to data they shouldn’t be able to access. For example, students would have access to tests, children would have access to our web site viewing habits, employees would have access to confidential data about other employees—all if they were able to get physical access to our computers while we were away. The ability to easily reset a password introduces you to a feature of the Mac OS X security preferences that protects data, even if the password is reset using the CD: FileVault. FileVault removes the ability to access data in a user’s folder, even if the password is reset, by encrypting the contents of a user’s home folder into a secured disk image.
■
Note
The FileVault feature is only as strong as the password protecting the home folder.C H A P T E R 1 ■ S E C U R I T Y Q U I C K - S T A R T 11
To use FileVault, you will need to set it up in the Security preference pane. Open System Preferences, and click Security (see Figure 1-8). Then click the FileVault tab. Next, click Turn On FileVault. At this point, you will need to give the system a master password. The master password can unlock any FileVault on a computer, so it needs to be a strong one. To enable the master password, click the Set Master Password button, and type the password you want to use twice. Then, enter a hint to help you if you forget it at a later date (do not enter the password itself!), as shown in Figure 1-9.
Figure 1-8. Setting up FileVault
■
Note
If you suspect that others will enable FileVault to encrypt their home folders, such as students, children, or employees, then setting up a master password before they can enable FileVault will help ensure that you will always be able to log into any FileVault disk images that are created by other users on the system.12 C H A P T E R 1 ■ S E C U R I T Y Q U I C K - S T A R T
Figure 1-9. Setting the master password
Figure 1-10. Authenticating to an account
If you want to change FileVault settings later, you can do so by returning to the Security preference pane (see Figure 1-10). You can change the master FileVault password or turn off FileVault completely (if the home folder is large, be prepared to wait a while for it to decrypt).
Infrared Controls in Security Preferences
C H A P T E R 1 ■ S E C U R I T Y Q U I C K - S T A R T 13
someone to walk by the machine and launch menu options by use of a remote, which can be rather annoying. (If you do not have an infrared receiver, then you will not have this option in your Security Preferences.) Once the technology is more thoroughly utilized, there is also the theoretical chance that it could be used to exploit the system. This is a new concern since the release of the wifi exploit at DefCon 2006 by David Maynor that we cover further in Chapter 9.
Noticing this as a possibility, Apple introduced the ability to enable and disable the remote control infrared receiver in the Security preferences. If you still want to use an infrared receiver, you can pair the receiver to your system, which disables all receivers other than the one used to pair with the computer. To pair your infrared remote control with your computer, hold the fast-forward and menu buttons down on the remote for five seconds. If you will not be using an infrared receiver, then you should disable the ability to do so. To turn off the ability to use an infrared receiver, click the Security pane in System Preferences, and select Disable Remote Control Infrared Receiver (see Figure 1-11). You may also want to unpair the remote (because you have a new remote or lost your old one). To do this, simply click on the Unpair button in this window (Pair turns into Unpair when the remote is paired with the machine).
Figure 1-11. Disabling the remote control infrared receiver
Other System Preferences
The security features built into the Network preference pane include the ability to configure your client system to work with a proxy server and other advanced networking features. These advanced networking techniques will be covered in depth in subsequent chapters. Suffice it to say that networking options are aplenty here.
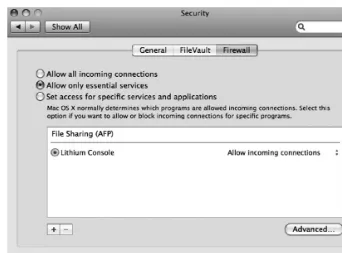
The Mac OS X firewall is a software-based application firewall built into the operating system designed to block unwanted network traffic. It is disabled by default, and you should usually enable it. To do this, open the Security preference pane, and click the Firewall tab. Then, select the Allow Only Essential Services option (see Figure 1-12).
14 C H A P T E R 1 ■ S E C U R I T Y Q U I C K - S T A R T
Figure 1-12. Firewall options in the Security preference pane
Software Update
You can use the Software Update preference pane to keep your system updated with the latest Apple updates and security patches (see Figure 1-13).
By default the Software Update feature is turned on, which means that the system will automatically search for updates on a weekly basis. There are rare situations where you will not want to run certain software updates because they can cause conflicts with other installed software, as has been the case with Apple QuickTime updates and the Final Cut software on multiple occasions. But for most users Software Update is one of the best ways to keep the latest and greatest security patches on their system, so it should be enabled. Before running any software updates on mission-critical systems, you should test them in a lab environment. Typically, security updates will not cause issues with other applications, but it is still wise to test them in a lab environment before installing them on mission-critical machines.
C H A P T E R 1 ■ S E C U R I T Y Q U I C K - S T A R T 15
Figure 1-13. Software Update preference pane
For many, using the Mac OS X Software Update preference pane will be adequate to keep their computer updated. However, if you have multiple systems on your network that need updating, you can quickly bottleneck your Internet pipe if multiple users are downloading updates all at the same time. You will most likely want to deploy a solution to help you conserve your bandwidth by managing these updates. The Software Update Server feature in Mac OS X Server is a great solution for controlling Apple software updates. However, this is not going to be the right solution for everyone because it requires an OS X Server to use.
■
Note
There are ways to run the Software Update Server feature without having it run on a Mac, but it is best to run it on Mac OS X Server for simplicity’s sake.Security updates should always be taken seriously and run when possible (see Figure 1-14). One unique aspect of the Apple Software Update preference pane is that security updates are always deployed independently from other updates. Security updates rarely force a restart of the computer and almost invariably contain a comprehensive description explaining what they fix and why they were written.
Occasionally a software update will fail. When this occurs, it is possible for the update to become stuck in the software update cache. To clear these out or retrieve them, browse to the
16 C H A P T E R 1 ■ S E C U R I T Y Q U I C K - S T A R T
Figure 1-14. List of security updates in Software Update
Figure 1-15. Navigating to where security updates are stored
Bluetooth Security
C H A P T E R 1 ■ S E C U R I T Y Q U I C K - S T A R T 17
phones, laptops, PCs, printers, and digital cameras. The Apple Bluetooth keyboard and mouse are popular Bluetooth devices in Apple environments.
Bluetooth works by pairing two devices. Once two devices are paired, they are able to freely exchange data while paired. To pair a device with an Apple computer, you will need your computer to be discoverable, or awaiting a pairing. You are also required to accept the pairing in most cases. However, there are a variety of attacks that can force a pairing if your system is set to be discoverable without using a password. This creates a security vulnerability that can be prevented by not having Bluetooth enabled unless you are actively using a device via Bluetooth.
Bluetooth is enabled and discoverable by default. If you do not want to use Bluetooth on your system, then open System Preferences and select the Bluetooth preference pane. Once you have this pane open, then click the Turn Bluetooth Off button to disable Bluetooth on your system (see Figure 1-16). If you want to use Bluetooth but do not want your system to be discover-able, then you can disable discoverability by unchecking the Discoverable box on this pane.
Figure 1-16. Bluetooth preference pane
The Devices tab of the Bluetooth preference pane offers a way to view devices that have been paired with Mac OS X computers (see Figure 1-17). Here, you will see any devices previously paired and be able to configure each device with its appropriate settings.
18 C H A P T E R 1 ■ S E C U R I T Y Q U I C K - S T A R T
Figure 1-17. Configuring Bluetooth devices
Figure 1-18. Bluetooth sharing
C H A P T E R 1 ■ S E C U R I T Y Q U I C K - S T A R T 19
Require Pairing for Security box checked because this will force a more secure pairing of the device.
Printer Security
In the move from Tiger to Leopard, Apple removed the Printer Setup utility. All controls for printing have now been moved into the Print & Fax preference pane in System Preferences. The Print & Fax preference pane offers few options for configuring access to shared printers and faxes. When sharing printers, only the printers that the user needs should be configured. Allowing a user to print to a printer that they shouldn’t be using can cause confidentiality issues if the documents they are printing land in the wrong hands. To disable printers not in use, uncheck each printer on the Sharing tab (see Figure 1-19).
Figure 1-19. Printer sharing
You can get more control over printer sharing by using Terminal or the Common Unix Printing System (CUPS) web interface to configure the CUPS. CUPS uses the Internet Printing Protocol (IPP) to provide printing services to users. The CUPS daemon is controllable through a variety of mechanisms such as configuration files and web interfaces, which is convenient but also not entirely secure. If you do not need to allow access to printers installed on your computer, it is best to leave printer sharing disabled.
20 C H A P T E R 1 ■ S E C U R I T Y Q U I C K - S T A R T
• MaxCopies
• Port
• BrowseAllow
• BrowseAddress
• SystemGroup
• The Location’s directive’s Allow option
■
Note
The Location directive has an Allow option that can be used to dictate which addresses are allowed to access shared printing and remote administration.• AuthType
• AuthClass
• The Limit directive’s Require User option
■
Note
The Limit directive has a Require User option that dictates what access various users have. You should limit users’ access on an “as-needed” basis.C H A P T E R 1 ■ S E C U R I T Y Q U I C K - S T A R T 21
Sharing Services
If you are not sharing any resources on your computer, disable any sharing services that might be running. To do this, open the Sharing preference pane, and review the items on the Services tab that are being used to share resources (see Figure 1-21).
Figure 1-21. Sharing preferences
■
Tip
Disable all services that are not needed by the user you are configuring access for. These services are more comprehensively discussed in Chapter 10, Chapter 11, and Chapter 12.Securely Erasing Disks
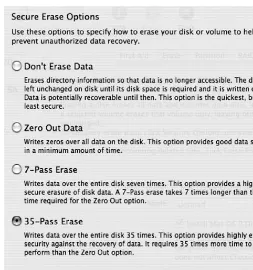
22 C H A P T E R 1 ■ S E C U R I T Y Q U I C K - S T A R T
To securely erase a disk, open Disk Utility, and click the drive in the left column. Next, click the Erase tab, and then click the Security Options button (see Figure 1-22).
Figure 1-22. Erase feature of Disk Utility
This will display a list of secure erase options (see Figure 1-23). The Zero Out Data option will write zeroes over the entire hard drive. This can take minutes to hours depending on the size of the drive. For those needing a more secure erase option, Mac OS X also has a 7- or 35-pass erase available. These options will write data onto every sector of the drive in the number of passes selected. This can take tens of hours for larger drives but will yield a more secure removal of your data, rendering it virtually impossible to extract data from the drive if it were sent to drive recovery.
C H A P T E R 1 ■ S E C U R I T Y Q U I C K - S T A R T 23
Figure 1-23. Secure Erase window
Using the Secure Empty Trash Feature
The Secure Empty Trash feature works much the same way as the Secure Erase feature. This is more secure than simply emptying the trash in that it also overwrites the location of the hard drive where the data in the trash was stored with random data. This will cause the data to be much harder to recover if it were to fall into the wrong hands. To securely empty the trash, click Finder ➤ Secure Empty Trash (see Figure 1-24).
24 C H A P T E R 1 ■ S E C U R I T Y Q U I C K - S T A R T
In Finder, click the Secure Empty Trash screen, and then click the OK button to make the files unrecoverable. It is worth noting that there are a variety of popular applications to help undelete files. As Figure 1-25 states, by clicking the OK button to securely erase your trash, you will not be able to recover the files at a later date, even with these data recovery applications.
Figure 1-25. Secure Empty Trash confirmation
Using Encrypted Disk Images
Encrypted disk images offer you a place to keep files in an encrypted form. You can use these if you do not want to keep your entire home folder encrypted as you would with FileVault (likely because of speed or compatibility issues). Encrypted disk images are much like ZIP files that compress a bunch of files into one file, but anyone attempting to access the data within them will need a password to do so.
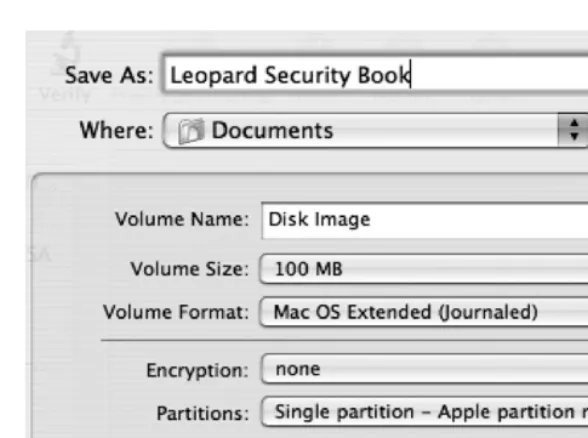
To create an encrypted disk image, open Disk Utility, and click New Image in the toolbar. The following screen (Figure 1-26) will have a wide variety of options. The Volume Size and Encryption settings are the most important to consider when creating the disk image. The volume size determines the size limit of the disk image. The encryption type can be 128-bit or (for more security) 256-bit; 256-bit images are harder to crack, but they are slower to create and to open when created. They will also take up more disk space than 128-bit. It’s important to consider whether 256-bit encryption is worth the performance hit and disk space increase you will experience from using it.
■
Note
If you are unsure what the size of your disk image should be and are not worried about limiting its size, choose Sparse Disk Image from the Image Format options, and the image will automatically grow as it requires more space (such as when you add files to it).C H A P T E R 1 ■ S E C U R I T Y Q U I C K - S T A R T 25
Figure 1-26. Encrypted Disk Image options
Securing Your Keychains
Mac OS X uses encrypted keychains to keep track of commonly used passwords and certificates that are accessed regularly. It is meant to make your life easier by automating the manual reentry of this information every time you need to access it. One keychain password can be used to unlock a number of passwords, allowing your computer to keep track of credentials, saving you time, and allowing you to not have to keep track of them yourself. This is also helpful in that it allows a single service to maintain a centralized database of passwords, rather than having each appli-cation ask for passwords. This provides a substantially secure way of caching passwords for future use. But it’s secure only if used correctly. When setting the keychain password, make sure to use a difficult password to crack that is unique from all the other passwords on the machine.
■
Note
You can use the Keychain Access Utility to view and manage keychains.26 C H A P T E R 1 ■ S E C U R I T Y Q U I C K - S T A R T
Figure 1-27. Keychain Access options
You can create new keychains by clicking Open Keychain Access and clicking the + sign on the next screen. This essentially creates an encrypted disk image file containing other informa-tion that needs to be secured, such as cached passwords to web sites. The password assigned to each keychain will open the disk image, thereby unlocking the keychain. Each keychain can and should have a different password.
Best Practices
To wrap this chapter, here is a “cheat sheet” of some of the most important practices you should employ in keeping your Mac secure. Some of these will be covered in later chapters:
• Install antivirus software (see Chapter 4).
• Always install Apple’s security updates.
• Open files only from known sources (see Chapter 10).
• Use a standard account for everyday work (see Chapter 3).
• Disable automatic login, and assign a password for every user (see Chapter 3).
• Lock your screen when you step away, and require a password to unlock it.
• Give your keychain its own password, and lock it when it is not in use.
• Use a firewall (see Chapter 8).
• Encrypt important files.
• Protect your wireless network with WPA, and use VPNs when using public wireless (see Chapter 9).
• Protect sensitive e-mail from prying eyes using encryption (see Chapter 5).
• Practice private surfing (see Chapter 5).
27
■ ■ ■
C H A P T E R 2
Security Fundamentals
Y
ou just bought your first Mac. Or maybe you’ve been buying Macs for years. You might even be part of the Mac cult phenomenon that is rapidly afflicting the world, spanning generations of Macophiles before you. Perhaps you’ve inherited the responsibility of overseeing a network with Mac computers. What made you buy a Mac? Perhaps it was the ease of use or the creative software bundled with it, or perhaps you just really related to the Mac guy more than the PC guy on the television commercials. Whatever the case may be, congratulations. You will now be working with one of the most advanced, most innovative, and most powerful operating systems on the market today.Presumably you or the person who purchased the computer bought into the security hype surrounding Macs. “Viruses don’t infect Macs,” as Apple’s web site boasts. Although much has been done by the Mac community to make this statement true, in the past few years security holes have been cropping up all over the place in the Mac community. A Mac is far from being 100 percent secure. In fact, Apple has been releasing security patches on a regular basis to address these security holes. Apple even admits on its web site that a Mac running with factory settings will protect you from viruses much better than a PC, but it’s a good idea to run extra virus and security software.
In Chapter 1, we gave you a quick-and-dirty way to secure your Mac. In this chapter, we start to break down the fundamentals of security on a Mac. We explore what hackers are hunting for and the various security risks inherent with owning a Mac, including discussing the different forms security can take on. We’ll begin to explore the command line and the various commands you’ll be using throughout the book to harness the power of the Unix shell.
28 C H A P T E R 2 ■ S E C U R I T Y F U N D A M E N T A L S
■
Note
There is more to security best practices than running security updates. Good security design is a process of reviewing the risks and determining which vulnerabilities are acceptable vs. what it would cost to remedy the problem. In fact, some security measures can be rather expensive. If you are trying to maintain a secure home network or you are in charge of administering your organization’s security, whether it’s your home office or a networked environment of 100,000 computers, it is most important to define how important your data is to you and how much it would mean if it fell into the wrong hands or was somehow lost.What Can Be Targeted?
In this ultraconnected world, everyone and everything can be attacked. Home users are just as vulnerable as users in larger networked environments. Elements such as cookies, insecure forms on web sites, computer logs, phishing scams (such as that suspicious e-mail that “assists” you in resetting your PayPal password while secretly directing you to a rogue web server), e-mail, and banking records are often the easiest targets.
Platforms with low market shares, such as the Mac, are less likely to get attacked than those with high market shares, as evidenced by the thousands of exposed vulnerabilities on Windows. Hacking, packet sniffing, exposing passwords, and other more specific attacks are statistically rarer on a Mac, but they still occur and are not as difficult to perpetrate on a Mac as one might think. For example, running a high-end packet sniffer such as Ethereal on a network can start exposing passwords in minutes on a network that is submitting information over insecure channels, whether it’s on a Mac or a PC. And as the Mac continues to increase its market share (currently at 3.2 percent; Apple sold 34 percent more Macs in 2007 than in 20061), you will start to see the number of attacks increasing.
Worms are also a weakness on the Mac. (People tend to call them viruses, but technically this is incorrect; you’ll learn more about worms and viruses in Chapter 4.) Most of the worm threats are based on insecure Microsoft Office code, causing an infection on the computer and in many cases causing documents to be destroyed or lost. Several antivirus packages deal with these, but sadly they are not nearly as feature rich or powerful as the antivirus applications available for Windows computers.
Many attacks that can affect a Mac do not specifically target Apple’s operating system. Most of the services that are at the core of OS X users are rooted in Unix and have been in use for more than 30 years. They have become more secure over time but unfortunately still have flaws in their original architecture. Packages such as Apache (the built-in web server), Samba (the built-in file and printer sharing server), and CUPS (the default printing software) are vulnerable to well-known attacks if left unsecured.
The Accidental Mac Administrator
What makes the Mac community unique is that many of the Mac system administrators are often not techies. A good portion of their job is often rooted in other disciplines, such as teaching, running a library or media lab, or editing film. Unfortunately, administrators in Mac environments
C H A P T E R 2 ■ S E C U R I T Y F U N D A M E N T A L S 29
tend to spend less time securing their networks and more energy on the creative side of using a Mac. Additionally, because security is often not the primary responsibility of many Mac administrators, they are generally not as educated in security best practices as others.
Ironically, some in the Mac community consider security precautions pointless, citing that Mac OS X is perfectly secure out of the box, and many administrators buy into that idea. This is an alarmingly inappropriate position to take with any operating system considering today’s connected world. If proper security precautions are not taken, any computer can be hacked, no matter what operating system it’s running. And although it is true that a properly secured Mac-based environment has fewer risks than a Windows-based environment, steps must be taken to properly implement a secure Mac-based network.
Conversely, there are also those in the IT world, the Chicken Littles, if you will, who constantly see the sky falling when it comes to computer security. Adopting an overly alarmist position about security can also have dire effects on your budget. Some administrators go overboard, exhibiting what we call alarmism. Alarmism is generally only a good idea when those who work around you blatantly refuse to practice even the most basic of security precautions (such as using a word like password as the server password—don’t laugh, we’ve seen it).
Kinds of Attacks
In the military, an attack is classified as an aggressive attempt to conquer and destroy an enemy, sometimes by denying them access to resources. Computer attacks are no different. Many computer attacks involve trying to steal or destroy data; others involve blocking access to network resources. The following is a list of computer security attacks that are commonly discovered when investigating hacked systems:
Brute-force attacks: This is an attack that attempts to try every possible combination of a password or cipher key (discussed in more detail in Appendix E) in order to gain unautho-rized access to resources.
Buffer overflows: Also known as a buffer overrun, buffer overflows are attacks that cause a program or computer to crash or act in some way that it was not designed to. Programming errors allowing certain memory exceptions typically cause buffer overflows.
Spoofing attacks: These include attacks where one person or program impersonates another person or program in order to gain access using false credentials. Spoofing attacks include man-in-the-middle attacks, phishing attacks, and referrer spoofing (see Chapter 11 for more information on referrer spoofing).
Viruses and malware: Discussed in detail in Chapter 7, these are software programs that are installed on your computer for the express purpose of causing it harm. (Malware is short for “malicious software.”)