Hack 71 Dealing with Stragglers, Deadbeats, and
Returns
Filing non-paying bidder alerts and credit requests in the event of a failed transaction.
Although sellers are responsible for paying all fees associated with an auction, eBay is not unreasonable about refunding those fees when it comes to returns, deadbeat bidders, and other extenuating circumstances.
Regardless of the terms of a failed transaction, every seller can complete the following two-step process to recover any final-value fees associated with an auction. Unfortunately, listing fees are nonrefundable, but they are never very large.
6.8.1 Non-Paying Bidder Alert
If a bidder never pays, if a bidder returns an item, or if you and the bidder settle a transaction for less than the final bid price, the first (and sometimes only) step is to file a Non-Paying Bidder Alert.
This is different from the "payment reminder," available in the Selling tab of My eBay. Sending a payment reminder is optional, and is not a prerequisite to using the Non-Paying Bidder form. A Non-Paying Bidder Alert can be filed only after 7 days (and no more than 45 days) have passed since the end of the auction.
NPBComplaintForm), and enter the eBay item number as instructed.
You'll be presented with a list of reasons. The reason you choose here will have a very real effect on the way eBay handles the rest of the process. There are effectively three different scenarios:
1. Urge the bidder to pay. If you choose any of the following options, an email will be sent to the bidder
reminding him of his obligation to pay. This will also enable you to subsequently use the Final Value Fee Credit Request Form, discussed in the next section. The options are:
High bidder didn't contact you.
High bidder refused the item.
High bidder didn't send payment.
High bidder sent payment, but check bounced or payment was stopped.
High bidder didn't comply with seller's terms and conditions stated in listing.
One or more of your Dutch auction bidders backed out of sale.
2. Cancel the transaction. Choose either one of the following to end the process here and get a refund immediately:
Both parties mutually agreed not to complete the transaction.
3. Apply for a partial credit. Use one of the following options if the transaction was successful, but the amount you ultimately received from the customer was less than the final bid price (for example, if you issued a partial refund, as described in [Hack #70]). As with reason #2, your refund will be immediate, and the process will end here.
Sale price to high bidder was actually lower than the final high bid.
High bidder in Dutch auction did not complete the transaction. You sold the item to another bidder.
6.8.2 Final Value Fee Credit Request Form
If the action you took when filing the Non-Paying Bidder Alert resulted in a warning email being sent to the bidder, you are obligated to give the customer another 10 days to comply and send payment in full. If the bidder still hasn't paid after those 10 days, then you can follow up by filing a Final Value Fee Credit Request. (Note that credit requests will be denied if 60 days have passed since the end of the auction.)
When you complete a Final Value Fee Credit Request, the bidder involved will receive a Non-Paying Bidder Warning. A bidder who receives three such warnings will be suspended from eBay. For this reason, you should be diligent about following through for deadbeat bidders. Likewise, you should be extremely careful about filing
Go to Site Map Request Final Value Fee Credit Request Your Final Value Fee Credit (
cgi3.ebay.com/aw-cgi/eBayISAPI.dll?CreditRequest), and enter the eBay item number in the form shown in Figure 6-5.
Figure 6-5. Use the Final Value Fee Credit Request
Form to get most of your fees back after a failed
transaction
Here, you'll be presented with the same assortment of reasons that appeared on the Non-Paying Bidder Alert Form, plus a field in which to specify how much money if any you received from the bidder. Click Submit when you're done, and eBay will credit the appropriate amount to your account.
Your credit will take effect immediately. To see how much
6.8.3 Relisting and Other Options
When all is said and done, you'll most likely still have the item, which means you'll want to relist it and try to sell it again.
Before you relist, make sure to add the deadbeat bidder from the first round to your Blocked Bidder List, as described in [Hack #54]. You can also see if any of the other bidders on the auction are still interested by using the Second Chance Offer on your My eBay Selling page.
You can relist any item on eBay by going to the completed auction page and clicking "Relist your item." You can relist multiple items quickly in the Unsold Items section of your My eBay Selling tab.
Relisting in this way has three advantages over creating a new listing:
You don't have to enter all the auction details again; eBay will do it for you. All you need to do is click Go To Review to jump to the last page of the form, and then click Submit Listing to start the new auction.
If you turn on the Relisted Item Link option, a prominent link will be placed on the old auction, directing any
customers who happen to see it to the new auction page. It's a great way to get a little extra free advertising for your item.
If the first auction failed because it didn't receive any bids or the reserve wasn't met, eBay will waive the listing fees for the relisted auction.
relisted after a deadbeat bidder backs out usually closes at a higher price the second time. Why? First, two back-to-back day auctions have twice the exposure (14 days) of a single 7-day auction; if you do it right, anyone who visits the first
auction will see a link to the relisted auction. Second, any
unsuccessful bidders on the first auction are likely to return and bid more aggressively on the second auction, especially if you're selling something rare. Third, a diligent seller is likely to
Hack 70 Damage Control Before and After You
Ship
How to handle problems discovered by either you or the customer.
"A diplomat is a person who can tell you to go to hell in such a way that you actually look forward to the trip."
Caskie Stinnett, 1960
So you're packing up an item to ship to a customer, and you suddenly discover a scratch, scrape, hole, discoloration, or missing part that you hadn't noticed and hadn't mentioned in the auction description. Sure, you can pack it up, ship it, and hope the bidder never notices. But he will, and you know it. The best approach involves a quick preemptive email to the bidder, like one of the following:
"I just noticed a nick on the back of the item while I was packing it. Let me know if you no longer want it, and I'll refund your money. Otherwise, I'll ship right away." Give your customer a way out. In most cases, if the problem is minor, the customer will still want the item. Not only will this note make you appear honest, but your customer will have a more realistic expectation about the condition of the item, and less of a reason to return it when it finally arrives.
"While packing up your item, I discovered a flaw I hadn't noticed when writing up the auction description. I've
to you along with a partial refund. Or, if you're no longer interested, I'll refund your payment in full." The photo gives the customer additional information with which he can
make an informed decision, and, again, helps set a more reasonable expectation. And the partial refund is an
excellent compromise that will both sweeten the deal for the customer and save you the trouble and expense of having to relist the item.
"I was called out of town for a few days, and I had to leave before I got a chance to ship your package. I shipped your package this morning and upgraded it to second-day air for no extra charge. I'm sorry for the delay; please let me
know when the package arrives." Damage control isn't just for physical damage; it's for dealing with snags in any part of the transaction. Not only should you contact customers before they receive a late package, you should make some concession to help compensate for the delay. For instance, a free shipping upgrade will cost you very little, but will go a long way toward making your customer happy with the product when it finally does arrive.
"I was getting ready to pack your item, but I couldn't find some of the parts that were listed in the auction
description. I apologize for the inconvenience, and have refunded your payment." This is the best approach if you're reasonably certain the customer will no longer want the item, as it doesn't even suggest the possibility. Assuming you're sufficiently apologetic and your tone is sincere, the customer will be understanding, and will quickly release you of your obligation without further inquiry or negative
feedback.
The goal in each case is not only to set a reasonable
want is to go to the trouble and expense of shipping an item, only to have the customer complain and ultimately return it to you. Not only would you have to refund the shipping fees
(assuming that you're at fault), but you'd be stuck with negative feedback and an item you then have to resell.
If you instead refund the customer's money before shipping, you'll still be stuck with the item, but you won't get negative feedback, you won't lose money in shipping costs, and you won't have to go through the hassle of dealing with an unsatisfied customer.
And don't forget the partial refund, either. By refunding some of your customer's money, either by a small token amount or
perhaps by shipping for free, you'll still be able to complete the sale and the buyer will be happy to get his product for a little less.
If you end up refunding some or all of the customer's payment, make sure to apply for a credit for the appropriate final-value fees, as described in [Hack #71].
6.7.1 After the Fact
If the customer has already received the package, any hopes of setting a reasonable expectation will be dashed. But you can still try to ensure that your customer will be happy with his or her purchase.
The typical scenario involves a customer who isn't happy with an item for whatever reason. Some customers will be more understanding and reasonable than others, but it's up to you to set the tone for the rest of the transaction and deal with the problem appropriately.
1. Check out the customer's feedback rating and look for signs that he has harassed other sellers. A customer with glowing feedback can be much more readily
trusted than one whom other sellers have found to be unreasonable or uncooperative.
See if the customer has left feedback for you yet. If not, you'll still have a chance at coming out of this unscathed. Otherwise, you might understandably be less willing to
compromise, given that there's seemingly nothing in it for you. But don't forget that feedback can be retracted, as described in
[Hack #6], so there's still a chance that you could make things right for both you and the bidder.
Double-check your auction description for a mention of the problem. If the customer's complaint is addressed in your description, then all you need to do iskindlyinform the bidder that the problem was explained in the auction. A seller should never be held responsible for a complaint based solely on the buyer not having read the auction description.
Examine your photos of the item to see if you can
corroborate (or refute) the seller's story. It will be up to your judgment as to how clearly the problem was illustrated by your photos, and how you wish to proceed.
Offer a partial refund commensurate with the severity of the problem. If the customer is happy to accept, you won't have to take the item back and refund all the customer's money.
If the customer rejects the partial refund, then it's up to you whether or not to give the customer a full refund and whether or not you include the cost of shipping. It's generally accepted that the seller refunds shipping charges if the seller is at fault; otherwise, the customer is entitled to nothing more than a refund of the final bid price.
Watch out for fraud when handing out refunds. Some people will buy an item to replace a defective one they already have, only to return the defective unit to the unsuspecting seller and effectively get the item fixed for free. Make sure to inspect both the item and the customer's feedback profile for signs of fraud.
Note that you should never ask the bidder to cover eBay's fees if they return an item, mostly because you can apply for a
Hack 54 Keeping Out Deadbeat Bidders
A little diplomacy will help keep out deadbeats and still
allow healthy bidding on your auction.
"Good judgment comes from bad experience, and a lot of that
comes from bad judgment."
One of the most frustrating aspects of selling on eBay is dealing with winning bidders who don't pay. Not only are non-paying bidders a waste of the seller's time and money, they end up ruining honest bidders' chances of winning the auction.
You can always tell a seller has been recently burned by a
deadbeat from the harsh warnings in their auction descriptions:
"Don't bid if you don't intend to pay!"
"Serious bidders only."
"If you have zero feedback, email before bidding or your bid will be canceled!"
"A non-paying bidder will receive negative feedback, lots of threatening email, and a note to your mother."
The problem with all of these is that they typically do more
won't read your description anyway.
Instead, start by thinking about why someone may not pay after winning an auction, and then find a diplomatic way to weed out such bidders.
In most cases, it will be new eBay users with a feedback rating of less than 10 or so who end up bidding and not paying, a fact due largely to their inexperience rather than any kind of malice. For instance, new bidders will often wait until after they've bid to read the auction description and payment terms (if they read them at all). Or, a bidder might bid and later discover that he or she no longer needs or wants your item. And since
inexperienced eBay users typically don't know how to retract bids or communicate with sellers, nor do they understand that they can simply resell something they don't want, they simply disappear, hoping that the problem will go away if they ignore a seller's emails.
Naturally, there are also those clowns who bid with no intention of paying. This is actually quite uncommon, and such abusers of the system don't last long on eBay. If you suspect that someone with a vendetta against you might bid on one of your auctions just to leave feedback, you may want to update your Blocked Bidder List (described later in this hack).
So how do you tell the difference between honest bidders and dishonest deadbeats? Go to Search By Bidder, enter the bidder's user ID, and click Yes to include completed items. If the user's bidding history seems reasonable (a few bids, all along the same lines), then he is probably a legitimate bidder. However, if the user is bidding as though it were going out of style, trying to buy up as many high-priced items as possible, then you've likely found yourself a deadbeat.
Since the problem of deadbeat bidding is most often caused by a lack of experience, any notes of warning in your auction
description should instead be welcoming and instructional. Think of it as educating your bidders on eBay basics:
"Attention new bidders: please read the auction description carefully and make sure it's what you want before you bid."
"Please read my payment and shipping terms to be sure you can complete the transaction before you place your first bid."
"If you have any questions about this auction, please contact me before you bid."
Not only do these examples encourage bidders to bid on your auctions, they enforce the practices that will help ensure that they're happy once they've paid and have received their items, which will reduce the likelihood of negative feedback and having to deal with returns. See [Hack #39] for more ideas.
Finally, to avoid misunderstandings that can lead to non-paying bidders, take steps to make sure your payment and shipping terms are as clear as humanly possible. See [Hack #48] and
[Hack #40] for ways to remove clutter and set apart important policies in your auction descriptions, respectively.
4.23.2 Being Proactive Behind the Scenes
Probably the best approach to preventing deadbeats is to be a little sneaky about it. Instead of relying on bidders to effectively censor themselves (which they won't), simply let them bid
Check back and review the status of your running auctions every few days. If you see any eBay users with zero feedback or the little "new user" icon next to their user IDs, just send them a quick note to verify that they're serious. If you don't get a reply in a day or two, cancel their bids and let them know why.
Now, if any of your auctions has a high bidder with a negative
feedback rating (less than zero) or a feedback profile with excessive negative comments, don't feel bad about canceling their bids and blocking them from bidding on any of your auctions.
4.23.3 Canceling Bids and Blocking Bidders
Canceling bids is easy . . . and fun! With the ability to cancel a bid at any time and for any reason, a seller yields tremendous power (over his or her own running auctions, anyway).
To cancel a bid, go to Site Map Cancel Bids on My Item, and follow the prompts. All bids placed by the specified bidder will be canceled, and the auction price will be adjusted accordingly. (You can also cancel all bids on an auction in one step by going to Site Map End my listing.)
Once a user's bids have been canceled, you'll have the
opportunity to add that user's ID to your Blocked Bidder List, available at Site Map Blocked Bidder/Buyer List. The list is simply a textbox with the user IDs of all the bidders you don't want bidding on your auctions, separated by commas. Note that although blocking a user prevents the user from placing any future bids on your auctions, it has no effect on any open bids placed by that user on any running auctions, so you may want to check your running auctions when you're done for any
eBay doesn't allow you to automatically block bidders based solely on their feedback rating, which is a good thing. After all, every eBay user has to start somewhere. Don't assume every new user is going to be a deadbeat, but don't expect new users to understand all the
ramifications of bidding, either. If you get stuck with a deadbeat bidder, they'll usually shape up with a little diplomacy and motivation; see
[Hack #71] for more information.
Timing is important when canceling bids. Canceling a bid too early is usually pointless, since the user is likely to be outbid by someone else, and the cancellation would just lower the final price needlessly. Canceling too late is also not a good idea, since it would keep the final price artificially high close to the end of the auction, which might scare off bidders planning to snipe. A good window in which to cancel bids is typically about 20-30 hours before the end.
Regardless of the timing, there's usually no benefit to canceling bids by a user who isn't currently the high bidder, with two
Hack 39 Expectation Management
A few carefully chosen words in your auction descriptions will help avoid unhappy buyers, returns, and negative feedback.
"If you lend someone $20 and never see that person again, it was probably worth it."
Most sellers would agree that an eBay transaction can be considered successful if the bidder pays promptly, leaves
positive feedback, and then disappears. Naturally, this happens when the bidder is happy. Unhappy bidders, on the other hand, have complaints, want refunds, leave nasty feedback, and, all told, make themselves a general pain in the neck.
When a bidder is displeased, it's usually because of a failure by the seller long before the customer even places a bid on the item. It's the seller's job to describe the item so that the
eventual buyer will be pleased with it, even if it means pointing out its flaws.
Think about it: every time you're happy or unhappy with a transaction, it's because the experience either met or failed to meet your expectations. The higher the expectations, the
harder it is to meet them. The key is to strike a balance
between making your product look good and setting reasonable expectations.
Consider the following when writing your auction description:
"indistinguishable from brand new." No matter how good it looks to you, the person who's just laid down $1,500 of their hard-earned money will expect more than you'll probably be able to deliver.
If the item has been used, say so; don't expect your bidders to realize this simply by scrutinizing your blurry photos or noticing that you set a low starting bid.
Mention all flaws, regardless of how insignificant. Whether or not the flaws are important is beside the point. Rather, it's the blunt honesty that will win the trust of your bidders, and ultimately get you more money for your items (and happier bidders to boot).
If you're selling something belonging to someone else, say so. Otherwise, your bidders will expect you to have full knowledge of its history and will hold you accountable for any flaws you don't specifically mention up front. Anything you know about the item's history (such as previous
owners, repairs, or accidents) should be mentioned in the description, along with the current condition of the item. Or, if the item has had a relatively cushy life surviving no
accidents and requiring no repairs then say so.
If it's dirty, clean it. If you don't want to take the time to clean it, say that it's dirty in the description. Or, better yet, say something like "With a good cleaning, this item will be as good as new!"
Measuring tapes are cheap and plentiful. Be sure to include the dimensions of your item, especially if you're not that familiar with it. This is not so much for the bidder's
convenience, but rather to help ease (or confirm) your bidders' fears that you might've miscategorized your item. For instance, if you're selling your grandfather's model
trains and you're not sure of the scale (HO, N, Z, etc.), then you run a pretty good chance of getting it wrong. If you include the dimensions, your bidders can be sure of what they're buying, long before they receive it and have to send it back.
Don't forget to mention the inclusion (or exclusion) of the original box, manuals, accessories, warranty card,
paperwork, price tags, or anything else your bidders might expect to get with your item.
See [Hack #55] for tips on taking good photos that will simultaneously sell your item and inspire trust in those who would pay for it.
Don't say "the photo says it all." The photo never says it all.
Finally, your tone sets an expectation with your bidders as to what you'll be like to deal with. Be inviting and friendly, and invite inquiries from interested bidders. Write in
complete sentences. See [Hack #54] for ways to protect your interests in the auction description, and [Hack #53]
for everything else.
Hack 6 Remove Unwanted Feedback
Use SquareTrade's mediation services to retract feedback.
eBay doesn't kid around when it comes to feedback, and neither do most users. Although eBay is quite clear about stating that every member who leaves feedback is responsible for his or her own words and that, once posted, feedback cannot be
retracted, there is indeed a way out.
In fact, there are several circumstances under which a feedback comment can be removed:
The feedback does not appear to be connected with eBay, the particular member for which it was left, or the particular transaction with which it is associated.
The feedback contains offensive language, personal identifying information, links to pictures or web sites, or false claims with regard to eBay policies or law-enforcement organizations.
The feedback was mistakenly left for the wrong user, and the person who left feedback corrects the error and then contacts eBay.
The feedback was left by someone with false contact information.
eBay receives a court order finding that the feedback is slanderous, libelous, defamatory, or otherwise illegal, or as a result of a settlement agreement.
eBay is notified by SquareTrade to remove the feedback, as explained in the next section. If the feedback comment doesn't meet any of the other criteria listed here, then going through SquareTrade is your best choice.
Go to http://pages.ebay.com/help/policies/feedback-removal.html for all the legalese associated with eBay's feedback removal policy.
1.7.1 SquareTrade
Any eBay member who wishes to have a feedback comment removed must do so with the cooperation of the person who originally left the feedback.
Here's how it works:
1. The recipient of the unwanted feedback files a case at www.squaretrade.com and pays the service fee.
There is no time limit.
Emails are sent to both parties.
Each party independently agrees to have the feedback removed.
A mediator at SquareTrade investigates the case.
The only time things proceed differently is if the other party doesn't respond to any of the SquareTrade emails within 14 days. In this case, a SquareTrade mediator reviews the case, and hopefully dismisses the feedback. The restriction here, however, is that the case must be filed within 90 days of the date of the feedback; this prevents eBay members from
attempting to remove old feedback from posters who have long since left eBay and changed email addresses.
Hack 48 Make Good Use of the About Me Page
Set up a static page on eBay for all the stuff that would
otherwise clutter up your auction pages.
Many sellers make the mistake of including pages and pages of payment and shipping terms, only to supplement it with a
single sentence about the item itself. No wonder bidders never read descriptions!
I hate clutter, whether it's on one of my own auctions or someone else's. I like to reserve the space in my auction
descriptions for information about the item being sold, mostly because bidders have a limited attention span, and I, as a seller, have a limited amount of time to prepare my auctions. eBay allows any user to build a static page right on the eBay web site separate from their auctions with whatever content he or she wants to make public. Although anyone can put
together an About Me page by going to Site Map About Me, it's sellers who will benefit most from this feature.
Since the About Me page is separate from auctions, its content can be modified at any time, even after your auctions have received bids. See
[Hack #50] and [Hack #51] for more information.
whenever your ID appears on eBay. And finally, you'll be able to insert dynamic, eBay-specific content in your page, as follows.
4.17.1 Just Say No to Templates
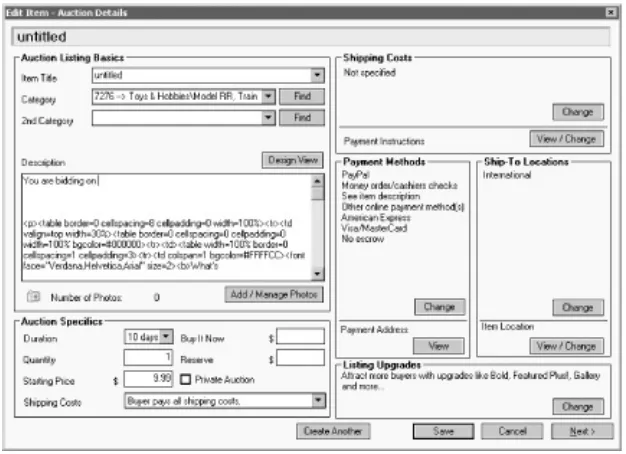
When you use the About Me feature for the first time, eBay presents a selection of different templates that you can choose from to frame your page. The next step involves filling in about a dozen fields with your personalized information (see Figure 4-13), such as a title, welcome message, something called
"another paragraph," and some of your favorite links. You can also choose to display recent feedback and a list of your items for sale, right on the page.
Figure 4-13. The About Me setup page is the first
thing you see when you build an About Me page,
but it doesn't afford the flexibility of the optional
If you want to have full control over the look of your page, you can skip the setup page by clicking Preview at the bottom of the page. Then, on the next page, click "Edit using HTML." You'll then be shown a single edit box, prefilled with the HTML code from your current About Me page. You can proceed to modify or replace this code as you see fit. See [Hack #40] for assistance in this area, as well as information on using a WYSIWYG web page editor to create pages like this.
(Ctrl-V). Do this every time you modify your page.
Since the page is hosted on the eBay site, you'll have access to features not otherwise available if you were to host the page yourself. Using specialized HTML tags, you can insert eBay-specific content, such as recent feedback and a list of your running auctions. In all, five tags are available, each with a selection of options to further customize your page.
<eBayUserID>
Instead of putting your email address in your About Me page, you can take advantage of eBay's privacy features. Having your bidders contact you through the Contact an eBay Member form will reduce the spam and other nuisance emails you might otherwise get. For example:
<ebayuserid nofeedback nomask>
The nofeedback and nomask options remove the feedback in parentheses and the icons that would normally appear after your user ID. If you want more flexibility, you can include a hard-coded link to the same page, like this:
<a href="http://cgi3.ebay.com/aw-cgi/eBayISAPI.dll?ReturnUserEmail&requested=
<eBayFeedback size=n>
Use this tag to include a table with some recent feedback you've received; specify size=15 to show the last 15 comments. You can further customize the table with the following additional options:
alternatecolor=red (the color of the upper line of each comment; see [Hack #41] for a list of supported colors)
comment)
border=1 (the width, in pixels, of the table border)
tablewidth=100% (the width of the table, as a percentage of the width of the browser window) <eBayItemList>
This tag places a table with a list of your running auctions right in your text, similar to the "View seller's other items" page. You can customize the table with these options:
sort=n (where n can be 8 to show newly listed auctions first, 2 to show the oldest auctions first, 3 to show the auctions ending first, or 4 to show the lowest-price items first)
since=n (include a positive number for n to show completed items, up to 30 days old)
category=n (restrict the listing to items in a single category; see [Hack #12] for more information on the category number to include here)
border, tablewidth, and cellpadding (see <eBayFeedback>, above)
<eBayMemberSince> <eBayTime>
These two tags display the date you first registered and the current date in eBay time, respectively.
You might use <eBayMemberSince> like this:
eBay member since <ebaymembersince format="%B %d, %Y">
31st, 2003" in your About Me page. The idea is to imply a certain level of trustworthiness, corresponding to the length of time you've been buying and selling on eBay. But since this date never changes, there's no reason you can't simply type it directly onto your page.
Since <eBayTime> doesn't necessarily show either the
seller's local time or the bidder's local time, but rather only the current time in eBay's time zone (Pacific time, GMT-8:00), its usefulness on this page is limited.
The codes used in the format string are as follows. To format the date, include %A for the day of the week (%a to abbreviate), %m for the month number, %B for the month name (%b to abbreviate), %d for the day of the month, and %Y for the year (%y for only two digits). Likewise, to format the time, type %I for the hour (%H for 24-hour clock), %M for the minute, %S for the second, and %p for the appropriate "AM" or "PM" text. (Note that the codes are case-sensitive; %Y is different from %y.)
4.17.2 Referencing the About Me Page
Once you've built an About Me page, a little "me" icon will appear next to your user ID (right after the feedback rating) wherever your ID appears on the eBay site. Another user can simply click the icon to view your About Me page. But you can also link directly to your About Me page in your auctions using this simple URL:
http://members.ebay.com/aboutme/user_ID/
If you want eBay's little "me" icon to appear in your link, use this code:
src="http://pics.ebay.com/aw/pics/aboutme-small.gif" border=0></a> for payment and shipping terms.
If your About Me page is complicated or lengthy, you may want to divide it up with named anchors. For instance:
<a name="shipping"></a> My Shipping Terms . . . <p>
<a name="payment"></a> My Payment Terms . . .
You can then jump to any anchor on the page by placing a # sign at the end of the URL, followed by the anchor name. For example, you may want to place this code in your auction description:
Please read my <a href="http://members.ebay.com/aboutme/
shipping terms</a> and my <a href="http://members.ebay.com/aboutme/ #payment">payment terms</a> before you bid.
Hack 40 Formatting the Description with HTML
Use HTML tags to turn a drab block of text into an interesting, attractive, and effective sales tool.
As a seller on eBay, you're expected to wear a lot of hats: diplomat, market researcher, salesperson, and yes, even web designer. Since eBay auctions are web pages, your description area can be decorated with the same fonts, colors, images, links, and tables found on any other web site.
If you're already familiar with HTML, you'll probably want to skip this primer and just use it as a quick-reference. The rest of the hacks in this chapter contain more meaty HTML code.
4.9.1 Rapid HTML Primer
For many sellers, the introduction to HTML comes in the disappointment of seeing a carefully formatted description seemingly mutilated by eBay. For example, this text:
Antique steam shovel toy: real working treads
working shovel, turn crank to raise glossy red lacquer
in immaculate condition!
will look like this when viewed on an eBay auction page:
Antique steam shovel toy: real working treads
in immaculate condition!
The fault lies not with eBay, but with the way web browsers interpret plain text. All spacing, alignment, and line breaks are effectively ignored in favor of the HTML code that is the basis of formatting in all web pages.
HyperText Markup Language (HTML) consists of plain text interspersed with markup tags. A tag is a special formatting keyword enclosed in pointy brackets (also known as carets and greater-than and less-than symbols). For instance, simply place the <br> tag in your text to insert a line break, or <p> to insert a paragraph break. For example:
real working treads<br>working shovel, turn crank to raise<br>glossy red lacquer
Tags that modify text actually require two parts: a tag to turn the formatting on and another to turn it off. For example, the <center> tag, used to center-justify text and images, requires a corresponding </center> tag later on to restore the default left justification. Other tags that work like this include <b>bold</b>, <i>italics</i>, and the <table></table> structure, all
described in the next sections.
4.9.2 HTML Quick Reference
Table 4-2 shows some of the more tags[2] you'll use in your auction descriptions, and how they'll appear on the auction page.
[2] For a complete listing of all HTML tags, consult an HTML reference such as www.w3.org or
HTML & XHTML: The Definitive Guide (O'Reilly).
Table 4-2. HTML tags that affect spacing and alignment
Line break First line<br>SecondLine First LineSecond Line
Paragraph break First line<p>Second Line First Line
Second Line
No break My <nobr>red steamshovel</nobr> Myred steam shovel
Horizontal line, centered First section<hr>Secondsection
First section
Second section
Center-justify <center>In themiddle</center> In the middle
Right-justify <p align=right>wayover</p> way over
Indent <blockquote></blockquote> See the nexttable
Start a bulleted list (unordered list) <ul><li>item A<li>itemB</ul> item A item B
Start a numbered list (ordered list) <ol><li>item A<li>itemB</ol> 1. item A item B
Display preformatted text with all line breaks and spacing
<pre>Color: Red
Size: Small
Age: Really old</pre>
Color: Red
Size: Small
Age: Really old
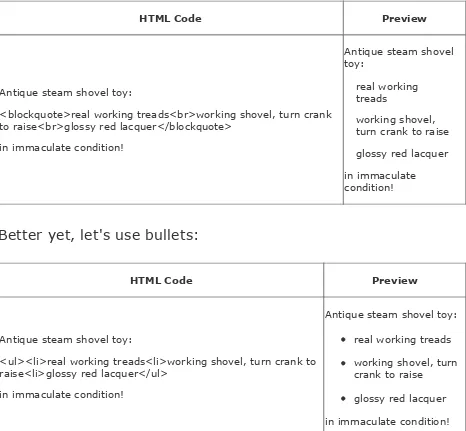
So using some of these tags, we can fully reproduce the steam shovel description as intended:
HTML Code Preview
Antique steam shovel toy:
<blockquote>real working treads<br>working shovel, turn crank to raise<br>glossy red lacquer</blockquote>
in immaculate condition!
Antique steam shovel toy:
real working treads
working shovel, turn crank to raise glossy red lacquer in immaculate condition!
Better yet, let's use bullets:
HTML Code Preview
Antique steam shovel toy:
<ul><li>real working treads<li>working shovel, turn crank to raise<li>glossy red lacquer</ul>
in immaculate condition!
Antique steam shovel toy: real working treads working shovel, turn crank to raise
glossy red lacquer in immaculate condition!
Note that the individual tags don't have to be on separate lines, but it would sure make the code easier to read. Table 4-3 shows the commonly used HTML tags that affect the appearance of text.
Table 4-3. HTML tags that affect fonts and appearance
Bold Shipping is <b>Free</b> Shipping isFree
Italics it's <i>really</i> important it's importantreally
Subscript Drink H<sub>2</sub>O Drink H2O
SuperscriptTurn 180<sup>o</sup> Turn 180o
Set the
font <font style="font-family:courier">Mono-spaced</font> Mono-spaced
Set the
font size <font style="font-size:120%">Big</font> or <fontstyle="font-size: 80%">small</font>
Big or small
Set the
font color It's <font style="color:white">invisible</font>! It's !
Tags can be combined to achieve just about any effect. Take care when nesting HTML tags, however, so that structures do not improperly overlap. For example, this is wrong:
The <i>coldest <b>winter</i></b> I ever spent
But this is correct:
was <i>a summer in <b>San Francisco</b></i>
Essentially, tags that are opened first should be closed last.
If you want to test your HTML code before placing it into your auction, simply type it into a plain text editor. Save the file with the .html
4.9.3 Images and Links
An image of any size, from a tiny icon to a full-size photo of what you're selling, can be inserted anywhere in your text using the <img> tag, like this:
<img src="http://pics.ebay.com/aw/pics/navbar/ebay_logo_home.gif">
In this case, the image URL points to a GIF file on eBay's
pics.ebay.com server that happens to be the eBay logo itself. See [Hack #59] for information on placing your photos on the Web and referencing them from your auctions.
By default, the image will appear inline with the text, which typically doesn't look very professional. Instead, you can left-justify or right-left-justify the image and the text will wrap around it:
<img src="http://pics.ebay.com/aw/pics/navbar/ebay_logo_home.gif" align=right hspace=4 vpsace=7 border=1>
Also shown in this example are the hspace and vspace parameters, which specify invisible horizontal and vertical margins in pixels, and the border parameter, which places a black line around the image with the thickness also specified in pixels.
Hyperlinks are created by placing the <a> (anchor) structure around ordinary text, like this:
<a href="http://www.ebayhacks.com/">click here</a>
Here, the text "click here" will automatically appear blue and underlined in your auction, and when clicked will navigate to the URL http://www.ebayhacks.com/. Make sure to include the
Always test each and every one of your links before placing them into your auction descriptions. The last thing you want is 20 confused bidders emailing you because you mistyped a URL in one of your links.
Of course, you don't want your bidders to click a link and leave your auction, never to return. To have the link open in a new window, leaving your auction description window intact, include the target="_blank" parameter:
<a href="http://www.ebayhacks.com/" target="_blank">click here</a>
Note that the <img> and <a> tags can be combined to make clickable images; see [Hack #60] for details.
4.9.4 Tables
Tables are easy to create and are a great way to organize
information in your auction descriptions. A table is defined with a single <table></table> structure with one or more <tr> </tr> and <td></td> structures contained therein. For
instance, this code defines a simple table with two rows and two columns:
<table width=90% border=1> <tr>
<td>Color:</td>
<td>red lacquer with chrome trim</td> </tr>
<tr>
<td>Dimensions:</td>
<td>3 inches high, 4 inches long</td> </tr>
</table>
Once a row is complete, another row begins. The resulting table looks like this:
Color: red lacquer with chrome trim
Dimensions: 3 inches high, 4 inches long
Note that text and images should never be placed outside the <td> tags. Use indents, like in the example above, to make the code more readable and to help you keep track of your rows and columns.
Using nested tables, you can create a nice-looking box to highlight important information:
<table border=0 cellspacing=0 cellpadding=0 width=40% bgcolor=#000000> <tr><td>
<table width=100% border=0 cellspacing=1 cellpadding=3> <tr><td bgcolor=#CCCCCC align=center>
<b>Condition of this item</b> </td></tr>
<tr><td bgcolor=#FFFFFF>
Brand new in the original box with all original paperwork. <br>Batteries are not included.
</td></tr> </table>
</td></tr> </table>
which should look something like this:
Condition of this item
The bgcolor parameter in the <td> tag sets the background color; the six-digit code is explained in [Hack #41].
Tables are also often used to make simple bars and stripes. For example, to include section headers that match those on eBay auction pages, use this code:
<table width="100%" border="0" cellpadding="0" cellspacing="0"> <tr><td bgcolor="#9999CC">
<img src="http://pics.ebay.com/aw/pics/x.gif" width=1 height=1> </td></tr>
<tr><td bgcolor="#EEEEF8" nowrap>
<img src="http://pics.ebay.com/aw/pics/x.gif" width=6 height=1> <font face="Arial" size="3"><b>
Your Title Goes Here . . . </b></font>
</td></tr> </table>
Table cells with background colors set with the aforementioned bgcolor parameter can be fine-tuned with transparent, single-pixel images (like x.gif here) used as spacers.
4.9.5 Using a WYSIWYG Editor
For more complicated page layouts, you may wish to use a graphical web page editor such as Netscape/Mozilla Composer (free from www.netscape.com or www.mozilla.org), HTML-Kit (free from www.chami.com/html-kit), or any word processor (Wordperfect, Word, etc.).
The problem is that web page editors are all designed to
interfere with people's ability to bid on your item.
If you've generated a page with a Microsoft Office application such as Word, Excel, or Powerpoint, the resulting HTML will be clogged with extraneous codes that should be removed. The easiest way to do this is to use the Microsoft Office HTML Filter, available for free at
www.microsoft.com/downloads.
First, open the generated HTML file in a plain text editor (e.g., Notepad on Windows) so you can see the HTML tags. The actual body of the page will be contained within a <body></body>
structure, so all you need to do is delete everything before the opening <body> tag and the closing </body> tag, as well as the tags themselves. Then, select everything that's left (Ctrl-A), copy it to the clipboard (Ctrl-C), and paste it into the
Hack 55 How to Keep Your Item from Looking
Pathetic
A simple approach to taking great photos of your items.
Simply put, good photos will get you more bids and more money. An attractive, clear, well-composed photo will excite customers and inspire trust in your bidders that you're selling what you say you're selling.
On the other hand, if your photos are blurry, poorly lit, too
small, or too cluttered with junk, your bidders will not be nearly as impressed. Not surprisingly, bad photos will make your item look pathetic, and as a result your auction will get fewer bids and less money (if it sells at all).
5.2.1 Composition
Start with a neutral background, like an empty table or section of the floor. A little texture (like wood or fabric) can be nice, but don't overdo it. Avoid carpet, which can make your item look dirty and shabby. And nobody is going to want something that is seen sitting in the dirt.
A shiny, reflective base, like a mirror or the top of a silver file cabinet, will make smaller items look like they're in a professional showroom. A close-up shot with only a little depth of field, as explained in [Hack #56], will throw any unwanted background reflections out of focus.
unnecessary clutter from the photo; it should be crystal-clear to your customers exactly what they're bidding on.
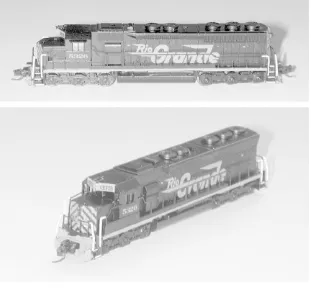
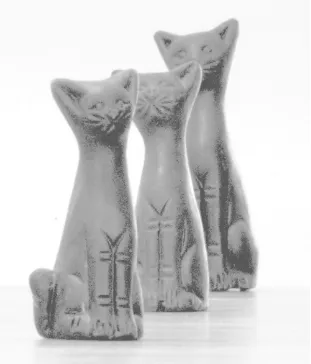
Shoot from an angle to illustrate that you're selling a three-dimensional object. An object photographed slightly askew will look much better than if it's perfectly centered and aligned with the edges of the photo. Figure 5-1 shows the same object shot at two different angles, one of which looks much better than the other.
Figure 5-1. Photograph your items from an angle
to make them look more attractive
Show the entire item fully assembled in at least one photo, preferably the first. Don't take it apart unless you feel it's important to show an internal feature or to illustrate the way the item goes together.
Case in point: Not too long ago, I purchased a toy car on eBay from a seller who included only a single, rather small photo of the item. To illustrate that one of the wheel bolts was missing, the seller physically removed one of the wheels and placed it underneath the vehicle to prop it up. The photo made it look more like a pile of junk than a car, and as a result, I got it for less than half the price the model typically fetched. When the car arrived, I simply attached the wheels and reveled at the great deal I had gotten. Although the seller was probably just trying to set a reasonable expectation, as detailed in [Hack #39], he went too far, and his car looked simply pathetic.
5.2.2 Photographing Collections
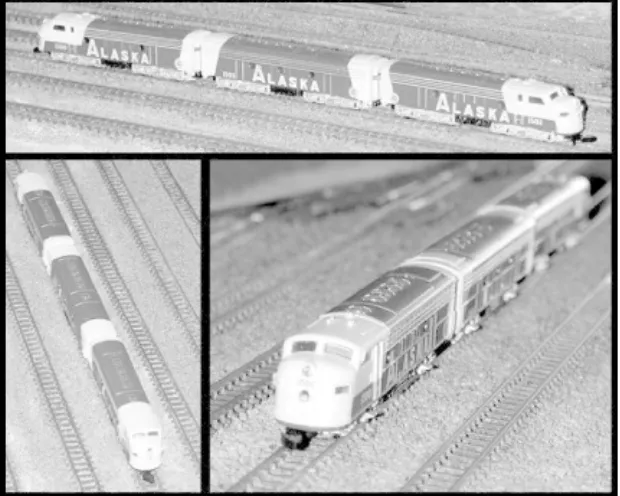
If you're selling a collection of items, or if there are included accessories, include at least one photo showing the entire collection together. Figure 5-2 shows a handheld computer
(PDA), together with a bunch of included accessories. The group shot makes your bidders feel like they're getting a lot for their money, and it clearly illustrates exactly what is included with the auction.
5.2.3 Lighting
Don't rely entirely on your camera's flash to sufficiently
illuminate your object, or half your item will appear in shadow. You don't need professional-quality studio lighting, only a desk lamp or overhead light to serve as a second light source. But if there's too much light, any detail in the item might get washed out. Figure 5-3 shows the same item photographed with
different amounts of light.
Hack 53 Diplomacy 101: Answering Dumb
Questions
Good and bad ways to handle communications with
seemingly lazy or dim-witted bidders.
No matter what you do, you'll never get all your bidders to read your auction descriptions, shipping terms, or payment
instructions as carefully as you'd like them to, if at all. As a result, you'll occasionally get a bidder who looks at an auction entitled "Antique Royal-Blue Vase," sees the large photo of a royal-blue vase, and then writes you to ask what color the vase is.
OK, it's not usually that bad, but sometimes it seems like it is. The first thing to remember is how easy it is to miss even the most obvious piece of information. Instead of antagonizing your bidder with the all-too-familiar, "It's blue, like it says in the
description," try one of the following:
"The vase is a deep royal blue that almost looks purple in low light. The glaze seems a little darker at the bottom." Not only does this answer the bidder's question respectfully, it presumes that the bidder was looking for more
information than simply, "it's blue."
"The vase is royal blue. The photo in the auction actually has a pretty good reproduction of the color, so please let me know if it doesn't come through." This not only (kindly)
legitimate reason for the bidder asking the question in the first place; namely, that the photo might not have loaded properly on the bidder's computer.
Instead of driving your bidders away, you'll be sending them the message, so to speak, that a transaction with you will be a
pleasant one, that you're trustworthy, and that your item is as you've described it. See [Hack #20] for some of the tactics that your bidders might be using.
It may seem like a no-brainer, but when replying to a bidder's question it's important to use your email program's Reply feature so that the original message appears at the bottom of your response. This way, the bidder doesn't receive an email that simply says "Yes," with no further clue as to what question you're answering. Strangely, this simple bit of "netiquette" is basically ignored by even the most experienced sellers don't be one of them.
Next, remember that for every bidder who writes you with a question, there will be 10 potential bidders who don't bother. Either they bid without asking, only to be disappointed later, or they move on and bid on someone else's auction instead. For this reason, it's best to be a little proactive. If a bidder asks a question that isn't answered in your auction description, go ahead and revise the auction to include the extra information, as described in [Hack #50]. And if you find that several bidders are asking a question that you feel is already addressed, there must be something unclear about it. There's certainly no harm in going back to the auction and trying to clarify.
4.22.1 Check Out Your Bidders
When an unfamiliar eBay user makes contact, you may want to take a moment to figure out who he or she is before you reply. For example, if your auction states that you won't ship
internationally, and someone from Iceland[5] is inquiring about your item, you'll want to let him know that you can't ship to him. But how do you know where these bidders are located? Well, you'll have a pretty good clue if someone asks, "How
much to ship to Iceland?" but otherwise you'll have to do a little investigating.
[5] For my beloved readers in Iceland, please substitute Greenland here.
Start by going to Search Find Members, type the bidder's user ID into the Feedback Profile box, and click Submit. (For a shortcut, just open any member's feedback page and replace the user ID in the URL with that of the member you're
investigating. See Chapter 1 for more information on feedback.) The country where the member is registered is shown right in the summary box at the top of the page.
While you're at it, take a look at the member's feedback rating. If the member has an excessive amount of negative comments, now may be an excellent time to make sure that bidder can't bid on your auctions. See [Hack #54] for details.
The country specified on the Feedback page is not foolproof, however. If you're suspicious, just look at the bidder's email address, which will appear at the top of the email they've sent you. Unless the bidder's domain is .com, .net, .org, or .edu, the TLD (top-level domain) will contain a country code (such as .uk
Hack 50 Make Changes to Running Auctions
Keep your auctions looking and performing their best with post-listing revisions.
We all misspell words from time to time, but where auction titles and descriptions are concerned, innocent typos can
adversely affect sales. eBay allows you to modify your auctions once they've been started, but certain revisions may not be allowed, depending on when you submit them and whether the item has received any bids.
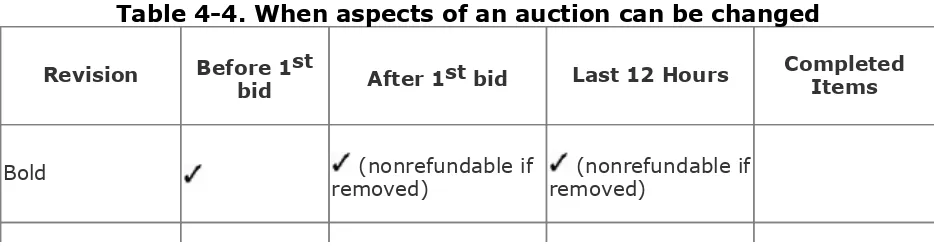
For example, eBay understandably doesn't let you change the description once someone has bid on your auction,[4] but you can add to the description. Any supplemental text and photos are placed at the end of the description, accompanied by a date and timestamp, making it clear to your bidders exactly what you added and when. Additionally, since eBay doesn't allow bidders to retract their bids within the last 12 hours of an auction (see [Hack #27]), further revisions normally available to sellers are prohibited during that time. Table 4-4 shows possible revisions to a running auction; a checkmark indicates when each revision is allowed.
[4] Note that canceling bids, as described in [Hack #54], will not restore your ability to make changes to the auction description.
Table 4-4. When aspects of an auction can be changed
Revision Before 1st
bid After 1st bid Last 12 Hours
Completed Items
Bold (nonrefundable if
Buy-It-Now vehicles with a reserve price only
only using second-chance offer
Calculated
shipping change in invoiceonly
Cancel bids
Categories
Counter
Description add to only add to only, unlessit has also received a bid
Duration only by ending early only by endingearly
End listing
Featured (nonrefundable if
removed) removed) (nonrefundable if
Gallery (nonrefundable if
removed) removed) (nonrefundable if
Gallery photo
Gift services (nonrefundable if
removed) removed) (nonrefundable if
Highlight (nonrefundable if
removed) removed) (nonrefundable if
Item location
Listing format (auction vs. fixed-price)
Payment details add to only change in invoiceonly
Payment
instructions change in invoiceonly
Pictures (if
hosting on eBay) add to descriptiononly
Pictures (if hosting yourself)
Private auction
Quantity
Reserve price vehicles only, can beremoved or lowered once
vehicles only, use second-chance offer
Shipping details add to shippingdestinations only change in invoiceonly
Starting price
Title
Most revisions can be made by clicking the "Revise your item" link at the top of the auction page, or by going to Site Map Revise my item and entering the auction number. There are a few exceptions, such as "Fix my gallery image," all of which appear in the "Manage My Items for Sale" section of the eBay site map.
upgrade fees) from the first auction if the relisted auction sells, so it should ultimately cost you nothing but time.
There are ways to sneak around eBay's auction revision
policies, of course, as long as you don't do anything egregious like changing what the auction is for after the high bidder has bid.
If you host your own photos, you can change them at any time, even after the auction has ended. All you need to do is make sure you don't change the photo filenames. See
[Hack #59] for more information.
See [Hack #51] for ways to change your auction description when eBay won't otherwise allow you to do so.
Your About Me page is separate from your auctions and can be modified at any time, regardless of the status of your auctions. This makes it ideal for your payment and shipping terms, contact information, and details about your
Hack 51 Dynamic Text in Auction Descriptions
Use inline frames to change the text in your auction
descriptions, even after bids have been placed.
Once bids have been placed on an auction, eBay severely restricts the changes that the seller is allowed to make (see
[Hack #50] for details). Probably the most prevelant restriction is the auction description itself, which can only be added to once the auction has received its first bid. Fortunately, you can use iframes (inline frames) to work around this.
Any text not hardcoded into your auction description will not be indexed by eBay Search, so you'll want to restrict dynamic text to material not specific to the item being sold (such as payment terms or information about your company).
An inline frame is like a web page within a web page. To try it, place the following code right in your auction description:
<iframe src="http://www.ebayhacks.com/myiframe.html" style="width:350;height=200;" align=left>
<a href="http://www.ebayhacks.com/myiframe.html" target=_blank>Click here</a> to view additional information about this auction.
</iframe>
The web page designated by the src parameter in the <iframe> tag will load in a window 350 pixels wide and 200 pixels high, as shown in Figure 4-18.
that can be changed, even after the auction
receives bids
The page you reference can be any page on any web site, but you'll most likely want to place one of your own pages in the iframe. See [Hack #59] for more information on hosting your own web pages (HTML files). In this example, the page is
named myiframe.html and is located on www.ebayhacks.com. Unfortunately, support for iframes among the browsers
currently in use is a little sketchy, especially in older versions. You can accommodate users viewing your auction with iframes-challenged browsers by including alternate text between the <iframe> and </iframe> tags, like the link to the page in the example above.
Parameter Description
style="width:n;height:n;" Specify the width and height of the box, in pixels orpercentages
style="margin:n;" Specify the horizontal and vertical distance between theiframe content and its border
style="border:n;" Specify the border width; use 0 to turn it off completely
scrolling=no Turn off the scrollbars; note that the viewport can still bescrolled by clicking and dragging to select text inside
align=left | right | top | middle | bottom
When you align the iframe to the left or right, the exterior text wraps around the box; otherwise the box is placed in-line with the text, and the align parameter only affects whether surrounding text is aligned to the top, middle, or
bottom of the box
Now, you can set apart the iframe with a thick border or added whitespace by simply enclosing it in a table, but in your
auctions you probably want it to blend in as much as possible with the surrounding text. In that case, try this:
<p>
<iframe src="http://www.ebayhacks.com/myiframe.html" scrolling=no style="width:100%;height=200;margin:0;border:0;">
<a href="http://www.ebayhacks.com/myiframe.html" target=_blank>Click here</ a> to view additional information about this auction.
</iframe> <p>
The only guesswork is in the height parameter, which unfortunately must be set to a static value. You'll see the
problem when you resize the browser window: if the page is too wide, you'll be stuck with extra space at the bottom; if the page is too narrow, the height won't be sufficient to hold all the text. Ideally, the height of the box should automatically adjust to the size of the contents of the iframe which, not surprisingly, is something we can accomplish with a little added JavaScript. Start by simplifying the <iframe> tag by removing the height style:
<iframe src="http://www.ebayhacks.com/myiframe.html" scrolling=no style="width:100%;margin:0;border:0;" id="myIframe">
Also new is the id="myIframe" parameter, which assigns a name (myIframe) to the iframe that we'll use later. Next, the JavaScript code that does the resizing is actually placed in the referenced HTML file:
<html> <head>
<script type="text/javascript"> function resizeIframe( ) {
parent.document.getElementById('myIframe').height = document.getElementById('myContent').scrollHeight; }
</script> </head>
<body style="margin:0;border:0" [2]
onload="resizeIframe()" onResize="resizeIframe( )"> <div id="myContent"> [3]
Your content goes here...
</div> [4] </body>
Here's how it works. The visible content of the page all of it is placed inside the <div></div> structure, [3] to [4], which defines a layer named myContent. (The layer acts like a taut rubber band, stretching to the edges of its contents and allowing us to calculate the overall height of the text.) The single line of JavaScript code [1] sets the height of
myIframe object on the parent page (the auction, in this case) to be equal to the height of the myContent layer.
Finally, the <body> tag [2] executes the JavaScript code by running the resizeIframe function when the page is first loaded and also whenever the page is resized. The style parameter in the <body> tag helps reinforce the marginless, borderless appearance, as illustrated in Figure 4-19.
Figure 4-19. A dynamically resizing, borderless
iframe placed in your auction description will
If all goes well, the iframe will automatically resize to fit its contents and will look just like another paragraph in your
How to Tell Dynamic from Static Text
So, if you're a bidder, how can you tell that you're looking at a page with dynamic text in an iframe? Just press Ctrl-A to select all the hardcoded text in the auction, and any blocks of dynamic text will stand out like a sore thumb. If you're concerned that a seller has included dynamic text describing something important, simply highlight the text with the mouse, copy it to the clipboard (Ctrl-C), and paste it into a text editor (Ctrl-V) for safe storage.
If you suspect that a seller is using dynamic text for deceptive reasons (e.g., to defraud bidders), report the auction to eBay by going to
Hack 41 Customize Auction Page Backgrounds
Make your item stand out with a little personalization of
the auction page using JavaScript.
Although the description area occupies only a portion of the auction page, it's possible to include code with the ability to reach out and affect the entire page.
Why would you want to do this? Well, as the theory goes, a more distinct auction will get more attention from bidders. However, anyone who looks at your auction has already given you their attention, so the effect will not be earth-shattering. Still, a little tweaking may make your auction look nicer, or at least let you express your own personal style and have a little fun with your auctions.
Never build an auction such that it will be rendered inoperable if a bidder has disabled JavaScript support in his or her browser. For instance, if you place white text on a dark background but the
background remains white due to the JavaScript code not working, then all you'll have is white text on a white background and a very frustrated bidder.
This code, when placed anywhere in your auction description, will change your auction's background color:
<script language=javascript><!--document.bgColor='blue';
--></script>
For more control, you may wish to use RGB (red-green-blue) color coding instead, like this:
document.bgColor='#C5D0EE';
The six-digit color code (here, C5D0EE) is comprised of three pairs of hexadecimal numbers, ranging from 00 (zero, no color) to FF (256, full color). Each pair represents the amounts of red, green, and blue to be used, respectively. For instance, #FF0000 is solid red (no green or blue components), and #FF00FF is purple (red and blue, but no green). Likewise, #000000 represents solid black and #FFFFFF represents solid white. Convenient color tables can be found at
www.utexas.edu/learn/html/colors.html. If you have Adobe Photoshop, you can mix colors in the Photoshop color picker, and the corresponding hex code will appear right next to the red, green, and blue values.
Unfortunately, the eBay logo and menu bar that appear at the top of auction pages aren't intended to be used with colored backgrounds and will have an unsightly white matte instead of the ideal transparent background.
To change your auction's background wallpaper image, insert this code into your auction description:
<script
language=javascript><!--document.body.background='http://www.ebayhacks.com/pictures/stone.gif'; --></script>
Simply replace
http://www.ebayhacks.com/pictures/stone.gif with the full URL of the background image you wish to use. See [Hack #59]
Hack 12 Tweaking Search URLs
Tap into eBay's massive database right from your own address bar.
eBay is essentially a massive database. Every time you view an auction page, you're just looking at a single database record. Every time you search, you're performing a query. But even if you're not familiar with DB lingo, you can play with eBay's URLs to tweak what you see.
2.5.1 Auction Pages
Many pages on eBay use a standard CGI (Common Gateway Interface) format, which is nothing more than a program name followed by a command and one or more parameters:
http://cgi.ebay.com/ws/eBayISAPI.dll? ViewItem&item=3128013703
Here, cgi.ebay.com is the name of the server, eBayISAPI.dll is the filename of the program, ViewItem is the command to execute, and item=3128013703 is a parameter. Any additional parameters are separated by ampersands (&).
Some sellers reference other auctions by simply including the auction number in their descriptions, usually because they don't know how to make links (see [Hack #40]). To view the auction by its number, simply copy and paste the number into the URL, replacing the one that's there.
2.5.2 Search Pages
A typical search page URL looks something like this:
http://search.ebay.com/ws/search/SaleSearch? satitle=avocado+green
Here, I searched for "avocado green", which you can see in the parameter satitle=avocado+green. Most searches will
probably have more parameters, some more self-descriptive than others.
The real value in tweaking the URL is the ability to add or
change options otherwise unavailable or inconveniently located in the search interface. One of the most useful of these is the self-evident sorecordsperpage option. Although you can choose this option by going to Search Advanced Search Results Per Page, this can be cumbersome, and you can't add it to an existing search you've already built. Instead, simply type the following at the end of an existing search URL:
&sorecordsperpage=100
Note the required ampersand (&) to separate this parameter from the one that precedes it. (In the old days, you could have up to 200 items on a page, but eBay has since reduced the limit to 100; anything higher will simply be ignored.) Here are some of the other parameters that are worth typing:
&sorecordsperpage=number Number of search results to show per page, max=100
&sapricelo=price Show only auctions above or equal to a certain price
&sapricehi=price Show only auctions below or equal to a certain price
&sacategory=num+num+num Restrict results to specified categories; see the next section
&sacategoryex=num+num+num Exclude results from specified categories
&sasaleclass=class Show (1) auctions only or (2) Buy-It-Now listings only
&sapaypal=1 Show only listings that accept PayPal
2.5.3 Searching in Categories
Although there's no way to specify a category directly in the search field, there is a quick way to convert a standard search to a category-specific search without having to drill down
through layers of category links. (See [Hack #11] for the long way.)
eBay has thousands of categories (more than 15,000 at the time of this writing), each identified by a unique category number. Although there's no obvious rhyme or reason to the numbering scheme, you may eventually learn the numbers of your favorite categories. The category number is easily found in the URL of the category listing; for example:
http://listings.ebay.com/aw/listings/list/category19116/index.html
Here, the category number is 19116. (You can also get the number of any category by viewing the complete list at
&sacategory=19116
You can specify multiple category numbers by separating them with plus signs, something you can't do by clicking links on search pages.
Categories are typically restricted to a single nationality. For example, a given category number at ebay.com won't be recognized at ebay.de, even though ebay.de may have an equivalent category that goes by a different number. See [Hack #15] for det