• Table of Contents • Index
• Reviews
• Reader Reviews • Errata
• Academic Flash Hacks
By
Sham Bhangal
Publisher : O'Reilly Pub Date : June 2004
ISBN : 0-596-00645-4 Pages : 480
• Table of Contents Pub Date : June 2004
ISBN : 0-596-00645-4
Acknowledgments
Hacks #1-7
Section 1. Fake Per-Pixel Transitions
Section 2. Per-Pixel Text Effects
Section 3. Simulate Old Film Grain
Section 4. Create SWFs from Animated GIFs
Section 5. Animate Photoshop PSD Files with Flash
Section 6. A Tree Grows in Brooklyn
Section 7. Blowin' in the Wind: Simulate Tree Movement
Chapter 2. Color Effects
Hacks #8-13
Section 8. Video Color Effects
Section 9. Video Fade to Black and Fade to White
Section 10. A Custom Color Transform Class
Section 11. Create and Organize Custom Swatches
Section 12. Borrow Color Schemes from Nature
Section 13. Simulate Sepia Effects
Chapter 3. Drawing and Masking
Hacks #14-25
Section 14. Create Filled Circles Quickly at Runtime
Section 15. Create Synthetic Art
Section 16. Create Seamless Tiles
Section 17. Fill Areas with Patterns
Section 18. Imitate Escher
Section 19. Fix Alpha Property Inaccuracies
Section 20. Use Complex Shapes as Masks
Section 21. Interference Patterns and Ripple Effects
Section 22. Feather Bitmap Edges
Section 23. Add a Vector Edge to a Bitmap
Section 24. Solve the Bitmap-Shift Bug
Section 25. A Page-Turn Effect (Exploit Symmetry and Masking)
Chapter 4. Animation
Hacks #26-34
Section 26. Smooth Scripted Motion
Section 27. Time-Controlled Movement
Section 28. Quick, Bandwidth-Efficient Character Animation
Section 29. alt-Flash: Motion Graphics Alternatives
Section 30. Deja New Animations
Section 31. Hacking The Matrix
Section 33. Particle Effects
Section 34. Shape Tweening Complex Shapes
Chapter 5. 3D and Physics
Hacks #35-41
Section 35. Simulate 3D
Section 36. Panoramic Images
Section 37. An Optimized 3D Plotter
Section 38. Use Acceleration to Simulate Gravity and Friction
Section 39. Simulate a Throw
Section 40. Detect Multiple Collisions
Section 41. Turn Toward a Point
Chapter 6. Text
Hacks #42-51
Fonts
Section 42. Keep Text Legible
Section 43. Autocomplete Text Fields
Section 44. Store a List of All Input Words
Section 45. Import Complex Formatting in Flash
Section 46. HTML and CSS in Flash
Section 47. Use Accessibility Text as Help Text
Section 48. Text Effect Framework
Section 52. Create a Flash Speech Synthesizer
Section 53. A Talking, Lip-Synched Avatar
Section 54. The Ubiquitous Sound-Kicker Hack
Section 55. Turn Low-Bandwidth Monaural Sounds into Stereo Sounds
Section 56. Real-Time Sound Effects
Section 61. Amit's Dials (Interactive Testing)
Section 63. Button Movie Clips
Section 64. Dude, Where's My Scrollbar?
Chapter 9. Performance and Optimization
Hacks #65-73
Optimize Filesize and Download Time
Optimize Graphics
Increase Code Performance
Section 65. Beat Flash File Bloat
Section 66. Bandwidth Testing for Complex Sites
Section 67. Hide Low-Quality Settings
Section 68. Optimize Graphics for Performance
Section 69. Benchmark Runtime Performance
Section 70. Adjust the Animation Complexity Dynamically
Section 71. Performance Budget
Section 72. Substitute Bitmaps for Vectors
Section 73. Optimize Component Downloading and Usage
Chapter 10. ActionScript
Hacks #74-85
Changes in Flash MX 2004
Section 74. External Script Editors
Section 75. Strict Typing and Casual Scripters
Section 76. Code Hints
Section 77. Clone an Object
Section 78. An Idle Timer (Timeout Event)
Section 79. Fast ActionScript Searches
Section 80. Lock the actions Layer
Section 81. Debug with trace( )
Section 82. Undocumented ActionScript
Section 83. ASnative( ) Back Door
Section 84. Obscure Operators
Section 85. Import ASC Files as XML
Chapter 11. Browser Integration
Hacks #86-96
Section 86. Keep Your Site Browser Friendly
Section 87. A Universal Flash Plugin Sniffer
Section 88. Test Multiple Flash Plugins
Section 89. Preferences and Publishing Defaults
Section 90. Center Your SWF Without Scaling
Section 92. Dynamically Resize Content
Section 93. Create HTML Links in Flash
Section 94. Integrate the Back Button with Flash
Section 95. Give the Flash SWF Keyboard Focus
Section 96. Add Key Shortcuts to Your Site
Chapter 12. Security
Hacks #97-100
Privacy Settings
Cross-Domain Policy
Handling Local Executables
Section 97. Recover Content from a SWF
Section 98. Protect and Obfuscate Your Flash Files
Section 99. Make Your SWF Phone Home
Section 100. Review Compiled ActionScript
Colophon
Copyright © 2004 O'Reilly Media, Inc.
Printed in the United States of America.
Published by O'Reilly Media, Inc., 1005 Gravenstein Highway North, Sebastopol, CA 95472.
O'Reilly books may be purchased for educational, business, or sales promotional use. Online editions are also available for most titles (http://safari.oreilly.com). For more information, contact our corporate/institutional sales department: (800) 998-9938 or [email protected].
Nutshell Handbook, the Nutshell Handbook logo, and the
O'Reilly logo are registered trademarks of O'Reilly Media, Inc.
The Hacks series designations, Flash Hacks, the image of a spotlight, "Hacks 100 Industrial-Strength Tips and Tools," and related trade dress are trademarks of O'Reilly Media, Inc.
Many of the designations used by manufacturers and sellers to distinguish their products are claimed as trademarks. Where those designations appear in this book, and O'Reilly Media, Inc. was aware of a trademark claim, the designations have been printed in caps or initial caps.
Credits
About the Author
Contributors
About the Author
Contributors
The following people contributed their hacks, writing, and inspiration to the book:
Anthony "Ant" Eden (a.k.a. arseiam) has worked for several high-profile clients including Microsoft, Disney, and Adobe. He spends his spare time creating wild and quirky effects with ActionScript, which can be sampled at
http://www.arseiam.com.
Zeh Fernando has been working with Macromedia Flash since Version 2. Currently working at Brazilian-based design studio Grafikonstruct (http://www.grafikonstruct.com.br), he creates real-world Flash-based web sites daily and is searching for better ways to do it in his free time.
Edwin "XemonerdX" Heijmen is a professional Flash developer living in the Netherlands who also moderates several ActionScript forums. He enjoys combining
mathematics and code, some results of which can be seen at http://www.poeticterror.com. Besides ActionScript, he also enjoys coding PHP, ColdFusion, Python, and every obscure language he can get his hands on. Other passions include his wonderful girlfriend, underground metalcore, open source software, Russian literature, and his friends.
Adam Phillips is the award-winning animator behind
which can be found at http://www.biteycastle.com.
Grant Skinner (http://www.gskinner.com) is an
internationally recognized Flash developer with experience fusing code, interface design, usability, marketing, and business logic. He works with top agencies and progressive corporate clients on Flash application conceptualization, architecture, and implementation. Grant has won multiple top Flash awards, has had work featured in the SIGGRAPH Web Expo of "The finest web-graphics work of 2003," and participates regularly in numerous conferences and
publications.
Stickman has asked that his real name be kept secret to protect the innocent, but we can divulge that he works in web design for a large content site in the UK and is also a freelance writer. Oh, he is also tall and thin. You can catch up with his online persona at
Acknowledgments
This book has been a long time in the making, and thanks go out to all who stayed on for the ride. I guess it's been a strange trip for all involved!
Thanks, of course, go to Macromedia for creating Flash and to the contributors for contributing hacks.
Thanks to Colin Moock (http://www.moock.org) for his great books, technical assistance, and insightful Foreword.
Thanks to the review team for querying and correcting: Marc Garrett, David Humphreys, Chafic Kazoun, Marc Majcher, Sam Neff, Darron Schall, Jesse Warden, and Edoardo Zubler.
Thanks also to the folks at O'Reilly, including Tim O'Reilly for the initial comments and Rael Dornfest for putting the "hack" into Flash Hacks. Thanks also to Brian Sawyer and Claire Cloutier for production assistance, to Rob Romano for
converting the numerous screenshots, and to Norma Emory for her detailed copy editing. Special thanks to Bruce Epstein for his death-defying nerves of steel in the face of insurmountable deadlines, superhuman editing strength, and time for a chat. Thanks also to my agent, Carole McClendon, at Waterside Productions.
Thanks to the designers within the Flash community who have provided helpful advice on third-party tools, including Igor Kogan, Dave Hayden, Damian Morten (Flasm), and Alex Blum (Flash Plugin Switcher). Thanks to Alessandro Capozzo
(http://waxpraxis.org), Erik Natzke (http://www.natzke.com), James Paterson (http://www.presstube.com), Amit Pitaru
(http://www.pitaru.com), and Hardino (http://www.hardino.com).
Foreword
About seven years ago, I started working with Macromedia FlashVersion 2.0 to be precise. The client for my first Flash project was Levi's Canada, the world-famous apparel company. Levi's was looking for the proverbial "really cool web site." I guess corporations, like any other living entity, have an
aversion to death, and Levi's was keen to renew its lease on life by attracting a new generation of customers (read: teenagers). But kids, said Levi's, don't like clothing web sites; to a kid, a clothing web site is a boring shopping catalog with a Buy button. The solution? Make the new Levi's site an interactive comic strip, where the stories of the characters lead to Levi's products. Fill the comic with action, romance, drama, and intrigue...kids love that stuff.
At the initial project meetings, the creative director presented the animated web site concept while we, the HTML jockeys and web designers, shuddered at the thought of trying to implement it. As envisioned, the site even includedhold onto your hatactual sounds for the characters' voices! (Remember this was 1997; audio and animation on web sites was almost unheard of.) In our first technical plan for the site, we proposed the use of animated GIF images, WAV sound files, and JavaScript image rollovers. We knew the site wouldn't be as spectacular as the creative director had described, but we were accustomed to playing the developer scapegoat. We would be the ones to break the news to the client: web browsers can't really do
animated cartoons; the creative director's description of the site was conceptual, intended merely as inspiration, not to be taken literally.
But the creative director had seen animations on the Web; he was sure of it. He asked us how Disney's web site did its
name of the software and technical details were irrelevant. The Levi's site had to be animated at any cost. So we did the Levi's site in Flash (see it at
http://moock.org/webdesign/portfolio/levisite).
Shortly after we completed the Levi's site, the web design industry went crazy over Gabocorp and EYE4U, two
self-promotional web agency sites with animated Flash interfaces. By today's standards, these two sites look comically simple and naïve. (See for yourselfas of April 2004 the original EYE4U site is still live at http://www.eye4u.com.) Gabocorp and EYE4U consisted of nearly no programming, arguably gaudy design, some moving shapes, and some balls flying around the screen. So what made them popular?
Like the Levi's site, they proved that you could hack the system.
As a browser add-on, Flash is one of the largest scale hacks of the past decade. Since its inception, Flash has breathed life into the somewhat sterile web browser. Flash lets the creative
community explore what the Web can be: a cartoon network, a game platform, an OS-style environment for connected
applications, an electronic art gallery, a video chat, a
collaborative multiuser environment, a remote meeting room, an MP3 music playeror pretty much anything you can dream up. Fitting that ideal, Macromedia used "What the Web can be" as its marketing slogan a few years back.
Accordingly, it's no surprise that Flash is pervasively flexible, a veritable hacker's playground. In fact, Flash's "hackability" is arguably the key to its success. Here, I'm using the word "hack" to mean "a creative exploration, using any means possible
(even ugly), that leads to some desirable (even exhilarating) result." Flash grew from a humble animation toy to the
expansive "Rich Internet Application" tool it is today, largely in response to the hacks introduced by the development
I remember people using Flash 3 to create games like Whack-a-Mole, Leo's Great Day
(http://www.pepworks.com/leoenglish.swf ), and even crude prototypes of Pacman and chess. Mind you, all without a single line of code. Flash 3 had no scripting language! In response to this hacked demand for greater interactivity, Macromedia
introduced a very simplistic version of ActionScript in Flash 4. Little did they know it would fuel a motion graphics movement that would influence design in print, television, and movies for years. Months after Flash 4 shipped, sites like Mono-craft
(http://www.yugop.com), PrayStation
(http://www.praystation.com), Levitated Design & Code (http://www.levitated.net), and Presstube
(http://www.presstube.com) became famous for their creative explorations in real-time audio/visual expression (in other words, for their hacks!).
People use Flash to explore things that are hard or impossible to do in other media. It's hard to do motion graphics in HTML, but you can dream about a motion graphics web with Flash. It's hard to do expressive, customized user interfaces in traditional desktop applications, but you can see branded Flash
applications today on thousands of web sites. As I write this foreword, I'm finishing up a web site in which you can observe other connected users interacting with the site's interface (see
http://moock.org/unity/clients/uPresence). Meanwhile Marcos Weskamp is working on Version 2 of his remote control car application (http://www.marumushi.com/apps/remotedriver2), in which anyone in the world can drive a physical remote
control car via a Flash-based web interface. It's hard to imagine building these things with any tool but Flash.
So Flash is a hacker's paradise. It lets you play. It gives you the freedom to explore your ideas. And it forces you to pull some zany tricks to get what you want. For a long time, the tricks and hacks of Flash have circulated throughout the online
committed to print in this book, in a quality and style deserving of the O'Reilly name.
I consider this book both a service and a challenge.
The service: use what you find in these pages to your
advantage on whatever you're building. There's tons of great info here, bound to be of help on nearly any project. You'll benefit from Sham Bhangal's considerable experience in the field and a clarity of expression I truly believe only Bruce Epstein (this book's editor) can guarantee.
The challenge: remember that exploration and invention are your greatest tools. Before there were books on Flash and before there were established tricks and methodologies, there was a vision of what could be and the clever, bullish, tinkering desire to make it so.
Preface
Macromedia Flash's ancestor started out as a core component of the pen computer, a keyboardless machine that used a pen stylus for input, making it much more portable than traditional keyboard-based designs and ideal for handheld devices. The system featured a vector-based drawing engine, which was more suited to input via a pen than more traditional bitmap-based systems.
The idea didn't take off, but a new avenue was beginning to present itselfthe Web. The pen-based vector drawing program became FutureSplash, which was released around 1995 as a web-centric vector animation tool. FutureSplash was soon bought by Macromedia, and the first version of the renamed application, Flash, was released in 1996.
Late in 2003, Macromedia released Flash MX 2004 (and Flash MX Professional 2004) and the corresponding Flash Player 7 browser plugin and ActiveX control. In recent years, Flash has gained a number of important features, including multimedia handling capabilities (sound, images, video) and a full-fledged scripting language (ActionScript) to create nonlinear animation or client-side processing, as well as interfacing with remote data or server-side scripts.
Flash is now the standard web multimedia delivery platform. The Flash Player (the browser plugin that plays back Flash SWF files) is ubiquitous, and Flash can also create desktop
applications. Web design continues to move away from
Why Flash Hacks?
The term "hacking" has a bad reputation in the popular media. They use it to refer to breaking into systems or wreaking havoc using computers as weapons. Among people who write code, though, the term "hack" refers to a quick and dirty solution to a problem or a clever way to get something done. And the term "hacker" is taken very much as a compliment, referring to someone as being creative and having the technical chops to get things done. The Hacks series is an attempt the reclaim the word, document the good ways people are hacking, and pass the hacker ethic of creative participation on to the uninitiated. Seeing how others approach systems and problems is often the quickest way to learn about a new technology.
Flash Hacks is about coming up with new ideas for your Flash web designs, ActionScript, and Flash content.
Flash authoring is all about creativity, in both design and
coding, and pushing the envelope of what is possible. Although multimedia scripting has become more structured and
formalized, there is still plenty of room (and need) for hacks and workarounds when the standard routes fail.
When I first opened up the Flash application and started reading the official documentation, it took me a while to
understand how Flash is really supposed to be used, and from feedback I have received since, this is a common problem.
Therefore, this book is not just about showing you some interesting hacks, it is about showing you some of the
nonobvious techniques and ideas that will make your Flash designs more original and your applications more effective.
Of course, this also means that you won't be using many of the hacks presented here as-is, but instead will use them as
starting points for further exploration and development.
Experimentation is to be promotedit is what Flash and the Flash community are all about. This book borrows much from the rich tradition of the Flash community but also presents many
Who This Book Is For
Okay, let's face it. O'Reilly is better known for its technical references than for edgier books like the Hacks series. O'Reilly has published some of the most advanced books on ActionScript development available, including the well-respected ActionScript for Flash MX: The Definitive Guide and the hard-core object-oriented programming guide Essential ActionScript 2.0, both by Colin Moock. O'Reilly's ActionScript Cookbook, by Joey Lott, presents more than 300 practical recipes for a wide range of ActionScript problems, and Flash Remoting: The Definitive Guide, by Tom Muck, covers high-end application development and remote connectivity.
I think it is safe to say that this book is substantially different from those books, which is appropriate since the books serve different purposes, even if their audiences overlap. Whereas those are serious, traditional programming books speaking to well-structured code and best practices, this tome is full of exploration and whimsy. Whereas those books speak of
productivity to experienced programmers, this book speaks of adventure to the young at heart. If you're new to Flash, this book is as tantalizing as the aroma of a warm apple pie. If you are experienced with Flash, and perhaps a bit bored with it, it might remind you why you fell in love with Flash in the first place. That said, hard-core developers will find lots of serious coding advice, optimization techniques, and tips and tricks for application development.
Frankly, if you've never used Flash, some of the hacks will confuse you, but many will not, as there is something here for everyone. In early chapters, I make an effort to explain
be placing most of our scripts on a dedicated actions layer
[Hack #80] but some scripts must go in external .as files [Hack #10] .
Because this book is predominantly geared toward readers with some familiarity with Flash, if you've never used Flash, you should probably pick up one of the many fine tutorial books available from (gasp!) other publishers. (O'Reilly is coming out with a Flash tutorial bookFlash Out of the Box by Robert
Hoekmanin the second half of 2004.) If you don't have a copy of the Flash authoring tool, you can download a trial version from Macromedia
(http://www.macromedia.com/cfusion/tdrc/index.cfm?
product=flash) and go through some of the included tutorials to learn the basics, too.
That said, many of the hacks in this book can be appreciated even if you've never picked up Flash. I certainly hope this book inspires the uninitiated to try Flash and those who know Flash to appreciate it anew.
If you're a traditional programmer new to Flash or a serious application developer, be forewarned. This book isn't about best practices or object-oriented programming or Rich Internet
Application (RIA) development. And if you're prejudiced against Flash, the large number of hacks covering animation, drawing, and motion graphics may turn you off to Flash forever. That would be a shame. What is presented here is but a small slice of the Flash universe, my own personal corner in fact (with a little help from friends and contributors). Skip around and you'll find not just eye candy and ear candy but lots of ActionScript examples, too. You'll learn something, even if it wasn't what you set out to learn.
The Flash universe is both vast and diverse and this book doesn't try to be all things to all people. But almost every
techniques and tips. If you were ever a child, if you were ever in love, if you like drive-in movies or howling at the moon, this book will remind you a little bit of all those things. And that, to me, seems like a very good thing.
How to Use This Book
If you read the book from cover to cover, you'll find many
technical tidbits in unlikely places that you'd miss if you judge a hack by its title alone. For those who prefer to pick an
interesting hack from the table of contents and dive right in, be sure to skim the remaining hacks to see what you might be missing. Be sure to read through the chapter headings
regardless of whether you are a newbie or an expert in a given topic, as you're sure to find something both useful and
interesting at almost every turn.
If you want to get some quick ideas for new directions in your designs, the first four chapters look at the core techniques that affect the look and feel of a site, such as drawing, animation, and effects. Chapter 5, Chapter 6, Chapter 7, and Chapter 8
revolve around media and content, so visit them for inspiration and information pertaining to 3D, text, sound, or UI elements.
Chapter 9, Chapter 10, Chapter 11, and Chapter 12 cover
How This Book Is Organized
Flash is a versatile authoring tool and consists of a number of separate areas that usually need to be combined to produce the finished effect or piece, so don't take the chapter titles and
synopses as anything other than broad headings. For example, many chapters contain some element of animation, and most hacks contain ActionScript because it lets you do some really cool things. Regardless, we have straitjacketed the 100 hacks into something resembling sensible groupings. So there are chapters on drawing, sound, optimization, and a whole lot more.
Chapter 1, Visual Effects
This chapter looks at ways you can make your graphic content more interesting by adding various snazzy effects and transitions.
Chapter 2, Color Effects
The savvy designer uses color in addition to animation. Color is often overlooked, but this chapter shows how color changes can transform the atmosphere of a piece or add video-like effects, such as fades and wipes.
Chapter 3, Drawing and Masking
Combining Flash's graphic animation facilities with
authoring time and runtime. Masking, which underlies many of the graphics tricks and techniques, is also discussed.
Chapter 4, Animation
The hacks in this chapter offer content creation shortcuts for manually drawn animation, plus ways to optimize animation created under ActionScript control.
Chapter 5, 3D and Physics
This chapter provides a number of hacks that bypass Flash's performance limitations to add physics simulations and 3D effects to your repertoire.
Chapter 6, Text
This chapter covers ways to store, display, and manipulate text, as well as create animated text effects.
Chapter 7, Sound
Without sound, your carefully crafted content will feel flat and uninspired. This chapter helps the audio-challenged create and manipulate sound effects and music.
Chapter 8, User Interface Elements
Chapter 9, Performance and Optimization
This chapter includes hacks to keep your filesizes small and your applications speedy.
Chapter 10, ActionScript
Although almost every hack in the book includes some ActionScript, this chapter covers ways to get the most out of ActionScript, including undocumented goodies.
Chapter 11, Browser Integration
This chapter looks at ways of maximizing browser compatibility so you can maximize the audience and enhance their enjoyment of your content.
Chapter 12, Security
Conventions Used in This Book
The following typographical conventions are used in this book:
Plain text
Indicates menu titles, menu options, menu buttons, and keyboard accelerators (such as Alt and Ctrl).
Italic
Indicates new terms, function names, method names, class names, event names, package names, layer names, URLs, email addresses, filenames, file extensions, pathnames, and directories. In addition to being italicized in the body text, method and function names are also followed by
parentheses, such as setInterval( ).
Constant width
Indicates code samples, movie clip instance names, symbol names, symbol linkage identifiers, frame labels, commands, variables, attributes, properties, parameters, values,
objects, XML tags, HTML tags, the contents of files, or the output from commands.
Constant width bold
literally by the user. It is also used within code examples for emphasis, such as to highlight an important line of code in a larger example.
Constant width italic
Shows text that should be replaced with user-supplied values. It is also used to emphasize variable, property,
method, and function names referenced in comments within code examples.
Color
The second color is used to indicate a cross-reference within the text.
This icon signifies a tip, suggestion, or general note.
This icon indicates a warning or caution.
The thermometer icons, found next to each hack, indicate the relative complexity of the hack:
Using Code Examples
This book is here to help you get your job done. In general, you may use the code in this book in your programs and
documentation. You do not need to contact us for permission unless you're reproducing a significant portion of the code. For example, writing a program that uses several chunks of code from this book does not require permission. Selling or
distributing a CD-ROM of examples from O'Reilly books does require permission. Answering a question by citing this book and quoting example code does not require permission.
Incorporating a significant amount of example code from this book into your product's documentation does require
permission.
We appreciate, but do not require, attribution. An attribution usually includes the title, author, publisher, and ISBN. For example: "Flash Hacks, by Sham Bhangal. Copyright 2004 O'Reilly Media, Inc., 0-596-00645-4."
If you feel your use of code examples falls outside fair use or the preceding permission, feel free to contact us at
Getting the Code Examples Working
The most common reason for being unable to get a code
Any code example that accesses movie clips, buttons, or text fields via ActionScript won't work unless you set the item's instance name properly. To set the instance name for a movie clip, button, or text field, select it on stage and enter the
instance name on the left side of the Properties panel (Window Properties) where you see the placeholder "<Instance
Name>".
Another common source of problems is failure to set a symbol's linkage identifier properly, as is necessary when accessing
Library symbols from ActionScript. To set the linkage identifier for a symbol, check the Export for Actionscript and Export in First Frame checkboxes in the Symbol Properties or Linkage Properties dialog box. (These are accessible by selecting a symbol in the Library (Window Library) and choosing either Properties or Linkage from the Library panel's pop-up Options menu.) Then enter the identifier in the field labeled Identifier (which isn't active until Export for ActionScript is checked).
Read the instructions carefully to make sure you haven't confused a movie clip instance name with a symbol linkage identifier.
If you still can't get it working, download the examples from this book's web site, contact O'Reilly book support, or check the book's errata page. If all else fails, get a tutorial book on Flash or ask an experienced Flasher for help.
Many of the longer examples and sample files can be downloaded from this book's web page at http://examples.oreilly.com/flashhks.
Many of the hacks presented in this book are written in
ActionScript 2.0, which requires the Flash MX 2004 or Flash MX Professional 2004 authoring environment. You can use either of these authoring tools (see
http://www.macromedia.com/software/flash/productinfo/features/comparison
for a comparison of the two) because we don't use any features that are exclusive to the Professional edition. To make sure the examples compile, you should set the ActionScript Version to ActionScript 2.0 under File Publish Settings Flash. All
examples have been tested in Flash Player 7.
Where noted, ActionScript 2.0 class definitions must be placed in external .as files. For example, the custom Transform class
[Hack #10] must be placed in an external plain-text file named Transform.as (both the capitalization of the name and the .as extension are mandatory). You can create and edit such a file in Flash MX Professional 2004 if you select File New ActionScript File. If using Flash MX 2004, you'll need an external text editor
[Hack #74] .
We can't give a full course on object-oriented programming (OOP) and ActionScript 2.0 here, although we do try to provide pointers throughout the book. For many more details on
ActionScript 2.0 classes and object-oriented development, see Essential ActionScript 2.0 by Colin Moock (O'Reilly).
Most examples can also be exported in Flash Player 6 format from Flash MX 2004 (standard or Professional edition), by setting the Export format to Flash Player 6 under File Publish Settings Flash.
However, methods that are new to Flash MX 2004 and Flash Player 7 won't work if you are exporting to Flash Player 6 format. For example, where we use
The previous version of the Flash authoring tool, Flash MX, does not support ActionScript 2.0. However, many of the hacks and example code will work in Flash MX. If you have Flash MX and want to try out an ActionScript 2.0 hack, you can convert most of the examples to ActionScript 1.0 by simply removing the ActionScript 2.0 datatyping as shown next.
For example, here is the ActionScript 2.0 code using datatypes (shown in bold):
// ActionScript 2.0 with datatypes
// Requires Flash MX 2004 authoring environment
// configured to compile ActionScript 2.0
function myFunction(x:Number):Number {
var y:Number = 2 * x;
return y;
}
var myString:String = "hello";
var myClip:MovieClip = this.createEmptyMovieClip("myClip", 0);
var double:Number = myFunction(2);
trace(double);
And here is the ActionScript 1.0 version without datatypes:
// Works in Flash MX authoring environment (and later)
var myClip = this.createEmptyMovieClip("myClip", 0);
var double = myFunction(2);
trace(double);
This book uses a lot of timeline-based code, which, although it is not necessarily a best practice, is supported for both
ActionScript 1.0 and ActionScript 2.0. We made this choice because most of the examples don't lend themselves readily to custom ActionScript 2.0 classes. This also makes the examples easier to follow and implement in both Flash MX and Flash MX 2004.
Some of the class-based OOP examples written in ActionScript 2.0 won't compile in ActionScript 1.0 and require Flash MX 2004 (standard or Professional edition). If you are still using
ActionScript 1.0 in Flash MX 2004, consider this as an
opportunity to broaden your horizons. See Chapter 10 and
Chapter 12 for additional details and resources on the
Case-Sensitivity
Many developers continue to be confused by the case-sensitivity rules in Flash MX 2004. Realize first that we are talking about two different issues: compile-time case-sensitivity and runtime sensitivity. The ActionScript 1.0 compiler is not
case-sensitive, whereas the ActionScript 2.0 compiler is. However, runtime case-sensitivity is a function of the version of the SWF file format to which you export, not the ActionScript version used at compile time nor the version of the Flash Player plugin in which the file is played.
Runtime case-sensitivity is summarized in Table P-1, reproduced from Colin Moock's excellent book, Essential ActionScript 2.0 (O'Reilly).
Table P-1. Runtime case-sensitivity support by language, file format, and Flash Player version
Movie compiled as either ActionScript 1.0
or 2.0 and Played in FlashPlayer 6 Played in FlashPlayer 7
Flash Player 6-format .swf file Case-insensitive [1]
Case-insensitive 1 Flash Player 7-format .swf file Not supported[2] Case-sensitive
[1] Identifiers (i.e., variable and property names), function names, frame labels, and symbols export IDs are case-insensitive in Flash Player 6-format .swf files. But reserved words such as if are case-sensitive, even in Flash Player 6.
Comments and Questions
Please address comments and questions concerning this book to the publisher:
O'Reilly Media, Inc.
1005 Gravenstein Highway North Sebastopol, CA 95472
(800) 998-9938 (in the United States or Canada) (707) 829-0515 (international or local)
(707) 829-0104 (fax)
We have a web page for this book, where we list errata,
examples, and any additional information. You can access this page at:
http://www.oreilly.com/catalog/flashhks
To comment or ask technical questions about this book, send email to:
For more information about our books, conferences, Resource Centers, and the O'Reilly Network, see our web site at:
Chapter 1. Visual Effects
Hacks #1-7
Section 1. Fake Per-Pixel Transitions
Section 2. Per-Pixel Text Effects
Section 3. Simulate Old Film Grain
Section 4. Create SWFs from Animated GIFs
Section 5. Animate Photoshop PSD Files with Flash
Section 6. A Tree Grows in Brooklyn
Hacks #1-7
This book assumes you are familiar with the basics of using Flash to create visual effects and animations using the timeline. If you aren't comfortable with Flash, you might still find the techniques employed here interesting. Once you've learned some Flash basics via either Flash's online help or a tutorial book, you can revisit the hacks that piqued your curiosity. I considered beginning the book with tips on optimization, security, and similar topics. But I decided to defer those until later, hoping that the hacks in this chapter would get you excited about the book and expand your horizons while remaining true to the hacker ethic: "Show me the cool stuff first."
So, in this chapter, I've grouped hacks that show you how to achieve some effects you might not have known about or might have seen and not known how to reproduce. As with all the hacks presented in this book, I hope they educate and
ultimately inspire younot in the sense of "inspiration," as when one views a great piece of art, but in the sense of "motivation." Thus, I hope you are motivated to try these hacks and inspired to create some of your own.
The hacks in this chapter are grouped together because they are all loosely associated with visual effects. Later chapters in this book deal with additional visual effects using transitions and colorization, 3D, masking, and the Drawing API. This chapter includes pixel effects and converting from animated GIFs and Photoshop files to Flash .fla and .swf files (the source document and distribution formats used by Flash). I close the chapter with two hacks that show you how to generate a tree and make it sway in the breeze.
chapters use them as well. So for readers unfamiliar with masks, here is a brief introduction.
Flash animations are created by superimposing one or more layers in an animation (similar to layers as you'd find in
Photoshop and other graphics programs). The Timeline panel contains the main timeline, which organizes the layers and displays their contents over time. Masks are traditionally used to create visual effects, such as a spotlight effect, in which one layer is viewed through the "hole" created by the masking layer. That is, the masking layer defines the area of the underlying masked layer that is visible (the remainder is "masked off" and therefore invisible). To create a masking layer (or simply "mask layer") in the authoring tool, insert a new layer in the timeline (using Insert Timeline Layer) in front of the layer you want masked. Then set the mask layer's Type to Mask in the Layer Properties dialog box, accessible under Modify Timeline Layer Properties. Then, on the mask layer, create the shape to use as the mask. In Flash, areas with pixels in the mask layer allow the masked layer to show through. Areas in the mask layer without pixels block (mask off) the masked layer. For example, if you want to create a spotlight effect in which the masked layer shows through the circle, you could use the drawing tools (Window Tools) to create a black circle as the mask.
Flash MX added the ability to create scripted masks in which a mask defined by one movie clip is used to mask another movie clip's contents. A scripted mask, as the name implies, is a mask applied dynamically at runtime with ActionScript via the
MovieClip.setMask( ) method. Applying a runtime mask is akin to creating a mask layer during authoring time, except that it affords much more flexibility. The mask used over a given clip can be changed at runtime, and new masks can be created at runtime. Although you can animate a mask layer in the
authoring tool, again, you can create more sophisticated
most out of the various hacks in this book that use author-time and runtime (scripted) masks. For more information on masks see the online Help topic How Do I Basic Flash Work with Layers Add a Mask Layer, or search the online Help for the term "Mask."
Hack 1 Fake Per-Pixel Transitions
Simulate pixel-based fades and wipes, as supported in Macromedia Director.
Flash doesn't have built-in support for pixel-based transitions. This hack can be used with other video-friendly hacks [Hack #8] to make your static bitmaps more interesting [Hack #3].
Flash uses a vector-based rendering engine, which doesn't allow direct access to the individual screen pixels. This hack depends on the fact that pixels are small, and when you make something small, it looks like anything else that is small.
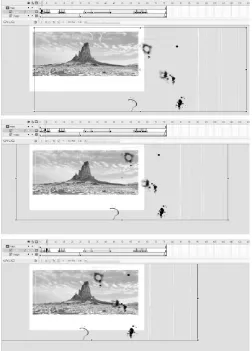
The per-pixel transition effect is shown in Figure 1-1.
The transition hides (masks) pixels in the first image over time so that the image disappears a few pixels at a time. Masking off the first image reveals a second image that is positioned below it, thus creating the transition effect from the first image to the second image. The masks used to create the preceding effect are shown in Figure 1-2. Note that for black pixels, the mask effect shows the first (topmost) image; for white pixels (no mask), it shows the second (bottom) image.
As we shall see, we can make much more complex transitions with little change.
This hack requires three steps:
1. Make the fake pixel. In this hack we will create a little 4x4 rectangle.
Find a way to make lots of fake pixels. This is done very easily in Flash using MovieClip.attachMovie( ).
Create a transition by creating a script that makes each dot disappear after a certain time. By using all the dots as a large mask, we create the transition between two images (or video clips), as seen in Figure 1-1.
The problem here is that we will have thousands of fake pixels, and we can't use anything as processor-extravagant as
the duration of the effect. Instead, we will use setInterval( ), which reduces our processing overhead significantly by running code only once per fake pixel for the duration of the effect.
Make the Pixels
Making a pixel mask is as simple as creating a rectangle:
1. Create a new Flash document (File New Flash Document).
Use Modify Document to set the Stage area bigger than 200 200 pixels and specify a white background (any light color will allow you to see the black rectangle in Step 3).
Draw a black rectangle with no stroke (the stroke wouldn't be seen but would still slow down our effect).
Using the Properties panel (Window Properties), set the rectangle's height and width to 4. Set the X and Y coordinates to 0. You can see the result just next to the registration point in
Figure 1-3.
ActionScript gurus might want to draw the mask using the Drawing API, but it would take too long for Flash to dynamically draw all the
rectangles we would need for this effect.
Convert the rectangle into a movie clip symbol by selecting it (with the Selection tool) and pressing F8 (Modify Convert to Symbol), which brings up the Symbol Properties dialog box. Name the movie clip symbol dot and make sure you have the export options set up as shown in Figure 1-4 (click the
Advanced button if you don't see the Linkage options).
Figure 1-4. The Symbol Properties dialog box
attach the Library symbol to the main timeline at runtime. If you want to avoid creating and then deleting the movie clip from the Stage, you can use Insert New Symbol (CtrlF8 or -F8) to create the movie clip symbol directly in the Library.
The effect uses a large mask consisting of these 4x4 squares. The mask is applied to the first image, and the effect works by masking additional rectangles over time, causing the second image (which is below the first) to show through the gaps.
Make Lots of Pixels
On the main timeline, add a new layer and name it actions
[Hack #80] .
In the actions layer of the main timeline, select frame 1 and attach the following script using the Actions panel (F9):
function drawGrid (theWidth:Number, theHeight:Number):Void {
var initDot:Object = new Object( );
var k:Number = 0;
for (var i:Number = 0; i < theWidth; i += 4) {
for (var j:Number = 0; j < theHeight; j += 4) {
var dotName:String = "dot" + i + "_" + j;
initDot._x = i;
initDot._y = j;
k++;
}
}
}
drawGrid(200, 200);
The preceding code creates a 200x200-pixel square consisting of our 4 4 movie clips (you can invoke the drawGrid( ) function with different dimensions to create a grid of a different size). Each pixel is placed at position (i, j) and depth k on the Stage and has instance name doti_j. The first instance name
(situated at the top left of the square) is dot0_0 and the last one is dot199_199 (bottom right). You can see the movie clips created if you run the code in Debug Movie mode (Control Debug Movie), but be aware that the debugger will take some time to display all your movie clips (although it may look as if Flash has hung up, give it a few seconds!).
This effect creates a large number of movie clips; (200/4)2 = 2500. Flash seems to become very sluggish if more than 3000 to 4000 movie clips appear on the screen at the same time (even if you are not
moving the clips), so you are advised not to go far beyond 2500. If you need to mask a larger area than the one we are working with (200 pixels square), consider making the constituent rectangles bigger rather than adding more of them.
The trick now is to make the dots disappear on demand. The way to do this is via setInterval(object, "method", timer), which invokes the function object.method( ) every timer
milliseconds. Add the following code after initDot._y = j; in the preceding script:
initDot.timer = 1000 + Math.ceil(Math.random( )*800);
The preceding line creates a property, timer, which stores an integer between 1000 and 1800 for each dot clip. The 1000 specifies the pause before the effect starts, and the 800 is the duration of the effect. Both values are in milliseconds, the standard measure of time in ActionScript.
imageClip.setMask(mask);
for (var i:Number = 0; i < theWidth; i += 4) {
for (var j:Number = 0; j < theHeight; j += 4) {
var dotName:String = "dot" + i + "_" + j;
initDot._x = i;
initDot._y = j;
initDot.timer = 1000 + Math.ceil(Math.random( )*800);
// Place the masking dots within the container mask clip
mask.attachMovie("dot", dotName, k, initDot);
k++;
}
}
}
drawGrid(200, 200, image1_mc);
So now we have all our dot clips inside another movie clip
Create the Timers
We already have a timer property for each dot movie clip. Now let's write the code to make our dots disappear.
Edit the dot movie clip symbol and add a new layer named actions (the first layer of a timeline is traditionally named scripts or actions and used exclusively to hold your timeline-based scripts).
In the first frame of the actions layer, add the following code:
removeMe = function ( ) {
clearInterval(countDown);
this.removeMovieClip( );
};
var countDown = setInterval(this, "removeMe", timer);
The last line of the preceding code uses setInterval( ) to create a timer named countdown for each dot. It calls the removeMe( ) function when the timer expires. The removeMe( ) function
clears the interval and then removes the current dot clip, which creates our "disappearing pixels" transition effect.
If setInterval( ) is passed a function reference as the first parameter, such as setInterval(removeMe, timer);, the value of the keyword this
Using the Effect
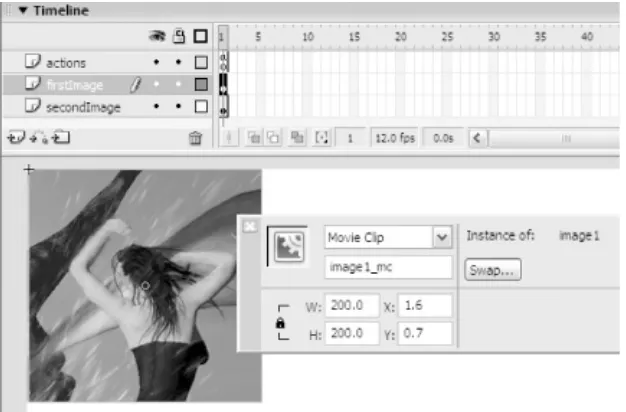
To use the effect, you need to have the two things you want to transition between on two separate layers, with the first image or video clip on the top layer, as shown in Figure 1-5. You
should give the first clip the instance name image1_mc using the Properties panel. The second image can be called anything since it is never referred to in the code.
Figure 1-5. Setting up a transition between two
layers
Extend the Effect
By changing the time interval before each dot disappears, you can create different transition effects. For example, changing the timer values based on the position of the dots serves as the basis for many common pixel-based transitions:
// Left-to-right wipe
initDot.timer = 1000 + (Math.random( )*(initDot._x)*10);
// Diagonal wipe
initDot.timer = 1000 + (Math.random( )*(initDot._x + initDot._y)*5);
Final Thoughts
Hack 2 Per-Pixel Text Effects
Create advanced text effects and transitions that operate on the per-pixel level.
The problem in simulating per-pixel effects in Flash is that
potential performance degradation limits how many fake pixels you use. You have two ways to keep this number small: keep to small images (as we did in the per-pixel transition effect hack
[Hack #1]), or use the effect on an image with lots of
background pixels (which you can ignore to reduce the number of fake pixels needed).
Although it's probably obvious in hindsight, it took me ages to realize that text fits the "lots of background pixels" criterion. A quick trawl on the Web suggests that it really isn't obvious because nobody else seems to be using this hack.
In this hack, we'll make the text appear to coalesce from pixels spread out over the screen. Of course, you can implement
various effects using different calculations for the mask pixels' positions.
The hack comes in two parts:
Converting the text block's shape into 1x1 squares (i.e., our "fake pixels")
Animating the fake pixels
Here are the steps:
Press Ctrl-B (Windows) or -B (Mac) or choose Modify
Break Apart twice to turn the text field into a primitive shape.
With the text still selected, press F8, and convert it into a movie clip symbol named text. Make sure the Export for ActionScript checkbox is checked and specify the linkage
identifier as text. (Delete the clip instance from the Stage, as we'll be adding it at runtime from the Library with
MovieClip.attachMovie( ).)
For the effect to work, the movie clip's registration point must be at the top left of the text. Enter Edit in Place mode by double-clicking the movie clip; then to select all the text choose Edit Select All and enter 0 for X and Y values in the Properties panel, as shown in Figure 1-6.
Figure 1-6. Setting the registration point for the
selected text symbol
add to your SWF, remember that Flash effectively does the
same thing when you save font outlines to your SWF, which you have to do whenever you want to treat font characters as
graphic elements.
You also need to create a second movie clip with linkage identifier dot. The dot clip should consist of a 1 1 rectangle, with X and Y positions both set to 0 as shown in Figure 1-7 (use the Properties panel to set these because the dot will be too small to see).
Figure 1-7. The 1 1 pixel mask
This code replicates the "zoom in from the sides with blur" effect, but this time the text really does blur (the effect is
usually simulated with alpha), as shown in Figure 1-8, because we are splitting the text into pixels as part of the effect.
function mover( ) {
this._x -= (this._x - this.x) / 4;
this._y -= (this._y - this.y) / 4;
}
function lastMover( ) {
this._x -= (this._x - this.x) / 4;
this._y -= (this._y - this.y) / 4;
if ((this._x - this.x) < 0.1) {
dotHolder.removeMovieClip( );
textClip._visible = true;
}
}
textClip = this.attachMovie("text", "textClip", 0);
textClip._x = 200;
textClip._y = 100;
textClip._visible = false;
// Initialize variables, including height and width
var dots = 1;
var distance = 10000;
var stopDot = true;
var height = textClip._y + textClip._height;
var width = textClip._x + textClip._width;
// Create a dot clip for every pixel in the text
var dotHolder = this.createEmptyMovieClip("holder", 1);
for (var j = textClip._y; j < height; j++) {
for (var i = textClip._x; i < width; i++) {
if (textClip.hitTest(i, j, true)) {
var clip = dotHolder.attachMovie("dot", "dot" + dots, dots);
if (stopDot) {
clip.onEnterFrame = lastMover;
stopDot = false;
} else {
clip._x = Math.random( ) * distance - distance/2;
clip.onEnterFrame = mover;
}
// Store the position that the dot clip has
// to get to (clip.x, clip.y) and move it off screen
clip.x = i;
clip.y = j;
clip._y = j;
dots++;
}
}
}
The subsequent for loop uses MovieClip.hitTest( ) to find all nonempty pixels in the text and create a dot movie clip corresponding to each. Each of these dots is given an
onEnterFrame( ) handler to animate the overall effect. (Instead, we could use setInterval( ) to animate the effect [Hack #1].)
Two hacks are at work in this loop code.
The first hack, using hitTest( ), is the reason we had to break apart our text. The hitTest( ) method always returns false
when used with a dynamic text field (in which case it treats all pixels as empty).
The second hack is the way we check that all pixels are in their final positions. Most of our pixels are placed randomly on the screen and controlled by the event handler mover( ). The first pixel, however, is placed furthest away and also given a slightly more complicated event handler, lastMover( ). This event stops the effect when the associated pixel has moved to its final
position, by which time the others will also have reached their final positions (given that they all have less distance to travel).
Although a bit of a kludge, this hack is far more performance-friendly than forcing each pixel to perform a similar check.
Final Thoughts
Hack 3 Simulate Old Film Grain
Create the effect of old film grain using Photoshop and Flash.
Flash's vector graphic engine has a lot going for it, but
sometimes you want something a little less clean-edged. Adding an old film grain effect is one of the easiest ways to add instant atmosphere or a grungy hard edge to an otherwise crisp and clean clip. It can be combined with video colorization [Hack #8]
or sepia tone colorization [Hack #13] for more dramatic and specialized effects.
The most obvious way to add a film grain effect is to add
random vector lines and dots to an image. That reproduces the effect, but it doesn't really reproduce the atmosphere of old film; we still end up with a crisp rendering. In this hack we use a bitmap, which allows us to avoid the clean effect of vectors.
The hack has two parts: creating the film grain bitmap in
Photoshop and then importing and using it in Flash. (We could of course use Fireworks in place of Photoshop; the principles are the same.)
Create the Film Grain Bitmap
Dirt, scratches, and dropouts add a real-world edge to a
photograph. Dust, dirt, and hair or lint that has made its way onto the film or negative appear as dark patches and lines. Scratches appear as white lines.
1. Open Photoshop.
Press D to reset to the default background and foreground colors.
Press X to switch background and foreground colors. This will give you a background color of black and a foreground color of white.
Create a new Photoshop file called grain.psd using File New. Select a bitmap size that is longer than it is wide. I created a file 800 400 pixels for demonstration purposes, but you can go much smaller (typically 400 200).
Check the Background Color option in the Contents section of the New Document dialog box, as shown in Figure 1-9. This creates a rectangular black canvas.
Add a new layer using the Create a New Layer icon at the bottom of the Layers tab. We will be drawing only on the new layer, so ensure Layer 1 is always selected in the Layers tab, as shown in Figure 1-10.
Figure 1-10. The newly created layer selected in
Photoshop
We now need to draw our effects. Three types of noise are seen on old film:
Hairlines
Hairlines are caused by dark strands in the film.
Dots and patches
Scratches
These are caused by scratches in the film that erase part of the film image.
Using the Photoshop tools (typically the Pencil and Brush tools), add the three types of effect on Layer 1. In Figure 1-11, I have created small dots to the left, large patches in the middle, and scratches to the right. I have also created hairlines at the top and bottom.
Figure 1-11. Simulated imperfections in
Photoshop
Using Photoshop's Eraser tool with a medium opacity, fade some of your pixels. On real film, deep scratches and other effects appear white, but many imperfections affect the film surface only partially, and this is what we are simulating in
Figure 1-12.
Although we have used only white, many effects on old film are black, so we also need to simulate those:
1. Select some areas of your white pixels using Photoshop's Selection tool.
Invert the selection using Image Adjustments Invert. Although your selected pixels will seem to disappear, this is because you are creating black pixels on a black background; they are still there, you just can't see them.
Delete the background layer (click-drag it in the Layers tab, and release it over the trashcan icon at the bottom of the tab).
You should end up with something like the image shown in
Figure 1-13 (the checkerboard background is Photoshop's way of representing zero alpha, or no pixels).
Save the image as a PNG file. Do not optimize it for the Web in any way.
Many designers optimize their graphics at this point, given that they are about to be loaded into a web design package (Flash). There is really no need to do so; leaving the optimization until the point you create the SWF in Flash always gives you more flexibility.
For example, if the client decides she wants a high-bandwidth version of the site, you simply change the bitmap export
settings in Flash. If you had optimized your bitmaps before importing them into Flash, you would have to go to Photoshop and reexport the images at the new setting. Then, you would have to swap all instances of the old bitmap on the Flash
timeline for the new one. Obviously, then, importing full-quality bitmaps into Flash, and letting Flash optimize them, can be a real time-saver compared to the alternatives. For those who prefer working in Fireworks, its integration with Flash (i.e., its launch and edit feature) can also speed your workflow.
Once you've exported the bitmap as a PNG file from Photoshop, you still need to use it in Flash:
1. Import the PNG file into Flash using File Import Import to Library.
Select the bitmap in the Library.
Right-click (Windows) or -click (Mac) in the Library panel, and select Properties from the context menu that appears (also known as the pop-up Options menu).
Change the Bitmap Properties, as shown in Figure 1-14: select a low JPEG compression ratio and remove smoothing (Flash handles bitmaps faster if you disable smoothing).
Figure 1-14. Bitmap properties in the Flash
Library
Note that we have created an image that has both JPEG compression and an alpha channel! You cannot have a JPEG image with an
to mind, which is very useful to know when you want to overlay Flash vectors with a bitmap.
Drag the bitmap onto the Stage, then press F8 (Modify
Convert to Symbol) and convert the bitmap into a movie clip symbol named grain.
All you have to do now is overlay a quick-moving version of our movie clip onto a video, bitmap, or vector animation. In Figure 1-15, I have overlain it over a static image, making the image appear as if it is a section of video.
I have also used a mask to hide areas of the grain clip that don't appear over the image. The final effect is shown in Figure 1-16 (or take a look at grain.fla, which is downloadable from this book's web site).
Final Thoughts
Not only can this technique add interest to a section of video that isn't doing much, it can also:
Hide imperfections in the video (such as pixelation caused by high compression rates).
Give movement to static images, making them appear as if they are a video clip.
Hack 4 Create SWFs from Animated GIFs
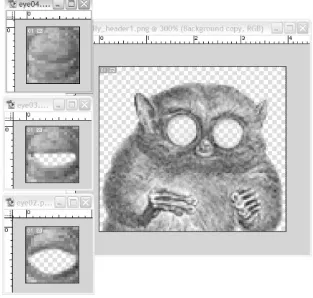
Quickly repurpose animated GIFs for use in Flash effects. I thought it would be fun to show how you can enhance a GIF by reproducing it in Flash. So I went to the O'Reilly home page (http://www.oreilly.com) where I was greeted by the little
critterI'm told it's a tarsiershown in Figure 1-17. The filename is oreilly_header1.gif, which is typical of slices created for an
HTML-based table, so I knew I had a GIF I could work with. Anyway, I kept looking at him, given that he looks so cute, and then I blinked. He blinked back. After the surprise and
obligatory double take, I realized he's an animated GIF.
Figure 1-17. The O'Reilly tarsier mascot on
oreilly.com
So I started thinking...doing a Flash version of this critter would be a good example of the difference between Flash and
The GIF Animated Critter
We can obtain a copy of our animated friend using a web browser's Save option. In Internet Explorer on Windows, for example, we right-click on the GIF and select Save Picture As from the pop-up menu to download the image to our local drive.
Another advantage of Flash animations over animated GIFs is that you can make them harder to steal than this critter was from O'Reilly's site by obfuscating the SWF [Hack #98] in the browser cache, which is where users ordinarily look for
downloaded SWFs.
If you open the O'Reilly GIF file in an image editor (such as Fireworks or Photoshop/ImageReady), you will see that the blink animation runs every 12 seconds (the first frame has a delay of 12 seconds), and the animation is 12 seconds in total. One thing worth noticing is that an awful lot of pixels in the image don't change between framesonly the eyes do. So
converting it to Flash and animating only the eyes should give us a big filesize advantage straight away.
Notice also that the animation is not interactive. In this case, the lack of interactivity is appropriate designyou don't want the critter's actions to distract the readerbut we will add
interactivity for fun and show that the SWF will still be smaller than the original GIF.
Create the Animation Assets
really only a mask in which you can have pixels showing or not showing. The PNG-24 format supports true alpha, where
transparency has a percentage value. Figure 1-18 shows the PNGs (as seen in Photoshop) ready for export into Flash.
Figure 1-18. The animated GIF as PNG files
I've used a couple of cool hacks here:
I have cropped the image to separate the portion that animates (i.e., the eyes) from everything else.
reverse of the eye opening sequence), so we can
significantly reduce the number of unique frames we need to re-create it in Flash, again reducing filesize.
We can export with true alpha in PNG-24 format, which allows us to feather the edges of the image. If we place the critter in front of a jungle scene to make him more at home, we can blend his edge pixels rather than producing jaggies or a halo as we'd expect with a standard GIF.
To add transparency to an imported image in Photoshop:
1. In the Layers tab, copy the Background layer.
Delete the original Background layer. You will now end up with a single layer called Background Layer Copy.
When you use the Eraser tool on this layer, it creates an
alpha channel. (Having deleted the Background layer, when you erase any pixels, there is no background to show through, so Photoshop instead gives you transparency.)
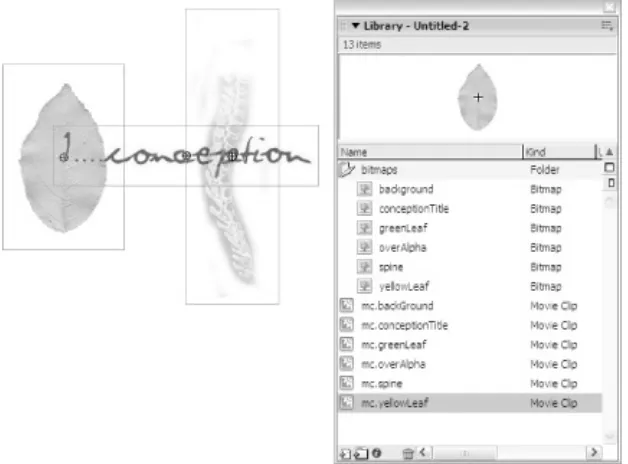
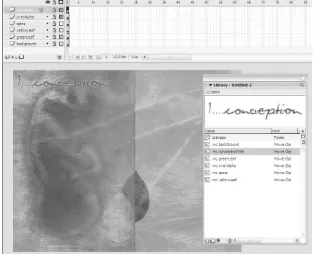
If you import the PNG images into Flash (using File Import), you can rebuild the critter in the usual way, starting from the lowest layer up: first the eyeballs, then the pupils, followed by the eyelids, and finally the body, as shown in Figure 1-19.
Note that the eyeballs are vectors in this version. The blink
sequence is implemented as a movie clip consisting of the three bitmaps with the eyes closing progressively and the same three bitmaps being reversed to reopen them.
The pupils are two dots named leftEye_mc and rightEye_mc. When controlled by the following script, they will keep a wary eye on the mouse cursor, as shown in Figure 1-20. As usual, you can add this code to the first frame of your actions layer on the main timeline.
Figure 1-20. Tracking the mouse position
followMouse = function ( ) {
this.startX = this._x;
this.startY = this._y;
this.onEnterFrame = animateEye;
};
var distX = (_xmouse - this._x) / 50;
var distY = (_ymouse - this._y) / 50;
if (Math.abs(distX) < 5) {
this._x = this.startX+distX;
}
if (Math.abs(distY) < 5) {
this._y = this.startY+distY;
}
};
leftEye_mc.onEnterFrame = followMouse;
rightEye_mc.onEnterFrame = followMouse;
The followMouse( ) function is specified as the onEnterFrame event handler for both pupils. Once it is called, it simply
captures the starting pupil position and changes the
onEnterFrame event handler to animateEye( ) for subsequent frames. This function moves the pupils a distance from the start position, based on the mouse position, giving the appearance that the critter is watching the mouse.
that's not a hackthat's what Flash is all about.
Figure 1-21. A sad tarsier and his drinking buddy
Final Thoughts
Although this is a fairly standard animation, the way it was (very) quickly converted from an existing animated GIF shows how easy it is to create a more versatile Flash animation.
Bitmaps with transparency can be stacked above one another to create layered animations using the animated GIF bitmaps
themselves. This trick is also a good way to export Photoshop PSD files into Flash; simply export each layer as a separate PNG-24, which will include transparency. You can then