SECOND EDITION
SharePoint 2010 for Project
Management
SharePoint 2010 for Project Management, Second Edition by Dux Raymond Sy
Copyright © 2012 Innovative-e, Inc. All rights reserved. Printed in the United States of America.
Published by O’Reilly Media, Inc., 1005 Gravenstein Highway North, Sebastopol, CA 95472. O’Reilly books may be purchased for educational, business, or sales promotional use. Online editions are also available for most titles (http://my.safaribooksonline.com). For more information, contact our corporate/institutional sales department: (800) 998-9938 or corporate@oreilly.com.
Editors: Courtney Nash and Rachel Roumeliotis
Production Editor: Kristen Borg October 2008: First Edition.
February 2012: Second Edition.
Revision History for the Second Edition:
2012-01-11 First release
See http://oreilly.com/catalog/errata.csp?isbn=9781449306373 for release details.
Nutshell Handbook, the Nutshell Handbook logo, and the O’Reilly logo are registered trademarks of O’Reilly Media, Inc. SharePoint 2010 for Project Management, the image of a black fox squirrel, and related trade dress are trademarks of O’Reilly Media, Inc.
Many of the designations used by manufacturers and sellers to distinguish their products are claimed as trademarks. Where those designations appear in this book, and O’Reilly Media, Inc., was aware of a trademark claim, the designations have been printed in caps or initial caps.
While every precaution has been taken in the preparation of this book, the publisher and author assume no responsibility for errors or omissions, or for damages resulting from the use of the information con-tained herein.
Table of Contents
Preface . . . vii
1. Project Kickoff . . . 1
What Is a PMIS? 4
Deciding to Use a PMIS 4
What Is SharePoint? 5
Other Options 8
Our Case Study: SharePoint Dojo, Inc. 8
Best Practices Checklist 9
Summary 9
2. Setting Up the PMIS . . . 11
How Will You Organize Your PMIS? 12
Using Site Templates 14
Creating a SharePoint 2010 Site 14
Workshop 2.1: Establishing the SharePoint 2010 PMIS Foundation 15
Part 1: Creating the PMIS 16
Part 2: Customizing the Site Theme 17
Part 3: Adding an Announcement List 18
Part 4: Displaying Announcements on the Home Page 20
Workshop 2.1 Debriefing 22
Customizing the PMIS 22
Workshop 2.2: Updating Your Site’s Regional Settings 25
Workshop 2.2 Debriefing 25
Part 1: Creating and Populating a Calendar List 36 Part 2: Creating and Populating a Contacts List 38
Part 3: Creating a Risks List 40
Part 4: Creating a Project Tasks List 41
Part 5: Creating and Populating a Custom Resource List 41 Part 6: Displaying the New Lists on the Home Page 46
Workshop 3.1 Debriefing 48
Using Libraries 49
Creating a Document Library (a How-To) 52
Populating a Document Library 55
Workshop 3.2: Creating and Populating a Document Library 55
Part 1: Creating a Document Library 55
Part 2: Populating a Document Library 57
Workshop 3.2 Debriefing 60
Site Access in SharePoint 65
Creating SharePoint Groups 65
Adding Site Members 66
Enabling the Access Request Feature 69
Customizing Permissions 70
Workshop 4.1: Adding Site Members 73
Part 1: Adding Site Members 74
Part 2: Customizing List Permissions 75
Workshop 4.1 Debriefing 77
Best Practices Checklist 79
Summary 79
5. Supporting Team Collaboration . . . 81
Enabling Document Management Solutions 82
Overview of Check-Out/Check-In 83
Overview of Version History 85
Overview of Content Approval 87
Workshop 5.1: Updating a Project Document 89
Part 1: Requiring Check-Out 89
Part 2: Checking Out and Editing a Document from the Document
Library 91
Part 3: Viewing All the Changes Made to the Document 93
Facilitating Team Collaboration 96
Wikis 97
Discussion Boards 98
Document Workspaces 99
Creating a Document Workspace 100
Best Practices Checklist 102
Summary 102
6. Project Tracking . . . 103
Tracking Project Tasks 104
Tracking Risks 107
Workshop 6.1: Updating the Schedule and Tracking Risks 110 Part 1: Updating the Project Tasks List 110 Part 2: Populating and Updating the Project Tasks List 112
Part 3: Documenting Risks 115
Workshop 6.1 Debriefing 119
Controlling Changes with Workflow 119
Workshop 6.2: Creating a Change Control System with
Three-State Workflow 122
Part 1: Creating a Custom List 123
Part 2: Customizing the Three-State Workflow 124
Part 3: Testing the Workflow 130
Workshop 6.2 Debriefing 135
Best Practices Checklist 135
Summary 135
7. Project Reporting . . . 137
Custom Views 137
Workshop 7.1: Creating a Custom View 141
Workshop 7.1 Debriefing 145
Using Web Parts for Interactive Reporting 145 Workshop 7.2: Maximizing Project Reporting with Web Parts 150 Part 1: Updating Web Parts on Your PMIS Home Page 150
Part 2: Creating a Project Dashboard 153
Part 3: Finalizing the Dashboard 160
Workshop 7.2 Debriefing 163
Subscribing to Alerts 163
Using Meeting Workspaces 166
Workshop 7.3: Creating a Meeting Workspace 169
Workshop 7.3 Debriefing 171
Best Practices Checklist 172
8. Integrating PM Tools . . . 173
Integrating Microsoft Project into SharePoint 174
Workshop 8.1: Using Microsoft Project 176
Workshop 8.1 Debriefing 178
Using Microsoft Excel and SharePoint 178
Creating a Custom List from an Existing Excel Spreadsheet 179 Exporting an Excel Spreadsheet to SharePoint As a Custom List 180 Synchronizing Excel Tables with a SharePoint List 182 Workshop 8.2: Synchronizing Excel with SharePoint 185
Part 1: Creating an Excel Table 185
Part 2: Synchronizing the SharePoint List with Excel 188
Workshop 8.2 Debriefing 189
Best Practices Checklist 189
Summary 190
9. Project Closing . . . 191
Overview of Creating a PMIS Template 192
Overview of Archiving the PMIS 194
Workshop 9.1: Creating a PMIS Site Template 195
Workshop 9.1 Debriefing 198
Ensuring Stakeholder Buy-In 198
1. Leverage and Prove the Value of SharePoint as a PMIS on a Pilot Project 198 2. Provide User Support in Learning and Utilizing SharePoint 199
3. Measure and Broadcast Success 199
4. Gather Feedback 200
Best Practices Checklist 201
Summary 201
Preface
Ang hindi marunong lumingon sa pinangalingan ay hindi makakarating sa paroroonan. (He who does not know how to look back at where he came from will never get to his destination.) —Dr. José P. Rizal, Philippine national hero
Do you find yourself asking for more time whenever you work on a project? Do you ever get the extra time you asked for? Well, if you’re like me, you rarely get the extra time you need from your customers. This got me thinking about how I can buy more time for my projects.
I decided to find out if I could gain more time by reducing inefficiencies within the project team (which also includes myself). In a recent project, I monitored and analyzed a few individuals for a week and was amazed at what I discovered.
During an average eight-hour workday, each individual spent about 45 minutes looking for information. For example, when asked by a client to retrieve a specific status report, the project coordinator had to look for it on the network share, in her email inbox, in the project folder of her computer, and she even had to call up another colleague to help her find it. This typical mode of searching took up time that could have been spent on something more productive. In addition, project resources were unproductive due to poor document management practices, inefficient project communication stand-ards, and ineffective project collaboration tools. According to a May 31, 2007, New York Times article, “Time Wasted? Perhaps It’s Well Spent” (http://www.nytimes.com/ 2007/05/31/fashion/31work.html), a Microsoft study found that American workers, on average, spend 45 hours a week at work, with 16 of these hours described as “unproductive.”
Other than time, how much does this cost the project and the organization? Well, depending on who you’re considering, 45 minutes might cost $50 for a project coor-dinator or $250 for a technical contractor, each day.
Bottom line: time and money are not well spent. What if my team could regain just 20 of those 45 minutes wasted each day?
With SharePoint, we achieved this and more. Apart from increasing productivity, we were able to:
• Automate status reporting for stakeholders
• Use collaboration to generate real-time project lessons learned that were easily accessible by a globally dispersed team
• Synchronize standard project information such as calendars, contacts, and documents
• Document and track project risks and issues • Maintain a quality log
• Integrate existing project management tools such as email, Microsoft Word, Excel, and Project into SharePoint
• Create and manage a change control system
For me, the best part of using SharePoint was that once the IT/IS department performed the installation and initial configuration, I didn’t have to burden anybody to set up and further configure this unique Project Management Information System (PMIS)—I did it all myself. In addition, I was still able to better use existing tools like Microsoft Office along with SharePoint.
That’s what this book is all about. By clearly mapping the relationships between project management processes and project stakeholders, and by leveraging tools like Share-Point, you will learn how to apply common and practical project management techni-ques using SharePoint. More importantly, with this book you will quickly master SharePoint so you can build a PMIS that can help you efficiently coordinate commu-nication and collaboration throughout your project team.
Who Should Read This Book
This book will be most valuable to individuals working on projects who want to adapt SharePoint for project management, including:
Project managers
Project team members
Members of the team work in a project environment that requires participating in collaborative activities, such as project planning, status updates, risk monitoring, tracking, requesting changes, and maintaining critical project information.
Program managers
Program managers seek a standard, consistent, and best-practices approach to im-plementing a PMIS across projects in the organization.
IT/IS directors
Directors want to learn how SharePoint can meet the needs of project managers in the organization.
SharePoint consultants
SharePoint consultants can help you to leverage your SharePoint technical skills by offering a focused approach in implementing SharePoint as a PMIS.
What You Need to Best Use This Book
To maximize the benefits of this book, familiarity with basic project management con-cepts and terminologies is assumed. This book is intended for individuals with a project management background who are interested in leveraging SharePoint on their projects. Furthermore, it is ideal that you have an existing SharePoint environment (SharePoint Foundation or SharePoint Server) where you can practice and apply the techniques that you will learn. If you are not sure about this, ask your IT/IS department these two questions:
• Am I a member of an existing SharePoint site? • Am I allowed to create SharePoint subsites?
If the answer to both questions is yes, you are in good shape. If the answer to either or both questions is no, I suggest you ask for appropriate SharePoint access or rely on external SharePoint hosting vendors such as Office 365.
Even better, you can leverage a fully functioning SharePoint environment, designed for this book from Cloudshare, that you can use FREE for 14 days. Visit http://innovative -e.com/sp4pmlab for more details.
My Assumptions in Writing This Book
My assumptions are that you:
Have some sort of project management experience
You have managed projects formally or informally and are familiar with funda-mental project management concepts and practices.
Are new to SharePoint
You may have heard of SharePoint or have been told to use SharePoint to manage your projects. If you have used SharePoint before, you will gain practical knowledge in applying SharePoint for project management.
Are using SharePoint for project management purposes
This book is focused on helping you leverage SharePoint for project management, regardless of what industry you are in. The concepts and techniques in this book apply to IT, construction, government, education, finance, and healthcare projects. If you are interested in using SharePoint to deploy a corporate portal, create an ecommerce website, or develop a proprietary SharePoint application, this is not the book for you.
Are not interested in the nitty-gritty technical details of SharePoint
I am not inclined to write yet another technical book about SharePoint. Though I am a certified SharePoint geek, there are tons of other books available that do a great job of discussing advanced technical topics. The level of technical detail I will cover is just enough for you to get your PMIS up and running.
Are comfortable using Microsoft Windows, Microsoft Office, and a web browser
The technical background required to fully utilize SharePoint is minimal. As long as you are familiar with basic computing concepts—such as creating and saving documents, copying files, logging in and logging out, using passwords, surfing the Web, clicking on links on a web page, downloading and uploading, and distin-guishing files versus folders—you are in good shape.
Are willing to change and try something new
Remember, to benefit from this book, you have to consciously decide that how you manage project information, facilitate team collaboration, and enable project communication must change for the better.
Additional Resources
Websites:
• Project Management Institute (http://www.pmi.org) • PRINCE2 (http://www.prince2.com/)
• Microsoft Project for the Masses: FREE Resource Management Solution (http:// spgur.us/MSPFM)
Books:
• Making Things Happen: Mastering Project Management by Scott Berkun (O’Reilly, 2008)
• Applied Project Management: Best Practices on Implementation by Harold Kerzner (Wiley, 1999)
• Microsoft SharePoint 2010 Plain & Simple by Jonathan Lightfoot and Chris Beckett (Microsoft Press, 2010)
Contents of This Book
This book includes hands-on workshops, which will help you leverage a SharePoint PMIS just as you would in a typical project environment. And using each chapter’s detailed, step-by-step logical processes, you will integrate project management best practices and standards to fully reap the benefits of a SharePoint PMIS.
Chapter 1, Project Kickoff
Chapter 2, Setting Up the PMIS
Chapter 3, Adding PMIS Components
Chapter 4, Adding Stakeholders to the PMIS
Chapter 5, Supporting Team Collaboration
Chapter 6, Project Tracking
Chapter 7, Project Reporting
Chapter 8, Integrating PM Tools
Chapter 9, Project Closing
Conventions Used in This Book
The following typographical conventions are used in this book:
Italic
Indicates new terms, URLs, email addresses, folder names, filenames, and file extensions.
Constant width
Used for program listings, as well as within paragraphs to refer to program elements such as variable or function names, databases, data types, environment variables, statements, and keywords.
Constant width bold
Constant width italic
Shows text that should be replaced with user-supplied values or by values deter-mined by context.
This icon signifies a tip, suggestion, or general note.
This icon indicates a warning or caution.
Using Code Examples
This book is here to help you get your job done. In general, you may use the code in this book in your programs and documentation. You do not need to contact us for permission unless you’re reproducing a significant portion of the code. For example, writing a program that uses several chunks of code from this book does not require permission. Selling or distributing a CD-ROM of examples from O’Reilly books does require permission. Answering a question by citing this book and quoting example code does not require permission. Incorporating a significant amount of example code from this book into your product’s documentation does require permission.
We appreciate, but do not require, attribution. An attribution usually includes the title, author, publisher, and ISBN. For example: “SharePoint 2010 for Project Manage-ment, Second Edition, by Dux Raymond Sy (O’Reilly). Copyright 2012 Innovative-e, Inc., 978-1-449-30637-3.”
If you feel your use of code examples falls outside fair use or the permission given above, feel free to contact us at permissions@oreilly.com.
Safari® Books Online
Safari Books Online is an on-demand digital library that lets you easily search over 7,500 technology and creative reference books and videos to find the answers you need quickly.
O’Reilly Media has uploaded this book to the Safari Books Online service. To have full digital access to this book and others on similar topics from O’Reilly and other pub-lishers, sign up for free at http://my.safaribooksonline.com.
How to Contact Us
Please address comments and questions concerning this book to the publisher: O’Reilly Media, Inc.
1005 Gravenstein Highway North Sebastopol, CA 95472
800-998-9938 (in the United States or Canada) 707-829-0515 (international or local)
707-829-0104 (fax)
We have a web page for this book, where we list errata, examples, and any additional information. You can access this page at:
http://shop.oreilly.com/product/0636920020387.do
To comment or ask technical questions about this book, send email to:
bookquestions@oreilly.com
For more information about our books, courses, conferences, and news, see our website at http://www.oreilly.com.
Find us on Facebook: http://facebook.com/oreilly
Follow us on Twitter: http://twitter.com/oreillymedia
Watch us on YouTube: http://www.youtube.com/oreillymedia
Acknowledgments
It’s been an amazing ride since the first edition of SharePoint for Project Management
was published. SharePoint has exploded in the enterprise; in a recent report from AIIM, project management is the top use of SharePoint today (http://www.aiim.org/Research/ Industry-Watch/SharePoint-2011).
With this second edition, I would like to thank the following for their unwavering support, trust, and patience:
• The Lord God for the awesome plan He has for me, as promised in Jeremiah 29:11 • My wonderful wife, Ramona, and amazing children, Johannes and Danika, for
making all this worthwhile
• Team Innovative-e for all the help and insights
• The global SharePoint community for the kindness and hospitality you’ve shown me
• My good friend Dave Murphy for jumping in at the last minute to review
Off You Go
The last thing I want is for you to think of SharePoint as a burden or a necessary evil, simply because your boss is making you use it for your projects.
My hope is that, after reading this book, you will be able to use SharePoint to effectively manage your projects, make them less complicated, and make your team more efficient. Should you have any questions, comments, and/or feedback, feel free to visit http:// www.spforpm.com or contact me at dux@spforpm.com.
CHAPTER 1
Project Kickoff
It must be considered that there is nothing more difficult to carry out nor more doubtful of success nor more dan-gerous to handle than to initiate a new order of things. —Niccolò Machiavelli, Italian philosopher
As most of you would agree, the definition of a project varies greatly—it can be building the next space shuttle, upgrading the production line of your manufacturing facility, or just creating a new website for a customer. One common factor that holds true across these varying project types is that all of them involve multiple people interacting with a wide array of project information.
This information can include templates, emails, schedules, proposals, forms, budgets, contact information, status reports, regulatory compliance, and even ad hoc docu-ments. In spite of our best attempts to effectively manage project information, we all seem to fall short at times. We rely on inconsistent and inefficient tools that are typically a combination of three things:
Local/personal storage
If project information is stored in an individual’s personal computer, email, or portable storage device, can important information—such as a project schedule— be made available to relevant stakeholders in a timely manner? If the computer or portable storage device breaks down, how is the information restored?
Network-based storage
If you are using central storage through a file-sharing network or web-based envi-ronment, how do you prevent files from being overwritten? What are the standards for maintaining versions? Can you easily define who can access what information?
Mixed bag of project management tools
Checklist: Essential Project Management Activities
When I formally started managing projects more than 15 years ago, I had the wrong impression that the very first step to take was to fire up a scheduling tool (such as Microsoft Project) and start cranking out the project tasks, defining the task duration, and establishing the task dependencies. It never really worked out well for me. Only later did I realize that there are other crucial steps I failed to do.
Here’s my essential list of project management activities that every project manager should be doing throughout the life of a project:
• Create guidelines for how your projects will be initiated • Run a kickoff meeting to define project objectives • Identify your stakeholders
• Identify project information taxonomy
• Plan your projects with your team, including creating the work breakdown struc-ture (WBS), creating the network diagram, identifying the critical path, and opti-mizing the project schedule
• Define the probability and impact of project risks • Create a change control process for scope changes • Define quantifiable project-tracking processes • Facilitate a lessons-learned meeting
To improve these inefficiencies, three things are necessary:
Apply a standard set of project management processes from the start of the project until the end
While I won’t go into detailed discussions on project management concepts and theories, I will say that to make SharePoint work to your advantage, you have to employ sound project management techniques and practices.
If you don’t have one, the best way to develop a project management methodology is to review best practices from the Project Management Institute’s (PMI) Project Management Body of Knowledge (PMBOK)Guide and the Projects in Controlled Environments (PRINCE2) road map.
Use a Project Management Information System (PMIS) to support your project manage-ment processes
As any experienced project manager would validate, having an easy-to-use, accessible, reliable, and scalable collaborative platform can contribute greatly to a project’s success. That’s the crux of what you will learn in this book: using Share-Point as your PMIS.
Educate and update your project team with project management best practices
Having an incremental approach to continuous process improvement will enable the project team to make better use of the PMIS.
Dux Quax: Is It Changeworthy?
Listen, before you go gung-ho and start implementing formalized project management processes in your organization, slow down, my good friend. I guarantee that it won’t work if you change the rules overnight. People, by nature, are averse to change (as you might already know). As the old adage goes, “If it ain’t broke, don’t fix it.”
So, what should you do? How can you convince your team that it’s necessary to im-plement project management processes? Taking baby steps is key:
Make the case that having sound project management processes will greatly improve how projects are run in the organization
A good exercise is to examine a previous project that didn’t turn out too well—it might have been delayed or gone over budget. Assess whether you had sound planning processes. Could you have done a better job defining the work and draw-ing up a more realistic schedule and budget?
Implement new processes one at a time
Initially, focus on the planning aspects of project management. Perhaps come up with a standard on defining project goals, identifying stakeholders, prioritizing requirements, generating work breakdown, assigning work, developing a project schedule, and documenting a risk management plan.
Involve the team
Allow the team to provide feedback on the processes that will be implemented. Ask if they’re relevant. If not, how can they be improved? Is there anything missing? What kind of support is necessary to ensure that these processes are adopted?
Remember, people can change as long as they perceive it as worthwhile. They are more likely to make changes that will bring about benefits at a personal level than at the organizational level.
What Is a PMIS?
As defined by the Project Management Institute (PMI; see http://www.pmi.org), a
Project Management Information System (PMIS) is a standardized set of automated project management tools available within an organization and integrated into a sys-tem. Although the PMI does not specify which tools or technologies to use as a PMIS, SharePoint can be customized as one.
Checklist: Essential PMIS Capabilities
A reliable PMIS should support most, if not all, of the communication and collaboration needs of a project environment. Here is a list of essential PMIS capabilities:
• Supports the generation of a project charter, schedule, and budget • Facilitates communication and feedback
• Monitors project activities • Controls project changes
• Analyzes and forecasts project performance • Disseminates project status to relevant stakeholders
• Provides real-time information essential for initiating, planning, executing, con-trolling, and closing a project
Deciding to Use a PMIS
No matter how small or large a project is, being able to efficiently manage project information whenever, wherever, and however can greatly contribute to project suc-cess. A key requirement for making this possible is leveraging a PMIS.
Here are five telltale signs that you need to begin using a PMIS:
No standardized system for integrating project goals
Project schedule, cost, and quality objectives are individual silos. For example, financial information in Excel is not automatically recalculated anytime the project schedule is adjusted using scheduling tools such as Microsoft Project. Making manual updates takes time away from other project activities.
Inefficient document management
Project documents are not stored in a central location. Tracking, undoing changes, and the ability to roll back to prior versions are limited. Additionally, varying levels of access permissions are unavailable. IT/IS can only do so much in supporting information access requirements.
Lack of appropriate tools to facilitate team collaboration
Inability to report accurate and timely status of the project
Project status information is available only when the project manager makes it available. How do you deal with project sponsors who want to view real-time project status data?
Not achieving organizational strategic goals
Lacking a standardized tool to facilitate consistent project management processes throughout an organization can limit the ability to effectively support strategic goals.
As a project manager, these five issues can more than justify the need for any organi-zation to invest in a reliable, effective, customizable, and easy-to-implement PMIS. Today, multiple PMIS solutions are available. However, in addition to being costly, they can require specialized skills to implement, customize, and maintain. That’s why a lot of these initiatives have achieved only limited adoption. This is how SharePoint sets itself apart.
What Is SharePoint?
How do people describe SharePoint? In my experience, the definition always gets lost somewhere between collaboration and document management. Here’s a concise and straightforward description of SharePoint:
SharePoint allows individuals in an organization to easily create and manage their own collaborative solutions.
It sounds simple, but let me dissect what it truly means:
Individuals
Does this word specify that SharePoint users have to be technically savvy? No. In fact, as long as users have familiarity with Windows, Microsoft Office, and surfing the Web, they will be in good shape.
Organization
This term implies that SharePoint can be used by a limited number of people be-longing to the same group. It also means that there will be varying levels of authority and privileges within the group. As a result, you don’t have to rely on the IT/ IS department to set up permissions in SharePoint—you are empowered to define and manage access to specific information. You will learn more about permissions in Chapter 4.
Easily
Collaborative
The intent of SharePoint is to support collaborative activities (formal or informal) in which groups engage.
SharePoint has been around since 2001. It has evolved from a simple website manage-ment tool to an empowering collaboration platform that integrates seamlessly with the Web, Microsoft Windows, and Microsoft Office. Since it is a foundational Microsoft technology, various organizations—including government institutions, airlines, banks, construction companies, and retail industries—have benefited from its tools and fea-ture sets.
SharePoint does not refer to a specific product or technology. Using the phrase “Mi-crosoft SharePoint” is like using the phrase “Mi“Mi-crosoft Office.” It refers to several as-pects of collaborative solutions. The key components are SharePoint Foundation (SF) and SharePoint Server (SS).
To distinguish SF and SS, an analogy that I often use is to compare SharePoint to a car. What’s the main purpose of a car? To take you from point A to point B, agreed? Which component of a car is required to do this? The engine, of course.
The main purpose of SharePoint is to empower users with document management and team collaboration tools. SF fulfills this purpose. It is the core “engine” of SharePoint. Without SF, there is no SharePoint. SF (shown in Figure 1-1) is available with Windows 2008 Server or later.
Figure 1-1. A SharePoint site using a SF site template
features include Enterprise Search, Personalization, Enterprise Content Management, etc. Unlike SF, SS (shown in Figure 1-2) has separate licensing. Licensing can vary and become quite costly. For more information about licensing, visit Microsoft’s SharePoint website at http://www.microsoft.com/sharepoint.
Figure 1-2. A SharePoint site using SS features
Since SharePoint can be considered a platform for improving document management and collaboration, it can be adopted as a tool to assist most project environments. In this book, I will show you how to build a SharePoint PMIS primarily using SF. This means that the techniques you will learn can be applied regardless of whether you have SF or SS in your organization.
Dux Quax: Is SharePoint the Only Game in Town?
Don’t get me wrong here. There are a lot of other great products that can be used as a PMIS. There are full-featured enterprise-level products, such as Microsoft Project Server, Clarity, and Primavera; and even open source, web-based products, such as Google Apps and Basecamp.
As depicted in Figure 1-3, project management maturity should have the people, pro-cess, and technology in lockstep.
Figure 1-3. Project management maturity
Other Options
How about free, web-based, open source products such as Google Sites, Dux? Well, they can serve as a relatively good PMIS to a certain extent. My issue with these tools is their lack of integration with existing project management tools that I use. The last thing I want to do is enter the same set of information 10 times in 10 different places. So, how is SharePoint different? If you are coming from an environment where you don’t really have an established project management process and are mostly using Mi-crosoft Word, Excel, Outlook, and maybe MiMi-crosoft Project to manage your projects, using SharePoint is taking a baby step ahead. Remember that people are often averse to change. Well, stepping up to SharePoint is not as drastic a change as learning how to use other, more complex PMIS tools.
Also, I really like the integration between SharePoint and the Microsoft Office products that I use day in and day out. For example, I can enter project schedule information in my Outlook calendar and it will show up in SharePoint, and vice versa. Additionally, an Excel spreadsheet can synchronize milestone tracking with SharePoint, so if my team leads enter milestone completion dates in SharePoint, those dates show up in the Excel spreadsheet sitting on my computer. Isn’t that amazing? See “Using Microsoft Excel and SharePoint” on page 178 in Chapter 8 for more on this.
Our Case Study: SharePoint Dojo, Inc.
To better reinforce what you will learn, you will practice key concepts and techniques by managing a project for SharePoint Dojo, Inc., a fictional company that we will use throughout this book.
As history has proven, SharePoint Dojo provides first-rate instruction in the art of tae kwon do, led by a staff of certified masters who have at least eight years of teaching experience and who have competed in international events. In 2008, the company was cited as one of the fastest-growing businesses in the United States.
To continue its explosive growth, SharePoint Dojo is expanding internationally, open-ing company-owned martial arts trainopen-ing studios in major cities. Multiple project teams have been assembled, and each team will be responsible for managing the opening of each respective studio.
As the project manager, you will be personally responsible for integrating SharePoint Dojo into the local culture and community of the city to which you have been assigned. The challenges will be significant. You will be required to select the site and furbish the studio, comply with local laws and regulations, set up distribution and logistics, de-velop IT infrastructure and regional reporting initiatives, integrate with existing systems and processes, identify which programs will sell the best in your region, and highlight local opportunities. You will have to handle local contractors, employ staff locally, and carry out local marketing and advertising. The whole time you will have to stay focused on the SharePoint Dojo brand and the SharePoint Dojo experience—this is more than a series of local initiatives to make some money; it is about global expansion.
As identified by senior management, there are two areas that are crucial to your overall success. The first is having correct project governance in place. It is critical that existing project management standards and processes be followed. Second, a PMIS must be established for each project team, enabling all the teams to share and collaborate on detailed project information, risks, and lessons learned in real time.
To accomplish all of these goals, SharePoint Dojo has adopted PMI standards for project governance and implemented a PMIS using Microsoft SharePoint. You will need to set up your own SharePoint PMIS for your project.
Best Practices Checklist
• Establish or be familiar with your project management processes. • Establish a PMIS for your project.
• Centralize project documents. • Streamline project communication.
• Become familiar with your SharePoint environment.
Summary
• Successful projects result from sound project management practices, standards, and processes.
• SharePoint’s main purpose is to improve how we manage information and facilitate collaboration. It can be used as a PMIS.
CHAPTER 2
Setting Up the PMIS
Tell me and I’ll forget; show me and I may remember; involve me and I’ll understand. —Chinese proverb
The first step in taking advantage of SharePoint 2010 in a PMIS is to familiarize yourself with the structure of SharePoint 2010 sites. SharePoint 2010 sites are collaborative websites that are organized in a hierarchy. They are composed of top-level sites and subsites, as shown in Figure 2-1.
Figure 2-1. SharePoint site hierarchy
A site collection is an aggregation of a top-level site and its subsites. Site collections are independent of one another. A top-level site without subsites can also be considered a site collection. So, in short, a top-level site is synonymous with a site collection. A PMIS can be created as a top-level site or a subsite. Keep in mind that, by definition, projects are temporary—they have a start date and an end date. This means that a SharePoint PMIS is a temporary site, unlike other SharePoint sites created for perma-nent purposes, such as departmental sites, product sites, customer support sites, etc. You have to think about what will happen to the PMIS once the project is completed. SharePoint 2010 does not automatically remove inactive sites.
How Will You Organize Your PMIS?
Organizations typically have more than one project utilizing SharePoint as a PMIS. It is critical that you plan and assess how these project-focused sites will be organized and structured for your environment.
Involve key decision-makers from IT/IS and your Project Management Office (PMO), if you have one, when choosing one of the three high-level PMIS hierarchy options:
Single-site collection
Includes a top-level PMO site. All project sites are subsites (Figure 2-2).
Multiple-site collections
Each PMIS is a top-level site (Figure 2-3).
Multiple-site collections created for a specific department, business unit, product line, etc.
The PMIS is created as a group of subsites within these top-level sites (Figure 2-4).
Figure 2-2. Single-site collection
Figure 2-4. PMIS created as subsites
Your decision should be based upon the following three organizational criteria:
IT/IS involvement in creating a site that spans the three collections
If each PMIS is a top-level site, IT/IS will likely be responsible for creating the site and defining its site members. However, if each PMIS is a subsite, IT/IS is less likely to be involved, and either the project manager or someone on the project team will create the site.
Technical considerations
SF has search limitations. By default, SF can only search within a single site col-lection. For example, if somebody in senior management is interested in looking for a specific document contained within the various project sites, she will have to go to each individual site to run a search if every PMIS is a top-level site. This is not the case if the entire PMIS is grouped as a single site collection. Note that this limitation can be resolved if you have SS instead of SF, because SS comes with an Enterprise Search capability.
If IT/IS decides to enable Automated Site Collection Deletion, a feature that automatically deletes an inactive site collection, the deletion will only work if each PMIS is a top-level site, since the feature deletes an entire site collection. If multiple PMISes are grouped in a single site collection, the site collection probably won’t be automatically deleted because the likelihood of the entire site collection being inactive is minimal.
Decision-making and reporting structure
Dux Quax: Permanent Versus Temporary Sites
I typically advise my clients that they should have a site collection for permanent sites. These sites would be specific to departments, business units, products, and anything that could be used for permanent collaboration. Additionally, a site collection should be created for temporary sites such as a PMIS or a meeting-centric SharePoint site known as a meeting workspace (see the section “Using Meeting Workspa-ces” on page 166 in Chapter 7).
What typically happens is that there are more temporary SharePoint sites created than permanent ones. Once a temporary site is no longer needed, it is easier to maintain and audit if it was in a separate site collection.
Using Site Templates
SharePoint 2010 comes with site templates for convenient site creation. Common site templates are listed in Table 2-1.
Table 2-1. Default site templates
Site template name Description
Team Site A site used for collaboration Blank Site A blank site with no predefined features
Document Workspace A site that allows collaboration on one or more specific documents
Wiki Site A site that can be quickly edited to record information and then linked through keywords Blog A site for a person or team to post ideas, observations, and expertise that also allows site visitors to
leave comments
The template determines the default site functionality, layout, menus, etc. (see Fig-ure 2-5). You can also create custom site templates (see “Overview of Creating a PMIS Template” on page 192 in Chapter 9). Typically, organizations would have custom templates created and made available.
Creating a SharePoint 2010 Site
These are the basic steps in creating a SharePoint 2010 subsite from an existing Share-Point 2010 site:
1. Click Site Actions→New Site. 2. Select the desired template.
3. Enter the appropriate information for the Title and “URL name”. You need only put the name of the subsite in the URL form, rather than rewriting the entire URL. 4. Click Create.
5. On the “Set Up Groups for this Site” page, define your site members and their permissions, and then click OK.
Dux Quax: When Do I Start Building a PMIS?
Ideally, you should start building your PMIS as soon as you get the project assignment, or ASAP. Prior to getting involved with the initial phase of project planning, make sure that all of the necessary components and tools that you need in the PMIS are already in place to support project activities from the beginning until the end.
Workshop 2.1: Establishing the SharePoint 2010 PMIS
Foundation
In this workshop, you will create a SharePoint 2010 PMIS for the case study project. You are tasked with building a PMIS for managing the opening of a SharePoint Dojo in the city of Cebu, in the Philippines. Feel free to use any city you want as you follow along.
For fields and settings that aren’t mentioned in the workshop steps, accept the default settings.
Part 1: Creating the PMIS
Follow these steps to set up your PMIS:
1. Using Internet Explorer, access any existing SharePoint 2010 site of which you are a member. Make sure that you have the permission to create a subsite.
2. Click Site Actions→New Site. 3. Click the Browse All tab.
4. In the “Select a Template” section, select Blank Site.
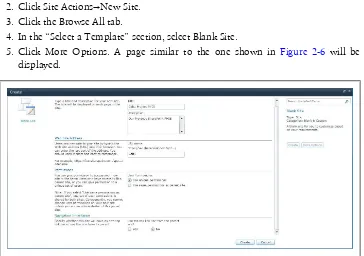
5. Click More Options. A page similar to the one shown in Figure 2-6 will be displayed.
Figure 2-6. Update site information
6. Enter the Title, Description, and “URL name”.
7. In the User Permissions section, select the “Use unique permissions” option. 8. In the “Use the top link bar from the parent site?” section, select No. 9. Click Create.
10. The “Set Up Groups for this Site” page will be displayed. Click OK. Once the site has been created, the home page will be displayed.
Part 2: Customizing the Site Theme
Once your site has been created, you can update your basic site settings using the Site Settings page. You can access this page by clicking Site Actions→Settings on your home page. The Site Actions menu is only visible to users who have site administration per-missions (primarily the site owners). We will discuss site customizations in detail after this workshop. For now, let’s look at some of the basic customizations that you can apply:
1. On your newly created site, click Site Actions→Site Settings. The Site Settings page will be displayed.
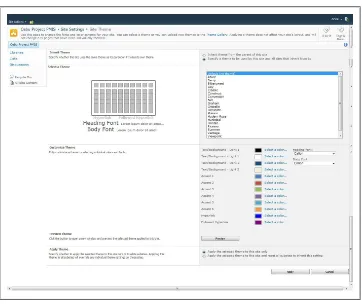
2. In the “Look and Feel” section, click Site Theme. The Site Theme page will be displayed (see Figure 2-7).
Figure 2-7. The Site Theme page
4. Click the home tab (in Figure 2-7, the home tab is “Cebu Project PMIS” in the upper-left corner of the page; yours will show the name of your project title) to return to your home page with the new theme applied.
There are several ways to navigate back to your home page: using the home tab, using breadcrumb navigation, and using the Navigate Up button. All three navigation options are located in the upper-left corner of the page and are visible in Figure 2-8. In Figure 2-8, you see the home tab, entitled “Cebu Project PMIS” in the upper left. You may also nav-igate back to your home page using the breadcrumb, which is the click-able link also entitled “Cebu Project PMIS” above the home tab. One additional way to navigate back to home is to click the Navigate Up button (the icon with the up arrow and the folder), which will provide a drop-down box enabling you to navigate to the portion of the site you would like to find.
Part 3: Adding an Announcement List
In Parts 1 and 2, you created the foundation of a SharePoint 2010 PMIS. You will now add basic site components, which are known as SharePoint lists. Lists are used to store and organize information in SharePoint (for more information, see the section “Using SharePoint Lists” on page 28 in Chapter 3). In this section, you will add an An-nouncements list that can be used to provide relevant project anAn-nouncements:
1. On the home page, click Lists, and then click Create (Figure 2-8).
2. The Create page will be displayed. In the Lists section, click Announcements. 3. Click More Options.
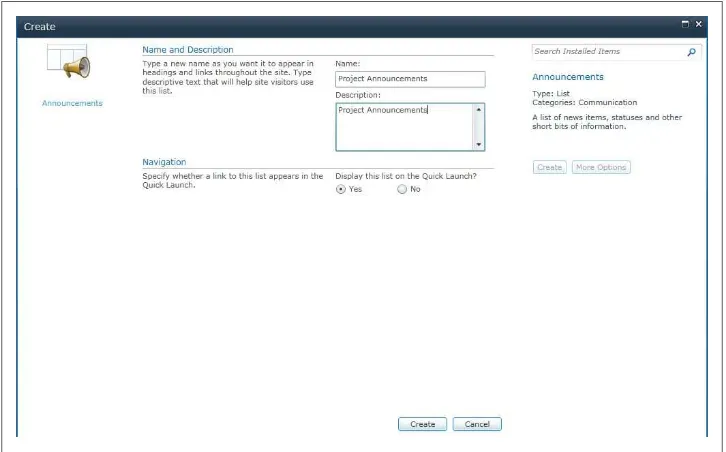
4. In both the Name and Description fields, enter the text Project Announcements,
and in the “Display this list on the Quick Launch?” section, select Yes (see Fig-ure 2-9). Yes is the default selection. See “Customizing the PMIS” on page 22 for more about the Quick Launch.
Figure 2-9. Creating an Announcements list
5. Click Create. You have just created a Project Announcements list. The purpose of an Announcements list is to store relevant information that you would like to an-nounce or broadcast to site members.
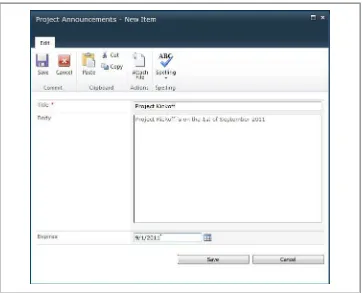
6. To add an announcement to your Project Announcements list, click “Add new announcement”. Enter the Title, Body, and expiration date (Figure 2-10). Note that there are a number of features available for formatting the text, similar to what you’d find in Microsoft Word.
Figure 2-10. Creating a new announcement
8. After creating the announcement, click Save. You will now see the new announce-ment on the Project Announceannounce-ments page, but you will not see the announceannounce-ment on the site’s home page.
Part 4: Displaying Announcements on the Home Page
1. On the home page, click Site Actions→Edit Page. Your site will now be in Edit mode. Edit mode allows you to add, remove, and update web parts and their settings.
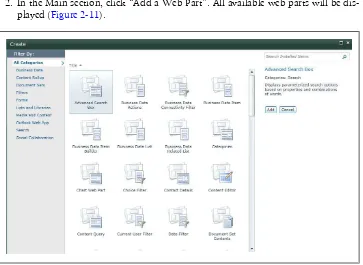
2. In the Main section, click “Add a Web Part”. All available web parts will be dis-played (Figure 2-11).
Figure 2-11. Adding web parts
3. Select “Lists and Libraries” from the menu on the left.
4. Select Project Announcements and click Add. The announcement you created ear-lier will be displayed (see Figure 2-12).
5. Click Stop Editing, which is located at the top left of the screen below Site Actions. The announcement you created earlier will now be displayed on the home page. 6. To return to your home page, use the home tab, the Navigate Up button, or
nav-igate by breadcrumb. See “Customizing the PMIS” on page 22 for a refresher on navigation.
Workshop 2.1 Debriefing
In Part 1 of the workshop, you selected a blank template in order to build the PMIS from the ground up. This will allow you to later define each component and feature of the site, as well as its access restrictions and other custom functionalities, helping you to fully experience and work with various aspects of SharePoint 2010. Instead of al-lowing existing users from the parent site to access the site, you selected the “Use unique permissions” option under user inheritance. As a result, you are responsible for defining who can access your PMIS.
In Part 2, you updated the basic look of the site with a predefined theme. To add a custom theme (to conform to your organization’s branding scheme, for example), you must have the IT/IS department create the theme and make it available as a selection. In Part 3, you added the built-in Announcements list and called it Project Announce-ments. You will use this list later to store and display project announceAnnounce-ments. In the section “Creating SharePoint Lists” on page 34 in Chapter 3, you will learn how to create additional lists for your PMIS.
Finally, in Part 4, you used Edit mode to add the Project Announcements list web part to your home page so that visitors to your PMIS can see the latest project announce-ments. You will learn more about web parts in the section “Using Web Parts for Inter-active Reporting” on page 145 in Chapter 7.
Customizing the PMIS
Once you have created your SharePoint 2010 site, the next step is to customize the PMIS. Customization can be done in four key areas:
Branding
It is important to determine whether you have to apply corporate branding stand-ards to your PMIS. You will have to check with IT/IS to see if there are any custom site templates or themes that have your corporate colors and logo. These custom templates or themes must be developed by somebody who is familiar with tools such as SharePoint Designer or, in some cases, Visual Studio .NET.
In a project environment, a consistent look and feel throughout various projects will minimize your stakeholders’ learning curve as they start using the PMIS. Wouldn’t it be frustrating to have a PMIS that looks different every time you begin a new project within your organization?
Usability
Two things come to mind when we look at site usability:
• Site navigation: In SharePoint 2010, three mechanisms are used for site naviga-tion: breadcrumb navigation, the top link bar, and the Quick Launch (see Fig-ure 2-13).
Figure 2-13. Site navigation options
Breadcrumb navigation is used to navigate between top-level sites and subsites. Typically, when you initially create a site, SharePoint 2010 enables the top link bar and Quick Launch, and it is up to you to customize and update them. By default, the top link bar and Quick Launch are prepopulated with links to com-mon site sections. Essentially, you can define which links appear both in the top link bar and the Quick Launch, and you can customize them on the Site Settings page. In a project environment, it is essential to have the most commonly ac-cessed site sections—such as project documents, the calendar, and the risk log—available in your site navigation.
by accessing the mobile version of the PMIS. The mobile version is optimized for mobile devices. It limits unnecessary visuals and, more importantly, it still keeps most of the PMIS functionalities, such as logging in, posting, and updating information, as well as deleting entries from existing sets of project information. The mobile version is available by default. All you have to do is enter /m at the end of the PMIS address (for example, http://sp.sharepointdojo.com/cebu/m), and you’re good to go.
Additionally, there are apps available for various mobile devices that provide more features and functionalities to better interact with your SharePoint-based PMIS (for example, http://www.shareplusapp.com/).
Compliance
Are there any standards or regulatory compliance issues you have to address for your PMIS? For example, if you have to subscribe to Section 508, SOX, PRINCE2, CMMI, ISO, or PMI standards, how long do you have to archive project informa-tion? What are the stipulations on information access or privacy? You should set this up as early as possible.
Project-specific needs
Do you have a global project team? If so, on which regional setting will your PMIS be based? Will project information be displayed in multiple languages? Is there a need to monitor and audit PMIS usage and traffic? All of this can be configured on the Site Settings page of your PMIS, which we’ll cover next.
Dux Quax: How Can I Get There?
I always hear complaints that SharePoint is bad. However, if I can rephrase that state-ment, it should be, “The implementation of SharePoint is bad.” You see, nothing is wrong with SharePoint. In fact, I think SharePoint is brilliant for its purpose. It is not fair to compare SharePoint with existing tools and products out there, because most of the time you are comparing apples and oranges.
The typical problem people run into is that when SharePoint is being implemented, IT/ IS fails to engage the needs of the greater population. Who are the users? What kind of technical backgrounds do they have? How can they leverage SharePoint?
Workshop 2.2: Updating Your Site’s Regional Settings
In this workshop, you will update the regional settings, such as time zone, calendar, and time format, for the SharePoint 2010 PMIS you created in Workshop 2.1. For fields and settings that aren’t mentioned in the workshop steps, accept the default settings.
1. Click Site Actions→Site Settings.
2. In the Site Administration column, click Regional Settings.
3. A page similar to the one shown in Figure 2-14 will be displayed. Update the desired fields, and then click OK.
Figure 2-14. The Regional Settings page
Congratulations! You have updated the Regional Settings for your SharePoint 2010 PMIS.
Workshop 2.2 Debriefing
Best Practices Checklist
• Decide how to structure SharePoint 2010 sites.
• Make all sites top-level sites or a single site collection with multiple subsites. • Group sites by department, project, or customer product.
• Perform necessary customizations early on.
Summary
• SharePoint 2010 sites are organized in a hierarchy. A site collection is composed of top-level sites that may or may not include subsites.
• When creating a PMIS, it is important to know which corporate standards have to be applied for branding, usability, compliance, and any other project-specific requirements.
CHAPTER 3
Adding PMIS Components
Virtually every company will be going out and empow-ering their workers with a certain set of tools, and the big difference in how much value is received from that will be how much the company steps back and really thinks through their business processes. —Bill Gates, philanthropist
Now that our SharePoint site has been created and customized, the next step is to decide which features are necessary for our PMIS. At a basic level, PMIS components should allow the project team to:
Centralize project information
Project information includes project contacts, calendars, documents, templates, forms, and checklists. In addition to storing project information, the PMIS should maintain a history and define who has access to the information.
Facilitate project communication and collaboration
Collaborative project activities include scheduling meetings, jointly developing proposals, and informally brainstorming project strategies. The PMIS should sup-port all activities of this type.
Automate project processes
Automating project processes, such as change control, should be available in the PMIS. The PMIS can automate the submission of change request forms by sending the form to the appropriate members of the change control board, recording the decision, and routing to the appropriate stakeholder the necessary actions to be taken.
Table 3-1. Essential PMIS components
PMIS component Purpose
Project Calendar Stores common project events such as meetings, deadlines, and resource availability Project Tasks Stores project task information, assignments, and status
Project Risks Stores project risk information, priority, and status Project Contacts Stores common project contacts
Project Resources Stores project resource information, skill sets, and rates
Project Documents Stores relevant project documents, templates, checklists, and reports Change request system Stores change request information, decisions, and actions Project Announcements Stores relevant project announcements
Project Milestones Stores project milestone information with baseline dates and actual dates
With a SharePoint PMIS, critical project information is centrally stored in a secured location, where document management features such as version control, check-in/ check-out, and content approval can be enabled. It can be accessed from a web browser and from most Microsoft Office applications.
Dux Quax: No More Double Entry
One of the goals of using a PMIS is to minimize or completely eradicate the need to enter project information twice. Don’t you love it when you have to enter project mile-stone dates into some system and then have to do it again in your copy of Microsoft Outlook? How about when a resource emails you a timesheet and you have to enter it into some funky timesheet software and then also in your copy of Microsoft Project or Excel?
With SharePoint, you can say bye-bye to many of these redundancies through the use of its two fundamental information storage and management capabilities: lists and libraries.
Using SharePoint Lists
In SharePoint, information is organized and stored in lists. A list is a collection of shared information in a SharePoint site. Anyone who has access to the site will be able to view the lists. However, as you will learn in Chapter 4, you can also limit who can add, edit, and view lists by updating access permissions.
Figure 3-1. A SharePoint list
SharePoint comes with ready-made lists, but also allows you to create custom lists. The following are some standard PMIS lists (these standard lists can be renamed to fit your needs; for example, the “Issues” list can be renamed “Project Risks”):
Project Calendar list
Events associated with meetings, schedules, milestones, and other project activities (Figure 3-2). This information can be synchronized with Microsoft Outlook 2007 or 2010.
Project Contacts list
Used to store common project contacts (Figure 3-3). This list can be synchronized with Microsoft Outlook 2007 or 2010.
Figure 3-3. Project Contacts list
Project Tasks list
This list is a to-do list for the team (Figure 3-4); tasks can be assigned to team members. This list can be synchronized with Microsoft Outlook 2007 or 2010.
Issues list
This list is useful for tracking project risks or issues (Figure 3-5). Items on the list can be tracked based on priority and status.
Figure 3-5. Issue tracking list
Project Resources (custom) list
This list is used to store project-specific information with customized columns such as resource information, budget, earned value, etc. (see Figure 3-6).
Lists are composed of two key sections, the List ribbon and the Items ribbon, which are organized in separate ribbons under List Tools. The List Tools, List ribbon (see
Figure 3-7) is used to manage the list.
Figure 3-7. List Tools, List ribbon
Dux Quax: Unleash the Power of Custom Lists
To me, the custom list is one of the features that makes SharePoint flexible and pow-erful. Not only can I replicate existing Excel spreadsheets, Word-based forms, and even Access databases and have them available in SharePoint, I can also fully use document management capabilities, permissions-based access, and browser-based availability. Heck, how can I beat that?
While some project information should not be shared, you should look at existing project artifacts that require collaboration and consider converting them into custom lists.
Common menu items for the List Tools, Items ribbon include:
New Item
Creates and defines new items in the list (Figure 3-8).
Figure 3-8. New Item
Alert Me
Figure 3-9. Alerts
List Settings
Defines list settings such as columns, list permissions, and views (Figure 3-10).
Figure 3-10. List Settings
Modify View
Specifies how list items will be displayed (Figure 3-11). Every list comes with a default All Items view, and some lists have special views. For example, a Calendar list has views for viewing events in a calendar format. You can also create custom views.
Figure 3-11. Modify View
Below the List Tools ribbons you will find the list Items, which are organized in a tabular format by default (see Figure 3-12). You can perform specific list item actions by se-lecting the desired action from the item’s action drop-down menu.
The actions include:
View Item
Displays details about the item, including when it was last modified.
Edit Item
Allows you to modify the item’s information.
Manage Permissions
Allows you to modify the item’s permissions.
Delete Item
Removes the item from the list.
Special Actions
Includes special item-level actions, such as Export Contact for the Contacts list. This action exports the contact information to Microsoft Outlook.
Compliance Details
Displays details to determine what retention stage an item is in. You can also take action to keep this item in compliance with organizational policy.
Alert Me
Notifies you when changes are made to the item.
Creating SharePoint Lists
There are two types of lists: standard, out-of-the-box SharePoint lists, and custom lists. The process of creating these lists is similar, but when creating custom lists, you must define the specific columns. Before you create any type of list, make sure you have the appropriate permissions to do so. By default, if you have the permissions required to create a SharePoint site (as you did in Chapter 2), you should have the permissions required to create lists.
Here are the basic steps to create a SharePoint list:
1. From an existing SharePoint site, click Site Actions→More Options.
2. Select List from the “Filter By:” types list in the left sidebar, and then select the type of list you would like to create (for example, Announcements, Calendar, Contacts, or Custom). If you select Custom, you will need to click the More Op-tions button to configure your custom list.
3. Once created, if necessary, specify custom settings for:
Custom Columns
In the List Tools, List ribbon, select Create Column.
Custom Views
4. To update list settings, in the List Tools, List ribbon, select List Settings (see Fig-ure 3-13).
Figure 3-13. A List Settings page
Workshop 3.1: Creating and Populating Lists
In this workshop, you will continue building your PMIS by creating and populating a calendar list, contacts list, risks list, tasks list, and a custom resource list.
Part 1: Creating and Populating a Calendar List
Use the following steps to create a calendar list and populate it with information: 1. Access your PMIS and click Site Actions→More Options.
2. In the Tracking category, click Calendar and click More Options. 3. The New page will be displayed. Enter the following information:
Name: Project Calendar
Description: <city>Dojo Project Calendar
4. Click Create.
5. The Project Calendar list will be displayed. Click Calendar Tools→Events→New Event.
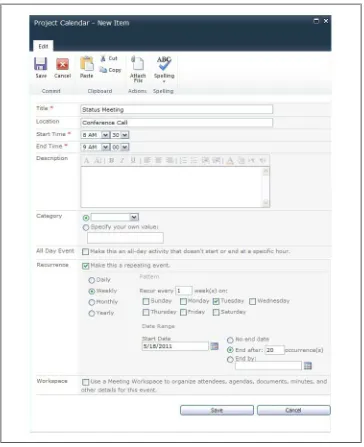
6. The New Item page will be displayed (see Figure 3-14). In the Recurrence section, enable the option to make this a repeating event.
7. Enter the following information: Title: Status Meeting
Location: Conference Call
Start Time: 8:30 A.M. End Time: 9:00 A.M.
Description: Weekly project status meeting
8. In the Recurrence section, select the Weekly option, and enter the following information:
Weekly
Recur 1 week(s) on: Tuesday (de-select the day of the week that is selected by default if it is a day other than Tuesday; the default is the same day of the week that you are performing the exercise)
Start Date: <Today’s date>
End after: 20 occurrence(s)
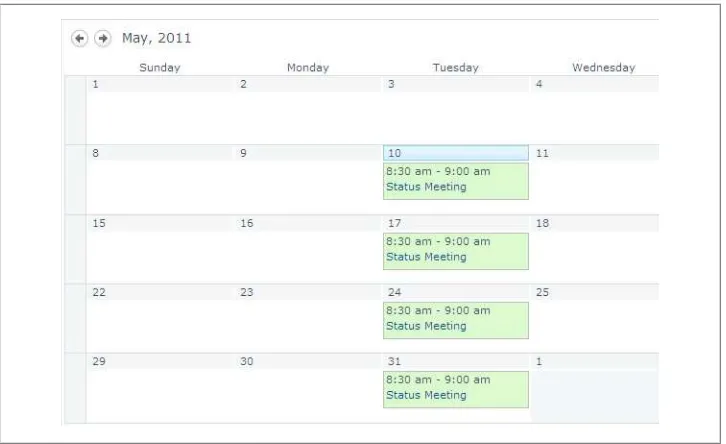
9. Click Save.
Figure 3-15. Status meetings in the Project Calendar
Part 2: Creating and Populating a Contacts List
Use the following steps to create a list of contacts and add contact information: 1. Click Site Actions→More Options.
2. In the Communications category, click Contacts and click More Options. 3. The New page will be displayed. Enter the following information:
Name: Project Contacts
Description: A listing of project contacts
4. Click Create.
You have just created a contacts list. You will now populate it:
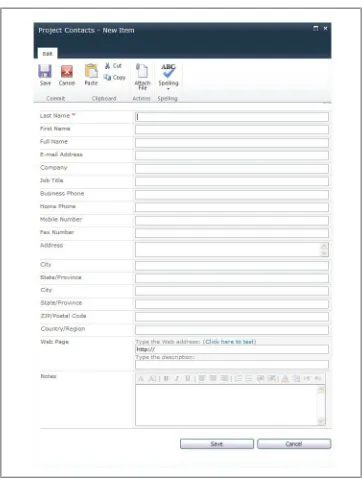
5. On the List Tools ribbon, click Items→New Item. A page similar to the one shown in Figure 3-16 will be displayed.
6. Enter your own contact information in the available fields. 7. Click Save.
As you can see, Last Name is the only required field. However, it is recommended that you add all pertinent information to maximize the usefulness of the Project Contacts list.
You can view the new contact information on the Project Contacts page (Figure 3-17).
Figure 3-17. Contacts added to the Project Contacts list
Part 3: Creating a Risks List
SharePoint comes with an issue-tracking list, and this is what you will use to create a risks list. I’m calling it a risks list because, as part of the project management process that I follow, risk assessment is a fundamental component of the project. An important aspect of this process is documenting any risks that have been identified.
Use the following steps to create a risks list: 1. Click Site Actions→More Options.
2. In the Tracking category, click Issue Tracking and click More Options. 3. A new page will be displayed. Enter the following information:
Name: Project Risks
Description: Identify and track project risks
Display this list on the Quick Launch? Yes (Yes is the default; see “Customizing the PMIS” on page 22 for more about the Quick Launch)
Part 4: Creating a Project Tasks List
Use the following steps to create a Project Tasks list: 1. Click Site Actions→More Options.
2. In the Tracking category, click Project Tasks and click More Options. 3. A new page will be displayed. Enter the following information:
Name: Project Tasks
Description: Identify and track project tasks
Display this list on the Quick Launch? Yes
To have the tasks list send automated email messages, make sure your IT/IS department has enabled this capability on the Share-Point server. The default is to not send emails.
4. Click Create. The Project Tasks page will be displayed (Figure 3-18).
Figure 3-18. Project Tasks list
Part 5: Creating and Populating a Custom Resource List
Use the following steps to create and add information to a custom resource list: 1. Click Site Actions→More Options.
2. In the Blank & Custom category, click Custom List and click More Options. 3. A new page will be displayed. Enter the following information:
Name: Project Resources
Description: List of project resources