Beginning JSP 2: From Novice to
Professional
by Peter den Haan, Lance
Lavandowska, Sathya Narayana
Panduranga and Krishnaraj
Perrumal
ISBN:1590593391
Apress
© 2004 (480 pages)Let this be your guide as you begin using JSP.
It reviews HTML and provides an overview of
JSP, then demonstrates how to pull data from a
database and begin using it, giving you the
skills to enter the Java Development and Web
Development industries.
Table of Contents
Beginning JSP 2—From Novice to Professional
Introduction
Chapter 1
- Creating Your First JSP Page
Chapter 2
- Learning How HTML Works
Chapter 3
- Introducing JSP
Chapter 4
- Working with Data
Chapter 5
- Making Decisions, Decisions
Chapter 6
- Reusing Code
Chapter 7
- Performing Time Management
Chapter 8
- Using JSP and XML Together
Chapter 9
- Going Behind the Scenes
Appendix A
- JSP Syntax Reference
Appendix B
- JSP Implicit Objects
Appendix C
- XML Configuration Files
Appendix D
- Getting More Information
Index
List of Figures
List of Tables
Back Cover
Let
Beginning JSP 2
be your guide as you begin using
JSP. This comprehensive guide starts by steering you
through your first JSP application. It reviews HTML,
and provides you with a useful overview of JSP. You’ll
then be ready to start learning one of the core
techniques in JSP: pulling data from a database and
working with that data.
When you’ve mastered this technique, you’ll be ready
to branch out powerfully into other JSP topics:
variables, scope, flow control, and code reuse for
productive time management. Finally, the book shows
you how you can use JSP with XML and gives you a
taste of some advanced topics, including using Struts
and the Model View Controller.
This book’s step-by-step examples explain the
techniques behind the code. The authors include
realistic scenarios wherever possible to build your
knowledge and confidence in JSP. After reading this
book, you’ll have the knowledge and skills to enter the
web development and Java development industries. All
you need to begin this journey is a basic understanding
of HTML and Java.
About the Authors
Peter den Haan is a senior systems engineer at
Objectivity Ltd., a UK-based systems integration
and lead developer for Internet and intranet projects
for clients ranging from the UK Football Association
Premier League to Shell Finance.
Lance Lavandowska has been working with JavaServer
Pages since 1998. He has contributed to several
Apache Jakarta projects, the Castor project, and the
Roller weblogger project. Lance has also served as a
technical reviewer on several JSP books and is a
coauthor of
Professional JSP Site Design
.
Sathya Narayana Panduranga is a software design
engineer living in the software capital of India,
Bangalore. He has expertise in Microsoft and Java
technologies, and has worked in the domains of the
Internet, telecom, and convergence. His favorite areas
of interest are distributed and component-based
application architectures, and object-oriented analysis
and design. Contributing to a range of technical articles
and books is a hobby that gives him the immense
satisfaction of being able to share his knowledge.
Krishnaraj Perrumal is founder and director of Adarsh
Softech. He has successfully developed and managed a
number of software projects and e-projects, and his
programming experience spans 15 years. He regularly
gives presentations on Java technology, XML,
information systems security, and audit. He is a Sun
Certified Java Programmer, a Certified Novell Netware
Engineer, and a Certified Information Systems Auditor.
Currently, he spends most of his time providing
Beginning JSP 2—From Novice to Professional
PETER DEN HAAN,
LANCE LAVANDOWSKA,
SATHYA NARAYANA PANDURANGA, AND KRISHNARAJ PERRUMAL
EDITED BY MATTHEW MOODIE
Copyright © 2004 by Peter den Haan, Lance Lavandowska, Sathya Narayana Panduranga, and Krishnaraj Perrumal
All rights reserved. No part of this work may be reproduced or transmitted in any form or by any means, electronic or mechanical, including
photocopying, recording, or by any information storage or retrieval system, without the prior written permission of the copyright owner and the publisher.
ISBN (pbk): 1-59059-339-1
Printed and bound in the United States of America 10987654321 Trademarked names may appear in this book. Rather than use a
trademark symbol with every occurrence of a trademarked name, we use the names only in an editorial fashion and to the benefit of the trademark owner, with no intention of infringement of the trademark.
Lead Editor: Matthew Moodie
Technical Reviewers: Scott Davis and Matthew Moodie
Editorial Board: Steve Anglin, Dan Appleman, Gary Cornell, James Cox, Tony Davis, John Franklin, Chris Mills, Steve Rycroft, Dominic Shakeshaft, Julian Skinner, Jim Sumser, Karen Watterson, Gavin Wray, John Zukowski
Copy Editor: Kim Wimpsett
Production Manager: Kari Brooks Production Editor: Laura Cheu
Compositor: Kinetic Publishing Services, LLC Proofreader: Liz Welch
Indexer: Michael Brinkman
Artist: Kinetic Publishing Services, LLC Cover Designer: Kurt Krames
Manufacturing Manager: Tom Debolski
Distributed to the book trade in the United States by Springer-Verlag New York, Inc., 175 Fifth Avenue, New York, NY 10010 and outside the United States by Springer-Verlag GmbH & Co. KG, Tiergartenstr. 17, 69112 Heidelberg, Germany.
In the United States: phone 1-800-SPRINGER, e-mail
<[email protected]>, or visit
http://www.springer-ny.com. Outside the United States: fax +49 6221 345229, e-mail
[email protected], or visit http://www.springer.de.
For information on translations, please contact Apress directly at 2560 Ninth Street, Suite 219, Berkeley, CA 94710. Phone 510-549-5930, fax 510-549-5939, e-mail <[email protected]>, or visit
http://www.apress.com.
http://www.apress.com in the Downloads section. About the Authors
Peter den Haan
Peter den Haan is a senior systems engineer at Objectivity Ltd., a UK-based systems integration company. He started out programming at 13 on a RadioShack TRS-80 model I with 16KB of memory, but he has progressed since to become a J2EE systems architect and lead
developer for Internet and intranet projects for customers ranging from the UK Football Association Premier League to Shell Finance.
Peter has previously written the security and cryptography chapters for Beginning Java Networking. He's a Sun Certified Java 2 developer, a JavaRanch bartender, a self-confessed geek; he has a doctorate degree in theoretical physics and plays bass in the local worship band. You can reach him at [email protected].
Lance Lavandowska
Lance Lavandowska has been working with JSP since 1998. He has contributed to several Apache Jakarta projects, the Castor project, and the Roller Weblogger project. Lance has also served as a technical
reviewer on several JSP books and was a coauthor on Professional JSP Site Design.
Sathya Narayana Panduranga
Krishnaraj Perrumal is founder and director of Adarsh Softech. He has successfully developed and managed a number of software projects and e-projects, and his programming experience spans the past 15 years. He regularly gives presentations on Java technology, XML, information
systems security, and audits.
He's a Sun Certified Java Programmer, a Certified Novell NetWare Engineer, and a Certified Information Systems Auditor. Currently he
spends most of his time providing consultancy and solutions for computer security, in addition to Web development. He loves to spend all his free time with children, but being tech savvy, information technology
constitutes both his profession and his hobby. You can contact Krishnaraj at <[email protected].>
About the Editor Matthew Moodie
Matthew Moodie enjoys a life of fun in Glasgow, Scotland. He's a keen novice gardener with a houseful of plants. He'd like to thank Laura for her love and friendship.
About the Technical Reviewer
Scott Davis is a senior software engineer and instructor in the Denver, Colorado, area. He has worked on a variety of Java platforms, from J2EE to J2SE to J2ME (sometimes all on the same project). He's a frequent presenter at national conferences and local user groups. Most recently, he was the president of the Denver Java Users Group
Introduction
Welcome to Beginning JSP 2: From Novice to Professional. This book is for novices and teaches JavaServer Pages (JSP) 2 using basic
principles. You don't need to know any Java to use this book because JSP 2 is a significant development of the JSP technology that has greatly reduced JSP's reliance on Java knowledge. However, to get the most out of supporting technologies and maximize your JSP applications, you need to know some basic Java techniques. We'll teach you these techniques and show you when and where to use the Java language. The JSP 2 specification is the biggest revision of JSP since its creation. It's now easier for nonprogrammers to build powerful, dynamic Web applications. The authors of this book realize that JSP 2 is a
tremendously powerful tool but that it's also a daunting prospect for many nonprogrammers. In response to this, the authors have written an easily accessible guide for those who are beginning their career in Web
programming. This book introduces all the important concepts without fuss or overcomplication and always keeps the readers' best interests at heart.
Chapter 1 takes you through the Java and JSP installation processes so you're ready for the rest of the book. Chapter 2 is a Hypertext Markup Language (HTML) recap, which will act as a useful reference for those who already know a little HTML. After running through the basics, the book moves through simple JSP pages in Chapter 3 to working with data in Chapter 4, probably the most common and important task you'll have to undertake when using JSP. After all, what's the point of using dynamic Web pages if you have no dynamic data on which to work?
Chapters 5 and 6 introduce your first Java and show you how to use simple Java utility code to enhance your JSP pages. The emphasis is always on JSP and how Java fits into the new JSP 2 framework.
Chapters 7 and 8 introduce more advanced JSP techniques and use the newly incorporated JSP Tag Library (JSTL) tags to work with dates,
times, and formatting. Chapter 8 introduces Extensible Markup Language (XML), the ubiquitous data description specification, and JSP's tools for dealing with it. XML is such an important part of modern Web applications that it's essential in any beginner's handbook. You'll soon find that XML is an inescapable part of today's Web.
Chapters 9 and 10 cover topics that will ensure your applications are well designed and flexible. Specifically, Chapter 9 covers servlets and filters, both of which are Java classes that run alongside JSP pages and add robust functionality to any Web application. Chapter 10 introduces the Model-View-Controller design concept and the Struts framework, which implements it for JSP pages. By using Struts you instantly add good design and flexibility without any of the hard work usually associated with scalable Web applications.
By the time you've finished the book, you'll have an example Web application for taking data, validating it, storing it in a database, and reporting back to the user. However, the real benefit will be in the design under the covers. Your application will use good practice throughout and can form the basis for many similar applications in the future.
I hope you enjoy reading this work and that you have every success in the future.
Overview
Welcome! In recent years, Java has risen to become one of the dominant development platforms for the Web, and knowledge of Java and often JavaServer Pages (JSP) is required for a wide variety of situations throughout the industry. You probably already knew that, and that's why you're reading this book right now.
In this book, we set out to make it easy for anyone of only modest computing skills to learn enough about Java and JSP to create Web applications using the latest technologies in this arena, such as JSP 2.0 and Tomcat 5.0 (you'll learn what these are in just a few paragraphs). The goal of this first chapter is to install all the tools on your machine that you'll need to develop JSP Web applications. We'll walk through the
process of writing a simple Web application and discuss some
fundamental principles of the Web itself, covering the role that Java and related technologies have to play.
Installing the Software
Fortunately, all the software you'll use throughout this book is available without charge. In this chapter, you'll install the essentials for creating Java Web applications:
Java 2 Standard Edition Software Development Kit (J2SE SDK): Software developers use three different versions of Java: Java 2 Micro Edition (J2ME), Java 2 Standard Edition (J2SE), and Java 2 Enterprise Edition (J2EE). J2ME is used for
developing applications for small devices such as phones or personal digital assistants (PDAs). It's a stripped-down version that's highly optimized for these devices' limited capabilities. J2SE is the standard version of Java for developing everything else from games to business applications. J2EE is built on top of J2SE, adding a plethora of features geared toward applications for large businesses (so-called enterprises). All the extras
included with J2EE can be downloaded separately and used with J2SE.
Apache Jakarta Tomcat: Tomcat is what's known as a servlet container. In the Java world, a servlet container is responsible for receiving Web requests and passing them to Java Web
applications. We'll discuss servlet containers and Tomcat in greater detail later in the "Java and the Web" section.
We'll provide instructions for installing these applications on Windows 2000/XP and Red Hat Linux. If you're using a different version of Windows or a different distribution of Linux and you can't figure out what's going on from the instructions given, don't panic; both of these applications come with their own installation instructions. In a pinch, you can simply refer to them.
Downloading Java Standard Edition
resource locator (URL):
http://java.sun.com/j2se/1.4.2/download.html
This URL takes you to a page offering the various flavors available
depending on the platform you use. You also have a choice between the Java Runtime Environment (JRE) and the SDK. The JRE is for folks who want to run Java applications but aren't developing Java software, so you'll want the SDK.
If you're on Linux, download the RPM in the self-extracting file.
Note Be sure to download the J2SE SDK, not the JRE.
Because Web sites are subject to change, and books sadly don't change after they've been printed, these links may no longer work. In that event, visit http://java.sun.com and download the latest version of Java for your operating system that you can find. Sun does a pretty good job of providing help and instructions to get you this far.
Installing Java on Windows
The file you've downloaded is a self-extracting EXE file, so double-click it once it has been downloaded. You then need to enter the name of the folder where Java is to be installed. Choose something such as
C:\java\jdk1.4, but if you install to somewhere else, be sure to note the location for future use. Now finish the installation, leaving any options at their default values.
Note If possible, you should avoid using directory names that contain spaces (for example, C:\Program Files). This can cause subtle, difficult-to-troubleshoot errors in the future.
Installing Java on Red Hat Linux
The Red Hat Package Manager (RPM) file you downloaded is wrapped in a self-extracting binary format that you'll need to execute before
and type the following:
chmod a+x j2sdk-1_4_2_02-linux-i586-rpm.bin ./j2sdk-1_4_2_02-linux-i586-rpm.bin
You'll then see a long license. Read it carefully (wink), and then agree to it, at which point an RPM file will be extracted into the same directory. Before you can install it, you must become the root user by typing the following:
su
Once you've entered the root password at the prompt, you can then install Java by typing this:
rpm -U j2sdk-1_4_2_02-linux-i586-rpm
Of course, if you've downloaded a different version of Java, you'll need to use that filename in place of the one shown here.
The RPM will install Java to the following path:
/usr/java/j2sdk1.4.2_02.
Downloading Tomcat
This book has been written for the latest incarnation of the Apache
Foundation'sTomcat Web server, which is version 5.0. However, Tomcat 5.0 wasn't quite ready for release at the time of this writing, so we can't provide a definitive URL for down-loading it. A good place to start is at the following URL:
http://jakarta.apache.org/site/binindex.cgi
This URL should open a page with (among other things) assorted links under the headings of Release Builds, Milestone Builds, and Nightly Builds. Look for anything starting with Tomcat 5 in the Release Builds section, and click it. In the event that there's no release build of Tomcat 5, download the latest Tomcat 5 release under the Milestone Builds heading or try the following URL:
The Tomcat 5 link takes you to a screen that begins with a file listing. Click the folder marked bin, and from the list of files that then appear, Windows users should select the latest version of Tomcat 5 that ends with .exe, and Linux users should download the latest version ending with .tar.gz.
Note Don't download any files that have LE in the filename because this indicates the Light Edition of Tomcat. Although the Light Edition avoids downloading duplicate copies of libraries that are now included in the 1.4 version of J2SE, it also excludes two libraries, JavaMail and the Java Activation Framework, that you'll use later in this book.
Installing Tomcat on Windows
Just as with Java, all you need to do to install Tomcat is double-click the file you've downloaded. You'll need to select a directory for the
installation, such as C:\java\ tomcat50. As with Java, you'll need to remember this location for later use. Don't click the NT Service checkbox if you see it. This option means that Windows will start Tomcat
automatically every time the system boots up and stop it when Windows shuts down. This is really only useful when Web applications are finished, rather than when applications are being created, as in this book.
Installing Tomcat on Linux
To install Tomcat, you'll need to create a suitable directory with the
mkdir command and extract Tomcat into that directory with the following command (assuming you're in the same directory where you downloaded Tomcat):
tar -xzf jakarta-tomcat-5.0.16.tar.gz -C /usr/local/java/tomcat50
Of course, change the names of the file and directory as appropriate.
The final step of the installation is to set some environment variables that applications can use to find components required for proper operation. Tomcat needs you to set two environment variables, and you'll also modify the PATH variable so that the Java and Tomcat files are accessible from any other folder.
Windows 2000/XP
To configure Windows 2000/XP, follow these steps:
1. Open the System item in Control Panel, and select the Advanced tab.
2. Click the Environment Variables button to open the Environment Variables dialog box. You should see a window like the one shown in Figure 1-1.
Figure 1-1: The Environment Variables dialog box
3. Click the New button in the lower System Variables section. When the New System Variable dialog box appears, enter a name of JAVA_HOME and enter the full path to your JDK (such as C:\java\jdk1.4) for the value.
CATALINA_HOME, the value of which specifies the location of your Tomcat installation (such as C:\java\tomcat50).
5. Create one last variable by following the same process. Call it CLASSPATH, and give it a value of
%CATALINA_HOME%\common\lib\servlet.jar;.
Note If you already have an environment variable called CLASSPATH, place the previous value at the end of the existing value, with a semicolon (;) at the end of the old value and before the value given in step 5. 6. Locate the variable named Path in the System Variables list,
and double-click it or click the Edit button to open the Edit System Variable dialog box.
Chances are, a few different paths are already given for this variable, each path separated by a semicolon. Select the value box, and press the End key on your keyboard. Type the
following, including the semicolon at the beginning:
;%JAVA_HOME%\bin;%CATALINA_HOME%\bin
7. Once you're done, click OK to close the Edit System Variable window, and click OK a couple more times to close the
Environment Variables and System Properties dialog boxes.
Red Hat Linux
Red Hat Linux's default shell is the popular Bourne Again Shell (or bash). If this is your shell, you'll need to edit your account's startup script. To do this, log in under your own account (usually not root), and add the following lines to the ~/.bashrc file using your editor of choice:
export JAVA_HOME=/usr/java/j2sdk1.4.1_01
export CATALINA_HOME=/usr/local/java/tomcat50
export PATH=$PATH:$JAVA_HOME/bin:$CATALINA_HOME/bin
export CLASSPATH=$CLASSPATH:$CATALINA_HOME\common\lib\servlet.jar:.
~/.tcshrc by adding the following lines:
setenv JAVA_HOME /usr/java/j2sdk1.4.1_01
setenv CATALINA_HOME /usr/local/java/tomcat50
setenv PATH ${PATH}:${JAVA_HOME}/bin:${CATALINA_HOME}/bin
setenv CLASSPATH ${CLASSPATH}:${CATALINA_HOME}\common\lib\servlet.jar:.
Again, if you've chosen different directories for the previous installation, change them as necessary; if you're not sure which shell you're using, type echo $SHELL to find out.
You're all done with installing—time to try out Tomcat!
Trying It Out: Testing Tomcat
To test that Tomcat is working, follow these steps:
1. On Windows, the installer created a group in your Start menu, probably called Apache Tomcat 5.0. To run Tomcat, select the Start Tomcat item in this menu. Alternately, if you prefer the Windows command line, you can execute the following command:
> %CATALINA_HOME%\bin\startup
However, because you've added %CATALINA_HOME%\bin to the path, you can just type startup, and it'll work.
On Linux, you can start Tomcat by executing the following script:
/usr/local/java/tomcat50/startup.sh
Because you've added Tomcat to the PATH variable, you can simply type startup.sh.
Figure 1-2: Tomcat's default welcome page
3. Scroll to the Examples box on the left side, click the JSP
Examples link, and try out a couple of the sample programs to verify that everything is working properly. If you can't get the examples to work, double-check that you've correctly followed the previous instructions.
4. At some point, you'll want to shut Tomcat down. On Windows, you can do this by clicking the Stop Tomcat item in the Start menu. The command-line version of this is
%CATALINA_HOME%\bin\shutdown, or just shutdown. Normally, you should avoid simply closing the Tomcat window because that may result in losing data.
On Linux, execute the script shutdown.sh. How It Works: When Things Go Wrong
If Tomcat didn't start like it was supposed to, try the following suggestions to figure out where things went wrong:
1. On Windows, open a command prompt (look for Command Prompt in the Start menu or type cmd or command in the Run option given on the Start menu). Type the command cd
%CATALINA_HOME%. On Linux, type cd
that environment variable in the previous "Configuring Your Environment" section.
2. Repeat the same process using %JAVA_HOME% or
$JAVA_HOME. If you're not in the correct location, make sure you set up this variable correctly in the "Configuring Your
Environment" section.
3. From the Windows command line, type java and press Enter. If you see a message starting with "'java' is not recognized as," try typing %JAVA_HOME%\bin\java and pressing Enter. If that still produces the same error message, it indicates that Java wasn't properly installed for some reason.
Verify that you properly followed the instructions for installing Java, and check the http://java.sun.com Web site for help. If the first command failed but the second one succeeded, repeat the instructions for setting the PATH variable in the
"Configuring Your Environment" section.
The same applies to Linux users, but you'll need to use
$JAVA_HOME in place of %JAVA_HOME% in the previous
instructions. Also note that Windows uses a backslash (\) for its paths whereas Linux uses a forward slash (/).
Creating Your First Web Application
Okay, you've got Java, you've got Tomcat: Now you're ready to write a little Web application. This example will be your first look at JSP
technology, which mixes Java code with standard Hypertext Markup
Language (HTML), and what could be better for your first application than a version of the timeless "Hello World" program? Far be it from us to break from long-standing tradition. To add a dynamic touch, you'll make it perform some hard-core number crunching.
Trying It Out: Building a Simple Web Application
To build a simple Web application, follow these steps:
1. You'll start by creating a new Web application called helloJSP. To do this, create a new folder with that name in the webapps
subdirectory off the Tomcat installation folder. This will create the directory structure shown in Figure 1-3.
Figure 1-3: Tomcat's directory structure
Inside the helloJSP folder you just created, create a folder called WEB-INF (on Linux, this directory name must be ALL CAPS). As you'll see in later chapters, this folder is the location for essential files for the Web application.
You can now place all sorts of resources in the helloJSP Web application folder that form part of the Web application itself. This might include HTML files and JSP pages, which can be placed directly inside the helloJSP folder, and you could view them by navigating in your Web browser to a URL such as
http://localhost:8080/helloJSP/filename.html. 3. You're going to create a JSP page, which can include Java
code that's run by the Web server (in other words, by Tomcat) to alter what's sent to the browser. It's important to be clear that the code is running on the server—although, as you run
examples in this book, you'll probably have the browser running on the same machine as the Web server, that's not the case for applications that have been deployed.
Create a new text file in your helloJSP folder, and call it
index.jsp. When writing code files, be they JSP or Java, you'll need to use a text editor such as Notepad or emacs rather than a word processor such as Microsoft Word that would insert special formatting characters that would render your code
useless.
4. Open the new index.jsp file, and add the following code:
<html> <head>
<title>My First JSP</title> </head>
<body>
Hello, world! <p/>
</html>
Save the file, and you're done.
5. Now, you'll check to see how your JSP page appears in a Web browser. Start Tomcat (if it's still running from earlier, you'll need to shut it down and restart it so it'll recognize your new
helloJSP Web application), and then navigate to
http://localhost:8080/helloJSP/index.jsp in your browser. You should see a screen that looks something like the one in Figure 1-4.
Figure 1-4: A first JSP
Congratulations! You've created your first JSP page, and you're on your way to a larger world of Java fun. If all this still seems a bit hazy at the moment, don't worry because things will become clearer as you progress through the book.
If it didn't work for you, make sure that Tomcat is running and that you have capitalized the URL just as the index.jsp file and helloJSP
folder are capitalized on your hard disk. How It Works
If you've done any work with HTML, the JSP you wrote should look
familiar to you. In fact, the only JSP-centric code you wrote was this line:
2 + 2 is ${2 + 2} and 4 * 4 is ${4 * 4}
JSP uses the ${ ... } special notation to distinguish itself from normal HTML. The servlet container (that is, Tomcat) will then attempt to
evaluate the expression within those tags.
mathematical expressions: 2 + 2 and 4 * 4. Of course, you'll soon learn how to do much more than simple arithmetic.
While you're here, select View Ø Source in your browser to see exactly what HTML the browser received. Notice that it's entirely HTML: The JSP code elements have been replaced with the result of the contained
expressions, and the Java code was run on the server and never made it as far as the browser:
<html>
<head>
<title>My First JSP</title> </head>
<body>
Hello, world! <p/>
2 + 2 is 4 and 4 * 4 is 16 </body>
</html>
The URL you used to request the page,
http://localhost:8080/helloJSP/ index.jsp, comprises five distinct parts:
http: This indicates that your request and response are carried over the Hypertext Transfer Protocol (HTTP), which is the
standard mode of communication between browsers and servers on the World Wide Web.
localhost: This is the name of the Web server. localhost is a reserved name to indicate the local machine—that is, the
machine on which the browser is running. Normally, a Web browser will access a server somewhere else in the world, in which case this part would be replaced with the domain where you're making the application available, such as
www.myJSP.com. During development and testing, however, pages are often accessed from a browser running on the same machine as the Web server, in which case the localhost
Technically, localhost is an alias for the IP address 127.0.0.1, sometimes called the loopback address, which indicates the local machine.
8080: This is the port number on which the Web server is listening. A computer can have various server programs each waiting for clients (such as Web browsers) to connect to them. To avoid clashing, each server program must have a unique port number. Normally Web servers use port 80, so Tomcat uses port 8080 by default to coexist with any other Web server that may be running on the same machine.
helloJSP: This is the name of the Web application you created, and it tells Tomcat which subfolder of webapps contains the resources for this application.
index.jsp: This is the name of the actual document you
requested. The .jsp extension tells Tomcat to treat the file as a JSP file and execute any Java code it contains. Files that have the .html extension are left untouched and sent directly to the browser.
Exploring a Brief History of Java and the Web
For the curious, the following sections summarize the history of the Web and the role that Java plays in it. Feel free to skip to the next chapter if you'd rather just get down to business.
The Web
Back in the 1960s, as computers began their prolific distribution, the U.S. military constructed a computer network called ARPANET, which was designed to ink key computers across the nation. The network was based on a peer-to-peer model; that is, instead of a single machine acting as the server, all computers on the network passed along messages. The idea was that this made the network resistant to disruption caused by a nuclear attack on the United States knocking out key computers.
Fortunately, this resistance to nuclear attack was never tested, but the network's well-designed and robust architecture ensured its survival. As well as the military, the academic community was connected to it, and soon the network became primarily used for scientific research and collaboration. It was renamed the Internet because it linked up many local-area and wide-area networks.
In the early days of the Internet, few people outside the scientific
disciplines were even aware that it existed, and fewer still had access to it. Ease of use wasn't a priority, and the first generation of Internet users worked with command-line utilities such as Telnet, File Transfer Protocol (FTP), and Gopher to get anything useful done.
application used by many.
The Web began to gain momentum and by 1993 comprised around 50 Web servers. At this time an event occurred that would light the fuse of the Internet skyrocket: the National Center for Supercomputing
Applications (NCSA) at the University of Illinois released the first version of the Mosaic Web browser for Unix, PC, and Macintosh systems. Prior to Mosaic, the only fully featured browser available was on the NeXT platform.
With the Mosaic foundation in place, 1994 saw the emergence of the Web into popular culture, and members of the general public began to explore the Internet for themselves. In the same year, a small Silicon Valley company, which would eventually become Netscape, was founded by some of the same folks who had created Mosaic. The so-called New Economy consisting of e-land grabs and irrationally overvalued
companies was just around the corner. And the rest is, well, history.
Note For more information about the history of the Internet, see
http://www.isoc.org/internet/history/. For more information about the history of the Web, see http://www.w3.org/History.html.
How the Web Works
There can be confusion as to what exactly the Internet is and how it's different from the Web. The Internet is the physical computer network that links computers around the world. The Web, on the other hand, is a
service that sits on the foundation of the Internet. The Web allows computers to communicate with each other. The Web is one of many different services that utilize the Internet; others include e-mail, streaming video, and multiplayer games.
As a service, the Web defines how two parties—a Web client (generally a Web browser) and a Web server—use the Internet to communicate.
Web page you've asked for, and the Web server responds with an appropriate message containing the HTML for the page if it's available. For each additional page that's viewed, the Web browser sends
additional requests to the Web server, which likewise responds with the appropriate messages.
This type of relationship is called a request-response model. The requests and responses travel over the Web using HTTP. Just as a diplomatic protocol dictates how two governmental parties should conduct discussions, HTTP defines what messages should be
exchanged when two computers communicate remotely. The request the client sends to the server is the HTTP request, and the response sent by the server back to the client is the HTTP response.
The Responsive Web
The Web today doesn't consist solely of static pages that return an
identical document to every user, and many pages contain content that's generated independently for each viewer. Although static files still have their place, the most useful and appealing pages are dynamically created in response to the users' preferences.
The Common Gateway Interface (CGI) provided the original mechanism by which Web users could actually execute programs on Web servers, not just request HTML pages. Under the CGI model, the following happens:
1. The Web browser sends a request just as it would for an HTML page.
2. The Web server recognizes that the requested resource corresponds to an external program.
3. The Web server executes the external program, passing it the HTTP request that it received from the browser.
5. The Web server passes the program's output back to the browser as an HTTP response.
CGI was enormously popular in the early days of the Web as a means of generating Web pages on the fly. Almost every programming language imaginable has been used to implement some kind of CGI-based
solution, but Perl is perhaps the most popular language for CGI development.
However, as the Web grew in popularity and the traffic demands placed on Web sites increased, CGI wasn't efficient enough to keep up. This is because, with CGI, each time a request is received, the Web server must start running a new copy of the external program.
If only a handful of users request a CGI program simultaneously, this doesn't present too much of a problem, but it's a different story if
hundreds or thousands of users request the resource at the same time. Each copy of the program requires its own share of processing time and memory, and the server's resources are rapidly used up. The situation is even bleaker when CGI programs are written in interpreted languages such as Perl, which result in the launch of large run-time interpreters with each request.
Alternatives to CGI
Over the years, many alternative solutions to CGI have surfaced. The more successful of these provide an environment that exists inside an existing Web server or even functions as a Web server on its own.
Many such CGI replacements have been built on top of the popular open-source Apache Web server (http://www.apache.org). This is
Although few developers actually create modules themselves (because they're relatively difficult to develop), many third-party modules exist that provide a basis for developers to create applications that are much more efficient than normal CGI. These are a few examples:
mod_perl: This maintains the Perl interpreter in memory, thus freeing Perl scripts from the overhead of loading a new copy of the Perl interpreter for each request. This module is very popular. mod_php4: This module speeds up code in the popular PHP language in the same way that mod_perl speeds up Perl.
mod_fastcgi: This is similar to plain-vanilla CGI, but it enables programs to stay resident in memory rather than terminating when each request is completed.
Note Although the Apache name originally referred only to the Apache Web server, a legion of open-source programs have been developed under the auspices of the Apache Project, including the Tomcat server, which you're using in this book. One CGI replacement technology you may well have already heard of is Microsoft's Active Server Pages (ASP). Initially, Microsoft attempted to create an interface to its Internet Information Services (IIS) Web server, called Internet Server Application Programming Interface (ISAPI). This didn't spawn the large following that Apache's equivalent API did, but it's nevertheless a high-performance API that many businesses use,
including eBay (you can visit http://www.netcraft.com to see
which Web server any site on the Internet is using). However, because of its complexity, ISAPI is rarely suited to the beginning developer.
Microsoft's IIS Web server itself, however, is widely used, largely
because it comes free with many versions of Windows. Incidentally, you can configure IIS to work with Tomcat.
Microsoft followed up ISAPI with its ASP technology, which lets you embed programming code, typically VBScript, into standard HTML
shortly.
Java and the Web
At last we come to Java. Java was initially released in the mid-1990s as a way to liven up dull, static Web pages. It was platform-independent (the same Java code can run on computers running a variety of different operating systems rather than being tied to just one), and it allowed
developers to have their programs execute in the Web browser. Many an industry sage prognosticated that these Java applets (applet being a "mini-application" that executes within another application—the browser) would catch on, making the Web more exciting and interactive and
changing the way people bought computers, reducing all the various operating systems into mere platforms for Web browsers (see Figure 1-5).
Figure 1-5: A Java applet in action
Note Figure 1-5 shows one of many applets available at
http://java.sun.com/applets/. If you enter the URL shown in
Figure 1-5, don't forget to capitalize it as it appears.
However, Java applets never really caught on to the degree people predicted, and other technologies such as Macromedia Flash became more popular ways of creating interactive Web sites. However, Java isn't just good for applets: You can also use it for creating stand-alone
platform-independent applications. Although these too could threaten the monopolies of entrenched incompatible operating systems, Java
applications with windows, icons, buttons, and so on—has until recently been quite poor and slow. This situation is changing; in fact, today's versions of Java enable developers to create cutting-edge GUI applications.
But like a prizefighter who won't stay down, those innovative Java architects kept on fighting, releasing Java servlets into the arena. Servlets ("mini-servers") are another alternative technology to CGI. Servlets aren't stand-alone applications, and they must be loaded into memory by a servlet container. The servlet container then functions as a Web server, receiving HTTP requests from Web browsers and passing them to servlets that generate the response, typically an HTML
document. Alternatively, the servlet container can integrate with an existing Web server; for example, a popular Apache module, called a connector and found on the Tomcat Web site, integrates Apache with the Tomcat servlet container.
The simplicity of the Java programming language, its
platform-independent nature, Sun's open-source and community-driven attitude toward Java, and the elegance of the servlet model itself have all made servlets an immensely popular solution for providing dynamic Web content.
JSP
To make creating dynamic Web content even easier, Sun introduced JSP. Although writing servlets can require extensive knowledge of Java, a Java newbie can learn some pretty neat tricks in JSP in a snap. JSP represents a viable and attractive alternative to Microsoft's ASP.
Note JSP technology is actually built on top of servlets. As you'll see later in the book, the two technologies actually work well
together, and it's common to use both in the same Web application.
More About Servlet Containers
operate: a servlet container. Tomcat, which you installed earlier, is known as a reference implementation of a JSP servlet container, but this isn't to say it's not worthy of use in production systems. Indeed, many
commercial installations use Tomcat, but many other servlet containers are available. These include Caucho Resin
(http://www.caucho.com), which is very popular and somewhat faster than Tomcat but is a commercial product that must be purchased. Jetty (http://jetty.mortbay.org) is perhaps the most popular open-source competitor, and there are many alternatives.
The Java Community
In fact, the multiplicity of servlet containers is another example of the biggest strength of the Java family of technology: choice. All the Java technologies are controlled by a community of developers and
corporations who together form the Java Community Process (JCP). The JCP system enables anyone to contribute to the future of Java by
participating in expert committees that shape new features of the language or simply by issuing feedback to Java's architects.
Through the JCP and the documents it publishes into the public domain, anybody can develop Java extensions and features as defined by the JCP. The JCP's main purpose is to prevent the Java language from degenerating into a chaos of incompatible, duplicated, and redundant functionality by setting standards. However, because of the freedom to create Java technology based on these standards, Java developers have a great deal of choice of development tools offered by a variety of
competing vendors.
This philosophy is often referred to as "agree on standards, compete on implementation." It's in direct contradiction to Microsoft's philosophy embodied in such technologies as its .NET platform. Microsoft controls the standards used in .NET, and it creates most of the development tools associated with .NET. Considering the benefits and pitfalls of each model —Java's community-driven approach versus Microsoft's benevolent
Web Applications
To create a Web application of any significant utility, a developer usually creates many different JSP pages and/or servlets. Additionally, the
developer may have a number of images and HTML pages they want to associate with the JSP pages and servlets, and there may be code libraries and other files that form part of the same application.
Keeping track of all of these files can be a bit difficult, and configuring a servlet container to know where to find them all can seem quite a
nightmare. Hang on— actually, it's really rather easy. It turns out that there's a standard directory layout for Web applications. Furthermore, a standard configuration file for Web applications tells servlet containers how the Web application works. Both of these are regulated by the JCP as described previously.
By following this standard layout, Java developers don't have to worry about how to configure different servlet containers; it all happens automatically. Chapter 2 discusses this standard directory layout in greater detail.
Application Servers
Servlet containers are only part of the Java story. Since the development of servlet and JSP technology, many additional Java technologies have been created that ease the development of large and complex business applications, either for use on the Internet or for use on private intranets. Examples of these technologies include Enterprise JavaBeans, which aims to make it easier for developers to distribute Java code onto many different servers (as opposed to having all of the code for an application on one server), and the Java Connector Architecture, which helps
developers include older, pre-Java applications and data sources in their applications. These advanced technologies geared toward large
businesses make up the J2EE standard, which was briefly mentioned at the start of this chapter.
technologies, is usually much more feature-rich than a servlet container such as Tomcat, and often includes features that enable it to service many more users than a typical servlet container. However, because JSP and servlets compose a key part of the J2EE platform, application
servers also must support the same features that a servlet container does—and often, an application server simply integrates with one of the existing servlet containers.
Although application servers can set you back tens of thousands of dollars, some free application servers are available, such as jBoss (http://www.jboss.org).
JavaScript
In closing, we'll talk about JavaScript. JavaScript is a technology that enables Web pages to have some programmatic functionality in the browser. Java applets are isolated applications that are simply displayed on a Web page, but JavaScript works with and can manipulate the HTML page in which it's embedded.
Some folks, after coding some JavaScript code here and there, are under the impression they know Java and have programmed in Java, but this isn't really true. JavaScript isn't Java; it's an entirely distinct programming language that was developed about the same time Java was released. Originally called LiveScript, the name was changed by Netscape to JavaScript because its syntax was similar to Java's and because those behind it wanted to capitalize on the exposure and popularity of the Java language. However, Microsoft introduced its own scripting language, JScript, and after a while a neutral standard was developed, with the decidedly less appealing name of ECMAScript. Today, JavaScript and JScript are based on this open standard (also called ECMA-262), but Netscape and Microsoft persist in using their proprietary names for their implementations.
response, and JSP code is executed by the Web server before the Web server sends the HTTP response. In fact, JSP is what creates the HTTP response. Thus, JavaScript is said to be a client-side technology, and it's code that can be viewed (and copied) by Web users; JSP is a server-side technology where the code isn't visible to Web users because it's
Summary
In this chapter, we've tried to get you up and running as a budding Web developer. You've done the following:
Installed the basic tools you need to create Java Web applications
Created your first simple Web application
Examined the history of the Web, the difference between static and dynamic Web content, the approaches to creating dynamic content, and the difference between client-side programming (such as JavaScript) and server-side programming (such as JSP or servlets)
In subsequent chapters, you'll build on this foundation to create
Overview
In chapter 1, you downloaded and set up the tools necessary to develop applications with JavaServer Pages (JSP). Chapter 1 also covered some background information that will help put that development into context. In this chapter, we'll carry on consolidating the foundation that you'll build upon as you establish your JSP career.
We'll start out with a quick rundown of Hypertext Markup Language (HTML), covering what makes up a simple HTML page. Once the HTML refresher is out of the way, we'll introduce JSP's major features so you get a feel for what's possible with JSP.
Summarizing HTML
JSP pages consist of normal HTML with additional JSP-specific code. For readers with HTML experience, this means that writing JSP pages will be a piece of cake— you simply add a few JSP elements to your existing HTML pages where you want JSP to create dynamic features, and you're good to go.
However, if you've never written HTML before, or are quite rusty, don't panic. In the following sections, we'll briefly introduce HTML. You won't be an HTML expert after this crash course, but you'll learn enough to lay a solid foundation upon which you can build with JSP.
Tags
HTML consists of two basic elements: tags and text. To understand the relationship between the tags and the text, look at a snippet of HTML:
<h1>Header</h1> Normal text.
This HTML would be displayed by a Web browser in a format similar to the following:
Header Normal text.
The <h1> tag, short for header 1, instructs Web browsers to display the text within it as a large header. The </h1> tag, which complements the
<h1> tag, marks the end of text that should be formatted as a header. You can extract a few key points from this example:
HTML tags are enclosed in angle brackets, < and >. Examples of HTML tags are <h1>, <body>, and <table>.
Tags that contain text, such as <h1>text</h1> and
<span>text</span>. Such tags should always have a matching beginning and ending tag.
"Stand-alone" tags that don't contain text, such as <hr /> and
<br />. Such tags should always end with />. Although the final
/> wasn't a requirement in the past, it has been changed to
comply with the rules of Extensible Markup Language (XML), and it also makes it clear if a tag is a container tag. This set of new rules is called Extensible HTML (XHTML). Although today's browsers support both formats, you're strongly encouraged to use /> where it's compatible.
The primary purpose of tags is to modify the appearance and behavior of text. There are, however, some other uses, as you'll learn in the "Creating HTML Forms" section.
Important Principles
There are 90 different HTML tags. However, an HTML page should contain at least two tags: <html> and <body>. The following example therefore represents the smallest possible HTML page:
<html> <body> </body> </html>
Generally speaking, all of the content of the HTML page that's displayed by the Web browser should be nested in the <body> tag.
To actually display an HTML element's tag in a browser, you need to use special characters; otherwise, the browser would interpret the tag you want to display as the tag itself. The following example shows a situation where the browser interprets your intention and processes the example tag instead of displaying it as text:
The </body> tag is used to close the <body> tag. </body>
</html>
This results in The tag is used to close the tag. in the browser window. To solve this problem, you use < (the less-than symbol) and > (the greaterthan symbol):
<html> <body>
The </body> tag is used to close the <body> tag. </body>
</html>
There are many other special characters in HTML, such as copyright symbols and specialist text symbols, as you'll see in the "Nonbreaking Spaces" section.
Attributes
Most HTML tags can have various attributes set to alter their behavior or appearance in some way. Such attributes appear after the tag name, within the opening tag itself. For instance, the HTML <table> tag, which you use to organize output in the form of rows and columns, has the attribute border that can be set as follows:
<table border="1">
In this case, you've assigned border a value of 1, which indicates the size of the border to draw around the table and its cells.
Note that all values given to attributes should be enclosed in quotes (either single or double quotes, but they must match and be consistent throughout the page). Previous versions of HTML didn't require the quotes, and you may encounter code that doesn't use them, but in general you should avoid that style.
In this book, we'll introduce the attributes that are useful for the examples and case studies. You can obtain the complete list of HTML tags
(URLs):
http://www.w3.org/TR/REC-html40/index/elements.html http://www.w3.org/TR/REC-html40/index/attributes.html
Formatting HTML Output
One of the key concepts of HTML is that any sequence of whitespace is rendered on the browser screen as a single space. In other words, any line breaks or groups of more than one space character will appear on the screen as a single space. For example, the following three different HTML pages would all be displayed in the same way:
<html> <body> Hello World! </body>orl </html>
<html><body>Hello World!</body></html> <html><body>Hello World!</body></html>
A browser would display all of these pages as this: Hello World!
Preformatted Text
You can switch off this whitespace handling if you have text you want to display as is by wrapping the text in <pre> tags. The classic example is displaying formatted code in the browser:
<pre>
public class Servlet01 extends HttpServlet {
public void doGet(HttpServletRequest req, HttpServletResponse res) throws ServletException, IOException {
String reqErrorUri =
} }
</pre>
This will be rendered in a fixed-width font much like the code font used in this book. Note that the newline after the beginning <pre> and
immediately before the ending </pre> won't be rendered.
Line Breaks
To display text on two or more different lines, you use the <br /> tag to instruct the browser to insert a line break. The following code:
<html><body>Hello<br />World!</body></html>
would therefore be displayed as follows: Hello
World!
Nonbreaking Spaces
Browsers will wrap the lines of text on your Web page according to the margins in the current window, with the break at the most convenient whitespace. This may cause a problem if you want to keep two words or symbols on the same line. You solve this problem with the nonbreaking space character:
For example, if you want to display a date, using will ensure the entire date is displayed on one line:
The date of publication is the 29th March 2004.
Paragraphs
tag, with an important difference: The <p /> inserts space between two paragraphs whereas the <br /> tag simply breaks the line.
The following HTML:
<html><body>Hello<p />World!</body></html>
would be displayed like so: Hello
World!
Phrases
All of the previous elements allow you to format and structure entire paragraphs of text. The next set of elements you'll see allows you to format phrases to make them stand out from the surrounding paragraph. For example, you may want to format a single Java command in a
paragraph or cite a source for your quote.
This is a sample Web page showing a few phrase-formatting tags:
<html> <body> <p>
Here is some <em>emphasized text</em>. </p>
<p>
Here is some <strong>strongly emphasized text</strong>. </p>
<p>
A line of code in a paragraph would look like this <code>System.out.println("Code text");</code>
</p> <p>
As the <cite>NY Times</cite> said in January... </p>
Tables
A great many HTML pages place text into tables as a simple yet robust means of formatting data. HTML tables are defined by the <table> tag, which contains a <tr> tag for each row in the table and a <td> tag for each cell in a row. Thus, the following code:
<html> <body>
<table border="1"> <tr>
<td> Hello </td> <td>
World! </td> </tr> <tr> <td>
This is </td>
<td>
a table! </td>
</tr> </table> </body> </html>
Figure 2-1: Formatting tables
Tables can also have column headings, which are added with the <th>
element:
<html> <body>
<table border="1">
<tr><th>Course</th><th>Tutor</th></tr> <tr>
<td>
Introductory Linguistics </td>
<td>
Prof. Hurford </td>
</tr> <tr> <td>
Starting Prolog </td>
<td>
C.S. Mellish </td>
</tr> </table> </body> </html>
Each <th> element is equivalent to a bold <td> element and is placed in a <tr> element in the same way.
A Little Style
The style of HTML text is controlled by a special attribute that belongs to almost every tag: the style attribute. Some examples of the style
attribute are as follows:
<html> <body>
<p style="color: red">
This text will be in red! </p>
<p style="color: blue; font-size: 20pt"> This big text will be in blue!
</p> </body> </html>
The preceding example if rendered would appear in a browser as shown in Figure 2-2.
Figure 2-2: Using the style attribute
Note that you used the <p> tag as a container to apply its style to the text inside. Take a closer look at one of the style attributes you added to the
<p> tags:
style="color: blue; font-size: 20pt"
The value of the style attribute—"color: blue; font-size: 20pt"—controls how the contents of the container tag are displayed using the style language called Cascading Style Sheets (CSS). CSS is a way of defining rules that modify how HTML tags are rendered. A CSS rule takes this form:
css_attribute: css_value
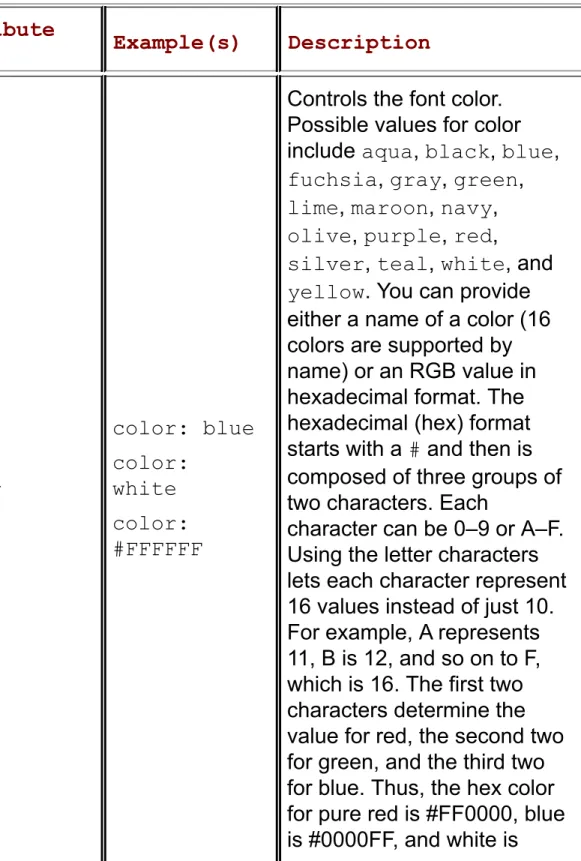
joining them together with a semicolon, as shown in the previous example. Table 2-1 describes some examples of valid CSS attributes.
Table 2-1: Valid CSS Attributes
Attribute
Name Example(s) Description
color color: blue color: white color: #FFFFFF
Controls the font color. Possible values for color include aqua, black, blue,
fuchsia, gray, green,
lime, maroon, navy,
olive, purple, red,
silver, teal, white, and
yellow. You can provide either a name of a color (16 colors are supported by name) or an RGB value in hexadecimal format. The hexadecimal (hex) format starts with a # and then is composed of three groups of two characters. Each
#FFFFFF. background-color background-color: black
Determines the background color of a region. Like for the
color attribute, this may be either a name or be a value.
font-size font-size: 12pt font-size: 12px font-size: smaller
Controls the size of the font. The values can be given in either font point size (pt) or exact height in pixels (px) format. Relative font sizes are also possible with the words larger and smaller.
font-family font-family: Arial font-family: Tahoma, sans-serif
Sets the font to be used.
That's enough CSS to get you started, but CSS enables you to do a lot more. If you're interested, visit http://www.w3.org/Style/CSS/.
Creating Style Classes
If you want to apply the same style to multiple parts of your HTML document, it'd be rather tedious to repeat it all over the place, as in the following HTML fragment:
<p style="font-size: 20pt; color: blue; font-family: sans-serif"> Paragraph 1 Text.
</p>
<p style="font-size: 20pt; color: blue; font-family: sans-serif"> Paragraph 2 Text.
</p>
Paragraph 3 Text. </p>
CSS enables you to create classes that consist of a set of style rules, defined in a <style> tag within the HTML <head> section. You can then associate these styles with HTML tags by setting the class attribute as shown in the following example:
<html> <head>
<style type="text/css"> .bigblue {
font-size: 20pt;
font-family: sans-serif; color: blue;
}
</style> </head> <body>
<p class="bigblue"> Paragraph 1 Text. </p>
<p class="bigblue"> Paragraph 2 Text. </p>
<p class="bigblue"> Paragraph 3 Text. </p>
</body> </html>
Trying It Out: Creating a Simple HTML Page
To create a simple HTML page, follow these steps:
1. First, you need to set up folders in Tomcat's webapps directory to create a new JSP application. For this example, call it
PhoneBook and create a folder inside it called WEB-INF. As you may remember from the first chapter, this folder must exist for Tomcat to recognize your files as a new Web
application.
2. Save the following code as phoneNumbers.html in the
PhoneBook folder:
<html> <head>
<style type="text/css"> BODY {
font-family: sans-serif; font-size: 10pt;
background-color: navy; color: white;
}
TABLE {
border: 1px solid black; font-family: sans-serif; font-size: 10pt;
}
.row1 {
background-color: gray; color: black;
}
.row2 {
background-color: silver; color: black;
}
<body>
These are some of my friends. <p />
<table> <tr> <th> Name </th> <th> Phone </th> </tr>
<tr class="row1"> <td>
Amy </td> <td>
415-555-1212 </td>
</tr>
<tr class="row2"> <td>
Geoff </td> <td>
415-555-1213 </td>
</tr> </table> </body> </html>
3. Start Tomcat, and view the file by navigating to the following URL in your browser:
http://localhost:8080/PhoneBook/phoneNumbers.html
similar to Figure 2-3.
Figure 2-3: CSS in action How It Works
This HTML file is a good example of the tags introduced earlier. You added a few new twists to the CSS in the <style> tag, such as the ability to redefine a tag's default style (the BODY and TABLE style names) and the border attribute.
It's important that you save the HTML file with a name that ends in .html
or .htm, as you've done, so that the Web server (in this case, Tomcat) knows that the file contains HTML markup.
Specifying a Style for a Single Element
The previous code uses the .stylename form to apply the style to all elements with that class. Sometimes, however, you'll want to be able to specify styles for individual elements, some of which may have identical names. For example, you may want to have a <table> element of class
red and a <td> element of class red, each of which with a different property you want to alter.
In this case, you can use the tag.stylename form:
TABLE.red {
border: 1px solid red; }
TD.red {
}
These settings will override any general CSS settings for <table> or
<td>. Therefore, you can think of CSS as hierarchical because you can specify a toplevel setting for all elements of a certain type and then
override these as you get more specific needs. So, in these examples, a
<table> element of class red will have all the attributes from the TABLE entry, except border, which is specified with TABLE.red.
Using the id Attribute
The id attribute is common to all HTML elements and is used to uniquely identify an element in a document. As such, you can use it to uniquely style an element in a document. Suppose you have the following HTML:
<tr id="grade"/>
You could style it using the following syntax:
#final_marks {
background-color: red; }
Styling an Application
So far you've been adding style to a single document, but most Web sites consist of more than one document. If you wanted consistency of style across all the documents, you'd have to copy and paste all the style information from phoneNumbers.html into all the other documents. This is a time-consuming and error-prone process.
Luckily, CSS has an answer to this problem: You can move all your style information into an external file that can be shared by all pages in your Web site. For this you have to create a style sheet with the .css
extension. This file contains the contents of the <style> element that you would have used across your Web site.
PhoneBook directory as follows:
BODY {
font-family: sans-serif; font-size: 10pt;
background-color: navy; color: white;
}
TABLE {
border: 1px solid black; font-family: sans-serif; font-size: 10pt;
}
.row1 {
background-color: gray; color: black;
}
.row2 {
background-color: silver; color: black;
}
Delete the <style> element, and replace it with the following <link>
element:
<head>
<link rel="stylesheet" type="text/css" href="format.css" /> </head>
View phoneNumbers.html again. There should be no difference in the output, but it's now much easier for you to reuse style information.
<div> and <span>
the data represents overdue bills and so should be colored red.
A <div> element covers blocks of text, much like a <p> tag does, and a
<span> tag is used inline, much like the <em> or <cite> tags. The logical structure is maintained with the id attribute. As with all the tags that provide a physical structure, you can use class and style
attributes with <div> and <span>.
The following example highlights new code to the user. You'll apply the following stylesheet to a page that contains examples of code that are built up as the user progresses through a tutorial:
.newcode {
background-color: silver; color: black;
}
.oldcode {
background-color: white; color: gray;
}
.highlight {
text-decoration: underline; }
Here you're marking new code with a light-gray background and black text. Code the user has already seen is on a white background with gray text