Learn to:
•
Navigate the interface and set up reusable
master pages
•
Work creatively with lines, text frames,
and graphics frames
•
Manipulate text and spiff up your
documents with graphics
•
Create PDFs, Web pages, and Flash
files from InDesign
InDesign
®
CS5
ART IS TK
WILL BE
INSERTED
DURING
Start with
FREE
Cheat Sheets
Cheat Sheets include
•
Checklists
•
Charts
• Common Instructions
• And Other Good Stuff!
Get Smart at Dummies.com
Dummies.com makes your life easier with 1,000s
of answers on everything from removing wallpaper
to using the latest version of Windows.
Check out our
•
Videos
• Illustrated Articles
• Step-by-Step Instructions
Plus, each month you can win valuable prizes by entering
our Dummies.com sweepstakes. *
Want a weekly dose of Dummies? Sign up for Newsletters on
• Digital Photography
• Microsoft Windows & Office
• Personal Finance & Investing
• Health & Wellness
• Computing, iPods & Cell Phones
•
eBay
•
Internet
• Food, Home & Garden
To access the Cheat Sheet created specifically for this book, go to
InDesign
CS5
FOR
by Galen Gruman
InDesign
CS5
FOR
111 River Street Hoboken, NJ 07030-5774 www.wiley.com
Copyright © 2010 by Wiley Publishing, Inc., Indianapolis, Indiana Published by Wiley Publishing, Inc., Indianapolis, Indiana Published simultaneously in Canada
No part of this publication may be reproduced, stored in a retrieval system or transmitted in any form or by any means, electronic, mechanical, photocopying, recording, scanning or otherwise, except as permit-ted under Sections 107 or 108 of the 1976 Unipermit-ted States Copyright Act, without either the prior written permission of the Publisher, or authorization through payment of the appropriate per-copy fee to the Copyright Clearance Center, 222 Rosewood Drive, Danvers, MA 01923, (978) 750-8400, fax (978) 646-8600. Requests to the Publisher for permission should be addressed to the Permissions Department, John Wiley & Sons, Inc., 111 River Street, Hoboken, NJ 07030, (201) 748-6011, fax (201) 748-6008, or online at http:// www.wiley.com/go/permissions.
Trademarks: Wiley, the Wiley Publishing logo, For Dummies, the Dummies Man logo, A Reference for the Rest of Us!, The Dummies Way, Dummies Daily, The Fun and Easy Way, Dummies.com, Making Everything Easier,and related trade dress are trademarks or registered trademarks of John Wiley & Sons, Inc. and/ or its affi liates in the United States and other countries, and may not be used without written permission. InDesign is a registered trademark of Adobe Systems Incorporated. All other trademarks are the property of their respective owners. Wiley Publishing, Inc., is not associated with any product or vendor mentioned in this book.
LIMIT OF LIABILITY/DISCLAIMER OF WARRANTY: THE PUBLISHER AND THE AUTHOR MAKE NO REPRESENTATIONS OR WARRANTIES WITH RESPECT TO THE ACCURACY OR COMPLETENESS OF THE CONTENTS OF THIS WORK AND SPECIFICALLY DISCLAIM ALL WARRANTIES, INCLUDING WITH-OUT LIMITATION WARRANTIES OF FITNESS FOR A PARTICULAR PURPOSE. NO WARRANTY MAY BE CREATED OR EXTENDED BY SALES OR PROMOTIONAL MATERIALS. THE ADVICE AND STRATEGIES CONTAINED HEREIN MAY NOT BE SUITABLE FOR EVERY SITUATION. THIS WORK IS SOLD WITH THE UNDERSTANDING THAT THE PUBLISHER IS NOT ENGAGED IN RENDERING LEGAL, ACCOUNTING, OR OTHER PROFESSIONAL SERVICES. IF PROFESSIONAL ASSISTANCE IS REQUIRED, THE SERVICES OF A COMPETENT PROFESSIONAL PERSON SHOULD BE SOUGHT. NEITHER THE PUBLISHER NOR THE AUTHOR SHALL BE LIABLE FOR DAMAGES ARISING HEREFROM. THE FACT THAT AN ORGANIZA-TION OR WEBSITE IS REFERRED TO IN THIS WORK AS A CITAORGANIZA-TION AND/OR A POTENTIAL SOURCE OF FURTHER INFORMATION DOES NOT MEAN THAT THE AUTHOR OR THE PUBLISHER ENDORSES THE INFORMATION THE ORGANIZATION OR WEBSITE MAY PROVIDE OR RECOMMENDATIONS IT MAY MAKE. FURTHER, READERS SHOULD BE AWARE THAT INTERNET WEBSITES LISTED IN THIS WORK MAY HAVE CHANGED OR DISAPPEARED BETWEEN WHEN THIS WORK WAS WRITTEN AND WHEN IT IS READ.
For general information on our other products and services, please contact our Customer Care Department within the U.S. at 877-762-2974, outside the U.S. at 317-572-3993, or fax 317-572-4002. For technical support, please visit www.wiley.com/techsupport.
Wiley also publishes its books in a variety of electronic formats. Some content that appears in print may not be available in electronic books.
Library of Congress Control Number: 2010925693 ISBN: 978-0-470-61449-5
Galen Gruman is theprincipal at The Zango Group, an editorial and
book production fi rm. As such, he has produced several books for Wiley Publishing and is a regular contributor to Macworld. He is author or coauthor
of 24 other books on desktop publishing.
Gruman led one of the fi rst successful conversions of a national magazine to desktop publishing in 1986 and has covered publishing technology since then for several publications, including Layers Magazine; the trade weekly
InfoWorld, for which he began writing in 1986 and of which he is now
To Ingall, who gives me the space as needed to write books such as this.
Author’s Acknowledgments
side the U.S. at 317-572-3993, or fax 317-572-4002.
Some of the people who helped bring this book to market include the following:
Acquisitions, Editorial, and Media Development
Project Editor: Pat O’Brien Acquisitions Editor: Bob Woerner Copy Editor: Debbye Butler
Technical Editor: Jonathan Woolson Editorial Manager: Kevin Kirschner Media Development Project Manager:
Laura Moss-Hollister
Media Development Assistant Project Manager: Jenny Swisher
Media Development Associate Producers: Josh Frank, Marilyn Hummel,
Douglas Kuhn, and Shawn Patrick Editorial Assistant: Amanda Graham Sr. Editorial Assistant: Cherie Case Cartoons: Rich Tennant
(www.the5thwave.com)
Composition Services
Project Coordinator: Patrick Redmond Layout and Graphics: Ashley Chamberlain,
Joyce Haughey
Proofreaders: Laura Albert, Susan Hobbs Indexer: BIM Indexing & Proofreading Services
Publishing and Editorial for Technology Dummies
Richard Swadley, Vice President and Executive Group Publisher Andy Cummings, Vice President and Publisher
Mary Bednarek, Executive Acquisitions Director Mary C. Corder, Editorial Director
Publishing for Consumer Dummies
Diane Graves Steele, Vice President and Publisher Composition Services
Introduction ... 1
Part I: Before You Begin ... 7
Chapter 1: Understanding InDesign Ingredients ... 9
Chapter 2: Making InDesign Work Your Way ... 33
Part II: Document Essentials ... 47
Chapter 3: Opening and Saving Your Work ... 49
Chapter 4: Discovering How Pages and Layers Work ... 59
Chapter 5: The Joys of Reuse ... 85
Chapter 6: Working with Color... 99
Part III: Object Essentials ... 117
Chapter 7: Adding Essential Elements ... 119
Chapter 8: Manipulating Objects ... 137
Chapter 9: Organizing Objects ... 157
Chapter 10: Aligning and Arranging Objects ... 173
Part IV: Text Essentials ... 197
Chapter 11: Putting Words on the Page ... 199
Chapter 12: The Ins and Outs of Text Editing ... 219
Chapter 13: The Styles of Text ... 237
Chapter 14: Fine-Tuning Paragraph Details ... 247
Chapter 15: Finessing Character Details ... 263
Part V: Graphics Essentials ... 277
Chapter 16: Importing Graphics ... 279
Chapter 17: Fitting Graphics and Setting Paths ... 291
Part VI: Getting Down to Business ... 301
Chapter 18: Working with Tabs and Tables ... 303
Chapter 19: Working with Footnotes, Indexes, and TOCs ... 315
Chapter 20: Working with Automatic Text ... 327
Chapter 23: Web Project Basics ... 371
Chapter 24: Presentation Project Basics ... 383
Part VIII: The Part of Tens ... 405
Chapter 25: Top Ten New Features in InDesign CS5 ... 407
Chapter 26: Top Ten Resources for InDesign Users ... 411
Introduction ... 1
About This Book ... 1
Foolish Assumptions ... 2
How This Book Is Organized ... 2
Part I: Before You Begin ... 2
Part II: Document Essentials ... 3
Part III: Object Essentials ... 3
Part IV: Text Essentials ... 3
Part V: Graphics Essentials... 3
Part VI: Getting Down to Business ... 3
Part VII: Printing, Presentation, and Web Essentials... 4
Part VIII: The Part of Tens ... 4
Conventions Used in This Book ... 4
Icons Used in This Book ... 5
What You’re Not to Read ... 6
Where to Go from Here ... 6
Part I: Before You Begin ... 7
Chapter 1: Understanding InDesign Ingredients . . . .9
Understanding Global and Local Control ... 10
Choosing the right tools for the job ... 11
Specifying measurement values ... 12
Discovering the Document Window ... 13
Rulers ... 13
Zero point ... 15
Pasteboard ... 16
Application frame and bar ... 16
Pages and guides... 17
Page controls ... 18
Opening Multiple Document Windows ... 18
Tooling around the Tools Panel ... 20
Using the Selection tools ... 22
Using the Type tool ... 23
Using the object-creation tools ... 24
Using the navigation tools ... 24
Working with Panels, Docks, and Workspaces ... 26
Chapter 2: Making InDesign Work Your Way . . . .33
Setting Document Preferences ... 33
Type preferences ... 34
Composition preferences... 36
Measurement preferences ... 37
Document defaults ... 40
Modifying Defaults for Text and Objects ... 41
Text defaults ... 42
Object defaults ... 42
Modifying Defaults for Views ... 43
Adding Default Colors and Styles ... 44
Part II: Document Essentials ... 47
Chapter 3: Opening and Saving Your Work . . . .49
Setting Up a New Publication ... 49
Opening documents ... 52
Saving documents ... 54
Exporting document content ... 55
Recovering from Disaster ... 56
Chapter 4: Discovering How Pages and Layers Work. . . .59
Understanding the Pages Panel ... 59
Adding pages ... 60
Selecting pages ... 62
Copying pages ... 62
Deleting pages ... 63
Moving pages within documents ... 63
Moving pages among documents ... 64
Applying custom page sizes ... 64
Working with Page Numbers ... 65
Working with starting pages ... 66
Dividing a document into sections ... 66
Removing a section start ... 68
Navigating Documents and Pages ... 68
Navigating with the Pages panel ... 68
Navigating with the menus and shortcuts ... 69
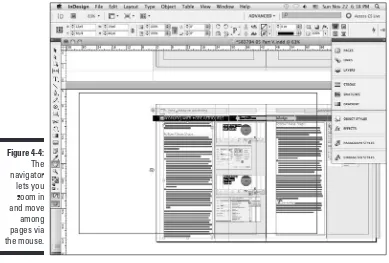
Using the navigator ... 70
Adjusting Page Layouts and Objects ... 70
Using the Layout Adjustment command ... 71
Using the Page tool ... 73
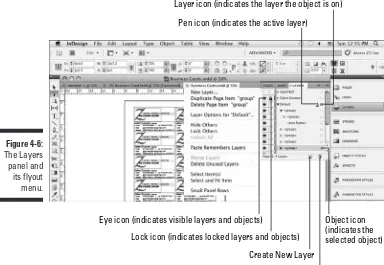
Using Layers ... 74
Layer basics ... 75
Working with layers ... 76
Chapter 5: The Joys of Reuse . . . .85
Building and Using Templates ... 85
Creating templates ... 86
Modifying templates ... 86
Creating documents from templates ... 87
Building and Using Master Pages ... 87
Creating a new master page ... 88
Importing a master page ... 90
Deleting a master page ... 91
Applying a master page to document pages ... 91
Changing master items on document pages ... 92
Building and Using Libraries ... 93
Creating a library ... 93
Putting items into a library ... 95
Copying library items onto document pages ... 98
Managing library panels ... 98
Chapter 6: Working with Color . . . .99
Working with Colors ... 99
Creating color swatches ... 100
Using Kuler colors ... 104
Creating mixed colors ... 106
Defi ning Tints ... 107
Working with Gradients ... 108
Creating gradient swatches ... 108
Understanding the Gradient panel ... 110
Managing Swatches ... 112
Editing swatches ... 112
Copying swatches ... 112
Deleting swatches ... 112
Importing swatches ... 113
Exporting swatches ... 115
Applying Swatches ... 115
Part III: Object Essentials ... 117
Chapter 7: Adding Essential Elements . . . .119
Working with Frames and Shapes ... 119
Creating frames and shapes ... 119
Reshaping frames and shapes ... 122
Creating Lines and Paths ... 123
Drawing a straight line ... 124
Understanding paths ... 125
Blurring the Lines between Text and Graphics ... 131
Converting text to shapes ... 131
Making text follow a path ... 132
Applying Strokes ... 133
Setting stroke appearance ... 133
Creating stroke styles ... 135
Chapter 8: Manipulating Objects. . . .137
Selecting Objects ... 137
Resizing and Scaling Objects ... 141
Resizing objects ... 141
Scaling objects ... 142
Moving Objects ... 142
Deleting Objects ... 143
Preventing Objects from Printing ... 143
Hiding Objects ... 144
Replacing Object Attributes ... 148
Making Fancy Corners ... 150
Using Transparency and Lighting Effects ... 152
Basic transparency ... 152
Drop shadows and inner shadows ... 154
Feathering and other lighting effects ... 155
Chapter 9: Organizing Objects . . . .157
Combining Objects into a Group ... 157
Locking and Unlocking Objects ... 158
Working with Object Styles ... 159
Creating object styles ... 159
Managing object styles ... 163
Applying object styles ... 164
Managing object styles ... 165
Managing Links ... 165
Adding Metadata Captions ... 169
Chapter 10: Aligning and Arranging Objects. . . .173
Positioning Precisely with Coordinates ... 173
Lining Up Objects with Guidelines and Grids ... 174
Using ruler guides ... 175
Working with column guides ... 178
Working with smart guides ... 178
Aligning Objects to Each Other ... 182
Using the Align panel ... 183
Working with live distribution ... 184
Using the Gap tool ... 185
Stacking Objects ... 186
Creating Inline and Anchored Frames ... 187
Working with inline frames ... 188
Working with anchored frames ... 191
Part IV: Text Essentials ... 197
Chapter 11: Putting Words on the Page . . . .199
Working with Text Frames ... 199
Creating master text frames ... 200
Creating individual text frames ... 200
Setting up automatic page creation ... 201
Making changes to text frames ... 203
Importing Text ... 204
Import options for Microsoft Word and RTF fi les ... 205
Import options for Microsoft Excel fi les ... 207
Pasting text into an InDesign document ... 208
Dragging and dropping text ... 209
Threading Text Frames ... 209
Breaking and rerouting threads ... 211
Working with Columns ... 212
Specifying columns in master frames ... 212
Changing columns in text frames ... 212
Wrapping Text around Objects ... 214
The Text Wrap panel ... 214
Setting text-wrap preferences ... 217
Chapter 12: The Ins and Outs of Text Editing . . . .219
Editing Text ... 219
Controlling text view ... 220
Navigating through text ... 220
Highlighting text ... 220
Undoing text edits ... 221
Using the Story Editor ... 221
Tracking text changes ... 222
Searching and Replacing Text ... 225
Replacing text ... 226
Replacing formatting ... 228
Changing special characters ... 229
Checking Spelling ... 230
Checking spelling as you type ... 231
Correcting mistakes on the fl y ... 231
Using the Check Spelling dialog box ... 232
Changing the spelling and hyphenation dictionaries... 233
Chapter 13: The Styles of Text . . . .237
Creating Styles ... 237
Getting Fancy with Nested Styles ... 239
Managing Styles ... 241
Updating styles... 241
Sharing styles with others ... 241
Using style groups ... 242
Other management options ... 243
Applying Styles to Text ... 244
Paragraph particulars ... 244
Character characteristics ... 245
Chapter 14: Fine-Tuning Paragraph Details . . . .247
Applying Paragraph Formats ... 248
Specifying Alignment and Indents ... 250
Adjusting indent controls ... 251
Inserting space between paragraphs ... 252
Controlling space between lines ... 252
Controlling where paragraphs break ... 253
Spanning paragraphs across text columns ... 254
Adding Drop Caps ... 254
Controlling Hyphenation and Justifi cation ... 256
Manual hyphenation ... 256
Automatic hyphenation ... 257
Controlling justifi cation ... 258
Composing text ... 259
Ruling Your Paragraphs ... 260
Chapter 15: Finessing Character Details . . . .263
Specifying Character Formats ... 263
Modifying Font, Type Style, and Size ... 266
Changing font family and font style ... 266
Changing type size ... 267
Using Other Character Formats ... 268
Horizontal Scale and Vertical Scale options ... 269
Baseline shift ... 270
Skew (false italic) ... 270
Capitalization options ... 271
Superscript and Subscript ... 271
Controlling Space between
Characters and Lines ... 274
Kerning ... 274
Tracking ... 275
Leading ... 275
Part V: Graphics Essentials ... 277
Chapter 16: Importing Graphics . . . .279
Preparing Graphics Files ... 279
Importing and Placing Graphics ... 281
Specifying Import Options ... 285
Import options for bitmap graphics ... 285
Import options for vector fi le formats ... 287
Import options for placed InDesign fi les ... 288
Working with Image Layers ... 289
Working with layers during import ... 289
Working with layers after import ... 290
Chapter 17: Fitting Graphics and Setting Paths . . . .291
Cropping Graphics ... 291
Figuring out the Fitting Commands ... 292
Working with Graphics in Irregular Shapes ... 294
Using a graphic’s own clipping path ... 295
Creating a clipping path in InDesign ... 296
Part VI: Getting Down to Business ... 301
Chapter 18: Working with Tabs and Tables . . . .303
Setting Tabs ... 303
Setting Up Tables ... 305
Adjusting tables ... 307
Formatting tables ... 308
Using table and cell styles ... 311
Modifying and managing table and cell styles ... 313
Converting Tabs to Tables (and Back) ... 313
Chapter 19: Working with Footnotes, Indexes, and TOCs. . . .315
Adding Footnotes ... 315
Creating Indexes ... 318
Choosing an indexing style ... 318
Adding index items via the Index panel ... 319
Polishing and generating the index ... 321
Creating Tables of Contents ... 322
Chapter 20: Working with Automatic Text . . . .327
Automating Page Numbers ... 327
Using Section Markers ... 328
Using Cross-References ... 329
Using Text Variables ... 331
Editing and managing text variables ... 333
Inserting text variables ... 334
Using Conditional Text ... 334
Chapter 21: Publishing Books . . . .337
Creating a Book ... 337
Working with Book Chapters ... 338
Finding out about chapter status ... 340
Taking advantage of style sources ... 340
Synchronizing formatting ... 341
Printing Chapters and Books ... 342
Working with Sections in Chapters ... 342
Numbering pages consecutively ... 343
Numbering pages with sections ... 343
Setting chapter numbers ... 344
Part VII: Printing, Presentation, and Web Essentials ... 345
Chapter 22: Printing and PDF’ing Your Work . . . .347
Checking Your Document before Printing ... 348
Identifying and fi xing errors ... 348
Telling InDesign what to check for ... 350
Setting Up Booklets ... 351
Calibrating Color ... 353
Choosing Print Options ... 355
The General pane ... 357
The Setup pane ... 358
The Marks and Bleed pane ... 359
The Output pane ... 360
The Graphics pane ... 362
The Color Management pane ... 362
The Advanced pane ... 362
The Summary pane ... 362
Exporting PDF Files ... 362
The General pane ... 364
Chapter 23: Web Project Basics . . . .371
Understanding InDesign’s Web Intent ... 372
Using Hyperlinks ... 373
Creating hyperlinks ... 373
Converting hyperlinks in text automatically ... 378
Importing hyperlinks ... 378
Applying hyperlinks... 378
Modifying and deleting hyperlinks ... 379
Exporting to the Web ... 380
Chapter 24: Presentation Project Basics . . . .383
Working with Video and Sound ... 384
Settings for animations ... 385
Settings for audio ... 386
Settings for video ... 386
Giving Readers Pushbutton Control ... 387
Creating buttons ... 387
Creating button states ... 389
Setting button actions ... 389
Applying Page Transition Effects ... 391
Animating Objects ... 393
Setting animation effects... 394
Sharing and managing animation effects ... 396
Creating and adjusting motion paths ... 397
Timing animation sequences... 398
Exporting to Interactive PDFs and Flash Files ... 400
Exporting interactive PDFs ... 400
Exporting Flash fi les ... 402
Part VIII: The Part of Tens ... 405
Chapter 25: Top Ten New Features in InDesign CS5 . . . .407
Easier Selection and Manipulation ... 407
Column Spanning ... 408
The Gap Tool ... 408
Gridifi ed Frame Creation ... 408
Tracked Changes ... 409
Animation ... 409
Interactivity Preview ... 409
Local Document Fonts ... 409
Autofi t ... 410
Live Object Redistribution ... 410
Chapter 26: Top Ten Resources for InDesign Users. . . .411
Web Sites ... 411 InDesignCentral ... 411 The Adobe Web site ... 412 InDesign User Group... 412 Creativepro ... 413 Magazine Resources ... 413 InDesign Magazine ... 413 Layers magazine... 413 Macworld magazine ... 414 Recommended Books ... 414W
hat is Adobe InDesign, and what can it do for you? In its more than a decade in existence, InDesign has become the most powerful publish-ing application, one that lets you work the way you want to work. You can use InDesign as a free-form but manual approach to layout, or as a structured but easily revised approach. The fact that you can choose which way to work is important for both novice and experienced users because there is no single, correct way to lay out pages. Sometimes (for example, if your project is a one-time publication, such as an ad), creating a layout from scratch — almost as if you were doing it by hand on paper — is the best approach. And sometimes using a highly formatted template that you can modify as needed is the way to go. You don’t need to reinvent the wheel for documents that have a structured and repeatable format, such as books and magazines.InDesign can handle sophisticated tasks, such as glossy magazines and high-impact ads, but its structured approach to publishing also makes it a good choice for newspapers, newsletters, and books. InDesign is also a good choice for corporate publishing tasks, such as proposals and annual reports. In all cases, you can design for printing on paper or electronic distribution as Adobe Acrobat Portable Document Format (PDF) files. Plug-in software from other vendors adds extra capabilities.
Plus, you can use InDesign for interactive PDF and Flash documents that can play movies and sounds, and let users click buttons to invoke actions such as changing pages, opening files, and animating objects on the page either auto-matically or in response to user actions. You can also use InDesign as a start-ing point to create Web pages, though you’ll more likely use its Web-export capabilities to convert your print documents into files that you can refine in your favorite Web editor. This support for electronic media and distribution is the new frontier for publishing, and Adobe is provisioning the first wave of settlers.
About This Book
easier. Part of its success is due to the fact that its interface is like that of its sister applications, Adobe Illustrator and Adobe Photoshop, which are also components of the Adobe Creative Suite.
If you’re new to InDesign, welcome! I hope you find the information in these pages exactly what you need as you get started.
Foolish Assumptions
Although this book has information that any level of layout artist or produc-tion editor needs to know to use InDesign, this book is primarily for those of you who are fairly new to the field, or who are just becoming familiar with the program. I try to take the mystery out of InDesign and give you guidance on how to create a bunch of different types of documents.
I don’t assume that you’ve ever used InDesign (or any publishing program). But I do assume that you have a basic knowledge of Macintosh or Windows — enough to work with files and applications. And I assume that you have basic familiarity with layout design, such as knowing what pages, margins, and fonts are. But I don’t expect you to be an expert in any of these areas —nor do you have to be!
How This Book Is Organized
This book contains eight parts. I also include some bonus content on the InDesignCentral Web site (www.InDesignCentral.com).
Part I: Before You Begin
Designing a document is a combination of science and art. The science is in setting up the structure of the page: How many places will hold text, and how many will hold graphics? How wide will the margins be? Where will the page numbers appear? You get the idea. The art is in coming up with creative ways of filling the structure to please your eyes and the eyes of the people who will be looking at your document.
Part II: Document Essentials
Good publishing technique is about more than just getting the words down on paper. It’s also about opening, saving, adding, deleting, numbering, and setting layout guidelines for documents. This part shows you how to do all that and a lot more, including tips on setting up master pages that you can use over and over again. You also find out how to create color swatches for easy reuse in your documents.
Part III: Object Essentials
This part of the book shows you how to work with objects: the lines, text frames, graphics frames, and other odds and ends that make up a publication. If you’ve used previous versions of InDesign, pay extra attention to the CS5 ver-sion’s (good) changes in how to select objects and do things like rotate them. You also discover how to apply some really neat special effects to them.
Part IV: Text Essentials
When you think about it, text is a big deal when it comes to publishing docu-ments. After all, how many people would want to read a book with nothing but pictures? In this part, I show you how to create and manipulate text, in more ways than you can even imagine.
Part V: Graphics Essentials
Very few people would want to read a book with nothing but text, so this part is where I show you how to handle graphics in InDesign — both importing them from the outside and creating your own within InDesign.
Part VI: Getting Down to Business
Part VII: Printing, Presentation,
and Web Essentials
Publishing is no longer about just the printed page. Now you can create PDF files, Web pages, and Flash files from InDesign — and each supports differ-ent kinds of interactive capabilities and media files. This part starts with the skinny on how to set up your output files, manage color, and work with service bureaus. Then it explains how to use hyperlinks in your document for both Web and PDF pages. Finally, it explains InDesign’s interactive push-button, page transition effects, and animation capabilities that bring page layout into new dimensions, and then shows you how to export these interac-tive files to PDF and Flash formats.
Part VIII: The Part of Tens
This part of the book is like the chips in the chocolate chip cookies; you can eat the cookies without them, but you’d be missing a really good part. It’s a part that shows you some important resources that can help you make the most of InDesign, as well as highlights what I think are the best of InDesign’s new features.
Conventions Used in This Book
This book covers InDesign on both Macintosh and Windows. Because the application is almost identical on both platforms, I point out platform-specific information only when it’s different — and that’s very rare. I’ve used Macintosh screen shots throughout; Windows screen shots are usually iden-tical, except for the dialog boxes to open, save, and export files — these are arranged differently on Macs and PCs (for all programs, not just InDesign), but the relevant options to InDesign are the same. If you’re a Windows user, a quick look at Adobe’s documentation, which shows Windows screens, can show you how the interfaces are nearly identical. So don’t worry about them.
Here are some other conventions used in this book:
✓ Menu commands: They’re listed like this: Window➪Pages. That means
✓ Key combinations: If you’re supposed to press several keys together, I indicate that by placing a plus sign (+) between them. Thus, Shift+Ô+A means press and hold the Shift and Ô keys and then press A. After you’ve pressed the A key, let go of all the keys. I also use the plus sign to join keys to mouse movements. For example, Alt+drag means to hold the Alt key when dragging the mouse.
Note that the Macintosh sequence comes first, followed by the Windows equivalent.
✓ Pointer: The small graphic icon that moves on the screen as you move
your mouse is a pointer (also called a cursor when you’re working with text). The pointer takes on different shapes depending on the tool you select, the current location of the mouse, and the function you are performing.
✓ Click: This means to quickly press and release the mouse button once.
Many Mac mice have only one button, but some have two or more. All PC mice have at least two buttons. If you have a multibutton mouse, click the leftmost button when I say to click the mouse.
✓ Double-click: This tells you to quickly press and release the mouse
button twice. On some multibutton mice, one of the buttons can func-tion as a double-click. (You click it once, but the computer acts as if you clicked twice.) If your mouse has this feature, use it; it saves strain on your hand.
✓ Right-click: A feature first implemented on Windows, but present on
Macs since the late 1990s, this means to click the right-hand mouse button. If your Mac has only one button, hold the Control key when clicking the mouse button to do the equivalent of right-clicking in pro-grams that support it. Mac OS X automatically assigns the right-hand button on a multibutton mouse to the Control+click combination; if your mouse came with its own system preference, you can often further cus-tomize the button actions.
✓ Dragging: Dragging is used for moving and sizing items in an InDesign
document. To drag an item, position the mouse pointer on the item, press and hold down the mouse button, and then slide the mouse across a flat surface.
Icons Used in This Book
So that you can pick out parts that you really need to pay attention to (or, depending on your taste, to avoid), I use some symbols, or icons, in this book.
If you see this icon, it means that I’m mentioning some really nifty point or idea that you may want to keep in mind as you use the program.
This icon lets you know something you’ll want to keep in mind. If you forget it later, that’s fine; but if you remember it, it will make your InDesign life a little easier.
Even if you skip all the other icons, pay attention to this one. Why? Because ignoring it can cause something really, really bad or embarrassing to happen, like when you were sitting in your second-grade classroom waiting for the teacher to call on you to answer a question, and you noticed that you still had your pajama shirt on. I don’t want that to happen to you!
This icon tells you that I am about to pontificate on some remote technical bit of information that may help explain a feature in InDesign. The technical info will definitely make you sound impressive if you memorize it and recite it to your friends.
What You’re Not to Read
If you see any text in this book that has this icon next to it, feel free to skip right over to the next paragraph. This icon alerts you to geeky information that you don’t need to know to use InDesign. I just couldn’t help giving you a little extra-credit information in case you were a budding geek like me.
Where to Go from Here
If you’re a complete beginner, I suggest you read the book’s parts in the order I present them. If you haven’t used InDesign before but you have used other layout programs, do read Part I first to get in the InDesign frame of mind, and then explore other parts in any order you want. If you have used InDesign before, peruse them in any order you want, to see what’s changed.
Y
ou have your copy of InDesign, and you’d like some basic information on how to get started, right? Well, you’ve come to the right place. This part helps you sail smoothly through InDesign and gives you a general idea of what InDesign can do. I explain the layout approaches you can take, as well as how to set up InDesign to work the way you work.Understanding InDesign
Ingredients
In This Chapter
▶ Getting acquainted with the InDesign approach ▶ Figuring out global versus local control
▶ Exploring the document window ▶ Surveying the top tools
▶ Becoming familiar with tools and panels ▶ Discovering what’s in the menus
S
tarting to use a new software application is not unlike meeting a new friend for the first time. You take a long look at the person, maybe ask a few questions, and begin the process of becoming acquainted. (If you’re not new to InDesign but are new to the CS5 version, it’s like seeing a friend you haven’t seen in a while — you observe any changes and catch up on what’s happened in the meantime.)Just as it’s worthwhile to find out the likes and dislikes of a new friend, it’s also worth your time to wrap your head around InDesign’s unique style and approaches. When you do so, you’ll find it much easier to start using InDesign to get work done.
in the document window, survey the most commonly used tools, and explain how InDesign packages much of its functionality through an interface ele-ment called a panel.
Understanding Global and Local Control
The power of desktop publishing in general, and InDesign in particular, is that it lets you automate time-consuming layout and typesetting tasks while at the same time letting you customize each step of the process according to your needs.
What does that mean in practice? That you can use global controls to estab-lish general settings for layout elements, and then use local controls to modify those elements to meet specific requirements. The key to using global and local tools effectively is to know when each is appropriate.
Global tools include
✓ General preferences and application preferences (see Chapter 2)
✓ Master pages and libraries (see Chapter 5)
✓ Character and paragraph styles (see Chapter 13)
✓ Table and cell styles (see Chapter 18)
✓ Object styles (see Chapter 9)
✓ Sections and page numbers (see Chapter 4)
✓ Color definitions (see Chapter 6)
✓ Hyphenation and justification (see Chapter 14)
Styles and master pages are the two main global settings that you can expect to override locally throughout a document. You shouldn’t be surprised to make such changes often because although the layout and typographic functions that styles and master pages automate are the fundamental com-ponents of any document’s look, they don’t always work for all the specific content within a publication. (If they did, who’d need human designers?!)
Local tools include
✓ Frame tools (see Part III, as well as Chapter 16)
✓ Character and paragraph tools (see Chapters 14 and 15)
Choosing the right tools for the job
Depending on what you’re trying to do with InDesign at any given moment, you may or may not immediately know which tool to use. If, for example, you maintain fairly precise layout standards throughout a document, using master pages is the way to keep your work in order. Using styles is the best solution if you want to apply standard character and paragraph formatting throughout a document. When you work with one-of-a-kind documents, on the other hand, designing master pages and styles doesn’t make much sense — it’s easier just to format elements as you create them.
For example, you can create drop caps (large initial letters set into a para-graph of type, such as the drop cap that starts each chapter in this book) as a character option in the Character panel, or you can create a paragraph style (formatting that you can apply to whole paragraphs, ensuring that the same formatting is applied each time) that contains the drop-cap settings and then apply that style to the paragraph containing the drop cap. Which method you choose depends on the complexity of your document and how often you need to perform the action. The more often you find yourself taking a set of steps, the more often you should use a global tool (like character and para-graph styles) to accomplish the task.
Fortunately, you don’t need to choose between global and local tools while you’re in the middle of designing a document. You can always create styles from existing local formatting later. You can also add elements to a master
Keep your bearings straight
A powerful but confusing capability in InDesign is something called a control point. InDesign lets you work with objects from nine different reference points — any of the four corners, the middle of any of the four sides, or the center — such as when positioning the object precisely or rotating the object. You choose the active reference point, or control point, in the Control panel or Transform panel, using the grid of nine points arranged in a square.
By default, InDesign uses the central reference point as the control point, which is great for rotating an object, but can lead to confusion
when you enter in the X and Y coordinates to place it precisely. That’s because most people use the upper-left corner of an object when specifying its coordinates, not the center of the object. Be sure to change the control point to the upper-left reference point whenever entering X and Y coordinates in the Control or Transform panels.
Specifying measurement values
Another situation in which you can choose between local or global controls is specifying measurement values. Regardless of the default measurement unit you set (that is, the measurement unit that appears in all dialog boxes and panels), you can use any unit when entering measurements in an InDesign dialog box. For example, if the default measurement is picas, but you’re new to publishing and are more comfortable working in inches, go ahead and enter measurements in inches.
InDesign accepts any of the following codes for measurement units. (Chap-ter 2 explains how to change the default measurements.) Note that the x in the following items indicates where you specify the value, such as 2i for 2
inches. It doesn’t matter whether you put a space between the value and the code: Typing 2inch and typing 2 inch are the same as far as InDesign is
✓ xc (for ciceros, a European newspaper measurement)
✓ xag (for agates, an American newspaper measurement)
✓ xcm (for centimeters)
✓ xmm (for millimeters)
What to do when you make a mistake
InDesign is a very forgiving program. If you make a mistake, change your mind, or work yourself into a complete mess, you don’t have to remain in your predicament or save your work. InDesign offers several escape routes. You can
✓ Undo your last action by choosing Edit➪Undo (Ô+Z or Ctrl+Z). (You can’t undo some actions, particularly actions such as scrolling that don’t affect any items or the underlying document structure.) You can undo multiple actions in the reverse order in which they were done by
repeatedly choosing Edit➪Undo (Ô+Z or Ctrl+Z); each time you undo, the preceding action is undone.
✓ Redo an action you’ve undone by choosing Edit➪Redo (Shift+Ô+Z or Ctrl+Shift+Z).
InDesign CS5 adds the capability to specify measurements in pixels, as part of its newfound capability to create “Web-intent” documents in addition to the traditional “print-intent” ones, as Chapter 3 explains.
You can enter fractional picas in two ways: in decimal format (as in 8.5p) and in picas and points (as in 8p6). Either of these settings results in a
measure-ment of 81⁄2 picas. (A pica contains 12 points.)
Discovering the Document Window
In InDesign, you spend lots of time working in document windows — the “containers” for your documents. Each document, regardless of its size, is contained within its own document window.
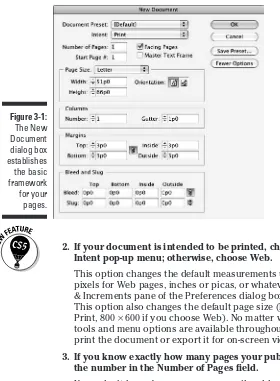
The best way to get familiar with the InDesign document window is by opening a blank document. Simply choosing File➪New➪Document (Ô+N or Ctrl+N) and clicking OK opens a new document window. Don’t worry about the settings for now — just explore.
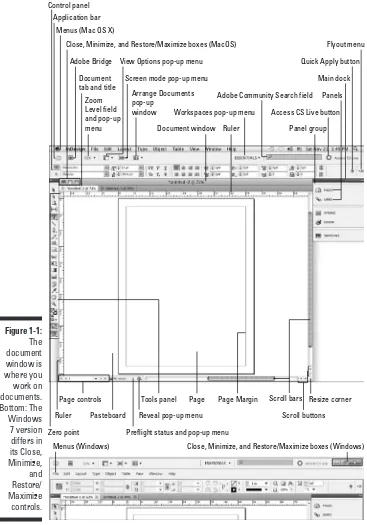
Figure 1-1 shows all the standard elements of a new document window. I won’t bore you by covering interface elements that are standard to all pro-grams. Instead, the rest of this section focuses on InDesign-specific elements.
Rulers
Document windows display a horizontal ruler across the top and a vertical ruler down the left side. As shown in Figure 1-1, the horizontal ruler measures from the top-left corner of the page across the entire spread, and the vertical ruler measures from the top to the bottom of the current page. These rulers are handy for judging the size and placement of objects on a page. Even expe-rienced designers often use the rulers while they experiment with a design.
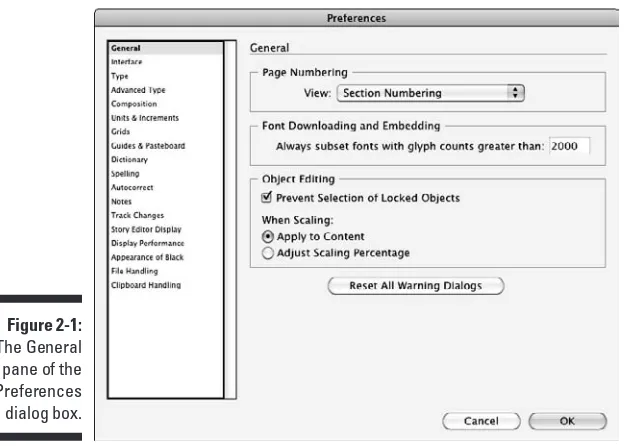
Both rulers display increments in picas unless you change the measurement system for each ruler in the Units & Increments pane of the Preferences dialog box. Choose InDesign➪Preferences➪Units & Increments (Ô+K) or Edit➪Preferences➪Units & Increments (Ctrl+K) to open the Preferences
Figure 1-1:
Close, Minimize, and Restore/Maximize boxes (MacOS) Control panel
Menus (Windows) Close, Minimize, and Restore/Maximize boxes (Windows) Ruler Pasteboard
Page controls
Preflight status and pop-up menu Zero point
Reveal pop-up menu
Tools panel Page Page Margin
If you change the ruler measurement system when no documents are open, the rulers in all new documents will use the measurement system you selected. If a document is open when you make the change, the rulers are changed only in that document.
You can also create your own measurement system by choosing Custom. Most people should ignore this option, but sometimes it can make sense, such as setting the ruler to match the line spacing, so that you can measure number of lines in your ruler.
If your computer has a small monitor and the rulers start to get in your way, you can hide them by choosing View➪Hide Rulers (Ô+R or Ctrl+R). Get them back by choosing View➪Show Rulers (Ô+R or Ctrl+R).
Zero point
The point where the rulers intersect in the upper-left corner of the page is called the zero point. (Some people call it the ruler origin.) The zero point is the starting place for all horizontal and vertical measurements.
If you need to place items in relation to another spot on the page (for exam-ple, from the center of a spread rather than from the left-hand page), you can move the zero point by clicking and dragging it to a new location. Notice that the X: and Y: values in the Control panel update as you drag the zero point so that you can place it precisely.
If you change the zero point, it changes for all pages or spreads in the docu-ment. You can reset the zero point to the upper-left corner of the left-most page by double-clicking the intersection of the rulers in the upper-left corner.
If you move the zero point, all the objects on the page display new X: and Y: values even though they haven’t actually moved. Objects above or to the left of the zero point will show negative X: and Y: values, and the X: and Y: values of other objects will not relate to their actual position on the page or spread.
Pasteboard
The white area that surrounds the page is called the pasteboard. It’s a work-space for temporarily storing objects. The pasteboard above and below each page or spread is an inch deep. The pasteboard at both left and right of a page or spread is just as wide as the page. For example, a spread composed of two 8-inch-wide pages has 8 inches of pasteboard to the left and 8 inches of pasteboard to the right, plus 1 inch of pasteboard above and 1 inch below.
You can set your own preferred height and width of the pasteboard. To do so, open the Guides & Pasteboard pane of the Preferences dialog box and choose a new value for the Horizontal Margins and/or Vertical Margins field. (Choose InDesign➪Preferences➪Guides & Pasteboard [Ô+K] or Edit➪Preferences➪Guides & Pasteboard [Ctrl+K] to open the Preferences
dialog box.)
Application frame and bar
With the application frame, Mac users can put all the InDesign elements in their own container so that they don’t float freely and other applica-tions don’t peek through. You show the application frame by choosing Window➪Application Frame — doing so makes InDesign for Mac behave
like InDesign for Windows. (By default, the application frame is turned off in InDesign for Mac.)
Conversely, Windows users can choose Window➪Application Frame to hide
the application frame so that InDesign for Windows looks like InDesign for Mac. (By default, the application frame is turned on in InDesign for Windows.)
The Application Frame menu command is a toggle, hiding the application frame if it’s visible and showing it if it’s hidden. You see a check mark next to the menu option if the application frame is visible. (InDesign uses the same toggling indicator in other menus.)
Above the Control panel is the application bar, which offers easy access to other Adobe applications, such as Bridge, and access to controls over vari-ous view options. It appears by default if the application frame is enabled. When the application frame is hidden, you can show or hide the application bar by choosing Window➪Application Bar.
The application bar has several handy elements. From left to right:
✓ The third element is the View Options pop-up menu, which lets you hide and show frames boundaries, hidden characters, grids, and other such visual aids from one handy location. These options previously existed but only in a variety of scattered menu options (where they also remain).
✓ The fourth element, the Screen Mode pop-up menu, duplicates the Screen Mode feature at the bottom of the Tools panel (explained later in this chapter).
✓ The fifth element, the Arrange Documents pop-up menu, gives you fast access to InDesign’s controls over how document windows are arranged (covered later in this chapter).
✓ The sixth element, the Workspaces pop-up menu, gives you quick access to the workspaces you’ve defined (as described in the “Working with Panels, Docks, and Workspaces” section, later in this chapter).
✓ The seventh element is the Adobe Community Search menu, which you can use to find help from the Adobe community forums on the Web.
✓ At the far right is the new Access CS Live button, which opens up Adobe’s extra-cost subscription services such as multiuser screen shar-ing and multiuser design review in your browser.
Pages and guides
Pages, which you can see on-screen surrounded by black outlines, reflect the page size you set up in the New Document dialog box (File➪New➪Document
[Ô+N or Ctrl+N]). If in your document window it looks like two or more pages are touching, you’re looking at a spread.
InDesign uses nonprinting guides, lines that show you the position of margins and that help you position objects on the page. Margins are the spaces at the outside of the page, whereas columns are vertical spaces where text is sup-posed to go by default. Magenta lines across the top and bottom of each page show the document’s top and bottom margins. Violet lines show left and right columns (for single-page documents) or inside and outside columns (for spreads).
You can change the location of margin and column guides by choosing Layout➪Margins and Columns. You can create additional guides — such as
Page controls
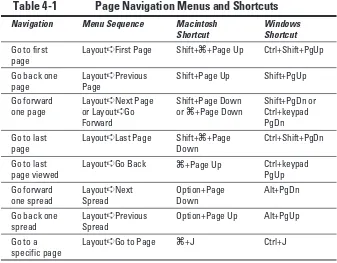
If you feel like flipping through pages of the document you’re creating, InDesign makes it easy with page-turning buttons and the Page field and pop-up menu. Controls for entering prefixes for the page numbers of sec-tions, and for indicating absolute page numbers in a document that con-tains multiple sections, are also handy. (An absolute page number indicates a page’s position in the document, such as +1 for the first page, +2 for the second page, and so on.)
At the bottom left of the document window is a combined Page page-number field and pop-up menu encased by two sets of arrows. These arrows are page-turning buttons that take you to, from left to right, the first page, the preced-ing page, the next page, and the last page. Just click an arrow to get where you want to go.
You can also jump directly to a specific document page or master page in several ways:
✓ Highlight the current number in the page number field (by selecting it with your cursor), enter a new page number or master-page name, and press Return or Enter.
✓ Use the Go to Page dialog box (Ô+J or Ctrl+J), enter a new page number or a master-page name, and press Return or Enter.
✓ Choose the desired page from the Page pop-up menu.
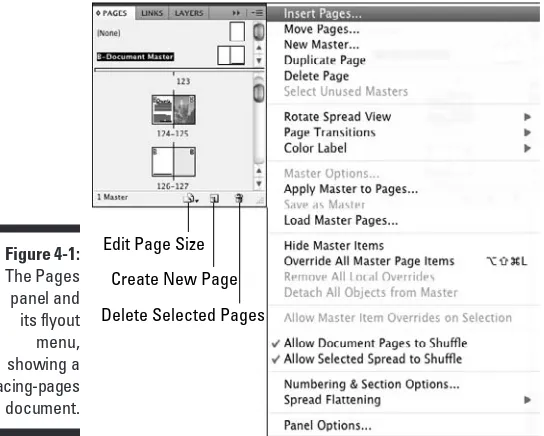
✓ You can also use the Pages panel to navigate your document, as Chap-ter 4 explains.
Opening Multiple Document Windows
If you like to work on more than one project at once, you’ve come to the right program. InDesign lets you open several documents at once. It also lets you open multiple windows simultaneously for individual documents. A large monitor (or having multiple monitors connected) makes this multiwindow feature even more useful. By opening multiple windows, you can
✓ Display two (or more) different pages or spreads at once. You still have to work on the documents one at a time, but no navigation is required — you have only to click within the appropriate window.
✓ Display multiple magnifications of the same page. For example, you
✓ Display a master page in one window and a document page based on that master page in another window. When you change the master
page, the change is reflected in the window in which the associated document page is displayed.
Document windows are by default accessed through a set of tabs below the Control panel, though as I explain later, you can also work with them as a series of free-floating windows.
When multiple windows are open, you activate a window by clicking on a window’s title tab or anywhere within its window. Also, the names of all open documents are displayed at the bottom of the Window menu. Choosing a document name from the Window menu brings that document to the front. If multiple windows are open for a particular document, each window is displayed (they’re displayed in the order in which you created them) in the Window menu.
To show multiple windows on-screen at once, first make them free-floating by choosing Window➪Float All in Window. Then choose either
✓ Window➪Arrange➪Tile
When you choose the Tile command, all open windows are resized and displayed side by side.
✓ Window➪Arrange➪Cascade
When you choose the Cascade command, the windows overlap each other so that each title bar is visible.
You can also use one of the window-layout options in the Arrange Documents pop-up menu’s options in the application bar. How they display will depend on the option you chose.
To put all these windows back into their regular tabs so that only one docu-ment window is visible on-screen at a time, choose Window➪Arrange➪
Consolidate All Windows or choose the Consolidate All Windows option (the single-window icon) in the Arrange Documents pop-up menu in the applica-tion bar.
To close all windows for the currently displayed document, press Shift+Ô+W or Ctrl+Shift+W. To close all windows for all open documents, press
Option+Shift+Ô+W or Ctrl+Alt+Shift+W.
own tab or free-floating window, depending on whether you’ve enabled Open Documents as Tabs in the Interface pane of the Preferences dialog box (InDesign➪Preferences➪Interface [Ô+K] or Edit➪Preferences➪Interface
[Ctrl+K]).
You can tell that a document window shows a different view of an existing document by looking at the name of the document in the window’s title. At the end of the document name will be a colon (:) followed by a number. Newsletter.indd:1 would be the document’s first window, Newsletter.indd:2 would be its second window, and so on.
Tooling around the Tools Panel
You can move the InDesign Tools panel (see Figure 1-2) — the control center for 32 of InDesign’s 33 tools, as well as for 13 additional functions — by click-ing and draggclick-ing it into position. The Tools panel usually appears to the left of a document.
The one tool not directly accessible from the Tools panel is the Marker tool. But you can switch to it from the Eyedropper tool by holding Option or Alt. (Chapter 6 explains its use.)
To discover each tool’s “official” name, hover the mouse pointer over a tool for a few seconds, and a tool tip will appear (see Figure 1-2), telling you the name of that tool. If the tool tips don’t display, make sure that the Tool Tips pop-up menu is set to Normal or Fast in the Interface pane of the Preferences dialog box (choose InDesign➪Preferences➪Interface [Ô+K] or Edit➪Preferences➪Interface [Ctrl+K]).
Tools panel includes tools for creating and manipulating the objects that make up your designs. The tools in the Tools panel are similar to those in other Adobe products (such as Photoshop, Illustrator, and Dreamweaver).
You don’t need to worry about all the tools, so in the text that follows I high-light just those that you’ll need to know to start using InDesign. You’ll likely come across the other tools as you work on specific tasks, so I cover those tools in the chapters that introduce those functions.
InDesign adds two tools: the Page tool (see Chapter 4) and the Gap tool (see Chapter 10). It drops the Position tool. Also, you can get more detail on any tool and how to use it by going to the new Tool Hints panel (choose Window➪
Utilities➪Tool Hints); it shows options for whatever tool you then select.
Figure 1-2:
The InDesign Tools panel (left) and its pop-out tools (cen-ter). Hover the mouse over a tool
Selection tool Direct Selection tool Page tool
Gap tool Type tool Line tool Pen tool Pencil tool Rectangular frame tool
Rectangle tool Scissors tool Free Transform tool Gradient tool Gradient Feather tool Note tool Eyedropper tool Hand tool Zoom tool
Swap fill and Stroke
Apply options Select Contents Select Container
Default Fill and Stroke Stroke
Using the Selection tools
To work with objects, you have to select them. InDesign provides two tools to do that, letting you select different aspects of objects.
Selection tool
The Selection tool is perhaps the most-used tool in InDesign. With the Selection tool, you can select objects on the page and move or resize them. You may want to think of this tool as the Mover tool because it’s the only tool that lets you drag objects around on-screen.
After you’ve selected the Selection tool, here’s how it works:
✓ To select any object on a document page, click it. If you can’t seem to
select it, the object might be placed by a master page (a preformatted page used to format pages automatically), or the object might be behind another object.
✓ To select an object placed by a master page, press Shift+Ô or Ctrl+Shift while you click.
✓ To select an object that is completely behind another object,Ô+click it or Ctrl+click it. For graphics frames, you can also click the “doughnut hole” icon — formally called the content grabber — that appears over the center of an object when you hover over any portion of it.
The content grabber is new to InDesign CS5. You can turn it off and on by choosing View➪Extras➪Show/Hide Content Grabber.
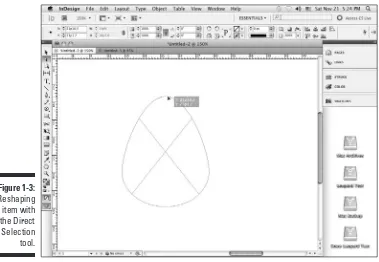
Direct Selection tool
The Direct Selection tool is what you use to work on the contents of a frame, not the frame itself. For example, you can use the Direct Selection tool to select individual handles on objects to reshape them or to move graphics within their frames.
Here’s how the Direct Selection tool works:
✓ To select an object to reshape it, click the object to display anchor
points on the edges (the anchor points are hollow handles that you can select individually, as shown in Figure 1-3). You can drag the anchor points to reshape the object.
✓ To select objects placed by a master page, Shift+Ô+click or
Selection tool, making it easier to select and move graphics in frames that are overlapped by others.
✓ To move a frame but leave the graphic in place, click an edge of the
frame and drag it.
Using the Type tool
A very frequently used tool, the Type tool lets you enter, edit, and format text. The Type tool also lets you create rectangular text frames.
Here’s how the Type tool works:
✓ To create a rectangular text frame, click and drag; hold the Shift key to create a perfect square.
✓ To begin typing or editing text, click in a text frame or in any empty frame and type away.
I explain stories and threaded text frames in Chapter 11.
Figure 1-3:
Using the object-creation tools
InDesign has a bunch of tools for creating shapes. Part V covers them in more depth, but you should know about a few of them now because they create objects that can contain either text or graphics. Plus, you can also use them to draw your own shapes that you then color or otherwise embellish in your layout. Here’s what you need to know:
✓ Pen tool: With the Pen tool, you can create simple illustrations. You
use the Pen tool, which is modeled after the pen tools in Illustrator and Photoshop, to create paths (both open, such as lines, and closed, such as shapes) consisting of straight and curved segments. Give it a try — it’s fun! (Chapter 7 explains how to use the tool.)
✓ Type tool: The Type tool lets you draw rectangular text frames, as well as type text inside them.
✓ Line tool: The Line tool lets you draw freestanding lines (paths) on your
page. After selecting this tool, simply click and drag the mouse to draw the line. Holding the Shift key while you click and drag constrains the line angle to 45-degree increments, which is useful for creating straight horizontal and vertical lines.
✓ Frame and shape tools: InDesign has three frame tools (Rectangle Frame, Ellipse Frame, and Polygon Frame) and three shape tools (Rectangle, Ellipse, and Polygon). The frame and shape tools are redundant because both frames and shapes can hold text or graphics or be empty.
Because the frame and shape tools really do the same thing, you might use the frame tool when creating frames that will have their content added later. Why? Because the frames appear with a big X through them, making them easier to spot when looking for frames to fill. The shape tools create frames without that X, so it’s easier to overlook them. To create a rectangle or ellipse, choose the appropriate tool, click
some-where in the document window, and drag the mouse to another loca-tion. The rectangle or ellipse fills the area. But creating a polygon works differently, as Chapter 7 explains.
Using the navigation tools
✓ Hand tool: The Hand tool lets you move a page around to view differ-ent portions of it or another page differ-entirely. After selecting the Hand tool, click and drag in any direction. You can access the Hand tool temporar-ily without actually switching tools by pressing Option+spacebar or Alt+spacebar.
For a quick way to pan through your document, make sure that the Hand tool is active. Then click and hold the mouse. InDesign will zoom out and display a red rectangle. If you move the mouse, InDesign stops zooming and instead lets you move the rectangle to a new area of focus. Let go to have InDesign display that part of the document back at the original zoom setting. If the autozoom is too fast, you can use the up and down arrow keys instead to manually move through various zoom levels. And if you decide you’ve navigated some place you didn’t mean to, just press Esc — as long as the mouse is still pressed — to start over.
✓ Zoom tool: With the Zoom tool, you increase and decrease the document
view scale. You can highlight a specific area on a page to change its view, or you can click on-screen to change the view scale within InDesign’s preset increments, which is the same as pressing Ô+= or Ctrl+= to zoom in.
✓ Screen Mode buttons: At the very bottom of the Tools panel is the Screen Mode button, which by default shows the Normal mode as active. Its pop-out menu has four additional options: Bleed, Slug, Preview, and Presentation. The Normal screen mode shows rulers, frame edges, document margins, page boundaries, guides, text flow indicators, and all the other visual cues that InDesign displays to help you identify various kinds of objects. The Preview mode shows you just the pages and their content, without these onscreen indicators, so you can see what the reader will ultimately see, The Bleed mode is a variation of the Preview mode that shows any objects that bleed (extend) beyond the page boundaries, whereas Slug mode is a variation of the Preview mode that shows the space reserved for information such as crop marks and color separation names used in final output. (The View menu also has a Screen Mode submenu that lets you access these modes.)
The new Presentation mode is also a variation of the Preview mode, except that even the InDesign menus and document window disap-pear, so all you see is the layout. Furthermore, you can go through the layout as if it were a slideshow, such as to show the layout comps to a client. Click the mouse or press → to advance to the next spread, and
Shift+click or right-click the mouse or press ← to go to the previous
spread. You can also press Home to go to the first spread and End to go to the final spread. Press Esc to return to your previous screen mode. If your Tools panel displays in two columns, you get two screen mode
Working with Panels, Docks,
and Workspaces
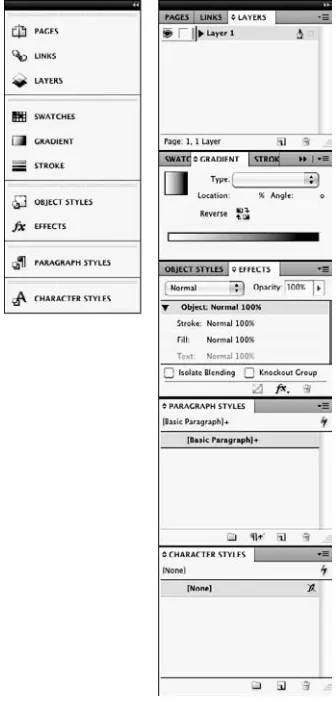
InDesign has so many controls and features that its designers have long ago stopped relying on menu commands to access them all. Instead, most of InDesign’s features are presented as sort of miniature dialog boxes, called panels, that are “windows” of readily accessible options to consider when working in InDesign.
Working with panels
Panels provide an interactive method of working with features, one that lets you access the controls quickly. In many cases, panels offer the only method for performing many tasks. Figure 1-1, earlier in this chapter, shows the panels that appear on-screen by default. Note that you can access all panels — except Quick Apply and Tabs — via the Window menu, whether or not the panel is displayed on-screen at the moment.
Panels typically have three — but sometimes four — controls:
✓ All panels but the Access CS Live, Attributes, Background Tasks, CS News and Resources, Kuler, Pathfinder, Script Label, Story, Tool Hints, and Tools panels have a flyout menu, which provides a pop-up menu of controls relevant to that panel.
✓ Any active panel — meaning it’s displayed in front of any others in its panel group so that you can actually modify its settings — has a close control to remove the panel from the panel group. This control isn’t a way to switch to another panel in that panel group — to do that, just click the tab of the panel you want to work with. (If you remove a panel by mistake, go to the Window menu to open it again.)
Using contextual menus
InDesign’s contextual menu interface element is very useful. By Control+clicking or right-clicking the document, an object, elements listed in a panel (such as a list of files or styles), the rulers, and so on, you can display a menu of
✓ Any active panel has a collapse control (the >> icon). For panels in the dock, clicking that icon collapses it back into the dock. For panels not in the dock (that is, for floating panels), collapsing them shrinks the panel to a much smaller size to get them out of the way. When collapsed, these panels will have a << icon to expand them again. (The Tools panel is an exception: Clicking the >> icon changes it to a two-column layout, while clicking the << icon changes it to a one-column layout.)
✓ Some panels have an expand/collapse control, which looks like a caret
(^) above a down-facing caret. Click the control to show more or fewer options. (If all options are displayed, clicking the control will shorten the panel and hide some of the advanced options; if only the basic options are displayed, clicking the control lengthens the panel and shows all the options.)
Panels new to InDesign CS5 are
✓ The Access CS Live, CS News and Resources, and CS Review panels (which relate to extra-cost online services from Adobe not covered in this book)
✓ The Animation, Background Tasks, Media, Object States, Preview, and Timing panels, which are part of InDesign CS5’s new multimedia capa-bilities (see Chapter 24)
✓ The Mini Bridge and Tool Hints panels covered in this chapter
✓ The Track Changes panels (see Chapter 12)
To better suit your working style, you can drag panels by their tabs to move them from one panel group to another, drag them out of a dock so that they’re floating, or drag them into a dock so that they’re no longer free-floating. The dock feature lets you keep panel groups in one contained area, which helps keep the interface from getting too cluttered. But you’re not forced to work this way: You can still drag panels outside the main dock so that they’re free-floating on-screen.
Not all panels display in the main dock; less-used panels, such as Data Merge, show up in a free-floating panel group when you open them via the Window menu. Of course, you can always add such panels to the main dock if you use them a lot.