QuickBooks
2011
QuickBooks
2011
Bonnie Biafore
Beijing | Cambridge | Farnham | Köln | Sebastopol | Tokyo
QuickBooks 2011: The Missing Manual
by Bonnie BiaforeCopyright © 2011 O’Reilly Media, Inc. All rights reserved. Printed in the Unites States of America.
Published by O’Reilly Media, Inc., 1005 Gravenstein Highway North, Sebastopol, CA 95472. O’Reilly Media books may be purchased for educational, business, or sales promotional use. Online editions are also available for most titles: http://my.safaribooksonline.com. For more information, contact our corporate/institutional sales department: 800-998-9938 or [email protected]. Printing History:
November 2010: First Edition.
Nutshell Handbook, the Nutshell Handbook logo, the O’Reilly logo, and “The book that should have been in the box” are registered trademarks of O’Reilly Media, Inc. QuickBooks 2011: The Missing Manual, The Missing Manual logo, Pogue Press, and the Pogue Press logo are trademarks of O’Reilly Media, Inc.
Many of the designations used by manufacturers and sellers to distinguish their products are claimed as trademarks. Where those designations appear in this book, and O’Reilly Media, Inc. was aware of a trademark claim, the designations have been printed in caps or initial caps. While every precaution has been taken in the preparation of this book, the publisher and author assume no responsibility for errors or omissions, or for damages resulting from the use of the information contained herein.
Table of Contents
Missing Credits
. . .xix
Introduction
. . .1
Part One: Getting Started
Chapter 1: Creating a Company File
. . .13
Opening QuickBooks . . . 13
Before You Create Your Company File . . . 14
Start Date . . . 14
Account Balances and Transactions . . . 15
About the EasyStep Interview . . . 17
Starting the EasyStep Interview . . . 17
Company Information . . . 18
Creating Your Company File . . . 20
Customizing Your Company File . . . 21
Beginning to Use QuickBooks . . . 24
Modifying Company Info . . . 25
What’s Next? . . . 25
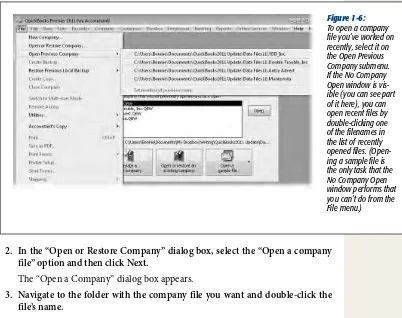
Opening an Existing Company File . . . 26
Opening a Recently Opened Company File . . . 26
Opening Any Company File . . . 26
Restoring a Backup File . . . 28
Opening a Portable Company File . . . 28
Converting from Another Program to QuickBooks . . . 29
Converting from Quicken Home & Business . . . 29
Converting from a Non-Intuit Program . . . 30
Chapter 2: Getting Around in QuickBooks
. . .31
The QuickBooks Home Page . . . 31
Vendors . . . 33
Employees . . . 36
Company . . . 37
Banking . . . 37
The Company Snapshot . . . 37
Using Menus and the Icon Bar . . . 38
Switching Between Open Windows. . . 38
Chapter 3: Setting Up a Chart of Accounts
. . .41
Acquiring a Chart of Accounts . . . 42
Importing a Chart of Accounts . . . 42
Naming and Numbering Accounts . . . 44
Setting Up Account Numbers . . . 44
Standardizing Account Names . . . 46
Creating Accounts and Subaccounts . . . 47
Viewing Account Names and Numbers . . . 47
Creating an Account . . . 49
Modifying Accounts . . . 54
Hiding and Deleting Accounts . . . 55
Hiding Accounts . . . 55
Deleting Accounts . . . 55
Merging Accounts . . . 57
Chapter 4: Setting Up Customers and Jobs
. . .59
Creating Customers in QuickBooks . . . 61
Creating a New Customer . . . 62
Customer Data Entry Shortcuts . . . 69
Adding and Editing Multiple Customer Records . . . 70
Importing Customer Information . . . 74
Exporting Customer Information . . . 76
Creating Jobs in QuickBooks . . . 79
Creating a New Job . . . 80
Modifying Customer and Job Information . . . 82
Categorizing Customers and Jobs . . . 83
Understanding Customer Types . . . 83
Creating a Customer Type . . . 85
Categorizing Jobs . . . 86
Adding Notes About Customers . . . 87
Merging Customer Records . . . 88
Hiding and Deleting Customers . . . 90
Deleting Customers . . . 90
Hiding and Restoring Customers . . . 91
Chapter 5: Setting Up Invoice Items
. . .93
What Items Do . . . 93
When You Don’t Need Items . . . 94
Should You Track Inventory with Items? . . . 95
Generic or Specific? . . . 97
Naming Items . . . 98
Subitems . . . 99
Creating Items . . . 100
Creating Multiple Items. . . 101
Creating Individual Items . . . 102
Service Items . . . 104
Service Items Without Associated Costs . . . 105
Service Items with Associated Costs . . . 106
Product Items . . . 107
Inventory Part Fields . . . 111
Non-Inventory Part Fields . . . 114
Other Types of Items . . . 114
Other Charge . . . 114
Subtotal . . . 116
Group . . . 116
Discount . . . 118
Payment . . . 119
Setting Up Sales Tax . . . 120
Sales Tax Codes . . . 121
Sales Tax Items . . . 122
Modifying Items . . . 124
Hiding and Deleting Items . . . 125
Hiding Items . . . 126
Deleting Items . . . 126
Chapter 6: Setting Up Other QuickBooks Lists
. . .129
The Vendor List . . . 130
Creating a Vendor . . . 131
Entering Address Information . . . 131
Additional Info . . . 131
Importing Vendor Information . . . 133
Filling in Expense Accounts Automatically . . . 134
Categorizing with Classes . . . 135
Price Levels . . . 137
Creating a Price Level . . . 138
Applying Price Levels . . . 140
Customer and Vendor Profile Lists . . . 140
Sales Rep List . . . 141
Customer Type List . . . 141
Vendor Type List . . . 143
Job Type List . . . 143
Terms List . . . 143
Customer Message List . . . 145
Payment Method List . . . 145
Vehicle List . . . 146
Fixed Asset Items . . . 146
Creating and Editing List Entries . . . 148
Creating Entries . . . 149
Editing Entries . . . 150
Merging List Entries . . . 150
Hiding and Deleting List Entries . . . 151
Hiding Entries . . . 151
Deleting Entries . . . 153
Finding List Entries in Transactions . . . 153
Sorting Lists . . . 154
Printing Lists . . . 154
Blasting Out a Quick List . . . 155
Customizing a Printed List . . . 155
Chapter 7: Managing QuickBooks Files
. . .157
Switching Between Multi- and Single-User Mode . . . 157
Backing Up Files . . . 158
Choosing Standard Settings for Your Backups . . . 160
Backing Up Manually . . . 162
Automated Backups . . . 164
Restoring Backups . . . 168
Sending Company Files to Others . . . 171
Creating a Portable Company File . . . 172
Opening a Portable Company File . . . 173
Verifying Your QuickBooks Data . . . 174
Running the Verify Data Utility . . . 175
Reviewing Problems . . . 175
Running the Rebuild Data Utility . . . 176
Cleaning Up Data . . . 176
Running the Clean Up Company File Utility . . . 178
Cleaning Up After Deleting Files . . . 179
Part Two: Bookkeeping
Chapter 8: Tracking Time and Mileage
. . .181
Setting Up Time Tracking . . . 182
Turning on Time Tracking . . . 182
Setting Up the People Who Track Time . . . 183
Setting Up Items and Customers for Time Tracking . . . 184
Entering Time in QuickBooks . . . 185
Filling in Weekly Timesheets . . . 185
Running Time Reports . . . 190
Tracking Mileage . . . 192
Adding a Vehicle . . . 192
Setting the Mileage Rate . . . 193
Recording Mileage Driven . . . 194
Generating Mileage Reports . . . 196
Chapter 9: Paying for Expenses
. . .199
When to Pay Expenses . . . 199
Entering Bills . . . 200
Automating Recurring Bills . . . 205
Memorizing a Bill . . . 206
Using a Memorized Bill . . . 207
Creating Memorized Groups of Bills . . . 208
Purchasing Inventory . . . 209
Creating Purchase Orders . . . 210
Receiving Inventory and Bills Simultaneously . . . 213
Receiving Inventory Before the Bill . . . 215
Handling Reimbursable Expenses . . . 218
Setting Up Reimbursements As Income . . . 219
Recording Reimbursable Expenses . . . 220
Paying Your Bills . . . 221
Selecting Bills to Pay . . . 221
Modifying Payment Amounts . . . 223
Applying Discounts and Credits to Payments . . . 223
Setting the Payment Method and Account . . . 227
Paying Selected Bills . . . 228
Producing Checks . . . 228
Writing Checks by Hand . . . 228
Setting Up QuickBooks to Print Checks . . . 229
Printing Checks . . . 232
Writing Checks Without Entering Bills . . . 233
Using the Write Checks Window . . . 234
Adding Checks to an Account Register . . . 236
Paying with Cash . . . 238
Paying with Credit Cards . . . 238
Recording Vendor Refunds and Credits . . . 240
Running Expense-Related Reports . . . 241
A/P Aging and Vendor Balance Reports . . . 241
Purchases Reports . . . 242
Paying Sales Tax . . . 242
Sales Tax Payment Preferences . . . 243
Producing Reports of the Sales Tax You Owe . . . 243
Chapter 10: Invoicing
. . .247
Choosing the Right Type of Form . . . 248
Sales Receipts . . . 248
Statements . . . 249
Invoices . . . 250
Sales Forms and Accounts . . . 250
Creating Invoices . . . 252
Creating an Invoice . . . 253
Filling in Invoice Header Fields . . . 255
Entering Invoice Line Items . . . 260
Applying Subtotals, Discounts, and Percentage Charges . . . 265
Adding a Message to the Customer . . . 267
Choosing How to Send the Invoice . . . 267
Adding a Memo to Yourself . . . 268
Creating Batch Invoices . . . 269
Invoicing for Billable Time and Costs . . . 272
Setting Up Invoicing for Time and Costs . . . 272
Adding Billable Time and Costs to Invoices . . . 273
Using the Invoice for Time & Expenses Command . . . 273
Selecting Billable Time and Costs . . . 275
Checking for Unbilled Costs . . . 278
Invoicing for Backordered Products . . . 278
Using Pending Invoices for Backorders . . . 279
Using Sales Orders for Backorders . . . 280
Estimating Jobs . . . 282
Creating an Estimate . . . 283
Creating Multiple Estimates . . . 284
Creating an Invoice from an Estimate . . . 286
Comparing Estimates to Actuals . . . 288
Creating Progress Invoices . . . 288
Progress Invoicing Options . . . 288
Fine-Tuning a Progress Invoice . . . 290
Handling Refunds and Credits . . . 292
Creating Credit Memos . . . 292
Creating Refund Checks . . . 293
Applying Credits to Existing Invoices . . . 294
Applying Credits to New Invoices . . . 296
Editing Invoices . . . 296
Voiding and Deleting Invoices . . . 297
Chapter 11: Producing Statements
. . .299
Generating Statements . . . 299
Creating Statement Charges . . . 300
Generating Customer Statements . . . 303
Previewing Statements . . . 307
Chapter 12: Transaction Timesavers
. . .309
Printing Sales Forms . . . 310
Setting Print Options . . . 310
Aligning Forms and Paper . . . 312
Choosing a Print Method . . . 314
Printing One Form . . . 315
Printing in Batches . . . 315
Printing Mailing and Shipping Labels . . . 316
Printing Packing Slips . . . 318
Emailing Sales Forms . . . 319
Choosing a Send Method . . . 319
Emailing One Form . . . 320
Emailing in Batches . . . 321
Memorized Transactions . . . 322
Using a Memorized Transaction . . . 324
Editing a Memorized Transaction . . . 324
Finding Transactions . . . 325
Searching with QuickBooks’ Centers . . . 325
Finding Items . . . 327
Using the Search Command . . . 327
Using the Find Command . . . 329
Chapter 13: Managing Accounts Receivable
. . .333
Receivables Aging . . . 334
Accounts Receivable Aging Reports . . . 335
Customer & Job Reports . . . 336
Receiving Payments for Invoiced Income . . . 338
Applying Credits to Invoices . . . 342
Discounting for Early Payment . . . 344
Deposits, Down Payments, and Retainers . . . 347
Setting Up QuickBooks for Prepayments . . . 348
Recording Prepayments . . . 349
Applying a Deposit, Down Payment, or Retainer to an Invoice . . . 350
Refunding Prepayments . . . 351
Applying Finance Charges . . . 353
Finance Charge Preferences . . . 353
Assessing Finance Charges on Overdue Balances . . . 354
Cash Sales . . . 355
Creating Sales Receipts . . . 356
Editing Sales Receipts . . . 357
Voiding and Deleting Sales Receipts . . . 357
Memorizing a Batch Sales Transaction . . . 358
Making Deposits . . . 361
Choosing Payments to Deposit . . . 361
Recording Deposits . . . 362
Depositing Money from Merchant Card Accounts . . . 364
Chapter 14: Doing Payroll
. . .367
Paying Yourself . . . 368
Doing Payroll Yourself . . . 368
Adding Payroll Transactions from an Outside Service . . . 370
Choosing a Payroll Service . . . 372
Applying for a Payroll Service . . . 373
Setting Up Payroll . . . 374
Setting Up Compensation and Benefits . . . 375
Setting Up Employees . . . 377
Setting Up Payroll Taxes . . . 382
Entering Historical Payroll . . . 383
Running Payroll . . . 384
Printing Paychecks and Pay Stubs . . . 388
Paying Payroll Taxes . . . 390
Preparing Payroll Tax Forms . . . 393
Chapter 15: Bank Accounts, Credit Cards, and Petty Cash
. . . .395
Entering Transactions in an Account Register . . . 396
Opening a Register Window . . . 396
Creating a Transaction in an Account Register . . . 397
Handling Bounced Checks . . . 400
Setting Up QuickBooks to Handle Bounced Checks . . . 400
Recording Bank Charges . . . 402
Re-invoicing for Bounced Checks . . . 403
Transferring Funds . . . 405
Reconciling Accounts . . . 407
Preparing for the First Reconciliation . . . 407
Preparing for Every Reconciliation . . . 407
Starting a Reconciliation . . . 408
Reconciling Transactions . . . 410
Reconciliation Reports . . . 412
Modifying Transactions During Reconciliation . . . 412
Stopping and Restarting a Reconciliation . . . 413
Correcting Discrepancies . . . 414
Undoing the Last Reconciliation . . . 416
When Your Bank Makes a Mistake . . . 417
Managing Loans . . . 417
Setting Up a Loan . . . 418
Adding a Loan to Loan Manager . . . 419
Setting Up Payments . . . 423
What-If Scenarios . . . 425
Tracking Petty Cash . . . 426
Recording ATM Withdrawals and Deposits to Petty Cash . . . 426
Recording Purchases Made with Petty Cash . . . 427
Chapter 16: Making Journal Entries
. . .429
Balancing Debit and Credit Amounts . . . 430
Some Reasons to Use Journal Entries . . . 431
Creating General Journal Entries . . . 433
Filling in General Journal Entry Fields . . . 435
Checking General Journal Entries . . . 436
Reclassifications and Corrections . . . 437
Reclassifying Accounts . . . 437
Reassigning Jobs . . . 437
Recording Depreciation with Journal Entries . . . 438
Recording Owners’ Contributions . . . 439
Chapter 17: Generating Financial Statements
. . .441
The Profit & Loss Report . . . 442
Generating a Profit & Loss Report . . . 445
Other Profit & Loss Reports . . . 446
The Balance Sheet . . . 448
Understanding the Balance Sheet . . . 449
Generating a Balance Sheet Report . . . 450
The Statement of Cash Flows . . . 451
Understanding the Statement of Cash Flows . . . 451
Generating a Statement of Cash Flows . . . 452
Other Helpful Financial Reports . . . 454
Chapter 18: Performing End-of-Year Tasks
. . .457
Checking for Problems . . . 457
Viewing Your Trial Balance . . . 458
Generating Year-End Financial Reports . . . 459
Generating Tax Reports . . . 462
Sharing a Company File with Your Accountant . . . 463
Creating an Accountant’s Review Copy . . . 463
Sending a Copy Directly to Your Accountant . . . 466
Merging Accountant Changes into Your Company File . . . 467
Canceling an Accountant’s Review Copy. . . 468
Setting Up an External Accountant User . . . 469
1099s . . . 470
Generating 1099 Reports . . . 470
Printing 1099-MISC Forms . . . 471
Part Three: Managing Your Business
Chapter 19: Managing Inventory
. . .477
The QuickBooks Inventory Process . . . 478
Setting Up Inventory Items . . . 478
Buying and Selling Inventory . . . 479
Running Inventory Reports . . . 479
How Much Is Inventory Worth? . . . 480
Inventory Stock Status . . . 483
Viewing One Inventory Item . . . 484
Performing a Physical Inventory . . . 484
Adjusting Inventory in QuickBooks . . . 485
Adjusting Quantities . . . 486
Adjusting Quantities and Values . . . 488
Chapter 20: Budgeting and Planning
. . .491
Types of Budgets . . . 492
Ways to Build Budgets . . . 493
Creating Budgets in QuickBooks . . . 494
Filling in Budget Values . . . 496
Copy Across Columns . . . 497
Adjust Row Amounts . . . 498
Creating Additional Customer:Job or Class Budgets . . . 499
Copying Budgets and Creating What-if Budgets . . . 501
Running Budget Reports . . . 504
The Budget Overview Report . . . 504
Budget vs. Actual Report . . . 505
Profit & Loss Budget Performance Report . . . 506
Budget vs. Actual Graph . . . 507
Chapter 21: Working with QuickBooks Reports
. . .509
Finding the Right Reports . . . 510
Reviewing Reports in the Report Center . . . 511
Working with Reports in the Report Center . . . 512
Finding Frequently Used Reports . . . 512
Running Reports. . . 513
Printing and Saving Reports. . . 516
Saving Reports As Files . . . 517
Customizing Reports . . . 519
Date Ranges . . . 521
Subtotals . . . 522
Customizing the Columns in Reports . . . 523
Sorting Reports . . . 525
Filtering Reports . . . 527
Report Headers and Footers . . . 528
Memorizing Reports . . . 531
Swapping Reports Between Company Files . . . 533
Exporting a Report Template . . . 533
Importing Report Templates . . . 534
Part Four: QuickBooks Power
Chapter 22: Online Banking Services
. . .537
Setting Up Your Internet Connection . . . 538
Setting Up Your Accounts for Online Services . . . 539
Applying for Online Services . . . 539
Activating Online Services for Your QuickBooks Account . . . 540
An Intro to Exchanging Data with Your Bank . . . 543
QuickBooks’ Online Banking Modes . . . 543
Downloading Statements with WebConnect . . . 544
Creating Online Items for Direct Connections . . . 545
Online Banking Using Side-by-side Mode . . . 547
Sending and Receiving Transactions . . . 547
Matching Transactions . . . 548
Matching Unmatched Transactions . . . 550
Adding Multiple Transactions . . . 553
Deleting Downloaded Transactions . . . 555
Online Banking Using Register Mode . . . 556
Sending and Receiving Items . . . 556
Working with Online Items . . . 557
Matching Transactions . . . 557
Adding Multiple Transactions . . . 559
Deleting Downloaded Transactions . . . 560
Chapter 23: Configuring Preferences to Fit Your Company
. . .561
An Introduction to Preferences . . . 562
Accounting . . . 563
Bills . . . 566
Checking . . . 567
Choosing the Bank Accounts You Use . . . 567
Setting the Way Company Checks Work . . . 568
Choosing Company-Wide Payroll Accounts . . . 569
Choosing an Online Banking Mode . . . 570
Desktop View . . . 570
Window Preferences . . . 570
Preferences for Saving the Desktop . . . 571
Choosing a Color Scheme . . . 572
Setting Up the QuickBooks Home Page . . . 572
Finance Charge . . . 573
Tuning QuickBooks to Your Liking . . . 575
Company-Wide General Preferences . . . 578
Integrated Applications . . . 579
Items & Inventory . . . 580
Jobs & Estimates. . . 581
Multiple Currencies . . . 582
Payments . . . 582
Payroll & Employees . . . 583
Reminders . . . 585
Reminders on the My Preferences Tab . . . 585
Reminders for Everyone . . . 586
Reports and Graphs . . . 587
Preferences for the Reports You Generate . . . 588
Preferences That Apply to Every Company Report . . . 589
Sales & Customers . . . 590
Sales Tax . . . 591
Search . . . 592
Send Forms . . . 592
Spelling . . . 594
Tax: 1099 . . . 595
Time & Expenses . . . 595
Chapter 24: Integrating QuickBooks with Other Programs
. . . .597
Mail Merge to a Word Document . . . 598
Creating Letters and Envelopes in QuickBooks . . . 598
Synchronizing Contacts . . . 603
Using QuickBooks Contact Sync for Outlook . . . 603
Setting Up an Integrated Application . . . 606
Exporting QuickBooks Data . . . 608
Exporting Lists and Addresses . . . 610
Exporting Reports . . . 611
Importing Data from Other Programs . . . 614
Importing an Excel Spreadsheet . . . 614
Importing a Delimited File . . . 616
Chapter 25: Customizing QuickBooks
. . .619
Customizing the Desktop . . . 620
Customizing the Home Page . . . 620
Fast Access to Favorite Commands . . . 620
Building Your Favorites Menu . . . 621
Customizing the Icon Bar . . . 622
Customizing the Company Snapshot . . . 626
Customizing Forms . . . 629
Working with Form Designs . . . 630
Editing an Existing Form in QuickBooks . . . 633
Additional Customization . . . 637
Managing Templates . . . 639
Copying a Template . . . 640
Deleting or Hiding a Template . . . 640
Exchanging Templates Between Company Files . . . 641
Chapter 26: Keeping Your QuickBooks Data Secure
. . .643
Setting Up the Administrator . . . 644
Assigning the Administrator User Name and Password . . . 644
Resetting the Administrator Password . . . 646
Complying with Credit Card Security Regulations . . . 647
Creating QuickBooks Users . . . 648
Adding New Users . . . 650
Resetting a User Password . . . 651
Restricting Access to Features and Data . . . 651
What the Access Areas Represent . . . 652
Setting Access Rights . . . 654
Audit Trails. . . 655
Part Five: Appendixes
Appendix A: Installing QuickBooks
. . .657
Appendix B: Help, Support, and Other Resources
. . .667
Missing Credits
About the Author
Bonnie Biafore has always been fascinated with math in its practical and more esoteric forms. As an engineer and project manager, she’s thorough and steadfastly attentive to detail but redeems herself by using her sick sense of humor to transform these drool-inducing subjects into entertaining reading. She writes about personal finance, investing, accounting, and project management. Her NAIC Stock Selection Handbook won major awards from the Society of Technical Communication and APEX Awards for Publication Excellence (but the raves she receives from beginning investors mean much more to her).
Bonnie is also the author of O’Reilly’s Microsoft Project 2010: The Missing Manual, Personal Finance: The Missing Manual, Quicken 2009: The Missing Manual, and On-line Investing Hacks. She writes a monthly column called “WebWatch” for Better In-vesting magazine and is a regular contributor to www.interest.com. As a consultant, she manages projects for clients and wins accolades for her ability to herd cats.
When not chained to her computer, she hikes and cycles in the mountains, walks her dogs, and cooks gourmet meals, and hones her project management skills sched-uling her life. You can learn more at Bonnie’s website, www.bonniebiafore.com, or email her at [email protected].
About the Creative Team
Nellie McKesson (production editor) spends her spare time doing DIY home reno-vation projects on her house, and pursuing her love of layout and template design in InDesign (www.dessindesigns.com).
Lauren Becker (technical reviewer) is a senior at Emory University’s Goizueta Business School, pursuing an Accounting concentration and a Persian/Farsi minor. Email: [email protected].
Acknowledgments
Behind the scenes, a throng of folks work hard to make a book (and me) look as good as we do. I am always grateful for the improvements that people make to my writing. My words (and bookkeeping) are better for it. Dawn Mann has done a fabu-lous job of piloting this book through the shoals of publishing. Special thanks to Denise Getz for building an index that helps you find all the information you want (especially important given the complete absence of an index in QuickBooks Help).
I also want to thank the technical reviewers Lauren Becker and Shaheen, for keep-ing me honest. And last, but definitely not least, my agent Neil Salkind deserves an award for his unwavering support for more than a decade.
Introduction
T
housands of small companies and nonprofit organizations turn to Quick-Books to keep their finances on track. And over the years, Intuit has intro-duced various editions of QuickBooks to satisfy the needs of different types of companies. Back when milk was simply milk, you either used QuickBooks or you didn’t. But now, when you can choose milk from soy beans as well as cows, and five different levels of fat, it’s no surprise that QuickBooks comes in Simple Start, Pro, Premier, Online, and Enterprise editions (which, in some cases, are dramatically dif-ferent from their siblings), as well as six industry-specific editions. From the smallest of sole proprietorships to burgeoning enterprises, one of these editions is likely to meet your organization’s needs and budget.QuickBooks isn’t hard to learn. Many of the features that you’re familiar with from other programs work just as well in QuickBooks—windows, dialog boxes, drop-down lists, and keyboard shortcuts, to name a few. And with each new version, Intuit has added enhancements and new features to make your workflow smoother and faster. The challenge is knowing what to do according to accounting rules, and how to do it in QuickBooks.
What’s New in QuickBooks 2011
Despite the fluctuating size of the tax code, accounting and bookkeeping practices don’t change much each year. The changes in QuickBooks 2011 are mostly small tweaks and subtle improvements, but a few additions might be just what you’ve been waiting for:
• The QuickBooks Setup window (page 24) now opens after you finish creating a new company file. The window steps you through setting up customers, ven-dors, employees, items you sell, and bank accounts.
• The Company Snapshot window now includes a Customer tab (page 37) that lets you review the status and recent transactions of your customers.
• Transaction windows like Create Invoices and Enter Bills include a new panel with a summary of the customer’s or vendor’s account status and a list of recent transactions (page 201).
• QuickBooks now offers separate preferences to automatically apply discounts and credits (page 223).
• You can set up a batch of invoices (page 269) for the same items and amounts and then send them to as many of your customers as you want. In addition, you can add all the customers that receive the same invoice to a billing group and then choose that group to send the invoice to each customer in it.
• QuickBooks can now use Web-based email accounts (page 593), such as Gmail or Yahoo.
• The new “Balance sheet by class” report lets you prepare a balance sheet for each class you track—perfect for keeping tabs on the performance of different busi-ness units or locations.
When QuickBooks May Not Be the Answer
When you run a business (or a nonprofit), you track company finances for two rea-sons: to keep your business running smoothly and to generate the reports required by the IRS, SEC, and anyone else you have to answer to. QuickBooks helps you per-form basic financial tasks, track your financial situation, and manage your business to make it even better. But before you read any further, here are a few things you shouldn’t try to do with QuickBooks:
• Work with more than 14,500 unique inventory items or 14,500 contact names. QuickBooks Pro and Premier company files can hold up to 14,500 in-ventory items and a combined total of up to 14,500 customer, vendor, employee, and other (Other Names list) names. (QuickBooks Enterprise Solutions version 7.0 and later increases these limits to 1,000,000.)
• Track personal finances. Even if you’re a company of one, keeping your per-sonal finances separate from your business finances is a good move, particularly when it comes to tax reporting. In addition to opening a separate checking ac-count for your business, track your personal finances somewhere else (like in Quicken). If you do decide to use QuickBooks, at least create a separate com-pany file for your personal financial info.
will generate lots of income, and you should track it in QuickBooks. However, in QuickBooks, these types of investments show up as assets of the company (page 146).
• Manage customer relationships. Lots of information goes into keeping cus-tomers happy. With QuickBooks, you can stay on top of customer activities with features like To Do items, Reminders, and Memorized Transactions. But for tracking details like memberships, items sold on consignment, project progress, and scheduled events, another program like Microsoft Excel or Access would be a better solution.
Note: Intuit sells an online customer-management product called Customer Manager (http://customer man-ager.com). Also, some third-party customer-management programs integrate with QuickBooks (page 609).
Choosing the Right Edition of QuickBooks
QuickBooks comes in a gamut of editions, offering options for organizations at both ends of the small-business spectrum. QuickBooks Simple Start and Online Edition cover the basic needs of very small operations. Enterprise Solutions, on the other hand, are the most robust and powerful editions of QuickBooks, boasting enhanced features and speed for the biggest of small businesses.
Warning: QuickBooks for Mac differs significantly from the Windows version, and unfortunately you won’t find help with the Mac version of the program in this book.
This book focuses on QuickBooks Pro because its balance of features and price make it the most popular edition. Throughout this book, you’ll also find notes about features offered in the Premier edition, which is one step up from Pro. (Whether you’re willing to pay for these advanced features is up to you.) Here’s an overview of what each edition does:
• QuickBooks Simple Start is mainly a marketing tool, because you’ll quickly outgrow its limitations. (At that point, you can move your data to QuickBooks Pro or QuickBooks Online.) But it’s a low-cost option for small businesses with simple accounting needs and only one person running QuickBooks at a time. It’s easy to set up and use, but it doesn’t handle features like inventory, down-loading transactions from your bank, tracking time, or sharing your company file with your accountant.
• QuickBooks Pro is the workhorse edition. It lets up to five people work in a company file at a time; you can purchase licenses in single- or five-user packs. QuickBooks Pro includes features for tasks such as invoicing; entering and pay-ing bills; job costpay-ing; creatpay-ing estimates; savpay-ing and distributpay-ing reports and forms as email attachments; creating budgets automatically; projecting cash flow; tracking mileage; customizing forms; customizing prices with price levels; printing shipping labels for FedEx and UPS; and integrating with Word, Ex-cel, and hundreds of other programs. QuickBooks Pro’s name lists—customers, vendors, employees, and so on—can include up to a combined total of 14,500 entries. Other lists like the Chart of Accounts can have up to 10,000 entries. • QuickBooks Premier is another multi-user edition. For business owners, its big
claim to fame is handling inventory items assembled from other items and com-ponents. In addition, Premier can generate purchase orders from sales orders and estimates, and apply price levels to individual items. You can also track em-ployee info and get to your data remotely. This edition also includes a few extra features that typically interest only accountants, like reversing general journal entries. When you purchase QuickBooks Premier, you can choose from six dif-ferent industry-specific flavors (see the next section). Like the Pro edition, Pre-mier can handle a combined total of up to 14,500 list entries.
• Enterprise Solutions 10.0 is the edition for larger operations. It’s faster, bigger, and more robust than its siblings. Up to 30 people can access a company file at the same time, and this simultaneous access is at least twice as fast as in the Pro or Premier edition. The database can handle lots more names in its cus-tomer, vendor, employee, and other name lists (1,000,000 versus 14,500 for Pro and Premier). You can have multiple company files, work in several locations, and produce combined reports for those companies and locations. And because more people can be in your company file, this edition has features such as an enhanced audit trail, more options for assigning or limiting user permissions, and the ability to delegate administrative functions to the other people using the program.
The QuickBooks Premier Choices
FREQUENTLY ASKED QUESTION
Nonprofit Dilemma
I’m doing the books for a tiny nonprofit corporation. I’d really like to avoid spending any of our hard-raised funds on a special edition of QuickBooks. Can’t I just use Quick-Books Pro?
You may be tempted to save some money by using Quick-Books Pro instead of the more expensive QuickQuick-Books Nonprofit Edition, and you can—if you’re willing to live with some limitations. As long as funding comes primarily from unrestricted sources, the Pro edition will work reasonably well. Your biggest annoyance will be using the term “cus-tomer” when you mean donor or member, or the term “job” for grants you receive. Throughout this book, you’ll
find notes and tips about tracking nonprofit finances with QuickBooks Pro (or plain QuickBooks Premier).
However, if you receive restricted funds or track funds by program, you have to manually post them to equity accounts and allocate them to accounts in your chart of accounts, since QuickBooks Pro doesn’t automatically per-form these staples of nonprofit accounting. Likewise, the program doesn’t generate all the reports you need to sat-isfy your grant providers or the government, although you can export reports (page 611) and then modify them as necessary in a spreadsheet program.
Note: Accountant Edition is designed to help professional accountants and bookkeepers deliver services to their clients. It lets you run any QuickBooks edition (that is, Pro, or any of the Premier versions). In addition to being compatible with all other editions of QuickBooks, it lets you design financial statements and other documents, process payroll for clients, reconcile clients’ bank accounts, calculate depreciation, and prepare clients’ tax returns.
• The General Business version has all the goodies of the Premier Edition like per-item price levels, sales orders, and so on. It also has more built-in reports than QuickBooks Pro, sales and expense forecasting, and a business plan feature (although, if you’re using QuickBooks to keep your books, you may already have a business plan).
• The Contractor version includes special features near and dear to construction contractors’ hearts: job-cost and other contractor-specific reports, the ability to set different billing rates by employee, and tools for managing change orders. • Manufacturing & Wholesale is targeted to companies that manufacture
prod-ucts. It includes a chart of accounts and menus customized for manufacturing and wholesale operations. You can manage inventory assembled from compo-nents and track customer return materials authorizations (RMAs) and damaged goods.
• The Professional Services version (not to be confused with QuickBooks Pro) is designed for companies that deliver services to their clients. Unique features in-clude project-costing reports, templates for proposals and invoices, billing rates that you can customize by client or employee, and professional service–specific reports and help.
• The Retail version customizes much of QuickBooks to work for retail opera-tions. It includes a specialized chart of accounts, menus, reports, forms, and help. Intuit offers companion products that you can integrate with this edition to support all aspects of your retail operation. For example, QuickBooks Point of Sale tracks sales, customers, and inventory as you ring up sales, and it shoots the information over to your QuickBooks company file.
UP TO SPEED
Learning More About Accounting
If you need to learn a lot about QuickBooks and a littlesomething about accounting, you’re holding the right book. But if bookkeeping and accounting are unfamiliar territory, some background training (page 675) may help you use QuickBooks better and more easily (without calling your accountant for help five times a day).
The Accounting and Business School of the Rockies offers an accounting and bookkeeping self-study course that
you can play on a VCR or DVD player. The course pres-ents real-life accounting situations, so you’ll learn to solve common small-business accounting challenges, and it in-cludes hands-on exercises to help you master the material. It doesn’t take long to complete, so you’ll be up and ac-counting in no time. To contact the school, visit www.useful training.com or call 1-303-755-6885.
Accounting Basics—The Important Stuff
Intuit claims that you don’t need to understand most accounting concepts to use QuickBooks. However, you’ll be more productive and have more accurate books if you understand the following concepts and terms:
• Double-entry accounting is the standard method for tracking where your money comes from and where it goes. Following the old saw that money doesn’t grow on trees, money always comes from somewhere when you use double-entry account-ing. For example, as shown in Table I-1, when you sell something to a customer, the money on your invoice comes in as income and goes into your Accounts Re-ceivable account. Then, when you deposit the payment, the money comes out of the Accounts Receivable account and goes into your checking account. (See Chapter 16 for more about double-entry accounting and journal entries.)
Table I-1. Following the money through accounts
Transaction Account Debit Credit
Sell products or services Service Income $1,000
Sell products or services Accounts Receivable $1,000
Receive payment Accounts Receivable $1,000
Receive payment Checking Account $1,000
Pay for expense Checking Account $500
Pay for expense Office Supplies $500
• Chart of Accounts. In bookkeeping, an account is a place to store money, just like your checking account is a place to store your ready cash. The difference is that you need an account for each kind of income, expense, asset, and liability you have. (See Chapter 3 to learn about all the different types of accounts you might use.) The chart of accounts is simply a list of all the accounts you use to keep track of money in your company.
• Cash vs. Accrual Accounting. Cash and accrual are the two different ways companies can document how much they make and spend. Cash accounting is the choice of many small companies because it’s easy: You don’t show income until you’ve received a payment (regardless of when that happens), and you don’t show expenses until you’ve paid your bills.
The accrual method, on the other hand, follows something known as the matching principle, which matches revenue with the corresponding expenses. This approach keeps income and expenses linked to the period in which they happened, no matter when cash comes in or goes out. The advantage of this accrual method is that it provides a better picture of profitability because in-come and its corresponding expenses appear in the same period. With accrual accounting, you recognize income as soon as you record an invoice, even if you’ll receive payment during the next fiscal year. For example, if you pay employees in January for work they did in December, those wages are part of the previous fiscal year.
• Financial Reports. You need three reports to evaluate the health of your com-pany (described in detail in Chapter 17):
— The income statement, which QuickBooks calls a Profit & Loss report, shows how much income you’ve brought in and how much you’ve spent over a period of time. This QuickBooks report gets its name from the dif-ference between the income and expenses, which results in your profit (or loss) for that period.
between your assets and liabilities is the equity in the company—like the equity you have in your house when the house is worth more than you owe on the mortgage.
— The Statement of Cash Flows tells you how much hard cash you have. You might think that the Profit & Loss report would tell you that, but noncash transactions—such as depreciation—prevent it from doing so. The state-ment of cash flows removes all noncash transactions and shows the money generated or spent operating the company, investing in the company, or financing.
About This Book
These days, QuickBooks Help gives more in the way of accounting background and troubleshooting tips than it used to, although useful examples are still in short sup-ply. The problem is finding the topics you want. If the Relevant Topics feature (page 668) doesn’t answer your question, the Live Community—which lets you ask your peers and experts for answers (page 670)—offers no assistance, and searching with keywords doesn’t produce the answer you’re looking for; then QuickBooks Help can’t help you. In addition, QuickBooks Help doesn’t let you mark your place, un-derline key points, jot notes in the margin, or read about QuickBooks while sitting in the sun; this book does.
This book takes the place of the manual that should have accompanied QuickBooks 2011. It applies to the Windows version of QuickBooks Pro and Premier. (Because the Mac version of the program differs significantly from the Windows one, this book won’t be of much help if you have QuickBooks for Mac.)
In these pages, you’ll find step-by-step instructions for using every QuickBooks Pro feature, including those you might not quite understand: progress invoicing (page 288), making general journal entries (page 433), customizing forms (page 630), writ-ing off losses (page 405), and so on. If you’re just startwrit-ing out with QuickBooks, you can read the first few chapters as you set up your company file. After that, go ahead and jump from topic to topic depending on the bookkeeping task at hand. As mentioned earlier, you’ll learn about some of the extra bells and whistles in the QuickBooks Pre-mier edition, as well. (All of the features in QuickBooks Pro—and in this book—are also in Premier.) To keep you productive, this book also includes evaluations of fea-tures to help you figure out which ones are useful and when to use them.
Note: Although each version of QuickBooks introduces new features and enhancements, you can still use this book if you’re keeping your company books with earlier versions of QuickBooks. Of course, the older your version of the program, the more discrepancies you’ll run across.
to understand the current topic. On the other hand, people with advanced skills should watch for similar boxes labeled “Power Users’ Clinic,” which cover more technical tips, tricks, and shortcuts for experienced QuickBooks fans.
About the Outline
This book is divided into five parts, each containing several chapters:
• Part One: Getting Started covers everything you have to do to set up Quick-Books based on your organization’s needs. These chapters explain how to create and manage a company file; set up accounts, customers, jobs, invoice items, and other lists; and manage QuickBooks files.
• Part Two: Bookkeeping follows the money from the moment you rack up time and expenses for your customers and add charges to a customer’s invoice to the tasks you have to perform at the end of the year to satisfy the IRS and other interested parties. These chapters describe how to track time and expenses, pay for things you buy, bill customers, manage the money that your customers owe you, pay for expenses, run payroll, manage your bank accounts, and perform other bookkeeping tasks.
• Part Three: Managing Your Business delves into the features that can help you make your company a success—or even more successful than it was be-fore. These chapters explain how to keep your inventory at just the right level, build budgets, and use QuickBooks’ reports to evaluate every aspect of your enterprise.
• Part Four: QuickBooks Power helps you take your copy of the program to the next level. You’ll learn how to save time and prevent errors by download-ing transactions electronically; boost your productivity by settdownload-ing QuickBooks’ preferences to the way you like to work and integrating QuickBooks with oth-er programs; customize QuickBooks’ components to look the way you want; and—most important—set up QuickBooks so your financial data is secure. • Part Five: Appendixes provides a guide to installing and upgrading
Quick-Books and a reference to help resources.
Note: You can find three bonus appendixes online at www.missingmanuals.com/cds: Keyboard Shortcuts, Tracking Time with the Standalone Timer, and Advanced Form Customization.
The Very Basics
To use this book (and QuickBooks), you need to know a few basics. This book assumes that you’re familiar with the following terms and concepts:
and release the left button on the mouse (or laptop trackpad). To right-click means the same thing, but pressing the right mouse button instead. (Usually, clicking selects an onscreen element or presses an onscreen button, whereas right-clicking typically reveals a shortcut menu, which lists some common tasks specific to whatever you’re right-clicking.) To double-click, of course, means to click twice in rapid succession, again without moving the pointer at all. And to drag means to move the cursor while holding down the (left) mouse button the entire time. To right-drag means to do the same thing but holding down the right mouse button.
When you’re told to Shift-click something, you click while pressing the Shift key. Related procedures, like Ctrl-clicking, work the same way—just click while pressing the corresponding key.
• Menus. The menus are the words at the top of your screen: File, Edit, and so on. Click one to make a list of commands appear, as though they’re written on a window shade you’ve just pulled down. Some people click to open a menu and then release the mouse button; after reading the menu command choices, they click the command they want. Other people like to press the mouse button continuously as they click the menu title and drag down the list to the desired command; only then do they release the mouse button. Both methods work, so use whichever one you prefer.
• Keyboard shortcuts. Nothing is faster than keeping your fingers on your key-board to enter data, choose names, trigger commands, and so on—without los-ing time by grabblos-ing the mouse, carefully positionlos-ing it, and then chooslos-ing a command or list entry. That’s why many experienced QuickBooks fans prefer to trigger commands by pressing combinations of keys on the keyboard. For example, in most word processors, you can press Ctrl+B to produce a boldface word. In this book, when you read an instruction like “Press Ctrl+A to open the Chart of Accounts window,” start by pressing the Ctrl key; while it’s down, type the letter A; and then release both keys.
About
➝
These
➝
Arrows
Throughout this book, and throughout the Missing Manual series, you’ll find sen-tences like this one: Choose Lists➝Customer & Vendor Profile Lists➝Customer
Type List. That’s shorthand for a much longer instruction that directs you to navi-gate three nested menus in sequence, like this: “Choose Lists. On the Lists menu, point to the Customer & Vendor Profile Lists menu item. On the submenu that ap-pears, choose Customer Type List.” Figure I-1 shows the menus this sequence opens.
Figure I-1: Instead of filling pages with long and hard-to-follow instructions for navigating through nested menus and nested folders, the arrow notation is concise, but just as informative. For example, choosing Lists➝Customer & Vendor Profile Lists➝Customer Type List takes you to the menu shown here.
About MissingManuals.com
At www.missingmanuals.com, you’ll find articles, tips, and updates to this book. In fact, we invite and encourage you to submit such corrections and updates yourself. In an effort to keep the book as up-to-date and accurate as possible, each time we print more copies of this book, we’ll make any confirmed corrections you’ve sug-gested. We’ll also note such changes on the website, so that you can mark important corrections into your own copy of the book, if you like. (Go to www.missingmanuals. com/library.html, click this book’s name, and then click the “View/Submit Errata” link of the left side of the page to see the changes.)
Safari
®Books Online
Safari Books Online is an on-demand digital library that lets you easily search over 7,500 technology and creative reference books and videos to find the answers you need quickly.
With a subscription, you can read any page and watch any video from our library online. Read books on your cell phone and mobile devices. Access new titles before they are available for print, and get exclusive access to manuscripts in development and post feedback for the authors. Copy and paste code samples, organize your fa-vorites, download chapters, bookmark key sections, create notes, print out pages, and benefit from tons of other time-saving features.
chapter
1
Creating a Company File
A
company file is where you store your company’s records in QuickBooks, and it’s the first thing you need to work on in the program. You can create a com-pany file from scratch or convert records previously kept in a small business accounting program or Quicken. The easiest approach is to use a file that someone else created. For example, if you’ve worked with an accountant to set up your com-pany, she might provide you with a QuickBooks company file configured precisely for your business so you can hit the ground running.If you have to create your own company file, this chapter tells you how to use the Quick-Books EasyStep Interview to get started, and points you to the other chapters that explain how to finish the job. If you already have a company file, you’ll learn how to open it, update it to a new version of QuickBooks, and modify basic company information.
Opening QuickBooks
Here are the easiest ways to open QuickBooks:
• Desktop icon. If you told QuickBooks to create a desktop shortcut during in-stallation (page 662), double-click the shortcut to launch QuickBooks.
• Quick Launch toolbar. The fastest way to open QuickBooks is to click its icon on the Windows taskbar—but first you have to put it there. In Windows 7, right-drag (that’s right-dragging while holding down the right mouse button) the program’s desktop shortcut onto the taskbar, as shown in Figure 1-1. In Windows XP, right-drag it onto the Quick Launch toolbar (to display the toolbar, right-click the taskbar, and then choose Toolbars➝Quick Launch) and then choose Copy
Your Company File Your Company File
Figure 1-1:
Windows’ taskbar keeps your desktop tidy. It’s easy to reach, because program windows don’t hide the taskbar the way they do desktop shortcuts.
• Programs menu. Without a desktop icon, you can launch QuickBooks from the Start menu. Click Start➝QuickBooks Pro 2011 (or QuickBooks Premier
Edition 2011). If QuickBooks isn’t already listed on the menu, choose All Programs➝QuickBooks➝QuickBooks Pro 2011 (or QuickBooks Premier
Edi-tion 2011).
The first time you launch QuickBooks, you’re greeted by the “Welcome to Quick-Books” screen. You have to create or open a company file, and then you’re ready to dive into bookkeeping. The rest of this chapter explains how to create a company file and then how to open company files you create.
Before You Create Your Company File
If you’ve just started a business and want to inaugurate your books with QuickBooks, your prep work will be a snap. On the other hand, if you have existing books for your business, you have a few small tasks to complete before you jump into QuickBooks’ setup. Whether your books are paper ledgers or electronic files in another program, gather your company information before you open QuickBooks. That way, you can hunker down in front of your computer and crank out a company file in record time. This section explains what you need to create your company file in QuickBooks.
Start Date
Your Company File Your Company File
The more realistic approach is to enter your financial state as of a specific date and, from then on, add all new transactions in QuickBooks. The date you choose is called the start date, and you shouldn’t choose it randomly. Here are your start date options and the ramifications of each one:
• The last day of the previous fiscal year. The best choice is to fill in your records for the entire year. Choose the last day of your company’s previous fiscal year as the company file start date. That way, the account balances on your start date are like the ending balances on a bank statement, and you’re ready to start book-keeping fresh on the first day of the fiscal year.
Yes, you have to enter checks, credit card charges, invoices, and other transac-tions that happened since the beginning of the year, but that won’t take as much time as you think. And you’ll regain those hours when tax time rolls around, as you nimbly generate the reports you need to complete your tax returns. If more than half of the year has already passed, the best approach is to be pa-tient and postpone your QuickBooks setup until the next fiscal year. Intuit re-leases new versions of QuickBooks in October or November each year for just that reason. But waiting until next year isn’t always an option, particularly if your old accounting system vendor wants a truckload of cash for an upgrade. In cases like that, go with the next start-date option.
Tip: For practice, you can set the start date for your company file to the starting date from the bank state-ment closest to your company start date. Then you can enter transactions for the month and try reconcil-ing your bank account to those transactions.
• The last day of the previous fiscal period. The next best start date is the last day of the previous fiscal quarter (or fiscal month at the very least). Starting in the middle of a fiscal year makes the entire year’s accounting more difficult. Since your company file doesn’t contain a full year’s worth of detail, you’ll have to switch between QuickBooks and your old filing cabinets to prepare your tax returns and look up financial information. Starting just before a fiscal period mitigates this hassle but doesn’t eliminate it.
Account Balances and Transactions
Your Company File Your Company File
• Cash balances. For each bank account you use in your business (checking, savings, money market, petty cash, and so on), find the bank statements with statement dates as close to—but earlier than—the start date for your Quick-Books file.
Gather deposit slips and your checkbook register to identify the transac-tions that haven’t yet cleared; you’ll need them to enter transactransac-tions, unless you download transactions from your bank (page 547). If you have petty cash lying around, count it and use that number to set up your petty cash account (page 426).
Tip: The balance sheet that you included with your previous year’s tax return is a great starting point for your account balances. Your tax return also shows your Federal Tax ID number, which you’ll need, too.
• Customer balances. If customers owe you money, pull the paper copy of every unpaid invoice or statement out of your filing cabinet so you can give Quick-Books what it needs to calculate your Accounts Receivable balance. If you didn’t keep copies, ask your customers for copies of the invoices they haven’t paid or simply create invoices in QuickBooks to match the payments you receive. • Vendor balances. If your company thinks handing out cash before you have to
is more painful than data entry, find the bills you haven’t yet paid and get ready to enter them in QuickBooks so you can generate your Accounts Payable bal-ance. (To reduce the number of transactions you have to enter, simply pay those outstanding bills and record the payments in QuickBooks.)
• Asset values. When you own assets such as buildings or equipment, the value of those assets depreciates over time. If you’ve filed a tax return for your company, you can find asset values and accumulated depreciation on your most recent tax return (yet another reason to start using QuickBooks at the beginning of the year). If you haven’t filed a tax return for your company yet, the asset value is typically the price you paid for the asset.
• Liability balances. Find the current balances you owe on any loans or mortgages. • Inventory. For each product you stock, you need to know how many items you
had in stock as of the start date, how much you paid for them, and what you expect to sell them for.
Tip: The basic QuickBooks editions like QuickBooks Pro and QuickBooks Premier aren’t very good at working with inventory that you assemble from components or raw materials. See page 107 to learn how to track such inventory.
Interview Interview
withholdings, such as tax agencies or the company handling your 401(k) plan. Oh yeah—and you need payroll details for each employee. Chapter 14 explains the ins and outs of payroll in QuickBooks.
Tip: If you have outstanding payroll withholdings such as employee payroll taxes, send in the payments so you don’t have to enter those open transactions in QuickBooks.
About the EasyStep Interview
Keeping books requires accuracy, attention to detail, and persistence, hence the customary image of spectacled accountants hunched over ledgers. QuickBooks can help you keep your books without ruining your eyesight or your posture—as long as you start your QuickBooks company file with good information.
UP TO SPEED
The Fastest Way to a New Company File
The proud owners of brand-new businesses face adilem-ma: They have more important things to do than muddle through setting up a company file in QuickBooks, but money is usually as short as free time. Even so, if you don’t know much about bookkeeping or accounting, a few hours of your accountant’s time is a worthwhile investment. You’ll not only save untold hours of tedium and confusion, but also know that your books are set up properly. Accountants well-versed in QuickBooks can create a flawless company file without breaking a sweat.
If you plan to do without an accountant but you want some help setting up your company file, once you get past the “Welcome to QuickBooks” screen, you can choose Help➝Find A Local QuickBooks Expert. By answering a few questions on the Local QuickBooks Expert website (http:// tinyurl.com/find-qbadvisor), you can locate someone in your area to help you get started.
In QuickBooks 2011, the Interview is relatively short and sweet; it takes about 30 minutes. All it wants to know is some company information, the industry you’re in, and the features you want to use. QuickBooks then sets your preferences and creates a few accounts (like basic income and expense accounts and your checking account), but you have to do the bulk of the setup work later.
Starting the EasyStep Interview
Interview Interview
GEM IN THE ROUGH
Experimenting with a Sample File
You don’t have to use your real company file to test outQuickBooks features you’ve never used. QuickBooks comes with several sample files: one for a basic product-based business, another for a basic service-product-based business, and several more for more specialized pursuits like con-tracting, consulting, manufacturing, law firms, and so on.
To experiment with QuickBooks features before you put them in production, in either the “Welcome to QuickBooks” screen or the No Company Open window, click “Open a sample file”, and then choose the sample file you want. (If
your company file is open, choose File➝Close Company/ Logoff to display the No Company Open window.) If you botch your experiment, you can always reinstall the sample files from the QuickBooks CD.
Don’t try to use these sample files as your company file. They come with accounts, customers, vendors, and trans-actions (such as checks, invoices, and purchase orders). Besides, QuickBooks 2011 sets the date in these files to 12/15/2013, which makes transactions later than you or your vendors would like.
The Get Started screen assures you that you’ll be ready to start using QuickBooks in about 30 minutes. Start by clicking one of the following three buttons:
• Convert Data. If you have existing records in Quicken or another accounting program, you’re in luck. Converting your books (page 29) is easier than starting from scratch.
• Skip Interview. If you’re something of a QuickBooks expert, this option lets you set up a company file without a safety net. It opens the “Enter your company information” window, followed by a few screens of data entry. If you need help during the process, you can always click the “Get answers” link.
• Start Interview. If you don’t fit into either of the previous categories, this one’s for you. The following sections take you through the process step by step, from start to finish. Keep in mind that, if you leave the interview before QuickBooks creates your company file, the program won’t save any of the information you entered. So make sure you have at least 10 minutes to complete the first set of steps.
Company Information
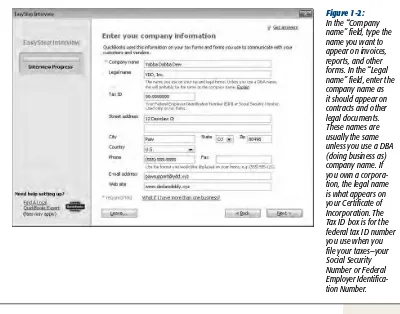
After you click the Start Interview button, the first setup screen (Figure 1-2) asks you for the basic 411 about your company, such as its legal name and tax ID. (If any of the fields confuse you, try clicking the “Get answers” link in the upper-right corner.) Click Next when you’re done filling out the fields.
Interview Interview
Figure 1-2: In the “Company name” field, type the name you want to appear on invoices, reports, and other forms. In the “Legal name” field, enter the company name as it should appear on contracts and other legal documents. These names are usually the same unless you use a DBA (doing business as) company name. If you own a corpora-tion, the legal name is what appears on your Certificate of Incorporation. The Tax ID box is for the federal tax ID number you use when you file your taxes—your Social Security Number or Federal Employer Identifica-tion Number.
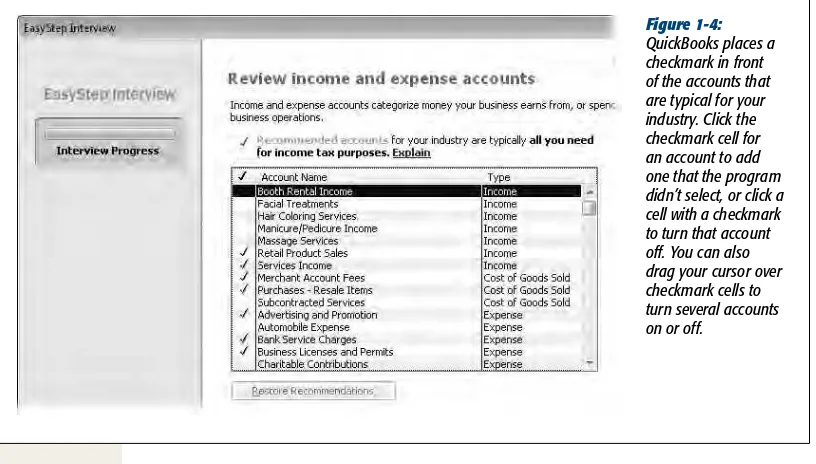
• Your industry. Choose carefully on the “Select your industry” screen. The list of industries is robust, so chances are good you’ll find one that’s close to what your company does. Based on your choice, QuickBooks adjusts its settings and the chart of accounts it creates to match how your business operates. For ex-ample, the program creates income and expense accounts for your type of busi-ness and automatically turns on features like sales tax and inventory if your industry typically uses them. If QuickBooks makes assumptions you don’t like, you can select different options during the interview or alter your preferences (page 561) and accounts (page 49) later.
If you don’t see an obvious choice in the Industry list, scroll to the bottom and choose either General Product-based Business or General Service-based Business.
Interview Interview
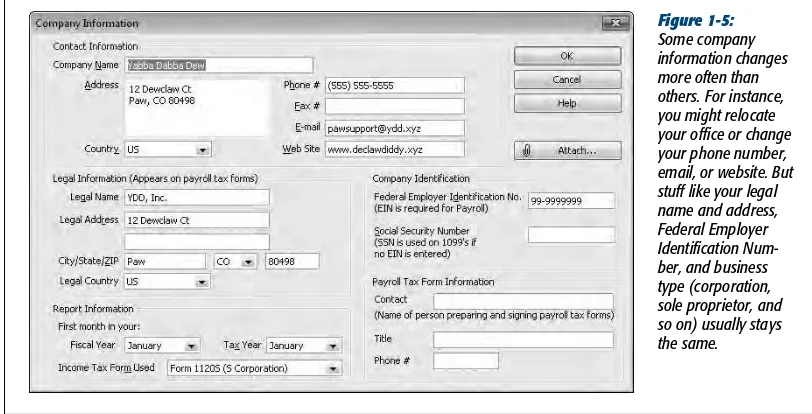
nonprofits. When you select an option on this screen, QuickBooks assigns the corresponding tax form to your company file. After you finish the Interview, you can see the tax form it selected by choosing Company➝Company
Informa-tion, which brings up the Company Information window shown in Figure 1-5 (page 25). The Income Tax Form Used box at the bottom of this window lists the tax form for your company type.
• The first month of your fiscal year. When you start your company, you choose a fiscal year. On the “Select the first month of your fiscal year” screen, Quick-Books automatically sets the “My fiscal year starts in” box to January because so many small businesses stick with the calendar year for simplicity. If you start your fiscal year in another month, choose it from the drop-down list.
• The administrator password. The administrator can do absolutely anything in your company file: set up other users, log in as other users, and access any area of the company files. Surprisingly, setting an administrator password is optional. QuickBooks lets you click Next and skip right past the “Set up your administrator password” screen, but this is no time for shortcuts, as the box below explains. Type the password you want to use in both the “Administrator password” and “Retype password” boxes, and then keep the password in a safe but memorable place. (Page 644 explains how to change the administrator name and password.)
TROUBLESHOOTING MOMENT
Safe Login Practices
Don’t even think about having everyone who works with acompany file share one login. You don’t want everyone to have access to payroll data, and you wouldn’t know which person to fire if you found any less-than-legal transactions in the company file. Even if you run a small business from home, an administrator password prevents the chimney sweep from swiping your business credit card number. Chapter 26 has much more about keeping your Quick-Books files secure, but here are some password basics:
• Set a password that’s at least eight characters long and is a combination of letters and numbers. • Passwords are case-sensitive, so make sure that Caps
Lock isn’t turned on by mistake.
• Type the password in both the “Administrator pass-word” and “Retype passpass-word” boxes. If you copy and paste the password from the “Administrator pass-word” box into the “Retype passpass-word” box, you could copy a typo and not be able to access the company file you just created.
If you forget the administrator login and password or lose the piece of paper they’re written on, you won’t be able to open your company file without some fancy footwork, so keep a record of them someplace safe. If you’ve tried everything and your administrator password is still missing in action, see page 646 to learn how you can reset it.