MongoDB and Python
Niall O'Higgins
EditorMike Loukides
Editor
Shawn Wallace
Copyright © 2011 Niall O'Higgins
O’Reilly books may be purchased for educational, business, or sales promotional use. Online editions are also available for most titles (http://my.safaribooksonline.com). For more information, contact our corporate/institutional sales department: (800) 998-9938 or
corporate@oreilly.com.
Nutshell Handbook, the Nutshell Handbook logo, and the O’Reilly logo are registered trademarks of O’Reilly Media, Inc. MongoDB and Python, the image of a dwarf mongoose, and related trade dress are trademarks of O’Reilly Media, Inc.
Many of the designations used by manufacturers and sellers to distinguish their products are claimed as trademarks. Where those
designations appear in this book, and O’Reilly Media, Inc. was aware of a trademark claim, the designations have been printed in caps or initial caps.
While every precaution has been taken in the preparation of this book, the publisher and author assume no responsibility for errors or omissions, or for damages resulting from the use of the information contained herein.
Preface
I’ve been building production database-driven applications for about 10 years. I’ve worked with most of the usual relational databases (MSSQL Server, MySQL, PostgreSQL) and with some very interesting nonrelational databases (Freebase.com’s Graphd/MQL, Berkeley DB, MongoDB). MongoDB is at this point the system I enjoy working with the most, and choose for most projects. It sits somewhere at a crossroads between the performance and pragmatism of a relational system and the flexibility and expressiveness of a semantic web database. It has been central to my success in building some quite complicated systems in a short period of time.
I hope that after reading this book you will find MongoDB to be a pleasant database to work with, and one which doesn’t get in the way between you and the application you wish to build.
Conventions Used in This Book
The following typographical conventions are used in this book: Italic
Indicates new terms, URLs, email addresses, filenames, and file extensions. Constant width
Used for program listings, as well as within paragraphs to refer to program elements such as variable or function names, databases, data types, environment variables, statements, and keywords.
Constant width bold
Shows commands or other text that should be typed literally by the user.
Constant width italic
Shows text that should be replaced with user-supplied values or by values determined by context.
TIP
This icon signifies a tip, suggestion, or general note.
CAUTION
Using Code Examples
This book is here to help you get your job done. In general, you may use the code in this book in your programs and documentation. You do not need to contact us for permission unless you’re reproducing a significant portion of the code. For example, writing a program that uses several chunks of code from this book does not require permission. Selling or distributing a CD-ROM of examples from O’Reilly books does require permission. Answering a question by citing this book and quoting example code does not require permission. Incorporating a significant amount of example code from this book into your product’s documentation does require permission.
We appreciate, but do not require, attribution. An attribution usually includes the title, author, publisher, and ISBN. For example: “MongoDB and Python by Niall O’Higgins. Copyright 2011 O’Reilly Media Inc., 978-1-449-31037-0.”
Safari® Books Online
NOTE
Safari Books Online is an on-demand digital library that lets you easily search over 7,500 technology and creative reference books and videos to find the answers you need quickly.
With a subscription, you can read any page and watch any video from our library online. Read books on your cell phone and mobile devices. Access new titles before they are available for print, and get exclusive access to manuscripts in development and post feedback for the authors. Copy and paste code samples, organize your favorites, download chapters, bookmark key sections, create notes, print out pages, and benefit from tons of other time-saving features.
How to Contact Us
Please address comments and questions concerning this book to the publisher:
O’Reilly Media, Inc.
1005 Gravenstein Highway North Sebastopol, CA 95472
800-998-9938 (in the United States or Canada) 707-829-0515 (international or local)
707-829-0104 (fax)
We have a web page for this book, where we list errata, examples, and any additional information. You can access this page at:
http://www.oreilly.com/catalog/0636920021513
To comment or ask technical questions about this book, send email to: bookquestions@oreilly.com
For more information about our books, courses, conferences, and news, see our website at
http://www.oreilly.com.
Find us on Facebook: http://facebook.com/oreilly
Follow us on Twitter: http://twitter.com/oreillymedia
Acknowledgments
I would like to thank Ariel Backenroth, Aseem Mohanty and Eugene Ciurana for giving detailed feedback on the first draft of this book. I would also like to thank the O’Reilly team for making it a great pleasure to write the book. Of course, thanks to all the people at 10gen without whom
Chapter 1. Getting Started
Introduction
First released in 2009, MongoDB is relatively new on the database scene compared to contemporary giants like Oracle which trace their first releases to the 1970’s. As a document-oriented database generally grouped into the NoSQL category, it stands out among distributed key value stores, Amazon Dynamo clones and Google BigTable reimplementations. With a focus on rich operator support and high performance Online Transaction Processing (OLTP), MongoDB is in many ways closer to MySQL than to batch-oriented databases like HBase.
The key differences between MongoDB’s document-oriented approach and a traditional relational database are:
1. MongoDB does not support joins.
2. MongoDB does not support transactions. It does have some support for atomic operations, however.
3. MongoDB schemas are flexible. Not all documents in a collection must adhere to the same schema.
1 and 2 are a direct result of the huge difficulties in making these features scale across a large distributed system while maintaining acceptable performance. They are tradeoffs made in order to allow for horizontal scalability. Although MongoDB lacks joins, it does introduce some alternative capabilites, e.g. embedding, which can be used to solve many of the same data modeling problems as joins. Of course, even if embedding doesn’t quite work, you can always perform your join in
application code, by making multiple queries.
The lack of transactions can be painful at times, but fortunately MongoDB supports a fairly decent set of atomic operations. From the basic atomic increment and decrement operators to the richer
“findAndModify”, which is essentially an atomic read-modify-write operator.
It turns out that a flexible schema can be very beneficial, especially when you expect to be iterating quickly. While up front schema design—as used in the relational model—has its place, there is often a heavy cost in terms of maintenance. Handling schema updates in the relational world is of course doable, but comes with a price.
In MongoDB, you can add new properties at any time, dynamically, without having to worry about ALTER TABLE statements that can take hours to run and complicated data migration scripts. However, this approach does come with its own tradeoffs. For example, type enforcement must be carefully handled by the application code. Custom document versioning might be desirable to avoid large conditional blocks to handle heterogeneous documents in the same collection.
The dynamic nature of MongoDB lends itself quite naturally to working with a dynamic language such as Python. The tradeoffs between a dynamically typed language such as Python and a statically typed language such as Java in many respects mirror the tradeoffs between the flexible, document-oriented model of MongoDB and the up-front and statically typed schema definition of SQL databases.
will immediately be comfortable with MongoDB documents and queries.
For these reasons, MongoDB and Python make a powerful combination for rapid, iterative
Finding Reference Documentation
MongoDB, Python, 10gen’s PyMongo driver and each of the Web frameworks mentioned in this book all have good reference documentation online.
For MongoDB, we would strongly suggest bookmarking and at least skimming over the official MongoDB manual which is available in a few different formats and constantly updated at
http://www.mongodb.org/display/DOCS/Manual. While the manual describes the JavaScript interface via the mongo console utility as opposed to the Python interface, most of the code snippets should be easily understood by a Python programmer and more-or-less portable to PyMongo, albeit sometimes with a little bit of work. Furthermore, the MongoDB manual goes into greater depth on certain advanced and technical implementation and database administration topics than is possible in this book.
For the Python language and standard library, you can use the help() function in the interpreter or the pydoc tool on the command line to get API documentation for any methods or modules. For example:
pydoc string
The latest Python language and API documentation is also available for online browsing at
http://docs.python.org/.
Installing MongoDB
For the purposes of development, it is recommended to run a MongoDB server on your local machine. This will permit you to iterate quickly and try new things without fear of destroying a production database. Additionally, you will be able to develop with MongoDB even without an Internet connection.
Depending on your operating system, you may have multiple options for how to install MongoDB locally.
Most modern UNIX-like systems will have a version of MongoDB available in their package management system. This includes FreeBSD, Debian, Ubuntu, Fedora, CentOS and ArchLinux. Installing one of these packages is likely the most convenient approach, although the version of MongoDB provided by your packaging vendor may lag behind the latest release from 10gen. For local development, as long as you have the latest major release, you are probably fine.
10gen also provides their own MongoDB packages for many systems which they update very quickly on each release. These can be a little more work to get installed but ensure you are running the latest-and-greatest. After the initial setup, they are typically trivial to keep up-to-date. For a production deployment, where you likely want to be able to update to the most recent stable MongoDB version with a minimum of hassle, this option probably makes the most sense.
In addition to the system package versions of MongoDB, 10gen provide binary zip and tar archives. These are independent of your system package manager and are provided in both 32-bit and 64-bit flavours for OS X, Windows, Linux and Solaris. 10gen also provide statically-built binary
distributions of this kind for Linux, which may be your best option if you are stuck on an older, legacy Linux system lacking the modern libc and other library versions. Also, if you are on OS X, Windows or Solaris, these are probably your best bet.
Finally, you can always build your own binaries from the source code. Unless you need to make modifications to MongoDB internals yourself, this method is best avoided due to the time and complexity involved.
In the interests of simplicity, we will provide the commands required to install a stable version of MongoDB using the system package manager of the most common UNIX-like operating systems. This is the easiest method, assuming you are on one of these platforms. For Mac OS X and Windows, we provide instructions to install the binary packages from 10gen.
Ubuntu / Debian:
sudo apt-get update; sudo apt-get install mongodb Fedora:
sudo yum install mongo-stable-server FreeBSD:
sudo pkg_add -r mongodb Windows:
like C:\mongodb and add the bin directory to your PATH. Mac OS X:
Go to http://www.mongodb.org and download the latest production release compressed tar file for OS X—choosing 32-bit or 64-bit depending on your system. Extract the contents to a location like /usr/local/ or /opt and add the bin directory to your $PATH. For exmaple:
cd /tmp
wget http://fastdl.mongodb.org/osx/mongodb-osx-x86_64-1.8.3-rc1.tgz tar xfz mongodb-osx-x86_64-1.8.3-rc1.tgz
sudo mkdir /usr/local/mongodb
sudo cp -r mongodb-osx-x86_64-1.8.3-rc1/bin /usr/local/mongodb/ export PATH=$PATH:/usr/local/mongodb/bin
INSTALL MONGODB ON OS X WITH MAC PORTS
If you would like to try a third-party system package management system on Mac OS X, you may also install MongoDB (and Python, in fact) through Mac Ports. Mac Ports is similar to FreeBSD ports, but for OS X.
A word of warning though: Mac Ports compiles from source, and so can take considerably longer to install software compared with simply grabbing the binaries. Futhermore, you will need to have Apple’s Xcode Developer Tools installed, along with the X11 windowing environment.
The first step is to install Mac Ports from http://www.macports.org. We recommend downloading and installing their DMG package. Once you have Mac Ports installed, you can install MongoDB with the command:
sudo port selfupdate; sudo port install mongodb
To install Python 2.7 from Mac Ports use the command:
Running MongoDB
On some platforms—such as Ubuntu—the package manager will automatically start the mongod daemon for you, and ensure it starts on boot also. On others, such as Mac OS X, you must write your own script to start it, and manually integrate with launchd so that it starts on system boot.
Note that before you can start MongoDB, its data and log directories must exist.
If you wish to have MongoDB start automatically on boot on Windows, 10gen have a document describing how to set this up at http://www.mongodb.org/display/DOCS/Windows+Service
To have MongoDB start automatically on boot under Mac OS X, first you will need a plist file. Save the following (changing db and log paths appropriately) to
/Library/LaunchDaemons/org.mongodb.mongod.plist: <?xml version="1.0" encoding="UTF-8"?>
<!DOCTYPE plist PUBLIC "-//Apple//DTD PLIST 1.0//EN" "http://www.apple.com/DTDs/PropertyList-1.0.dtd">
<string>org.mongo.mongod</string> <key>ProgramArguments</key>
<array>
Next run the following commands to activate the startup script with launchd: sudo launchctl load /Library/LaunchDaemons/org.mongodb.mongod.plist sudo launchctl start org.mongodb.mongod
A quick way to test whether there is a MongoDB instance already running on your local machine is to type mongo at the command-line. This will start the MongoDB admin console, which attempts to
connect to a database server running on the default port (27017).
In any case, you can always start MongoDB manually from the command-line. This is a useful thing to be familiar with in case you ever want to test features such as replica sets or sharding by running multiple mongod instances on your local machine.
Assuming the mongod binary is in your $PATH, run:
Setting up a Python Environment with MongoDB
In order to be able to connect to MongoDB with Python, you need to install the PyMongo driver
package. In Python, the best practice is to create what is known as a “virtual environment” in which to install your packages. This isolates them cleanly from any “system” packages you have installed and yields the added bonus of not requiring root privileges to install additional Python packages. The tool to create a “virtual environment” is called virtualenv.
There are two approaches to installing the virtualenv tool on your system—manually and via your system package management tool. Most modern UNIX-like systems will have the virtualenv tool in their package repositories. For example, on Mac OS X with Mac Ports, you can run sudo port install py27-virtualenv to install virtualenv for Python 2.7. On Ubuntu you can run sudo apt-get install python-virtualenv. Refer to the documentation for your OS to learn how to install it on your specific platform.
In case you are unable or simply don’t want to use your system’s package manager, you can always install it yourself, by hand. In order to manually install it, you must have the Python setuptools package. You may already have setuptools on your system. You can test this by running python -c import setuptools on the command line. If nothing is printed and you are simply returned to the prompt, you don’t need to do anything. If an ImportError is raised, you need to install setuptools. To manually install setuptools, first download the file http://peak.telecommunity.com/dist/ez_setup.py
Then run python ez_setup.py as root.
For Windows, first download and install the latest Python 2.7.x package from http://www.python.org. Once you have installed Python, download and install the Windows setuptools installer package from
http://pypi.python.org/pypi/setuptools/. After installing Python 2.7 and setuptools, you will have the easy_install tool available on your machine in the Python scripts directory—default is
C:\Python27\Scripts\.
Once you have setuptools installed on your system, run easy_install virtualenv as root.
Now that you have the “virtualenv” tool available on your machine, you can create your first virtual Python environment. You can do this by executing the command virtualenv --no-site-packages myenv. You do not need—and indeed should not want—to run this command with root privileges. This will create a virtual environment in the directory “myenv”. The --no-site-packages option to the “virtualenv” utility instructs it to create a clean Python environment, isolated from any existing
packages installed in the system.
You are now ready to install the PyMongo driver.
With the “myenv” directory as your working directory (i.e. after “cd myenv”), simply execute bin/easy_install pymongo. This will install the latest stable version of PyMongo into your virtual Python environment. To verify that this worked successfully, execute the command bin/python -c import pymongo, making sure that the “myenv” directory is still your working directory, as with the previous command.
Chapter 2. Reading and Writing to MongoDB with Python
MongoDB is a document-oriented database. This is different from a relational database in two significant ways. Firstly, not all entries must adhere to the same schema. Secondly you can embed entries inside of one another. Despite these major differences, there are analogs to SQL concepts in MongoDB. A logical group of entries in a SQL database is termed a table. In MongoDB, the
analogous term is a collection. A single entry in a SQL databse is termed a row. In MongoDB, the analog is a document.
Table 2-1. Comparison of SQL/RDBMS and MongoDB Concepts and Terms
Concept SQL MongoDB
One User One Row One Document
All Users Users Table Users Collection
One Username Per User (1-to-1) Username Column Username Property
Many Emails Per User (1-to-many) SQL JOIN with Emails
Table Embed relevant email doc in UserDocument
Many Items Owned by Many Users
(many-to-many) SQL JOIN with Items Table Programmatically Join with Items Collection
Hence, in MongoDB, you are mostly operating on documents and collections of documents. If you are familiar with JSON, a MongoDB document is essentially a JSON document with a few extra features. From a Python perspective, it is a Python dictionary.
Consider the following example of a user document with a username, first name, surname, date of birth, email address and score:
from datetime import datetime user_doc = {
"username" : "janedoe", "firstname" : "Jane", "surname" : "Doe",
"dateofbirth" : datetime(1974, 4, 12), "email" : "janedoe74@example.com", "score" : 0
}
As you can see, this is a native Python object. Unlike SQL, there is no special syntax to deal with. The PyMongo driver transparently supports Python datetime objects. This is very convenient when working with datetime instances—the driver will transparently marshall the values for you in both reads and writes. You should never have to write datetime conversion code yourself.
Instead of grouping things inside of tables, as in SQL, MongoDB groups them in collections. Like SQL tables, MongoDB collections can have indexes on particular document properties for faster lookups and you can read and write to them using complex query predicates. Unlike SQL tables, documents in a MongoDB collection do not all have to conform to the same schema.
Connecting to MongoDB with Python
The PyMongo driver makes connecting to a MongoDB database quite straight forward. Furthermore, the driver supports some nice features right out of the box, such as connection pooling and automatic reconnect on failure (when working with a replicated setup). If you are familiar with more traditional RDBMS/SQL systems—for example MySQL—you are likely used to having to deploy additional software, or possibly even write your own, to handle connection pooling and automatic reconnect. 10gen very thoughtfully relieved us of the need to worry about these details when working with MongoDB and the PyMongo driver. This takes a lot of the headache out of running a production MongoDB-based system.
You instantiate a Connection object with the necessary parameters. By default, the Connection object will connect to a MongoDB server on localhost at port 27017. To be explicit, we’ll pass those
parameters along in our example:
""" An example of how to connect to MongoDB """ import sys
from pymongo import Connection
from pymongo.errors import ConnectionFailure
def main():
""" Connect to MongoDB """ try:
c = Connection(host="localhost", port=27017) print "Connected successfully"
except ConnectionFailure, e:
sys.stderr.write("Could not connect to MongoDB: %s" % e) sys.exit(1)
if __name__ == "__main__": main()
Getting a Database Handle
Connection objects themselves are not all that frequently used when working with MongoDB in Python. Typically you create one once, and then forget about it. This is because most of the real interaction happens with Database and Collection objects. Connection objects are just a way to get a handle on your first Databse object. In fact, even if you lose reference to the Connection object, you can always get it back because Database objects have a reference to the Connection object.
Getting a Database object is easy once you have a Connection instance. You simply need to know the name of the database, and the username and password to access it if you are using authorization on it.
""" An example of how to get a Python handle to a MongoDB database """ import sys
from pymongo import Connection
from pymongo.errors import ConnectionFailure
def main():
""" Connect to MongoDB """ try:
c = Connection(host="localhost", port=27017) except ConnectionFailure, e:
sys.stderr.write("Could not connect to MongoDB: %s" % e) sys.exit(1)
# Get a Database handle to a database named "mydb" dbh = c["mydb"]
# Demonstrate the db.connection property to retrieve a reference to the # Connection object should it go out of scope. In most cases, keeping a # reference to the Database object for the lifetime of your program should # be sufficient.
assert dbh.connection == c
print "Successfully set up a database handle"
Inserting a Document into a Collection
Once you have a handle to your database, you can begin inserting data. Let us imagine we have a collection called “users”, containing all the users of our game. Each user has a username, a first name, surname, date of birth, email address and a score. We want to add a new user:
""" An example of how to insert a document """ import sys
c = Connection(host="localhost", port=27017) except ConnectionFailure, e:
sys.stderr.write("Could not connect to MongoDB: %s" % e)
dbh.users.insert(user_doc, safe=True)
print "Successfully inserted document: %s" % user_doc
if __name__ == "__main__": main()
Note that we don’t have to tell MongoDB to create our collection “users” before we insert to it. Collections are created lazily in MongoDB, whenever you access them. This has the advantage of being very lightweight, but can occasionally cause problems due to typos. These can be hard to track down unless you have good test coverage. For example, imagine you accidentally typed:
# dbh.usrs is a typo, we mean dbh.users! Unlike an RDBMS, MongoDB won't # protect you from this class of mistake.
dbh.usrs.insert(user_doc)
The code would execute correctly and no errors would be thrown. You might be left scratching your head wondering why your user document isn’t there. We recommend being extra vigilant to double check your spelling when addressing collections. Good test coverage can also help find bugs of this sort.
Another feature of MongoDB inserts to be aware of is primary key auto-generation. In MongoDB, the _id property on a document is treated specially. It is considered to be the primary key for that
unique when created. It can be considered similar in purpose to a UUID object as defined by RFC 4122. MongoDB ObjectIds have the nice property of being almost-certainly-unique upon generation, hence no central coordination is required.
This contrasts sharply with the common RDBMS idiom of using auto-increment primary keys. Guaranteeing that an auto-increment key is not already in use usually requires consulting some
centralized system. When the intention is to provide a horizontally scalable, de-centralized and fault-tolerant database—as is the case with MongoDB—auto-increment keys represent an ugly bottleneck. By employing ObjectId as your _id, you leave the door open to horizontal scaling via MongoDB’s sharding capabilities. While you can in fact supply your own value for the _id property if you wish— so long as it is globally unique—this is best avoided unless there is a strong reason to do otherwise. Examples of cases where you may be forced to provide your own _id property value include
migration from RDBMS systems which utilized the previously-mentioned auto-increment primary key idiom.
Write to a Collection Safely and Synchronously
By default, the PyMongo driver performs asynchronous writes. Write operations include insert, update, remove and findAndModify.
Asynchronous writes are unsafe in the sense that they are not checked for errors and so execution of your program could continue without any guarantees of the write having completed successfully. While asynchronous writes improve performance by not blocking execution, they can easily lead to nasty race conditions and other nefarious data integrity bugs. For this reason, we recommend you almost always use safe, synchronous, blocking writes. It seems rare in practice to have truly “fire-and-forget” writes where there are aboslutely no consequences for failures. That being said, one common example where asynchronous writes may make sense is when you are writing non-critical logs or analytics data to MongoDB from your application.
WARNING
Unless you are certain you don’t need synchronous writes, we recommend that you pass the “safe=True” keyword argument to inserts, updates, removes and findAndModify operations:
# safe=True ensures that your write
Guaranteeing Writes to Multiple Database Nodes
The term node refers to a single instance of the MongoDB daemon process. Typically there is a single MongoDB node per machine, but for testing or development cases you can run multiple nodes on one machine.
Replica Set is the MongoDB term for the database’s enhanced master-slave replication configuration. This is similar to the traditional master-slave replication you find in RDBMS such as MySQL and PostgreSQL in that a single node handles writes at a given time. In MongoDB master selection is determined by an election protocol and during failover a slave is automatically promoted to master without requiring operator intervention. Furthermore, the PyMongo driver is Replica Set-aware and performs automatic reconnect on failure to the new master. MongoDB Replica Sets, therefore,
represent a master-slave replication configuration with excellent failure handling out of the box. For anyone who has had to manually recover from a MySQL master failure in a production environment, this feature is a welcome relief.
By default, MongoDB will return success for your write operation once it has been written to a single node in a Replica Set.
However, for added safety in case of failure, you may wish your write to be committed to two or more replicas before returning success. This can help ensure that in case of catastrophic failure, at least one of the nodes in the Replica Set will have your write.
PyMongo makes it easy to specify how many nodes you would like your write to be replicated to before returning success. You simply set a parameter named “w” to the number of servers in each write method call.
For example:
# w=2 means the write will not succeed until it has # been written to at least 2 servers in a replica set. dbh.users.insert(user_doc, w=2)
NOTE
Introduction to MongoDB Query Language
MongoDB queries are represented as a JSON-like structure, just like documents. To build a query, you specify a document with properties you wish the results to match. MongoDB treats each property as having an implicit boolean AND. It natively supports boolean OR queries, but you must use a special operator ($or) to achieve it. In addition to exact matches, MongoDB has operators for greater than, less than, etc.
Sample query document to match all documents in the users collection with firstname “jane”: q = {
"firstname" : "jane" }
If we wanted to retrieve all documents with firstname “jane” AND surname “doe”, we would write: q = {
"firstname" : "jane", "surname" : "doe" }
If we wanted to retrieve all documents with a score value of greater than 0, we would write: q = {
"score" : { "$gt" : 0 } }
Notice the use of the special “$gt” operator. The MongoDB query language provides a number of such operators, enabling you to build quite complex queries.
Reading, Counting, and Sorting Documents in a Collection
In many situations, you only want to retrieve a single document from a collection. This is especially true when documents in your collection are unique on some property. A good example of this is a users collection, where each username is guaranteed unique.
# Assuming we already have a database handle in scope named dbh # find a single document with the username "janedoe".
user_doc = dbh.users.find_one({"username" : "janedoe"}) if not user_doc:
print "no document found for username janedoe" Notice that find_one() will return None if no document is found.
Now imagine you wish to find all documents in the users collection which have a firstname property set to “jane” and print out their email addresses. MongoDB will return a Cursor object for us, to stream the results. PyMongo handles result streaming as you iterate, so if you have a huge number of results they are not all stored in memory at once.
# Assuming we already have a database handle in scope named dbh # find all documents with the firstname "jane".
# Then iterate through them and print out the email address. users = dbh.users.find({"firstname":"jane"})
for user in users:
print user.get("email")
Notice in the above example that we use the Python dict class’ get method. If we were certain that every single result document contained the “email” property, we could have used dictionary access instead.
for user in users:
print user["email"]
If you only wish to retrieve a subset of the properties from each document in a collection during a read, you can pass those as a dictionary via an additional parameter. For example, suppose that you only wish to retrieve the email address for each user with firstname “jane”:
# Only retrieve the "email" field from each matching document. users = dbh.users.find({"firstname":"jane"}, {"email":1}) for user in users:
print user.get("email")
If you are retrieving a large result set, requesting only the properties you need can reduce network and decoding overhead, potentially increasing performance.
Sometimes you are not so interested in the query results themselves, but are looking to find the size of the result set for a given query. A common example is an analytics situation where you want a count of how many documents are in your users’ collections. MonogDB supports efficient server-side counting of result sets with the count() method on Cursor objects:
# Find out how many documents are in users collection, efficiently userscount = dbh.users.find().count()
print "There are %d documents in users collection" % userscount
comprising the property to sort on, and the direction. The PyMongo sort() method is analogous to the SQL ORDER BY statement. Direction can either be pymongo.ASCENDING or pymongo.DESCENDING. For example:
# Return all user with firstname "jane" sorted
# in descending order by birthdate (ie youngest first) users = dbh.users.find(
{"firstname":"jane"}).sort(("dateofbirth", pymongo.DESCENDING)) for user in users:
print user.get("email")
In addition to the sort() method on the PyMongo Cursor object, you may also pass sort instructions to the find() and find_one() methods on the PyMongo Collection object. Using this facility, the above example may be rewritten as:
# Return all user with firstname "jane" sorted
# in descending order by birthdate (ie youngest first) users = dbh.users.find({"firstname":"jane"},
sort=[("dateofbirth", pymongo.DESCENDING)]) for user in users:
print user.get("email")
Another situation you may encounter—especially when you have large result sets—is that you wish to only fetch a limited number of results. This is frequently combined with server-side sorting of results. For example, imagine you are generating a high score table which displays only the top ten scores. PyMongo Cursor objects have a limit() method which enables this. The limit() method is
analogous to the SQL LIMIT statement.
# Return at most 10 users sorted by score in descending order # This may be used as a "top 10 users highscore table"
users = dbh.users.find().sort(("score", pymongo.DESCENDING)).limit(10) for user in users:
print user.get("username"), user.get("score", 0)
If you know in advance that you only need a limited number of results from a query, using limit() can yield a performance benefit. This is because it may greatly reduce the size of the results data which must be sent by MongoDB. Note that a limit of 0 is equivalent to no limit.
Additionally, MongoDB can support skipping to a specific offset in a result set through the
Cursor.skip() method provided by PyMongo. When used with limit() this enables result pagination which is frequently used by clients when allowing end-users to browse very large result sets. skip() is analogous to the SQL OFFSET statement. For example, imagine a Web application which displays 20 users per page, sorted alphabetically by surname , and needs to fetch the data to build the second page of results for a user. The query used by the Web application might look like this:
# Return at most 20 users sorted by name, # skipping the first 20 results in the set users = dbh.users.find().sort(
("surname", pymongo.ASCENDING)).limit(20).skip(20)
Finally, when traversing very large result sets, where the underlying documents may be modified by other programs at the same time, you may wish to use MongoDB’s Snapshot Mode. Imagine a busy site with hundreds of thousands of users. You are developing an analytics program to count users and build various statistics about usage patterns and so on. However, this analytics program is intended to run against the live, production database. Since this is such a busy site, real users are frequently
documents—while your analytics program is running. Due to quirks in MongoDB’s cursoring
mechanism, in this kind of situation your program could easily see duplicates in your query result set. Duplicate data could throw off the accuracy of your analysis program, and so it is best avoided. This is where Snapshot Mode comes in.
MongoDB’s Snapshot Mode guarantees that documents which are modified during the lifetime of a query are returned only once in a result set. In other words, duplicates are eliminated, and you should not have to worry about them.
NOTE
However, Snapshot Mode does have some limitations. Snapshot Mode cannot be used with sorting, nor can it be used with an index on any property other than _id.
To use Snapshot Mode with PyMongo, simply pass “snapshot=True” as a parameter to the find() method:
# Traverse the entire users collection, employing Snapshot Mode # to eliminate potential duplicate results.
for user in dbh.users.find(snapshot=True):
Updating Documents in a Collection
Update queries in MongoDB consist of two parts: a document spec which informs the database of the set of documents to be updated, and the update document itself.
The first part, the document spec, is the same as the query document which you use with find() or find_one().
The second part, the update document, can be used in two ways. The simplest is to supply the full document which will replace the matched document in the collection. For example, suppose you had the following document in your users collection:
user_doc = {
"username" : "janedoe", "firstname" : "Jane", "surname" : "Doe",
"dateofbirth" : datetime(1974, 4, 12), "email" : "janedoe74@example.com", "score" : 0
}
Now let’s say you wish to update the document with username “janedoe” to change the email address to “janedoe74@example2.com”. We build a completely new document which is identical to the original, except for the new email address.
# first query to get a copy of the current document import copy
old_user_doc = dbh.users.find_one({"username":"janedoe"}) new_user_doc = copy.deepcopy(old_user_doc)
# modify the copy to change the email address new_user_doc["email"] = "janedoe74@example2.com" # run the update query
# replace the matched document with the contents of new_user_doc dbh.users.update({"username":"janedoe"}, new_user_doc, safe=True)
Building the whole replacement document can be cumbersome, and worse, can introduce race conditions. Imagine you want to increment the score property of the “janedoe” user. In order to achieve this with the replacement approach, you would have to first fetch the document, modify it with the incremented score, then write it back to the database. With that approach, you could easily lose other score changes if something else were to update the score in between you reading and writing it.
In order to solve this problem, the update document supports an additional set of MongoDB operators called “update modifiers”. These update modifiers include operators such as atomic
increment/decrement, atomic list push/pop and so on. It is very helpful to be aware of which update modifiers are available and what they can do when designing your application. Many of these will be described in their own recipes throughout this book.
To illustrate usage of “update modifiers”, let’s return to our original example of changing only the email address of the document with username “janedoe”. We can use the $set update modifier in our update document to avoid having to query before updating. $set changes the value of an individual property or a group of properties to whatever you specify.
# run the update query, using the $set update modifier.
# potential race condition.
dbh.users.update({"username":"janedoe"},
{"$set":{"email":"janedoe74@example2.com"}}, safe=True) You can also set multiple properties at once using the $set update modifier:
# update the email address and the score at the same time # using $set in a single write.
dbh.users.update({"username":"janedoe"},
{"$set":{"email":"janedoe74@example2.com", "score":1}}, safe=True)
NOTE
At the time of writing, the PyMongo driver, even if you specify a document spec to the update method which matches multiple documents in a collection, only applies the update to the first document matched.
In other words, even if you believe your update document spec matches every single document in the collection, your update will only write to one of those documents.
For example, let us imagine we wish to set a flag on every document in our users collection which has a score of 0:
# even if every document in your collection has a score of 0,
# only the first matched document will have its "flagged" property set to True. dbh.users.update({"score":0},{"$set":{"flagged":True}}, safe=True)
NOTE
In order to have your update query write multiple documents, you must pass the “multi=True” parameter to the update method.
# once we supply the "multi=True" parameter, all matched documents # will be updated
dbh.users.update({"score":0},{"$set":{"flagged":True}}, multi=True, safe=True)
WARNING
Deleting Documents from a Collection
If you wish to permanently delete documents from a collection, it is quite easy to do so. The PyMongo Collection object has a remove() method. As with reads and updates, you specify which documents you want to remove by way of a document spec. For example, to delete all documents from the users collection with a score of 1, you would use the following code:
# Delete all documents in user collection with score 1 dbh.users.remove({"score":1}, safe=True)
Note that the remove() method takes a safe parameter. As mentioned in the earlier section “Write to a Collection Safely and Synchronously”, it is recommended to set the safe parameter to True on write methods to ensure the operation has completed. It is also worth noting that remove() will not raise any exception or error if no documents are matched.
Finally, if you wish to delete all documents in a collection, you can pass None as a parameter to remove():
# Delete all documents in user collection dbh.users.remove(None, safe=True)
MongoDB Query Operators
As mentioned previously, MongoDB has quite a rich set of query operators and predicates. In
Table 2-2 we provide a table with the meaning of each one, along with a sample usage and the SQL equivalent where applicable.
Table 2-2. MongoDB query operators
Operator Meaning Example SQL Equivalent
$gt Greater Than “score”:{"$gt”:0} >
$lt Less Than “score”:{"$lt”:0} <
$gte Greater Than or Equal “score”:{"$gte”:0} >=
$lte Less Than or Equal “score”:{"$lte”:0} ⇐
$all Array Must Contain All “skills”:{"$all”:["mongodb”,"python"]} N/A
$exists Property Must Exist “email”:{"$exists”:True} N/A
$mod Modulo X Equals Y “seconds”:{"$mod”:[60,0]} MOD()
$ne Not Equals “seconds”:{"$ne”:60} !=
$in In “skills”:{"$in”:["c”,"c++"]} IN
$nin Not In “skills”:{"$nin”:["php”,"ruby”,"perl"]} NOT IN
$nor Nor “$nor”:[{"language”:"english"},{"country”:"usa"}] N/A
$or Or “$or”:[{"language”:"english"},{"country”:"usa"}] OR
$size Array Must Be Of Size “skills”:{"$size”:3} N/A
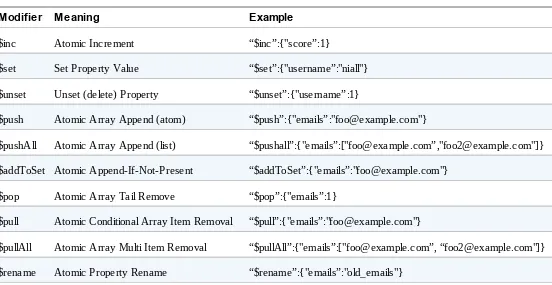
MongoDB Update Modifiers
As mentioned in the section “Updating Documents in a Collection”, MongoDB comes with a set of operators for performing atomic modifications on documents.
Table 2-3. MongoDB update modifiers
Modifier Meaning Example
$inc Atomic Increment “$inc”:{"score”:1}
$set Set Property Value “$set”:{"username”:"niall"}
$unset Unset (delete) Property “$unset”:{"username”:1}
$push Atomic Array Append (atom) “$push”:{"emails”:"foo@example.com"}
$pushAll Atomic Array Append (list) “$pushall”:{"emails”:["foo@example.com”,"foo2@example.com"]}
$addToSet Atomic Append-If-Not-Present “$addToSet”:{"emails”:"foo@example.com"}
$pop Atomic Array Tail Remove “$pop”:{"emails”:1}
$pull Atomic Conditional Array Item Removal “$pull”:{"emails”:"foo@example.com"}
$pullAll Atomic Array Multi Item Removal “$pullAll”:{"emails”:["foo@example.com”, “foo2@example.com"]}
$rename Atomic Property Rename “$rename”:{"emails”:"old_emails"}
Chapter 3. Common MongoDB and Python Patterns
After some time working with MongoDB and Python to solve different problems, various patterns and best practices begin to emerge. Just as with any programming language and database system, there are established approaches for modeling data along with known methods for answering queries as
quickly and efficiently as possible.
While there are myriad sources of such knowledge for traditional RDBM systems like MySQL, there are far fewer resources available for MongoDB. This chapter is an attempt to address this.
A Uniquely Document-Oriented Pattern: Embedding
While the ability of MongoDB documents to contain sub-documents has been mentioned previously in this book, it has not been explored in detail. In fact, embedding is an extremely important modeling technique when working with MongoDB and can have important performance and scalability
implications. In particular, embedding can be used to solve many data modeling problems usually solved by a join in traditional RDBMS. Furthermore, embedding is perhaps more intuitive and easier to understand than a join.
What exactly is meant by embedding? In Python terms, when the value of a key in a dictionary is yet another dictionary, we say that you are embedding the latter in the former. For example:
my_document = {
"name":"foo document",
"data":{"name":"bar document"} }
Here, “data” is a sub-document embedded in the top-level document “my_document”.
Embedding sub-documents can be a useful, natural technique to reduce clutter or namespace collisions. For example consider the case where a “user” document should reference Facebook, Twitter and IRC account usernames, passwords and associated details—in addition to storing a “username” property native to your applicaton:
user_doc = {
"username":"foouser", "twitter":{
"username":"footwitter", "password":"secret",
"email":"twitter@example.com" },
"facebook":{
"username":"foofacebook", "password":"secret",
"email":"facebook@example.com" },
uniqueness constraint can actually be exploited and enable some useful patterns. Specifically, see the section titled “Fast Accounting Pattern”.
Of course, embedded sub-documents can be queried against just like their top-level counterparts. For example, it would be completely legal to attempt to query for the above document in a collection called “users” with the following statement:
user_doc = dbh.users.find_one({"facebook.username":"foofacebook"})
As you can see, the dot (“.”) is used to denote keys in an embedded sub-document. This should be familiar to anybody who has worked with objects in JavaScript, where object-style access via the dot notation can be used in parallel with dictionary-style access via square brackets. As MongoDB uses JavaScript heavily internally, this choice of notation is unsurprising. JSON is JavaScript Object Notation, afterall. The dot notation can also be used in update statements with update modifiers such as $set to set the value of an individual sub-property:
# update modifiers such as $set also support the dot notation dbh.users.update({"facebook.username":"foofacebook"},
{"$set":{"facebook.username":"bar"}}, safe=True)
This use of embedded sub-documents is useful, but perhaps even more useful is to embed multiple documents under a single key. In other words, a property whose value is a list or array of sub-documents. In MongoDB, this is a legal and very useful construct. This is a very natural way to model one-to-many relationships, or parent-child relationships. Consider the example of a “user” document which can reference multiple email addresses for that user. In the relational model, this would
typically be achieved with two tables—one for users, and one for the email addresses associated with each user. A join query could then be used to retrieve a user along which each of its email addresses.
In MongoDB, a natural approach to model a one-to-many relationship would be to simply have a property “emails” on the user document, the value of which is an array containing sub-documents, each representing an associated email account. For example:
# A user document demonstrating one-to-many relationships using embedding # Here we map multiple email addresses (along with whether or not the email # is the user's primary email address) to a single user.
user_doc = {
"username":"foouser", "emails":[
{
"email":"foouser1@example.com", "primary":True
}, {
"email":"foouser2@example2.com", "primary":False
}, {
"email":"foouser3@example3.com", "primary":False
} ] }
embedded structure. Just as you can query for documents by the value of sub-documents directly embedded in the top-level document, documents can also be located by the value of sub-documents embedded in arrays. To do this, simply use the same dot (“.”) notation, as described earlier in this section. MongoDB transparently searches through arrays for sub-documents.
Returning to our earlier example of a single user with multiple email addresses, consider the following code:
# A user document demonstrating one-to-many relationships using embedding user_doc = {
"username":"foouser", "emails":[
{
"email":"foouser1@example.com", "primary":True
}, {
"email":"foouser2@example2.com", "primary":False
}, {
"email":"foouser3@example3.com", "primary":False
# Retrieve the just-inserted document via one of its many email addresses user_doc_result = dbh.users.find_one({"emails.email":"foouser1@example.com"}) # Assert that the original user document and the query result are the same assert user_doc == user_doc_result
In addition to MongoDB understanding lists of sub-documents to enable querying for embedded values via the dot notation, there are also useful update modifiers. $pull, $push and their variants are the most helpful, enabling atomic append and removal of sub-documents to and from embedded lists. Consider the case where a user no longer wishes a particular email address to be linked to his or her account. The naive way to remove that email address from their user document would be to first query for their user document, modify it in your application code so it no longer contains the removed email address, and then send an update query to the database. Not only is this cumbersome, it also introduces a race condition, as the underlying user document may have been modified by another process in between your read and write:
# Naive method to remove an email address from a user document # Cumbersome and has a race condition
user_doc = {
"username":"foouser", "emails":[
{
"email":"foouser1@example.com", "primary":True
}, {
"email":"foouser2@example2.com", "primary":False
"email":"foouser3@example3.com",
# Retrieve the just-inserted document via username
user_doc_result = dbh.users.find_one({"username":"foouser"})
# Remove the "foouser2@example2.com" email address sub-document from the embedded list del user_doc_result["emails"][1]
# Now write the new emails property to the database
# May cause data to be lost due to the race between read and write
dbh.users.update({"username":"foouser"},{"$set":{"emails":user_doc_result}}, safe=True) The three most common operations on sub-documents embedded in a list property are: Deletion,
insertion and modification. Each of these can be performed atomically with the provided update modifiers. First let’s demonstrate the use of $pull to remove the sub-document matching
“foouser2@example2.com” in a simple and race-free way:
# Atomically remove an email address from a user document race-free using the # $pull update modifier
user_doc = {
"username":"foouser", "emails":[
{
"email":"foouser1@example.com", "primary":True
}, {
"email":"foouser2@example2.com", "primary":False
}, {
"email":"foouser3@example3.com", "primary":False
# Use $pull to atomically remove the "foouser2@example2.com" email sub-document dbh.users.update({"username":"foouser"},
{"$pull":{"emails":{"email":"foouser2@example2.com"}}}, safe=True) In this example, $pull is used to match an embedded document with
"email":"foouser2@example2.com" in the “emails” field. $pull will remove the entire document from the array in an atomic fashion, meaning there is no opportunity for a race condition. You can also use query modifiers with $pull, for example to remove all sub-documents with a “primary” value that is not equal to True, you could write the following:
# Use $pull to atomically remove all email sub-documents with primary not equal to True dbh.users.update({"username":"foouser"},
{"$pull":{"emails":{"primary":{"$ne":True}}}, safe=True)
The full range of query modifiers (see table in Chapter 2) are available for use, including $gt, $lt and so on. Additionally, $pull can be used with arrays containing atoms (numbers, strings, dates,
list of primitive types in an array, you can remove elements atomically with $pull too.
The $push update modifier is used to atomically append an element to an array. At the time of writing, $push can only support adding items to the end of the array—there is no update modifier to add an element to the beginning of an array, or to insert it at an arbitrary index. $push is simple to use, because, unlike $pull, it does not take any field match or conditional arguments.
For example, to atomically add a new email address to our user document, we could use the following query:
# Use $push to atomically append a new email sub-document to the user document new_email = {"email":"fooemail4@exmaple4.com", "primary":False}
dbh.users.update({"username":"foouser"},
{"$push":{"emails":new_email}}, safe=True)
The final case is updating an existing sub-document in-place. This can be achieved using what is called the “positional” operator. The positional operator is represented by the dollar sign (“$”). Basically, it is replaced by the server with the index of the item matched by the document spec. For example, suppose we wish to make our user document’s “foouser2@example2.com” email address primary. We could issue the following update query to modify it in-place:
# Demonstrate usage of the positional operator ($) to modify # matched sub-documents in-place.
user_doc = {
"username":"foouser", "emails":[
{
"email":"foouser1@example.com", "primary":True
}, {
"email":"foouser2@example2.com", "primary":False
}, {
"email":"foouser3@example3.com", "primary":False
# Now make the "foouser2@example2.com" email address primrary dbh.users.update({"emails.email":"foouser2@example2.com"}, {"$set":{"emails.$.primary":True}}, safe=True)
# Now make the "foouser1@example.com" email address not primary dbh.users.update({"emails.email":"foouser1@example.com"},
{"$set":{"emails.$.primary":False}}, safe=True)
NOTE
Note that the $ operator cannot be used with upserts (see section on upserts later in this chapter) additionally it only works with the first matched element.
loaded into memory. This means that there is no extra cost (aside from the additional network and decode/encode CPU overhead incurred by a larger result set) to fetch embedded data. Once the top-level document has been retrieved, its sub-documents are immediately avaialble, too. Contrast this with a relational schema design utilizing joins, where the database may need to read from one or more additional tables to fetch associated data. Depending on the situation, these joins could impact query performance considerably.
Secondly, it is also very important to be aware that there is a size limit on documents in MongoDB. Additionally, the document size limit has been increased over successive major MongoDB releases. In MongoDB 1.4.x and 1.6.x, the maximum document size was 4MB but in 1.8.x it was increased to 16MB. One can expect that this limit may continue to increase—perhaps eventually to be arbitrarily large—but for now, keep in mind that documents have a finite size when modeling your data.
In practice, it is rare to reach even a 4MB document size, unless the design is such that documents continue to grow over time. For example, a scenario where new properties are created on an hourly or daily basis. In such cases, it is wise to ensure there is some application logic to handle purging old/expired embedded sub-documents to prevent the limit being hit.
Another example would be building a document publishing platform which embedded every single document posted by a user as a sub-document inside of the user document. While performance would be excellent since a single query for the user document could retieve all their published documents in a single shot, it is quite likely that some users would eventually publish more than 16MB of content. Hence there is often a judgement call to be made when designing MongoDB schemas: To embed, or not to embed.
Fast Lookups: Using Indexes with MongoDB
The role of indexes in MongoDB is very similar to their role in traditional RDBMS such as MySQL, PostgreSQL, etc. MongoDB offers two kinds of indexes out-of-the-box: Btree indexes and geospatial indexes. The btree indexes in MongoDB are much the same as the equivalents in MySQL or
PostgreSQL. When in a relational system you would put an index on a column to get fast lookups on that field, you do an analogous thing in MongoDB by placing an index on a particular property in a collection. Just as with an RDBMS, MongoDB indexes can span multiple fields (a.k.a. compound indexes)—useful if you know in advance that you will be querying based on the value of more than a single property. A compound index would be useful for example if you were querying documents by first name and last name. In MongoDB, btree indexes can have a “direction”. This direction is only useful in the case of compound indexes, where the index direction should match the sort direction or range query direction for optimal performance. For example, if you are querying a range (say, A through C) on first name and last name and then sorting in ascending order on last name, your compound index direction should also be ascending.
Using a btree index will incur a performance hit on writes, as the database must now update the index in addition to the data. For this reason, it is wise to choose your indexes carefully. Avoid superfluous indexes if at all possible. Indexes also take up valuable storage—not so much of an issue with on-disk space today given the low price-per-terrabyte—but in memory, too. Your database will run fastest when it resides entirely in memory, and indexes can considerably add to its size. It is a classic Computer Science time vs. space tradeoff scenario.
MongoDB btree indexes can also be used to enforce a unique constraint on a particular property in a collection. By default, the _id primary key property has a unique index created in MongoDB. The unique constraint will prevent the protected property from ever having a duplicate value within the collection. This can be useful for values which are expected to be globally unique in the collection— a common example being usernames. Beware of over-reliance on this feature, however, as in the current implementation of sharding, unique indexes are supported only on the _id property— otherwise they are not enforced globally across the cluster.
Btree indexes also transparently support indexing multi-value properties, that is, properties where the value is an array. Each item in the array will be properly stored in the index to enable fast retrieval of the parent document. This can be useful for performant implementations of tagging, where each tag is stored as a string inside a “tags” list property on the document. Lookups for documents matching one or more of those tags (potentially using the $in query operator) will then be looked up in the “tags” index. Furthermore, btree indexes are equally well supported when placed on embedded
sub-documents. If, for example, you store email addresses as embedded sub-documents, and you wish to be able to look up by the value of the email address using an index, MongoDB allows this. Hence the following document and query could take advantage of an index:
user_doc = {
"username":"foouser", "emails":[
{
"email":"foouser1@example.com", "primary":True
}, {
"primary":False },
{
"email":"foouser3@example3.com", "primary":False
} ] }
dbh.users.insert(user_doc)
# If we place an index on property "emails.email", # e.g. dbh.users.create_index("emails.email")
# this find_one query can use a btree index
user = dbh.users.find_one({"emails.email":"foouser2@example2.com"})
Btree indexes in MongoDB are also important when performing server-side sorting of results.
Without an index on the property you are sorting by, MongoDB will run out of memory when trying to sort anything greater than a relatively small results set (approx. 4Mb at time of writing). If you expect that you will be sorting result sets larger than 4Mb, you should specify an index on the sort key. It is easy to underestimate this and find exceptions are being raised on queries against larger, real-world data which were not anticipated during development.
To create an index with the PyMongo driver, use the Collection.create_index() method. This method can create single-key indexes or compound indexes. For a single-key index, only the key needs to be provided. A compound index is slightly more complicated—a list of 2-tuples (key, direction) must be supplied.
For example to create an index on the username property of a collection called users, you could write the following:
# Create index on username property dbh.users.create_index("username")
To create a compound index, for example on the first_name and last_name, with an ascending direction, you could specify:
# Create a compound index on first_name and last_name properties # with ascending index direction
dbh.users.create_index([("first_name", pymongo.ASCENDING), ("last_name", pymongo.ASCENDING)])
Indexes in MongoDB each have names. By default, MongoDB will generate a name, but you may wish to give a custom name—particularly for compound indexes where the generated names are not
especially readable by humans. To give a custom name during creation, supply the name=<str> parameter to the create_index() method:
# Create a compound index called "name_idx" on first_name and last_name properties # with ascending index direction
dbh.users.create_index([
("first_name", pymongo.ASCENDING), ("last_name", pymongo.ASCENDING) ],
name="name_idx")
access. Building an index in the background may take slightly longer, and will still cause additional load on the system, but the database should otherwise remain available.
To specify that an index should be built in the background, pass the background=True parameter to the create_index() method:
# Create index in the background # Database remains usable
dbh.users.create_index("username", background=True)
As mentioned earlier in this section, MongoDB btree indexes can be used to enforce a uniqueness constraint on a particular property. Unique constraints can be applied to both single-key indexes and compound indexes. To create an index with a unique constraint, simply pass the unique=True
parameter to the create_index() method:
# Create index with unique constraint on username property dbh.users.create_index("username", unique=True)
Be aware that unique indexes in MongoDB do not function exactly the same as indexes in RDBMS systems. In particular, a document with a missing property will be added to the index as if it the value of that property were null. This means that when a unique constraint is added to a btree index in
MongoDB, the database will prevent you from having multiple documents in the collection which are missing the indexed property. For example, if you have created a unique index for the username
property in a users collection, only one document in that collection may be permitted to lack a username property. Writes of additional documents without a username property will raise an exception. If you try to add a unique index to a collection which already contains duplicates on the specified property, MongoDB will (unsurprisingly) raise an exception. However, if you don’t mind throwing away duplicate data, you can instruct MongoDB to drop all but the first document it finds using the dropDups or drop_dups parameter:
# Create index with unique constraint on username property
# instructing MongoDB to drop all duplicates after the first document it finds. dbh.users.create_index("username", unique=True, drop_dups=True)
# Could equally be written:
# dbh.users.create_index("username", unique=True, dropDups=True)
Over time, your schema may evolve and you may find that a particular index is no longer needed. Fortunately, indexes are easy to remove in MongoDB. The Collection.drop_index() method deletes one index at a time. If you created your index with a custom name (as described above), you must supply this same name to the drop_index() method in order to delete it. For example:
# Create index on username property called "username_idx" dbh.users.create_index("username", name="username_idx") # Delete index called "username_idx"
dbh.users.drop_index("username_idx")
If, on the other hand, you did not give your index a custom name, you can delete by passing the original index specifier. For example:
All indexes in a collection can be dropped in a single statement using the Collection.drop_indexes() method.
If you wish to programatically inspect the indexes on your collections from Python, you can use the Collection.index_information() method. This returns a dictionary in which each key is the name of an index. The value associated with each key is an additional dictionary. These second-level
dictionaries always contain a special key called key, which is an entry containing the original index specifier—including index direction. This original index specifier was the data passed to the