Angular: Up and Running
Learning Angular, Step by Step
Angular: Up and Running
By Shyam Seshadri
Copyright © 2018 Shyam Seshadri. All rights reserved. Printed in the United States of America.
Published by O’Reilly Media, Inc., 1005 Gravenstein Highway North, Sebastopol, CA 95472. O’Reilly books may be purchased for educational, business, or sales promotional use. Online editions are also available for most titles (http://oreilly.com/safari). For more information, contact our corporate/institutional sales department: 800-998-9938 or [email protected].
Acquisitions Editor: Mary Treseler
Developmental Editor: Angela Rufino
Production Editor: Kristen Brown
Copyeditor: Kim Cofer
Proofreader: Jasmine Kwityn
Indexer: Ellen Troutman-Zaig
Interior Designer: David Futato
Cover Designer: Ellie Volckhausen
Illustrator: Rebecca Demarest
June 2018: First Edition
Revision History for the First Edition
2018-05-31: First release
See http://oreilly.com/catalog/errata.csp?isbn=9781491999837 for release details.
The O’Reilly logo is a registered trademark of O’Reilly Media, Inc. Angular: Up and Running, the cover image, and related trade dress are trademarks of O’Reilly Media, Inc.
The views expressed in this work are those of the author, and do not represent the publisher’s views. While the publisher and the author have used good faith efforts to ensure that the information and instructions contained in this work are accurate, the publisher and the author disclaim all
responsibility for errors or omissions, including without limitation responsibility for damages
this work is at your own risk. If any code samples or other technology this work contains or describes is subject to open source licenses or the intellectual property rights of others, it is your responsibility to ensure that your use thereof complies with such licenses and/or rights.
Introduction
It’s funny that we constantly over- or underestimate the impact of certain events and projects in our lives. I seriously believed that the last project I worked on at Google, Google Feedback, would end up completely changing how the company interacted with its customers. And I believed Angular (AngularJS at the time) would just be another flash-in-the-pan, yet-another-framework that would not outlive the Feedback project’s admin interface.
And in hindsight, it was exactly the other way around. While Feedback still exists and is baked into a lot of Google products, it is Angular that has gone from a tiny project used by one internal team at Angular to now being used by thousands of developers and companies worldwide. And a lot of it stems from Misko, Igor, and the entire team around it, and their unerring dedication to improving how we develop web applications.
What started off as a two-member project is now one of the largest open source communities on the web, and the framework has impacted and been a part of thousands of projects across the world. There are dozens of books, hundreds of tutorials, and thousands of articles on Angular, and Angular’s adoption and support continues to grow each day.
Some of the major concepts that were ahead of their time during the first version of Angular (like data binding, separation of concerns, dependency injection, etc.) are now common features of new
frameworks.
The biggest change to the AngularJS ecosystem has been the release of the new version of Angular (initially called Angular 2.0, now just called Angular). It was a drastic, non-backward-compatible change that almost divided an entire community. But with community engagement and an open, inclusive team, what could have been a disastrous step turned out to be a much needed overhaul of Angular to bring it to the new age of web development.
Truly, what makes Angular a great technology and framework is the community around it—those who contribute to the core framework, or develop plug-ins for it, as well as those who use it on a day-to-day basis.
As part of the community, I am truly excited to present this book, and contribute in my own way to what makes this community great.
Who Should Read This Book
We will also use TypeScript, which is the recommended way of developing in Angular, but a preliminary knowledge is sufficient to read this book.
We will take it step by step, so relax and have fun learning with me.
Why I Wrote This Book
Angular as a framework has grown immensely, and comes with a large set of features and
capabilities. With a large community behind it, it also comes with an influx of helpful content. But the help content, tutorials, and guides are either focused only on particular topics, or sporadic and not necessarily useful for someone getting started.
The aim of this book is to provide a step-by-step guide on getting started with Angular. Each concept is provided in a logical, organized fashion, building on top of the previous one. With so many moving parts and an active community, this book does not intend to cover each and every aspect, but instead focuses on the core building blocks in a detailed fashion while letting readers discover the rest on their own.
At the end of the book, you should be familiar with a majority of the Angular framework, and be able to use Angular to develop your own web applications and use it in your own projects.
A Word on Web Application Development Today
JavaScript has come a long way, to the point where it is one of the most widely used and adopted programming languages. Nowadays, it’s rare for web developers to have to worry about browser inconsistencies and the like, which was the primary reason for frameworks like jQuery to have existed.
Frameworks (like Angular and React) are now a very common choice for developing frontend experiences, and it is rare for anyone nowadays to decide to build a frontend application without leveraging one.
The advantages of using frameworks are manifold, from reducing boilerplate code, to providing a consistent structure and layout for developing an application to many more. The primary intent is always to reduce the time spent on cruft, and focus more on the major functionality we want to provide. And if it works across browsers (and platforms, like Android and iOS, in addition to desktop), then more power to it.
Angular (as well as other frameworks) provides this, primarily through some core fundamentals that are at the heart of the framework, including:
Powerful templating syntax driven by declarative programming Modularity and separation of concerns
Testability and awesome testing support Routing and navigation
And a host of other features, from server-side rendering, to the ability to write native mobile applications, and much more!
With the help of Angular, we can focus on building amazing experiences, while managing complexity and maintainability in a seamless fashion.
Navigating This Book
This book aims to walk a developer through each part of Angular, step by step. Each chapter that introduces a new concept will be immediately followed by a chapter on how we can unit test it. The book is roughly organized as follows:
Chapter 1, Introducing Angular, is an introduction to Angular as well as the concepts behind it. It also covers what it takes to start writing an Angular application.
Chapter 2, Hello Angular, walks through creating a very simple Angular application, and diving into how the pieces work together. It also introduces the Angular CLI.
Chapter 3, Useful Built-In Angular Directives, digs into the basic built-in Angular directives (including ngFor, ngIf, etc.) and when and how to use them.
Chapter 4, Understanding and Using Angular Components, covers Angular components in more detail, as well as the various options available when creating them. It also covers the basic lifecycle hooks available with components.
Chapter 5, Testing Angular Components, introduces how to unit test angular components using Karma and Jasmine, along with the Angular testing framework.
Chapter 6, Working with Template-Driven Forms, covers creating and working with forms in Angular, specifically template-driven forms.
Chapter 7, Working with Reactive Forms, covers the other way of defining and working with forms, which is how to create and develop reactive forms.
Chapter 8, Angular Services, covers Angular services, which includes how to use built-in Angular services, as well as how and when to define our own Angular services.
Chapter 9, Making HTTP Calls in Angular, moves into the server communication aspect of Angular, and delves into making HTTP calls, as well as some advanced topics like
interceptors and the like.
harder cases like asynchronous flows as well as services and components that make HTTP calls.
Chapter 11, Routing in Angular, goes in depth into how we can accomplish routing in an Angular application and covers the Angular routing module in detail as well as a majority of its features.
Chapter 12, Productionizing an Angular App, finally brings together all the concepts and covers taking the developed Angular application to production and the various concerns and techniques involved in the same.
The entire code repository is hosted on GitHub, so if you don’t want to type in the code examples from this book, or want to ensure that you are looking at the latest and greatest code examples, visit the repository and grab the contents.
This book uses AngularJS version 5.0.0 for all its code examples.
Online Resources
The following resources are a great starting point for any AngularJS developer, and should be always available at your fingertips:
The Official Angular API Documentation The Official Angular Quickstart Guide The Angular Heroes Tutorial App
Conventions Used in This Book
The following typographical conventions are used in this book:
Italic
Indicates new terms, URLs, email addresses, filenames, and file extensions.
Constant width
Used for program listings, as well as within paragraphs to refer to program elements such as variable or function names, databases, data types, environment variables, statements, and keywords.
Constant width bold
Shows commands or other text that should be typed literally by the user.
Shows text that should be replaced with user-supplied values or by values determined by context.
TIP This element signifies a tip or suggestion.
NOTE This element signifies a general note.
WARNING This element indicates a warning or caution.
Using Code Examples
Supplemental material (code examples, exercises, etc.) is available for download at
https://github.com/shyamseshadri/angular-up-and-running.
This book is here to help you get your job done. In general, if example code is offered with this book, you may use it in your programs and documentation. You do not need to contact us for permission unless you’re reproducing a significant portion of the code. For example, writing a program that uses several chunks of code from this book does not require permission. Selling or distributing a CD-ROM of examples from O’Reilly books does require permission. Answering a question by citing this book and quoting example code does not require permission. Incorporating a significant amount of example code from this book into your product’s documentation does require permission.
We appreciate, but do not require, attribution. An attribution usually includes the title, author, publisher, and ISBN. For example: “Angular: Up and Running by Shyam Seshadri (O’Reilly). Copyright 2018 Shyam Seshadri, 978-1-491-99983-7.”
If you feel your use of code examples falls outside fair use or the permission given above, feel free to contact us at [email protected].
O’Reilly Safari
Safari (formerly Safari Books Online) is a membership-based training and reference platform for enterprise, government, educators, and individuals.
Review, Prentice Hall Professional, Addison-Wesley Professional, Microsoft Press, Sams, Que, Peachpit Press, Adobe, Focal Press, Cisco Press, John Wiley & Sons, Syngress, Morgan Kaufmann, IBM Redbooks, Packt, Adobe Press, FT Press, Apress, Manning, New Riders, McGraw-Hill, Jones & Bartlett, and Course Technology, among others.
For more information, please visit http://oreilly.com/safari.
How to Contact Us
Please address comments and questions concerning this book to the publisher:
O’Reilly Media, Inc.
1005 Gravenstein Highway North
Sebastopol, CA 95472
800-998-9938 (in the United States or Canada)
707-829-0515 (international or local)
707-829-0104 (fax)
We have a web page for this book, where we list errata, examples, and any additional information. You can access this page at http://bit.ly/angularUR.
To comment or ask technical questions about this book, send email to [email protected]. For more information about our books, courses, conferences, and news, see our website at
http://www.oreilly.com.
Find us on Facebook: http://facebook.com/oreilly
Follow us on Twitter: http://twitter.com/oreillymedia
Watch us on YouTube: http://www.youtube.com/oreillymedia
Acknowledgments
This book is dedicated to my wife, Sanchita, and my parents and grandmom who were my rock as well as my motivation to write this book in the best manner I could, all the while balancing my own fledgling startup in its most precarious time (the beginning!).
This book of course wouldn’t be possible without the faith and efforts of the awesome team at O’Reilly, especially Angela and Kristen!
Chapter 1. Introducing Angular
Our expectations of what we can perform on the web (and by web here, I mean both desktop as well as the mobile web) has increased to the point where what used to be full-fledged native desktop applications are run on the browser. Web applications now resemble desktop native applications in scope and complexity, which also results in added complexity as a developer.
Furthermore, Single-Page Applications (SPAs) have become a very common choice in building out frontend experiences, as they allow for great customer experiences in terms of speed and
responsiveness. Once the initial application has loaded into a customer’s browser, further
interactions only have to worry about loading the additional data needed, without reloading the entire page as was the norm with server-side rendered pages of the past.
AngularJS was started to first bring structure and consistency to single-page web application
development, while providing a way to quickly develop scalable and maintainable web applications. In the time since it was released, the web and browsers have moved forward by leaps and bounds, and some of the problems that AngularJS was solving weren’t as relevant anymore.
Angular then was basically a completely new rewritten version of the framework, built for the new-age web. It levernew-aged a lot of the newer advances, from modules to web components, while
improving the existing features of AngularJS, like dependency injection and templating.
TIP
From now on, when I say AngularJS, I refer to the original AngularJS framework, the 1.0 version. Whenever I mention Angular, it refers to the newer framework, from 2.0 onward. This is primarily because Angular 2.0 onward does not predicate itself to using only JavaScript, but also supports writing applications in TypeScript.
Why Angular
Angular as a framework provides a few significant advantages while also providing a common structure for developers on a team to work with. It allows us to develop large applications in a maintainable manner. We will dig into each one of these in more detail in the following chapters: Custom components
Angular allows you to build your own declarative components that can pack functionality along with its rendering logic into bite-sized, reusable pieces. It also plays well with web components. Data binding
Dependency injection
Angular allows you to write modular services, and have them injected wherever they are needed. This greatly improves the testability and reusability of the same.
Testing
Tests are first-class citizens, and Angular has been built from the ground up with testability in mind. You can (and should!) test every part of your application.
Comprehensive
Angular is a full-fledged framework, and provides out-of-the-box solutions for server communication, routing within your application, and more.
NOTE
Angular as a framework has adopted semantic versioning for all new releases. Furthermore, the core team has an aggressive
roadmap, with a new major release planned every six months. Thus, what started off as Angular 2 is now referred to as just Angular, since we don’t want to call them Angular 2, Angular 4, Angular 5, and so on.
What This Book Will Not Cover
While Angular as a framework is quite large, the community around it is even larger. A lot of great features and options for use with Angular in fact stem from this community. This makes life harder as an author to figure out how to write a book that preps you, the reader, as an Angular developer, while still limiting the scope to what I think are the essentials.
To that extent, while Angular can be extended in so many ways, from writing native mobile apps using Angular (see NativeScript), rendering your Angular application on the server (see Angular Universal), using Redux as a first-class option in Angular (multiple options; see ngrx), and many more, the initial version of the book will only focus on the core Angular platform and all the
capabilities it provides. It will also strive to focus on the more common cases rather than cover every single feature and capability of Angular, as such a book would run into thousands of pages.
The intention is to focus on the parts that will be necessary and useful to all Angular developers, rather than focus on bits and parts that would be useful to a subset.
Getting Started with Your Development Environment
Angular expects you to do a fair bit of groundwork to be able to develop seamlessly on your computer. Certain prerequisites need to be installed that we will cover in this section.
Node.js
While you will never be coding in Node.js, Angular uses Node.js as its base for a large part of its build environment. Thus, to get started with Angular, you will need to have Node.js installed on your environment. There are multiple ways to install Node.js, so please refer to the Node.js Download Page for more instructions.
WARNING
On macOS, installing Node.js through Homebrew has been known to cause some issues. So try installing it directly if you run into any problems.
You need to install version 6.9.0 or above of Node.js, and version 3.0.0 or above of npm. You can confirm your versions after installing by running the following commands:
node --version npm --v
TypeScript
that is easier to understand, reason about, and trace. It ensures that the latest proposed ECMAScript features are also available at the tip of our fingers. At the end of the day, all your TypeScript code compiles down to JavaScript that can run easily in any environment.
TypeScript is not mandatory for developing an Angular application, but it is highly recommended, as it offers some syntactic sugar, as well as makes the codebase easier to understand and maintain. In this book, we will be using TypeScript to develop Angular applications.
TypeScript is installed as an NPM package, and thus can be simply installed with the following command:
npm install -g typescript
Make sure you install at least version 2.4.0 or above.
While we will be covering most of the basic features/concepts that we use from TypeScript, it is always a good idea to learn more from the official TypeScript documentation.
Angular CLI
Unlike AngularJS, where it was easy to source one file as a dependency and be up and running, Angular has a slightly more complicated setup. To this extent, the Angular team has created a command-line interface (CLI) tool to make it easier to bootstrap and develop your Angular applications.
As it significantly helps making the process of development easier, I recommend using it at the very least for your initial projects until you get the hang of all the things it does and are comfortable doing it yourself. In this book, we will cover both the CLI command as well as the actions it performs underneath, so that you get a good understanding of all the changes needed.
Installing the latest version (1.7.3 at the time of writing this book) is as simple as running the following command:
npm install -g @angular/cli
TIP
If you are scratching your head at this newfangled naming convention for Angular packages, the new syntax is a feature of NPM called scoped packages. It allows packages to be grouped together within NPM under a single folder. You can read more here.
Once installed, you can confirm if it was successful by running the following command:
Getting the Codebase
All the examples from this book, along with the exercises and the final solution, are hosted as a Git repository. While it is not mandatory to download this, you can choose to do so if you want a
reference or want to play around with the samples in this book. You can do so by cloning the Git repository by running the following command:
git clone https://github.com/shyamseshadri/angular-up-and-running.git
This will create a folder called angular-up-and-running in your current working directory with all the necessary examples. Within this directory you’ll find subfolders containing the examples,
organized by chapter.
Conclusion
At this point, we are all set up with our development environment and are ready to start developing Angular applications. We have installed Node.js, TypeScript, as well as the Angular CLI and
understand the need and use of each.
Chapter 2. Hello Angular
In the previous chapter, we got a very quick overview of Angular and its features, as well as a step-by-step guide on how to set up our local environment for developing any Angular application. In this chapter, we will go through the various parts of an Angular application by creating a very simple application from scratch. Through the use of this application, we will cover some of the basic terminologies and concepts like modules, components, data and event binding, and passing data to and from components.
We will start with a very simple stock market application, which allows us to see a list of stocks, each with its own name, stock code, and price. During the course of this chapter, we will see how to package rendering a stock into an individual, reusable component, and how to work with Angular event and data binding.
Starting Your First Angular Project
As mentioned in the previous chapter, we will heavily rely on the Angular CLI to help us bootstrap and develop our application. I will assume that you have already followed the initial setup
instructions in the previous chapter and have Node.js, TypeScript, and the Angular CLI installed in your development environment.
Creating a new application is as simple as running the following command:
ng new stock-market
When you run this command, it will automatically generate a skeleton application under the folder
stock-market with a bunch of files, and install all the necessary dependencies for the Angular
application to work. This might take a while, but eventually, you should see the following line in your terminal:
Project 'stock-market' successfully created.
Congratulations, you have just created your first Angular application!
TIP
While we created our first application with the vanilla Angular CLI command, the ng new command takes a few arguments that allow you to customize the application generated to your preference. These include:
Whether you want to use vanilla CSS or SCSS or any other CSS framework (for example, ng new --style=scss)
Whether you want inline styles/templates
Whether you want a common prefix to all components (for example, to prefix acme to all components, ng new --prefix=acme)
And much more. It’s worth exploring these options by running ng help once you are a bit more familiar with the Angular framework to decide if you have specific preferences one way or the other.
Understanding the Angular CLI
While we have just created our first Angular application, the Angular CLI does a bit more than just the initial skeleton creation. In fact, it is useful throughout the development process for a variety of tasks, including:
Bootstrapping your application Serving the application
Running the tests (both unit and end-to-end) Creating a build for distribution
Generating new components, services, routes and more for your application
Each of these corresponds to one or more Angular CLI commands, and we will cover each one as and when we need or encounter them, instead of trying to cover each command and its uses upfront. Each command provides further flexibility with a variety of arguments and options, making the Angular CLI truly diverse and capable for a wide variety of uses.
Running the Application
Now that we have generated our application, the next part is to run it so that we can see our live running application in the browser. There are technically two ways to run it:
Running it in development mode, where the Angular CLI compiles the changes as it happens and refreshes our UI
Running it in production mode, with an optimal compiled build, served via static files For now, we will run it in development mode, which is as simple as running
ng serve
from the root folder of the generated project, which is the stock-market folder in this case. After a little bit of processing and compilation, you should see something like the following in your terminal:
Date: 2018-03-26T10:09:18.869Z Hash: 0b730a52f97909e2d43a Time: 11086ms
chunk {inline} inline.bundle.js (inline) 3.85 kB [entry] [rendered] chunk {main} main.bundle.js (main) 17.9 kB [initial] [rendered] chunk {polyfills} polyfills.bundle.js (polyfills) 549 kB [initial] [rendered] chunk {styles} styles.bundle.js (styles) 41.5 kB [initial] [rendered] chunk {vendor} vendor.bundle.js (vendor) 7.42 MB [initial] [rendered]
webpack: Compiled successfully.
The preceding output is a snapshot of all the files that the Angular CLI generates in order for your Angular application to be served successfully. It includes the main.bundle.js, which is the transpiled code that is specific to your application, and the vendor.bundle.js, which includes all the third-party libraries and frameworks you depend on (including Angular). styles.bundle.js is a compilation of all the CSS styles that are needed for your application, while polyfills.bundle.js includes all the polyfills needed for supporting some capabilities in older browsers (like advanced ECMAScript features not yet available in all browsers). Finally, inline.bundle.js is a tiny file with webpack utilities and loaders that is needed for bootstrapping the application.
ng serve starts a local development server on port 4200 for you to hit from your browser. Opening
http://localhost:4200 in your browser should result in you seeing the live running Angular
Figure 2-1. Hello Angular application in the browser
You can actually leave the ng serve command running in the terminal, and continue making changes. If you have the application opened in your browser, it will automatically refresh each time you save your changes. This makes the development quick and iterative.
In the following section, we will go into a bit more detail about what exactly happened under the covers to see how the generated Angular application works and what the various pieces are.
Basics of an Angular Application
At its core, any Angular application is still a Single-Page Application (SPA), and thus its loading is triggered by a main request to the server. When we open any URL in our browser, the very first request is made to our server (which is running within ng serve in this case). This initial request is satisfied by an HTML page, which then loads the necessary JavaScript files to load both Angular as well as our application code and templates.
One thing to note is that although we develop our Angular application in TypeScript, the web
application works with transpiled JavaScript. The ng serve command is responsible for translating our TypeScript code into JavaScript for the browser to load.
If we look at the structure the Angular CLI has generated, it is something like this:
stock-market
Root HTML—index.html
If you take a look at the index.html file, which is in the src folder, you will notice that it looks very clean and pristine, with no references to any scripts or dependencies:
<!doctype html>
<html lang="en"> <head>
<meta charset="utf-8">
<title>StockMarket</title>
<base href="/">
<meta name="viewport" content="width=device-width, initial-scale=1">
<link rel="icon" type="image/x-icon" href="favicon.ico"> </head>
<body>
<app-root></app-root>
</body> </html>
Root component for our Angular application
The only thing of note in the preceding code is the <app-root> element in the HTML, which is the marker for loading our application code.
What about the part that loads the core Angular scripts and our application code? That is inserted dynamically at runtime by the ng serve command, which combines all the vendor libraries, our application code, the styles, and inline templates each into individual bundles and injects them into
index.html to be loaded as soon as the page renders in our browser.
The Entry Point—main.ts
The second important part of our bootstrapping piece is the main.ts file. The index.html file is responsible for deciding which files are to be loaded. The main.ts file, on the other hand, identifies which Angular module (which we will talk a bit more about in the following section) is to be loaded when the application starts. It can also change application-level configuration (like turning off
framework-level asserts and verifications using the enableProdMode() flag), which we will cover in Chapter 12:
import { enableProdMode } from '@angular/core';
import { platformBrowserDynamic } from '@angular/platform-browser-dynamic';
import { AppModule } from './app/app.module';
import { environment } from './environments/environment';
if (environment.production) { enableProdMode();
}
.catch(err => console.log(err));
Bootstrap the main AppModule
Most of the code in the main.ts file is generic, and you will rarely have to touch or change this entry point file. Its main aim is to point the Angular framework at the core module of your application and let it trigger the rest of your application source code from that point.
Main Module—app.module.ts
This is where your application-specific source code starts from. The application module file can be thought of as the core configuration of your application, from loading all the relevant and necessary dependencies, declaring which components will be used within your application, to marking which is the main entry point component of your application:
import { BrowserModule } from '@angular/platform-browser';
import { NgModule } from '@angular/core';
import { AppComponent } from './app.component';
@NgModule({ declarations: [
AppComponent ],
imports: [ BrowserModule
],
providers: [],
bootstrap: [AppComponent] })
exportclassAppModule { }
NgModule TypeScript annotation to mark this class definition as an Angular module
Declarations marking out which components and directives can be used within the application Importing other modules that provide functionality needed in the application
The entry point component for starting the application
TIP
This is our first time dealing with a TypeScript-specific feature, which are decorators (you can think of them as annotations). Decorators allow us to decorate classes with annotations and properties as well as meta-functionality.
Angular heavily leverages this TypeScript feature across the board, such as using decorators for modules, components, and more. You can read more about TypeScript decorators in the official documentation.
declarations
The declarations block defines all the components that are allowed to be used in the scope of the HTML within this module. Any component that you create must be declared before it can be used. imports
You will not create each and every functionality used in the application, and the imports array allows you to import other Angular application and library modules and thus leverage the components, services, and other capabilities that have already been created in those modules. bootstrap
The bootstrap array defines the component that acts as the entry point to your application. If the main component is not added here, your application will not kick-start, as Angular will not know what elements to look for in your index.html.
You usually end up needing (if you are not using the CLI for any reason!) to modify this file if and only if you add new components, services, or add/integrate with new libraries and modules.
Root Component—AppComponent
We finally get to the actual Angular code that drives the functionality of the application, and in this case, it is the main (and only) component we have, the AppComponent. The code for it looks
something like this:
import { Component } from '@angular/core';
@Component({
selector: 'app-root', templateUrl: './app.component.html', styleUrls: ['./app.component.css'] })
exportclassAppComponent { title = 'app'; }
The DOM selector that gets translated into an instance of this component The HTML template backing this component—in this case, the URL to it Any component-specific styling, again pointing to a separate file in this case The component class with its own members and functions
A component in Angular is nothing but a TypeScript class, decorated with some attributes and
metadata. The class encapsulates all the data and functionality of the component, while the decorator specifies how it translates into the HTML.
The app-selector is a CSS selector that identifies how Angular finds this particular component in any
translates to looking for <app-root> elements in the HTML), they can be any CSS selector, from a CSS class to an attribute as well.
The templateUrl is the path to the HTML used to render this component. We can also use inline templates instead of specifying a templateUrl like we have done in the example. In this particular case, the template we are referring to is app.component.html.
styleUrls is the styling counterpart to the template, encapsulating all the styles for this component. Angular ensures that the styles are encapsulated, so you don’t have to worry about your CSS classes from one component affecting another. Unlike templateUrl, styleUrls is an array.
The component class itself finally encapsulates all the functionality backing your component. It makes it easy to think of the responsibilities of the component class as twofold:
Load and hold all the data necessary for rendering the component
Handle and process any events that may arise from any element in the component
The data in the class will drive what can be displayed as part of the component. So let’s take a look at what the template for this component looks like:
<h1>
{{title}}
</h1>
Data-bound title from the component
Our HTML is as simple as can be for the component. All it has is one element, which is data-bound to a field in our component class. The double-curly ({{ }}) syntax is an indication to Angular to replace the value between the braces with the value of the variable from the corresponding class.
In this case, once the application loads, and the component is rendered, the {{title}} will be replaced with the text app works!. We will talk in more detail about data binding in “Understanding Data
Binding”.
Creating a Component
So far, we have dealt with the basic skeleton code that the Angular CLI has generated for us. Let’s now look at adding new components, and what that entails. We will use the Angular CLI to generate a new component, but look underneath the covers to see what steps it takes. We will then walk through some very basic common tasks we try to accomplish with components.
Steps in Creating New Components
We can simply create a new stock-item by running the following command from the main folder of the application:
ng generate component stock/stock-item
There are a few interesting things to note here:
The Angular CLI has a command called generate, which can be used to generate components (like we did in the preceding example), and also to generate other Angular elements, such as interfaces, services, modules, and more.
With the target type, we also specify the name (and the folder) within which the component has to be generated. Here, we are telling the Angular CLI to generate a component called stock-item within a folder called stock. If we don’t specify stock, it will create a component called stock-item in the app folder itself.
The command will generate all the relevant files for a new component, including: The component definition (named stock-item.component.ts)
The corresponding template definition (named stock-item.component.html) The styles for the component (in a file named stock-item.component.css)
The skeleton unit tests for the component (named stock-item.component.spec.ts)
In addition, it updated the original app module that we saw earlier so that our Angular application recognizes the new module.
This is the recommended convention to follow whenever you are working with components: The filename starts with the name of the item you are creating
This is followed by the type of element it is (in this case, a component) Finally, we have the relevant extension
This allows us to both group and easily identify relevant and related files in a simple manner. When you run the command, you should see something like this:
create src/app/stock/stock-item/stock-item.component.css create src/app/stock/stock-item/stock-item.component.html create src/app/stock/stock-item/stock-item.component.spec.ts create src/app/stock/stock-item/stock-item.component.ts update src/app/app.module.ts
available to our Angular application. Let’s take a look at the modified app.module.ts file:
import { BrowserModule } from '@angular/platform-browser';
import { NgModule } from '@angular/core';
import { AppComponent } from './app.component';
import { StockItemComponent } from './stock/stock-item/stock-item.component';
@NgModule({
exportclassAppModule { }
Importing the newly created stock-item component Adding the new component to the declarations section
In the application module, we have to ensure that the new component is imported and added to the declarations array, before we can start using it in our Angular application.
Using Our New Component
Now that we have created a new component, let’s see how we can use it in our application. We will now try to use this skeleton in the app component. First, take a look at the generated
stock-item.component.ts file:
import { Component, OnInit } from '@angular/core';
@Component({
selector: 'app-stock-item', templateUrl: './stock-item.component.html', styleUrls: ['./stock-item.component.css'] })
exportclassStockItemComponentimplements OnInit {
constructor() { }
ngOnInit() {
}
}
The component has no data and does not provide any functionality at this point; it simply renders the template associated with it. The template at this point is also trivial, and just prints out a static
message.
To use this component in our application, we can simply create an element that matches the selector defined anywhere inside our main app component. If we had more components and a deeper hierarchy of components, we could choose to use it in any of their templates as well. So let’s replace most of the placeholder content in app.component.html with the following, so that we can render the stock-item component:
<div style="text-align:center">
<h1>
Welcome to {{ title }}! </h1>
<app-stock-item></app-stock-item>
</div>
Adding our stock-item component
All it takes is adding the <app-stock-item></app-stock-item> to our app.component.html file to use our component. We simply create an element using the selector we defined in our component. Then when the application loads, Angular recognizes that the element refers to a component, and triggers the relevant code path.
When you run this (or if your ng serve is still running), you should see both the original "app works" along with a new "stock-item works" in the UI.
Understanding Data Binding
Next, let’s focus on getting some data and figuring out how to display it as part of our component. What we are trying to build is a stock widget, which will take some stock information, and render it accordingly.
Let’s assume that we have a stock for a company named Test Stock Company, with a stock code of TSC. Its current price is $85, while the previous price it traded at was $80. In the widget, we want to show both the name and its code, as well as the current price, the percentage change since last time, and highlight the price and percentage change in green if it is an increment, or red if it is a decrement. Let’s walk through this step by step. First, we will make sure we can display the name and code in the widget (we will hardcode the information for now, and we will build up the example to get the data from a different source later).
We would change our component code (the stock-item.component.ts file) as follows:
import { Component, OnInit } from '@angular/core';
@Component({
templateUrl: './stock-item.component.html', styleUrls: ['./stock-item.component.css'] })
exportclassStockItemComponentimplements OnInit {
publicname: string; publiccode: string;
publicprice: number;
publicpreviousPrice: number;
constructor() { }
Implement OnInit interface from Angular, which gives us a hook to when the component is initialized
Definition of the various fields we will want to access from the HTML OnInit function that is triggered when a component is initialized
Initializing the values for each of the fields
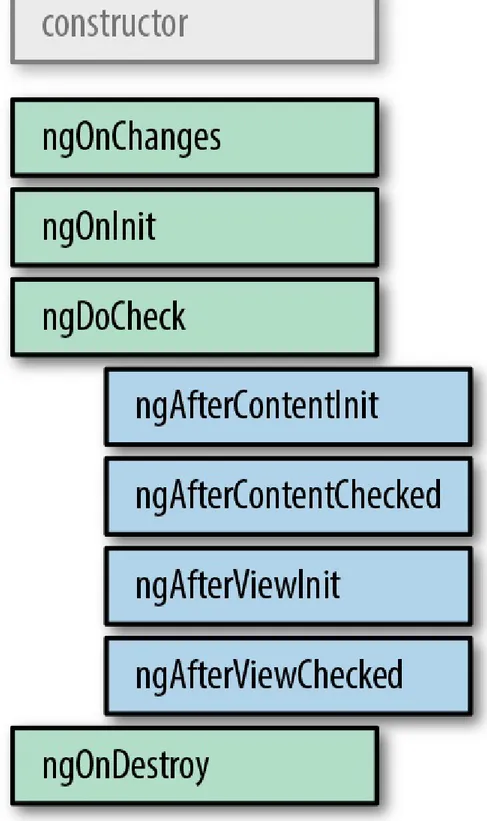
Angular gives us hooks into the lifecycle of a component to let us take certain actions when a
component is initialized, when its view is rendered, when it is destroyed, and so on. We’ve extended our trivial component with a few notable things:
OnInit
Angular’s OnInit hook is executed after the component is created by the Angular framework, after all the data fields are initialized. It is generally recommended to do any initialization work of a component in the OnInit hook, so that it makes it easier to test the functionality of the rest of the component without necessarily triggering the initialization flow every time. We will cover the remaining lifecycle hooks in Chapter 4.
ngOnInit
When you want to hook on the initialization phase of a component, you need to implement the OnInit interface (as in the example) and then implement the ngOnInit function in the component, which is where you write your initialization logic. We have initialized the basic information we need to render our stock widget in the ngOnInit function.
Class member variables
We have declared a few public variables as class instance variables. This information will be used to render our template.
information:
<div class="stock-container">
<div class="name"><h3>{{name}}</h3> - <h4>({{code}})</h4></div>
<div class="price">$ {{price}}</div> </div>
and its corresponding CSS (the stock-item.component.css file), to make it look nice:
.stock-container { border: 1px solid black; border-radius: 5px; display: inline-block; padding: 10px; }
.stock-container .name h3, .stock-container .name h4 { display: inline-block;
}
NOTE
Note that the CSS is purely from a visual perspective, and is not needed nor impacts our Angular application. You could skip it completely and still have a functional application.
Figure 2-2. Angular app with stock component
We have just used one fundamental building block from Angular to render our data from our component into the HTML. We use the double-curly notation ({{ }}), which is also known as
interpolation. Interpolation evaluates the expression between the curly braces as per the component
backing it, and then renders the result as a string in place in the HTML. In this case, we render the name, code, and the price of the stock using interpolation. This picks up the values of name, code, and price, and then replaces the double-curly expression with its value, thus rendering our UI.
This is Angular’s one-way data binding at work. One-way data binding simply refers to Angular’s capability to automatically update the UI based on values in the component, and then keeping it updated as the value changes in the component. Without one-way binding, we would have to write code to take the value from our component, find the right element in HTML, and update its value. Then we would have to write listeners/watchers to keep track of when the value in the component changes, and then change the value in the HTML at that time. We can get rid of all of this extra code because of data binding.
In this particular case, we are binding to simple variables, but it is not necessarily restricted to simple variables. The expressions can be slightly more complex. For example, we could render the same UI by changing the binding expression as follows in stock-item.component.html:
<div class="stock-container">
<div class="name">{{name + ' (' + code + ')'}}</div>
In this case, we replaced our multiple heading elements with a single div. The interpolation expression is now a combination of both the name and the code, with the code surrounded by
parentheses. Angular will evaluate this like normal JavaScript, and return the value of it as a string to our UI.
Understanding Property Binding
So far, we used interpolation to get data from our component code to the HTML. But Angular also provides a way to bind not just text, but also DOM element properties. This allows us to modify the content and the behavior of the HTML that is rendered in the browser.
For example, let’s try to modify our stock widget to highlight the price in red if the price is less than the previous price, and in green if it is equal to or more than the previous price. We can first change our component (the stock-item.component.ts) to precalculate if the difference is positive or negative like so:
import { Component, OnInit } from '@angular/core';
@Component({
selector: 'app-stock-item',
templateUrl: './stock-item.component.html', styleUrls: ['./stock-item.component.css'] })
exportclassStockItemComponentimplements OnInit {
publicname: string; publiccode: string; publicprice: number;
publicpreviousPrice: number; publicpositiveChange: boolean;
constructor() { }
In this code, we added a new public variable called positiveChange, which is of type boolean, and then set the value based on comparing the current price with the previous price. This gives us a singular boolean value that we can use to decide whether to highlight the price in red or green. Next, let’s add some classes in the stock-item.component.css file to allow for changing the color of the text:
border: 1px solid black; border-radius: 5px; display: inline-block; padding: 10px; }
.positive { color: green; }
.negative { color: red; }
We simply added two classes, positive and negative, which change the color of the text to green and red, respectively. Now let’s tie this together to see how we can use this information and classes in
our stock-item.component.html file:
<div class="stock-container">
<div class="name">{{name + ' (' + code + ')'}}</div>
<div class="price"
[class]="positiveChange ?'positive' :'negative'">$ {{price}}</div> </div>
We have added one new binding on the price div element, which reads as:
[class]="positiveChange ? 'positive' : 'negative'"
This is the Angular syntax for property binding, which binds the value of the expression to the DOM property between the square brackets. The [] is the general syntax that can be used with any property on an element to bind one-way from the component to the UI.
In this particular case, we are telling Angular to bind to the class property of the DOM element to the value of the expression. Angular will evaluate it like a normal JavaScript expression, and assign the value (positive in this case) to the class property of the div element.
WARNING
When you bind to the class property like we did in the example, note that it overrides the existing value of the property. In our example, the "price" class is replaced with the class "positive", instead of appending to the existing value of the property. You can notice this for yourself if you inspect the rendered HTML in the browser. Be careful about this if you bind directly to the class property.
Notice that we have been explicitly referring to the data binding working with DOM properties, and not HTML attributes. The following sidebar goes into more detail on the difference between the two, and why it is important to know and understand as you work on Angular. But simplifying it, Angular data binding only works with DOM properties, and not with HTML attributes.
HTML ATTRIBUTE VERSUS DOM PROPERTY: WHAT’S THE DIFFERENCE?
As mentioned, when we work with data binding in Angular, we aren’t working with HTML attributes but rather DOM properties. Attributes are defined by HTML, while properties are defined by the Document Object Model. Though some attributes (like ID and class) directly map to DOM properties, others may exist on one side but not the other.
But more importantly, the distinction between the two is that HTML attributes are generally used for initialization of a DOM element, but after that, they have no purpose or effect on the
underlying element. Once the element is initialized, its behavior is controlled by the DOM properties from then on.
For example, consider the input HTML element. If we bootstrap our HTML with something like:
<input type="text" value="foo"/>
this initializes an input DOM element, with the initial value of the DOM property value to be set to foo. Now let’s assume we type something in the text box, say bar. At this point:
If we do input.getAttribute('value'), it would return foo, which was the attribute value we used to initialize the HTML.
If we do input.value, we will get the current value of the DOM property, which is bar. That is, the attribute value is used to boostrap and set the initial value of the HTML DOM
element, but after that, it is the DOM property that drives the behavior. If you inspect the HTML, you will see that it is still the initial HTML we provided, and does not update either.
In Angular, we thus bind to the DOM property, and not to the HTML attributes. Whenever we think about one-way binding from the component to the UI, we should always keep this in mind!
Just like we did for the class property, depending on the use case, we can actually bind to other
HTML properties like the src property of an img tag, or the disabled property of input and button. We will cover this in more depth in the next chapter. We will also cover a simpler and more specific way of binding CSS classes in the next chapter as well.
Understanding Event Binding
interactions, and work with events and event binding in Angular.
Say we wanted to have a button that allows users to add the stock to their list of favorite stocks. Generally, with a button like this, when the user clicks it, we would want to make some server call and then process the result. So far, since we are working with very simple examples, let’s just say we wanted to handle this click and get a hook to it in our component. Let’s see how we might accomplish that.
First, we can change our component code in stock-item.component.ts to add a function toggleFavorite, which should be triggered each time the click happens from the UI:
import { Component, OnInit } from '@angular/core';
@Component({
selector: 'app-stock-item',
templateUrl: './stock-item.component.html', styleUrls: ['./stock-item.component.css'] })
exportclassStockItemComponentimplements OnInit {
publicname: string; publiccode: string; publicprice: number;
publicpreviousPrice: number; publicpositiveChange: boolean; publicfavorite: boolean;
constructor() { }
console.log('We are toggling the favorite state for this stock'); this.favorite = !this.favorite;
}
}
We have added a new public boolean member variable called favorite, which is initialized with a false value. We then added a new function called toggleFavorite(), which simply flips the boolean value of favorite. We are also printing a log in the console to ensure this is getting triggered.
Now, let’s update the UI to use this concept of a favorite and also allow users to toggle the state:
<div class="name">{{name + ' (' + code + ')'}}</div>
<div class="price"
[class]="positiveChange ?'positive' : 'negative'">$ {{price}}</div>
<button(click)="toggleFavorite()"
[disabled]="favorite">Add to Favorite</button> </div>
We have added a new button in the stock-item.component.html file to allow users to click and add the stock to their favorite set. We are using the data-binding concept from the previous section on the disabled property. Thus, we are disabling the button based on the boolean value favorite. If favorite is true, the button will be disabled, and if it is false, the button will be enabled. Thus, by default, the button is enabled.
The other major thing we have on the element is this fragment:
(click)="toggleFavorite()"
This syntax is called event binding in Angular. The left part of the equals symbol refers to the event we are binding to. In this case, it is the click event. Just like how the square-bracket notation refers to data flowing from the component to the UI, the parentheses notation refers to events. And the name between the parentheses is the name of the event we care about.
In this case, we are telling Angular that we are interested in the click event on this element. The right part of the equals symbol then refers to the template statement that Angular should execute whenever the event is triggered. In this case, we want it to execute the new function we created, toggleFavorite. When we run this application in our browser, we can see the new button. Clicking it would render something like Figure 2-3.
Figure 2-3. Handling events in an Angular app
gives you access to the underlying DOM event by giving access to a special variable $event. You can access it or even pass it to your function as follows:
<div class="stock-container">
<div class="name">{{name + ' (' + code + ')'}}</div>
<div class="price"
[class]="positiveChange ?'positive' : 'negative'">$ {{price}}</div>
<button(click)="toggleFavorite($event)"
[disabled]="favorite">Add to Favorite</button> </div>
In the HTML, we simply add a reference to the variable $event, and pass it in as an argument to our toggleFavorite function. We can now refer to it in our component as follows:
import { Component, OnInit } from '@angular/core';
@Component({
selector: 'app-stock-item',
templateUrl: './stock-item.component.html', styleUrls: ['./stock-item.component.css'] })
exportclassStockItemComponentimplements OnInit {
publicname: string; publiccode: string; publicprice: number;
publicpreviousPrice: number; publicpositiveChange: boolean; publicfavorite: boolean;
constructor() { }
When you run the application, you will see that when you click the button, your console log now appends the actual MouseEvent that was triggered, in addition to our previous code.
focus, blur, submit, and others like them.
WHY ANGULAR SHIFTED TO PROPERTY AND EVENT BINDING
Anyone who has worked on AngularJS would be wondering why the framework developers decided to do such a major breaking change when they created Angular. The binding syntax has changed drastically, as well as the directives and symbols used. In AngularJS, we had ng-bind, src, and the like for binding from our controllers to the UI, and directives like click and ng-submit for handling events.
This meant that any time there was a new event or property that we wanted to bind to in
AngularJS, we would end up writing a wrapper directive that would do the work of translating from AngularJS to the inner workings and vice versa.
The other problem with the AngularJS syntax was that there was no clear differentiation between data flowing from our controller to the UI or from the UI to the controller. Both follow the same syntax, which made understanding the HTML sometimes difficult, and required developers to understand each directive first.
In Angular, we instead rely on core DOM properties and events for binding. This means that if a property or event exists as per the HTML standards, we can bind to it. This also makes it very easy to work with web components that expose proper properties and events, as Angular works with them simply out of the box, without needing to write any additional code. This has also made obsolete the tons of AngularJS directives from the past, such as ng-click, ng-submit, and so on, and makes it easier for any web developer to quickly understand and work with Angular. You don’t have to spend as much time learning Angular-specific knowledge.
Furthermore, the square bracket and parentheses notation also makes it very obvious about the flow of data. Any time you see the square bracket notation, you can be assured that it is data flowing from the component into the HTML. Any time you see the parentheses notation, you are guaranteed that it refers to an event and flows from a user action to the component.
Using Models for Cleaner Code
The last part of this chapter covers something that is more of a best practice, but it is worth adopting —especially as we aim to build large, maintainable web applications using Angular. We want to use encapsulation to ensure that our components don’t work with lower-level abstractions and properties, like we did previously where the stock widget gets an individual name, price, etc. At the same time, we want to leverage TypeScript to make it easier to understand and reason about our application and its behavior. To this extent, we should ideally model our stock itself as a type in TypeScript, and leverage that instead.
want additional logic in addition to just the values (calculating whether the price differential is positive or not, for example), we can use a class.
We can use the Angular CLI to quickly generate a skeleton class for us, by running:
ng generate class model/stock
This will generate an empty skeleton file called stock.ts in a folder called model. We can go ahead and change it as follows:
exportclassStock { favorite: boolean = false;
constructor(publicname: string, publiccode: string, publicprice: number,
publicpreviousPrice: number) {}
isPositiveChange():boolean {
returnthis.price >= this.previousPrice; }
}
This gives us a nice encapsulation while we work with stocks across our application. Note that we didn’t actually define the variables name, code, and so on as properties of the class. This is because we are using TypeScript’s syntactic sugar to automatically create the corresponding properties based on the constructor arguments by using the public keyword. To learn more about TypeScript classes, refer to the official documentation. In short, we have created a class with five properties, four coming through the constructor and one autoinitialized. Let’s see how we might use this now in our
component:
import { Component, OnInit } from '@angular/core';
import { Stock } from '../../model/stock';
@Component({
selector: 'app-stock-item',
templateUrl: './stock-item.component.html', styleUrls: ['./stock-item.component.css'] })
exportclassStockItemComponentimplements OnInit {
publicstock: Stock;
constructor() { }
ngOnInit() {
this.stock = newStock('Test Stock Company', 'TSC', 85, 80); }
console.log('We are toggling the favorite state for this stock', event); this.stock.favorite = !this.stock.favorite;
}
}
In stock-item.component.ts, we imported our new model definition at the top, and then replaced all
the individual member variables with one variable of type Stock. This simplified the code in the component significantly, and encapsulated all the logic and underlying functionality within a proper TypeScript type. Now let’s see how stock-item.component.html changes to accommodate this change:
<div class="stock-container">
<div class="name">{{stock.name + ' (' + stock.code + ')'}}</div>
<div class="price"
[class]="stock.isPositiveChange()?'positive' :'negative'">
$ {{stock.price} </div>
<button(click)="toggleFavorite($event)"
[disabled]="stock.favorite">Add to Favorite</button> </div>
We have made a few changes in the HTML for our stock item. First, most of our references to the variable are now through the stock variable, instead of directly accessing the variables in the component. So name became stock.name, code became stock.code, and so on.
Also, one more thing of note: our class property binding now refers to a function instead of a
variable. This is acceptable, as a function is also a valid expression. Angular will just evaluate the function and use its return value to determine the final expression value.
Conclusion
In this chapter, we started building our very first Angular application. We learned how to bootstrap our Angular application, as well as understand the various pieces that the Angular skeleton
application generates and their needs and uses. We then created our very first component, and looked at the steps involved in hooking it up to our application.
Following that, we added some very basic data to our component, and then used that to understand how basic Angular data binding works, using both interpolation as well as property binding. We then looked at how event binding works, and handled user interactions through it. Finally, we encapsulated some information in a TypeScript class to make our code cleaner and modular.
In the next chapter, we will go through some basic Angular directives that Angular provides out of the box and how it allows us to work with templates in an effective manner.
Exercise
Each chapter will have an optional exercise at the end to reinforce some of the concepts covered in the chapter, as well as give you some time to experiment and try your hand at Angular code. Over the course of the book, we will build on the same exercise and keep adding more features to it.
The finished source code for the exercise is available in the GitHub repository in each chapter’s folder. You can refer to it in case you are stuck or want to compare the final solution. Of course, there are multiple ways to solve every problem, so the solution in the repository is one possible way. You may arrive at a slightly different solution in the course of your attempts.
For the first exercise, try to accomplish the following:
1. Start a new project to build an ecommerce website. 2. Create a component to display a single product.
3. The product component should display a name, price, and image for the product. You can initialize the component with some defaults for the same. Use any placeholder image you want.
4. Highlight the entire element in a different color if the product is on sale. Whether the product is on sale can be an attribute of the product itself.
5. Add buttons to increase and decrease the quantity of the product in the cart. The quantity in the cart should be visible in the UI. Disable the button if the quantity is already zero.
Chapter 3. Useful Built-In Angular
Directives
In the previous chapter, we got started with our very first Angular application, and got a feel for using the Angular CLI to begin a new project and create components in it. We got a basic sense of how to use Angular’s data and event binding mechanisms as well.
In this chapter, we will first understand what directives are in Angular and how they are different from components. We will then cover some basic directives that Angular provides out of the box and the use cases where they’re applicable. By the end of the chapter, you should be comfortable using most of the out-of-the-box directives that Angular provides and understand when and where to use them.
Directives and Components
A directive in Angular allows you to attach some custom functionality to elements in your HTML. A component in Angular, like the one we built in the previous chapter, is a direcive that provides both functionality and UI logic. It is fundamentally an element that encapsulates its behavior and rendering logic.
Noncomponent directives, on the other hand, usually work on and modify existing elements. These can be further classified into two types:
Attribute directives
Attribute directives change the look and feel, or the behavior, of an existing element or component that it is applied on. NgClass and NgStyle, which we will see later in this chapter, are examples of attribute directives.
Structural directives
Structural directives change the DOM layout by adding or removing elements from the view. NgIf and NgFor are examples of structural directives that we will see later in this chapter.
Built-In Attribute Directives
TIP
We generally refer to the directive with the name of its class, which is why we call the directive NgClass or NgIf. But the same directive, when used as an HTML attribute, is usually in camel-case, like ngClass or ngIf. Keep this in mind as we go along.
NgClass
The NgClass directive allows us to apply or remove multiple CSS classes simultaneously from an element in our HTML. Previously, we applied a single class to our element to highlight whether it was a positive or a negative change as follows:
<div[class]="stock.isPositiveChange()? 'positive' : 'negative'">
$ {{stock.price}}
</div>
In this example, we simply look at a boolean value, and then decide whether to apply the class
positive or negative based on that. But what if we had to apply multiple CSS classes? And they were all (or a lot of them) conditional? You would end up having to write code that does string generation based on these multiple conditions, so that you could have one string that represents all the classes that need to be applied.
This is cruft code that is not worth writing or maintaining. So for these kinds of situations, Angular provides the NgClass directive, which can take a JavaScript object as input. For each key in the object that has a truthy value, Angular will add that key (the key itself, not the value of the key!) as a class to the element. Similarly, each key in the object that has a falsy value will be removed as a class from that element.
TRUTHY AND FALSY IN JAVASCRIPT
JavaScript allows us to use non-boolean values in conditional statements. Thus, instead of just true and false, a whole set of values are equivalent to true and false. In JavaScript, the following values are treated as falsy:
undefined null NaN 0
"" (any empty string) false (the boolean value)
Any other value is treated as truthy, including, but not limited to: