prePress
t
Published with the authorization of Microsoft Corporation by: O’Reilly Media, Inc.
1005 Gravenstein Highway North Sebastopol, California 95472
With
Microsoft prePress
, you can access just-written content from upcoming
books. The chapters come straight from our respected authors, before they’re
fully polished and debugged—for critical insights now, when you need them.
This document contains one or more portions of a preliminary version of a Microsoft Press title and is provided “as is.” The content may be changed substantially upon final publication. In addition, this document may make reference to pre-released versions of software products that may be changed substantially prior to final commercial release. Microsoft reserves the right to not publish this title or any versions thereof (including future prePress ebooks). This document is provided for informational purposes only. MICROSOFT MAKES NO WARRANTIES, EITHER EXPRESS OR IMPLIED, IN THIS DOCUMENT. Information and views expressed in this document, including URL and other Internet website references may be subject to change without notice. You bear the risk of using it.
Complying with all applicable copyright laws is the responsibility of the user. Without limiting the rights under copyright, no part of this document may be reproduced, stored in or introduced into a retrieval system, or transmitted in any form or by any means (electronic, mechanical, photocopying, recording, or otherwise), or for any purpose, without the express written permission of Microsoft Corporation.
Some examples are for illustration only and are fictitious. No real association is intended or inferred. This document does not provide you with any legal rights to any intellectual property in any Microsoft product, service, or other offering.
© 2013 Patrick LeBlanc. All rights reserved.
Microsoft and the trademarks listed at
Contents at a glance
Part I
Getting started with Microsoft SQL Server 2012
Chapter 1
Overview of Microsoft SQL Server 2012
Chapter 2
Installing, configuring, and upgrading
Microsoft SQL Server 2012
Chapter 3
Using SQL Server 2012 administration and
development tools
Part II
Designing databases
Chapter 4
Designing SQL Server databases
Chapter 5
Creating your first table
Chapter 6
Building and maintaining indexes
Part III
Advanced database design topics
Chapter 7
Table compression
Chapter 8
Table partitioning
Chapter 9
Database snapshots
Chapter 10
The SELECT statement
Part IV
Using Transact-SQL (TSQL)
Chapter 11
Advanced data retrieval topics
Chapter 12
Modifying data
Chapter 13
Built-in scalar functions
Part V
Creating other database objects
Chapter 14
Advanced TSQL topics
Chapter 15
Views
Chapter 16
User-defined functions
Chapter 17
Stored procedures
Part VI
SQL Server replication
Chapter 19
Replication
Part VII
Database maintenance
Chapter 20
Backups
Chapter 21
Managing and maintaining indexes and statistics
Chapter 22
Maintenance plans
Part VIII
Database management
Chapter 23
SQL Server Profiler
Chapter 24
Extended events
Chapter 25
SQL Server security
Chapter 26
Resource Governor
Chapter 27
SQL Server Agent
Chapter 28
Database mail
Chapter 29
Data definition triggers
Chapter 30
Dynamic management objects
Part IX
High-availability solutions
Chapter 31
AlwaysOn
Chapter 32
Log shipping
PA R T I
Getting started
with Microsoft
SQL Server 2012
CHAPTER 1 Sections, body text, and emphasis tags . . . .3
CHAPTER 2 Code elements . . . .7
CHAPTER 3 Using SQL Server 2012 administration and
C H A P T E R 1
Overview of
Microsoft SQL Server 2012
After completing this chapter, you will be able to
■ Explain SQL Server components and features and their uses . ■ Identify SQL Server features vital to your environment .
■ Define and scope your SQL Server installation topology from a high level.
The process of learning a new technology can be daunting and sometimes involves a tremendous amount of time and effort. Each step of the process, from installing and configuring the software to deploying the first project, introduces new challenges. These challenges often grow when the tech -nology includes several components and features, so the first step, especially with a multicomponent technology, is to identify the components your environment requires and gain a good understanding of the functionality of each component . To that end, in this chapter, you will examine the components and features of Microsoft SQL Server 2012 and determine how they fit into your installation.
Like most relational database management systems (RDBMSs), SQL Server 2012 includes several components . The product itself, however, is often divided into two distinct categories: business intel-ligence (BI) and the Database Engine .
Business Intelligence
Business intelligence (BI) refers to data transformed into knowledge that can then be used to make more informed business decisions . For example, a company whose primary purpose is to sell bikes could use its data to identify sales trends and the purchasing patterns of its customers . From that analysis, the company could decide to focus sales efforts on a particular area or region, which in turn could lead to better opportunities and offer the company competitive advantages in its industry .
Database Engine
The Database Engine sits at the core of the SQL Server components . The engine operates as a service on a machine, which is often referred to as an instance of SQL Server . You can run multiple instances of SQL Server on a given server . When you connect to SQL Server, the instance is the target of the connection . Once an application is connected, it sends Transact-SQL (T-SQL) statements to the in-stance . The inin-stance in return sends data back to the client . Within the connection is a security layer that validates access to the data as specified by the database administrators (DBAs). The Database Engine enables you to leverage the full capabilities of all of the other components, such as accessing, storing, and securing the data .
The storage component of the Database Engine determines how the data is stored on disk . When designing your databases, you will specify various aspects that will dictate how your tables, indexes, and, in some cases, views are physically organized on your disk subsystem . You will examine the con-cepts of tables, indexes, and views in detail in later chapters . In SQL Server 2012, you can physically distribute data across disks by partitioning it, or dividing the data into distinct, independent parts . Partitioning not only improves query performance, but it also simplifies the process of managing and maintaining your data . With the release of SQL Server 2012, Microsoft increased the number of sup-ported partitions to 15,000 per table .
Within the Database Engine itself, the storage engine is the primary component . Surrounding it are several additional components that depend on the engine . These components include the following:
■ T-SQL programming interface (Microsoft's implementations of the SQL ANSI standard
language)
■ Security subsystem ■ Replication ■ SQL Server Agent
■ High availability and disaster recovery tools ■ SQL Server Integration Services
■ SQL Server Management tools
The following sections provide a brief explanation of each component .
T-SQL Programming Interface
-as Visual B-asic and C# .NET can send T-SQL queries from applications to the Datab-ase Engine. The Database Engine will then resolve the queries and send the results back to the client .
In addition, you can write data definition queries to create and modify objects that act as mecha -nisms for surfacing the data. T-SQL also allows you to manage server configurations and security seamlessly . T-SQL is a set-based language, meaning that it performs optimally when interacting with data in sets as opposed to manipulating strings or iterating over rows of data . While T-SQL is capable of these cursor-based operations, these types of operations are less efficient than a properly designed
set-based approach. If you find you are using T-SQL to perform cursor-based operations, consider leveraging a common language runtime (CLR) language . Using your favorite compiler (Visual Studio, for example), you can extend the functionality of T-SQL .
SQL Server 2012 introduces several new T-SQL programming enhancements, including a simpler form of paging, windowing functions, and error handling. A THROW statement is introduced that provides a way to elegantly handle errors by raising exceptions . You can now create a FileTable that builds on the FileStream technology introduced in SQL Server 2008 . Coupling the FileTable with Full-TextSearch allows you to run complicated queries against massive amounts of text data (such as the complete text of this book) . SQL Server 2012 also introduces several new conversion, string, logical, data, and time functions .
Security Subsystem
In most organizations, data is the most valuable asset, and keeping that data secure is a major con -cern. Any vulnerability in an organization's security might end up triggering a series of events that could prove catastrophic to the business . This is why SQL Server 2012 consists of a robust security subsystem that allows you to control access via two modes of authentication, SQL and Windows. As an administrator, you are able to configure SQL Server security at multiple levels. Using T-SQL or SQL Server Management Studio, you can control access to a particular instance of SQL Server, to specific databases, to objects within those databases, and even to columns within a particular table.
SQL Server also includes native encryption . For example, if you want to secure employees' So-cial Security numbers, using column level encryption, you could encrypt a single column in a table . SQL Server also includes Transparent Data Encryption (TDE), which allows you to encrypt an entire database without affecting how clients and applications access the data . However, if someone were to breach your network security and obtain a copy of a data file or backup file, the only way that person could access the data is with an encryption key that you set and store .
Even with all of these security capabilities, SQL Server provides you with the ability to audit your server and databases proactively. In SQL Server 2012, you can filter audit events before they are writ -ten to the audit log . Chapter 26, “Security,” describes how to plan and deploy your SQL Server security strategy. You will learn specific concepts around creating logins and users, and you will examine how to create a security approach and maintain security accounts .
the ability to create users within a database without requiring you to create a server login, known as
contained databases . In past versions of SQL Server, prior to granting access at the database level, an administrator was required to create a server login . With the advent of SQL Server 2012, a user can be self-contained within a database .
Replication
SQL Server replication has been available in most releases of the product . Over time, replication types were introduced to ensure that users could configure replication architectures that satisfied a wide range of scenarios . Using SQL Server replication technology, you can distribute data locally, to differ-ent locations, using File Transfer Protocol (FTP), over the Internet, and to mobile users . Replication can be configured to push data, pull data, and merge data across local area networks (LANs) and wide area networks (WANs).
The simplest form of replication, snapshot replication, periodically takes a snapshot of the data and distributes it to servers that are subscribed to the publication . Snapshot replication is typically used to move data at longer intervals, such as daily or nightly. While this method is effective, it is often insuffi -cient in satisfying the high demands of users for near real-time data . If higher throughput is required, users often leverage transactional replication . Instead of distributing snapshots of data, transactional replication continuously sends data changes as they happen to the subscribers . Transactional replica-tion is typically used in a server-to-server topology where one server is the source of the data and the other server is used as a backup copy or for reporting .
Both replication types are one-way data movements . But what if you need bidirectional move-ment? For example, assume you have mobile users who work offline. While they are offline, they enter information into a database residing on an instance of SQL Server running on their laptops . What happens when they return to the office and connect to the network? In this scenario, the local in -stance will synchronize with the company’s primary SQL Server database . Merge replication will move transactions between the publisher and subscriber since the last time synchronization occurred .
SQL Server professionals debate the use of replication as a high availability (HA) or disaster re-covery (DR) technology . Could it be used for either? There is a possibility; however, replication only moves schema changes and data. To provide an effective HA or DR topology, every aspect of the instance should be included such as security, maintenance, jobs, and so on. Therefore, using replica -tion in either case could pose potential problems in the event of hardware failure or a disaster .
See Also Chapter 19, "Replication," discusses the replication in depth.
SQL Server Agent
To ensure that you are notified in the event of a job failure, SQL Server Agent allows you to config -ure operators and alerts. An operator is simply an individual and an email address. Once you config -ure an operator, you can send notifications or alerts to that person when a job succeeds, completes, or fails .
High Availability and Disaster Recovery Tools
With growing demands on server availability and uptime, it is vital that your RDBMS include several mechanisms that will ensure the consistency and availability of your data . SQL Server 2012 provides four technologies for high availability:
■ AlwaysOn Availability Groups In SQL Server 2012, Microsoft introduces AlwaysOn Avail
-ability Groups. An Avail-ability Group supports failover for a set of databases and leverages the existing database mirroring technology to maintain secondary replicas of the database on local or remote instances of SQL Server . This technology differs from traditional failover clustering in two ways:
•
You can configure automatic failover without the use of a Storage Area Network (SAN).•
You can configure one or more of the secondary replicas to support read-only operations. Since a SAN is no longer required, you now have the ability to configure HA and DR using one technology . By leveraging the database mirroring capability to move data over distances using TCP/IP, you can have a copy of the database stored in a data center located in a differ-ent geographic area .■ Failover clustering SQL Server failover cluster instances provide high availability support at
the server level. Prior to building an AlwaysOn SQL Server failover instance, you must create and configure a Windows Server failover cluster.
■ Database mirroring A predecessor of AlwaysOn, database mirroring provides high
availabil-ity at the database level . It maintains two copies of the database on instances of SQL Server running on separate servers . Typically, the servers are hosted in separate geographic locations, not only ensuring HA, but also providing DR. If you want to incorporate automatic failover, you must include a third server (witness) that will change which server is the owner of the da-tabase. Unlike with AlwaysOn, with database mirroring you cannot directly read the second -ary copy of the database . You can, however, create a snapshot of the database for read-only purposes . The snapshot will have a different name, so any clients connecting to it must be aware of the name change . Please note that this feature has been deprecated and replaced by AlwaysOn; therefore, going forward, you should use AlwaysOn instead of database mirroring.
■ Log shipping This is another technology that provides high availability at the database level,
Note If you are familiar with SQL Server, you may be wondering why replication does not appear in the preceding list . This is because replication lacks a few key features, such as
ho-listic database synchronization (as opposed to object-level movement).
SQL Server Integration Services
SQL Server Integration Services (SSIS) is a platform that allows you to build high-performance extrac-tion, transformaextrac-tion, and loading (ETL) frameworks for data warehouses . So why is it included in here in a list of Database Engine components? In most cases SSIS is used for ETL; however, it offers a number of tasks and transformations that extend its usage well beyond ETL .
For example, if you are new to administering a SQL Server environment, SSIS provides you with the tools needed to perform several administrative tasks, including rebuilding indexes, updating statistics, and backing up databases, which make up the primary list of maintenance items that should be per-formed on any database . Without SSIS, as a new administrator you could spend a lot of time writing T-SQL just to get these activities running on a regular basis. But this is not the extent of the capabili -ties of SSIS for administrators . How often are you asked for an export of data to Microsoft Excel or to move data from one server to another? Using SSIS, you can quickly export or import data from various sources, including Excel, text files, Oracle, and DB2.
SQL Server Management Tools
SQL Server 2012 includes two graphical user interfaces that enable you to manage, monitor, maintain, and develop in a SQL Server environment. The first is SQL Server Management Studio (SSMS), which allows you to perform just about any action you can think of against an instance of SQL Server. It is an integrated environment where you can access many instances of SQL Server . It consists of a broad set of tools with a rich set of interfaces and script editors that simplify the process of developing and configuring SQL Server instances.
In addition to SSMS, SQL Server 2012 introduces SQL Server Data Tools (SSDT) . SSDT is another integrated environment, but it was designed specifically for database developers. You can explore the database and database objects using the SQL Server Object Explorer. So far, some of the most talked-about features of SSDT are the ability to easily create or edit database objects and data, and run queries directly from the interface . Using the visual Table Designer, you can change table schemas for both database projects and online database instances.
Summary
C H A P T E R 2
Installing, Configuring,
and Upgrading
Microsoft SQL Server 2012
After completing this chapter, you will be able to
■ Understand the differences between the various SQL Server editions . ■ Select hardware for your SQL Server instance .
■ Use the setup files to install an instance of SQL Server.
Editions of SQL Server 2012
It’s now time to get your hands dirty and start working with SQL Server . However, before you run off and install an instance of SQL Server, you should first become familiar with the different editions of SQL Server that Microsoft offers . The SQL Server 2012 versions are offered in three categories: primary, specialized, and breadth. All editions come in 32-bit and 64-bit flavors, so don’t worry if you don’t have any 64-bit machines available; you can still get started with SQL Server. However, this book will cover the installation and configuration of a 64-bit version of SQL Server.
TABLE 2-1 SQL Server 2012 Primary Editions
Edition Description
Enterprise This is considered the premium edition of SQL Server . This edition is all-inclusive, meaning that it contains all the features available in every edition . SQL Server Enterprise delivers a comprehensive data center solution that supports a high level of mission-critical workloads, blazing-fast performance, virtualization, and business intelligence (BI) capabilities .
Business Intelligence This is a new edition to the SQL Server family . It is focused on delivering all-encompassing BI-focused solutions . The Business Intelligence edition enables organizations to build, de-ploy, and manage highly scalable solutions efficiently and effectively. When accessing data, end users will have a browser-based experience that allows them to slice and dice data in ways that they could previously only imagine .
Standard While not as robust as the Enterprise or BI edition, the Standard edition does boast several intriguing capabilities . Most important, it encompasses basic data management and BI ca-pabilities that are more in line with the needs of smaller-scale deployments of SQL Server . If you are looking at running a departmental application, or if you have a smaller organization, this is the version for you .
The next category is hard to call a category because it contains only one version, but it is still noteworthy . The specialized category contains the Web edition . This edition is optimally designed for those SQL Server instances that will support Internet-facing workloads and is intended for web hosting service providers . It allows organizations of any size to deploy web-based content such as webpages, applications, sites, and services .
The final category, breadth, was designed for specific scenarios and is offered for free or at a very low price . Table 2-2 describes the two editions in this category: Developer and Express .
TABLE 2-2 SQL Server 2012 Breadth Editions
Edition Description
Developer This is identical to the Enterprise edition, except that it is only licensed for development and test sys-tems. You cannot use it for production purposes. Note, however, that you can easily upgrade it to the Enterprise license for production use if you need to .
Express The Express version of SQL Server is a great entry-level product . It is perfect for learning and building small data-driven applications .
Choosing Hardware for SQL Server
Choosing the hardware to run your software is often a challenge . With SQL Server 2012, it’s even more challenging because you must consider the disk subsystem along with the typical server specifi -cations, such as CPU and memory, among others .
As with any relational database management system (RDBMS), memory is at the top of the re -source list . This book doesn't delve too deeply into a hardware discussion, since the main purpose is to get you started with SQL Server, but note that hardware requirements vary across SQL Server edi-tions. At a minimum, your server should meet the hardware specifications outlined in Table 2-3.
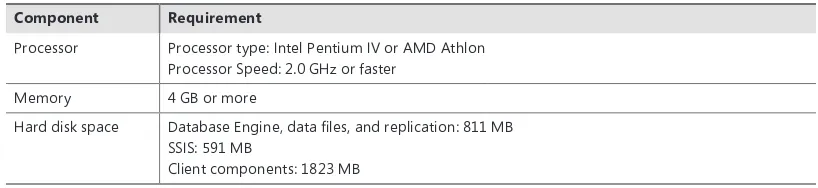
TABLE 2-3 SQL Server 2012 Recommended Hardware Specifications
Component Requirement
Processor Processor type: Intel Pentium IV or AMD Athlon Processor Speed: 2 .0 GHz or faster
Memory 4 GB or more
Hard disk space Database Engine, data files, and replication: 811 MB SSIS: 591 MB
Client components: 1823 MB
The requirements provided are specific to an Enterprise, Business Intelligence, or Standard instal -lation . The number of processors, size of your disk subsystem, and amount of memory are primarily dependent on the type of workload, your availability requirements, and I/O requirements . For more information on specific requirements for other editions, please refer to SQL Server 2012 Books Online. An exhaustive list is provided for every edition.
Software Prerequisites
TABLE 2-4 SQL Server 2012 Minimum Software Requirements
Software Requirement
Operating system Enterprise and BI versions operating system requirements: Windows Server 2008 R2 SP1 64-bit Datacenter
Windows Server 2008 R2 SP1 64-bit Enterprise Windows Server 2008 R2 SP1 64-bit Standard Windows Server 2008 R2 SP1 64-bit Web Windows Server 2008 SP2 64-bit Datacenter Windows Server 2008 SP2 64-bit Enterprise Windows Server 2008 SP2 64-bit Standard Windows Server 2008 SP2 64-bit Web
Standard and Developer versions operating system requirements: Windows 7 SP1 64-bit Ultimate
Windows 7 SP1 64-bit Enterprise Windows 7 SP1 64-bit Professional Windows Server 2008 SP2 64-bit Datacenter Windows Server 2008 SP2 64-bit Foundation
Windows Vista SP2 64-bit Ultimate Windows Vista SP2 64-bit Enterprise Windows Vista SP2 64-bit Business .NET Framework .NET 3.5 SP1
Internet software Internet Explorer 7 .0 or later
In addition to these requirements, SQL Server setup installs .NET 4.0, SQL Server Native Client, and SQL Server–specific support files.
Before Installation
Prior to installing SQL Server, ensure that you have selected and configured hardware that will sup -port the version of SQL Server you plan to use. Also, carefully consider the hardware and software requirements for that version . In addition, ensure that all the external needs, such as service accounts and service packs, have been created, configured, or downloaded.
SQL Server Instances
■ SQL Server 2005 (32-bit)
■ SQL Server 2005 (64-bit) x64
■ SQL Server 2008 (32-bit)
■ SQL Server 2008 (64-bit) x64
■ SQL Server 2008 R2 (32-bit)
■ SQL Server 2008 R2 (64-bit) x64
■ Microsoft SQL Server 2012 Release Candidate (RC) 0 (32-bit)
■ Microsoft SQL Server 2012 RC 0 (64-bit) x64
Service Accounts
Each service in SQL Server is a mechanism that is used to manage Windows or SQL authentication for SQL Server operations . During installation, you will be able to select which components to install . As a result, the SQL Server setup will install specific services. Since this book is focused on Database Engine, it will only discuss a few of the possible services: the Database Engine, SQL Server Agent, and SQL Server Integration Services (SSIS) .
As a best practice, you should use separate accounts for each SQL Server service. The accounts should be configured with the lowest possible user rights. During the installation, SQL Server will assign default accounts to these services based on the host operating system . If you are running Win-dows 7 or WinWin-dows Server 2008 R2, you can use two new types of service accounts: a virtual account or a managed services account (MSA).
The primary purpose of both account types is to simplify administration for the database adminis-trator. An MSA is a domain account whose password is automanaged by the domain controller . It can be used to start a Windows service, but not to log on to a computer . Virtual accounts are managed local accounts that are also automanaged . Both accounts can access network resources, but virtual accounts cannot be used with SQL Server failover cluster instances . If other servers and clients need to communicate with these services, you must configure the services to use domain accounts.
Note When changing service accounts, always use SQL Server Configuration Manager.
Collation Sequences
During some SQL Server engagements, you will likely encounter many people who just accept the default collation. In most cases, the default is sufficient; however, since it’s responsible for case sensitivity, international characters, case sorting, accenting sensitivity, and rule sorting, you should definitely consider it prior to install. SQL Server allows collation specification at the server, database, and column level. As a best practice, you should use a single collation within your company.
Authentication Modes
The final consideration is specific to authentication. During installation, you are given two choices of authentication: Windows and SQL Server . If you choose Windows, the SA login, which will be dis -cussed in Chapter 25, "SQL Server Security," will be disabled . Selecting Windows limits access to SQL Server to Windows accounts . If you select mixed mode authentication, you will have the ability to create accounts that are specific to SQL Server.
Installing SQL Server
This section will show you how to install SQL Server. Note that SQL Server can be installed using several methods, which include unattended, command prompt, configuration file, sysprep, and server core . This section will describe the simplest installation method, which is using the SQL Server 2012 Setup wizard . If you don’t have a licensed copy of SQL Server, you can download an evaluation copy from the Microsoft website .
Installing SQL Server from the Setup Wizard
This exercise will quickly run through the installation process .1. Either insert the SQL Server 2012 media into a DVD or CD drive or access it from a local or networked drive . Look in the root folder of the media and double-click setup.exe . If you are using an .iso file, you will need to use a tool to mount it or software such as WINRAR to ex -tract the contents .
2. The SQL Server Installation 2012 Setup wizard will open . Select Installation from the left
navi-gation area. On the right, click New SQL Server Stand-Alone Installation or Add Features to an Existing Installation, depending on your needs .
3. The installer will then execute a list of setup support rules . To view a complete list, click the
Show Details button . Click OK .
5. On the next page, check the box labeled "I accept the license terms ." You also have the option of sending additional information to Microsoft about your installation . Make your choice and click Next. Note that the button labeled Next will not be enabled unless you accept the license terms. The installer will then install the necessary setup files.
6. After the setup files are installed, another set of setup support rules will run. Click Next.
7. Now you must select the server role. Select the SQL Server Feature Installation radio button,
and click Next.
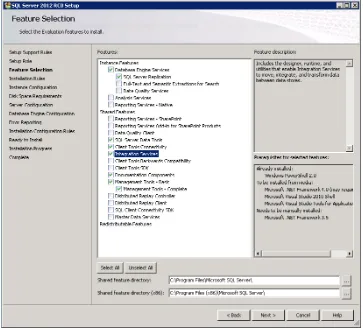
8. On the Feature Selection page, select the following: Database Engine Services, SQL Server Replication, SQL Server Data Tools, Client Tools Connectivity, Integration Services, Documen-tation Components, Management Tools - Basic, and Management Tools - Complete . The page should resemble Figure 2-1 . This book will focus on these foundation features, but you can in-stall others if you want, as well. Also, if you are inin-stalling a second instance of SQL Server 2012, the shared features will already be installed, so the Shared Features options will be grayed out .
9. Toward the bottom of the page are options for specifying the directory where you want to install the features. Accept the defaults and click Next.
10. A few more installation rules will execute. If you have installed all the proper prerequisites,
everything should run successfully. Click Next.
11. On the Instance Configuration page, select whether to install a default installation or a named
instance . If a default instance is already installed, your only choice will be to install a named instance. The Named Instance text box will display the name you use to connect to the SQL Server—for example, ServerName\InstanceName\. The instance ID is used to identify installa -tion directories and registry keys for an instance of SQL Server. Click Next.
12. The Disk Space Requirements page summarizes how much available space there is and how much is required. Click Next.
13. On the Server Configuration page, you specify the login accounts and startup types for the
SQL Server services . If you want other services to communicate with SQL Server and vice versa, you must specify a domain account, an MSA, or a virtual account as the login account for Database Engine. For now, accept the defaults. For the SQL Server Agent service, change the startup type to Automatic. Click the Collation tab next to the Service Accounts tab. You can customize your collation on this page, but for now accept the default collation and click Next.
14. On the Database Engine Configuration page, first select your authentication mode. Select the
radio button labeled Mixed Mode (SQL Server Authentication and Windows Authentication). Then specify a password for the SA account. Provide a password of your choice. Click the but -ton labeled Add Current User. On the Data Directories tab, you can change the location where the system databases and user databases are stored. For now, accept the defaults. The final tab allows you to enable FileStream. Leave it disabled for now. Click Next.
15. If you want to report errors about the installation, select the check box on the Error Reporting
page, and then click Next.
16. One last rules check is run. If everything passes, click Next.
17. You are now ready to install . Click the button labeled Install .
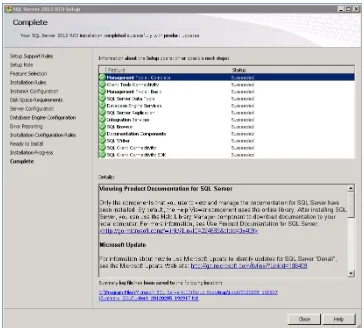
FIGURE 2-2 SQL Server 2012 setup summary page .
After Installation
After your SQL Server installation is complete, there are certain things you should do. The following subsections describe a couple of them .
Assigning a TCP/IP Port Number to the
SQL Server Database Engine
First, you may want to change the SQL Servers default TCP port from 1433 to a different port. This exercise describes how .
1. Open SQL Server Configuration Manager by clicking Start | All Programs | Microsoft SQL
2. In the left-hand navigation pane, expand SQL Server Network Configuration and click Proto -cols for MSSQLSERVER . If you are changing the port for a nondefault instance, then you will click Protocols for <Instance Name> .
3. Right-click TCP/IP in the left section .
4. You can configure each specific IP address, or you can configure the port for all IP addresses.
To do so, click the IP Addresses tab, scroll to the bottom to locate IPALL, and change the port number to your desired port . Don’t change the port, as this will require you to include the port number when connecting to this server .
5. Restart the instance of SQL Server that has been changed . Click SQL Server Service in the left
navigation pane .
6. Select SQL Server (MSSQLSERVER), right-click, and select Restart .
Once this change is made, you are required to specify this port number when you connect to the SQL Server instance .
Opening a SQL Server Instance Port Using Windows Firewall
If you attempt to connect to SQL Server from another machine now, the connection attempt will time out . To connect to this instance, you must open the port . You can do so using Windows Firewall, as follows:1. Open Windows Firewall and click Start | Control Panel | Windows Firewall.
2. Toward the top of the page, click Advanced Settings.
3. Select Inbound Rules from the left navigation pane . 4. Click New Rule from the right navigation pane.
5. On the Rule Type page, select the radio button labeled Port, and click Next.
6. Ensure that the radio button labeled TCP is selected and enter 1433 in the text box labeled
Specific Local Ports. Click Next.
7. Select the Allow the Connection radio button and click Next.
8. In the text box labeled Name, type a descriptive name for your inbound rule. Click Finish.
How to Upgrade to SQL Server 2012
Whether you are upgrading an existing server from one version to the next or installing a new version on a new server, you should carefully think through and plan this task . You have two upgrade choices: in-place or side-by-side . Each has advantages and disadvantages . Often your choice will depend on how much downtime your environment can support, the age or state of the existing systems, and funding . During an in-place upgrade, your system will be down for some time . If you are a member of a 24/7 organization, taking the system down may not be an option, and you will be required to do a side upgrade. Also, if you are looking to replace older or out-of-date machines, then side-by-side is your only option . With that said, purchasing new hardware has a cost, and if you don't have funding, then your only option is an in-place upgrade .
In-Place Upgrade
Just the thought of upgrading any software may send chills down your spine . Fortunately, the process of upgrading to SQL Server 2012 has been greatly improved over the years . SQL Server 2012 has several supported upgrade paths . Therefore, if you are currently running SQL Server on previous ver-sions, you can quickly upgrade to SQL Server 2012 without upgrading to other versions . SQL Server 2005 with SP4 is the oldest version of SQL Server that has a direct upgrade path. If you are running a version older than this, you will need to upgrade to that version before you can perform an in-place upgrade to SQL Server 2012 . For example, if you are currently running SQL Server 2000, you must upgrade to SQL Server 2005 with SP4 prior to running an in-place upgrade to SQL Server 2012.
Since this is an introductory book, how to actually perform the upgrade will not be covered; how-ever, the following preupgrade checklist should assist you prior to an in-place upgrade:
■ Ensure that your version of SQL Server has a supported upgrade path . ■ Back up all your databases, including system databases .
■ Run SQL Server Upgrade Advisor to prepare for the upgrade to SQL Server 2012.
■ Verify that your hardware and software meet the minimum requirements for SQL Server 2012 . ■ Stop replication and make sure that the replication log is empty .
■ Ensure that all the database server logons are stored in the master database .
■ Estimate the disk space required for the components being upgraded and ensure that
suf-ficient disk space is available.
Side-by-Side Upgrade
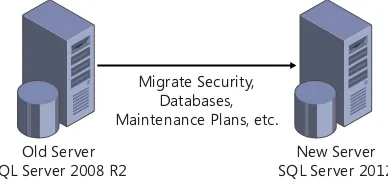
This type of upgrade may not stress you as much as an in-place upgrade, simply because the old serv-er remains in place and can be made available quickly in the event of an installation failure . You will follow the same steps as outlined in the "Installing SQL Server from the Setup Wizard" section of this chapter . Once you've completed the steps, you will need to migrate your security, databases, replica-tion configurareplica-tion, maintenance plans, and any other custom configurareplica-tions that have been added to your SQL Server installation . This process gives you the advantage of having a stable rollback plan . In the event of an installation failure or some other type of catastrophe, you can always turn the other server back on and continue operations as normal. Figure 2-3 illustrates a side-by-side migration.
While this strategy offers several advantages, it could require that your organization purchase new hardware . In addition, this method may require that you have disk space that accommodates two identical databases . For organizations with very large databases, this could pose a problem .
Migrate Security, Databases, Maintenance Plans, etc .
Old Server SQL Server 2008 R2
New Server SQL Server 2012
FIGURE 2-3 SQL Server 2012 side-by-side migration .
Summary
C H A P T E R 3
Using SQL Server 2012
administration and
development tools
After completing this chapter, you will be able to
■ Use SQL Server 2012 Books Online .
■ Create solutions and projects with SQL Server Management Studio.
■ Use Object Explorer.
■ Use SQL Server Data Tools .
■ Use SQL Server Configuration Manager.
Using SQL Server Books Online
Over the years, Microsoft SQL Server Books Online (BOL) has been criticized for its lack of content and its inability to effectively explain how to use various SQL Server tools and options . However, as the versions of SQL Server have progressed, so has the documentation . Unfortunately, the perception of BOL remains marred by the many years of criticism and, in some cases, its limited content . While BOL does not and probably will never provide a walk-through for every possible task, it does offer a good foundation and starting point for anyone interested in gaining general knowledge about all of the capabilities of SQL Server .
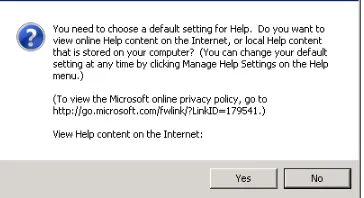
FIGURE 3-1 The SQL Server 2012 Online Help Consent dialog box displays the first time you open SQL Server Books Online .
You have the option of storing the help content locally or viewing it online . If you decide to view it online, you can always change the setting later . In the next exercise, you’ll install BOL locally .
Install Books Online locally
1. Click the Yes button in the Online Help Consent dialog box . Microsoft Help Viewer 1 .1 displays .
2. Click the Help Library Manager icon .
3. In the Help Library Manager dialog box, click Install Content from Online. A fetch process
begins that provides you with a list of available content .
4. From the list, click the Add button next to Books Online, located under the SQL Server 2012
category .
5. Click the Update button . The install process begins . 6. When the update is complete, click the Finish button . 7. Click Exit .
8. Close Microsoft Help Viewer .
9. Now open SQL Server Books Online by clicking Start | All Programs | Microsoft SQL Server
2012 | Documentation & Community | SQL Server Documentation.
10. In the left navigation section, you should see several SQL Server choices .
Using SQL Server Management Studio
Your ability to efficiently manage and maintain your SQL Server environment has been greatly improved with the introduction of Microsoft SQL Server Management Studio (SSMS) in SQL Server 2005. Administrators can configure other SQL Server components, such as replication, availability groups, Microsoft SQL Server Agent, change data capture (CDC), and many other features that will be discussed later in this book. In addition, you can create databases and database objects, such as tables, views, and stored procedures . Finally, after building a database, you can also manage the data inside the database using SSMS .
Get started with SQL Server Management Studio
1. To open SSMS, click Start | All Programs | Microsoft SQL Server 2012 | SQL Server Management
Studio .
2. When SSMS opens, the Connect to Server dialog box appears. Accept the defaults for every
option except the Server Name drop-down list. Type your server name and click the Connect button .
Before you start using SSMS, let’s take a quick tour of the environment . First, you may notice that the SSMS environment is very similar to that of most Microsoft products. At the very top is the main menu, which has several options available . Directly below the main menu is the Standard toolbar, which is loaded by default . If you right-click anywhere on either toolbar, a context menu appears . From this menu, you can select other choices that will add new items to the existing toolbars or add new toolbars to the menu. Below all the menus and to the left of the window is Object Explorer.
Use Object Explorer
1. Open SSMS if you have not already done so . When prompted by the Connect to Server dialog
box, ensure that Database Engine is selected from the Server Type drop-down list, type your server name in the Server Name drop-down list, and ensure that Windows Authentication is selected in the Authentication drop-down list.
2. If Object Explorer does not open, select Object Explorer from the View menu or press F8.
Object Explorer will appear to the left of the SSMS window.
4. You can explore various server objects by expanding any of the folders displayed in Object
Explorer. For example, expand the Management folder. You can now view and configure fea -tures such as Data Collection, Database Mail, and Extended Events .
5. Right-click the server name, which is the topmost item in the Object Explorer tree. From the
context menu, select Reports | Standard Reports | Server Dashboards. This report provides you with a high-level overview of the server .
6. To view more detailed information, instead of selecting Server Dashboards from the report list, select Activity-All Active Sessions. This report reveals all active open sessions on that server .
7. In the toolbar located above Object Explorer, click the button labeled New Query. A new
query window opens in which you can write queries to create objects, configure components, and query database objects.
Note The preceding steps provide a quick overview of some of the SSMS function-ality . Throughout this book, you’ll learn more details and additional steps to help you take full advantage of the capabilities of SSMS .
While out of the box SSMS is configured to provide a full set of functionality to administrators and developers, it also provides you with the ability to make it your own. If you don’t like Object Explorer on the left, you can move it, or if you don’t like the font of the query editor, you can change it to one of your choice. You have several options available for configuration.
Personalize SQL Server Management Studio
1. Open SSMS if it is not already open .
2. Select Tools | Options.
3. In the Options dialog box, select Fonts and Colors .
4. Select Courier New from the Font drop-down list.
5. Select 16 from the Size drop-down list .
6. Click OK .
7. Open a query window and type SELECT @@SEVERNAME . Click the red exclamation point icon in the menu bar to execute the query .
9. Click the drop-down arrow located to the right of the words Object Explorer . Select Float from the menu .
10. Click and drag Object Explorer onto the left docking option that appears. This docks Object
Explorer back in its original position . Explore a little and move it to other docking locations . Find the one that best fits your preference.
Using SQL Server Management Studio to
create solutions and projects
While most of this chapter’s content has been specific to administrators, SSMS does provide func -tionality for developers as well. In other words, you can create project-based solutions that help you organize your development and configuration scripts. Using SSMS, you can create a solution, which is a container of projects. Within SSMS, you can create two types of projects:
■ SQL Server Scripts ■ Analysis Services Scripts
In the next exercise, you will create a SQL Server Scripts project.
Create solutions and projects
1. Open SSMS if it is not already open .
2. From the menu select File | New | Project.
3. The New Project dialog box opens.
4. There are two Installed Templates to select from . Ensure that you select the SQL Server Management Studio Projects template. This choice provides two project types. Select SQL Server Scripts .
5. At the bottom of the screen, in the Name text box, type SBS2012Chp3 .
6. Accept the defaults for the Location and Solution drop-down lists.
7. Type SBS2012 in the Solution Name text box. 8. Click OK .
To the right, you will notice a new docked window labeled Solution Explorer .
10. Select New Connection.
11. Type your server name in the Server Name drop-down list.
12. Click OK .
13. Right-click the Queries folder .
14. Select New Query.
15. Right-click the newly created query and select Rename .
16. Change the name of the query to Select Server Name . Ensure that you don’t remove .sql .
17. In the query editor, type SELECT @@SERVERNAME .
18. Select File | Save All.
Using SQL Server data tools
SQL Server 2012 introduces a new development environment for SQL Server database developers called SQL Server Data Tools (SSDT) . Although the primary purpose of this tool is development, it can be used for database deployment and database-level configurations. Using SSDT, you can cre -ate databases and database objects such as tables, views, stored procedures, and triggers. You can also edit data within the tables . In addition, you can execute queries and perform database schema compares .
SSDT replaces Business Intelligence Development Studio (BIDS). As a result, not only can you create and deploy databases, but you can also create Analysis Services, Integration Services, and Reporting Services projects. In addition, these projects can be checked into source control solutions such as Team Foundation Server .
Use SQL Server Data Tools
1. Click Start | Microsoft SQL Server 2012 | SQL Server Data Tools.
2. If this is your first time opening SSDT, you will be prompted with the following screen. The
3. Select SQL Server Development Settings from the Choose Your Default Environment Settings list box .
4. Click Start Visual Studio .
5. Choose File | New | Project.
6. In the Recent Templates pane located in the left of the New Project dialog box, select SQL
Server .
7. Select SQL Server Database Project from the project list.
8. In the Name text box, type AdventureWorks .
9. Accept the default for the Location drop-down list.
10. In the Solution Name text box, type SBSChp3 .
11. Click OK .
12. In Solution Explorer, right-click the AdventureWorks project. Select Import | Database. The
13. Click the New Connection button.
14. Type your server name in the Server Name drop-down list.
15. Select AdventureWorks2008R2 from the Select or Enter Database Name drop-down list.
16. Change the selection in the Folder Structure drop-down list to Object Type.
17. Click OK .
18. Accept all the defaults for the remaining items and click the Start button. The database import
process begins .
19. Once all the objects have been imported, click the Finish button.
20. In Solution Explorer, expand the Tables folder .
21. Double-click the Address.sql item.
22. In the table designer view, locate AddressLine1 under the Name column. For that column,
change the Data Type from nvarchar(60) to nvarchar(65) .
23. Right-click the AdventureWorks project in Solution Explorer and select Deploy from the con -text menu. Now the changes are deployed to the database on the server.
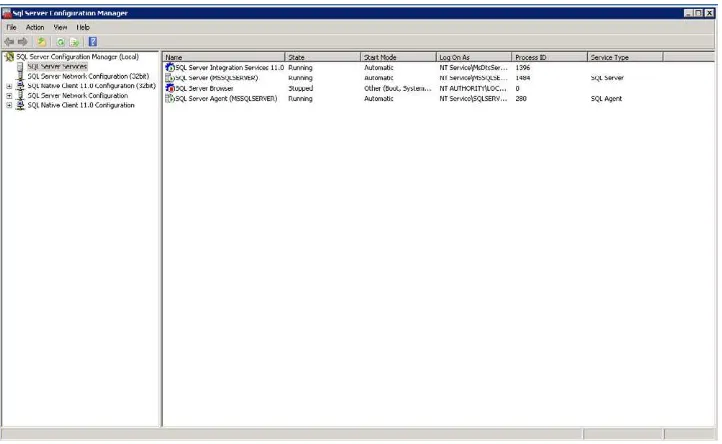
Using SQL Server Configuration Manager
SQL Server Configuration Manager, shown in Figure 3-2, allows you to manage the SQL Server ser -vices that have been installed on your server .
FIGURE 3-2 SQL Server Configuration Manager.
Using SQL Server Configuration Manager, you can perform the following actions:
■ Start, stop, and pause a service ■ Change service accounts ■ Configure network protocols
■ Configure advanced properties such as AlwaysOn and Filestream
Because these services are centralized, administrators are able to configure and manage services from one location .
Use SQL Server Configuration Manager
1. Open SQL Server Configuration Manager by clicking Start | All Programs | Microsoft SQL
Server 2012 | Configuration Tools | SQL Server Configuration Manager.
2. In the left pane, right-click the SQL Server (MSSQLSERVER) .
3. Click Properties in the context menu .
4. In the Properties dialog box, you will notice several tabs . Click each to view the available options .
5. With the Log On tab activated, click the Stop button . 6. Click the Start button .
7. Click OK .
8. Expand the SQL Server Network Configuration item.
9. Select Protocols from MSSQLSERVER .
10. If you want to enable the Named Pipes protocol, right-click and select Enable from the con
-text menu .
Summary
PA R T I I
Designing databases
CHAPTER 4 Designing SQL Server databases . . . .35
CHAPTER 5 Creating your first table . . . .49
C H A P T E R 4
Designing SQL Server databases
After completing this chapter, you will be able to
■ Understand the requirements and functions of each system database . ■ Understand the SQL Server database structure .
■ Create a database . ■ Add and alter filegroups.
■ Add files to filegroups.
■ Detach and attach databases .
■ Understand database recovery models .
The database is the container for all objects within Microsoft SQL Server for the relational engine. In this chapter, you will learn about the system databases that store vital information about the SQL Server instance. You will also learn fundamental techniques needed to create user-defined databases, along with methods you can use to control how and where data is stored . The methods include creating databases that consist of multiple filegroups and multiple data files. Finally, you will learn how to move databases from one instance of SQL Server to another, and you will explore database recovery models .
Understanding SQL Server System Databases
Before you start creating Microsoft SQL Server 2012 databases, you should have a good understand-ing of the system databases that are created by default when you install an instance of SQL Server . Each of the following databases serves a specific purpose and is required to run SQL Server:
master database
The master database, as its name suggests, is the primary system database . Without it, SQL Server cannot start. The master database contains the most important information about objects within the SQL Server instance, such as the following:
■ Databases
For example, if you want to quickly obtain a list of all the databases on an instance of SQL Server, you can execute the following query:
//The following code returns a list of all databases on an instance of SQL Server Select * from sys.master_files
This query returns a list of databases and also additional configuration options that have been specified for each database. This approach is faster than using Microsoft SQL Server Management Studio (SSMS), where you view this information one database at a time .
tempdb database
The tempdb database is a global playground for temporary objects created by the internal processes that run SQL Server and temporary objects that are created by users or applications. These temporary objects included temporary tables and stored procedures, table variables, global temporary tables, and cursors. In addition to temporary objects, tempdb stores row versions for read-committed or snapshot isolation transactions, online index operations, and AFTER triggers. One important thing to note about tempdb is that it is re-created every time SQL Server is restarted. Although you can create objects in tempdb, you should never use it as a database where persisted information is stored.
model database
Note If the model database does not exist or is offline, tempdb cannot be created . This is because, as mentioned previously, it is re-created each time SQL Server is restarted . Since each database uses model as a template, and tempdb is no exception, it must exist to re-create tempdb at startup .
msdb database
The s serves primarily as the back-end database for Microsoft SQL Server Agent. Whenever you create and/or schedule a SQL Server Agent job, the metadata for that job is stored in this database. In addi -tion to SQL Server Agent data, msdb stores informa-tion for the following components:
■ Service brokers ■ Alerts
■ Log shipping ■ SSIS packages
■ Utility control point (UCP) ■ Database mail
■ Maintenance plans
resource database
The resource database is a hidden, read-only database that is usually not discussed very often . The resource database's primary purpose is to improve the upgrade process from one version of SQL Server to the next. All system objects for an instance of SQL Server are stored within the resource database . This database cannot be backed up or restored . You should not attempt to change or move this database unless Microsoft Customer Support directs you to do so .
distribution database
The final system database is the distribution database . This database exists only when you have con-figured this instance as a distributor for replication. Prior to configuring replication, you must perform this configuration. All metadata and history for the various types of replication are stored within this database .
View system databases
1. Open SQL Server Management Studio (SSMS) and connect to a server . 2. Object Explorer should be open. If it is not, press F8 to open it.
3. In Object Explorer, expand Databases.
4. You will see a folder labeled System Databases . Expand it .
Understanding the SQL Server database structure
As mentioned previously, databases are the primary data storage objects within SQL Server. The database creation process, while very simple, always requires careful thought relating to the struc-ture . Databases can be created using many different technologies and techniques . In this chapter, you will focus on using T-SQL and SSMS. By default, every SQL Server database consists of two files (see Figure 4-1):
■ The data file contains data and database objects such as tables, views, and stored procedures. ■ The log file contains information that assists in the recoverability of transactions in the
database .
SBSChp4DB
Data File (C:\SQLData\SBSChp4DB .mdf)
Log File (C:\SQLData\SBSChp4DB_log .ldf)
Creating a database
There are two types of data files: primary and secondary. When a database is initially created, the primary data file is created. By default, it contains all the startup information for the database. As user-defined objects are created, they may also be stored in the primary data file. However, you may implement certain architectural strategies to improve the performance, scalability, and maintainabil-ity of your database. These strategies are discussed in the upcoming “Adding Files and Filegroups” section .
Prior to running the script, create two folders on the root of your C drive: SQLData and SQLLog .
Create your first database with SSMS
1. Open SSMS .
2. Open Object Explorer, if it is not already opened.
3. Click the arrow next to your server .
4. Right-click the Databases folder .
5. In the context menu, select New Database.
6. The New Database dialog box opens. Ensure that General is selected in the Select a Page sec -tion on the left .
7. In the Database Name text box, type SBSChp4SSMS .
8. In the Database Files section, locate the Path column. On the first row under the Path column,
click the ellipsis button. Browse to C:\SQLData.
9. On the same row, under the File Name column, type SBSChp4SSMS .
10. On the second row, under the Path column, click the ellipsis button. Browse to C:\SQLLog.
12. Click OK .
13. In the left section labeled Select a Page, select Filegroup .
Create your first database with T-SQL
1. Open the query editor in SSMS .
2. In the query editor, enter the following T-SQL code:
--Use this script to create a database using T-SQL USE master;
CREATE DATABASE SBSChp4TSQL ON PRIMARY
(NAME='SBSChp4TSQL1', FILENAME = 'C:\SQLDATA\SBSTSQL1.mdf', SIZE=10MB, MAXSIZE=20, FILEGROWTH=10%)
LOG ON
(NAME='SBSChp4TSQL_log', FILENAME = 'C:\SQLLog\SBSTSQL_log.ldf', SIZE=10MB, MAXSIZE=200, FILEGROWTH=20%);
Understanding arguments
■ database_name is the name of the database, which must be unique to any of the databases
that exist at the time of creation .
■ ON specifies the filegroup and begins the section where the data file is defined.
■ LOG ON begins the section where the log is defined.
■ Name is the logical file name used by SQL Server when referencing the file. As with database_
name, it must be unique .
■ FileName is the operating system path and file name, including the file extension.
■ Size specifies the initial size of the file in megabytes (MB) by default. Kilobytes (KB), gigabytes
(GB), and terabytes (TB) can also be specified.
■ Maxsize specifies the maximum size to which the file can grow (shown in megabytes by
default) .
■ Filegrowth specifies the growth increment of the file. It is also shown in megabytes by default,
but it can be specified as a percentage.
Note This is not an exhaustive list of available database creation options. As you work more
and more with SQL Server, you may discover a need for the other available options, which
you can find in SQL Server Books Online.
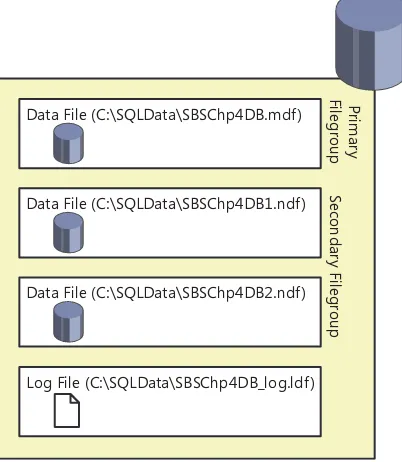
Adding files and filegroups
Instead of placing user-defined objects in the primary data file, you have the option of adding a secondary data file to your database. These files types are usually distinguished by the file extension: primary files are usually suffixed with .mdf, while secondary files are suffixed with .ndf. Neither is a requirement; however, it is a best practice to use these extensions. The secondary data files are often used to spread data across disk subsystems or to add more disk space to a database in the event that the other data files have reached maximum capacity.
SBSChp4DB
Primar
y
Filegr
oup
Secondar
y Filegr
oup
Data File (C:\SQLData\SBSChp4DB .mdf)
Log File (C:\SQLData\SBSChp4DB_log .ldf) Data File (C:\SQLData\SBSChp4DB1 .ndf)
Data File (C:\SQLData\SBSChp4DB2 .ndf)
FIGURE 4-2 Database files and filegroups.
In the image are two filegroups:
■ The primary filegroup contains the primary data file. ■ The secondary filegroup contains two secondary data files.
Add files and filegroups using SSMS
1. Open SSMS and connect to a SQL server instance .
2. Expand the Databases folder .
3. Right-click the SBSChp4SSMS database and select Properties.
4. Select Filegroups from the Select a Page section of the Database Properties dialog box .
5. Click the Add button under the Rows section.
6. In the newly created row, under the Name column, type SBSSSMSGroup1 .
8. In the Select a Page section, select Files, and then maximize the window .
9. Click Add.
10. In the newly created row, under the Logical Name column, enter SBSChp4SSMS1 .
11. In the Filegroup column, select SBSSSMSGroup1 .
12. In the Path column, click the ellipsis button. Browse to C:\SQLData.
13. In the File Name column, enter SBSChp4SSMS1.ndf .
14. Click OK .
Add files and filegroups using T-SQL
1. Open the query editor in SSMS .
2. In the query editor, enter the following T-SQL code:
--Use this code to add a file and filegroup to a database USE master;
ALTER DATABASE SBSChp4TSQL
Detaching and attaching SQL Server databases
Now that you’ve created your database, what happens if you need to move it to another instance of SQL Server? For example, assume that you want to redistribute the free space on a server or decom-mission a server, which would require you to detach a database from one instance of SQL Server and then attach the database to a new instance of SQL Server . To accomplish this, you can use either T-SQL or SSMS .
There are currently two ways to attach a database to and one way to detach a database from an instance of SQL Server . To attach a database, you use sp_attach or CREATE DATABASE specifying the FOR ATTACH argument. Please note that the sp_attach system stored procedure has been deprecated and will be removed from future versions of SQL Server. As a result, it is recommended that you use only the CREATE DATABASE option when attaching databases.
Detach a SQL Server database using SSMS
1. Open SSMS .
2. Open Object Explorer, if it is not already open.
3. Expand the server node .
4. Expand the Databases folder .
5. Right-click the SBSChp4SSMS database.
6. Select Tasks | Detach.
8. Click OK .
Now that the database is detached, you can copy the files to the new storage location and attach the database to a new instance of SQL Server .
Detach a SQL Server database using T-SQL
1. Open SSMS, and then open a new query window . 2. Enter and execute the following script:
USE Master;
EXEC sp_detach_db @dbname = 'SBSChp4TSQL';
Attach a SQL Server database using SSMS
1. Open SSMS .
2. Open Object Explorer, if it is not already open.
5. Click Attach.
6. Click the Add button.
7. In the Locate Database Files dialog box, expand the folder labeled C .
8. Locate and expand the SQLData folder, and then select the SBSChp4SSMS.mdf file.
9. Click OK .
10. Click OK .
Attach a SQL Server database using T-SQL
1. Open SSMS, and then open a new query window .
2. Enter and execute the following script:
USE master;
CREATE DATABASE SBSChp4TSQL ON
Understanding database recovery models
A SQL Server database can be set to one of three recovery models:
■ Simple ■ Full
■ Bulk-logged
The model determines how precisely a database may be restored .
Simple model
The simple model does not allow for transaction log backups. As a result, you cannot restore a database to a point in time . Your database is vulnerable to data loss when using this model . That said, using this model does ease the task of administration because SQL Server will reclaim space automati-cally from the transaction log .
Full model
With the full model, data loss is minimal when the transaction log is backed up on a regular basis . Every transaction is fully logged to the transaction log, and the transaction log will continue to grow until it is backed up . While this model does add administrative overhead, your data is protected from data loss .
Bulk-logged model
When you use the bulk-logged model, bulk operations are minimally logged, which reduces the size of the transaction log. Note that this does not eliminate the need to back up the transaction log. Unlike in the full recovery model, in the bulk-logged model you can restore only to the end of any backup; you cannot restore to some point in time .
Summary
C H A P T E R 5
Creating your first table
After completing this chapter, you will be able to
■ Develop a naming standard . ■ Understand schemas .
■ Understand the different SQL Server data types . ■ Understand column properties .
■ Create and alter tables .
■ Understand computed columns . ■ Add constraints to a table.
■ Understand the FileTable feature . ■ Create a database diagram .
Just as the database is the primary container of all objects on an instance of Microsoft SQL Server, the table is the primary container of all data on a SQL Server instance . Tables are the foundation of all objects, and without them a database is useless. The power in any application is the data that it accepts and stores . Without a relational database management system (RDBMS) to store and main-tain that data, the application would likely not exist .
While this book's primary focus is SQL Server, it should be noted that databases come in many shapes and forms . For example, the most widely used database is a Microsoft Excel spreadsheet . Many people extract data or request data from an RDBMS and import that data into Excel . Once the data is in Excel, the end user may create a series of spreadsheets and workbooks that together pro-vide a very robust reporting tool containing answers to many organizational questions .