PUBLISHED BY Microsoft Press
A Division of Microsoft Corporation One Microsoft Way
Redmond, Washington 98052-6399 Copyright © 2012 by William R. Stanek
All rights reserved. No part of the contents of this book may be reproduced or transmitted in any form or by any means without the written permission of the publisher.
Library of Congress Control Number: 2011944612 ISBN: 978-0-7356-6376-3
Printed and bound in the United States of America. First Printing
Microsoft Press books are available through booksellers and distributors worldwide. If you need support related to this book, email Microsoft Press Book Support at mspinput@ microsoft.com. Please tell us what you think of this book at http://www.microsoft.com/ learning/booksurvey.
Microsoft and the trademarks listed at http://www.microsoft.com/about/legal/en/us/ IntellectualProperty/Trademarks/EN-US.aspx are trademarks of the Microsoft group of companies. All other marks are property of their respective owners.
The example companies, organizations, products, domain names, email addresses, logos, people, places, and events depicted herein are fictitious. No association with any real company, organization, product, domain name, email address, logo, person, place, or event is intended or should be inferred.
This book expresses the author’s views and opinions. The information contained in this book is provided without any express, statutory, or implied warranties. Neither the authors, Microsoft Corporation, nor its resellers, or distributors will be held liable for any damages caused or alleged to be caused either directly or indirectly by this book.
Acquisitions Editor: Anne Hamiliton Developmental Editor: Karen Szall Project Editor: Karen Szall
Editorial Production: Christian Holdener, S4Carlisle Publishing Services Technical Reviewer: boB Taylor
To my wife—for many years, through many books, many millions of words, and many thousands of pages, she's been there, providing support and encouragement and making every place we've lived a home.
To my kids—for helping me see the world in new ways, for having exceptional patience and boundless love, and for making every day an adventure.
To Karen, Martin, Lucinda, Juliana, Ben, and many others who’ve helped out in ways both large and small.
Contents at a Glance
Introduction xxi
PART I MICROSOFT SQL SERVER 2012 ESSENTIALS
CHAPTER 1 Managing Your SQL Servers 3
CHAPTER 2 Managing SQL Server Services and Clients 43
PART II MICROSOFT SQL SERVER 2012 MANAGEMENT
AND SECURITY
CHAPTER 3 Implementing Policy-Based Management 77 CHAPTER 4 Configuring and Tuning Your SQL Servers 111
CHAPTER 5 Tuning and Linking Your SQL Servers 137 CHAPTER 6 Database Administration Essentials 193 CHAPTER 7 Implementing SQL Server 2012 Security 253
PART III MICROSOFT SQL SERVER 2012 DATA MANAGEMENT
CHAPTER 8 Manipulating Schemas, Tables, and Views 313 CHAPTER 9 Using Indexes, Constraints, and Partitions 361
PART IV MICROSOFT SQL SERVER 2012 OPTIMIZATION,
MAINTENANCE, AND RECOVERY
CHAPTER 10 Automating and Maintaining SQL Server 2012 403 CHAPTER 11 SQL Server 2012 Backup and Recovery 453 CHAPTER 12 SQL Server 2012 Profiling and Monitoring 501
What do you think of this book? We want to hear from you!
Microsoft is interested in hearing your feedback so we can continually improve our books and learning resources for you. To participate in a brief online survey, please visit:
Contents
Introduction xxi
PART I
MICROSOFT SQL SERVER 2012 ESSENTIALS
Chapter 1 Managing Your SQL Servers 3
Using SQL Server Management Studio . . . .4
Getting Started with SQL Server Management Studio 5
Connecting to a Specific Server Instance 7
Connecting to a Specific Database 7
Managing SQL Server Groups . . . .9
Introducing SQL Server Groups and the Registered
Servers View 9
Creating a Server Group 10
Deleting a Server Group 11
Editing and Moving Server Groups 11
Adding SQL Servers to a Group 12
Managing Servers . . . .12
Registering a Connected Server 13
Registering a New Server in the Registered
Servers View 14
Registering Previously Registered SQL Server 2000
Servers 15
Updating Registration for Local Servers 15
Copying Server Groups and Registration Details
from One Computer to Another 15
Editing Registration Properties 18
Connecting to a Server 18
Disconnecting from a Server 18
Moving a Server to a New Group 18
Using Windows PowerShell for SQL Server Management . . . .19
Starting, Stopping, and Configuring SQL Server Agent . . . .25
Starting, Stopping, and Configuring MSDTC . . . .25
Managing SQL Server Startup . . . .26
Enabling or Preventing Automatic SQL Server Startup 27 Setting Database Engine Startup Parameters 28 Managing Services from the Command Line 31 Managing the SQL Server Command- Line Executable 32 Managing Server Activity . . . .33
Examining Process Information 33 Tracking Resource Waits and Blocks 35 Troubleshooting Deadlocks and Blocking Connections 39 Tracking Command Execution in SQL Server 41 Killing Server Processes 42 Chapter 2 Managing SQL Server Services and Clients 43 Managing SQL Server Component Feature Access . . . .44
Managing the Network and SQL Server Native Client Configuration . . . .49
Managing the Connections Configuration 51 Specifying the Shared Memory Network Configuration 52 Specifying the Named Pipes Network Configuration 52 Specifying the TCP/IP Network Configuration 53 Configuring Security for Native Client Configurations 58 Configuring the Native Client Protocol Order 58 Configuring the Shared Memory Native Client Configuration 59 Configuring the Named Pipes Native Client Configuration 59 Configuring the TCP/IP Native Client Configuration 60 Understanding the Services Configuration . . . .61
Configuring SQL Server Services . . . .65
Managing Service State and Start Mode 67
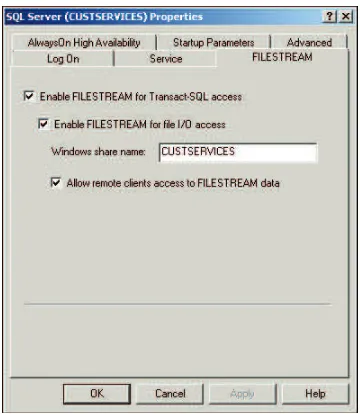
Setting Up File Streaming 70
Configuring Service Dump Directories,
Error Reporting, and Customer Feedback Reporting 73
PART II
MICROSOFT SQL SERVER 2012 MANAGEMENT
AND SECURITY
Chapter 3 Implementing Policy-Based Management 77
Introducing Policy-Based Management . . . .77
Working with Policy-Based Management . . . .80
Configuring Central Management Servers . . . .88
Registering Central Management Servers 88
Registering Subordinate Servers and Groups 89
Moving Subordinate Servers and Server Groups 90
Deleting Subordinate Servers and Server Groups 91
Executing Statements Against Multiple Servers 91
Managing Policies Throughout the Enterprise . . . .92
Importing and Exporting Policies 92
Configuring and Managing Policy Facets 94
Creating and Managing Policy Conditions 95
Creating and Managing Policies 99
Managing Policy Categories and
Mandating Policies 102
Evaluating Policies 104
Troubleshooting Policies 107
Chapter 4 Configuring and Tuning Your SQL Servers 111
Accessing SQL Server Configuration Data . . . .112
Techniques for Managing SQL Server Configuration
Options . . . .114
Setting Configuration Options 114
Working with SET Options 115
Working with Server Options 118
Working with Database Options 120
Managing Database Compatibility 122
Configuring SQL Server with Stored Procedures . . . .123
Executing Queries and Changing Settings 124
Checking and Setting Configuration Parameters 126
Changing Settings with ALTER DATABASE 131
Chapter 5 Tuning and Linking Your SQL Servers 137
SQL Server Management Studio Essentials . . . .138
Managing the Configuration with SQL Server
Management Studio 138
Determining System and Server Information 140
Configuring Utility Control Points 141
Working with Linked Servers and Distributed Data . . . .146
Using Distributed Queries 147
Using Distributed Transactions 150
Running the Distributed Transaction
Coordinator Service 152
Configuring Authentication and Auditing . . . .152
Setting the Authentication Mode 152
Setting the Auditing Level 153
Enabling or Disabling C2 Audit Logging 154
Enabling or Disabling Common Criteria Compliance 155
Tuning Memory Usage . . . .155
Working with Dynamically Configured Memory 157
Using Fixed Memory 158
Enabling AWE Memory Support 159
Optimizing Memory for Indexing 160
Allocating Memory for Queries 161
Configuring Processors and Parallel Processing . . . .162
Optimizing CPU Usage 162
Setting Parallel Processing 165
Configuring Threading, Priority, and Fibers . . . .166
Configuring User and Remote Connections . . . .168
Setting Maximum User Connections 168
Setting Default Connection Options 169
Configuring Remote Server Connections 171
Managing Server Settings . . . .172
Setting the Default Language for SQL Server 174
Allowing and Disallowing Nested Triggers 175
Controlling Query Execution 175
Configuring Year 2000 Support 176
Managing Database Settings . . . .177
Setting the Index Fill 177
Configuring Backup and Restore Time-Out Options 178
Configuring Backup and Restore Retention Options 179
Flushing the Cache with Checkpoints 179
Compressing the Backup Media 180
Managing Linked Servers . . . .180
Adding Linked Servers 180
Configuring Security for Linked Servers 185
Setting Server Options for Remote
and Linked Servers 187
Deleting Linked Servers 188
Troubleshooting Configuration Problems . . . .189
Recovering from a Bad Configuration 189
Changing Collation and Rebuilding the master
Database 190
Chapter 6 Database Administration Essentials 193
Database Files and Logs . . . .193
Database Administration Basics . . . .198
Viewing Database Information in SQL Server
Management Studio 199
Viewing Database Information Using T-SQL 201
Checking System and Sample Databases 202
Examining Database Objects 203
Creating Databases . . . .206
Creating Databases in SQL Server Management
Studio 206
Creating Databases Using T-SQL 210
Altering Databases and Their Options . . . .212
Setting Database Options in SQL Server
Management Studio 212
Configuring Automatic Options 218
Controlling ANSI Compliance at the Database Level 220
Configuring Parameterization 221
Configuring Cursor Options 224
Controlling User Access and Database State 225
Setting Online, Offline, or Emergency Mode 226
Managing Cross-Database Chaining and External
Access Options 227
Configuring Recovery, Logging, and Disk I/O Error
Checking Options 228
Viewing, Changing, and Overriding
Database Options 230
Managing Database and Log Size . . . .230
Configuring SQL Server to Manage File Size
Automatically 231
Expanding Databases and Logs Manually 231
Compressing and Shrinking a Database
Manually 232
Manipulating Databases . . . .236
Renaming a Database 236
Dropping and Deleting a Database 237
Attaching and Detaching Databases 238
Tips and Techniques . . . .242
Copying and Moving Databases 242
Moving Databases 246
Moving and Resizing tempdb 247
Creating Secondary Data and Log Files 248
Preventing Transaction Log Errors 249
Preventing a Filegroup Is Full Error 250
Creating a New Database Template 250
Configuring Database Encryption 250
Chapter 7 Implementing SQL Server 2012 Security 253
Overview of SQL Server 2012 Security . . . .254
Working with Security Principals and Securables 254
Understanding Permissions of Securables 257
SQL Server 2012 Authentication Modes . . . .263
Windows Authentication 263
Mixed Security and SQL Server Logins 264
Authentication at the Database Level 264
Special-Purpose Logins and Users . . . .265
Working with the Administrators Group 265
Working with the Administrator User Account 265
Working with the sa Login 266
Working with the NT SERVICE and SYSTEM Logins 266
Working with the Guest User 266
Working with the dbo User 267
Working with the sys and INFORMATION_SCHEMA
Users 267
Permissions . . . .268
Object Permissions 268
Statement Permissions 274
Implicit Permissions 275
Roles . . . . . . .275
Server Roles 275
Database Roles 277
Managing Server Logins . . . .279
Viewing and Editing Existing Logins 279
Creating Logins 281
Editing Logins with T-SQL 283
Granting or Denying Server Access 284
Enabling, Disabling, and Unlocking Logins 286
Removing Logins 287
Changing Passwords 287
Configuring Server Roles. . . .288
Assigning Roles by Login 288
Assigning Roles to Multiple Logins 289
Revoking Access Rights and Roles by Server Login 290
Controlling Database Access and Administration . . . .291
Viewing and Editing Existing Database Users 291
Creating Database Users 292
Removing Users 295
Assigning Access and Roles by Login 295
Assigning Roles for Multiple Logins 296
Creating Standard Database Roles 297
Creating Application Database Roles 299
Removing Role Memberships for Database Users 300
Deleting User-Defined Roles 300
T-SQL Commands for Managing Access and Roles 301
Managing Database Permissions . . . .302
Assigning Database Permissions for Statements 302
Object Permissions by Login 306
Object Permissions for Multiple Logins 308
PART III
MICROSOFT SQL SERVER 2012
DATA MANAGEMENT
Chapter 8 Manipulating Schemas, Tables, and Views 313
Working with Schemas . . . .314
Creating Schemas 315
Modifying Schemas 317
Moving Objects to a New Schema 318
Dropping Schemas 319
Getting Started with Tables . . . .320
Table Essentials . . . .321
Understanding Data Pages 321
Understanding Extents 323
Understanding Table Partitions 324
Working with Tables . . . .324
Creating Tables 325
Modifying Existing Tables 331
Viewing Table Row and Size Information 334
Displaying Table Properties and Permissions 334
Displaying Current Values in Tables 334
Copying Tables 335
Renaming and Deleting Tables 335
Managing Table Values . . . .338
Using Native Data Types 338
Using Fixed-Length, Variable-Length,
and Max-Length Fields 343
Using User-Defined Data Types 344
Allowing and Disallowing Nulls 347
Using Default Values 347
Using Sparse Columns 347
Using Identities and GUIDs 348
Using User-Defined Table Types 350
Using Views . . . .353
Working with Views 354
Creating Views 355
Modifying Views 359
Using Updatable Views 359
Managing Views 360
Chapter 9 Using Indexes, Constraints, and Partitions 361
Creating and Managing Indexes . . . .362
Understanding Traditional Indexes 362
Using Clustered Indexes 364
Using Nonclustered Indexes 365
Using XML Indexes 365
Using Filtered Indexes 365
Determining Which Columns Should Be Indexed 366
Indexing Computed Columns and Views 368
Viewing Index Properties 368
Creating Indexes 370
Managing Indexes 374
Using the Database Engine Tuning Advisor 377
Working with Columnstore Indexes . . . .382
Using Columnstore Indexes 382
Viewing Columnstore Index Properties 384
Creating and Managing Columnstore Indexes 385
Column Constraints and Rules . . . .386
Using Constraints 386
Creating Partitioned Tables and Indexes . . . .391
Creating Partition Functions 392
Creating Partition Schemes 393
Creating Partitions 394
Viewing and Managing Partitions 395
Compressing Tables, Indexes, and Partitions . . . .396
Using Row and Page Compression 397
Setting or Changing Compression Settings 398
PART IV
MICROSOFT SQL SERVER 2012 OPTIMIZATION,
MAINTENANCE, AND RECOVERY
Chapter 10 Automating and Maintaining SQL Server 2012 403
Database Automation and Maintenance . . . .404
Using Database Mail . . . .406
Performing the Initial Database Mail Configuration 406
Managing Database Mail Profiles and Accounts 411
Viewing or Changing Database Mail
System Parameters 412
Using SQL Server Agent . . . .413
Accessing Alerts, Operators, and Jobs 413
Configuring the SQL Server Agent Service 413
Setting the SQL Server Agent Mail Profile 414
Using SQL Server Agent to Restart Services
Automatically 415
Managing Alerts . . . .415
Using Default Alerts 415
Creating Error Message Alerts 416
Handling Alert Responses 417
Deleting, Enabling, and Disabling Alerts 419
Managing Operators . . . .419
Registering Operators 419
Deleting and Disabling Notification
for Operators 420
Configuring a Fail-Safe Operator 421
Assigning or Changing Job Definitions 422
Setting Steps to Execute 424
Configuring Job Schedules 428
Handling Job Alerts 430
Handling Notification Messages 431
Managing Existing Jobs 432
Managing Job Categories 432
Automating Routine Server-to-Server
Administration Tasks . . . .433
Copying User Accounts, Tables, Views, and Other Objects from One Database to Another 434 Copying Alerts, Operators, and Scheduled Jobs from One Server to Another 437 Multiserver Administration . . . .438
Event Forwarding 438 Multiserver Job Scheduling 439 Database Maintenance . . . .442
Database Maintenance Checklists 442 Using Maintenance Plans 443 Checking and Maintaining Database Integrity 448 Chapter 11 SQL Server 2012 Backup and Recovery 453 Creating a Backup and Recovery Plan . . . .453
Initial Backup and Recovery Planning 454 Planning for Mirroring and Mirrored Database Backups 459 Planning for Backups of Replicated Databases 460 Planning for Backups of Very Large Databases 461 Planning for Backup Compression 462 Selecting Backup Devices and Media . . . .463
Using Backup Strategies . . . .465
Creating a Backup Device . . . .468
Performing Backups . . . .470
Creating Backups in SQL Server Management
Studio 470
Using T-SQL Backup 476
Performing Transaction Log Backups 479
Restoring a Database . . . .481
Database Corruption and Problem Resolution 481
Restoring a Database from a Normal Backup 484
Restoring Files and Filegroups 489
Restoring a Database to a Different Location 490
Recovering Missing Data 491
Creating Standby Servers 491
Using T-SQL Restore Commands 493
Restoring the master Database . . . .498
Chapter 12 SQL Server 2012 Profiling and Monitoring 501
Monitoring Server Performance and Activity . . . .501
Reasons to Monitor SQL Server 501
Getting Ready to Monitor 502
Monitoring Tools and Resources 503
Working with Replication Monitor . . . .506
Starting and Using Replication Monitor 506
Adding Publishers and Publisher Groups 507
Working with the Event Logs . . . .508
Examining the Application Log 509
Examining the SQL Server Event Logs 512
Examining the SQL Server Agent Event Logs 513
Monitoring SQL Server Performance . . . .514
Choosing Counters to Monitor 515
Performance Logging 517
Viewing Data Collector Reports 521
Configuring Performance Counter Alerts 522
Configuring a Management Data Warehouse . . . .523
Understanding Management Data Warehouses 523
Creating the Management Data Warehouse 524
Setting Up Data Collection 524
Solving Performance Problems with Profiler . . . .525
Using Profiler 525
Creating New Traces 526
Working with Traces 529
Saving a Trace 530
Replaying a Trace 530
What do you think of this book? We want to hear from you!
Introduction
M
icrosoft SQL Server 2012 Pocket Consultant is designed to be a concise and compulsively usable resource for Microsoft SQL Server 2012 administrators. It covers everything you need to know to perform the core administrative tasks for SQL Server and is the readable resource guide that you’ll want on your desk at all times. Because the focus is on giving you maximum value in a pocket-sized guide, you don’t have to wade through hundreds of pages of extraneous information to find what you’re looking for. Instead, you’ll find exactly what you need to get the job done.This book is designed to be the one resource you turn to whenever you have questions about SQL Server administration. To this end, the book zeroes in on daily administration procedures, frequently used tasks, documented examples, and options that are representative while not necessarily inclusive. One of the key goals is to keep content concise enough that the book is compact and easy to navigate, while also ensuring that the book contains as much information as possible. Instead of a 1,000-page tome or a 100-page quick reference, you get a valuable resource guide that can help you quickly and easily perform common tasks, solve problems, and implement advanced SQL Server technologies such as replication, distributed queries, and multiserver administration.
Who Is This Book For?
Microsoft SQL Server 2012 Pocket Consultant covers the Standard, Business
Intelligence, Enterprise, and Developer editions of SQL Server. The book is designed to be used in the daily administration of SQL Server and is written for:
n Current SQL Server database administrators
n Accomplished users who have some administrator responsibilities n Administrators migrating to SQL Server 2012 from previous versions n Administrators transitioning from other database architectures
To include as much information as possible, I had to assume that you have basic networking skills and a basic understanding of SQL Server. With this in mind, I don’t devote entire chapters to understanding SQL Server architecture or running simple SQL queries. But I do cover SQL Server installation, configuration, enterprise-wide server management, performance tuning, optimization, maintenance, and much more.
How Is This Book Organized?
Speed and ease of reference are essential parts of this hands-on guide. The book has an expanded table of contents and an extensive index for finding answers to problems quickly. Many other quick reference features have been added to the book as well. These features include quick step-by-step procedures, lists, tables with fast facts, and cross-references.
The content is presented in four parts:
n Part I, “Microsoft SQL Server 2012 Essentials,” discusses how to manage your SQL Server and SQL Server Services and clients.
n Part II, “Microsoft SQL Server 2012 Management and Security,” dives into the
details of implementing and configuring your SQL Server environment.
n Part III, “Microsoft SQL Server 2012 Data Management,” focuses on data and the everyday tasks and best practices for managing your data.
n Part IV, “Microsoft SQL Server 2012 Optimization, Maintenance, and Recovery,” addresses some of the more advanced topics that all administrators need to know.
What Is SQL Server 2012?
By functioning as a mission-critical data platform, allowing dynamic development, providing extensive business intelligence, and going beyond relational data, SQL Server 2012 provides the bedrock foundation on which small, medium, and large organizations can build their IT infrastructure. At the core of SQL Server 2012, you’ll find the following:
n Database Engine Services Includes the core database, notification, and replication components. The core database—also known as the Database Engine—is the heart of SQL Server. Replication increases data availability by distributing data across multiple databases, allowing you to scale out the read workload across designated database servers.
n Analysis Services Delivers online analytical processing (OLAP) and data-mining functionality for business intelligence applications. Analysis Services enables your organization to aggregate data from multiple data sources, such as relational databases, and work with this data in a wide variety of ways.
n Integration Services Provides an enterprise data transformation and integration solution for extracting and transforming data from multiple data sources and moving it to one or more destination data sources. This functionality allows you to merge data from heterogeneous data sources, load data into data warehouses and data marts, and more.
n Service Broker Provides reliable queuing and messaging as a central part of the database. Queues can be used to stack work such as queries and other requests and perform the work as resources allow. Messaging allows database applications to communicate with each other. The Database Engine uses Service Broker to deliver notification messages.
n Master Data Services Provides a framework for creating business rules that ensure the quality and accuracy of your master data. Business rules can be used to start business processes that correct validation issues and handle workflows.
n Data Quality Services Provides a framework for creating a knowledge base repository of metadata that helps to improve the quality of your organization’s data. Data cleansing processes can modify or remove data that is incomplete or incorrect. Data matching processes can identify and merge duplicates as appropriate.
System Requirements
Successful database server administration depends on three things: knowledgeable database administrators, strong database architecture, and appropriate hardware. The first two ingredients are covered: you’re the administrator, you’re smart enough to buy this book to help you through the rough spots, and you’ve implemented SQL Server 2012 to provide your high-performance database needs. This brings us to the issue of hardware. You should run SQL Server 2012 on a system with adequate memory, processing speed, and disk space. You also need an appropriate data and system protection plan at the hardware level.
Key guidelines for choosing hardware for SQL Server are as follows: n Memory All editions of SQL Server 2012 except for Express require
a minimum of 1 gigabyte (GB) of RAM. In most cases, you want to have at least 4 GB of RAM as a minimum starting point, even for development. The primary reason for having extra memory is performance. Additional database features—such as Analysis Services, Reporting Services, and Integration Services—increase the memory requirements. Also consider the number of user connections. Each user connection consumes about 24 KB. Data requests and other SQL Server processes use memory as well, and this memory usage is in addition to all other processes and applications running on the server.
always test with a representative workload). If the server supports more than 100 users or doesn’t run on a dedicated system, you might consider adding processors (or using a system that can support additional processors as your needs grow). Keep in mind that the size of the queries and data sets being processed affects how well SQL Server scales. As the size of jobs being processed increases, you have increased memory and processor needs. n Disk drives The amount of data storage capacity you need depends
entirely on the number and size of the databases that the server supports. You need enough disk space to store all your data plus work space, indices, system files, virtual memory, and transaction logs. For log shipping and mirroring, you need space for the backup share and, in the case of a cluster, the quorum disk. I/O throughput is just as important as drive capacity. For the best I/O performance, Fibre Channel (FC) or Fibre Channel over Ethernet (FCoE) is the recommended choice for high-end storage solutions. Strongly consider solid state drives (SSDs) over spinning disks. Instead of using a single large drive, you should use several smaller drives, which allows you to configure fault tolerance with RAID. I recommend separating data and logs and placing them on separate spindles. This includes the backup share for log shipping and the quorum disk for clustering.
n Data protection You should add protection against unexpected drive failure by using RAID. For data, consider RAID 0 + 1 or RAID 5 as a starting point. For logs, consider RAID 1 as a starting point. RAID 0 (disk striping without parity) offers good read/write performance, but the effect of any failed drive is that SQL Server can’t continue operation on an affected database until the drive is replaced and data is restored from backup. RAID 1 (disk mirroring) creates duplicate copies of data on separate drives, and you can rebuild the RAID unit to restore full operations. RAID 5 (disk striping with parity) offers good protection against single drive failure but has poor write performance. For best performance and fault tolerance, RAID 0 + 1 is recommended. This configuration consists of disk mirroring and disk striping without parity.
n Uninterruptible power supply (UPS) SQL Server is designed to maintain database integrity at all times and can recover information by using transaction logs. However, this does not protect the server hardware from sudden power loss or power spikes. Both of these events can seriously damage hardware. To prevent this, get a UPS that conditions the power. A UPS system gives you time to shut down the system properly in the event of a power outage, and it is also important in maintaining database integrity when the server uses write-back caching controllers.
Conventions Used in This Book
I’ve used a variety of elements to help keep the text clear and easy to follow. You’ll find code terms and listings in monospace type, except when I tell you to actually type a command. In that case, the command appears in bold type. When I introduce and define a new term, I put it in italics.
Other conventions include the following:
n Best Practices To examine the best technique to use when working with
advanced configuration and administration concepts
n Caution To warn you about potential problems you should look out for n More Info To provide more information on a subject
n Note To provide additional details on a particular point that needs emphasis
n Real World To provide real-world advice when discussing advanced topics n Security Alert To point out important security issues
n Tip To offer helpful hints or additional information
I truly hope you find that Microsoft SQL Server 2012 Pocket Consultant provides everything you need to perform the essential administrative tasks for SQL Server as quickly and efficiently as possible. You are welcome to send your thoughts to me at [email protected] or follow me at www.twitter.com/WilliamStanek. Thank you.
Other Resources
No single magic bullet for learning everything you’ll ever need to know about SQL Server 2012 exists. While some books are offered as all-in-one guides, there’s simply no way one book can do it all. With this in mind, I hope you use this book as it is intended to be used—as a concise and easy-to-use resource. It covers everything you need to perform core administration tasks for SQL Server, but it is by no means exhaustive.
Your current knowledge will largely determine your success with this or any other SQL Server resource or book. As you encounter new topics, take the time to practice what you’ve learned and read about. Seek out further information as necessary to get the practical hands-on know-how and knowledge you need.
I recommend that you regularly visit the SQL Server site (www.microsoft.com/ sqlserver/) and Microsoft’s support site (www.support.microsoft.com) to stay current with the latest changes. To help you get the most out of this book, you can visit my corresponding website at www.williamstanek.com/sqlserver. This site contains information about SQL Server 2012 and updates to the book.
Support and Feedback
Errata
We’ve made every effort to ensure the accuracy of this book and its companion content. Any errors that have been reported since this book was published are listed on our Microsoft Press site at oreilly.com:
http://go.microsoft.com/fwlink/?LinkId=235906
If you find an error that is not already listed, you can report it to us through the same page.
If you need additional support, email Microsoft Press Book Support at [email protected].
Please note that product support for Microsoft software is not offered through the addresses above.
We Want to Hear from You
At Microsoft Press, your satisfaction is our top priority, and your feedback our most valuable asset. Please tell us what you think of this book at:
http://www.microsoft.com/learning/booksurvey
The survey is short, and we read every one of your comments and ideas. Thanks in advance for your input!
Stay in Touch
PAR T I
Microsoft SQL Server
2012 Essentials
CHAPTER 1 Managing Your SQL Servers 3
CHAPTER 2 Managing SQL Server Services and Clients 43
Connecting to a Specific Server Instance Connecting to a Specific Database
C H A P T E R 1
Managing Your SQL Servers
n Using SQL Server Management Studio 4
n Managing SQL Server Groups 9
n Managing Servers 12
n Using Windows PowerShell for SQL Server Management 19
n Starting, Stopping, and Configuring SQL Server Agent 25
n Starting, Stopping, and Configuring MSDTC 25
n Managing SQL Server Startup 26
n Managing Server Activity 33
M
icrosoft SQL Server Management Studio is the primary tool you use to manage databases and servers. Other tools available to manage local and remote servers include SQL Server PowerShell, SQL Server Configuration Manager, Database Engine Tuning Advisor, and SQL Server Profiler. You use SQL Server Configuration Manager to manage SQL Server services, networking, and client configurations. Database Engine Tuning Advisor is available to help optimize indexes, indexed views, and partitions, and SQL Server Profiler lets you examine events generated by SQL Server, which can provide helpful details for troubleshooting. In this chapter, you will learn how to use SQL Server Management Studio. SQL Server Configuration Manager is discussed in Chapter 2, “Managing SQL Server Services and Clients.” For details on tuning and tracing, see Chapter 12, “SQL Server 2012 Profiling and Monitoring.”Whenever you’re working with databases and servers, keep in mind these concepts to help ensure your success:
n Contained databases These databases are fully or partially isolated
boundary between the application model and the Database Engine instance. Contained database users with passwords are authenticated by the database. Authorized Microsoft Windows users and group members can connect directly to the database and do not need logins in the master database. n FileTable Table structures act as virtual shares by storing FILESTREAM data
and directory data as rows within tables. Even though the Database Engine manages the data at all times, a FileTable appears as a Windows share for non-transactional file access, allowing you to use MOVE, XCOPY, and other standard commands to load files when you are working with the command line or a batch script. The root of the hierarchy is established when you create the FileTable. A FileTable cannot be replicated or selected into like other tables.
n Indirect checkpoints Checkpoints are triggered based on the targeted recovery time you specify for a database, as opposed to automatic
checkpoints, which are based on the maximum number of log records that can be processed in a particular recovery interval. A database that has a targeted recovery time does not use automatic checkpoints. Although indirect check-points can reduce read/write spikes by continually writing in the background, this continuous writing increases the total write load for the server instance, which may degrade performance for online transactional workloads. You also should be aware of changes to the way the Database Engine works. While there are many discontinued and deprecated features, remember these important changes:
n Databases must be set to at least compatibility level 90. Level 90 is for Microsoft SQL Server 2005. Any earlier database is updated automatically when you install Microsoft SQL Server 2012.
n Indexes containing varchar(max), nvarchar(max), and varbinary(max) columns can now be rebuilt as an online operation.
n Re-create triggers that have WITH APPEND clauses, as these are no longer supported. Do the same for COMPUTE and COMPUTE BY, which must be rewritten by using the ROLLUP clause.
n Replace remote servers by using linked servers, and replace aliases with user accounts and database roles as appropriate.
n Replace the usage of SQL Mail with Database Mail and use ALTER DATABASE instead of sp_dboption.
n Use two-part table names following the syntax schema.object with ALTER TABLE, rather than four-part names, such as server.database.schema.table.
Using SQL Server Management Studio
establishing a connection to a SQL Server instance and then administering its resources. If you have disabled remote server connections to a particular server, you can work only with the server locally (by logging in to the system at the keyboard or by establishing a remote Terminal Server session in Windows and then running the local management tools).
Getting Started with SQL Server Management Studio
When you start working with SQL Server Management Studio, you see the Object Explorer view, shown in Figure 1-1. If this view is not displayed, you can access it (and other views) from the View menu. The following descriptions explain how to use each view:
n Object Explorer Allows you to view and connect to instances of SQL Server, Analysis Services, Integration Services, and Reporting Services. Once you have connected to a particular server, you can view its components as an object tree and expand nodes to work your way to lower levels of the tree.
n Registered Servers Shows the currently registered servers. Use Registered Servers to preserve login information for servers that you access frequently. The top bar of the view allows you to switch quickly between servers of a particular type (SQL Server, Analysis Server, Integration Server, or Report Server).
n Template Explorer Provides quick access to the default Query Edi-tor templates, organized by action, and any custom templates you create. You can create templates in any script language supported by SQL Server Management Studio, SQL Server, and Analysis Server.
n Solution Explorer Provides quick access to existing SQL Server and Analysis Server projects. A project details the connections, queries, and other functions that are performed when the project is executed.
To run SQL Server Management Studio, click Start, type ssms.exe in the Search box, and then press Enter. Alternatively, select the related option on the Microsoft SQL Server 2012 menu. Next, you must connect to the server you want to work with. There are several ways to do this:
n Connect using a standard login to a server instance. n Connect using a login to a specific database.
n Connect using server groups and registered servers.
Connecting to a server instance allows you to work with that particular server and its related components. (See Figure 1-2.) Typically, you want to connect to a server’s Database Engine. The Database Engine gives you access to the following components and features:
n Databases Manage system databases, including the master and model databases, as well as user databases and database snapshots. If you’ve installed Reporting Services, you also can access the ReportServer and Report ServerTempDB databases under this node.
n Security Manage SQL Server logins, server roles, stored credentials, cryptographic providers, and auditing.
n Server objects Configure backup devices, HTTP endpoints, linked servers, and server triggers.
n Replication Configure distribution databases, update replication passwords, and launch Replication Monitor.
n Management View SQL Server logs, create, view, and manage
maintenance plans, Microsoft Distributed Transaction Coordinator (MSDTC), and Database Mail. Configure data collection, Resource Governor, and Policy-Based Management policies.
n SQL Server Agent Configure SQL Server Agent jobs, alerts, operators, proxies, and error logs.
Connecting to a Specific Server Instance
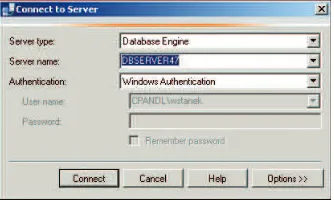
To connect to a specific server instance by using a standard login, follow these steps: 1. Start SQL Server Management Studio. In the Connect To Server dialog box,
use the Server Type list to select the database component you want to connect to, such as Database Engine. (If you exited the Connect To Server dialog box, you can display the Connect To Server dialog box by clicking File, Connect Object Explorer in SQL Server Management Studio.)
2. In the Server Name box, type the fully qualified domain name (FQDN) or host name of the server on which SQL Server is running, such as
EngDBSrv12.cpandl.com or EngDBSrv12, or select Browse For More in the related drop-down list. In the Browse For Servers dialog box, select the Local Servers or Network Servers tab as appropriate. After the instance data has been retrieved, expand the nodes provided, select the server instance, and then click OK.
TIP The list in the Browse For Servers dialog box is populated by the SQL Server Browser service running on the database servers. There are several reasons that a SQL Server instance you want to work with might not be listed. The SQL Server Browser service might not be running on the computer running SQL Server. A firewall might be blocking User Datagram Protocol (UDP) port 1434, which is required for browsing. Or the HideInstance flag might be set on the SQL Server instance.
3. Use the Authentication list to choose the option for authentication type, which is either Windows Authentication or SQL Server Authentication (based on the authentication types selected when you installed the server). Provide a SQL Server login ID and password as necessary.
n Windows Authentication Uses your current domain account and password to establish the database connection. This authentication type works only if Windows authentication is enabled and you have appropriate privileges.
n SQL Server Authentication Allows you to specify a SQL Server login ID and password. To save the password so that you do not have to reen-ter it each time you connect, select Remember Password.
4. Click Connect. Now you can use the Object Explorer view to work with this server.
Connecting to a Specific Database
To connect to a specific database by using a standard login, follow these steps: 1. Start SQL Server Management Studio. In the Connect To Server dialog
such as EngDBSrv12.cpandl.com or EngDBSrv12. (If you exited the Connect To Server dialog box, you can display the Connect To Server dialog box by clicking File, Connect Object Explorer in SQL Server Management Studio.) 2. Use the Authentication list to choose the option for authentication type,
which is either Windows Authentication or SQL Server Authentication (based on the authentication types selected when you installed the server). Provide a SQL Server login ID and password as necessary.
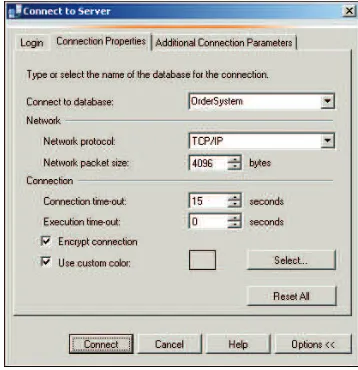
3. Click Options to display the advanced view of the Connect To Server dialog box. Select the Connection Properties tab, shown in Figure 1-3.
FIGURE 1-3 Connect to a specific database.
4. In the Connect To Database box, type the name of the database you want to connect to, such as Personnel, or select Browse Server in the related drop-down list. When prompted, click Yes to establish a connection to the previously designated server. In the Browse Server For Database dialog box, select the database you want to use, and then click OK.
5. Using the Network Protocol list, select the network protocol and any other connection properties if you are prompted to do so. Shared Memory is the default network protocol for local connections. TCP/IP is the default for remote connections. If you want, establish a secure connection by selecting the Encrypt Connection check box.
Managing SQL Server Groups
You use SQL Server groups to organize sets of computers running SQL Server. You define these server groups, and you can organize them by function, department, or any other criteria. Creating a server group is easy. You can even create subgroups within a group, and if you make a mistake, you can delete a group as well.
MORE INFO Centrally managed servers also can be organized into server groups. For more information, see the “Configuring Central Management Servers” section in Chapter 3, “Implementing Policy-Based Management.”
Introducing SQL Server Groups and the Registered Servers
View
In SQL Server Management Studio, you use the Registered Servers view to work with server groups. To use this view, or to display it if it is hidden, press Ctrl+Alt+G.
The top-level groups are already created for you, based on the SQL Server instances. Use the Registered Servers toolbar to switch between the various top-level groups. These groups are organized by SQL Server instance as follows:
n Database Engine n Analysis Services n Reporting Services
n SQL Server Compact Edition n Integration Services
Although you can add registered servers directly to the top-level groups (as explained in the “Managing Servers” section later in this chapter), in a large enterprise with many SQL Server instances, you probably want to create additional levels in the server group hierarchy. These additional levels make it easier to access and work with your servers. You can use the following types of organizational models:
n Division or business unit model In this model, group names reflect the divisions or business units to which the computers running SQL Server belong or in which they are located. For example, you could have server groups such as Engineering, IS, Operations, and Support.
Figure 1-4 shows an example of using server groups. As the figure shows, subgroups are organized under their primary group. Under Database Engine, you might have Corporate Customers, Engineering, and Enterprise Data groups. Within Engineering, you might have Dev, Test, and Core subgroups.
FIGURE 1-4 Use server groups to organize SQL Server deployments.
Creating a Server Group
You can create a server group or a subgroup by completing the following steps: 1. In SQL Server Management Studio, display the Registered Servers view by
pressing Ctrl+Alt+G. If the view was previously hidden, this step also displays the view.
2. Use the Registered Servers toolbar to select the top-level group. For example, if you want to create a second-level or third-level group for Database Engine instances, select Database Engine.
3. As necessary, expand the top-level group node and the Local Server Groups nodes by double-clicking each in turn. You will see the names of the top-level server group and any second-level server groups that you created. You can now do the following:
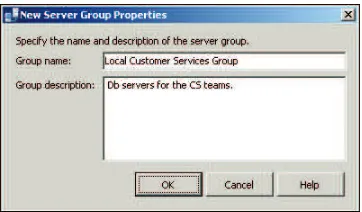
n Add a server group to one of the top-level or second-level groups by right-clicking the group name and choosing New Server Group.
n Add a server group to a lower-level group by expanding the server group entries until the group you want to use is displayed. Right-click the group name, and then choose New Server Group.
FIGURE 1-5 Enter a name and description in the New Server Group Properties dialog box.
Deleting a Server Group
You can delete a group or subgroup by completing the following steps:
1. In SQL Server Management Studio, display the Registered Servers view by pressing Ctrl+Alt+G. If the view was previously hidden, this step also displays the view.
2. Use the Registered Servers toolbar to select the top-level group in which the group you want to delete is located. For example, if you want to delete a second- or third-level group for Database Engine instances, select Database Engine.
3. Click the plus sign (+) next to the group or subgroup you want to delete. If the group has servers registered in it, move them to a different group. (The steps involved in moving servers to a new group are explained in the “Moving a Server to a New Group” section later in this chapter.)
4. Select the group or subgroup entry.
5. Press Delete. When prompted to confirm the action, click Yes.
Editing and Moving Server Groups
Server groups have several key properties that you can edit: the name, the description, and the location in the Registered Server hierarchy. To edit a group’s name or description, follow these steps:
1. Right-click the group in the Registered Servers view, and then select Properties.
2. In the Edit Server Group Properties dialog box, enter the new group name and description. Click OK.
To move a group (and all its associated subgroups and servers) to a new level in the server group hierarchy, follow these steps:
2. In the Move Server Registration dialog box, you can now do the following: n Move the group to the top-level group by selecting the top-level group.
This makes the group a second-level group.
n Move the group to a different level by selecting a subgroup into which you want to place the group.
3. Click OK.
Adding SQL Servers to a Group
When you register a computer running SQL Server for use with SQL Server Management Studio, you can choose the group in which you want to place the server. You can even create a new group specifically for the server. The next section covers the topic of server registration.
Managing Servers
Servers and databases are the primary resources you manage in SQL Server Management Studio. When you select a top-level group in the Registered Servers view, you can see the available server groups. If you expand the view of these groups by double-clicking the group name, you can see the subgroups or servers assigned to a particular group. Local servers are registered automatically (in most cases). If a local server is not shown, you need to update the local registration information. If the remote server you want to manage is not shown, you need to register it.
Registration saves the current connection information and assigns the server to a group for easy future access using the Registered Servers view. After you register a server, you can connect to the server to work with it and then disconnect when you have finished simply by double-clicking the server entry in the Registered Servers view. If you are not automatically connected, you can force a connection by right-clicking the server entry and then selecting New Query (if you want to create an SQL query) or Object Explorer (if you want to view and manage the server).
You can start the registration process by using either of the following techniques: n Register a server to which you are connected in Object Explorer.
n Register a new server in the Registered Servers view. You can manage previous registrations in a variety of ways:
n Import registration information on previously registered SQL Server 2000 servers.
n Update registration information for local servers.
Registering a Connected Server
Any server to which you have connected in Object Explorer can be registered easily. Registration saves the current connection information and assigns the server to a group for easy future access using the Registered Servers view. To register a connected server, follow these steps:
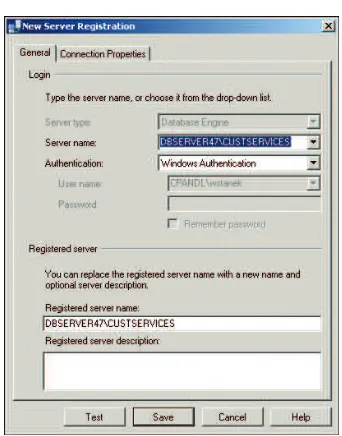
1. In Object Explorer view, right-click any server to which you are currently connected, and then choose Register to display the New Server Registration dialog box, shown in Figure 1-6.
2. On the General tab, the current values for the server name and
authentication type are filled in for you. Although the Registered Server Name option is set to the same value as the server name, you can modify this name and add a description.
3. On the Connection Properties tab, you can specify the database to which you want to connect and set options for networking and connections. If you want to encrypt the connection, select the Encrypt Connection check box.
4. To test your settings before you save the registration settings, click Test. If the test is unsuccessful, verify the settings and then make changes as necessary. As discussed in Chapter 2, SQL Server doesn’t allow remote connections by default, so you must change the configuration settings to allow remote connections. 5. Click Save to save the server registration.
By default, the server is added to the top-level group. To move the server to a new level in the server group hierarchy, follow these steps:
1. Right-click the server in the Registered Servers view, point to Tasks, and then select Move To.
2. In the Move Server Registration dialog box, you can move the server to a different level by selecting the subgroup into which you want to place the server.
3. Click OK.
Registering a New Server in the Registered Servers View
You do not have to connect to a server in Object Explorer to register the server. You can register new servers directly in the Registered Servers view by following these steps:
1. In the Registered Servers view, use the toolbar to select the type of server you want to connect to, such as Database Engine.
2. Expand the available groups as necessary. In the Registered Servers view, right-click the group into which you want to register the server, and then select New Server Registration to display the New Server Registration dialog box, shown previously in Figure 1-6.
3. In the Server Name box, type the FQDN or host name of the server on which SQL Server is running, such as EngDBSrv12.cpandl.com or EngDBSrv12. 4. Use the Authentication list to choose the option for authentication type,
which is either Windows Authentication or SQL Server Authentication (based on the authentication types selected when you installed the server). Provide a SQL Server login ID and password as necessary.
n Windows Authentication Uses your current domain account and password to establish the database connection. This authentication type works only if Windows authentication is enabled and you have appropriate privileges. n SQL Server Authentication Allows you to specify a SQL Server login ID
and password. To save the password so that you do not have to reenter it each time you connect, select Remember Password.
5. You also can specify connection settings by using the options on the Connection Properties tab. These options allow you to connect to a specific database instance and to set the network configuration. If you want to encrypt the connection, select the Encrypt Connection check box. 6. The registered server name is filled in for you based on the previously
entered server name. Change the default name only if you want SQL Server Management Studio to use an alternate display name for the server. 7. To test the settings, click Test. If you successfully connect to the server, you
Registering Previously Registered SQL Server 2000 Servers
Registration details for servers registered by SQL Server 2000 can be imported into SQL Server Management Studio. This makes it easier to work with existing SQL Server 2000 installations. If the SQL Server 2000 installations were previously registered on the computer, you can import the registration details into a specific server group by completing the following steps:
1. In the Registered Servers view, use the toolbar to select the type of server you are registering, such as Database Engine.
2. Right-click the Local Server Groups entry, point to Tasks, and then select Previously Registered Servers.
3. Available registration information for SQL Server 2000 servers will be imported. If an error prompt is displayed, you might not be logged in locally to the computer on which the servers were registered previously.
Updating Registration for Local Servers
Local servers are registered automatically (in most cases). If you have added or removed SQL Server instances on the local computer and those instances are not displayed, you need to update the local server registration. Updating the registration information ensures that all currently configured local server instances are shown in SQL Server Management Studio.
To update registration details for local servers, follow these steps:
1. In the Registered Servers view, use the toolbar to select the type of servers you are registering, such as Database Engine.
2. Right-click the Local Server Groups entry, point to Tasks, and then select Register Local Servers.
Copying Server Groups and Registration Details from One
Computer to Another
After you register servers in SQL Server Management Studio and place the servers into a specific group hierarchy, you might find that you want to use the same registration information and server group structure on another computer. SQL Server Management Studio allows you to copy registration information from one computer to another by using an import/export process. You can copy the registration details with or without the user names and passwords.
To export the registration and group information to a file on one computer and then import it onto another computer, complete the following steps:
1. Start SQL Server Management Studio on the computer with the registration and group structure details that you want to copy.
3. In the Registered Servers view, use the toolbar to select the type of servers you want to work with, such as Database Engine.
4. Right-click the Local Server Groups entry, point to Tasks, and then select Export to display the Export Registered Servers dialog box, shown in Figure 1-7. 5. Under Server Group, select the point from which the export process will
begin. You can start copying registration information at any level in the group structure:
n To copy the structure for a top-level group, all its subgroups, and all registration details for all related servers, select the Local Server Groups entry. n To copy the structure for a subgroup, its subgroups (if any), and all
registration details for all related servers, select a subgroup. n To copy the registration details for a single server, select the server.
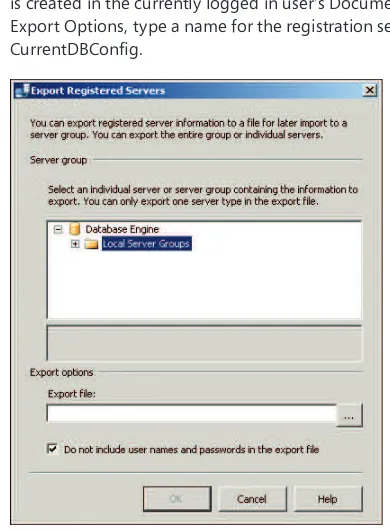
6. The server group structure and registration details are exported to a registration server file with the .regsrvr extension. By default, this file is created in the currently logged in user’s Documents folder. Under Export Options, type a name for the registration server file, such as CurrentDBConfig.
FIGURE 1-7 The Export Registered Servers dialog box.
TIP If you place the registration server file on a secure network share, you can
7. By default, the current authentication details for server connections are not exported into the saved file. If you want to export user names and passwords, clear the Do Not Include User Names And Passwords In The Export File check box.
8. Click OK. If the export is successful, you see a dialog box confirming this. Click OK in the dialog box. If there is a problem, note and correct the problem.
9. Start SQL Server Management Studio on the computer to which you want to copy the server group and registration details. If you did not place the registration server file on a secure network share, you need to copy the file to this computer now.
10. Select the Registered Servers view by pressing Ctrl+Alt+G.
11. In the Registered Servers view, use the toolbar to select the type of server you want to work with, such as Database Engine.
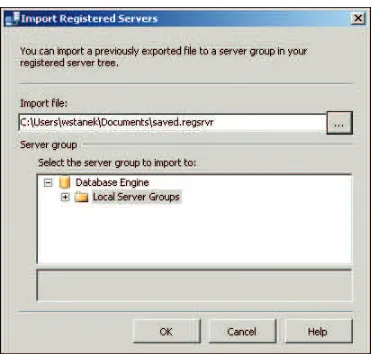
12. Right-click the Local Server Groups entry, point to Tasks, and then select Import to display the Import Registered Servers dialog box, shown in Figure 1-8.
FIGURE 1-8 The Import Registered Servers dialog box.
13. In the dialog box, click the button to the right of the Import File text box, and then use the Open dialog box that appears to select the registration server file you want to import.
14. Under Server Group, select the server group under which you want the imported groups and servers to be created.
Editing Registration Properties
You can change a server’s registration properties at any time by right-clicking the server entry in the Registered Servers view in SQL Server Management Studio and then selecting Properties. Use the Edit Server Registration Properties dialog box to make changes. The only property you cannot change is the server type. Be sure to test the settings before saving them.
Connecting to a Server
After you register a server, connecting to it is easy. Right-click the server entry in the Registered Servers view in SQL Server Management Studio, and then select New Query (if you want to create an SQL query) or Object Explorer (if you want to view and manage the server). You also can double-click the server entry to establish a connection and then work with the server in the Object Explorer view.
NOTE SQL Server Management Studio connects to other servers that are running
SQL Server by using the network protocol set in the registration properties. If you have disabled the network protocol or remote access entirely for a server, you won’t be able to connect to that server in SQL Server Management Studio. You need to make the appropriate changes in the registration properties or in the surface area configuration. Chapter 2 discusses surface area configuration.
Disconnecting from a Server
When you have finished working with a server, you can disconnect from it. This eliminates the back-and-forth communications to the server. To disconnect, right-click the server’s entry in the Object Explorer view in SQL Server Management Studio, and then select Disconnect from the shortcut menu.
Moving a Server to a New Group
To move the server to a new group, complete the following steps:
1. Right-click the server you want to move in the Registered Servers view, point to Tasks, and then select Move To from the shortcut menu to display the Move Server Registration dialog box.
2. In the Move Server Registration dialog box, expand the Local Server Groups entry to see a list of subgroups. Expand the subgroups as necessary. You can now do the following:
n Move the server to the top-level group by selecting the top-level group. This makes the server a member of the top-level group.
n Move the server to a different level by selecting the subgroup into which you want to place the server.
Deleting a Server Registration
If you change a server name or remove a server, you might want to delete the server registration in SQL Server Management Studio so that SQL Server Management Studio no longer tries to connect to a server that cannot be accessed. Right-click the server entry in the Registered Servers view and then select Delete. When prompted to confirm the action, click Yes to delete the server registration details.
Using Windows PowerShell for SQL Server Management
The graphical management tools provide just about everything you need to work with SQL Server. Still, there are many times when you might want to work from the command line, such as when you are working on a Windows Server 2008 R2 Core installation. To help with all your command-line needs, SQL Server 2012 includes the SQL Server provider for Windows PowerShell (also known as “SQL Server PowerShell”). To work with SQL Server via Windows PowerShell, you must first open a Command Prompt window or Windows PowerShell prompt and then start SQL Server PowerShell by typing sqlps at the command line.
Windows PowerShell introduces the concept of a cmdlet (pronounced
“ commandlet”). A cmdlet is the smallest unit of functionality in Windows PowerShell. Cmdlet names are not case-sensitive. SQL Server PowerShell cmdlets include the following:
n Backup-SQLDatabase Performs backup operations on SQL Server databases.
n Convert-UrnToPath Converts a SQL Server Management Object Uniform Resource Name (URN) to a SQL Server provider path. The URN indicates a management object’s location within the SQL Server object hierarchy. If the URN path has characters not supported by Windows PowerShell, the characters are encoded automatically.
n Decode-SQLName Returns an unencoded SQL Server identifier when
given an identifier that has been encoded.
n Encode-SQLName Encodes special characters in SQL Server identifiers and name paths to formats that are usable in Windows PowerShell paths. The characters encoded by this cmdlet include \:/%<>*?[]|. If you don’t encode these characters, you must escape them by using the single quotation mark (‘) character.