For your convenience Apress has placed some of the front
matter material after the index. Please use the Bookmarks
Contents at a Glance
Contents...vii
About the Authors... xxiii
PART 1: Introducing Microsoft SQL Server 2012 ...1
■
Chapter 1: New Features Overview...3
■
Chapter 2: Pre-Installation Considerations...15
■
Chapter 3: Choosing a High-Availability Solution ...33
PART 2: Getting Started ...59
■
Chapter 4: Installing and Upgrading ...61
■
Chapter 5: Post-Installation ...99
PART 3: Administering Microsoft SQL Server 2012 ...125
■
Chapter 6: Multi-Server Administration...127
■
Chapter 7: Managing Security Within the Database Engine...159
■
Chapter 8: Working with Database Objects ...183
■
Chapter 9: Indexing for Performance...223
■
Chapter 10: Managing Backups ...257
■
Chapter 11: Restore and Recovery Strategies ...283
PART 4: Troubleshooting and Tuning...353
■
Chapter 13: Monitoring Your Server ...355
■
Chapter 14: Auditing SQL Server...389
■
Chapter 15: Extended Events Interface ...403
■
Chapter 16: Managing Query Performance...421
■
Chapter 17: Secrets to Excelling as a Professional DBA...451
■
Chapter 18: What’s Next? ...463
C H A P T E R 1
■ ■ ■
New Features Overview
The release of Microsoft SQL Server 2012 has introduced many new features that increase scalability, manageability, availability, programmability, and security across the enterprise. With many
organizations focused on consolidation and virtualization, this couldn’t have come at a better time. As the demand for data keeps growing and security and compliance keep tightening, the role of the database administrator (DBA) has become an increasingly critical part of the organization. It is important for every DBA to have a good understanding of the tools available to help maintain a highly available, secure environment.
This book will cover the techniques you need to understand to implement and manage a successful database environment. After a brief overview of some of the enhancements, you will learn how to make intelligent decisions when choosing an installation or upgrade path. You will also learn how to manage a secure and consistent database environment by implementing policies across the organization. By learning how to automate tedious administrative tasks, you can focus on more important tasks, like performance tuning. Finally, we will look at what the future holds for database administration, as well as give you the resources necessary to excel as a DBA.
This chapter presents an overview of several new features available in SQL Server 2012.Although this chapter will not cover every detail of every new feature available in SQL Server 2012, it will provide a brief introduction to many of the major enhancements. We dig deeper into many of these features as we progress through the book.
Availability Enhancements
Availability is becoming a greater concern with many organizations wanting to achieve four and five nines. Since achieving four nines allows for less than one hour of downtime per year and achieving five nines allows for less than six minutes per year, living up to this expectation is not an easy task. There have been improvements in many areas to help achieve this goal, including the addition of the new AlwaysOn functionality.
Online Index Rebuilds
SQL Server 2005 introduced the ability to rebuild an index online with a few limitations that have remained consistent through SQL Server 2008 R2. First, you could not rebuild an XML or Spatial (SQL 2008 or later) index online. Second, you could not rebuild an index online if the index contained the large object datatype columns xml, varchar(max), nvarchar(max), varbinary(max), image, text, or ntext. Prior to SQL Server 2012, if you needed to do online index maintenance on indexes with these
limitations, your only option was to reorganize the index.
CHAPTER 1 ■ NEW FEATURES OVERVIEW
that contain image, text, or ntext data types, but these data types are deprecated and should be replaced with the new (max) data types anyway. The enhancements made to online index rebuilds could easily span multiple categories, as rebuilding indexes online allows for more flexible management capabilities. You will find this to be true with several features discussed throughout the chapter.
Indirect Checkpoints
When a checkpoint occurs, SQL Server writes the dirty pages in memory to disk to provide a consistent point for database recovery. Although checkpoints occur automatically, based either on workload or triggered by certain actions, such as a database backup, there are a few things you can do to influence when they occur. Prior to SQL Server 2012, you could set an instance wide recovery interval setting using sp_configure or manually issue a database checkpoint using the T-SQL CHECKPOINT command. The default behavior for SQL Server is to try to maintain a recovery time of one minute. Increasing the recovery interval setting causes SQL Server to take checkpoints less often, whereas decreasing the recovery interval will cause checkpoints to occur more often.
New to SQL Server 2012 is the ability to override the instance level recovery interval at the database level using the TARGET_RECOVERY_TIME option of the ALTER DATABASE command. The recovery time can be set using seconds or minutes. For example, to change the recovery time for the
AdventureWorks 2008R2 database to five minutes, you can issue the following command: ALTER DATABASE AdventureWorks2008R2
SET TARGET_RECOVERY_TIME = 5 MINUTES
Typically, you will want to keep the default behavior; however, if you run into performance issues because of numerous checkpoints or you would like a faster recovery time, you have the option. Keep in mind that changing the target recovery time can lead to performance issues and may not increase your recovery time at all if your workload has long running transactions.
Clustering
Clustering has always been a major factor when determining a high availability strategy and Microsoft continues to add features to improve this technology. In SQL Server 2012, Microsoft has added support for multi-subnet clustering, an improved and more flexible failover policy, as well as the placement of tempdb on a local drive. Being able to place the tempdb on a local drive can offer major performance gains especially if you add solid state drives into the equation. Multi-subnet clustering has been supported on Windows since Windows Server 2008; however, it was not supported in SQL Server. Now that multi-subnet clustering is available in SQL Server 2012, this opens the door to a native
geographically dispersed clustering solution within SQL Server. You can find more on multi-subnet clustering at http://msdn.microsoft.com/en-us/library/ff878716(v=SQL.110).aspx. In addition, SQL Server 2012 uses the Microsoft cluster service (MSCS) as a key component in the new AlwaysOn feature.
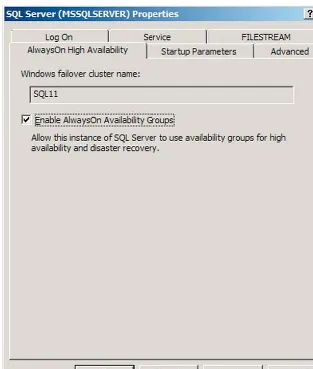
AlwaysOn
AlwaysOn is the big new high availability/disaster recovery feature in SQL Server 2012. In fact, it was initially referred to as HADRON (High Availability Disaster Recover Always On). AlwaysOn basically provides the best of both worlds in clustering and database mirroring. AlwaysOn uses clustering
CHAPTER 1 ■ NEW FEATURES OVERVIEW
Manageability Enhancements
There have been some nice features added in SQL Server 2012 to enhance your management capabilities. You may not easily find many of the new features from within the GUI, but they open several options from an administrative perspective. For example, you can now use the plan cache as a work load for the Database Engine Tuning Advisor. You can use many of the new features, such as the Extended Events GUI, to attain more insight into your servers. In addition, you can use features, such as Contained Databases, to attain more granular control of your environment.
Extended Events
Although Extended Events have been available since SQL Server 2008, Microsoft has added an Extended Events user interface in SQL Server 2012 to ease usability. In addition to the standard user interface, Microsoft has also included a Wizard, as shown in Figure 1-1, to further help with configuration. Prior to SQL Server 2012, Extended Events had a very sharp learning curve and parsing the xml data was
unpleasant to say the least. The addition of these features should help bring the power offered by Extended Events to the DBA for daily monitoring and troubleshooting. Chapter 15 provides further detail about Extended Events.
CHAPTER 1 ■ NEW FEATURES OVERVIEW
Database Restores
SQL Server Management Studio has been enhanced in several areas, when it comes to restoring databases as well. First, Microsoft has added an easy way to check for and repair corruption in database pages, as shown in Figure 1-2. The repair pages grid displays any records that appear in the
suspect_pages table in the msdb database. You can also execute a DBCC CHECKDB WITH
PHYSICAL_ONLY command against the database to populate the grid. Finally, you can simply select the Add button to populate the grid manually.
Figure 1-2. Page Restore – General Page
CHAPTER 1 ■ NEW FEATURES OVERVIEW
Figure 1-3. Backup Timeline
The backup timeline shows you when your backups were taken, as well as the type of backup. You can move the slider along the timeline at any point within the transaction log backup to create a STOPAT datetime parameter for the restore command. Chapter 11 provides more information about restoring databases.
Contained Databases
A contained database is a new feature in SQL Server 2012 that eases many of the issues related to external database dependencies, such as logins or references to other databases. A contained database has everything it needs to function properly within the database itself. A fully contained database has no external dependencies, making movement between servers without breaking functionality easy. However, fully contained databases will not be completely implemented in SQL Server 2012. Although databases can only be partially contained using SQL Server 2012, this is a huge step in the right direction when manually moving databases between servers or when databases automatically move using features, such as AlwaysOn. Chapter 8 has additional detail about contained databases.
Programmability Enhancements
CHAPTER 1 ■ NEW FEATURES OVERVIEW
throughout the rest of the book, this section introduces you to some of the new programming enhancements found in SQL Server 2012.
Functions
Several new functions are available in SQL Server 2012 to help make coding T-SQL an easier task. There are new functions that you may already be familiar with, such as IIF, already available in many other Microsoft applications. A good number of the functions provide new options when working with date and time values, whereas others provide new capabilities when parsing and converting data. The following is a list of new functions available in SQL Server 2012.
• CHOOSE. This function returns an item from a list based on a specified index. The data type that is returned is based on the data type with the highest precedence within the list. The first parameter is the index of the value within the list you wish to return. The remaining n number of values constitutes the list. For example, SELECT CHOOSE (2, 'ValueA', 'ValueB', 'ValueC') will return “ValueB.” • IIF. The IIF function takes three arguments. The first is a Boolean expression
followed by two possible values. If the expression equates to true, the first expression is returned; if the expression is false, the second value is returned. For example, SELECT IIF (1 > 2, 'ValueA', 'ValueB') returns “ValueB,” since the expression in the first argument is false.
• CONCAT. The CONCAT function returns a concatenated string based on a list of values. The input values are converted to strings, and NULL values are converted to empty strings. For example, SELECT CONCAT (1, '- Example ', 'Concat - ', NULL, GETDATE()) returns “1- Example Concat - Sep 28 2011 12:17PM.” • FORMAT. This function returns a value based on the format supplied to the
function. The FORMAT function takes numeric or date and time value as the first parameter and returns a value based on the format string of the second
parameter. The format argument is based on the .Net framework format strings. You can provide an optional third parameter to specify the culture in which to format. For example, SELECT FORMAT(555231234,'###-##-####','en-US') will return “555-23-1234,” SELECT FORMAT(10,'C','en-US') will return “$10.00,” and SELECT FORMAT(GETDATE(),'MM/dd/yy','en-US') will return “09/28/11.” • PARSE. The PARSE function converts a string value to a numeric or date and time
data type. You can optionally specify the culture to use for the translation. If the translation is not possible, the function returns an error. For example, SELECT PARSE ('28 de julio de 2011 ' AS DATETIME USING 'es-ES') returns “2011-07-28 00:00:00.000” using the Spanish culture; however, SELECT PARSE ('28 de julio de 2011 ' AS DATETIME USING 'en-US') fails using the English culture.
• TRY_PARSE. TRY_PARSE converts a string value to a numeric or date and time data type. You can optionally specify the culture to use for the translation.
TRY_PARSE is very similar to PARSE; however, if the translation is not possible, the TRY_PARSE returns NULL instead of an error. For example, SELECT TRY_PARSE ('28 de julio de 2011 ' AS DATETIME USING 'en-US') will return a NULL value. • TRY_CONVERT. This function converts a data type to another specified data type.
CHAPTER 1 ■ NEW FEATURES OVERVIEW
• EOMONTH. The EOMONTH function accepts a date parameter and returns the last day of the given month. You can provide an optional integer argument that will add the number of months given to the date parameter before returning the last day of the month. For example, SELECT EOMONTH ('9/15/2011',2) will add two months and return “2011-11-30 00:00:00.0000000.”
• DATEFROMPARTS. DATEFROMPARTS returns a date value based on integer input values. The complete syntax is DATEFROMPARTS (year, month, day). For example, SELECT DATEFROMPARTS (2011,9,15) returns “2011-09-15.” The remaining functions are very similar to this function with a variation of output data types and input precision.
• DATETIME2FROMPARTS. This function returns a datetime2 value based on integer input values. The complete syntax is DATETIME2FROMPARTS (year, month, day, hour, minute, seconds, fractions, precision).
• DATETIMEFROMPARTS. This function returns a datetime value based on integer input values. The complete syntax is DATETIMEFROMPARTS (year, month, day, hour, minute, seconds, milliseconds).
• DATETIMEOFFSETFROMPARTS. This function returns a datetimeoffest value based on integer input values. The complete syntax is
DATETIMEOFFSETFROMPARTS (year, month, day, hour, minute, seconds, fractions, hour_offset, minute_offset, precision).
• SMALLDATETIMEFROMPARTS. This function returns a smalldatetime value based on integer input values. The complete syntax is
SMALLDATETIMEFROMPARTS (year, month, day, hour, minute).
• TIMEFROMPARTS. This function returns a time value based on integer input values. The complete syntax is TIMEFROMPARTS (hour, minute, seconds, fractions, precision).
Sequence Numbers
A sequence is a new type of user-defined object in SQL Server 2012 that acts like a global identity column for the database. The default data type for a sequence object is bigint. A sequence object can be very useful, if you need to share a series of numbers between tables or if you need to know a value before performing an insert. For example, you can call the sequence object from the application, insert a row using that sequence number, and then run additional logic using the same sequence number to uniquely identify the row. You can even choose to cycle the sequence object so that it will start over when it reaches a specified value. You request the next sequence number using the NEXT VALUE FOR clause (see Listing 1-1).
■Note In addition to T-SQL, you can create and manage sequence objects using the Sequence folder located under the Programability node for the database in SSMS.
Listing 1-1. Sequence Object Example
CHAPTER 1 ■ NEW FEATURES OVERVIEW
START WITH 1 INCREMENT BY 1;
--Create Table Using Default Sequence Numbers CREATE TABLE SequenceTest1
(
Col1 BIGINT DEFAULT (NEXT VALUE FOR TestSequence), Col2 CHAR(1)
);
--Create Table With No Default CREATE TABLE SequenceTest2 (Col1 BIGINT PRIMARY KEY, Col2 CHAR(1));
--Insert 3 Rows Into SequenceTest1 INSERT INTO SequenceTest1 (Col2) VALUES ('a'), ('b'), ('c');
--Insert 3 Rows Into SequenceTest2 INSERT INTO SequenceTest2 (Col1, Col2) VALUES (NEXT VALUE FOR TestSequence,'d'), (NEXT VALUE FOR TestSequence,'e'), (NEXT VALUE FOR TestSequence,'f');
--Select The Data SELECT Col1, Col2 FROM SequenceTest1;
SELECT Col1, Col2 FROM SequenceTest2;
CHAPTER 1 ■ NEW FEATURES OVERVIEW
You can restart a sequence object by using ALTER SEQUENCE as shown in the following command. ALTER SEQUENCE TestSequence
RESTART WITH 1;
If you want a sequence object to restart automatically, you can specify the options when creating the sequence object. For example, the following sequence object will restart at the number 1 specified by the MINVALUE when it reaches 100 specified by the MAXVALUE. If you create a sequence object in descending order by specifying a negative number for the INCREMENT BY option, the sequence object will restart when it reaches the MINVALUE.
CREATE SEQUENCE CycleSequence
Sequences have long been available in other database systems—notably Oracle’s. Perhaps the most common source of angst is from gaps in sequences. There are several reasons individual sequence values might be lost. For example, you might insert a set of rows into a table and end up with keys numbered 1, 2, 4, 5, but without a 3. Our advice? Do not worry about gaps. Gaps are a side-effect of how sequences are implemented within the instance. If you use sequences as surrogate key generators, then gaps don’t really matter because the keys are arbitrary anyway. If gaps do matter to you, then rethink your position and your design, and if gaps still matter, then sequences are the wrong solution.
OFFSET and FETCH
The ORDER BY clause has been enhanced by adding the OFFSET and FETCH clauses. The OFFSET and FETCH clauses give you the capability to implement a paging solution by allowing you to specify a starting and ending set of rows to return with each execution. For example, you can return rows 1 through 20 on one execution and rows 21 through 40 on the next. Each query is a completely separate execution as far as SQL Server is considered, so the offset needs handled by the application code. This also means that, if the underlying data changes, so will the results. OFFSET can also be used
independently of FETCH. For example, you can specify an OFFSET of 10 to skip the first 10 rows of a result set. The code in Listing 1-2 returns products 21 through 40 from the Production.Product table in the AdventureWorks2008R2 database ordered by the highest list price. This might simulate a customer on a website paging through twenty products at a time on page two.
Listing 1-2. Using OFFSET and FETCH
SELECT ProductID, Name, ListPrice FROM Production.Product
ORDER BY ListPrice DESC OFFSET 21 ROWS
CHAPTER 1 ■ NEW FEATURES OVERVIEW
THROW
THROW is a new statement in SQL Server 2012 that you can use to raise custom error messages. When used in the TRY block of the TRY/CATCH construct, execution is sent to the CATCH block. You can use the THROW statement inside the CATCH block of the TRY/CATCH construct to re-throw an error message to the user. When used inside the CATCH block, you can use THROW without additional parameters. If THROW is used outside of a CATCH block, three parameters are required: error_number, which is an integer value between 50,000 and 2,147,483,647; message, which is nvarchar(2048); and state, which is a tinyint between 0 and 255. The severity level of a THROW statement is always 16; the severity level is not a configurable option. Listing 1-3 provides an example.
Listing 1-3. Using THROW
USE tempdb; GO
CREATE TABLE UserErrors (ErrorNumber int,
ErrorMessage varchar(2048), ErrorLine int,
ErrorDateTime DateTime);
BEGIN TRY
--Generate an error
SELECT 1 + 'a' AS ErrorTest; END TRY
BEGIN CATCH
--Capture the error INSERT INTO UserErrors
(ErrorNumber, ErrorMessage, ErrorLine, ErrorDateTime)
SELECT ERROR_NUMBER(), ERROR_MESSAGE(), ERROR_LINE(), GETDATE(); --Return an error to the user
THROW 50000, 'The application has encountered an error.', 1; END CATCH;
GO
SELECT * FROM UserErrors;
CHAPTER 1 ■ NEW FEATURES OVERVIEW
If you click the Results tab, as shown in Figure 1-6, however, you see that we logged some useful information that will help troubleshoot the error. If we had used the THROW statement in the CATCH block without any additional parameters, the actual error message displayed in Figure 1-6 would have been returned to the user.
Figure 1-6. Actual error logged in the CATCH block
EXECUTE WITH RESULT SETS
You can now return one or more result sets from a stored procedure and control the data type and column names returned by using the WITH RESULT SETS option of the EXECUTE command. When specifying the definition of the result sets, a number of limitations exist. For example, the number of columns must match the output of the stored procedure. Additionally, if the stored procedure returns two result sets, you must also define two result sets. SQL Server will automatically convert the column data types to the data types specified in the definition of the result sets; however, if this conversion results in an error, the batch is aborted. Listing 1-4 provides an example.
Listing 1-4. EXECUTE WITH RESUT SETS
USE tempdb; GO
CREATE PROCEDURE MultiResultSets AS
SELECT 1 AS Col1R1, 2 as Col2R1;
SELECT '123' AS Col1R2;
GO
EXEC MultiResultSets WITH RESULT SETS (
(R1C1 int, R1C2 int), (R2C1 int)
);
CHAPTER 1 ■ NEW FEATURES OVERVIEW
redefining results for application input when a schema change is not preferable, but it could prove a beneficial solution when needed.
Summary
C H A P T E R 2
■ ■ ■
Pre-lnstallation Considerations
Unfortunately, in most production environments, you do not have enough time to preplan the installation of SQL Server. In addition to ensuring your current production environment performs as expected, you provide server specifications for new systems. This requires a lot of research to determine things such as how much RAM the server will need; what type and how powerful the CPUs should be; and the layout, size, and RAID (redundant array of independent disks) levels of your storage system, along with many other considerations. In addition to providing server specs, you also have to manage the implementation of processes and procedures after the installation is complete. If there is a lack of preparation and research time, you sometimes make the wrong assumptions or decisions when providing your recommendations. Although bypassing some research up front will save time initially, there may be an extreme cost to you and the company by not taking the time to preplan properly. For the next two chapters, we are going to talk about some of the things that you definitely want to consider before installing SQL Server 2012.
Choosing a SQL Server Edition
Microsoft SQL Server provides multiple editions to help organizations with different performance and price requirements to accomplish their goals. Table 2-1 gives a brief summary of these editions, which we will then talk about in more detail.
Based on the requirements received (that is, making a big assumption that you will actually receive good requirements), you can determine which edition of SQL Server enables you to fulfill those requirements. As always, the fully loaded option costs more than the stripped-down alternative; so instead of always going with the best edition on the market, do a little research and choose the edition needed to complete the requirements for the application. In SQL Server 2012, Microsoft has
consolidated the number of editions available to their customers. Now, there are three primary editions of SQL Server 2012: Enterprise, Business Intelligence, and Standard Editions. The Workgroup, Standard for Small Businesses, and DataCenter Editions no longer exist in SQL Server 2012 while the Web Edition will only be available to companies that host sites for customers. Luckily, Developer, Express, and Compact Editions are offered to us with the same prices and license agreements as previous versions of SQL Server.
Table 2-1.SQL Server Edition Feature Comparison
Feature Enterprise Standard Business
Intelligence
Basic OLTP
CHAPTER 2 ■ PRE-INSTALLATION CONSIDERATIONS
Feature Enterprise Standard Business
Intelligence
Manageability (SQL Server Management Studio,
Policy-based Management)
Corporate Business Intelligence(Reporting, Analytics,
Multidimensional BI Semantic Model)
Self-Service Business Intelligence (Alerting, Power
View, PowerPivot for SharePoint Server)
x
Enterprise data management (Data Quality Services,
Master Data Services)
x
In-Memory Tabular BI Semantic Model
x
Advanced Security (Advanced auditing, transparent
data encryption)
x x
Data Warehousing (ColumnStore, compression,
partitioning)
x x
High Availability (AlwaysOn) Advanced Basic Basic
Enterprise Edition
Enterprise Edition is the fully loaded, production-licensed edition of SQL Server. This edition provides the performance, scalability, security, and availability needed to perform as the data layer for enterprise-wide applications. Use Enterprise Edition on applications where you identify the features of that edition as a necessity to meet the requirements or future requirements for the instance of SQL Server.
Unfortunately, the costs of Enterprise licenses are too expensive to justify the purchase of the edition if the organization will not take advantage of the features that it provides.
Please spend time narrowing down the application requirements and thoroughly evaluating the editions prior to recommending the purchase of an edition. The company that employs you will appreciate it.
CHAPTER 2 ■ PRE-INSTALLATION CONSIDERATIONS
Standard Edition
Standard Edition is another licensed production system without all the features of the Enterprise Edition, but it is built to provide ease of use and manageability. Standard Edition is run in environments where you have determined that the features provided only in the Enterprise Edition are not needed to accomplish the current and future requirements of all applications running on the server. Let’s be honest: Asking for or receiving detailed requirements from management, customers, or clients probably will not happen all the time. (You will be lucky if you can make them out through the beer stains on the napkin.) Therefore, when it comes down to determining the version that meets the bare-bones requirements you receive, you may have to go back to the requirements provider to ensure all the documentation is accurate and complete. Try asking the requirements provider a series of questions in different ways to help you determine what the real requirements are for the application. That way you will feel comfortable supporting the application on the edition of SQL Server chosen. Standard Edition is significantly cheaper than Enterprise Edition so be wary of management wanting to install Standard Edition even though the application needs Enterprise Edition features.
Stand your ground and make the application owner or management sign off on the functionality that you will not be able to provide if they insist on purchasing the cheaper edition. That way, when the blame game starts and people start pointing fingers, you can pull out your documentation and utilize your get-out-of-jail-free card.
In the Standard Edition, Microsoft has included many of the features required to manage a production environment in small to midsized organizations, and maybe even larger organizations, depending on the requirements of the application. Review Table 2-1 to identify the features of the Standard Editions.
Overall, the Standard Edition is not a bad choice when you do not have to utilize the greater number of features available in the Enterprise Edition. Remember, a “nice-to-have” is completely different than a feature that is absolutely necessary. The cost difference does not justify the purchase of the Enterprise Edition if the features are just nice-to-haves.
Developer Edition
The Developer Edition contains all of the features of the Enterprise Edition, but it is licensed for nonproduction systems. This edition is ideal for developers or administrators looking to install and test out SQL Server 2012.
Developer Edition offers a great introductory platform for validating your application’s functionality with the new version of SQL Server 2012, along with providing a playground for trying out features. While doing this, make a detailed evaluation of the features that your production environment requires. If the organization is planning to purchase the Standard Edition, then experiment with the features of Enterprise Edition by using the Developer Edition. That will help you determine if the production environment needs the features that the Standard Edition does not support. Likewise, if the organization is purchasing Enterprise Edition, then use the Developer Edition to evaluate what supporting your production environment would be like without all the features available in the Enterprise Edition.
CHAPTER 2 ■ PRE-INSTALLATION CONSIDERATIONS
Business Intelligence Edition
Business Intelligence Edition is the new edition created by Microsoft that includes all the Standard Edition features along with additional reporting features for Business Intelligence or BI. Review table 2-1 to identify the additional features added to the BI edition. We do not discuss Business Intelligence features within this book. Review other Apress Titles, like Pro SQL Server 2012 BI Solutions, to find out additional information pertaining to Business Intelligence.
Web Edition
The purpose for the Web Edition, as the name implies, is for web-hosting companies that need to provide their customers with highly available and scalable solutions for a low cost. Web Edition has no restrictions on the amount of memory the instance can support or a cap on the size of databases. That increases its scalability options for web-hosting companies. The price is per processor, per month under the general guideline of the Service Provider Licensing Agreement (SPLA). Web Edition is only available for companies that provide hosted solutions. Once again, this edition targets specific organizational requirements and should be researched further to determine if you can benefit from using this version.
As we wrap up the section on editions, we want to encourage you to make time to evaluate the features and functionality of each edition as it applies to your situation before providing a
recommendation on which SQL Server edition to purchase. For some of you, it is a no-brainer: You will have to utilize the Enterprise Edition for a number of reasons. However, there are a large number of you who might think you need the Enterprise Edition, but you do not have the evidence to support that decision. Install the Developer Edition, try out the new features, and document your results. That way, when the time comes to discuss with management or the application owner the edition that you have to purchase, you will have documentation, hard facts, and solid analysis to support your recommendation and why so much money needs to be spent on the Enterprise Edition.
SQL Server 2012 Licenses
In SQL Server 2012, Microsoft decided to modify their license agreement from previous versions of SQL Server. Previously, when you chose to purchase SQL Server licenses based on processors, the cost was based on the number CPU sockets that exist on your server. In SQL Server 2012, your licensing cost is dependent upon the total number of cores that exist on your server. Microsoft bases licenses cost in SQL Server 2012 on the number of cores that exist on your server instead of the number CPU sockets on your server like previous versions.
■ Note Remember, there are three editions of SQL Server 2012 you can purchase: Enterprise, Standard, and Business Intelligence Editions. You purchase Enterprise and Standard Editions by CPU Cores, and you purchase Standard and Business Intelligence Editions by the Server + Client Access License Model.
CHAPTER 2 ■ PRE-INSTALLATION CONSIDERATIONS
We would love to provide you with suggestions on the best way to deal with this change in licensing, but there are too many variables that exist for us to cover them all in this section. Our best
recommendation is to contact your Microsoft sales representative and discuss your licensing situation. We find discussions regarding license changes are painless. One suggestion: have the conversation with your representative sooner rather than later. Do not let the licensing policy change before you have talked with your representative and understand the best way for your organization to proceed. Make sure you address licensing with Microsoft sooner rather than later especially if you don’t have Software Assurance with Microsoft and you plan on upgrading to SQL Server 2012
Determining Hardware Requirements
Now that you have determined the edition of SQL Server 2012 that best fits your requirements, the process of figuring out the specifications for the hardware begins. The commonly used industry term for this process is “specing” or “spec’ing out” the server. To spec out the server is to create a document that contains specifications for the server (both brand and model), the CPU requirements (how fast and how many), and the storage and memory requirements. (There are additional things that will be included in this document, like NIC cards, but that is outside the scope of this book.)
Spec’ing out servers is a process that definitely is an art rather than a science. Several companies provide tools that assist you in determining the size of servers, disk, and so on needed to fulfill your business requirements. Often times, vendors recommend servers and disk arrays that accommodate growth and flexibility within your business requirements. However, your reputation is ultimately on the line for the equipment you recommend purchasing. As you gain more experience with the various vendor tools, you will recognize instances where you need to stray away from the recommendation and increase the amount of CPU purchased or reduce the speed of the disks. Remember, vendors are out there to make money. You need to understand when to stick with the vendor’s recommendation and when to seek a second opinion. The goal of this section is to provide you with tips and things to think about during the decision-making process to help you make the best decision for your organization. Before you get started, there are a number of questions that should be answered regarding the software before you can realistically provide hardware requirements. If you lack such answers about the software requirements, then you are either going to have to research the answers to these questions or make intelligent guesses.
Some questions that you may want to consider are the following:
• What types of requests will the application be supporting (such as online transaction processing, online analytical processing, and so on)?
• How many concurrent users does the application expect?
• What is the expected response time of the application?
• What is the application usage pattern? What is the frequency of reads compared to writes? How does it use tempdb?
• What is the maximum number of transactions per second?
• What is the combined spaced needed to support all of the databases on that server?
• What are the future growth plans for the application over the next 3 to 5 years?
• What is the projected growth of the data over the next 3 to 5 years?
• What is the skill set of the developers writing the application? If this is an upgrade, then what is the performance of the current application? If this is a new
CHAPTER 2 ■ PRE-INSTALLATION CONSIDERATIONS
group? Do the developers follow normalization and indexing practices? Do they use stored procedures to access data? Figure out what you can about the developers.
• What are the availability requirements? It always helps to know if you will be purchasing more than one server.
• What is your budget?
Feel free to add as many questions to this list as you feel is necessary. The more information you know about the environment, the closer you will be to ensuring that your recommendation meets and exceeds your business requirements.
One other thing you need to know before getting started is what the minimum requirements are for the available SQL Server editions. See Table 2-2 for a brief summary of those requirements by edition.
Table 2-2.SQL Server Edition Minimum Requirements
Edition Memory Processor
Enterprise (64-bit) Minimum: 1 GB Processor Type: Itanium
IA64 Recommended: 4 GB Processor Speed: Minimum
Maximum: OS Max Recommended 2.0 GHz or faster
Enterprise (64-bit) Minimum: 1 GB # of Processors: OS Max
Recommended: 4 GB Processor Speed Minimum 1.4 GHz,
Maximum: OS Max Recommended 2.0 GHz or faster
Standard (64-bit) Minimum: 1 GB # of Processors: 16
Recommended: 4 GB Processor Speed: Minimum 1.4
Maximum: OS Max GHz, Recommended 2.0 GHz or faster
Developer (64-bit) Minimum: 1 GB Processor Type: 1.4 GHz
Recommended: 4 GB Processor Speed: Minimum 1.4
Maximum: OS Max GHz, Recommended 2.0 GHz or faster
Web (64-bit) Minimum: 1 GB Processor Type: See web site
Recommended: 4 GB Processor Speed: Minimum 1.4
Maximum: OS Max GHz, Recommended 2.0 GHz or faster
Express with Tools Minimum: 512 MB Processor Type: See web site
(64-bit) Recommended: 1 GB Processor Speed: Minimum 1.4
CHAPTER 2 ■ PRE-INSTALLATION CONSIDERATIONS
Edition Memory Processor
Express with Advanced Minimum: 512 MB Processor Type: See web site
Services (64-bit) Recommended: 1 GB Processor Speed: Minimum 1.4
Maximum: 1 GB GHz, Recommended 2.0 GHz or faster
Determining CPU Needs
Determining the amount of CPU needed to handle the workload of the application or applications running on a server can sometimes be a little challenging. We would love to provide you with absolute metrics, but there are too many variables to provide that level of detail. Instead, we would like to discuss some of the factors that contribute to the amount of CPU needed and walk through a process that helps you build servers that resemble the server(s) you have in-house.
Deriving a Baseline Specification
To begin, you need baseline information for comparing your questions. If an external vendor developed the application you will be supporting, then hopefully they provided recommendations for CPU needs based upon users, workload, and so on. If you are purchasing a server for consolidation or to upgrade existing hardware, then utilize the existing hardware to determine usage statistics. If you are
implementing a brand-new application in your environment with no supporting documentation, then find an application that closely resembles the expected usage patterns and user base and use its SQL Server for your baseline. As a last resort, go out on the web, find an application that is similar in functionality and features, and use its user and workload recommendations.
■ Tip Strive to use comparable servers from your own environment. Your environment already supports the number of users, typical transactions per second, and the quality of servers that run your existing applications. Management is also accustomed to the cost of those servers. Trust your existing servers to provide a good baseline server speciation.
Consider Future Utilization
Now that you have a baseline server to start from, start looking at the causes of increased CPU utilization. Do not forget to pay close attention to how high the CPU usage is within your baseline and compare that to the level where you would like to keep the CPU usage of the new server. For example, if your baseline server constantly runs at 80% CPU utilization and the new server should run at 50% or lower, then make sure to consider that factor when determining how much CPU is needed.
Here are some questions to think about when deriving a new server specification from an existing, baseline server:
• What is the difference in the number of concurrent users?
• What is the transaction per second difference?
CHAPTER 2 ■ PRE-INSTALLATION CONSIDERATIONS
• Are the application usage patterns the same?
• Did the quality of the developers change?
I hope that these questions stimulated your mind with even more questions to consider. Please add as many questions to this list as possible. Try to consider all the factors and think through all of the scenarios that can affect CPU utilization.
Example Using the CPU Questions
Let’s say that your baseline server runs on average at 60% CPU utilization. Your company plans to upgrade the application, and you are getting ready to purchase a new server to support that upgrade. Because of the new features of the application:
• Your user base is going to increase by 1 1/2 times what it is now.
• Your transactions per second are going to double.
• You are going to use database compression to improve IO, but add CPU
Knowing about these increases, you can consider them in light of some additional requirements that you have pertaining to the new server:
• You want to keep the same response time.
• You want your system running at 40% CPU utilization instead of 60%.
Finally, you also know a couple of additional facts:
• The usage pattern of the application will stay the same.
• The vendor still has not figured out how to partition its tables or any other performance improvement technique.
Reviewing this scenario definitely shows you the need to purchase more CPU than what currently exists in your baseline server. How much to increase the CPU? We cannot tell you that. As the DBA, you have to determine the importance of each answer and factor in what it will mean to the increase or decrease in CPU utilization for the new server. This method will take some getting used to, and the process may not be perfect the first couple of times through. As you fine-tune your questions and establish what the answers mean for the CPU, you will begin to develop a consistent method for determining the amount of CPU needed for any new server that you are spec’ing out.
Disk Subsystems
Determining the design, size, and utilization of the disk subsystem is either complex or extremely simple. Unbelievably, there are still DBAs out there who support systems with one physical hard drive that contains the operating system files, the data, log, and backup files for SQL Server. In some instances, servers were set up this way because of budget reasons. In other instances, servers were set up this way due to the lack of knowledge in the spec’ing out phase of the disk subsystem.
CHAPTER 2 ■ PRE-INSTALLATION CONSIDERATIONS
measuring your disk performance and, make sure you understand the language presented in this section, then you are more than likely going to select a disk subsystem that supports your workload and avoid the problems associated with selecting an inefficient disk subsystem for your upcoming load.
The goal of this section is to provide you with some information and tips about determining the space needed to store the database. We also hope to help with terminology and to present options for laying out the data, log, tempdb, and backup files on the server.
For those who have had conversations with server administrators or hardware specialists, you know they use terms not commonly used in the database world. If you are not prepared and do not
understand these terms when discussing a disk subsystem, then you may miss out on a key design decision. Therefore, here is a brief list of some common terms and their definitions to help you with that conversation.
• Physical hard drive: The actual tangible unit attached to a server.
• Logical hard drive: Provides usable storage capacity on one or more physical disk drives.
• Local disks: Disks that are controlled and connected to the hard disk controller.
• Spindle: Responsible for turning the hard disk platters. This is another way to reference a physical hard drive.
• Logical unit number (LUN): The number assigned to a logical unit of disk, normally assigned directly to a drive letter or volume.
• Disk subsystem: The complete set of components that make up the storage for the server.
• RAID level: Used to simultaneously use multiple disks for better performance.
• Storage area network (SAN): Architecture used to attach remote computer storage devices to servers.
• Disk array: A disk storage system that contains multiple disk drives.
• Hot standby: Also known as a hot spare, it refers to a physical disk that resides in the disk array waiting for another disk to fail so it can fill in.
• IOPS(I/O per second): Stands for the number of reads and writes performed on the disk subsystem in one second’s time.
The first decision probably made for you by the organization is how the disk subsystem is attached to the server. Generally, any established company has already made the strategic decision to purchase a SAN, use a fiber channel to connect to the disk array, or to use local disks. So we are not going to spend any time discussing how the disk will be attached to your SQL Server. For the most part, you will need to fit in with whatever storage infrastructure your organization has already chosen.
Database Sizing
CHAPTER 2 ■ PRE-INSTALLATION CONSIDERATIONS
■ Note If you are not upgrading and do not have vendor specification documents, then do not worry. We have another method to show you after this one.
Estimating Size from a Baseline
Starting with your baseline, here are some of the questions that you may want to ask:
• What is the expected user projection? Are your users going to stay the same or grow 50%? How does the increase in the number of users impact the data growth projects?
• How large are the current databases (applies to upgrading only)?
• How many years did it take to accumulate that amount of data (applies to upgrading only)?
• What is the difference between the data retention policies for the baseline and new databases?
• How many years is your data projection for?
• Are there any projected data retention policy changes?
• Is there a difference between the data storage practices used by the application your baseline database supports vs. the new application that you are installing?
As we said before, please add your own questions to this list. The questions listed here are to help stimulate ideas. The more questions you come up with, the better your database size estimation will be. Do not forget to determine how much each answer factors into the final recommendation for the sizing of your disks.
Estimating Size Based Upon Row and Column Sizes
If the previous method does not work for you, then Microsoft provides some information about sizing your database. The size of a database consists of the sum of the individual sizes of the tables within that database. The size of a table is determined by the number of indexes, the types of indexes, and/or the heap if the table does not have any indexes.
Following is a brief summary of Microsoft’s size estimation process. First, for each table, you must calculate the amount of space required to store data on the heap:
1. Calculate the space used to store data in the leaf-level pages.
2. Calculate the space used to store index information in the table’s clustered index, if there is one.
3. Total the calculated values.
Next, you must estimate the size of each nonclustered index upon the table:
CHAPTER 2 ■ PRE-INSTALLATION CONSIDERATIONS
2. Calculate the space used to store index information in the non-leaf levels of the non-clustered index.
3. Total the calculated values.
Repeat the preceding two processes for each table in your database. Sum all the values together. When you have gone over every table and index, you will have a reasonable estimate of the amount of disk space that you need to allocate to your database.
■ Note Detailed instructions on computing row, column, and index sizes can be found at http://msdn.microsoft.com/en-us/library/ms187445(v=SQL.110).aspx
Regardless of the method used to determine the projected size of your databases, you still have to figure out the sizes for the log, tempdb, and backup drives. The backup drive will have to be large enough to store the database backup file. It will also need to be large enough to hold multiple copies of the backup file if holding multiple backups is part of your backup strategy. The backup drive also needs room for transaction log backups, if you plan to back up your log files.
The size of the log drive should be 25% of the database drive or two times the size of your largest transaction, and the tempdb drive should also be 25% of the database drive. Once you have determined the sizes of your new database and the sizes of the drives needed for any additional files, the next step is for you to determine the RAID levels for the drives and how you want them configured.
■ Tip If given a choice between small fast drives or the large slower drives, choose the small fast drives. Smaller faster drives outperform larger slower drives.
Determining RAID Levels
Hopefully, there is still some flexibility in the decision-making process for the RAID levels of the physical disks. Which level you choose depends upon your requirements for fault tolerance and performance. Cost is also a significant factor. If you want the best in both fault tolerance and performance, then be prepared to pay for it.
Understanding RAID Levels
There are three basic RAID levels that are used on SQL Server: RAID 1, RAID 0, and RAID 5. Also commonly used is a combination of 1 and 0, which is called RAID 10. Following are descriptions of these levels:
• RAID 0 (striped disks): Stripes data across multiple drives; no redundancy.
CHAPTER 2 ■ PRE-INSTALLATION CONSIDERATIONS
• RAID 5 (striped disks with distributed parity): Stripes data across multiple drives, and parity information for one drive is distributed across all drives; good redundancy.
• RAID 10 (mirrored and striped): Data is striped across mirrored drives; good redundancy.
RAID 0
Of the three RAID levels previously listed, RAID 0, or striped, is the best for input and output (IO) performance. When the disk subsystem is set up on RAID 0, the disk controller ensures the striping of data occurs evenly across all disks in an array. Unfortunately, if one disk fails in the array, then the data stored within those disks are lost. RAID 0 has no fault tolerance, we don’t use it on systems that are required to be available, and data loss is unacceptable. RAID 0 is the cheapest of the listed RAID levels because of the lack of redundancy. You do not have to purchase additional drives which means all the drives in a RAID 0 array are used.
RAID 1
RAID 1, or mirrored disks, copies all data written to the primary disk to a secondary disk. Both disks are available for reads, which makes RAID 1 very fast for data retrieval. Because data writes occur to multiple disks, then a failure in the primary or a secondary disk does not cause data loss or application
unavailability. That is the reason why RAID 1 provides redundancy within the disk array. The
redundancy provided by RAID 1 is what makes this option expensive. In order to set up RAID 1, every physical drive purchased for writes has to have an additional drive in order to copy the data. You can see how the cost for using this RAID level increases rapidly.
RAID 5
RAID 5, or striped disks with distributed parity, stripes data across multiple drives and writes parity bits across all drives. Data retrieval on RAID 5 is very fast, but writes are extremely costly. Because of the parity bit, when one command writes to disk, one write occurs to write the data to disk, and then a parity write occurs to write to the parity drive, followed by a check to ensure that a disk failure did not occur during the write operation. A single write command potentially costs four IO; that is costly in an environment with heavy writes.
On the other side, the parity bits ensure that, in the event of drive failure, the re-creation of the data stored on that disk occurs without loss of availability to the application or data loss. The redundancy of RAID 5 is good as long as you don’t lose multiple drives. It is good practice to use a hot-swappable drive in RAID 5. A hot-swappable drive is one that is part of the array, unused until a failure occurs in one of the disks. That drive has all the data from the failed drive re-created on it, and then it steps in and becomes a part of the array. RAID 5 is a relatively inexpensive option for providing redundancy. Writes occur on all drives, minimizing the need for extra drives not used for writing. At a minimum, RAID 5 requires three drives, which means 33% of each drive will be used for parity.
RAID 10
CHAPTER 2 ■ PRE-INSTALLATION CONSIDERATIONS
The implementation of RAID 01 occurs by striping first and then mirroring the striped set. RAID 10 provides the benefit of striping to RAID 1 while creating the needed redundancy for RAID 0, making the combination of the two RAID levels nice complements to one another. Clearly, you can see the cost of RAID 10 over the previously discussed RAID levels. At a minimum, RAID 10 needs four drives, and the numbers quickly increase from there. Luckily, hard drives are getting cheaper, making this option more feasible in today’s environments.
Choosing Your RAID Level and Laying Out Your Files
Now that you understand RAID levels, we can discuss the layout of SQL Server’s files and the RAID levels of the drives that will support them. Here are a couple of things to keep in the back of your mind:
• The RAID level selected may increase the cost of your disk subsystem. So know your budget as you read the tips for laying out your SQL Server files.
• The size of the system that you are designing may not require you to implement all of the tips that we provide. If you are creating a system for a couple of users with low transactions per second, then it is probably overkill to implement everything we suggest in this section.
We like to set up all of our servers the same, but that decision of how you set up your own servers is left up to you. Depending on the disk subsystem that you have at your organization, you may not have much decision-making power when it comes to determining the RAID levels of whatever new server you are configuring. In some environments, SAN administrators predetermine the RAID levels for the drives. Do not get upset—there is no reason to worry about decisions you have no control over. Just worry about what you do have control over.
• Place your data, log, tempdb, and backups on separate physical drives.
• Set the RAID level on your data drive to RAID 10, or set it to 1 if the budget does not permit 10 for heavy read and write systems. RAID 5 for heavy read and very little writes.
• Set the RAID level on your log drive to RAID 1.
• Set the RAID level on your tempdb drive to RAID 10, or set it to 1 if the budget does not permit 10.
• Set the RAID level on your backup drive to RAID 5.
Right now, not everyone in the industry agrees with setting up your data drives on RAID 1 or RAID 10. There are people who would like to place data files on a RAID 5 disk array. We have supported databases on both setups and could argue both ways. Our preference is RAID 10 or 1, and that is why we listed those RAID levels in the section. If you have the time, then do your own research so you can make an informed decision.
CHAPTER 2 ■ PRE-INSTALLATION CONSIDERATIONS
Final Disk Storage Configuration
After the drives are set up, there are just a few more things that we recommend you doing to ensure your disk subsystem is ready for production:
Ensure your disk subsystem can handle your SQL Server IO production load by utilizing IO subsystem stress tools.
Create separate tempdb files for every physical processor at a minimum. (Multiple cores count as multiple processors, but hyper-threading technology does not.)
Make sure the disk offset of your drives are set up to 64 KB at a minimum. By default Windows 2008 sets the offset to 1024 KB. Make sure you have enough time to test the various offsets for your disk subsystem to determine what is best. (Feel free to research disk offsets and how and why to validate your disk offset online.)
Proper configuration of your physical and logical disk is essential to SQL Server running effectively. Make enough time to test the IO subsystem of your SQL Server before the server goes into Production. Validate the correctness of your supplied configuration options. We have reviewed newly built servers and identified partitions that were on the same physical drive with different logical drive letters instead of separate physical drives with different logical drive letters. So, verify the settings or get the server administrator to show you how if you do not know. Learn to use the physical disk monitors in
Performance Monitor (covered in Chapter 13) to proactively monitor your disk subsystem. That way, you are the first one to know when your disk starts to become a bottleneck. Take advantage of the
information and implement or verify that these tips are in place on your server(s).
Determining Memory Requirements
Generally, we try to purchase as much memory as a server will hold. The more memory you have, that much more of your database can be stored in memory, decreasing the amount of time it takes to retrieve data from the disk. Unfortunately, when budgets are tight, nobody has the luxury of spending extra money.
When accurately trying to determine the amount of memory needed for a new server, we always resort to our baseline servers and start asking questions. The following questions are not meant to be the only questions asked. They are designed to get you thinking about the changes within your application that would affect the amount of memory needed. For the following set of questions, we are going to add a little more reasoning around each question and why it is important to memory contributions:
• What is the difference in the number of concurrent users between your baseline database and the new one you are configuring? The more concurrent users there are, the greater the need to keep frequently accessed data in memory. The greater the memory, the more data that are kept in memory, preventing physical disk reads.
• What is the transaction per second difference? If transactions increase, then the amount of data needed to process the requests likely will increase. The more memory you have, the more data pages you can keep in memory instead of on physical disk.
CHAPTER 2 ■ PRE-INSTALLATION CONSIDERATIONS
• What is the difference between the size of your baseline database and the system you are implementing? What about expected growth? The bigger the database, the more memory you want. Generally, larger databases require larger data sets in memory to fulfill user queries. The more memory you have, the more queries you can process without having to go to a physical disk.
As we said before, please add any questions you would like to the preceding list. Figure out how the answers to these questions will factor into the overall increase or decrease of needed memory. Never underestimate the amount of memory you need. In fact, you should overestimate when it comes to memory. After all, what is the worst thing that would happen if your entire database were in memory? Our guess is that you would have some happy customers.
Choosing the Server
There are a number of vendors that build servers that allow enough customization in their server models to build a SQL Server to meet and exceed the needs of any application. No one pays us to advertise for one company or the next, so we really do not have a vendor preference. And in many cases, an
organization will have a standard vendor that you will be required to use, except in the rare case when requirements dictate otherwise.
When researching models provided by your hardware vendor, make sure you pay attention to the maximum memory, CPU, and so forth that each model supports. Leave yourself a bit of headroom for future expansion. That way, if one of the requirements was wrong, some of the requirements changed after ordering the server, or one of your best guesses was a little off, you have some wiggle room in the currently ordered hardware. We would prefer to go back to management and request additional money to buy more memory instead of requesting money to purchase a new server because the server cannot handle any additional memory. After you have determined the model of the server to use, finish preparing your neatly formatted document, including all of the specifications that you have just determined. Congratulations, your server specification document is complete.
Documenting a repeatable process for consistently spec’ing out new servers ensures that the decision-making process for all new servers will cover the same considerations. The old way of undocumented, intelligent analysis does not work if you want all DBAs performing this task the same way. Sit down with your team, go over the questions that should be considered, and determine the factor of increase or decrease based on the response to each question.
Creating a sound, server specification document will not only save you time when spec’ing out servers, but it will also save support time when you are up and running in production. Spend the time to do the work, and document the process so that that you can repeat it and improve it going forward.
SQL Server Consolidation
Consolidating SQL Server instances onto a single or multiple servers has become increasingly popular with 64-bit hardware. 64-bit servers have enabled you to utilize servers with up to 32 processors and the maximum amount of RAM supported by the operating system directly without having to use other technologies to address the memory. That kind of power within a single server has helped organizations easily make the switch to consolidated setups.
CHAPTER 2 ■ PRE-INSTALLATION CONSIDERATIONS
For those of you scratching your head trying to figure out why in the world one would want to consolidate multiple SQL Server instances, let’s review some of the pros and cons.
Benefits of server consolidation include the following:
• Reduces the amount of management required to support physical servers
• Decreases the number of SQL Server licenses needed
• Increases the application uptime and availability
• Increases performance within the applications
But there’s a cloud to go along with every silver lining. Drawbacks to consolidation include the following:
• Management of the consolidated server is more challenging in terms of maintenance windows, patching, scheduled jobs, and so on.
• When the consolidated server goes down, then all the applications on that server are down.
• The upfront cost of purchasing a big beefy server, which includes the license and hardware, is expensive. You may want to consider purchasing a redundant server for the consolidated server. When you have multiple applications on one server, you definitely don’t want to lose that server for any period of time.
Although there are a couple of issues to think about before deciding to consolidate, we definitely think exploring the benefits of SQL Server consolidation in your environment is a worthwhile task. We’re going to provide you with some lessons that we have learned while supporting consolidated
environments:
Do not put mission-critical applications on a consolidated server. We suggest that you deal with those applications individually.
Write clearly documented guidelines for applications to abide by in prior to adding the application to the consolidated server. For example, application users can have database owner rights to their database only Do not allow users to have system administrator rights because that impacts more than just the application they are using.
Name your automated processes with some form of application identification. In a consolidated server environment, multiple applications will likely have their jobs that need to run. Identifying jobs for an application without any form of identification can be time consuming. That is not the situation you want to be in, especially when you have management on your back about rerunning a process.
Watch out for out-of-control applications and set up a policy for removing that application from the consolidated server. Remember, one bad application impacts all the other applications on that server.
Only add one application/database at a time to the consolidated server. This enables you to monitor the server after the addition of an application to ensure that the server resources are at a manageable level.
CHAPTER 2 ■ PRE-INSTALLATION CONSIDERATIONS
Group similar application types and functionality together on the same consolidated database server. In most cases, similar applications have similar usage patterns, maintenance windows, and other similarities that enable the support of those groups of applications easier.
Spend some time monitoring an application before adding it to your consolidated server. That way, you estimate the amount of resources it will consume on the consolidated server. You do not want to wait until the addition of the application to the server to realize that it will negatively influence the resources on the consolidated server.
Create service level agreements for every application on the server. With that information, you will know the order in which to get applications back up in case of emergency.
If you are considering consolidating your SQL Server instances but would like more information about the servers in your environment to help identify hardware and software similarities, then use the Microsoft Assessment and Planning (MAP) toolkit. MAP will provide you with detailed reports of all the instances of SQL Server installed in your environment. MAP scans the network and collects detailed information from each computer using Windows Management Instrumentation (WMI) calls, Remote Registry service, and Simple Network Management Protocol (SNMP). MAP then stores the collected information in a SQL Server database for later reporting.
Before consolidating your SQL Server instances, you may also want to consider ensuring the compatibility of the features on the various SQL Server instances. Apparently, the features selected during installation can dictate how SQL Server stores information within the data files. When databases are set up on editions containing those features, they cannot be migrated to a SQL Server that does not support them. Running the sys.dmdbpersistedskufeatures dynamic management view will allow you to compare the features that are restricted by the edition. If the view does not return results, then the database does not contain any edition-specific features.
Do not get discouraged after reviewing the preceding tips. Consolidating SQL Server is not always complex, and it provides benefits to you and the organization. Look at your database environment and identify servers that have minimal CPU utilization and low transactions/ batches per second. Start with small, low-impact servers and then determine if you want mission-critical applications on a
consolidated server. Make sure you have thought through and tested your high-availability plan. Having a server go down and being without one application is stressful, but losing ten applications at the same time without a recovery plan is just plain madness. So spend a little time up front to document and test your recovery plan before adding databases to the consolidated server. Who knows? With the money you save the company in license fees and server maintenance, you may actually see the benefit in your pay-check. Well, we can dream can’t we?
Consolidation with Virtual Servers
Virtual servers are becoming increasingly popular for SQL Server installations, especially for
CHAPTER 2 ■ PRE-INSTALLATION CONSIDERATIONS
Summary
There are many decisions that must be made prior to installing SQL Server. At a minimum, you have to determine which edition of SQL Server to install, the hardware that SQL Server will run on, and whether to add the database to an existing consolidated server. We know planning and preparing is something that you do not have enough time to do. Remember your Five P’s: Proper Planning Prevents Poor Performance. Repeat that phrase to encourage yourself during the times when properly preparing for an installation doesn’t seem likely.