Praise for Practical Zendesk Administration
“In today’s ever-changing business world, sustaining your competitive advantage comes down to maintaining great customer relationships. The Zendesk customer service platform has helped Box provide outstanding customer service, and the best practices in this book are a useful tool to help your organization do the same thing.” — Aaron Levie Co-Founder and CEO at Box
“I can think of none more qualified to write this book than Stafford Vaughan. Not only is he an expert in Zendesk best practices, but his hands-on experience in using Zendesk and teaching Zendesk training courses means you’ll learn valuable tips that will save you time and eliminate error. No Zendesk administrator should be without this book.” — Micah Solomon Bestselling Author of High-Tech, High-Touch Customer Service
“Cloud, mobile and SaaS are driving radical changes in technology business models. Customer support models and expectations have changed too, and you need to be ready. Stafford has led hundreds of top companies to successful next-generation customer support. You won’t find a greater expert on practices and approaches for Zendesk-driven customer support. If you’re responsible for a Zendesk deployment, get this book now.” — Carson Sweet Co-Founder and CEO at CloudPassage
Stafford Vaughan and Anton de Young
SECOND EDITION
Practical Zendesk Administration, Second Edition
by Stafford Vaughan and Anton de Young
Copyright © 2014 Stafford Vaughan and Anton de Young. All rights reserved. Printed in the United States of America.
Published by O’Reilly Media, Inc., 1005 Gravenstein Highway North, Sebastopol, CA 95472.
O’Reilly books may be purchased for educational, business, or sales promotional use. Online editions are also available for most titles (http://my.safaribooksonline.com). For more information, contact our corporate/ institutional sales department: 800-998-9938 or [email protected].
Editors: Mike Loukides and Andy Oram Production Editor: Nicole Shelby Copyeditor: Jasmine Kwityn Proofreader: Rachel Monaghan
Cover Designer: Randy Comer Interior Designer: David Futato Illustrator: Rebecca Demarest
October 2012: First Edition May 2014: Second Edition Revision History for the Second Edition: 2014-05-09: First release
See http://oreilly.com/catalog/errata.csp?isbn=9781491900697 for release details.
Nutshell Handbook, the Nutshell Handbook logo, and the O’Reilly logo are registered trademarks of O’Reilly Media, Inc. Practical Zendesk Administration, the picture of a European nightjar, and related trade dress are trademarks of O’Reilly Media, Inc.
Many of the designations used by manufacturers and sellers to distinguish their products are claimed as trademarks. Where those designations appear in this book, and O’Reilly Media, Inc. was aware of a trademark claim, the designations have been printed in caps or initial caps.
While every precaution has been taken in the preparation of this book, the publisher and authors assume no responsibility for errors or omissions, or for damages resulting from the use of the information contained herein.
This book is dedicated to Zendesk’s founders—Mikkel Svane, Morten Primdahl, and Alexander Aghassipour—for dreaming up and building a simple yet powerful customer
Table of Contents
Foreword. . . xi
Preface. . . xiii
1. Introduction to Zendesk. . . 1
Explanation of the Zendesk Plans 1
Terms and Definitions 3
User Interface Experience 6
Steps to Administer Zendesk 8
Internal Versus External Customer Service 9
2. Initial Setup. . . 11
Creating a Sandbox 11
Help Center Branding 12
Customizing the Zendesk URL 13
Internationalization 15
Administrator Interface Language 15
Setting the Time Zone 16
Multilanguage Support for End Users 16
Dynamic Content for Text Translation 17
Outgoing Email 21
Email Notification Sender Address 22
Personalized Email Replies 22
Sender Policy Framework (SPF) Settings 23
Digitally Signed Outbound Email 23
3. Security. . . 25
Social Media Logins 25
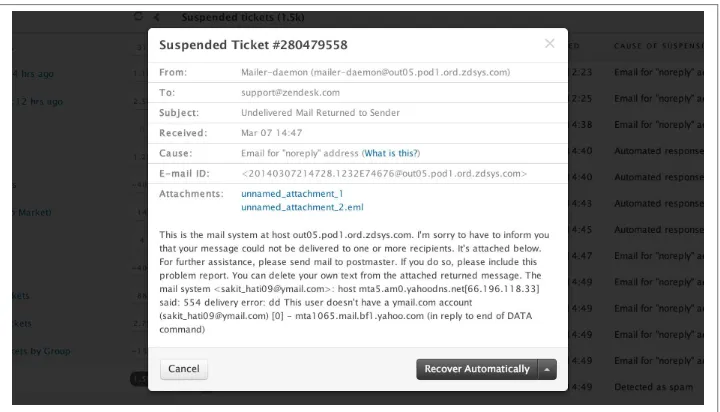
Suspended Tickets 28
Public Creation of User Profiles 29
Questions and Ideas 164
Help Center Customization 165
Themes and Simple Design Changes 166
Advanced Customization 167
Promoted Articles 168
Google Analytics 170
Foreword
We built Zendesk back in 2007 because we were frustrated with the quality of the cus‐ tomer service applications that existed at the time. The vast majority of these “solutions” were big, clunky, on-premise enterprise applications, were distributed on CDs, and took forever to deploy. Even proof-of-concept projects often took months to complete. And when all was said and done, no one, especially the customer, was ever really satisfied. Zendesk was the first truly cloud-based customer service application that you could sign up for, subscribe to, and configure online. Launching the application within an orga‐ nization took hours instead of months.
Nowadays, it’s hard to imagine software being distributed or packaged any other way. We helped revolutionize an entire industry in only five years, yet that handful of years seems like a lifetime ago. The changes in technology have been only part of the story. More important are the cultural shifts that the technology enabled, the changes in the very relationships between companies and their customers. The explosion of online social networks, crowd-sourced review sites, and subscription-based business models creates incredible opportunities (or challenges, depending on your perspective) for those businesses willing to shift their thinking about customer relationships. Our goal at Zendesk was always to help businesses realize those opportunities.
This manual—while it focuses on teaching administrators and agents how to use Zen‐ desk better—can also set the groundwork for building better, simpler, more human customer relationships within your own organization. By learning how best to use Zen‐ desk, you can accomplish larger organizational goals and changes: empowering em‐ ployees to fully help customers, increasing responsiveness, becoming more transparent, and seeing and relating to your customers more fully.
We applaud any business that sets its sights beyond simple brand loyalty, and instead makes the shift toward customer relationships. It takes a ton of work, but it’s worth it. We couldn’t ask for better guides into Zendesk than Stafford and Anton. Stafford created the original Zendesk training program and has helped hundreds of businesses use Zen‐
desk to transform their own customer service operations. Anton has run the documen‐ tation team at Zendesk for three years, took over customer training in 2013, and knows the product inside and out. Aside from their deep product knowledge, both of them are gifted with the skill of making even the most complicated concepts seem simple, and they remain keenly focused on what is actually important: using Zendesk to accomplish your organization’s goals.
Reading these chapters is like reading the advanced manual we never wrote when we designed the product. Stafford and Anton’s ability to enlighten readers on how to use the product better and the reasons for the design decisions in Zendesk never ceases to impress us.
Passion is what drove Zendesk’s founders to build the product before you today. But it is the success of our customers that built our company. More than 40,000 organizations around the world rely on Zendesk for great customer service and engagement. We believe this book can help all Zendesk admins and agents improve customer service and build better customer relationships for their organizations.
Happy reading! And if you are ever in San Francisco, let us know so we can buy you a drink.
Preface
In 2011, a survey was conducted to find out what people really value about the com‐ panies and brands they use. It may surprise you to know that when choosing among product quality, price, or customer service, 55% of people selected customer service as the most important factor in determining whether they would recommend a company. The example I often give is this: imagine your friend has bought a pen. Now imagine you want to buy a pen for yourself, and you ask your friend whether she likes the pen she purchased. Statistically speaking, your friend is unlikely to say, “it’s a good pen because it writes really well.” She also won’t say, “I like this pen because I got it for a good price” or “I like it because it doesn’t smudge.” No, statistically speaking, your friend is most likely to say, “I like this pen because, on the day it ran out of ink and I called the pen company, the customer service rep made me feel really good about owning this pen.”
That is the sort of relationship Zendesk helps you achieve with your customers. For more details on this statistic, see the “Why Companies Should Invest in the Customer Experience” infographic.
The best way to describe this book is “the Zendesk consultant in book form.” The advice, best practices, and pitfalls included in this book are the result of working in the trenches, launching Zendesk customer implementations, delivering training sessions, and an‐ swering literally thousands of questions from training participants in countries all over the world. Every question from a Zendesk training participant gives me a fresh per‐ spective on new ways to use the product, which I’ve tried to capture and share in this book.
Zendesk is a popular customer service software tool, and its approach has always been to deliver a powerful solution with beautifully simple design. However, Zendesk’s simple design philosophy should not lead you to believe that the product is not powerful. In fact, the entire purpose of this book is to bring the expansive set of Zendesk features to light, explain their purpose, demystify the best approach to use them, and help you to get the most out of the product.
In explaining the features of the Zendesk product, we’ve focused on best practices in‐ stead of the step-by-step configuration tasks carried out by an administrator. If you are completely new to Zendesk and you find that you’re having trouble understanding some of the concepts in this book, we recommend taking a look at the official Zendesk user guide before diving further into this book. This will ensure that you have a solid un‐ derstanding of the features before getting the advice on best practices contained in this book. It may also help to build a strong foundation for the process of making important decisions about your Zendesk instance.
It’s also worth noting that this book focuses specifically on best practices for the Zendesk product without going into depth on the broader techniques for providing outstanding customer service. Zendesk is a tool that can be wielded in any way that works best for your organization.
In his book High-Tech, High-Touch Customer Service (AMACOM, 2012), Micah Solomon describes the idea of “touching” customers as the starting point to developing a lasting relationship. It’s impossible to physically touch customers over the Internet, but it’s possible to use Zendesk to reach out to those customers and deliver that meta‐ phorical touch. This book will get you to the point of using the tool to its full potential —all that’s left is for you to use it. As Micah Solomon says, “the goal in all this is to touch customers in a way that builds true customer loyalty.”
—Stafford Vaughan
Chapter Overviews
Chapter 1, Introduction to Zendesk
Before diving into the Zendesk product itself, this chapter explains the most im‐ portant concepts of the tool. By the end of this chapter, you’ll understand many of the terms used in the product and the benefits of implementing Zendesk as your customer service solution.
Chapter 2, Initial Setup
There is a small set of tasks that all Zendesk administrators should perform on their instances before allowing users to sign in. This chapter explains these initial setup tasks and focuses on the steps necessary to give your Zendesk environment the same branding as the rest of your organization. It also provides details on setting up your Zendesk instance for an international audience.
Chapter 3, Security
Chapter 4, User Management
This chapter explains the various types of users that can be created (end users, agents, and administrators) and the roles of each one, as well as the different per‐ missions you can configure for them.
Chapter 5, Channels
Zendesk is a tool that leverages many different methods of creating tickets, from common systems such as email to the newer approach of using social media plat‐ forms such as Facebook and Twitter. This chapter explains each of these channels, how to set them up, the benefits of each one, and how to make the most of them. Chapter 6, Fields and Data Capture
Out of the box, Zendesk has a number of default fields that capture the standard information required by any customer service team. As an administrator, you have some control over these fields, as well as the ability to add new fields to your Zendesk instance.
Chapter 7, Agent Support Process
Making a support agent’s life easier is a good idea for everyone involved. This chap‐ ter explains some of the techniques you can use to make the support process more efficient, as well as the best ways to manage the decisions that agents make on a daily basis.
Chapter 8, Automated Business Rules
Automating your business process in Zendesk will not only save your team time, it will also reduce the risk of mistakes. This chapter describes the various Zendesk features—including triggers and automations—you can use to achieve this. It also provides examples of common business processes and their associated business rules, which gives you an inside look into how other customer service teams operate. Chapter 9, Help Center
The Zendesk Help Center allows you to provide self-service support to your cus‐ tomers. This chapter explains how to set up your Help Center and customize it to reflect your company’s or organization’s brand. This chapter also includes infor‐ mation on how to measure the use of your Help Center and constantly improve it.
Zendesk Version
The version of Zendesk covered in this book is the latest public release as of March 2014. Zendesk has a frequent—often weekly—release schedule, with new features and updates to existing features. The release notes are made available to the public in the official Release Notes forum. Throughout this book we’ve deliberately described features without giving detailed steps to configure them, and we’ve included screenshots only in situations when we believe that the explanation would not be complete without them. The purpose of this book is to focus on the advice and best practices for administering
the product, rather than be a step-by-step guide. If you would like or need more detailed instructions, the official Zendesk user guides may be a useful accompaniment to this book.
Conventions Used in This Book
The following typographical conventions are used in this book: Italic
Indicates new terms, URLs, email addresses, filenames, and file extensions.
Constant width
Used for program listings, as well as within paragraphs to refer to program elements such as variable or function names, databases, data types, environment variables, statements, and keywords.
This element signifies a tip, suggestion, or general note.
This element indicates a warning or caution.
Safari® Books Online
Safari Books Online is an on-demand digital library that delivers expert content in both book and video form from the world’s leading authors in technology and business.
Technology professionals, software developers, web designers, and business and crea‐ tive professionals use Safari Books Online as their primary resource for research, prob‐ lem solving, learning, and certification training.
ogy, and dozens more. For more information about Safari Books Online, please visit us online.
How to Contact Us
Please address comments and questions concerning this book to the publisher: O’Reilly Media, Inc.
1005 Gravenstein Highway North Sebastopol, CA 95472
800-998-9938 (in the United States or Canada) 707-829-0515 (international or local)
707-829-0104 (fax)
We have a web page for this book, where we list errata, examples, and any additional information. You can access this page at http://bit.ly/zendesk-2e.
To comment or ask technical questions about this book, send email to bookques [email protected].
For more information about our books, courses, conferences, and news, see our website at http://www.oreilly.com.
Find us on Facebook: http://facebook.com/oreilly Follow us on Twitter: http://twitter.com/oreillymedia Watch us on YouTube: http://www.youtube.com/oreillymedia
Content Updates
This update to Practical Zendesk Administration brings all of the content up to date with the version of Zendesk that is available as of March 2014. The many user interface and workflow enhancements and new features added since the first version of the book was published have been added. The biggest change is that the new version of the Zen‐ desk customer-facing support portal, Help Center, has replaced the older version, Web Portal, which was included in the first version of the book but is no longer available to new Zendesk customers. Many of the sections of the book have been updated as a result and a new chapter on Help Center replaced the previous Web Portal chapter, which was called “Forums”. The other new Zendesk features that were added include the following:
• New security features:
— Digitally Signed Outbound Email Communication — Administrative Audit Log
— Agent Device Management • Customer Lists
• Multiple Organizations • Support Email Addresses • On-hold Ticket Status
• Custom User and Organization Fields • Ticket Forms
CHAPTER 1
Introduction to Zendesk
Zendesk is a customer service solution that is designed to be beautifully simple, and is used by many of the world’s largest organizations to provide support to their customers. It’s a Software-as-a-Service (SaaS) product, which means that your organization will pay a monthly fee for every registered member of your support team using the product. Zendesk will take care of the hosting for you, as well as the other logistics of running a complex website, which allows you to focus on the important tasks—such as providing great support to your customers.
In this book we use the phrase Zendesk instance, which refers to the Zendesk environ‐ ment of your organization, and presumably the environment you’ll be administering. Unless your organization is very large, you will typically have one Zendesk instance. The domain name of the instance will be something like mycompany.zendesk.com. That is one Zendesk instance, and all of the settings discussed in this book can be applied to that instance.
Explanation of the Zendesk Plans
There are five different Zendesk plans, the features of which will be applied to your entire Zendesk instance:
Starter
The name of this plan suggests that it’s well suited to customers just getting started with Zendesk, which is true, but it’s also a great fit for smaller shops with limited customization needs for the product. The total cost for this plan is $1/month for each agent (if billed annually) or $2/month for each agent (if billed monthly). It allows for up to three agent accounts. The best part is that a very deserving nonprofit organization gets a donation equal to your first year’s subscription. Donations from the Starter plan have benefited the UCSF Benioff Children’s Hospital and chari‐
ty:water (a nonprofit organization that brings clean and safe drinking water to people in developing nations).
Regular
The Regular plan is designed for customers that don’t need the bells and whistles of the higher plans. The cost for this plan is $25/month for each agent (if billed annually) or $29/month for each agent (if billed monthly). Unlike the Starter plan, there is no limit on the number of agents that can be included on this plan. The Regular plan is particularly well suited to customers who are satisfied with basic reporting functionality, and who are running Zendesk for customers in a single language and time zone. The support offered by Zendesk on this plan is limited to email support only.
Plus
This is the most popular option, and is the perfect plan for midsize to large organ‐ izations. Features of this plan include advanced business analytics with GoodData, as well as complete internationalization features and a number of tools to improve team collaboration. The cost of this plan is $59/month for each agent (if billed annually) or $69/month for each agent (if billed monthly). Similar to the Regular plan, there is no restriction on the number of agents that can be included on this plan. We highly recommend this plan to customers, and it provides the added ben‐ efit of both email and phone support from Zendesk.
Enterprise
For larger organizations, the Enterprise plan adds further security and compliance features, as well as the ability to maintain multiple connected Zendesk instances with separate branding for each. These features will not be necessary for everyone. On the other hand, a feature that is available only on the Enterprise plan—agent roles—is one of the most useful pieces of the entire product (see “Enterprise Agent Roles and Light Agents” on page 42 for further details). This feature alone can be worth the extra cost for some customers. I recommend that all Zendesk customers take a second glance at this plan (don’t be scared by the “Enterprise” label, because it’s something of a misnomer). The Enterprise plan is $125/month for each agent (if billed annually) or $139/month for each agent (if billed monthly), but when you consider that Light Agents are free accounts, it doesn’t necessarily have to be more expensive than the other plans. As a bonus, this plan offers 24/7 support from the Zendesk support team.
Enterprise Elite
advisory events. This plan is available to Zendesk customers who purchase a con‐ tract of $100,000 or more per year.
For further information about the set of plans and the features contained in each one, visit the plan comparison page. Throughout this book we specifically state if a feature is available only on one of the more expensive plans. It’s up to you to decide whether such features are necessary for your use case.
Once you select a plan, all of the agents in the system will be on that plan. It’s not possible to pick and choose plan features to delegate to certain agents in the system. If you have 100 agents on the Regular plan and you’d like to upgrade to the Plus plan, the additional cost will be for every agent currently enabled in the system.
Terms and Definitions
Rather than explaining all of the product terms up front, we’ll explain only the most important concepts here. We’ll wait until the individual chapters to introduce the terms more comprehensively. The following terms are so fundamental to Zendesk that many of the topics in this book won’t make sense until you understand them:
Ticket
A support request submitted by a customer to ask for assistance. The term is selected to be as generic as possible, to capture the broad range of requests submitted to your customer service team.
Field
Before a ticket is submitted, the user will provide details about her request by en‐ tering values into the ticket fields. Examples of default system fields are Subject, Description, and Priority. It’s also possible for administrators to add custom fields, which capture more specific information in the ticket.
Comment
These are pieces of text that are added to a ticket and form the conversation that will help solve it. Comments can be public, which means that they’re visible to end users who have access to the ticket. Comments can also be private, which means that only members of your internal support team and administrators will be able to read them.
User
A user is anyone with an account in the Zendesk instance. All users are classified as one of three types: end users, agents, and administrators.
End user
An end user account is usually one that has been created by a customer when he submits a ticket. End users typically have access to their own tickets and sometimes tickets requested by other people at their organization, but never tickets requested by other user accounts. End users are also restricted as to the fields that they can view or edit, unless an administrator has enabled access to those fields.
Agent
An agent is typically a person who works for the support organization, providing assistance to customers. Agent access to tickets will vary according to permissions set up by administrators, but agents can typically access a wide range of tickets submitted by customers.
Administrator
Administrators are the users who have complete access to the Zendesk instance. They can control all settings and are able to read all tickets reported by all users. Administrator users are also classified as agents in the system, meaning that their access includes all of the agent functions, and that every administrator user is billed by Zendesk as an agent account. For the purposes of this book, we’re assuming that you’ll have full administrative privileges in your Zendesk instance.
Group
Groups are used to collect your agents together for the purpose of applying business rules or restricting visibility of a Zendesk feature. Groups can contain only agent or administrator accounts and cannot contain end users. Tickets in your Zendesk instance may be assigned to groups, which indicates the team of agents who are currently working on the ticket.
Organization
To collect your end users, you use organizations. Doing so allows you to apply different support processes to different sets of customers. For example, you’re able to automatically assign a ticket from a user in a specific organization (from a specific company) to the agent group that provides support to that company.
Assignee
When an individual member of your support team is working on a ticket, she will be set as the assignee of a ticket. The assignee of a ticket must always be an agent, although in rare circumstances the assignee may be an administrator. This is be‐ cause administrators typically set up and manage Zendesk instances but are not involved in solving tickets. But there’s nothing preventing administrators from do‐ ing so, of course.
Requester
Channel
There are nine different ways for customers to create a ticket in Zendesk, and these are referred to as channels. The options include the Help Center, email, chat, phone, the Feedback Tab, Facebook, Twitter, ticket sharing, and the API. The various channels are one of the great advantages of Zendesk, because allowing customers to contact your support team using the method in which they’re most comfortable is the first step to creating a positive customer service experience.
Views
Part of the agent business process will involve checking a specific list of tickets every day to find tickets to work on. Views are configurable saved searches that make it possible for agents to repeatedly find tickets according to the same criteria. Zendesk starts with a number of default views, but as an administrator, you can add new views according to the specific business process of your organization. Agents can also create personal views that only they can see.
Macros
When your agents solve tickets, they’ll probably find that the same processes or questions are often repeated. Agents and administrators are able to create macros that capture a specific set of actions and store them in the form of a shortcut. The use of macros can save agents considerable time when solving support requests. Help Center
Your customer-facing support portal is the Help Center, which includes both the Knowledge Base and the Community. It’s where your customers go to find answers, participate in your community, request support, and track the support requests that they’ve already created. It’s a separate application in your Zendesk instance, mean‐ ing that it exists in a separate browser window from the agent and administrator part of your Zendesk instance. The design is based on themes and is easily cus‐ tomizable so that you can change it to match your branding.
Knowledge Base
The Knowledge Base, one half of the customer-facing Help Center, is designed to support a self-service customer workflow by anticipating requests from customers and providing articles that answer these questions in advance. Providing a knowl‐ edge base for your customers may be one of the best first steps you can take when setting up Zendesk to provide support. A question answered via a search of your knowledge base means one fewer ticket in your queue or one fewer phone call for your agents. Research clearly indicates that customers prefer to find answers themselves.
Community
The other half of the Help Center is Community. If you’re familiar with sites such as Stack Overflow, you already have some idea of what the Community feature in Help Center provides. Your customers can post questions into discussion topics
(e.g., a topic about a specific product), and members of your user community pro‐ vide answers. The best or correct answer is marked as such and moved to the top of the answer thread. The Community feature in Help Center is an invaluable com‐ panion to your knowledge base and allows your customers to create their own discussion threads and to help each other learn and use your products and services. Triggers
When tickets are created or updated, triggers will be fired to execute a specific set of actions. Typically the actions will include sending an email notification to users about the update, but other triggers might be used to change a field on a ticket according to certain criteria.
Automations
Automations are similar to triggers in that their function is to automatically execute a set of actions, but the difference is that automations will be executed after a certain amount of time passes. Typically automations are useful for setting reminders or defining escalations.
Email notifications
These are simply emails that are sent from Zendesk to your users. Zendesk uses email notifications to keep in touch with users in a number of contexts; for example, notifications will be sent when users are created or when knowledge base articles are added. They can also be configured in triggers and automations. The template for all of these email notifications is consistent, which will be explained later in this book.
Business process
Generally we use the term business process to refer to a process that is followed or defined by your organization. The business processes of organizations are usually what makes them so unique. Some processes are less tangible, and will involve a set of instructions being provided to your support agents. Other processes can be de‐ fined in Zendesk more tangibly, and when this happens, they are termed business rules.
Business rules
These are the automated processes that are defined in Zendesk. Business rules can be agent rules (such as views and macros) or global rules (such as triggers and automations). Other rules can also be configured through the administrator inter‐ face of Zendesk.
User Interface Experience
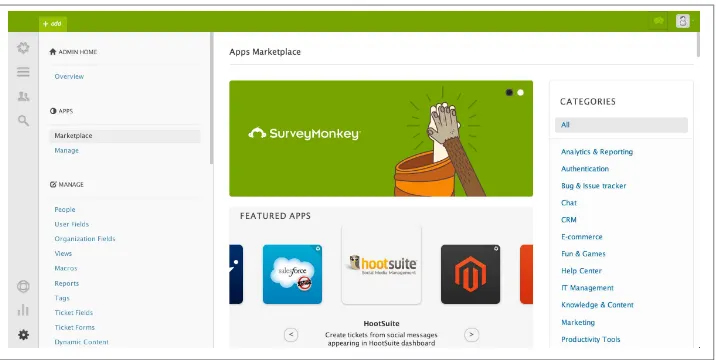
After signing in as an administrator, you can open the product administration section directly by clicking the Admin icon in the lower-left corner of every screen. This icon looks like a cog, and is visible in Figure 1-1. Once inside the administration console, you will see a list of the administration menu options, grouped by category, on the lefthand side of the screen. After opening one of the administration menu items, you’ll see the options for that section of the product on the righthand side of the menu. Figure 1-1 shows an example of the Zendesk administration screen. The toolbar appears on the lefthand side of the screen, the administration navigation is beside it, and the Apps Marketplace page occupies the rest of the screen.
Figure 1-1. Administrator user interface, with the Apps administration page selected
When agents are signed in to Zendesk, they have a slightly different experience than administrators. Their experience is focused on the toolbar icons in the upper left, in‐ cluding the buttons to view a list of tickets or to create new tickets. The end user expe‐ rience also differs because end users only use the Help Center.
Examples of the ticket screens from the agent and end user interfaces are shown in the section “Data Capture Lifecycle” on page 85.
Administrators can use the “Assume identity” feature (explained in more detail on page 51) to sign in as an end user and see what that user sees in her view of the Help Center. This can be very useful in trou‐ bleshooting issues end users may have when using the Help Center.
Most of the user interface design elements in Zendesk use standard conventions, with a tendency on the side of simplicity. There are two unconventional design elements worth mentioning:
Deleting items
In some software products, when you see a list of items, a Delete button will often appear beside the item that you want to delete. This allows you to delete the item from a list directly. However, in Zendesk, this Delete button is hidden on the Edit page, so you’ll first need to click the Edit link for the item (a macro, for example), then click the Delete button (located beside the button to submit the form). You can also delete a ticket through the Delete command in the “Ticket options” menu of a ticket. However, while it might be common practice to make it easy to delete information, it’s not really best practice—especially when it comes to tickets. Main‐ taining the historical integrity of items such as tickets is important in customer service tools, and you really should only delete a ticket if it is junk (not a real support issue from a real customer that needs to be solved).
Secondary hover operations
When you read a list of items in Zendesk, the edit operation will usually be available via an Edit link on the far right column of the list. If you hover your mouse over an item in the list, you may also notice some secondary operations visible only when you’re hovering. The most common example is the Deactivate link, which is a hover operation, or the Clone function, which is also visible only when hovering the mouse over an item in a list. To execute these operations, you’ll need to hover the mouse over the item in the list and then click the link. There’s no way to make these hover operations visible on the page permanently.
Steps to Administer Zendesk
There’s no single set of steps that every Zendesk administrator must follow, and there is no specific order in which you must take the steps to configure your Zendesk instance successfully. Your Zendesk instance might leverage the default, out-of-the-box config‐ uration with only minor changes before your agents sign in and get started. It’s also possible that you’ll change every one of the settings in the product or find ways to configure the product to do something new and creative, just because it suits the needs and processes of your organization.
Internal Versus External Customer Service
Most of this book is dedicated to the idea that you’ll be providing support to your customers. In the section “Terms and Definitions” on page 3, we defined end users as your customers, and your agents as your support staff. This is the most common usage of the product. It’s not the only usage of the product, though. As a customer service tool, Zendesk can also be used internally within your organization. For example, it could be used by your IT Operations team to provide support to the rest of your organization. If you’re using Zendesk in this way, you’ll need to do some mental translations as you’re reading this book. When we describe the “customers,” we’ll be referring to people at your organization who will be getting support. When we refer to your “support team,” we’re referring to the agents in Zendesk, who would be your IT Operations team in this example. In general, it doesn’t hurt to still consider the team members at your organi‐ zation as “customers,” because in a way, anyone who submits a ticket deserves out‐ standing customer service from the team that is using Zendesk.
If you decide to use Zendesk to support a team internally within your organization, and all of the people at your organization are end users and your support team are the only agents in Zendesk, there’s not really going to be a big difference from the standard use of the product. On the other hand, if you give your employees—who are the people submitting tickets—agent profiles in your Zendesk instance (instead of end-user pro‐ files), there are a few configuration items that you might want to customize:
• The automated actions that move a ticket from the Pending or Solved statuses into Open (as described in “Ticket Status” on page 96) will not be fired if the email is from an agent account. The workaround will be that your business process should mon‐ itor updates to tickets on a regular basis.
• If the requester is forwarding an email and the Agent Forwarding feature (described on page 59) is enabled, the most recent comment on the email will be removed from the ticket. Zendesk will also request the ticket on behalf of someone else. To avoid this, you might want to consider disabling the Agent Forwarding feature.
• Agents cannot provide feedback using the Customer Satisfaction feature (described on page 151).
Many organizations run Zendesk very successfully as an internal customer service tool, but it is important to take these items under consideration to determine how they will impact your particular Zendesk instance.
Common Customer Service Concepts
Many of the terms used by Zendesk (e.g., agent and ticket) are standard in the industry. If you’ve used customer service software before, these terms will be familiar to you, as
will many of the other terms used in the product. Zendesk also has product-specific terms, some of which are explained in the “Terms and Definitions” on page 3, and some of which are explained throughout this book.
CHAPTER 2
Initial Setup
Every Zendesk instance has a set of features that you’ll need to configure once, and a set of features that you’ll configure on an ongoing basis. This chapter deals primarily with the former, and covers most of the options that you’ll choose during the very early phases of your implementation, and generally will not need to change afterward. Some of the topics in this chapter—especially the email and domain name setup—may require assistance from teams other than your own, so it’s best to get in early and con‐ figure these features now, even if you haven’t fully defined your business process.
Creating a Sandbox
Before you start the configuration of any Zendesk environment, it’s important to un‐ derstand that for every Zendesk instance on the Plus or Enterprise plans, there is another instance known as a sandbox. In a nutshell, the sandbox is an environment for testing, learning, and making mistakes. We mention the sandbox at this point in the book be‐ cause it’s something that you’ll probably want to use as you follow along with the topics in the book and start to configure your own environment. It’s not possible to transfer the settings from your sandbox environment directly to your production environment, but after learning how to use each of the features covered in this book, you should find it fairly simple to repeat the configuration. I also find that it’s best to complete your configuration in the sandbox environment and confirm that all features are working in conjunction with each other before starting the process of configuring your production environment.
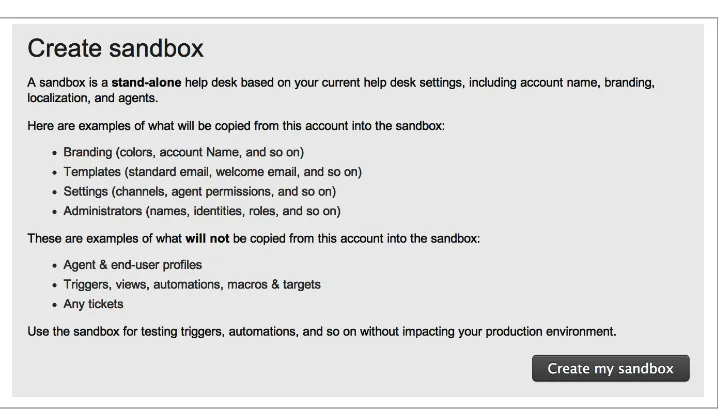
To create a new sandbox as an administrator, select the “Create sandbox” administrative action. The first time you create a sandbox, you’ll receive a confirmation message listing which settings will be copied and which will not (Figure 2-1). Zendesk copies some administrative settings, but not all of them. Most notably, it does not copy live ticket or user data. The general rule is that only low-impact settings are copied, such as your
branding and channel options, to avoid messy mistakes with emailing live data to cus‐ tomers during testing. Also, all administrator users will be copied into the new sandbox with the same passwords as your production instance.
Figure 2-1. Confirmation screen for sandbox creation
Your sandbox URL will be a unique web address based on your production environment URL. If your Zendesk instance is available at <companyname>.zendesk.com, the sand‐ box URL will be something like <companyname>1325888214.zendesk.com. That URL includes a numerically incrementing number, unique to every sandbox created. Once it’s been created, you can visit your sandbox by signing in to Zendesk and selecting the “Go to sandbox” administrative action.
The great thing about the sandbox is that if you mess everything up, it’s very easy to create a new empty sandbox. To do this, simply open your production instance again and select the “Reset sandbox” administrative action. This will first delete the existing sandbox, then create an empty sandbox with a new URL, ready for more testing.
Help Center Branding
speak, whereas your customers visit your support site expecting a user experience that appears to be a seamless extension of your website.
As an administrator, you can customize your Help Center, which is based on themes and provides an easy-to-use interface. You can make simple style changes using color pickers and font choosers, or more elaborate changes with Cascading Style Sheets (CSS) and JavaScript.
Help Center Customization Using CSS and JavaScript
If you’re inclined and have the necessary skills, you can also use CSS and JavaScript technology to modify the end-user look and feel of your Help Center entirely. There are many examples of Zendesk instances with attractive interface customizations, including:
• School of Rock • bettercloud • charity: water • Rockstar Games • box
CSS and JavaScript customization instructions are not covered in this book, but the Zendesk site has a useful post, “CSS Cookbook for Help Center,” that provides all the details.
Customizing the Zendesk URL
The URL, or web address, of a new Zendesk instance will be based on the subdomain selected during the setup process. For example, if your company name is “Blue Skies,” your Zendesk URL might be blueskies.zendesk.com. For the purposes of this example, let’s assume that the company’s main website is blueskies.com. Although Zendesk would love for all of its customers to have the word “zendesk” in their Help Center URL, most customers prefer to change this to hide the Zendesk name, in favor of their own company name in the URL. If you’re on the Regular, Plus, or Enterprise plans, you will be able to customize this URL. Customers such as Box, charity:water, bettercloud, and Rockstar Games use a method of prefixing the company URL with the word support.
There are several benefits to customizing the URL of your Help Center: Customer convenience
If you use a subdomain of your primary domain name (e.g., the Help Center sub‐ domain of blueskies.com would be support.blueskies.com), this makes it easier for
customers to predict the URL of your support site. Your customers are far more likely to visit the support.blueskies.com URL to get support from Blue Skies than to visit blueskies.zendesk.com, which would require them to have prior knowledge that the Blue Skies company uses Zendesk.
Portability
If, at a later date, you decide that you’d rather not continue to use Zendesk as your customer service tool, it’s much more convenient and reliable for you to redirect the support.blueskies.com domain name to your new support portal than to com‐ municate a new URL to all of your customers.
White labeling
Rather than publicize that they’re using Zendesk as their support portal, some or‐ ganizations prefer to white-label their use of Zendesk, meaning that the support portal looks similar to their website but doesn’t use the word Zendesk. The benefit for the company is that it keeps a cohesive brand throughout the website, without the appearance of many technologies connected together. Fortunately, Zendesk is very good with its integrations, which allow you to fully customize the Help Center interface using CSS and JavaScript, and also integrate your user account with an internal database by using single sign-on (see “Integrating with an External User Database” on page 30 for further information).
Customization of your Zendesk URL involves two steps. The first step is to set up a Canonical Name (CNAME) record with your Domain Name Service (DNS) provider. The CNAME record is basically an alias for the URL prefix, which redirects the user to another location. If you choose the support. prefix, which is the most common, you would need to set up a CNAME record in your DNS to redirect “support” to the full URL of the Zendesk instance, which is blueskies.zendesk.com in my example. Making this specific change (along with the following step) would allow customers to visit the domain name support.blueskies.com, and it would load the same blueskies.zen‐ desk.com Zendesk instance. From the customers’ perspective, the domain name would always appear to be support.blueskies.com. If you do not have the experience or quali‐ fications to make a DNS change yourself, you can ask a member of your IT team or service provider to do it for you.
message that the CNAME has not been set up properly, and you’ll need to check your settings and wait longer.
If you’re on either the Plus or Enterprise plan and using SSL on your Zendesk instance—which is something that we strongly encourage you to do—you should make sure to read “Secure Sockets Layer (SSL)” on page 34. That section explains how to set up SSL on a cus‐ tom domain name, which will ensure that Zendesk does not revert to the default URL when using a secure connection.
Once all of these changes have been made, you and your customers should be able to visit the new URL that you’ve chosen, and the word zendesk will never appear in the URL again.
Internationalization
At the time of writing, the Zendesk Help Center interface supports 38 different lan‐ guages. The administrator and agent interfaces support the following 23 languages: Chinese (Simplified), Chinese (Traditional), Danish, Dutch, English (US), English (Canada), English (UK), French, French Canadian, German, Italian, Japanese, Korean, Norwegian, Polish, Portuguese, Brazilian Portuguese, Spanish, Latin American Spanish, Swedish, Russian, Turkish, and Ukrainian. For geographically dispersed users, Zendesk also supports every time zone in the world.
As Zendesk spreads to organizations throughout the world, much greater attention is being given to the internationalization needs of these customers. In the last several years, Zendesk added a translated agent interface, the ability to create text translations, and automatic language detection of incoming emails. Behind the scenes, Zendesk also has features that will check browser headers of Help Center visitors, which adjusts the vis‐ itor’s language settings automatically. All of these features help you to ensure that a great customer support experience starts in the local language of visitors to your Help Center.
Administrator Interface Language
The Zendesk administrator interface supports the 23 languages listed in the previous section. To change your language selection, you’ll need to click your profile picture in the upper-right corner of the screen and select the option to edit your profile. The profile page has a drop-down list with all of the supported languages in the product. After updating your selection you should refresh your browser window, and…voilà! Every‐ thing is in French. Or German. Or Italian. Or one of the 20 other options currently supported.
Zendesk is constantly adding new languages to the administrator and agent interfaces, so if you don’t see your language, you can try asking the Zendesk support team when your language will be supported by the agent and administrator interfaces.
Setting the Time Zone
Accurate times and dates are important in every customer service tool, and Zendesk allows time zones to be adjusted on a global and individual user basis.
To change the global time zone of your Zendesk instance, open the Localization tab on the Account administration page, select the appropriate option from the list of available time zones, and then click “Save tab.” Once set, all times and dates will be displayed to users relative to the time zone selected. This is an important change to make, because customer service is a timely activity by its nature, and a time that suggests the last update was eight hours ago, when it was really one hour ago, could cause a lot of customer confusion and anger. Setting the correct time zone for your instance avoids these prob‐ lems.
If you’re on either the Plus or Enterprise plan, Zendesk has a feature that will allow all users to set their own personal time zone. All new user profiles will use the time zone selected as the global setting by default, but individual agents and end users can adjust their own time zone by editing their profile and selecting the time zone from the list of options.
On the Localization tab on the Account administration page you can also to select between 24-hour (military) time and 12-hour time. The default is 24-hour time, and this setting will be applied to all users, regardless of their individual time zone selection. Unless you’re literally in the military, I don’t think there’s a best practice associated with this feature; it’s a subjective decision made by the administrators and imposed on all users.
Multilanguage Support for End Users
Administrators can enable or disable certain languages, depending on the location of their customer base, and they can also select a default language other than English for their instance. In general, we recommend enabling as many languages as you will pos‐ sibly need, rather than including only those languages you’re absolutely sure you will need. It doesn’t cost anything to add a language, and there’s very little additional over‐ head (an exception to this is covered in “Dynamic Content for Text Translation” on page 17). Most of the Zendesk user interface is translated automatically, so adding a fringe language might make only one more customer happy, but it will be nice to have that happy customer.
guage, and below that there is a link to display “Additional languages.” The latter option is available only to users on the Plus or Enterprise plans. After opening the list of ad‐ ditional languages, you can use the checkboxes to select the languages in which you’d like to offer support to your customers. Once you’ve made your selections, click “Save tab.”
As soon as you’ve enabled new languages using the technique just described, end users will see a drop-down menu in the Help Center, as shown in Figure 2-2, allowing them to switch to a different language. When the user selects a new language, all text that is a noneditable part of the Zendesk user interface will be automatically updated. Behind the scenes, Zendesk will also detect the location of visitors based on their computer and browser settings, and will attempt to automatically select an appropriate language for the user.
Figure 2-2. Selecting a language in the Help Center
Although all of the words in the Help Center user interface are translated by default, you’ll need to have any content you add to your Help Center translated yourself. You start with an article in your default language (English, for example) and then create language-specific versions for the languages that you support in your Help Center. When Zendesk detects the user’s language, the correct version of the article is shown. You can also set a separate name for your Help Center for every language you support. All of the outgoing notifications to your customers can be configured to display relevant content in the language the user has selected, and these will all be explained later in this book.
Dynamic Content for Text Translation
Dynamic content is a feature that allows standard pieces of text to be defined and asso‐ ciated with a special code (known as a placeholder). Translated versions of the text will then be displayed to users who speak a language other than English. Dynamic content is most useful in email templates and macros, and is available only to users on the Plus or Enterprise plans.
You can easily enable multiple languages in your Zendesk instance and also customize the text in your email notifications, macros, automations and triggers, ticket forms, and ticket and user and organization fields. However, Zendesk does not automatically trans‐ late this content for you. For this reason, if you’re using multiple languages in Zendesk, it’s also very important that you take advantage of the dynamic content feature. From the customer’s perspective, there’s nothing worse than having been led to believe that one’s language is fully supported and then receiving an email notification that is only in English. This situation can be avoided with dynamic content, which allows you to create those translated versions of text.
To get started, open the “Dynamic content” administration page. A brand new Zendesk instance will not have any pieces of dynamic content defined, but it’s quite easy to define your own.
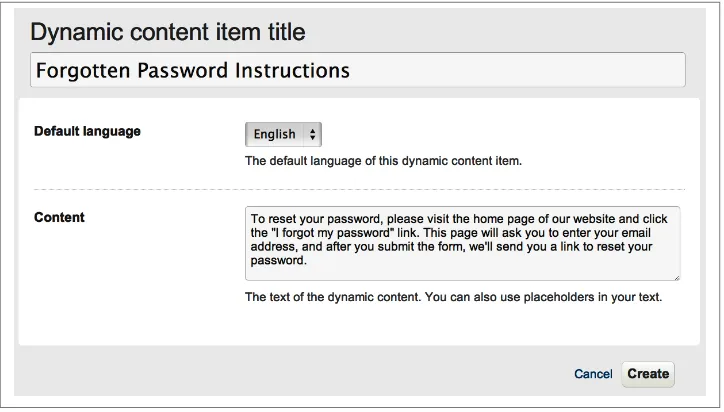
To explain dynamic content, we’re going to use a simple example of writing a set of instructions to reset a forgotten password. We revisit this topic in “Referring Macros to the Knowledge Base” on page 128 to explain an even better practice for doing this, but let’s start with the basics in this exercise.
After you’ve clicked “add item” on the main “Dynamic content” page, the first field on the configuration page will be the Name. The value in this field will be used as a reference in several places throughout the product, so it’s important that you select something that is meaningful and descriptive. For this example, we’ll call our piece of dynamic content “Forgotten Password Instructions.” Next, set the default language to English. The default language is the one used when a translation has not been defined for the specific language selected by the end user. Finally, define the content. In our example, the content would be a series of steps for the user to change her password. An example of this process is shown in Figure 2-3. When you’re finished, click Create, and you’ll have your first piece of dynamic content.
Every translation of a piece of dynamic content is called a variant. It’s best to define a variant for every language that you have enabled in your Zendesk instance; otherwise, users may end up seeing a default piece of text, which is probably in a language other than what they selected.
Figure 2-3. Dynamic content creation screen
Figure 2-4. Dynamic content summary screen, showing two variants
The key to using dynamic content is placeholders, which are explained in more detail on page 150. However, for the moment, suffice it to say that the automatically generated placeholder for our example is {{dc.forgotten_password_instructions}}. This is a special code used by Zendesk to refer to the piece of dynamic content. When I add this placeholder to an email or macro, it will be converted automatically to show text in the language selected by the user who will read the information. If the placeholder is used in an email template, the relevant user for the purposes of translation will be the recipient of the email. If the placeholder is used in a macro, the relevant user for the purposes of translation will be the requester of the ticket.
In the case of dynamic content on screen elements, the language selection will be based on the viewer of the text. In the case of dy‐ namic content in emails, even if the agent executing a macro has selected English as his language, the variant selected for the dynam‐ ic content in the macro will be based on the requester’s language selection.
There are many alternatives to using dynamic content, such as creating a different macro for every language in the system. I find that when it comes to text that needs to be translated, dynamic content is a bit more complex, but saves time and effort further down the track. It also decreases clutter in your Zendesk instance, and reduces the number of configurations required by administrators.
Bulk Translations
Instead of translating your dynamic content one piece at a time, you can define the standard pieces of dynamic content, then export the list and update all of the translations simultaneously. This makes the process of translating your entire Zendesk instance more scalable, and is particularly useful if you’re using a translation agency, because you won’t need to give it access to Zendesk.
To use this feature, start by defining all of the pieces of dynamic content using the technique described earlier in this section. Then, from the “Dynamic content” man‐ agement page, click the “Export content” link on the right side of the screen. When you click the Export button, you’ll see a message saying that the export is in progress, and you’ll receive an email when it is complete. You should check your email inbox and follow the link to download the ZIP file of translations.
Every language supported by your Zendesk instance will have its own file contained inside the ZIP file. The format of each of these files is comma-separated values (CSV), with each row representing a piece of dynamic content to be translated. If you provide this file to a translation agency, it should send back the file in the same format, but the contents of the “X text” column should be updated to include the translated versions. The letter X must be replaced with the unique code for each language; for example, the Danish language code is “da” and the corresponding column is named “da text” in the CSV file.
wise, you introduce risk into the process. It’s also very valuable to keep the “Default text” column in the CSV file, because it’s a useful point of reference for the person translating the piece of text.
After translation, you’ll need to import each of the CSV files into Zendesk individually. It’s not possible to import all files as a ZIP file, and if you try, Zendesk will flag this as “Malformed CSV input.” To start the import, select the “Import content” link from the same place as the link that exports content, then browse to the file and upload it. If your format is correct, your content will be updated immediately. If your format is incorrect, Zendesk will notify you via email.
Outgoing Email
Zendesk relies heavily on email for communication with users. When you originally create your Zendesk instance, the default email address will be set based on the subdo‐ main name of your instance, but most customers prefer to customize the email address to be something more simple or consistent with their branding. This section will provide instructions on how to configure your outgoing emails, and how to ensure that security and spam controls are set up correctly. For an explanation of how to find the email templates used by outgoing emails in Zendesk, see “Email Notifications” on page 147.
Customizing the Email Domain
Continuing our example from earlier, if our Zendesk URL is blueskies.zendesk.com, Zendesk will automatically assign an email prefix of support@ to our sender email ad‐ dress, producing a default support address of [email protected]. Again, this email address has the word zendesk in it, which may confuse many customers and should thus be avoided (for more on this, refer back to “Customizing the Zendesk URL” on page 13). The other benefit of removing the zendesk part from your incoming email address is that it’s easier for customers to remember [email protected] than [email protected] when emailing your support team.
Before changing the default support address of outgoing emails, you’ll need to ensure that your mail server is configured to capture responses to the emails. Assuming that [email protected] is the sender address of our emails, unless emails sent to sup‐ [email protected] are configured to make their way into our Zendesk instance, the responses will be lost in the ether.
In order to make this change, you’ll need to ask your mail server administrators to forward to your Zendesk email address all incoming emails that are addressed to your designated support address. The exact method to do this varies depending on your mail service provider, but the process is usually common knowledge for mail server admin‐ istrators, and a list of the steps for the popular services (Gmail, Yahoo! Mail, and Microsoft Exchange) is available in the Zendesk knowledge base article on the topic. As
long as your email administrators understand that the objective is for all emails sent to your instance’s default support address (in this example, [email protected]‐ desk.com) to be redirected to your main support email address (i.e., support@blue‐ skes.com), they can make the change and it will be applied immediately.
Email Notification Sender Address
When a change occurs to a ticket in Zendesk, a feature called triggers generates an email notification to affected users. Other events—such as the creation of a user account— also generate an email notification to users. The email address used as the sender of these emails will vary, depending on the configuration options that you select in the “Email channel” administration page, and some other options for configuration are revisited in “Bidirectional Email Communication” on page 147.
The first step in changing the sender address is to open the Email section on the Chan‐ nels administration page, and add a new support address. After you’ve made this change, outgoing emails will be sent from this address. It’s usually best to allow your customers to reply directly to email notifications—which will add their response into Zendesk. Thus, the common convention of prefixing your email notifications with noreply@ is not our recommended practice. Choosing an email address prefix such as support@ is a good choice, because this will typically be the email address for your incoming email channel (covered on page 58).
Personalized Email Replies
By default, the sender name of email notifications will be the same as the name used in the default support address. Some customers find this to be a little bit impersonal—after all, the support experience should be with a real person and not an inanimate customer service tool.
To ensure the most personalized experience for your customers, Zendesk has a feature named personalized email replies. This very simple feature will change the sender name on outgoing emails to be the name of the agent who triggered the notification. To explain this by example, if this feature is enabled and an agent named Erin replies to a support ticket saying, “Thanks for submitting this ticket, we’ll send a response shortly,” the name of the sender of the email will be “Erin” and the email address will be “sup‐ [email protected].”
email [email protected] instead and reach the entire support team. The opposite can also be true—you might be trying to email the whole Blue Skies support team, but all you see in your address book is “Erin.” For this simple reason, Zendesk uses the prefixed personalized email name for direct agent-to-customer communication and saves your default support address (e.g., [email protected]) for system notifications not related to a specific ticket or agent.
Sender Policy Framework (SPF) Settings
The protocol used on the Internet to send email, known as SMTP, is defined so that anyone in the world could send an email pretending to be any other email address, and the email would still be sent. The catch is that most people have spam filters, and spam filters are clever at recognizing fake emails (known as “spoofed” emails). Spam filters can identify spoofed emails by checking the location of the sender of the email, and comparing that to the location of the company that the sender is pretending to be. If those locations differ, there is a high chance that the email will be identified as spam. When Zendesk sends emails on behalf of your company, this situation occurs. Fortu‐ nately, you can fix it easily. If you’ve customized the domain name of the sender address for emails, it’s very important that you also follow the steps in this section.
First, you’ll need your DNS administrator to change the Sender Policy Framework, or SPF, rules for the relevant domain name. Essentially, this causes your domain name to tell the world that it trusts Zendesk to send emails on your behalf. Then, if a spam filter checks for validity, the email will not be flagged as spam. The specific SPF record to be added to most customer’s DNS settings is v=spf1 include:_spf.zdsys.com ?all, and there are more detailed instructions in an article in the Zendesk knowledge base.
The SPF record for your specific mail configuration may vary de‐ pending on which service your company uses to host its domain name and which mail server you are using, although most domain name administrators should have the required knowledge to make this change.
Digitally Signed Outbound Email
If you’re on the Plus or Enterprise plans, after you’ve customized the domain name of the sender address for emails, you can add another layer of protection against email spoofing by digitally signing your outbound email. This ensures that email sent from your Zendesk instance actually came from someone in your organization.
Zendesk supports DKIM (Domain Keys Identified Mail) and DMARC (Domain-based Message Authentication, Reporting & Conformance) authentication, and all email sys‐ tems that support these protocols check inbound email to see if messages are properly
digitally signed. If they are, those messages are delivered. If not, the message may be delivered with a caution or completely discarded.
CHAPTER 3
Security
By its nature, customer service software captures personal information about people and organizations. This information is stored in the cloud as a SaaS solution. The idea of customer information being stored outside of a company’s firewall often makes ad‐ ministrators nervous, but the reality is that any company in a position similar to Zendesk understands the potential security concerns, and takes every possible precaution to mitigate risk. Zendesk has some extraordinarily large companies in its customer list, and the security team takes the privacy of the information in your Zendesk instance very seriously.
The topics in this chapter will help you, as an administrator, to take best advantage of the security features in Zendesk.
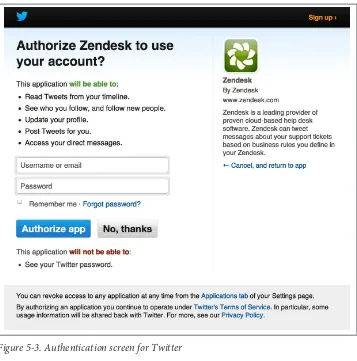
Social Media Logins
As part of its integration with popular social media platforms, Zendesk has integrated its user management system in a way that allows users to sign in using these platforms (if this feature is enabled by an administrator). The benefit to your customers is that they do not need to memorize a dedicated username and password for Zendesk, because they’re using a username and password that already exists in another system. From Zendesk’s perspective, the tool is basically saying, “If you can successfully sign in to one of these social media platforms, we trust that platform enough to accept their word on the fact that you are who you say you are.”
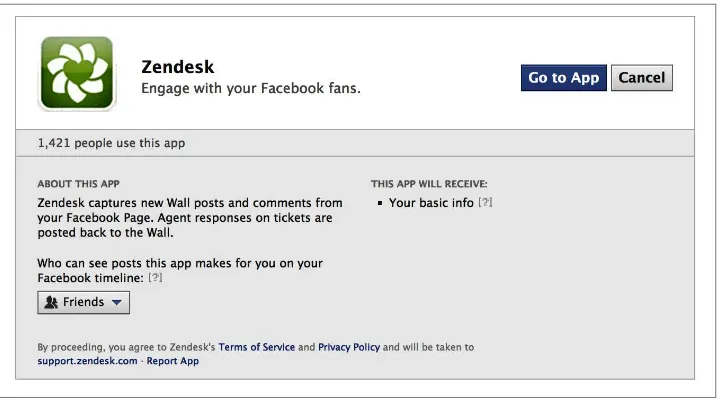
The platforms supported by this feature are Twitter, Facebook, and Google, and this section covers all three.
Regardless of which platform is used, Zendesk will never have ac‐ cess to the customer’s password for that service.
The social logins are enabled on the End Users tab of the “Security administration” page. Enabling each of the options is a simple process of selecting the relevant checkbox and saving the tab. When you enable each of the social media platforms, customers will immediately see that platform listed on the sign-in page, as an alternative to entering a Zendesk username and password. Figure 3-1 demonstrates an example with the logins for Twitter, Facebook, and Google enabled.
Figure 3-1. Sign-in page displayed to users when the social media logins are enabled
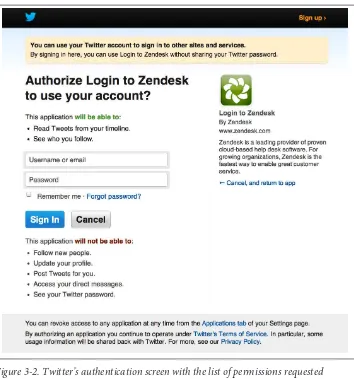
Figure 3-2. Twitter’s authentication screen with the list of permissions requested
When a user successfully authenticates with the social media service, he will be signed in to Zendesk, and Zendesk will create a user account for him automatically. If the user has signed in using Twitter or Facebook, Zendesk will immediately prompt him to enter an email address. Zendesk relies on email heavily for its communication with users, which is the reason why an email address is required at this stage. In fact, users cannot proceed with using Zendesk—even after signing in—until they have provided an email address. In the case of the Google social media login, Zendesk will be notified of the user’s email address by Google automatically, so the user will not be prompted separately for his email address.
From an administrator’s perspective, it’s impossible to tell whether a user is choosing to authenticate using a social media service, or if he has a password configured in Zendesk.